换一换
换一换 


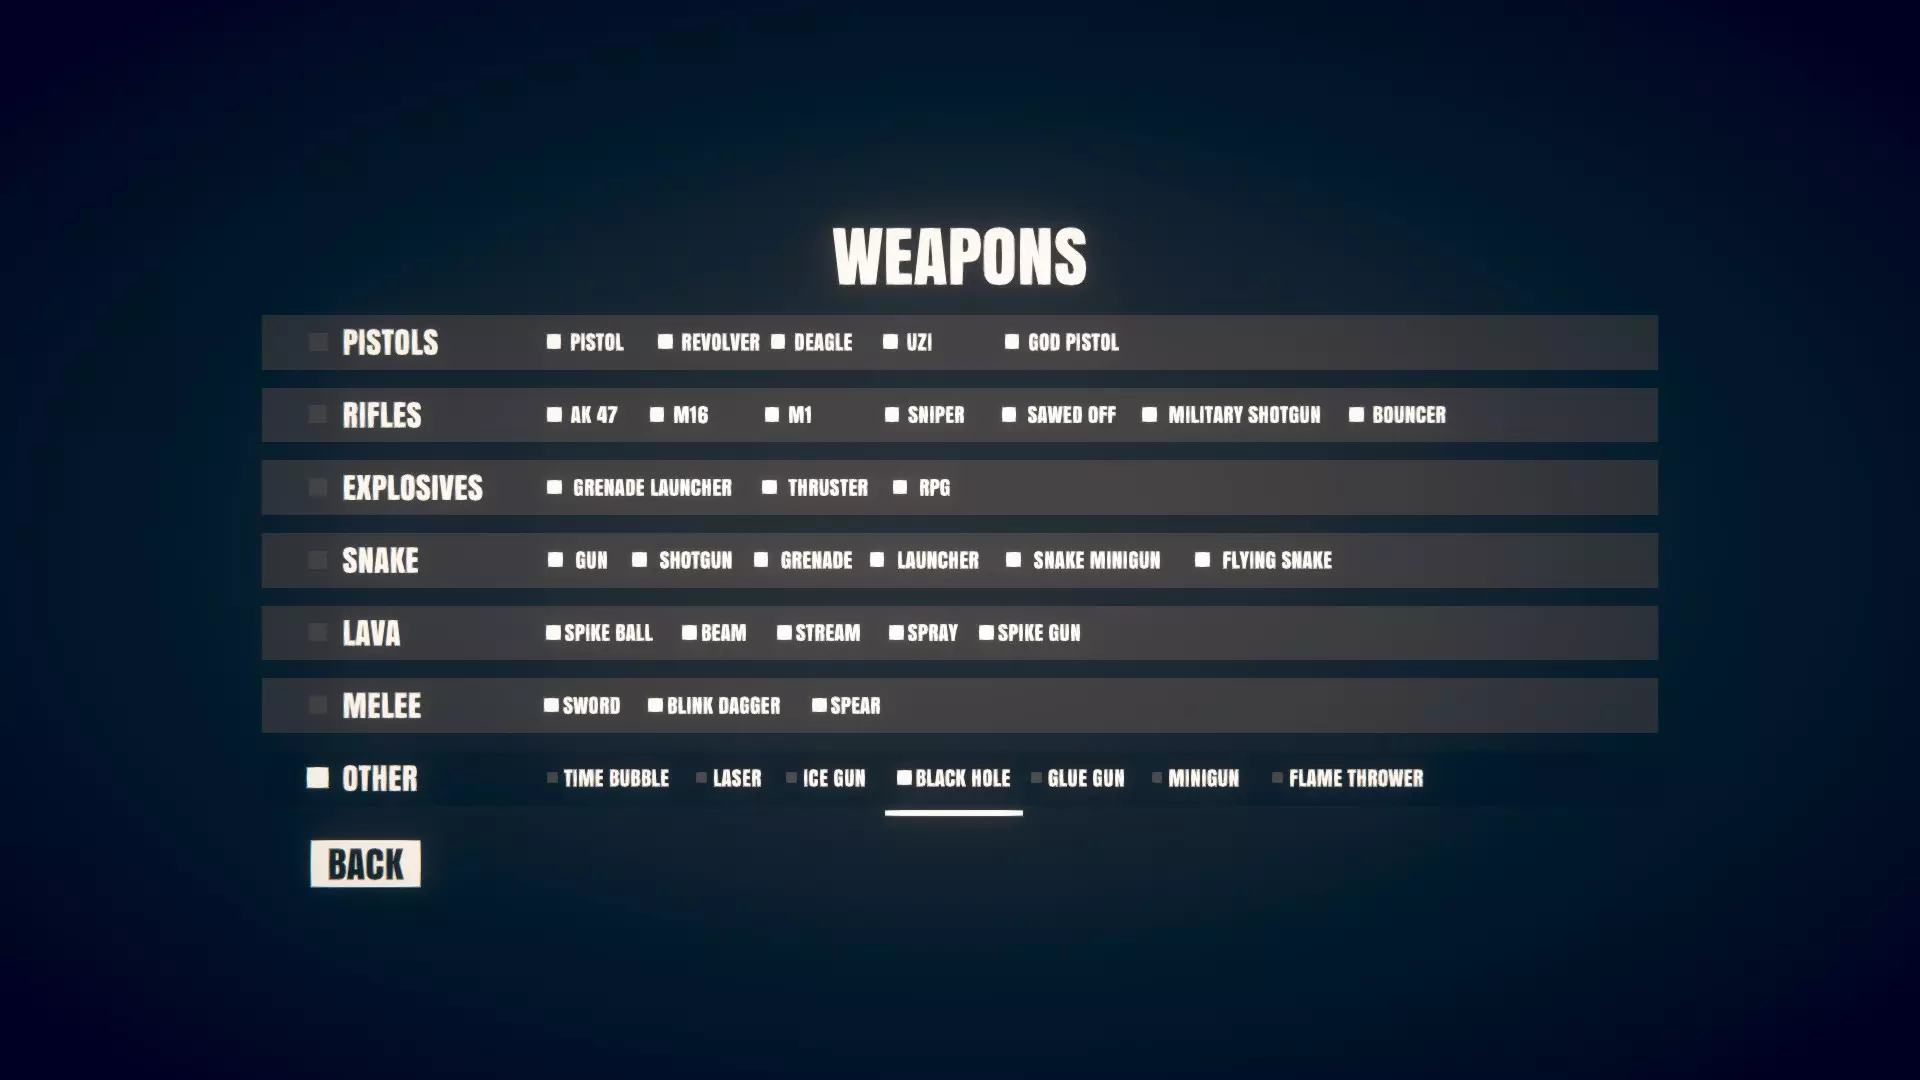
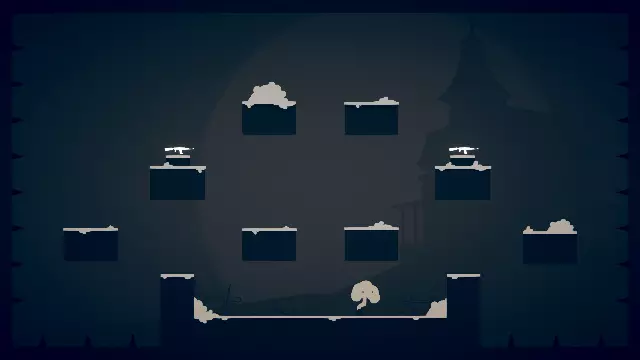
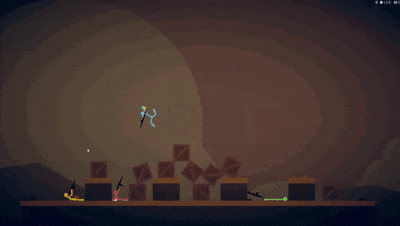
Pro tips, weapon stats, map strategies, achievements - everything you need to know about Stick Fight: The Game. Introduction Welcome! This guide will be split up into several sections - use the bar on the right to navigate to what you want to know. If you're on mobile just scroll down to get to it. Your Enemies Enemies are separated in three different categories: Players, Snakes, and the Environment. The Environment. This hazard will kill you almost as much as players. Spikes, lava, spike balls, the void, exploding barrels - all of these will kill you as much as another player will - some kill instantly, others deal less damage. Spikes - Instant kill. Rainbow Boss's Spikes - These are special in that they do not instantly kill you. Instead, they deal 35 damage. Lava and Lava Streams - Deal 35 damage when touched. Spike Balls - Instant kill. Void - Instant kill. Explosive Barrels - Can deal as little as 10 damage if they graze you, or as much as 55 damage with a direct hit. Players. Players are your enemies - there can be 1-3 of them. They are controlled by other people, and are unpredictable. They can pick up guns and can easily defeat you. Snakes. Snakes are only seen from Snake guns and Western maps. Snake health scales with player health. Snakes can be hit with 'headshots' and 'neckshots'. Snakes - Same HP as players - depends on HP settings. Deal 5 damage. Giant Snakes and Giant Flying Snakes - Two times the HP of players - depends on HP settings. Deal 25 damage. Note that snakes from Snake guns are much slower than those that come from barrels in Western maps. Weapons Note: Headshots do double damage, neck shots do 1.5x damage! PISTOLS Fists Damage: 22 Throw Damage: N/A Ammo: Infinite Knockback: Low Firerate: Medium Recoil: Medium Forward The default weapon. Always used if no other weapon is held. Pistol Damage: 32 Throw Damage: 55 Ammo: 15 Knockback: Low Firerate: High Recoil: Low Upward Decent DPS, useful if other enemies don't have weapons. Drops automatically even if disabled on Winter8 and Castle17. Revolver Damage: 44 Thrown Damage: 55 Ammo: 6 Knockback: Low Firerate: High, but high recoil makes it fire extremely inaccurately without the Quickdraw. Recoil: High Upward Strong, but its high recoil means you have to wait between shots to be accurate. However, if you have high Clicks Per Second, you can perform the Quickdraw. To do this, fire all its shots in a row immediately as you pick it up and you will be unaffected by recoil. Deagle Damage: 56 Thrown Damage: 55 Ammo: 15 Knockback: Very High Firerate: High, but high recoil makes it fire extremely inaccurately without the Quickdraw. Recoil: High Upward, Medium Backward Exactly like the revolver, but it has larger shots and deals high knockback. The Quickdraw can also be performed with this weapon. Uzi Damage: 14 Thrown Damage: 55 Ammo: 40 Knockback: Medium Firerate: High Recoil: Low Deals medium knockback, but with high firerate, it is easy to push people off the map with. God Pistol Damage: 30-60 (hit) 1-30 (grazed) Thrown Damage: 55 Ammo: Infinite Knockback: Low Firerate: High Recoil: Low Upward The only infinite ammo weapon in the game. Note that this weapon has a smaller chance to drop than other weapons. RIFLES AK47 Damage: 23 Thrown Damage: 55 Ammo: 30 Knockback: Low Firerate: High Recoil: Low Upward M16 Damage: 20 (per shot) Thrown Damage: 55 Ammo: 88 3-shot bursts Knockback: Low Firerate: High (3-shot bursts) Recoil: Low Upward Extremely powerful. Has massive amounts of ammo and great damage. Fires in 3-shot bursts every time you fire. M1 Damage: 35 Thrown Damage: 55 Ammo: 8 Knockback: Medium Firerate: Medium Recoil: Medium Upward Relatively good. Better than most pistol weapons. Sniper Damage: 75 Thrown Damage: 55 Ammo: 5 Knockback: Medium-High Firerate: Low Recoil: Medium Upward Has a laser sight. Sawed-Off Damage: 10-30 per shot (random) Thrown Damage: 55 Ammo: 50 (shots) Knockback: Medium Firerate: Low (spread of 5 shots) Recoil: Very High Backward Fires a wide spread of 5 shots. Useful for getting to high places or boosting with the recoil. Military Shotgun Damage: 5-6 (per shot) Thrown Damage: 55 Ammo: 10 spreads Knockback: Low Firerate: Medium (spread of 5 shots Recoil: Medium Backward Fires a tight spread of five shots. Useful for more precise boosting. Bouncer Damage: 45 Thrown Damage: 55 Ammo: 30 Knockback: Low Firerate: High Recoil: Low Upward Shots bounce 6 times. EXPLOSIVES Grenade Launcher Damage: 50-80 depending on proximity Thrown Damage: 55 Ammo: 5 Knockback: Medium Firerate: Medium Recoil: Medium Upward Fires flashing grenades that explode after a short delay. Deal the same amount of damage no matter how much of a direct hit the shot was. Can be stopped midair with Time Bubble, but will still explode while in the bubble. Thruster Damage: 0 (shot) 15 (explosion) Thrown Damage: 55 Ammo: 20 Knockback: Low Firerate: High Recoil: Low Upward Push back the enemy and then explode. RPG Damage: 300+ Thrown Damage: 55 Ammo: 3 Knockback: Low Firerate: Very Low Recoil: High Upward Fires rockets that explode. The rockets can be frozen midair with Time Bubble - but be warned, touching them will still make them explode and kill you. Note that this weapon has a smaller chance to drop than other weapons. SNAKE Snake Gun Damage: 5 (snake bite) Thrown Damage: 55 Ammo: 6 Knockback: Low Firerate: High Recoil: High Upward Shoots snakes that have HP that scales with the player HP (e.g. if the HP setting is at 100, snakes will have 100 HP. If it is at 200, snakes will have 200 HP). Snake Shotgun Damage: 5 (snake bite) Thrown Damage: 55 Ammo: 10 Knockback: Low Firerate: Low Recoil: High Backward Fires a wide spread of three snakes. Snake Grenade Launcher Damage: 5 (snake bite) Thrown Damage: 55 Ammo: 5 (grenades) Knockback: Low Firerate: Medium Recoil: Low Upward Fires grenades that instead of exploding burst into four snakes. Snake Launcher Damage: 25 (giant snake bite) Thrown Damage: 55 Ammo: 3 Knockback: Medium Firerate: Very Low Recoil: High Upward Fires a giant snake with double the player's starting HP. Snake Minigun Damage: 5 (snake bite) Thrown Damage: 55 Ammo: 40 Knockback: Low Firerate: Very High Recoil: Low Fires snakes. Flying Snake Launcher Damage: 25 (giant snake bite) Thrown Damage: 55 Ammo: 3 Knockback: Medium Firerate: Very Low Recoil: High Upward Fires a giant snake that has small white wings and ignores gravity. LAVA Lava Spike Ball Gun Damage: 20-40 (spike) Thrown Damage: 55 Ammo: 5 Knockback: Low Firerate: Medium Recoil: Low Upward Fires orange circular projectiles that split into 25 spikes. Lava Beam Damage: 215 Thrown Damage: 55 Ammo: 25 Knockback: Low Firerate: High Recoil: Low Upward Fires a non-damaging laser sight that becomes a damaging beam after a short delay. Lava Stream Damage: 1 every frame, about 60 per full second of direct contact (dependent on FPS of game) Thrown Damage: 55 Ammo: 10 seconds of firing Knockback: High Firerate: Highest Recoil: None Fires a beam of lava that does constant damage. Lava Spray Damage: 5-20 (depending on proximity) Thrown Damage: 55 Ammo: 40 Knockback: High Firerate: High Recoil: Low Upward Fires droplets of lava. Lava Spike Gun Damage: 10-15 (shot) 5-10 (spike) Thrown Damage: 55 Ammo: 25 Knockback: Low Firerate: High Recoil: Low Upward Fires shots that send three spikes outwards from where the shot hits. MELEE Sword Damage: 68 Thrown Damage: 55 (sometimes randomly 85????) Ammo: 25 Knockback: Low Firerate: High Recoil: Medium Forward Stabs the space in front of you, pushing you forward. Has a bug where it does less damage at 100 HP. Blink Dagger Damage: 22-50 (random???) Thrown Damage: 55 (randomly 85?) Ammo: 25 Knockback: Very High Firerate: Medium Recoil: High Forward Slicing teleports you forward, damaging anything where you end the teleport. Spear Damage: 20 Thrown Damage: 55 (randomly 85?) Ammo: 25 Knockback: High Firerate: Low Recoil: Medium Forward Stabs the space in front of you, pushing you forward. OTHER Time Bubble Damage: 12.5 (shot) 200 (explosion) Thrown Damage: 55 Ammo: 5 Knockback: None Firerate: Low Recoil: Low Upward Fires shots that create a bubble where they hit that traps players before the bubble explodes after a short delay. Laser Damage: 10 Thrown Damage: 55 Ammo: 60 Knockback: Very High Firerate: High Recoil: Low Upward Fires high-knockback shots. Ice Gun Damage: 7.7 Thrown Damage: 55 Ammo: 40 Knockback: Medium Firerate: High Recoil: Low Backward Fires ice chunks that slow down players. Black Hole Damage: Infinite Thrown Damage: 55 Ammo: 1 Knockback: Low Firerate: N/A Recoil: Low Upward Fires a black hole that expands and sucks in everything. Glue Gun Damage: 5 Thrown Damage: 55 Ammo: 40 Knockback: Low Firerate: High Recoil: Low Upward Fires glue pellets that stick players to their spot on the screen. Minigun Damage: 5 Thrown Damage: 55 Ammo: 200 Knockback: Low Firerate: High Recoil: Medium Backward Fires rapidly with high recoil, letting it be used as a jetpack. Flamethrower Damage: 0 (shot) 5 (second of burn) Thrown Damage: 55 Ammo: 100 Knockback: Low Firerate: High Recoil: Low Upward Shoots fire. Burn effect lasts for 6 seconds. Removed Weapons These weapons used to be in the game, but were removed. Laser Planter Damage: N/A Thrown Damage: 50 Ammo: 5 Knockback: N/A Firerate: Medium Recoil: Low Backward This weapon shoots projectiles that make lasers where they land. The projectiles pass through players harmlessly. This was likely removed because it caused too much lag. Pumpkin Launcher Damage: 25 Thrown Damage: 50 Ammo: 15 Knockback: Very High Firerate: Medium Recoil: Medium Backward Although still in the game, it is not available through the weapons menu. Laser Sword Damage: 100 Thrown Damage: 50 Ammo: 24 Knockback: High Firerate: Medium Recoil: High Forward Although still in the game, it is not available through the weapons menu. Halloween AK-47 Damage: 22 Thrown Damage: 50 Ammo: 200 Knockback: Low Firerate: High Recoil: Low Upward Not removed, but not on the weapons menu. Same as a normal AK, but with more ammo. Exclusively on Halloween 5. Halloween Revolver Damage: 50 Thrown Damage: 50 Ammo: 500 Knockback: Low Firerate: High, but medium recoil makes it fire inaccurately without the Fast Click Glitch. Recoil: Medium Upward Not removed, but not on the weapons menu. Same as a normal Revolver, but with more ammo and lower recoil. Exclusively on Halloween 8. The Fast Click Glitch can be performed with this weapon. Halloween Pistol Damage: 25 Thrown Damage: 50 Ammo: 40 Knockback: Low Firerate: High Recoil: None Not removed, but not on the weapons menu. Same as a normal Pistol, but with more ammo and no recoil. Exclusively on Halloween 2. Halloween Sniper Damage: 50 Thrown Damage: 50 Ammo: 30 Knockback: Medium-High Firerate: Low Recoil: Medium Upward Not removed, but not on the weapons menu. Same as a normal Sniper, but with more ammo. Exclusively on Halloween 11. Shotgun Damage: Unknown Thrown Damage: 50 Ammo: Unknown Knockback: Low Firerate: Low Recoil: High Backward This shotgun was removed and replaced by the Sawed Off and the Military Shotgun. It is essentially a fusion of those two, with slightly less knockback and less spread than the Sawed Off. Unused Weapons These weapons were never in the game, but are present in the files. Shield Damage: N/A Throw Damage: 50 Ammo: N/A Knockback: N/A Firerate: N/A Recoil: N/A Not to be confused with the shield that appears when you right-click. Meant to block bullets, but is knocked out of the player's hand if the shield is hit. Fan Damage: 0 Throw Damage: 50 Ammo: 50 Knockback: Medium Firerate: Very High Recoil: None Blows back any players it is 'fired' at within a short range. Ball Launcher Damage: 0 Throw Damage: 50 Ammo: 1 Knockback: Technically High Firerate: N/A (1 ammo) Recoil: Low Forward Fires a physics ball that will weigh down and drag along other players. Bow Damage: Unknown (broken so it cannot shoot players) Throw Damage: 50 Ammo: 3 Knockback: Unknown Firerate: Low Recoil: None Fires arrows that do not move from where they were fired and therefore cannot hit players. The arrows block the Sniper's laser sight and can be touched and stood on by players other than the player who fired the arrows. Minigun Old Damage: 6 Throw Damage: 50 Ammo: 110 Knockback: Low Firerate: Very High Recoil: Low Backward A smaller Minigun. MiniMinigun Old Damage: 5 Throw Damage: 50 Ammo: 100 Knockback: Low Firerate: Very High Recoil: Very Low Backward A very small Minigun. Holy Sword Damage: 15 (shot) 100 (sword) Throw Damage: 80 Ammo: Infinite Knockback: Low Firerate: High Recoil: Medium Forward A golden sword that fires projectiles that stab swords into any obstacle they hit. Becomes a normal Sword when thrown. Shown in early gifs of the game, with an unused animation likely used when the sword was obtained. Holy Minigun Damage: 1 (shot) 25 (sword) Throw Damage: 50 Ammo: Infinite Knockback: Low Firerate: High Recoil: Low Backward A golden minigun that fires projectiles that stab swords into any obstacle they hit. Becomes a normal Minigun when thrown. Lava Whip Damage: 22 Throw Damage: 50 Ammo: 25 Knockback: Low Firerate: Low Recoil: Medium Forward The whip can only hurt a player by hitting them with the hilt. The lava part does nothing. Maps And Strategies For Them Woods Relatively simple. None of these are special, it's easy to get to the gun spawns first. Desert Most of these are simple - just remember to jump off boxes as the map falls and be sure to always Block Punch jump. Note that Desert 2, 7, and 8 are Local-only maps and cannot be encountered in normal play. Desert 5:
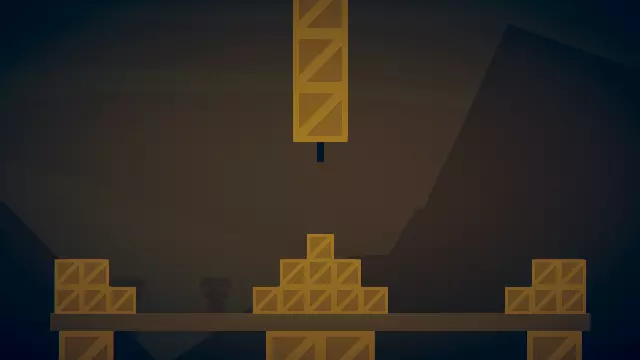
沙漠5地图有一个独特的优先获取枪械的策略。从中央金字塔状箱子堆顶部的箱子进行格挡拳击跳,跳到平衡的大箱子上,你就能比其他玩家跳得更高,从而优先拿到枪械。但要注意,一定要站在右侧才能拾取枪械! 此外,支撑大箱子的灰色小平台是地图翻转后唯一会保留的物体,如果你想存活,就赶紧到达那里! 沙漠9:

沙漠9因其几个特点而值得注意。这里会定时掉落两把左轮手枪。通常,你可以采用两种策略:击倒或击退。 在击倒策略中,你需要射击对手站立的箱子,使其摔倒,从而让对手无法避免掉落。 在击退策略中,你通过射击对手,将其击退至两侧的死亡区域。 防御方法: 击倒:如果对手在你击倒或击退他们之前先将你击倒,你必须拥有极高的跳跃技巧和极好的运气,或者必须掌握【武器骑乘】(参见进阶策略)。如果对手击倒了你的箱子,想要获胜会非常困难。 击退:击退相对容易防御。如果你能掌握武器格挡(参见中级策略),在这里会非常有用。否则,反复点击向下键让自己成为更小的目标是一个可行的策略(尽管这可能会影响你的瞄准)。 工厂 大多数这类地图需要基本的平台跳跃才能到达中间区域。不过,有些地图是特殊情况。 注意,工厂5是仅限本地的地图,在正常游戏中无法遇到。 工厂2:

这张地图的独特之处在于,其侧面旋转平台可以反复踩踏以到达更高的位置(从而率先获取武器)。注意不要被它们拖出地图外! 工厂3:

这张地图的独特之处在于平台是基于动量的。当你站在平台边缘时按住向下键,平台就会向下移动。你可以利用这一点——将平台向下推,然后迅速冲到顶部,率先拿到武器! 工厂4:

工厂4关的有趣之处在于,当关卡的侧面部分转动时,你需要紧紧抓住它们,这样才能获得优先拿到武器的最佳位置。 工厂7关:

工厂7有一个抢先获取武器的独特策略。你可以在立方体向上移动时跳到它上面以获得更高的高度,从而比其他人先拿到武器。 工厂9:
工厂9乍一看像是一张无武器地图。所有武器都落在屋顶上。不过,有办法可以上到屋顶。当最左侧或最右侧的平台下降时,跳上平台,然后在平台回升时,从平台上跳下来并落到屋顶边缘。这操作有难度,但一旦掌握技巧就会变得简单。 工厂11和12:


有两张地图,上面会有障碍物顺着传送带掉落,把你撞进虚空。对付这两张图有个实用策略:按住下方向键,你就会固定在原地,传送带无法移动你。这在射击时非常有用,你可以站在固定位置射击,不用在射击时上下移动。 城堡 这些地图相对复杂,需要熟练的跳跃技巧才能快速拿到枪。 城堡9:
这张地图的墙壁会向内移动挤压你,如果你捡起霰弹枪、迷你机枪或其他能增强后坐力的武器,就相对容易获胜。如果你能高效运用【武器滑行】(详见进阶策略),那这张地图就会变得非常简单。 城堡10:
这张地图上有一个反复摆动的大型尖刺球。你可以通过格挡拳击跳得足够高,从而登上锁链,获得比敌人更高的位置。这样你就能轻松抢先拿到武器。 城堡15:
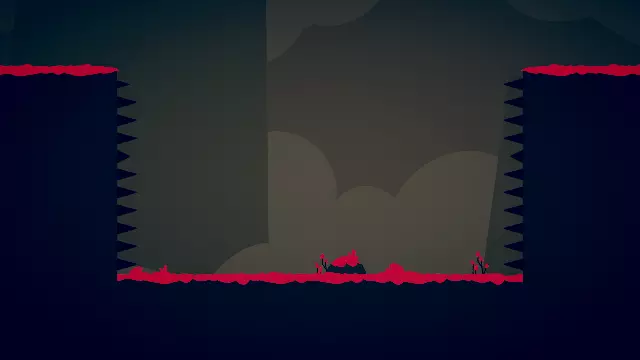
这张地图上有一个巨大的尖刺球会滚过屏幕。有时,其他玩家会占据所有空隙,或者根本没有空隙。这种情况下,霰弹枪、迷你机枪、闪烁匕首或挖掘(参见进阶策略)会非常有帮助。如果你有霰弹枪或迷你机枪,可以通过后坐力助推越过尖刺球。如果你有闪烁匕首,可以传送到地下,等尖刺球过去后再传送出来。你也可以挖掘并等待尖刺球通过。 城堡17:
这张地图有独特的策略。你可以轻松使用格挡跳(Block Punch jump)跨越平台之间的间隙来接近敌人。不过,你也可以通过武器跳(weapon jump)跳到掉落的武器上,然后返回平台。 冬季 这些地图相对简单。很容易先拿到武器。 注意,冬季13是仅限本地的地图,无法在正常游戏中遇到。 冬季7:

这张地图有一个特殊的漏洞:如果你对着平台和墙壁之间的角落出拳,就能卡进漏洞到达另一边。这对于躲避更强的玩家很有用。 地图及其策略(续) 激光 这些地图通常以陷阱为主,但仍然相对简单。 激光3:

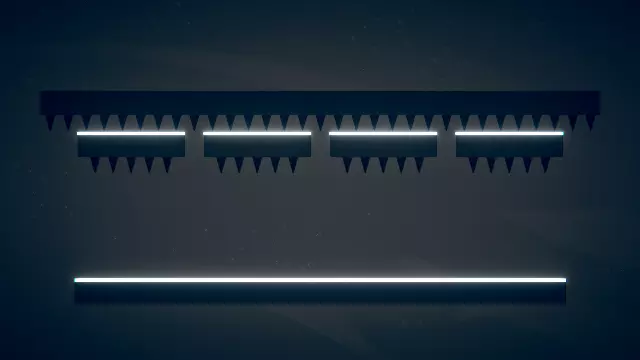
这张地图有两种特殊方法可以避开陷阱并率先拿到枪。可以通过墙壁跳跃到达中间柱子的顶部以获得制高点(从而率先拿到武器)。不过,也可以从那里跳到左侧或右侧的激光发射器上,在它移动时保持平衡,从而完全避开陷阱。激光8:
注意,可以跳到激光剑上方的平台获取武器掉落,这些武器可能比激光剑更强大。 西部 这些地图通常有初始武器,关卡中遍布桶和蛇。 西部10:
在这张地图上很容易进行挖掘(参见进阶策略)。 熔岩 这些地图包含危险的平台跳跃区域,到处都是链条平台、尖刺和熔岩。请务必小心。 熔岩6:
这张地图不需要使用枪械就能到达锁链平台上的熔岩溪流枪——一个时机恰当的格挡拳击跳跃就能轻松让你上去。 万圣节 这些地图包含消失的平台,因此需要良好的时机把控。它们仍然相对简单。 万圣节7:

这张地图有两个长矛平台。通常情况下,你需要等待消失的平台重新出现。不过,通过精准时机的格挡拳击跳跃可以轻松到达那里。 万圣节 2、5、8 和 11:
查看首领攻略。 自定义地图 这些地图是随机生成的,难度极高。有些可能是竞速类,有些可能设计得比较“赖皮”——在这里你得依靠直觉。 成就 成就!这些很有趣,通常几个小时内就能解锁。 虽然这可能被视为作弊,但你可以在本地对战中让使用手柄的玩家轻松获取这些成就。 王牌:

这个成就相对简单,你只需击杀其他三名玩家。你很可能在正常游戏过程中就能解锁。Royal Ace

这个难度稍高。你必须完美赢得一场比赛,同时消灭所有其他玩家!通常来说,如果掉落的武器比较强力,比如激光枪或M16,会更容易做到。

将地图设置为顺序模式,选择所有地图,然后和他人进行一长局游戏——最终你会达成的!征服者:

和探险家角色的情况相同,但如果你找到一个挂机玩家(或者有手柄玩家充当挂机玩家),会简单得多。 4d火柴人:

如果你找到或创建一个仅使用黑洞枪的比赛,你会相当容易地获得这个成就。双杀:

这个应该很简单——你只需要一把强力的枪或剑,快速连续击杀两名玩家。 三连杀:

比双杀稍难,但仍相对容易获得。 杀戮盛宴、暴走、主宰比赛、无人能挡、大屠杀、超神、以及wicked stick


这些只有游戏高手才能获得——你必须赢很多次。 贪吃蛇:

获取起来非常简单。只需进入有蛇的西部地图,然后被蛇杀死。即可解锁成就。 斯蒂克·欧文:

也相当简单,只需跳到一些蛇旁边,然后跑过去就能获胜。 反弹:

用狙击手最容易做到这一点。你可以轻松地将子弹反弹回对方身上并获胜。 反击:

如果你擅长格挡的话会相对简单。你的功夫很厉害:

易如反掌。在空中击中并击杀敌人。在1点生命值模式下最容易完成。 白色死神:

仅使用狙击枪。继续游玩,最终你会完成的。反弹:

这个成就有点难。最简单的方法是让一名玩家挂机,并且只使用【保镖】职业。先用【保镖】职业练习,直到你能成功为止。 轻易取胜:

真的很简单,尤其是在工厂10和8。冰河世纪:

如果你使用榴弹发射器或时间气泡来摧毁冰块,应该会很容易。 闪烁匕首(Flashing Dagger)

如果你处于闪烁匕首仅用模式且生命值在25左右,那这应该是小菜一碟。A Poultry Meal

你应该已经有这个了。你可以通过日常游玩获得。

很简单。只需把握好跳跃时机就能成功。 爆头:

通常最好在100生命值和有狙击手的比赛中达成,因为在这种设定下爆头是致命的(而且这些狙击击杀也有助于达成【White Death】)。 晓晓:

好吧……我的意思是…… 新手策略 移动 好的。移动看似简单,但通过调整移动方式可以带来很多变化,从而助你获胜(胜利?:P)。游戏开始时,3秒倒计时结束后就要立即开始移动。利用这3秒时间(如果有人加载较慢,时间可能更长)规划你的移动路线!例如,在【城堡2】中使用黄色角色时,你可以从起始位置使用格挡拳跳,落到旁边的旋转平台上,然后再用格挡拳跳跳到侧边的小平台,最后拳跳到中间的主顶层平台,就像这样:

As shown in this gif, you would want to be constantly punching where you want to go to be faster. Jump types: There are three different kinds of jumps, each with a walljump variant and a reverse variant. I will explain each and the pros and cons of each jump. First of all, let me explain reverse variants. Jumping pulls you up to higher places (W or Up Arrow by default [although I personally prefer the spacebar]). Reverse jumps are pulling you down - always holding the down key (S or Down Arrow by default). Normal Jump. This jump is just a normal, default jump. Use this only if you're trying to jump up a small little ledge, or if you just want to barely grab a weapon from a platform without poking your head out of cover. Pros: Useful for light, small jumps for bridging small distances. Cons: Cannot carry you very high, not very useful for fast movement. Walljumping with this jump is not reccomended. Don't do normal jump walljumps. This does not have a reverse variant. Punch Jump. This jump carries you higher than the normal jump. Use this one for medium-sized jumps, for the same things as normal jumps but slightly higher. Pros: Higher than the normal jump, useful for bridging medium-sized distances. Cons: Can't jump high enough to reach most special areas in maps. Walljumping with this one is. . . finnicky. You can use it for shorter walljumps. Reverse punch jumps are better known as punch slams. These are useful for getting to a lower part of the map quickly. Block Punch Jump. This one is the best one. You should use this almost all the time. It lets you reach areas faster and easier than most other players. Pros: Highest jump, can bridge almost all distances. Cons: Not useful when trying to stay behind cover. Block Punch Walljumps are very fast and useful. Always use these, as they get you the farthest the fastest. Reverse block punch jumps are the most useful reverse jumps. They are also useful as "Mario Jumps" (see Intermediate Strategies). You can use these reverse jumps to take a player who is walking by below by surprise. They are also useful for knocking down a walljumping player. Strategies! Weapon Jumps Weapons can be jumped off of if you land on them - either as you pick them up, or with another weapon in hand. If multiple weapons are falling, you may pull of multiple weapon jumps - although this is rather difficult. Reloading If you memorize ammo counts, you can recognize when your weapon is almost out of ammo. If your weapon has only one or two shots left, throw it and pick it back up again to refill the ammo. This is especially useful with low-ammo weapons like the Snake Launcher and the RPG. Quickdraw This one is only useful with more inaccurate weapons. If a weapon is picked up while moving and then fired fast enough, all inaccuracy is removed - the weapon will shoot directly at the cursor, regardless of recoil. This is especially useful with the Revolver and the Deagle, as up to 6 shots can be fired in quick succession in one direction. Intermediate Strategies Here I'll introduce the term Signature Technique. A Signature Technique is a strategy developed by or mainly used by a single person. I shall attribute most of these to players as their Signatures. Bodysurfing LoafYT's Signature Technique This tactic allows you to both reach incredible heights (physically, haha) and deal significant damage to your opponent. To perform this trick, you must position yourself to punch your opponent into the air and then navigate in midair to areas in which you can punch them upward again and again. Weapon Blocking Signature: ??? This tactic allows you to defend against players with guns' bullets. If a player shoots at you, ensure that they hit your weapon instead of you. If you can, make the bullet hit the end of your weapon - you will drop the weapon if it hits the part you're holding. This is especially useful with Spears, as they can be used as mobile cover. Mario Jump Signature: ??? This is essentially a hit-and-run tactic, letting you deal damage and then escape. The way this tactic works is that you jump from above your target, then as you land on them, punch them, and then jump off of their body. This lets you get away from them before they can retaliate. "Attack Rocket" Minigun specific strategy Kuino's Signature Technique If you have a minigun, it is often difficult to control. However, there is a way to easily deal a lot of damage to opponents below you. With the minigun, reach a high point from which to shoot opponents. Now, tap shoot repeatedly, so that you do not go up or down but merely hover while shooting. This makes you essentially a turret. ThrowShooting Signature: ??? This tactic is used if an enemy is charging you while you have a weapon. If you are sure you will hit the enemy, it is useful to fire and throw simultaneously to deal more damage - they will be jarred by the bullet and won't see the throw coming. Point Preparation Signature: ??? This tactic lets you save the time you would normally use to turn your gun at an enemy - before you pick up a gun, point your cursor where you want the gun to point so that you can immediately shoot when you get it. Advanced Strategies Throwhopping

我的标志性技巧 投掷跳跃是一项非常高级的技巧,需要大量练习,且在使用较小武器时对精准度要求极高。它能让你跨越巨大的尖刺坑或 lava pit 间隙,在难度极高的自定义地图中尤其有用。 要完成第一次投掷跳跃,你必须持有武器。像火箭筒和 minigun 这类较大的武器更容易用于此技巧。当然,使用 minigun 时,你直接通过射击就能越过坑洞,霰弹枪也是如此。另外,你不能使用长矛、剑或闪烁匕首,因为它们会弹离表面。 第一次跳跃有两种方法: 缓慢但安全的方法:
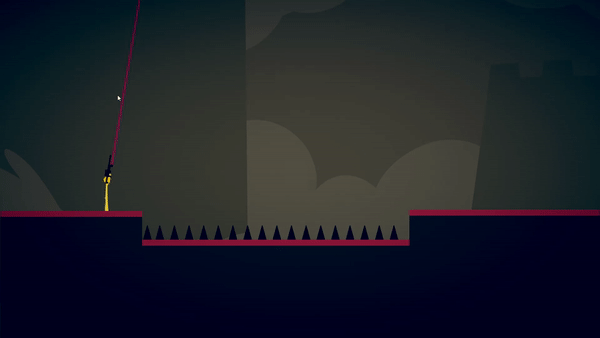
以特定弧度将武器抛向空中,使其落在距离你一个格挡冲刺跳跃(Block Punch Jump)的熔岩或尖刺上。进行格挡冲刺跳跃,这样你就能踩着武器进行武器跳跃,然后按照连续投掷跳的步骤操作。 更冒险但更快的方法:
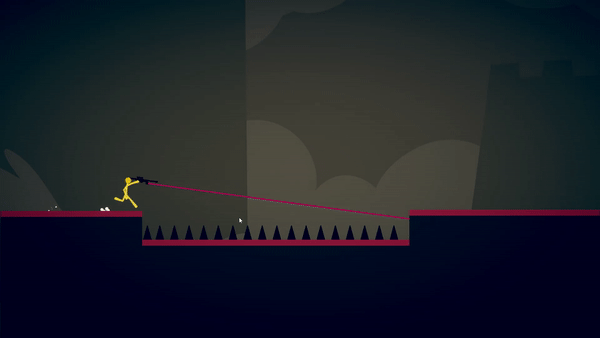
警告:这需要精准瞄准,确保你的武器落在尖刺/熔岩上方,而不是弹开或卡在尖刺之间。 从坑边的平台边缘跳下,在跳跃过程中,将武器扔向你想要着陆的位置。然后你可以落在武器上,在武器上跳跃直到拾取冷却结束,接着进行武器跳跃。之后,按照连续投掷跳跃的步骤操作。 连续投掷跳跃: 警告:与“更冒险但更快的方法”一样,出于相同原因,这也需要精准瞄准。 通过武器跳跃捡起武器后,将武器扔向你将要着陆的位置。落在武器上,然后在上面跳跃直到拾取冷却结束,再次进行武器跳跃。重复此过程。这里有一张用于练习你的投掷跳跃技巧的地图。挖掘

我的招牌技巧(没错,所有高级技巧都是我的) 这是一种很难施展的技巧。需要两名玩家参与。一名玩家必须被另一名玩家推入地下。最简便的方法是先用子弹攻击,然后迅速接拳。这样一来,一名玩家就能待在地下移动,然后突然从敌人身后冒出并获胜。 上述动图的慢放版本:
武器骑乘 (即将添加动图!) 我的招牌技巧 这是一项非常困难的技巧。需要在武器可拾取的冷却间隙将自己“卡”进武器里。成功的话,它能像翅膀一样带你飞到地图顶端。 Boss 攻略 蓝色 Boss: 击败它:这个 Boss 相对容易击败。只需闪避并射击,直到进入弹跳阶段,然后继续射击(弹跳阶段不会造成伤害)。 扮演它:这确实很难。尝试在霰弹枪和速射阶段近距离最大化输出,并在弹跳阶段躲避。 黄色 Boss: 击败它:这个 Boss 相当容易击败。记住在每次左轮射击之间停顿,以减少 inaccuracy。注意躲避激光。扮演该角色:发射与地面平行的激光——如果玩家不够快,很容易死亡。 红色 Boss: 击败它:困难。在射击阶段攻击它,在圆环阶段躲到掩体后面,在锯片阶段只管跑。 扮演它:在射击阶段躲藏,在圆环阶段从掩体后射击玩家,在锯片阶段将他们逼入角落以轻松击杀。 彩虹 Boss: 击败它:相当简单。在射击阶段大量攻击,在波浪阶段跳过波浪,在内爆阶段进入圆圈。你可以将内爆反弹回 Boss 身上! 扮演它:在射击阶段从侧面射击玩家(这样更难躲避)。在波浪阶段上下移动以扰乱波浪。尝试用内爆攻击命中玩家,这会造成大量伤害。注意玩家可能会将内爆反弹回你身上! 待办事项: - 添加更多图片和动图 - 添加近战技巧和徒手战斗获胜的相关信息 - 添加更多地图策略和武器策略