换一换
换一换 


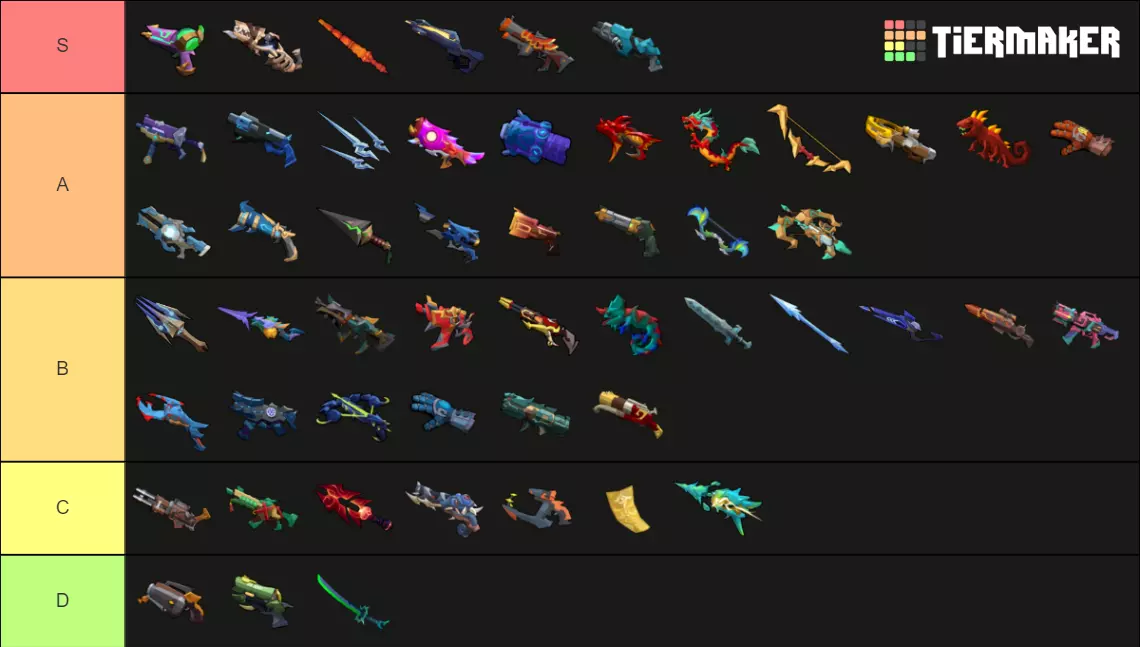
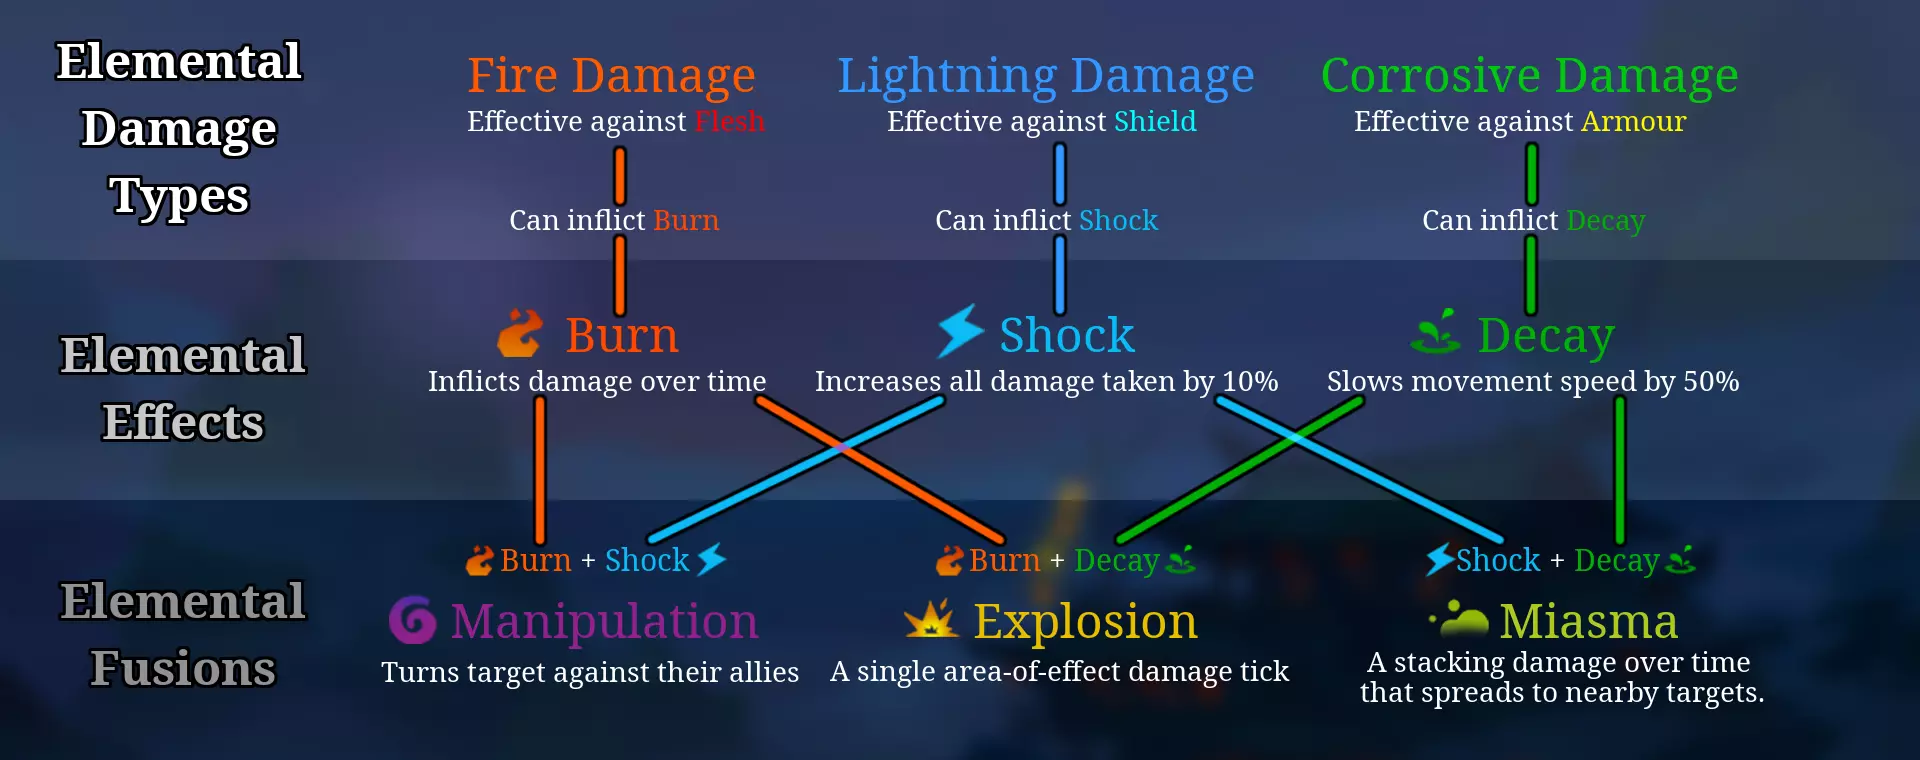
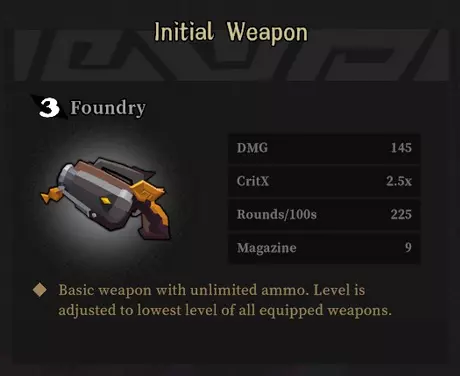
Given a number of streamers have picked up the game recently, which will hopefully see a large influx of new players joining - I have consolidated a number of tips and tricks from various posts and my own playthroughs. Please feel free to add more in the comments. Thanks to the following from Reddit for extra tips and updates: rubberturtle, WolfPhoenix, Levitupper and a bunch of folks from the discord as well. Some of the mechanics are unconfirmed, so if you've discovered more accurate stuff through testing - let us know! EDIT (01/21) - Hey all, thanks for all the awards and points. Unfortunately the guide is pretty dated now as I've been burnt out playing GR in the early versions. As you all are probably aware, the developer has been great at providing new features and updates but it makes updating a guide pretty tedious. I'll be back whenever 1.0 is out for an updated version! However if you want to add your own tips and tricks in the comments, i'll be sure to add them :) Damage Elemental Damage types (Corrosive, Fire, Lightning) are different from the Elemental Effects they have a chance to proc (Decay, Burning, Shock). Make sure you read scrolls properly to understand which of the two they impact Lightning has bonus damage against shields (blue health bar), Corrosive against armour (yellow health bar) and Fire against normal HP (red health bar) The fusion system lets you proc additional damage types when enemies are under the effects of 2 elemental effects. ◘ Decay + Shock = Miasma - A very strong DOT that can shred enemies, and can have multiple stacks (up to 9). It is also an AOE with a wide range that has weaker procs on surrounding enemies ◘ Decay + Burning = Explosion - Causes a single tick AOE on proc. ◘ Shock + Burning = Manipulation - Confuses enemies and makes them fight their allies. The AI for this is a bit wonky, e.g Archers hitting as melee instead of ranged Fusion damage types and elemental effects can be triggered by a variety of mechanics: ◘ Weapons - Can apply Decay, Burning, and Shock ◘ Weapons - Can also directly trigger Miasma, Explosion, and Manipulation through the "Shared Weapon Damage" Gemini inscription ◘ Weapons (e.g. Launchers) - Triggers Explosion ◘ Cat Grenade - Applies Decay ◘ Cat Energy Orb - Applies Burning when Fire Elemental Damage is levelled to Tier 3 ◘ Dog Grenade - Triggers Explosion ◘ Scrolls - Can modify the chance/ability to proc certain effects and damage types Critical Strike - In this game, a critical strike only procs whenever you hit the weak spot on an enemy and shows up as a Yellow number. Usually the head but on some enemies, it may be elsewhere (e.g the x mark on the back of Dark-faced bandit or the mouth in phase 1 of the 2nd boss) Lucky Shot - This is calculated separately to Crit and can proc on any enemy hit (like a traditional RPG crit). It can be stacked over 100% resulting in additional procs which you see as different coloured damage numbers (Tier 1 <100%, x2= Orange, Tier 2 <150%, x3 = Purple, Tier 3 >150%, x4 = Red). Lucky Shot can proc on the same hit as a Crit as well. Scrolls & Interactions Advanced Depot + Aura of Venom - The weapon’s alternative fire with this scroll essentially means you can empty your reserved ammo with one right-click Preemptive Strike + Prism / Golden Bow / One-shot snipers Snow Boots + scrolls with negative movement impacts (e.g. Decay Enthusiast or Heavy Shield). Snow Boots are generally a really good pickup as there are many enemies that proc slow effects later in the game. Especially the final boss where getting slowed can mean the difference between dying to or dodging the artillery strikes Triple Comeback - The shield and HP reduction are removed once all 3 stacks have procced Dual edge - Increases Damage dealt AND Damage taken by 1% and 0.2% respectively (i.e. if you kill 50 enemies you will deal 50% more damage but also take 10% more damage) Brutal Gloves - Usually an instant drop unless you have a build that can use it (Launchers or Lucky Shot). Crit damage is a huge DPS boost and shouldn't be sacrificed for a flat damage increase Air Bag + HP loss scrolls - Air Bag constantly drains your HP to 1, meaning scrolls like Berserk Soul and Persistent will very often be at maximum potential even while you have full shields. This build pairs well with Paranormaility Elemental Cube + No-reload weapons / infinite ammo scrolls - The game doesn't consider weapons like Prism and Golden Bow to technically ever reload, meaning they will never reset the element chosen by the Cube. You can re-roll the Cube to the correct element with the pistol (you can see which element is currently active based on the small buff icon), and then it will keep that element forever if you use one of these weapons. This also applies to infinite ammo builds like Laser/Thunderclap Gloves + Genesis/Bloody Ammo/Advanced Depot. Improved Clip + low magazine weapons - Because the ammo is added directly into your magazine, if your magazine is full or just very small in general you will get almost no ammo back when you pick up an ammo box, causing you to run out of ammo fairly quickly. This also applies to Against the Flow, since 10% of a small magazine is often 0 ammo return. On The House - If you buy On The House from a peddler, your next purchase from that peddler will be free. Elemental Shards - Shards are good in certain situations like the Fire Shard + Fire Enthusiast combo which enables massive self-healing with a Fire build, or if you are able to get all 3 through shared drops from teammates Devils Covenant - The HP reduction is a one-off reduction in current HP and not a max HP reduction. You can heal back up after picking it You can drop scrolls by holding right-click hovering over the scroll icon in the Backpack menu Weapons Some weapons have an alternative fire that is extremely useful (e.g. The Porcupine alternative fire can be spammed along with the primary fire) Weapons can also have a secondary effect that can be found in the description. E.g - Thunderclap Gloves have an AOE while Laser Gloves do increasing damage to the same target Elemental weapons usually have a fixed elemental type (e.g Prism = Corrosive, Fire Dragon = Fire) but normal weapons have a small chance to drop with an elemental type as well A low damage high fire rate weapon can be used with the Bounty Hunter talent to amass large amounts of copper (e.g. Gloves). You can then go for a 15+ level weapon through Enhancements with your sizeable bank. This strategy pairs well with an early Devil's Covenant or Copper Miner There are maybe 1-2 weapons that are "bad" but most weapons are useable given the right inscriptions. I have seen people skip over some really good weapons and it is hard to make a tier list as it is very roll/character/scroll dependant. Experiment and have a play with all the weapons - this is a roguelite - you're going to die a lot anyway! Once you have decent levels and can progress comfortably to the third stage, the craftsman is usually saved for later given the better drops with Gemini inscriptions. However, if you have a decent starting weapon drop with good modifiers feel free to upgrade early Your starting pistol will synchronize its level with the lowest level out of the other two weapons Weapon Inscriptions Weapon Inscriptions have tiers. Tier 1 / Normal = Green text, Tier 2 / Rare = Blue Text = Tier 3 / Exclusive = Orange text. When a chest offers to upgrade a Normal inscription, it will only upgrade a Normal inscription. If you have no Normal inscriptions on the weapon, it will do nothing. The inscription it replaces is random. When it offers to replace all inscriptions, this does have a chance to roll for higher level inscriptions as well. Additionally, if you re-roll all inscriptions after upgrading a weapon to +5 or higher, it will always give it a Gemini inscription as one of the replacements (if you have Gemini inscriptions unlocked). Exclusive inscriptions are a bit misleading, as they are not always exclusive to the individual weapon but can be available for multiple weapons in a weapon type +0.2 projectiles translates to a guaranteed extra projective every 5 shots You need to have Gemini inscriptions on both weapons to activate the inscription effects. The inscription text will turn purple when activated ◘ Shared Crit Gemini - Adds the crit between the 2 weapons. Lets you crit with launchers that usually have 1x base critical damage ◘ Shared Weapon Damage Gemini - Lets you proc Fusion elemental effects with a single weapon Movement Weapons enable different movement speeds. Example - Prism lets you have a faster movement speed compared to a Tiger Cannon. You can use your starter pistol during jumping puzzles in vaults to hit those tricky long jumps Dash has some initial dodge frames so you can skip through traps or enemy projectiles with it The boulder vaults actually have an initial pattern than you can make through in one go. The 2nd (or is it third?) set of boulders in the first path of the Act 1 vaults can be slipped through in the gap between them Cat Elemental Build - Centred around Elemental Damage. Tier 3 +x% elemental damage is great but usually getting 1-2 tiers for 2 elemental types is fine for the late game as you are looking for the shared damage Gemini inscription to proc Fusion effects Sniper Build - Centered around Energy Blade ◘ Core Ascensions: Energy Blade, Acid/Pyro/Electro-dominance, Power Source ◘ Core Scrolls: Hawkeye ◘ Optional Scrolls: This is a pretty flexible build, bunch of options are available that help one-shotting enemies. Preemptive Strike, Bluff, Elemental Power, Ninja Invincibility, Rock-hard Determination, Penetration Bullet, Deadly Curse + defensive scroll, ◘ Weapons: Elemental Sniper. Golden Bow works well with Preemptive Strike. Multiple projectile inscriptions are great for hitting those high damage numbers Hot Stuff Build - There's a bunch of ways to play this. If you like running around like a pyromaniac with this https://www.youtube.com/watch?v=r32LcBqiv7I in the background - use a Fire Dragon. Alternatives are Laser Gloves, Justice or really most other weapons rolling with Fire elemental damage. ◘ Core Ascensions: Pyrodominance ◘ Core Scrolls: Fire Enthusiast, Flesh and Bones ◘ Optional Scrolls: Advanced Depot, Lucky Shot scrolls, Flame Shard, Defensive scrolls as you will be up-close if using a fire dragon ◘ Weapons: A good fire dragon can carry you till the final boss. You can then swap to another fire weapon or entirely different element with a shared weapon damage gemini inscriptio You can proc the Miasma fusion effect with a lightning weapon and the Decay effect from the corrosion grenades "ROF" in the Wildfire ascension refer to "Rate of Fire" Hex smoke is really powerful, it’s a great defensive and offensive ascension skill Acidic Explosion is also great for speed-clearing out enemies in the 1st stage where they are often grouped up (is it fixed damage or enemy HP based?) Dog Iron Man Build - I Am Iron Man ◘ Core Ascensions: Twin Gunner, Lucky Ammo, Battle Tested ◘ Core Scrolls: Advanced Depot ◘ Optional Scrolls: Other Ammo-based Scrolls (E.g. Against the flow) if you can't get Advanced Depot, Fire / Lightning Enthusiast, Flesh and Bones and Bloody Ammo if going Fire Enthusiast, Damage Scrolls ◘ Weapons: It's in the name! Laser and Thunderclap Gloves. Try to grab the Spore Gemini inscription later on if you can. Oww Bai Bai Build - Why dual wield when you can yeet a whole gun. Credit - https://www.youtube.com/watch?v=Lgbw76MR4ws ◘ Core Ascensions: Mad Bomber + all the other explosion ascensions ◘ Core Scrolls: + flat damage scrolls, Lucky Shot scrolls, Bullet Bank, Ammo Belt ◘ Optional Scrolls: Hawkeye + Deadly counter if you want to go for the 3m+ Shot. Deft hands is useful as well ◘ Weapons: Concealed Ammo + Big Hippo with shared magazine and any increased magazine inscriptions. Concealed Ammo's secondary fire scales with magazine size Dog Nuk'em Build - Each of the porcupine pellets can trigger an explosion with the fusion system ◘ Core Ascensions: You can mix and match between explosion and dual wield ascensions depending on what comes up ◘ Core Scrolls: Pretty flexible here. Deft Hands or Advanced Depot helps with reloading, especially if you want to rock a dual shotgun version (Fire Wild Hunt / Illusion + Porcupine) ◘ Optional Scrolls: Airbag + Beserk Soul is a fun variation ◘ Weapons: Porcupine + High burning proc weapon Launcher Explosion Build - Dual-wielding 2 launchers, having one as a bone dragon helps group up enemies. One of the few builds that can utilise Brutal Gloves as launchers usually have a 1x Crit Damage stat Elemental Explosion Build - Using a combination of a Decay and Burning procs Double Rainbooooow! Build - Getting a corrosive and fire rainbow can be a bit of lottery playing solo, but in a team game this build is great. Getting the exclusive inscription with the secondary arcs makes this an insane room clearer Double Hippo Build - Dual-wielding 2 Hippos with the spores Gemini. Works with any other high-fire rate weapon. It's a good way to overcome RNG weapon drops using the explosions with spores for any auto weapons that drop in the 3rd stage You can’t use secondary fire when dual-wielding so weapons like Justice and Rainbow Arch don’t work as well Prism works well with the Last Shot ascension You can cancel dual-wield by swapping to the default weapon Bosses 1st Boss If you're just starting off - having a lightning weapon is useful to remove the shields and fire damage helps shred the red hp. Once you've leveled up a bit, you'll find it easy to beat him with any weapon. Miasma procs with a lightning weapon and your corrosive grenades as Cat are also very useful You can use the 2 pillars to absorb some of his attacks, but don't stand too close as some of his attacks will AOE you or he'll explode the barrels near them Depending on your position, some of his attacks can only be dodged with a backward dash, especially his flying smash2nd Boss The mouth is the weak spot in the first phase and the so is the tail in the second phase To dodge the laser, you should dash in the opposite direction AFTER it starts Kamehameha-ing It's easier to tell when to dodge by standing still when the boss is in the mouth blast animation It doesn't do damage while travelling through sand and is targetable You can shoot its green globules out the air in the 2nd phase. With the right timing, you can also burst all of them right as it shoots them out. You can also do this with Energy Orb, or even a grenade toss. It's also quite easy to do with an extremely high fire-rate weapon, especially the gauntlets or a Fire Dragon3rd Boss Defensive scrolls are very useful here. Spirit Feline and Deflection Shield are a bit too OP and there are many situations where I and other people have soloed with these skills after 3 teammates have died. Just like the 2nd boss, you can actually shoot his projectiles in the second phase. And just like the second boss, if you target the tip of his nose with a gauntlet they will all be destroyed instantly as he shoots them. Eyes are the weak spot in the 2nd phase Vaults Vault Portals are random, unconfirmed if they are Pseudo-RNG (i.e higher chance when you have several rooms without vaults) There are 4 types of vaults - Enemy clearout (Act 1 only) - Clear basic enemies and contains 1 chest - Boulders (Act 1 and 2 only) - Dodge boulders and contains 2 chests. The bonus chest is in a slightly hidden spot: Near the fire trap at the end of the Act 1 vault and near the penultimate boulder spawn in Act 2 - Parkour (Act 2 and 3 only) - Platforming challenge which contains 2 chests. 1 of the chests is only available when the secondary, harder path is completed in the time limit. The time limit only begins when you initiate this harder path. - Elite clearout - Clear basic + Elite enemies and contains 1 chest but the elite can drop items/scrolls Multiplayer Enemy HP scales to the number of players in the game. It's 7x when there are 4 players present High projectile weapons sometimes lead to de-sync and “lag” for multiplayer games. Prism is a prime candidate for this. It’s not the only cause as the net-code is not super optimised but all those prisms bouncing around will sometimes spike your teammates to 999 ping. Somewhat fixed in 12/06 patch All drops (Scrolls and Weapons) are initially for yourself only. You need to “flip” them (pick-up and drop) for other co-op players to see them. This should be common practice for you when playing multiplayer lobbies! You need to be level 10 to use the game auto-match to play with random teammates, but can party-up with friends at any level If you are assigned host for random matchmaking the game will end for other players when you quit You should drop scrolls for teammates when they can really accentuate the builds they are going for. E.g. no point holding on to Fire Enthusiast if you are going corrosive and someone else is going for a Fire Dragon build Talents Each Talent point increases your Level by 1. Focussing on Tyrant Leader and Heavenly Essence helps boost your levels quickly but you need to spend points elsewhere to meet the level requirement. You can aim to spend on the cheapest talents to help achieve this but will, of course, be initially sacrificing other talents that may make progression easier. Skilled Craftsman allows you to have 3 instead of 2 upgrade uses per Craftsmen. To hit 120, you need to level both of the Hero trees for Dog and Cat (5 Talents each) Other This is a roguelite so ascension skills and scrolls are not persistent for the next playthrough. Talents are persistent however and can only be levelled at the end of a playthrough and not from the main menu even if you have reserved souls with the Dimeson Pouch talent You may be going into runs with a set build or OP setup you've seen elsewhere. As with many other roguelites, the best way to play the game is to go with the flow and slowly flesh a build out depending on the drops There is a save system between levels. Using the well in the transition stages will save your progression at that point There is an option in the Game Setting to remove the default weapon from mouse-wheel scrolling selection Elite mode is unlocked once you beat the final boss in normal. Yes, the English in this game is translated weirdly - Devs have already said this will be fixed in the future
新手常见问题解答、技巧与窍门

导读
这是一篇《枪火重生》的新手攻略帖,作者整合了伤害机制、武器搭配、角色Build、BOSS打法、联机技巧等多方面新手常见问题解答与技巧,因游戏版本更新较快,攻略已过时,作者表示将在1.0版本推出后更新。

评论
共0条评论

枪火重生 《枪火重生》游戏中幸运一击和暴击关系揭秘 揭秘游戏中幸运一击和暴击的区别及影响力
《枪火重生》是一款备受玩家喜爱的射击类游戏,其中幸运一击和暴击是游戏中非常重要的机制之一。本文将详细介绍这两个概念在游戏中的区别以及对游戏玩法的影响。
2026-04-30 04:500赞 · 0评论
《枪火重生》角色技能介绍[简易版]
本指南旨在介绍《枪火重生》中的角色技能(简单易懂版),包含各角色技能的说明及基础连招。【本指南仅适用于新手玩家,内容通俗易懂,不涉及深入细节】 简介: 游戏中有…
2026-02-19 07:000赞 · 0评论
《英雄旧忆》终局玩法 - 你需要知道的一切!
在本指南中,我将介绍《英雄旧忆》的终局玩法!(含视频) 视频(不想阅读的话建议观看)
2026-04-05 16:000赞 · 0评论

《龙腾世纪:起源》噩梦难度指南
在噩梦难度下为角色配备装备,例如阿尔达里昂、阿利斯泰尔、莱莉安娜、战犬马巴利、莫瑞甘、奥格伦、 shale、 Sten、温妮、泽万、洛根,以及战术脚本。 阿利斯…
2026-04-03 01:000赞 · 0评论
简明易懂的与好友一同进入游戏的指南!
如何与好友联机? 通过Steam在游戏中创建私人服务器,请按照以下步骤操作: 设置下载区域: 1. 打开Steam并进入设置菜单。 2. 选择下载选项。 3. …
2026-02-19 22:000赞 · 0评论
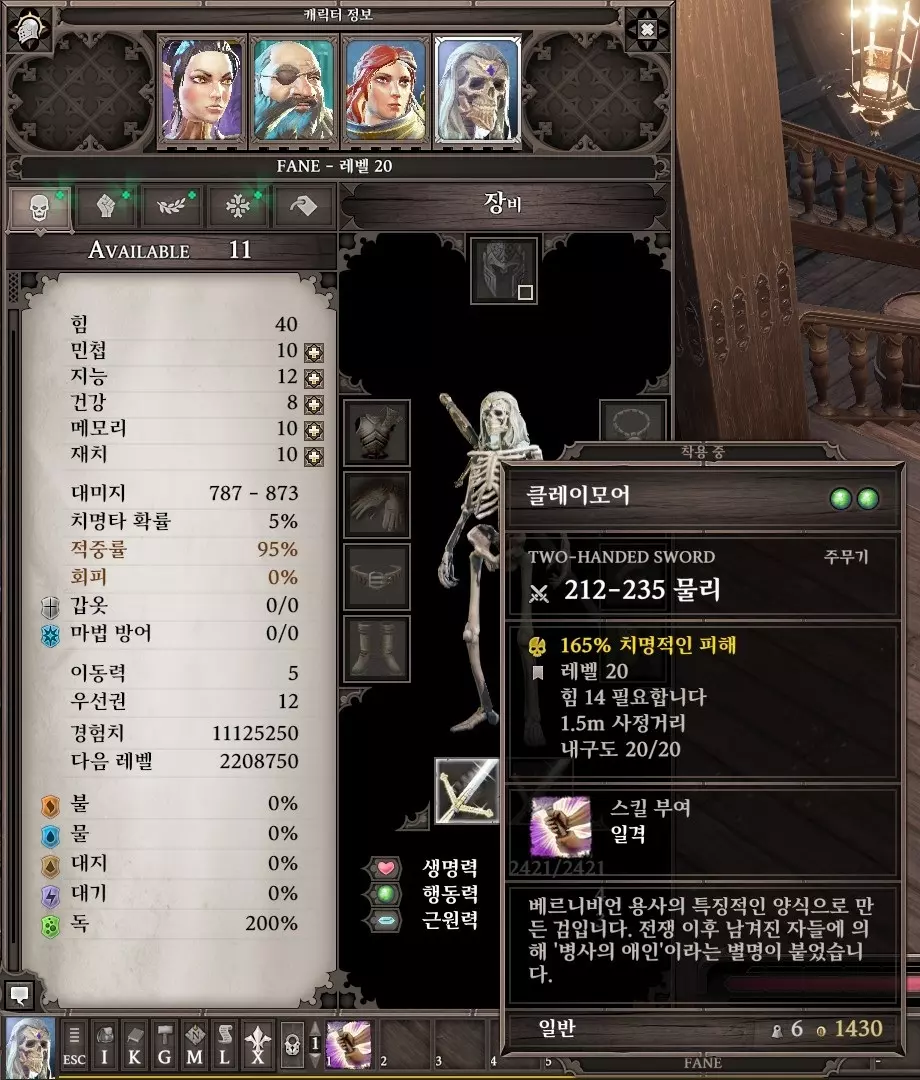
《神界:原罪2》角色构建中级指南
스탯/트리/클래스/데미지를 중심으로 자세하게 설명한 가이드입니다. 1장.들어가며 - DOS2에는 스토리, 탐험, 캐릭터 빌드, 전투 등 다양한 …
2026-02-19 04:000赞 · 0评论
美丽水世界 深海迷航联机指南!3分钟教会你多人游戏
游戏:深海迷航(美丽水世界,联机MOD是Nirtox
2026-01-28 19:200赞 · 0评论

《史莱姆牧场》合作模式 | 2026
《史莱姆牧场》合作模式安装与启动详细指南(支持2名及以上玩家在同一服务器中捕捉史莱姆) 首先,您和您的朋友需要拥有游戏的正版拷贝。由于内容包含外部链接,根据规则…
2026-02-19 19:000赞 · 0评论
如何与任意好友一起玩《乐高印第安纳琼斯2:冒险再续》
好的,下面为你介绍《乐高印第安纳琼斯2:冒险再续》的详细联机指南。 引言 首先,你需要选择以下适合你的情况: 1. 你拥有游戏,想和朋友一起玩,但不知道如何操作…
2026-03-18 01:000赞 · 0评论

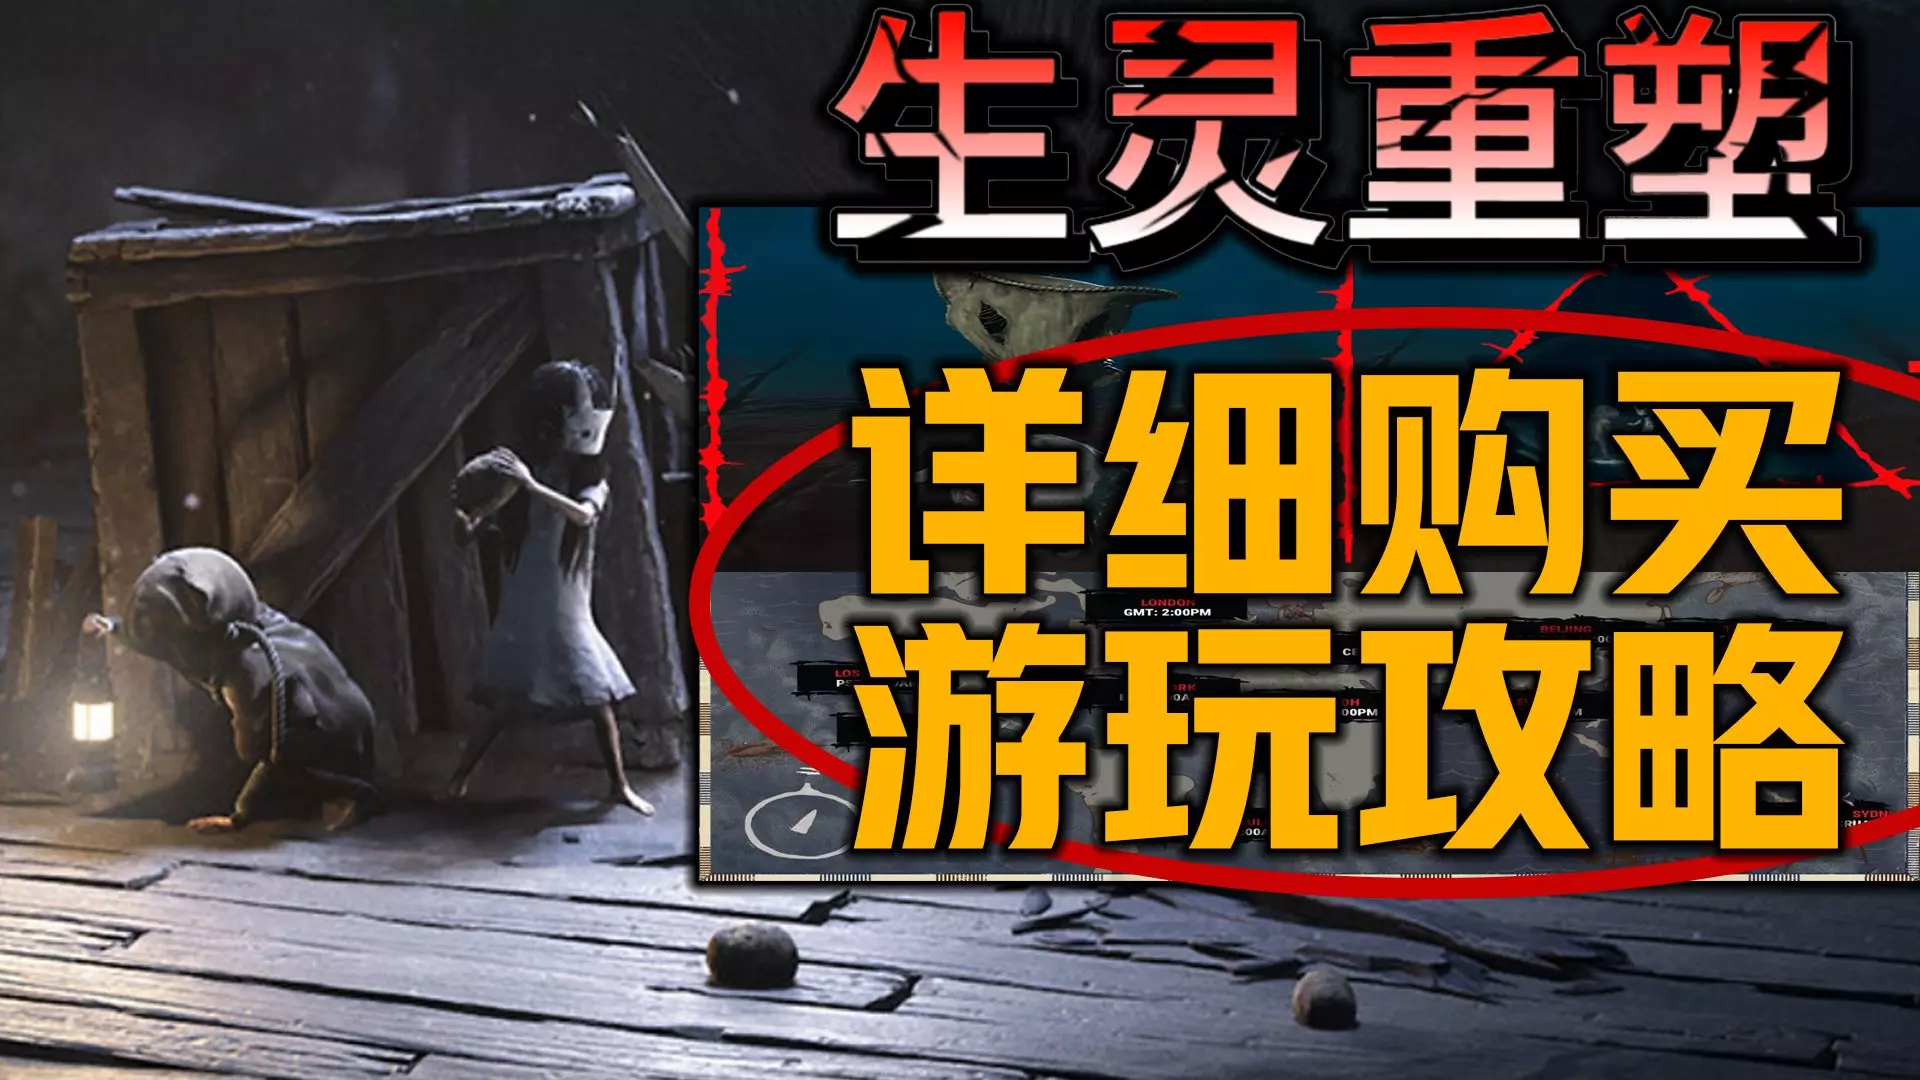
游戏 《生灵重塑新入坑发售必看》保姆级免费试玩联机指南+快速熟悉学会前小小梦魇新作游戏合作联机玩法模式购买豪华版本区别配置要求免费demo联机机制问题评测解答!
游戏:生灵重塑 游戏介绍及购买版本 官网:https://store.steampowered.com/app/2129530/_/
2026-01-15 11:210赞 · 0评论
暂无更多
最新更新
- 《枪火重生》5月9日更新内容 — 《枪火重生》更新内容:修复了游戏内出现的若干问题。感谢各位的反馈与建议!《枪火重生》修复与优化内容 1. 在设置中新增了调整【迅捷步伐】移动速度加成的功能。 2…
- 《枪火重生》×《堆叠飞升》捆绑包现已上线! — 双倍乐趣,超值合辑!《堆叠大陆》已于4月23日(太平洋时间)正式发售,《枪火重生》很荣幸能与之合作推出特别的Steam联动捆绑包! 一边是充满枪火与技能的Rog…
- 《枪火重生》Season 7 赛季中期更新(第二部分)更新公告 — 《枪火重生》更新内容 1.新增第七赛季【符文秘藏】玩法功能——符文阵列,以及新的符文石效果。 2.加入赛季等级追赶机制。 3.优化关卡内战斗后的交互体验。 4.…
- 《枪火重生》更新内容 1. 赛季更新 ① 新增玩法: — 《枪火重生》更新内容 1. 赛季更新 ① 新增玩法:符文阵列 在之前的更新中,我们引入了符文石从关卡挑战中随机掉落的机制。或许许多玩家已经注意到,在获取更多符文…
- 独立命运模组中无法携带的卷轴 — 由于我经常在新手(以及其他玩家)中遇到这个问题,因此在本指南中,我整理了关于【独立气运】模组中绝对不能拾取的秘卷的信息。(此词条仅在轮回模式中可用。) 为便于理…
- 《枪火重生》3月30日更新内容 — 《枪火重生》修复公告 1. 优化了苍觉携带符文石【次要技能-天裂】和【次要技能-超载】时的性能表现 2. 修复了多个符文石状态名称的文本问题 3. 修复了游戏内…
- 《枪火重生》第七赛季中期更新(第一部分)更新公告 — 《枪火重生》更新内容 1. 为第七赛季【符文秘藏】新增符文石效果,并在游戏过程中加入随机符文石掉落机制。 2. 优化了宁红夜的精神祝福【机甲冲击】的效果。 3.…
- 基础与进阶指南 - 莫莫 — 基础与进阶合一指南 重要提示: 最近更新后,“Ink Rhythm”已更名为【墨点】。为便于阅读,下文将【墨点】统一称为【墨点数】 技能 什么是【墨点数】和墨球…
- 指南:催眠大师 — 桃子角色轻松通关指南 简介 本指南是我的第一篇作品,可能不够完善,所以请手下留情。简单来说,我是在一次顺利通关(全程未受伤害)后决定写这篇指南的,而这个战术思路…
- 获取雷洛的专属等级边框【Thunderous Growl Achievement】 — 解锁雷洛外观框架与【Thundurous Growl】成就的简明攻略。包含最佳武器、升华选择以及各章节的额外技巧。 简介 要解锁雷洛的专属外观框架及配套成就【T…