换一换
换一换 


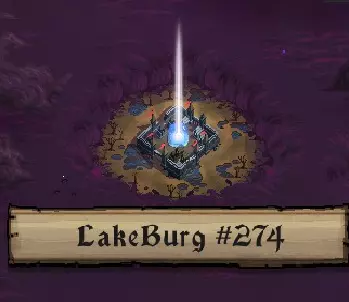
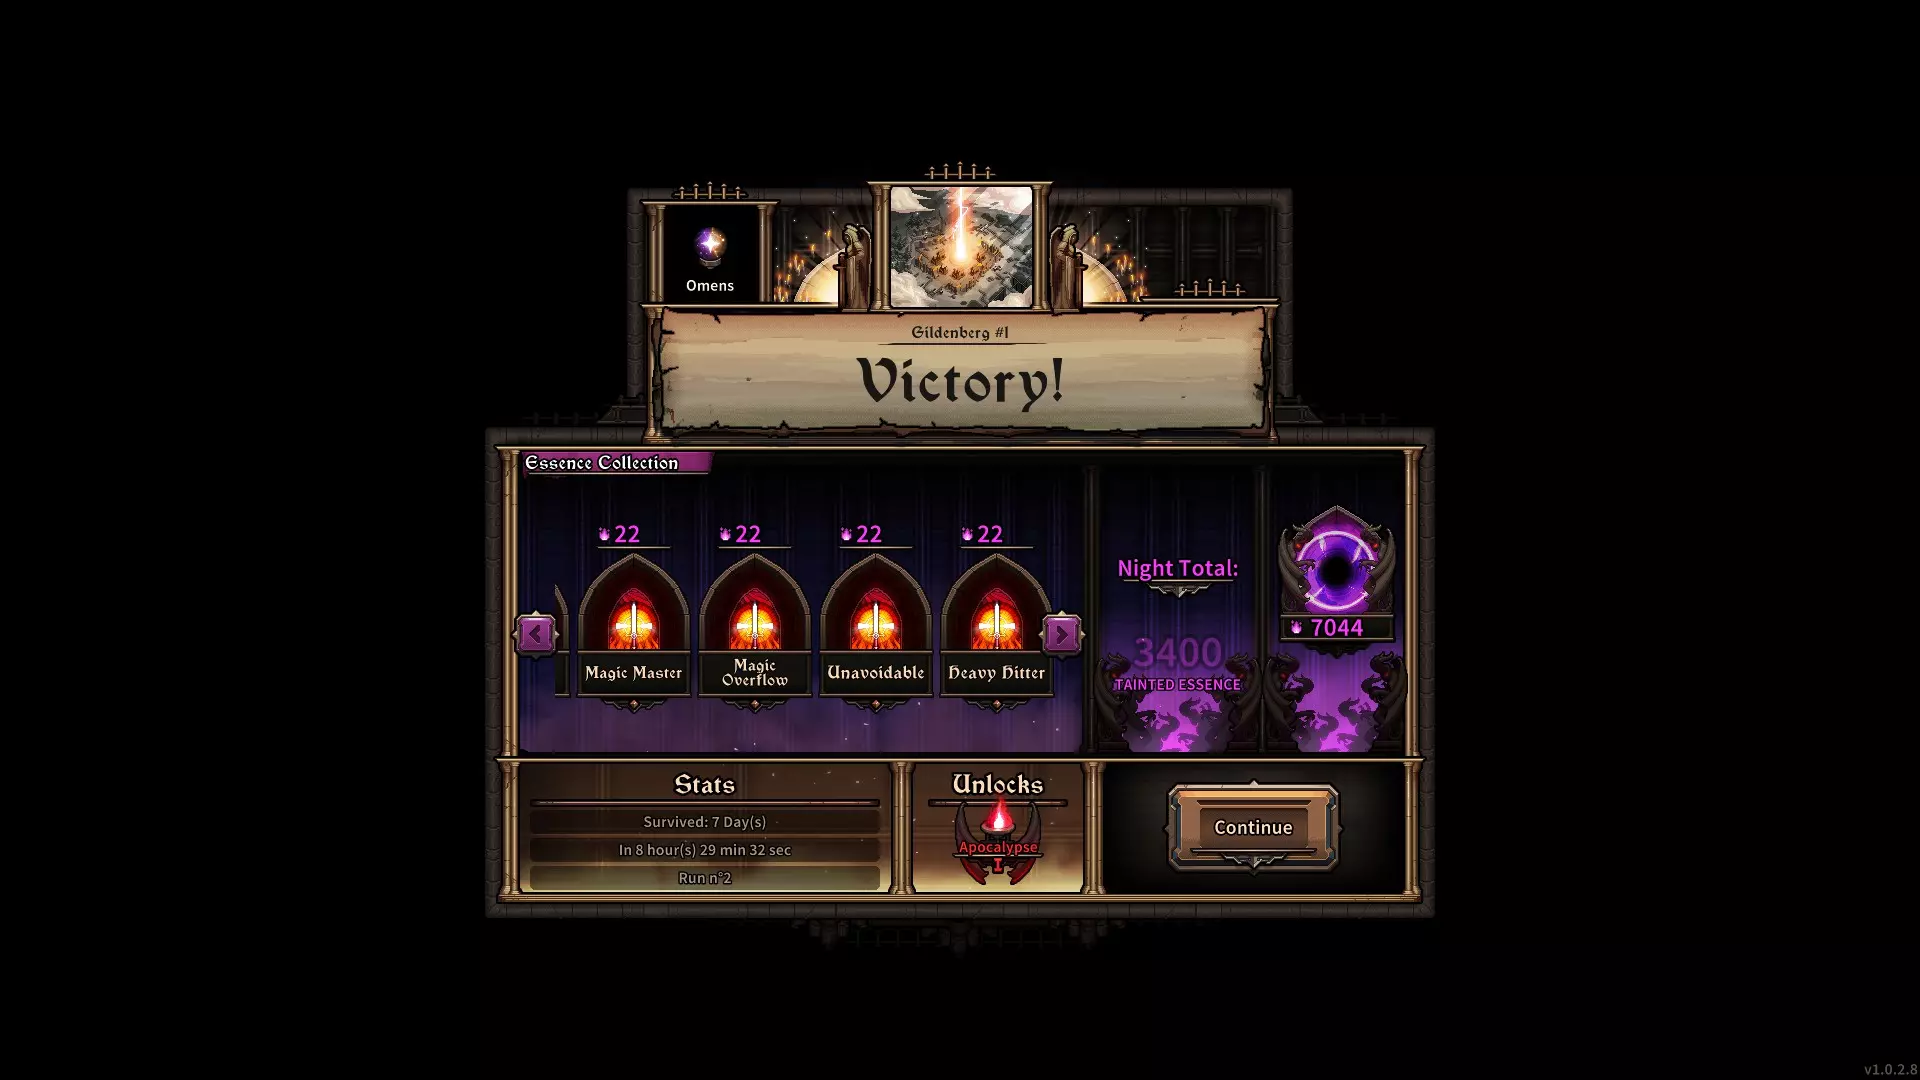
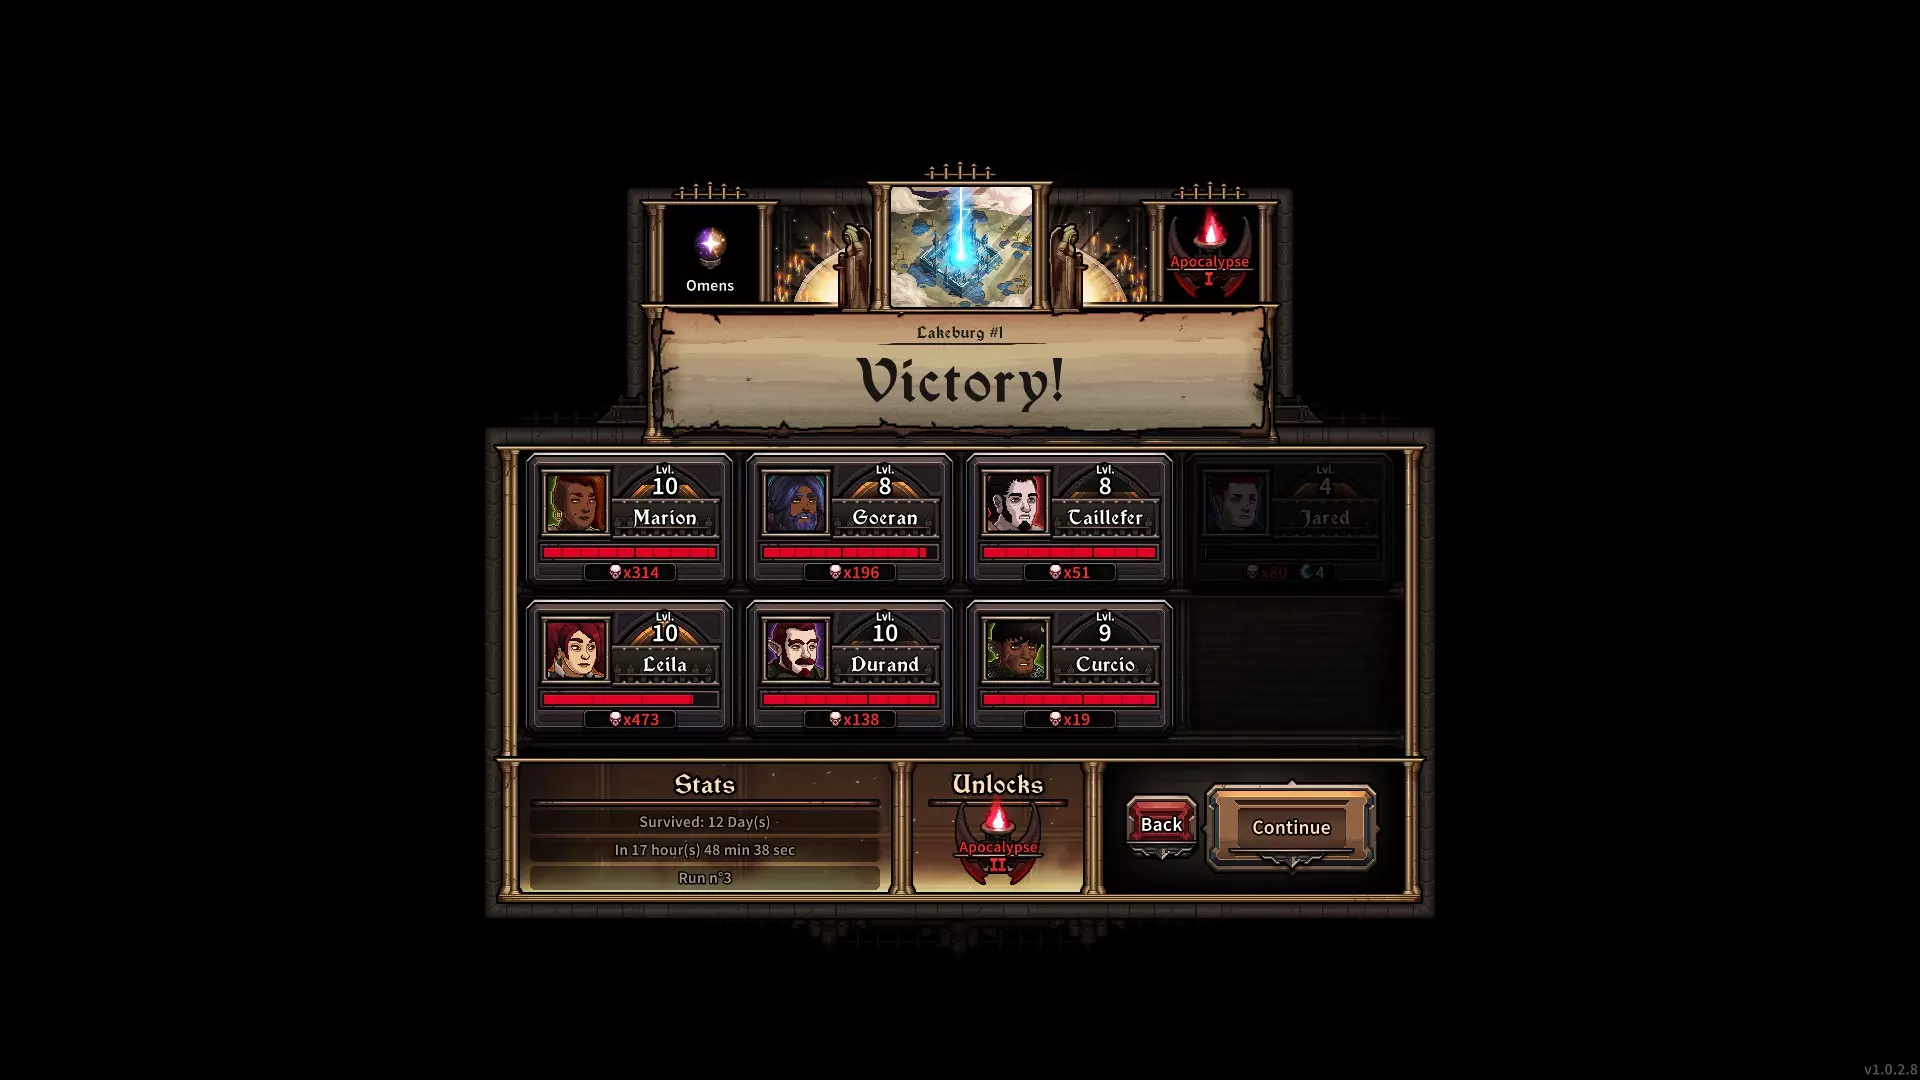
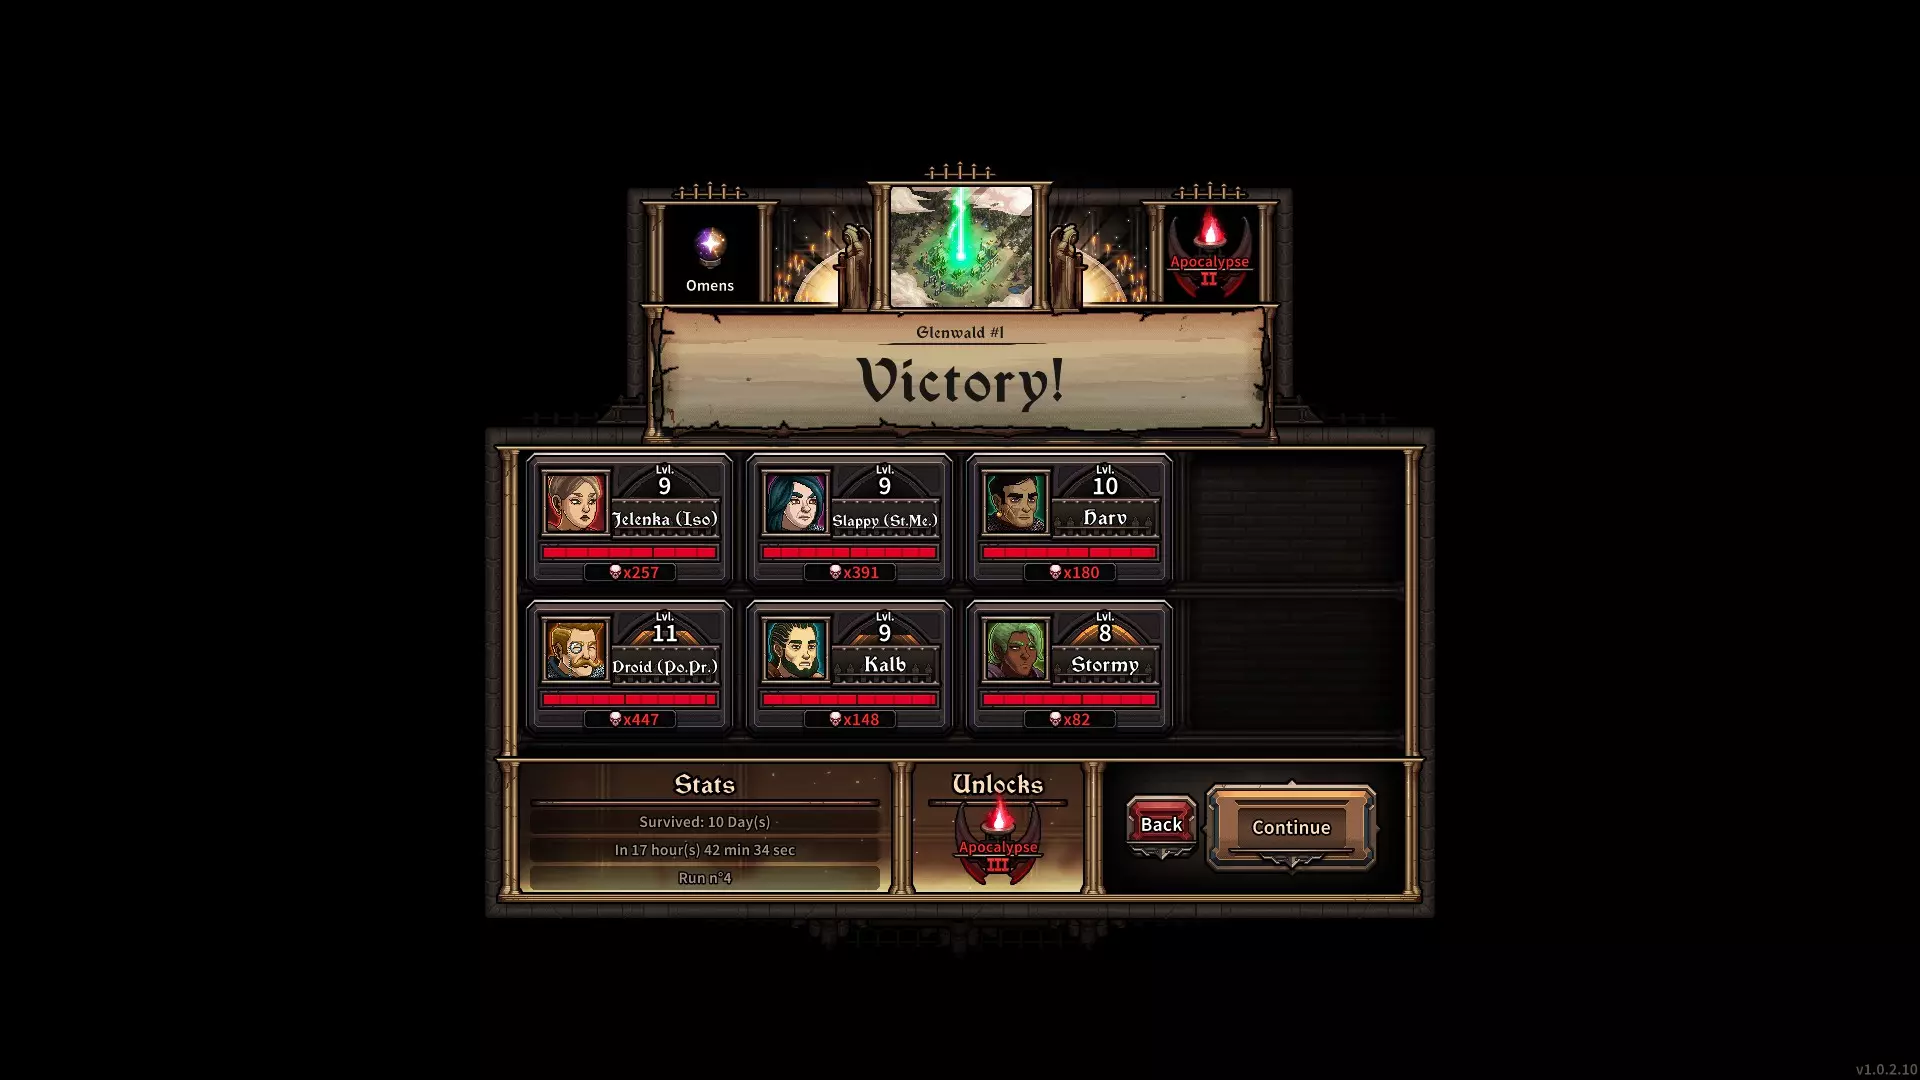
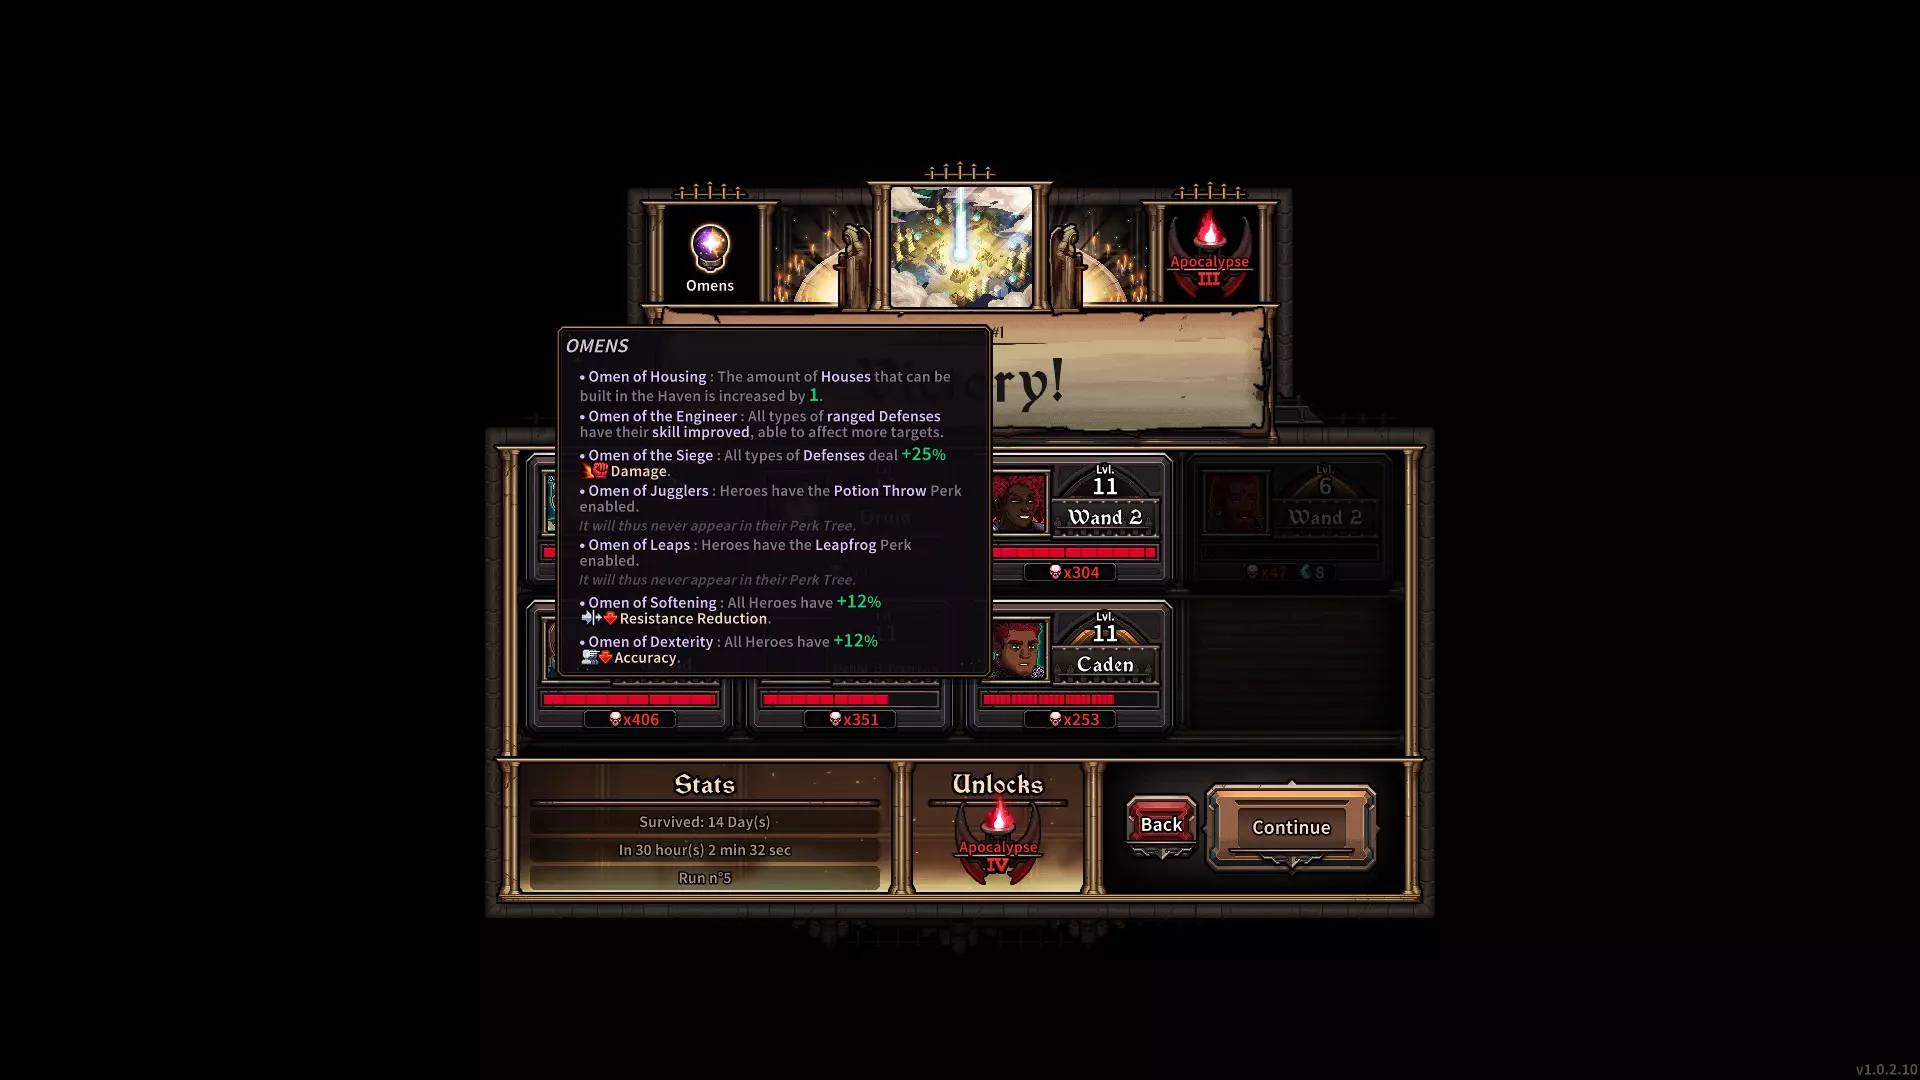
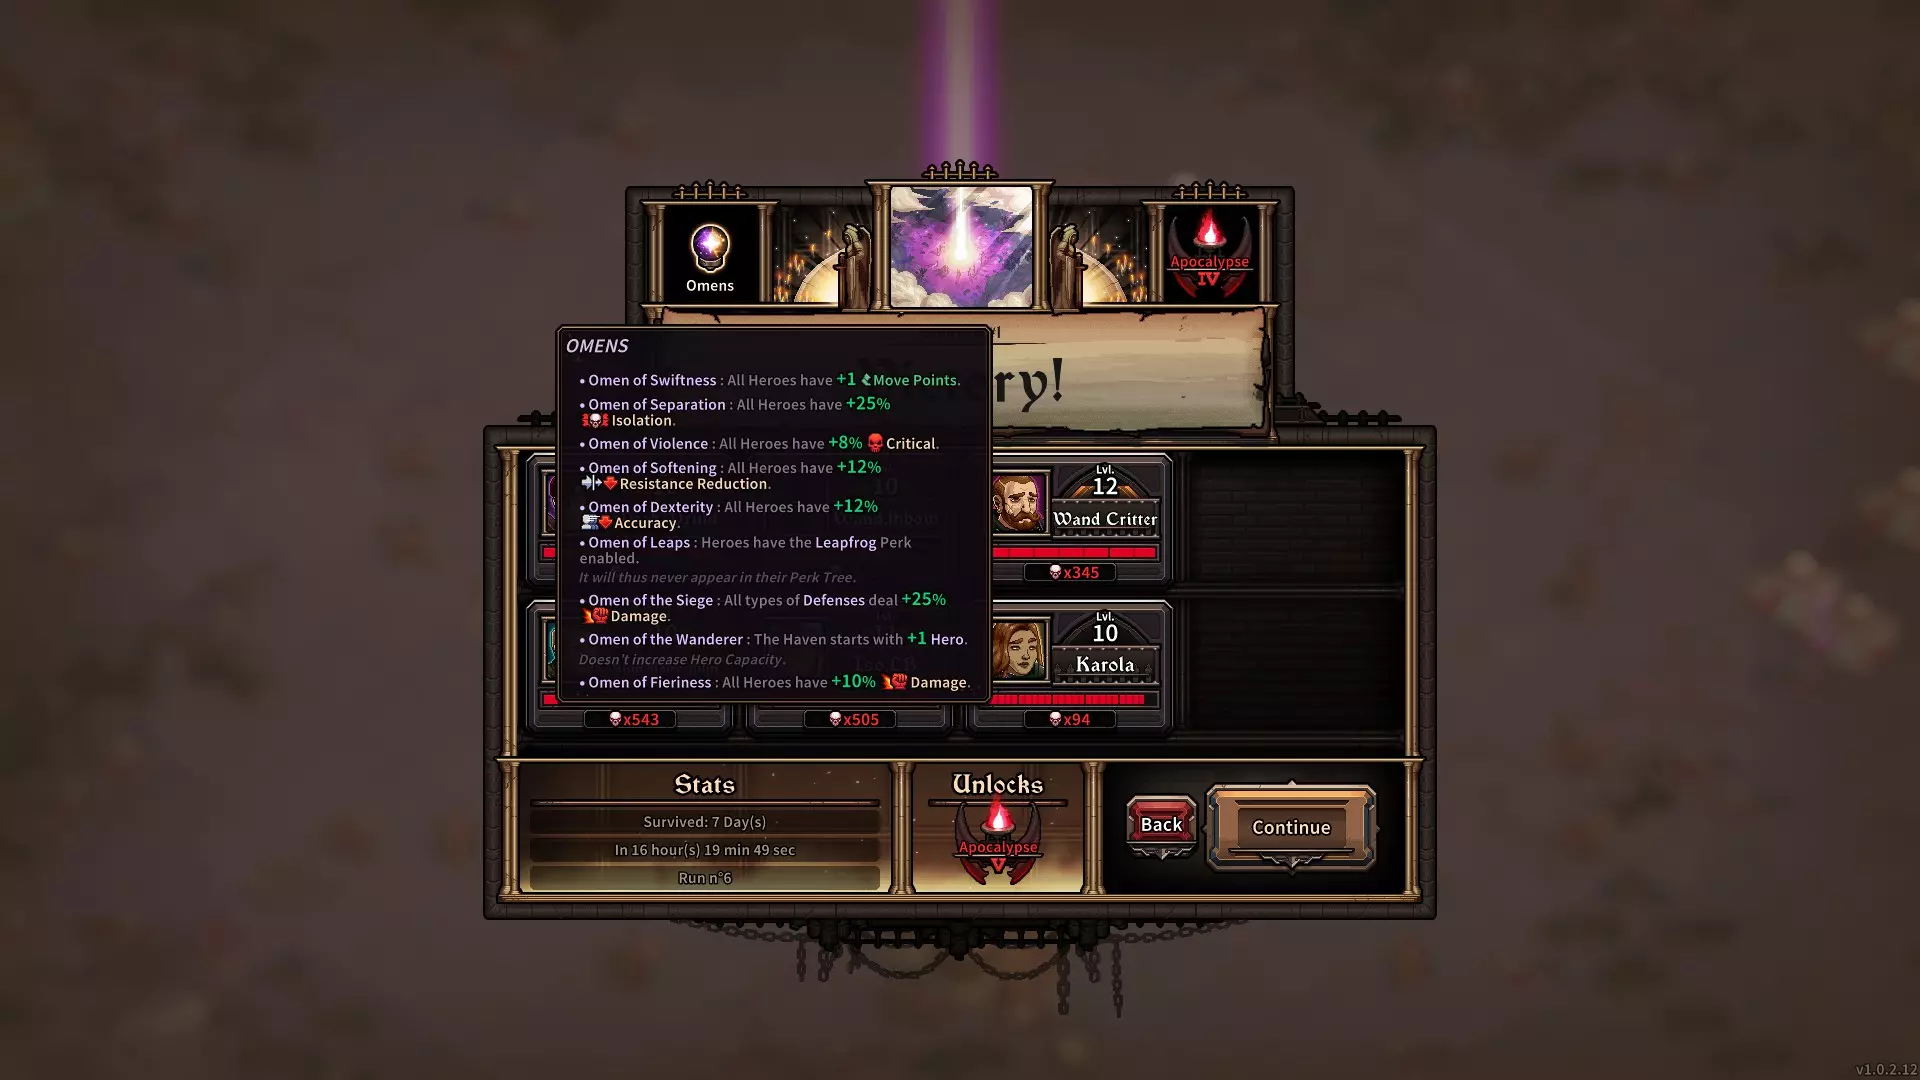
《最后的咒语》拥有20种不同武器、12项主要属性、18项次要属性、5个等级的8个 perk 树、5张地图以及7种难度设置。 该游戏经历了两年的抢先体验阶段,现已正式发布。 这听起来似乎并不复杂,按理说应该有数千玩家深入游玩并提供相关信息。 但为何现有攻略大多过时,新攻略又寥寥无几呢? 原因在于:当你掌握了一套不错的策略后,随着游戏进程的推进,该策略很快就会失去价值。 在我看来,真正能帮助你深入游戏的是那些通用知识! 我会尽我所能,为你提供尽可能多的常用游戏知识。为什么要读我的攻略呢?毕竟网上已经有那么多其他攻略了。 让我跟你说说我在这款游戏里的成就吧。 Ishtar Games 有一个活跃度很高的 Discord 服务器,是讨论游戏策略的绝佳场所。 成功击败吉尔登堡的最后一只鹰身女妖后,我们就解锁了启示录难度1。现在越来越多的人在首次尝试时就通关了吉尔登堡,他们接着会在启示录难度1下挑战莱克堡,然后在启示录难度2下挑战格伦瓦尔德…… 但是,如果我们每进入一张新地图就提高难度,在首次尝试时就通关所有地图,并且全程不让自己的领地被摧毁,直到所有魔法被彻底驱散,这样的游戏难度真的可以通关吗?按以下顺序首次尝试通关所有地图: Swampfurt Gildenberg Lakeburg - 启示录1 Glenwald - 启示录2 Elderlicht - 启示录3 Glintfein - 启示录4 - 禁止使用无限模式! - 为每个已通关的地图截图(Swampfurt除外;如果使用无限模式,该模式会显示在胜利界面,将自动导致挑战失败) - 若在Glintfein的胜利界面中显示启示录4,已解锁启示录5,且胜利界面左下角显示【Run No 6】信息,则挑战成功。 我已完成该挑战。
Turn Based Strategy There are 2 Types of Strategy Games: Real Time Strategy and Turn Based Strategy. Do not mistake this game with RTS, although it can have a fast paced playflow. Action Points(AP) and Movement Points(MP) are the most imporant ressources. Your turn ends, when you press end turn, but your heroes ressources eventually run out, when you have no AP and MP left. You can see the range of enemies movement in their turn, if you hold Alt. Theory: You want to use your MP and AP in a way, where your hero will get out of the enemies Range at the end of his turn. Note: Please keep in mind, anyone can approach this game and yes, although that may sound trivial to some people, other people may never crossed a thought about this. Experience Codewise - Basics This section explains the code and why it is a waste, to simply take a rare (the blue one) and therefor any lower Exp Upgrades per Level Up, which will be included to all following statements of this section, if there are no more Experience Modifiers included to the equation. This is the Experience per Level Code: <ExperienceNeededToNextLevel>200 * Pow(Level, 1.3) - 200 * (Level - 1)</ExperienceNeededToNextLevel>Which means: 200 * x^1,3 - 200 * (x - 1) (x standing for Level) The Code rounds up any decimals. In order to reach the next level, you have to finish your current level in that equation. You reach Level 2, if you finish Level 1. Requirements to finish Level 1: 200x(1^1.3)-200x(1-1) = 200 Exp Requirements to finish Level 2: 200x(2^1.3)-200x(2-1) = 292,46 Exp => 293 Exp (Also the Percentages are rounded up, too, as pretty much everything in the Code does.) Level Exp. to finish current Level Total Experience to finish Level Exp. to finish next Level 1 200 0* 147% 2 293 293 149% 3 435 728 85% 4 613 1341 62% 5 821 2162 49% 6 1055 3217 41% 7 1310 4527 36% 8 1586 6113 31% 9 1880 7993 28% 10 2194 10184 25% 11 2517 12701 23% 12 2858 15559 21% 13 3213 18772 20% 14 3581 22353 18% 15 3961 26314 17% This is how the Spreadsheet works: https://cdn.discordapp.com/attachments/741679195599405079/1096121633976102992/Explanation.jpg *Not accountable, due to the fact, that the first Exp. Upgrade is available with having the first Level Up. Given: Level 11 Hero; Finishing Level 11 = 12701 Total EXP needed; Rare (Blue) Exp. Upgrade = 20% Additionals: Finishing Level 12 = 15759 EXP Total; 3 Heroes (Because, if you do a Solo Hero Run, you will get to very high Levels, so we are strictly talking about an average run) Searched: Additional Levels per Modifier Problem: Scenario where a Hero would finish Level 11 on a run (Without Modifiers this rarely happens). Starting on First Level Up with 20%. (See Notes on Formular) Does the 20% compensate a level? Equation: 12701 x (100%+20%) = 15241,2 Total Experience Finishing Level 12 = 15559 Total EXP needed > 20% Experience Upgrade = 15242 Total Experience gained Conclusion: A rare Experience Upgrade on itself doesn't even compensate a single Level Up in an average run. Theory: I hope that I made this one as understandable as possible. If you pick (the blue) +20% Experience, you want to at least compensate that pick, by gaining at least one additional Level Up. If you watch the Spreadsheet, you mathematically compensate that pick, if you complete Level 14, because only then the Level Up needs 20% of your total amount of Experience gathered from finishing Level 13. TL;DR: 20% Exp. Upgrade on itself compensates on finishing Level 14 = On reaching Level 15. Experience Codewise - Indepth
我开设这个板块的主要原因是,有人提出升级时选择+20%经验加成的收益远超我的想象。于是我尝试用简单的数学来给出一个通俗易懂的解释。但经验相关的数学计算既有趣又令人头疼,我越深入研究其中的公式,就越深陷其中。接下来我将说明,为何在不同情况下,+20%经验加成的收益可能相当于0级,也可能相当于2-3级。

以下是可提升你的经验加成的方式: 等级提升:12%/17%/20% 元进度:5%/10%/15% 英雄特质:20% perk:求知若渴:25% 成长预兆:30% 最可靠的两种经验加成是元进度和成长预兆。【但成长预兆会占用3个槽位,因此不是一个强烈推荐的选择,此外还有另一个原因。】 获得拥有等级提升经验加成的英雄、英雄特质或求知若渴等提供经验加成的效果具有情境性。但为了对经验加成做出合理说明,我们设定总加成模拟值为160%。通过这种方式,我们将使用15%的【元进度】、25%的【求知者 perk】和20%的【稀有经验升级】,总共获得60%的加成。【求知者 perk】在达到3级时解锁,因此我们从3级开始计算。 等级 当前等级所需经验值 完成该等级所需总经验值 经验值完成下一级所需数据: 1级:200 0*(见备注) 147% 2级:293 0*(见备注) 149% 3级:435 435 141% 4级:613 1048 79% 5级:821 1869 57% 6级:1055 2924 45% 7级:1310 4234 38% 8级:1586 5820 33% 9级:1880 7700 29% 10级:2194 9891 26% 11级:2517 12408 24% 12级:2858 15266 22% 13级:3213 18479 20% 14级:3581 22060 18% 15级:3961 26021 17% 重要备注: *1. 如果你拥有【天赋预兆】,将额外获得1个【 perk点】,因此在2级时就能解锁【求知者 perk】。这意味着本表格对你不适用,你可以使用另一个表格。但如果你使用【天赋预兆】,实际上可以用【成长预兆】来替代,因为理论上:【天赋预兆】在3级时有机会获得25%的经验加成,而【成长预兆】在1级就能提供30%的固定经验加成。这就是为什么这些内容没有添加到本次模拟中的原因。 2. 此外,还有另一个重要变量,理论上我们需要将其加入到计算公式中,那就是在选择【求知者】 perk之前你已经获得的经验值数量。例如,如果你达到3级,你很可能不会正好在0/435经验值时达到该等级。因此,如果你选择了经验相关的perk,那么任何理论上提供的电子表格都会失去其说服力。在任意等级的1/435到434/435经验值区间内进行升级。这就是该变量未被添加到本模拟中的原因。 3. 我们不会在方程中添加额外的特定变量,例如: 1. 放弃除一个英雄外的所有英雄,因此该英雄比平均流程更快达到更高等级。 2. 让单个英雄获得所有击杀,因此该英雄比平均流程更快达到更高等级。 3. 尽快获得六个英雄,使英雄间分摊的共享经验更多,因此英雄比平均流程更晚达到更高等级。 4. 没有英雄拥有防御训练 perk,且所有单位都被防御塔击杀,因此英雄比平均流程更晚达到更高等级。总结:我们想对这个普通事件做出一个常用表述。 已知:5级英雄;完成5级需要1869总经验值;经验修正值=60% 补充信息:(完成6级=1055经验值)=已收集总经验的57% 公式:经验修正值=60%>已收集总经验的57% 结论:完成6级达到7级时,升级时的稀有经验加成将得到补偿。 理论:从技术上讲,选择稀有升级最终会自我补偿并体现出其价值,随着等级的提升,每级经验差会下降,再结合其他经验乘数,这种效果会更加明显。经验 - 总体说明 存在两种类型的经验
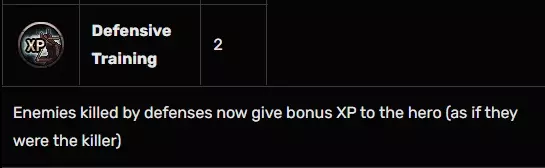
共享经验与击杀经验。 当英雄击杀敌人时,他会获得自己的那部分共享经验和击杀经验。 查看英雄经验进度的一个好方法是查看其角色面板中的击杀计数器! 像弩炮、投石机或陷阱这类防御建筑会获取击杀经验,仅将共享经验分享给所有玩家。 选择了防御训练 perk 的英雄,将获得上述防御建筑的击杀经验。 当两名英雄选择相同的 perk 时,每次击杀两人都将获得全额击杀经验。 在任何一局游戏中都不必专注于经验策略。如前所述,在大多数(但并非所有)情况下,获取适量的经验本身就能带来回报。不过,还有一个不错的经验速升策略。 酒馆会提供与你最高等级英雄等级相同的英雄。 游戏开始时选择一名经验值较高的英雄,尽可能让他获得所有必要的击杀(如果不能全部的话),这样他就能获得共享经验和击杀经验。 配合防御训练,你很可能在这个策略中不需要其他英雄。 理论:你可以让一名英雄获取所有可能的经验值来快速提升等级,从而在游戏早期就能在酒馆解锁高等级英雄。 经验值 - 实地研究与结论 为了验证我的说法,我做了一个小的实地研究。我曾有过一套不错的配置:一名英雄在3级时达到160%的经验倍率,一名英雄保持115%的经验倍率,还有一名英雄装备了降低13%经验倍率的物品,最终她的经验倍率为102%。 来认识一下: 兰普:160% 妈妈:115% 奥皮吉:102%
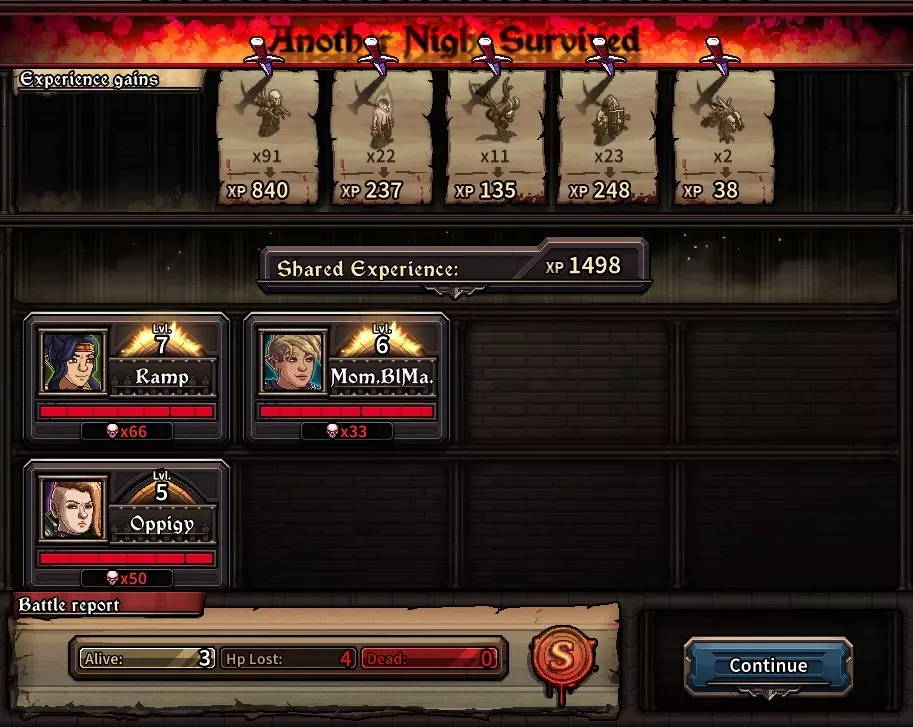
正如“深入解析”部分所计算的,英雄兰普在达到7级时,其经验加成补偿了升级所需的20点经验值。以下是与其他英雄的直接对比。 兰普和奥皮吉当时的击杀数大致相同,这使得两者的计算结果几乎完全具有可比性——奥皮吉几乎达到5级,而兰普在相同的进度下却达到了7级! 但当我查看妈妈和奥皮吉的数据时,结果相当令人震惊。 从以下截图中可以看到,奥皮吉在整局游戏中总共多获得了50次击杀,这意味着她获得的总经验值比妈妈更多。但即使是少量的13%经验值差异(妈妈115%,Oppigy 102%)也会对结果的差异程度产生巨大影响。这对最终结论来说是一个重要发现! 结果:
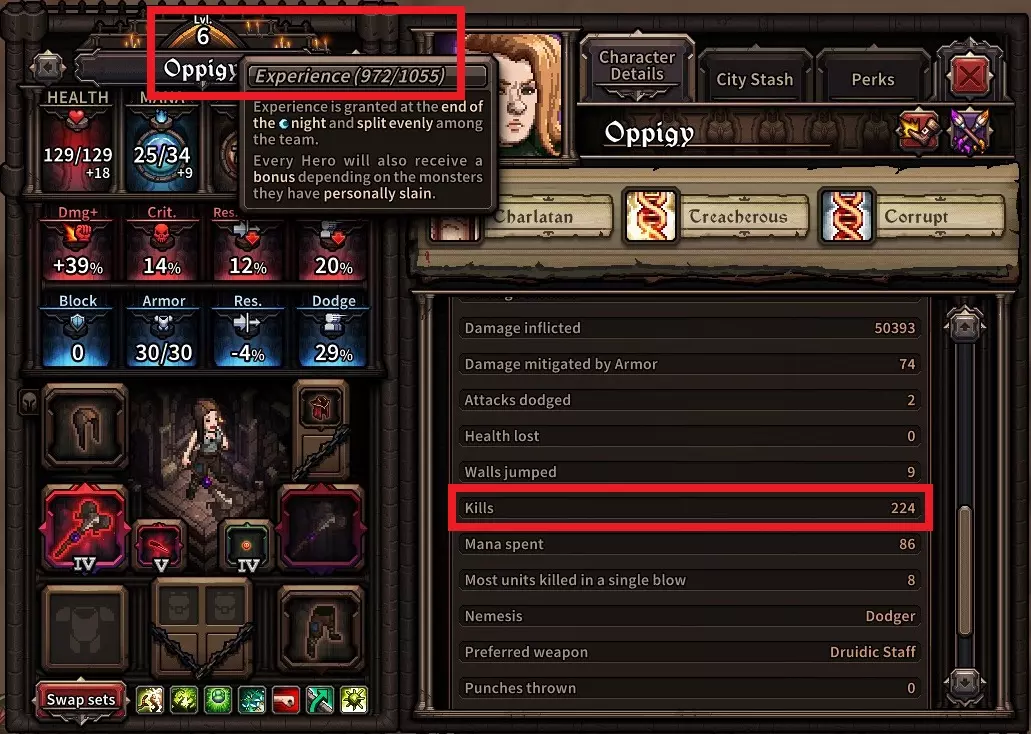
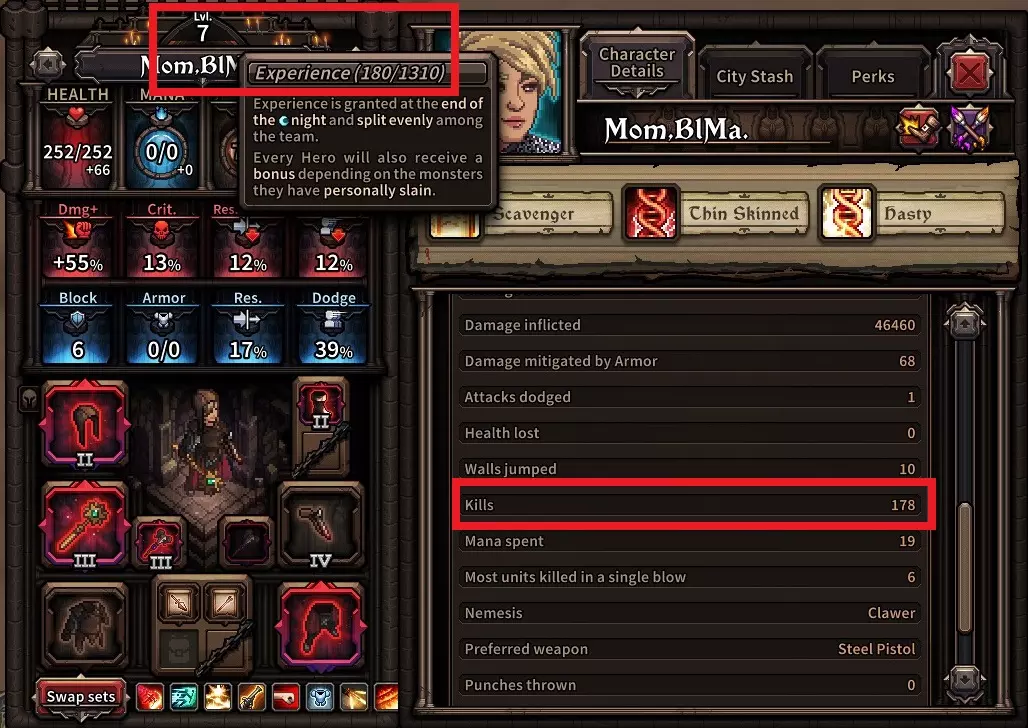
关于升级时是否值得选择经验值的问题,经验值代码分析和实地研究为我提供了两个结果和三个观察结论。 1. 结果:经验值倍率达到60%及以上的理论被证明非常有效。 2. 结果:如果将15%的元进度加成作为升级时的经验值升级项,在本研究中,该升级项能够弥补更快升级所带来的影响。 1. 观察结论:较小的数值(102%经验值)需要较高的数值(多50次击杀)才能弥补13%的经验值差异所带来的进度差距。(这对我来说仍然很有趣。) 2. 观察结论:如果某个英雄拥有较高的经验值修正,那么将所有击杀都分配给他是更好的投资。 3.观察:经验倍率越高,该策略的价值就越大。 结论:从宏观角度来看,选择经验倍率本身并不能带来补偿,但从微观角度则可以。 在微观层面上,“经验倍率能带来补偿”这一说法完全是主观的,且只有在极端情况下才会体现,例如差少量经验升级时。 在宏观层面上,当经验倍率提升至60%及以上时,真正的补偿和价值提升才开始显现。即使在像吉尔登贝格这样的小地图上,这一策略也能带来回报! 理论与总结: 单独选择升级中的+20%经验倍率,其价值相当于0级,只是在主观感受上显得有价值。 若英雄已拥有经验倍率加成,再选择升级中的+20%经验倍率,则可能相当于提升2-3级。 防御

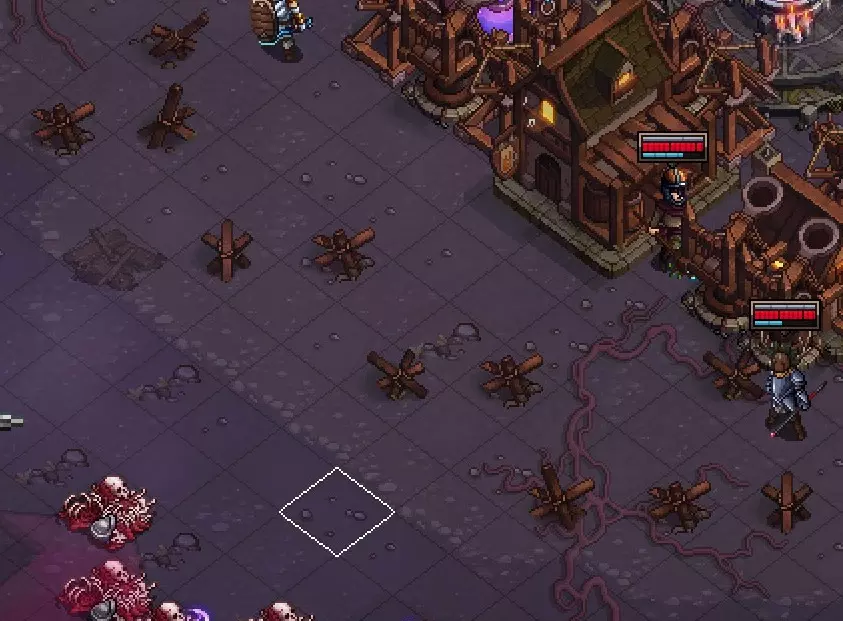
弩炮、投石机和陷阱均属于防御设施。 如前所述,若未习得相关技能,防御设施会夺取击杀经验。 在游戏初期,建议优先建造投石机,原因如下: 弩炮和陷阱无法手动操控,它们会在敌人移动结束、开始攻击前自动对敌人造成伤害。 投石机的优势在于: 1. 更远的技能范围 → 若放置在中央位置,可支援多个方向。 2. 物理伤害 → 这种伤害类型能够有效穿透护甲,为纯魔法伤害或纯远程伤害的队伍提供理想支援。 3. 中等伤害 → 你可能觉得这是缺点,但并非如此,记住:防御设施会夺取击杀经验。合理配置低生命值敌人能让该侧的英雄轻松清理它们,从而获得击杀经验。 4. 更多范围攻击 5. 手动攻击 -> 尤其是当你有需要与孤立英雄配合的阵容时,手动削弱弱小敌人可以创造完美的敌人孤立条件。即使在游戏后期也是如此。 6. 不可闪避攻击 -> 应对那些逃跑者、爬行者、闪避者和猎人的夜晚。

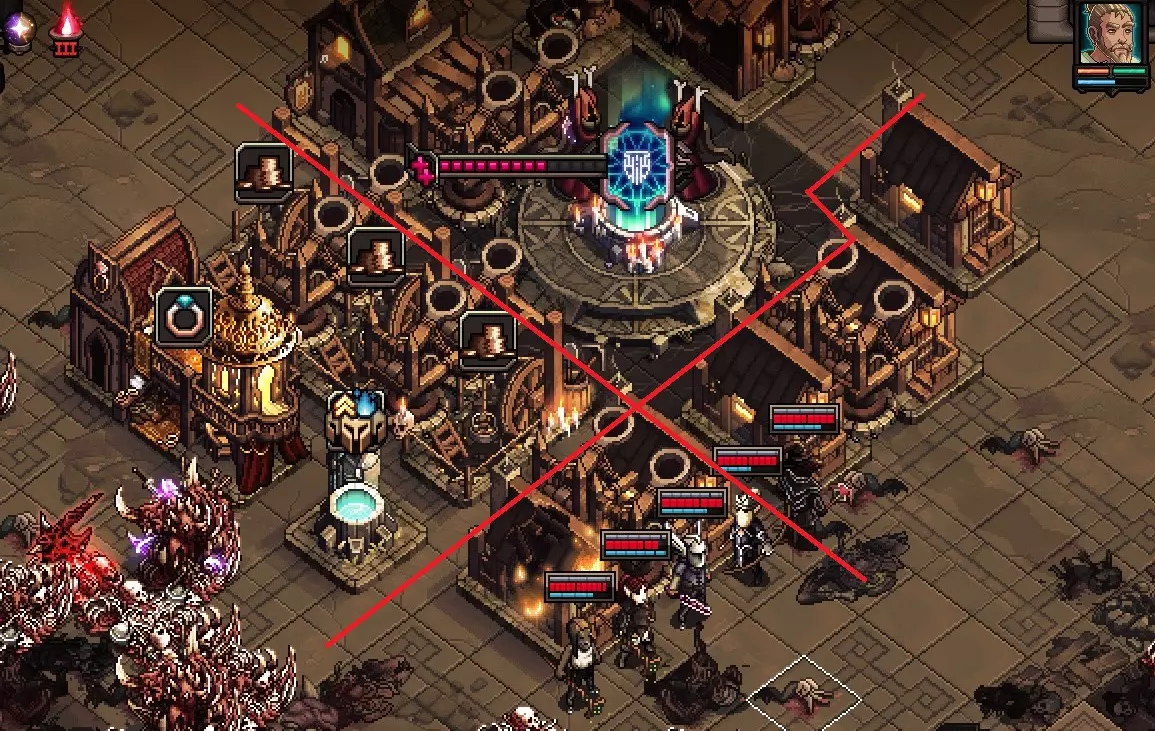
你可以在左上角看到夜晚的进度。 当你到达夜晚结束时,会显示还需要击杀的敌人数量。 一个不错的经验法则是在这段时间内使用投石机。 理论:在早期使用投石机可以让你的英雄更容易获得经验,在后期使用可以削减敌人数量,以便进行更简单的部署。 城墙 在我们开始讨论城墙之前,以下是敌人优先攻击目标的规则: 爪型敌人: 1. 攻击英雄:在2格范围内会被吸引 2. 攻击城墙:在1格范围内会被吸引 3. 攻击魔法阵:默认目标 4.攻击建筑(墙壁除外):不会产生仇恨,仅在移动后恰好相邻时才会对其进行攻击。 以下内容仅针对爪牙,但也适用于其他敌人。 基本上,任何爪牙都会选择合理的路径前往魔法阵。如果通往魔法阵的所有路径都被阻挡,它们会径直冲向魔法阵,摧毁沿途的一切。 如果英雄与敌人保持2格距离,敌人会走向英雄。墙壁则为1格距离。 墙壁有不同类型,每种墙壁都有其优缺点。(O=空地,X=墙壁)
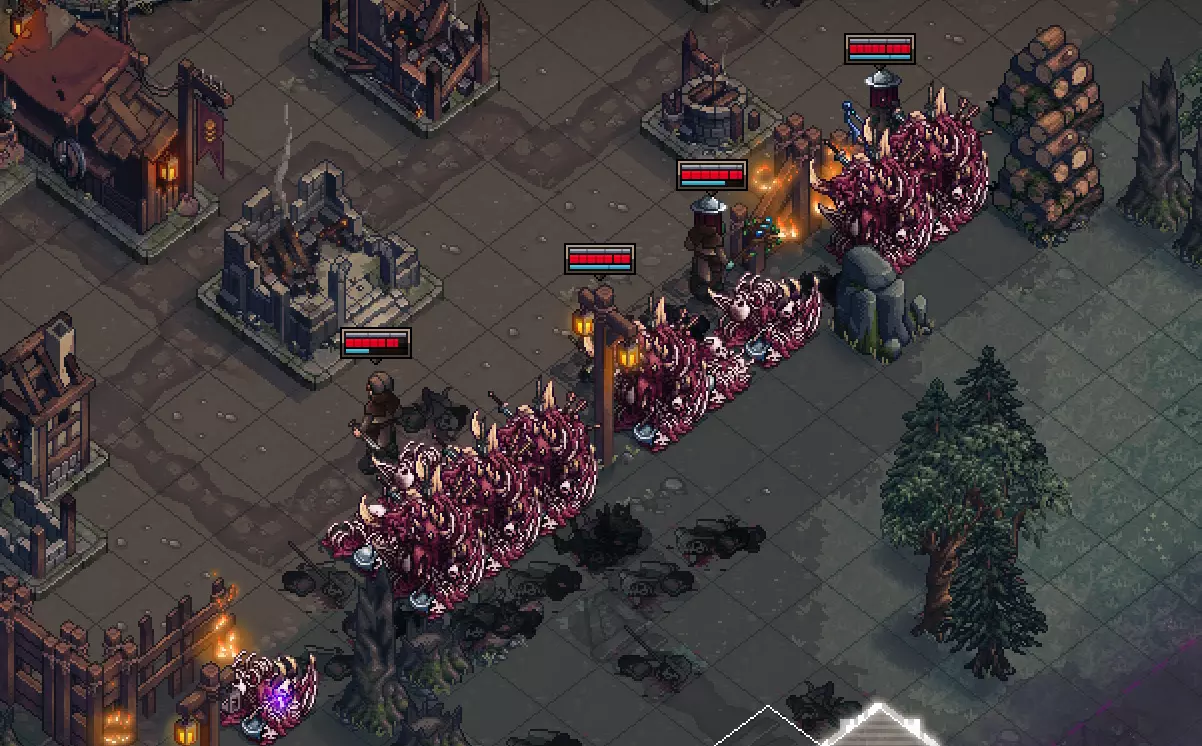
1. 墙壁 XXXXXXXX OOOOOOO 你直接用墙壁把所有东西都围起来。 + 单个近战单位攻击单个墙壁单位 + 敌人在墙壁前堆积 + 更容易生成尸体 + 完美的球体激光设置 + 零散敌人不成威胁 + 非常好的蔓延设置 + 墙壁倒塌缓慢 - 石墙会阻挡视野 - 成本高昂 - 难以进行隔离设置 - 大多数范围攻击无法正常生效 - 难以进出墙壁 - 容易受到分裂者和爆破者的范围攻击 理论:如果你不使用隔离设置,并且有有效的方法击杀爆破者和分裂者,同时能够持续获得大量材料,那么这个策略非常适合你。 但是随着难度的提升,实施这个策略会变得越来越困难。
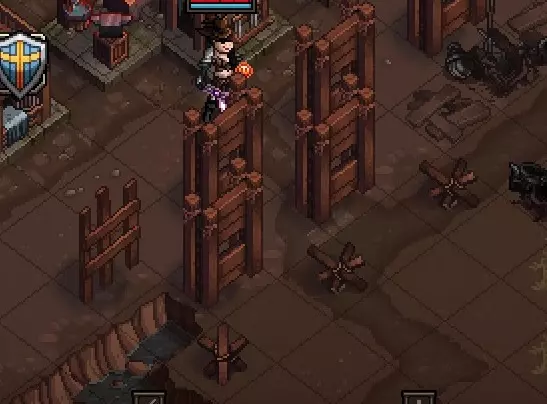
2. 国际象棋式墙体 XOXOXOXO OXOXOXOX 你以类似国际象棋棋盘的方式放置墙体。 + 成本低廉 + 可用于孤立敌人的布局 + 迫使敌人进入必须承受范围伤害的位置 + 分裂者和枪骑兵仅攻击单个单位 + 不会阻挡视野 + 飞行单位倾向于降落在棋盘区域内(有利于孤立) + 便于设置短弓手的第四技能 +/- 建议采用对角线布局 - 爆破者可摧毁最多5个单位 - 布局扩展困难 - 难以跳跃穿过 - 墙体快速倒塌 理论:这种布局的思路是让多个敌人集中攻击一面墙,从而将它们聚集在易受范围伤害的位置。同时,这也能更轻松地孤立单个敌人,以便更好地实施孤立战术。 问题在于,这样做最终会牺牲你的防御。不过,过度伤害会根据防御建筑(如路障)的剩余生命值进行数学补偿。例如:3个单位攻击1个路障:(路障生命值:)20 -(3个单位的总伤害:)300 = -270(过度伤害)。这部分过度伤害本应是对第一道墙的必定伤害。
3. 廉价国际象棋式城墙 XOOXOOXO OXOOXOOX 你以更高效的国际象棋式方式放置城墙。 + 极度廉价 + 有趣的是,敌人接近此城墙时往往会更频繁地孤立自己 + 最多3个单位会攻击同一个城墙单位 + 爆破者最多只能摧毁2个城墙 + 分裂者和枪骑兵最多只能攻击1个城墙 + 跳跃并非强制 +/- 敌人在接近城墙前会设定一条直线路径(对扩散有利/对不同范围攻击有利有弊) +/- 易于通过(对英雄有利/对敌人不利) +/- 孤立和扩散设置(这实际上是个人偏好,取决于这是优点还是缺点) - 城墙倒塌速度极快 理论:国际象棋式城墙至少具备一定的城墙功能,而廉价国际象棋式城墙虽然只是个玩笑般的城墙,但它确实是城墙。有时候,当材料少到令人担忧时,一堵能充当【国际象棋墙】的墙总比什么都没有强。这堵墙救我的次数多得超乎我的想象。 【维修通道】 我是在Ic0n Gamings频道发现这个绝妙策略的。他的想法是建造一个所谓的“维修通道”,以便更好地通往其他区域。
伤害代码层面
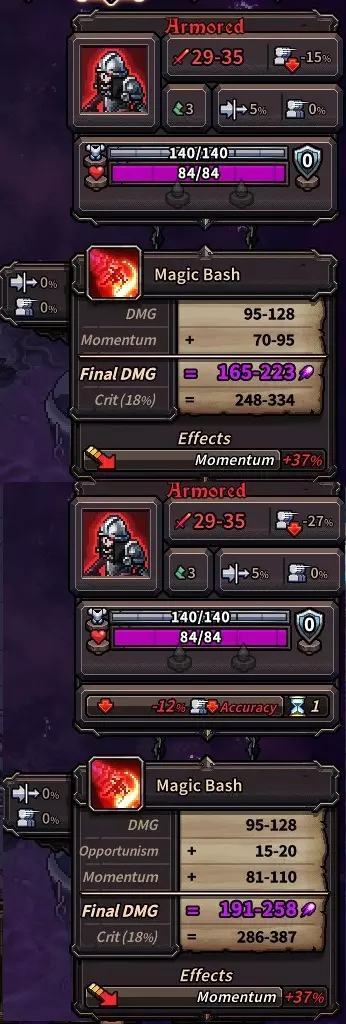
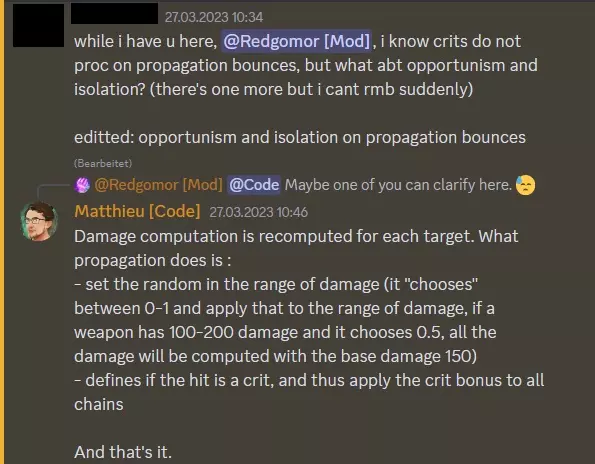
在讨论造成伤害时,有许多因素会影响最终结果。伤害的计算方式是乘法叠加而非加法叠加。以下是代码层面的伤害计算公式: (【基础伤害】×【属性伤害】×【伤害】×【孤立】×【机会】×【动量】×【 perk(总伤害)】×【抗性】 - 【格挡】)×【暴击】 = 最终伤害 【名称】【描述】 【基础伤害】武器的范围伤害值。在代码层面,最小伤害值为0,最大伤害值为1。系统会在0-1之间“选择”一个数值,并将其应用于伤害范围。² 【属性伤害】是物理、远程或魔法伤害的乘数。伤害:对任何伤害类型的伤害进行倍率加成,因此是通用性最强的选择。 孤立:仅在单位处于孤立状态时触发。 机会主义:当目标身上有任何负面效果时触发³。 动量:仅在与动量相关的技能上触发。 总伤害:所有总伤害只能通过 perk( perk)获得。 抗性:对目标施加抗性会减少其受到的伤害。反之,若将目标的抗性降至0%以下,则会增加其受到的伤害。 格挡:格挡的上限为100。少量格挡有一定作用,但数值过高时效果会减弱。 暴击:当暴击率达到100%时必定触发。它会与【暴击伤害增加乘数】相乘。例如,伤害范围为100-200,系统选择的数值为0.5,那么基础伤害将为150。 四种负面效果分别是:眩晕、中毒、减益和污染。 理论上:即使是小数值也能累积成极高的伤害输出,因此当各种【伤害乘数】可用时,你至少应各选择一个。 有些人会选择所有可能提升属性的【预兆】来进行弥补。 关于暴击如何作用于【增殖】的问题,我们从代码团队处获得了如下说明:
Damage The most consistent Damage Increase is Base Damage, which is located in the Range Damage of a weapon. The Range Damage of a Wand Tier 0 is 60-80 The Range Damage of a Wand Tier 1 is 67-89 Do not fall for the trap of lucrative Damage Multipliers on that specific weapon! Wand Tier 0 has +10% Damage as an attribute: 60-80 *1,1= 66-88 Damage in total < Wand Tier 1 67-89 Conclusion: The Wand Tier 1 IS superior. Theory: You want to access High Level Weapons as soon as possible, to get superior weapons as soon as possible. Poison Damage, Potent Toxins & Hex Made by @𝐈𝐥𝐲𝐚 [Limit Breaker], now @ilyat. I went ahead and took a look at how good the Potent Toxins perk actually is, if it is worth using and when it can be a trap. The perk increases your Poison Damage stat by +100%, but reduces the amount of turns it will tick by -1. When someone is looking to use Poison damage, they do so in three ways: Is the pump and forget: you know that X amount of Poison damage in the Y amount of turns it has is able to kill the target enemy with a single cast, meaning that it doesn't matter how long it will take, just that it will be both efficient in resources and one less problem to think about. Use is as a pseudo direct damage, trying to kill the enemies asap usually the turn it is applied in. The third way of using it, which is weaken the enemy enough but not killing it, and then bringing it close so you can stack it into a Corpse Pile using direct damage. I did some calculations on where the Potent Toxins perk actually increases damage for the total duration of the Poison, and where it reduces it: Here are the hero's Poison Damage stat thresholds: 200%, with a 3 turn Poison source, using all (except Orb) available sources of Poison. 300%, with a 4 turn Poison source, using all (except Orb) available sources of Poison with the Hex perk or the Orb (without Hex). 400%, with a 5 turn Poison source, using the Orb with the Hex perk combined. If your hero's Poison Damage stat is: Lower than the threshold number using the respective source, before getting the Potent Toxins perk, your Total damage dealt will the increased. Equal to the threshold number, it will do an equal amount of Total damage with the perk, but will allow you to kill the enemies a turn faster. Higher than the threshold number, your Total damage dealt using Poison will be decreased. Some math about the equal: 200%x3 = 300%x2 which is 600%, 300%x4 = 400%x3 which is 1200%, 400%x5 = 500%x4 which is 2000% (the xMultipliers are the amount of turns the Poison will tick) Final comments about Poison and how I see it The 5 turns on Orb are not optimal in any scenario and it's already hard to utilise 4 turns, making it impossible to get proper evaluation on it, especially on Apoc 1 and Apoc 5, the former increasing HP meaning different damage thresholds for wounding and the latter increasing all move by 1 and 2 on corresponding enemies, which means you need a faster kill time, even if it's one turn sooner. There's also the fact how far the Mist is from the Haven, as if it's at the closest 1 turns is max what you can get after they come out before enemies are already inside vs max fog distance on a map like Elderlicht where Fog gets pushed by 3 compared to other maps which is 2, so you get total 12 tile difference from closest to farthest, making it more possible to tick 2 more turns, even 3 sometimes, allowing all poison sources to get full value. When reading this you can argue I didn't take into account Septic Shock and how it can stall enemies both outside & inside the Haven, making the extra ticks on poison easier to make use out of, but I went into with the context you're playing on a difficult map and on high apocalypse level, meaning you don't have much of a wiggle room to use poison on the same enemy twice without getting punished by not damaging the rest of the horde. An example is Night 6 on Glintfein where there are so many enemies that with 6 heroes and good builds it's not smooth sailing. As there are other nuances when it comes to Poison sources, Bee sting and Poison knives, like actually having the accuracy to hit the enemy and the direct damage allowing for wounding earlier etc. About spreading, I didn't mention Contagion because personally I've just shelved it after it was changed in the 0.95->0.96 betas making it unable to spread on itself, meaning getting Epidemic is whatever if you don't have the Debuff tree for Sadiat to get more Opportunism stacks. Which leans into making Poison just another debuff in an Opportunism build rather Poison build. But if you manage to do something like double cast Putrid Acid in the middle of the horde with enough Poison damage and having applied Stun, at the end of your turn those enemies will die and spread the Poison to tick into the adjacent enemies for the next turn, while also possibly stunning them, meaning you can premonish the lockdown of 12 extra possible targets with stun, which might have more value than casting Putrid Acid in 2 seperate locations, that is assuming you have enough Poison damage for it to spread to the turn you applied it to more enemies. Economy Another question that gets asked frequently, is on how to set up the best economy in a run. People tried different approaches, explaining with global progress and the payback of building a certain type of economy. The problem is, that with Apocalypse 4 the numbers do not add up anymore. (Another reason on why it is so hard to make a proper guide.) When playing through a run, I'll go with that personal plan: 1. 2 Weapon Sets per Hero 2. High Level Weapons (ideally Level 5) 3. Equipment (and sometimes lower than Level 5 Weapons) with 3.1 +Multihit, +Propagation, +AP 3.2 +MP, +Crit, +DMG 3.3 +Isolation, +Opportunism, +Momentum 3.4 Rest 4. A Teleportation Skill/Perk/Scroll per Hero Ideally you want to prioritize to get access to Level 5 Gear as fast as possible, but getting there is difficult and should be approached with the concept of "Value per Worker". If you get a Mountain of Corpses, that Mountain is worth 40 Gold + 70 Materials or 2 Items that can be converted into gold. Your workers compete against this. If you manage to consistently get Mountain of Corpses (like we discussed it in the Wall section), you will not run into this problem. This needs to be updated as Corpse Generation and Corpse Pillagin got nerfed, but the plan remains the same, you want to get a decent Value per Worker. Theory: Going with that strategy, you want to have enemies as close to the haven as possible. Building a Seer is unnecessary, so by not building it you have more Gold for your economy. But if you can't afford a decent generation of Mountain of Corpses, we have to switch to alternatives. 1. Gold Mines Gold Mines provide 40 Gold per Worker and are a direct competition to Mountain of Corpses. 2. Shop Keepers Friend You don't need to sell Items immediatly. If you wait for the max Level of the Shopkeepers Selling Price (also paired up with the Shopkeeper Omen) you can make your items worth selling. In the lategame a rare Level 5 Items Selling Price starts with 60 gold. Another reason to get to Level 5 Items as fast as possible, the value per worker will increase to 60 Gold. 3. Low Panic Level Yes, playing good is another factor for consistent Gold Income. If it means sacrificing a worker here and there to give your heroes more mana or health, so be it. Every Gold that gets compensated with low panic level is a well invested worker. A good approach on how to start an economy is to sell all unnecessary Items, get 1-2 Gold Mines up and focus on scavenging Mountain of Corpses. You want to invest a Worker on 40 Gold per Gold Mine use, to use that gold to get more workers. You can buy back Items, that you sold for the same price. So you can ideally invest your items into economy, to get gold out of the economy to rebuy your items. Having a decent Value per Worker, you straight up invest into Gear Level of any Production Building. I would put Magic Shop on top of the most valueable Production Buildings. Followed by Bowyer and Armor Shop. Then comes Weapon Smith and Jeweler. And actually while I am writing this, someone else on the discord is figuring out an economy strategy that requires 0 Workers to pull of. Meta Progression
I figured, that going for the Apoc Hardcore Challenge pretty much lets you obtain 80% of all Meta Progression. The amount of Essences you'll get is insane. If you are having trouble with the game, then of course it will take more time, so priorities are the key here. You will eventually understand, that some playstyles will be better for you than other playstyles, so your priorities will differ from player to player and definitly from difficulty to difficulty. But here is, what's really important: The rarer the better. Once available, you should definitly Focus on "More Uncommon Level Up" and "More Rare Level Up", and on "More Uncommon Items", More Rare Items" and "More Epic Items" Meta Progressions. Rare Level Ups provide you access to increase AP, Propagation Bounce and Multihit Attributes. Epic Items are the most expensive weapons for you to sell in the Store. Heroes and Trivia I do not provide you a guide for a specific hero, because as of right now, the only thing that was consistent in my runs where my Poison Druids, and I don't need to tell you on how they function. All other heroes were completely different from the others and also completely situational. I had a Tome, Wand User with Propagations and Opportunism. (Which was by far the deadliest Wand User, I've ever made.) I had a Power Staff, Scepter User with Momentum and Sadist. I had a LB, Hammer User with Meteor Ring and Isolation. I had a Wand, 2H Axe User with High MP as a Supporter with Lone Wolves on each side. No, you cannot drive the same strategy every game, it is way too situational. (Except for Poison Druids...) I want to give you this approach, which still helps me a lot in my runs: 1. Get your Heroes Leapfrog and Potion Throw (Best via Omen) 2. Get your Heroes at least 10 Accuracy and Resistance Reduction (Best via Omen) 3. +10% Damage of a Multiplicator ACTUALLY IS +10% more Damage 4. +13% Experience IS NOT +13% more damage (and it hardly will be) 5. Have your 3 (or 4) starting heroes reach an efficient high level, so you can buy High Level Heroes 6. Even Heroes that seem completely useless can turn into absolute power houses, if you give them a try 7. You ultimately want to look for Kills per Action Point 8. Don't underestimate this, but averaging 1Kill per Action Point really is above average 9. Never pet a burning dog 10. Keep good weapons, especially good weapons 11. Build your heroes around your weapons, not the other way around Also here are some trivial theoretical thoughts, that I might update on a regular basis. Bosses Bosses have high damage and high resistances. Propagation bounces, if there are bouncable targets. Propagation does not bounce on isolated targets. (Except if they are diagonal and you've got the diagonal bounce trait.) Tomes 2nd Skill reduces Resistances and Damages. Having a unit stand next to a boss, does not make him isolated. Casting Tomes 2nd Skill on the boss, makes the skill bounce between him and the unit. A hero is also a unit, that can be placed next to a boss. All Debuffs can be dispelled with immunity or a Healing Potion. The Cap on Resistance Reduction is -50%. Resistance Reduced below 0% is Damage increasing. Theory: Following this strategy a Boss will get -50% Resistance and a negative alliteration, therefor guaranteing Opportunism and Isolation Modifications. Some Elites and a few Bosses have Magical Mirror. Death Denial makes your hero immune for the turn he died. A hero can die, while it is his turn. Attacking a Magical Mirror can kill the hero. Theory: Use the Death Denial Perk for Magical Mirror Enemies, to kill them without dieing. If you go with both theories that has been mentioned prior: You can manage to get a hero killed. Place that invulnerable hero next to a boss. Cast Tomes 2nd Skill on the Boss to let it bounce between him and the invulnerable hero. Cast Tomes 4th Skill on the Boss. Theory: Yes. 2. Catapults Most efficient Physical Damage Heroes require Blood Magic. In the early Magical and Ranged Damage is more effective. Both Types will have problems against Shielded enemies. Catapults deal Physical Damage. Theory: If you concentrate on Catapults first, you get easy access to Physical Damage, compensating Physical Damage Heroes Also if this wasn't obvious to you: End Nights fast, especially Boss Nights Alt+F4 Exploits What are Alt+F4 Exploits? The game does not save on hardresets, but rather has checkpoints on where the game saves automatically (at the end of a phase). Or if you manually quit the game to the main menu. You think that sounds like someone is just lazy in the code team? Wrong.

Alt+F4有哪些可利用的漏洞? 主要有两种漏洞:保存重启和技能排队。 第一种很明显,游戏会在一个阶段结束后或退出到菜单时保存。因此,当你犯错时,可以强制退出游戏,然后从上次软重置的地方重新开始。
第二个是隐藏队列。这个队列从未被完全发现,但它设定了一系列事件,如果你重置游戏,这些事件总是会重复发生。不过需要注意的是,这样做可能会导致存档损坏,所以如果你想测试的话要记住这一点。 你需要做的是创建一堆物品,记录下稀有度和属性的顺序,重置游戏,然后以不同的顺序生成物品,将队列中的稀有度和属性应用到你想要的物品上。 你也可以修改升级队列,因为它们有类似的机制。 此外,你还可以将不同的队列交织起来。但这需要更深入的探索,对大多数人来说可能过于复杂。也许你就是那个愿意报告其运行情况的人,但据我观察,目前还没有人报告过。 来源 TLS Strategies 和 TLS General Ishtar Games Discord Ic0n Gaming Letsatsis、DrakenKins 和 Tertulians 的指南 社区的理论研究和极限测试 以及维基任务组 结论 经验部分必须进行修改(几乎每天都在讨论中),已修改13次。这证明了,如果你想针对《最后的咒语》制作任何特定内容,总会发现还有其他需要解决的变量。 感谢所有在我的“启示录硬核挑战”中支持我并与我一同构建这些理论的人。也感谢Ilya/BloodSorrow对本指南的贡献。 如果你有特定问题,我强烈建议加入相关社群并在综合或策略频道提问。如果你在此评论区提出特定问题,我回答的优先级会比较低。我会努力解答常见问题,因为如前所述,这是了解这款游戏的最佳方式。 另外,如果你想引用我或本指南的内容,欢迎引用,但请注明出处。 谢谢!