换一换
换一换 


舰桥军官(BOffs)地面战斗配置指南:适用于全难度单人/剧情内容 简介 这是一份快速实用的指南,旨在帮助你组建一支可靠的地面小队,用于剧情任务。该配置成本不高,能够让你顺利通关游戏中大部分(如果不是全部)单人地面内容,无论难度如何。 在构建此配置时,我确保了其经济性。所有物品均为任务奖励,技能和专精的总花费在500-750k能量信用点之间,具体取决于交易所当前价格以及你实际需要购买的技能。 基础要点 让我们从基础开始。 舰桥军官,通常简称为BOffs,智商低得令人难以置信。他们几乎不用武器的主火力,也不会侧翼包抄敌人、避免被侧翼包抄,甚至不会蹲下以减少受到的伤害。 最后,由于AI的编码方式,所有舰桥军官会不断评估使用技能的条件是否满足。一旦满足条件,他们不会犹豫或协同,只会使用当前被判定为可用的任何技能——这往往意味着你会看到4个治疗技能都用在一个只有轻微擦伤的友方NPC身上,然后当敌人把你的整个小队撕碎时,你却不得不等待这些治疗技能的冷却时间——.-' 不过,并非毫无希望!虽然你无法教授你的舰桥军官(BOffs)战术定位,除非手动指挥他们,但你可以解决其他三个问题:正确使用武器、蹲下、过度杀伤。 蹲下:这是最容易解决的问题。舰桥军官不会主动蹲下,除非有某种效果能让他们通过蹲下获得加成——标准的蹲下+50%闪避不算在内。因此,你可以通过从指挥专精中获取“掩护”技能来让他们蹲下。“掩护I”就足够了,因为只需要该技能存在,不需要提供大幅加成。你可以在交易所花费约10万能量信用点(EC)购买教授舰桥军官该专精的手册,并在舰桥军官训练师处花费500能量信用点(EC)获取该技能。武器使用 你无法让你的舰桥军官(BOffs)好好使用武器的主火力。 不过他们使用副火力倒是没什么问题。 因此,你可以给他们配备一把副火力模式相当于主火力的武器——例如像等离子连发手枪这类基于燃料的武器(任务奖励:Iconian War -> Uneasy Allies,或在新罗慕路斯指挥部、戴森联合指挥部或德尔塔象限指挥部购买),或者任何火焰喷射类武器。
I love that pistol. Just by having your BOffs equipped with it, you’ve already more or less turned them into actual help during the battle, even without them having a single skill. OverkillWell, this one is tricky. You can't fix it as such. You can, however, work around it to a certain degree. You can avoid bringing multiple copies of the same ability and instead look for alternatives that have an identical, or similar enough, effect but a different duration and/or cooldown. WIth them not becoming ready for use simultaneously you only get overkill on the first instance they can be used in, then, after that one time, you are significantly less likely to see any more excessive use of the same ability on the same target. And lastly, you can prioritize abilities with shorter cooldowns, thus reducing the impact of 'wasting' a use of said ability. While this is not a perfect solution it does help mitigate the issue quite a bit. Theory - BOff Abilities Before I get into the nitty-gritty of the build I intend to introduce you guys to with this guide, let's talk about the theory and concepts behind picking BOff abilities and assembling a full away team. Ability CategoriesWhenever I start planning an away team setup I always mentally go through a checklist to ensure I got everything I need: Heal Disable (including knockdown) DPS Control (including Buffs, Debuffs and anything that moves or slows enemies) Let's talk a bit about each of these in more detail before I explain why I want some of each in any away team I put together. Theory - Heals These come in both Shield and Health healing types as well as in instant and over-time variants. Instant-Heals are what you want to avoid death right now, e.g. right after a major enemy attack or ability has hit one of the team so they get back to full before anything else can finish them off. The big risk with these is that not only has the dumb BOff AI a tendency to over-heal, thus wasting a lot of potentials, but they also all cast the same ability at the same time at the same target, thus having more than one of these tends to be ... situational at best. Heals-Over-Time (short 'HoT's), on the other hand, are best if you are facing many smaller attacks for some time. The slow heal will counter the incoming damage and thus give you more time to handle the situation however it requires - and time is indeed quite the valuable commodity in combat... When it comes to Shield and Health heals things are significantly easier - shield heals are almost completely a waste of space. Having a single one can help in particularly tough situations or against certain enemies, but any more is not worth it - too many effects can either nuke the shields or just bypass them directly to make them viable. Thus when looking at healing on ground you'll want to focus on health. With that being said, the most potent heals your BOffs will have access to are Nanite Health Monitor, Medical Tricorder, and Vascular Regenerator. Via the optional specializations, you also get access to Throw Regenerative Nanite Cannister, an AOE HoT grenade. Though while the Heal Grenade is quite potent I found the rest of the specialization too lacking to make it worth taking, thus ended up not taking it after some testing. Of these abilities the Nanite Health Monitor is by far the best for 3 reasons: Automation (automatically heals hurt allies near the target of the ability when they fall below a certain threshold - thus the healing can't be prevented by disabling the healer) Charges (you get 3 heals out of 1 use of an ability) Duration (the buff lasts several minutes - or until out of charges - thus even with your BOff AIs being trigger happy the ability is rarely, if ever, wasted) Besides these three major advantages, there is a fourth, more minor one as well - it is a buff and can't be applied to a target that already has that buff (? verification needed). This (should) prevent multiple BOffs from 'wasting' the ability by all putting it on the same target, thus make it a viable choice for picking more than once. Finally, you'll want a certain amount of redundancy when it comes to heals. A single BOff is too easily disabled or outright killed, thus having heals on two (or more) different entities ensures that the healing continues until the fight is truly lost (or won) and more healing would no longer matter anyways :-P Theory - Disables This category covers any ability or effect that prevents the enemy from acting. The top disables are obviously Paralyze, Stun and to a lesser degree Stasis effects (the last one less so since it is usually 'fragile' and ends if the victim takes too much damage, making it very situational and incompatible with AoE damage). Unfortunately, these three tend to be single target, are often either fragile or have a very short duration and most of them have fairly long cooldowns as well - together that makes these very potent while they last but then you're left without anything to hinder the enemy for way too long before they become available again. Fortunately, there are alternatives. Charm effects have similar duration and cooldown issues but tend to last slightly longer with a significantly longer cooldown - hence they help more in a single engagement but won't be available for the majority of the mission afterward. In my experience and testing, I have found that the two most effective means at hindering the enemy, partly because it messes with how the AI is coded, partly because it directly prevents them from acting, are staggers and knockdowns. Any effect that staggers the enemy briefly interrupts everything they do and I got the distinct impression that he AI also gets 'reset' each time, thus re-evaluating its actions when the stagger ends which in turn tends to make it switch targets and thus spread its damage over your entire away team, making it significantly less effective. Staggers also interrupt abilities with a 'charge' time, thus having at least one of these helps a lot when used on bosses to lock their nukes down - assuming you can control the ability usage precisely enough for that. The last and probably most readily available option is that of knockdowns. Knockdowns are essentially 'major staggers' and not only interrupt anything the victim was doing but also add a 'get up' animation which essentially is the same as the enemy being stunned for that duration. Yet, unlike stuns, knockdowns are readily available from loads of sources, tend to have very little cooldown, and are sometimes even part of basic attacks of certain weapons - e.g. Mortars. There is however a downside to knockdowns. While they are by far the most readily available means of disabling your enemies, it is unfortunately also the most easily resisted one and particularly tough enemies may even be completely immune to them. All in all, I found having several AoE knockdowns, e.g. from 2-3 Mortars, helps a lot against hordes of enemies like Borg or Hur'q but all types of disables work significantly less against bosses and elite enemies if they have any effect at all. Theory - DPS Abilities DPS or Damage Per Second, is technically a measure of someone's ability to deal sustained damage. In this case, I actually mean damage-dealing abilities though. DPS abilities usually came in either instant ('nuke') or dot (damage over time) variants and are either single target or hit an AoE (area of effect). Some rare abilities can affect multiple targets but don't hit an area, e.g. by chaining from target to target. I count those as AoE abilities anyways :-P Single target 'nukes' tend to have long cooldowns and, as already said, only target a single enemy. With how much STO focuses on waves of entire hordes & armies of enemies single target abilities tend to do fairly badly except during the last 30 seconds of some specific missions when you get to face the occasional boss. As a result, I tend to completely ignore single target damage-dealing abilities - at least for BOffs. AoE abilities, on the other hand, especially ones with a secondary effect, are basically made-to-order for the typical hordes of enemies one faces in most missions. The trick here is to find the ones that have a good balance between damage dealt, time over which said damage is dealt, number of enemies affected, and of cause time between uses. With those considerations in mind, there are surprisingly few BOff abilities that are worth considering - and most work best when paired with some way to slow or immobilize the enemy so they stay in the AoE for as long as possible. For me, the two abilities that stood head, shoulder and heck, even hip and knee, above all others were the Mortar, particularly the 23c Photonic Mortar, followed by the Paradox Bomb from the optional temporal specialization. The Paradox Bomb is, at least in my eyes, primarily a crowd control method that pulls all enemies into one cluster and mostly keeps them there for a time before ending with a bang - I consider it a control ability first and an AoE DPS one second simply because how effective the control is compared to the OK damage the AoE deals. Mortars, on the other hand, are basically insanely good - if they can hit the target. While their range (40m from the mortar itself) and AoE (5-10m radius iirc), as well as damage, are incredible and even the fire rate is quite good, the delay between firing and the mortar's shell impacting on the targeted location, unfortunately, means that quite often the target has already left the AoE. Hence while Mortars are by far the best DPS ability that a BOff can have in STO they do require a bit of a setup to work truly well - e.g. pairing them with a Paradox Bomb works so incredibly well one could honestly call that combination somewhat 'broken'. ;-P Note: The 23c Photonic Mortar was re-balanced to be more in line with the Quantum Mortar for Captains. This balance patch was skipped for BOffs though. Hence atm 23c Photonic Mortar outperforms Quantum Mortars for BOffs (but NOT Captains) by a very significant margin (just under 40% thanks due to the way faster fire-rate - that is for the Lt Cmd. Photon Mortar vs the Cmd. Quantum Mortar). Theory - Control Lastly, control abilities or more precisely battlefield control abilities give you that invisible edge in combat that goes beyond mere 'on paper' numbers - though they boost those as well - and are what differentiates an OK setup from an incredible one. For me, they fall into three categories: Weaken Enhancements Maneuverability Each of these has their role and a good setup has some of each of these to maximize the overall performance of the away team in all regards - instead of focusing everything onto a single aspect. The more well-rounded a setup is, the more readily it can adapt to the ever-changing conditions of the various battlefields, thus making it significantly more reliable. WeakenAny ability that reduces the enemy's statistics, e.g. damage or damage resistance, falls under this category. There are quite a few abilities that lower the (energy) damage output of enemies within quite significant AoEs by 20-60%, depending on the ability in question. It should be obvious that such an effect would make any battle significantly easier. As an engineer captain, my favorite such ability is the Neutronic Mortar[sto.gamepedia.com]. Not only does it deal the incredible damage to a large area, but it also debuffs both the enemy's damage output and their movement speed. This is by far my favorite engineering kit module in the game :-P Unfortunately, BOffs don't get access to anything quite so versatile and potent. IMO the exact ability you choose matters little, so long as you have one in your setup. I recommend browsing the STO Wiki for BOff abilities that are available based on the careers and specializations you decided on and simply pick from the available choices as suits your build. EnhancementsEnhancements are the bread-and-butter of control abilities and even of many DPS focused builds - both Captain and BOff ones alike. There are too many to list them all. However, for completions sake I'd like to list the ones I like best: Overwatch (tactical; team-wide %DRR buff with chance to expoes those that hit the team) Battle Strategies (tactical; team-wide %bonus damage buff with chance to expose those that hit the team) Strategic Analysis (command specialization, grants a team-wide buff that grows over time, enhances DRR and bonus damage for the entire team for about half a minute - imo the best team-buff in the game; unfortunately due to a bug (?) one can't sprint while providing this buff to the rest of the team when using this ability as a captain - they can spring fine though -.-') Take Cover (command specialization, allows the AI to crouch, DRR buff, HoT while crouched, all team-wide - very good defensive buff) I highly recommend taking a BOff with the command specialization along and giving them both Take Cover I and the highest level of Strategic Analysis you can fit into your particular setup - the effect of those two simply can't be overstated, even if your BOffs don't have weapons they can properly use the benefits to your captain alone are easily worth it. ManeuverabilityAny ability that either improves your ally's ability to maneuver on the battlefield, e.g. by being faster, or decreases your enemies, e.g. by slowing them, knocking them back, or pulling them to a certain location, falls into this category. They don't directly affect the damage calculations nor can their exact effect be reliably predicted with how random enemy positioning is, as such the actual impact of these abilities is almost impossible to properly determine while working purely 'on paper'. I found that being able to slow enemies is nice, but not a major benefit in most situations. A significant slow applied to a wide area/many enemies can be fairly noticeable as it makes it easier to avoid or flank them, but it is rarely decisive. Pulling enemies into tight clusters, on the other hand, is a game-changer. Not only does this make it significantly easier to move around them, either to flank them or for completing objectives, it also sets them up perfectly for AoE DPS abilities and AoE Weaken abilities to nerf then vaporize the entire lot of them. There are many abilities that can do so for captains. For BOffs though, the choices are significantly more limited. The most effective by far is the Paradox Bomb from the optional temporal specialization. I always pack at least two of those with my BOff teams, sometimes - as with this build - even more. Team Composition There are many ways to make an effective ground team. In this guide though, I'll only showcase two variations of the same build. The first one is meant for people that play through the story for the first time and want to enjoy it and its dialogue. Due to how some of the missions are scripted one needs at least one BOff of each career type for all the dialogues to show the correct person. The second one is the actual composition for when you grind story missions for their rewards, e.g. when hunting for one of the many awesome mission sets. Basic CompositionThe basic team composition is always the same: two engineers for area denial and AOE damage one scientist to heal the team and debuff the enemies and either another scientist or a tactician to buff the team and help out with crowd control

注意:我下面推荐的部分技能不属于三个基础职业(工程师、科学家、战术家),而是来自某个专精职业。要让你的舰桥军官学习这些技能,你需要先从交易所获取相应的专精资格手册(或自行制作)。目前它们的价格约为15万-30万能量信用点每个。 工程师 工程师在第3和第4插槽(分别为少校和指挥官等级)拥有相同的技能,即第3插槽的迫击炮(理想情况下是23世纪光子榴弹发射器III,因为它比量子迫击炮I强得多),以及来自时间专精的悖论炸弹II(如果能制作的话则为III)。其中一个在第一和第二槽位(分别对应学员和中尉)将拥有【不确定性爆发I】和【扩散衰减II】。

另一个的前两个槽位将配备【护盾充能 I】和【时间矩阵扩散 I】。

注意:如果你没有工程舰长,或者舰长没有装备破坏工具模块,那么我强烈建议选择破坏I而非护盾充能。当然,作为宝箱物品,它在交易所的价格不菲,但绝对物有所值! 舰载军官的迫击炮可能是其拥有的最高伤害技能。配合爆炸专家职务军官(通常简称DOff),当舰长或任何舰载军官使用迫击炮技能时,有几率额外生成两枚量子迫击炮,这能对敌人造成毁灭性打击。 使用迫击炮的另一个原因是,当敌人卡在地形或墙壁中或后面时,迫击炮通常可以无视这些障碍。因此,只要配备至少一门迫击炮,陷入敌人卡顿故障的概率几乎可以完全消除。 悖论炸弹能进一步增强迫击炮的威力,它会将敌人聚集起来,使他们更难躲避密集的迫击炮弹幕。 其他时间能力会对敌人造成伤害、减速并削弱他们,同时积累熵值,让悖论炸弹的打击更加强力。 最后,在少数情况下敌人确实向你开火时,护盾充能应该能让你(和你的舰桥军官)安然度过大部分攻击,不会有太大问题。科学家将配备医疗三录仪I、三录仪扫描I、悖论炸弹I以及纳米生命监测仪I(若能制作或从交易所购买,也可配备纳米生命监测仪II)。

纳米健康监测仪是一款优秀的全自动应急治疗装置,拥有多次充能——当它处于冷却状态时,医疗三录仪可以填补治疗空白。医疗三录仪还能让你的科学家无需触发纳米健康监测仪较长的冷却时间,就能将整个外勤小队的生命值恢复至满值。 另一方面,三录仪扫描是一种强大的减益效果技能,能够作用于大量敌人,为后续不可避免的迫击炮打击削弱敌人;而悖论炸弹则有助于将敌人聚集并压制在特定区域。 第四名船员 第四名船员的选择取决于你是想要一名战术家以体验故事任务的预期玩法,还是想要一个更可靠的选择,即再带一名科学家以获得更多治疗能力。无论你选择哪一个,他们都将拥有指挥专精,并使用该专精带来掩护和战略分析——这两个技能本身都是非常强大的增益效果,但掩护技能实际上能让你的舰桥军官蹲下,这使得这两个技能的实际影响比乍看之下要大得多。 掩护技能允许你的团队AI蹲下,提高他们的伤害抗性,并且在蹲下时,为他们提供持续治疗。 战略分析技能的强度会随着战斗持续时间的延长而增加,提高整个团队的伤害抗性,同时提供不断增长的额外伤害。 故事组合中的第四名舰桥军官是一名战术家。他们将携带【隐蔽姿态 I】、【战斗策略 II】、【战略分析 II】以及【守望 II】(或【守望 III】,如果你能制作或购买的话)。

所有这些都能为包括队长在内的整个团队提供非常强大的增益效果,从而显著提升外勤团队的表现,即便团队中大多数成员由【有限的】AI操控。 【战斗策略】能大幅提高团队的伤害输出,而【守望】不仅能显著增强团队的伤害抗性,还能让团队有机会在受到敌人攻击时,暴露并削弱其护甲。 【刷本配置】在此配置中,第四名舰桥军官为科学家。 他们将携带【隐蔽I】、【医疗扫描仪II】、【战略分析II】和【纳米生命监测仪I】(如果能制作或购买到,也可使用【纳米生命监测仪II】)。

既然我在上面已经描述了所有这些内容,这里就不再重复了,不过要提一下,在精英故事任务的某些地面战斗中,额外的治疗效果相当明显。如果一名治疗者被击晕或倒下,有一个备用治疗者会大有帮助! 让你的两名科学家都学习血管再生器技能也是个不错的主意,这样当你遇到博格或Hur'q这类大量较弱敌人时,就可以切换使用这个技能,而不是他们各自的医疗三录仪。 装备 关于地面小队的装备,我必须承认,你给他们配备的装备带来的影响相当小,除非你装备的物品除了属性之外还有特殊效果。因此,我推荐你的星舰军官团队尽可能获取以下几件装备。 装甲方面,我推荐获取杰姆哈达人装甲(任务奖励),因为它不仅拥有相当不错的属性,还能提供生命值再生,而且再生量相当可观。

地面上单纯存在一个提供百分比生命值回复的来源,虽算不上特别强力,但效果还是很明显的。若能达到100%或更高的回复加成,几乎就相当于一个小型的永久性持续治疗效果。 不过,要是能将这种回复效果与消除仇恨/吸引仇恨的方法结合起来,并迫使敌人将攻击分散到整个小队身上,情况就会变得显著不同,效果会强得多。 因此,如果你有能力为你的舰桥军官(BOffs)增加生命值回复,那将是一个相当显著的提升。但如果无法可靠地为舰桥军官消除仇恨,那么选择提供更好防御属性或直接增加生命值的装备,而非被动回复,可能是更明智的做法,你会从中获得更多收益。不过我得提醒你——这套护甲缺乏任何形式的近战防御,因此在对抗大量近战敌人,尤其是快速敌人的任务中,会比使用其他护甲时更困难一些。但值得注意的是:你已经拥有了大量的悖论炸弹、减速以及击退手段,所以这通常不是什么问题,即便面对像“家园”任务中出现的Hur'q虫群也是如此。 关于你的舰桥军官的护盾,我推荐使用罗慕伦特工个人护盾,这也是一个任务奖励。

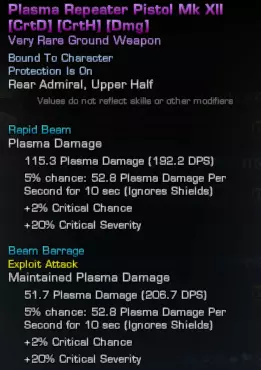
这块护盾还算不错,但在所有护盾中并不算特别出色。不过,它有一个其他护盾都不具备的优势:当穿戴者受到伤害时会自动进入隐形状态,而且冷却时间相当短,只有30秒。从技术上讲,Nakuhl护盾会更好,因为它能提供一段时间的完全免疫,而不仅仅是潜行。但遗憾的是,Nakuhl护盾的 buff 只会作用于舰长,即使是由舰桥军官触发也一样,因此对该舰桥军官毫无帮助。这使得它对舰桥军官来说毫无用处,无论它在舰长身上效果多好。因此,我选择了罗慕伦特工个人护盾。受到伤害时自动触发的隐形效果,加上较短的冷却时间,基本上能确保你的舰桥军官(BOffs)几乎持续失去仇恨,从而迫使敌人不断切换目标,将伤害分散到整个登陆小队及其宠物、随从或造物身上。这就是我为舰桥军官选择这款护盾的原因。 武器方面,正如我之前所说,舰桥军官很少使用所配备武器的主开火模式。他们偶尔会用,但极不可靠,几乎等同于不用。因此,如前所述,给他们配备主要依赖副开火模式的武器才是正确的选择。罗慕伦等离子连发手枪我之前提到的那个——至少到目前为止——是我整个舰桥军官团队的绝对最爱,而能通过任务免费获得它这一点更是锦上添花。
实际上,那件武器非常好用,我在舰长身上一直用到【声望】中期。期间我尝试了各种其他武器,但都效果不佳,最终才找到一件更适合我当前配装的武器。 装置方面,在我看来,每个舰桥军官(BOff)都应该配备两种消耗品,还有一种消耗品如果有的话也应该作为标准配置。 帕万治疗水晶 “沟通幻象”任务中的帕万治疗水晶是一种团队范围的持续治疗。单就这一点来说已经很不错了,但它的治疗量并不是特别突出。

不过,如果将其与某个能在使用医疗包时提供召唤医疗兵、护士或一级紧急医疗全息程序(EMH Mk I)机会的舰桥军官(DOff)搭配使用,效果就有些夸张了——召唤上述治疗单位的概率并非只判定一次,而是会针对水晶影响的每个目标分别判定……这意味着单次使用该水晶就能一次性召唤出一小队治疗单位。 这种组合非常出色——或者至少非常有趣——因此我在名册中始终保留一名一级紧急医疗全息程序舰桥军官和一名护士舰桥军官,并且在执行任何任务或战术舰队行动(TFO)时都会携带该水晶。让团队中的每位舰长都配备多个治疗NPC实在是个不容错过的好主意 :-P 频率调制器 这件物品可以免费复制,是任何博格任务的必备品——至少在你不使用博格无法适应的武器(例如造成动能或物理伤害的武器)时是如此。 虽然我可以在面对博格时更换舰桥军官的装备来应对这种情况,但我太懒了,因此始终让所有舰桥军官都装备一个频率调制器——这样也能确保我永远不会忘记给他们配备 ^.^ 战斗宠物 如果你给舰桥军官中的一位配备战斗宠物(例如可制作的任务奖励【Horta】),他们会在进入战斗时部署该宠物。因此,给你的每个舰桥军官配备宠物,你就能轻松在战场上获得大量额外的肉盾和一些额外的伤害输出。虽然战斗宠物的伤害输出不算出色,但它们作为可牺牲的肉盾表现相当不错,能让战斗变得轻松不少。最后,我想提一下循环呼吸器,它不仅能抵御某些环境影响,还能对抗偶尔出现的气体类技能。总结:总而言之,通过合理搭配范围伤害、群体控制以及减伤和恢复手段,游戏难度会显著降低。你的队伍几乎能让敌人永久聚集在一起,对这个绝佳目标施加大量减益效果并倾泻迫击炮炮弹,同时显著提升整个队伍的性能。他们还会凭借护盾的特殊能力自动撤退,并拥有足够的治疗能力,以恢复在上述所有情况之外受到的任何伤害。 我在多次测试中使用了这种外勤小队配置,包括多次以精英难度完成“蜂巢”故事任务。在所有这些测试中,我基本上完全没有操作队长,完全交由舰桥军官独立处理所有地面战斗。我还限制自己“原样”使用装备,也就是直接使用从各种任务中获得的装备,没有进行任何升级或重新改造以提升性能。即便在这样的设定下,我在整个任务中也只有一名舰桥军官倒下过一次——而且那是我自己的错。我过于自信,冲得比队伍太远,导致舰桥军官们不得不过度延伸到敌人中间,结果被包围,其中一人阵亡。不过即便如此,当我把他们拉回战斗边缘时,他们还是成功打赢了那场战斗。 我还没见过比这更高效又如此有趣的战斗团队呢。