换一换
换一换 


A look at the new Mirror Dungeon 6 achievements, in both Normal and Hard mode. Explanations, tips, and walkthroughs. This guide also includes general graphics to better help plan runs around status EGO gifts. Intro and Important Notes Welcome to the Mirror of Immortality. With new Achievements being phased back into runs, let's go over some best practices to help you get those clears! I will be continuing to update this guide as new achievements are added. Some of this will be a bit copy/paste from my old guide, but updates have been made where necessary. A few disclaimers - not a full guide to how to play Mirror Dungeon itself; the EGO gift images here are meant to be quick references (ie, no names are shown). For a full breakdown of what Mirror Dungeon is, how it works, and what EGO gifts do, check out Borderlined's suite of guides: https://steamcommunity.com/sharedfiles/filedetails/?id=3526253064 Like my last guide, I will be attempting to explain how to do these achievements in Normal Mode, wherever possible. However, there do seem to be more achievements that may require Hard Mode this time than there were last time. Even still, by the end of achievement rollouts, you should be able to claim the decaextraction ticket prizes without playing Hard mode if you so choose. Important Notes: For most of these achievements, you have to Claim Rewards on a run for the achievements to count as complete! Spending Starlight is one way to make many of these achievements much easier! I have been dreading how to deal with this. In general, you won't need starlight to accomplish most of these achievements. That being said, if attempting to double dip or make up for potential bad RNG, having a good amount of starlight will be VERY helpful - I doubt there will be a reason to hoard starlight, so don't be afraid to use it to make things easier for you! Clears Overview Most of these are the same as we had in the previous mirror dungeon, and are self explanatory. There are a few categories here - - Clear the Dungeon at Floor 5 or above X Times (Up to 50) - Clear the Dungeon at Floor 5 or above X Times in Hard Mode (Up to 15) - Clear the Dungeon at Floor 10 X Times (Up to 10) All of these speak for themselves. Asking 10 floor 10 clears instead of 1 is a big difference though, so it certainly encourages playing deeper into the run more than once. If you are a new player and do not have many IDs leveled, make sure you are using the Rental Teams! They are a bit limited in what they can do, but they will be a great way to double-dip with status achievements. They also are always max level, max uptie, and max EGO uptied as well - so be sure you are running them on Hard mode so they count towards the 15 clears you need! There are also a few Theme Pack achievements that are new as well. - Clear 6 Refraction Railway Theme Packs in a single Run This one is sneaky hard. The first time a Railway pack is available is floor 4. This means you MUST take a Railway pack on EVERY floor besides one, from 4 and above. Additionally, you only have 6 packs to choose from, so you MUST do all of these. These packs can be pretty brutal, so I would definitely recommend spending some starlight to help boost your power level and ego gifts as much as possible. If you start at floor 4 and never skip one, you will end after Floor 9 (but at that point you should just finish the run for other achievement progress.) On Floor 4, choose or search for Line 2: Mobius. It is currently the only railway pack that, for some reason, is not available on Floor 5+. On Floors 5-10, choose or search for one of the following packs. You can do them as they come up, or if you don't mind the possibility of rerolling things, doing them in descending order of release may be beneficial, as lines 4 and 5 can already be quite tough, fighting the envy peccatulum within with as few mounting trials as possible might make the difference. - Line 5: Merry Go Round - Line 4: Masquerade Section 4 - Line 4: Masquerade Section 3 - Line 3: MirrorClock OrangeRoad (If you have a Sinking team/gifts, you might consider moving this one earlier in the run as well.) - Line 1: MADNESS Final new one to talk about: - Clear 8 Canto Theme Packs in a single Run This one also requires a good bit of planning. Canto-themed floor packs are not enough, they must be named after the canto. Stick to the following layout and you will be fine: Floor 1: The Outcast Floor 2: The Unloving Floor 3: The Unconfronting Floor 4: The Unchanging Floor 5+: Choose From The Evil Defining The Heartbreaking The Dream Ending The Surrendered Witnessing It may be beneficial to attempt doing the more recent canto packs earlier, before enemies get too strong. Optimizing Runs A quick aside - we will need to do 10 Floor 10 runs to obtain all the achievements anyways, so it is totally reasonable to take each of these challenges one at a time. However. Because burning starlight makes a lot of things much easier, it is also a good idea to consider attempting to finish as much as possible in each run that we spend a ton of starlight on. For that purpose, we can double dip these achievements with some of the Tier 4 EGO gift achievements in the next section. If interested, check out the Advanced Combo runs section of the guide. Collection Overview This tab of achievements is split into 2 categories once again: unlocking a certain number of gifts/theme packs in your collection, and actually finishing a run with up to X number of certain ego gifts, both status and tier 4. (You also have to finish with 30+ ego gifts of any level, but this one is going to be completed on accident in most cases especially with a deep floor 10 run) We'll deal with the first category first as it as the most straightforward. First off, to find new theme packs, the theme pack search function lets you spend a small amount of starlight to choose any valid theme pack you want. You can use this, along with starting graces that give you rerolls, to easily complete the Theme Pack collection achievements. Secondly: when starting a run if Activate EGO search is on, you can start with any 3 EGO gifts at Tier 3 or below, even if you have not unlocked them yet. Because EGO gifts are added to your collection as soon as you pick them up, you can start a run, select 3 ego gifts you have not unlocked yet, and then abandon the run. This will add them to your collection but WILL NOT use up your starlight. You can repeat this method, if you wish, to fill in any missing gifts you do not have yet below tier 4. You can use this same method for fusion gifts that require 3 or fewer tier 3 or lower gifts, by selecting the 3 ingredients, playing to the first shop, fusing the item, and then forfeiting. 15+ Status Gifts Overview One of the few cases where these achievements actually became easier to do in normal mode than they were before. This is because EGO gift search lets you bring Hard mode-only gifts into Normal mode. When going for a certain number of status EGO gifts and playing in normal mode, use the selection to bring Hard mode gifts whenever possible. That way, the total pool of obtainable gifts has gone up and it will be much easier to complete the challenge. This is NOT MANDATORY to complete these achievements, even in normal mode, but it DOES help a lot and in some cases prevents certain theme packs from being mandatory to clear. That being said, searching for theme packs is cheaper than selecting EGO gifts to start with, so if you are low on Starlight, I recommend saving it. These achievements are very doable without it. Not completely free, though - In normal mode, you WILL have to either have to take specific Theme packs for unique gifts, or use the EGO gift search function in order to complete many of these status achievements. Other important general notes: If you fuse EGO gifts together, the product only counts as 1 EGO gift for the achievement. If you are going for these achievements, fusing EGO gifts for the target status will not only lower your total count, but may make it impossible to complete the achievement on a given run, since ingredients for status gifts will NOT reappear if you own a fusion that uses them. Take the difficult/abnormality encounters whenever you can. It may increase the length of the run, but getting Cost AND a free EGO gift is better than only getting one or the other. If you do happen to find yourself in an event, prioritize options that get you EGO gift quantity. If you gotta fight an abnormality to get 2 gifts instead of 1, it's worth it. EGO Gifts do not repeat. Use this to your advantage! If there are only four possible Tier 1 EGO gifts for your status, and you have 3 of them - you are better off trying to obtain that final gift by fusing instead of shop rerolling. Don't be afraid to buy trash EGO gifts in the shop for the sole purpose of fusion, especially when you are close to completing a certain tier of gift. If you select a keyword and the result of a fusion does not show your keyword, that means you have obtained all possible gifts of that Tier that can be currently fused. A related point - the results of a recipe fusion will behave as if you still own the ingredients to whatever fusion you made. (All this means is that the results of a fusion cannot be one of the ingredients to that fusion.) This can be useful to help force certain gifts. Some EGO gifts can only be obtained in Hard Mode! The wiki is not super clear about this and is also not good about showing which gifts those actually are. This guide's images will always separate out Normal and Hard mode gifts and fusion options. Don't spend Cost on rerolling too early. The deeper your run gets, the more trash EGO gifts you will have picked up, and the more likely it is you will be able to obtain what you need by either shop luck, pack rewards, or fusion. The Floor 3 shop is where I will really start to consider my options for rerolling. If you are playing on Hard Mode, and you do not have enough EGO gifts on Floor 5, continue playing into Parallel Superposition. Floors 6 - 10 will pull from the same pool of packs as Floor 5, so if you missed an important Theme Pack you will have additional chances to pick it back up. Past Floor 5, you don't have to 'win' - you can forfeit and collect rewards and still complete 'Beat Floor 5+' achievement conditions. Consider partnering these achievements with the status team loadout achievements, as those naturally fit together and help your run. Following this guide should make completing these achievements very consistent, even on Normal Mode. If running hard mode all the way to floor 10, getting 3 or even 4 of these achievements in one run is not unreasonable. Either way, I will be writing the following sections as if the player is in Normal Mode and not using gift search, but know that these are options available to you to make things easier, or if you just don't mind spending some extra starlight. Each image will include several sections: EGO gifts obtainable in Normal Mode (white text), EGO gifts only obtainable in Hard Mode (red text), and EGO gifts that are only obtainable in certain theme packs. There are also fusion sections for each of these categories, while applicable. Theme packs are labeled with two numbers or sets of numbers. Numbers in white are the floors that the pack can appear on in Normal Mode, and red numbers are the floors the pack can appear on in Hard Mode. If a Theme Pack is Hard Mode only, or if the relevant gift for a pack can only appear in Hard Mode, it will appear in red. 15+ Burn
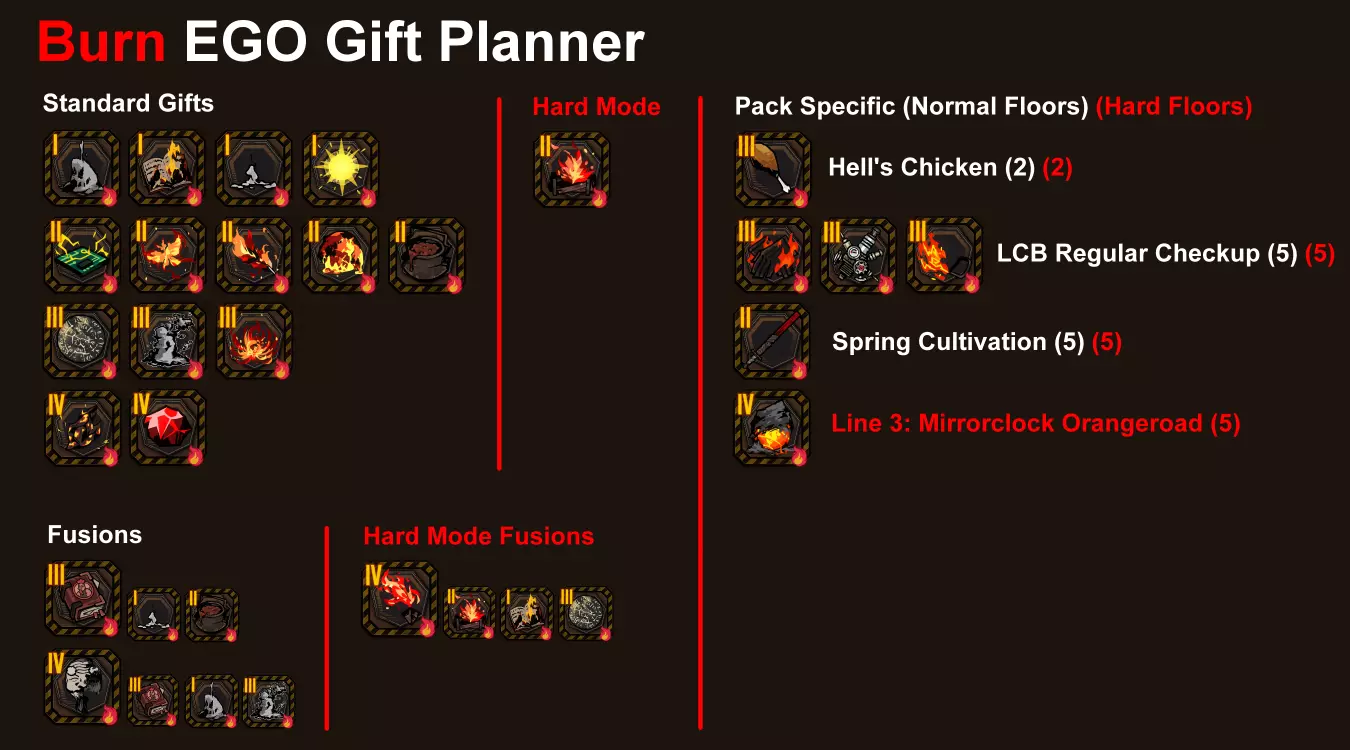
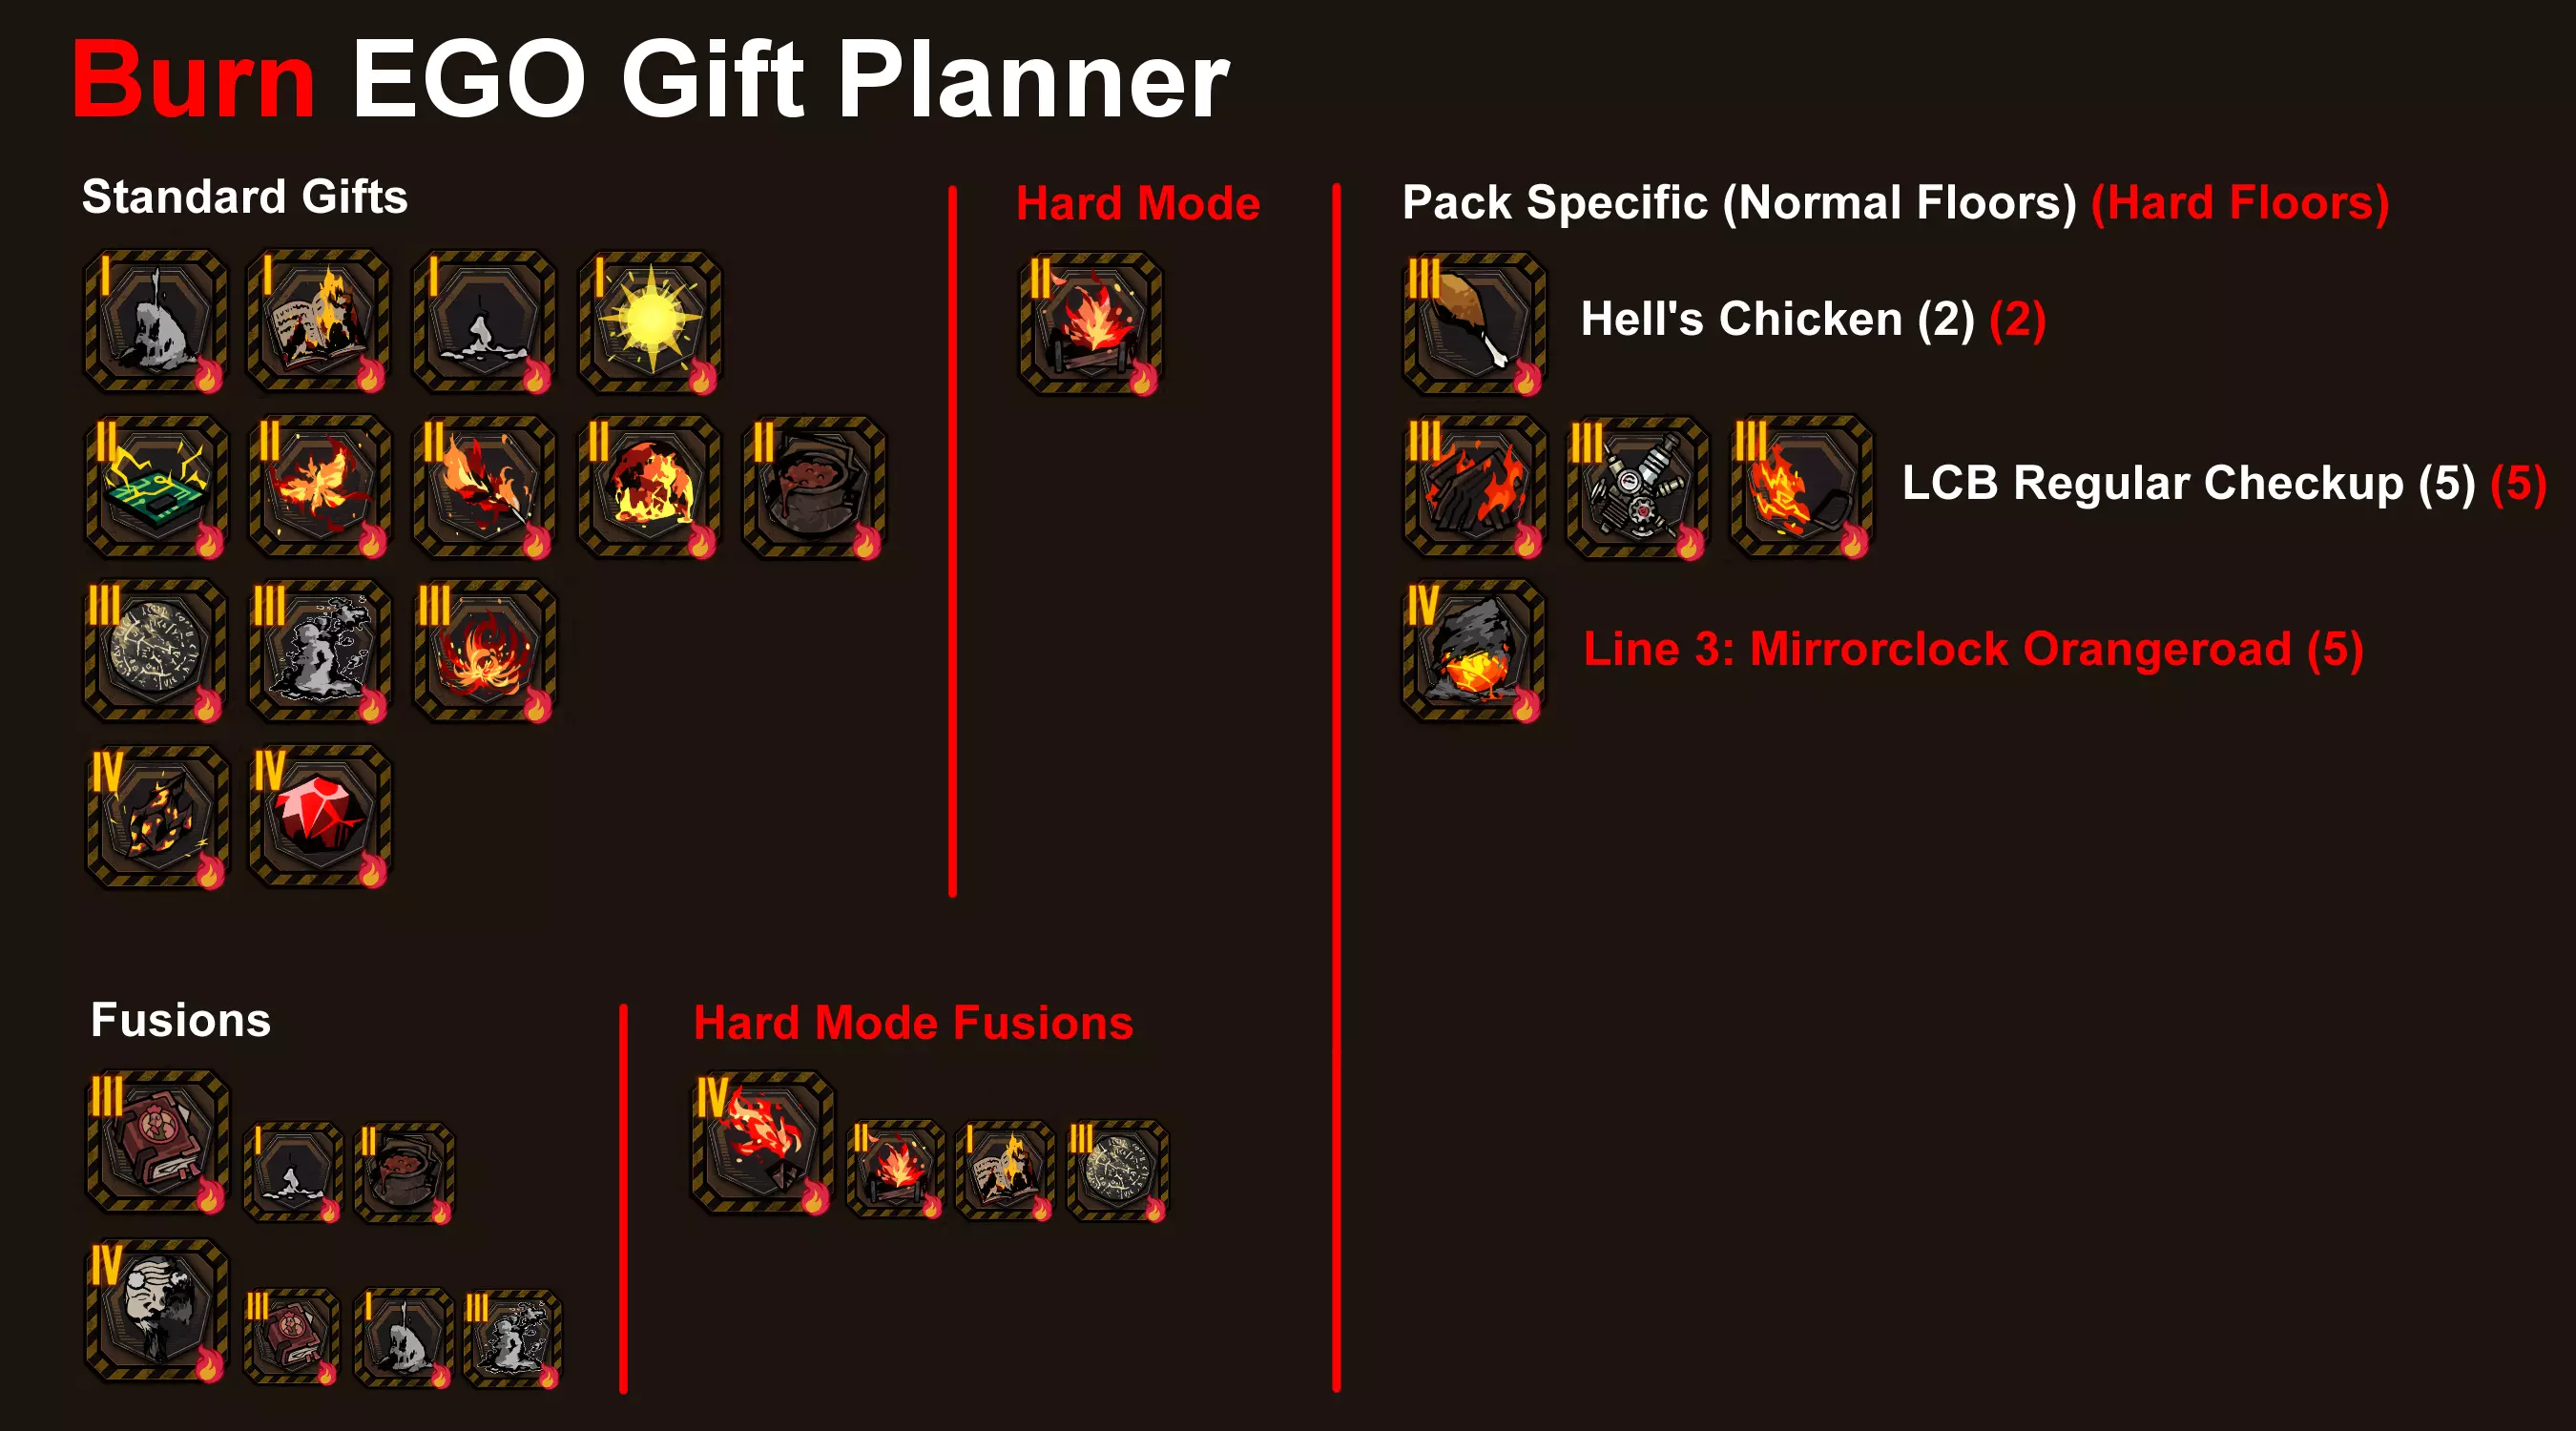
燃烧在主题卡包中的存在感极低,因此在普通模式下是较难完成的挑战之一。 优先在第二层选择【地狱炸鸡】以获取独特的恩赐。即使它未显示为卡包奖励,若选择的路线能触发该卡包的多个事件,通常也能获得燃烧恩赐。 同样,在第五层锁定【LCB定期检查】。这里的恩赐并不常见,尤其是它们均为三阶恩赐,因此进入该层时,拥有足够的费用用于商店刷新,或额外的EGO恩赐用于融合,将极为有用。事件再次成为获取保底燃烧恩赐的有效途径。若你已完成此成就,恭喜!接下来会更顺利。 15+ 流血
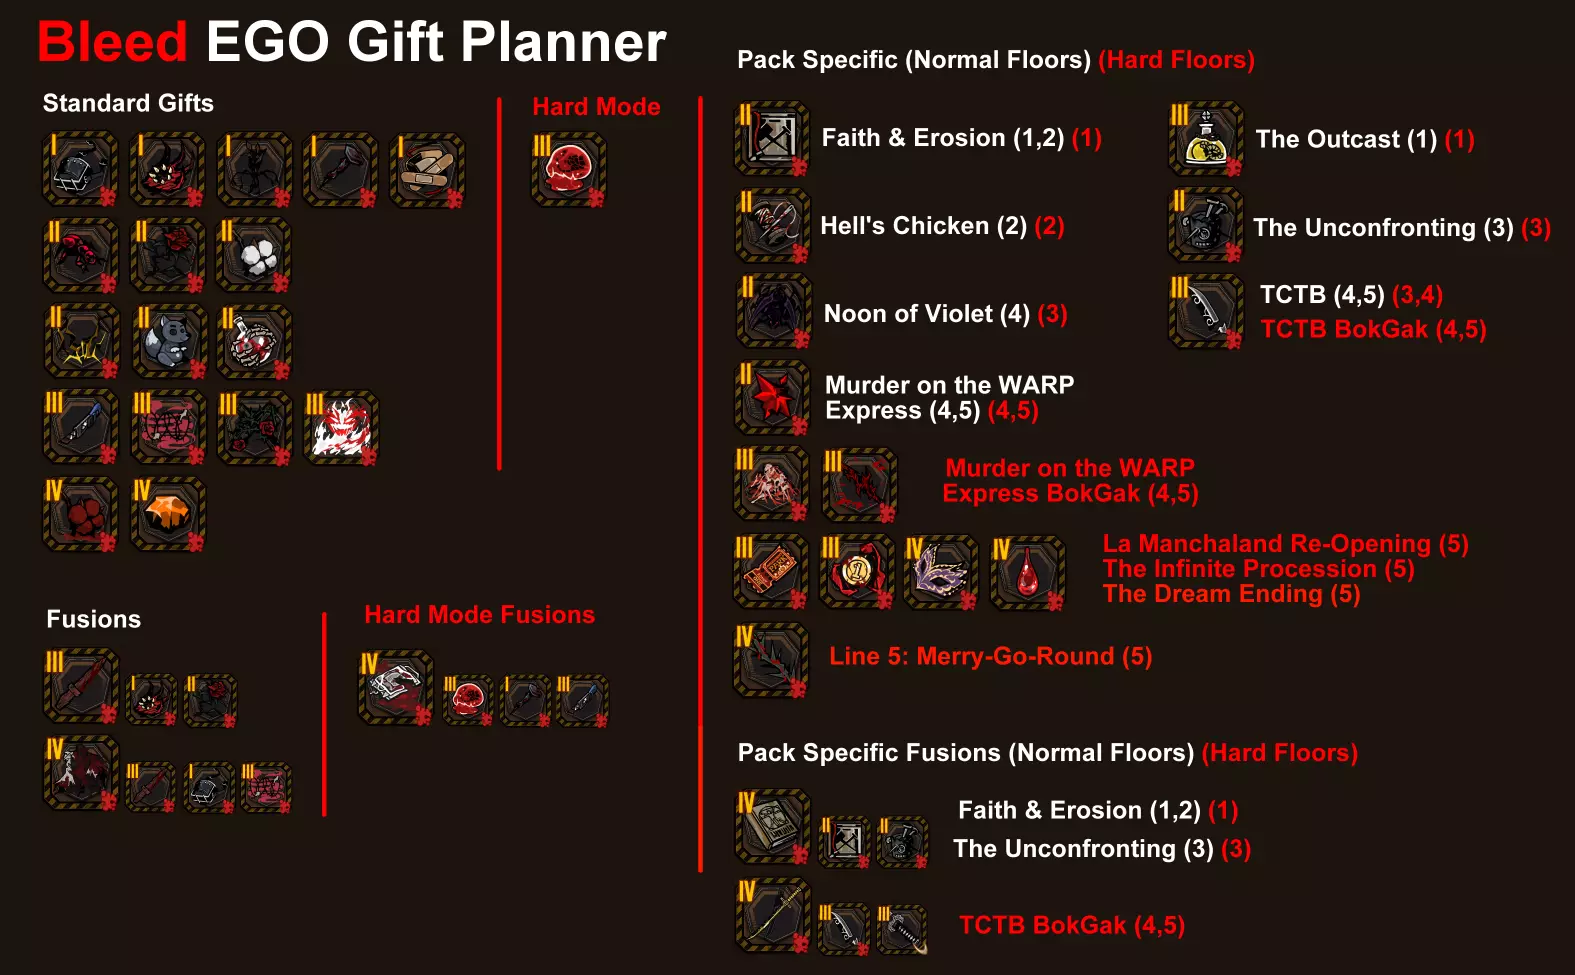
从这类最难的成就之一,到最简单的成就之一!流血类EGO礼物数量众多,这个成就很难错过。 虽然专注于标准EGO礼物没问题,但也要注意,每个楼层都有可能出现主题礼包,如果你运气好的话,其中可能包含一个独特的、必定出现的流血类礼物作为奖励。一定要专注选择这些带有独特EGO礼物奖励的主题礼包——标准礼物随时都能获得,所以要充分利用这些限量礼包! 在极限模式中,隐藏Boss战会额外掉落一个4级流血类礼物,但由于该战斗的出现是随机的,所以本部分未将其纳入,因为它不可靠。 15+ Tremor
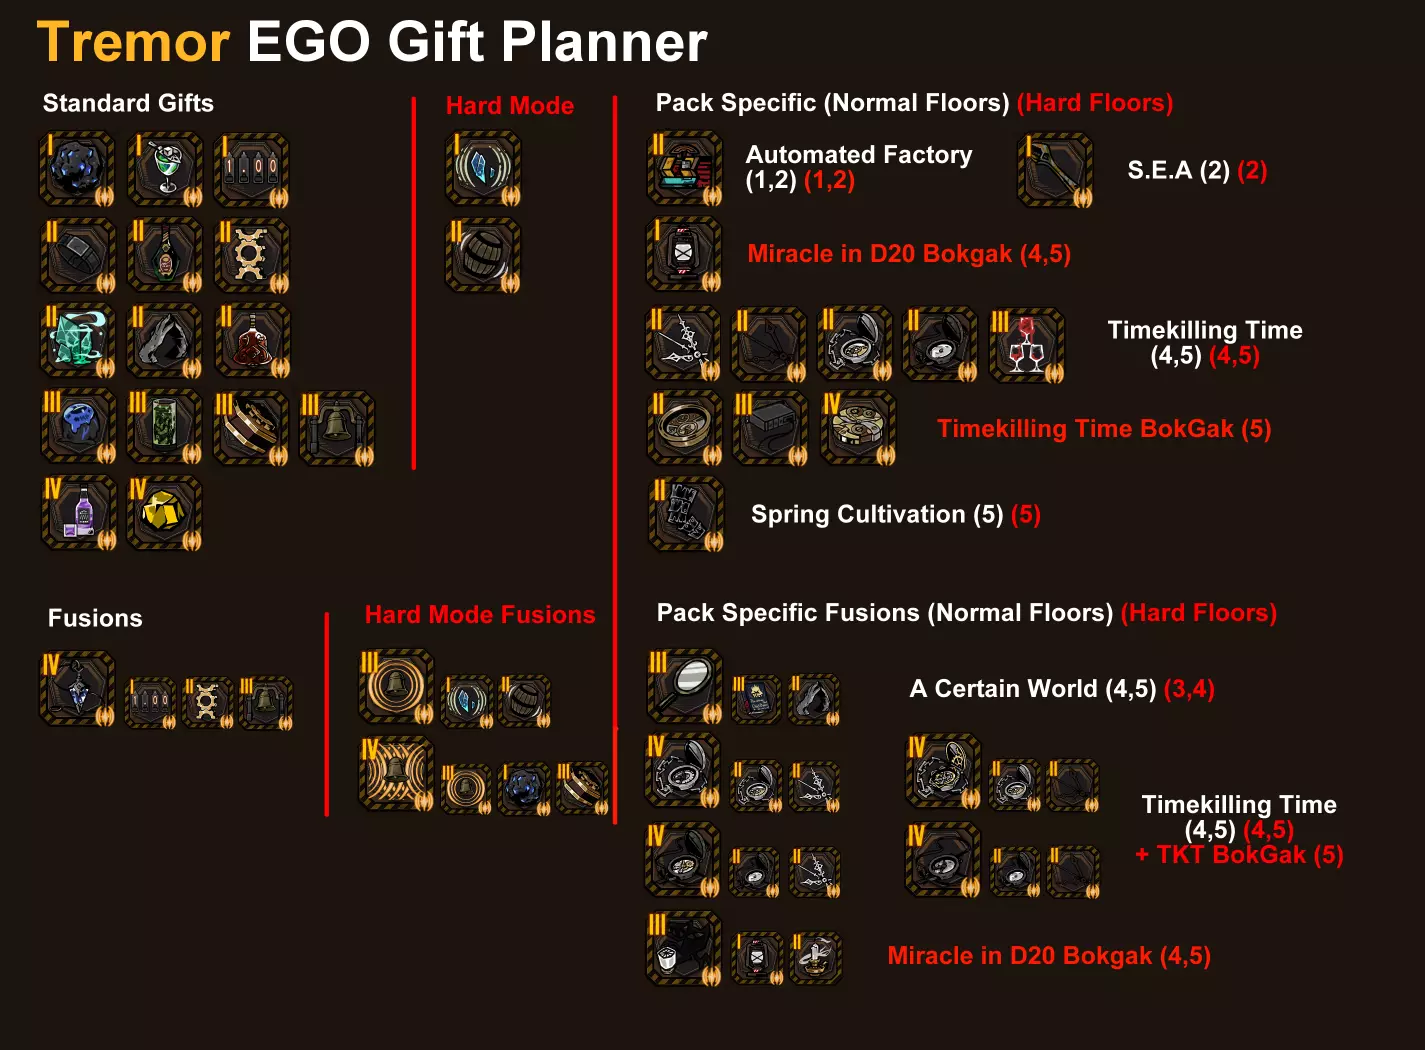
震颤这个效果很有趣。理想情况下,你可以在2层拿到S.E.A.包,但即使没拿到,【时间杀手】也是后期的秘密武器,非常实用。它不仅会出现在两层,只要有足够的重roll次数,就很有可能找到它,而且主题包本身通常包含很多能提供震颤增益的事件。在这种情况下,我会调整关卡选择的优先级,专注于获取尽可能多的事件。 在极限模式中,隐藏Boss战会额外掉落一个4级震颤增益,但由于该战斗的出现是随机的,无法保证稳定获取,因此本部分暂不讨论。 15+ 破裂
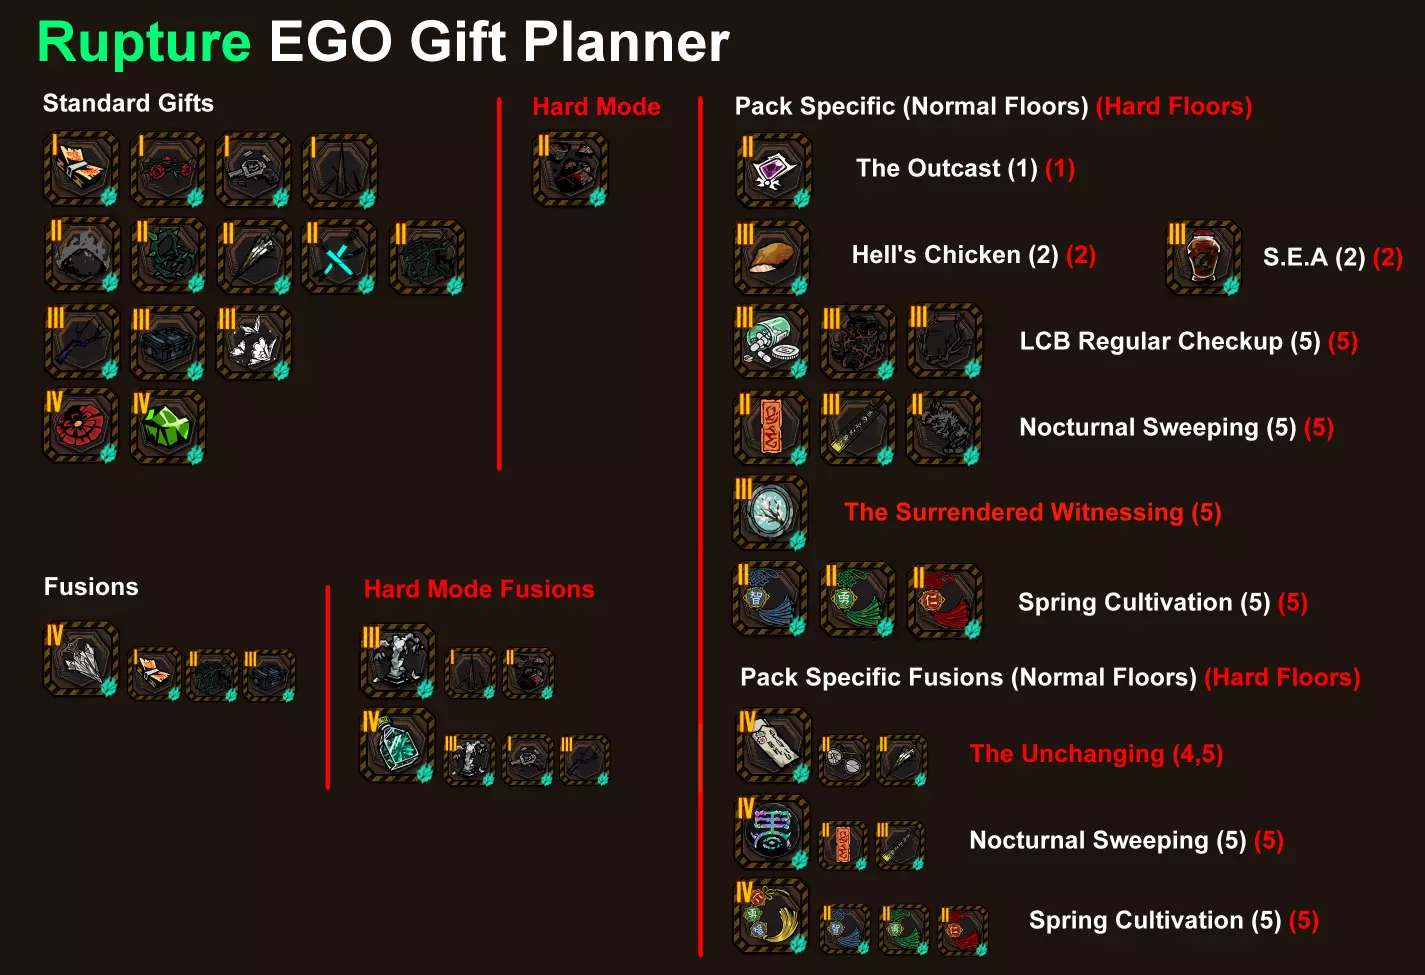
在《Rupture》中,有一个良好的开局非常重要。尽早重roll出“弃儿”会很不错。我还建议,在第二层选择时,如果可能的话,优先选“地狱炸鸡”而不是“S.E.A.”。“地狱炸鸡”更稳定,而且通常会包含一个能免费获得Rupture礼物的事件。 在第五层选择“夜间清扫”或“定期检查”是不错的备用方案,但在普通模式下当然只能选一个。不管怎样,一定要带着足够的费用进入商店,以便进行一些Rupture重roll——如果你已经有很多Rupture礼物了(你应该会有),这会大大增加独特礼物出现的可能性。 15+ 沉没值
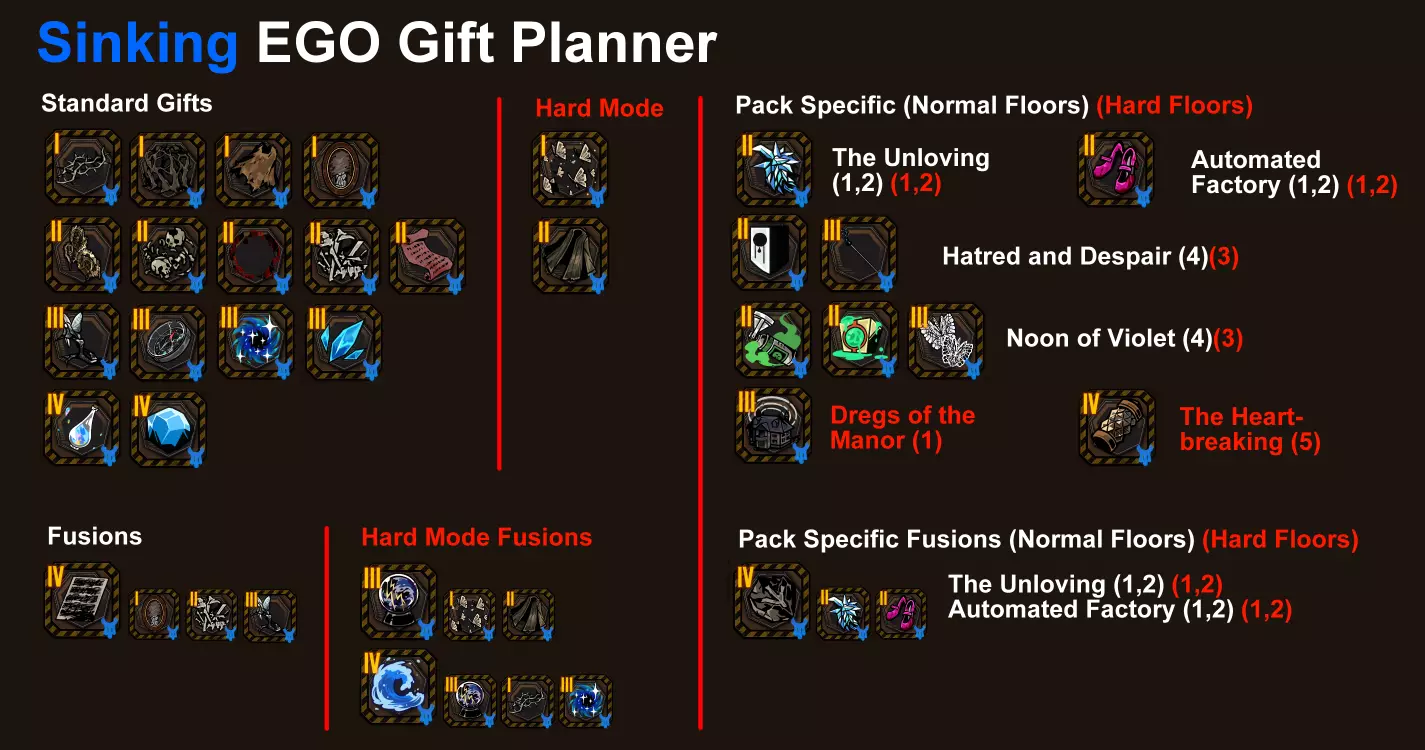
沉没相对来说比较简单。【无情】是前期的绝佳选择,而【紫罗兰正午】出现得足够晚,你很可能已经能够融合出那些恩赐,还有可能获得礼包奖励。【紫罗兰正午】的布局也很有利,有两个强制事件,这可能会让你免费获得额外的独特恩赐。如果【紫罗兰正午】没有出现,【憎恨与绝望】是不错的备选,但可用的沉没恩赐较少。 【庄园残渣】可以在普通模式中出现,但其沉没恩赐仅在困难模式中才有。 15点以上的镇定值
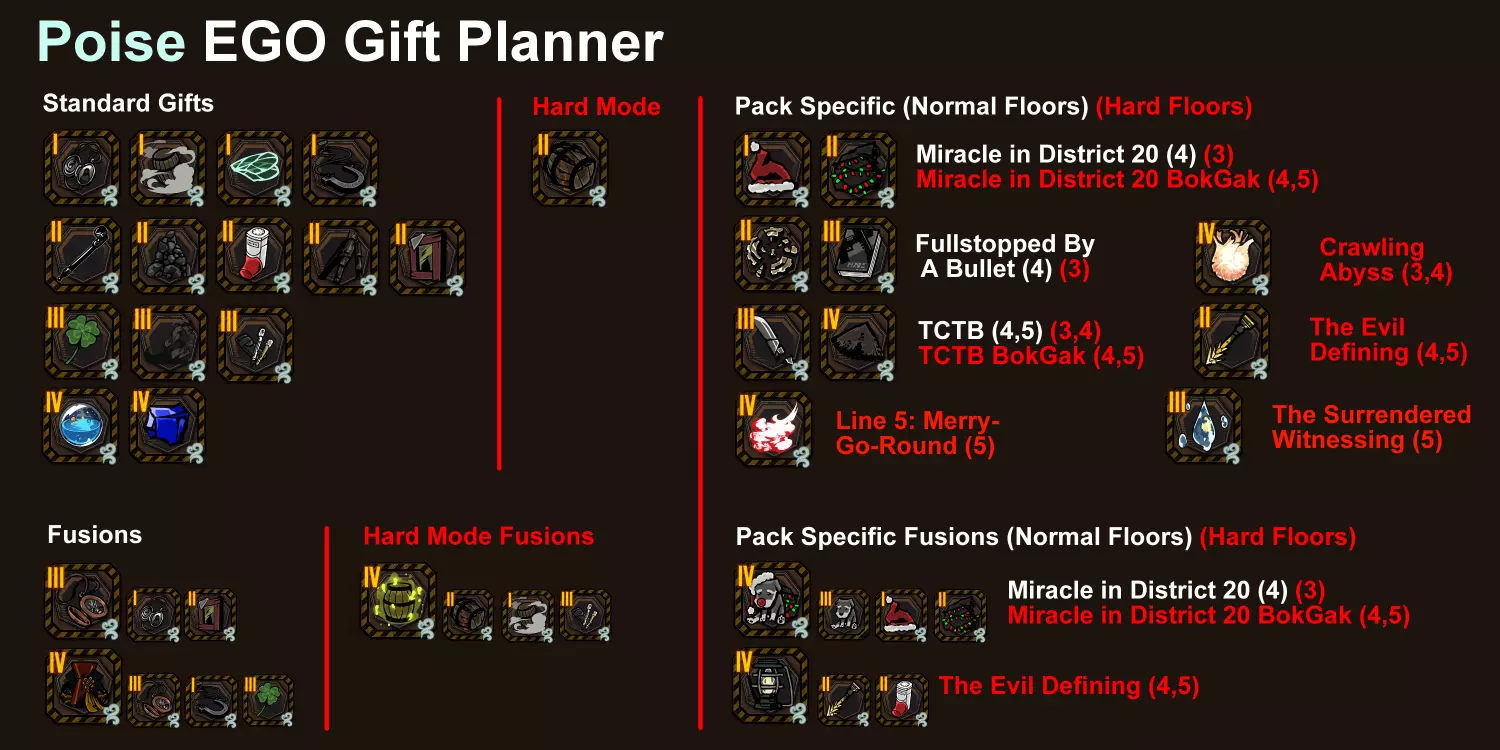
韧性在这里也有很多选择,不过有一些仅在困难模式中解锁。20区的【奇迹】可能比【饮弹止步】更高效,因为它的韧性恩赐等级较低,更容易遇到且融合起来更简单。如果这两个选项都没出现,4层的【殓骨】也是可用的,它通常会包含一个或两个韧性恩赐作为固定奖励。不过,优先选择【奇迹】或【饮弹止步】来应对4层,因为我们总能在5层把【殓骨】作为最后的备选。 虽然【爬行深渊】会出现在普通模式,但它的恩赐是困难模式专属的。 15+充能
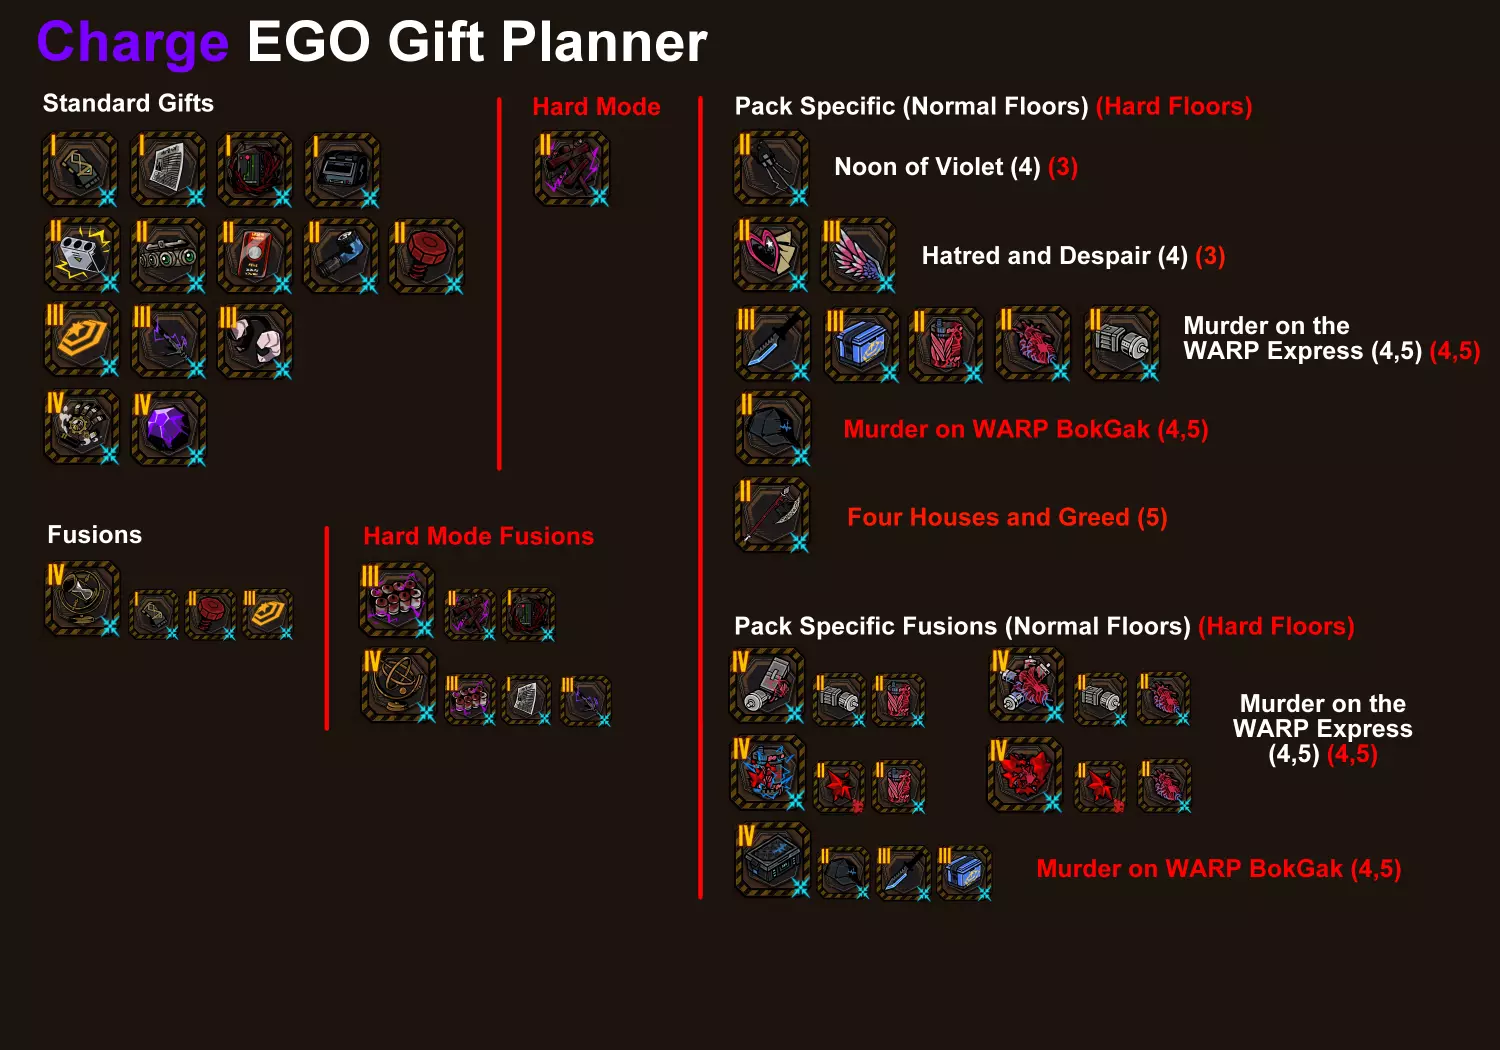
充能与震颤有一个相似之处,那就是【WARP特快列车谋杀案】是一个非常容易获取的卡包,它能提供大量充能相关的卡牌选项。【紫罗兰正午】基本上是在第四层没找到WARP卡包时的最坏选择,而你每次都应该以找到WARP为目标。(不过在困难模式下,这些卡包不会冲突。) 10+钝击/穿刺/挥砍
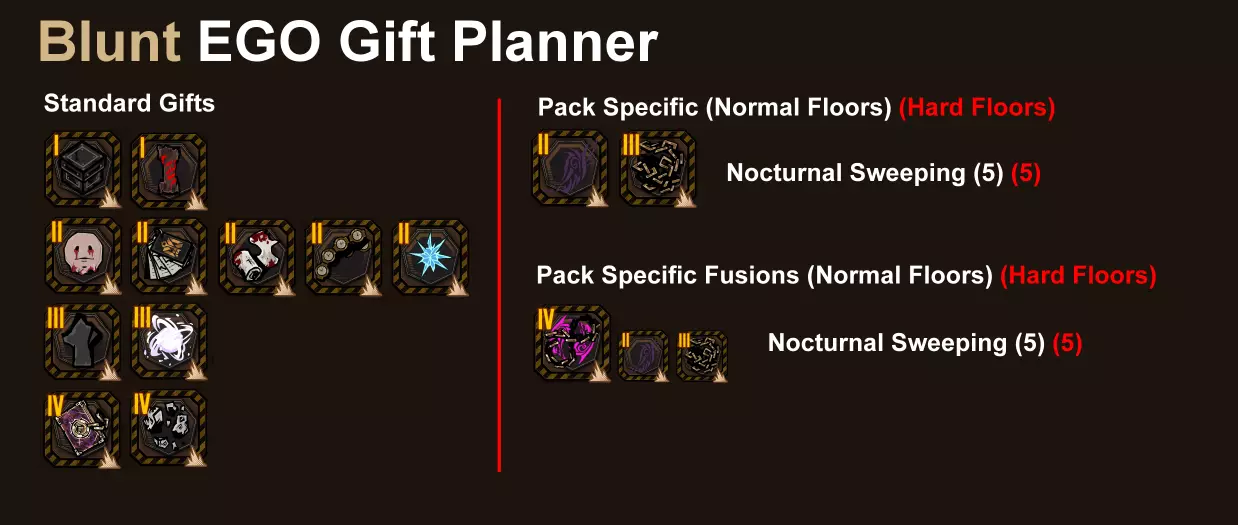
伤害类型相关的成就没那么吓人。钝击类是其中最简单的。更好的是,普通模式可以获取专门的【To Be Crushed】和【Crushers and Breakers】主题礼包,这些礼包很可能包含相关的EGO礼物。虽然图表中没有显示,但在普通模式下,第一个礼包可在2/3层找到,第二个在5层。困难模式下,则分别在1/2层和4层。 随着【Nocturnal Sweeping】的推出,我们获得了首个特定礼包的钝击类EGO礼物。如果你难以达到10点(钝击伤害),这是一个获取额外助力的好方法。
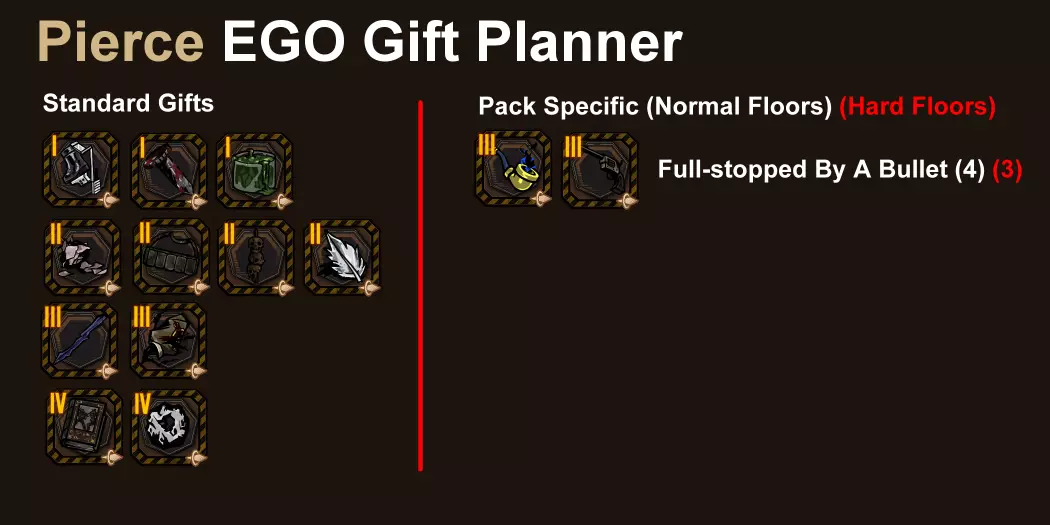
穿刺伤害同样简单,且有更多选择。按照前一节提到的楼层布局,找到【待穿刺】和【穿刺者与穿透者】主题包。此外,【Full-stopped by a Bullet】可以作为中途的补充选择。
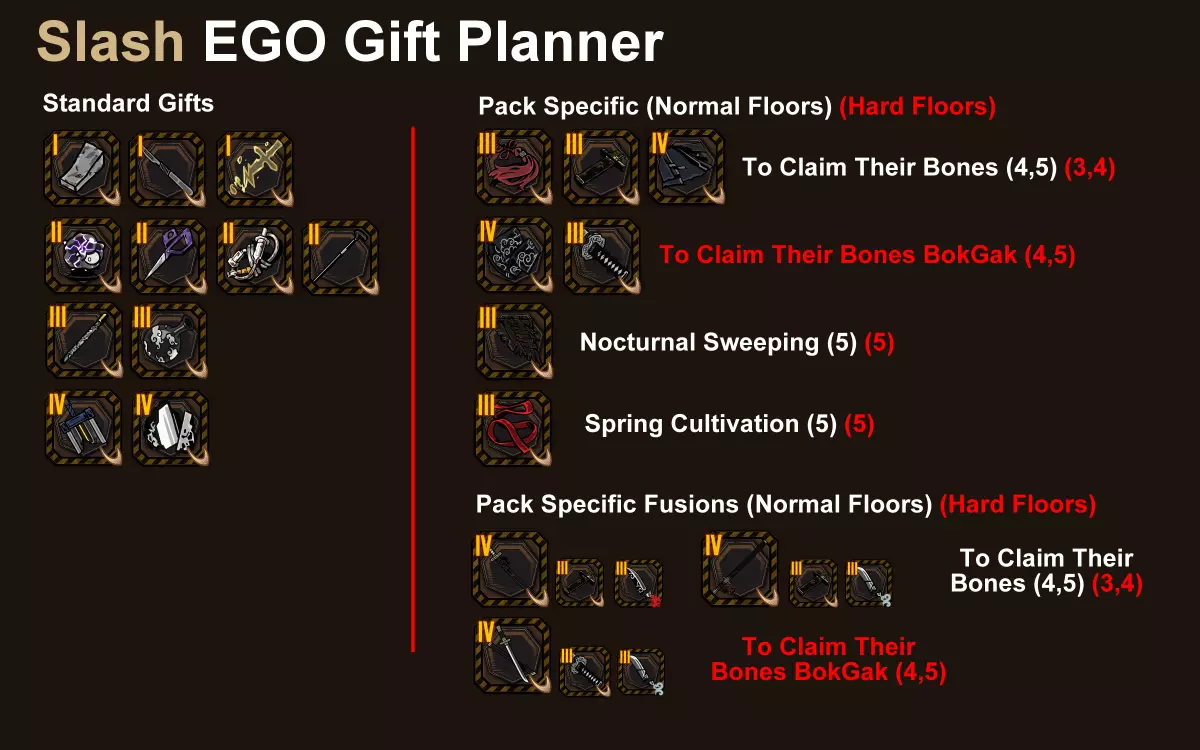
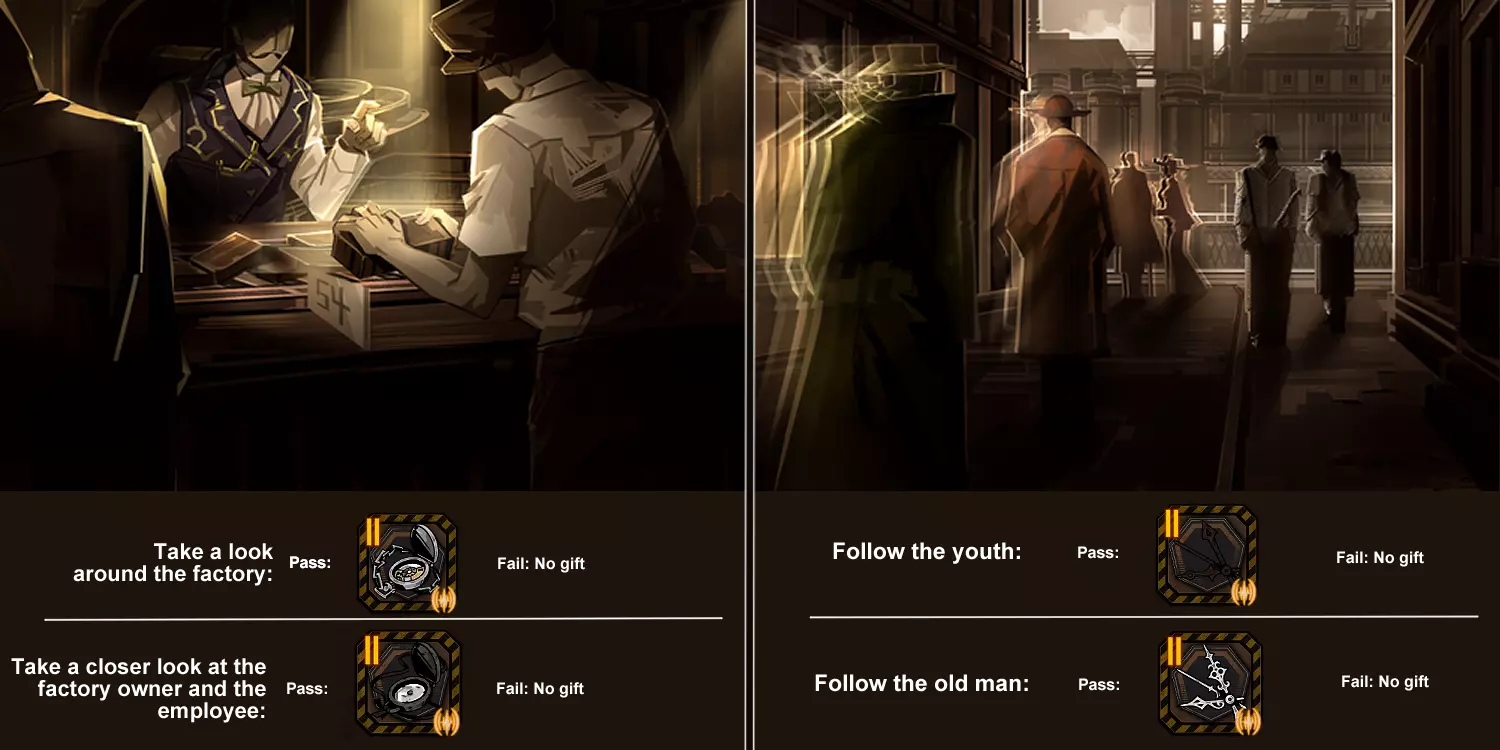
劈砍是其中最有趣的。它仍然需要10个礼物,但多亏了我们的朋友Blade Lineage,它有大量额外选项。你可以按照钝器部分提到的楼层布局来寻找【待劈砍】和【切片与切丁】主题包。(你可以在不与切片与切丁包冲突的楼层选择【夺取他们的骨头】——普通难度选4楼,困难难度选3楼。) 四级礼物概述 这些成就变得更难了,以至于最高级别的成就无法在普通模式下完成。因此,我将假设你在这些部分玩的是困难模式。成就如下: 使用20个以上4级礼物通关 使用10个以上仅通过融合获得的4级礼物通关 使用8个以上主题包融合礼物通关 重要提示:【月相记忆】和【EX礼物】不计入此成就,它们有自己的成就类别。(不过说真的,在这次通关中你不应该融合月相记忆,因为这会导致4级礼物的净损失!) 另一方面,重复的4级礼物会被计入(例如,如果你有很多【璀璨遗迹】,不需要担心将它们融合成“真正的自我礼物”,它们会按原样计数)。 为了获得4级礼物,使用有助于自我礼物的【恩赐】会非常有用,尤其是使用星光升级它们。具体如下: 【机会彗星++】会在一局游戏的不同阶段为你提供3个保底的4级礼物,并且在融合时还能获得额外礼物。 【月亮之星-商店++】初始拥有25%的概率出现超级商店。理想情况下,我们所有的融合都应该在超级商店进行,因为超级商店对融合有加成,能让4级礼物的融合消耗更少材料。这是一个非常不错的选择。 【双星-商店++】同样非常出色,它意味着你可以在每个商店购买更多礼物,每场战斗获得更多费用,并且提高在商店中随机发现4级礼物的概率。 【完美可能性++】会让你开局获得3个3级礼物,这是个不错的加成。 【星雨】总是很实用,能让你开局就拥有可观的费用。尽可能获取更多的4级礼物 首先,如果你使用EGO礼物搜索来获得额外礼物,我建议获取【Nagel und Hammer Scripters】和【Squalidity】来合成【Wholeness】,然后在1层和2层运行【The Unloving】和【Automated Factory】卡包,以获得【Haunted Shoes】和【Frozen Cries】来合成【Hoarfrost Footprint】。通常你只能选择其中一个,而这两个都是容易获取的4级礼物。从3层开始,任何提供4级礼物作为奖励的卡包都应该毫不犹豫地选择。你可以参考下一部分中关于可融合特定礼物的一些建议,但实际上,由于我们并不在意获得的是哪种4级礼物,所以这个成就的核心就是“收集两个3级礼物和一个2级礼物,将它们融合,然后对结果感到满意即可”。仅用于融合的礼物是不错的额外奖励,但并非优先事项。记住,一获得融合4级礼物的材料就立即进行融合并非必要——等到后面的楼层再融合,可以让这些材料留在你的 inventory(物品栏)中,从而阻止这些礼物在商店或其他融合中出现。持有大量礼物是提高商店重roll效果的好方法。除了融合专用的礼物素材外,你只应从商店购买3级或4级礼物。通过随机事件战斗和奖励,你会获得足够的低等级礼物来支持融合。1级礼物大多可以直接出售以获取额外的【成本】收入,因为它们无法直接用于融合4级礼物(超级商店除外!)。之前提醒过——尽可能选择困难/异常遭遇战。这可能会增加 run 的时长,但同时获得【成本】和免费的【EGO】礼物,比只获得其中之一更好。 有几个值得关注的卡包。选择有4级礼物保底的卡包,比没有保底的更好。 【To Claim Their Bones】——非常好的卡包,包含大量4级融合机会。《时间杀手》/《WARP快递》——两者都提供通过融合获取4级礼物的灵活选择,融合材料通常是礼包奖励。如果没有其他选择,可以进入其中一个并留意材料。(完整材料列表见下一部分。) 铁路主题礼包——这些礼包通常包含4级奖励或可在商店购买。5号线可能是其中最好的,因为它有多个活动有机会提供4级礼物。 此外,还有两个活动以4级礼物作为奖励。请留意这些活动,若遇到务必选择正确选项。
接下来我们将重点介绍需要融合的成就——包括通用的【10+4级融合】成就,以及【8+主题包特定】成就。 这个成就与下一部分介绍的成就搭配良好,因此遵循上述原则并选择下文提到的包,是同时完成这两个颇具挑战性成就的好方法。 仅融合礼物概述
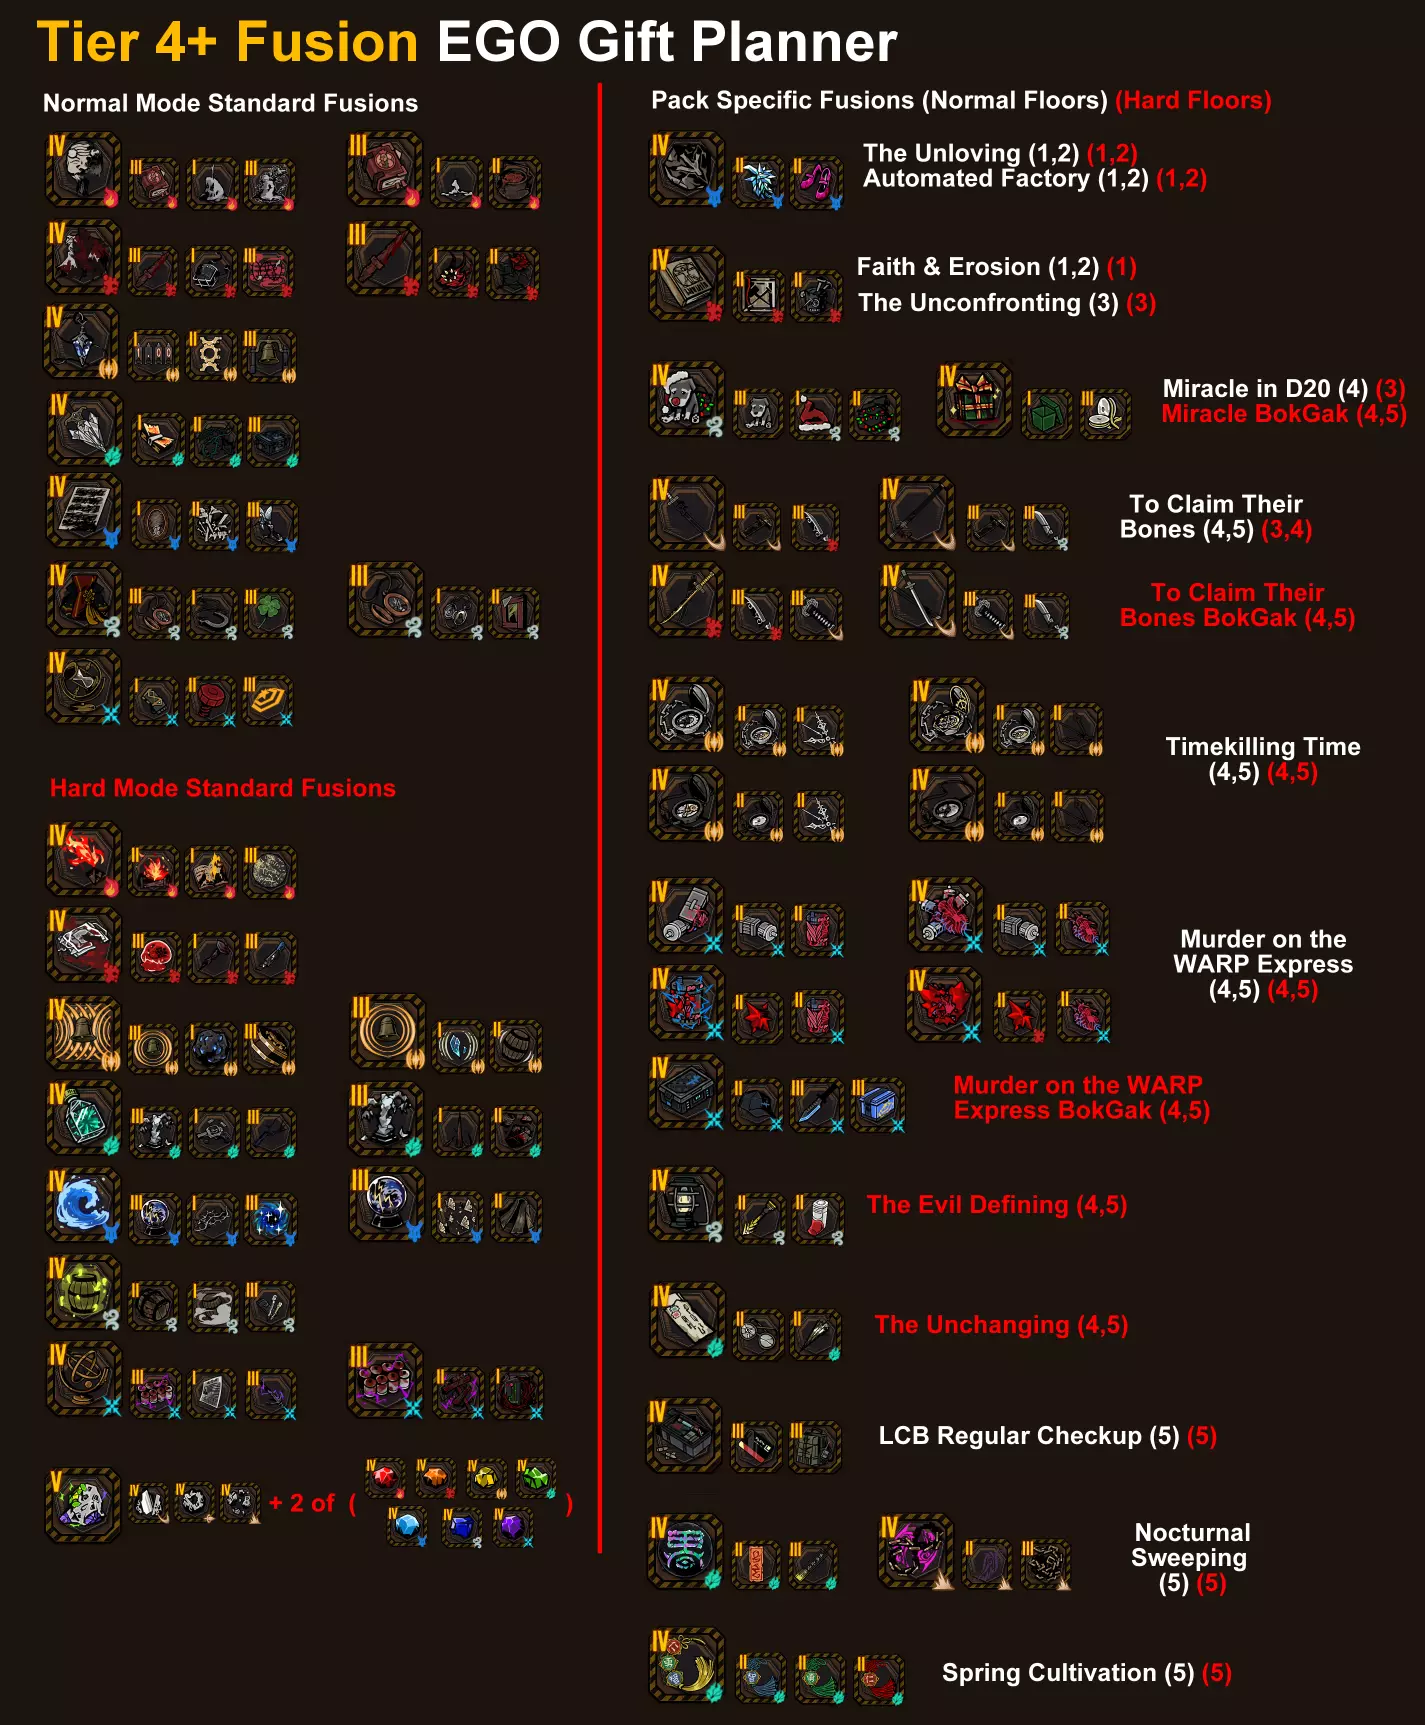
对于部分玩家来说,这张参考图或许足以让你凭经验通关。我会尝试提供一些额外帮助,但与我之前的攻略不同——之前的攻略有详细的流程,旨在帮助普通模式玩家稳定获得5个礼物——现在需要10个礼物的情况下,那份攻略已不再适用,因为在普通模式中追求10个礼物并不值得,而且我怀疑如果不大量消耗星光并依赖随机数生成,甚至根本无法实现。不过好消息是,现在我们有额外5层楼可供操作,还有强大的星光技能助力,这在某些方面意味着我们有了更大的容错空间。需要记住的几个通用原则: 优先关注早期的卡包——在10层的流程中,你有6次机会遇到5层及以上的卡包,因此选择有助于提升整体实力的优质早期卡包更为重要。 博格克卡包在这里更具吸引力,因为如果你在普通卡包中碰巧错过了某个素材,之后可以在博格克卡包中获取。这一点对TCTB和TKT尤其重要。 如果你持有多余的EGO礼物,商店中就不会再出现它们,从而提高主题卡包专属礼物的出现概率。记住——礼物是在你【完成流程】时进行统计的。你不必一有机会就立即融合,尤其是在持有礼物可能有助于促成融合的情况下。 融合时也适用同样的原则。如果你拥有除1个之外的所有2阶充能EGO礼物,那么融合2阶充能EGO礼物时,你必定会获得那个缺失的礼物。在主题包中融合时可以利用这一点,这样你就能获得大量包专属礼物,尤其是在像【Timekilling Time】或【WARP Express】这类包含大量同类型礼物的包中。 我们可以尝试将其与【20+ Tier 4 gifts】和【10+ Fusion-Only Tier 4 gifts】这两个成就结合起来。在进入进阶部分讨论其他路线之前,我会先对此进行说明。 (注意:我建议尝试将这些目标重叠进行,因为它们并非太难完成——但需要明确指出的是,对于该成就而言,主题包专属融合礼物不需要达到4阶。)这类只有两个,分别是手持镜子和暗影怪物。我仍然建议按照以下指南操作,这样你就能尽可能多地尝试同时处理多项任务了。速通
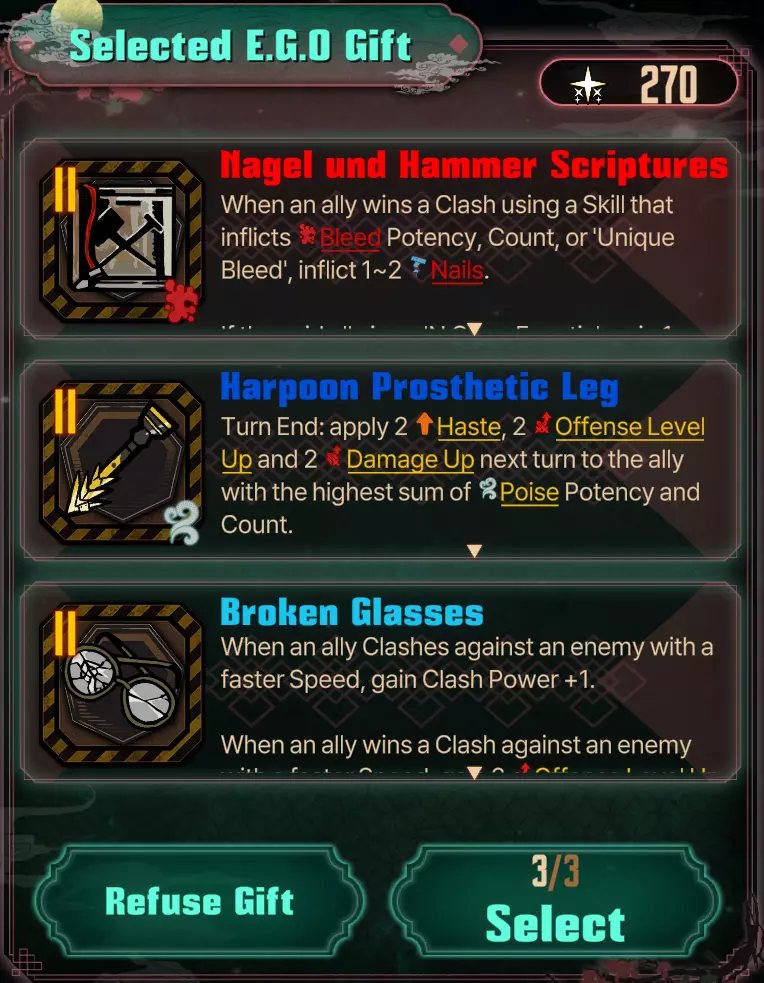
使用自我(EGO)礼物搜索功能时,建议稍后获取【纳格尔与哈默完整经文】。此外,我们可以收集【破碎眼镜】和【鱼叉义肢腿】——这是因为这些礼包中只有1个特定的融合礼物,现在获取的话,之后就可以跳过这些礼包,同时仍能获得100%的价值,因为它们可以与不需要特定礼包的通用礼物进行融合。 接下来,在1层和2层运行【无情】和【自动化工厂】礼包,获取【闹鬼鞋子】和【冰冻哭泣】来制作【白霜足迹】,这能完成另一个简单的融合。在3层,选择【回避】以获取【污秽】,从而完成【完整】融合。从第4层开始,尝试使用卡组重roll来寻找前文提到的剧情卡组,尤其是那些包含多种可融合礼物选项的卡组。 继续推进时,务必购买所有能找到的状态融合素材,特别是那些只需3个物品就能完全合成的素材。在清理卡组时,尽量优先处理事件和异常/困难战斗,以获取额外的EGO礼物——再次强调,持有礼物越多,商店中出现的礼物就越少,我们找到目标礼物的可能性也就越大。由于我们正在进行困难模式,会解锁更多4级状态融合,所以要仔细查看是否有有用的内容!一般来说,在早期楼层,我不会在商店上使用超过1到2次重roll,以保持成本在可控范围内。 选择楼层时,如果你没有主题包重roll次数了,不要害怕使用星光来搜索剩余的有用包之一。 作为最后的参考,我包含了一些与融合礼物相关的TKT和WARP的有用事件选择结果。
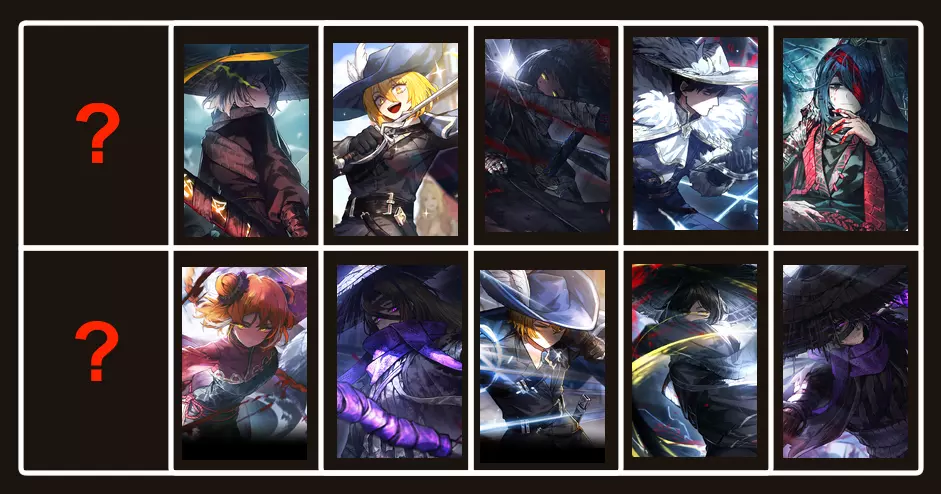
Good luck! If you struggle at all with this, I recommend picking up Chance Comet++. It is supremely powerful. In my test run, I was able to combine this achievement with the last one and ended with 48 tier 4 gifts. Loadout Overview Like last time, there are achievements for clearing floor 5+ with teams consisting of at least 5 IDs with a certain status archetype. These are naturally fit to be combined with the "15+ Status EGO Gifts" achievements from week 1's set, so consider doing those together if you haven't done them yet. (With good starting EGO gift/shop Graces, doing two of these at once is not that bad either, even with just a floor 5 run.) Firstly, choosing random IDs to hit 2, or even 3, of these status ID achievements in one run is doable. However, since we also need to beat floor 5+ with IDs consisting of specific factions anyways, those are the ones I will be focusing on, as we will naturally be completing the status teams at the same time. For Mirror Dungeon 6, we need to beat floor 5+ with the following faction loadouts. Unlike last time, however, we have almost 0 leeway to complete these. The numbers are kind of irrelevant, in most cases we need ALL the IDs belonging to each of these factions in order to complete the achievements: 3+ T Corp & 2+ Yurodiviye (No leeway) 4+ R Corp (No leeway) 4+ Zwei (1 ID of leeway and can use either Zwei Sinclair) 3+ Cinq (1 ID of leeway and can use either Cinq Don) 3+ Rosespanner (No leeway) 5+ Heishou (No leeway as of now) Additionally, there are achievements for beating the named story theme packs with teams consisting of the canto's main sinner alternate ID, along with a themed team from that canto. Do note that the Canto 3 / N Corp. achievement is the only one of these possible in normal mode. These can be in your backup units - but MUST be selected. If you have them equipped but not selected for combat, the achievement will not trigger. Beat "The Unconfronting" with N Corp Sinclair plus 3 other N Corp Fanatic IDs (Must be Fanatics, Fell Bullet Yi Sang does not count) Beat "The Unchanging" with all 4 of the Technology Liberation Alliance IDs (Spicebush Yi Sang, Sloshing Ishmael, Sunshower Heathcliff, Talisman Sinclair) Beat "The Evil Defining" with all 3 of the Pequod IDs (Yi Sang, Ishmael, Heathcliff) Beat "The Surrendered Witnessing" with Lord of Hongyuan Hong Lu, Hierarch Candidate Ishmael, and 4 Heishou IDs (It is possible to hit all of these in one run with clever use of the shop to swap IDs throughout a Floor 10 run. I DO NOT RECOMMEND THIS because you would need all of these IDs leveled and ready for use in infinite mode. While you can get by in the lower floors with some unleveled IDs, it gets much tougher later on, especially when taking the Mounting Trials on later floors into account. I heavily recommend not wasting xp tickets leveling these and to instead take these one at a time, but if you truly wish for this challenge, the Advanced Combo Run section has been updated to include a route for this.) You also technically don't need to finish the run if you are JUST going for these, but we will be able to overlap enough (and we need the clears) where finishing the run will be worth it. Note for Normal Mode Players / New Players:I'm sorry, they really upped the requirements this time around. More IDs required in general plus more hard-mode achievements means finishing these may be tough if you are stuck in normal mode or if you have a newer account without a ton of IDs. I won't go too far into details, but if you are playing on normal mode, taking these 5+ status ID achievements one at a time will let you have more control over which IDs you pick, as many IDs will count towards multiple statuses, you may have an easier time just throwing together anything you have that counts. If you need to take 7 runs to get just the basic statuses down, that's okay - the more runs you do, the more crates you will get to hopefully help you flesh out your collection of IDs. Be sure to be strategic with your dispensed IDs, and try to pick up ones that will help you reach the threshold for beating certain achievements. Feel free to leave any questions or comments if you would like more specific/detailed help. For other players - we have our goals, let's see if we can take care of these as efficiently as possible. Technically we do not need to finish the run after beating these bosses, but we might as well. Having less leeway is more annoying in terms of requiring you to have specific IDs to complete these achievements, but it does make routing them a bit easier. There is still a lot of annoying overlap, but following these guidelines will let you complete as many as possible in the fewest number of runs. I will be structuring each of these as a standard 5-floor run - we will be able to complete every achievement mentioned above in just 5 total runs. Only the first two require hard mode. 5-Run Loadout Plan Run 1: Pequod, TLA, T Corp, Tremor
在4层,选择【邪恶定义】,并且确保为 Boss 运行【Pequod】系列身份。在5层,选择【永恒不变】,到达商店后务必将【Pequod三人组】换成对应的【TLA】身份。(理论上,如果开局使用辛克莱、浮士德、唐和希斯克利夫,然后在4层商店将辛克莱和希斯克利夫换成【TLA】身份,唐换成【T公司】身份,这里也可以编入【N公司】队伍,但这样总体上并不能节省一次流程,所以没有太大必要这么做。同样,如果让浮士德、默尔索和格雷戈尔装备他们仅有的【沉没】属性身份,你可以在这里完成【沉没】相关内容。不过,这同样无法节省流程,而且对身份的要求更严格,所以我将其分开处理。) 流程2:【黑兽】、【Cinq】、【撕裂】、【镇定】
幸好辛奇有1个宽恕ID。我们跳过奥提斯,这样就能把他们和黑手党+洪卢大人以及候选人伊斯梅尔队伍组合起来。这个队伍自身就能满足撕裂和镇定状态的需求,所以任何易桑和希斯克利夫ID都可以用来填补空缺。记住,挑战“投降见证”关卡首领时,你必须带上洪卢、伊斯梅尔,以及至少5个黑手党中的4个。 (普通模式可行配队如下) 配队3:N公司、玫瑰扳手、流血
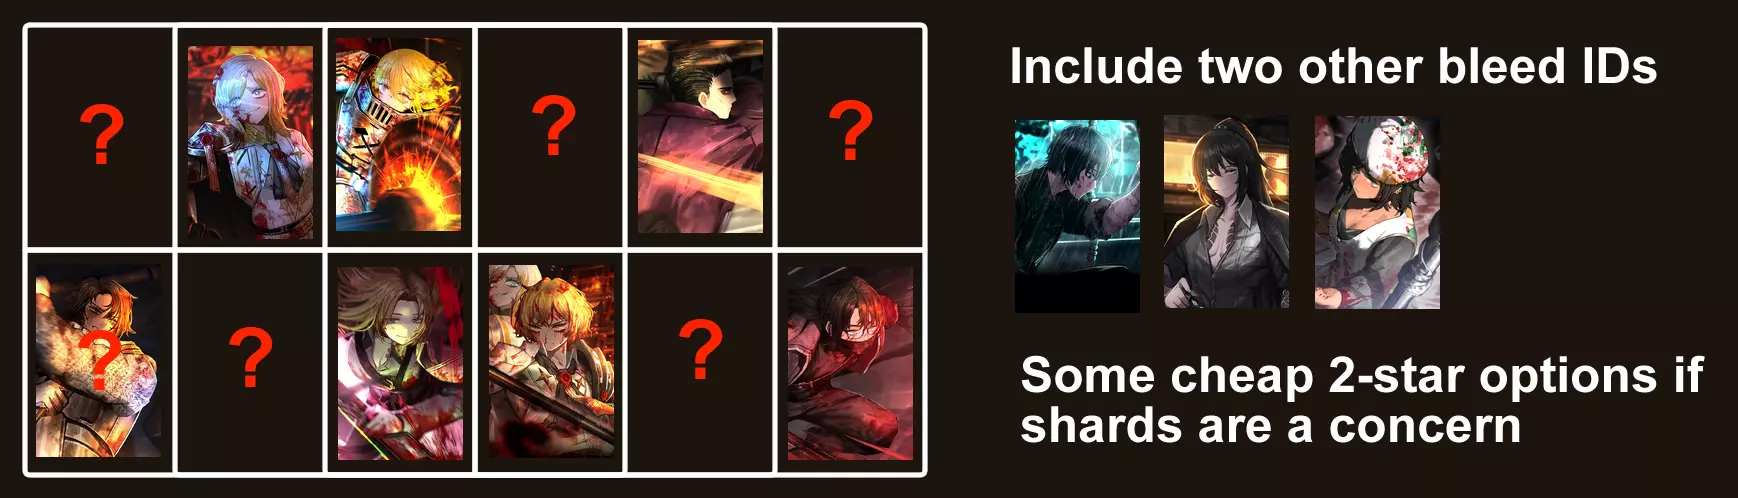
获取玫瑰扳手身份,为N公司配置辛克莱、浮士德、堂吉诃德和希斯克利夫。在易桑、菱沼、鸿璐、伊斯梅尔和奥提斯中,必须再选择两个具有流血效果的身份。如果你正在考虑购买一个身份来辅助完成此任务,【铃·奥提斯】是个不错的选择,她算作所有状态身份,并且在接下来的两次挑战中也能用于填补空缺。请注意,第三层的 boss【不面对者】必须使用辛克莱、堂吉诃德、希斯克利夫和浮士德来挑战。 挑战4:R公司,充能,沉没
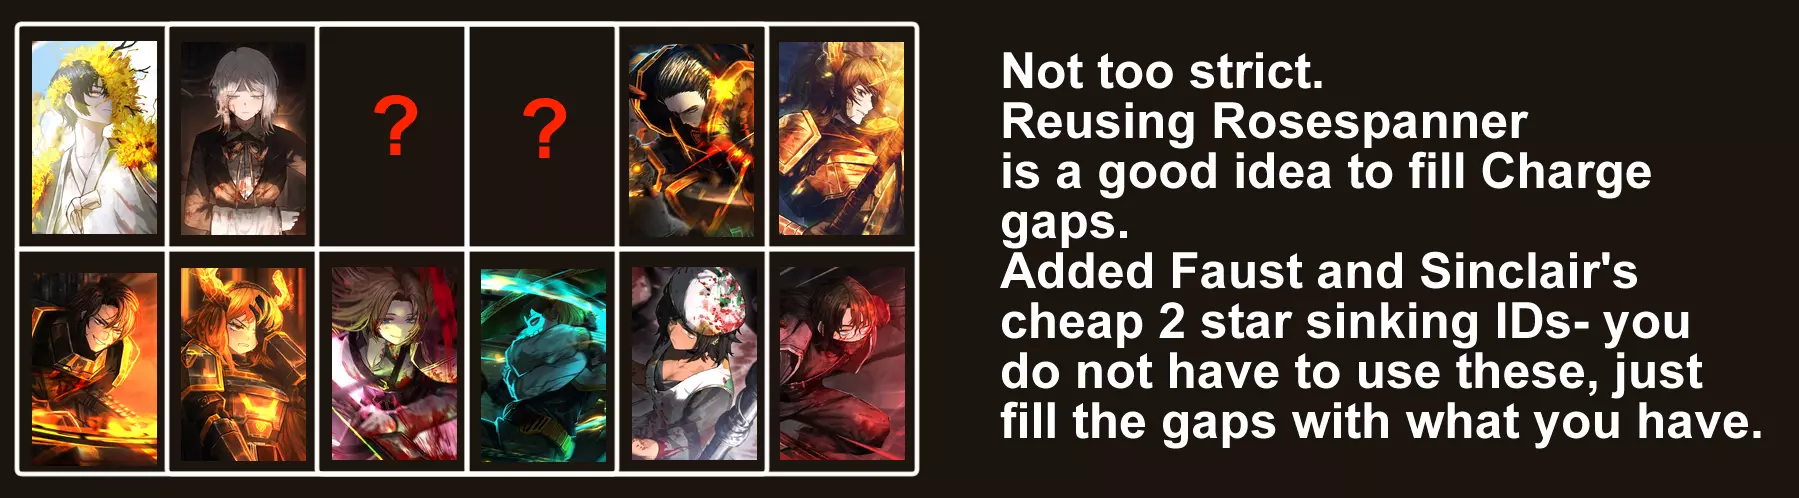
现在进行清理流程。这部分没什么意思。R公司的身份卡本身就满足了5个所需充能身份卡中的4个,所以我们需要再添加任意其他充能身份卡和3个沉沦身份卡。(唐和罗季昂最新的瓦尔普吉斯身份卡在这里非常合适,但我假设玩家没能幸运地获得这些,所以我填了一些其他选项。) 第五轮: Zwei,燃烧

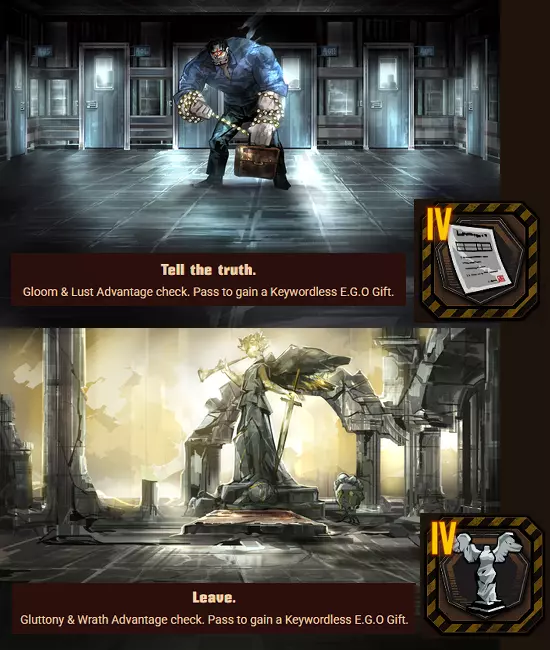
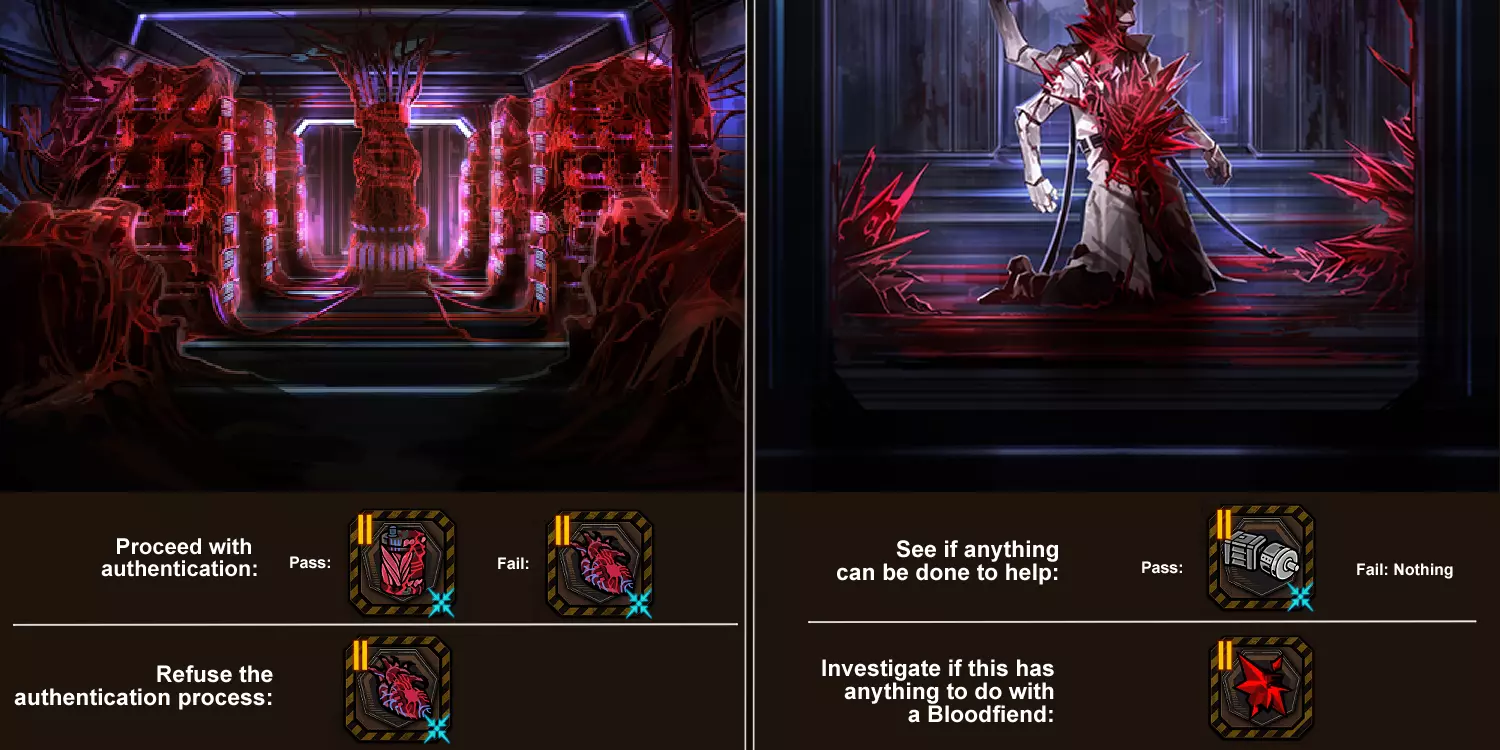
The "leftovers" run. Not that complicated, as all of the remaining sinner gaps except Heathcliff have at least 1 burn ID to choose from. You only need 4 of the 5 Zwei IDs listed. Shop Overview There are three main categories of Shop achievements, most of which we encountered last time, but with a few changes to the numbers required. All of these require clearing the dungeon at floor 5 or above. - Refresh the shop X+ times (Up to 50 times) - Purchase X+ gifts from the shop (Up to 50 gifts) - Win while holding X+ enhanced EGO gifts (Up to 20 gifts) Some other challenges include - Clear with at least 3000 Cost (Self explanatory, will not have a guide for this one, just save your cost) - Replace a sinner's entire kit with Skill 3s via shop replacement and clear - Fuse 20 times and clear - Finish the run after leaving the final shop with 0 Cost These shop achievements fit in really nicely with our initial Advanced Combo Run, where we try to hit 20+ Tier 4 gifts plus all Railway packs. With some care, we should be able to hit nearly all of these, especially if we dump starlight on a mega run. Otherwise, if you wish to take these in a more relaxed manner, continue on below. Refresh the Shop 50+ Times / Replace A Sinner's Kit with Skill 3s If you are willing to spend some starlight, this is doable in normal mode! 10 Refreshes per shop sounds like a ton, but Star of the Beginning++ and Moon Star-shop++ means we get 4 of those for free. If we spend our 2 normal free refreshes, then buy 6 more refreshes, then use our 2 free keyword refreshes, we will be asked to spend 495 Cost per shop, which isn't that unreasonable, especially if we have other Cost graces to help out. Don't forget you can sell EGO gifts if you need some extra cost. You could try to combine this with the "replace a sinner's entire kit with skill 3s" achievement, but only having 5 floors and no super shop makes this a bit risky, as you would need to get the same sinner at some point on every single shop. I would recommend doing this on hard mode, but if you are willing to roll the dice a bit, normal mode players can and should try to combine it with this achievement. ( An important note - if a sinner is dead, they cannot appear in the skill replacement slot. This means you can get a bunch of sinners killed early (or just kill the half of the team you aren't using) and this will make the achievement a lot more consistent. Especially nice in normal mode where you have less shops to work with! ) In hard mode with the above graces going to floor 10, you only need to spend 45 cost per shop on rerolls, which is even nicer (5 on average per shop, 4 of which are free). You have more chances to see a sinner appear in more shops, so just keep an eye out as you are doing your refreshes. Purchase 50+ Gifts from the Shop / Enhance 20+ Gifts / Fuse 20+ Times This one is simply just not possible in Normal mode. 5 floors leaves us with 10 gifts per shop, and shops cannot have that many gifts in normal mode. For hard mode, we can make this easiest with a Floor 10 run - which leaves us with buying 5 gifts per shop on average. We can buy more at super shops, which will definitely be appearing as we purchase all the gifts. Be sure to include the Binary Star Shop and/or Star of the Beginning Graces; we need their bonus shop EGO gift selection boons for this run to be consistent. Because we have all these excess gifts laying around, this fits in very naturally with the challenge of fusing 20 times, and to enhance 20 gifts. Just remember you only need to enhance a gift once for it to count. Be sure not to fuse away your enhanced gifts! Clearing the Dungeon With 0 Cost This seems like a very tricky achievement at first glance, but luckily we can make this very consistent by following a few guiding principles. 1: NO Bonus Cost EGO Gifts or ANY starting Graces - we want to keep our cost as predictable as possible. - Avoid the following EGO gifts: Milepost of Survival, Golden Urn, Rebate Token, New Release Pamphlet, Voracious Hammer, Preorder Discount, Renewed Merch, Trial Plan Guide, Prestige Card. If you accidentally obtain one of these, get rid of it by fusing it rather than selling it. If it has already ruined your cost total, it may be better to just reset the run if you don't want to bother thinking about how to recover. 2. Play on NORMAL MODE. Normal Mode allows us to see the entire floor at the start of each pack, making it easier to plan our route. This also just makes the run easier since we will not be purchasing EGO gifts. 3. Events are still good but avoid options that gain Cost, but gaining EGO gifts is still good. We want a decent collection of gifts by the end of the run. You are reasonably likely to run into an event that gives one of our NO-GO ego gifts above. Be sure to NOT choose options to obtain gifts in these cases (reference image below) 4. After beating a floor, do not choose a card that gives you cost. This also comes in random amounts, which is no good. If your only options both give you Cost, just click Cancel and move on without selecting a reward. 5. When choosing a path through the floor - avoid the risky chain encounters. (These give 120 cost, which will slightly throw off the balance of our plan, so these should not be fought if at all possible.) Abnormalities and Focused encounters are okay. 6. If you want, you can start with a Tier 1 EGO gift that can be enhanced. You are very likely to pick one up over the course of the dungeon, so I don't necessarily recommend spending starlight on this, but if you want to be VERY sure you can win, feel free to.

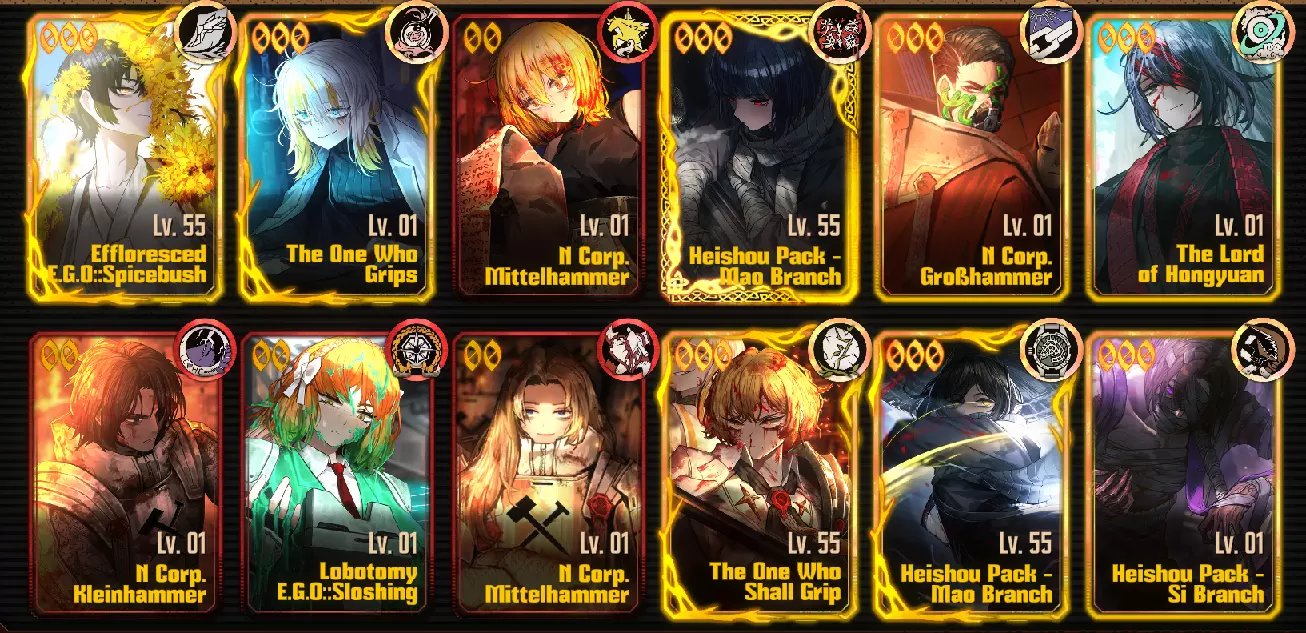
Following these principles we will be able to predict how much cost we have. We know we will need to beat floor 5 for this achievement, IE, leave the floor 5 shop with 0 cost. This means we only have 5 sources of DEFINITE cost gain during the run: beating the Floor 1-4 bosses, and our starting 200 Cost. This adds up to 1340 cost that we will definitely be getting as a constant. (200 base + 200 F1 + 240 F2 + 300 F3 + 400 F4). From there, assuming we only take Normal, Focused, or Abnormality packs, we will always be increasing this total by a multiple of 25. (75 for Normal, 100 for Focused, or 150 for Abnormality fights). The exact fights don't really matter, just keep taking these specific nodes through the dungeon. Keep avoiding the 120-reward hard fights if at all possible. FLOOR 1-4 SHOP:We can't let our total cost build up too high, so each shop we will control our spending by Healing INDIVIDUAL sinners, one at a time, until we are no longer able to. Prioritize sinners you are actually using, so they can take damage and get healed again in the future. If no sinners can be healed and you need to get cost down, use the Team function spend an additional 100 cost. To make the most of this, I recommend having your sinners at full HP just defend until they get hit, or take unopposed attacks, in the final fight before the shop. We ideally should be buying heals until we cannot afford any more at each of these shops. Similarly, we will not be buying any EGO gifts. The only time you SHOULD buy an EGO gift, is if you happened to pick up Urn or Hammer on accident, and you realize your cost is not a multiple of 5. In this case, buy EGO gifts with units digits that get you back to a multiple of 5. (For example, if my Cost ends in 8, I might buy 2 ego gifts, one that ends in 1, and one that ends in 2. This will put my units digits back at 5.) It may be easier on the brain to restart, but it is certainly recoverable if this happens. FLOOR 5 SHOPAssuming things have gone to plan, you should be entering the shop on floor 5 with 400 cost from the Floor 4 boss, plus whatever you had leftover from Floor 3, plus whatever you picked up on Floor 5. If you followed the guide perfectly, this cost should end in one of the following: 15, 40, 65, or 90. Don't forget to let your sinners take damage on the previous fight so you can spend cost to heal them up. If cost ends in 15: Refresh normally once. If cost ends in 40: Keyword refresh once, then enhance a Tier 1 EGO gift. If cost ends in 65: Refresh normally once, then enhance a Tier 1 EGO gift. If cost ends in 90: Keyword refresh once. You should now be at a multiple of 100 - to get rid of the rest of your cost, just spend it all on INDIVIDUAL sinner heals. (If you spend it on general heals for the whole team, you may get blocked from healing once everyone hits full HP. This might have happened to me. Learn from my errors.) Congrats! Recovery OptionsIf things got messy you may still be able to recover, especially if you are still on a multiple of 5. The goal is to get to an even hundred of Cost so you can buy heals, using the following properties: Enhance a Tier 1 Gift once to lose 50 cost. Again will lose 100. Enhance a Tier 2 Gift once to lose 60. Again will lose 120. Enhance a Tier 3 Gift once to lose 75 cost. Again will lose 150. Skill replacements will lose 45, 75, or 120 cost. If none of these work, you may be able to find a combination of these, along with normal and keyword refreshes, that work your cost down low enough to win. Get out a calculator if you have to! Remember that both refresh costs go up by 15 every time one is used. In WORST case scenarios where nothing works, you can try selling some gifts to try and find a new starting number, but the messier things get, the harder it is to recover. Don't feel too bad if this one takes a couple tries. Combat Overview With 1 exception, this category is tracked per combat - once you achieve the conditions, you will get the achievement immediately - you do NOT need to claim rewards or even finish the run for any of these. Remember that if you don't want to finish a run, you can always spend a ton of starlight to get helpful graces and starting gifts and then abandon the run to get that starlight refunded. There are some interesting/tough challenges in here, as well as the 99 status potency achievements from the last dungeon as well. Hitting "80 clash power" and dealing 15k damage in one skill also require some cheese or intense planning. I'll cover the less complex stuff first. I will update these following sections with a few reference images later, but I've spent like 10 hours over the past few days staring at stuff for this and doing test runs so I need a hot second Clear the Run with All IDs at Level 80 This is our one exception where we actually do need to complete the run for the achievement to count, so be careful. Also be aware that your backup IDs ALSO need to be level 80, so make sure you start every sinner with a level 55 ID regardless of if you will be using them or not. Favor of the Nebulae: +3 at start, +1 per clear up to 5 (8 total) Favor of the Nebulae+: +3 at start, +1 per clear up to 9 (12 total) Favor of the Nebulae++: +3 at start, +3 at floor 6, +1 per clear up to 9 (15 total) Piece of Relationship: +5 Piece of Relationship+: +7 Piece of Relationship++: +10 The Railway packs and Miracle in D20 BokGak can give you up to +3 levels, but they can only give you that level buff once in the run. This means that both of the above are mandatory to some extent for this achievement, or at the very least the most consistent way without relying on RNG abnormality events. If you haven't done your floor 10 all-railway achievement run yet, this is a great place for some overlap. Reach 20+ Speed There are a few different ways to go about this, but in order to try and keep things as focused as possible we'll just roll with using one of the Heishou IDs, as they have great base speed and are generally built to gain haste over time as well, and are also used in multiple places in achievements already. Some Haste EGO gifts to consider picking up or starting with: - Smoking Gunpowder++: 1-2 Haste when a Rupture skill is used - Resolution+: 2 Haste when the ID has 2 slash skills - Harpoon Prosthetic Leg: 2 Haste to ally with most Poise - Devil's Share: 1 Haste to ally with most Poise - Shadow Bamboo Hat: 2 Haste to Heishou Mao IDs - Ancient Effigy: 5 Haste to random ally Starlight Guidance Grace upgraded once will also increase the max speed by 3. Kill 7+ Enemies with One Skill There are not many floors with 7 enemies at once. The Sign of Roses fight in Line 2 is a good option, but Church of Gears in the Full-stopped By A Bullet pack is probably the best bet we have. Any high-attack weight EGO that hits 7 or more enemies should be able to get the clear here. Last season's Don Quixote limbus pass Yearning Mircalla EGO is especially good if you have it. If you want to either spend some starlight to help guarantee you have the DPS (or just want to speedrun to this floor and not care about finishing the run), start with at least Sharp Needle & Thread, and Grey Coat. Try to fuse into either of the Tier 4 EGO gifts for the damage type you choose, and ideally the Tier 4 status EGO fragment as well, before you reach the Fullstop Pack just to give yourself as much firepower as possible, but it's not mandatory. Use 7 Different Skill Affinities This one is kinda fun but obviously not very hard at all. Just make sure you bring a team with a decent spread of skill sins and you should be able to get this in a couple turns on floor 1. Activate Imposed Weight by Turn 2 and win on a Floor 5+ bossThis one is a little weirdly worded as well. You can have Weight active prior to Turn 2, and can use extra sinners before then as long as they die, but honestly I would recommend just attempting a solo on the boss for this achievement to make sure you get it fulfilled. (It's not as scary as it sounds, promise!) Solo has been confirmed to work, but if your HP is below 25%, then the Imposed Weight effect won't activate and you may not get the achievement. At the start of the run we grab the Imposed Weight ego gift (of course) as well as Manor-shaped Music Box which is a free stagger cancel, and lastly Ashen Constellation's Blessing. Both of these gifts will greatly help your survivability. They are not NEEDED but if you are new to soloing it will make things much more comfy. Regardless, you can play the first 5 floors normally, being sure to build up resources for any EGOs you plan on using. Picking up healing EGO gifts on the way will be nice as well, since Imposed Weight will slowly eat small bits of your health. On the boss, just enter alone with your desired sinner. You will start with just 1 skill slot and slowly gain slots over the following turns, so surviving the first few turns is the toughest part. IDs with Evades are very good here since you can reasonably dodge entire sets of attacks. Either way, defending through the early turns should let you survive long enough to start attacking with the skill slots you gain. (IE, on turn 2, attack with the first slot and defend with the 2nd slot if you have an evade). As your slots fill up, you will likely find the boss to be a bit of a pushover with all the extra power to your skills from Imposed Weight, especially in normal mode. 99 Status Potency Achievements These are mostly about reaching certain counts of status effects. You may get several of these naturally if you have not yet completed the status team or EGO gift achievements. Overall, try to get as many EGO gifts for the status as you can. I will highlight any EGO gifts that are especially powerful for achieving that status. One general tip for these - several of these statuses will be dealing lots of damage to enemies. Try going for them on Floor 5 or higher in order to give the enemies more survivability. Don't be afraid to use defense skills on some sinners to help enemies live long enough to reach these potencies. I'd recommend attempting these on bosses that have high protection or invuln mechanics to help keep them alive for the full damage amount, such as - So You Want to Get Beat, Hurtily My Form Empties Skin Prophet Shock Centipede Gasharpoon Ahab 99 Burn Potency: Fiery Down - Inflicts extra burn potency and doubles burn potency if over 20. Dust to Dust - Extra burn count to help kick things off at combat start. - Avoid Glimpse of Flames when going for this as it will kill most enemies before you can reach 99 potency. 99 Bleed Potency: Wound Cleric - Inflict extra bleed potency. Smoke and Wires - Doubles inflicted bleed. Red-stained Gossypium - Start combat with 15 count. Note - If you have access to her, the Sanguine Desire Rodion EGO is also perfect for maintaining count. 99 Tremor Potency: Oscillating Bracelet - Inflicts tremor on hit. Nixie Divergence - Helpful starting potency and count. Downpour - Ramping potency application. Tremor doesn't have super great EGO gifts so far as application is concerned, so having IDs that can consistently apply Tremor will be extra important. 99 Rupture Potency: Talisman Bundle - When enhanced, can make every hit apply rupture. Standard-duty Battery - Rupture on hit. Thunderbranch - Helps inflict more count. Note - Thrill helps with maintaining count, but also does a wild amount of damage, so if you are killing things too fast you may want to avoid or sell it. 99 Sinking Potency: Thorny Path - Extra potency and count. Midwinter Nightmare - Inflict sinking on all hits. If you're having trouble with this one, try going for this on a boss with sanity, so the Sinking isn't also dealing massive damage on every hit. 99 Poise Potency: Stone Tomb - 1.5x potency gain from skills. Nebulizer - Starts off with potency and count. Four-leaf Clover - Helps maintain count and potency. Endorphin Kit - Extra poise generation from skills. Avoid Angel's Cut, as it will consume potency to give count. 10 Charge Potency: !!!Warning - this is Potency, not Count! The only EGO gift that can help directly is T-1B Octagonal Bolt, which gives 1 potency for every 20 count consumed. Even this though has a limit of twice per encounter for a given ID, so you CANNOT get this achievement with this gift alone. Unique Charge also does not count for this. Most Charge IDs have no way of gaining potency either, so this means you MUST use one of the following IDs at at least Uptie 2 to unlock the passive, which all gain potency for every 10 count spent: -W Corp. Outis -Multicrack Faust -Multicrack Heathcliff -Reindeer Hong Lu -W Corp Don (but only if you happened to get the Love and Hate EGO) Outis and Heathcliff have great Charge-spending EGOs if you happen to have them as well, to help speed things up. Deal 15,000 Damage With One Skill First off - massive damage attacks that happen as the effect of EGO gifts do NOT count. This means Glimpse of Flames and Thrill, the Tier 4 gifts for Burn and Rupture, will not trigger this achievement on their own. The damage must be directly associated with a skill. There are a couple of cheesy ways to do this (hint, it's exactly the things that the achievement tells you). The non-cheesy way to do this is very hard. High attack weight EGOs have problems finding normal enemies that can get high enough HP even with lots of HP up mounting trials. Additionally, if the skill is multicoin, the later coins won't trigger if enemies die too soon. We could focus all the damage into boss enemies that that have invincibility mechanics like Skin Prophet, Shock Centipede or Gasharpoon Ahab due to their invincibility mechanics as another option. I personally am a big fan of attacking the Skin Prophet candles. To move onto the cool debuff strats, we have 2 options, Time Moratorium and Sinking Deluge. All the relevant IDs for these are required for other achievements so I feel more okay with recommending these options. If you have a good sinking team, I like Deluge more, but Moratorium has more versatility. Time Moratorium: This debuff absorbs all damage done to the enemy, and then dishes it out with a multiplier all at once. If it expires on its own, its damage is not linked to a skill, but if you apply a second instance of the debuff with a skill, that first instance will trigger and the damage multiplier will be counted as damage done by that skill. What this means is instead of dealing 15k damage with one skill, you can have a full round (or more) with all your sinners pouring damage into the debuff and trigger its payout all at once. The damage inflicted is Sloth Damage, so make sure you are running a pack with a boss that is Fatal to Sloth Damage, OR have Lunar Memory fused. This debuff is inflicted by T Corp Identities; Rodion, Don Quixote, and now Outis. If you can time it such that the enemy gets the debuff while staggered, all attacks will be fatal which is an excellent time to build up massive amounts of damage, especially using EGO gifts that boost raw damage. Sinking Deluge This debuff/skill effect is specifically caused by the Spicebush Yi Sang ID, and even more specifically, his Skill 3 on hit effect. Similarly to Glimpse of Flames, this does multiplicative damage based on Sinking Potency and Count, but will remove the Sinking status afterwards. This is slightly easier to control when you want to activate it than Time Moratorium, but as a tradeoff does rely on very high Sinking count and potency rather than just overall damage, so you'll probably want a full Sinking team. The Tier 4 sinking gift is extremely important as it vastly increases your potential damage output by ensuring the deluge damage is fatal. Just make sure you avoid using Yi Sang's skill 3 too soon or else you will lose the Sinking you have been building up. You will probably need to do this on a boss with either very high HP and sanity, or some invulnerability mechanic. You'll hit 99 potency before you hit 99 count, which will obliterate abnormalities without sanity. The Crit Achievement The wording on this achievement is very bad. Disclaimer, I am not fully sure of every requirement for this. Some things that appear to be true: - Every coin you deal damage with in the entire fight must crit, starting from turn 1 - Losing a clash counts as 'not doing damage with a coin' so will fail the achievement despite not being mentioned or really implied anywhere in the wording (I really hope they update the wording of this achievement soon) It sounds pretty scary, but on the other hand, this achievement is a Blade Lineage run achievement in disguise. The 'Ragged Bamboo Hat' EGO gift makes all BL ids always crit with poise, so ideally we can do a single normal mode run, pick up as many Poise EGO gifts as possible, and make sure we get this gift. There are only 6 BL ids, so we do need one additional Sinner to always crit - so we want to pick an extra poise ID that ideally has skills that gain poise on use, so that they have an easier time rolling that RNG with the below gifts. Side note - it is completely possible to do this without all 6 Blade Lineage IDs, if you don't have them all or don't want to shard them (which is fair) but just be aware that every non-BL ID is an extra reset point at the start of a fight if RNG is bad. Run as many as you can to reduce the inherent RNG of this run. With Nebulizer++ we can get our final sinner to 8 potency and count when Pride Resonance is active, which is itself a 40% chance to crit. Pendant of Nostalgia++ will apply another 4 potency to a random ally with poise, so if our final sinner has gloom and poise they are in the running to rng into this at the start of a fight. Stone Tomb is excellent to boost on-use poise gain which is great, since it applies before the roll happens. After this, other poise gifts like Four-leaf Clover and Endorphin Kit will do a good job maintaining potency and count. If you play a full normal mode run out after picking up the bamboo hat, you have decent odds of just stumbling into a clear along the way, but if not, you can spend some time restarting a fight to make sure the odds go in your favor. This does rely on RNG for getting the Bamboo Hat ego gift but honestly it's better than the RNG required without having 6 of your 7 sinners guaranteed to fulfill their requirements. Alternative strat Another option is if you have the Thoracalgia Faust EGO. Use this EGO along with other sinners with Pride Skills, along with Nebulizer and Stone Tomb as mentioned above. As long as Faust goes first and these conditions are met, the whole team should reach 20+ poise which will ensure a crit. This is probably a better option if you have access to the EGO, since it can be done earlier in the run, doesn't require a specific RNG gift drop from a late pack, and only has 1 mandatory buy (the EGO) as compared to trying to pick up several missing BL ids. However, this EGO is currently season-locked, meaning it cannot be dispensed until the next season starts, so if you do not have it, the Blade Lineage will be your best bet for now, unless you don't mind waiting several months. Clash Power 80 (the Cool Way) Part 1 Despite the name, and the confusing difference and bloat between Base Power, Clash Power, Final Power, Attack Power, Power, Skill Power - forget everything. This achievement is simply asking you to roll an 80 on a skill in a clash. (Not while dealing damage.) This is quite hard. To do this, we're going to have to do 4 things: 1. Get a lot of offense level up and power up. Luckily we have EGO gifts for that. 2. Give enemies a lot of offense level down. Luckily we have EGO gifts for that 3. Have enough base power on a skill or EGO where we can actually hit 80. 4. Have Fourth Match Flame Ryoshu. That's it. If you have this EGO at Uptie 4 you can skip reading this whole section. Click the Ryoshu chapter on the sidebar and see you there VERY IMPORANT: I WROTE THIS ALL OUT FOR FUN!If you JUST want the achievement and don't care about theorycrafting and stuff, JUST WAIT UNTIL 4TH MATCH FLAME APPEARS ON A RENTAL TEAM AND SKIP TO THE NEXT SECTION. If you're still here that means you want to do this the legit, cool way. There are several viable sinners and EGOs that have potential to hit this number. Which ID you want to use will depend on your team and what sounds fun to you. Want to build up an ID that grows in power and excels in long fights? Go for it. Want to stack plus coin power up on Edgar Heir Gregor or Liu Ishmael by upgrading all their skills to skill 3? Sounds awesome. Just want to use an EGO and see a giant number right off the bat? Cool (and probably the easiest option.) Main StrategyIn general I recommend keeping your target sinner in slot 1 and double-slotting them so that they get more skill usage which can be good for building resources in general. I recommend trying these on long fights in most cases, to build up as many buffs as possible. High recommendation to try this on a Line 1 pack on a mid/late parallel superposition floor, which opens with good slow fights to build resources and ends against My Form Empties with invuln mechanics and adds you can wail on to stall if necessary. Technically might be possible with a Rental team's EGO, but being limited to 5 floors is very hard when there are so many gifts to collect. Normally, our sinner's level will also give us more offense level (abbreviated to OL). However, the enemies will outscale us in mirror dungeon, so we will lose the arms race in terms of OL. However, if we use the Chesed ability, we can completely negate the base OL of skills and only leave the effects of EGO gifts and status effects. Our main goal as we move through the floors will be to pick up as many of the general gifts and gifts relevant to our status as we can. When we are ready, we will use Chesed to nuke the enemy's offense level and hopefully hit our target of 80. Increasing our PowerThis will be any direct power up effects as well as OL up. (Every 3 levels of difference in OL is another clash power. Will abbreviate all power-related effects to P as it all goes into the final number displayed.) Starting off with some useful gifts that EVERY ID can use. (We'll assume they are in sinner slot 1.) - Tango Marinade: +3P if speed is 9 above the enemy's - Chief Butler's Secret Arts: +3 OL if 6+ speed difference - Crown of Thorns: +1P each turn if at max sp - Hardship: +3 OL each turn if at max SP after 3 clashes - Imposed Weight: If solo, +2P (+3 at sub-50% hp) - Darkflame Smoking Pipe: +2P - Kaleidoscope: +4 OL if in a team of 5 from the same faction - Sunshower: +2P for everyone if sloth res exists or a 2+ attack weight skill (can use EGO to proc this) - Spicebush Branch: +3P once all skills have been used 3 times (careful of skill replacement) - The Unchosen: +2P after a sinner dies (not that consistent) - Emergency Investigator Badge: +2P after taking lethal damage (must upgrade twice to work on sinner 1) - Tier 4 Damage Type EGO Gift: +2P and +3 OL if 3 sinners total share that damage type - Tier 4 Damage Type Memory Stone: +2P and +1 Coin Power - EGO Fragment: If using an EGO, this gives power based on resources which can be quite strong depending on the EGO. (+5P or higher is common) Bleed Integration for Any Team: - Arrested Hymn: +2 OL when all enemies have bleed Sinking Integration for Any Team: - Faded Overcoat: +2 OL when 3 enemies at -45 SP. Any ID can inflict sinking with some decent gift setup. (but seeing 3 panicked enemies might be tough) Poise Integration for Any Team: - Clear Mirror, Calm Water++: +15 OL on Crit. Any ID can crit with some decent gift setup. - Finifugality: +2P at 40 Poise Potency/Count - Devil's Share: +2 OL to an ID with most Poise potency/count, 4 if they have Lust - Cigarette Holder: +2P at 5+ Poise count - Guiding Gas Lamp: +3 OL to an ID with most Poise potency/count Charge Integration for Any Team: - Biogenerative Battery: +1-6 OL as you build clashes, not consistent. +3 OL at 18 Charge - Nightvision Goggles: +5 OL, -15 Charge (risky, we want to just sit and not use charge) Status-Enabling Gifts: Some of my preferred options for bringing any status to any team. - Dust to Dust: Burn - Rusted Muzzle, Red-stained Gossypium: Bleed - Nixie Divergence, Downpour: Tremor - Talisman Bundle, Standard-duty Battery: Rupture - Midwinder Nightmare: Sinking - Nebulizer: Poise - Lightning Rod, Charge-type Gloves: Charge Starlight Guidance Grace upgraded once will also give +2P. Combining all of these gets you around 36 effective Power plus 1 Coin Power. It's worth noting you may need to use starting gifts to get some of the theme-pack exclusive gifts listed, otherwise there is a chance of missing out on a few. Obviously getting every single one of these is an unreasonable ask, so these are more meant to be things to keep an eye out for as you go through the run. Enemy DebuffsFor enemies, we only care about gifts that decrease the enemy's offense level, their clash power doesn't matter in terms of hitting our goal of rolling an 80. - Charred Disk: -4 OL with burn - Melted Eyeball: up to -10 OL with 2x tremor burst via Downpour++. (Tremor IDs get more) - Melted Spring: -3 OL with sinking - Broken Revolver: -2 OL with rupture - White Gossypium++: Unstaggers and applies up to 18 OL down on a previously staggered enemy, 24 if double staggered Sums to -37 even with just 2 tremor bursts which get the player an additional +12 or so to their rolls. All of these together mean we can get around +50-55 if all of these are active. (Breakdown: 27 Clash/Attack/Skill/Final Power, 45 OL Up = 15 effective Power, 37 OL Down = 12 effective Power) That should cover generic gifts, but don't worry, we still have more to go. Clash Power 80 (the Cool Way) Part 2 Status-dependent Power Boosts Here are some overviews for what is available for each status on top of what everyone has access to above. LOTs of info so sorry about that. TLDR: My personal opinion for some possible teams to run. Full numbers are below. S Tier: Charge (+25P, 3+ Coin Power) (What the hell) A Tier: Bloodfiends/KK (+14P, 3 Coin Power), Blade Lineage (+20P) B Tier: Poise (+15P on skill 3s with no other conditions) C Tier: Rupture (+16P), Tremor (+16P), Bleed (+4P, 3 Coin Power) - All good but rely heavily on many conditionals D Tier: Burn (+4P, 1 Coin Power), Sinking (+6P) Blunt IDs (+5P) are sligtly better than Slash or Pierce (+4P) but not enough for it to matter that much. If running Blade Lineage Slash is very good. (+5P extra) Burn: +1 Clash Power, +9 OL, +1 Coin Power = +4 Total +1 Coin Power Pain of Stifled Rage: +4 OL to Burn skills along with haste Combustion Gloves: +5 OL for 3 copies of a Skill Soothe the Dead: +1P and +1 Coin Power Bleed: +3 Coin Power, +4 OL, -15 Enemy OL = +4 Total +3 Coin Power Token of Victory: +2 OL on kill with 10 bleed (not that consistent) Respite: + OL based on remaining coins after clash (4 coins = 2, probably not getting much higher) Red-stained Gossypium: -15 OL to enemies at 30 bleed stack Bloody Mist: +3 Coin Power (kills the OL from Arrested Hymn but it's worth it) Bleed Subset - Bloodfiends: A Drop: Up to +4 Power if reducing bleed from ~55 to 15. (Very consistent with other gifts) Bleed Subset - Kurokumo: Resplendence: +2 Lust Power up, + 1 Slash Power Cloudpattern Gourd Bottle: +1P to skill 1, +1 extra to all KK IDs, -2 OL to enemy on hit Swarmcloud: +1 OL for KK IDs per 10% missing hp If you have a team of 3 Bloodfiends and 3 Kurokumo IDs, your bleed team can rocket up to +6-14 Power and +3 Coin Power depending on various conditionals, making this a very strong option as the coin power can easily translate into another +12 power on 4-coin skills Tremor: +8-13 Clash Power, +3-8 OL, -5 OL = +11-16 Total Sour Liquor Aroma: +3 OL Melted Eyeball: Improves an additional -5 OL to enemies with access to another tremor burst Microprecision Time Accelerator: +5P on turn 1, decreases by 1 per turn Clockwork Spring: +1P Epicenter: +3P Coupled Oscillation: Guarantees a stagger with Downpour++ and 1 extra tremor burst which is very consistent for triggering Gossypium - Do not fuse into Omnivibro Bell, you only keep 3 clash power whereas its ingredients give you 4 while separate Pocket Watch Type P: +2P, +2P if clashing with faster enemy +5/3/2OL to slowest sinners OR Type Y: +2P, +2P to Yurodivy IDs Rupture: +7-9 Clash power, +10 OL, -13 OL = +14-16 Total Twigs: -6 OL to enemies after being hit 9 times Spiked Combat Boots: +5 OL if 3 copies of skill Deathseeker: +1P, +2 OL. Extra +1P if single-coin Strange Glyph Inscriptions: +2 P or +3 if against Deathrite Haste Glyph of Glass Shards: +2P with 40 rupture Ruin: Improves Revolver with additional -4 OL, +1P Unmailed Letter: +1P vs slower enemy. If enemy has OL up, get +3 and inflict -3 Sinking: +3 Clash Power, 9 OL = +6 Total Eldtree Snare: +1P if Skill has 2 or fewer coins Red Order: +6 OL Haunted Shoes: +1P to 2nd sinner slot, worth mentioning but be careful Impending Wave: +1P, improves Surging Globe with additional +3 OL. Poise: +15P on Skill 3. Poise's other bonuses can be applied to any team. Lucky Pouch: +3 Final power, coin power worth +12 to Skill 3 Charge: +7 Clash Power (+4 to Skill 1), +56 OL, +3 Coin Power plus more on kill = +25P plus Coin power Has many gifts that affect specific skills. Probably stick with trying on skill 3, but there are lots of skill 1 buffs too included for reference. Patrolling Flashlight: +1P to Skill 1 Spent Use, Forming Hate: +10 OL after consuming 20 charge, +1P if ally lost SP Imitative Generator: +1 Coin Power to Skill 3, if 5+ base power, +2 instead E-Type Dimensional Dagger: +1P to Skill 1 Portable Barrier Battery: +2P to Skill 1 T-1 Perpetual Motion Machine: +10 OL after 40 charge consumed. +3P after 50 charge consumed T-5 Perpetual Motion Machine: +1P, +1 Coin Boost on kill, up to +30 OL at 3000 consumed charge Perpetual Generator Servos: +2P, up to +6 OL for 3 clash wins Overcharged Battery: +1 power upgrade to Biogenerative Battery, +1 Coin Power Slash: +3-4 Clash Power, +2 OL. Blade Lineage is a huge improvement Resolution: +1P Dreaming Electric Sheep: +2P after slash kill. +2 OL on envy resonance Cloudpattern Gourd Bottle: +1P to skill 1. Slash Subset - Blade Lineage: +4-5 total Cultivation: +4 slash power Old Dopo Robe: +1 Coin Power to skill 1. (+3 if single coin) Pierce: +3-5 Clash Power, +2 OL Torn Bandolier: +1P Gathering Skulls: +2P after pierce kill Torn Hems: +2 OL, +2P if 2 or less coins (also TLA buffs but please do not try this on TLA) Blunt: +4P, +4 OL = +5P. Middle is nice for +1 Coin Power Today's Expression: +2P after blunt kill Temporal Bridle: +2 OL Dimensional Perception Modifier: +2 OL on skill 1-2. Enhanced Tattoos - The Middle: +1P Blunt Subset - The Middle: Everlasting Chains of Bond: +1 OL, +1 Coin Power addition to Tattoos Clash Power 80 (Ryoshu style) "What Was that You Said About Fourth Match Flame Ryoshu?" This EGO skips all of the above nonsense and lets you get the clear as early as floor 2. An evasion ID for her is nice but not mandatory. The EGO should also be Threadspin 4 for this to work. We also want to make sure our team has plenty of Wrath and Pride to fuel this EGO. Ryoshu should unequip her other EGO so that we can force a corrosion easily, or at least make sure you can force the specific corrosion we need. Don't be afraid to go wild with starlight usage on graces, we will be abandoning this run so you will not lose anything. Do try to pick up some EGO gifts that help with power, including Imposed Weight. Rusty Commemorative Coin is good too for reasons that will become clear soon. We'll spend the first floor building up EGO resources and gifts. On floor 2, all we have to do is get the Automated Factory pack, and fight the "You Want To Get Beat? Hurtily?" boss. If you don't get this, you can just reset and go again. (Or try to find the boss on the "To Be Crushed" pack on floor 3, or failing that, Vain Pride on floor 4 if you really want to keep it rolling) Enter the fight with solo Ryoshu, and evade/defend/survive until she gets her full skill slots. Then, we need to corrode, which we can do by using 4th match flame itself. This will start dealing damage to the boss and its adds. On the turn we corrode, we will be damaging the enemies over and over again - they won't die due to the fight mechanics, so every time we fail a kill we will get 3 attack power up... Which will happen 3 times every time a corrosion goes off. The turn after, she should be well-prepared to use one more corrosion/EGO (choose based on your sanity) which should be enough to hit the 80 roll required for the achievement depending on rolls. This might take a few tries depending on corrosion luck and RNG, but it is a very brain-off option compared to the alternative. (Advanced) Combo Runs In this section we'll get into some meaty details on how to combine several of these previously mentioned achievements. The core idea is that even if we need 10 floor 10 runs, it will save us starlight in the long run if we can spend a lot of starlight on fewer runs that accomplish many goals, rather than Big thanks to Borderlined who helped me outline routes for this section. I will be assuming you have read the basic outlines in previous sections to get an idea of general best practices and things to consider when going for each of these individually, I'll try not to repeat myself too much. I would also potentially recommend waiting until we know all of the achievements if you want to truly run as few of these as possible. Future achievements are likely to contain some elements that may be able to mix into these runs, so if you follow these before all the achievements are out, know that you're potentially missing out on some easy overlap down the line. As further achievements come out, I will be adjusting these runs and adding onto this section as necessary. I Highly Recommend choosing both Chance Comet++ and Moon Star-shop++ for these runs. Their boons are immensely helpful to make things more consistent. Run 1: 20+ Tier 4s + 6 Railway Packs + 50 Bought EGO Gifts + 50 Refreshes + Fuse 20 Times + Replace A Sinner's Full Kit
Starting off, this one should be not all that bad. 20+ Tier 4s is actually very doable on any Floor 10 run with Comet++, but for now we will be pairing it with the 6 Railway Pack achievement. We'll start again with our classic Scriptures, Glasses, and Harpoon starting gifts for three easy fusions in the future. Be sure not to forget to fuse these later. To factor in the shop achievements, keep a running checklist of what you need to do at each shop on average, in order to stay on track. Take free refresh and cost-gaining Graces to stay afloat with how much spending is required. * Fuse 2 Gifts Per Shop * Refresh 5 times * Buy 5 Gifts * Enhance 2 Gifts Pick a Sinner you want to replace the full kit of on the Floor 1 shop, and as you go, keep an eye out for when this sinner appears in future shops. Aim for 1 replacement every 2 floors, and don't fall too behind or it will become risky/expensive to catch up later. Floor 1 and 2, pick up the ingredients for Hoarfrost with the Unloving+Automated Factory combo. Ideally, these packs should also give at least one other tier 2/3 gift. Might be worth just restarting if Floor 1 doesn't cooperate on that front. Floor 3 will be Unconfronting, to finish that fusion. Floor 4: Mandatory to take Line 2. Railway packs often have Tier 4 rewards, and all contain pack-exclusive tier 4 gifts that may appear in the shop, so holding lots of extra gifts and boosting shop rarity with graces will be effective here. For the rest of the run though, we will mostly be trading out our previous strategy of "always take a tier 4 gift" to instead focusing on Railway packs. Be sure to pick up the Nebulizer and Umbrella from shops to finish our starting gifts. Additionally, with Chance Comet, make sure you fuse one tier 4 gift in a shop whenever possible, as you will get a random tier 3 back. Floors 5-10: Continue to stock gifts and fuse into as much as you can. Make good use any super shop appearances to dump some trash EGO gifts into random tier 4 fusions with the extra fuse slots. Again, consider doing the railway packs in descending order to keep fights manageable, but if one of them has a guaranteed tier 4 reward, its a nice little bonus. As you move through, you will have 1 floor of leeway that you can use whenever you want. Ideally, try to choose either a pack that can give you nice consistent fusions (like TKT, TCTB, WARP), OR just any pack that has guaranteed tier 4 gifts. The railway packs themselves will help with this a lot. Run 2: 8+ Theme Pack Fusion-Only Gifts + 10+ Tier 4 Fusion-Only Gifts + 8+ Canto Named Theme Packs This run is a bit stricter in its requirements, but with some clever planning, we should be able to make it fairly comfy. Four of the Canto theme packs involve pack-specific fusions, so we need 4 more themed fusions in the 2 remaining non-story floors in a 10 floor run. Luckily, our old friends Timekilling Time, WARP Express, and To Claim Their Bones are here to fill those gaps. We will need to take two of these, and get 2 unique gifts from each. That brings our total fusion-only gifts to 8. We need 2 more, so as you move through these packs, you will need to keep an eye out for gifts that fuse into the unique status archetypes. (Charge and Tremor are probably good to choose just to help overlap with TKT and WARP, but this is up to you.) To start off, we need to pick up Haunted Shoes and Nagel Scriptures. We have one extra pick of leeway here, but we still need to be smart about this. Our final choice needs to be one of the ingredients for a fusion from TKT, TCTB, or WARP. It's up to you which one you want to focus on, but just remember to keep track of it for later. We need to be as specific as possible, so if a pack does not show up, you will need to reroll for it. Here's our rough floorplan. There is some leniency in which order you do things once you get to floor 5, so it's not super precise after this. Try not to end the run on the TKT/WARP/TCTB choice, as that will prevent you from getting access to the rewards of the pack, which you might need to complete your fusions. Floor 1: The Outcast Floor 2: The Unloving. Make sure you pick up Frozen Cries so you can fuse the gift. Floor 3: The Unconfronting. Make sure you pick up Squalidity so you can fuse the gift. Floor 4: The Unchanging. Be sure to pick up Broken Glasses. You will need to find or fuse Ragged Umbrella at some point to fuse this gift. Floor 5+: The Evil Defining. Pick up Harpoon Prosthetic Leg. You will need to find or fuse Nebulizer at some point to fuse this gift. Floor 5+: Break time! Pick one of either TKT, WARP, or TCTB. If you want to REALLY minmax this, you can use the pack search functionality on each normal reroll so you can compare the rewards from each of these packs and try to select one that provides you with the most ingredients. Either way, we will need to fuse 2 unique gifts here. Floor 5+: The Heartbreaking. Floor 5+: The Dream Ending. Floor 5+: Break time! Pick another of TKT/WARP/TCTB and fuse 2 more gifts. Floor 5+: The Surrendered Witnessing. By the time you reach floor 10, you will have needed to pick up/fuse at least 2 tier 4 status gifts, which shouldn't be that difficult if you've been focusing on this during the shops. With all that done, congrats! Additionally: I DO NOT recommend this but if you have enough of these IDs leveled, you can combine the story-specific loadout challenge achievements here as well. It's possible but I would probably advise against doing it this way. Starting loadout:
第4层:切换至晴雨希斯克利夫和护符辛克莱 第5层:切换至裴廓德号伊斯梅尔、易桑和希斯克利夫 在投降见证前:切换至候选人伊斯梅尔、黑兽法斯和黑兽罗迪翁 极限+隐藏 极限成就 这些成就虽然目标明确,但挑战难度极高。 首先,【逆境值达到50】的成就需要在极限模式的全部15层中承受每一个逆境。这需要充分的准备。个人建议选择所有初始恩赐。不必担心星光,即使同时选择3个初始礼物,这样做实际上也能获得盈余。今天我打到了15层,初始恩赐有一半进行了双重升级,还带了3个初始礼物,仅靠战利品包和逆境本身就净赚了近300星光。 如果你觉得有难度,我强烈推荐使用【锋利的针线】这个自我恩赐,它绝对应该成为你3个初始礼物之一(无关键词3级)。 这个礼物能轻松摧毁大群敌人。如果你选择那些在极限难度下有敌人集群的战利品包,就能充分利用高攻击权重的自我恩赐快速清场,即使在很深的楼层也一样。我个人会避开那些有单体异常战斗的战利品包,尤其是在后期楼层。用这个方法你也能玩得很“赖皮”。使用防御技能和冲突重定向,确保首先发动的是高攻击权重的EGO技能,这样你甚至可以用一个技能清掉15层的一整群7只血魔。 隐藏成就 这些也很直接,只要“完成特定操作”就能获得成就。确实存在特定策略,但我不会在这里赘述,大家可以参考Borderlined关于隐藏 bosses和EX ego礼物的精彩攻略。【每个节点出现隐藏boss的概率固定为10%,无法提高或降低。以下指南仅用于解释额外机制以及每个隐藏boss掉落的特殊专属EGO礼物奖励。】请注意:要获得“完成所有成就”奖励,你无需在此成就标签页中执行任何操作。此标签页纯粹是为了娱乐(或许还有一点点疯狂)。 隐藏 Boss 说明 结尾 + 更新 感谢阅读!特别感谢 Borderlined 提供的指南以及在规划本文所述的部分高级流程时给予的帮助。 随着时间推移和更多成就的添加,我将持续更新本指南。根据上一批成就,我对未来可能新增的内容有一个大致的想法,但之前也出现过意外情况,所以未来会怎样谁也说不准。以下是更新内容概述: 8/11 - 将4+级标题更新为4级,以匹配即将修复的翻译错误 8/11 - 更新了 canto 7 流血礼物,以反映其在任何 c7 主题包中的可用性 8/14 - 添加了第2周成就 8/22 - 添加了第3周成就,修正了一些错误并进行了说明 8/25 - 更新了【Imposed Weight】的信息 9/1 - 添加了替代暴击路线 11/4 - 添加了【WARP BokGak】和【Spring Cultivation Gifts】