换一换
换一换 


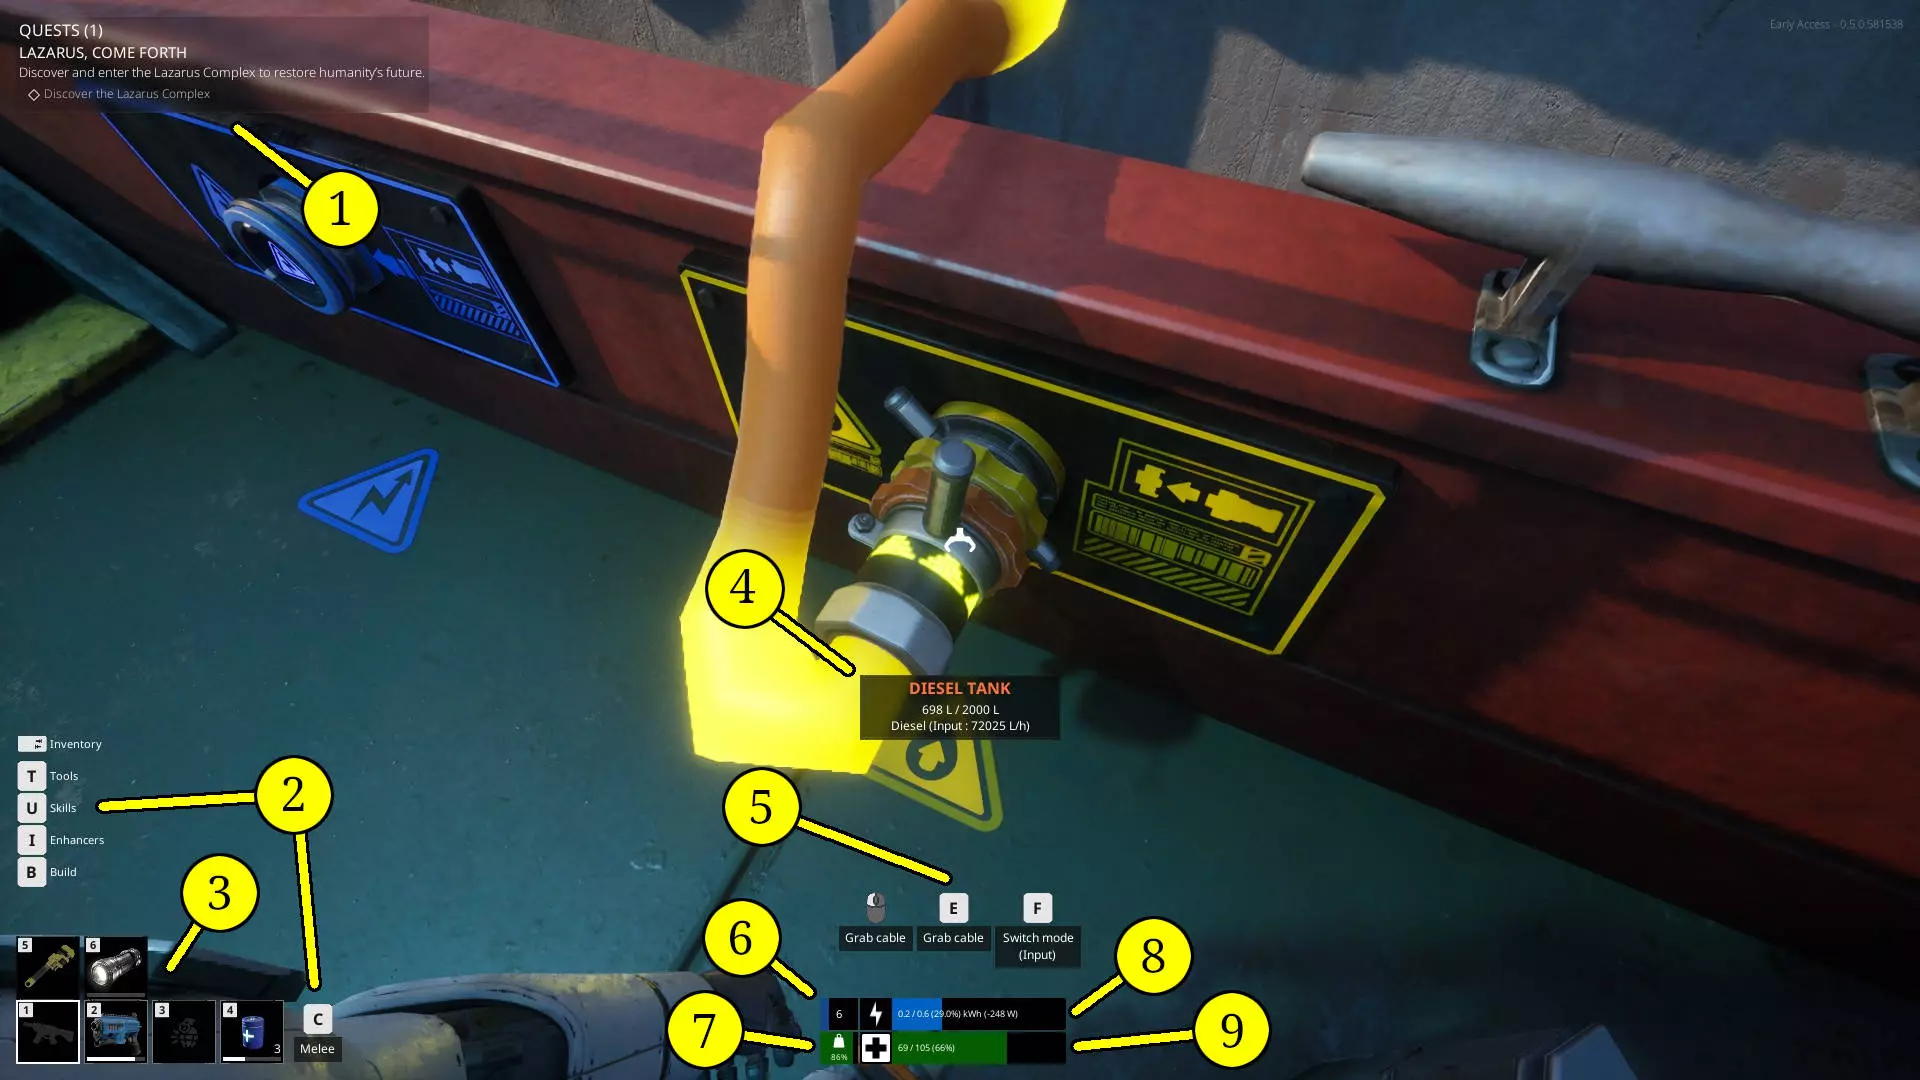
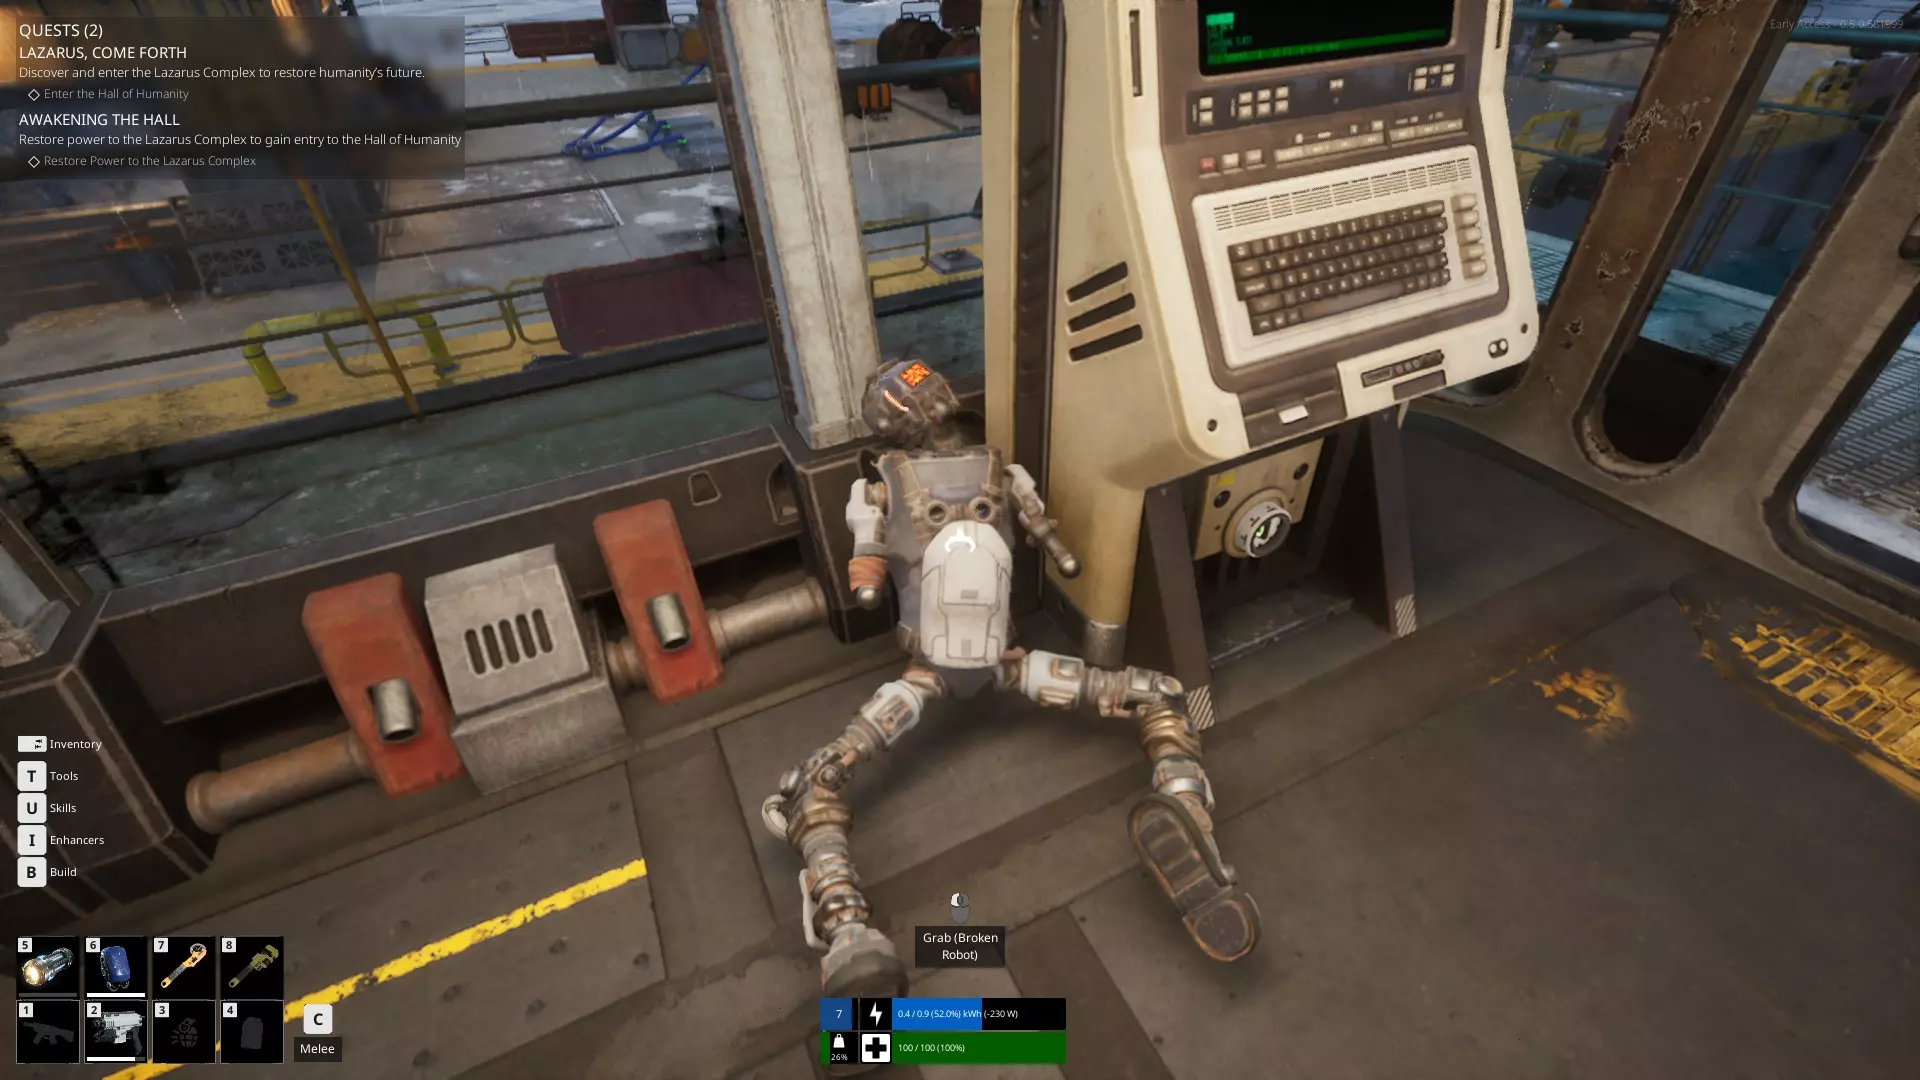
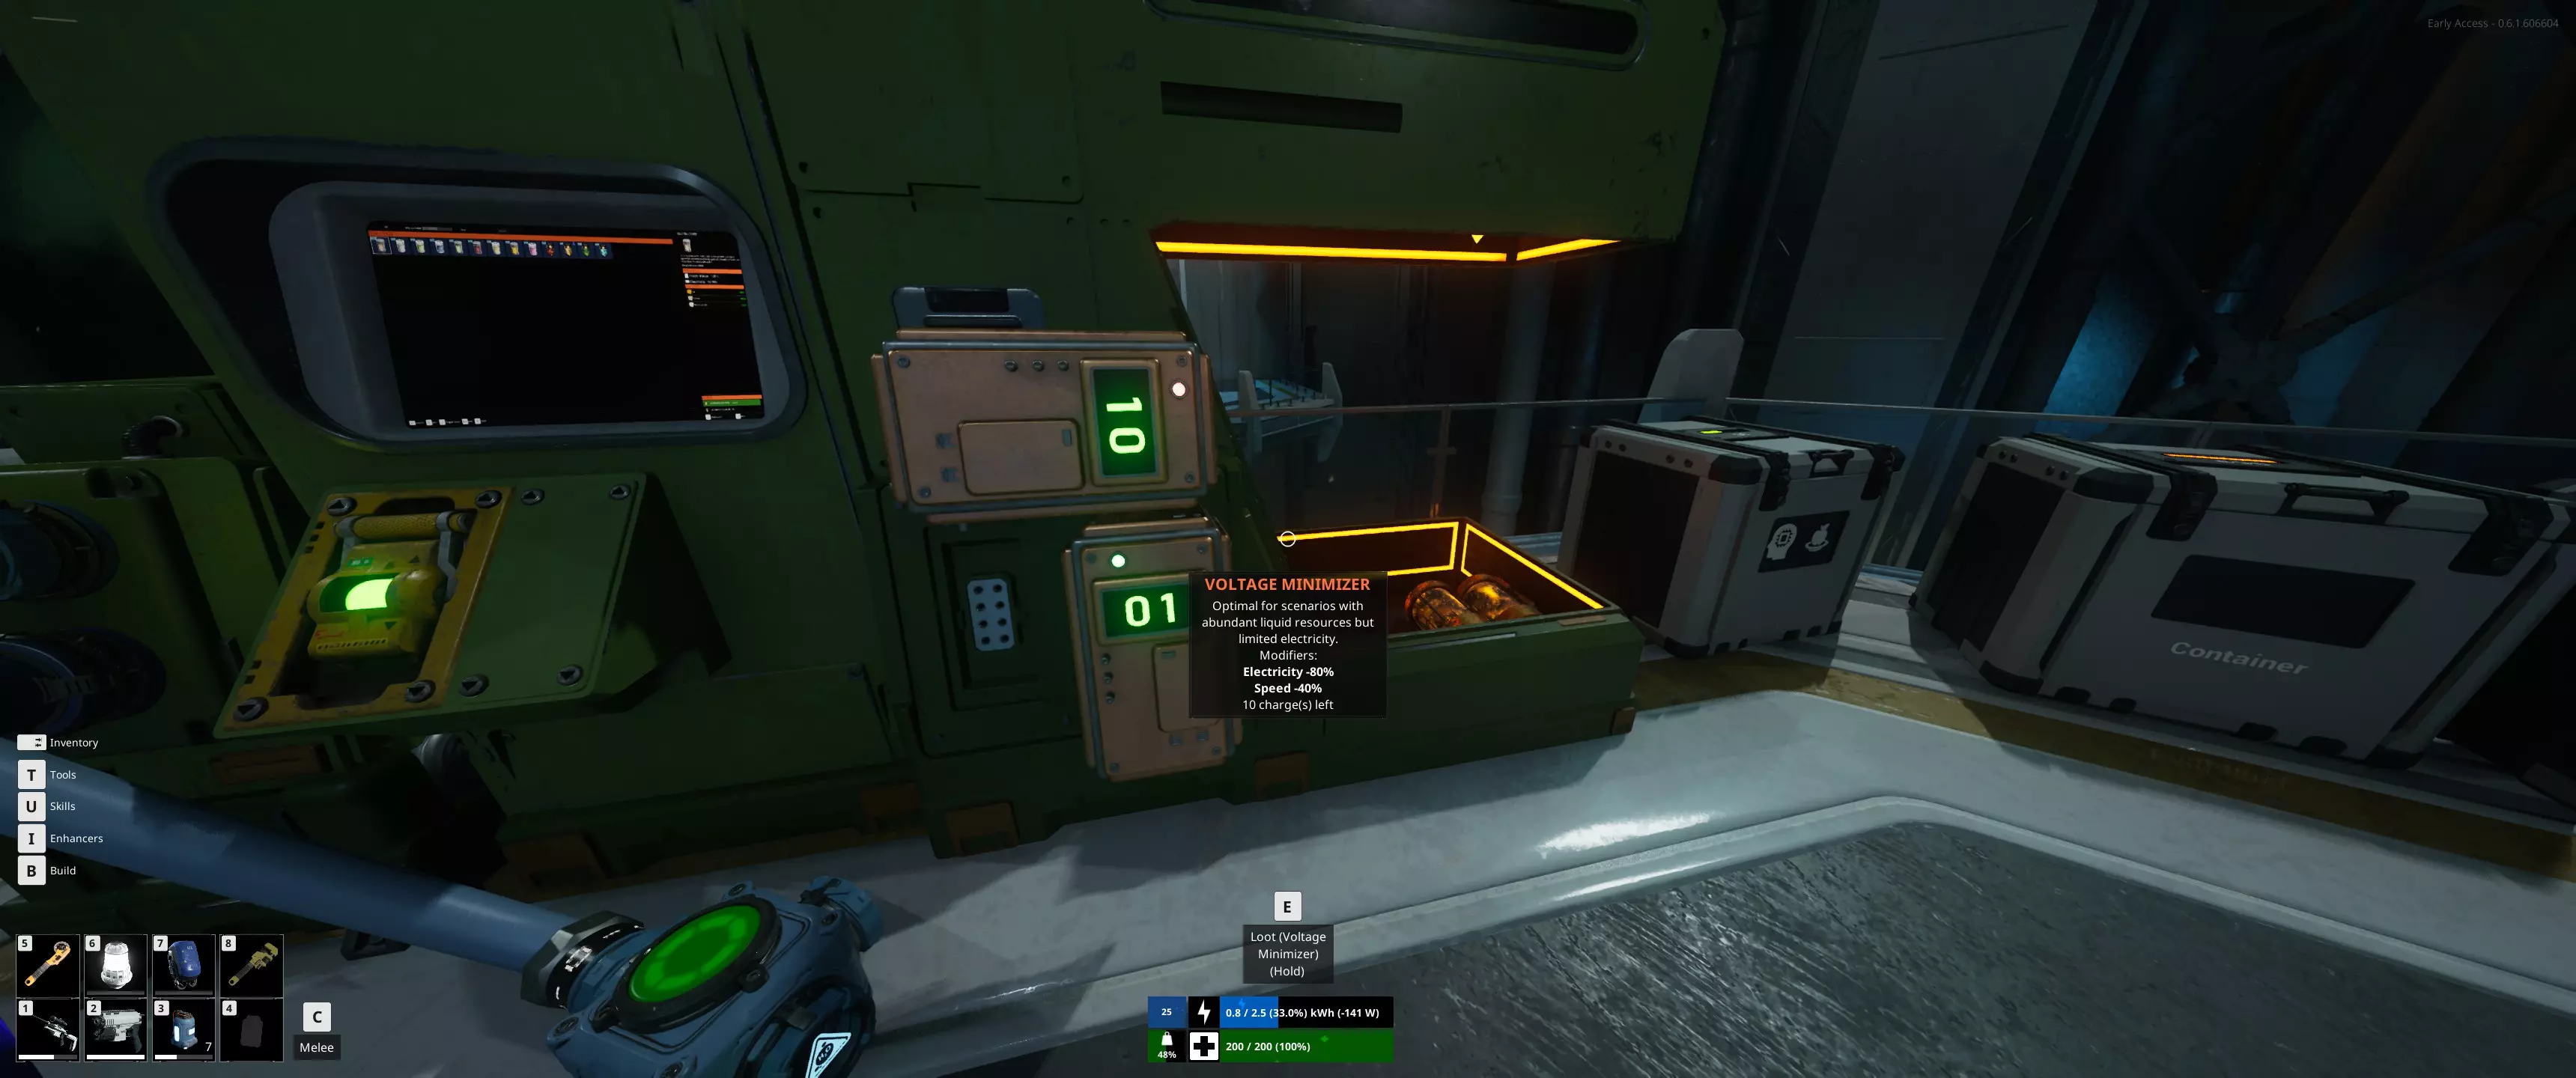
There are a few new player guides on here, but I wanted to make one that goes a bit further to also address some of the questions I have seen come up in those guides comments, on places like reddit, or discussions on steam. This guide also gets a bit into spoiler territory, so if you want to avoid those, it may be better to use one of the spoiler free guides on here instead. Intro This guide is intended as a more detailed and somewhat spoilery version of other similar guides I have seen here. The spoiler free guides are just fine, but they are limited as the nature of being spoiler free also limits their ability to go into more detail. I will not be covering mid to late game mechanics or builds here, just informing the players of certain things that are not clearly stated. The game does an ok job (so far) of explaining some things, but does not really mention others at all. Some of which are actually important to know in order to progress. The game does an alright job of leading you to figure these out on your own, but I have noticed that some players can have a more difficult time working some of these out and end up quitting before they even really start experiencing the game. I will try to order these tips in an intuitive way based on how the game seems to encourage you to progress, but don't put too much stock into what order these tips are placed as everyone plays and progresses differently. Basics of your robots stats On the surface, this is easy to understand. However, when I first started, I could not figure out why I was losing health despite not being hit by anything. I was just carrying stuff around and occasionally whacking some stuff with my trusty crowbar (I appreciate the Gordon Freeman inspiration there) that was not even getting close enough to hit me. What I didn't yet know is that all of the stats on your robot interact with each other in various ways. They were not separate one trick stats, like in most games. I will start with the top of the "enhancers" list and work my way down. Vitality - This is how much "health" you have. At 0 vitality you have 100 health points (HP). Each point into vitality is one HP. Fairly simple. This stat is deceptive as it interacts with the Battery stat in unexpected ways. I will go over that when I get there though. Engineering - This stat is mostly used for decreasing the time and power needed for assembling things on your robot or the fabricator. At max level a 50% reduction in build time and power consumption is quite significant. Certainly one of the more straightforward stats. Usually taken first by those with adhd who prefer not waiting too long for things to finish building/crafting. Haul Mastery - One of the objectively more important stats, this one allows you to flat out carry more weight in your inventory AND equipment. You get 1 Kg per point, so a total of 100 extra Kg, which is quite a bit. Considering later weapons like the Rifle and Flamethrower, weigh 20+ Kg's on their own, not to mention the weight of the ammo (yes it weighs a lot too), and backpacks, your looking at 70 or 80 Kg's fully loaded (if not more) in just equipment alone. This is important because as you carry more and more weight, the amount of power your robot needs per second goes up as well based on the percentage of total weight capacity used. This means that if you are carrying too much, not only will you move slower, but your robots battery will start draining extremely fast. This effect intensifies as the carried weight increases. Improved Hydraulics - This stat is quite contentious. Some players believe it is a waste of points as you can pick up most things you need to just enough to get the job done with 0 points in it. Some players think that it is necessary to quickly and efficiently haul heavy containers/objects. It really all depends on how you play and what your preferred method of salvaging/building away from your boat is. Either way, this stat allows you lift heavier objects easier and higher off the ground while using less of your robots power to do so. At 100 points, your lift capacity is doubled and the power required to lift things is basically negated compared to what it would be without points. Battery - Alright, this is the other objectively important stat, but also one that ties into how HP works as well. You start with 500 Wh of battery power and with 100 points in this stat you get an additional 2 kWh for a total of 2.5 kWh, which is five times more than what you started with. That amount can last you a long long time in situations where recharging options may be limited. Everything your robot does in this game requires some amount of battery power. This includes just standing there...menacingly. Hitting things in melee even costs power. Additionally, there is walking, crafting, salvaging, assembling, shooting, repairing, flashing (with your flashlight, put your pants back on), literally everything. So what happens when you run out of battery on your robot? Well...not much...at first. However, every second and every action will start to cost you HP as you have no power (here) left in your battery. If you are carrying a lot of scrap and equipment, and run out of battery in a location where the locals desire the taste of fresh robot, you have some very important decisions to make and fast. You are not screwed, but you are literally on borrowed time until you can get recharged, even a little. First, check to see if you have any "consumable batteries" in your inventory or equipped on your hot bar (highly recommended). If you do, eat(?) some of those and get enough charge back to make it somewhere you can fully recharge in peace. Alternatively, if you are wearing an "oni" backpack (backpack battery), you can hook that up to yourself by selecting it from the hot bar and selecting the option to connect it to you, then diverting the flow of power to your robot and out of the backpack. If you have none of these things, you may have to consider dropping all of the stuff in your inventory and booking it back to a spot you know you can recharge or find a consumable battery/power cannister. Every step and jump you take will consume your HP, not to mention every second you are not dead. After you recharge, you can come back and pick up all your stuff you dropped in your panic to not die. Pressure - This one can be a bit unclear at first until you visit your first underwater site. Pressure basically determines how deep you can go before you start taking HP damage, albeit slowly. Since you are a robot and don't need to do stupid human things like...breath, this stat is mostly just to limit how long you can be underwater below a certain depth. If you pop out of the water into an air pocket, you will stop taking damage (because you are a robot and don't need to breathe, obviously). The first place you are required to go underwater is only about 50ish meters down before you get into an air pocket, and you can go about 10 to 20 meters before you start taking damage with 0 points in this stat. Ultimately, not a huge deal right now until the devs start releasing more reasons to go down there. Scrapper - Depending on how you play, this stat can be seen as the opposite end of the Improved Hydraulics stat fan/hate club. If you spend a lot of quality alone time with your dismantle tool, this stat is for you. At max level it reduces how long it takes to scrap an object as well as how much power it takes from your robots battery. Some of the larger objects can take 300+ Wh's each to scrap, which is actually quite a bit when there are multiple to be scrapped. Coincidentally, those sorts of objects are also really heavy and unlikely to be carriable without a lot of points in Improved Hydraulics (sometimes not even with max points in it though). Power Management - This one is a bit unclear to me currently, so if someone wants to verify if what I am about to say is ♥♥♥♥♥♥♥♥ or not, please do so in the comments so I can stop embarrassing myself. As far as I can tell, power management either reduces power usage from everything your robot does, or it only reduces it for things not covered by other stats, like scrapper, or improved hydraulics. Things like walking, jumping, and flashing the flashlight. Either way, at max points it reduces whatever it is that it effects by 50%, which is definitely not nothing. Field Medic - This is a newer stat. It boosts recharge speed of power and health by up to 250%. This stat definitely seems to be more useful late game as you get more stat points into battery and/or vitality. At max level battery, it can take a decent amount of time to fully recharge your robot, even when you have more than enough power to do so. The throughput of power cables is still limited so this speeds that up considerably. Shock Absorber - Also a newer stat. Basically what it says on the tin. Reduces fall damage by up to 50% at max points. This is mostly for those who are...less...adept at jumping to high up ledges/ladders. Interestingly, fall damage is not actually referring to your HP, it is referring to your battery power...at first. As stated above though, once your battery power runs out, everything starts eating at your HP. So a longish fall may not actually kill you, but it will completely drain your battery and then reduce your HP considerably too. Basics of Cables Cables are fairly simple to understand how they work. Blue plug, blue cable, orange plug, orange cable. Easy Right? Well, there is slightly more that you should know in order to get the full use out of them. When you plug in a cable you can select what direction you want the contents of that cable to move by looking at one of the plugs for it and cycling through the options with the F key after connecting it. This does not apply to all things you plug into though, as some objects can only move the electricity/fuel/gas etc. in one direction. For example a Lumilite (solar panel), can only have electricity move out of it, not into it. So you cannot change the direction it will move. Same goes for all cannisters, you cannot put anything into cannisters, only draw them out. However, if you look at ones of the electrical plugs on your ship or a medium battery while plugged in, you have three options, not just two. Obviously, you have the 2 directions, represented by the arrows. So what is that third option that is just straight lines going across? That is the "balance" option (as I call it). The balance option will try to equalize the amount of power stored in whatever is plugged into it (based on current Wh stored, not based on percentage). So if you have 100 Wh of battery left on your robot and your ship has 200 Wh of battery left, the balancer option will recharge you only to the point where you and your ships battery have the same amount of charge, so your battery will only get charged to 150 Wh (or something close to it) until you direct the flow of electricity toward you to further recharge your robots battery. The same works in reverse, your robots battery can be used to recharge/balance your ship or medium batteries or to power stuff (never do this though). If you have the balance option on while your robot is at 100Wh of battery but your ship battery is full, it will fully recharge your robot as your batteries maximum quantity of Wh's is likely not high enough to reach a point where they will be equal. Although that being said, it is generally faster to redirect the flow into your robot to recharge faster (as far as I have observed). All the same mechanics apply to fuel/water/gas cables and storages as well. Basics of Recycling/Salvaging Recycling (I call it salvaging) is fairly straight forward as well, but the game does not really explain the more subtle details, nor does it really tell you how to determine what to look for while trying to get more of a specific resource. To start with, there are two different ways to salvage objects in the world. The first way is to pick an object up and throw it directly into the Recycler, provided you are able to actually lift the object, this is the more "power efficient" method of salvaging as it only has one step to get the resources from it. The second method, is to use the dismantle tool on the object you want to recycle. This tool is available to be "learned" from the skill tree once you reach level 2 and does not require any skill points to obtain (I feel like they should just unlock it for you automatically at level 2). Once you have unlocked it, you can press T to open the equipment menu and select the dismantle tool to use it. Alternatively, you can add it to your hot bar (by right clicking it and selecting which number to assign it to after pressing the T button) so you can just press one key to use it. An important thing to note about using the dismantle tool, is that it does not give you raw resources like iron or plastic from most objects. It will give you various kinds of scrap instead (the same kind of scrap that you can pick up off the ground), which can then be tossed into the Recycler all at once by hitting the F key after interacting with it (or one at a time if you prefer). Each time you use any tool (repair tool, dismantle tool, and flashlight), it will cost a certain amount of power from your robots battery, so make sure your battery has enough in it before trying to use it, otherwise you will start to take health damage. Lastly, salvaging whole objects or scrap may not always give the exact same quantity or types of the resources you would assume you would get from them. If you take a plastic pallet and toss it into the Recycler, you will always get 2 plastic (as far as I can tell). However, if you dismantle that same pallet down to the 2 plastic scrap it gives you and toss those into the Recycler, you will sometimes get 1 or 2 rubber instead. If you hold your mouse over each piece of scrap in your inventory, it will tell you what possibilities you may get from salvaging it. So, plastic scrap (oddly) has a chance of outputting rubber instead as it is listed in the details for that piece of scrap. Ultimately, either option is fine, but if you want to guarantee certain resources come out of it, you may be better off trying to haul the entire object to the recycler instead of dismantling it (as long as you can actually lift it). The power cost for using the dismantle tool is not usually a big enough deal to bother considering when deciding which one you want to do, as long as you have enough. Basics of Assembling Assembling modules you want to make, like the Lumilite (solar panel) mentioned earlier, is also relatively simple. You create the parts needed then build the module you want to place. Alternatively, you can do this in reverse, by creating the module where you want it to be placed first. This will leave a red outlined (ghost) version of it in place. Once the ghost of the module is in place the game will automatically add the parts needed to build it in your task list in the top left corner with your quests. If you look at the build list on your robot or in the Fabricator, you will notice that there are some numbers in the corners of the pictures of each module/part. The top left (light blue) numbers might say something like 0+3 or 30+25. The first number is how many of that item you have in your robots inventory right now. The number after the + is the amount of that item you are currently able to build with the materials you have available (either in your inventory or in storage nearby). If you have built a module but do not have all of the parts needed to assemble it, there will be a yellow square in the bottom right corner of the picture of the parts needed to build it. That number is how many total parts are needed, despite how many you may already have in inventory/storage. If you have built multiple items and they are queued up, then you will see a dark blue square in the top right corner, indicating how many of those items are in que to be built currently. There are two ways to create parts for modules, you can do it from your robot, or a Fabricator. Doing it from your robot gives you the convenience of not needing a Fabricator, but it is also much slower, requires your robots power, and can also be less resource efficient (if the Fabricator has a production module attached to it). The other major drawback to producing things from your robots build menu is that you cannot be carrying objects or holding anything in your hands, like a tool or weapon, while your robot produces the items you set it to make. For instance, you cannot create more ammo for your rifle, while wielding the rifle. My recommendation is to always build what you need from a Fabricator if you can, especially when you are producing large amount of things like cables or ammo. In general though, assembling only requires the parts for it to be either in your inventory or in a storage that is close enough to be able to supply the needed parts. If you have the parts stored in a box, but the module is not getting built, you may need to move the storage closer before it registers, or put the parts in your inventory and carry them to the modules ghost. Tour of your ship and its functions In the starting area, you will find your ship sitting, docked and anchored within the safety of the Sanctuary. A bit...worn by the test of time, but overall in fairly good shape. I will be using nautical terms here when referring to where objects are located on the ship to make it easier to explain. Those terms are: Front of the ship when manning the wheel in the cabin is the "bow" of the ship Behind you when manning the wheel, at the back of the ship is the "stern". The left side of the ship when manning the wheel is the "port" side. The right side of the ship when manning the wheel is the "starboard" side. There are more directions, but to keep it simple, I will just use those. You didn't come here for nautical lessons. Starting at the bow of the ship and moving backward toward the stern. At the very bow of the ship, there is a lot of empty space, currently filled with a bunch of random boxes that can be salvaged, as well as some cannisters and a diesel engine you should probably plug in to your ship before you leave. I would recommend using this area to build things on your ship that need a lot of space, like solar panels and wind turbines, but that is up to you. There is also one of your anchor reels on the starboard bow, but you cannot interact with it directly. Further back toward the center of the ship, directly on the deck, is what I call the "galley". You can heal and save inside this room, which also happens to have doors that can be closed, if you want or need to. I personally use this room for storing power/fuel cannisters at first, but you can do whatever you like with it. Using it for storage boxes is also not a bad idea as it is centrally located on the ship, meaning basically anywhere on the ship can be reached for the purposes of assembling parts/modules. Directly above the galley, is the "Wheel house". You can access it by the ladder on the starboard side of the galley, or from the stairs on the port side. I am unsure why they didn't put the ladder in a place that would make it preferable over the stairs if coming from the stern or starboard side, but...it is what it is. Inside the wheel house is...the wheel. You use this to steer the ship and the other controls to move forward and backward, as well as raise and drop the anchor. I wish it also had a door that I could close, but it does not. It does however, have an electrical and fuel plug, so at least you can recharge while you travel. The map console is located to the right of the wheel. There is also the ship power breaker in this room, but...I usually leave it be. Moving further back from the wheel house and galley is the stern of the ship. On the starboard side is a very subtle but also very useful machine of the ship. A "drag net" as I call it. When you first board the ship, it will be raised, but if you interact with the switch on it, it will insert the container into the machine and drop the net into the water. If you interact with it again, it will raise the net and pop out the container, which may contain up to 15 Kg's of salvage and/or bio material. Both of which are extremely useful and basically free to gather. Once the net is dropped into the water, it will start to gather stuff into the container. Once the container is full (at 15 Kg), it will not gather anymore until the contents are removed and the net dropped back down. An important note is that even if your ship is anchored/moored, it still gathers materials, just much slower. So even if you anchor your ship and go inside a building for a while, it will continue to pick stuff up. I recommend always keeping it gathering and emptying it when it is full. You can tell if it is full based on the display next to the switch on it saying 15 Kg (possibly 14.9 Kg's). You don't need to pull up the net to check the box to see if its full or not. Continuing at the stern, in the center, is the water pump. You are likely not able to do anything with this yet if you are just starting in the sanctuary. Once you reach level 7, you will get access to unlock water cables, extenders, containers, and the water purifier. The purifier allows you to desalinate the water into fresh water, which is what is stored in water containers and used in other things later. Don't worry too much about it right now though. Moving on to the port side, next to the water pump, is the other anchor reel. As with the one on the starboard bow, you cannot interact directly with it as it is controlled from the wheel house. Alright, now with the deck out of the way, from the stern of the ship you look toward the bow and you will see stairs descending below deck to the engine room. The engine room actually has two engines in it. One is electrical (blue), and the other is diesel (yellow). Each engine can support up to 5 engine cylinders (the blue boxes or yellow cylinders with rollers on top) that can be "plugged in" by placing them on top of their respective slots. You can remove and replace each cylinder whenever you like as you can create better versions of each type as you progress in levels. You start with the basic version at levels 2 and 3, and then progress to the "booster" (level 2) version at level 6. Then finally the "super booster" (level 3) version at level 13. You can mix and match these with other versions as you have 5 slots. So you can have 4 basics and one super booster if you like, for some reason. Each cylinder adds a certain amount of speed to the boats maximum speed, depending on its level. If you run out of diesel fuel, your diesel engines will shut off, but if you still have power left in the ships batteries, your electrical engines will still function, but you will have lost at least half of your ships speed until you refuel (or however much of your ships speed was coming from the diesels). The reverse is also true, highly recommend getting solar panels and wind turbines on your ship asap to prevent this. Use cannisters of power (blue) and/or fuel (yellow) as emergency resupplies until you can get bigger storage tanks/batteries built on your ship. Note that Red cannisters may say Petrol, but they do not refuel your ship, only yellow diesel ones will work. They are different types of fuel used for different things, even though they use the same type of orange cable. If you run out of both fuel and power...you are dead in the water until you get back one or the other. Avoid at all costs. I recommend making sure all 5 slots of both of them are filled with at least the basic version before leaving the sanctuary. You can find at least 2 of each either on your ship or hidden around the Sanctuary. You can make the rest of them using a fabricator. The speed you get from each cylinder is worth the higher fuel/power consumption of having them all plugged in (in my opinion). Ok, now moving further in from the engine room, beyond the closed door, is the "craft room" (I like to call it that ok?). Arguably, one of the most important rooms on the ship. It contains a Fabricator and a Recycler. You will need to plug both of them into power plugs before using them, preferably the ones closest to their sockets next to each machine, but any on the ship will do. Once you do, you will be able to turn them on and off (if you need to conserve power as they still use a small amount even when idle) whenever you like, using the switch on each one. There are also convenient fuel and electrical gauges located in that room on the wall toward the bow (right above the power plugs). These not only show you how much fuel and power you have, but (generally) the rate at which you are generating/using the fuel and power. Finally, moving toward the bow past the craft room is the "cabin". It contains some non-functional benches and a desk. I usually use it for additional storage at first, and later for other production machines. Other than the two power plugs in here, nothing really important of note. Hopefully the devs do something with this room later. Basics of Sailing Once you have finally opened up the docks doors and readied your ship, it is time to set off into the vast blue unknown. Controlling your ship is surprisingly simple and mostly intuitive. W and S control your throttle/speed. You can see how much power you have going forward or backward on the bottom right (left of your speedometer) with the vertical bar that fills up and down as you throttle up and down. A and D steer your ship left and right, as noted by the horizontal bar on the bottom right (below your speedometer). Spacebar raises and drops your anchor. Note that when dropping your anchor, they do take some time to actually hit the bottom, so there will be a delay between when you hit spacebar and when your ships anchor actually stops your ship. An interesting (and nice to have) feature of your anchor is that if you drop it and it hits the bottom while you are moving, it will not only stop your ship very quickly, but also pull your ship back toward the anchor from where you first dropped it. So if you are going too fast in an attempt to dock, and drop your anchor at the right spot, your ship should be pulled back so you end up stopping much closer to the dock than you would otherwise. It may not necessarily pull you all the way to where you dropped it though, but definitely faster than having to back all the way up or turn around to approach the dock again. The F key, changes your view from 1st person view to a 3rd person view of your ship. If you are in 1st person view you can even look at the map to the right while driving the ship, although you cannot control it while viewing the map. Still a nice convenience. The H key is your horn. Honk to establish dominance at all times. Honk for victory. Honk for Humanity. Honk. Within your speedometer on the bottom right, you can see your speed in KM/H (unsure why they don't also have the option for knots or Freedom Units but I will let it go). Distance you have traveled in total. How much fuel you have left. How much power you have left. Lastly, if for some reason you like to immerse/torture yourself. You can look at the console the wheel is connected to and notice there are colored buttons on it that can do some of the functions that you can also control from the wheel (mostly). The left most (green) one controls the horn (obligatory honk required). The one to the right of the horn is the raise/lower anchor button. On the right side of the wheel are the buttons to turn on/off each of the two engines. I can sort of see turning off the electrical one if you need it for producing items on your ship and don't have enough power for your ships engine and the machines at the same time...but still...why not just wait till you are anchored to do that instead? Turning off your diesel engine though...not entirely sure why you would want to do that, but I guess it is nice to have options. Finding where to go now You have finally set sail and dodged the obvious sea mines (at least I hope you did). There are plenty of things to explore, but you will be directed toward a navigational beacon in your quest log. You don't have to go there first if you just want to wander, but I would recommend at least going to this first one quickly as it will show you where things are on the map within its range, namely the power and refueling platforms, which you will definitely need very soon. Navigational beacons are usually covered in various kinds of...wildlife(?), that you will probably need to deal with to get it working. How you do that is up to you. Your first step is to power the platform the beacon is on. Usually this is in a small room with a plug on the outside and inside of the wall with the door going into it. That is how you can keep the door closed while also powering the platform, if you choose to do it that way. Inside that room you will need to connect the power to the main breaker the same way you did at the sanctuary when you started. You can either hook it up to a power cannister, to give the platform some power for a good 20 or so minutes (never really counted but a good amount of time nonetheless), or connect it to your ship to draw power from it, or you can repair/build solar panels and wind turbines built on the platform and use those. Entirely up to you. Once you have the platform powered, you now need to find the navigation console somewhere inside the main building on the platform. Also, likely covered in the local...fauna. After you find the console and clear out the locals, you are halfway done. You now need to power the navigational beacon using the power plug going into the console. Again, how you do it is up to you, any of the methods mentioned previously for powering the platform will work for this as well. Just know that it will likely require a significant amount of power to charge up fully. You can see the progress of the nav beacon charge on the top left corner as a task, near the quest objectives. While you have the navigational beacon charging, it is time to fix the beacon itself. This usually consists of climbing up to the top of a very damage tower using the very damaged scaffolding. However, once you reach the top (or sometimes halfway points along the way) there will be a ladder you can let down by interacting with it, so you don't have to climb all the way back up again if you fall or don't have the materials you need to repair the beacon. Trust me, you will appreciate them being there once you let them down. Alright, so now you reached the top. Repair the damaged breaker at the top of the tower, interact with the ladder to let it down, and climb back down it (or try to jump into the water from there if you are feeling spicy) to the room with the nav console you were charging. Once it is fully charged, you should be able to flip the switch on the beacon console to activate it and it will scan the area and show all the areas of interest (above and below water) in a massive range. Note that you do not have to repair/use a nav beacon to be able to visit a location and have it show on your map, this just makes it easier to find various locations within its range without wandering around and running out of fuel and power in the process. It is at this point that I would highly recommend noting where the fuel depots and power stations are on the map so you can head toward the ones you need most at that moment. But you do you, I am not your dad. After you and your ship are prepped and ready, you should have a quest to head to the Lazarus Complex. So off with you. Honk your horn. Save Humanity. Honk your Horn again. Conclusion This is meant to be more of a detailed guide of how to get started, which is why I stopped where I did. I added additional information to some of the more basic mechanics as I noticed some people just need/want more information on certain things, and that's ok. Telling them to "just google it" is the dumbest ♥♥♥♥ ever and I wish people would stop doing it (LMGTFY in particular is my hated nemesis). I also purposely did not start listing off "advanced" techniques like building stuff on the sides of your ship or getting into mid to end game mechanics like transporting/making humans or making the ingredients to make humans. Those deserve their own guides, and I am sure someone else is willing to go in depth on those subjects. If anything I stated in this guide is incorrect or outdated (other than my recommendations as those are just my opinions), let me know in the comments and I would be happy to correct them. If you have any questions about anything I did or did not cover in this guide, I would also be willing to entertain those as well as I am sure I missed some things that probably should have been included here. I have ADHD and probably forgot to add it along the way.
新玩家提示及基础机制的详细说明

2026-02-15 16:00:23
转载

导读
这是一篇面向游戏新玩家的详细基础机制指南,涵盖机器人属性、线缆使用、回收组装、船只功能、航行操作等核心内容,还涉及部分剧透内容,帮助新玩家理清游戏未明确说明的关键机制,避免因不懂机制过早放弃游戏,核心主关键词为游戏新玩家指南、机器人属性机制。

评论
共0条评论


最新更新
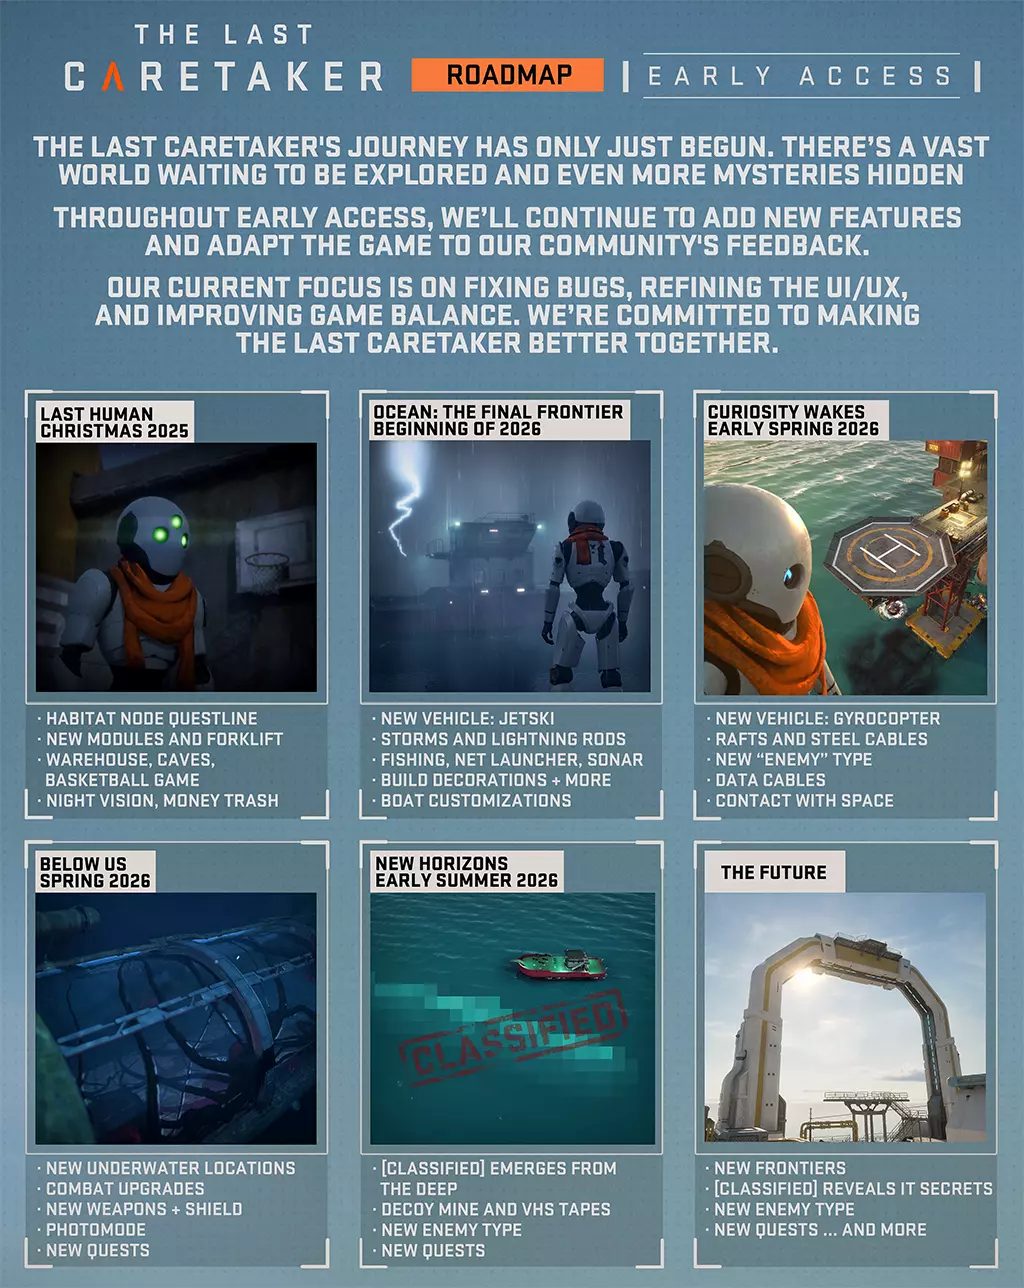
- 《最后的守护者》更新04:在我们之下 - 观看安蒂和杰克展示全新内容 — 各位管理员, 和安蒂以及杰克一起体验04号更新【在我们之下】的精彩内容,并回答社区问题吧! 更新内容: 1. 用于升空的回收陀螺仪 2. 可回收蓝图的陀螺仪服务…
- 《最后的守护者》更新内容4:下方世界已上线 — 《最后的守护者》Content Update 4:Below Us现已上线 守护者们, 《最后的守护者》的Content Update 4:Below Us现已…
- 《最后的守护者》3.5版本更新:暗影降临 - 观看安蒂与杰克试玩 — 安蒂和杰克将一同体验3.5版本:暗影降临更新,展示该更新所包含的内容并解答社区问题! 3.5版本:暗影降临更新是根据玩家反馈直接推出的。本次更新侧重于玩家日常游…
- 《最后的守护者》3.5版本更新内容:暗影降临 — 各位守护者注意!我们为大家准备了一个惊喜更新,现已面向所有抢先体验玩家推出。【更新3.5:暗影降临】包含了许多原计划用于更新4的修复内容。不过,基于社区反馈,C…
- 《最后的守护者》更新03:好奇心觉醒 - 改进内容 — 《最后的守护者》更新版本03:修复公告 2026年3月21日 - [更新03:Build 0.7.0.609056] 变更与修复: 1. 修复了特定物体可能丢失…
- Antti和Jack直播更新03:好奇心觉醒! — 《The Last Caretaker》更新内容:好奇苏醒 加入安蒂和杰克,一同体验我们的最新更新【好奇苏醒】,他们将展示此次更新带来的所有全新功能与内容! 为…
- 《最后的守护者》更新内容:好奇心觉醒 — 各位守护者们,大家好!“好奇苏醒”现已对所有抢先体验玩家开放。此次更新极大地推动了任务进展:你终于能与太空取得联系,海洋中出现了新的威胁,并且首次可以携带一些帮…
- 速通《最后的守护者》试玩版! — 在这段视频中,杰克巧妙地找到了速通我们增强版试玩Demo的方法。你是否也为《最后的守护者》想出了有趣的玩法?欢迎在我们的社区分享! 还在犹豫?下载最新升级的试玩…
- 人类的种子 — 在本指南中,我将分享如何在游戏中寻找种子的方法,这是我77小时游戏时长积累的一些经验和观察,相信很多人都不知道。 海洋 当我们在海上航行刷资源或只是在海上漂浮时…
- 《The Long Dark》性能指南 — 《最后的守护者》性能优化指南:助你充分发挥游戏性能。本指南中的部分建议或许同样适用于其他游戏。 为何需要本指南及前言 原因很简单…… 玩家们只想好好玩游戏,而不…