The Last Caretaker

The Last Caretaker

The Last Caretaker

欢迎来到The Last Caretaker社区! 
关注
48帖子·--新帖
游戏详情
全部
官方资讯
攻略创作
组队交友
问题反馈

《The Last Caretaker》更新内容:好奇苏醒 加入安蒂和杰克,一同体验我们的最新更新【好奇苏醒】,他们将展示此次更新带来的所有全新功能与内容! 为庆祝更新,我们还将在3月19日至3月26日期间在Steam平台推出首次20%折扣活动。 更新03:好奇苏醒 - 亮点: 1. 与太空的接触 全新的人类理事会及委员会系统,让已发射的人类能够通过终端获得席位并执行行动。 2. 新威胁 撞角鲨鱼、激光鲨鱼和大天使加入这个世界。敌人的生成更加智能,行为也更为谨慎。 3. 新故事内容 随着世界的扩展,探索新的任务和新的地点。《最后的守护者》更新内容 1. 你不再孤单 2. 性能与稳定性提升 旅途平安。 ——Channel37

--
--
--
--

由于部分内容涉及游戏内具体操作按键(如“Q”)且未明确游戏名称,以下为基于通用游戏语境的汉化内容: 入门小贴士 因为有些内容我也是经过长时间尝试后才弄明白,所以在这里为新手们提供一些小技巧。如果你们玩的是英文版,或者游戏提示未来会优化得更好,其中有些技巧可能就没什么必要了。如果我之后还发现其他有用的内容,会继续补充在这里。大家也欢迎分享自己的技巧,我会添加进去。希望这些能帮到一些人。 管道 请记住: 当你手持管道时,按住【Q】键可以重新收集管道。入口、出口、平衡: 连接管道时按下“f”键,可以调节电力、燃料、水和气体的流动方向。这样可以避免例如意外将船只电量耗尽到崩溃边缘的情况。 拉撒路基地供电: 我花了很长时间寻找拉撒路基地的电力来源。屋顶的总供电不是问题,问题在于各个舱室的供电。舱室实际上需要从外部单独供电。最简单的方法是从码头沿着电梯旁边铺设线路上去。这大约需要100根电缆。几台风力发电机就能满足需求。 船只 燃料不足: 船只并非一定需要燃料。你也可以仅使用电动机行驶。如果电量不足,你可以改为仅让柴油发动机运行。两种发动机都有开关可以关闭。 3/4前进挡 虽然踩油门快速到达目的地很诱人,但适当降低速度是值得的。在75%行驶速度下,柴油消耗量会减少近一半,而速度仅降低约10%。数字风暴: 100%推力 75%推力 柴油消耗 ~14000升/小时 ~6800升/小时 能源消耗 ~14千瓦/小时 ~6.3千瓦/小时 速度 ~35公里/小时 ~35公里/小时 建造: 你可以在船上安装太阳能电池板和风力发电机。 关于渔网: 船尾有一张渔网。当你抛出渔网后,它会随着时间装满,最多可达14.9千克。即使船只抛锚时,渔网也会继续填充。它始终是获取废料和生物垃圾的好来源。 工具 趣味拆解: 制作一个拆卸工具。使用它可以拆解大型物品,如叉车、鲨鱼残骸,尤其是(我花了很长时间才尝试)水雷。能量背包: 非常实用的工具。你可以用它短暂为物品供电,例如从终端获取访问代码,或者在外出时为自己充电,尤其是在你又一次不小心耗尽电量的情况下。 能量手枪: 能量手枪需要充电,它没有传统意义上的弹药。只需连接线路并等待充满即可。外出时,你也可以将它与各种能量背包连接,以获得更强的威力。总体而言,它仅适用于消灭大量小型敌人。目前无法用能量手枪击杀机械鲨鱼,我曾连接到飞船并持续攻击了5分钟也未能成功。弹匣:我不确定建造它有什么用,但你并不需要它。武器本身自带弹匣,你直接装填相应的子弹即可。

--
--
--
--
--
--

There are a few new player guides on here, but I wanted to make one that goes a bit further to also address some of the questions I have seen come up in those guides comments, on places like reddit, or discussions on steam. This guide also gets a bit into spoiler territory, so if you want to avoid those, it may be better to use one of the spoiler free guides on here instead. Intro This guide is intended as a more detailed and somewhat spoilery version of other similar guides I have seen here. The spoiler free guides are just fine, but they are limited as the nature of being spoiler free also limits their ability to go into more detail. I will not be covering mid to late game mechanics or builds here, just informing the players of certain things that are not clearly stated. The game does an ok job (so far) of explaining some things, but does not really mention others at all. Some of which are actually important to know in order to progress. The game does an alright job of leading you to figure these out on your own, but I have noticed that some players can have a more difficult time working some of these out and end up quitting before they even really start experiencing the game. I will try to order these tips in an intuitive way based on how the game seems to encourage you to progress, but don't put too much stock into what order these tips are placed as everyone plays and progresses differently. Basics of your robots stats On the surface, this is easy to understand. However, when I first started, I could not figure out why I was losing health despite not being hit by anything. I was just carrying stuff around and occasionally whacking some stuff with my trusty crowbar (I appreciate the Gordon Freeman inspiration there) that was not even getting close enough to hit me. What I didn't yet know is that all of the stats on your robot interact with each other in various ways. They were not separate one trick stats, like in most games. I will start with the top of the "enhancers" list and work my way down. Vitality - This is how much "health" you have. At 0 vitality you have 100 health points (HP). Each point into vitality is one HP. Fairly simple. This stat is deceptive as it interacts with the Battery stat in unexpected ways. I will go over that when I get there though. Engineering - This stat is mostly used for decreasing the time and power needed for assembling things on your robot or the fabricator. At max level a 50% reduction in build time and power consumption is quite significant. Certainly one of the more straightforward stats. Usually taken first by those with adhd who prefer not waiting too long for things to finish building/crafting. Haul Mastery - One of the objectively more important stats, this one allows you to flat out carry more weight in your inventory AND equipment. You get 1 Kg per point, so a total of 100 extra Kg, which is quite a bit. Considering later weapons like the Rifle and Flamethrower, weigh 20+ Kg's on their own, not to mention the weight of the ammo (yes it weighs a lot too), and backpacks, your looking at 70 or 80 Kg's fully loaded (if not more) in just equipment alone. This is important because as you carry more and more weight, the amount of power your robot needs per second goes up as well based on the percentage of total weight capacity used. This means that if you are carrying too much, not only will you move slower, but your robots battery will start draining extremely fast. This effect intensifies as the carried weight increases. Improved Hydraulics - This stat is quite contentious. Some players believe it is a waste of points as you can pick up most things you need to just enough to get the job done with 0 points in it. Some players think that it is necessary to quickly and efficiently haul heavy containers/objects. It really all depends on how you play and what your preferred method of salvaging/building away from your boat is. Either way, this stat allows you lift heavier objects easier and higher off the ground while using less of your robots power to do so. At 100 points, your lift capacity is doubled and the power required to lift things is basically negated compared to what it would be without points. Battery - Alright, this is the other objectively important stat, but also one that ties into how HP works as well. You start with 500 Wh of battery power and with 100 points in this stat you get an additional 2 kWh for a total of 2.5 kWh, which is five times more than what you started with. That amount can last you a long long time in situations where recharging options may be limited. Everything your robot does in this game requires some amount of battery power. This includes just standing there...menacingly. Hitting things in melee even costs power. Additionally, there is walking, crafting, salvaging, assembling, shooting, repairing, flashing (with your flashlight, put your pants back on), literally everything. So what happens when you run out of battery on your robot? Well...not much...at first. However, every second and every action will start to cost you HP as you have no power (here) left in your battery. If you are carrying a lot of scrap and equipment, and run out of battery in a location where the locals desire the taste of fresh robot, you have some very important decisions to make and fast. You are not screwed, but you are literally on borrowed time until you can get recharged, even a little. First, check to see if you have any "consumable batteries" in your inventory or equipped on your hot bar (highly recommended). If you do, eat(?) some of those and get enough charge back to make it somewhere you can fully recharge in peace. Alternatively, if you are wearing an "oni" backpack (backpack battery), you can hook that up to yourself by selecting it from the hot bar and selecting the option to connect it to you, then diverting the flow of power to your robot and out of the backpack. If you have none of these things, you may have to consider dropping all of the stuff in your inventory and booking it back to a spot you know you can recharge or find a consumable battery/power cannister. Every step and jump you take will consume your HP, not to mention every second you are not dead. After you recharge, you can come back and pick up all your stuff you dropped in your panic to not die. Pressure - This one can be a bit unclear at first until you visit your first underwater site. Pressure basically determines how deep you can go before you start taking HP damage, albeit slowly. Since you are a robot and don't need to do stupid human things like...breath, this stat is mostly just to limit how long you can be underwater below a certain depth. If you pop out of the water into an air pocket, you will stop taking damage (because you are a robot and don't need to breathe, obviously). The first place you are required to go underwater is only about 50ish meters down before you get into an air pocket, and you can go about 10 to 20 meters before you start taking damage with 0 points in this stat. Ultimately, not a huge deal right now until the devs start releasing more reasons to go down there. Scrapper - Depending on how you play, this stat can be seen as the opposite end of the Improved Hydraulics stat fan/hate club. If you spend a lot of quality alone time with your dismantle tool, this stat is for you. At max level it reduces how long it takes to scrap an object as well as how much power it takes from your robots battery. Some of the larger objects can take 300+ Wh's each to scrap, which is actually quite a bit when there are multiple to be scrapped. Coincidentally, those sorts of objects are also really heavy and unlikely to be carriable without a lot of points in Improved Hydraulics (sometimes not even with max points in it though). Power Management - This one is a bit unclear to me currently, so if someone wants to verify if what I am about to say is ♥♥♥♥♥♥♥♥ or not, please do so in the comments so I can stop embarrassing myself. As far as I can tell, power management either reduces power usage from everything your robot does, or it only reduces it for things not covered by other stats, like scrapper, or improved hydraulics. Things like walking, jumping, and flashing the flashlight. Either way, at max points it reduces whatever it is that it effects by 50%, which is definitely not nothing. Field Medic - This is a newer stat. It boosts recharge speed of power and health by up to 250%. This stat definitely seems to be more useful late game as you get more stat points into battery and/or vitality. At max level battery, it can take a decent amount of time to fully recharge your robot, even when you have more than enough power to do so. The throughput of power cables is still limited so this speeds that up considerably. Shock Absorber - Also a newer stat. Basically what it says on the tin. Reduces fall damage by up to 50% at max points. This is mostly for those who are...less...adept at jumping to high up ledges/ladders. Interestingly, fall damage is not actually referring to your HP, it is referring to your battery power...at first. As stated above though, once your battery power runs out, everything starts eating at your HP. So a longish fall may not actually kill you, but it will completely drain your battery and then reduce your HP considerably too. Basics of Cables Cables are fairly simple to understand how they work. Blue plug, blue cable, orange plug, orange cable. Easy Right? Well, there is slightly more that you should know in order to get the full use out of them. When you plug in a cable you can select what direction you want the contents of that cable to move by looking at one of the plugs for it and cycling through the options with the F key after connecting it. This does not apply to all things you plug into though, as some objects can only move the electricity/fuel/gas etc. in one direction. For example a Lumilite (solar panel), can only have electricity move out of it, not into it. So you cannot change the direction it will move. Same goes for all cannisters, you cannot put anything into cannisters, only draw them out. However, if you look at ones of the electrical plugs on your ship or a medium battery while plugged in, you have three options, not just two. Obviously, you have the 2 directions, represented by the arrows. So what is that third option that is just straight lines going across? That is the "balance" option (as I call it). The balance option will try to equalize the amount of power stored in whatever is plugged into it (based on current Wh stored, not based on percentage). So if you have 100 Wh of battery left on your robot and your ship has 200 Wh of battery left, the balancer option will recharge you only to the point where you and your ships battery have the same amount of charge, so your battery will only get charged to 150 Wh (or something close to it) until you direct the flow of electricity toward you to further recharge your robots battery. The same works in reverse, your robots battery can be used to recharge/balance your ship or medium batteries or to power stuff (never do this though). If you have the balance option on while your robot is at 100Wh of battery but your ship battery is full, it will fully recharge your robot as your batteries maximum quantity of Wh's is likely not high enough to reach a point where they will be equal. Although that being said, it is generally faster to redirect the flow into your robot to recharge faster (as far as I have observed). All the same mechanics apply to fuel/water/gas cables and storages as well. Basics of Recycling/Salvaging Recycling (I call it salvaging) is fairly straight forward as well, but the game does not really explain the more subtle details, nor does it really tell you how to determine what to look for while trying to get more of a specific resource. To start with, there are two different ways to salvage objects in the world. The first way is to pick an object up and throw it directly into the Recycler, provided you are able to actually lift the object, this is the more "power efficient" method of salvaging as it only has one step to get the resources from it. The second method, is to use the dismantle tool on the object you want to recycle. This tool is available to be "learned" from the skill tree once you reach level 2 and does not require any skill points to obtain (I feel like they should just unlock it for you automatically at level 2). Once you have unlocked it, you can press T to open the equipment menu and select the dismantle tool to use it. Alternatively, you can add it to your hot bar (by right clicking it and selecting which number to assign it to after pressing the T button) so you can just press one key to use it. An important thing to note about using the dismantle tool, is that it does not give you raw resources like iron or plastic from most objects. It will give you various kinds of scrap instead (the same kind of scrap that you can pick up off the ground), which can then be tossed into the Recycler all at once by hitting the F key after interacting with it (or one at a time if you prefer). Each time you use any tool (repair tool, dismantle tool, and flashlight), it will cost a certain amount of power from your robots battery, so make sure your battery has enough in it before trying to use it, otherwise you will start to take health damage. Lastly, salvaging whole objects or scrap may not always give the exact same quantity or types of the resources you would assume you would get from them. If you take a plastic pallet and toss it into the Recycler, you will always get 2 plastic (as far as I can tell). However, if you dismantle that same pallet down to the 2 plastic scrap it gives you and toss those into the Recycler, you will sometimes get 1 or 2 rubber instead. If you hold your mouse over each piece of scrap in your inventory, it will tell you what possibilities you may get from salvaging it. So, plastic scrap (oddly) has a chance of outputting rubber instead as it is listed in the details for that piece of scrap. Ultimately, either option is fine, but if you want to guarantee certain resources come out of it, you may be better off trying to haul the entire object to the recycler instead of dismantling it (as long as you can actually lift it). The power cost for using the dismantle tool is not usually a big enough deal to bother considering when deciding which one you want to do, as long as you have enough. Basics of Assembling Assembling modules you want to make, like the Lumilite (solar panel) mentioned earlier, is also relatively simple. You create the parts needed then build the module you want to place. Alternatively, you can do this in reverse, by creating the module where you want it to be placed first. This will leave a red outlined (ghost) version of it in place. Once the ghost of the module is in place the game will automatically add the parts needed to build it in your task list in the top left corner with your quests. If you look at the build list on your robot or in the Fabricator, you will notice that there are some numbers in the corners of the pictures of each module/part. The top left (light blue) numbers might say something like 0+3 or 30+25. The first number is how many of that item you have in your robots inventory right now. The number after the + is the amount of that item you are currently able to build with the materials you have available (either in your inventory or in storage nearby). If you have built a module but do not have all of the parts needed to assemble it, there will be a yellow square in the bottom right corner of the picture of the parts needed to build it. That number is how many total parts are needed, despite how many you may already have in inventory/storage. If you have built multiple items and they are queued up, then you will see a dark blue square in the top right corner, indicating how many of those items are in que to be built currently. There are two ways to create parts for modules, you can do it from your robot, or a Fabricator. Doing it from your robot gives you the convenience of not needing a Fabricator, but it is also much slower, requires your robots power, and can also be less resource efficient (if the Fabricator has a production module attached to it). The other major drawback to producing things from your robots build menu is that you cannot be carrying objects or holding anything in your hands, like a tool or weapon, while your robot produces the items you set it to make. For instance, you cannot create more ammo for your rifle, while wielding the rifle. My recommendation is to always build what you need from a Fabricator if you can, especially when you are producing large amount of things like cables or ammo. In general though, assembling only requires the parts for it to be either in your inventory or in a storage that is close enough to be able to supply the needed parts. If you have the parts stored in a box, but the module is not getting built, you may need to move the storage closer before it registers, or put the parts in your inventory and carry them to the modules ghost. Tour of your ship and its functions In the starting area, you will find your ship sitting, docked and anchored within the safety of the Sanctuary. A bit...worn by the test of time, but overall in fairly good shape. I will be using nautical terms here when referring to where objects are located on the ship to make it easier to explain. Those terms are: Front of the ship when manning the wheel in the cabin is the "bow" of the ship Behind you when manning the wheel, at the back of the ship is the "stern". The left side of the ship when manning the wheel is the "port" side. The right side of the ship when manning the wheel is the "starboard" side. There are more directions, but to keep it simple, I will just use those. You didn't come here for nautical lessons. Starting at the bow of the ship and moving backward toward the stern. At the very bow of the ship, there is a lot of empty space, currently filled with a bunch of random boxes that can be salvaged, as well as some cannisters and a diesel engine you should probably plug in to your ship before you leave. I would recommend using this area to build things on your ship that need a lot of space, like solar panels and wind turbines, but that is up to you. There is also one of your anchor reels on the starboard bow, but you cannot interact with it directly. Further back toward the center of the ship, directly on the deck, is what I call the "galley". You can heal and save inside this room, which also happens to have doors that can be closed, if you want or need to. I personally use this room for storing power/fuel cannisters at first, but you can do whatever you like with it. Using it for storage boxes is also not a bad idea as it is centrally located on the ship, meaning basically anywhere on the ship can be reached for the purposes of assembling parts/modules. Directly above the galley, is the "Wheel house". You can access it by the ladder on the starboard side of the galley, or from the stairs on the port side. I am unsure why they didn't put the ladder in a place that would make it preferable over the stairs if coming from the stern or starboard side, but...it is what it is. Inside the wheel house is...the wheel. You use this to steer the ship and the other controls to move forward and backward, as well as raise and drop the anchor. I wish it also had a door that I could close, but it does not. It does however, have an electrical and fuel plug, so at least you can recharge while you travel. The map console is located to the right of the wheel. There is also the ship power breaker in this room, but...I usually leave it be. Moving further back from the wheel house and galley is the stern of the ship. On the starboard side is a very subtle but also very useful machine of the ship. A "drag net" as I call it. When you first board the ship, it will be raised, but if you interact with the switch on it, it will insert the container into the machine and drop the net into the water. If you interact with it again, it will raise the net and pop out the container, which may contain up to 15 Kg's of salvage and/or bio material. Both of which are extremely useful and basically free to gather. Once the net is dropped into the water, it will start to gather stuff into the container. Once the container is full (at 15 Kg), it will not gather anymore until the contents are removed and the net dropped back down. An important note is that even if your ship is anchored/moored, it still gathers materials, just much slower. So even if you anchor your ship and go inside a building for a while, it will continue to pick stuff up. I recommend always keeping it gathering and emptying it when it is full. You can tell if it is full based on the display next to the switch on it saying 15 Kg (possibly 14.9 Kg's). You don't need to pull up the net to check the box to see if its full or not. Continuing at the stern, in the center, is the water pump. You are likely not able to do anything with this yet if you are just starting in the sanctuary. Once you reach level 7, you will get access to unlock water cables, extenders, containers, and the water purifier. The purifier allows you to desalinate the water into fresh water, which is what is stored in water containers and used in other things later. Don't worry too much about it right now though. Moving on to the port side, next to the water pump, is the other anchor reel. As with the one on the starboard bow, you cannot interact directly with it as it is controlled from the wheel house. Alright, now with the deck out of the way, from the stern of the ship you look toward the bow and you will see stairs descending below deck to the engine room. The engine room actually has two engines in it. One is electrical (blue), and the other is diesel (yellow). Each engine can support up to 5 engine cylinders (the blue boxes or yellow cylinders with rollers on top) that can be "plugged in" by placing them on top of their respective slots. You can remove and replace each cylinder whenever you like as you can create better versions of each type as you progress in levels. You start with the basic version at levels 2 and 3, and then progress to the "booster" (level 2) version at level 6. Then finally the "super booster" (level 3) version at level 13. You can mix and match these with other versions as you have 5 slots. So you can have 4 basics and one super booster if you like, for some reason. Each cylinder adds a certain amount of speed to the boats maximum speed, depending on its level. If you run out of diesel fuel, your diesel engines will shut off, but if you still have power left in the ships batteries, your electrical engines will still function, but you will have lost at least half of your ships speed until you refuel (or however much of your ships speed was coming from the diesels). The reverse is also true, highly recommend getting solar panels and wind turbines on your ship asap to prevent this. Use cannisters of power (blue) and/or fuel (yellow) as emergency resupplies until you can get bigger storage tanks/batteries built on your ship. Note that Red cannisters may say Petrol, but they do not refuel your ship, only yellow diesel ones will work. They are different types of fuel used for different things, even though they use the same type of orange cable. If you run out of both fuel and power...you are dead in the water until you get back one or the other. Avoid at all costs. I recommend making sure all 5 slots of both of them are filled with at least the basic version before leaving the sanctuary. You can find at least 2 of each either on your ship or hidden around the Sanctuary. You can make the rest of them using a fabricator. The speed you get from each cylinder is worth the higher fuel/power consumption of having them all plugged in (in my opinion). Ok, now moving further in from the engine room, beyond the closed door, is the "craft room" (I like to call it that ok?). Arguably, one of the most important rooms on the ship. It contains a Fabricator and a Recycler. You will need to plug both of them into power plugs before using them, preferably the ones closest to their sockets next to each machine, but any on the ship will do. Once you do, you will be able to turn them on and off (if you need to conserve power as they still use a small amount even when idle) whenever you like, using the switch on each one. There are also convenient fuel and electrical gauges located in that room on the wall toward the bow (right above the power plugs). These not only show you how much fuel and power you have, but (generally) the rate at which you are generating/using the fuel and power. Finally, moving toward the bow past the craft room is the "cabin". It contains some non-functional benches and a desk. I usually use it for additional storage at first, and later for other production machines. Other than the two power plugs in here, nothing really important of note. Hopefully the devs do something with this room later. Basics of Sailing Once you have finally opened up the docks doors and readied your ship, it is time to set off into the vast blue unknown. Controlling your ship is surprisingly simple and mostly intuitive. W and S control your throttle/speed. You can see how much power you have going forward or backward on the bottom right (left of your speedometer) with the vertical bar that fills up and down as you throttle up and down. A and D steer your ship left and right, as noted by the horizontal bar on the bottom right (below your speedometer). Spacebar raises and drops your anchor. Note that when dropping your anchor, they do take some time to actually hit the bottom, so there will be a delay between when you hit spacebar and when your ships anchor actually stops your ship. An interesting (and nice to have) feature of your anchor is that if you drop it and it hits the bottom while you are moving, it will not only stop your ship very quickly, but also pull your ship back toward the anchor from where you first dropped it. So if you are going too fast in an attempt to dock, and drop your anchor at the right spot, your ship should be pulled back so you end up stopping much closer to the dock than you would otherwise. It may not necessarily pull you all the way to where you dropped it though, but definitely faster than having to back all the way up or turn around to approach the dock again. The F key, changes your view from 1st person view to a 3rd person view of your ship. If you are in 1st person view you can even look at the map to the right while driving the ship, although you cannot control it while viewing the map. Still a nice convenience. The H key is your horn. Honk to establish dominance at all times. Honk for victory. Honk for Humanity. Honk. Within your speedometer on the bottom right, you can see your speed in KM/H (unsure why they don't also have the option for knots or Freedom Units but I will let it go). Distance you have traveled in total. How much fuel you have left. How much power you have left. Lastly, if for some reason you like to immerse/torture yourself. You can look at the console the wheel is connected to and notice there are colored buttons on it that can do some of the functions that you can also control from the wheel (mostly). The left most (green) one controls the horn (obligatory honk required). The one to the right of the horn is the raise/lower anchor button. On the right side of the wheel are the buttons to turn on/off each of the two engines. I can sort of see turning off the electrical one if you need it for producing items on your ship and don't have enough power for your ships engine and the machines at the same time...but still...why not just wait till you are anchored to do that instead? Turning off your diesel engine though...not entirely sure why you would want to do that, but I guess it is nice to have options. Finding where to go now You have finally set sail and dodged the obvious sea mines (at least I hope you did). There are plenty of things to explore, but you will be directed toward a navigational beacon in your quest log. You don't have to go there first if you just want to wander, but I would recommend at least going to this first one quickly as it will show you where things are on the map within its range, namely the power and refueling platforms, which you will definitely need very soon. Navigational beacons are usually covered in various kinds of...wildlife(?), that you will probably need to deal with to get it working. How you do that is up to you. Your first step is to power the platform the beacon is on. Usually this is in a small room with a plug on the outside and inside of the wall with the door going into it. That is how you can keep the door closed while also powering the platform, if you choose to do it that way. Inside that room you will need to connect the power to the main breaker the same way you did at the sanctuary when you started. You can either hook it up to a power cannister, to give the platform some power for a good 20 or so minutes (never really counted but a good amount of time nonetheless), or connect it to your ship to draw power from it, or you can repair/build solar panels and wind turbines built on the platform and use those. Entirely up to you. Once you have the platform powered, you now need to find the navigation console somewhere inside the main building on the platform. Also, likely covered in the local...fauna. After you find the console and clear out the locals, you are halfway done. You now need to power the navigational beacon using the power plug going into the console. Again, how you do it is up to you, any of the methods mentioned previously for powering the platform will work for this as well. Just know that it will likely require a significant amount of power to charge up fully. You can see the progress of the nav beacon charge on the top left corner as a task, near the quest objectives. While you have the navigational beacon charging, it is time to fix the beacon itself. This usually consists of climbing up to the top of a very damage tower using the very damaged scaffolding. However, once you reach the top (or sometimes halfway points along the way) there will be a ladder you can let down by interacting with it, so you don't have to climb all the way back up again if you fall or don't have the materials you need to repair the beacon. Trust me, you will appreciate them being there once you let them down. Alright, so now you reached the top. Repair the damaged breaker at the top of the tower, interact with the ladder to let it down, and climb back down it (or try to jump into the water from there if you are feeling spicy) to the room with the nav console you were charging. Once it is fully charged, you should be able to flip the switch on the beacon console to activate it and it will scan the area and show all the areas of interest (above and below water) in a massive range. Note that you do not have to repair/use a nav beacon to be able to visit a location and have it show on your map, this just makes it easier to find various locations within its range without wandering around and running out of fuel and power in the process. It is at this point that I would highly recommend noting where the fuel depots and power stations are on the map so you can head toward the ones you need most at that moment. But you do you, I am not your dad. After you and your ship are prepped and ready, you should have a quest to head to the Lazarus Complex. So off with you. Honk your horn. Save Humanity. Honk your Horn again. Conclusion This is meant to be more of a detailed guide of how to get started, which is why I stopped where I did. I added additional information to some of the more basic mechanics as I noticed some people just need/want more information on certain things, and that's ok. Telling them to "just google it" is the dumbest ♥♥♥♥ ever and I wish people would stop doing it (LMGTFY in particular is my hated nemesis). I also purposely did not start listing off "advanced" techniques like building stuff on the sides of your ship or getting into mid to end game mechanics like transporting/making humans or making the ingredients to make humans. Those deserve their own guides, and I am sure someone else is willing to go in depth on those subjects. If anything I stated in this guide is incorrect or outdated (other than my recommendations as those are just my opinions), let me know in the comments and I would be happy to correct them. If you have any questions about anything I did or did not cover in this guide, I would also be willing to entertain those as well as I am sure I missed some things that probably should have been included here. I have ADHD and probably forgot to add it along the way.

--
--
--
--
--
--

在本指南中,我将分享如何在游戏中寻找种子的方法,这是我77小时游戏时长积累的一些经验和观察,相信很多人都不知道。 海洋 当我们在海上航行刷资源或只是在海上漂浮时,如果看到空旷的海面上有飞翔的天使,那就意味着往水下看,那里通常会有装着种子的胶囊。

--
--
--
--

自定义本地化。 讨论主题重复。 信息 讨论主题重复 说明: 解压到游戏文件夹(SteamLibrary\steamapps\common\Voyage),即可使用。替换英文本地化,不覆盖文件。 提示: 如果你的电脑配置较低导致游戏卡顿,可在游戏启动参数中添加-noraytracing。此外,还可以使用优化工具。更新器 开发者页面上可以找到该程序的最新版本以及主要使用说明。 如需为游戏《最后的守护者》配置翻译更新,请获取翻译作者置顶帖中的公开档案直接链接。 游戏文件的位置路径如下: %SteamLibrary% steamapps common Voyage 其中%SteamLibrary%是Steam库文件夹的完整路径。Steam库中D盘游戏的Updater软件设置示例

--
--
1
--
--
--

对付滚轮小子和激光小子的另一种方法,从1级开始就适用。 这是一份关于克兰克族已知的最有效的撬棍技巧指南。 什么是滚轮小子/激光小子? 它们是大型圆形敌人。 滚轮小子是灰色的,会开枪。 激光小子颜色稍浅,会发射激光并生成小型敌人。 那么如何让它们“安分”下来? 作为一名强大的PK玩家,你只需近战接近它们,尽情挥舞撬棍即可。 它们没有任何近战攻击能力,所以要极度激进,把它们打垮。 不过它们会尝试后退,这可能会让你陷入更多敌人的包围,所以要尝试通过改变你冲向它们的角度,将它们引诱到空旷区域。 重复上述操作,直到它们爆炸。 战利品 恭喜你,玩家!你击败了那个机械敌人,现在可以拾取它的战利品了。 拆解它们需要消耗大量能量,所以在使用研磨机处理它们那些可怜的电路之前,先去给自己充能吧。 而且它们相当重,你很可能无法把它们拖到回收机那里,不过我从没试过,毕竟谁会把强化点加在力量上呢,对吧? 为什么要这么做? 为什么要选择这种方式,而不是其他更安全的拆解机器人的方法呢? 因为你在1级时就能这么做,不需要任何资源、弹药或其他东西,只需要消耗挥动撬棍所需的能量,就像戈登·弗里曼那样。

--
--

在这段视频中,杰克巧妙地找到了速通我们增强版试玩Demo的方法。你是否也为《最后的守护者》想出了有趣的玩法?欢迎在我们的社区分享! 还在犹豫?下载最新升级的试玩Demo体验一下吧。 如果你已准备好深入我们被洪水淹没的世界,现在正是入手抢先体验版《最后的守护者》的绝佳时机,踏上在被洪水淹没的地球生存并拯救人类的史诗之旅! 如果你玩过试玩Demo或完整游戏,在Steam上留下你的评测将为我们提供宝贵反馈,帮助我们改进游戏。

--
--

船只航程的简要计算 引言 这与其说是指南,不如说是计算依据。我想知道船只的航行距离,于是进行了一些计算。如果发现任何错误,请告诉我,我会进行修正。请注意,英语并非我的母语。 条件 我在以下条件下进行了计算: 游戏仍处于测试阶段,接近第二次重大更新发布 船只始终以100%油门行驶 引擎已达到最大配置(每个引擎配备5个顶级气缸/助推器) 未考虑其他因素或许可以略微调整波浪的速度和范围 射程测量 我测量了满柴油箱、满中型电池以及两者结合时的行驶距离 仅使用柴油,一箱油:以约30公里/小时的速度行驶约3.8公里 仅使用电力,一块电池:以约20公里/小时的速度行驶约3.5公里 两者结合使用:以40公里/小时的速度行驶约6公里(这意味着速度提升了10公里/小时,但续航里程减少了1公里。柴油在行驶约4.8公里后耗尽) 为了进一步计算,我们假设永远不会耗尽电力,并且始终同时使用两种引擎。这意味着每6公里消耗2000升柴油,即每1公里消耗333升柴油。 石油转化为柴油 可以通过蒸馏塔生产柴油。转化率并非1:1,而是……1120升原油可转化为2000升柴油,或者2000升原油可转化为3560升柴油。这意味着在船上储存原油而非柴油,可获得约178%的额外收益。 储存空间:船上的空间有限且至关重要。原油储罐与柴油储罐的容量相同,均为2000升,但占用空间更小。在实验中,相同的方形区域内可放置15个柴油储罐,却能放置20个原油储罐,因此可获得额外33%的空间收益。 综合收益:若将转化率和储存空间的优势相结合,原油相比柴油的综合收益系数约为237%(计算方式为178%×133%或1.78×1.33×100)。直接对比数据如下: 2000升柴油 = 6公里 2000升原油 = 约4735升柴油 = 约14.2公里 实际续航里程 根据船只搭载的原油储罐数量,以下是几种续航估算: 1个原油储罐 = 14.2公里(全速行驶约21分钟) 5个原油储罐 = 71公里(约1小时46分钟) 10个原油储罐 = 142公里(约3小时33分钟) 25个原油储罐 = 355公里(约8小时53分钟) 50个原油储罐 = 710公里(约17小时45分钟) 结论 储存原油!你可以轻松在甲板上放置50个储罐,这相当于237000升柴油。这对于任何长途航行来说都应该足够了!

--
--
--
--

《最后的看守者》。纯环境音效。游戏玩法。 《最后的看守者》。火箭补给。 
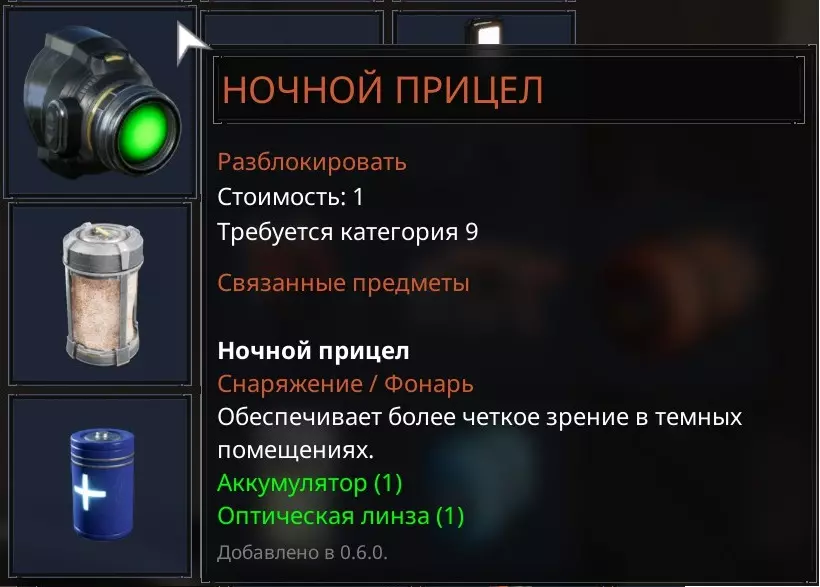
如何给火箭补充燃料以及生产燃料、柴油、蒸馏水、氧气和甲烷。

《最后的守护者》开启冒险。第一章 我们醒来,开始积累足够的资源和等级,为踏上拯救人类的旅程做准备。 《最后的守护者》49号信标与船只清理。第二章 升级并整理船只,然后启动49号导航信标。 
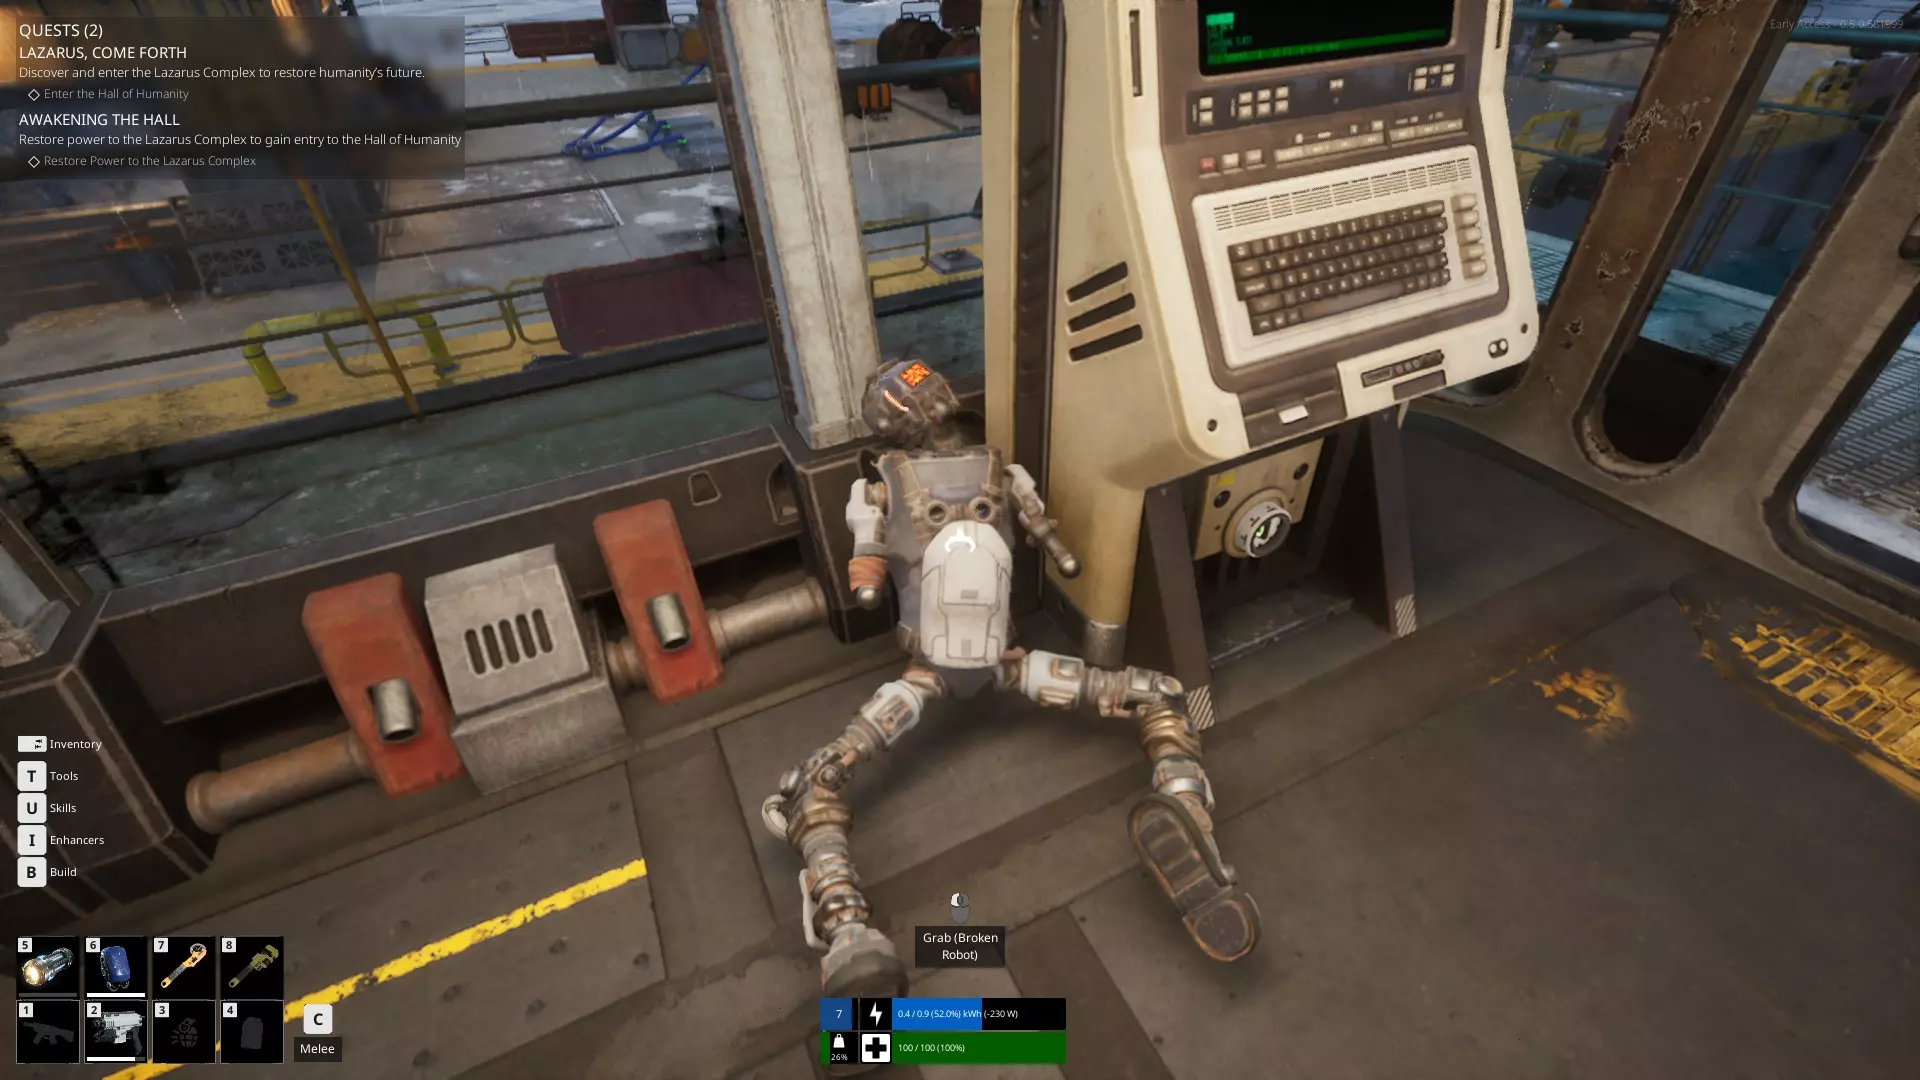
《最后的守护者》加油站与拉撒路基地。第三章 加注柴油,并开始为拉撒路计划的设施供电。 《最后的守护者》更多拉撒路内容。第四章 修理孵化器和信号装置。 《最后的守护者》资源获取与孵化器。第五章 让孵化器投入运行,并对基地进行资源收集。 《最后的守护者》猎户座氦气储备与阿尔法中央仓库。《最后的看守者》第7章:阿尔法中央仓库 修复了猎户座氦气储备的能源问题,在修复猎户座的电力并清理垃圾后,我们前往阿尔法中央仓库并进行熏蒸。 收集资源,进行熏蒸并提升等级。 《最后的看守者》第8章:双子座氦气储备 启动并刷取空间站资源。我们到达了陵墓。 《最后的看守者》第9章:诺福克陵墓 捕获了目标物品。 《最后的看守者》第10章:种子、清理与胶囊 启动设备,进行熏蒸,并获取了第一颗人类种子放入胶囊中。 《最后的看守者》第11章:土豆、吉他与埃菲尔铁塔图纸 创造了一个美男子,差点被一条2吨重的凤尾鱼吃掉。

--
--

船只在从一个区域进入另一个区域时突然停止移动,既不前进也不后退,对操控无反应并停留在原地,即使改变方向或尝试转向也是如此。 解决方法 1. 跳出船外 2. 向前游离船只至少150-200米(50米对我无效) 3.回到船上。返回后,船会再次开始移动。其他解决方法:在讨论区看到过加载早期存档的方法。我有两个间隔10分钟的存档,但都没能解决问题。

--
--

我不确定是否有人提到过,但可以稍微控制一下管道混乱的问题。 可以通过连接器,让多个液体(输油管道)或气体(气体软管)同时通过一条管道输送。例如,在加油时,对于机油、柴油和汽油,只需要一条管道。 也就是说,如果你有一个机油罐、一个柴油罐和一个汽油罐,只需铺设一条加注和排空管道。在油罐前安装一个连接器,就可以同时给这三个油罐加注或排空。即使在炼油厂直接安装一个连接器,将汽油、柴油和机油进行所谓的短接,也可以用一条管道继续输送。游戏会忽略流动方向。此外,不再需要三条管道,只需一条即可。重要的是要使用同时具备分流器和合并器功能的连接器。这一方法同样适用于甲烷和氧气。希望我已经解释清楚了。

--
--