换一换
换一换 


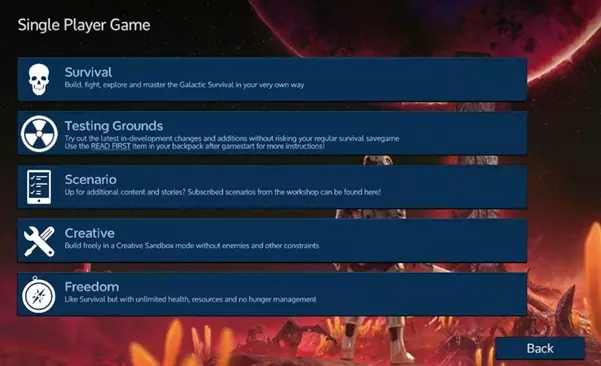
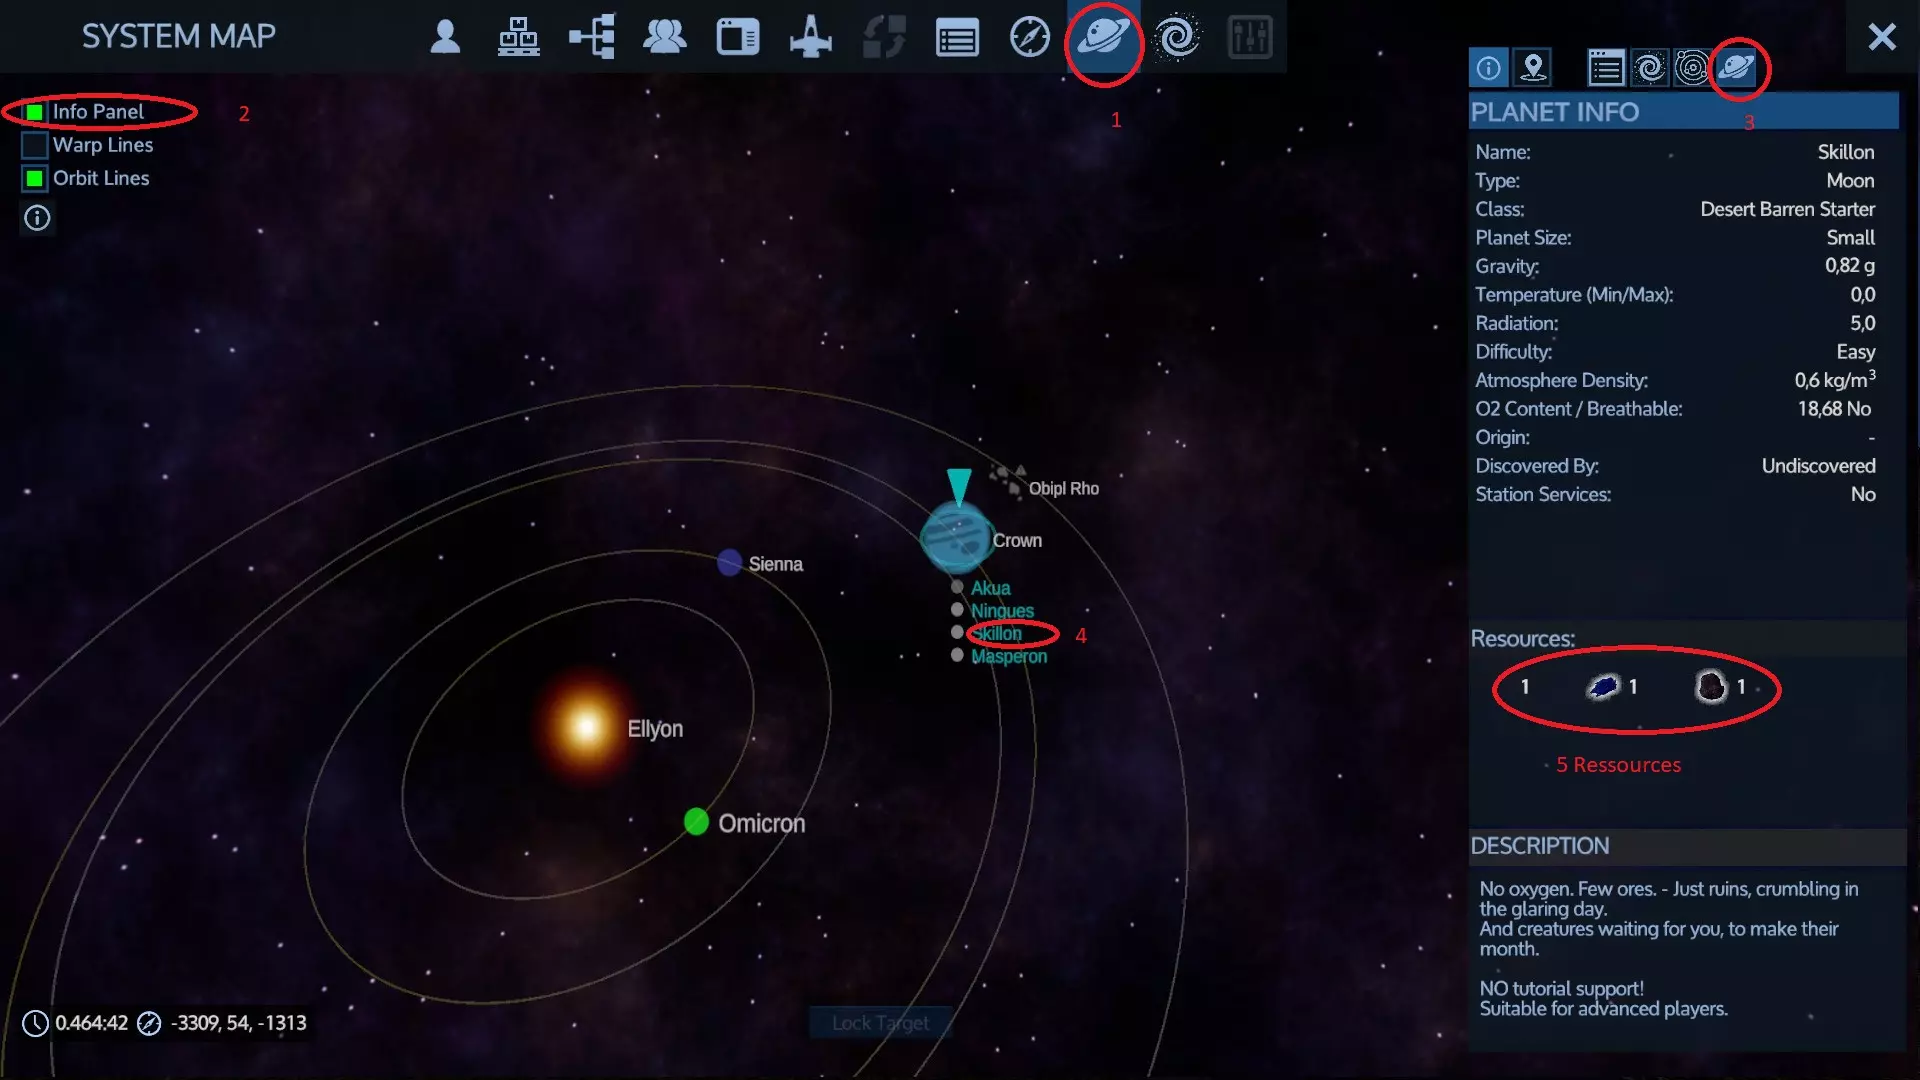
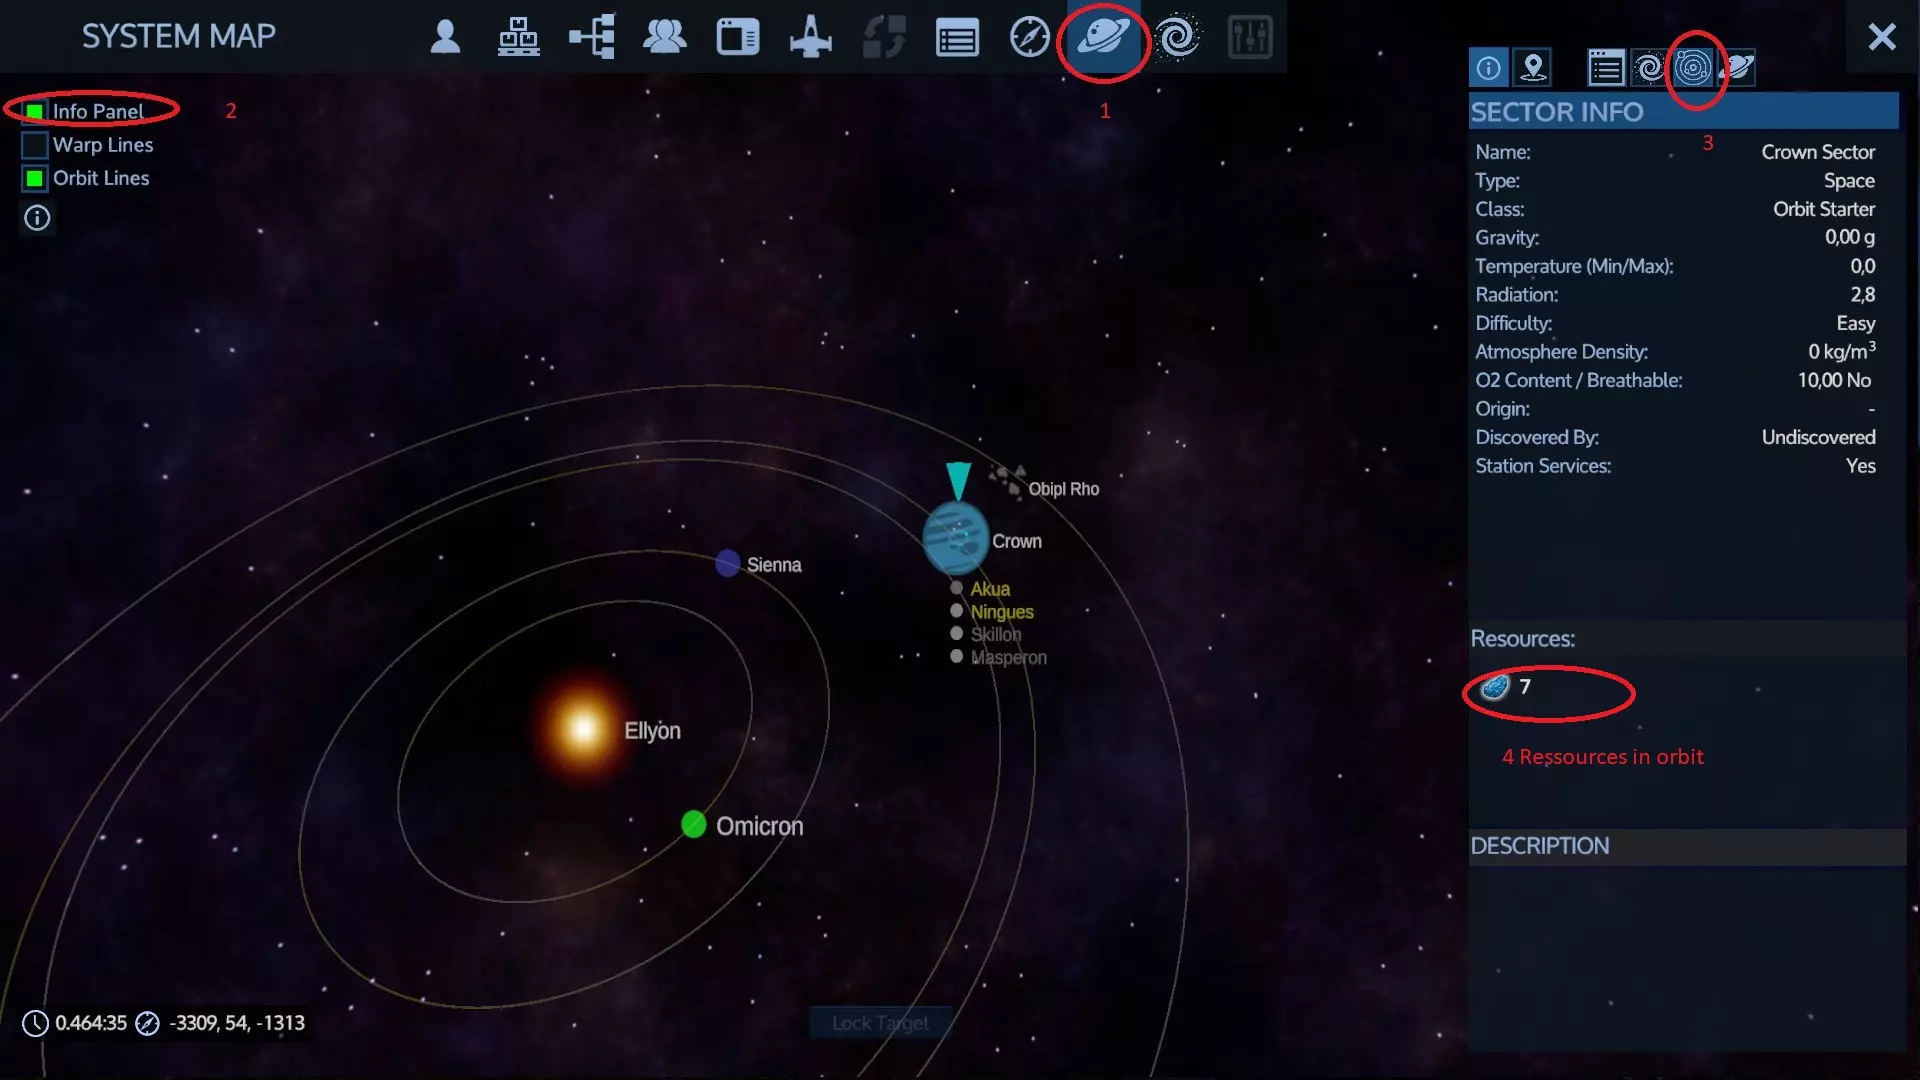
Essential things about how to get you started in the game, where to find what etc. including some basic combat tips How the game works, What items do you need, how to find them, what they do etc. Before going deeply into the game there are some essential basics to know about how the game works. First, let me say it immediately: Skip the tutorial in the game, it's useless and a waste of time, you won't learn anything really important. There is a F1 > Empyriopedia section in the game but you will be utterly lost about what to find in it because there is no search, no index of the items, nothing whatsoever to help you FAST, othwerwise you must take the time to scrutinize everything in it but that's not why you are playing a game... So forget about that and instead read the following to get you started efficiently and... ...ignore all the following at your own peril! Tips about how to read this guide: If you are a returning player or a new player searching something in particular, then it's best to scroll down this guide and look on the right side at the different chapters containing topics you are interested in. Other than that, I highly recommend to read the next 4 chapters because they are of central importance for the gameplay. The other chapters are more intended as a reference, good to read when the time comes to know more about these mechanics. The Tech Tree (F3): This will be your reference point for all sort of devices and items. It will display all common tools and items you're using in the game sorted by the different vessels or bases that can use those items. However it doesn't contain everything what's in the game, see the points below about Constructors. Howering your mouse over an item will explain what it does, how to craft it, what you need for it. The tech tree is the only interface that I advice you to examine in-depth, take your time, hover your mouse over the items and you get all possible infos. Don't be one of the 95% of players asking stupid questions in the forums who have never used the tech tree other than unlocking stuff and not reading the item descriptions. That doesn't mean you should read everything from A-Z, but every time you don't know something about an item and if you can't see it in the Constructor's interface (which will give the same info) then the Tech Tree is the first place you should look into. Crafting and Constructors Other than to survive and explore this game is about crafting and building. When you start you have the Survival Constructor (TAB > on the right side), this one contains all important SURVIVAL DEVICES (Heater/Cooler, Water Condenser for O2, Portable Constructor). Hold your mouse on them to read their description, it will tell you what you need to find in order to craft these devices. Other more advanced constructors will NOT have these devices in their list, so don't forget about this Survival Constructor later in the game! You should craft a Portable Constructor as soon as you can, only with this one you will be able to process basic resources like Iron, Carbon, Silicon, Copper into more advanced materials and craft some basic tools and weapons. A very basic resource is called CRUSHED STONES, an element with which you can produce the basic resources (see end of last paragraph) with every type of constructor. This element is found by harvesting stones laying around everywhere when you start and gathered more quickly and in bigger quantities later when you mine ore deposits or asteroids, it will always be a good side-product when mining ores. As for Constructors, they come in different sizes and capablities, essentially you craft the higher one with the constructor you already have. Constructors and their craftings is not everything what's in the game! If a constructor cannot craft something or if you don't see an item in the interface then you must or unlock it in the tech tree (F3) first or you need a better constructor to craft it. Or you must buy the item because you cannot craft it at all. Tip 1: Some rare and very useful items cannot be crafted and are not in any vendor's stocks to buy them, you get them as rewards for reaching certain XP point totals or by concluding with success a mission chapter. Visit important space stations, look and interact with GIN consoles! Also occasionally, when invading difficult POIs or ships in space (more about this in my Logistics chapter here below) you may find these items in a loot container, generally red ones, but don't rely on finding what you need, what you find is random! Tip 2: A fast way to search for an item in the Contructor UI is to chose 1 of the 5 categories, filter to 'Show All Templates' on the right and then enter parts of the item name in the search box which is located on the right after the word 'TEMPLATES'. The item will then be filtered in the display below, hower your mouse over it and read its description. Some items cannot be crafted at all and you will not see them in the tech tree. Important examples are: Weapon upgrades, medium and heavy armor suits, armor boosters (except the EVA booster), night vision goggles, mining cores that you need for making autominers. Except when you are so lucky to find these items in some loot container, you must BUY these - among many other things - at NPC vendors located in planet bases or in space stations, and this also means that if you don't explore enough then you won't find important stuff or loot that will help you when you are still in a early stage. How to find resources To find resources look for stones in the wild or in the water on planets or use the different maps. Get familiar with the planet map (M), the orbital map (M), the system map and galaxy map, take note of the help and display tools, activate the box on the upper left of the system map to activate the detailed view, don't skip doing this because you need it to display where the different resources are, namely asteroids or ore deposits on planets. Vendors in appropriate outposts or some space stations will also sell all kind of ores and 2-step produced materials but you will need to explore and find them, for this also pay attention to the section "Station Services" in the info panel for planets and orbits, if it says 'Yes' this tells you that there is at least 1 important station somewhere to discover. The following 2 pictures show what you should select in the System Map for searching resources, on planets and in orbit. Tip: Hovering your mouse over the resource symbol will tell you exactly what this resource is.
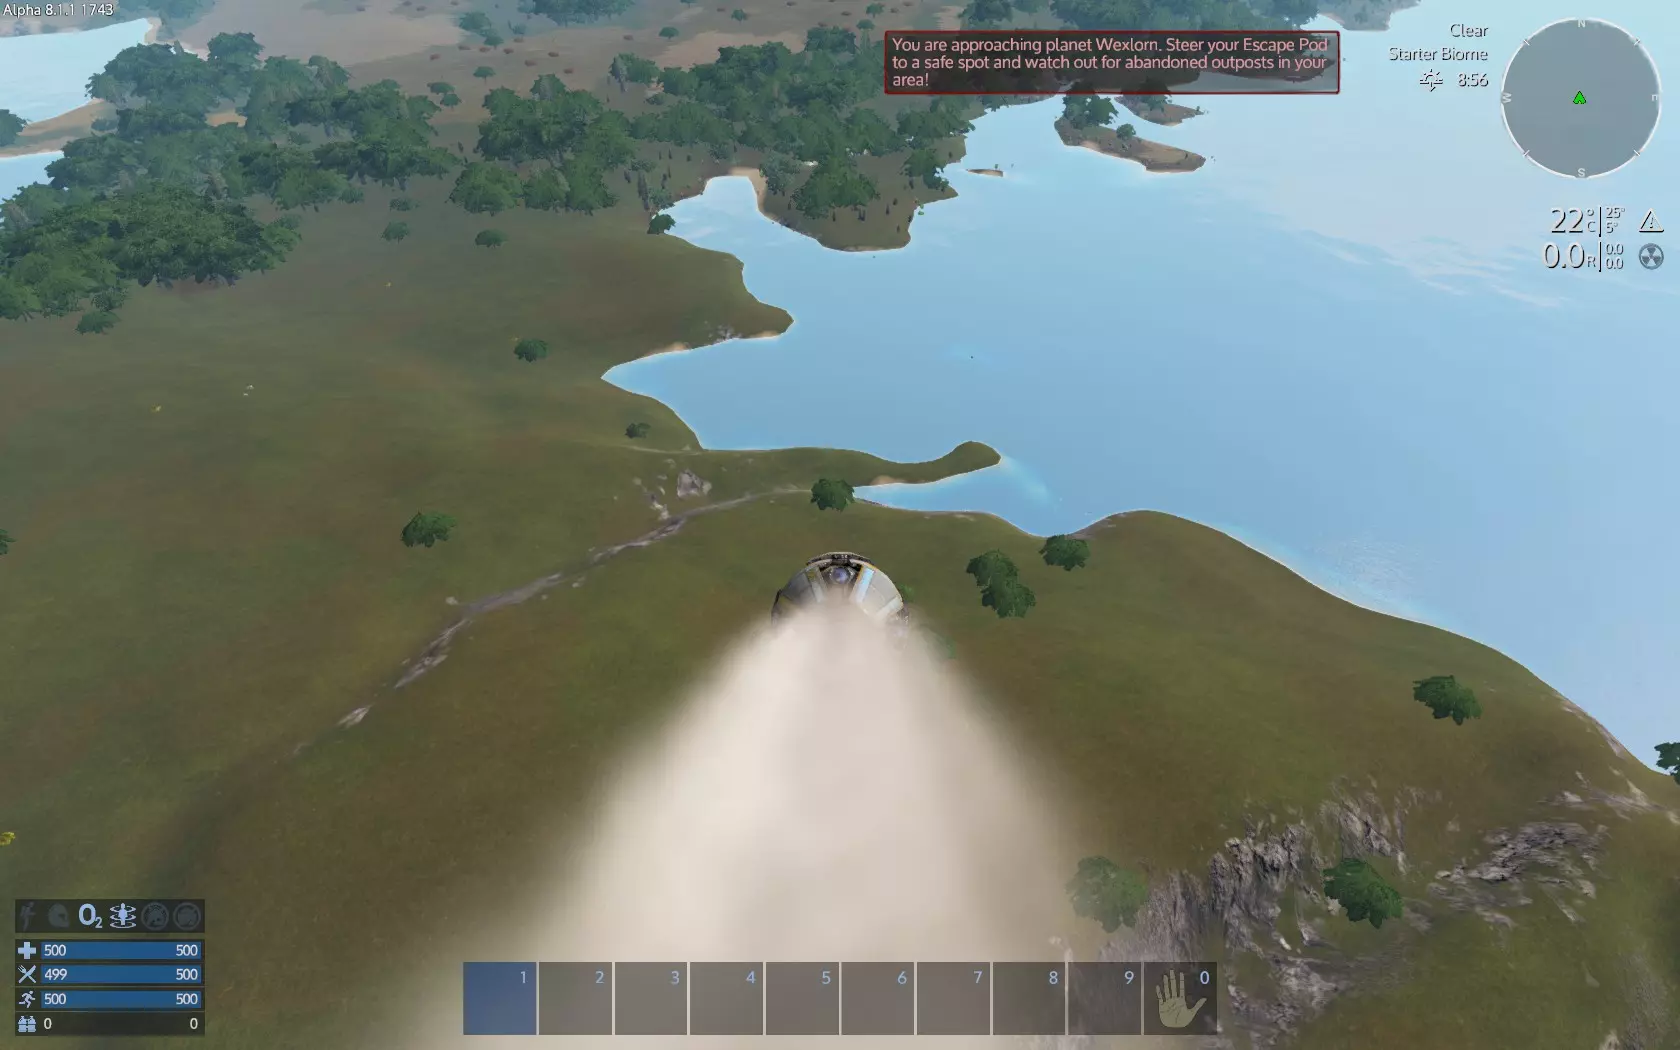
以下是行星地图上关于现有资源的信息。2/4表示在4个现有矿床中,你已发现2个。你需要通过安装在飞船或悬浮载具上的探测器,或在步行时使用手持探测器来寻找这些矿床。
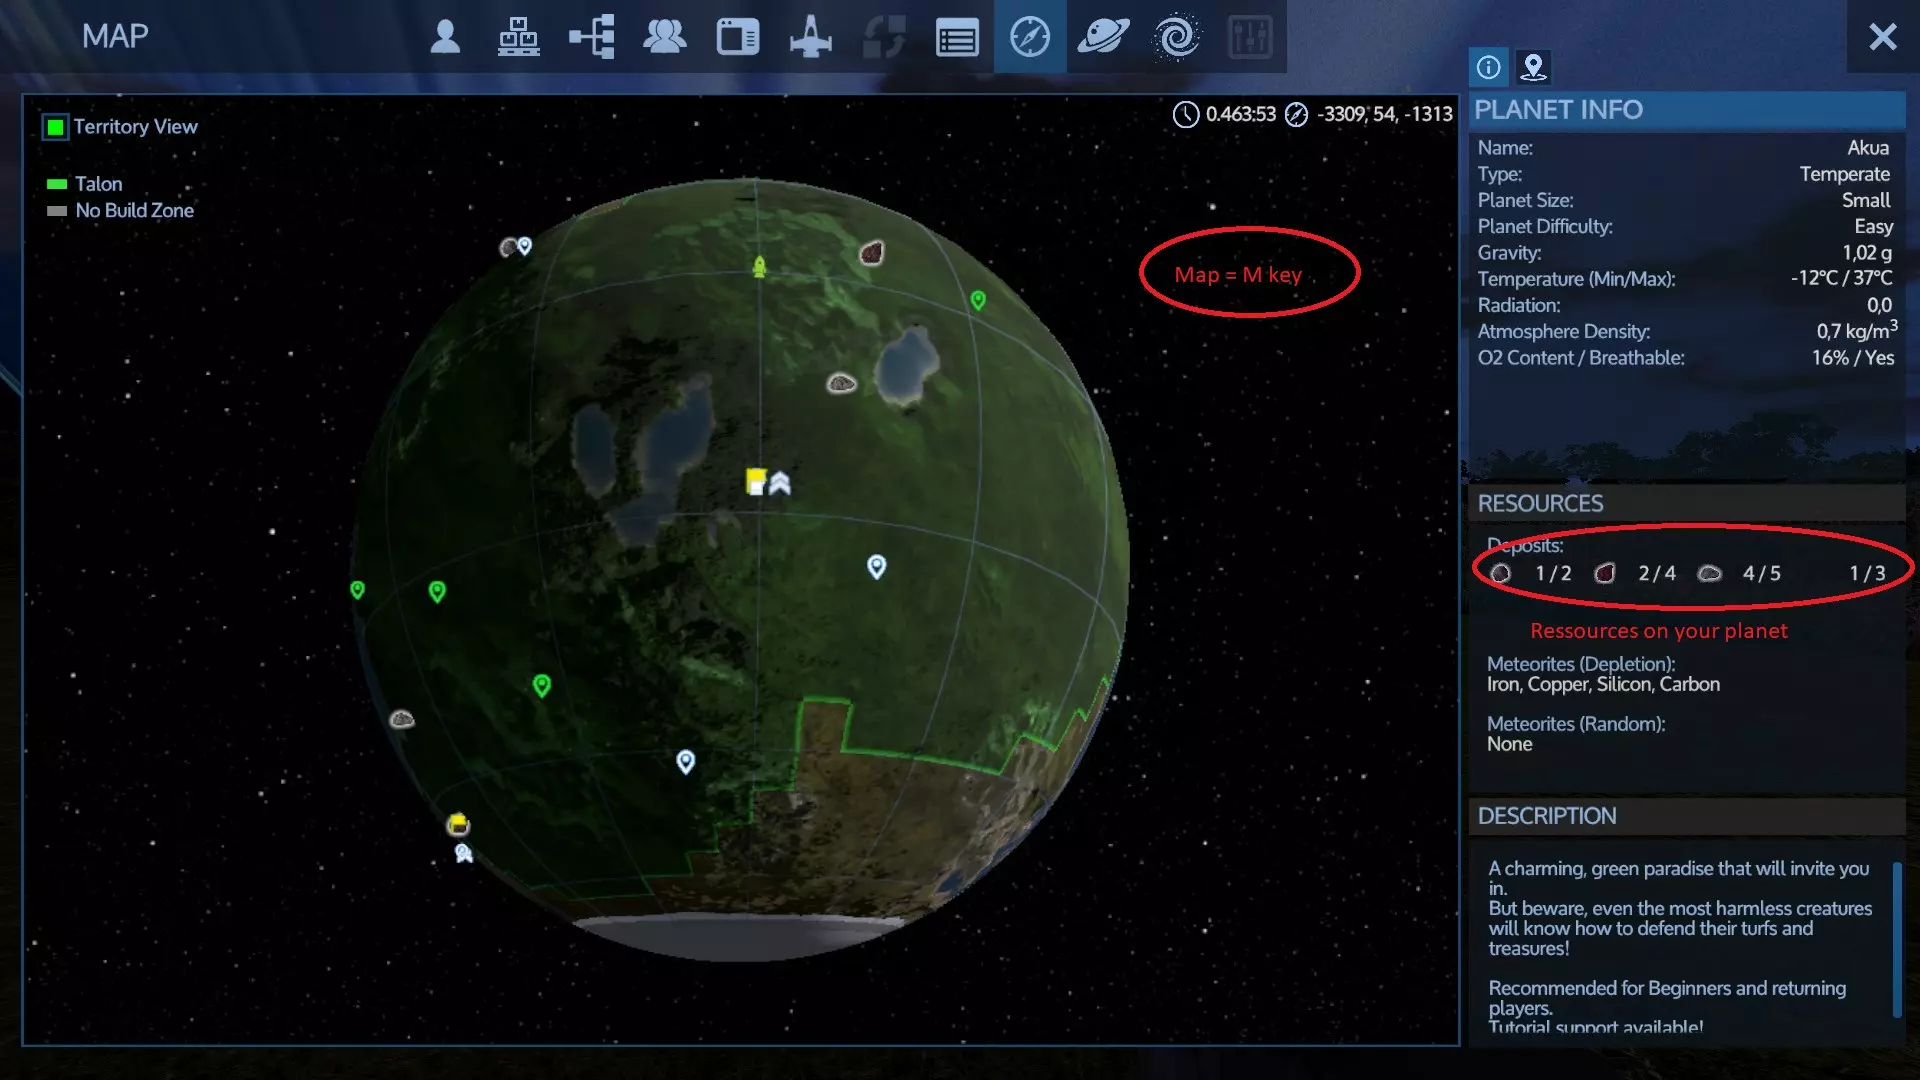
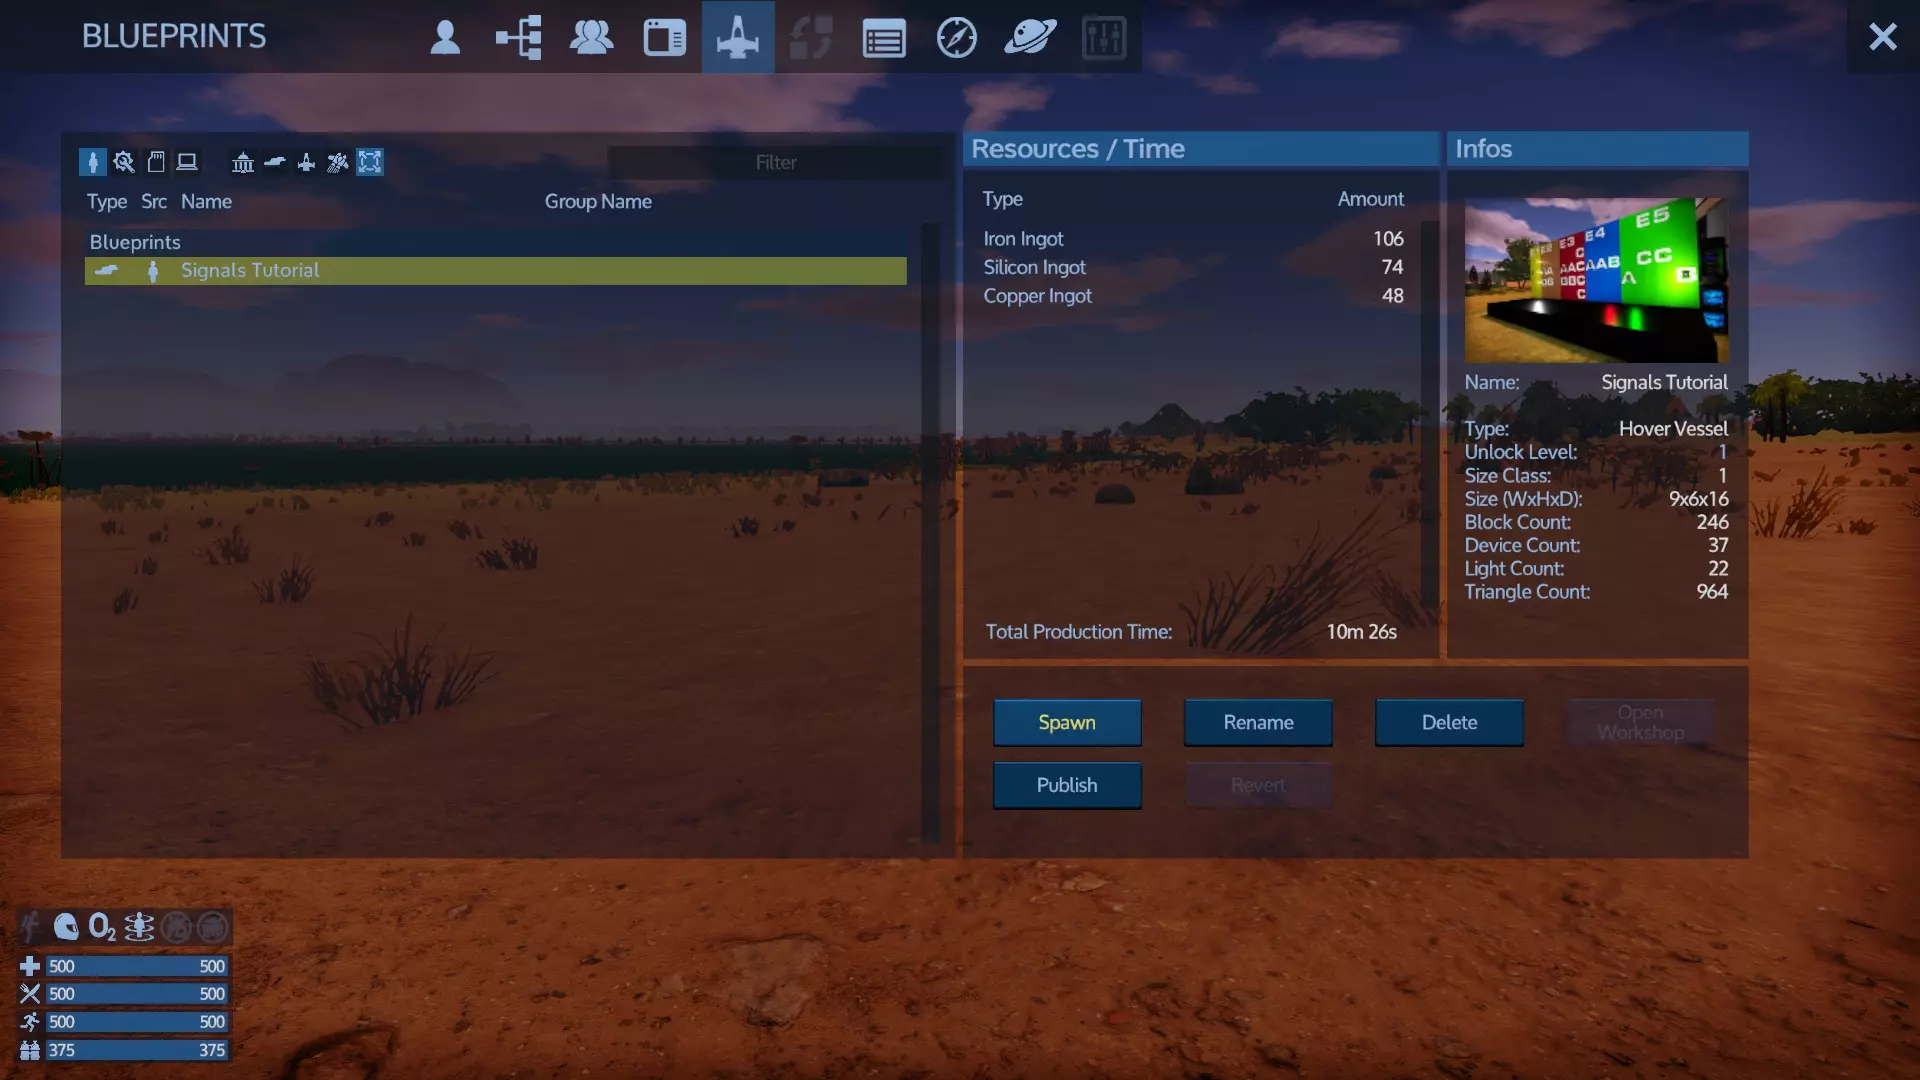
Important notes: The planet map like shown above is only accessible if you are located in the planet's high atmosphere or elsewhere on that specific planet, if you are in space or located on another planet then this map is NOT accessible, but like shown in the first picture above you can always know which resource is on which planet - even if you haven't explored it yet. System maps are only accessible once you have entered a system, chose a system in the Galaxy map and double-click on it or go in the Registry (TAB or F1 and the 4th top icon from the right), chose your system and chose to display it. About Health and Infections Your best friends against your health dropping when you start are BANDAGES that you can easily craft in your Survival Constructor, they give you each a boost of 45 in health. Infections caused by spiders or other creatures are instead very serious, not only will your health drop, but you need to cure these infections fast. If you get an infection soon after starting the game you will die in a short time, just accept it and go on with the game, that's bad luck, next time you'll know it better to use your jetpack to keep distance from creatures, forget about any melee attack unless you are playing the DLC. Later in the game with an infection, if you don't have the necessary pills, medecines or med injections, you need to move to a doctor in a station or in your base, hover vessel or ship where you have installed medical equipments. Hurry-up, you have got little time only! The Logistics (F4) This is a must-know when playing with volume / weight ON. Look in F1 > Empyriopedia in the Logisitcs chapter under game mechanics, or use the search in the Community > General Discussion forum, enter 'logistics' to know how important this aspect is - even if you play with volume OFF. In this forum almost everything has been asked in the last 8 years, so search for it...There is almost never the need to ask elaborated questions for the 100th time... Here are the basics to know: Hit F4, and 2 displays will appear, on both sides chose your player inventory / your ship / your base and the appropriate containers or cargo boxes to transfer items or ores via 'teleport', let's call it so. For that to always work you must place WIRELESS DEVICES in your bases and vessels, this will give you a range of 100m to make these transfers when you are at any given point within that range. That's not much of a range but it will be enough for the purpose of not having to carry everything on foot which will be impossible if you play with Volume ON, and even with Volume OFF this is a convenient procedure you must know. Note: Wireless devices that you place in bases or vessels will NOT stack-up to increase the distance. If you have a setup like A-B-C-D with increasing distance then A-D is not reachable if more than 100m away even if you have installed 1 or more such devices in all 4 assets. A common situation for using the Logistics: If you are near a POI or wreckage in space that you want to loot, you must first find and remove the faction core somewhere in the structure, if any to be able to at least salvage the POI. and place your own core to retrieve all elements like devices, weapons or blocks or to retrieve fuel from the POI tanks. Some structures and wreckages in space come without a faction core, but others have one. How do you know if there is such a faction core? Simple, try to place your own core, if you see the core preview in blue color, that means there is no faction core, you can place your own core immediately, if that doesn't work (you only see a red preview at a place where you could drop your core) it means you must first find and destroy the emeny core before placing your own. Note: In some POIs, the cores are placed in a fashion that makes it impossible for you to reach them. This is not a bug but the intention of the POI author who has designed the POI with the purpose that it cannot be destroyed or taken-over. In general this is true for story POIs but it may also apply to common POIs, not everything is up for grap to you... After coring the structure, start the Logistics with F4, chose your vessel container on the right in which you want to place automatically all your loot you pick-up with your multitool then chose the Wireless Icon on the top, this will activate the automatic transfer towards your vessel container and the background color of your container and toolbar will change to yellow. At this point, I advice you to NOT use the Logistic toolbar in yellow but instead press the T key to have access again to your normal toolbar, the Logistic mode will stay active until you get out-of-range which will make a warning message appear. When you are finished press the wireless button again to deactivate the Logistics. Tip: After coring a structure (vessel or base), you have immediate access to the device menu and thus you have access to all containers, tanks and boxes ready to transfer all the content into your vessel, this breaks the game immersion somewhat but it's there if you are in a hurry or if you quickly want to know what's installed inside (weapons, devices, loot etc.) You can also set a waypoint towards specific objects inside the structure to loot them. For more game immersion, explore the structure instead of using the device menu, your choice. Important details to know: Any structure or vessel with a faction core cannot be salvaged, their objects cannot be retrieved until you remove the faction core. A structure without core can only be salvaged, if that's what you want to do then you don't need to core the structure. but in order to retrieve in one piece blocks, devices or machinery and weapons you need to core the structure.With your Multitool you have the choice to salvage a POI taking raw materials only, or you remove entire blocks, devices and mounted weapons all in one piece. Salvaging: Chose the Salvage setting of your Multitool before shooting on objects and all 2nd-step raw materials will be transfered in your selected container. Removing: Chose the Remove setting of your Multitool to pick-up entire objects like devices (constructors, furniture, thrusters, generators, oxygen tanks etc.) or entire blocks and mounted weapons to be transfered to your selected container. Tip: A T2 multitool will yield more return on your salvage compared to a T1 or to the survival tool. And a Deconstructor will yield even more: You get 100% possible yield return with it, as well as with so-called Multi Turrets that you can place on ships or HVs with the sole purpose to salvage. Note that with a Multi Turret, you will also need to install a Ore & Wood Container to place your salvage, a normal container CANNOT be linked to it. The same is true when using a Harvester on a HV which I highly recommend to salvage wood at high speed. Even if you play with Volume OFF this method is very convenient to loot places and have everything auto-transfered to your vessel container keeping your avatar inventory free, it will not work with every loot container but it will certainly work for everything you pick-up with your multitool. You must do this if playing with Volume ON otherwise you would soon have to free your avatar inventory because of weight limitations. With Volume set to ON your avatar inventory will have a weight restriction and all sorts of containers and boxes will have a limited weight and volume to place items inside, the dimension and weight of a specific item will dictate how many of them you can place inside. Containers and boxes exist in different sizes and using CONTAINER EXTENSIONS when building your structures allow to setup big cargo volumes. Playing with Volume ON will force you to have more bases to stock your goods and more SV or HV vessels for transport purposes making the usage of the Logistics necessary. All this is not true with Vomume OFF and you have no weight restrictions with your avatar inventory, but even with this setting there will only be a maximum amount of slots you can use in any given container or box, but this limit is very generous. Not everyone - me included - likes to play with Volume On, I find it overly cumbersome and I just try to handle items 'reasonably' and I try to simulate these restrictions in my mind while having it set to OFF...but play like you want of course. You can at any time chose your savegame, go in the Difficulty Settings and switch Volume ON or OFF for your comming game sessions (and change everything else too if you want). Running a Base or Vessel...with enough energy to run it I will not go in much details about how to build a base, first because there are tons of videos showing it, second because it's rather straight forward. However there are some important details to know before you start which I list in the following. You can overcome all the building in the game by using the Workshop and by handling Blueprints. For that see my 'Factory and Blueprint' section below. Now for the most basics in base and vessel building: If you want to manually build a base or vessel you need to always start with a STARTING BLOCK, those special white blocks and the one appropriate for your structure, and build everything connected to it. The item display in the Tech Tree and the Constructors are color-coded. Get accustomed to these colors to use the right blocks and devices for a base or a vessel. Even the type of vessels (HVs, SVs, CVs) have their own blocks and you can filter in the contructor's UI to be sure to craft and use the right block. You can only place devices or blocks on a base or vessel, not in the wild. Starter Blocks, Portable Constructors and survival devices made by your Survival Constructor are an exception. Block placement tips: (For all the tips here below it's assumed you are holding your Multitool) Some items and blocks have undergroups, use the RMB on a block to make them visible and chose what you need. Put everything you use for building in your toolbar and use your Multitool or Painting Pistol to handle blocks. Select the block in your toolbar and use RMB to open a submenu showing the possible block shapes, the colors and the textures. And no, there are no other shapes, what you see is what you get but be sure to filter the list correctly with the tabs and browse through the different pages to make everything visible. You can drag the mouse when placing blocks to place them in a line very fast. CTRL-Right-Click will copy blocks, the orientation (rotation) will be kept in the copy. For it to work you must have the category of blocks you want to copy in your toolbar, chose it and put the preview adjacent to a block you want to copy, then hit CTRL-Right-Click; the next block of this category that you place will be a copy of the exact shape, color and texture. Using the middle mouse button on a window with your multitool will toggle its transparency. You must get familiar and use the N menu in Creative Mode to make complex block operations like copy-pasting entire block sections between different bases etc. I will not mess-up to explain it here long and large, go watch a video about it or search the forums. For any energy-demanding items or devices in your base/vessel you will at least need: - A Core (see note below) - A Cockpit in case of a vessel (see note below) - Enough numbers of Generators with enough maximum power output for the devices you are running at the same time; - Enough Fuel Tanks of appropriate size. - A shower / closet for planets with radiation; using the shower will reduce to 0 any sustained radiation. - If you run a farm, you need Growing Plots for your sprouts, Growing Lights illuminating those blocks from above (1 light can illuminate a 3X3 block area), a Food Processor and one or more Fridges. - (Optional, very recommended): Install medical devices as soon as you can to cure infections, traumas etc. and to fully restore your health. - (Optional, recommended): Install a Bed to be able to skip time (e.g. to terminate quickly your constructor cycles etc.) Note about the Core: In a survival game as well as in Creative mode, and unless you know exactly what you are doing, always use the green standard core. You can place a core as a last step before saving your work in a blueprint (see section Factory and Blueprints below) and I highly advice you to place the core so that it can only hardly be destroyed by any enemy. If your core gets destroyed together with other important devices you lose control over your structure, a vessel will be stopped and cannot be controlled or flown away until a new core is installed and the necessary repairs are done. During base attacks aggressors will try to reach your core and destroy it replacing it with their faction core in which case you don't have control over the base anymore (it appears in red or in the new faction color on the map and in 3D view.) To regain control you need to re-core the base. Note about Cockpits: You can install more than 1 cockpit on your vessel but cockpits must follow the flight vector (flying direction) set initially by the orientation of the starter block. You cannot place more cockpits having different flight vectors. Energy in your base: To avoid running out of energy in your base consider adding solar equipment. In general, 4-6 Solar Panels and 1-2 Capacitators will be enough to quickly fill a battery to 100% and reduce or solve any energy problems. Your battery charge can be seen in the P menu, main page. Every capacitator will give you a 1500 fuel equivalent to be used for any running device before your fuel tanks are needed but the more capacitators you add, the longer it takes to fill your battery to 100%. The sun type, the distance to the sun, your lattitude on the planet your base is located, other than weather conditions, all have a huge impact of how fast a battery can charge. In the Energy section of the P menu there is a separate 'Solar Energy' section that shows you in real-time what performance you get with solar energy. The P menu of your base/vessel, statistic section, will tell you about your maximum energy output and your current output. Be aware that if the current output is bigger than the maximum output available, then your generators will EXPLODE and need to be replaced. Additionally, for planets without O2 and/or radiation you need: - You need rooms or room areas that are airtight. - O2 Tanks; - A Ventilator in each room or any closed room area to make oxygen circulate. Making sure a room area is airtight can be tricky. Read the next section. Checking if a room or a structure is airtight On planets without O2 or such planets with radiation, rough weather and temperature conditions, it's important that your base is airtight which means that single room areas must be closed with blocks that are labeled to be airtight in the item description. This includes windows and doors as well as blocks placed behind/below/above devices or machinery. If your base or particular room is not airtight all weather effects from outside including radiation and temperature will take effect inside your room, thus harming you. Farming will be impossible. O2 cannot circulate in such rooms unless you are on a planet having a breathable O2 atmosphere and still your room must not be 'isolated', having at least 1 door connecting to the outside, otherwise you would quickly start to suffocate... Once your base is airtight you will have a constant inside temperature of 22°C with no radiation and oxygen circulating in the room as long as a ventilator covering the room is running and your O2 tanks are not depleted. To check if a particular room area is airtight I use a rather simple method and it has always worked for me even in complex structures (works also for vessels): - Quick check: Open N menu > Debug > Show Oxygen. If you see blue O2 bubbles filling the room it's all OK, you can skip the points below, your room area is airtight. - Chose 'show airtight blocks' in the N menu - What's green is airtight - Some blocks and devices are not green, you need to look what's behind them: a) is it green? Then it's ok. b) it's not green? Then you need to make it airtight. All this assumes that: - Your structure is powered on - You have O2 Tanks filled enough - your O2 is switched on in the main P menu - You have Ventilators in all closed rooms and they must run, if they don't run your room is still not airtight. Difficult cases: In some difficult cases where a room is not airtight and you don't find the leak use my method above but use God mode and go look below the pavement if there is a leakage and make it airtight. For example I had a case where a fuel tank which is not airtight was installed, so I had to add airtight blocks. This was not immediately visible and I had to use God Mode to see it. To enable God Mode: Start the console with the appropriate key and type gm in the console. You can now walk through walls or obstacles and move faster than usual by using the CTRL + movement keys. Important: If your room is airtight the ventilators will work and your temperature inside will be 22°C with no radiation. Despite of that parts of the terrain could be inside your structure causing weather effects to apply inside, for example it could be snowing inside your closed room and the temperature at that place could be like the ouside or some adverse weather like acide rain could apply inside your room and harm you. To correct this use your drill or survival tool to wipe out all parts of the terrain inside your structure, usually overlapping terrain on the pavement caused by the way you have spawned the blueprint. Leaving your Vessel alone or exploring the Orbits...There are no safe Heavens! A common beginner mistake is to leave your base or vessel still powered-on without paying attention wether there is enough energy - say fuel - to keep it running, with the consequence that you find your base powered-off and the fuel tanks empty when you return. Other than ruining all your farming and fridge contents this can have bad consequences in hostile environments. For a base this is a minor inconvenience because in single player the vanilla game doesn't present very aggressive attacks against your base and you can easily overcome them if you only have some decent weapons in your inventory. In some game scenario mods like RE / RE2 you will have a much harder time in this regard. With a longer power shut-down your farmed sprouts will die and your fridge contents will perish, farming requires a constant supply of O2 at constant temperature of about 20°-35° with no adverse weather effects and no radiation. This is achieved by making your farming area airtight (about that read the 2 sections above.) Tip: If you don't run any farming and only have food and perishables in your fridges you can transfer your fridge contents in your leaving vessel and power-off your base to save energy. However keep in mind that your base could be attacked when you return, usually the attack will occur as soon as you power-on your base again. With a self-sufficient solar-powered base this dance is not necessary, you can keep it powered-on forever, also with farming, but still an attack can occur when you return, so be prepared! For vessels however, CVs in space especially, a power shut-down can be deadly for your vessel, without energy your turrets and shields will be down giving an easy ride for potential attackers. So, I will give you 2 tips here, one to avoid this error, one to correct the mistake in case your vessel is attacked when you return to it. a) You can see in the P menu, main page, how long your energy with the current payload work will last. It's under 'Power left' and will tell you how many hours REAL TIME your fuel will last until your tanks are depleted, any solar energy is NOT considered. So plan ahead accordingly! Note: Shields, Turrets and Constructors set to ON in the P menu will consume energy even at idle which cannot be neglected, you must judge if the environment is safe enough to switch them off before you leave (see more below about such safety conditions.) If these devices are active they consume about 10 times more energy (and ammo of course in the case of turrets). In hostile space or in the vicinity of hostile POIs on planets I would keep Turrets and Shields in my vessel set to ON before I leave with enough Fuel and Pentaxid in the tanks and enough ammo in the ammo containers. b) If you return to a powered-off CV in space chances are you may get attacked in that moment. What you can do if you approach in a SV is: Swtich to the Registry (TAB or F1 and the 4th top icon from the right), find your CV in the list, click on it and click on the box below to access the P menu of your vessel. Here you can transfer fuel to the tanks or command your constructors to produce some fuel. Then switch your turrets ON to defend against the aggressors. Lesson learned. Next time you better do like explained in point a). How safe is your vessel if you leave it alone? Are orbits and stations safe heavens? Your ship will not get attacked while you are far away from it but this can happen if you return to it and enemies are close (less than 2 km). Generally, parking your vessels in space is dangerous, this is obvious in hostile territories, but it's possible to meet big pirate frigates or battlecruisers in every system, so you can never be sure that your parked CV or other parked vessels are safe, even parking inside a friendly station is not totally safe, if pirates attack the station your ship can be attacked too - and generally will. BTW, when I speak about pirates I don't mean the members of the 'Pirates' faction which you can befriend but members of the Warlords faction which are always your enemies and hostile with all other factions. They may come with the most crazy powerful ships, be sure to switch to the orbital map often or frequently use the external view-around camera (see next chapter), every red moving ship that is closer than 5 km can become an immediate threat very fast. Get in the habit to carefully scout a new system when you enter it the first time so to know about your 'neighbours'. If you watch closer the enemies flying in orbit you will notice that they follow repeating patrol routes. The path of enemy patrol routes will almost always cross the vicinity of valuable asteroids (Gold, Promethium, Pentaxid), be sure to never park and leave your vessels close to such bodies and while mining these bodies always be on alert. If you travel in a cheap mining or scouting vessel with no shields and minimal weapons I advice you to install an armored cockpit, without it you will thank me later for this advice... The safest place for a parking vessel is in the wild on a barren, inhabited planet surface, so you can be quite sure that no drones will be there, but I say this without any guarantee... The only time a landed vessel is totally safe is when the vessel is docked (this is true in the vanilla game but not true in RE2). And landed and docked are 2 different things. Only SVs and HVs can dock to platforms and sometimes this will not be possible (in particular, if a vessel is already docked to another vessel then you cannot dock on that vessel, 'chain-docking' is not allowed in EGS), CVs cannot dock anywhere except on another non-docked CV. It's impossible for any vessel to dock in the wild, you need at least some built platform. In some cases you can dock your vessel on a wreckage or on the platform of some POIs but not always. Your vessel would then be safe, and by safe I mean: Enemies will ignore a docked vessel and shoot through it if they aim at you. Tip: Nothing is easier than to build a cheap platform enabling all your SVs and HVs to dock at it, thus making your vessels safe when you leave them. And such a platform is also best for repair purposes. On my Workshop page you can find and subscribe to 2 such platforms of different sizes: https://steamcommunity.com/sharedfiles/filedetails/?id=3164778778 Flying vessels, the different flight modes and camera views Using WASD keys will activate the different thrusters causing you to fly in the opposite direction. Using the SPACE key when a ship is landed (or docked) will make it hover over the ground. Notes about high gravity planets: On planets with high gravity, hovering may NOT be possible and you must have enough of thruster power to rejoin the orbit, so take care not to make a descent on such planets with a ship that hasn't enough engine power! The various explanations here below may NOT work on planets with high gravity. High gravity for this discussion purpose is intended to be 4g or more. Tip: There are various booster types to be used with your suit to help you on gravity planets for better movements and jumps. Take a look at them and have them in your inventory when you are on a high gravity planet! Now you know why it's a good idea to always have a Armor Locker installed in your ship, you need it to change the suits and booster configurations. Using CTRL+WASD keys when you have reached the desired speed will enable auto-thrusters, it will block the speed without the need to constantly press WASD keys. Press one of the WASD keys again to disable this mode. Using CTRL+WASD keys, then pressing the i key at any time, this will disable auto-break and will also disable all thrusters. This is useful in space where there is no friction that would slow you down without active thrusters, and therefore once you have reached the desired speed and you hit the i key you will continue at that speed, without working thrusters like it would happen in real space. Press and hold the W or S key in this mode to increase or decrease and continue at that speed once you release the W / S key. Other than saving you fuel by not using the thrusters, this will also allow you to turn your ship in one direction while flying in another direction. Press the i key again to re-enable auto-break. Note: Disabling auto-break , as said, is only useful in space, but there will be no Newtonian gravitational pull that attracks you towards the planetary bodies, this is not simulated in the game unless you are already in the planet atmosphere. Disabling auto-break over the planet surface will make hovering impossible and will pull you to the ground in a un-controlled fashion, therefore not very useful. Camera views: V key will toggle cockpit view and the ship 3rd person view, or you can chose to play in first person seeing exactly what you would see with your eyes, or hit the V key to play in 3rd person focusing on your avatar. If you want to see a larger area in first-person, you can set the FOV setting in the Option Menu to a higher value. The description that now follows is true for your avatar or for any vessel when you are in the cockpit. If you hit ALT in 3rd person view you can use the mouse wheel to zoom-in or zoom-out on your ship, then use PAGE-UP / PAGE-DOWN key to set the view height of the ship. Pressing ALT again will permanently save these settings (except for hower bikes). Also, if you use the ALT key in 3rd person you can turn the outside view around your ship by moving the mouse. This - and in combination with auto-thrusters or the disabled auto-break (see above) - this is very useful to detect nearby vessels or POIs around you, you can then estimate the threat level you are up to when flying in space and observe enemy ship distances increase or decrease and take the necessary steps. Using this view-around when flying over a planet surface is also a fast way to detect mining resources or POIs after having scanned with your Detector. Press ALT again to disable this view-around. Waypoints - How to set them, how to toggle their visibility Waypoints have 3 main purposes: - They allow you to keep track of your assets in the game - They allow you to find your route towards a specific place (Navigation) - They guide you during missions The following questions and answers are for you if you ever have problems with waypoints or if you don't succeed to return to some objects, bases or vessels located 'somewhere'... Question 1: Can you lose any asset in your game because you don't remember where it's located? Answer: NO. Question 2: Can you quickly and easily set a waypoint towards any of your assets or anything you have already discovered, and even if light years away? Answer: YES. Question 3: Can you toggle the visibility of all the waypoints, inclusive story waypoints without losing them? Answer: Yes, except the waypoints on the planet map previously set by you, to not see them anymore you must manually delete them. On the planet map (M), you can set custom waypoints by just clicking the map and a box with more options will appear. In space you use the orbital map (M) to click on a object after which you can set the waypoint to it. After this, an icon will be placed on the map which you must then click again to erase it. Sounds complicated? Yes it is, but fortunately: There is a much simpler way to make everything that you have already discovered visible to you, like locations of interest, your devices or ships in the wild or every object in space that you have already discovered. It's done with the Registry Tab. The Registry Tab: If you hit F1 or TAB, a serie of icons at the top are placed to get you in the different UIs and menus of the game interface like faction information, the system and galaxy map etc. and also: the Registry tab, it's the 5th icon from the right side towards left (be aware that some icons may be greyed out, so count them too!). The Registry will contain chronologically everything you have ever discovered sorted by the different Systems, orbits, planets. Clicking on a location on the left side will show you a list of things including your ships, your bases, POIs, wreckages, asteroids, space stations etc, To see everything be sure that the list is filtered to 'All', but you can also filter on resources or buildings only, but to see everything make sure you have the UI unfiltered! Tip: Using the manual waypoint method will soon clutter your 3D view with waypoints. How to get rid of them? The Registry has an option to Reset all Waypoints. Use it, and don't be afraid, you won't lose track of anything... Toggling the visibility of waypoints in the Registry: Let's say you are in your ship in space and you want to travel far away to a planet to re-collect all your Autominers spread in the wild on planet X. This is a common example of how the Registry is useful. Search Planet X in the Registry on the left side, click on it, then on the right side look for objects belonging to the player. Soon you will find one of your Autominers, click on it and chose the Waypoint box below which will toggle a waypoint towards it, a triangular icon will appear in the list on the right of the object name. Repeat for other autominers. And that's it...The waypoints are now visible in the 3D world and you can warp to them in no time. What? You don't know how to do it? Point your ship to the waypoint and hit the warp key, just make sure your ship is at a speed below 50. Got it? See, you are making progress! Once you see what's in the Registry, now you know why you can't lose track of anything you have discovered or placed somewhere in the galaxy, and you can always return to it. Toggling the visibility of mission waypoints and mission instructions: This is done in the PDA, there is a box with a switch on the upper right in the main PDA screen (more about missions in the next chapter). About story missions and other missions Introduction / Foreword The many story mission steps in this game require you to solve a variety of puzzles, some are simple but others are rather complex and tricky. This adds most fun to the game until...yeah maybe you know it already...until you encounter game bugs that will break these missions. The only remedy is: You have quicksaved the game before doing the mission (ESC > use the disc icon) and reload the save if things go wrong; in this case don't forget to a) re-save again when you replay the save and b) delete savegame copies at some point, they add-up for a lot of disc space. You skip the mission step and go ahead with the game.I wish there was a simple command in the PDA to entirely reset a mission, but nada, you must use a console command and the procedure is not simple (search in the Steam forum with the keyword 'lschaps' to find my extended explanation, I advice not doing it but instead simply skip the mission step.) That said, in the following you should not expect to find 'solutions' for the different missions, I won't spoil the game for you, but I will rather explain the generic mission process so you can overcome the most common problems. Tip: On Youtube you will find mission playthroughs for the most difficult missions, go watch them if you really cannot succeed and you think there is no bug that hampers your progression. With missions, it's all about following waypoints, carefully look around to spot them, if there are none then you need to do something specific first like crafting something or find a console to interact etc. Or the next mission step is not yet ready to trigger before you go to a certain location, in the PDA the next step or mission is then marked as being started 'automatically', so don't bother and do other stuff in the meantime. That's the short story, now let's see the details, but I tell you here one important thing: Read These Damn Messages and Dialogues ! Not doing it will make it very likely that you won't know where to go and cannot conclude a mission step. You can always display them again by going in the Logs (see more below about how to do it.) In the vanilla game there are 3 types of missions: Missions you do on the starting moons for the local habitants or missions you do at some of the faction's Homeworlds. Some of these missions can be repeated by picking them again when speaking with a NPC. Faction missions that you can start to improve your reputation with the factions, you unlock other such missions by succeeding the first one etc. At some point they will appear in your PDA where you can read the objectives and the rewards you get. You can enable, disable, pause or restart them at any time. The main story missions you do once you leave the starting moon(s). In this case you should already have some clues about where to go to trigger these missions. These missions can only be paused or skipped but not restarted (unless you use a complicated procedure with the console to reset them). Important: While you can do these missions in Multiplayer, all these missions were designed for Single Player only. This means that when playing them in multiplayer you may quickly come to broken ends or stucked situations, for example if 1 player completes the mission by taking over a POI this will break the mission for all other playing members. If Multiplayer is your thing then concentrate on specific scenarios designed for Multiplayer or chose a good server to play the game. The missions you find in the standard survival game are best played in Single Player. The scenario RE2 is a game mod designed to also have playable missions in Multiplayer among many other things that go well beyond the standard gameplay, you can also play it in SP and I recommend this scenario for more advanced players. But like other modded scenarios in general, RE2 cannot handle or fix bugs comming from the vanilla game, notably when playing missions. Game bugs must be reported to the devs using the vanilla game. See in the forum's bug section about how to report bugs, there is a single procedure for this that must be followed. What follows will describe the general mechanics of the main story missions found in the vanilla game. To trigger missions you must reach a certain position inside or around a POI which will then pop-up a message from your IDA. Only at that point the PDA will list the missions which you can do, toggle their visibility or skip their different steps. From thereon, all mission steps will end or with a waypoint to follow, or with some infos about what to do next, or where you should go to trigger subsequent missions, so read these dialogues and don't just click them away. Astute players will find that focusing on the colored highlighted text will be a good shortcut instead of reading everything, but that may not be true in all cases! You don't have to do the entire mission in one go, if you feel you are underpowered and need better weapons, more medecines etc. you can leave at anytime and return later, all mission waypoints and onscreen instructions (on the right side below the HUD) will stay visible unless you toggle their visibility in the PDA interface, there is a switch box on the upper part. Hiding the instructions and mission waypoints is convenient to do if you do other stuff, but then: don't forget to make the mission visible with the box again when you return to the mission. If you are unsure about how to proceed or If you don't remember what to do then look in the PDA > click on your mission chapter > click on your current mission step and then go in the Logs where you can read the last instructions or dialogues. The key to succeed in these missions is to use all the available information in the mission description or in the dialogues, explore all corners of a POI which may open to hidden areas, read important pointers in some LCD displays, or even find some passwords to open doors, find and toggle switches in some odd places etc. etc. That's it, and if a mission doesn't work for you then don't make a big rant in the forums but skip the mission step in the interface and go on. A lot of these story missions have tricky puzzles to advance the story or missions can get broken if you do unexpected things, it's hard to know what's the case, a bug or a puzzle not solved...Whatever, if you are stucked you can skip the mission step in the PDA, and you know what? I have over 1600 hours in this game and I didn't solve all these missions, there will be another new game at some point where I will retry them. Also, do not interfere with a story-related POI before doing the mission, chances are you will break the POI and its related mission. Look at the map and you will see that story POIs have a different icon than usual POIs, this also means that you cannot takeover the location by destroying its core, just ignore these locations outside of a mission. Tired of so many bug reports, the devs have now made it so that you will get a warning message if you are close to a story POI without having a related mission to it (at least this should be true for most of them). So read the message and don't just click it away. About the Factory and Blueprints Where the hell is the factory? Hit F2 and you have 2 main tabs, the Library (blueprints) and the Factory. Click on the Factory tab and that's the factory, it doesn't exist otherwise in the game, it's an interface only. Say 'shame on you' to the devs for such a crazy design... Now, what does the factory and where can you find what you have produced with it, where is your blueprint that you want to spawn? In the Library section you have a list of stock blueprints, your own custom blueprints and Workshop blueprints that you have previously subscribed, they all appear if you filter the interface. Click on one, change to the Factory, and you will see what you need to craft the blueprint, mostly INGOTS which are crafted with the constructors, but you can also put entire devices and 2nd-step materials in it like metal plates etc. (you have an oxygen tank for your SV? Put it inside, it will count for the needed resources). Once you have put all needed materials in the Factory, you hit 'Start Production' and there it goes after the needed time displayed for it. Your blueprint will be at the top of the list on the left side and ready to be spawned. Be careful: What you put in the factory will stay there, not possible to put it out anymore, but can be used for future craftings. If you build somethng (or you modify something) then point on your target and hit ALT-O, this will save a custom blueprint that you can craft in the future in the same way with the factory. Additional tips: The Factory UI while telling you what you need to craft a blueprint lacks information about what is exactly installed in a BP that comes with the game or from the Workshop, what devices are installed, what type of fuel tanks and generators, the type and nr. of constructors, does it have a teleporter? Etc. You can't tell this based on the UI so you must hope that the Workshop author provides this information. The best you can do is to look for yourself and this is really easy: Make a separate game start in Creative Mode, load the blueprint and visit the structure. Use the P menu > Devices to quickly see what is installed. As a general hint of what may be installed in a BP before visiting it: First, the Tier number will tell you, a T4 structure is usually made for mid- or endgame players equiped with the highest devices. Valuable devices like teleporters, shields etc. will have a high player level requirement. The UI will list the highest level in the blueprint which also determines which level you must reach before you are allowed to spawn the blueprint in Survival. This doesn't tell you exactly what devices are installed but if you see something like T3, lev 20, you'll know there are expensive devices inside and you won't be able to spawn it in Survival before you are at lev 20. Refer to the Tech Tree (F3) in the game to know what level the different devices have. If you're looking for a startng and cheap base or vessel in the stock blueprints or on the Workshop: Look at the Tier class of the BP, you want to use or subscribe to something which is Tier 1 or Tier 2, but not higher because you would need a too high level for you to use it early in Survival (but read my next point). Just because a Workshop item is at T4, way over your current level, or it's built for RE, that doesn't mean you cannot use it in vanilla or as a starter vessel / starter base. However you will have to modify it in Creative Mode by removing all expensive devices, remove all RE blocks and devices (which may be tedious to do, rather look if the author also offers a vanilla version), then save your BP as a custom one with ALT-O and then you can use it at a low level in Survival and in vanilla. Keep your modified bases and vessels up to date! If you have modified your base don't forget to use the ALT-O command to save your modifications in your blueprint. With hover vessels, small vessels and capital vessels the same applies but you can also REPAIR them. You have 3 options to do that: - Do everything manually which I really don't recommend; - Repair your vessel with the Repair Bay - Repair your vessel at friendly or neutral bases using the 'Services' which will cost you credits, and not a few... The Repair Bay T1 can repair damaged blocks only, the T2 repair bay can do a complete repair by also adding the missing blocks. For that the repair bay is relying on a Repair Blueprint (RB) that you have saved before in the P MENU > MAIN PAGE > REPAIR BLUEPRINT BOX. The first time you spawn a vessel this RB is saved automatically, but then not anymore! Everytime you modify your vessel, DON'T FORGET to save this RB or you will completly mess-up the repair process later!! The game DOES NOT automatically save a RB each time after you modify something on your vessel, so you need to remember that saving your RB is ALSO an important part of your modification! Important: The Repair Bay can be accessed with the F key to pick-up again any remaining resources inside, which alas is not true with the Factory. The RB has its limits. If you do part of the repairs yourself by adding blocks then the repair process with a repair bay T2 will be a total failure, the process will add blocks already added by you etc. making your vessel ready for the trash can. Maybe patches or updates have fixed this, but I'm not sure. To avoid all this trouble do the following: Repair your vessel immediately without first adding blocks Use your Painting Pistol to mark in a certain color all blocks you must add before repair and remove these blocks before starting the repair with the repair bay. If a big update is released: You must start new, but how can you keep what you had in your old savegame? A major update adding stuff like new story missions, new planets and biomes, changed POIs etc., all this will require you to start a new game to make these changes visible, or you can continue with your old save but not playing the new features, however this could lead to some malfunctions in your game immediately after loading or later, even crahsing the entire game. You then also need to start a new game. Question is now, can you start new and keep what you had in your old save? Yes, with the help of Console Commands. In this guide I don't give any clues for using these commands except in a previous chapter where I adviced to use God Mode to check if a base is airtight in difficult situations. But now it's time to introduce a couple of new commands so you don't have to start your game at square 1 if Steam hits you with a new update. Here are the steps to follow for starting a new game but adding what you had in your old game: First make sure that you have saved with ALT-O all your custom bases and vessels. Start a new game then use these console commands to get what you had in your old save: sbp im You can now spawn your blueprints for free and type H to access the free item menu to get back what you had. There is no other solution apart using a special tool to download in the official forum which automates this process also giving you back your container contents. Additionally, you can use these commands: level x to get your player level x you had in your old save. If you ever want to reduce your level to x (e.g. from lev 25 to lev 10), then use these 2 commands: level x+ level x= faction rep local Col 20000 This will change your Colonists reputation to Friendly. (Col = Colonists, Pol = Polaris, Pir = Pirates, look in your old save's faction list to see the right acronym for the different factions and use the exact same syntax). Use it to change the reputation according to what it was in your old game. AFAIK in your new game this wiill only work once you have discovered a faction and when it's listed in your faction list. give credit xxx This will change your overall new credit deposit. Chose the number you had in your old save (can be seen when hitting TAB > Player Statistics). Note: The key command for starting the console is the 'tilde' key which is located left from number 1 on the top left of your keyboard below the ESC and the Function keys. If this key doesn't work for you then rebind this key in the game options using the same keystroke (which may output differently according to different language settings on your computer). Combat tips or...If You Think Enemies Are Too Strong For all those players who do bad in combat or think the enemies are too strong: Don't despair, I have you fully covered with my following points. a) First, check the difficulty settings and set the enemies to EASY, the default is Medium but that's way too hard for beginners IMO. There are other options you may also want to lower. b) You forget to check your armor suit, if it's worn up or very low then a single hit will kill you, go repair it in a Repair Station. For best results you must have a Heavy Armor with armor boosters installed to sustain longer combat, this will reduce your mobility so you need to find the best compromise (e.g. an EVA booster is not always needed, if you take it away you get a lot more armor and mobility). c) In space, you are mostly gonna need a SHIELD if you go near enemy targets (red), or you simply make a fly-by with max speed, by doing so you can identify them by scanning (detector) but they can hardly hit you, do not engage in combat or get close to enemies without a shield. d) With a un-shielded SV, a drone can kill you with a single hit (in space or planetside) if your cockpit is not armored, install an armored cockpit. e) Don't let infected creatures, Legacy NPCs, golems and whatelse get near to you, kill them first or overjump them using your jetpack, or take distance, there is no good melee attack in this game that would help you (unless you play the DLC). Use your hoverbike to evade quickly if you are outnumbered. f) Take your time when attacking non-shielded POIs or non-shielded ships in space, the enemies will not respawn if you destroy the spawning points placed on the ground, and ships in space will have their weapons remained destroyed once you kill their turrets. g) No chance to kill shielded enemies without energy weapons which are: LASER, PLASMA or ARTILLERY turrets, or manual weapons of that category. Projectile weapons like miniguns or cannon turrets are too slow and weak to deplete shields, so you'd lose your time and ammo with them. Planetside, only HVs can equip and use energy weapons, a HV will be your first choice against enemy shields. SVs can use their manual energy weapons like missiles and plasma guns but their shields are weak and so a SV is not very effective against a shielded POI (on planets and in space alike). CVs on planets are useless against shielded POIs, you cannot use your energy turrets (in the vanilla game.) I hope these couple of tips help you on your way, cheers. The learning curve of this game is quite high, so go watch some videos! A 15-seconds video sequence can be better than 1000 words. This guide is meant to cover the basics only, not going into advanced details and procedures like how to handle vessel sensors correctly, how to define and install efficient signal systems for your devices, how do you copy-paste entire construction pieces or how to use the console and what commands can most help you etc, etc. Maybe some day I will make a more advanced guide but this one was already a lot of work. So all I can say as a conclusion is: Keep your eyes open, search the forums and ask questions and... ... and go watch recent Youtube videos that show these advanced mechanics (often older videos will also do). You can search and filter videos by keywords, for example enter in the YT searchbox 'Empyrion Galactic Survival start' or 'Empyrion Galactic Survival building' or 'Empyrion Galactic Survival sensor' etc, and you can also hit the filter button to restrict the output, all this saves a lot of time. Will all these points discussed, that's basically it. After this you should at least be able to play for some hours before you have to quit and ask other questions. Have a fun time with Empyrion Galactic Survival !