换一换
换一换 


This is a WIP guide for the newly added Snoozaland (the rougelike mode) It contains - overview on various new mechanics - various tips & tricks I discovered - rewards - (more TBA) Introductions This guide covers the rougelike mode, i.e. Snoozaland, added in the latest 2.0.1 update. https://www.fantasylife.jp/fli/en/patchnote/ver_2_0_1/ Most sections should be completed besides the Strategy sections, and maybe the description of the guide itself. Hopefully I can get these done within the next few days... Link to Guide Portal Before we start, I want to quickly mention the Guide Portal, where you should be able to look up and find most guide resources about different aspects of the game. https://steamcommunity.com/sharedfiles/filedetails/?id=3484233912 I also put together various other tips & tricks, and link the Compendium spreadsheet there as well. You may find more useful information there, check it out! Google Sheet[docs.google.com] | HTML View Mode[docs.google.com] Other Snoozaland Resources This Chinese post covers a lot of keypoints about Gold Cluster, would recommend checking it out even if it means having to rely on machine-translation: https://tieba.baidu.com/p/10380131138 Update: It's been translated! https://www.reddit.com/r/fantasylife/comments/1qwv6vw/guide_everything_you_need_to_know_about_gold Mechanics Overview What Snoozaland is about Basically, each timer you enter the Snoozaland, you start as a lv1 No Life in a small section of Ginormosia. From there, you slowly become stronger by leveling up from combat and/or by obtaining stronger equipment. And within 20 minutes, you want to go to the section with a warp circle, then challenge the Final Boss and win. Each run costs 3 Cashnuts. Before starting a run, you can spend 10 Cashnuts to reroll which area you start at, as well as which End Boss you would be facing. Lastly, failing a run would not change these condition, as the only other way to reroll is by defeating the End Boss. General FlowI would provide a more detailed rundown in the Strategies section, here's a quick overview: Pick a starting life For each zone Activate the Alchemy Robot, which allows teleporting Open any treasure chest and crate you see Finish the area objective to unlock new areas Fill in the Alchemy Robot for loots if possible Use the new weapons/tools to defeat higher lv enemies/nodes, which in turns increase the quality of loots you would get After all zones are unlocked, Keep filling in the Alchemy Robot for more loots This maximizes your strength so you can take on the End Boss This also maximizes the treasure points that you can spend after each run Just make sure not to get greedy and run out of time! Generally speaking, once the 1-min mark is hit, you want to fast-travel to each Alchemy Robot just in case you missed picking up any loot, and then head to the Warp Circle right after Challenge the End Boss and win! Alchemy Robot & Fever Time Alchemy Robots are cauldron-shaped robots, where you can input the materials you've found, to obtain generally better loots. Types of Alchemy Robots Name Preference Points Needed Monziger Z Monster parts, e.g. fang 100~300 Mr. Hammer #1 Ore 100~300 Chomp Leafe Wood 100~300 Chef Piggy Ingredients, e.g. meat & fish 100~300 King Tweet Tweet Gatherable, e.g. shell 1000 (one-time only) Monziger Z & Chef Piggy are what I consider the best type, since the input materials are the easiest to get a lot of. Each not guanranteed to have all 5 types in a run. I had an unlucky run where I got all 3 common types EXCEPT the monster pot, and the golden pot didn't show up either. Ended up getting only 500k points that time, it is what it is. ¯ _(ツ)_/¯ Fever TimeFever Drone (from Drowsy Mimics) puts the machine into Fever Time until the end of the run. Input materials are worth twice as much Cooldown timer reduces from 1 minute to 10 seconds Do note that the golden pot still cannot be reused even if you use the drone on it, so doing so is not recommended Drowsy Mimic (You can view the in-game Guide app as well) Drowsy Mimic is a special enemy that occasionally shows up in Snoozaland. Similar to the question mark event, the mimic's position is always visible on the map. And when one appears, there would be a message on the screen as well. Usually you want to always go after it ASAP. Drowsy Mimic is "defeated" by just bumping into it, though only after a few seconds upon falling from the sky. There are 6 possible outcomes from doing that: Headbang, where all enemies and gatherables die in one hit Angel Time, where random consumables are added to inventory Bomb, where your item would be thrown out when it explodes Devil Time, where your items are thrown out randomly Enemy Room, where everything dies in one hit. Reward is a Fever Drone Treasure Room, with a guaranteed Fever Drone and Gold Cluster - Ordered from most common to rarest in my experience - See the General Tips section below for more Rewards (Dark Don Shop) At the end of each run, you can spend the points on unlocking new recipes among various things, plus buying the materials exclusive used in crafting them. This is also where you spend the rare Gold Cluster on a different sets of wares. Notably, you can also get the Legendary materials needed for crafting the Time series weapons/tools very reliably here, so this might be a more interesting alternative, than constantly refreshing Ginormosia for legendary bosses to spawn randomly. Time weapons are trash anyway so I wouldn't bother Recommended Way to Spend Points and Gold Clusters Points Remaining What to Buy (many points) The thing you want ^ One-Time Unlocks, e.g. permanent stuff - Furniture Recipes - Mounts - Armor 60k+ Dark Metal -> Dark Orb -> Dark Silk 10k+ Any of the 3 tree furnitures 5k+ Tall Grass x1 1k+ Sack of Silver x1~4 500+ Sack of Copper x1 (many Gold Clusters) The thing you want 2+ One-Time Unlocks, e.g. permanent stuff 1 Dark Silk x3 -> Dark Orb -> Dark Metal x3 Summaries of Purchasable Wares Materials Armor Objects Recipes Other Points Dark Materials Legendary Materials useless junk Cool clothes Music Mushroom Flowers Grass Gothic furnitures Pirate furnitures Things like dolls Mount Hairstyle Pirate themed designs House - Brick D Emote & Sticker Gold Cluster (everything above) Gleamstone A hood A wing ----- Dragon Armor - Azure, Blaze - Cursed, Dark Things like dolls Mount Hairstyle & Feature House - Forest D - Stocks are rotated randomly, similar to the Traveling Merchant in Ginormosia - Point Shop wares are also based on Shop Levels, increased by total accumulated points - Never buy things from the Consumable tab, none of them seems worth it IMO - The "dark weapons/tools" don't seem to be in the game right now See this compendium page for the full lists of shop wares. https://docs.google.com/spreadsheets/d/1BrBcKh3peA96u3EIj19QROujZLBC4d3ilW-KWyf7Anw/edit?gid=467283371#gid=467283371 Polishing with Gleamstone After reaching rank 3 of shop levels, you unlock the ability to polish weapons and tools, each time requiring a Gleamstone. While the first one would be given for free, subsequent polish requires purchasing one from Dark Don for 3 Gold Clusters each. (very expensive!) Basically, polishing a weapon or tool would greatly boost its stats, by a set amount depending on the weapons. The game also tells you it would occasionally fills your special bar to full when wielding it, but I haven't polish a weapon so I cannot confirm how it works. Your weapon now also have a purple aura around it, so polishing a True Time weapon might make for a shinning cool cosmetic weapon? Anyway, I heard each weapon/tool can only be polished once ever, and it doesn't matter how well you perform so long as you can complete it, i.e. getting a Done is just as good as getting Perfect. No worry about getting imperfect results so long as you are not outright failing, in which case just reload. In the end, this is just another potentially helpful upgrade, but not essential similar to aging. Honestly I wouldn't bother with these for now, since no new challenging bosses have been added, so no point in going through the trouble in obtaining the 3 Gold Clusters for each polish IMO. Maybe by the time the new Primordial Dragon boss added in the future, the extra fire power would be very impactful? Dragon Armor
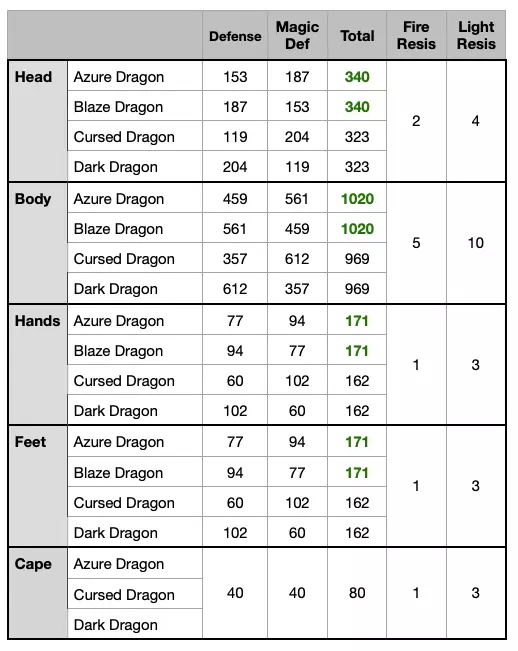
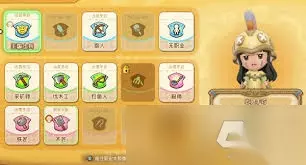
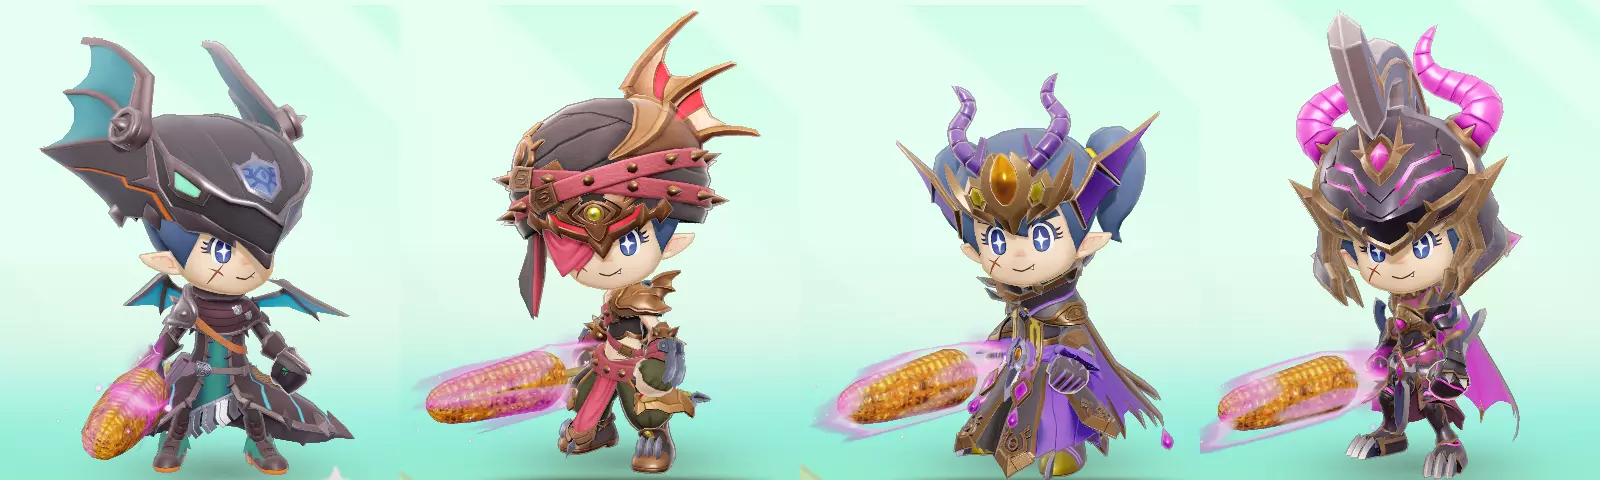
新的龙甲目前拥有最佳的防御属性。感谢Dangolue在Discord上发布相关属性数据,这些数据最初来自百度贴吧的中文内容,后经其翻译。 这些盔甲无法重铸。 自2.0.4版本起,这些盔甲现在可以重铸以随机获得理想技能,使其成为新的最佳盔甲,相较于石板盔甲有显著提升。 值得注意的是,分开的躯干和裤子部件可能仍然是更优选择,因为这样可以堆叠更多【物品掉落率+】技能。龙甲所需材料 角(200k) 丝绸(120k) 金属(60k) 宝珠(200k) 所需材料数量 4 51 46 20 总点数(1m) 0.8 6.12 276 4头部2* 2~4* 2~3 1身体2~4 2~4 1手部2~3 2~3 1脚部2~3 2~3 1背部3 2 1坐骑2 1 - 诅咒龙和黑暗龙的头部装备使用黑暗之角而非黑暗丝绸 - 黑暗之角在其他情况下未被使用 - 黑暗木材目前似乎完全未被使用?它们看起来也很酷!
(credits to Chaos on Discord for sharing it) Primordial Dragon Dark Dragon Weapons & Tools Dark Dragon weapons/tools are added in v2.1.0, whose recipes are the rewards for defeating the new endgame boss Primordial Dragon, which I'll likely write more about. eventually Things to Note: Recipes are guaranteed to drop, but which you get is selected randomly - After all 15 have been obtained, subsequent defeats reward 3 Cashnuts... There are recipes for "True Dark Dragon" weapons/tools too (from the True Dragon, duh) - Thoguh, those do not use the lesser weapons/tools as ingredients, so don't craft those The weapons have dark element - True version have unique sets of equipment skills - Remake : Charge Attack +30% - Aging : Change/Remove weapon's element I think these have slightly higher stats than the True Time series? - But of course, they take so much time just to get the recipes and the ingredients - THey are technically the best equipment now, but is it worth the grind? ¯ _(ツ)_/¯ The new recipes actually use Dark Lumber!! Memo Treasure Points At the end of each round, all the items you have obtained so far would be tallied, the sum of which becomes your score of that run, where you can spend on purchasing the items from Dark Don. This means you want to enter the boss area as late as possible to maximise points. Just make sure not to be greedy and run out of time, like I did, for 3 times... Note that certain materials, e.g. Dragonfly and Water Shard, are considered as treasure in Snoozeland. They are in a different tab when filling the Alchemy Robot, and you don't want to put the treasure in of course. Also, all consumable items are worth the same amount of points at the end, be it the starting potion or Spraylixir. TL;DR If your equipment is good enough and you just want more points, prioritize picking: - Gold Cluster -> Sack of Secrets -> Treasures -> High ★ Equipment -> Consumables Point Summaries Points Treasure Equipment Others 30k Sack of Secrets 20k (weird stuff from Fishing) 15k 5★ Treasure End Boss Material 10k 4★ Treasure True Time series Rare Crown Material 5k 3★ Treasure 1k~5k Most Equipment Bugs, e.g. butterflies 500 Basic Weapons/Tools - From picking 1st Life; and - From the end boss if it's gathering 300 All Consumables 100 Basic Armor 30 All Other Materials 5 Starting Armor Don Statue Answers They are basically the Goddess Statues in Treasure Grove, but the question-set is not randomly generated and somewhat trickier. Despite him asking for your preference, you actually want to pick what Dark Don would like instead. Usually, you want to be a "good kid" (e.g. nothing illegal like stealing), but you also want to be the "cool kid", even if it means stepping a bit close to the boundary? (e.g. be rich but unlikable) Some feel contradicting in some sense, so it's better to rely on the table below if it's a new question or when you cannot remember. Answering incorrectly paralyzes you for about 3 seconds, but getting the right answer buffs you for 3 minutes, plus an item that's usually a consumable (or 10% to be a Gold Cluster.) List of QuestionsA spreadsheet compiled by someone named Jun was posted on Discord: https://images.steamusercontent.com/ugc/12779464508745361343/5166B8C9F39BB0D63C9B33175444A70F0A636409/ (Apparently some questions have multiple correct answers?) Below is the table that I put together before seeing that. Note that there are 3-option questions that I got wrong, so I wasn't sure of the answer either. Question (alphabetical order) Answers But if you were... which would you prefer? Ho ho ho... purely out of curiosity, of course. ✓ Always Tepid Soup ☓ Always Crisp Veggies But if you were... which would you prefer? Ho ho ho... purely out of curiosity, of course. ✓ Same Outfit Forever ☓ Same Meal Forever But surely there's one you like just a little more, right? Go on, tell me your favorite! ☓ Mercenary Marcen ? Cook Cocott ? Magician Oz But surely there's one you like just a little more, right? Go on, tell me your favorite! ? Tailor Sue ☓ Miner Meralda ? Carpenter Daiku If you found a wallen stuffed with Dosh in the middle of nowhere... what would you do? Ho ho... ✓ Return It ☓ Keep It If you have to choose, which would you be? ✓ Rich but Unlikable ☓ Poor but Likable Just between us... When you take a bath, which part do you wash first? ☓ Head ☓ Hands ✓ That's a Secret Now that we've warmed things up... The real question! Which do you prefer, coffee or tea? ✓ Coffee ☓ Tea Now, if you only had one spot left... who would you invite to join you? ? The Pluckky Princess ? The Fishing Fanatic ☓ Bad Boy ""Artiste"" Question time! If you could have one superpower, which would you pick? Answer with your gut! ✓ Turn Invisible ☓ Run at Super Speed So, what would you bring as your island companion? Choose carefully. ☓ Weird Pad ☓ Favorite Booke ✓ Dark Don So, which type are you? Do you prefer looks or power? And no, you can't pick both! ✓ Looks ☓ Power So, let's hear it straight! Which do you prefer, dogs or cats? ☓ Dog ☓ Cat ✓ Bears Still, plain water's just too boring... So tell me, what's your favorite drink? ☓ Apple Juice ✓ Wheat Juice ☓ Milk They come in all shapes and sized, you know. So if you could become one, which would you be? ✓ A Golden Bust ☓ A Fancy Teapot ☓ A Cute Doll You strike me as the funny half of the duo... but deep down, which are you? Funny or serious? ✓ Funny One ☓ Serious One Exclusive Encyclopedia Entries Similar to Treasure Trove, certain entries can only be encountered in Snoozaland. Most notably, all 7 bosses are exclusively found here at the end of each round, so you might want to reroll for these if you are missing their entries. There are also 4 variants of Jelling, including one only found around volcano, so you might want to do a run there even if the terrain is annoying to navigate. Type End Boss Field Monster & Gatherable Enemy 🜲 Joker Spooky - Nightmare Circus 🜲 Legendary Bandit - Legend of Badass 🜲 Prismatic Golem - Prism Crash! 🜲 Lunaria - Graceful Wings in Moonlight 🜲 Clown Spooky Mummy Skeleton Zombie Pirate 🜲 Angry Pirate Jelling Lava Jelling Mountain Jelling Desert Jelling 🜲 Nightmare Bunny 🜲 Golden Bee 🜲 Menacing Head Haniwa 🜲 Killertaur Drowsy Mimic Ore 🜲 Darkness Claw - Lady Luck Smiles Upon You! Rainbow Ore Deposit Tree 🜲 Divine Beard Tree - Trimming the Divine Beard Golden Tree Fish 🜲 Azure Dragon Tuna - Fishing for Fortune! Nightmare Fish - (from any fish shadow) Crops 🜲 Zeus Pumpkin - All-Powerful Pumpkin White Pumpkin Strategies General Tips & Tricks This section contains various tips in not particular order. Avoid runs taking place in the Mountain and Volcano These terrains are the most annoying to navigate. In my first run in the Volcano, the first objective is destroying the boxes unmarked on map, and my team spent a whole 5 minutes just running around blindly looking for them... About Drowsy Mimic Teleporting removes any of these effects, so you can remove negative effects with this Headbang is very useful for racking up materials and EXP from crown bosses Headbang can be used to defeat even the End Boss Bomb and Devil have small chance of giving you a Gold Cluster Enemy Room are most easily cleared with ranged weapons, e.g. Hunter In single-player mode, timer is paused in certain menu, e.g. selecting rewards from loot crate Note that the countdown from Alchemy Robot does not start until it finishes the animation. If you intentionally leave a loot crate unopened, you can interact with it so the animation continues without advancing the timer. This is particularly impactful when Fever Time is active (more TBA) (TBA) Utilizing Fever Time Pick a lv3 monster pot (that takes 300 points to fill), use the drone on it, then keep feeding it until you have <10 seconds left.
(待定)多人模式 结语:感谢阅读! 有趣的是,“沉睡之地”玩法与“宝藏林”玩法有许多相似之处,比如专属的百科条目和奖励。不同之处在于,这种 Roguelike 玩法感觉更具吸引力,关卡设计比网格地牢更酷,时间限制在这里确实很重要,随着游玩时间的延长会变得更容易,而且我不必为了提升裁缝等级而反复重刷最终 Boss。 所以,这个模式确实很有趣!不过我也有一些不满(主要是游戏会自动装备裤子,这会移除工装裤,而且“暗武器”无法获取),但我在“沉睡之地”度过的十几个小时还是相当愉快的。
参考我的指南集和攻略 我在另一篇攻略和指南集表格中整理了各种其他技巧和窍门。你可能会在那里找到更多有用的信息,可以去看看! 我制作的《幻想生活i》攻略 全成就概览 生活技巧、经验值获取方法、最佳装备等 岛民食谱指南 稀有物品策略指南 时间旅行与跨存档快速指南 巨人国101与宝藏林概览 沉睡之地概览与策略 版本更新摘要