换一换
换一换 


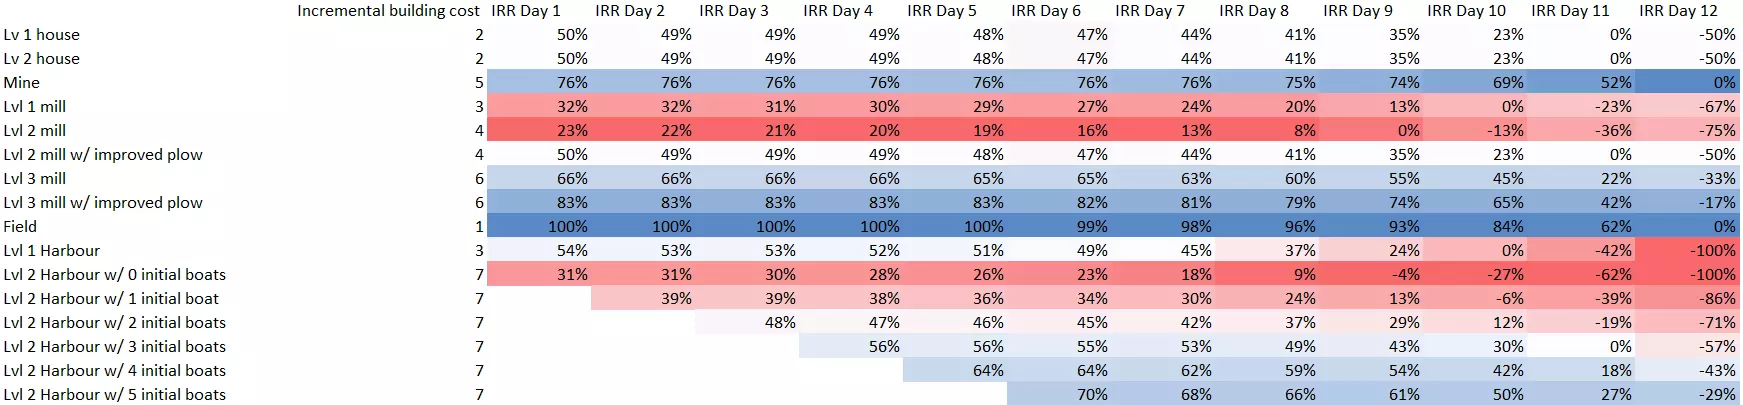
This is a walkthrough to get all three stars in the bonus mode Buying Time with two different strategies, one easier to execute and one to reach a higher score. Introduction Buying Time is a bonus mode/level in which you have to defend your castle for exactly two minutes each night. This means the time component of the scoring will be the same for everyone, so you must maximize for the other factors: getting a good economy so the surplus gold adds to the score and protecting all your buildings as much as possible. This makes this level a sort of puzzle to be solved. After solving it, I wanted to see what other people were doing and found a thread on the Thronefall subreddit created by the user c0d3rman sharing his strategy with an even better score than mine and he included that strategy as a contribution to this guide! Original reddit thread for reference. Inspired by his thread and his well explained and formatted guide, I decided to share my solution along with his in the same format as well. It is an easier solution to execute which can be done with double game speed at all times and no building gets destroyed at any point at the cost of having a slightly lower score compared to c0d3rman's solution. Wave Composition The level contains the following wave unit composition for each night. Dealing with specific enemies each night is referenced in both walkthroughs. In case you don't know the enemies' names, you can check it during the pause screen in the game. Night 130 flogres from northeast. Night 230 spiders from south; 60 swordsmen + 30 archers from southeast. Night 330 spiders + 4 catapults from south; 16 rams from east; 30 racers from northeast. Night 4120 spiky slimes from east; 20 wasps + 20 wheels from southeast. Night 5115 archers from south; 115 pikes from south; 12 rams from south; 12 catapults from south; 30 spiders from northeast. Night 670 barrel knights from northeast; 60 racers from east; 8 big spiders from southeast; 30 ogres from south; 25 flying mages from southwest. Night 712 wheels from northeast; 60 rams from east; 30 catapults + 7 big spiders from east; 60 barrel knights + 20 ogres + 7 big spiders from south; 30 furies from west. Easier Strategy Here is the strategy I came up with as a solution to Buying Time: Day 1:Build the castle and upgrade it to level 2 choosing magic armor; Build the mine next to the castle; Build the harbor; Get the 4 shrines except the southern one.Magic armor will deal with ranged enemies by itself in a few key waves. Leveling the castle early might seem strange but it allows to get the safe mine instantly. Four of the five shrines should be unlocked and activated during this first night, so make sure you execute the first night correctly. Night 1:Just hit each enemy once and walk away, grouping them together and keep them following you. I like to do this in the open area after they cross the first bridge because I find it easier. When the timer hits 30 seconds, I do a last hit on the whole group and direct them towards the castle until they forget about me. Now just wait in front of the castle while the big pack arrives. It will activate all four shrines when the timer runs out. Day 2:For the spiders, simply build a wall and the get the remaining shrine next to it; Build and upgrade the mill near the castle to level 2 using the leftmost specialization (improved plow); Build the blacksmith facility and research melee armor. Night 2:Just stand at the undefended lane with swordsmen and archers and make sure all the swordsmen attack you. Use the active ability often to mitigate damage and regenerate a bit of health. Nothing more to it, archers will die to the magic armor and you will not run out of health as long as you use the active ability every once in a while. Day 3:Upgrade your castle with Castle-Up; Fully upgrade your mill; Build the second mine; Build the wall to defend the lane of rams and upgrade it; Build the wall to the south of the ram lane even though there aren't any attackers, it's necessary to help share the damage done and will be used later. Night 3: Just kill the four catapults as soon as they spawn. If you maintain them as far as possible they will never make a single shot, but you can afford to make a couple mistakes. You can completely ignore every other enemy and just wait after destroying the fourth catapult. Day 4:Upgrade the harbor; Reinforce the walls to defend against the wheels; Build and fully upgrade both towers along this wall with bunker and then ballistic; Build and fully upgrade the left mill with improved plow; Build one house. Night 4:Stand in front of the spiky slime gate until a wasp flies over the wall. Pay close attention to it because when that happens you must walk below it so it attacks you and dies to magic armor. To help achieve that you can stand between their target (the blacksmith facility) and the right tower and they will deterministically hit you until they are killed by the magic armor since no other target is near. When the towers ramp up it gets much easier, you can just stay in front of the slime gate helping the towers but keep an eye if a wasp goes through and repeat the same process if necessary. In case you make a mistake and let a wasp through, it will take by itself about 30 seconds to destroy the blacksmith facility and it will still be fine if it started attacking with less than 30 seconds remaining. It also means that after the 30 seconds left threshold you don’t have to bother defending it anymore and can go back to helping killing the slimes. Day 5:Build and fully upgrade the last mill with improved plow; Reinforce the walls against the big wave; Build the tower to the right to defend this wall and upgrade it with bunker and ballistic; Research the second level of melee armor; Build the temple and choose Blessing; You should have 29 coins at this point, spend everything on houses and upgrades for them. Night 5:Just stand at the spawn point of catapults. Your goal is to destroy the catapults as soon as possible, but you will kill every unit except the ram while doing it. Just use the shield ability every once in a while to maintain your health up. The rams will go past you and will be destroyed by the tower and the shrine will take care of the north spider wave. Day 6:Next to the harbor, build the south eastern tower and upgrade it with castle and then ballistic; Build and upgrade the north eastern wall; Build a second tower near the southern wall and upgrade it with bunker and then ballistic. Night 6:This is the easiest night. You must tank and kill at least 5 ogres near one of the towers so the walls won't get destroyed. After that you can just wait the timer without attacking or defending anything. Day 7:Upgrade the temple and choose Blessing. Night 7:Stand at the spawn point of the catapults and kill them as soon as possible. You'll destroy them fast enough and there will always be plenty of time until the next one. You can even afford to let them take a couple of shots. If a spider sticks on you just ignore it. Easier Strategy Expected Results Victory! Expect a score of 10012 if you had no restarts and 9912 if you had. Base score: 4200 (no buildings destroyed at any point) Gold bonus: 2880 Mutator bonus: 2832 No restarts: 100

Higher Scoring Strategy This is an alternate strategy created by u/c0d3rman, which is harder to execute but gives a slightly higher score. Night 1Upgrades:Castle + lv2[assassin](3 + 7 = 10) Harbor (3) 4x shrines, all except the southern one (4x3 = 12) Mine next to castle (5)Details:Let the flogres walk all the way up to the southern windmill area, until ~1:30. (You can use speedup to pass the time, bind the key in settings.) Try to form one central pack and circle around the exterior while pulling them downward. Stay away from the wall if you can. When shield is up, use it and run through the pack to tag everyone. You can stand still in the middle of the pack to heal from the axe if you need to. You'll naturally get pushed upward. Starting at ~0:20-0:10 depending on where you are, let a few ogres through to your castle or kite the whole pack towards it. It's OK to die at this point, the castle can take a few hits, but best if they don't reach it since they kill it pretty quickly. Make sure the flogres are within range of the castle shrines at 00:00. The long line of flogres will die and activate the four shrines. Night 2Upgrades:Southern shrine (3) Southern wall (3) Outer mine (5) Inner mill[plow]+ lv2 + 4 fields (3 + 4 + 4 = 11)Details:Let spiders run into wall, they will never break through. Start at the soldier + archer spawn and kill them the whole night. While only soldiers spawn, maintain aggro as close as possible to the spawn point. At 1:00 archers start spawning. HP will not be a problem, but aggro will, since the archers don't walk up to you. Tag them and continue kiting while slowly retreating as necessary. You should be able to keep them all at bay until the end of the wave. You don't need to keep them close, just make sure they don't reach the south wall or outer mine. When spiders die at the end of the night they will activate the last shrine. Night 3Upgrades:1 leftover inner mill field (1) Inner east wall[the vertical one next to the one you already have](3) South mill[plow]+ lv2 + 5 fields (3 + 4 + 5 = 12) 10 houses + 4 house upgrades (28) 1 gold leftoverDetails:Northeast shrine will hold the racers off all by itself. Your goal is purely to kill the catapults. They spawn every ~25.5 seconds, i.e. at 2:00, 1:35, 1:09, and 0:44. You must be there as they spawn and kill them immediately or they will break your walls. Start the wave while standing at the catapult spawn. Kill a catapult, run to the rams and deal some damage, run back, repeat. Prioritize arriving early at the catapults over the rams, they do a LOT more damage and will break your wall in 2 shots. Perfect micro not required, you have a lot of wiggle room. After the 4th catapult you can AFK at the rams. Do not fight the spiders, they will kill you. Avoid hitting them if you can so you stay on full HP to run faster. Save your shield for blocking spider damage (you don't need to spam it on cooldown). Usually better used on the way out from killing the catapult, since you'll have to stand still on the way in anyway and you'll heal to full while it's up. Night 4Upgrades:Lv3 castle castle-up (20) 6 house upgrades (12) Lv2 harbor (7) Lv3 inner & south mills (12) Tower next to south shrine + rapid shot + ballista (2 + 4 + 11 = 17) Lv2 inner east wall (6) Lv2 south wall (6) 4 gold leftoverDetails:The wasps will all fly towards the south mill. The shrine alone can kill them. The lv2 south wall upgrade is because we don't want the distributed damage to destroy it. Might be unnecessary but we'll want it later anyways and we've maxed out all the economy we're gonna get. Start the wave at the slime spawn and kite them the whole night. They hurt so be careful. When your shield's down, kite in circles, focusing on maintaining aggro and picking up stragglers. When shield is up stand still for maximum damage and healing. OK to let a few through. Night 5Upgrades:Tower on the west edge of the south wall + lv2 castle tower upgrade (2 + 4 = 6) Firewing lv2 (16 + 20 = 36) Outer east wall + lv2 (2 + 4 = 6)Details:Northeast shrine can handle the spiders. They will reach the mine but will die before they can destroy it. Turn off gallop since there are pikemen. Your priority is once again solely catapults. If you kill them the wall will hold. This is the toughest micro of the whole level. There's a lot more damage and you're slowed. Success here is all about rhythm; you want to die right after killing the second catapult so you respawn as soon as possible for the next one. Night 6Upgrades:Tower west of harbor + sniper + archer spire (2 + 4 + 11) Outermost east tower + rapid shot + ballista (2 + 4 + 11 = 17)Details:The sniper tower will hold off the mages. It's the only required upgrade tonight, the rest is for tomorrow but doesn't hurt now. (Other sniper tower positions may work too, I didn’t test them.) Start the night at the bottom of the stairs south of the outer mine. The barrel knights will drive right past the mine and to you. Spam space and stay in place, they will aggro on you and die; you heal more than they deal. It's OK to let 1 or 2 through. At 1:17 barrel knights will finish spawning and at around 1:05 you will kill the last one. Run to the ogres and start kiting them away from the wall. They WILL break through if you don’t. Kite carefully as they can easily kill you. You can ignore the big spiders and racers. Position the firewing at the ogre spawn, it helps a lot. The tower on the west edge of the south wall and its upgrade (which you got yesterday) are required since the ogres are out of range of the rapid shot tower most of the time, and the wall won’t hold without something to slow the ogres down (literally and figuratively). Night 7Upgrades:Northeast wall + lv2 (2 + 4 = 6) Optional: temple [blessing] (2)Details:Northeast wall will hold the wheels indefinitely and the sniper can easily deal with the furies. The inner east wall will hold the big spiders. Position the firewing over the catapult spawn and lock position. It will take out the catapults, which are otherwise impossible to deal with. If you’re unlucky, occasionally one will spawn while the firewing is distracted with a big spider and will get a shot off on the tower; the tower can tank exactly one shot and will die on the second. (If this happens late, it’s OK since the rams will break it anyway.) Theoretically, this may be possible with a lv1 firewing with perfect positioning and spider luck. The rams will break through the outer east wall towards the end of the night. This is not avoidable without spending a lot more (at least 8 berserks, maybe more), so it’s better to take the L. They’ll break the tower but nothing else. Your job is to defend the south wall. Spend the whole night there, kiting ogres away from the wall. Keep them in range of the rapid shot if you can. Don’t get careless and die, you take a lot of damage; if necessary, back off and regain HP, your wall can eat a few hits. Blessing makes it a LOT easier; without it, you need really good micro or the south wall will break at the end of the night. But blessing does lose you a couple dozen points. Higher Scoring Strategy Expected Results Results Expect a score of 10230 if you had no restarts and 10128 if you had. Base score: 4164 Gold bonus: 3070 Mutator bonus: 2894 No restarts: 102

计分说明 如前所述,本关卡的核心在于在尽可能防守基地的同时最大化经济。两种策略均可进行调整,并重新规划经济路线以达成不同结果。 需要注意的是,无重启奖励可为每种策略提供约100分,因此如果某些夜晚遇到困难,尽管重置天数,仍足以达成第三颗星9500分的最终目标。 简易策略调整 在使用相同防御的情况下,经济建造顺序仍有很大调整空间。你可以尝试不同的经济路线,例如在第一天建造所有圣坛(释放第一波敌人后,若将几只食人魔引向南部圣坛,这是可行的),并调整矿场的建造时机。另一个需要考虑的是推迟从铁匠铺进行第一次近战护甲升级,甚至可能跳过第二次升级。这肯定会增加执行难度,可能需要更多样化的防御塔,但或许是可行的。 更高得分策略调整 为了获得更高分数,你可以采用以下替代经济方案: 1. 1级城堡,4个神社,港口,6所房屋(除城堡前方的任意位置) 2. 南墙,南神社,外部矿场,内部和南部磨坊1级+各2块农田(已耕种),剩余1金币 3. 2级城堡,内部矿场,两座风车升至2级+5块农田,所有房屋升至最高级,剩余3金币 4. 从此处开始与常规方案相同 这将使你在第7夜结束时多获得16金币。没有2级城堡的情况下,第1夜的风筝操作会更困难,但仍是可行的(我已成功做到)。第二晚的风筝可能只有TAS(工具辅助操作)才能实现,我还没能成功——弓箭手伤害太高,而且场地太狭窄了。