换一换
换一换 


A complete guide on how to deal with the many difficulties of endless mode Introduction I've noticed that there are plenty of guides for achievements and challenges for the main levels, but almost all of them are just exact build orders. What this guide sets out to be is a general overview of many aspects of the game in regards to endless mode specifically, and some advanced tips and tricks to help with the greatly increased difficulty endless mode provides. Enemies and you (the good, the bad, and the ogre) The enemies that you fight in thronefall are absolutely not created equally. Some of them are complete pushovers, and others will destroy you without mercy, especially their elite or 'golden' version which appear on later stages. Here is a brief overview of each of them: Peasant/slime These two are lumped together as they have almost identical stats, fill the same role, and the only real difference is that slimes get distracted by whatever is closest and will happily munch an entire wall line, while peasants are slightly smarter and will try to break the towers first at least. Both of these enemies are individually very weak, being one-shot by anything maxed out, and easily dealt with by even tier one buildings. Their strength lies in the massive numbers they will sometimes spawn in, sometimes more than 100 per spawn location on higher waves, which can easily overwhelm any defense not prepared for them. What's worse is that they almost never arrive on their own, but rather act as a meat shield for archers, exploders, or catapults. Archers/crossbowmen While on paper these units act very differently, they really tend to function as tier 1 and tier 2 enemy ranged units, with the archers appearing in much larger numbers and having longer range, and the crossbowmen doing much more damage and having much more health. Archer mobs will usually spawn with basic units to shield for them, but even golden archers are very low health, and can be dealt with simply by walking to the back of the swarm with your melee units grouped and kamikazi'ing them, then letting towers mop up the stragglers. Where things get tricky is the crossbowmen. While quite short ranged, they deal heavy damage and are surprisingly well-armored. Avoid rushing into crossbow mobs like you would with archer mobs, and rely on hit-and-run tactics. they tend to be rather slow-moving, and will stop shooting at building to target you whenever you are near. Take advantage of this by moving close whenever you have full health, then quickly sprinting away as they fire to draw their shots away from your buildings. Golden crossbowmen are a force to be reckoned with, and can two-shot every unit in your roster, and deal with even a fully leveled king shockingly fast. These should be priority targets whenever they appear, as their damage can stack up very fast if left unchecked. Swordsman Basic infantry units, moderate heath, low damage, come in groups of 5-30 depending on wave number. Can safely be ignored if they are all that's coming from a particular direction, as 2-3 tier one towers or 1-2 tier twos can easily deal with them. Spearmen low health, low damage, and utterly terrifying. While they cannot go toe-to-toe with any of your units, and towers make quick work of them, they will single out the king and deal heavy damage, slowing you down to a crawl for extended periods with every hit. If any wave contains spearmen and your main weapon is melee, then things might get tricky. They will take you down very quickly if you charge into a group of them, they slow you down to their speed making it almost impossible to get away without killing them, and worst of all they can attack you through walls and gates, making the most reliable cheese useless against them. Fortunately, their actual stats when attacking anything else are rather lackluster, so just let your units and towers deal with these menaces. Spiky slimes Just tougher slimes right? Well, yes and no. They are just slimes, with the same AI and speed, however they have roughly triple the health and damage, multiplied again for golden spiky slimes. Add in the fact that they will still spawn in large numbers, and they can become a problem very quickly. Avoid sending your melee units in, have them focus on other enemies when present. Spiky slimes can make short work of most of your units, and no melee troop will get decent value against them. instead, have your archers hold position a little ways back from the wall. Slimes will always attack the nearest thing to them first, whatever it is. If you make sure that nearest thing is other sections of wall, then they will be distracted for quite a while, allowing your archers to thin the horde while you deal with all the other enemies, then bring all your forces back around to finish them off. Ogres Big, tanky, heavy hitting, you can tell all this just from one look at these ugly beasts. Despite that, the basic ones are relatively uninteresting. While they are tanky, they have no resistances, and any concentrated force will bring them down easy enough. Where things get tricky are the golden ogres. You can imagine golden enemies as having the extra health and extra damage campaign challenge modifiers on, and if you played through those then you remember how difficult just a few ogres were. Now take into consideration that they can spawn in groups of up to 30, and we start to reach the point where it is simply not possible to gather enough damage to stop them in time. Any group of more than 10 golden ogres should be enough to send your entire army to, leaving the other spawns to your towers if at all possible. The exact point they spawn from matters heavily; if they spawn far away and give you time to pick away at them, then you might pick off 5 or 6 before they reach your walls. If they spawn nearby, then things will be very difficult. They can break even stone walls in just ten hits, and almost any tower in just as few, and with ten or more in a group they will sweep through your base shockingly fast. If more than one golden ogre gets on top of your castle, its all over. You can draw them away by attacking them, as they will target whatever last damaged them for roughly 5 seconds. Use this to lure as many away as you can to lighten the load on your defenses. Boiling oil towers in the front and as many balistas as possible in the back are your best bet, but be aware it might not be enough. When you see these coming, be ready for a difficult fight. Racers These enemies are the weakest enemy that has resulted in an embarrassing number of losses, and shouldn't be underestimated. They will go straight for your castle, and only attack walls that are directly in their way, completely ignoring everything else, not even damaging fields they pass over. On their own, they don't deal a lot of damage, and have low health, but in large groups can punch through your walls and rush past your towers and army. The real problem comes when you ignore them, and trust me when i say you will. you will crush waves upon waves of these lil guys without a sweat, and start to ignore them. Then there will be a wave of racers on one side of the map, and a huge mixed wave on the other! of course you leave the racers to your towers, and tier twos should be enough, right? The racers will take your hubris and shatter your pride (and your castle). if allowed to bunch up just 20-30 are enough to punch through most of the wall lines in the game. just leave around 4-6 melee units at the wall they will be running into, this will be enough to break up the group and make sure not all of them are attacking at once, while adding some extra damage to thin them out. Hunterlings Low health, high damage, and will always gun straight for the king wherever you are on the map. whenever large groups of these are around (any number greater than 20), avoid standing behind your walls. leave your army and towers to take care of anything else that spawns, and go out into the most open spot you can find, then run in circles, best if its near a tower or two. The hunterlings will follow you relentlessly instead of adding their considerable damage into your towers. Just be careful, while you are respawning they will attack your other units, killing them all very quickly and potentially breaking your defense to allow their friends to rush in. -enemies continued Monster rider (horsemen) Moderate damage, medium health, fast speed, slowed down by the spear. Rather straightforward as far as enemies go, with the exception that they are monsters, not humans, meaning that the hunters get confused by them (more on that later). Exploder Little spiked meatballs that move towards the nearest building and explode as soon as they reach it, or once they die. These are a significant threat, and they will receive their own section later on for how to deal with them. Siege units Barrel knights A gaggle of madlads who strapped wheels to a barrel, hopped inside and called it a day. They deal very little damage, and even the golden ones don't hurt very much, but they are one of the tankiest enemies in the game. Being a siege unit, they take reduced damage from all ranged attacks, and while they don't do very much damage, a group of 20 unkillable idiots slapping your walls will bring them down eventually. Try to deal with bigger threats as fast as possible when these guys come out, then bring your army to bear on them as soon as you can. Rams Big, slow, and extremely high health. With ranged damage resistance and twice the health of an ogre, these will sap your dps as they approach your line, distracting your towers from the archers and exploders they frequently arrive with. Berzerkers and fire arrows make short work of them, but any other build will have to concentrate down any large group of them. On the plus side, for battering rams they don't actually deal very much damage to buildings, and you should have enough time to whittle them down. Catapults The only siege unit that doesn't have a large health pool, but makes up for it by being one of the most dangerous things in the entire game. They have extreme range, sitting comfortably on the edge of most towers range, and destroying any buildings very quickly. If they come from far away, or are exposed, then they pose little threat. The problem is when they spawn near your base or at the back of a large group, they can destroy your towers leaving you scrambling to dish out damage to the horde in front of them. They can also spawn less than 10 seconds away from attacking your castle on some maps, and destroy it it only a few hits, but that will be discussed in the maps section. These should be a high-priority target whenever they appear. Flying enemies Wasps small and weak, they would pose little threat except for the fact that they rush down your economy buildings, making these little nuisances a high-priority threat. Just a couple towers or archers can deal with them, but do not take scarecrows if wasps are coming. They tend to arrive in large numbers, and only one scarecrow blast will kill them, meaning too much damage is wasted as every scarecrow targets one, obliterates it, then gets demolished by the rest of the wasps. Easily dealt with if you have the bow and dagger, but melee builds might struggle, just have plenty of tier one towers lying around and you should be fine. Furies Slow moving, moderate health, and slow but very high damage projectiles. Small groups are no threat, but 20+ will shred your army and towers before moving on to all of your economy. The trick is that they will always target the unit closest to them, while their projectiles are quite slow, meaning that if you sprint around underneath them constantly they wont be able to destroy all of your mills for the 80th time (no i'm not upset it took me so long to figure this out, shut up) 1 tier one tower can deal with 1 fury, and 1 tier two can deal with 2 furies, with two towers or a single tier three being able to deal with around 4-5. Small groups of furies will regularly spawn apart from normal waves, so bear this math in mind to deal with them cheaply, and remember any upgrades you might have when calculating. Fire mages If you'll allow me a moment: AHHHHH ♥♥♥♥ THESE GUYS THEY ARE JUST THE WORST. I apologize, I've got it out of my system now. Anyways. Moderate health, low speed, splash damage dealing units who target units and towers before targeting every economy building nearby, and ignoring the king unless directly damaged by him. The trouble is twofold, one: they almost never spawn alone, and whenever supported they will always sit right behind their allies, compounding with problem two: they are not siege units or monsters, meaning that there is no way to have your forces single them out. any wave that has a group of fire mages and a group of infantry to soak damage will always end with all of your units dead, your tower slowly plinking away at a group of 50 slimes, while 5 fire mages gleefully fly around destroying every single one of your mills and houses. Scarecrows are highly recommended here and here alone, as its the only thing that will focus the mages specifically, and most mills are close enough to the front to be firing while your army is still alive. If you have a ranged weapon, then great! if not, be prepared not to spend any money on economy while mages are around, as you'll need it for towers and archers, or else you'll be the proud owner of several broken mills every round. -Spawning mechanics Just a quick mention of a few things: mono waves and how to tell what the threat of each stage will be. Mono waves are rather rare, tend to be either a free win or a guaranteed loss, and come in two varieties. There are Mono-enemy stages, and Mono-spawn stages. Mono-enemy stages will either only spawn one kind if enemy every single night, or only a handful of supporting units while spawning literal hundreds of the main unit. Mono-spawn stage will only have enemies spawn from a single entrance, even during the final night where they would normally spawn all over. Mono-enemy stages can be extremely easy for the most part, as it allows you to build a hard counter. Mono-archers? build crossbows. Mono-slimes? flails. Mono-exploders? suffer. I have only had this happen once, but i kid you not my final wave was 208 exploders and 4 monster riders, with 104 spawning from each side of the map. it was a rush spawn as well instead of a trickled, and i was almost instantly overrun. Mono-spawn stages are a little different. up to stage 10 they are basically a free win, but beyond that the amount of units that come from a single direction are more than a maxed out defense can hold, and can go from being a free win to a sure loss. Additionally, every stage will have a small selection of enemies that arrive, usually around 4 different types chosen randomly, and you should receive at least one of all of them in the first three nights, meaning that whatever comes for you early, you should be ready for extreme numbers later on. For this reason i usually try to handle the early waves on my own, upgrading the castle to tier 2 usually on day 2 or 3, so that i can build my army around my enemies. Weapons and you (stabbing, etc.) There are four main weapons that you will be offered at random: the bow and dagger, the spear, the sword, and the staff. Almost all of them are viable, and should be considered side-grades with specific strengths and weakness, with one exception that we'll get to later. The four weapons can generally be grouped as single target ranged, single target melee, splash melee, and splash ranged respectively. The bow and dagger is the most reliable weapon offered, with both ranged and melee damage, good dps, and the option to take assassin if there are a lot of siege units to deal with. I've found that this weapon has the second-best dps, especially considering that you can rush in, stab a high-value target, then keep shooting while your health regenerates. It does however suffer when dealing with large groups of weaker enemies, and should be paired with at least one unit of flails to offset this. The spear is the single-target melee weapon, and should be considered the most defensive, with a special ability that can briefly out-heal large amounts of incoming damage. The spear also vastly slows down any fast enemy, just as barricades do, especially useful at stopping exploders, kiting hunterlings, and blunting a horsemen rush. The sword is the splash damage melee weapon, with hands-down the best dps, at the cost of having no defensive options to speak of, and being useless against air units. Something worth note with all weapons, but especially this one: whenever you respawn, particularly with the ring of respawning, you deal your attack damage to all enemies around you and spawn with a fully charged special. For the sword, this means you can charge into the back line of a dangerous wave, use your special, die, deal respawn damage and use your special again for almost instant triple damage, enough to kill a group of crossbowmen or catapults that would have wreaked havoc on your defenses. If only there was good splash for air units... The lightning staff. Each shot does roughly 1/3rd the damage of a bow shot, but can target as many enemies as are in range, given that they are at least roughly 2 horse-lengths away from each other, as well as the single most damaging attack in the game on its special, which starts a lengthy wind-up before smiting an area with lightning. -So what should i use? So what should you prioritize taking? Well, anything except the lightning staff, which should be avoided at all costs. Allow me to explain. The other three weapons are all perfectly viable, although i tend to prefer the bow and dagger, as being left useless against air units has come back to bite me plenty of times. The problem with the lightning staff is simple dps, from both you and the enemy. The staff spreads its damage out over a wide area, dealing very little to each enemy struck. While it sounds like just hitting 4 or more enemies every time would make this the best weapon, taking the lightning staff is, in fact, almost always a death sentence. Finishing enemies off is incredibly important, otherwise there is no point attacking them at all. When your walls are being attacked, there is no difference between an army of nearly-dead monsters and an army of full health ones, and your towers will usually either one-shot enemies, or 3-4 shot them, and the staff simply does not do enough damage to change this math. The staff's only saving grace is it's special, which does deal genuinely massive damage, especially once the king has been leveled up. One smite is enough to kill almost any basic enemy in the game, and many golden ones, while being able to hit flying enemies as well, though it can be difficult to line up. The problem is its very long recharge time. This is helped by taking assassin, but even then you're doing nothing for 10-20 seconds at a time, and when the king is usually your biggest single damage source, you will feel the loss of a better weapon. Units and you (Huntzerker? Hardly know 'er!) Melee units: Knights The humble knight is often overlooked, as it has the least dps outs of the melee units, and as we discussed with the lightning staff, that matters. What the do have, however, is the most health out of all the melee units, and by a fair bit. They have roughly 2x the spearmen and flails health, and even more than the moderately tanky berzerker. This is all the have going for them unfortunately, but they shouldn't be ignored because of that. They are the only unit that can survive golden crossbows and golden ogres for any length of time, and are a must-have in those cases. A knights purpose is not to kill the enemy, but to hold them still while your archers and towers take care of them. Spearmen Faster than knights, but with much less health and slightly more damage, they are anti-fast through and through. You would think to use them against exploders especially, but be careful! if left alone your spearmen will all charge the first spiky meatball and all die horribly when it explodes. The way to use spearmen is to leave groups of one or two on hold position in a line stretching away from your walls, with 4 or 5 left to roam to deal with regular enemies. Flails as tanky as spearmen, as much damage per attack as knights, but dealing that damage in an area around them, much like the swords special attack. These are the go-to answer to any massed group of weaker enemies, and pretty much the only thing that can deal with huge numbers of spiky slimes. Berzerkers By far the most single target damage out of the melee units, by far the fastest, and the second takiest, these units are a force to be reckoned with. they prioritize attacking siege units, and rapidly dish out large amounts of dps to everything else, making them a fantastic frontline unit. Ranged units Longbowmen The basic ranged unit, with decent damage and the longest range. If left unattended they will slowly walk forward, making it important to put them on hold position far back from the wall to avoid other archers or fire mages, who will make short work of them. Something to note if you find your dps lacking is that you should individually string out your archers in a line rather them clumping them up to avoid all their arrows hitting the same target and overkilling (a bigger problem for the high-damage longbowmen, which is why its listed here) Crossbowmen A glorified melee unit, they have the most health of any ranged unit, roughly the same as a berzerker even, and with a very high damage attack that fires very slowly with an extremely short range. Sadly, they fire a little too slowly, and should only be used if you just need to tank absurd amounts of damage. They do have extra damage and resistance to other ranged units, making them the go-to for crossbow, archer, and fire mage mono-stages, but they have little other use. Fire arrows roughly the same damage as a longbowman but with less range, they leave behind a pool of burning fire that continues to damage enemies. Unlike the other ranged units, fire arrows should be bunched up, as the fire pools damage stack with eachother, and can create small zones of pure death when grouped up. They are also the only ranged unit that ignores siege units resistance, making them the go-to pick for siege units large groups of small enemies. Hunters Fast moving and fast firing, with nearly triple the attack speed of longbowmen while only doing slightly less damage, and unlike crossbowmen they actually have a low-damage melee attack they can use in addition to their bow, giving them extra dps in melee range, which they aggressively try to take advantage of, perhaps too much (more on that later). They will prioritize monster units, and are the best all-rounded ranged units, with fantastic dps to boot, they earn their place on the front line. -wait, aren't two of those better than the rest? Now, you may have noticed that berzerkers and hunters sound pretty good, and if you've played much of the game you've probably fallen into the habit of only building them every single stage. I was the same way, and never made it past stage 8 until i used the other units, and now reliably make it to 10+. The problem is their priorities. If a berzerker catches even a whiff of lumber anywhere on the map, they will all drop what they were doing and move towards it. 120 spiky slime on one side and 4 barrel knights on the other? guess what, all your melee units left you to go ruin those barrel boys, and now you're swarmed. Berzerkers also aren't the tankiest melee unit, with knights being the only ones that can take a crossbow barrage or hold golden ogres at bay, and exploders, knights, and racers rush past, leaving the zerkers dumbfounded where a spear line would have made short work. Hunters have a similar problem, and if you use them a lot you may have noticed they are rather... suicidal. extremely in fact. The problem lies in the fact that they want to use the extra dps of their melee weapon while not really having the health to stay at the front for long. Add that to their priority for monster units, and they will happily gather around an exploder and blow themselves up on it. On every. Single. Exploder. Not to mention the fact that they will focus down every last racer and slime before firing a single shot at the archers or fire mages that are destroying them. You might find yourself telling them to hold position more often than not, in which case you should really be at least considering the other options. With all that said, hunters and berzerkers have become everyone's first pick for a reason. They simply have the best overall stats out of their groups, and so in most cases it does make sense to pick them, but being able to recognize when your huntzerkers will just die, and being able to set up other units just as well, will make the difference at the higher stages where golden enemies require specialization. Maps and you (insert joke here) The actual map section of this will be fairly short, as i mainly intend to talk about economy and generally how to approach it here. You have probably noticed that two of the maps have an entrance very close to the base that is only guarded by two towers, that being the lake map and the forest map. While most of the time this is fine, and even two towers are usually enough when backed up by the army, but there are a few times when rng can simply end your run here: golden ogres and golden catapults, as well as regular catapults when supported by normal units. A group of golden ogres needs two full armies worth of respawning units and ideally 5 or 6 tier 3 towers, so these two entrances simply don't have what it take to stop them. Catapults pose an entirely different problem: they can't be body blocked, and if they see your castle they will prioritize it over everything else. The above two entrances, as well as the windy south passage on the canyons map will have catapults able to see your castle just 10 seconds after spawning, meaning you only have that long to get on top of them and kill them. A difficult task normally, very difficult with golden catapults, and nearly impossible if they have units supporting them that with take shots and kill your approaching army. As far as i can tell, these are the only problems that are genuinely impossible to overcome rather than simply difficult, and the only change i would ask of the devs is to make these three entrances not able to spawn more than 10 of these enemies, as i have had a stage 12 run ended by 53 catapults spawning in the south desert canyon with fire mage support. I am not inherently salty when i lose, but impossible odds are unsavory. moving on to economy: build houses ya greedy fools. a tier 1 mill costs 5 to produce 3, versus 6 gold of houses to produce the same, a tier 3 mill with 6 fields costs 19 to produce 13, versus 20 for 10; or docks, which at tier two, over 8 rounds for 13 gold will produce 60 gold, where 14 gold of houses will produce 56. Only a tiny amount less, for a building that is safely behind your walls, almost never getting destroyed, and with fortified houses can actually contribute to your defense decently well. Mines should almost always be made, and definitely always with indestructible mines, but mills and docks are slightly better for something that is far more exposed, and at higher stages you cannot survive losing even one night of economy. Advanced tips (yes, exploders are annoying, here's how to stop them) Exploders. The worst, right? Not if you know how to deal with them! we've already discussed the spearmen optimization, but the real trick is understanding that you simply can't stop all of them. They will reach your line, and they will blow up on something. What you need to do is give them something that doesnt matter for them to blow up on. If you know that large numbers of exploders are coming, dont build a fortress tower, or even an oil tower, build a support tower. It has by far the most health out of all the tier 3s, nearly triple that of a fortress tower. while it won't shoot at the enemy, we already noticed that we can't stop them all. The support tower, without any perks or upgrades can tank nearly 20 exploders, with the higher health perk and the resistance perks and upgrade, this increases massively, making one support tower able to reliably tank basically all the exploders that come your way. Something else to discuss here is what i call the "trap perks". There are 3 perks that feel like an instant take, but will actually ruin your run. These are the warrior mode, commander mode, and glass cannon perks. Even if you take both warrior and commander mode to cancel eachother out, your units and towers only gain ~10% damage, and you are actively worse until halfway through, especially the first couple nights where you would want to solo while you build economy. Glass cannon sounds great at first, until you get only melee weapons offered, or you have to charge through a wave to reach catapults at the back. Avoid all three of these perks at all costs, you cannot spare the damage from yourself and your towers for either "mode" perk, and you need the tankyness that glass cannon take away. Summary To wrap things up: Build more houses; try using other units than huntzerker; avoid the lightning staff, "mode" perks, and glass cannon at all costs; just tank exploders with support towers; and, most importantly, good luck! My high score is just shy of 200,000, and I've had several runs come close, i would love to know what the record is! And if you have any tips to add, i would love to get better! This is just some things that I've learned, and i hope it helps anyone who's struggling to break stage 10+! And thank you devs for making a great game, I've loved every hour of it!
如何精通《王座陨落》

2026-02-20 13:00:14
发布在Thronefall
转载

导读
这是一篇《王座陨落》无尽模式进阶攻略,涵盖各类型敌人特性与应对方法,分析了武器、兵种的优劣势及适配场景,还讲解了地图风险点、经济布局技巧,以及规避陷阱 perk、应对自爆怪等进阶技巧,助力玩家应对无尽模式高难度。

评论
共0条评论

《王座陨落》心得分析
本篇心得针对已经学会操作的玩家而设 实用技巧: 按ESC后可以在菜单栏看到本回合的收入情况、收入组成;以及敌人兵种和兵种特色。 能够携带的增益数量和流派组合往往…
2026-02-18 13:000赞 · 0评论

《王座陨落》入门指南
攻略,也仅是基本信息分享。攻略不是最优解,多尝试不同的打法,体验游戏而不是战胜游戏。 游玩稍有心得,与大家分享。经济建筑优先级 房屋(2金币建造→每晚1金币;2…
2026-02-19 07:000赞 · 0评论
《王座陨落》 perk指南与概述
Having amassed hundreds of hours in the game and obtained multiple High Scoring …
2026-02-20 10:000赞 · 0评论
最后的忍者 完全攻略
攻略 第一关:荒野之地 在此收集所有闪烁的物品。你不必击败所有敌人——但你可以这么做。此外,在第一关无需跳过河流,因为你最终只会从关卡的另一端出来,而且由于操作…
2026-04-05 10:000赞 · 0评论
《恶魔匕首》V3攻略指南(2019)
最详尽彻底的《恶魔匕首》攻略 结构说明 由于要涵盖的信息非常多,我会按照秒数区间来讲解,例如0-39秒。 在2021年修订本攻略时,我决定为各个部分命名,使其不…
2026-03-20 16:000赞 · 0评论

王国:通用技巧
General tips about Kingdoms mode Intro After finishing a few Kingdoms runs, thou…
2026-02-19 01:000赞 · 0评论

《班迪与黑暗复兴》第三幕-全收集流程图文攻略指南
本文转自neoseeker网用户:Berserker
2025-11-17 10:4220赞 · 0评论
《幽浮2》利爪失魂者怎么打?直播实况第25集:变态敌人应对攻略
2026-05-28 03:340赞 · 0评论

地下蚁国生存指南
### 游戏获胜指南(制作中) 基础要点 以下是一些实用技巧: 1. 漫长、狭窄且蜿蜒的路径通向胜利 单个格子可以容纳多只蚂蚁。利用长路径限制敌人数量,并将路径…
2026-04-07 22:000赞 · 0评论
如何在《燥热:意念删除》中达到中等偏上水平
《燥热:意念删除》入门指南 基础操作 如果你玩过《燥热》系列游戏,应该了解一些基础策略,包括: - 拳击、抓取、射击 - 射击与投掷 - 投掷与拳击 - 热切换…
2026-04-02 01:000赞 · 0评论
暂无更多
最新更新
- 《Thronefall》开发更新 — 各位女王与国王们, 非常感谢大家在玩家调查问卷中提供的所有反馈——这些反馈对于我们确定游戏中需要修复和新增的关键内容优先级非常有价值。 获取IP的商业流程以及建…
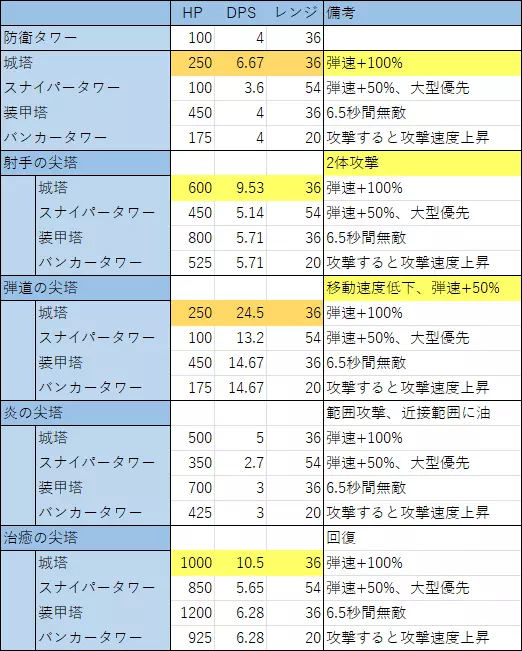
- 全单位详细数据 — 全单位详细数据 塔
- 如何精通《王座陨落》 — A complete guide on how to deal with the many difficulties of endless mode Intro…
- 《王座陨落》 perk指南与概述 — Having amassed hundreds of hours in the game and obtained multiple High Scoring …
- 通用技巧 — 经济管理的一些小建议和想法 通用技巧 1. 这对几乎所有即时战略游戏都适用,但我还是提一下: 【前期游戏应尽可能专注于经济发展,同时在保证安全的前提下,防御设施…
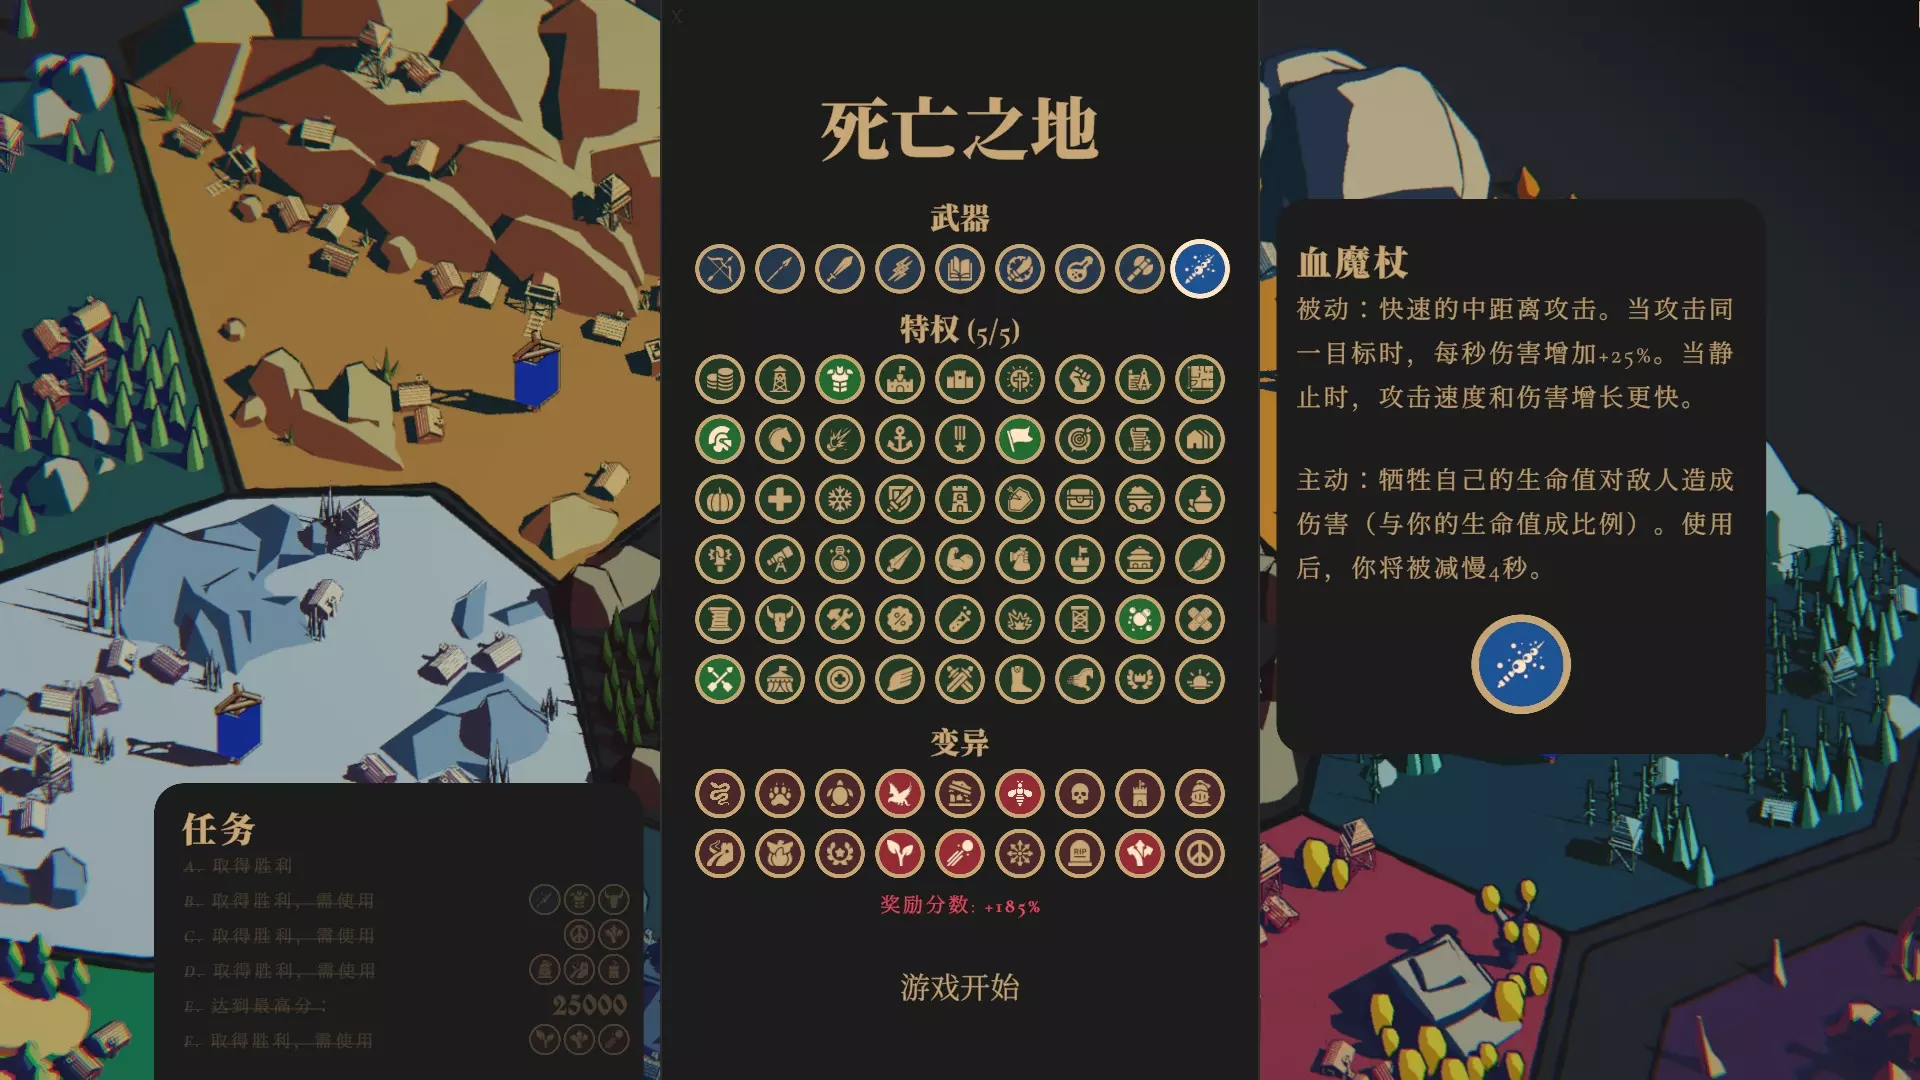
- 关于我如何在《托腾德》中获得25000分的视频 — 这是一个关于我如何攻克游戏中最难挑战的视频攻略:在托滕德(Totend)获得25000分。要解锁所有成就,你必须达成这一目标。 你好,如果你也在为我认为是游戏中…
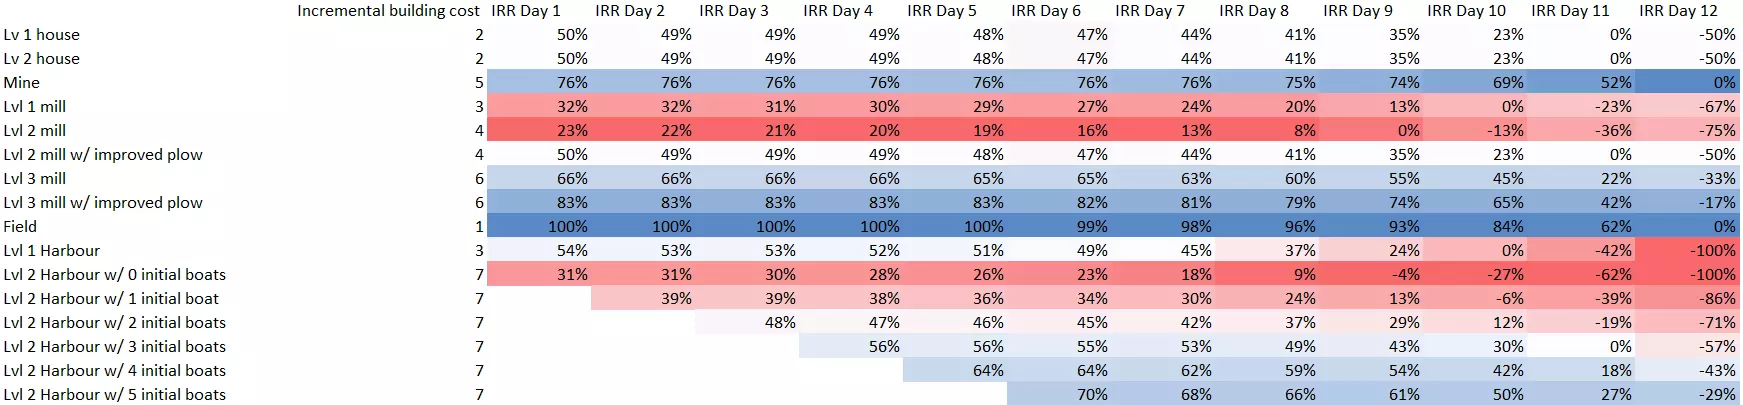
- 构建一个动态经济体系 — 在本指南中,你将看到一个非常简单的策略,适用于《王座陨落》的每张地图,无需依赖技能或优化,就能动态构建王国经济,每次都能获胜。不需要图表或电子表格! 动态经济入…
- 建造与升级技巧 — 【过时内容(于UFERWIND更新后)】 关于建造、升级选择以及部队武器配置的通用建议 升级主基地 - 主基地可升级2次,分别消耗7枚和20枚金币。 - 每次升…
- 《王座陨落》1.21版本弗罗斯特湖任务F指南 — 本指南将帮助你达成【Frostsee Quest F】胜利。现已更新至1.21版本,助力完成【Ruler of Frostsee】成就。 准备工作: - 武器:…
- 《王座陨落》施图尔姆克拉姆任务A、B、C、D、E及F指南 — 本指南将帮助你完成施图姆克拉姆任务A、B、C、D、E和F的胜利。以助力达成【Ruler of STURMKLAMM】成就。 配置A和B: 武器:弓和匕首 技能:…