换一换
换一换 


General tips about Kingdoms mode Intro After finishing a few Kingdoms runs, thought I'd share some of the tips and startegies that helped me beat it, seeing that there aren't many guides on Kingdoms yet. Kingdoms is a new game mode which blends classic DD2 gameplay with a town managment similar to DD1. You have a limited number of days (turns) to complete a series of quests and defeat the final boss. Each day you can move to an inn or a camp, inns can be upgraded, while camps cannot. Between each is a region with a short stagecoach run with about 3 nodes on average (can be up to 5 later on). You can choose 4 heroes to start with, then 8 more are scattered throughout the map, that you can form 2 more teams with. Don't forget to Shift+Click to "reserve" heroes you want in your run, otherwise they'll be random. A speed up option has been added in the settings, you can shoose to speed up the stagecoach and/or combat by 50%. Except during the boss battles and sieges There is a retreat button on the top left part of the screen during combat. Team A relevant thing to consider is you can get ambushed at camps, so you want heroes that aren't useless when shuffled Beast ClanWhen choosing a team, keep in mind that the beastmen have a high Blight resistance, so blight DoT team might struggle until you give them some blight piercing. My go-to team was: Crusader, Bounty Hunter, Highwayman, Runaway Rank 1: Crusader - Good damage, can heal and stress heal, decent tank and has mobility skills MAA is also a great alternative, so is Hellion Rank 2: Bounty Hunter - Good damage, best versitality skills, stuns, debuffs, moves. Has the best stun move in the game which can come in clutch vs beastmen to counter Berserk. MAA or Abomination can also fit in here or just Flagelant Rank 3: Highwayman - Good damage, steals tokens, usefull in all ranks, hits all ranks, riposte can apply combo. Can respec him into sharpshot, double tap skill is amazing on that path Occultist is a good alternative, you need someone that removes enemy tokens efficiently Jester also works applying cleave bleed, blinds and plenty of combo tokens Rank 4: Runaway - DoT, debuffs, blinds, conditional healer. Smokescreen can be an alternative counter to enrage, applies blind, vulnerable and combo. This team likes using combo. Could respec her into arsonist for flame DoT piercing, to make her more useful in the Sprawl. Alternatively can use Plague Doc, but you'll have to give her blight piercing if you wanna go blight with her The CovenAny good team will work here, but since Coven uses stealth try to include Highwayman, Runaway or Vestal, due to their stealth removal skills. Lepers Intimidation is ok, not the best, since it needs to be upgraded. Hellions Barbaric Yawp is not reliable enough imo, but can be used if necessary. Also don't stack all three in the same team, you want your backup teams to be able to deal with stealth too. My primary team for Coven was: Hellion, MAA, Plague Doc, Runaway. Hearthlight and Bellow skills really shine in this mode. In plenty of Coven battles witches start with up to 2 Dodge+ and stealth skill gives them Crit Token. We can use these skills to counter that without much headache. You can even use Firestarter on MAA and have him burn the entire enemy team when he yells at them, not as good as it sounds, but a viable strat. Rank 3 is a bit of an awkward spot for this team, since Hellion and Plague Doc can't reach it and they don't have pull skills, but can dish out a lot of damage to front ranks and punish rank 4. This is why Magnesium Rain is essential for a smooth battle. Occultist can work well instead of Plague Doc, solves rank 3 issue, but this comp is a bit riskier since you lose consistent healing. Hellions Bleed Out has been buffed and works well with Adrenaline Rush, which isn't nearly as good without Winded tokens. Secondary team: Crusader, Flagellant, Bounty Hunter, Sharpshot Highwayman Bounty Hunter in Rank 3 is interesting, he's an excellent back rank disruptor, just give him No Escape and Hurlbat. Mark also removes Dodges entirely and you can even keep Collect Bounty, this setup makes him not care about being shuffled. This team can have possibly devastating encounters with Death, as she tends to appear at the worst times, but if you play smart it's extra mastery points. The team can handle her, even on escalation 3, bad shuffling being the main threat. The CourtThe Courtiers are well rounded, deal a lot of damage, use plenty of buff tokens and some of their units have a lot of Dodge tokens, that we need to deal with efficiently. Due to Contagion, using backup teams is a bit of a risk, but also enables your primary team to heal fatigue at every Camp. Every escalation upgrades one attack into a conditional stronger attack, for example instead of hitting only one hero, in rank 1 the same attack hits your ranks 1-3. The Court Team: MAA, Highwayman, Surgeon Plague Doc, Occultist. Bellow is again, quite useful in this mode not only because of Dodge tokens, it removes the painful Riposte and Crit, if you upgrade. Have Rampart if you want to use Duelist Advance, but the skill is good on its own too. Defender is a life saver even more in this mode, you can prevent combo attacks, which are quite dangerous. Highwayman is our primary killer with Wicked Slash, going for crits or give him Melee damage trinkets, but he can also deal with tokens using Highway Robbery. Double Cross isn't bad either, if your only targets have Blocks, it softens one up for Incision. If you find Coiled Chain give it to Highwayman, he's usually first and can sometimes steal a backline kill first round. Have Pistol Shot, just to have reach, most of his Meele skills only hit Rank 1 and 2. Point Blank and Duelist combo has a lot of damage potential. Hellion is a good alternative, but move her to rank 1, so she can reach rank 4, Bounty Hunter can also fill this spot. Plague Doc is a Healer+damage support, doesn't have to be Surgeon, I just use it for heal bonus. Occultist is essential, upgraded Vulnerability Curse is a must have, removing all defensive tokens from a unit and making it vulnerable, enabling you to possibly one-shot some enemies on a crit. Daemons Pull is also a must have, disrupting enemy positions forcing them to use weaker attacks, as well as corpse clear. Bounty Hunter can also fill this role. You can use Sharpshot in this position, but give him upgraded Tracking shot, that skill is very effective vs Dodge, then use Bounty Hunter or Hellion in the front ranks. Tips and Strategy General Tips - Retreat button has been introduced in this mode, it's on the top left of the screen next to the enemy advantage banner... Use it when necessary, the party will gain +2 stress on successful retreat - Kingdoms has a new mechanic called Fatigue, which basically drops your heroes max HP (0-20%) after each region or upon hitting Deaths Door. You can use items, hospitals or just rest to heal fatigue. And by rest, I mean you need to skip a day or swap out and station your heroes. Stationing in the inn for a day also gives you a one region buff for +20% HP and damage and +2 speed. Helpfull if you can spare the time. The No rest achievement is very doable, just a little bit more expensive, hit those hospitals or upgrade a Physician at an inn, 10% heal is 8 baubles (6 at an upgraded inn). After some 5 or so days or when fatigue is too high (about 20%), I like to switch to the B team for a few locations. This gives the main team time to heal and opportunity to upgrade B team, then switch again when fatigue gets too much to handle. - In hero selection, don't forget to Shift+Click on the heroes you want to be your backup teams, since the Coven update, you can choose who is available. If you don't, it's random. - You can sell trinkets, stagecoach and some items to the Hoarder, so don't just dump stuff you don't need. There is also Inn storage available from the map menu. - Always avoid wheel and armour damage if you can, repair is costly and you can use those resources for fatigue heal or trinkets, it can really stack up and hurt your economy. - It's worth to plan out your route based on inn treasures, they usually give quite a bit of resources and good trinkets. Same goes for contracts, the contract even says whats in store (beast den, lair boss or a fight with an elite). Inn treasures are more plentifull if the inn is upgraded. - Buy rumors, they often give good trinkets worth much more. The image on the rumor tells you what region it's in and the text tells you which node. You should aim for those, but don't break the bank over it, trinkets are Inedible (gold) quality, but random.

- Use undergorund pasage carefully once you hit escalation 2, Sluice is esspecially dangerous, the Kingdoms patch buffed the pigs and they deal a lot of damage. Catacombs I find less scary, but can still get out of control if you're not careful. Slimes will multiply only if there is a corpse adjescent to them. Destroying the corpses gives you a bit of resources too, so it isn't a waste of turn there. - Save up blight resist inn and combat items in Beast Clan module, two of each will do, they'll come in handy in the endgame. Also, don't dump the slime mold right away, you could get food barrels and a bunny pet. Extra HP is always welcome, but if you don't get the items and lack inventory space, dump them. In Coven, save up on stun resist Inn Item and try to buy the 100% stun resist trinket (Inert Indicia). Buy the Coven exclusive items too, they are really good. Be mindfull with the mandrake tho, it's a risky item, equip it on a hero with the highest stun resist or with the trinket, it's a budget Oversprung clock combo with the trinket. It's also worth to save up 4 of Mandrakes for the end boss, but only with the trinket. The Court, save up 4 bleed resist inn items and bring plenty of healing items for the last boss, not much else can help against that one. - The Coven uses a lot of stealth, but there is a mechanic that allows you to hit a stealthed enemy if its the only target on the board. Corpses do count as targets too, so you need to remove them first in order to target the stealthed unit. So, for example, you got a stealthed piggy with 3 corpses and you can't target it, but you use Magnesium rain to remove the corpses and the next hero will be able to hit the piggy despite being stealthed. It's a niche situation, but can help sometimes. - Heroes that aren't on the stagecoach (defending sieges) and have a meltdown, "only" lose HP, but not affiliation with anyone - It's fine to sacrifice an inn if it's too difficult or inconvinent to defend and always choose to defend an upgraded inn. Just don't make a habit out of it, besides being a losecon, every hero gains stress and fatigue when an inn is lost. - Maintain good relationships: give them a lot of whiskey flasks (don't gamble with the bigger packing, unless you like to gamble), chocolate, books and most importaint, keep stress below 5. When stress is 5 or more they will argue more often and drop the relationship status during travel, not to mention meltdowns. If a dialogue option reduces relationship, pick the one you can afford to lose. Getting out of a negative relationship over trying to get a positive one is a priority, try to keep it on 10 or more, 8 or lower and expect to get a blue border skill. - Try Convergence map for Blood Moon dificulty. It's a small map, that will allow to quickly move between inns and you'll have the same amount of resources for fewer inns. Meaning they'll be easier to upgrade. Ofcourse, the downside is you can only lose one inn. It also has less regions, which becomes quite relevant in The Crimson Court mode, due to a certain quest, making it the easiest map to complete it on. Escalation 1: Take as many battles as you can, this will give you much needed resources and mastery (mastery is less relevant here). You have more HP and deal more damage in Escalation 1, so fights will be easiest early on. Keep in mind that boss lairs are still a threat if you don't have your essential skills available and mastered, so don't get too overconfident on those, but having a trophy early on will help make the rest of the run easier (be ready for The Collector surprise). Even if you don't feel ready for the boss, you should still take the lair for the first two fights, you will get resources after escaping before the boss. Would recommend not to skip days in this phase, use the escalation buffs to your advantage as much as possible to gain resources and trophies. Escalation 2: Pick your battles or remember to use retreat, you are significantly weaker in this phase, but should still take most of them. Hoard nodes give out more resources though, so take those instead. You should also try to clear out a boss lair if you haven't already. Elites can now appear in resistance encounters. Escalation 3: Due to a quest in Beastmen module, you'll have to fight road battles in this phase. For the resistance encounters I prefer to mostly avoid them and aim for road battles, enemy damage is high now. Would not recommend to take on lair bosses in this phase, too risky imo, but again take the two battles before it. Elites are more common now. Stock up on flame items, even with three locations, the flame will go down to 0 by the end and you don't want a random shambler. The purple menace is even worse with all the escalation buffs. You should focus on the quest, sieges are plenty and veteran militia can mostly defend them, at this point it becomes a battle of attrition. The Court gets pretty intense in escalation 3 and you might find yourself struggling to defend sieges with veterans alone. It is highly recommended to send a hero able to remove defense tokens easily. Occultist, Vestal, Highwayman, Bounty Hunter are great for the job. The last two are also good if you lack damage. If you're not spread too thin, you could also send a damage hero as well, but it is not essential. Do note that veteran militia can defend on their own, but some fights are very hard and you're risking a nasty crit or low damage losing you the inn. Rest to full in the final inn or camp before the last location, you'll want your team on 100% for the boss. Inn Upgrades BarracksYou don't need to upgrade barracks in every inn early escalation 1, upgrade barracks on the inns you don't plan on visiting often or are hard to reach quickly. There won't be many sieges and you can defend them either with your main crew or any 4 stationed heroes. When upgrading, go for partisan immediately, basic militia is weak, while partisan can defend most sieges up to escalation 3 Escalation 2 you should have your distant inns upgraded at least to partisan militia and if you can spare the resources go for veteran. Mid to end of Escalation 2, most of the inns you can't defend with heroes should have partisans at least. Escalation 3 try to have most of the inns on veteran, there will be a lot of sieges and veterans can defend on their own better than un-upgraded heroes. Plus, you'll want to focus on the quest. ProvisionerIn the central inn or the one you think you'll be using a lot, you should upgrade provisioner to full, buy that capstone ASAP. Cheaper items and more resources is something you want early. And this should be your priority upgrade. Other inns you can do basic provisioner upgrades if you can spare the resources, but its only worth if you have relics and baubles to spare. Paying additional 5 inn materials for cheaper items is also worth. PhysicianUpgrade Physician to fatigue heal in one of the inns you will frequent, fatigue along with lack of resource will be one of your main issues. Not bad to upgrade early, esspecially if you don't plan on skipping days. Plus, this upgrade heals your stationed heroes a lot more and provides more healing items. Capstone gives you a positive quirk every time you arrive, it's usefull, but can be a double edge sword if you already have 3 quirks you're happy with. MasteryFull upgrade on this one shouldn't be a priority. I like to upgrade mastering in the first inn and then upgrade unlocking skills in the next inn. Just pay up those 10 materials whenever you need skills and don't forget about your other 8 heroes, they can't defend sieges with bad skills. Once you're comfortable with everyones loadout pick an inn to upgrade stats, similar to Altar of Hope in Confessions. Try to have stats upgrades by mid escalation 2, they aren't essential, but do help a lot. They mostly buff your DoT and Deaths Door resistance and reduce the max stack of fatigue from 50% to 30%. Meaning, that hero can't get more than 30% max HP drop due to fatigue. I would recommend full stats upgrade before the boss.
WainwrightPriority on this one varies, if you got a good pet or a trophy early it's worth upgrading, but I've had runs without either and didn't upgrade. Also not a priority if you avoid road damage. However, it's worth to pop 10 materials at any inn whenever you need repairs, road damage becomes uncomfortably common in escalation 3. Upgrades allows you to buy pets, but those can be looted in camps and dens, and they aren't cheap. Auto-repair both armour and wheels on every arrival is usefull, but you can't have it in every inn. Personally, this tree is the lowest priority for the advanced upgrade. Suggested upgrades might be a bit difficult to achieve on Blood Moon or Large maps, but as long as you're not struggling, it's fine. Plus, it takes into account intense fighting early on. Try the smallest map on Blood Moon, time is short on that difficulty and less inns means less resources needed. Crimson Curse Crimson Curse (CC) adds enough content to deserve it's own chapter. These are unique to Curse of the Court mode and are not present in other modes. It also makes the Court mode somewhat more difficult. Skip this section if you want to go in blind! - Crimson Curse is a disease that you can cure only with The Cure item which is available near the end of the module or rarely in the Inn shop. A random hero will contract the disease early in the questline, but others can also contract it from the Court enemies and later on any enemy with the contagion. They can also contract it if stationed in an Inn near a region with Contagion (more on that below), while those stationed at camps are safe. - Blood items that manage CC are the Bloodsucker Blood, The Wine and The Blood. Keep in mind that these items will also give CC to healthy heroes. - Crimson Curse has 4 stages, each with it's own effects. Bloodlust, Passive, Craving and Wasting. Passive is the default state, giving your hero blood items in this stage (or craving) will move them into Bloodlust. Giving them blood while wasting will become passive. I would recommend to give blood only in wasting state, so you don't run out of blood items, unless you want them in Bloodlust. Do not keep them in wasting stage! Mid-escalation 2, it's somewhat easier to get blood items. - Each stage provides different stats; Passive: +1 speed, -5% Bleed/Stun resist, Craving in 2 days; Craving: +2 speed, -10% Bleed/Stun resist, Wasting in 3 days; Wasting: -2 Speed, -20% Bleed/Stun/Death resist.... Luckily, unlike DD1 the hero cannot die from CC, but the debuff is pretty rough still. Bloodlust: +4 speed, +20% damage, +20% stun resist, -20% bleed resist, - 100% Resolute chance, Heal 5% Fatigue on a kill (DoT kills count too) and chance for friendly fire (similar to hatefull relationship) that can transfer CC. Bloodlust provides a lot of benefits, but be aware of a potential friendly fire. It also expires after 1 day, so it's best used when you know you're in for a tough fight. Alternatively, give them Bloodlust when you want to heal fatigue and save some resource. This is useful early in the game as later, camps heal plenty of fatigue. - Early on, a Contagion will appear in one region and will spread to nearest regions every day. Enemies in these regions will have 85% chance to spawn with one of the stages of CC, providing them the same stats and also a chance to give CC to healthy heroes. Infected regions also affect your adjescent Inns and Camps. Inns will heal 10% less fatigue and has 5% chance to give CC to stationed heroes. Arriving in camps heals 20% fatigue and health, and 2 stress, but this only applies when you arrive with the stagecoach. Heroes stationed in Camps have 25% to remove a negative quirk. - Contagion really encourages you to use camps over Inns and unless you want your heroes to have CC or they already have it, I'd reccommend to keep them stationed in camps. This presents us with a problem however, and that is fatigue and HP healing for your backup heroes. Camps don't heal a lot and Inns if not upgraded heal almost nothing, so either upgrade Physician tree or use items if you cannot wait for camp heal. 20 Inn materials in Physician cancels out the debuff, but doesn't prevent the chance to contract CC. Switching heroes more often is also an option, but requires a lot of mastery in later escalations, which risks you not being able to keep up with the difficulty spikes. There are plenty of dens in escalation 2 that make this option viable. In any case, try to upgrade backup heroes skills and trinkets, or they won't be able to defend sieges - Keeping two backup heroes at camps will easily give you the Social Distancing achievement, you can still use them to defend sieges, it's about 5% chance to contract CC after inn defence. Just don't forget to return them to the camp afterwards. Beast Clan Units They have a special ability called Enrage, which they can get at the start of the battle in most sieges. Each enemy has a unique condition through which they can gain enrage, it's shown as a permanent buff next to their HP bar. Each stack gives them +1 damage and once they stack 3, they go berserk at the start of the next round. While berserk they have 100% damage resist and +10% DoT resist, but still take DoT damage. They use a special strong attack while berserk after which they lose the condition and gain negative tokens, mostly vulnerable, weak and daze. Stun, blind or DoT them to death while berserk or use defensive skills, direct attacks are useless. They are quite resistant to blight, but with piercing most of DoT still goes through on basic enemies. Huntsman
基础且最常见的单位。这些单位每次攻击都能施加虚弱效果,在等级3时攻击力极高。位于前两排时,它们可以攻击第1或第2排;位于后排时,只能攻击第3或第4排。它们的普通攻击会施加虚弱效果,而远程攻击(针对第3和第4排)还会移除一个格挡标记。当其他猎人或部落行者死亡时,它们会进入狂怒状态。 狂怒攻击是范围伤害。对后排英雄非常危险,当它们位于后排时应优先集火。 它们偶尔会掉落猎人战斧战斗物品,对 boss 非常有效,建议留到 boss 战使用。 部落行者
另一种常见单位。部落行者喜欢频繁移动,移动时会获得狂怒效果。在前排时,它们可以攻击1或2号位,造成可观伤害并施加枯萎效果,同时获得反击效果,反击命中时自身会后退1位。在后排时,它们会攻击任意位置,造成压力伤害并前进1位。 狂暴攻击状态下,前排的部落行者攻击方式不变,但会造成范围伤害;后排的部落行者则会攻击所有英雄,造成少量伤害和大量压力伤害,并前进1位。 尝试在它们被施加减益、身上有持续伤害效果或拥有防御标记时对其造成高额伤害,它们的反击伤害很高。 部落召唤者
一种支援单位,并非每场战斗都会出现,但仍相当常见。每当相邻友军受到攻击时,它就有几率进入狂怒状态。通常会施放【召唤怒火】,为一名友军提供强化和狂怒效果,但也可能使你的英雄感染枯萎。在后排时攻击3或4号位,在前排时可攻击任意位置。 狂战士形态下,它要么为所有友军提供增益,要么对英雄进行范围枯萎攻击。 几乎在每场战斗中,都应优先消灭该单位。它不仅会对你叠加持续伤害,更糟糕的是,它能强化那些强力输出单位,使它们更频繁地进入狂怒状态。 3个部落行者加上这个单位,在我看来是最糟糕的敌人组合,它们能快速积累狂怒值,几乎每回合都会进入狂战士状态,到第3回合时,它们都会获得反击能力。先击杀2级行尸,再击杀萨满,这样可以阻止它们持续获得怒气。不要让2级和3级行尸交换位置,每次移动都会让它们双双进入激怒状态。 腐爪
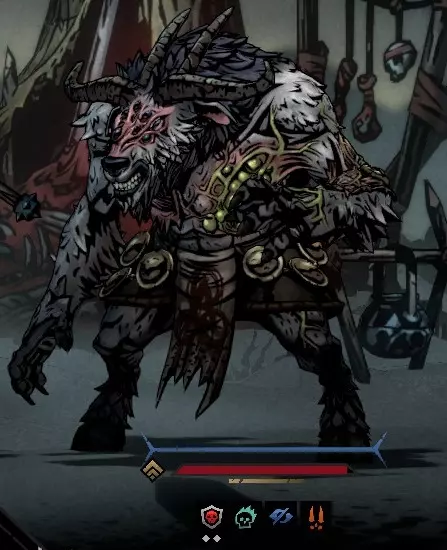
一种大型壮汉敌人,从第二阶段开始出现。 处于前排时,会攻击1或2号位,造成高额伤害并施加流血和枯萎效果。 处于中排或后排时,会使用猛击攻击,造成中等伤害和击退效果,同时自身向前移动并获得2倍嘲讽。 无论处于哪个位置,都可能对任意排发动尖叫,施加2层易伤和恐惧效果,并获得2倍格挡和狂怒状态。 受到攻击时有33%的几率获得狂怒,暴击时则有66%的几率获得狂怒。 狂暴状态下且位于前排时,会使用横劈攻击;位于后排时,猛击会攻击1-3号位,可能造成队伍位置打乱,自身向前移动1位并获得2倍嘲讽。 这是一种极具威胁的敌人,能造成大量伤害且抗击打能力强。在萨满之后,应优先处理它。当它狂暴时,尝试致盲或眩晕它,并且/或者让前排角色保持格挡状态,它的攻击非常猛烈。其中两个敌人的威胁程度出乎意料地较低,它们的嘲讽效果会相互抵消,并且大多无法使用最具威胁的正面攻击。不过,如果你没有位移技能,它们交替使用猛击技能时仍可能造成干扰。 女巫单位 女巫们的设计很有趣,彼此之间协同性很强,不像兽人那样单纯依赖力量。她们会使用大量标记,包括潜行、为自身施加增益效果以及复制你身上的减益效果,同时也能造成可观的伤害。这种协同性使得在某些敌方组合中,很难评估每个单位的威胁等级。 她们在攻城战开始时还会获得闪避效果。 虔信者
基础女巫单位,也是唯一拥有主动潜行技能的单位。使用潜行技能后,她获得2倍潜行效果和1个暴击标记。她的所有攻击造成相同的中等伤害,但会对你施加或复制减益标记。她在潜行状态下攻击时会无视格挡并窃取1个正面标记,因此尽管伤害输出较低,也不应被低估。 当处于1或2号位时,她的攻击会命中敌方1或2号位,并给予你1个随机减益(除眩晕外);处于3或4号位时,她会将1或2个负面标记复制到相邻英雄身上,且攻击可命中除4号位外的任何位置。这与嘲讽机制存在特殊互动,基本上每次受到攻击时嘲讽效果都会转移,使其效果大打折扣。她只能在2号和3号位使用潜行技能。战斗开始时拥有1个闪避标记,速度相当快,会在回合早期行动。在配置4个此类单位的情况下,将专注等级设为2以避免它们交替进入潜行状态。单个潜行单位容易应对,而2个潜行单位可能会降低你的坦克 effectiveness。
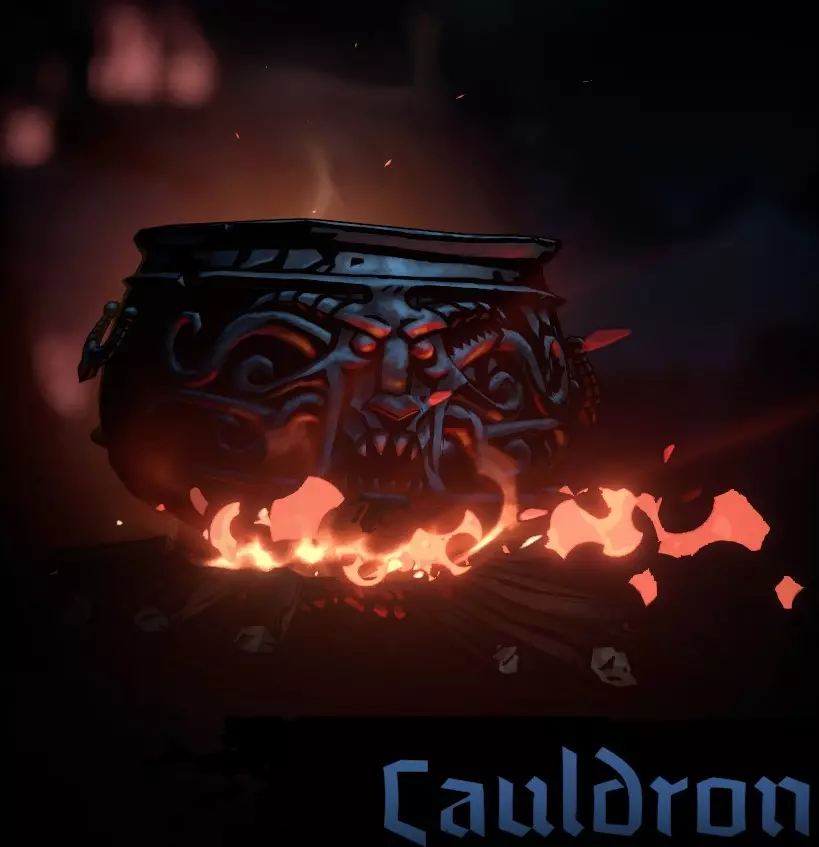
女巫集会的壮汉,相当常见。她喜欢站在前排,其技能能让她轻松进入战斗位置。她能造成大量伤害,但仅攻击1、2号位。这是对你前排角色生存能力的考验,他们需要有高生命值或良好的续航能力,比如格挡、闪避或治疗效果。 若她处于后排,会使用一种造成可观伤害的攻击,并为自身增加速度和生命回复。因此尽量不要让她完全退到后排,否则她会不断叠加生命回复效果。当她受到治疗时,下一次攻击还会造成压力伤害。 在中排和前排时,她经常使用范围劈砍攻击,造成高额伤害,并且你的负面标记越多,她的法杖攻击就会获得越多增益。该员工的攻击为单体目标,但会造成高额伤害并施加【眩晕】效果,因此务必确保拥有【格挡】能力,若能让其攻击落空(如【致盲】或【闪避】)则更佳。战斗开始时持有一个【格挡】标记。 若你使用的是脆弱的前排单位,该员工威胁极高,此时应优先处理。 【坩埚】
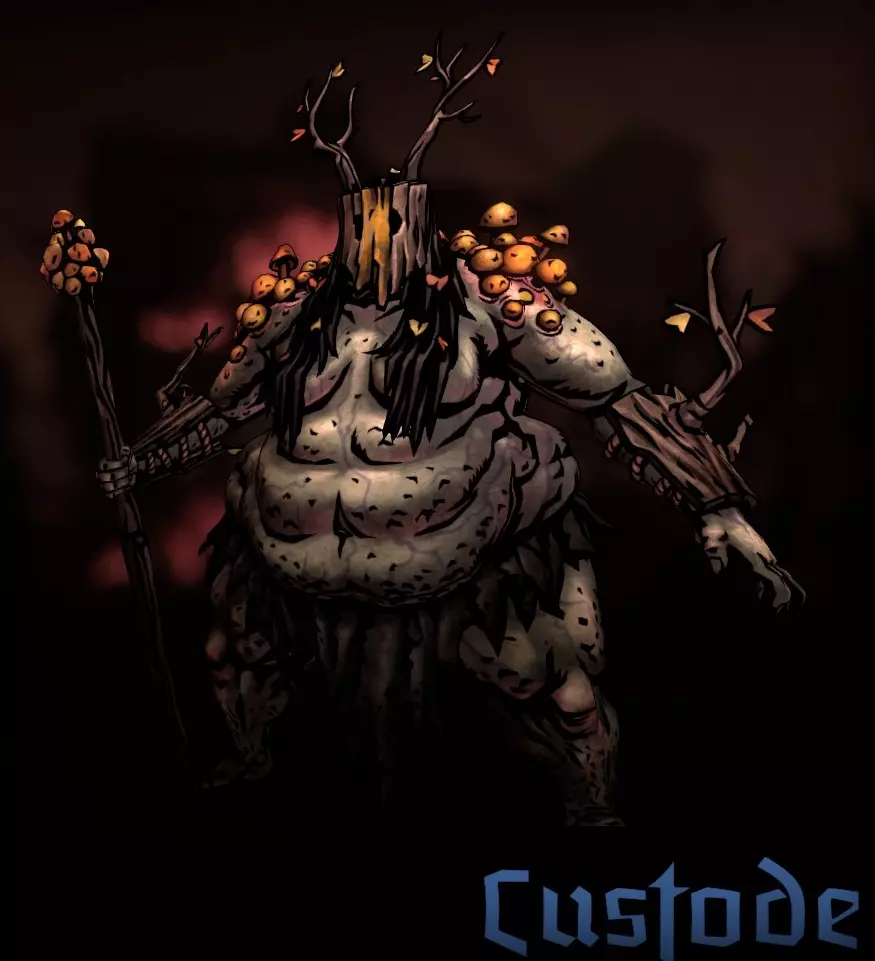
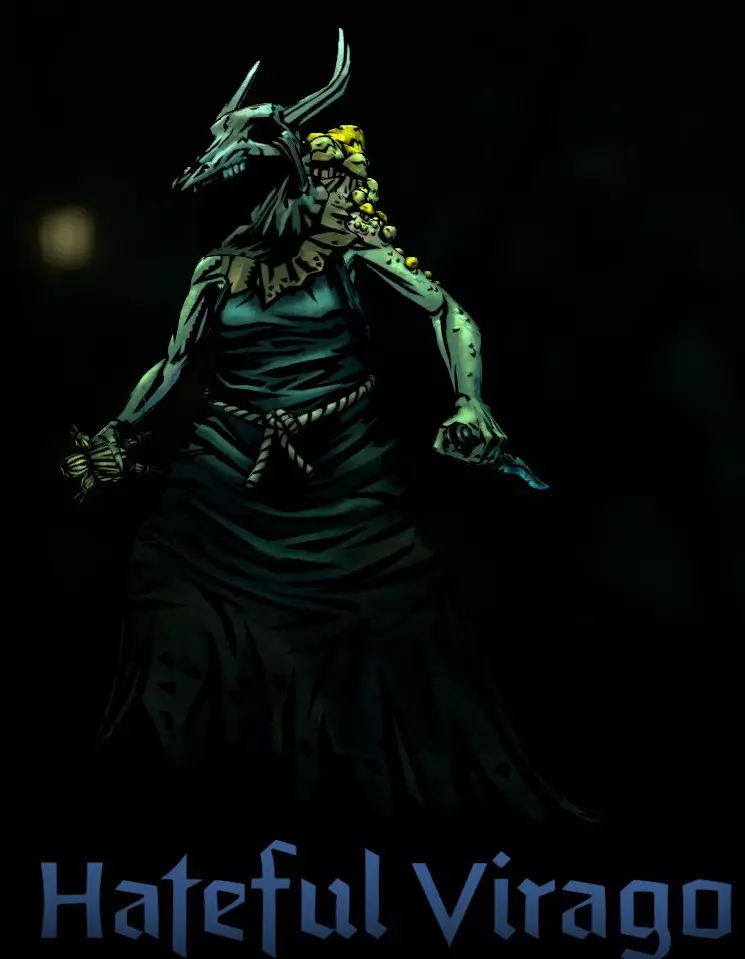
一种支援单位,并非每场战斗都会出现,但相当常见。它拥有大量生命值,且以整个队伍为目标。其行动模式在为女巫提供增益和灼烧你的队伍之间交替。由于速度较慢,它通常在行动顺序中处于最后一位。 女巫可以花费一个回合用草药为其施加增益,使其行动获得额外效果。如果你造成足够的伤害,该效果将被移除,直到女巫再次为其施加增益。其生命值条上会显示破甲阈值。 防御性行动会为所有女巫提供一个正面标记,若处于强化状态,还会附加潜行或再生效果。因此,若没有移除潜行的技能,你可能会发现只能攻击坩埚。 攻击性行动会对整个队伍造成1或2点伤害,并施加2层灼烧效果。若处于强化状态,还会移除一个正面标记并施加4层灼烧效果。听起来效果一般,但由于它的目标是你的整个队伍,效果会叠加起来。大多数时候我喜欢先解决掉这些敌人,因为如果它给类似【Custode】的敌人提供强化、格挡+以及潜行/再生效果,你可能会吃到30点【Heartwood】伤害。此外,当它被摧毁时,会对相邻的女巫施加燃烧效果以及它身上的所有减益标记。 【Hateful Virago】
这个敌人会让人回想起《暗黑地牢》初代,在《暗黑地牢2》中同样危险。它能造成高额伤害、压力值,附加燃烧效果,还会打乱队伍阵型,战斗开始时拥有闪避加成和2层死亡护甲。这绝对是优先击杀目标,它能轻易毁掉你的一天,而且并不容易被消灭,要尽快将其解决。 当它处于4号位时,只能使用腐臭气息,该技能不会造成伤害,但会施加6层枯萎、2点压力值和致盲效果。 在2号位和3号位时,它会使用高额伤害的 hex 法术(原词),随机攻击2名英雄,附加2点压力值、易伤效果并打乱队伍阵型。 在1-3号位时,它能使用一种诅咒技能,同样造成高额伤害,并附加虚弱和燃烧效果。 不要让它行动太多回合,否则你就没有行动机会了。 【坏死真菌】

另一个《暗黑地牢》的怀旧元素,真菌会取代女巫尸体,仅在第3级 escalation 中出现,并会禁用所有治疗来源。它不会行动,但在回合结束时会受到持续伤害。 它甚至不算作敌人,所以如果你清除了其他所有女巫,战斗就会结束。 如果你需要治疗就击杀它,否则忽略它并专注于敌人。 同一时间只能有一个真菌。 宫廷单位 宫廷派系比其他派系拥有更多单位,其中有几个非常危险,这使得这个派系偶尔难以对付,但通过合理使用技能和集火,它们可以像其他派系一样被瓦解。让它们危险的是其整体高伤害输出,它们会使用大量标记,并且随着 escalation 等级的提升,它们的能力也会增强。能够忽略和/或移除闪避的技能至关重要,队伍中至少需要一个。移动类技能也很有帮助,一些危险的敌人可以通过移动使其脱离站位来进行控制。通过阻止一次强力攻击,你可能获得比单纯造成伤害更大的收益。大多数敌人都拥有较高的流血抗性,因此不建议使用流血效果。 在【升级阶段2】和【升级阶段3】,敌人会获得被动增益,根据在场单位的不同,这些增益会延长其流血攻击的持续时间、提供抗性或格挡效果。 【群体】
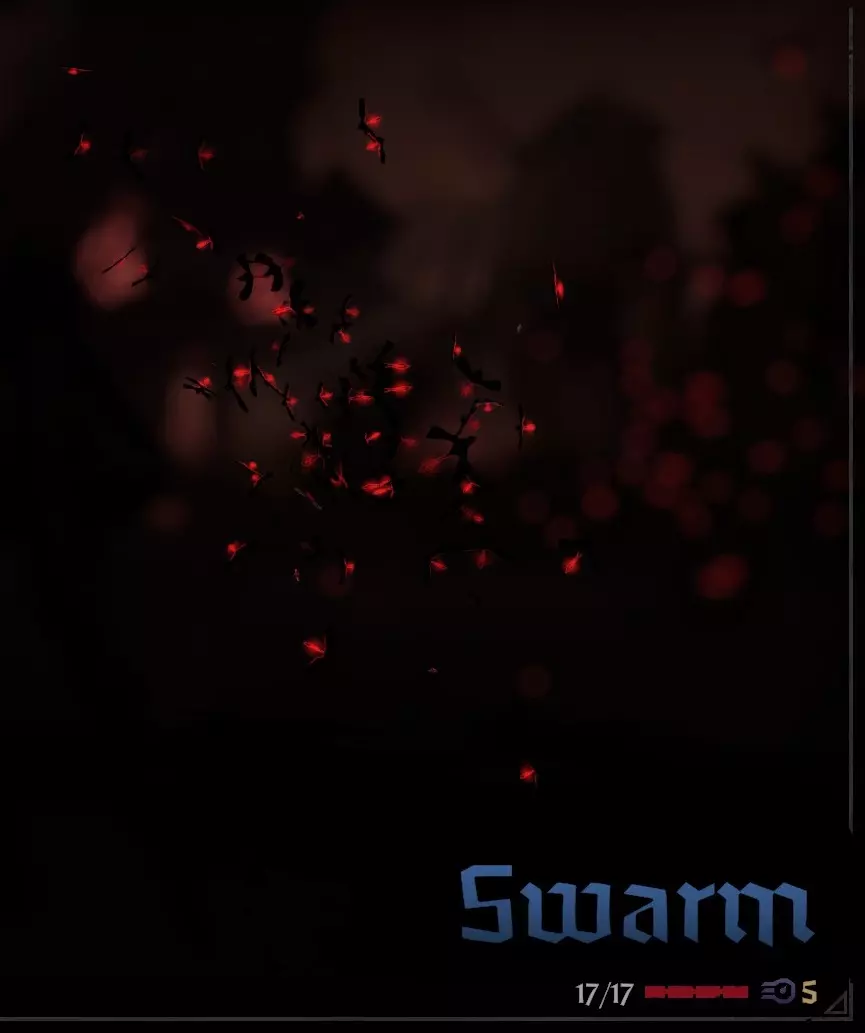
你会遇到的首批宫廷敌人之一。它们初始拥有1或2层闪避加值,并有一个造成少量伤害的单体攻击,但会施加一个随机减益标记或连击效果以及2点压力值。在游戏初期,它们可能相当危险,因为能快速叠加你的压力值,导致崩溃,但一旦你获得合适的压力治疗手段,它们就更像是个麻烦。在我看来,任何战斗中它们都是最低优先级。茧

一个等待孵化的怪物。在游戏初期相当常见,就像【蜂群】一样,但到了第1阶段中期会变得较为稀有。它们在第一回合不会行动,但会在第二回合【孵化】,对单个英雄造成可观的伤害和1点压力伤害,之后会被除【蜂群】外的任意【宫廷】敌人替代。这很糟糕,所以你会想杀死它……但如果你这么做,它会生成【蜂群】,这是一个相对较小的威胁。如果你用持续伤害攻击瞄准它,持续伤害状态会转移到【蜂群】或【廷臣】身上。 问题在于,【茧】会在游戏开始时替代道路战斗,而在这么早期就要应对4个【茧】是有点挑战的,所以要准备好面对【骑士】或【侍从】。 【祈求者】

基础敌人,在大多数遭遇战中都会出现。它们看似不起眼,实则威胁极高,应优先处理。 其基础攻击能造成可观伤害,可攻击1-3号位,施加2层枯萎、压力,并可能赋予连击标记。同时,自身会向前移动。 若处于1号位,且在难度等级2及以上时,它们会使用强化版攻击,对我方1-3号位造成范围伤害,之后自身会后退。这是它们主要的威胁来源——对我方三名英雄同时造成伤害和枯萎效果,务必避免承受多次这样的攻击。应在它们到达1号位前将其消灭,或使其后退。 在难度等级3时,基础攻击会施加4层枯萎而非2层。 当生命值低于75%时,它们还会获得护卫能力,并恢复50%生命值。一种特别棘手的敌人组合是祈祷者搭配3个骑士。要尽快消灭祈祷者,否则它每回合都会对你造成范围伤害,骑士会退后并让祈祷者处于1号位,使其能够释放枯萎爆发技能。然后消灭后排(4号位)的骑士,如果你有清除尸体的能力,此时你基本就能赢得这场战斗,骑士在1号位和2号位时几乎无害。如果没有清除尸体的能力,那就尽量让它们排队,让2号位的骑士比3号位的先行动,它们会一直用弱攻击互相切换位置。
后排的强力输出者。通过将他们拉到前排、致盲等方式干扰他们,然后集火一名祈求者,再解决这些家伙。如果你有强力的后排伤害,那么一定要优先消灭骑士,他们对燃烧伤害有抗性,但其他持续伤害更容易生效。 骑士拥有两种强力攻击,可攻击任何位置并造成大量伤害(每击约6-10点)。其中一种攻击只能在3、4号位使用,若目标带有连击标记则会使其眩晕,随后自身位移,这可能极具破坏性,但只有祈求者会施加连击标记,因此我们要优先集火祈求者。 另一种攻击可在2-4号位使用,会施加4层流血和压力值,且每次升级后该攻击的暴击率会提高。骑士在前排时威胁不大,他们能在第二排使用流血攻击,但通常会进行位移,所以可以用移动技能来应对。他们的眩晕抗性也较低,因此可以尝试将其眩晕。 乡绅在这部分之后有专门的章节,其中包含对抗他的策略建议。 宴会
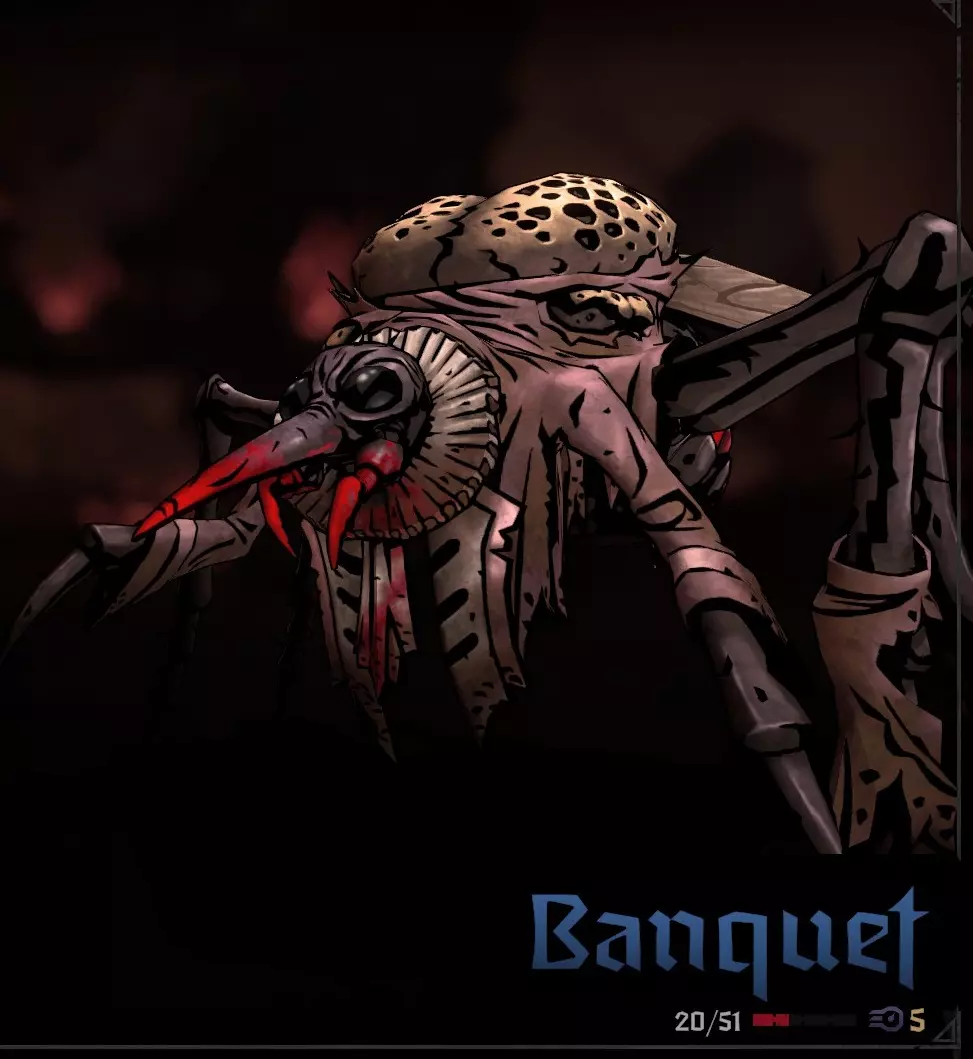
这是一个占据2个槽位的重量级攻击单位,会攻击你方两侧的镜像位置。也就是说,如果它在2号位和3号位,就会攻击你方的2号位和3号位,造成高额伤害,尽量让角色带有格挡或闪避效果。如果某个英雄身上有连击标记,它就会使用【渴望】技能,该技能暴击率很高,能为【宴会】回复生命值,同时还会给【宴会】增加2个增益标记。 防御带有连击标记的英雄可以阻止【宴会】回复生命值和获得连击标记,只要有机会就强烈建议这么做。 如果有空位,它会使用【孵化场】技能召唤【蜂群】。说实话,这比它的高伤害技能要好一些,但会召唤出两个烦人的敌人,这些敌人可能会让你方角色陷入易伤状态,进而受到【宴会】的高额伤害攻击。 【宴会】搭配两个【骑士】是一套伤害非常高的组合,可能会用大量伤害压制你。如果你先击败宴会,就能阻止蜂群生成,并且在清理尸体后,单个骑士只会使用弱攻击,从而让这场战斗变得更简单。这种策略更可取,因为先击败骑士可能会导致与宴会的战斗时间延长,因为宴会会用蜂群替代骑士,使你失去回合优势。乡绅
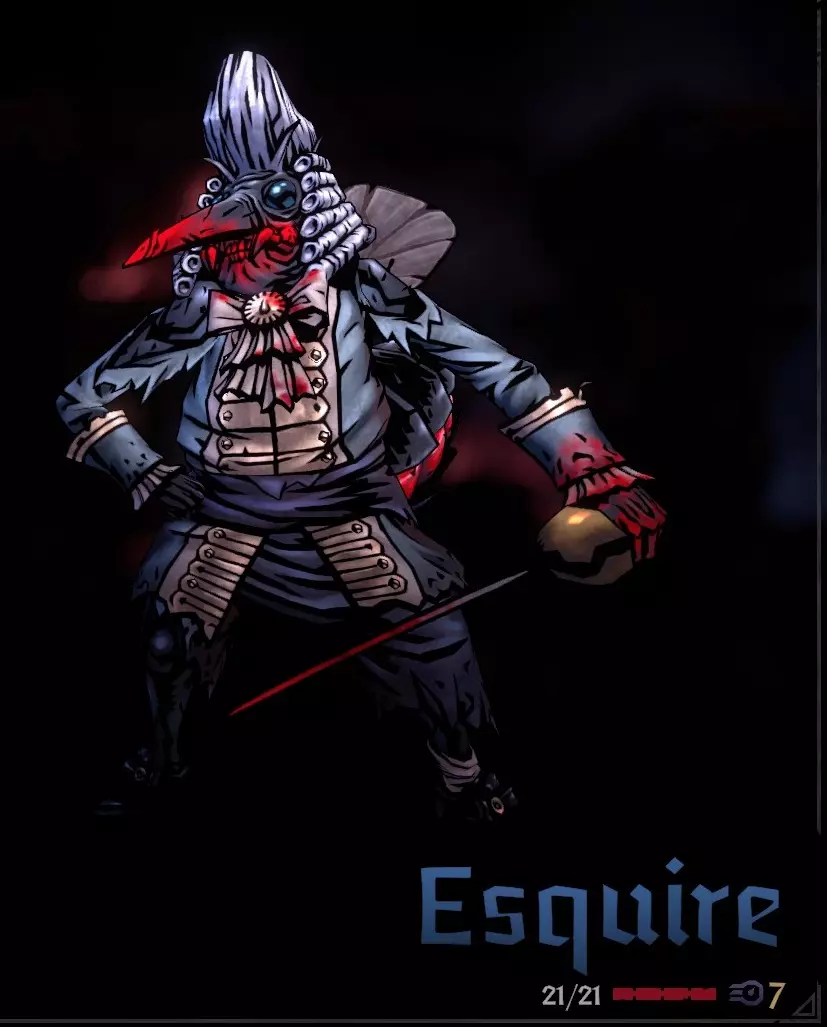
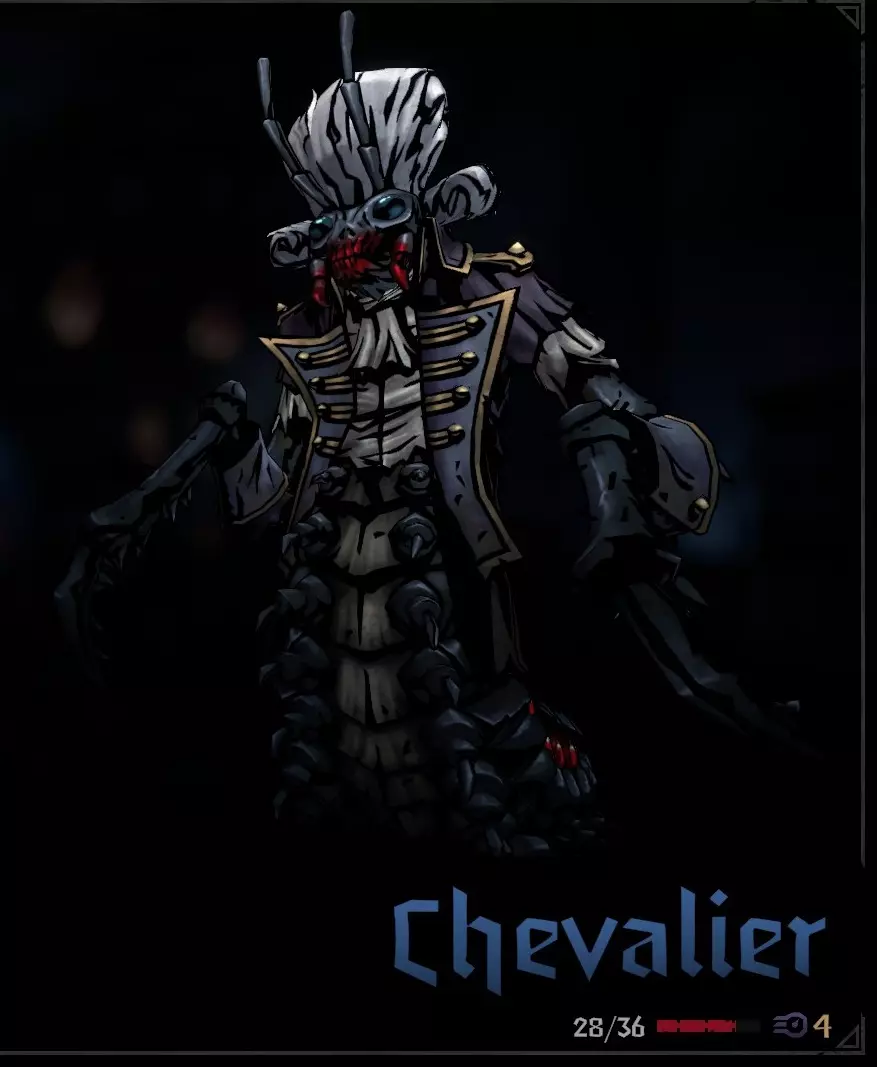
这家伙!居然要单独给他开个章节来讲。我看到很多人都讨厌他,那我们就来看看怎么打败他吧。 他速度快,伤害高,很难被打断,还会生成大量标记,并且战斗开始时就带有闪避效果……不过好在他的生命值相对较低,招式也比较固定。现在说最关键的一点:如果你不能快速解决他,那就先别管他。他的攻击确实疼,但要是在他身上浪费太多时间,其他廷臣很快就会对你造成更高的伤害。先解决掉祈求者和骑士,然后再集中火力对付他。 他通常的第一招是“机敏 rapier”,这是一种低伤害攻击,会给他自身叠加2层反击和2层闪避效果。在更高难度下,闪避效果会变成强化闪避,再加上他初始就有的闪避,偶尔还会格挡……想打破他的防御可不容易,祝你好运。这家伙就是我们使用神秘学者(或任何无视闪避的英雄)的唯一原因。升级后的脆弱诅咒能彻底消除他的防御能力,让他暴露在攻击之下。你也可以用战吼驱散他的反击,不过这仍然有危险,还会让他转而使用渴求技能。通过这种组合,你可以相当快速且相对轻松地解决侍从。 使用战斗物品先消除他初始的闪避,然后再消灭他也是可行的办法。 他的另一种攻击有很高的暴击率,并且无视格挡,如果你依赖格挡的话会相当危险。如果侍从处于4号位,他会使用渴求技能,这会让他移动到1号位,恢复生命值并获得2个增益标记,可能是暴击和强化,那样我们就麻烦了。如果发生这种情况,他是优先处理目标,或者用已升级的【咆哮】、【虚弱诅咒】或【拦路抢劫】移除其标记。尽量不要让他到达4号位。 如果生成两个,我仍然建议先消灭【祈求者】和【骑士】,然后集中攻击一个【侍从】。一场战斗中最多会生成三个,幸好这种情况很少见,在这种情况下,尽快消灭【骑士】,然后逐个集中攻击【侍从】。这个组合的棘手之处在于【渴求】很容易被触发。 【侍从】对民兵尤其危险,即使是完全升级的民兵也难以应对,因为民兵无法 counter 他的【闪避/反击】组合,并且会无视你前排的【格挡+】。嗯,基本上是无法 counter 的。使用一名乡绅时,先用手弩手优先解决他的同伴。前排角色应先进行防御,然后使用【先发制人】,但不要以乡绅为目标,让他主动攻击你,这样你就能进行反击并降低他的闪避率。一旦他被破隐,集火攻击他,直到他再次使用【迅捷剑智】,然后重复上述流程。前排角色的防御也很重要,乡绅会无视格挡,但其他敌人不会,他的【反击】也不会。别忘了治疗前排,他们会需要治疗的。 面对两名乡绅时,适用相同策略,但如果两名乡绅都在前两排,使用【双手挥击】。这会降低两者的闪避率,但只有一个(前排的那个)能使用【反击】,不像《暗黑地牢1》,每次攻击只能触发一个【反击】标记。对于后排的乡绅,你可以用手弩手的范围攻击达到同样效果,注意别让他跑到第四排。最烂的组合,三个乡绅和一个骑士。如果你的任何一名弩手比任何乡绅先行动,就使用范围攻击,然后尝试在乡绅获得闪避前击杀一名乡绅,否则就先杀骑士。混合使用【过手攻击】来移除两个闪避效果,并使用【引导打击】直到其中一个失去闪避,然后用弩手和【引导打击】集火那个失去闪避的目标。接着处理下一个。别忘了防御和治疗,这不仅仅是每回合都造成伤害,也要防止受到过多伤害。这场战斗很难,但只要策略得当,民兵也能成功,这是经验之谈。 当发生围城战时,你应该针对乡绅制定计划,如果可以的话,派遣一名拥有移除闪避技能的英雄,这会让战斗轻松很多。一旦目标失去闪避,你的弩手应该能迅速解决他。【剧透警告:前方包含怪物及 Boss 剧透内容】
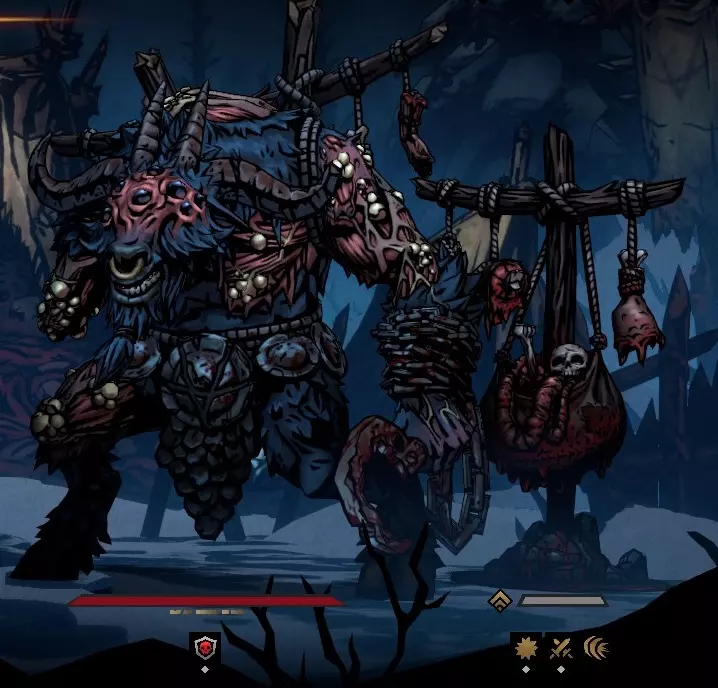
首领 兽人族腐爪阿尔法:当你收集到20张兽皮后,下一个区域的最后一个节点会出现一个无法避开的巢穴。做好准备,它本质上是一个巢穴首领,在阿尔法出现前你将先与两波兽人战斗,这一切都像野兽巢穴一样是一场连续的战斗。建议让队伍完全休息好再挑战。
阿尔法是腐烂之爪的强化版本,拥有相同的技能组合和能力,但生命值、抗性和伤害更高。每回合行动两次。 狂怒横劈会造成大量伤害,因此要准备好致盲/眩晕它,并让前排角色进行格挡/闪避。携带烟雾弹或嗅盐也会有所帮助,它命中的次数越少越好。 使用疫病/流血抗性物品,并携带持续伤害治疗物品。 这场战斗的大部分威胁来自之前的两场战斗,如果能在不受太多伤害的情况下清除它们,阿尔法应该不会带来太大麻烦。 击败后会掉落一个战利品,并揭示一个 Boss 位置。该位置始终穿过山区。进入 Boss 区域前必须装备奖杯,在到达 Boss 之前,你将进行两场兽人族战斗。 【肉钩】
兽人族的最终首领战核心在于标记管理和伤害减免,该首领的攻击力极高。它拥有100%的枯萎抗性,因此如果你队伍中有枯萎持续伤害类型的英雄,需为其配备穿透效果、饰品、死亡帽孢子、英雄路径等,否则这些英雄将毫无用处。流血和燃烧效果更为可靠,其对这两种效果的抗性仅为30%。该首领还拥有70%的高眩晕抗性,因此致盲效果是对抗其狂暴状态的更可靠手段。 这场战斗耗时较长,难度与告解神父系列首领相当,但只要妥善管理标记并做好准备,就不会太难。战斗前请将英雄状态恢复至满,并升级酒馆以获得区域战斗加成,例如从专精树中获取的敏捷训练加成。 该首领会造成大量枯萎和流血伤害,因此请使用提供抗性的酒馆物品,并携带一些对抗枯萎效果的道具。如果你获得了猎人之斧道具,现在正是使用它的最佳时机,该道具对这个 Boss 非常有效。 确保拥有良好的标记移除技能,例如 highwayman 的拦路抢劫、双重打击,甚至速射(仅在神射手路径可用);abomination 的镣铐或本能;野兽形态下,漫游者路径的部分技能可以忽略防御标记;bounty hunter 的标记;occultist 的诅咒等。 战斗开始时会有一个无敌的图腾,它身上带有大量标记,并且在每回合开始时会生成更多标记。如果未进入狂暴状态,Boss 会在每回合的最后行动阶段从这个图腾获取多个标记,你需要处理这些标记,这就是为什么我们需要能够直接移除标记的技能。你可以使用劈砍技能移除帖子上的标记,防止首领窃取,但如果没有可窃取的东西,他会获得2点狂怒值……这更糟,所以要集火首领。战斗中帖子会移动,但首领体型为3,你应该总能锁定他。 拥有与腐爪相同的技能组,新增一个后排技能,攻击4号位并拉拽2格;他的尖叫减益效果也会拉拽2格,因此拥有一些移动技能会很有帮助。 普通攻击暴击或未命中时获得狂怒值。狂暴状态下,除了使用强化技能外,最后一回合会改为治疗自身10%生命值,而非窃取标记。每回合行动三次,因此持续伤害(DoT)如果生效会非常有效。 标记和移动你的英雄是主要威胁……当然,纯粹伤害也是一方面,但毕竟是最终 Boss。如果他把你的后排拉过来,再用强化+暴击标记猛击,那情况就不妙了。 女巫集会 母亲的眷属 当你完成女巫之刃后,巢穴将成为下一个区域的第一个节点。第一波会遇到普通的巢穴怪物,第二波则是3只喷射者和眷属。 这场战斗类似标准的蜘蛛战斗,不同之处在于眷属攻击时会向前移动1格,并在回合结束时让其身后的蜘蛛进入潜行状态。在你使用女巫之刃移除其所有特殊标记前,眷属免疫伤害。眷属会专注攻击持有之刃的角色,嘲讽对其无效,尚未测试守护效果,所以不要把之刃交给脆弱的英雄。使用战斗道具或劈砍技能来移除它们的闪避效果,然后集火其中一个目标。如果你有持续伤害型角色,比如【逃亡者】【瘟疫医生】【炼金术士】,可以让他们攻击其他目标,依靠持续伤害将其击杀,之后再转移到下一个目标。 在这场战斗中,拥有能清除致盲效果的道具会非常有帮助。如果没有,就让被致盲的英雄攻击带有闪避效果的蜘蛛,这样可以同时清除两种状态标记。与格挡不同,闪避效果是在被攻击时移除,而非被命中时。如果你觉得自己运气好(技术高超),可以忽略这条建议。 织母
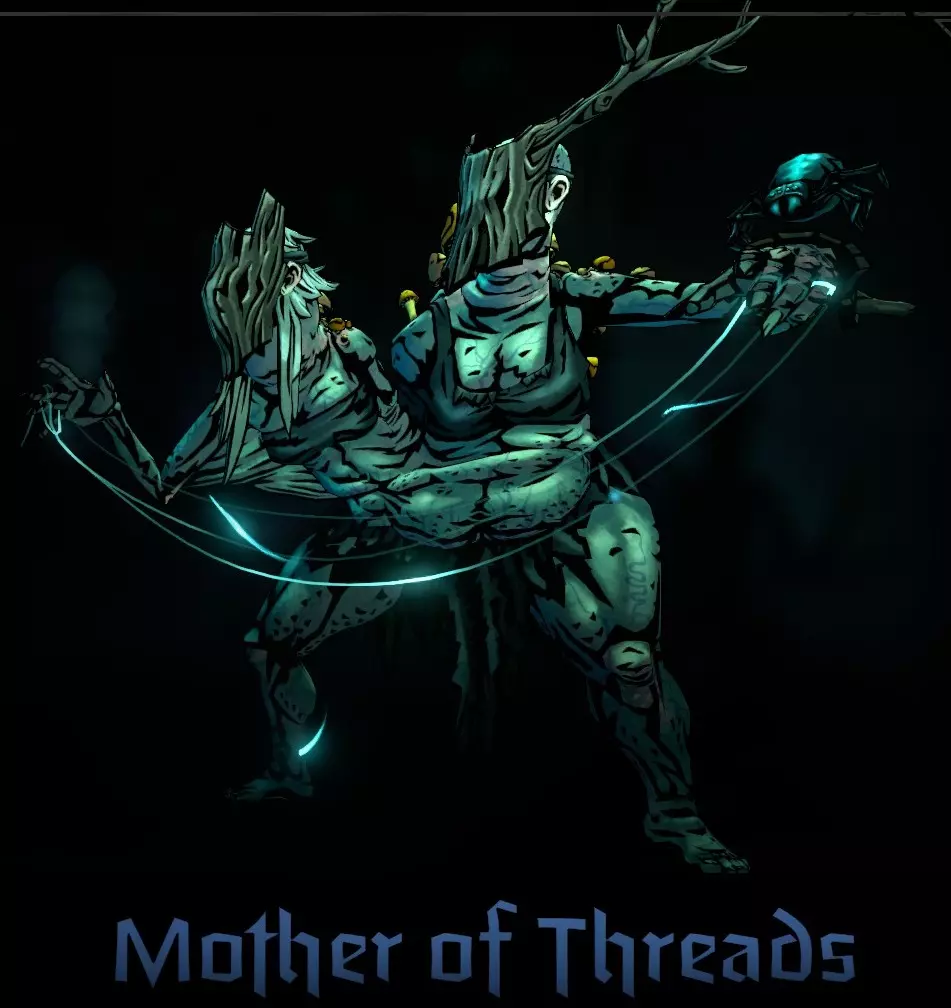
母亲是一个相当直接的 Boss,只要做好准备就不算太难,它主要是一场 DPS 竞速战。 建议给全队配备女巫草药,为你的主力输出(我们这里用的是蛮战士)装备眩晕免疫饰品【Inert Indicia】以及满堆叠的曼德拉草。如果你没有这个饰品,就不要使用曼德拉草。如果有的话,给队伍其他成员使用增加眩晕抗性的酒馆道具。 如果你有【The Generals Dream】成就(全队免疫定身),装备它,这可能是这场战斗的最佳成就。如果没有,就施加你能获得的任何移动抗性 buff。 母亲会造成可观的伤害,还能移动你的英雄,并在每次攻击时施加负面标记和燃烧效果。她有一个被动技能,该技能取决于场上与她一同出现的小怪。战斗开始时,她会有一个蜘蛛随从,其行为与普通的喷射者类似。我的建议是,你应该忽略并控制(致盲、嘲讽、闪避、眩晕)这个蜘蛛,集中攻击首领。原因是,如果蜘蛛被杀死,“母亲”会在4号位召唤一个蘑菇,它不仅会阻止你所有的治疗,还会让“母亲”获得窃取你的再生能力。这比蜘蛛糟糕得多,所以只需集中攻击首领。当她的生命值低于50%时,她会用蘑菇替换蜘蛛。如果你的生命值状况良好,忽略蘑菇并集中攻击首领;只有当你需要治疗时,才尽快尝试杀死蘑菇。 她的第一个攻击会命中1号或2号位,并造成2格击退。第二个攻击会命中你的整个队伍,施加 daze 和压力,同时触发她的被动效果。她的另一阶段(蘑菇形态)中,攻击全体队伍的技能会施加易伤和压力状态。要迅速击杀她,否则她会对你造成巨额伤害。 尽可能使用曼德拉草,我们并不在意是否能击晕 boss,那只是额外收获,我们只想通过饰品获得增益标记。这能让战斗轻松不少,尤其是当你获得强化或暴击增益时,因为她并不会生成太多防御标记。 如果你能用减益效果控制 boss 并集火造成高额伤害,她应该就能被轻松击败,在我看来是三个 boss 中最简单的一个。 首领:猩红宫廷大公
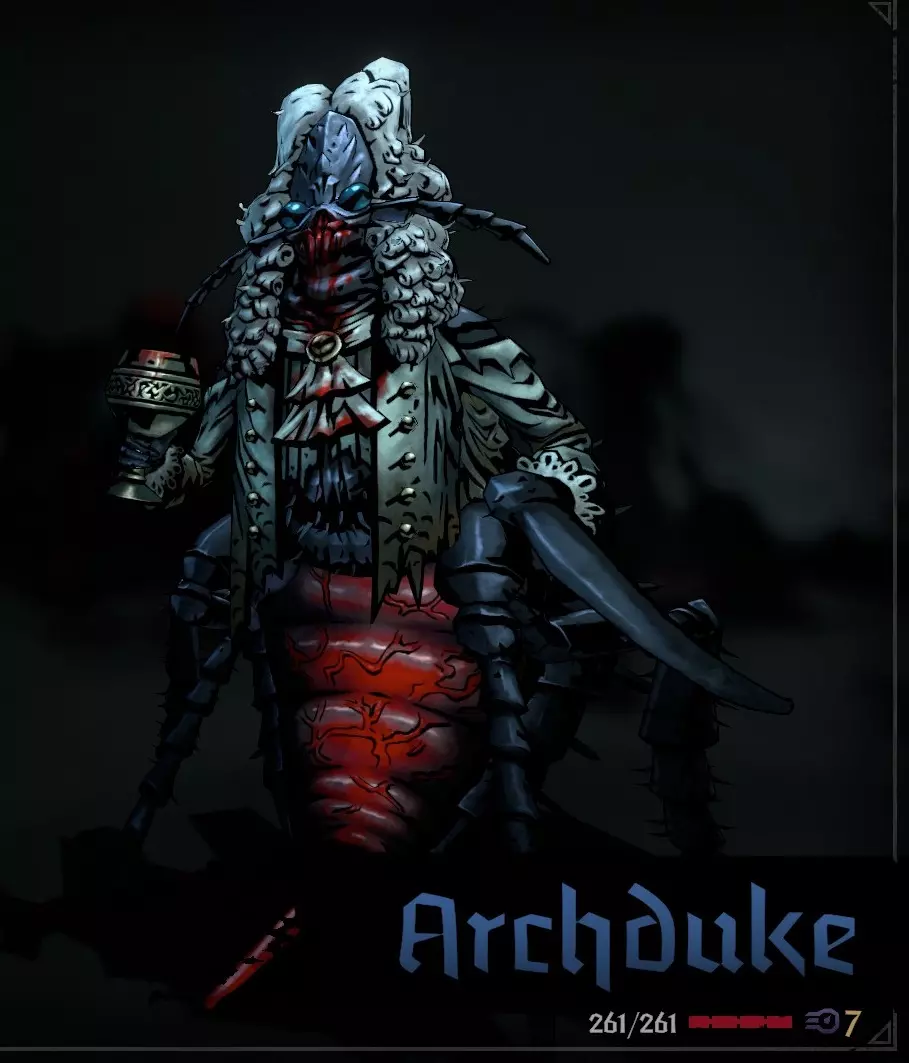
所有王国 Boss 中最难的一个。这是一场漫长的耐力战,难度堪比告解 Boss。每回合至少行动三次,甚至可能更多。 使用加血液抗性的酒馆道具,并携带治疗道具,你会受到大量伤害。烟雾弹、膜翼或任何提供闪避的道具都是不错的备用选择。不要尝试对他使用眩晕,他有 100% 眩晕抗性,并且对流血有抗性,但不抗燃烧,对枯萎的抗性一般。 战斗开始时只有他一人,但他会在第一回合召唤一名廷臣协助自己,并且每回合只要有空位就会召唤廷臣,且不会召唤上一次召唤过的廷臣,所以场上不会出现两名相同的廷臣。你的其中一个角色等级带有标记,该等级将成为其【抽血】攻击的目标,以填充他的酒杯。此攻击无视闪避,造成中等伤害和2点压力值。如果他对带有控制效果的英雄使用此技能,该攻击会解除控制效果。下一轮,他将使用酒杯为一名盟友施加增益,给予其两个增益标记并治疗10%生命值。 如果他击中状态良好的英雄,他会饮用酒杯中的血液并治疗自身10%生命值。【抽血】攻击不可躲避,无视闪避、致盲、潜行和嘲讽效果,但可以被格挡且不会无视防御。他会在每回合交替使用【抽血】和【酒杯】技能。他的普通攻击能造成可观伤害,施加流血效果,移动自身并获得闪避,因此在这场战斗中,清除闪避的技能至关重要,追踪射击是最佳选择,因为它还能阻止其获得新的闪避。 如果他抽取了控制类血液,普通攻击将为他提供格挡代币。 对他使用闪避和致盲技能仍然值得,因为他的其他攻击仍会受到影响。 尽可能集火 Boss,如果你每回合未能造成足够伤害,他就会回血,战斗拖得越久情况越糟。每当他有闪避时就使用清除闪避的技能,并利用这个窗口攻击他,他通常每回合会叠加 2-3 层闪避。如果他身上有闪避效果,你可以尝试碰运气攻击他,或者如果场上有祈求者或骑士,就先击杀他们,然后等待能清除闪避效果的英雄回合。侍从应该被忽略,在使用任何范围技能时顺便击杀他即可,最安全的方法是用火焰炸弹配合连击攻击 boss。攻击侍从会分散对 boss 的伤害,而且你还需要清除他的闪避效果。 如果你只想跟上他的治疗量,每回合至少要造成 30 点以上的伤害。 由于他每回合至少有三次行动,持续伤害是跟上输出的好方法。如果你觉得可以少带一个治疗物品,也可以携带异界碎片来辅助自己。在我的第一次尝试中,我不得不使用所有物品(治疗包、脓疱和肾上腺素药剂),而在血月难度的尝试中,我需要搭配一只+30生命值的兔子使用治疗包和药膏。如果你使用枯萎效果,最好提供一些枯萎穿透,因为他仍有30%的几率抵抗枯萎,这可不太妙。如果没有良好的穿透效果,就别费心使用流血效果了。 值得考虑在这场战斗中让你的英雄携带控制技能,甚至可以给他们嗜血效果来获得额外的生命值和伤害。当他从受折磨的英雄身上吸取血液时,他不会治疗自己,而是会使用格挡,你可能更容易打破这个格挡。这也会给你时间造成伤害并保持节奏。这样做的风险是侍臣会被强化,而且他最终会从健康的英雄身上吸取血液,开始治疗和闪避。野兽氏族任务线
该任务主要包括装备物品和到达物品描述中提示的特定节点。 需要注意的是,一旦装备了驿站马车任务物品,就无法卸下,并且在该阶段完成后会被移除。完成任务阶段后,你将获得奖励,主要是精通点,但有些会提供特质和资源。 有些任务需要等到 escalation 事件发生后才能继续。我推测这是为了防止在较简单的 escalation 阶段速通该模式……毕竟在 escalation 1 阶段, boss 会相当容易对付。 当装备了驿站马车任务物品时,所需节点是必定出现的,这样你可以在一定程度上根据自己的需求来操控节点。当你到达第一个酒馆时,会获得一个名为【望远镜】的驿站马车物品。装备它后,系统会要求你前往瞭望塔。到达瞭望塔后,你将获得【手绘地图】,只需将其送到任意一个酒馆即可。 建议在第一个区域跳过瞭望塔,选择参与战斗。因为无论如何你都需要到酒馆交付地图,而战斗能让你获得更多资源。 交付地图后,你会得到【救护指定】驿站马车物品。装备它后,每个区域都会同时出现医院和囤积者。你需要分别拜访这两者各两次,然后前往一个被围攻的酒馆。 这个任务阶段可以适当延长,尤其是如果你拥有【囤积者地图】物品的话。这能让你囤积更多饰品和驿站马车物品(前提是你有足够的资源购买)。此外,医院可以治疗你的疲劳,让你和你的团队能够继续前进。 当你从医院和囤积者处各获得4件物品后打破围城,会得到【Childs Plea】,它不可装备,你需要将其交给医院以获得【Pungent Offal】。 这是一种可以装备给英雄的战斗物品。 无论是否装备它,下一个区域都会出现兽穴。前往兽穴,第二波敌人会被4名猎人替代,对其中一名猎人使用【Pungent Offal】,你将获得一名受伤的幸存者,需要将其护送到酒馆。 尽量在难度1时完成此操作,4名猎人可能是一场具有挑战性的遭遇战。 将幸存者护送到酒馆会获得【Survivors Tale】,这是一种酒馆物品。使用它后,你将获得【Cold Storage】驿站马车物品。在主力队伍中使用【幸存者的故事】,它会为队伍提供【野兽憎恨】特性,该特性对 beastmen 造成的伤害提升20%,同时受到来自它们的伤害降低20%。如果没有更好的特性,建议锁定此特性,否则它可能会被替换,这是对抗 beastmen 的强力增益。 仅在阶段2装备【冷藏库】,它在阶段1无法推进。这件物品要求你前往全部5个区域(Sprawl、Tangle、Tundra、Shroud、Foetor)。每个区域的首次战斗遭遇(无论是地点还是道路战斗)会给予3个身体部位,总共15个……每个身体部位会消耗你 inventory 中的一个堆叠。 由于这个任务会占用大量 inventory 空间,建议规划路线,以最少时间包含每个独特地点,尽量避免重复经过同一区域。这个任务耗时越长,你需要处理掉的物品就越多……就算有额外的背包格子,空间依然会很紧张。集齐全部15个物品后,你需要将它们送到一家酒馆,下方是完整收集品的截图。
将尸体送到酒馆会获得4个腐烂死者驿站马车物品。在第3阶段升级前不要装备它们,否则任务将无法推进,并且你会失去驿站马车的槽位。 装备后,它会将所有道路战斗替换为野兽人遭遇战,击败后可获得4张兽皮。你需要收集20张兽皮。 收集完成后,下一个区域的最后一个节点会有一个兽穴,里面有一场与阿尔法的战斗。 如前所述,尽快完成这个阶段,不要在第3阶段升级中逗留,尤其是在血月难度下。 击败阿尔法会获得进入首领位置所需的阿尔法战利品。遗憾的是,它没有额外效果。在挑战首领前在酒馆装备它,祝你好运。女巫会任务线 女巫会任务线与阵营的互动性更强,你需要揭露隐藏在我们中间的女巫。她们会混入普通敌人中,你得判断平民究竟是真平民还是隐藏的女巫(即臭名昭著的“可疑少数”)。 你一开始就拥有学者钥匙串,无需装备,只需前往学者书房即可。但和野兽氏族任务类似,建议出于同样原因在第二个区域再去处理。在书房中,你可以选择与女巫战斗以推进任务,或者直接领取常规奖励。击败女巫会获得猎巫人地图。 猎巫人地图需要装备,之后前往营地,你将获得战斗道具“占卜粉尘”。装备【探知粉尘】并将其用于周身环绕绿色雾气的敌人身上。这类敌人会在道路战斗中生成,使用粉尘后会显露出其女巫的真面目。 女巫现身时总是拥有满血状态、已清除持续伤害效果并带有闪避标记,因此如果你计划使用粉尘,就不要浪费回合去攻击被雾气笼罩的敌人。任何类人型敌人都可能是女巫伪装的,最常见的是信徒,若有两个空位则可能是狱卒,而最终遭遇战中通常是悍妇。 击杀女巫后,战斗结束时会获得【女巫手指】,你总共需要收集5个。每次到达营地时,你会获得更多【探知粉尘】,记得装备它,尤其是在更换队伍的情况下。
当你拥有5根手指后,抵达酒馆会获得手指炸弹。这是另一种战斗道具,用于大锅。使用该道具会立即摧毁大锅并获得煮头。 你需要找到围城场景,因为此时女巫遭遇战仅在围城场景中出现。 煮头是一种宠物,但只能在第2阶段升级,所以在此之前不要装备它。 装备煮头后,每个区域都会开始生成首领巢穴,击败首领后会获得木制代币。 目标不是收集这些代币,它们是用于购买女巫专属物品和匕首碎片的货币,每件物品需花费1个代币。 这些碎片才是目标,共有3个,每个碎片位于不同的商店,分别是酒馆、囤积者商店和医院。因此,你需要先击败强大的敌人,然后前往这3家商店。 巢穴首领并非代币的唯一来源,但单个首领可提供3个代币,足以购买匕首的所有部件。 其他代币来源包括围攻战和任何迷你首领,例如收藏家、军阀、外科医生等。围攻战、外科医生和古物商可提供1-2个代币,其他所有来源则提供3个代币,但巢穴首领和围攻战是最可靠的。完成此任务后,你仍能从这些来源获得木质代币,因此可以继续购买女巫物品。酒馆宝藏也可能提供代币,但它们从第3阶段开始出现。 这一阶段能让你更轻松地完成【Trophy Case】成就,无需四处摸索并寄希望于找到巢穴首领。做好准备,你基本上需要连续对抗那些你之前错过的 Boss,除非你玩的是标准难度或光辉难度,那样的话时间应该很充裕。 集齐三件物品后,将它们送到酒馆,你会获得一把诅咒匕首和一个被堵住嘴的水煮头颅。你需要将头颅重新装备为宠物,并把它带到绿洲。这会得到一个净化头骨,清除选定英雄的所有压力,并赋予他们女巫杀手/憎恨者特性。 这些任务物品要一直保留到第三阶段,并且在第一个酒馆获得火焰之刃。 这里就是“可疑少数”任务线的开始。 “可疑少数”任务线:首先装备火焰之刃,建议把它交给速度最慢的英雄,原因是这把剑必须对处于燃烧状态的女巫使用,所以你需要先施加持续伤害效果。这把刀刃无视潜行、闪避和格挡,因此必定命中,并且当你有燃烧目标时必须使用它(非可选)。 刀刃能瞬间杀死女巫,然后自身发生变形。这仅在少数特定遭遇战中有效,在围城战中既不会变形,甚至无法使用。对普通敌人使用时,效果类似瘟疫医生的“死亡原因”技能,会立即结算所有持续伤害并治愈目标,但会将部分伤害转移给使用刀刃的英雄。 火焰之刃会依次变形为枯萎之刃、鲜血之刃,每次用它杀死女巫都会触发变形,每种形态的效果相同,但分别对应各自的元素。 刀刃一旦装备,只能在酒馆、营地或变形后才能卸下。这也会让援助遭遇战变得更常见,这也是我们“喂养”武器的方式。你必须正确判断这些平民究竟是真正的平民,还是伪装的女巫。错误的决定将至少消耗你15点火炬之光。 进入援助遭遇战时,你会听到女巫的笑声,不要被它迷惑,这是每次都会发生的,线索是视觉上的。 imposters身上会长有蘑菇,有些比其他的更容易被发现,但一旦你知道要寻找什么,就会变得简单。 每次做出正确的决定将获得True Sight成就。 此外,遇到伪装女巫完全是随机的,在我的第一次游戏中,我在3个区域就完成了,第二次则花了7个以上的区域,一直遇到平民。以下是真实平民的图片,如果你不确定,可以随时参考,这些是平民。
以下是冒名顶替者的示例,这些是女巫

头顶上的那个小蘑菇是唯一的线索。
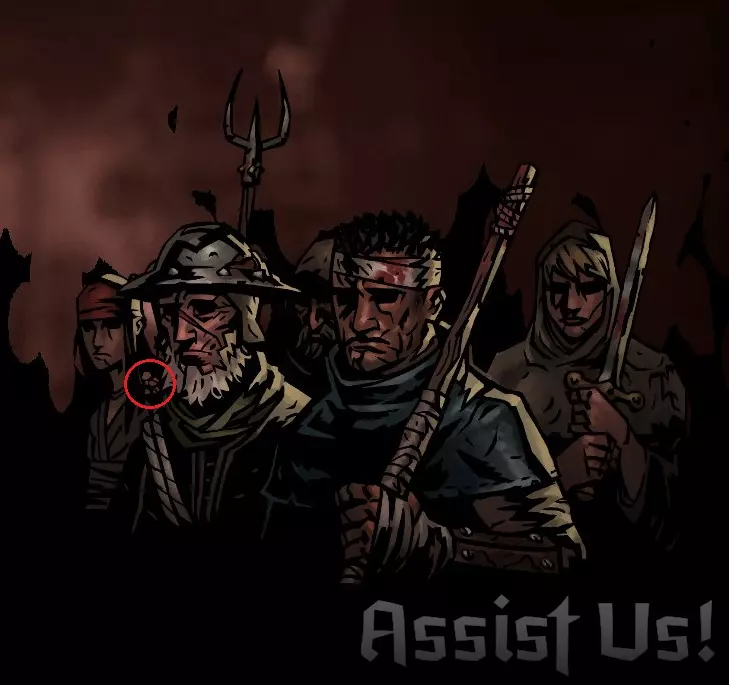
左边女人的肩膀上有蘑菇。同样,右边的女人肩膀上也可以有蘑菇。
Shroom on the back of the old mans helmet If you make a correct decision about true civilians, you will gain some food and combat items with the same element as the current form of the blade. This covers you if you don't have anyone that deals DoT with skills. If you make the wrong decision, you fight conscripts... They deal more emotional damage than being an actual threat. After you transform Blade of Blood, you will gain a Witchblade, equip this on your fast hero that can take hits, whoever has the blade will be focused by the next boss. The blade triggers automaticaly every round and applies 3 debuff tokens. Equiping it also makes the next region have a Beast Lair, where you will find your next objective, Mother's Familiar. Go to the Lair and the 2nd wave will be 4 spiders, but the last one will be purple, with 3 Tokens that make it almost immune to damage, this is the Mother's Familiar. The Witchblade will remove a token and once all are removed, the spider can be defeated. This is why we want the blade on the fastest, so that at some point all other heroes can target the familiar. Once you defeat the purple spider the Coven boss location will be revealed, but first you need to deliver the spider to an Inn. As long as you have it, every battle will have at least 2 spiders, so no lollygagging. Equip the spider to a pet slot and you can fight the Boss... good luck! The Court Questline The Court quest is about surviving and containing the Curse. A lot of the quests can be completed pretty quickly, then just survive to the next escalation. The finale requires planing a driving route, which should be completed ASAP, especially on Blood Moon difficulty. In this mode you will stay in Escalation 3 the longest. You start with a Stagecoach item, Fuel Requisition, equip it and go to Assistance Encounters, Hoarders or Hospitals, where you will recieve Fuel Oil. This needs to be delivered to an inn, where you will recive Accelerant combat item. During the entire course of escalation 1, all road battles are replaced with Cocoons and Swarms. This early a fight with 4 cocoons can mess you up pretty good, mostly because of stress, so until you actually have Accelerant I'd advise to avoid road battles as much as possible. Equip Accelerant to your fastest hero and plan a course to an Underground passage. You will still recieve Fuel Oils when you visit mentioned locations, and you should visit them. As long as you have Accelerant, you should aim for road battles. Accelerant instantly destroys all Cocoons, leaving you to potentially only deal with a single swarm. Plus, you still gain rewards like a normal road battle, so this is almost free resources. In Underground, you should have at least 4 Accelerants, the road battles will be at almost every path and you don't want to actually fight Cocoons, like we've already mentioned. Once you destroy a Cocoon in underground you will recieve Odoriferous Blood Sample, which you need to deliver to an inn. Once you do, one of your heroes will contract Crimson Curse and a contagion will begin on the map, infecting neighbouring regions and spreading every day. You will get a stagecoach item, Public Health notice, you could equip it immediately because it forces Hospitals to spawn, but it will not progress until escalation 2. To progress it, you will need to visit Hospitals in infected zones, where you will recieve Research Notes. You need to collect four research notes. When you have four, deliver them to the inn, where you will recieve Research Journal. This is not equipable, but it spawns Chiurgeons Table locations. You will need to defeat one to get his Syringe. Avoid using DoTs on him and instead go pure damage, he will just convert it to regen at the end of his turn. Kill his backup first, and have your tank pump Block tokens. The Doc will buff or heal his allies, but once you eliminate them he will start attacking. He usually attacks rank 1 the most, but will also hit rank 2 occasionaly. He deals a lot of damage and bleed. If you have bandages or Pustules, pack them for this fight. Equip the Syringe and with it, you will need to collect four samples. You can also collect the Blood from infected enemies with the Syringe. The samples you need to collect are from the uninfected creatures, one from an Assistance Encounter, one from a Healthy beast in a Beast Den, one from a Courtier and one from a Healthy Cosmic enemy (The Tundra/Mountain). The two samples (beast and Cosmic) that must be from unifected creature are WITHOUT the biohazard symbol beneath their HP. Once you have all four, deliver them to the inn, but you will need to wait for escalation 3 for this. In escalation 3, you will get a Purifier... Now this could be a tricky part on Blood Moon, depending on what map you're playing. You need to purify every single one of the infected regions, by visiting inns and camps. When you arrive in an inn/camp, all adjescent regions will be purified, so you'll need to plan your course to complete this before your time runs out. Purified regions will not be infected again. This part is why I recommend playing the Convergence map, you can clear the map in 7 days, just by traveling on the edge of the map. And then you need to reach the boss, which spawns in the Shroud area below the camp in the bottom middle of the map. The Purifier also creates one Cure per day, if you'd like to get rid of Crimson Curse from your Heroes, but it also works as stress heal for healthy ones. Prepare as much as you can before the boss, rest buffs, bleed resist, healing items, maximum relationships, remove any bad quirks that will hinder you in combat, you will need any advantage you can have, the boss is no joke. Final words RNG will mess you up, the hero you invested a lot in will get focused and will fail 80% death resist first hit, you will get annoying quirks and your 66% retreat chance will fail 5 times in a row.... All part of DD experience But, as the Academic wisely put it: "Persistence will overcome even the greatest of threats" Hopefully this guide has been helpful and makes your Kingdoms experience more enjoyable. If you have any more tips, please do share!