换一换
换一换 


这是一份详尽的100%成就指南,包含从0到100%的逐步流程。如果您在寻找特定的成就或收集品,可以使用Ctrl+F并在搜索栏中输入相关内容以获取更直接的帮助。 我会为我的所有指南提供支持和调试帮助。如果您有任何问题、遇到困难或发现指南中的错误,请随时留言,我会尽快回复您。祝您游戏愉快! 简介:
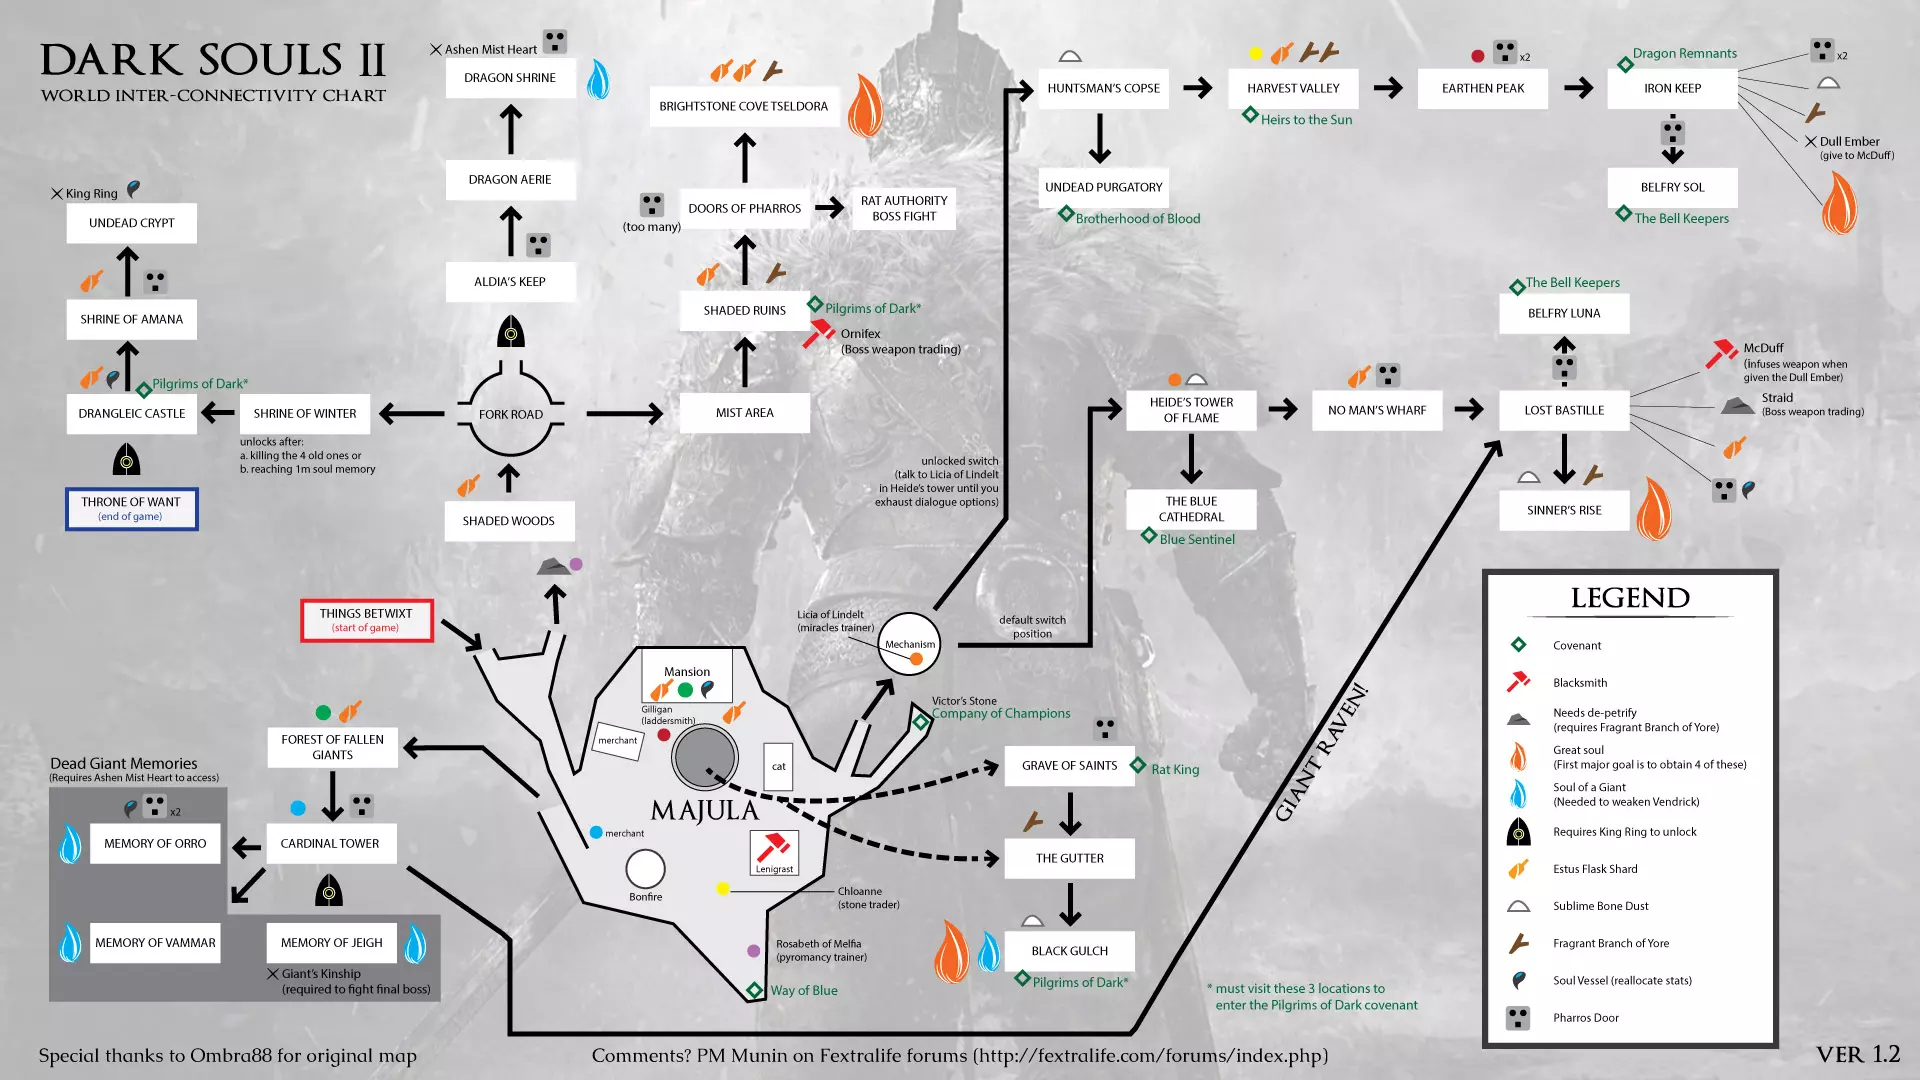
成就分类:(38个) 剧情相关:(11个) 支线任务:(9个) 誓约:(10个) 收集品:(5个) 强化:(1个) 击杀:(1个) 杂项:(1个) 要达成《黑暗之魂2:原罪学者》的100%完成度,我们需要在同一个角色上完成两次完整周目和半次周目(即三周目)。这是一款开放世界游戏,你可能会比本指南中提到的时间更早或更晚获得某些成就/物品,本指南并非完美无缺。唯一可能错过的成就是与NPC和特定Boss战相关的。某些NPC支线任务很难找到或完成,这使得它们相关的成就极易错过。虽然职业和游玩风格无关,但我们实际上至少需要8点智力和8点信仰才能与两位售卖我们所需法术的商人对话,所以务必记住这一点。遗憾的是,戒指或物品提供的加成不算在内。游戏中有一个名为【灵魂容器】的物品,可以让我们重置角色等级。如果你找到两个,就可以通过重置来获得所需的信仰/智力,之后再恢复到原来的build。游戏中的灵魂容器不止一个,所以不必太担心。 只要商人活着,我们随时都能从他们那里购买特定的法术。我通常会刷魂,一旦法术可用就立即购买,但你也不一定非要这么做。如果你愿意,可以等到游戏后期我们到达最佳刷取区域时再快速获取它们。如果你看到有法术出售但我没说要买,那就意味着我们可以在游戏世界的某个地方找到它。省着点你的魂。 以下是所有成就和隐藏成就的整理列表。这是我进行成就解析的依据,也是我开始100%完成游戏之旅前创建的第一个参考资料。要推进游戏中的某些区域,我们需要认真收集【昔日香枝】以进入隐藏区域,那里有我们需要的NPC或物品。游戏中共有17个【昔日香枝】,每个都有其用途。这17个【昔日香枝】的位置都包含在下面的成就清单中。开始游玩前请注意:要解锁成就,你必须处于Steam在线状态(不是《黑暗之魂2》内在线,而是连接到Steam在线)。如果你处于Steam离线状态,游戏内解锁成就时将不会被记录。当然,由于《黑暗之魂2》的特性,你无法通过重新加载存档来重复触发解锁成就的事件。如果在离线时触发了成就解锁条件,该成就将在当前周目作废,只能在下周目及以后重新解锁。 本指南包含大量剧透。 流程1:自我回忆 1.完成巨人陨落之森和海德巨火塔 2.誓约:冠军的契约、青之守护者 3.姿势:1/12 4.奇迹:9/28 5.法术:2/31 6.咒术:0/24 7.咒印:0/23 8.成就:5/38 ----------------------------------------------------------------------------------------------------- 传火祭祀场

成就#1 - 这就是黑暗之魂:首次死亡。 这是不可避免的,如果你在前几个小时的游戏中没有解锁这个成就,之后肯定会解锁。如果你在解锁了其他所有成就的情况下,却莫名其妙地没有解锁这个成就……那绝对是值得吹嘘的硬核资本。这可能是在100%完成一款游戏时,唯一从未被解锁过的“伟大”成就。

成就#2 - Self Recollection:夺回肉身并以不死人身份出发。 与无主之地的小屋里的三位古老防火女交谈。在此过程中你将变为“人类”并设计你的角色。此成就不可错过。 蜜酒镇:

成就#3 - 适者盟约:发现适者盟约。 与胜利石碑对话并在蜜酒镇加入冠军的契约。该石碑位于蜜酒镇左侧,穿过所有建筑后朝着通往海德巨火塔的通道方向,在通道右侧、靠近大海的悬崖边可以找到。加入此盟约无任何前提条件。 请注意,加入该盟约后,敌人的生命值和伤害将大幅提升,无法召唤灵体,且敌人不再会消失。

成就#4 - 温顺誓约:发现温顺誓约。 在蜜酒镇俯瞰大海的地方,会有另一座巨大的纪念碑,即全球死亡纪念碑。纪念碑底部坐着一个人,灰心的索尔登。与他交谈,他最终会邀请你加入青之守护者誓约。如果你不想要冠军的契约所提供的所有功能,那么一定要留在这个誓约中。 动作#1 - 欢迎:向灰心的索尔登学习。在听完索尔登的所有对话后,我们可以从他那里学到第一个动作:“欢迎来到黑暗之魂”。 巨人陨落之森:(等级10-20) NPC - 梅伦蒂亚#1:在有 Cardinal Tower 营火的房间里,会有一个名为梅伦蒂亚的不死女巫。她会出售许多贵重物品。之后当我们击败区域 Boss 时,她会移动到【蜜酒镇】。 奇迹 #1 - 治愈:第一个奇迹可以从【梅伦蒂亚】处以 1500 灵魂购买。或者,当我们在【海德巨火塔】找到【莉夏】时,也可以从她那里购买。这也是【圣职者】职业的初始奇迹。 法术 #1 - 灵魂箭:第一个法术同样可以从【梅伦蒂亚】处以 1500 灵魂购买。之后在游戏中遇到【卡里昂】和【马杰洛】时,也可以从他们那里买到。如果你选择【魔法师】职业,这也是你会初始拥有的法术。 NPC - 卡尔 #1:从【 Cardinal Tower 】营火出发,下梯子并穿过左侧的通道。穿过雾门后,你会看到一个区域,中央有一个巨大的树根和一座木制结构。从该结构的后端,靠近远处墙壁的脚手架上有一个洞穴入口。进入洞穴(注意会有类似印第安纳·琼斯电影中的滚石),沿着通道向上走,会发现一个正在筛土的男人。 这是卡尔,他正在大陆上航行以绘制地图。与他交谈,他会给你打开 Majula 坑附近那座上锁庄园的钥匙。听完他所有的对话,他会告诉你他会返回 Majula,在我们杀死该区域的 Boss 后,可以在庄园地下室找到他。我们需要卡尔来完成【Curious Map】和【Gathering of Exiles】成就。法术【灵魂巨箭】:沿着大树根向上,再顺着墙壁旁的梯子向下,右侧的侧墙上会有一个洞。洞内是一个布满弩炮的房间,法术位于房间正前方的一具尸体上。此外,也可以从卡里姆的卡里希隆或梅尔维格的玛格罗尔处以3000灵魂购买该法术。

Achievement #5 – Last Giant: Defeat the Last Giant. In the depths of the Forest of Fallen Giants ruins we will find our first boss of the game. It is a fairly straight forward fight; it is weak to Fire & Lightning. NPC – Melentia #2: Once the Last Giant is defeated, return to Melentia & she will tell you that she will be leaving somewhere else. Upon returning to Majula you will find she has taken up residence beside a broken wall near the path leading up to Things Betwixt & Shaded Woods. This is needed for the Gathering of Exiles Achievement. Now it is time to head to Heide’s Tower of Flame, we can save the battle with the Pursuer after unlocking the first entrance to Lost Bastille. Heide’s Tower of Flame: (Level 30-40) NPC – Licia #1: After defeating the Dragon Rider boss, head up the stairs to the Tower of Flame Bonfire. Kneeling, overlooking the sea is a woman called Licia who will sell us Miracles we will need to acquire. Exhaust all her dialogue & she will leave to Majula, hanging out in the Rotunda that leads to Heide’s Tower of Flame & the Huntsman’s Copse which we need for the Gathering of Exiles Achievement. Miracle #2 – Homeward: Purchased from Licia for 2400 souls. Miracle #3 – Medium Heal: Purchased from Licia for 3000 souls. Miracle #4 – Guidance: Purchased from Licia for 3700 souls. Miracle #5 – Great Heal Excerpt: Purchased from Licia for 4500 souls. Miracle #6 – Resplendent Life: Purchased from Licia for 4500 souls. Alternatively, it can be bought from Straid once we reach him in Lost Bastille. Miracle #7 – Force: Purchased from Licia for 1800 souls. Alternatively, it can be bought from Cromwell when we meet him in Brightstone Cove Tseldora. Miracle #8 – Caressing Prayer: Purchased from Licia for 2000 souls. This can also be purchased from Cromwell. Miracle #9 – Replenishment: Purchased from Licia for 3000 souls. It can once again be purchased from Cromwell as well. Cathedral of Blue: (Level 30-40) NPC – Targray #1: We can find Targray on a balcony overlooking the sea just after the Old Dragonslayer boss battle. This is the herald of the Blue Sentinel Covenant. We cannot join it just yet though; we need to collect an item from Huntsman’s Copse first. If you use the White Soapstone given to us by Pate & help another player defeat a boss, you will get the same item we need. It is called a Token of Fidelity. So you may unlock the Achievement sooner if you get Summoned Online. Sequence 2: Wayward Knight of Mirrah 1.Complete No-Man’s Wharf & Lost Bastille 2.Fragrant Branch of Yore: Needed to progress through Lost Bastille 3.Gestures: 1/12 4.Miracles: 10/28 5.Sorcery: 8/31 6.Pyromancy: 1/24 7.Hexes: 0/23 8.Achievements: 5/38 ----------------------------------------------------------------------------------------------------- No-Man’s Wharf: (Level 35-45) Follow the passages down from the Tower of Flame Bonfire & into the cave system. From there we will discover the next area, No-Man’s Wharf. NPC – Lucatiel #1: Make your way through the Level until you get to a set of stone stairs leading upwards from the wharf. On the first tier, head left into a stone building. At the top of next set of steps inside, we can find a woman who is casually leaning up against a wall. This is Lucatiel, she has feather tipped hat & a silver mask covering her face. Exhaust all of her dialogue & she will tell us that she will assist us should we Summon her. We need Lucatiel to survive 3/4 of the boss battles she can be Summoned for to earn the Lucatiel Achievement. Miracle #10 – Emit Force: Carry on up the next set of steps & head along the cliffs that takes you over the wharf. You will see a stone building ahead with a large hole in it with a bunch of Dark Dwellers hanging around. To the right of this building is a corpse at the cliff edge. Looting it will give you the Emit Force Miracle. This Miracle can also be purchased from Targray or Cromwell in Brightstone Cove for 4200 souls. NPC – Carhillion #1: On the harbor leading up to the newly arrived pirate ship, head right, & there will be a shortcut we can trigger. From the shortcut head up the pier left, & we will find a man named Carhillion facing out to the water. We need at least 8 Intelligence (bonuses from rings unfortunately do not count) to even speak with him (prick), but once you do, he will sell us Sorceries we will need to purchase. Sorcery #3 – Shockwave: Purchased from Carhillion for 1800 souls. Sorcery #4 – Magic Weapon: Purchased from Carhillion for 2000 souls. Sorcery #5 – Soul Spear Barrage: Purchased from Carhillion for 2600 souls. Sorcery #6 – Yearn: Purchased from Carhillion for 3000 souls. Sorcery #7 – Heavy Soul Arrow: Purchased from Carhillion for 2000 souls. This can also be bought from Magerold. NPC – Lucatiel #2: If human, we can find Lucatiel’s Summon Sign on the pier that leads toward the pirate ship. We will need her for the boss battle with the Flexile Sentry. Boss – Flexile Sentry: This boss is need for the Lucatiel Achievement. It is the easiest boss we will face with her. If you cannot seem to get her to survive any of the boss fights to come, return to No-Man’s Wharf & use a Bonfire Ascetic to revive this boss as many times as you need. Hopefully it will not come to that… NPC – Carhillion #2: After killing the Flexile Sentry, return to Carhillion & exhaust his dialogue. He will now head to Majula & can be found to the left of the Monument of Global Deaths under a tree where we can purchase his Sorceries at our leisure & contribute to the Gathering of Exiles Achievement. Pyromancy #1 – Fireball: Return to the ship & head past the boss room. We can find our first Pyromancy in a chest up the ladder beside the navigation system. It can also be purchased from Rosabeth, a lady we meet later on for 1200 souls. Lost Bastille: (Level 55-65) Now we sail to the Lost Bastille, head up the elevator & find the Exile Holding Cells Bonfire to your left. From here, return to Forest of Fallen Giants Cardinal Tower Bonfire, we will return to Lost Bastille afterwards from a different entrance… Forest of Fallen Giants: From the Cardinal Tower Bonfire, head down the ladder & to the right through the metal gate shortcut you opened. Head past the two spear wielding Royal Soldiers & then right to the locked door. Using the Soldier Key we received from the Last Giant, unlock the door & head up to the boss room to defeat the Pursuer. This is a pretty difficult boss battle. The biggest thing is memorizing his moves, get behind him & attack when he finishes a combo. He is weak to Lightning & Strike Damage. There is also two ballistae in the boss room as well which if you can line the shot up it is a quick way to knock down 8/10 of his health bar down. The Shade, Ruined Alfis can be used for this boss fight if we lead him there; if you are Human, he is found at the beginning of the corridor full of Skeletons that leads to the area with the Soldier's Rest Bonfire. We can use the Soldier's Key to unlock the door to this corridor in the lower level below the Cardinal Tower Bonfire to the left, just before exiting into the outside area. Lost Bastille: (Level 55-65) Item – Dull Ember: After arriving for the second time in Lost Bastille thanks to Big Bird, we should find the Tower Apart Bonfire right in front of us. To the left in this room, are two chests & in one, will be the Dull Ember. This is an item we need for an NPC related to the Smith For Life Achievement in this area. NPC – Lucatiel #3: Carry on down the path along the wall & we will come to a door in a tower. Inside, we can find Lucatiel leaning against a wall. Exhaust all of her dialogue & she will give us a Human Effigy. She can now be Summoned for another boss battle further on in the game in Sinner’s Rise. NPC – McDuff #1: The next NPC is a pain in the (censored by Steam). There are two ways we can go about this. One: we get the Bastille Key after fighting the area boss & just simply unlock his door. Or two: if we want to chip away at his Achievement sooner, we have to blow up a wall. Leaving the Tower Apart Bonfire (carry Firebombs just in case) head down the path & through the tower. Carry on till you get to an Undead Jailer (giant mummy dude) standing in front of an exploding barrel. Aggro & kill him, leading him away from the barrel so that he/you do not set it off during the fight. Now, we must roll that barrel straight down the stairs & into the wall directly ahead at the bottom. If done right, it will explode & open an area that has McDuff’s Workshop Bonfire & of course, the NPC McDuff. Most likely though, it will roll & bounce off course, blowing up exactly where you do not want it to. This may take multiple tries to pull off & can be very frustrating. If it rolls to the wall & doesn’t explode, try throwing a Firebomb at it & blowing it up like that. Eventually, you will get inside that area, & will find McDuff sitting on top of a treasure chest. Light a torch at the Bonfire & use it to light the sconce in McDuff's room. Rest at the Bonfire & you will find McDuff has moved. If you grabbed the Dull Ember (found in a chest beside the Tower Apart Bonfire) we can now have him Infuse our weapons & purchase equipment from him. We need to spend a whopping 14,000 souls on weapon/armor upgrades or Infusions to unlock the Smith For Life Achievement. The consensus is that its upgrades & Infusions, not on item purchases. This can be done at any time over our game when souls are no longer an issue. When the allotted soul amount has been spent, we will get his equipment & an Achievement when you speak with him. Boss – Ruin Sentinel: This is the main boss of Lost Bastille. We will need its Boss Soul to trade in for the Heavy Homing Soul Arrow Sorcery from an NPC we meet later in Lost Bastille. Sorcery #8 – Hush: There are many Illusionary Walls to be found in the Ruin Sentinel boss room. There are four on the bottom floor & two on the top floor. We can find the Hush Sorcery in a chest on the top floor behind one of them. Either open the wall up from the bottom floor & climb up the ladder or climb up to the top floor & jump across the gap to open up the wall from there. Sequence 3: The Lost Sinner 1.Complete Belfry Luna, Lost Bastille, & Sinner’s Rise 2.Covenants: Bellkeeper 3.Fragrant Branch of Yore: Needed to unpetrify Straid of Olaphis 4.Gestures: 2/12 5.Miracles: 11/28 6.Sorcery: 11/31 7.Pyromancy: 3/24 8.Hexes: 2/23 9.Achievements: 7/38 ----------------------------------------------------------------------------------------------------- Belfry Luna: (Level 55-65) To get to Belfry Luna, head to the Servants' Quarters Bonfire in The Lost Bastille after defeating the Ruin Sentinels. Climb down the ladder found across from the Bonfire & use a Pharros' Lockstone on the contraption set into the wall (watch for the ambush by a Pursuer). Proceed through the wall & you will find a wooden door with a Bellkeeper sitting just inside.

成就#6 - 喧嚣誓约:发现喧嚣誓约。 与钟楼遗迹的敲钟人对话以加入该誓约。加入此誓约后,你将免疫钟楼区域发生的敲钟人入侵,同时可以作为入侵者被召唤到其他玩家的世界。 该区域还有一个可选 boss,但难度极高。如果你想挑战,可以敲响钟声并进入 boss 雾门。 遗忘囚笼:(等级 55-65) 物品 - 囚笼钥匙:从仆人宿舍营火出发,继续深入囚笼。穿过下一扇木门后,沿着左侧的断墙走,会发现一具尸体持有囚笼钥匙。如果你之前没能用木桶炸开墙壁,这把钥匙可以让你进入并见到麦克达夫。NPC - 斯特雷德 #1:我们接下来会遇到的NPC是一位名叫奥拉夫斯的斯特雷德的男性。他位于我们接下来要探索的四层建筑顶层,那个有五只爆炸木乃伊的房间里。遗憾的是,他被石化了,需要使用【芳香的乌拉席露枝条】才能解除。 动作 #2 - 嘲讽:这个动作可以向奥拉夫斯的斯特雷德学习,但需要先解除他的石化状态。他会在【流放者囚牢营火】旁边的牢房里,位置在通往罪人塔的桥对面的上层。听完他所有的对话后,再次与他交谈即可学会这个动作。 咒术 #1 - 黑暗珠:这个咒术可以向斯特雷德以600魂的价格购买。之后也可以从另外两个NPC【放逐者费尔金】和【黑暗潜者格兰达尔】处购买。咒术#2 - 黑暗冰雹:可在斯特雷德处花费1500灵魂购买,也可从马杰洛德和格兰达尔处购买。 奇迹#11 - 揭示:在斯特雷德处花费2200灵魂购买。 咒术#2 - 残留火焰:在斯特雷德处花费6700灵魂购买,也可从失落 Bastille 的不死狱卒(巨型木乃伊)处稀有掉落。 咒术#3 - 火焰横扫:在斯特雷德处花费9500灵魂购买,也可从 Belfry Sol 的钟卫处稀有掉落,该区域在进入钢铁要塞后可到达。 法术#9 - 追踪灵魂箭:在斯特雷德处花费6500灵魂购买。 法术#10 - 强力追踪灵魂箭:使用我们刚收集到的遗迹哨兵灵魂,可向斯特雷德兑换该法术,额外还需花费1500灵魂。法术#11 - 光明照耀:可从史垂德处以3000灵魂购买。之后也可从格兰达尔处购买。 罪人塔:(等级60-70) 现在我们穿过桥梁前往罪人塔。 NPC - 鲁卡提耶#4:乘坐电梯下到塔底后,在这个小房间的后墙边可以找到鲁卡提耶的召唤印记。我们需要她在该区域的 boss 战中存活下来。罪人塔可能相当棘手。召唤前,建议清理出一条通往雾门的道路,因为沿途的敌人可能会对鲁卡提耶造成严重伤害。 Boss - 失落罪人:如果用火炬点燃雾门两侧的两条油迹,你就能锁定她。如果你不这样做, boss房间将会完全黑暗,并且会禁用锁定功能,这会使战斗变得非常困难。她弱于雷电属性,并且对火焰属性有抗性。购买红眼戒指会很有用,这样罪人会更多地关注你而不是露卡提耶,从而让她存活下来。该戒指可以在蜜酒镇的夏拉格伊尔处用6700灵魂购买。

Achievement #7 – Sinner’s Bonfire: Light the Primal Bonfire in Sinner's Rise. After we defeat the Lost Sinner, carry on to the grand chamber beyond. There is a chest nearby containing a Fragrant Brach of Yore which you can use to unpetrify Straid of Olaphis if you haven’t already. In the center of this room will be our first Primal Bonfire, lighting this will unlock the Achievement & teleport us back to Majula. Sequence 4: Creighton the Manslayer 1.Complete Huntsman’s Copse & Undead Purgatory 2.Covenants: Blue Sentinels 3.Gestures: 3/12 4.Miracles: 13/28 5.Sorcery: 12/31 6.Pyromancy: 4/24 7.Hexes: 5/23 8.Achievements: 8/38 ----------------------------------------------------------------------------------------------------- Huntsman’s Copse: (Level 55-65) Explore around & farm the last few items or Spells you are missing. When finished, head back to Majula & go see Licia of Lindelt in the Rotunda. For 2000 souls, she will change the passageway to Heide’s Tower of Flame & let us go to the Huntsman’s Copse instead. NPC – Felkin #1: Before entering the actual, Huntsman’s Copse, look to your right at the cave mouth & you will see an NPC sitting in a chair. This is Felkin, we will have to buy some Hexes from him. The caveat is we need to have 8 Intelligence AND 8 Faith to speak with him this time. (Bonuses from rings do not count). Hex #3 – Dark Weapon: Purchased from Felkin for 2700 souls. Hex #4 – Resonant Flesh: Purchased from Felkin for 3400 souls. Hex #5 – Resonant Weapon: Purchased from Felkin for 4000 souls. Miracle #12 – Magic Barrier: Purchased from Felkin for 2700 souls. It can also be bought from an NPC called Vengarl who we shall meet in the Shaded Woods area. Item – Token of Fidelity: There is an item we need for the Blue Sentinels Covenant here in Huntsman’s Copse. It can be found below the large wooden bridge above us leading out to the Undead Purgatory, just outside the Bridge Approach Bonfire. If you want to avoid the risky fall down from the bridge itself, climb up the ladder leading above the Bridge Approach Bonfire's room (where the club wielding Undead is). Simply sprint off the ledge towards the corpse with the item. Jumping will take you too far & rolling won’t take you there at all. Alternatively, Tokens of Fidelity can be earned by assisting someone using your White Soapstone as a Phantom in Online. Sorcery #12 – Soul Spear: Across the first stone bridge of Huntsman’s Copse you can either carry on down a path uphill or go right, across another stone bridge. Follow the path forwards & it will lead you up to a large iron bridge you will have to lower. From that bridge, turn around & head to the left through the trees overlooking where you just walked up from. Below the cliff will be a hut with a hole in the roof. Drop down & fight off the Syan Soldier inside; one of the corpses in here will hold the Soul Spear Sorcery. This can alternatively be purchased from Grave Warden Agdayne in the Undead Crypt for 12,000 souls. Item – Undead Lockaway Key: Now head across that iron bridge into the next section. Just across the bridge is a locked hut with a Bonfire inside it. Take the path along the cliffs to the left & follow it along until you reach a crossroad. Take the path left up the hill & you will find the key on a corpse in the center of a clearing. Watch out for the Red Phantom Invader! NPC – Creighton #1: Take the Undead Lockaway Key back to the locked hut & you will see an NPC is slumped in the corner by the Bonfire. This is Creighton the Wanderer, wielder of the Dragonslayer’s Crescent Axe. Gesture #3 – Fist Pump: Learned from Creighton the Wanderer. Exhaust his dialogue & talk to him again to learn this Gesture. Pyromancy #4 – Combustion: Make your way down along the cliffs to the far end of the valley & loop under the waterfall. There you will see the rear entrance to the caves near the Undead Lockaway Bonfire. Inside the entrance to your right, you will find a Necromancer & a corpse which will be holding this Pyromancy at the end of the broken bridge. This can also be purchased from Rosabeth for 1500 souls. Undead Purgatory: (Level 65) From the Undead Lockaway make your way backwards across the iron bridge & to the area on the left across the second stone bridge. Fight your way through the slew of Executioners & across the rickety wooden bridge that will take you to Undead Purgatory. NPC – Titchy Gren #1: After the exceptionally annoying boss battle, carry on & up the stairs to the left. You will find a small gremlin guy standing in between some candles. We won’t be able to join his Covenant without a Token of Spite, a key item we will find later on in the Grave of Saints. We at least now have a Bonfire we can warp back to once we find it. Alternatively, if you play Online, you can receive this item sooner than I did using a Cracked Red Eye Orb. The Orb will allow you to Invade another players world. Defeat them, & you will be awarded souls & a Token of Spite. Cathedral of Blue:

成就#8 - Protector Covenant:发现守护者誓约。 携带在狩猎森林找到的忠诚之证,前往蓝调大教堂交给塔格雷。持有该物品时,塔格雷会询问是否加入蓝之圣职者,解锁此成就。 动作#4 - Duel Bow:加入蓝之圣职者后,听完塔格雷的所有对话,即可向他学习该动作。 奇迹#13 - 神圣雷电:作为蓝之圣职者,可从塔格雷处以3300灵魂购买此奇迹。此外,也可从克伦威尔处购买。 返回狩猎森林,沿着山谷向下回到瀑布处,穿过下一道雾门… 序列5:种豆得豆 1.1. 完成【丰收谷】与【土峰】 2. 誓约:太阳战士 3. 动作:6/12 4. 奇迹:15/28 5. 魔法:14/31 6. 咒术:4/24 7. 暗术:6/23 8. 成就:9/38 【丰收谷】(等级60-70) NPC - 克萝艾#1:进入丰收谷并找到毒池营火。从那里,沿着山坡向上走,会发现一名女子坐在岩石上。这就是克萝艾(铁匠雷尼格拉斯特的女儿)。她会卖给我们许多非常有用的强化材料,随着游戏进度推进,还会解锁更多稀有材料。只需听完她所有的对话,她就会前往如蜜。之后可以在如蜜镇中心的岩石上找到她。她是【流亡者集会】成就所需的另一个NPC。 【咒术6 - 再死一次】:此咒术可从克洛伊安妮处花费4000灵魂购买,也有几率从黑溪谷的【峭壁潜伏者】(躲在油池里的手状蠕虫生物)身上掉落。 【奇迹14 - 灵魂安抚】:可从克洛伊安妮处花费8800灵魂购买,也可从不死灵庙的【墓王卫士阿格戴恩】处购买。 【法术13 - 变色龙】:该法术位于【熔铁城营火】后方。在第二个有毒气和两个暗术巨人的大区域中,毒气最右侧角落有四具尸体堆,法术就在其中一具尸体上。

Achievement #9 – Brilliant Covenant: Discover a most brilliant Covenant. After The Mines Bonfire in the previously mentioned area, head across the wooden bridge past the Undead with the big hammer. Turn left after the bridge & head towards a small cave. Continue until you reach the end & you'll see a broken statue (a statue of the Nameless King cough* cough*). Pray to it, & you'll be asked to join the Covenant unlocking the Achievement. We need to achieve Rank 3 in this Covenant for the Sunlight Spear Miracle which will require 30 Sunlight Medals. This can be done Online or Offline. Online is a lot easier if you can manage it, using your Soapstone & being summoned as a Warrior of Sunlight in someone else’s game. Defeat a Boss with your Host (& yourself) surviving the battle & you will earn a Sunlight Medal while in this Covenant. Just make it a habit of putting your Sign down as you explore new areas or farming for souls/items. This is best done as early as possible, the higher your Soul Memory; the less likely you will be Summoned as it matches you to people with similar Soul Memories. The Offline method is a lot of farming. A lot. Of farming. There are only two enemy types in the game that drop Sunlight Medals & its very rare chance. In Harvest Valley, the Dark Magic Giants will drop them; there are four to be found. Shaded Woods has three Falconer’s that will drop them as well. Falconers are also found in Brightstone Cove; there are six to be found near the first Bonfire of that area. In NG+ we can find four more Falconers in Things Betwixt. I would suggest farming all of these enemies out, but refrain from using Bonfire Ascetics to respawn them. We have to make it NG++ anyways so just each playthrough, farm them out until we make it to NG++. If by then you still do not have enough Sunlight Medals, Bonfire Ascetic your heart away as it won’t over level the enemies in the area. Alternatively, if you join the Covenant of Champions, the enemies will not de-spawn & you can farm infinitely. The best Item Discovery Gear is: Jester’s Cap, Prisoner’s Tatters, & the Watchdragon Parma, as well as whichever version of the Covetous Gold Serpent Ring you have. Rusted Coins are a consumable item that can increase Item Discovery too, they last 5 minutes but do not stack if multiple are used at the same time. Just keep all of this in mind as we progress through the playthroughs; something to chip away at. If it makes you feel any better… I chose the Offline method for all the Covenants in the game. Gesture #5 – Praise the Sun: After joining the ‘Grossly Incandescent Covenant’ & becoming a Sun Bro, we will also receive this Gesture. PRAISE THE SUN!!! NPC – Lucatiel #5: Now enter the large stone fortress from the right/lower entrance & step into a large room with poison pots. Head through the door & take a right down the stairs & through the poison water. Following the path down, there will be a room on your right with Lucatiel in her usual position. You know the drill, exhaust that dialogue! Earthen Peak: (Level 65-75) Defeat the Boss of Harvest Valley & enter the Earthen Peak. Locate the Central Earthen Peak Bonfire through a Fog Gate. (Burn the windmill across from this Bonfire with your torch). NPC – Gilligan #1: From the Central Earthen Peak Bonfire, head up the stairs to your left & out the corridor to the right. There will be wooden railings lining an overlook of Harvest Valley. Destroy one & go along the left-hand ledge to find an old man standing there named Gilligan. Speak with him & buy his ladder for 2000 souls & exhaust all his dialogue (this will get us a Gesture). After the boss fight at the top of Earthen Peak, he will then move to Majula & contribute to Gathering of Exiles. Gesture #6 – Prostration: If you purchased Gilligan’s 2000 ladder in Earthen Peak, when you climb back up the ladder & speak to him again, we should be able to acquire this Gesture. I have read this can also be earned if you speak to him after he has moved to Majula. Sorcery #14 – Great Heavy Soul Arrow: From Gilligan, carry on back down the corridor & past the large wooden elevator. You will get to a passage with a Mannequin bowman at the end of it. Head to where he is & take a right, there will be a ledge looking into Earthen Peak; below it to the right is another ledge lower down. Drop down & there will be a door that opens to Pate’s room (we do not need him for anything). On this same ledge behind us, is a passage that ends with a chest with this Sorcery in it. It can also be purchased from Carhillion or Magerold for 4500 souls. Miracle #15 – Lightning Spear: From the last Sorcery, head back out to the ledge. To the right of the doorway is a drop that leads to another ledge lower down. Drop down again, & you should see a chest in the corner behind you that contains this Miracle. This can also be purchased from Licia for 6000 souls. If you burnt the windmill across from the Central Earthen Peak Bonfire, it will have removed a lot of the poison pool in the boss area. Defeat Mytha & carry on up to the first Iron Keep Bonfire. From here, I suggest we head back to Majula & go after a different Great One. Iron Keep is a very challenging area. Sequence 6: The Rotten 1.Complete Grave of Saints, The Gutter, & Black Gulch 2.Covenants: Covenant of Rodents 3.Fragrant Branch of Yore: Needed to open up the Hidden Chamber Bonfire 4.Gestures: 6/12 5.Miracles: 16/28 6.Sorcery: 15/31 7.Pyromancy: 4/24 8.Hexes: 9/23 9.Achievements: 12/38 ----------------------------------------------------------------------------------------------------- The Grave of Saints: (Level 45-55) It is now time to descend into the ominous pit that is in the center of Majula. We must drop down the planks to the first cave entrance with two torches outside it. The Silvercat Ring purchased from Shalquoir can be very useful for this. Removing your armor also reduces damage taken from falls as well. But first speak with Gilligan the Laddersmith.

成就#10 - Garrulous Miser:继承梯子铁匠吉利根的装备。 要获得此成就,我们必须花费12000灵魂购买吉利根最昂贵的梯子(或购买等值的物品)。再次与他交谈,他会给你他的梅卢弯刀。吉利根出售一种名为梯子模型的物品;我们最终需要从他那里购买这个物品,用于之后的一个NPC任务。 咒术#7 - 绝望低语:在圣徒墓地,离开哈瓦尔的安息处营火,经过有老鼠的圆形房间,上楼梯。你应该会看到一个法洛斯锁正对着你,对面是一座升起的桥。使用一块锁石,然后穿过那座桥。该咒术位于一段石阶顶部的一具尸体上。请注意,除了我们刚才使用的【辉石钥匙】外,该区域的其他钥匙都会触发陷阱。 Boss——【王室鼠先锋】:我们需要【王室鼠先锋的 Boss 灵魂】,用它与【斯特雷德】交换一个【咒术】。

Achievement #11 – Gnawing Covenant: Discover the Covenant of Rodents. After defeating the Royal Rat Vanguard, carry on to the next room & there will be a rat NPC we can speak to. We need a Rat Tail to join this Covenant however, one will be earned after killing the last boss so that is not an issue. Miracle #16 – Great Heal: After speaking with the Rat King, carry on & drop down into the area below. We will come to a flooded section with a broken stone bridge where exploding Mummies will ambush us. This Miracle can be found on a corpse in this area. It can also be purchased from Cromwell for 8000 souls. Item – Token of Spite: After the flooded section, climb down all the ladders leading down towards The Gutter. At the very bottom of the scaffolds, there will be a chest in the back that has this item. We need this for the Brotherhood of Blood Covenant. These can also be acquired through more nefarious methods by killing a Host as a Red Phantom Invader. The Gutter: (Level 65-75) Hex #8 – Dark Fog: Make your way through the Gutter & get to the Central Gutter Bonfire. From there, head down the many sets of ladders until you reach the ground below. To the left of the corrosive urns blocking the entrance to Black Gulch, are two large, hollow urns. Inside one is a corpse that has this Hex. This can also be purchased from Straid for 5200 souls. Black Gulch: (Level 65-75) This is a pretty irritating area, be sure to have lots of Poison Moss or other remedies for treating Poison. Using a whip or spear to deal with the Poison Statues is a good way to keep your distance from them without getting poisoned in the process. Sorcery #15 – Great Magic Weapon: From the Black Gulch Mouth Bonfire, head down the path & you will come across some oil puddles. To the left on this landing will be a cave with a chest containing this Sorcery. This can also be purchased from Navlaan, an NPC we will meet in Aldia’s Keep later for 6000 souls. As well, this is the Rank 1 reward for the Covenant of Champions if you have progressed that far. Hex #9 – Scraps of Life: Carry on down past the oil puddles a little ways & there will be a cluster of urns blocking the way. This Hex is found on a corpse underneath them. It can alternatively be purchased from Cromwell for 2200 souls. NPC – Lucatiel #6: Back track towards the first landing with the puddles. Where the path starts becoming thinner heading back up towards the Black Gulch Mouth Bonfire, look down over the edge. You should be able to see a ledge below you in the darkness (turning up the brightness settings can help). Drop down to it & head through the tunnel entrance. You will find our Boo leaning against the wall as usual. Exhaust all of her dialogue & she can be Summoned for the area boss. NPC – Darkdiver Grandahl #1: Make your way down to the second landing of Black Gulch. Along the cliff to the right you can find a petrified Hollow blocking a cave entrance. Unpetrify them, & you will have access to the Hidden Chamber Bonfire. From here, head over to the path leading back up to the first landing & look over the edge near the Crag Slipper hole. You should see a ledge in the gloom. Dropping down to it you should see a Stone Gate which will be locked. To open it, we need to drop down another two ledges where a large cave entrance will be. Inside the cave will be two Giants, killing them will give you the key to that door. An easy method is sprinting in between the two Giants to find a small cave with a chest inside at the far end. From there, shoot them to death with a ranged weapon. You will receive the Forgotten Key after killing the last one & a Soul of a Giant. We will need to collect 5 Giant Souls in total scattered throughout the game, do not consume these. For every Giant Soul we collect a certain boss will become weaker making it possible to defeat them for an Achievement. Return back to the Stone Gate with the Forgotten Key, & inside will be good ol’ Grandahl. We need to find Grandahl in all three of his locations before we can join his secret Cult. I mean Covenant… Item – Soul of a Giant #1: Defeating the two Giants in the caves below Black Gulch will give you our first Soul of a Giant. NPC – Lucatiel #7: We can summon Lucatiel for the boss battle with The Rotten, her Summon Sign can be found in the Hidden Chamber Bonfire room. If you killed the Flexile Sentry & the Lost Sinner bosses with her, this will be our final boss battle we have to worry about. There is a fourth, but it is very hard keeping her alive for it, so I suggest helping her survive this boss instead. Wearing the Red Eye Ring can be useful for that or Summoning the other two NPC’s in the area. Boss – The Rotten: This boss is not too bad. Lucatiel will not do a lot of damage but she has a lot more health than the other Summons in the area. It is weak to Lightning & Magic damage.

成就#12 - 幽邃篝火:点燃黑溪谷的原初营火。击败腐败物后,房间后方会出现一条隧道。在隧道内,我们将找到需要点燃的第二个原初营火,解锁该成就。这里还有通往“沉王”DLC的传送门,请记住这一点,找到龙爪钥匙后我们会回到这里。 序列7:铁之古王 1.完成钢铁要塞和索尔钟楼 2.誓约:血之誓约 3.姿势:6/12 4.奇迹:17/28 5.法术:17/31 6.咒术:8/24 7.暗术:10/23 8.成就:14/38 蜜拉雅: 奇迹#17 - 巨雷枪:现在我们有了遗忘钥匙,回到蜜拉雅的深坑,这里有一扇石门可以用钥匙打开。使用吉里甘售价12000魂的梯子或者跳下去(后果自负)并打开门。它位于深坑中途;墙上嵌着一个梯子,通向一个壁龛。另外,在我们之后获得国王戒指后,可以从史垂德处以13000魂购买。 法术#16 - 灵魂漩涡:它和巨雷枪在同一个房间。也可以从阿格戴恩处以10400魂购买。在辉石镇盖多勒的下湾营火处也能找到它;沿着一些索道下去,会在一个书架后面发现这个物品。 物品【龙爪】:在这个房间的左角落的一具尸体上,还放着我们进入【沉王】DLC所需的钥匙【龙爪】。 失落 Bastille: 咒术【剧毒迷雾】:回到失落 Bastille 的斯垂德处,用【王室鼠先锋】的灵魂加上1500魂可以兑换这个咒术。 不死人刑场(等级65): 带着在圣徒墓地找到的【怨恨之证】,传送到不死人刑场,解锁一个新的誓约。

成就13 - Sanguinary Covenant:发现嗜血者誓约。 给予蒂奇·格伦一个怨恨信物,他就会让我们加入他……成为血兄弟。直到永远…… 咒术6 - 火焰鞭:花费3800灵魂从蒂奇·格伦处购买。你也可以在太阳钟楼刷钟卫,有低概率掉落该咒术。 钢铁要塞:(等级80-90) 现在我们回到钢铁要塞的门槛桥营火。 NPC - 马杰洛1:从营火出发,穿过通往钢铁要塞的桥梁。进入后右手边有一条通道,沿着通道直走,你会来到一个壁龛。坐在“魔法地毯”上的是一个名叫马杰洛的男人。他是一名商人,也是我们稍后会找到的某个誓约的传令官。咒术#10-暗风暴:可从马杰尔罗德处花费4700灵魂购买。钢铁要塞是刷灵魂的绝佳地点,用于从目前遇到的商人处购买所需的法术或物品。该咒术也可从格兰达尔处购买。 法术#17-坠落控制:从马杰尔罗德处花费4800灵魂购买。 NPC-露卡提耶#8:可在熔铁恶魔的 Boss 雾门外找到露卡提耶的召唤印记。这场战斗中她即使死亡也没关系。除非你此时异常强大,否则她很可能无法存活,这是正常的。如果你已在与腐败物的 Boss 战中召唤过她,那么我们已完成所有需要与她一同进行的战斗。Belfry Sol(80-90级) 咒术7 - 献祭:从铁炉堂营火出发,穿过熔岩上方的桥梁,进入下一个大区域。在你面前的拉杆处左转,会看到一扇门。进入门内,穿过灯塔锁石墙后有一个梯子,可通往Belfry Sol。 穿过Belfry Sol,一路绕行后返回钢铁要塞。到达终点时,你会发现一个铁宝箱,里面装有此咒术。 钢铁要塞(80-90级) 咒术8 - 混沌风暴:从铁炉营火出发,返回充满熔岩的大房间。左侧有一段楼梯,向下走可到达一些可行走的灼热石块。在这些石块的远端左侧,有一个宝箱,里面装有此咒术。要到达这里而不死亡,你需要具备较高的火焰抗性。使用火焰石英戒指、快速出汗,用水壶装满水浇在身上,并装备你最好的火焰抗性装备。你可能无法活着返回楼梯。

成就#14 - Iron Keep Bonfire:点燃钢铁要塞的原初营火。击败钢铁老王后,前往 Boss 房间后方并走下楼梯。在最底部我们会找到第三个(或第二个)原初营火进行点燃。在前方的房间内是钢铁之王DLC的入口,但我们需要一把钥匙才能进入。 序列8:空洞森林 1.完成黑溪谷与法洛斯之门 2.【返生树枝】:用于解救黑溪谷的罗莎贝丝,以及在黑溪谷遗迹中另外使用2个以获取各种法术或物品 3.姿势:9/12 4.奇迹:17/28 5.魔法:19/31 6.咒术:12/24 7.暗术:11/23 8.成就:17/38 梅茹拉: 我们已经击败了3/4的古王,最后一个将在辉石镇盖多勒找到。前往那里的路线:从梅茹拉向北,沿着通往如蜜的小路返回。在小路上方有一条被树根覆盖的侧道,由此可进入一座石制建筑。 NPC - 本哈特#1:朱哥的本哈特是一名陷入困境的骑士,他坐在释放罗莎贝丝之前的废墟外。我们目前还无法帮助他。

成就#15 - 更衣:给梅莉亚的罗莎贝丝一件衣服穿。罗莎贝丝就是让本哈特感到不安的那座雕像。要解救她,需使用【返生树枝】。当她停止咳嗽后,与她多对话几次,她就会索要衣服。做件好事,给她一件衣服就能解锁该成就。 注意,给她的任何东西都无法取回。复活她并离开该区域后,她最终会前往【 Majula 】成为新居民。我们随时都可以给她衣服,所以如果第一次遇到她时没有东西可给,等她搬到【 Majula 】后仍能在任何时候给她。她可以在【 Global Death Monument 】下方找到。第七个姿势【喜悦】:既然道路已开通,且罗莎贝娜已被解除石化状态,回去告诉本哈特我们已经处理掉了雕像,这样他就能继续他的任务,你也能获得这个姿势。他会在游戏后期再次出现…… NPC本哈特#2:他会在四场Boss战中出现,我们需要让他至少在其中三场战斗中存活下来,以获得Moonlight Greatsword成就。

成就#16 - Gathering of Exiles:将蜜酒镇的人口增加到12人。 需要所有NPC同时在场才能解锁,如果有任何NPC死亡,则需要在二周目完成。这意味着在获得该成就前不能入侵利希娅。初始已有5人:绿袍圣女、灰心的索尔隆德、铁匠雷格里斯特、可爱的猫咪以及防具商莫格林。剩下的7人需要在流程中找到,分别是: 1.制图师卡尔(巨人陨落之森) 2.商人麦莲蒂亚(巨人陨落之森 - 击败最后的巨人后出现) 3.林德尔特的利希娅(海德巨火塔 - 击败龙骑兵后出现) 4.教派的卡利昂(无主之港 - 需要8点智力) 5.石头商人克萝艾(熔铁城) 6.梯子铁匠吉利根(土之高峰) 7.梅拉菲雅的罗莎贝丝(虚影森林 - 为她解除石化) 我在撰写本指南前就已解锁此成就,因此无法确切记起解锁时机,不确定是在最后一名NPC被送往麦道夫拉之后,还是需要自己先前往那里。 NPC - 罗莎贝丝 #1:返回罗莎贝丝处,现在可以向她购买咒术。由于附近有了营火,你也可以给她更好的衣服,以防之前给了她不太合适的衣物。 咒术 #9 - 快速出汗:向罗莎贝丝花费2300灵魂购买。 咒术 #10 - 火球:向罗莎贝丝花费3400灵魂购买。 咒术 #11 - 毒雾:向罗莎贝丝花费3400灵魂购买。 咒术 #12 - 钢铁身躯:向罗莎贝丝花费3500灵魂购买。物品 - 低语戒指:如果尚未购买此戒指,我们需要它来应对阴影森林中的某个NPC。该戒指可从甜蜜的夏库尔处以5800灵魂购买。 阴影森林:(等级80-90) 现在继续穿过我们解锁的门。前往废渊分岔路营火,从那里我们将有三个选择。左边的路径通往多兰古雷格城堡,中间的路径通往安迪尔馆,右边的路径则会带我们深入阴影森林。

Achievement #17 – Reflections on Disembodiment: Inherit equipment from the head of Vengarl. From the Ruined Fork Road Bonfire, enter the ominous mist area & head along the left side of the area. Stick to the left & eventually you will come to a clearing with a circle of rubble. Inside the circle on the right will be a red lion-head helm that speaks, neato! Listen to the whole tale of Vengarl. When his dialogue is fully exhausted, he will reward us for our patience with his helmet & what we really want, an Achievement. Be wary of the invisible assassins that may pursue you along the way! Gesture #8 – Decapitate: At some point during our dialogue with Vengarl we will have the option of acquiring this Gesture from him. Decapitate, very funny Vengarl. Did he actually teach us this, or are we just mocking him? Item – Fang Key: Carry on left through the misty area & head to the Shaded Ruins Bonfire. Now head further along these initial ruins until you see a hole in a wall on your right just over the edge. Leap down towards it & head up the path on your right to a petrified Lion Warrior. Release/kill him & we will receive the Fang Key. NPC – Tark #1: Be sure to have the Ring of Whispers equipped. From the Shaded Ruins Bonfire, head left out of the ruins & left again into a broken building. Head down into the basement & you will see a pit of sand, inside is a Man-Scorpion. Using the Ring of Whispers, speak with him & he will tell you about his betrothed who he wants us to kill. She will be the boss for this area, & Tark can now be Summoned to help us fight her. We are rewarded with a Gesture returning to him after the fight. NPC – Grandahl #2: Head along through the Level until you see two towers which lead up to the area boss. Instead of heading up the path, go straight past the towers towards a grassy patch & look for wooden boards. These will break when stepped on & you will fall into the upper level of the Basilisk Cave where none other than Grandahl will be. How did he get here? Sorcery #18 – Homing Soul Mass: This Sorcery is found in a chest beside Grandahl. Sorcery #19 – Repair: From the Shaded Ruins Bonfire, leave the ruins & head up to the right of the broken building we found Tark down in. You will see a petrified Lion Warrior blocking a chest. Use another Fragrant Branch of Yore & open the chest for the Sorcery. Boss – Scorpioness Najka: We need this boss’s soul to trade for the Soul Shower Sorcery. Gesture #9 – Warmup: After defeating the area boss, Scorpioness Najka, rest at a Bonfire & return to Tark with the Ring of Whispers. He will congratulate us & teach us this new Gesture as well as giving us a Fragrant Branch of Yore. Doors of Pharos: (Level 80-90) Now head on into the Doors of Pharos through Najka’s boss room. Hex #11 – Twisted Barricade: From Gyrm's Respite Bonfire, head right through the bottom area into the water. Carry on to the far end until you have to climb up a ladder. At the top just to the left will be a corpse with this Hex. Boss – Royal Rat Authority: We need this boss’s soul to trade for the Acid Surge Pyromancy. After defeating the boss, we can leave the Doors of Pharos & go to Brightstone Cove. Sequence 9: Drangleic Has Fallen 1.Complete Brightstone Cove Tseldora, Drangleic Castle, & King’s Passage 2.Covenant: Abysmal Covenant 3.Gestures: 10/12 4.Miracles: 18/28 5.Sorcery: 23/31 6.Pyromancy: 16/24 7.Hexes: 12/23 8.Achievements: 22/38 ----------------------------------------------------------------------------------------------------- Brightstone Cove Tseldora: (Level 90-100) NPC – Benhart #2: If you spoke to Benhart in Shaded Woods, near the Royal Army Campsite Bonfire we can find his Summon Sign in the last tent on the left. We can use him in the battle with the boss, Prowling Magus & Congregation. This is a very, very, simple fight, especially with Benhart. Boss – Prowling Magus & Congregation: This is the first boss that we can Summon Benhart into for the Moonlight Greatsword Achievement. NPC – Cromwell #1: After defeating the Prowling Magus, head outside the temple & turn around to face it. To your left & right will be alcoves, the right one contains a ladder that heads up into the temple. Inside the room it leads to will be, at long last, Cromwell the Pardoner… who really is not all that important. Miracle #18 – Perseverance: This is the only Miracle that has to be purchased from Cromwell as we probably have collected or will collect the other Spells from other sources. This Miracle costs 3500 souls. Item – Brightstone Key: Collected from killing the Duke of Tseldora on the way to the Primal Bonfire just after defeating the Duke’s Dear Freja boss.

成就 #18 – Brightstone Bonfire:点燃辉石镇盖多勒的原初营火。 击败公爵的宠儿弗蕾雅后,我们可以点燃最后的原初营火。被传送到麦道夫后,迅速传送回辉石镇的礼拜堂入口营火。 咒术 #13 – 大火球:使用辉石镇钥匙,返回布满蜘蛛的礼拜堂,该礼拜堂位于布满尖刺的桥梁对面。在最初那个有许多掉落公爵蜘蛛的房间里,我们的右侧有一扇锁着的门。穿过第二扇锁着的门后,咒术就在后面的铁箱中。 失落 Bastille: 法术 #20 – Soul Shower:用蝎子女娜吉卡的灵魂和额外1500灵魂从斯垂德处购买。咒术 #14 - 酸液喷吐:使用王室老鼠权威灵魂从史垂德处购买,额外花费1500灵魂。

成就#19 – Smith for Life:继承铁匠麦克杜夫的装备。 此时你可能已经花费了足够的灵魂,或者有足够的地方刷魂,这样我们就能获得麦克杜夫的装备了。在强化或质变上花费14000灵魂后,他会给我们一块楔形石原盘和一个实至名归的成就。

成就#20 - Supreme Weapon:将一把武器强化至极限。 所需材料: 1级:1个楔形石碎片 | 6级:3个楔形石大碎片 2级:2个楔形石碎片 | 7级:1个楔形石原盘 3级:3个楔形石碎片 | 8级:2个楔形石原盘 4级:1个楔形石大碎片 | 9级:3个楔形石原盘 5级:2个楔形石大碎片 | 10级:1个楔形石圆盘 你可能早就解锁了这个成就,但为了保险起见,我还是把它放在了这个流程的末尾。楔形石原盘可以在黑溪谷的吸魂鬼(手 worm 状生物)或法洛斯门径的石像鬼战士处刷取。 冬季神殿: 现在是时候前往多兰古雷格城堡了。探索你尚未去过的区域,或者刷取你需要的剩余法术。然后前往黑森林的废渊分岔路营火,选择左侧路径前往冬之神殿。在这里我们会找到象牙之王DLC的入口,继续前进并一路战斗进入多兰古雷格城堡。 多兰古雷格城堡:(等级95-105) 姿势#10 - 这就是我:打开魔像门后,从主入口进入城堡并上楼。我们会找到韦ladger大臣。耗尽他的对话后,再次与他交谈即可学习他的姿势。如果你选择离线路线,韦ladger是关键NPC。他会在二周目出售我们需要的最终法术,这些法术原本只能通过将特定誓约升到满级获得,这是一个非常方便的替代方法。咒术 #15 - 大火焰风暴:转身回到多兰古雷格正门外面。在大门左侧,靠墙的后方有一个铁箱,里面装有此咒术。也可以从蒂奇·格林处以4800灵魂购买。

成就#21 - Abysmal Covenant:发现深渊契约。 从王门营火出发,你会进入一个满是石像兵和门的房间。要打开这些门,你必须杀死敌人,用他们的灵魂来解锁门。注意,每扇门后都有一个废墟哨兵,且解锁的门会保持开启状态。废墟哨兵也会重生,所以如果打开多扇门,这个房间会变成真正的噩梦。为了安全和获取一些不错的灵魂,我发现逐个击杀它们是最简单的方法,但这非常耗时。该区域共有6扇石门,房间两侧各3扇。 房间最左侧的最后一扇石门,其地板是可塌陷的,通向下方的洞穴。内部有【法汉套装】、【多兰古雷格城下营火】,当然还有【深渊之主格兰德尔】,他会邀请我们加入他的深渊教派。这是一个纯离线誓约,最终会有一场可选的 boss 战,我们需要用其灵魂兑换一个咒术。我们会在变得更强之后再来处理这些,不要进入他打开的传送门。 咒术 #12 - 【静谧深渊】:只要我们遇到过【深渊之主格兰德尔】,就可以在他那里购买这个咒术。此时他会永久出现在我们找到他的三个地点中的任何一个,不再消失。这是一个非常昂贵的咒术,需要花费 13000 灵魂,所以我把它留到了后面。 物品 - 【冻花】:从【王城门营火】出发,打开你右边的第一道石门,然后上楼。你的右侧是持有这把钥匙的骷髅。它能让我们进入【象牙之王】DLC。 NPC - 本哈特 #3:击败双龙骑兵 boss 战后,继续前往中央城堡篝火,你会看到本哈特靠墙坐着。耗尽他的对话后,他会离开,并成为【镜之骑士】的召唤 NPC。 法术 #21 - 灵魂巨剑:离开中央城堡篝火,前往有停用电梯的区域。爬上电梯右侧的梯子,经过有石制士兵的房间。下一个房间里有两个铁箱,该法术在第二个箱子里。 咒术 #16 - 火焰风暴:从这里继续前进,进入有战车战马的大房间。左侧上楼,在顶部右转,尽头的宝箱里有这个咒术。或者,可以从蒂奇·格伦处花费4500灵魂购买。 法术22 - 强力魔法盾:启动电梯后,乘电梯到顶部。进入房间,左侧的宝箱里可以找到这个法术。也可以从纳夫兰或斯特雷德处花费6300灵魂购买。 国王通道:(等级105-110) NPC - 本哈特#4:与本哈特的第二次 boss 战是对阵镜之骑士。他的召唤印记位于 boss 雾门外侧右侧。

成就#22 - Looking Glass Knight:击败镜之骑士。 这将是一场具有挑战性的 boss 战,战斗中途,如果你在线游玩,他会从盾牌中召唤一个敌人幻影或入侵者。镜之骑士对暗属性、毒属性、剧毒属性以及打击伤害较为脆弱。 法术#23 - 灵魂箭:击败镜之骑士后,在电梯前左转,会看到一个宝箱,里面装有该法术。 流程10:王冠之重 1.完成阿玛那祭坛、不死人墓穴和安迪尔馆 2.姿势:11/12 3.奇迹:22/28 4.法术:25/31 5.咒术:18/24 6. hexes:13/23 7.成就:24/38 阿玛那祭坛(等级105-110) 奇迹#19 - 阳光之剑:进入该区域后,走到中途会来到“崩塌遗迹”营火。从营火出发,沿着水边向右走,直到在一排石柱附近发现一个食人魔。继续沿着这些石柱向右走,踏上一条狭窄的步道(注意脚下!),在步道尽头的宝箱中可以找到这个奇迹。 咒术#17 - 火焰风暴:在与石柱相同的区域,有一座大型鹅卵石小屋和一排石拱门。从这座小屋的右侧出发,经过一群诅咒瓮,朝着水边前进。在悬崖边缘的某个位置,有一个铁宝箱,里面装有这个咒术。法术#24 - 追踪结晶灵魂块:从罗伊的休息处营火出发,你会遇到一个有法师和古龙朝圣者的大型圆形区域。我们会在后方左侧的一根断柱上找到这个法术。 不死人墓穴:(等级105-110) NPC - 阿格戴恩#1:当我们深入不死人墓穴时,最终会进入一个房间,里面有人会喊不要“产生光亮”。我们会在右侧的楼梯上找到这个NPC。确保在通过这个区域时不要拿出火把,因为如果我们带着光亮接近阿格戴恩或他的手下,他会变得敌对。他会卖给我们一些东西,并且会成为该区域 Boss 的可选召唤 NPC。 动作#11 - 求饶:听完阿格戴恩的所有对话后,再次与他交谈即可学习他的动作。咒术#18 - 温暖:可从阿格莱因处花费5200灵魂购买。 物品 - 破碎的眼球:经过阿格莱因并进入有桥梁向前延伸的巨大区域后,从桥梁旁的左侧直接跳下。那里会有两个游魂和一具尸体。沿着这条路我们会来到一个可以攀爬的梯子(注意墙壁幽灵)。顶部有一个宝箱,里面装有破碎的眼球。这是一个重要物品,能让我们回到 Majula 时入侵莉西亚。除非已从她那里购买了所有需要的物品,否则不要这样做! Boss - 王盾韦施塔德:我们需要这个 Boss 的灵魂来兑换“神圣誓约”奇迹。

成就#23 - King's Ring:获得王之戒指。 击败BOSS韦施塔特后,我们可以在一个大房间里发现王多兰古雷格游荡。他没有敌意。王之戒指可以在他堆放在后角的装备上找到。之后我们会将他作为隐藏BOSS击杀,但在此之前需要收集5个巨人灵魂来降低他的生命值。 失落 Bastille: 奇迹#20 - 神圣誓约:将韦施塔特的灵魂和3000灵魂交给斯垂德,我们可以获得这个奇迹。 Majula: 奇迹#21 - 抚慰阳光:如果你已经从莉西亚那里购买了8个奇迹以及其他需要的物品,现在我们可以使用找到的破碎眼球宝珠入侵她。她实际上出乎意料地难对付,但一旦我们杀死她,就会获得抚慰阳光奇迹。这将把她从本场游戏中移除,如果你尚未获得【Gathering of Exiles】成就,此操作将导致该成就失效。 亚尔迪那的居所:(等级110-120) 返回黑森林的废路营火,现在沿着最后一条未探索的道路前往亚尔迪那的居所。

成就#24 - Lucatiel:继承蜜拉的露卡提耶的装备。 当你通过通往城堡的国王之门进入后,前往该区域左侧的一个小木棚。里面有前庭营火以及我们与露卡提耶的最后一次见面。如果你还没有和她一起完成3场 boss 战,不要和她对话,否则她会从游戏中消失,你将不得不在二周目重试。如果需要,我们可以使用营火的余烬来刷与她一起的 boss 战(我建议打灵活哨兵)。如果你已完成所需的战斗,与她对话,她会给我们她的装备和该成就。 咒术#13 - 亲和:这个咒术由在前庭营火外四处奔跑的狗头人(毛茸茸的猴子样生物)掉落。这些敌人很适合刷取,因为它们会掉落大量稀有物品,比如黑骑士装备。这些装备也可以从斯特雷德处花费11500灵魂购买。 NPC - 纳瓦兰#1:进入要塞后,你会看到一具巨大的龙骨架。在骨架下方右侧,有一个名为纳瓦兰的NPC被屏障挡住。当我们处于 Hollow(游魂)状态时,他会交给我们4个暗杀任务,目标是我们遇到过的一些NPC。现在先别管他,你可以选择接受第一个任务,但我们会在游戏接近尾声时再完成这些任务,因为我们还需要这些NPC活着来完成成就。另外,【绝对不要把他从监狱里放出来】。如果放了他,他不仅会在游戏中的随机地点入侵我们,还会导致无法完成他提供的任务。奇迹#22 - 大魔法屏障:从纳瓦兰出发,走上第一段楼梯,然后直走到一个满是镜子的区域。转身向右走,经过一只红色水晶蜥蜴,走到尽头会发现一个箱子,里面装有这个奇迹。或者,可以从韦拉杰处花费9300灵魂购买。 法术#25 - 灵魂喷涌:下一个法术位于走廊尽头,走廊上方有许多关着怪物的笼子。走廊左侧墙壁上有一扇门。进入后下楼梯,直到找到一个充满酸液的笼室。脱下装备进入酸液池,在右侧的尸体上可以找到该法术。 流程11:远古巨龙 1.完成龙巢与龙殿 2.誓约:古龙誓约 3.动作:11/12 4.奇迹:22/28 5.咒术:26/31 6. pyromancy:18/24 7. hexes:13/23 8. 成就:26/38 --------------------------------------------------------------------------------------------------- 龙巢:(等级110-120) 此区域没有法术或成就。继续前进直到抵达龙圣堂。 龙圣堂:(等级110-120) 物品 - 石化蛋:从圣堂入口营火出发,走上几级台阶,直到到达一个左侧有小桥的高原区域。穿过小桥,径直向前打破堆叠的箱子进入下方缺口。穿过下层区域,经过龙卫骑士,进入一座塔。进入塔后,会被名为龙牙维拉德的灵体入侵。在楼梯顶端,我们会进入一个房间,里面有一个幻影守卫着一座祭坛。石化蛋就在这座祭坛上;这是一个誓约物品,我们需要把它带回钢铁要塞交给马杰洛。 法术26 - 结晶魔法武器:收集到石化蛋后,前往俯瞰龙祭坛的阳台。阳台下方有一个小平台,我们可以跳下去。在平台右侧,有一个宝箱,里面装着这个法术。

成就#25 - Ancient Dragon:获取灰雾之心。 在通过这个区域后,我们会发现一条巨大的龙躺在平台上。与它对话并获得灰雾之心。 物品 - 巨人之魂#2:远古巨龙是一个可选的Boss战,难度非常高。击败它会获得第二个巨人之魂,但如果有哪个灵魂可以不收集的话,就是这个了,4/5个灵魂已经足够。当我们去挑战王多兰时,背包里每拥有一个巨人之魂,就会降低他的最大生命值,否则他会非常难对付…… 如果你决定挑战它,就在巨龙后脚的脚趾之间来回跑动。根据武器速度,以三或四连击进行攻击,在巨龙的脚试图踩踏你之前跑到下一只脚的位置。它的火焰吐息是即死攻击,当巨龙升空或抬起前身时,尽快跑到它的尾巴后面。这是一场耐力之战;它对魔法和雷电攻击较为脆弱。远古巨龙拥有巨大的生命值,最好携带修理粉……或者备用武器。 钢铁要塞:

成就#26 – Covenant of Ancients:发现一个古老誓约。 返回钢铁要塞的马杰洛处,将我们收集到的石化蛋交给他。这将解锁古老誓约并获得一个成就。 序列12:诸王之死 1.完成瓦马尔的回忆、杰的回忆和奥罗的回忆 2.手势:12/12 3.奇迹:22/28 4.法术:26/31 5.咒术:18/24 6.暗术:13/23 7.成就:30/38 ----------------------------------------------------------------------------------------------------- 巨人陨落之森: 现在我们拥有了灰雾之心,可以开始进入沉睡巨人的回忆了。当我们进入一段回忆时,只有5分钟时间,之后回忆就会消散,因此可能需要多次尝试才能完全探索每一段回忆。前往巨人陨落之森的【 Cardinal Tower 篝火】。从篝火出发,前往我们找到帕特附近的区域,然后进入有爆炸桶和皇家士兵掷弹兵的大片区域。从该区域向右走,就能找到我们遇到的第一个沉睡巨人——瓦马尔。 瓦马尔的回忆:(等级 120-125) NPC - 德拉蒙德 #1:使用灰雾之心进入梦境,开始通过该关卡。在到达我们必须打开的木门之前的最开始附近,会有一个穿着多兰古雷格套装的男人躺在地上,周围有许多死去的皇家士兵。与他对话并听完所有台词,之后我们可以从他那里获得一个成就…… 动作 #12 - 欢呼!如果你已听完德拉蒙德的所有对话,他就会教我们这个动作。这应该是我们要学的最后一个动作了……太棒了!

成就:Gesture Maestro:学习全部20种手势,其中8种在游戏开始时已解锁。 道具:巨人之魂#3:一路战斗穿过该区域,经过士兵与巨人混战的地方。从该区域后方的大型石制建筑出来后会看到一条河。向左走并登上一段石阶,经过一名双持巨棒的巨人。在一扇木门旁有一具死去的巨人,其紫色的手中握着巨人之魂。拾取它并离开瓦马尔的回忆。 奥罗的回忆:(等级120-125) NPC:本哈特#5:前往追击者的旧 boss 房间。在房间后端,坐在下一个沉睡巨人附近的就是本哈特。与他对话并耗尽所有对话内容。NPC - 本哈特 #6:现在使用【灰雾之心】并进入【奥罗的回忆】。我们现在可以在这里找到本哈特……不知为何……就在我们的出生点附近。与他对话并听完所有对话。 物品 - 巨人之魂 #4:离开你开始所在建筑的下层,前往庭院的尽头,那里有王室士兵正在与巨人战斗。在最里面的墙边,向左走,会有一小段石阶,沿着石阶上去可以找到另一具巨人尸体,上面持有【巨人之魂】。 【杰格的回忆】:(等级120-125) NPC - 本哈特 #7:从【红衣主教塔篝火】出发,下梯子并穿过火蜥蜴坑上方的石桥。用【士兵钥匙】打开一扇木门,再穿过一扇【国王之门】,我们可以找到一个新的篝火。这里就是那片不为人知之地(不过现在我们知道了),也是最后的沉睡巨人所在之处。进入这里会带我们前往杰格的回忆,在那里我们必须与巨人王战斗。这里有两个召唤符:本哈特和德拉蒙德队长。我们不能同时召唤他们,所以这次只召唤本哈特。 首领——巨人王:我们需要这个首领的灵魂来兑换“斥力咒”。 物品——巨人之魂#5:击败巨人王后,沿着新开启的楼梯向下走,然后左转。你会在角落里的一具尸体上找到最后一个巨人之魂。现在我们准备好挑战王多兰了。 奥罗的回忆:

成就#28 – Moonlight Greatsword:继承尤果的本哈特的装备。在与本哈特一同击败巨人王之后,返回欧罗的回忆,会发现本哈特仍坐在那里。与他对话,如果他在三场 boss 战中被召唤且存活,他就会将所有物品交给你。 游戏中还可以再召唤他两次,所以只要赢得三场战斗,就回到这个回忆处获取成就。不过这些都是非常困难的 boss。如果你还需要他在战斗中存活,可以使用营火的余烬让已击败的 boss 重生,并召唤他参与战斗(最简单的是徘徊术士)。 瓦马尔的回忆:

成就#29 - Holder of the Fort:继承德拉蒙德队长的装备。既然我们已经击败了巨人王,现在返回【瓦马尔的回忆】并再次与德拉蒙德对话。他会给予我们他的装备并解锁该成就。 巨人陨落之森: 道具 - 沉重铁钥匙:当我们在该区域时,不妨拾取这个关键道具以进入钢铁之王DLC。返回【 Cardinal Tower 篝火】。确保装备防火物品/装备以及【银猫戒指】,我们要跳入火坑! 如果可以的话,尝试从 ledge 上先用法术或弓箭击杀唯一可见的火焰蜥蜴。沿着这个 ledge 向左走,跳下到一个大型木制障碍物上以减轻坠落伤害。现在前往坑洞的后右角,进入下方的下一个区域,途中会经过另一只火焰蜥蜴。最好直接跑过去,这些家伙战斗起来非常烦人。你会进入一个巨大的房间,里面还有另外两只火焰蜥蜴。在这个房间的左角有一个壁龛,里面有一具骷髅,拿着【沉重铁钥匙】和【叛逆者大盾】。 不死人墓穴:

成就30 - Vendrick:击败Vendrick。 当我们收集到全部5个(或4个)巨人灵魂后,就该面对被遗忘的多兰古雷格之王了。背包里携带巨人灵魂会大幅降低他的最大生命值。他行动非常缓慢,但一旦击中你,伤害依然很高。这场战斗无法召唤帮手;他弱出血。 阶段13:渴望王座 1.完成远古暗穴和渴望王座 2.姿势:12/12 3.奇迹:22/28 4.魔法:26/31 5.咒术:18/24 6.暗术:18/23 7.成就:32/38 远古暗穴:黑溪谷(等级125-130) 现在是时候开始暗之朝圣者誓约任务了。前往黑溪谷的隐藏洞窟营火,爬下悬崖找到格兰达尔。记得带上大量人性沉淀物和火焰蝶。让格兰达尔开启通往远古暗穴的传送门,开启传送门需要消耗1个人性沉淀物,死亡后传送门将关闭。 黑溪谷容器:进入远古暗穴,一路击败黄王咒术师和铁壁幻影。沿着洞穴顺流而下,到达岔路口时左转。你会在洞窟深处找到容器,绕到侧面用火炬点燃它。 咒术#14——共鸣灵魂:完成第一个暗之朝圣者任务后与格兰达尔对话。该咒术通过达成誓约的1级 rank 获得。或者,可以从费尔金处以1100灵魂购买。 黑暗深渊:多兰古雷格(等级125-130) 多兰古雷格容器:传送到多兰古雷格城下营火,前往格兰达尔处。这绝对是所有深渊中最难的一个。穿过被淹没的区域,击败两个幻影和女巫树之灵。在第一个区域的左侧有一条隧道,沿着拐角走就能找到第二个容器。如果你使用奇迹,【强力灵魂奔流】奇迹非常有用,可以将幻影轰下悬崖,而不必正面战斗。 黑暗深渊:黑森林(等级125-130) 黑森林容器:传送到黑森林遗迹营火,下到石化蜥蜴洞穴中找到格兰达尔。在深渊中,击败前两个幻影和女巫树之灵,容器就在同一房间的左侧。乘坐电梯下去,击败最后一个幻影即可离开深渊。 boss——暗黑潜伏者:点燃所有3个容器后,当你准备离开最后的深渊时,会被暗黑潜伏者拦截。如果想达到暗黑朝圣者的3级 rank,就需要击败他。暗黑潜伏者对雷电和火焰伤害非常脆弱。这是一个极具挑战性的 boss,除了 dlc 外,它是游戏中最难的 boss。 解锁他之后,现在可以在三个古老深渊中的任意一个挑战暗黑潜伏者,我发现其中最简单的是虚影森林的传送门。我们需要这个 boss 的灵魂来兑换吸魂妖术。咒术15 - 强力共鸣灵魂:通过达成暗黑朝圣者契约2级获得。点燃所有3个容器后返回格兰达尔,他会授予2级契约并奖励此咒术。此外,也可从费尔金处以3400灵魂购买该咒术。 咒术16 - 高潮:通过达成暗黑朝圣者契约3级获得。击杀暗潜伏者后返回格兰达尔,即可将该契约升至满级。

成就#31 - Selfless Giver:将任意誓约的奉献值提升至最高。 达成任意誓约的3级 rank。可以通过任意誓约完成,但建议通过深渊誓约来完成,因为我们需要暗潜伏者的灵魂来达成另一个成就。 失落 Bastille: 咒术#17 - 击退:使用巨人王的灵魂,向斯特雷德兑换此咒术。额外花费5000灵魂。 咒术#18 - 吸血流星:使用暗潜伏者的灵魂,向斯特雷德兑换此咒术。额外花费5000灵魂。 渴望王座:(等级130) NPC - 本哈特#8:还需要本哈特?是的,如果你到目前为止还未获得月光大剑成就,在渴望王座的 Boss 房外,我们可以召唤本哈特协助我们。如果他存活下来,这将计入他必须经历的三场战斗。只需返回奥罗的记忆(追击者 boss 房间的后端)与他对话即可。

成就32 - The Heir:观看结局。 完成本体游戏并击败最终Boss后,游戏不会结束。 credits滚动结束后,我们将回到蜜酒镇,继续进行三个DLC的内容。在蜜酒镇的营火处,你可以选择开始二周目。显然,在完成本次游玩之前不要选择它。 序列14:沉王的王冠 1.完成圣所之城舒尔瓦 2.奇迹:23/28 3.法术:29/31 4.咒术:19/24 5.暗术:20/23 6.成就:33/38 ----------------------------------------------------------------------------------------------------- 蜜酒镇:

Achievement #33 – Curious Map: Light all flames on the map in Majula. After deciding the fate of the Throne of Want, return to Cale in the abandoned manor in Majula. When you speak with him, the Achievement should unlock. If you followed the guide up to this point, we should have met all the prerequisites for this Achievement. Just in case, the Bonfires we need to have lit & bosses/items found are: 1.Forest of Fallen Giants: Cardinal Tower Bonfire & the Last Giant 2.Sinner’s Rise: The Saltfort Bonfire & the Lost Sinner 3.Black Gulch: Hidden Chamber Bonfire & the Rotten 4.Iron Keep: Eygil's Idol Bonfire & the Old Iron King 5.Brightstone Cove: Lower Brightstone Cove Bonfire & the Duke's Dear Freja 6.Undead Crypt: Undead Ditch Bonfire & collecting the King's Ring 7.Dragon Shrine: Shrine Entrance & collecting the Ashen Mist Heart 8.Drangleic Castle: King's Gate Bonfire & Throne Watcher/Throne Defender Aldia’s Keep: NPC – Navlaan #2: Now it is finally time to work for Navlaan. Warp to the Foregarden Bonfire & go speak to Navlaan through his prison. He will only offer you his quests if you are Hollow. Navlaan Quest #1: Bring the Ladder Miniature to Navlaan, either kill Laddersmith Gilligan for it or buy it from him for 6399 souls. Navlaan Quest #2: Bring Cale’s Helmet to Navlaan, either kill Cale the Cartographer for it or receive it from him after completing the Curious Maps Achievement. Navlaan Quest #3: Bring the Sunset Staff to Navlaan, either kill Felkin the Outcast for it or exhaust all his dialogue if you have 20 Int & 20 Faith. If you have all the Spells you need from him, Felkin has lived out his usefulness… Pyromancy #19 – Forbidden Sun: Received from Royal Sorcerer Navlaan after completing his third quest. He will give you this if you show him the Sunset Staff from Felkin the Outcast. Navlaan Quest #4: Bring the Aged Feather to Navlaan, either kill the Emerald Herald for it or if you spoke with her in the Dragon Aerie, we will have received this through the story. Sorcery #27 – Unleash Magic: Received from Navlaan after completing his final quest. Show the Aged Feather to Navlaan for the Sorcery. Sorcery #28 – Hidden Weapon: Obtained by reaching Rank 2 in the Bell Keeper Covenant. This can be obtained Online or Offline. To do this Online, kill 30 Invaders &/or by Invading & killing 30 hosts in the two Belfry areas. You have to wear the Bellkeeper ring to be Summoned into a Belfry. For the Offline method you need to kill the Red Phantom known as Mad Warrior 30 times. Sounds simple enough, except for when you realize that he only has a chance to spawn. A small chance. To spawn. He can be found in Belfry Sol & will spawn around the corner to the left near the Bell Tower. This takes a long time, unfortunately this is the method I chose to do. Wearing the Delicate String ring purchased from Titchy Gren for 20,000 souls will increase your chances of being Invaded by Red Phantoms. 70% of the time when you head to look for him, he is not going to be there. To save time, if you have 13 Faith, you can use the Unveil Miracle which will locate nearby enemies. It won’t work if there are still Bell Keepers around or enemies in the immediate area of Iron Keep. Farm out the Alonne Knights in Iron Keep near the Bonfire & the Bell Keepers above then equip Unveil. From the Belfry Sol Bonfire cast Unveil; if the light just floats straight above you without any direction, he is not there. Reset at the Bonfire & try again; if the light arcs towards the ladder & looks like it is homing in on something, the Mad Warrior has spawned. There is a lot of speculation on how long this should take. Some people say they have killed him 30 times for 30 minutes of farming to 2 hours of farming. Me, I have 100% Dark Souls 2 three times now & every time I go to get this Sorcery it takes me a very, very long time. Stick with it, & eventually after 30 kills you will Rank up. Be sure to keep track how many times you kill him because the game won’t. If in doubt periodically talk to the little Bell Keeper at the top of the Belfry Sol ladder to see if you have Ranked up. After reaching Rank 2, you will be rewarded with the Hidden Weapon Sorcery. It was brought to my attention that there is an extremely useful strategy for farming the Mad Warrior on Fextralife involving playing in Windowed Mode & the Windows Task Manager tool. Using this method should allow you to know if the Mad Warrior has spawned without actually climbing up the abysmal ladder a million times to check physically. https://darksouls2.wiki.fextralife.com/Mad+Warrior I will be testing out this method out personally in the next few weeks to give a more detailed description for the guide. Massive thanks to the Achievement Hunter, Menace123, for bringing this to my/our collective attention!!! Shulva, the Sanctum City: (Level 130-140) It is now time for us to begin the Crown of the Sunken King DLC. Travel to the Hidden Chamber Bonfire in Black Gulch & head to the room with the Primordial Bonfire. Use the Dragon Talon (found in the Majula Pit behind a Forbidden Door) & begin the DLC. Hex #19 – Promised Walk of Peace: From the Sanctum Walk Bonfire, head down through Shulva. Follow all the stairs down until you reach a long, winding pathway made of stone leading to a lone tower. Fight your way to the end of the pathway & stand outside the broken tower with the Poison Statue inside it. Across from the tower entrance on your right is a line of statues with red eyes, below them is a platform you can drop down to. From below, look back up to the statues & shoot the wedge-shaped switch. It will raise the platform you’re on & from there you can now enter a secret cave. Head past the three Poison statues & you will find a strange tree. The Hex is found on one of the two corpses found to the left of the tree. Sorcery #29 – Focus Souls: Make your way to the large bridge that leads to Dragon’s Sanctum (where Sinh the Dragon shoots fireballs at it) & head to the right of the bridge through the urns. Follow the ledge along & you will find the Sorcery on a corpse hanging off of the ledge. Miracle #23 – Denial: In Dragon's Sanctum, head to the two floored room filled with spikes. From the stairs leading down into the room, follow the path along till you find a circular door in the right corner. Shoot the switch through that door three times to open the path into the room behind it. The Miracle will be in a chest. Hex #20 – Dark Greatsword: In the upper floor of this room, you will find a path that brings you into a room with a lot of Ghost Sanctum Knights & their corpses. On a loot-able body in one of the wall sarcophaguses you will find Eternal Sanctum Key. Return to the Tower of Prayer Bonfire & head back across the bridge to the Dragon’s Sanctum. As soon as you enter, open the locked door on your left using the key & make your way up the first two ladders. Defeat the Red Phantom Invader & find the Priestess’ Chamber Bonfire across the bridge. Across from that Bonfire, hit the wedge-shaped switch close by & activate the elevator. Ride down it & roll off it when the room opens up & you see a ledge. Follow the path to the left & head down around the building to find a secret room with a with this Hex inside a chest. That is all the Achievement related business to be done in Shulva. Beat as far as you like/can… Sequence 15: Crown of the Iron King 1.Complete Brume Tower 2.Miracles: 23/28 3.Sorcery: 29/31 4.Pyromancy: 22/24 5.Hexes: 21/23 6.Achievements: 33/38 ----------------------------------------------------------------------------------------------------- Brume Tower: (Level 140-150) When you are ready to begin the Crown of the Iron King DLC, make your way to the Primordial Bonfire in Iron Keep. Using the Heavy Iron Key (found in the bottom caves of the Fire Lizard pit in Forest of Fallen Giants) you can enter the DLC. Smelter Wedges #1-6: In this DLC, we need to collect all 12 Fragments of Nadalia’s Boss Soul to trade in to Straid for a Pyromancy. The fragments are found in Ashen Idols which can only be destroyed by using a Smelter Wedge. The first six Wedges are found right before crossing the iron chain into Brume Tower. Soul Fragment #1: From the Throne Floor Bonfire, head up the stairs & into the throne room. Use a Smelter Wedge & destroy the Ashen Idol to claim our first Fragment. Soul Fragment #2: Make your way down from the Throne Floor Bonfire now & climb down some ladders. Climb down a larger ladder & you will enter a room with the second Ashen Idol. Be careful, the Idol buffs nearby enemies making them a lot stronger. Either rush the Idol & destroy it or try luring the enemies away from the Idol before attacking. Pyromancy #20 – Dance of Fire: In the same room as Soul Fragment #2, turn back around to the ladder & head into the room on the left. There will be a corpse in the back that is holding this Pyromancy. Soul Fragment #3: From the Upper Floor Bonfire, head through the Fog Gate & down into the large room with the huge Iron Warrior in it. The third Ashen Idol is in the center of this room & will buff the enemies in it if not taken care of. Hex #21 – Recollection: From the Foyer Bonfire, head through the room to your right & make your way outside across an iron chain to a small tower. You will climb down & have to fight off a Red Phantom Invader, this can be a really challenging fight. In this room there is a ring of doors in the wall. From the broken ledge facing back towards the doors, head to the second door from the right (adjacent to the ladder) & you will find a corpse with this Hex on it. Beware opening all the doors as they will be permanently open, some have quite a few annoying enemies behind them… Item – Tower Key: After using the Scorching Scepter to activate all the elevators, take the lift down & head to the ashen cliff outside. There are three Iron Warriors in this room so be weary. The key is found at the far end of the cliff behind the massive mace wielding Iron Warrior. Item – Hollow Skin: To find some items in this DLC we will have to enter areas that are full of Hollowing Gas created by certain Ashen Idols. While wearing the Hollow Skin you no longer can be affected be Curse. From the Foyer Bonfire after using the Scorching Scepter, take the lift up. As soon as you get off the lift there will be another smaller elevator in front of you. There is an Illusionary Wall in the center of the elevator shaft near the bottom. Keep interacting with the wall in between the two elevator wheels to open the door. The Hollow Skin will be found in a chest. Soul Fragment #4: Return to the Foyer Bonfire & open the door behind where you placed the Scorching Scepter with the Tower Key. This area is filled with Hollowing Gas & the Hollow Skin can come in handy for this, but it is not mandatory. The fourth Idol is behind the locked door down the stairs & to the left. Pyromancy #21 – Fire Snake: In the same area at the opposite end (right side) there will be a doorless room with a chest containing this Pyromancy. Soul Fragment #5: From the Foyer Bonfire, head back up the first lift & follow the circular ledge around & it will take you to another elevator. Across from it at the far end is a locked door. Cross the gap & you will enter a room with an Iron Warrior & four doors. The fifth Ashen Idol is in the third door from left to right. Smelter Wedges #7-10: In the same area above the Foyer Bonfire, head up the small elevator we found the Hollow Skin on & take it to the top. Take the path right & you will come to an iron door. Inside & up the second floor will be 4 more Smelter Wedges in a chest at the end of the hall. Soul Fragment #6: Head back to the small elevator we came up & head across to the locked door on other side. Use the Tower Key & head up the next elevator. The sixth Ashen Idol will be found in the area where you are invaded by the Prowlers, on the way to the Smelter Throne Bonfire. Soul Fragment #7-10: From the Foyer Bonfire take the lifts down & carry on through the DLC until you are outside the large boss room. The next four Ashen Idols are around the outside of the room before you enter it, they will heal the boss during the battle if he approaches them. There are two Idols on either side of the Fog Gate. Boss – Fume Knight: We will receive a Soul Fragment for defeating this boss. He is weak to nothing, & has resistances to Lightning, Fire, Magic, Dark, Slash, & Thrust. The offline Summons are next to useless, if you can find an online Summon it could be handy. More often then not, you will have to defeat him on your own. Good luck. Soul Fragment #11: The next Soul Fragment is dropped by the Fume Knight. He is a very difficult boss to fight, possibly the hardest boss in the game. Smelter Wedge #11: Once the Fume Knight is dead, we will now have access to a secret area within the DLC. Head to the Smelter Throne Bonfire & enter the suit of armor’s Memory of the Old Iron King using the Ashen Mist Heart. After the boss fight of this area, head into the small room off the right & examine the chair to receive the final Smelter Wedge. Soul Fragment #12: Return to the Foyer Bonfire & take the stairs on your left leading up out of the room. At the top of the stairs will be a railing & another set of stairs leading down to a cliff edge. Out here, you can see a large iron chain spanning over to a broken tower. The final Ashen Idol is near the bottom of this tower, it can be very difficult to get to without the Hollow Skin. The Idol will curse you, & buff enemies health/damage as well as revive them until you destroy it. There is a Red Phantom Invader at the top of the tower near where you get off the iron chain, be careful. Lost Bastille: Pyromancy #22 – Outcry: With all 12 Soul Shards collected you will receive the “true” boss soul, the Soul of Nadalia – Bride of Ash. Return to Straid in Lost Bastille along with a whopping 45,000 souls to purchase this Pyromancy. Sequence 16: Crown of the Ivory King 1.Complete Frozen Eleum Loyce & NG 2.Miracles: 24/28 3.Sorcery: 30/31 4.Pyromancy: 22/24 5.Hexes: 22/23 6.Achievements: 33/38 ----------------------------------------------------------------------------------------------------- Frozen Eleum Loyce: (Level 150-160) With Brume Tower completed we enter the final DLC of the game, The Crown of the Ivory King. Warp to the Ruined Fork Road Bonfire in Shaded Woods & make your way to the Shrine of Winter to enter the DLC with the Frozen Flower. Hex #22 – Dark Dance: After the second Bonfire, follow the snowy path up until you reach a set of stone stairs. From there turn right & head down a small path between the buildings that leads to an overlook. Head right again & slip back between the buildings. The Hex will be found on a corpse up the path leading to two Retainer Rogues. Sorcery #30 – Soul Flash: Eventually, you will reach a part of the walls that has ballistae on it. Carry on until a Rampart Spearman ambushes you from a small room on the left. In that room is a lever that will lift up an elevator holding some coffins. This just opened a secret room for us. Warp back to the Outer Wall Bonfire & fight through the first three enemies of the DLC. In the room with the lit torch there is a small hall on the right where the elevator used to be. At the end of the hall is an iron chest with this Sorcery in it. Miracle #24 – Splintering Lightning Spear: After collecting the Eye of the Priestess return to the second Bonfire. Make your way back to the same area we found that lever for the elevator past the ballistae wall. Instead of heading down the stairs where we found the Eye of the Priestess, take the stairs leading up to the tower. On the backside we can now see a ladder which will take us up to a room with an iron chest that has this Miracle. Item - Symbol of Avarice: Our final Item to collect is the Symbol of Avarice. After we speak with the Ivory Queen, Aslanna, the blizzard around Eleum Loyce will cease. Go to the Inner Wall Bonfire, & pass down the hall into the first room where the Retainer Sorcerers & Crystal Golems are. Here we can find some Chest, one of which will be a Mimic so be careful. Kill the Mimic, & we will receive this Helmet that will boost are Item Discovery by a lot... this will be relevant later on. That is the last Achievement related item found in this DLC. After you finish with the DLC, double check to make sure you have completed everything up till this point. If you missed any NPC quests or Spells, you have an entire other playthrough you can try again & grab anything you missed. Sequence 17: The Next Monarch 1.Complete NG+ 2.Miracles: 26/28 3.Sorcery: 31/31 4.Pyromancy: 23/24 5.Hexes: 23/23 6.Achievements: 35/38 ----------------------------------------------------------------------------------------------------- Lost Bastille: Ring - Covetous Gold Serpent Ring +2: We will receive this Ring upon killing the Belfry Gargoyles in NG+. Once again, this will be an invaluable farming Item that will help us out when it is time for the final grind. Sinner's Rise / Lost Bastile NG+ Pyromancy #23 – Flame Weapon: Purchased from Straid with the Old Witch Soul for killing the Lost Sinner on NG+. It will cost an additional 10,000 souls. Black Gulch / Lost Bastile NG+ Hex #23 – Numbness: Using the Old Dead One's Soul we acquired for killing the Rotten in NG+, we can now trade this in for the final Hex. It will cost an additional 5000 souls.

成就#34 – Master of Hexes:学习全部23种咒术。获取斯特雷德的最后一个咒术后解锁。钢铁巨偶/失落 Bastile NG+ 奇迹#25 – Blinding Bolt:使用在NG+击败钢铁之王获得的老王之魂可兑换该奇迹,额外花费10000灵魂。辉石镇盖多勒/失落 Bastile NG+ 法术#31 – Crystal Soul Spear:在NG+击败公爵的亲爱弗雷娅获得古龙之魂后,可向斯特雷德购买该法术,额外花费10000灵魂。

Achievement #35 – Master of Sorcery: Learn all 31 Sorceries. This will be unlocked after giving the Old Paledrake Soul to Straid, the final Sorcery we need. Brightstone Cove Tseldora: Farming Sunlight Medals: This is when I farmed for this, but this could take you well into NG++ depending on which method you decide to use. Online is pretty straight forward, just pay attention to your Soul Memory & place your Summon Sign in high traffic areas, typically outside DLC boss rooms. Other good locations for Boss summons are the Demon of Song, Guardian Dragon, & the bridge approach to Undead Purgatory/Executioner Chariot. Offline is a whole other beast, & requires a few hours of farming. For farming gear set up you will want: The Watchdragon Parma (+50 ID) which is found in a Chest just outside/before entering the Blue Cathedral (+50 ID), Covetous Gold Serpent Ring +2 (+100 ID), the Jesters Cap (+50 ID) sold by Magerald of Lanafir at Iron Keep, Prisoner's Tatters (+50) which is dropped by Hollow Prisoners found all across the game (The Gutter, Harvest Valley, Huntsman's Copse, Grave of Saints, etc.), & lastly the Rusted Coin consumable which gives us a temporary (+100 ID). When farming, it is best to join the Covenant of Champions so that the enemies do not despawn & you have to use Bonfire Ascetics. The only two enemies that drop Sunlight Medals are the Dark Giants in Harvest Valley (bad to farm) & the Falconer's found in Things Betwixt (4 Falconers), Shaded Woods (3 Falconers), & Brightstone Cove Tseldora (6 Falconers). The Falconers at the Royal Army Campsite Bonfire are the best to farm since there are 6 potential chances for a drop. This... will still be a grind. Harvest Valley: NG+ Miracle #26 – Sunlight Spear: Requires Rank 3 in Heirs of the Sun Covenant, which requires 30 Sunlight Medals. After you have painstakingly farmed your Sunlight Medals, we can now acquire this Miracle at the Sunlight Altar in Harvest Valley. That is all we can do on NG+, now either playthrough the rest of the game at your own pace or speedrun to NG++. Offline Sunlight Farming for Dark Souls 2 (Original) Users: This is a special note for any who are using this guide while playing the Original Dark Souls 2 (not Scholar of the First Sin Edition). Our best farming location in Brightstone Cove does not exist & you are forced to go to less than ideal locations for farming... making a bad situation worse. SpaghettiBird came up with the best strategy I've heard, but it does require some pre-planning & us entering into NG+ (or NG++, etc.). Before entering NG+ be sure that: you are a part of the Covenant of Champions (most important preparation!), the Ring of Binding (also very important), you have all your Item Discovery farming Items in your Inventory, a stockpile of Rusted Coins (optional but still very useful), & the Aged Feather. Also be sure to equip whichever Spells/Miracles you want as we will not be able to change them once we begin. With all these preparations, double check, & enter into your next NG. When you spawn, we will be surrounded by 4 Falconers. Kill them, & do not speak with the Firekeepers or light the Things Betwixt Bonfire! Instead, use the Aged Feather right afterwards, & we will respawn back at the central stone dais where we first started with the 4 Falconers respawned. This is your new grind: kill Falconers, use Aged Feather to respawn them. This is by far the fastest method for farming Sunlight Medals since the Covenant of Champions makes them infinite. A caveat to this method, is that using the Aged Feather will not recharge your Spells or Estus Flasks. The only way we can do this is through death, which is why the Ring of Binding is important to lessen our Hollowing. Sequence 18: Requiem of the First Sin 1.Complete NG++ Mop Up 2.Miracles: 28/28 3.Pyromancy: 24/24 4.Achievements: 38/38 ----------------------------------------------------------------------------------------------------- Our final order of buisness for NG++ (apart from mopping up any Achievements you may be missing) will be to purchase our last Miracles & Pyromancy from Chancellor Wellager in Drangelic Castle. Unfortunately, we need to pass through The Shrine of Winter to reach him. Naturally, we have to defeat all four Great Ones over again, but there is a workaround we can do instead. Instead of defeating the four Great Ones to unlock it, you can accumulate enough souls & bypass it. The caveat is that we need a cumulative total of 3 million souls collected on this playthrough for them to open; not 3 million Soul Memory, the souls have to be collected during this current playthrough. It is also accumulative 3 million souls; you do not need to have 3 million on you at the same time. The best possible way to farm souls is actually accessible right from the start of the game, or close enough. It is farming the Rotten down in Black Gulch & using Bonfire Ascetics to keep respawning him. Depending on the farming gear you have equipped, he gives you around 200,000 - 310,000 souls per kill at Bonfire Level 8; around 10-15 kills to reach 3 million souls. Fortunately, it should only really take you an hour at most; depending on how often you die. While he himself is pretty easy... he will do insane damage if he hits you at all, so be careful! Be sure to keep track of your souls before you start farming so you have an idea of how much farming you need to do. When you have finished farming, you will need to purchase the Fragrant Branch of Yore from Melentia in the Forest of Fallen Giants so we can unpetrify Rosabeth & reach The Shrine of Winter... Drangleic Castle: NG++ The final 3 Spells we need for 100% can be purchased from Wellager for a total of 36,600 souls. On NG++ enemies will drop a lot more souls. If you farmed your way to 3 million you should have no shortage of souls for this. Miracle #27 – Wrath of the Gods: Purchased from Wellager on NG++ for 8200 souls. This can alternatively be acquired from achieving Rank 2 in the Blue Sentinels Covenant. To achieve Rank 2 you need to win 150 Duels in the Blue Cathedral arenas… no thank you. Miracle #28 – Bountiful Sunlight: Purchased from Wellager on NG++ for 11,000 souls. This can alternatively be acquired from achieving Rank 3 in the Blue Sentinels Covenant. To achieve Rank 3 you need to win 500 Duels in the Blue Cathedral arenas… who got time for that?

成就#36 – Master of Miracles:学习全部28个奇迹。 在二周目时我们应该能获得所有需要的奇迹,如果你选择了青之守护者路线(我对此表示怀疑),可能会更早解锁该成就。 咒术#24 – 混沌大火球:在二周目时从威拉杰处花费17400灵魂购买。另一种更早获得它的方法是在血之誓约中达到3级,需要通过决斗或击杀蓝灵500次。

成就#37–咒术大师:学习全部24种咒术。混沌大火球应该是你完成此成就所需的最后一个咒术,获取后即可解锁该成就。

成就#38 - The Dark Soul:获取全部38个成就! 这可能是我获取过的耗时最长的38个成就!除非我们开始玩《黑暗之魂3》…… 总结: 如果你已经看到这里并达成了100%完成度,向各位致敬。你确实具备成为下一位王者的潜质。我非常热爱黑暗之魂系列,也希望你们能和我一样在游玩过程中获得乐趣。如果本指南帮助你达成了100%完成度,可以让我知道。这能帮助我了解自己是否做得正确。
100%完成! 感谢选择Cynical Guides,我们下一个指南再见!