换一换
换一换 


赞美成就! 免责声明 达成游戏100%完成度无需进行在线游戏;但在线游玩无疑会让游戏变得更加简单。 本文不包含威尔杰院长在二周目+出售的法术,因为获取这些法术本就有更简单的刷取方式。 奇迹:阳光之枪 该奇迹可通过在太阳继承者誓约中达到3级获得,达成条件为提交30个太阳徽章。 在线方法:召唤金色灵体或作为金色灵体完成使命,即可获得太阳徽章。 离线方法:刷取墓地掘墓者和猎鹰骑士。 法术:隐藏武器 该法术可通过在钟卫誓约中达到2级获得,达成条件为击败30名钟楼入侵者。在线方法:在索尔钟楼或月钟楼,当人类宿主在 Boss 仍存活的情况下进入钟楼时,你会被强制召唤。 离线方法:在索尔钟楼,疯狂战士有几率作为红色入侵者出现,击杀他会计入入侵者数量。使用钢铁要塞的铁炉堂营火。 基础说明 注意:《黑暗之魂2》与《黑暗之魂2:原罪学者》有诸多相似之处,但主要区别在于物品的位置。如果你玩的是基础版,请查看本指南底部的相关指南。

This is Dark Souls - Die for the first time. Welcome to Dark Souls! This section will cover some basics of how Dark Souls 2 works that is important to this guide. Stat RespecYou can respec your stats using the Soul Vessel. It'll reset your character to the base level and base stats based on your starting class. Your souls remain unchanged while being given the same number of stat points you've leveled up. Below are required stats if you only want to respec just once. Licia of Lindelt - 30 Faith to receive Saint's Set and Chime Carhillion of the Fold - 8 Intelligence to engage speech and move to Majula; 30 Intelligence for Northern Ritual Band +1 Felken the Outcast - 8 Faith/8 Intelligence to engage speech; 20/20 required for Sunset Staff without killing him for Assassination Quest. Straid of Olaphis - 3 Faith/3 Intelligence to shop and trade; requires a Fragrant Branch of Yore Cromwell the Pardoner - 35 Faith for Ring of Resistance Soul Vessel Location 1. The most common Soul Vessel is located in the chest in the basement of Majula mansion. 2. Crestfallen Saulden gives you one after you get at least 4 exiles to Majula 3. Two are located inside a chest in Drangleic Castle, where you find a guy strapped to a door. 4. Wooden Chest behind a Pharros' Contraption illusory door. 5. Wooden Chest before the second bonfire in Undead Crypt, drop down the gap instead of going through the doorway 6. Corpse loot in Memory of Orro There are a few more not listed. Soul Memory Tiers & Multiplayer Items Multiplayer/CoopDark Souls II uses an interface known as Soul Memory which contains every single soul you've ever earned during your playthrough and places you in tiers and provides the structure for matchmaking. This goes for player invasions and player summons. Straid of Olaphis sells the Agape Ring which absorbs all souls earned by the player and thus preventing you from gaining souls and prevents your soul memory from increasing. Using this ring helps you balance your souls with someone you want to play coop with should you have too much and have them catch up to you. Soul Memory Tiers and Multiplayer Items courtesy of DSII Wiki[darksouls2.wiki.fextralife.com] TierSoul Memory Range10 - 9,999210,000 - 19,999320,000 - 29,999430,000 - 39,999540,000 - 49,999650,000 - 69,999770,000 - 89,999890,000 - 109,9999110,000 - 129,99910130,000 - 149,99911150,000 - 179,99912180,000 - 209,99913210,000 - 239,99914240,000 - 269,99915270,000 - 299,99916300,000 - 349,99917350,000 - 399,99918400,000 - 449,99919450,000 - 499,99920500,000 - 599,99921600,000 - 699,99922700,000 - 799,99923800,000 - 899,99924900,000 - 999,999251,000,000 - 1,099,999261,100,000 - 1,199,999271,200,000 - 1,299,999281,300,000 - 1,399,999291,400,000 - 1,499,999301,500,000 - 1,749,999311,750,000 - 1,999,999322,000,000 - 2,249,999332,250,000 - 2,499,999342,500,000 - 2,749,999352,750,000 - 2,999,999363,000,000 - 4,999,999375,000,000 - 6,999,999387,000,000 - 8,999,999399,000,000 - 11,999,9994012,000,000 - 14,999,9994115,000,000 - 19,999,9994220,000,000 - 29,999,9994330,000,000 - 44,999,9994445,000,000 - 999,999,999 Multiplayer ItemsMultiplayer Items each have specific properties in interacting with other players in the game. The ranges are based on your current tier and you can go up or down from your tier. Multiplayer ItemDown RangeUp RangeWhite Sign Soapstone-2+1White Sign Soapstone w/ Name-Engraved Ring-5+4Small White Sign Soapstone-3+1Small White Sign Soapstone w/ Name-Engraved Ring-6+5Red Sign Soapstone-5+2Dragon Eye-4+4Cracked Red Eye Orb0+3Cracked Blue Eye Orb-2+2Bell Keeper's Seal0+3Rat King-1+3 Walkthrough - Introduction This Storyline guide will point you where you should or shouldn't go while mentioning the required items for all the achievements for Dark Souls II. Tutorials

自我回忆 - 重获肉身并以不死人身份启程 此成就是在教程期间完成角色创建后获得的。如果你在这之前没有死亡,这可能是你的第一个成就。 如蜜 离开教程后,你会发现自己身处如蜜。 可以通过灰心的索尔登获得【弱者誓约】。 可以通过胜利者石碑获得【强者誓约】。 攻击井边的岩石可以获得一个元素瓶碎片。 灰心的索尔登会给予你“欢迎”手势。(姿势大师) 巨人陨落之森 从你前往如蜜的路径往下看,应该有一条隧道通向你的下一个区域。 商人玛莲妮亚位于此处。耗尽她的对话可将她迁移到如蜜。(流放者聚集)。她还出售许多所需的【芳香的思乡枝】中的第一个(12000魂)。 【白标记蜡石】在火祭场篝火上方的房间里 【元素瓶碎片】位于火祭场篝火附近,与可选BOSS【追击者】战斗的地点(爆炸墙外侧的梯子上方)的尸体上 【强力灵魂箭】法术在弩炮房间内 【楔形石原盘】(终极武器)位于弩炮房间下方的法洛斯机关装置中 【白标记蜡石】在摆脱帕特的陷阱后由他给予 【地图师卡尔】在此处;耗尽其对话可获得进入【蜜酒镇宅邸】的权限,清理地下室后返回此处可让他搬家。(好奇的地图/流放者聚集) Boss战前的门需要从【钢铁要塞】获得的【钢铁钥匙】才能打开。(重要提示) 追击者Boss:你可以在平台上与他战斗(仅出现一次),或者在他的常规位置战斗。在该区域最后一道雾门前,有一扇门,门旁墙上插着一把巨剑,你可以踩在剑上。这扇门需要士兵钥匙(见下文)才能打开。如果你之前没有杀死追击者,从这里进入会触发与他的战斗。击败他是完成游戏的必要条件,也可以留到之后再处理。

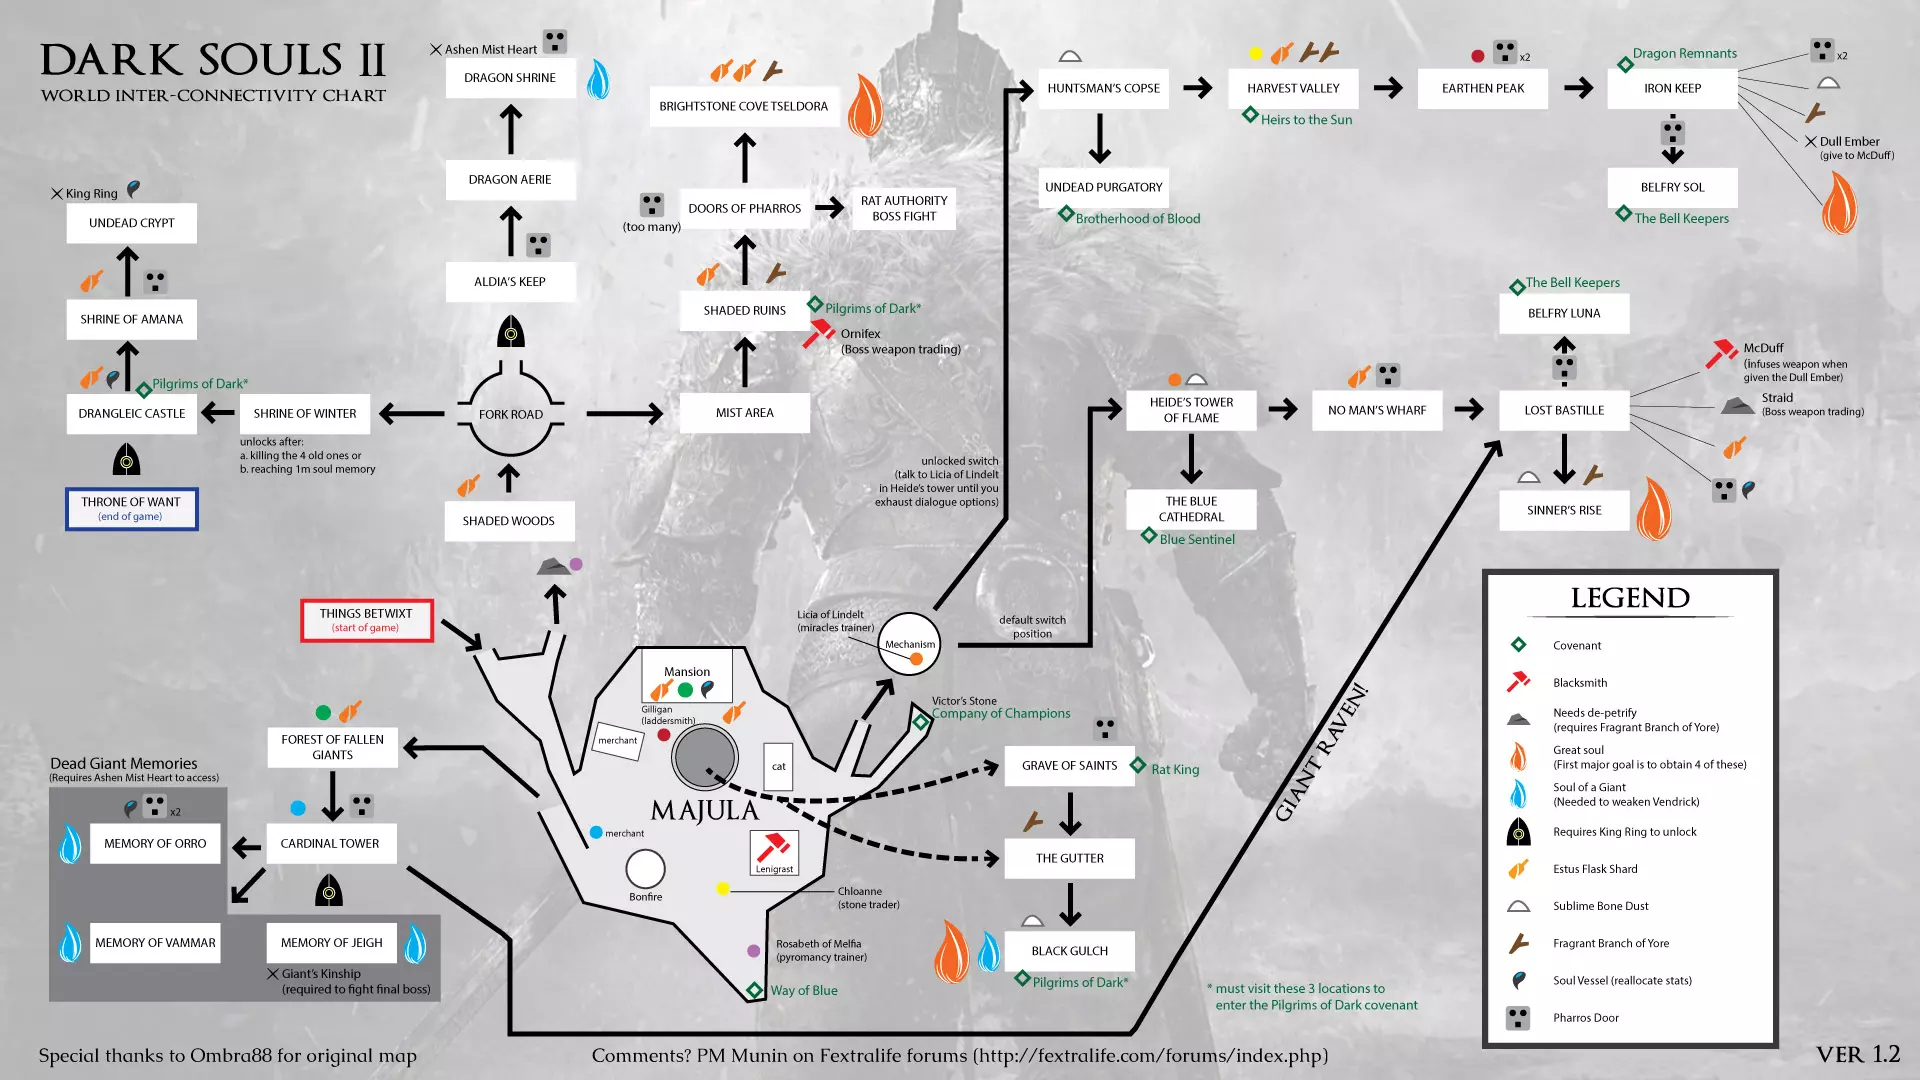
Last Giant - Defeat the Last Giant This is the main boss for the Forest of Fallen Giants and has two NPC summons available. If you got through Pate's trap successfully and exhausted his dialogue, then his sign will be before the fog gate. Sellsword Luet's shade summon is also in the same area. Upon beating the Last Giant, you will be awarded the Soldier Key which opens three doors. 1. Door to the Pursuer 2. Door to the fourth bonfire; Soldier's Rest 3. Door to the King's Gate for Memory of Vammar After that, your next task is to collect all four Great Souls. Pick any section you wish or follow this guide chronologically. Walkthrough - Lost Sinner Primal Bonfire [1/4] From Majula, head towards the stone pathway next to the cliff closer to the Mansion. This will lead to a rotunda with a mechanism. The path leads you to Heide's Tower of Flame. Heide's Tower of Flame There are two switches you want to activate in this area which alters the boss area to be easier Switch 1: Behind the Old Knight after the gate Switch 2: Near the door of the circular room you enter after the gate After the second switch, head to your right for the end of the area. Masterless Glencour can be summoned Licia of Lindeldt is located after the boss fight. Exhaust her dialogue for Gathering of Exiles.Cathedral of Blue From the second switch of Heide's Tower of Flame, head to the left this time. When you aggro the Heide Knight at the top of the stairs, bring him down and dispatch of him. You do not want to fight him on the stairs due to the dragon. Once the Knight is down, sprint to the dragon as fast as possible. You may need to have your shield up should you run too slow. After the dragon is defeated, you can lower the drawbridge to fight the Old Dragonslayer After the boss, you can light the bonfire down the stairs. At the balcony, Blue Sentinel Targray leads the Blue Sentinels covenant and you can get the Protector's Covenant achievement as well as the Duel Bow gesture if you have a Token of Fidelity. Token of Fidelity can be obtained by defeating a boss in co-op while not a member of the Heirs of the Sun or the corpse loot next to the Bridge Approach bonfire in Huntsman's CorpseNo Man's Wharf First instance of Lucatiel's Quest: After you cross the docks and meet the first set of stairs, she's up the first set then in the building to the left. Exhaust her dialogue. Allows her to be summoned later in this level. After going all the way up, you'll find a bell to ring that calls the ship to the docks. On the way down, there is a house with poison jars inside and a chest. The chest has a 'Fragrant Branch of Yore'. After descending back to the docks on the opposite side of the bonfire, kick the bridge down to set the shortcut. Take the other dock path close to the bridge shortcut and you will find Carhillion of the Fold. You need 8 INT for him to talk to you (only need it once, not everytime). Exhaust his dialogue for him to move to Majula (Gathering of Exiles). He sells sorcery spells. Taking the dock route to the ship, before the docks narrow, Lucatiel's sign will be on the corner to the right. She can be easily used as bait against the Flexile Sentry. Flexile Sentry will be the boss on the boat. After the boss, head up the ladder and you'll see a map and a chest containing the Fireball Pyromancy. Use the map to go to Lost Bastille.Lost Bastille Activate the Exile Holding Cell bonfire, and proceed up the stairs and to the drop down. Continue left and the alley contains an Estus Flask Shard. Pull the lever to open the gate. At the top of the stairs, an undead jailer will kick an explosive barrel down the stairs. You want this barrel to hit the giant crack in the wall to blow up the wall to gain access to Steady Hand McDuff and the bonfire. If the barrel doesn't explode, push it to the wall, then ignite with fire. Access the bonfire and warp to 'A Tower Apart' bonfire. Now from the 'A Tower Apart' bonfire: To the left in a chest will be the Antiquated Key if you have any interest in that. Once you leave the area, you can head straight passed the Undead Jailer. You'll want to break the boxes in front of the door as it's jamming it shut (use a firebomb if you're on the other side.) In this tower are two important things: The first is Lucatiel's second spot. Exhaust her dialogue here so she can be summoned during Sinner's Rise. She is not available for summon for the boss of this area. Near the tower, cross the rubble and open the doorway. Both ways lead to the boss fight. There are 3 Ruin Sentinels you have to fight, if you have trouble dealing with three at once, simply stay on the platform you end up on as you enter the fog gate so you can dispatch the first one. After the first one, another one may jump, or both. They attack as they jump up so be wary. Boss Soul trades for Heavy Homing Soul Arrow with Straid. After the boss fight, all of the walls for illusory doors. They're all opened with the confirm key. One of the rooms will have a ladder in it, climb up and open the chest for the Hush Sorcery. Continue into the next room minding the explosive mummy and to the Servants' Quarters bonfire. Head over to the doorway and outside. If you go to the edge of the broken bridge and break the boxes, you'll find the Bastille Key which is required for Sinner's Rise and may help accessing McDuff if you can't get the barrel to roll in your favor. Continue until you meet up with a gate, but instead head up stairs where you see a bunch of mummies. Dispatch of them and head to the middle cell where Straid of Olaphis is. You need 3 intelligence and 3 faith in order to talk to him. You should have another Fragrant Branch of Yore with you. See respective mastery section. He also possesses the Mock gesture for Gesture Maestro as well.Belfry LunaBelfry Luna isn't quite required in order to 100% this, but depending how you play, we'll go through it anyways. From the Servants' Quarters bonfire, head down the ladder. You'll be confronted by a Pursuer. Place a Pharros Lockstone into the contraption to reveal a illusory door that leads to Belfry Luna. Once you step onto the bridge, you're susceptible to grey phantom invasions, up to 3 per life. Once inside, you can speak to the dwarf to the right until he offers you to join the Bell Keepers and unlocking the 'Clangorous Covenant' achievement. Head up the stairs and go up the ladder and pull the lever to open the gate that leads to the boss. Head down and go through the boss gate. Masterless Glencour has a summoning sign under one of the stairs. Should you opt for online play for Rank 2 in the Bell Keepers, then this area is perfect for that. If not, see Belfry Sol for an easier farming method.Sinner's RiseThis is the separate tower near Straid's cell. Simply cross the bridge and go up for a bonfire. Else, go down. Once you head down the lift, you will immediately see Lucatiel's Summoning sign. Be wary as there are a few large beasts as well as the Flexile Sentry in the water. After navigating to the gates, use the Bastille Key. Cross the catwalk over the water and open up both doors and light the oil to illuminate the boss room. The Lost Sinner is an easy boss fight if you lit up the right allowing you to lock on. After the fight, open up the chest for another Fragrant Branch of Yore then use light the Primal Bonfire.

Sinner's Bonfire - Light the primal bonfire in Sinner's Rise. 1 down, 3 to go. Walkthrough - Iron Keep Primal Bonfire [2/4] Huntsman's CopseWith Licia of Lindelt moved to Majula, she'll be in the rotunda and you can pay her 2,000 souls to move the gate allowing you to access Huntsman's Copse. The first NPC you'll meet is Felken the Outcast. Should you have 8 Faith/Intelligence, you can access his shop with hex spells. 20 Faith/Intelligence will get you his Sunset Staff w/o killing him. Continue on the path until you reach the second bonfire of the area. Across the bridge gap is a Token of Fidelity and a Pharros Lockstone. Continue along the cliff side and cross the bridge. Head straight and you'll notice some loot in a hut to the right. Inside the hut is a Syan Knight and the Soul Spear sorcery (1 of 2). Straight ahead is Bashful Ray's shade summoning. From there, go up the hill and the hut to the left will have the lever that lowers the bridge. Before the bridge, you'll see a hut to your right with a hole in the roof. A Sublime Bone Dust is inside. Across the bridge is another hut with a bonfire and Creighton. You will need the Undead Lockaway Key in order to open this area. Creighton offers the 'Fist Pump' gesture for Gesture Maestro. Cross the smaller bridge and you'll see a path diverge up the hill. Take that hill path and you'll find the Undead Lockaway Key at the top on a body. Return to Creighton to pickup the gesture and head to the boss area. The only available summon for the area was Bashful Ray so you can bring him along if you want. The Skeleton Lords themselves aren't an issue, but each one you kill summons tons of skeletons including the every so annoying pinwheels. Only tip is to kill one lord at a time while dispatching the smaller underlings.Undead PurgatoryStarting from the Bridge Approach bonfire in Huntsman's Copse. After the first bridge, take the right where you'll cross tons of dark warriors. Then cross the bridge where you will be invaded. No possible summons for this boss. Use the divots in the wall to dodge the Chariot each time it passes. There are two necromancers that will keep reviving the skeletons so take them out then the skeletons. Get to the end of the path to close the gate on the chariot then finish him off. After the boss fight, you'll find Titchy Gren who leads the Brotherhood of Blood as well as sells pyromancy. You'll need a Token of Spite to get her to talk which can be found in a chest before The Gutter.Harvest Valley After arriving in Harvest Valley, you'll find Stone Trader Chloanne at the top of the peak. Exhaust her dialogue to relocate her to Majula (Gathering of Exiles). Nothing of importance so you can make your way to the second bonfire after the gate. From here, the second set of poison mist contains the Chameleon sorcery. This is its only appearance. Across the wooden bridge then take the path left to discover the Heirs of the Sun Covenant. Talk to the altar until it asks you to join for the 'Brilliant Covenant' achievement. The altar will also teach you the fabled 'Praise the Sun' gesture for Gesture Maestro. If you have spare poison moss, you can take the further path into Earthen Peak down lower to meet up with Lucatiel in a room. Exhaust her dialogue to move her to her next location. Otherwise, go ahead and fight the Covetous Demon. You can shoot the pots inside to drop undeads and bait him into eating them while you dish out damage.Earthen Peak Once in, there isn't any required loot. So continue across the bridge minding the ranged enemies to parallel bridge. At the end, you'll find a summon sign for Devotee Scarlet. Head up and you will see a wind mill and a fog gate with a bonfire. Light the windmill on fire to drain all poison. If you didn't talk to Lucatiel before the Covetous Demon due to the poison, the poison is now drained thus making it much safer to traverse. Now head up the stairs and head out the door way. You can summon Bashful Ray and break the wooden fence and head left to find Laddersmith Gilligan. Pay him 2,000 souls then exhaust his dialogue to move him in Majula (Gathering of Exiles). He also teaches you 'Prostration' gesture for Gesture Maestro. Go back into the doorway and up the ladder. Take the narrow path and up the stairs. You can go up stairs and get the bonfire behind the illusory doors or go ahead and fight the boss. Jester Thomas summon sign is near the stairs.Iron Keep - Part 1In Iron Keep, you'll notice quite a bit of lava. So be prepared for fire defenses should you need them. Go straight across the bridge and open the doors. You will be ambushed by some invaders. To the right is Magerold of Lanafir who leads the Dragon Covenant, but you cannot access it. In the main room, you'll notice some loot under a flaming bull head. You can no longer take it without dying, but you do need it later on so place a mental note here. It's the Iron Key. Head into the next room and out the door. You should be able to see a bridge in mid air and a lever down straight ahead. Pull the lever in order to lower one side of the bridge and cross the bridge. If you have not talked to Lucatiel in Black Gulch, this guide hasn't been there yet, then chances are you won't have a summon sign for her at the end of the bridge. If you need to summon her here, then skip to the Black Gulch section then return here. Smelter demon has some pretty strong attacks, but has no real health of its own. The only note is that you cannot drag out this fight and his fire aura does do damage. Belfry SolYou're going to need a Pharros Lockstone in order to access Belfry Sol. From the Ironheath Hall bonfire, head into the door way and across the bridge. Head into the room to the left and use the Pharros Lockstone to reveal a ladder that leads you to the Belfry Sol bonfire. Head up the ladder and should you skip Belfry Luna, you can join the Bell Keepers here and get the 'Clangorous Covenant' achievement. Overall a very short area, but go in make sure to pull the lever near the towers to ring the bell and lift the gate. At the end of the area, you'll find a chest with the Immolation pyromancy.Iron Keep - Part 2You can continue in Iron Keep right after Belfry Sol, or you can start from Ironheath Hall bonfire. The key thing to note here is the Chaos Storm pyromancy. In the second room with the lever that lowers and raises the platforms, you will notice a chest in the back left. To access this, you'll need to combine the Smelter Demon armor purchasable from Maughlin the Armorer in Majula, the urns of water at the very top, and either flash sweat pyromancy or small orange blurrs. Do the urns last and make sure to clear out the mobs so you have a clear path. Once that's all done, roll through the urns then drop down twice to the lava path and then run towards the chest. Heal when necessary. Once you get that, proceed in the area until you reach the fire-breathing bull mechanisms. There is a ladder to the left in the back that leads to a phantom and another ladder. Climb that for a bonfire and then pull the lever to disable the fire. Manhunter O'harrah's summoning sign is at the bottom of the ladders. Head into the next area and you'll be at the Old Iron King. Chances are, your summon is probably going to get wrecked by the Old Iron King, or he gets knocked off so you're better off learning his attack pattern as they're easy to dodge. After the fight, head down and light the primal bonfire.

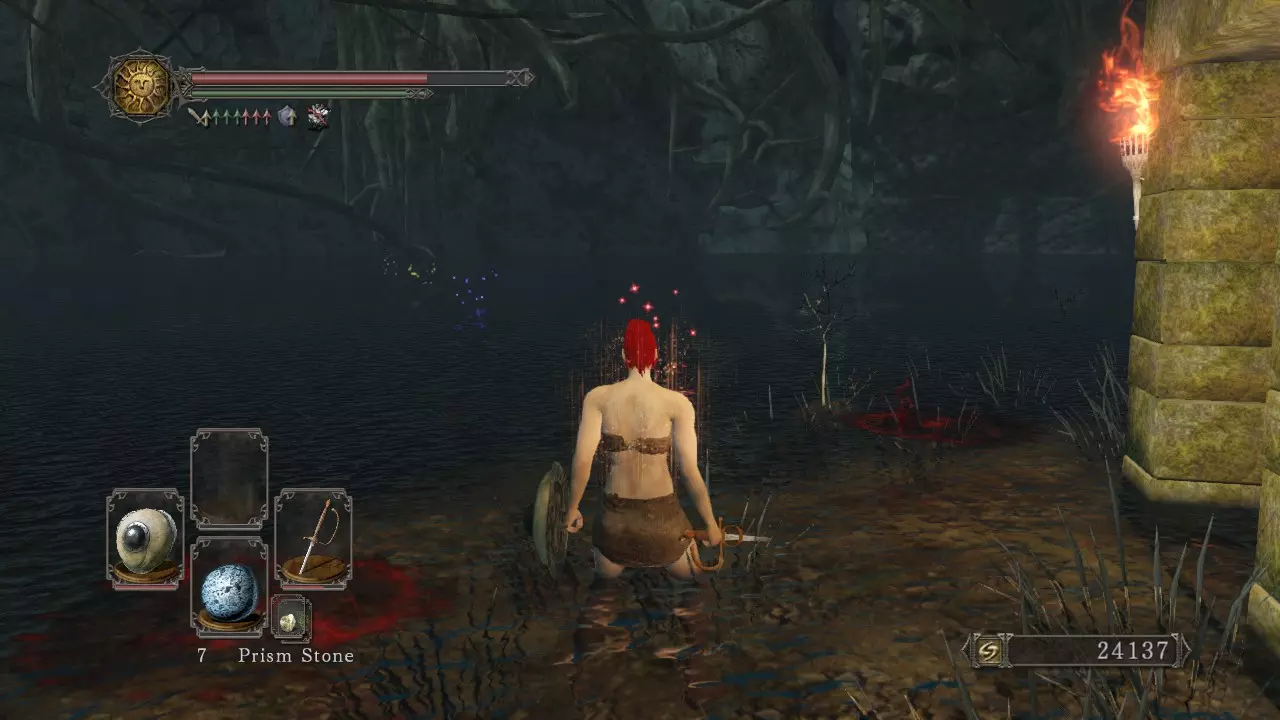
钢铁巨塔营火 - 点燃钢铁巨塔的原初营火。 已完成2个,还剩2个。 攻略 - 黑溪谷原初营火【3/4】 深坑 之后你需要重返这个区域,因为当你拿到遗忘钥匙后,这里会有一些重要物品。 确保在麦道夫有梯子铁匠吉利根很重要,这样你就能购买梯子,让下去变得容易得多。他出售三种梯子:500魂、3500魂和12000魂。 你还需要银猫戒指,这样你跳下去就不会损失太多生命值。你也可以卸下 armor/weapons 来减少伤害。 要跳过圣徒墓地,沿着12000魂的梯子下去,然后一直往下跳,直到找到门口。你需要前往【圣徒墓地】,原因有二。你可以选择沿着消耗3500魂的梯子下去,或者走消耗500魂的梯子,也可以直接跳下去(如果你能承受坠落伤害的话)。你看到的第一个门就通往圣徒墓地。 一旦踏入圣徒墓地,你就可能被【鼠王誓约】的成员召唤到他们的世界,所以要小心。 这里唯一的独特战利品是咒术【绝望低语】。当你到达桥梁区域时,在可能有桥梁降下的位置使用【法洛斯之石】。穿过桥梁后,上楼就能在一具尸体上找到这个咒术。 前往该区域尽头的营火处。大范围攻击在这里非常有用,而且你需要这个 Boss 魂来和【史垂德】交换【剧毒雾】。击败王室老鼠先锋后,进入下一个区域,你会看到鼠王坐在一些骸骨上。与他对话可加入鼠王誓约,并解锁Gnawing Covenant成就。 在圣徒墓地之后,一路向下掉落,你最终会来到一座有水晶蜥蜴的桥上。桥下是爆炸木乃伊,地面上可以看到大恢复奇迹(两个位置之一)。 下去之后,你可以穿过隧道,沿着一些梯子向下。底部会有一个宝箱,里面装有怨恨之证,这是在不死人刑场加入血之兄弟会所需的物品。 进入地沟后,你会处于一个近乎漆黑的区域,因此你可能需要带上火把来点亮所有 scones。当你到达第二个篝火后,返回有很多梯子的区域。顺着被罐子挡住的梯子下去。跳下去后会看到一些罐子,然后有一个箱子,里面装着【巨型棍棒】。再往下跳可以获得【黑暗迷雾】咒术。 从那里继续往下爬。你会注意到一些带刺的罐子。不要攻击它们,因为里面装满了腐蚀性酸液。用铁箭或骨灰瓮从远处打破它们。跳下去后拾取【昔日芳香枝条】。穿过雾门。 黑溪谷:左边是第一个篝火。沿着小路继续走。你看到的所有这些雕像都会发射毒雾,所以你需要摧毁大部分雕像。在斜坡底部,甚至在遇到第一个毒池之前,你可以从悬崖上跳下去,落到一个通往隧道的平台上。如果你一直跟进露卡提耶的支线任务,那么在隧道内会遇到她。与她对话直至对话结束,她会移动到最终位置阿尔迪亚的居所,并且之后可以在本区域召唤她。 向上走然后跳下去。向右走进入洞穴,宝箱里有大魔法武器法术。 返回并向下走。在陶罐附近以及野猪之间,可以召唤羞怯的雷和猎人奥哈拉。第一只野猪附近的尸体上有生命残渣咒术。 经过第二只野猪后,实际上可以再跳下去一次。第一次跳下会通向一扇石门,需要遗忘钥匙才能打开,门后是暗术师格兰达尔,与暗黑朝圣者任务相关。 从你着陆的位置,再向下跳入一个洞穴。这个洞穴会通向两名遗忘巨人。杀死他们可以获得巨人之魂以及遗忘钥匙。 乘坐笼式电梯返回上层,你会来到该区域更宽阔的下层部分。这里还会有两名森林骑士入侵。别忘了回到那扇锁着的门,与暗之赐予者格兰达尔对话,获取加入暗之朝圣者的第二个条件。 径直走向边缘,你会发现一个洞穴,里面有一条可以行走的小 ledge 路径。使用昔日香枝后前往篝火处。篝火旁还有露卡提耶的召唤符。 穿过巨大的雾门,前去挑战腐败物。由于腐烂物的强力攻击和熔岩坑,露卡提耶在这里很容易死亡,所以你需要快速造成伤害,或者召唤更多NPC/玩家来帮忙。之后,有一个隐藏得相当好的洞穴,里面有一个宝箱。再往后就是原初营火。此外,还有一个通往第一个DLC【沉没之王的王冠】的传送门,这一点稍后会提到。

【深谷营火】- 点燃黑溪谷的原初营火。 3个已完成,还剩1个。 攻略 - 辉石镇盖多勒原初营火 [4/4] 黑森林:你需要从梅维雅那里购买【低语戒指】。从如蜜出发,有一扇通往建筑的木门,走那条路。 建筑外会遇到尤格的本哈特,听完他的所有对话。 进入建筑,对梅莉亚的罗莎贝丝使用【返生树枝】。 她恢复正常后会索要衣物,任何衣物都可以,只需一件。之后听完她的所有对话,然后返回如蜜,以避免在后续遭遇战(流放者集会)中误杀她。

换衣服 - 给梅维雅的罗莎贝丝一些穿的东西 回到这里后,再次和本哈特交谈,他会为【姿势大师】成就给予“喜悦”姿势。说完他的所有对话以推进他的支线任务。 沿着路径前往下一个篝火,那里有三条岔路。走有雾的那条路。 在雾中,沿着左边的墙走,直到你到达地上有大量碎石的地方。在碎石顶部你应该能看到一些红色的布。那是凡格拉的头。

关于无身之魂的思考 - 继承凡荷尔的装备。 耗尽他的对话可获得他的头盔和成就。 再次与他交谈,可习得“斩首”姿势。真是讽刺。 之后,再次沿着左墙前进,并留意地面。如果迷路了,记住要往山上走。如果走对了方向,你会看到雾气消散。 在虚影森林,你会找到一处篝火。附近有一位石化的狮法师,他持有解救位于大型破损木坑底部的欧尼斐克斯所需的尖牙钥匙。 不过,你需要向左进入有诅咒壶和幽灵战士的建筑。穿过它们后,你会到达一个沙坑。装备【低语戒指】并与名为塔ark的巨型蝎人交谈。在击败【黑森林】的区域 Boss 后,你将从他那里获得【热身】姿势。这也能让你召唤塔ark。之后,你可以选择返回,或者如果你拥有足够的【原素瓶】,则继续前进。 回到主区域,径直走向有木桶的地方。打破木桶,打开宝箱即可获得【修复】法术。这是该法术的唯一获取途径。 若想找到铁匠欧尼斐克斯,需走过木板并打开门。 前往建筑群,经过建筑物后,寻找地面上的木板。走过木板即可跳下找到【黑暗赐予者格兰达尔】,这是他的第二个位置。 登上小山来到雾门处,塔ark的召唤符也会在这里。总的来说,蝎子女士娜吉卡难度不高,尤其是让塔尔克当诱饵的时候。 法洛斯之门 在【黑暗之魂2:原罪学者】中,该区域不再是必须探索的,加夫兰最终位置上方的门现在会自动打开。但你仍然需要【王 rat Authority】的 boss 灵魂。 爬上梯子后,前方的尸体上有【扭曲壁垒】咒术。 到达第二个营火后,你就会来到 boss 竞技场旁边。这个 boss 的难度取决于你的build。它对施法者抗性较高,但对近战build较弱。尽快消灭小老鼠,然后集中攻击大老鼠。 辉石镇盖多勒 这个区域最重要的是召唤尤果的本哈特,他的召唤符在其中一个较大的帐篷里。你只需带着本哈特一路前往【徘徊的魔术师与信徒】,这是一场极其简单的战斗。 击败 Boss 后,走出门口。你的右侧是篝火,左侧爬上梯子是赦罪者克伦威尔,你可能需要他来获取特定的奇迹或咒术。 你可以通过翻滚下岩石平台来跳过该区域的大部分内容,直接到达沙地。 继续穿过门,经过下一个沙地区域。径直向上走,进入建筑。这里需要注意的是,右侧的门内有【大火球】咒术,该门需要用下一个 Boss 掉落的【辉石钥匙】打开。 【猎人奥哈拉】的召唤符在这个房间的左侧。 穿过大门,爬上梯子,然后跳到蛛网上。这个区域周围有大量蜘蛛。柱子后面有灰烬骑士博伊德的召唤印记。 关于公爵的宠儿弗蕾雅,需要注意的是你只能攻击她两张脸中的一张。另外,在 boss 战结束后,一定要检查悬崖附近的红色发光云团,以获取伟大灵魂。 下一个房间里,你可以杀死公爵,获得雅儿的香枝和辉石钥匙。 继续前进,点燃原初营火。

Brightstone Bonfire - 点燃辉石镇盖多勒的初始营火。 4/4 完成。冬之神殿已激活。 攻略 - 灰雾之心 多兰古雷格城堡 从虚影森林的十字路口营火出发,走与雾门相反的路。这条路会通向冬之神殿。只需一直往前走,最终就能到达多兰古雷格城堡。 在城门口,你需要击杀两座雕像附近的敌人,以献祭他们的灵魂来激活雕像。城门最右侧的宝箱里有大火焰风暴咒术。 进入城堡后,你会在楼梯中段遇到韦ladger大臣。听完他的所有对话,可习得【This One's Me】手势,用于【Gesture Maestro】成就。 在王城门营火房间内,你会看到大量石像和6扇门。你需要注意的只有两扇门:最左侧的门和最右侧的门。 最左侧的门通往暗黑朝圣者的第三个也是最后一个地点。现在他应该会允许你加入,并获得【Abysmal Covenant】成就。这里还有一个篝火。 最右侧的门后面可以让你继续探索该区域。在房间内你会找到冰冻之花,它是进入象牙之王DLC所必需的物品。 继续通过关卡,直到你到达与娜珊德拉所在的王座室。听完她的所有对话后,前往双龙骑兵的 boss 房间。这是一场简单的战斗。 击败双龙骑兵后,你会来到多兰古雷格中部,应该能看到尤果的本哈特坐在墙边。完成他的对话以推进支线任务。 爬上梯子,穿过内部有雕像的门。显然因为难度过高,雕像已被移除,所以穿过下一扇门,引诱一个无头人偶敌人进入前一个房间,并在雕像附近将其击杀以激活电梯。 宝箱内有灵魂巨剑法术。独特生成。 进入带有门厅的下一个区域。阳台上的其中一个宝箱是宝箱怪,另一个内有火焰风暴咒术;非独特生成。 电梯激活后,返回多兰古雷格中央营火,电梯应该已经降下。乘坐电梯上去。在里面的宝箱中可以找到王之路钥匙和强力魔法盾法术。回到下方,穿过国王通道。本哈特的召唤印记在 Boss 门前左侧。至于镜之骑士,他的盾牌会反弹所有远程攻击,并且还能召唤 NPC 或玩家来协助他。

【成就】Looking Glass Knight - 击败镜之骑士 战斗结束后,两个宝箱会合并为一个。打开剩余的宝箱可获得法术【灵魂箭】,然后乘坐电梯下楼。 【阿玛那祭坛】第二个篝火后,你会遇到一个巨人。巨人身后的宝箱里有【阳光之剑】。此物并非唯一获取途径,在不死人墓穴后可向斯特雷德购买。 第三个小屋后,水中有咒术【火焰风暴】。虽然它并非唯一获取点,但这是目前最容易获得的方法。你需要前往小屋后方右侧的一个宝箱。
在第三个篝火和有腐蚀性雾气的洞穴之后,你会遇到一个有柱子的圆形竞技场。在一根断柱附近的尸体上,你可以找到【追踪灵魂结晶块】法术。继续前进,直到抵达 Boss 处。 不死人墓穴:一直前进,直到看到有人要求你不要制造光亮,此时不要制造光亮。走进去后向右转,会找到【墓王卫士亚格德尔】。听完他的所有对话后,可以开启他的商店,获得【求饶】姿势,之后还能看到他的召唤印记。他最稀有的法术是【温暖】咒术,其次是【灵魂枪】法术。继续在该区域探索,直到抵达第二个篝火。摧毁那些看起来像坟墓的雕像,以阻止咒术师刷新。经过有两个持巨盾敌人的走廊后,你会掉进一个陷阱。你想要走的那条路中间有一条线。那里有带法洛斯装置的幻影墙,使用该装置可以找到法洛斯门,门内有【雷枪】奇迹,此奇迹并非唯一。 继续前进并拉动拉杆解锁捷径。然后前往 Boss 大门。 【守墓人亚格德尔】的召唤印记位于通往 Boss 大门的楼梯前左侧。 Boss 战结束后,你实际上仍然可以挑战【王凡德里克】,并且在首次遭遇时他依然处于虚弱状态。不过,你需要造成出血伤害或使用腐蚀酸才能触发 Boss 战,否则他会无视你。从尸体上拾取【王的戒指】。

【国王戒指】- 获取国王戒指。这将赋予你打开所有国王之门的能力。 【阿尔迪亚的居所】你需要穿过黑森林篝火岔路口处的国王之门,走与雾径相反的道路。 露卡提耶的结局在此处。【确保在完成她的支线任务前不要与她对话】。如果她出现在这里,说明你已完成支线任务的对话部分。但要继承她的装备,你必须至少召唤她三次,且她每次都存活。详情见“露卡提耶”部分。 进入阿尔迪亚的居所后,龙不会主动敌对。在【原罪学者】版本中,当你点燃该区域的所有四个 scones( scones )并击败随之出现的每个红色幻影后,龙才会被激活。这条龙现在也持有【阿尔迪亚的钥匙】。非必需物品。 注意:不要拉动楼梯下方的拉杆。 如果你直走然后右转,会遇到【皇家法师纳瓦兰】。如果你处于人形状态,他会让你离开。如果你处于游魂状态,他会要求你代替他杀死各种NPC。这是必需任务,详见攻略的【清理部分】。建议在游戏后期再进行。 在右侧顶层,一个宝箱里装有【大魔法屏障】奇迹。并非唯一获取途径,【韦拉杰大臣】也有出售。 前往有大门的下一个区域。在左侧你会发现一扇门。进入后向下走。楼梯左侧中途隐藏着一个篝火。在腐蚀坑内,你会找到【灵魂喷涌】法术。将狗引到室内后,卸下你的装备并进行搜刮。这是一个独特的刷新点。 继续推进关卡。墙壁后会有几只食人魔埋伏,请注意。右侧的门需要用阿尔迪亚之钥打开。 守护者巨龙无法召唤帮手。它的攻击很简单,躲避它的火焰,在它落地时进行攻击。 龙巢/龙祭坛:与绿袍圣女对话可获得古旧羽毛。 原罪学者版本中,唯一的篝火处梯子已经放下,你可以直接爬上梯子,滑下斜坡到底部,过桥后进入龙祭坛,从而跳过这个区域。 向上走,经过第一个老骑士,在第二个老骑士处,走左侧的路并上楼梯。穿过通往塔楼的桥梁,然后从侧面跳下。如果龙牙维拉德入侵你,就说明你走对路了。登上螺旋楼梯,你可以拾取石化蛋。回到钢铁要塞的拉纳菲尔的马杰洛处,加入古龙余灰誓约。 跳下窗台,向右看,在一个箱子里可以找到结晶魔法武器法术。 前往区域尽头,与古龙对话获取灰雾之心。

古龙 - 获取灰雾之心 攻略 - 终章 现在你已获得灰雾之心,我们将在抵达游戏结局前击败凡德里克。 重返黑溪谷 此区域的情况取决于你是否已击败黑溪谷底部持有遗忘钥匙和巨人之魂的精英巨人。 如果你已击败它们,可忽略此部分。 如果你尚未击败,从黑溪谷的第二个营火出发并向下跳。再次向下跳入一条隧道,穿过隧道后会发现两个精英巨人。击败它们以获取遗忘钥匙和第一个巨人之魂。 你可以按原路返回,用遗忘钥匙打开门,如果你想与暗赠者格兰达尔交谈以加入暗黑朝圣者誓约的话。奥罗的回忆 我们要前往的第一个回忆区域,是你本应与鸟巢旁的“追击者” Boss 战斗的地方。 在这里与尤果的本哈特对话,直到他不再说话。 进入附近的巨人回忆,即可进入奥罗的回忆。 进入后,你会发现尤果的本哈特坐在楼梯前的地上。这是他的最终位置,如果你还没有获得第三次召唤机会,可以稍后再来。与他对话至结束,就能在杰伊的回忆中召唤他。 这里没有与成就相关的物品,你可以直接跑到尽头,从巨人尸体上拾取巨人之魂。杰伊的回忆:建议先完成杰伊的回忆,再去完成瓦马尔的回忆,这样就无需为了德拉蒙德队长的遗产而重返瓦马尔的回忆。 前往 Cardinal Tower 篝火,下梯子。过桥,用士兵钥匙开门,然后用国王戒指打开国王之门。 如果你已在各自的回忆地点与尤戈的本哈特或德拉蒙德队长充分对话,就可以专门召唤他们。为了成就,建议召唤本哈特。 整个区域就是一座桥,你可以跑过桥,等待滚石出现,滚石会对本哈特和炮击造成巨大伤害。冲过桥的尽头,即可遭遇巨人王。虽然巨人王难度不高,但战斗有时间限制,而且本哈特可能在早期就承受大量伤害,所以要尽快解决战斗。他会掉落巨人之魂。【瓦马尔的回忆】中的巨人位于你初次遇到帕特的地方,但在墙的另一边,不在陷阱里面。 在遇到一些关闭的门之前,德拉蒙德队长会倒在地上。耗尽他的对话可以学会“欢呼”手势,这是“手势大师”成就所需的最后一个手势。如果你也按照本指南操作,还会获得“坚守阵地”成就。

坚守堡垒 - 继承德拉蒙德队长的装备 唯一的要求是击败巨人之王,如果你按照本指南操作就能获得。如果没有,击败巨人之王后再去找德拉蒙德。

姿势大师 - 学习所有姿势 如果你错过了某个姿势,可以前往姿势大师区域,对比查看自己遗漏了哪些姿势以及如何获取它们。 此外,这里没有其他要求,你可以直接走到尽头,调查巨人的尸体以获得巨人之魂。 远古巨龙 如果你重返与“公爵的宠儿弗蕾雅”战斗的 boss 房间,可以进入石化巨龙的记忆,获得远古巨龙之魂,它恰当地描述了龙祭坛中的远古巨龙。 如果你前往龙祭坛并杀死远古巨龙,它会掉落第五个也是最后一个巨人之魂。你并不需要它,但可以获取。 王多兰 收集所有这些巨人之魂的全部目的是为了降低多兰的防御力。Vendrick的基础防御力为32倍,每获得一个巨人之魂,其防御力就会以2的倍数降低。因此,一个巨人之魂可将其防御力降至16倍,再获得一个降至8倍,接着是4倍、2倍,最终降至1倍。 Vendrick其实相当容易对付,只需贴住他非持武器手一侧的腿部即可。 第一种攻击模式是他垂直向下挥击。如果紧接着进行第二次挥击,那么之后他不会再进行水平挥击。如果两次垂直挥击之间有停顿,那么他接下来仍会垂直挥击。 第二种攻击模式是他以水平挥击开始。如果他停顿时间过长,就不会再进行挥击。 不要站在他身后过远的位置,尽量站在他总是会转向你的那一侧,直到引诱他发动攻击为止。如果你站得太靠后,他就会向后跳跃。

【成就】Vendrick - 击败凡德里克 渴望王座 既然凡德里克已被击败,我们可以前往结局。前往多兰古雷格城堡的王门营火。打开王门并一直走到尽头。 如果你需要本哈特完成他的支线任务,可以在这里召唤他。 根据你的尝试次数,你将连续进行3场 boss 战,面对4个 boss。 第一场战斗是对抗王座守护者和王座监视者。这里需要注意的是,你必须连续击杀他们,否则另一个会复活。如果你召唤了本哈特,他会在这场战斗后消失。 对抗娜珊德拉时,攻击诅咒迷雾将其摧毁,否则这是一场简单的战斗。 对抗安迪尔时,只需注意他的传送位置,传送处会发红光并伴有火焰。当他没有被火焰包裹时攻击他,此时他的防御力会降低。

The Heir - See the Ending It'll unlock once you complete the credits. Walkthrough - DLC The sole purpose of attempting the DLC in terms of achievements is to obtain the additional spells now required for Mastery. Crown of the Sunken KingTo enter the Sunken King DLC, you will need the Dragon Talon key item. Buy Laddersmith Gilligan's 12,000 soul ladder and climb down that ladder then up the metal ladder. Open the door and inside one of the chest will be the Dragon Talon. DLC entrance is after Black Gulch primal bonfire. Before you reach the second bonfire where you lift a ton of lifts at range, you will notice some statues with red eyes. Break them then shoot at the lift contraption behind it. You'll be able to cross into the cave with a tree that repairs equips for free. A corpse nearby will contain the Promised Walk of Peace hex. Before the bridge where the dragon crosses and burns the two enemies, instead of crossing the bridge, go straight on the ledge behind the pots to find the Focus Souls sorcery. Inside Dragon Sanctum, you'll drop down to an area with spikes and a wheel contraption. You will need iron arrows as the switch is behind the wheel so you have to reposition yourself three times to hit the switch. Inside the contraption is the Denial miracle. After you've obtained the Eternal Sanctum Key, go back to the beginning of Dragon Sanctum and open the door. Go up the ladder and cross the bridge and head to the final bonfire of Shulva. Activate the elevator and go down. On the way down or up, you can get off midway where there are chests. Inside the chest will be the Dark Greatsword hex. You can go around if you get off on the wrong side.Crown of the Old Iron KingNote: In order to fight Sir Alonne, you will need the Ashen Mist Heart to enter the memory. To enter the Old Iron King DLC, you need the Heavy Iron Key. First off you need the Iron Key which is the early loot under the fire-breathing bull statue in the first area of Iron Keep. From there, go to where you fought the Last Giant and you can now open the door. inside head straight ahead to the lizard near the gap. The corpse holds the Heavy Iron Key. DLC entrance is after the Iron Keep primal bonfire. After ascending the stairs, you'll find 6 smelter wedges on a body. Now this is a warning: I do not know how Dark Souls II handles drops, but they tend to disappear if you don't loot an item. If the Souls the Ashen Idol drops are drops instead of corpse loot, then that means dying twice would make it disappear. So clear the area before looting to be safe. Cross the chain link and light the first bonfire. You will meet your first Ashen Idol. It's recommended that you do not destroy this Ashen Idol just yet. Continue in the level and you'll enter a corridor with the second Ashen Idol. You may destroy this one. This is your 1st soul. After dropping down a few ladders, you'll enter a room with an Iron Warrior as well as some Ashen Warriors with an Ashen Idol in the back. Drop down head to your right into a separate room to find the 'Dance of Fire' pyromancy. You may destroy this Ashen Idol. This is your 2nd soul. Proceed in the level where you end up outside again. You will see a tower to the left with a set of stairs leading down after going down a ladder. The stairs leads to an Ashen Idol but leave it for later. Prior to getting the scepter, you'll climb down a ladder and be in a room with a bunch of doors. Behind one of the doors is the Recollection hex on a corpse. You will be invaded as you go down the ladder. Head through the doorway to the Foyer bonfire and proceed until you get the Scepter to activate the elevators. Now you can head to the boss and use the 4 remaining Smelter wedges you have on the 4 Ashen Idols surrounding the boss. If you don't disable them, they will heal the Fume Knight. This is the 3rd to 6th soul. You can summon two NPCs for the Fume Knight. After you defeat him, he will give you the 12th piece of the Soul of Nadalia. This would be your 7th soul. First off you'll need extra Smelter Wedges. From the Foyer bonfire, head up the lift and take the right. You'll be led into a curved hallway with fire breathing bull heads. Run through it and go up stairs. At the end of the hall is a chest with 4 smelter wedges. From the Foyer Bonfire, the door near the Scepter placement has an Ashen Idol inside. Go straight in and to your left. Then the room on the right has the Fire Snake pyromancy. This is your 8th soul. From the Foyer Bonfire, you'll need to go down the lift and you'll find an ash field with three iron warriors. You'll find the Tower Key which you'll need to fight Sir Alonne. From the Foyer Bonfire, go up the lift once, get off and head left and take that lift up. There will be an Ashen Idol immediately in front of you as you get invaded by Prowlers. This is your 9th soul. Continuing the path from the previous point, you'll find an armor glowing in red (only if you have the crown after the Fume Knight) and a bonfire. Examine the armor to fight Sir Alonne to obtain the 11th and final Smelter Wedge. Revisit the first bonfire and destroy the Ashen Idol. This is your 10th soul. From the second bonfire, head forward and the missing gap can be crossed with the elevator now. Inside the doorway will be an Iron Warrior and the Ashen idol behind the 3rd door from the left. This is your 11th soul. From the Foyer bonfire, head backwards and go down the stairs and across the chain link. There is an Ashen Idol near the bottom of the tower. This is your 12th soul and final soul. Upon having the 12th soul, you receive the true soul and can trade with Straid for Outcry for 45,000 souls.Crown of the Ivory KingIn order to enter the Ivory King DLC, you need the Frozen Flower. Should you not have it already by following the guide, it's in Drangleic Castle after the King's Gate bonfire. It's behind the first gate on the right on a corpse. DLC entrance is at Shrine of Winter. Mental Note: Once you've entered the first building, go downstairs and there is a doorway to the right. The passage is blocked by a elevator with coffins. Soul Flash is in the chest on the other side. After the bonfire where you drop down, you'll head up the stairs and into the next area. You can actually go towards the upper snow area which leads back to the fountain area. Take the snow ledge right and it'll lead you back to the area you were just except on top with a corpse loot. This is the Dark Dance hex. Continue in the level until you have to pull a lever to open a gate. One of these gateways has no door and you can go in and pull a lever thus raising the elevator with coffins you saw earlier. Once you're on the front balcony where you can see the first bonfire, go to the tower that's closest to the beginning bridge. If you look up, you can see a doorway. There is an invisible ladder that you can use that leads to the Splintering Lightning Spear miracle. It becomes visible if you have the Eye of the Priestess. Return to the first bonfire and run to the first bonfire and get the Soul Flash sorcery and thus completing your DLC journey for spells. Walkthrough - Clean-Up

Selfless Giver - 将誓约的信仰度提升至最高。 要获得Selfless Giver,你只需将一个誓约的信仰度提升至最高,但要在《黑暗之魂2》中达成100%成就,必须将两个誓约的信仰度升满,分别是暗黑朝圣者誓约和太阳的后裔誓约。最容易完成的誓约是青之守护者,但它并非达成100%成就的必需条件。 太阳的后裔 - 要将太阳的后裔誓约升满并获得阳光枪奇迹,你需要30个太阳徽章。这是独特的要求。 - 太阳徽章可以通过以下方式获得:作为太阳的后裔成员击败 boss,或者召唤太阳的后裔成员并一同击败 boss。 - 太阳徽章也会由夹缝森林(二周目)中的猎鹰骑士以及熔铁城的骑乘监工掉落。(那些向你发射暗魔法球的家伙)。 暗之朝圣者 - 你必须完成暗之朝圣者任务才能获得【极致】咒术,因为这是游戏中的独特事件。 - 要将誓约升到满级,你需要完成所有3个深渊以及击败暗潜者 boss。首次尝试深渊是免费的;之后每次尝试都需要消耗一个人性雕像。 - 要加入誓约,你必须先在所有3个地点与格兰达尔交谈。 - 地点1:黑溪谷的遗忘之门后面 从第二个篝火出发,往回走向剑背野猪,从悬崖跳下到一个 ledge 上。进入后与暗之赐予者格兰达尔交谈。必要的话加入誓约。进入深渊,点燃火炬,击败所有敌人后坠入深渊。- 位置2:在暗影森林尽头的一个深坑中 从暗影废墟营火出发,你可以直接跑过所有幽灵而不吸引它们的仇恨,所以径直跑向深坑,右转直到到达通往娜吉卡的山下。一直向前走,正前方有一块木板。踩上去木板会断裂,你会直接落到暗赠者格兰达尔旁边。完成深渊。 - 位置3:多兰古雷格城堡第三个营火 从多兰古雷格城堡的王门营火出发,在有雕像的房间里,最左边的灵魂门内有一个遗迹守卫和一块脆弱的地板,从那里跳下可以到达第三个营火和暗赠者格兰达尔。完成深渊。 - 在你完成第三个深渊后,暗潜者会立即出现,这是一场 boss 战。如果你未能击败他,就必须穿过整个深渊,然后再次与他战斗。我个人觉得【黑森林】的深渊对我来说是最简单的。 - 击败【暗潜伏者】后,与【黑暗赐予者格兰达尔】对话,他会根据你在誓约中的1、2、3级 rank,分别给予你【共鸣灵魂】、【大共鸣灵魂】和【高潮】咒术。

好奇的地图 - 点燃蜜酒镇地图上的所有火焰。此时你应该已经将卡尔引导至蜜酒镇,并且在攻略进行到这里时,你已经通关了游戏,因此与卡尔对话即可获得他的头盔和成就【Curious Map】。

【Supreme Weapon】- 将武器强化至极限。你只需将一把常规类型的武器强化至+10即可。你可以随意进行武器质变,这不会影响所需材料的数量。如果某把武器需要楔形石原盘,那么你就必须使用其他物品来强化。

Garrolous Miser - Inherit Laddersmith Gilligan's equipment If you haven't gotten this, you can head to Majula and speak with Gilligan next to the pit. Purchase his 12,000 soul ladder then exhaust his dialogue to receive the Melu Scimitar and this achievement. Walkthrough - Spells Shop SpellsI essentially pointed out all spell locations you could get for free while you progressed through the stages, but now we need to cover the rest and some that required revisiting. We'll go over the purchases first. Licia of Lindelt Heal for 1500 souls Med Heal for 3000 souls Great Heal Excerpt for 4500 souls Replenishment for 3000 souls Resplendent Life for 4500 souls Caressing Prayer for 2000 souls Force for 1800 souls Lightning Spear for 6000 souls Homeward for 2400 souls Guidance for 3700 soulsCarhillion of the Fold Soul Arrow for 1500 souls Great Soul Arrow for 3000 souls Heavy Soul Arrow for 2000 souls Great Heavy Soul Arrow for 4500 souls Shockwave for 1800 souls Soul Spear Barrage for 2600 souls Magic Weapon for 2000 souls Yearn for 3000 soulsRosabeth of Melfia Fireball for 1200 souls Fire Orb for 3400 souls Combustion for 1500 souls Poison Mist for 3400 souls Flash Sweat for 2300 souls Iron Flesh for 3500 soulsBlue Sentinel Targray Emit Force for 4200 souls Heavenly Thunder for 3300 soulsStone Trader Chloanne Soul Appease for 8800 souls Dead Again for 4000 soulsStraid of Olaphis Homing Soul Arrow for 6500 souls Strong Magic Shield for 6300 souls Cast Light for 3000 souls Unveil for 2200 souls Sunlight Blade (after Undead Crypt) for 12,400 souls Great Lightning Spear (after Undead Crypt) for 13,000 souls Dark Orb for 600 souls Dark Hail for 1500 souls Dark Fog for 5200 souls Affinity for 11,500 soulsTitchy Gren Firestorm for 4500 souls Great Combustion for 4800 souls Fire Whip for 3800 soulsMagerold of Lanafir Fall Control for 4800 souls Dark Hail for 1500 souls Dark Storm for 4700 soulsCromwell the Pardoner Scraps of Life for 2200 souls Great Heal for 8000 souls Emit Force for 4200 souls Heavenly Thunder for 3300 souls Perseverance for 3500 soulsFelken the Outcast Magic Barrier for 2700 souls Dark Orb for 600 souls Dark Weapon for 2700 souls Resonant Soul for 1100 souls Great Resonant Soul for 3400 souls Resonant Flesh for 3400 souls Resonant Weapon for 4000 soulsWeaponsmith Ornifex Homing Soul Arrow for 6500 souls Homing Soulmass for 6000 souls Fall Control for 4800 soulsChancellor Wellager Great Magic Barrier for 9300 souls Wrath of the Gods for 8200 souls (NG++) Bountiful Sunlight for 11,000 souls (NG++) Great Chaos Fireball (NG++)Grave Warden Agdayne Soul Spear for 12,000 souls Soul Vortex for 10,400 souls Soul Appease for 8,800 souls Warmth for 5,200 soulsDarkgiver Grandahl Cast Light for 3000 souls Dark Orb for 600 souls Dark Hail for 1500 souls Darkstorm for 4700 souls Profound Still for 13,000 soulsRoyal Sorcerer Navlaan Remember to be hollowed when you talk to him. Great Magic Weapon for 6000 souls Strong Magic Shield for 6300 souls Boss Soul TradingList excludes NG+ souls and DLC souls. Those are in their respective sections. Toxic Mist: Royal Rat Vanguard Soul (Grave of Saints) Acid Surge: Royal Rat Authority Soul (Door of Pharros) Sacred Oath: Soul of Velstadt (Undead Crypt) Soul Shower: Scorpioness Najka Soul (Shaded Woods) Heavy Homing Soul Arrow: Ruin Sentinel Soul (Lost Bastille) Lifedrain Patch: Darklurker Soul (Pilgrims of Dark) Repel: Giant Lord Soul (Memory of Jeigh) Other Spells Head to Aldia's Keep as a hollow and speak with Royal Sorcerer Navlaan under the staircase who will ask you to assassinate specific NPCs in his stead proving so by showing specific items. This guide will tell you how to do so without killing anyone. 1. Buy the Ladder Miniature from Gilligan's shop; receive Dispelling Ring 2. Complete Curious Map for Cale's Helmet; receive Simpleton's Spice 3. With 20 faith and intelligence, speak with Felken for Sunset Staff; receive Forbidden Sun pyromancy 4. You already have the Aged Feather; receive Unleash Magic sorcery Revisit the Pit in Majula, climb down ladder closest to Sweet Shalquoir. Climb up the ladder next to it and open the door with the Forgotten Key. Inside you will find Great Lightning Spear miracle. After buying all the miracles you need from Licia of Lindelt, invade her using the Cracked Eye Orb. Once you defeat her you will receive Soothing Sunlight miracle. As a member of the Bell Keeper, you'll have to get to Rank 2 for Hidden Weapon sorcery which consists of defeating 30 red phantoms or hosts. You can do it online, or offline. For offline go to Belfry Sol and go up the ladder. If you go to the tower, at the bottom of the first tower there's a chance of a Mad Warrior spawning. Aged Feather or Homeward Bone recommended to reset spawns. Memory trick no longer works so you have to check every time. Talk to the Dwarf to see if you ranked up. Walkthrough - NG+ and NG++ Before we begin, I'll quickly cover which key items are reset or not reset upon entering NG+ and further. Fragrant Branch of Yore will be removed from inventory. All keys will be removed from inventory. Aged Feather will not be removed from inventory. Estus Flask upgrades will not be removed. Soapstones will not be removed. King's Ring will be removed from inventory. Ashen Mist Heart will be removed from inventory. NG+To enter NG+ and further, you must return to the Far Fire bonfire in Majula. Rest at the bonfire and select to begin a new journey to Drangleic. Defeat Last Giant Defeat Pursuer at Forest of Fallen Giants Defeat Ruin Sentinels accessed through bird's nest at Lost Bastille (requires Branch) or skip with Pharros Lockstone/Antiquated Key Defeat The Lost Sinner [1/4] (loot Branch of Yore from chest afterwards) Defeat Dragonrider at Heide's Tower of Flame and move Licia of Lindelt to Majula Defeat Skeleton Lords in Huntsman's Copse Defeat Covetous Demon in Harvest Valley/Earthen Peak Defeat Mytha, the Baneful Queen in Earthen Peak and move Laddersmith Gilligan to Majula. Buy Gilligan's 12,000 soul ladder, climb down and roll down to the Gutter and move to Black Gulch while picking up the Fragrant Branch of Yore at the beginning of Black Gulch. Defeat the Rotten. [2/4] Free Rosabeth and defeat Scorpionness Najka in Shaded Woods. Defeat Prowling Magnus and Congregation in Brightstone Cove Tseldora. Defeat The Duke's Dear Freja in Brightstone Cove Tseldora. Kill the duke for a Fragrant Branch of Yore. [3/4] Defeat Smelter Demon in Iron Keep. Defeat Old Iron King in Iron Keep. Loot Fragrant Branch of Yore. [4/4] Free Straid in his cell and trade all four Old souls (NG+ of each Great Soul) for their respective spells. The Rotten drops the Old Dead One's Soul which trades for the Numbness Hex for 10,000 souls. Bonfire Ascetics can be used to obtain earlier at Black Gulch's second bonfire. This is the final Hex of the game and you should unlock Master of Hexes. Soul relates to Gravelord Nito. The Duke's Dear Freja drops the Old Paledrake Soul which trades for Crystal Soul Spear for 10,000 souls. Bonfire Ascetics can be used on the third bonfire in Brightstone Cove Tseldora. This is the final sorcery of the game and you should unlock Master of Sorcery. Soul relates to Seath the Scaleless. The Lost Sinner drops the Old Witch Soul which trades for the Flame Weapon pyromancy for 5,000 souls. Soul relates to the Bed of Chaos, or the Witch of Izalith. The Old Iron King drops the Old King Soul which trades for the Binding Bolt miracle for 5,000 souls. While this should align with the final king of Dark Souls, 4 Kings, it could refer to Gwyn. Defeat the Twin Dragonriders and Looking Glass Knight at Drangleic Castle. Defeat the Demon of Song in Shrine of Amana. Defeat Velstadt, the Royal Aegis in Undead Crypt and pick up the King's Ring. Defeat Guardian Dragon in Aldia's Keep. Obtain Ashen Mist Heart in Dragon Shrine. Defeat Giant Lord in Memory of Jeigh. Other memories not required. Defeat Throne Defender, Throne Watcher, and Nashandra Aldia only spawns if you kill Vendrick then Nashandra. NG++ Defeat Last Giant (buy Fragrant Branch of Yore from Merchant Hag Melentia) Defeat Pursuer at Forest of Fallen Giants Defeat Ruin Sentinels accessed through bird's nest at Lost Bastille (requires Branch) or skip with Pharros Lockstone/Antiquated Key Defeat The Lost Sinner [1/4] (loot Branch of Yore from chest afterwards) Defeat Dragonrider at Heide's Tower of Flame and move Licia of Lindelt to Majula Defeat Skeleton Lords in Huntsman's Copse Defeat Covetous Demon in Harvest Valley/Earthen Peak Defeat Mytha, the Baneful Queen in Earthen Peak and move Laddersmith Gilligan to Majula. Buy Gilligan's 12,000 soul ladder, climb down and roll down to the Gutter and move to Black Gulch while picking up the Fragrant Branch of Yore at the beginning of Black Gulch. Defeat the Rotten. [2/4] Free Rosabeth and defeat Scorpionness Najka in Shaded Woods. Defeat Prowling Magnus and Congregation in Brightstone Cove Tseldora. Defeat The Duke's Dear Freja in Brightstone Cove Tseldora. Kill the duke for Fragrant Branch of Yore.[3/4] Defeat Smelter Demon in Iron Keep. Defeat Old Iron King in Iron Keep. Loot Fragrant Branch of Yore. [4/4] Go to Drangleic Castle, exhaust Chancellor Wellager's dialogue. He now sells Wrath of the Gods, Great Chaos Fireball and Bountiful Sunlight. The final three spells of the game as you should unlock both Master of Miracles and Master of Pyromancy.

【The Dark Soul】- 解锁所有成就。 恭喜! 誓约 所有誓约相关成就仅要求触发邀请你加入誓约的对话即可。你无需实际加入该誓约并放弃当前誓约。成就会在此之前解锁。誓约将按你可接触到的逻辑顺序列出。

温顺者誓约 - 发现温顺者誓约 名称:青之守护者 NPC:灰心的索尔登 位置:如蜜纪念碑 等级 条件 奖励 0 加入 青之印记 1 击败1名入侵幻影 血咬戒指 2 击败5名入侵幻影 静默魔法 3 击败10名入侵幻影 青泪石戒指 台阶顶端坐着一名名为灰心的索尔登的男子。与他交谈并听完所有对话后,即可请求加入他的誓约。

最强者誓约 - 发现最强者誓约 名称:冠军的契约 NPC:胜利者石碑 位置:如蜜 等级 条件 奖励 0 加入 冠军的石板 1 献上10个光辉石 强力魔法武器 2 献上25个光辉石 古龙戒指 3 献上50个光辉石 征服者印记 从如蜜的纪念碑处向左眺望,你会注意到一条悬崖小径,它紧邻通往海德巨火塔的道路。在那条悬崖的尽头有一具尸体、一件物品以及胜利者石碑。

守护者誓约 - 了解守护者的誓约 名称:青之守护者 NPC:青之守护者塔格雷 位置:青之 cathedral 等级 条件 奖励 0 用忠诚之证加入 守护者印记 1 50次胜利 灵树之盾 2 150次胜利 神之怒 3 500次胜利 阳光滋润、塔格雷套装 击败古老龙骑兵后,青之守护者塔格雷就在阳台上。你必须持有忠诚之证才能触发与他的对话。忠诚之证可通过合作游玩获得,或在猎人 corpse 的桥头篝火旁的尸体上拾取。

啃食誓约 - 发现啮齿动物的誓约 名称:鼠王誓约 NPC:鼠王 位置:圣徒墓地/法洛斯门 等级 条件 奖励 0 加入 鼠王纹章 1 献上10个鼠尾 10个小光滑石 2 献上20个鼠尾 10个光滑石 3 献上35个鼠尾 沉睡龙徽戒指 鼠王会在圣徒墓地和法洛斯门的每个 Boss 被击败后出现。所以注意不要攻击他。这也意味着你至少要击败其中一个 Boss。

铿锵誓约 - 发现铿锵誓约 名称:钟楼守卫 NPC:矮人 位置:月亮钟楼/太阳钟楼 等级 条件 奖励 0 加入 钟楼守卫印记,5个锈蚀硬币 1 击败10名入侵者 楔形石原盘 2 击败30名入侵者 隐藏武器法术 3 击败100名入侵者 钟楼守卫套装 矮人坐在每个钟楼区域起点的柜子上。你也可以通过击败太阳钟楼中可能生成的NPC红灵来推进这个誓约的进度。他会在塔楼附近生成。

血腥誓约 - 探索嗜血者的誓约 名称:血之兄弟会 NPC:蒂奇·格林 位置:不死人刑场 等级条件奖励 0 用怨恨之证加入 血之纹章 1 50点等级点数 弯曲双剑 2 150点等级点数 新月镰刀 3 500点等级点数 混沌大火球咒术、格林套装 击败执行者战车后,你可以上楼找到蒂奇·格林。这里有一个营火,方便你找到蒂奇·格林,即使没有怨恨之证也能加入。一个怨恨之证就在地沟前。等级点数为净点数;失败-1,胜利+1。

光辉誓约 - 发现一个最光辉的誓约 名称:太阳后裔 NPC:太阳 位置:熔铁城 等级 条件 奖励 0 加入 太阳纹章 1 献上10个太阳徽章 太阳小圆盾 2 献上20个太阳徽章 太阳直剑 3 献上30个太阳徽章 阳光枪奇迹 在熔铁恶魔篝火之后,继续前进直到遇到另一组毒雾坑。另一边的路径通向一个有誓约的祭坛。作为誓约成员在合作模式中击败 Boss 可获得太阳徽章。此外,暗术巨人与猎鹰骑士也会掉落太阳徽章。

深渊契约 - 探索深渊契约 名称:黑暗朝圣者 NPC:黑暗赐予者格兰达尔 位置:虚影森林/黑溪谷/多兰古雷格城堡 等级 条件 奖励 0 加入 深渊印 1 通关1个深渊地牢 共鸣灵魂(咒术) 2 通关全部3个深渊地牢 大共鸣灵魂(咒术) 3 击败暗潜伏者 终焉(咒术)、黄王套装 要加入该契约,你必须在所有三个地点找到他。 虚影森林:在前往娜吉卡的山丘前的石制建筑旁,地面上有一些木板(不是靠近幽灵的那块,再往下走),踩在木板上会掉落到黑暗赐予者格兰达尔处。 黑溪谷:使用遗忘钥匙,从第二个营火出发,可以看到悬崖边缘下方有一个平台。跳下去并进入石门。多兰古雷格城堡:从王门营火出发,共有6扇门需要开启。左侧最远处的门内有一块脆弱的地板,通过它可以到达第三个营火以及暗术师格兰海尔。

远古誓约 - 发现古老誓约 名称:古龙余烬 NPC:拉纳菲尔的马杰尔 位置:钢铁要塞 等级 条件 奖励 0 用石化蛋加入 龙瞳,古龙印 1 献上10块龙鳞 龙头石 2 献上20块龙鳞 龙身石 3 献上30块龙鳞 黑龙大剑 在龙祭坛获得石化蛋后,返回钢铁要塞的拉纳菲尔的马杰尔(商人)处,他会让你加入。 神秘地图
【好奇的地图】- 点燃蜜酒镇地图上的所有火焰。 在巨人陨落之森,从 Cardinal Tower 篝火处爬下梯子后,穿过雾门,你会发现自己站在一根巨大的树根上。跳下去并前往洞穴。在洞穴顶部会遇到制图师卡尔。听完他的所有对话以获得房屋钥匙。返回蜜酒镇的宅邸,打开房门后前往地下室,清除那里的骷髅。远火篝火处的骷髅会根据篝火强度生成,每次强度增加会生成1个骷髅。之后,回去找卡尔并将他迁移到蜜酒镇。 这个成就基本上要求你完成游戏。每个数字对应地图上的一个火焰: 1. 击败最后的巨人 2. 击败失落罪人 3. 击败腐败物 4. 击败铁之古王 5.击败公爵的宠儿弗蕾雅 6. 获取国王戒指 7. 获取灰雾之心 8. 击败王座守护者与王座监视者 击败最终 Boss 后,返回地下室找卡尔,即可获得他的头盔,该头盔是皇家法师纳瓦兰暗杀任务所需物品。 碎嘴的守财奴
【喋喋不休的守财奴】- 继承梯子匠吉利根的装备 从土峰的第二个营火出发,上楼出门后会看到木栅栏。打破栅栏向左走就能找到吉利根。在土峰找到吉利根后,花费2000灵魂购买他的梯子,并听完他的所有对话,让他搬到 Majula。当他到达 Majula 后,会出售通往深坑的梯子。购买12000灵魂的梯子,然后与他对话,即可获得梅卢弯刀和该成就。 【流亡者的集结】

流放者的聚集 - 增加麦酒拉的人口 简单来说,这个成就要你找到所有可以迁移的NPC并将他们迁移到麦酒拉。为方便起见,共有7个NPC可以搬到麦酒拉。 商人哈格·梅伦蒂亚 位置:巨人陨落之森 - 她就坐在 Cardinal Tower 篝火旁。要将她迁移到麦酒拉,只需听完她的所有对话。在击败最后的巨人后,她会迁移到 Far Fire 篝火附近的墙边。 制图师卡尔 位置:巨人陨落之森 - 从 Cardinal Tower 爬下梯子后,他就在一个洞穴里。当你爬上树根时,可以从树根顶部跳到下方的建筑。悬崖上有一个洞穴,卡尔就在里面。首次耗尽他的对话会获得【蜜酒镇】宅邸的钥匙。返回【蜜酒镇】,进入宅邸并前往地下室。【蜜酒镇】的篝火强度每提升一级,就会生成一具骷髅。二周目有2具,三周目有3具,以此类推。清除威胁后,返回【卡尔】处并耗尽他的对话,他就会搬到宅邸内。 【林德尔特的莉西亚】 位置:【海德巨火塔】 击败【龙骑兵】后,上楼前往篝火处。莉西亚会在水边眺望。耗尽她的对话后,她会搬到【蜜酒镇】。她的新位置在前往【海德巨火塔】前的圆形大厅。 【教派的卡利昂】 位置:【无主码头】 要让卡利昂开口说话,需要至少8点智力。否则他会对你不屑一顾,你也很难对他造成什么影响。总之,他在码头的船前面,就在你踢断桥梁解锁捷径的地方,因为无主之港一开始只有一个篝火。之后他会转移到纪念碑和铁匠伦格里斯特之间的那棵树旁。 梅拉菲雅的罗莎贝丝 位置:虚影森林 你需要一个【返生树枝】来解救她。你可能还需要一件没用的 armor。商人 hag 梅伦蒂亚出售一件。从 Majula 出发,通往如蜜的小路附近有另一个洞穴入口。从那里沿着线性路径前进,你会看到一栋建筑,外面坐着一个男人。里面是被石化的 NPC 罗莎贝丝。对她使用【返生树枝】。一旦她解除石化状态,你还可以通过给她一件装备来获得【换洗衣物】。给她衣物后,她会搬到纪念碑台阶的底部。 石之商人克洛伊安妮 位置:熔铁城 她位于熔铁城入口处的悬崖边缘。听完她的所有对话后,她会搬到如蜜。她实际上是伦格里斯特的女儿,颇具讽刺意味的是,她就坐在他工坊附近的岩石上。 梯子铁匠吉利根 位置:辉石镇 从辉石镇的第二个篝火出发,上楼梯并走出门口。打破木栅栏,沿着边缘向左走就能找到吉利根。购买他售价2000魂的梯子,然后听完他的所有对话。他还会教一个手势。之后他会搬到如蜜的坑洞附近。 姿势大师
姿势大师 - 学习所有姿势 欢迎 NPC:灰心的索尔登(如蜜) 条件:听完他的所有对话,然后请求学习他的姿势。 决斗鞠躬 NPC:蓝 Sentinel 塔格雷(蓝调大教堂) 条件:持有誓约之证激活对话;誓约之证可在深渊或作为召唤协助击败 Boss 后获得。 喜悦 NPC:尤果的本哈特(虚影森林) 条件:在进入虚影森林前解除罗莎贝丝的石化,然后与本哈特对话。 嘲讽 NPC:史垂德(失落 Bastille) 条件:解救被石化的史垂德,然后在营火休息。之后与史垂德对话并请求学习他的姿势。 握拳 NPC:米拉的克雷顿(猎人尸体处) 条件:使用位于山顶的不死人囚笼钥匙,在猎人尸体处(靠近最后一个营火)解救克雷顿。【赞美太阳!】 NPC:废弃祭坛(土之祭坛) 条件:在熔铁城找到太阳继承者的祭坛即可。进入土之祭坛前,在第一个持锤敌人之后,遇到一堆罐子前,左侧有一条向下的小路。祭坛上有阳光照射。 【跪拜】 NPC:吉利根(土之祭坛/麦酒镇) 条件:在土之祭坛花费2000灵魂向他购买梯子,然后通过请求向他学习该动作。你也可以耗尽他的对话让他移动到麦酒镇。 【斩首】 NPC:凡荷尔的头颅(虚影森林) 条件:从十字路口的左侧小路进入浓雾中,找到凡荷尔的头颅即可。他穿着红色织物;听完他的故事后,你可以学习他的动作。热身 NPC:蝎人塔尔克(虚影森林) 条件:装备【低语戒指】与塔尔克交谈。【呢喃的希尔夸伊】(猫)在【麦酒镇】出售此戒指。必须在击败【蝎子女王纳吉卡】之后。 这就是我 NPC:韦拉杰大臣(多兰古雷格城堡) 条件:耗尽其对话直至可打开其菜单并学习其姿势。 求求你! NPC:墓王卫士阿格戴恩(不死人墓穴) 条件:耗尽其对话,且不使用任何光源以避免产生敌意。 万岁 NPC:德拉蒙德队长(瓦玛记忆) 条件:耗尽其对话以学习其姿势。 露卡提耶

露卡提耶 - 继承蜜拉的露卡提耶的装备 成就"Lucatiel"要求你完成两个条件才能继承她的装备。 对话1:无主码头 她的位置确实从第一个营火处移走了。现在她被安置在该区域早期的一间房子里。第一次穿过码头后,你会遇到一些楼梯。在楼梯的第一个平台,你应该能看到一个可以点燃的火盆,旁边有一间房子,里面有楼梯。她就在里面。 召唤1:无主码头 必须触发对应的无主码头对话。她的召唤印记也已移动。她原来的召唤印记放在一个需要你解锁的大门前。格里姆商人加夫兰现在占据了那个位置,而她的召唤印记已移至更靠近船只的码头处。具体位置在通往船只的最后一段路之前的码头拐角处。 对话2:失落 Bastille 她并未离开原来的位置,就在监狱守卫身后的塔楼里。只需听完她的所有对话即可。 召唤2:罪人塔 必须先触发“失落 Bastille”的对应对话。到达罪人塔后,乘坐电梯下行。她的召唤印记位于底部,在进入水域部分之前。她在这个区域很可能会死亡,因此建议在召唤前先清理该区域。这里会刷新一个灵活哨兵。对话3:丰收谷/土峰 我个人称这里为丰收谷,因为它位于贪婪恶魔之前,但严格来说这里是土峰内部。她会从土峰下层营火处转移到贪婪恶魔前的房间。在前往她所在的充满毒雾的走廊前,你可能需要先排空毒池。不需要跳跃,你可以在前一个房间爬下去。 对话4:黑溪谷 她没有离开原来的位置;这个位置在黑溪谷的早期区域,就在你到达水潭之前。悬崖边有一个小平台,你可以跳下去,那里有一条通向主路下方隧道的路。她会在隧道的尽头。听完她的所有对话。召唤3:黑溪谷 必须触发对应对话:黑溪谷。沿着悬崖追踪,最终会找到一条通往洞穴的小路。洞穴被一个石化敌人挡住,需要使用【芳香的干叶】才能移开;在你下到黑溪谷之前会获得一个。篝火附近会有露卡提耶的召唤符。 召唤4:钢铁堡 必须至少完成3段对话。她的召唤符出现在熔铁恶魔门前,周围有大量弓箭手。 最终对话:安迪尔馆 警告:如果尚未完成至少3次召唤,不要与她对话。你需要所有之前的对话。如果没有剩余召唤来达到3次,可以使用【营火的余烬】在更高周目尝试。否则,你将不得不等到下一周目才能再次尝试。一旦确定准备好了,就尽管和她对话吧,搞定! Master of Hexes

掌握所有咒术 - 学习全部咒术 咒术将按照它们在你物品栏中的显示顺序列出,以便于交叉查阅。对于【原罪学者】版本,你需要下载DLC法术。法术名称 位置 获取方式 商人价格 黑暗宝珠 Straid/Felkin/Grandahl 600灵魂 黑暗冰雹 Straid/Magerold/Darkdiver 1500灵魂 黑暗迷雾 Straid of Olaphis 5200灵魂 内在潜力 Straid of Olaphis 11500灵魂 死者复生 Stone Trader Chloanne 4000灵魂 黑暗武器 Felkin the Outcast 2700灵魂 绝望低语 Grave of Saints 穿过山谷;使用法洛斯之石 斥退 Straid of Olaphis 巨人王的灵魂 扭曲壁垒 Door of Pharros 梯子处尸体拾取 麻木 Straid of Olaphis 古老死者的灵魂(腐朽周目+) 黑暗巨剑 Sunken King DLC 参考攻略 - DLC 回忆 Old Iron King DLC 参考攻略 - DLC 生命碎片 Cromwell the Pardoner 2200灵魂 黑暗风暴 Magerold/Darkdiver 4700灵魂 共鸣灵魂 Felkin the Outcast 1100灵魂 强力共鸣灵魂 Felkin the Outcast 3400灵魂 高潮 Pilgrims of Dark rank 3 共鸣放逐者弗林 4000灵魂 共鸣武器 放逐者弗林 4000灵魂 吸魂补丁 欧兰帕的史垂德 暗潜者之魂 静谧深渊 深渊行者格兰达尔 13000灵魂 约定的和平漫步 太阳王DLC 详见攻略-DLC 黑暗之舞 象牙王DLC 详见攻略-DLC 奇迹大师

掌握奇迹 - 学习所有奇迹 奇迹将按照它们在你物品栏中出现的顺序列出,以便于交叉查阅。对于【原罪学者】版本,你需要下载DLC法术。法术名称 位置 商人价格 治愈 林德尔特的莉西亚 1500灵魂 中等治愈 林德尔特的莉西亚 3000灵魂 强效治愈残篇 林德尔特的莉西亚 4500灵魂 强效治愈 赦罪者克伦威尔 8000灵魂 抚慰阳光 入侵林德尔特的莉西亚 破碎的眼球宝珠 恢复 莉西亚/克伦威尔 3000灵魂 辉煌生命 莉西亚/奥拉夫斯的斯特雷德 4500灵魂 丰饶阳光 大臣韦拉格(二周目以上)11000灵魂 抚慰祷言 莉西亚/克伦威尔 2000灵魂 强力攻击 莉西亚/克伦威尔 1800灵魂 神之怒 大臣韦拉格(二周目以上)8200灵魂 释放强力攻击 蓝 Sentinel塔格雷/克伦威尔 4200灵魂 神圣雷电 塔格雷/克伦威尔 3300灵魂 雷电枪 林德尔特的莉西亚 6000灵魂 强力雷电枪 奥拉夫斯的斯特雷德 13000灵魂 阳光枪 太阳后裔 等级3 灵魂安抚 石头商人克洛伊安 8800灵魂 束缚闪电 奥拉夫斯的斯特雷德 老王灵魂(OIK NG+) 魔法屏障 放逐者费尔肯 2700灵魂 大魔法屏障 韦拉杰院长 9300灵魂 返乡 林德尔的莉西亚 2400灵魂 引导 林德尔的莉西亚 3700灵魂 神圣誓言 奥拉夫斯的斯特雷德 维尔德斯塔特之魂 揭示 奥拉夫斯的斯特雷德 2200灵魂 坚韧 宽恕者克伦威尔 3500灵魂 阳光之剑 奥拉夫斯的斯特雷德 12400灵魂 否认 沉王DLC 见攻略 - DLC 碎裂雷枪 象牙王DLC 见攻略 - DLC 咒术大师

火焰魔法大师 - 学习所有火焰魔法 火焰魔法将按照它们在你物品栏中出现的顺序列出,以便于交叉查阅。对于原罪学者版本,你需要下载DLC中的魔法。法术名称 位置 商人价格 火球术 罗莎贝娜 1200魂 火焰宝珠 罗莎贝娜 3400魂 大火球术 辉石镇盖多勒 辉石钥匙 混沌大火球术 韦ladger大臣(二周目+) 17400魂 火焰风暴 蒂奇·格伦 4500魂 火焰风暴(升级版) 阿玛那祭坛 第三间小屋附近的宝箱 混沌风暴 钢铁巨偶 击败熔铁恶魔后熔岩柱上的宝箱 引燃 罗莎贝娜 1500魂 大引燃 蒂奇·格伦 4800魂 火焰鞭 蒂奇·格伦 3800魂 毒雾 罗莎贝娜 3400魂 剧毒雾 斯特雷德 王立鼠先锋灵魂 酸液喷吐 斯特雷德 王立鼠 Authority灵魂 滞留火焰 斯特雷德 6700魂 火焰横扫 斯特雷德 9500魂 禁忌太阳 皇家魔法师纳瓦兰 暗杀任务 火焰武器 斯特雷德 老魔女灵魂(失落罪人二周目+) 快速出汗 罗莎贝娜梅莉亚的罗莎贝丝 2300 灵魂 钢铁身躯 梅莉亚的罗莎贝丝 3500 灵魂 温暖 墓王阿格戴恩 5200 灵魂 献祭 罪人塔 终点宝箱 火焰蛇 钢铁之王DLC 见攻略 - DLC 火焰之舞 钢铁之王DLC 见攻略 - DLC 呐喊 钢铁之王DLC 见攻略 - DLC 魔法大师

掌握所有法术 - 学习全部法术 法术将按照它们在你物品栏中出现的顺序列出,以便于交叉查阅。对于【原罪学者】版本,你需要下载DLC法术。法术名称 位置 获取方式 灵魂箭 卡里姆的卡里隆/熔铁城的马格罗尔德 1500魂 强力灵魂箭 卡里姆的卡里隆/熔铁城的马格罗尔德 3000魂 重灵魂箭 卡里姆的卡里隆/熔铁城的马格罗尔德 2000魂 强力重灵魂箭 卡里姆的卡里隆/熔铁城的马格罗尔德 4500魂 追踪灵魂箭 奥尔法席斯的斯特雷德/鸟人铁匠 6500魂 追踪重灵魂箭 奥尔法席斯的斯特雷德 击败遗迹守卫获得的魂 追踪灵魂块 鸟人铁匠 6000魂 追踪结晶灵魂块 阿玛纳祭坛 第三个营火后的尸体拾取 灵魂枪 守墓人亚格德尔 12000魂 结晶灵魂枪 奥尔法席斯的斯特雷德 古老苍白龙的魂(公爵的夫雷雅二周目+) 冲击波 卡里姆的卡里隆 1800魂 灵魂枪连射 卡里姆的卡里隆 2600魂 灵魂风暴 奥尔法席斯的斯特雷德 蝎子女娜吉卡的魂 灵魂巨 sword 多兰古雷格城 电梯雕像房间后的宝箱 灵魂漩涡 守墓人亚格德尔 10400魂 灵魂螺栓 多兰古雷格城堡 镜之骑士后的宝箱 灵魂洪流 安迪尔馆 腐蚀酸笼 魔法武器 大帽子罗根 2000灵魂 强力魔法武器 黑溪谷 营火后的第一个洞穴 结晶魔法武器 龙祭坛 石化蛋后的悬崖宝箱 强力魔法盾 史垂德 6300灵魂 渴望 大帽子罗根 3000灵魂 静谧 遗忘囚笼 熔铁恶魔 Boss房幻象房间(梯子) 坠落控制 鸟人/玛格罗尔 4800灵魂 隐藏武器 钟卫 2级 修理 虚影森林 金狮子法师附近的宝箱 光明照耀 史垂德/格兰达尔 3000灵魂 变色龙 熔铁城 第二个雾坑中的尸体 loot 解放魔法 王室法师纳瓦兰 暗杀任务 灵魂闪光 象牙之王 见攻略-DLC 集中灵魂 太阳王 见攻略-DLC 月光大剑

月光大剑 - 继承尤果的本哈特的装备。 和露卡提耶一样,你也需要在本哈特作为召唤出现前找到他,并至少召唤他三次。然后触发他的最终对话以获得他的装备。他持有一把亮蓝色的大剑,很容易辨认。 对话1:虚影森林 从麦道夫出发,前往虚影森林。你会遇到一扇被石化雕像罗莎贝丝挡住的门。本哈特会坐在这扇门的左侧。他会说自己无法通过这扇门。与他交谈直到对话结束。 解救罗莎贝丝:要解除NPC的石化状态,需要【芳香的艾尔德之枝】。最早可以从巨人陨落之森的商人处获得。她以12000魂的价格出售一个(对前期游戏来说非常高)。一旦你购买了它,就可以解救她。你需要她来完成另一个成就。 对话2:黑森林(与1相同) 解救罗莎贝丝后,返回本哈特处。他会感谢你解决了他的困境,并授予你【喜悦】姿势。耗尽他的对话后,你将在很长一段时间内与他没有交集。 召唤1:辉石镇盖多勒 如果你已完成他的前两段对话,他的召唤印记会出现在辉石镇盖多勒第一个篝火附近的帐篷内。这个区域没有太多危险点,除了他可能会掉下悬崖这一情况。 对话3:多兰古雷格城堡 击败双龙骑兵 boss 后,你会到达中央篝火处,届时会看到他靠墙坐着。为了触发与镜之骑士的战斗,请在此处听完他的所有对话。 召唤2:多兰古雷格城堡 就在镜之骑士的雾门前方,地面上会出现他的召唤印记。本哈特能轻松在这场战斗中存活下来,是个相当有用的诱饵;不过,镜之骑士可能需要一段时间才会将注意力从你身上移开。 对话4:巨人陨落之森 在追击者的官方Boss区域与巨人尸体之间,本哈特现在会坐在通往鸟巢的台阶附近。在此处听完他的所有对话,即可解锁他参与杰格的回忆战斗。 对话5:欧罗的回忆 奇怪的是,本哈特坐着的区域附近的回忆并非召唤他的地点。他会出现在离他坐着的地方最近的那个回忆中,坐在地上。在此处听完他的所有对话。这是他最后的位置。召唤3:杰格的回忆 如果你在此之前前往瓦马尔的回忆并与德拉蒙德交谈,就可以在这里召唤他;但你不能同时召唤他们两人。在这里,本哈特很容易死亡。 Boss本身不算大问题,但滚动的雕像头颅和轰炸对本哈特的伤害相当高,因此建议快速行动。 召唤4:渴望王座 在与娜珊德拉战斗前,你都可以在这里召唤本哈特。所以如果你在对抗王座守护者和王座监视者时召唤了他,且当时未能与娜珊德拉战斗,你可以再次召唤他。目前不清楚这算两次成功召唤还是会重叠计算。召唤5:龙之憩(DLC - 沉王的王冠) 在与埃拉娜的最终Boss战前,你可以在这里召唤本哈特,他的召唤印记位于Boss雾门所在区域的几根柱子旁边。 一旦你完成将他转移到奥尔罗的回忆,并至少3次召唤他且他在战斗中存活的要求,就回到他在奥尔罗的回忆中的位置,耗尽他的对话,他会给你他的装备并解锁成就。 注意:如果需要获得3次胜利,你可以使用营火的余烬在同一个Boss战中反复召唤本哈特。 铁匠人生

【Smith for Life】- 继承铁匠麦克杜夫的装备。 在失落 Bastille,Bastille 钥匙位于仆人宿舍篝火(击败 Ruin Sentinel 后)正后方的桥边平台上。或者引诱不死狱卒将桶踢向墙壁使其破碎,从而进入麦克杜夫所在区域并到达篝火处。《黑暗之魂2:原罪学者》版本移除了点燃火盆的要求,因此该成就不再可能错过。 其次,Dull Ember 已从钢铁堡移至失落 Bastille。它位于“隔离之塔”篝火旁的宝箱中,该篝火可从巨人陨落之森的追击者身后通过鸟巢传送到达。获得 Dull Ember 后,将其交给麦克杜夫,他就会为你提供服务。你需要在【服务】上总共花费14000个灵魂。购买物品不算在内。只有修理、强化和质变才算数。之后,通过与他对话可获得一块楔形石原盘和成就。楔形石原盘对【Supreme Weapon】成就很有用。
【至高武器】——将武器强化至极限。 你只需将一把常规类型武器强化至+10即可。你可以随意进行武器质变,这不会影响所需材料的数量。如果某把武器需要楔形石原盘,则你需要使用其他物品。 武器可通过以下铁匠进行强化: - 蜜酒镇的铁匠伦格里斯特 - 遗忘囚笼的稳手麦道夫 - 辉石镇的武器商欧尼斐克斯 击败钢铁巨偶后,石之商人克萝艾会无限出售楔形石碎片。 获得黯淡余烬后,稳手麦道夫会无限出售楔形石大碎片;或击败老巨人王与镜之骑士后,克萝艾也会无限出售楔形石大碎片。 击败娜珊德拉后,石之商人克萝艾会无限出售楔形石圆盘。【楔形石原盘】可通过以下方式获得:完成【Smith for Life】成就、达成【钟卫】誓约1级奖励、在获得【国王戒指】后向【克洛伊anne】购买,以及击败【辉石镇盖多勒】的小Boss【徘徊的法师与信徒】。 武器强化材料需求: +1:1个【楔形石碎片】 +2:2个【楔形石碎片】 +3:3个【楔形石碎片】 +4:1个【楔形石大碎片】 +5:2个【楔形石大碎片】 +6:3个【楔形石大碎片】 +7:1个【楔形石圆盘】 +8:2个【楔形石圆盘】 +9:3个【楔形石圆盘】 +10:1个【楔形石原盘】