换一换
换一换 


进阶玩家指南:利用现有特性与选项,通过深入研究游戏机制,帮助玩家提升至更高水平并稳定通关。 简介
So, you've beaten the High Dragun, you might even have beaten some, or all, of the character's pasts. Not bad, not bad at all. But ask yourself, are you really satisfied? Have you really plumbed the depths of the Gungeon, defeated the ultimate foes, faced the most inconceivable dangers and conquered the most punishing challenges? No? Still have that hunger to really make the Gungeon your own? Well, good news! This is the guide for you. In this guide I'll attempt to collate my experiences from hundreds of hours running through the Gungeon to try and give the best possible guide on higher level play. That means attempting tougher runs, with tougher characters or modifiers through tougher floors and, most of all, trying to make sure that you can be consistent and repeatedly complete the game with minimum strain and with the least possible dependence on favorable RNG. It will take a lot of practice, careful understanding of the game mechanics, skill and fortitude, but I am confidant with the right attitude and ambition anyone can truly conquer the Gungeon and see all that this game has to offer. So pointlessly ♥♥♥♥ those pistols and unnecessarily rack those shotguns to make that cool 'Cha-chk' sounds and lets ENTER THE GUNGEON! Note: This Guide is a work in Progress! Not everything I want to talk about will be present here at the moment and I still need to proofread and edit it. Please be mindful of that. Also, this guide was initially written months before Advanced Gungeons and Draguns was released, a large part of the guide may be out of date and a lot of new content will not be mentioned here as a result, I'll try and rectify this when I have the time. Basics: Mindset This guide will be working off of the assumption that you know how to play the game in the most basic manner, and maybe have made their way through several floors or even completed the game once or twice. As such I'm sure everyone knows that Blanks eliminate Bullets and Dodge-rolling gives you invincibility frames. That kind of thing. As such I will talk mostly about the basic ways I think you should approach the game in this section rather than mechanical minutia, and in general this guide will be as in depth as possible so there will be a lot to read. I don't have anything to say about Coop mode so you'll have to find another guide for that. For now I won't talk much about items, weapons and enemies outside of specific circumstances since there are other guides that do so, as well as the wiki, and its probably better to get your own sense of these things when playing the game. That might change in the future though. I will not be holding back on spoilers, so be warned! Mindset It's difficult to articulate what I mean exactly by mindset, but suffice to say you need to approach the game with a certain set of expectations to get the most out of it. Gungeon is quite unique, it's a bullet-hell, twin-stick shooter Roguelike with vast variety of weapons and items. However, of those elements the Bullet Hell part is probably the most important. That means it should be first and foremost approached like such a game, avoiding damage is probably the single most important part of this game if you want to do well, that means your ability to thread the needle through ever more complex bullet formations will be the main thing that determines if you stay alive. Not what gun you have, not what items you have, not how well you can aim at the enemies, simple footwork and damage avoidance is the name of the game, which can seem a bit misleading for a game ostensibly about collecting crazy weapons. Unlike a game like Binding of Isaac it's very rare to be carried by shear power of what you pick up, no matter what the game demands a certain level of skill, especially as I have said in avoiding damage, to make consistent progress. This has sometimes given the game a reputation of being excessively difficult, but I think all anyone needs is a good deal of practice and they'll get better and more consistent at the game and see how fun it can be. Another important aspect of mindset is making do with what you find. This is very important, as a Roguelike Gungeon will throw all kinds of weapons and items at you, and it's critical to get out of a mindset of being frustrated that you didn't find a particular weapon or whatever. Too many times have I seen people get angry that they only got Brown tier guns in floor one or what have you. The truth is that the game is actually extremely well balanced, almost every weapon or item you find has a purpose or strength that may not be obvious at first, and tier quality isn't the be all and end all. If you find a weapon you think sucks consider using it where you can and seeing if you come around to it or start to see the situations it works well in or the other weapons it synergises well with, there are tons of things I've grown to love over the course of playing that I thought sucked initially, experimentation is very important. This will be important later when we talk about chests. Just in general try and be positive and enjoy the game, don't get frustrated by a lack of progress, as you keep at it you will and continuously get better and better. Dying is normal and to be expected, every time you do die try to examine why and what you can do in the future to avoid that specific situation if it comes up again. With some elbow grease you'll be able to overcome almost anything the game throws at you. Basics: Evasion Evasion Keeping the above in mind you should concentrate on practicing your ability to move around bullets. The dodge-roll is very powerful, but it has certain drawbacks, you can't stop or change direction after you commit to it, the latter half of the roll does not have invincibility frames and there is a slight cooldown period where you can't use it. That means you can often roll through one bullet straight into another some distance away and unavoidably take damage. As such a lot of the time it's better to try and do small side-stepping movements to walk around bullets rather than going for the dodge roll every time, that will give you better control over your movement even though you don't have invincibility, save the dodge roll that for thick waves you absolutely won't be able to sidestep or as a way from moving quickly and safely from a place densely packed with bullets you will have trouble dodging to a place without many. As a follow-on always try to make sure you know where you are rolling towards and not just roll willy-nilly since you need to make sure you can move out of the roll with minimum fuss. When playing try to challenge yourself with regards to dodging to get better practice. Make an effort to finish floors without getting hit or even dodge rolling, try and earn those Master Rounds from flawlessing bosses especially floor 1 bosses. Personally I find a useful challenge is to go through the secret floor, the Oubliette (more on that later), find the old crest and try to bring it to the crypt in the Gungeon Proper. This is a demanding way to test your ability to not get hit and if you succeed you have the option of another floor to try. Speed upgrades like Shotgun Coffee can really help dodging and outrunning bullets. Blanks should be used as little as possible and any found ought to be saved for boss battles, even then completing a boss with leftover blanks gives you the option of trying to find secret rooms. A few weapons have the ability to destroy bullets (Blasphemy, Fightsabre, Excaliber and the Huntsman), of these I would not rely on the Huntsman or Excaliber to seriously prevent damage since they are not very reliable (they take time to apply the effect and only destroy bullets in a small area) but Fightsabre and Blasphemy are very useful in that regard. I will talk about Blasphemy in the section concerning the Bullet. It's also worth mentioning the Bloodied Scarf, this is a very unique green chest item that removes your dodge roll and replaces it with the ability to teleport, with a small blank effect destroying bullets around the area you teleport too. The location you teleport to is determined by where your cursor is when you hold down the Roll button, or just which direction you're moving if you tap the roll button. Some people consider this item very powerful, while others think its extremely hard to use and seriously messes up the muscle memory you build up playing normally. Unfortunately I'm in the latter category, but if you do find the Scarf its worth experimenting with (especially since you can phase through locked doors or into secret rooms without using a key or blank). Basics: Planning Planning Since we're talking about the prospect of making it all the way through to Bullet Hell, a certain degree of planning must be considered. You'll need to know how to maximize the effectiveness of the guns, items and pickups that the game throws at you and understand the ways you can best control the RNG to have a more stable and smooth run overall. Typically, when you go through a floor you'll want to find as many resources as possible, especially at the start. The most basic thing to do is make sure you are thorough, scour every room in the floor before leaving and make sure nothing is unaccounted for. Usually you should not rush towards the Boss and expect everything to work out, especially if you are fairly inexperienced, any single room has the potential to drop a key or even a chest, which can really help you, and you may find useful things like extra vendors, shrines, secret rooms and NPCs. Save important things like Blanks or armor for boss encounters, because they will be much more valuable there than in some random enemy room. There are always two chest rooms in each floor, except Bullet Hell, which has none. Of these chests one will be guaranteed to have a weapon and the other will be guaranteed to have an item, either passive or active. Knowing this will really help you plan out how to use your resources, especially at the start, if you open a chest and find a weapon you can be damn near guaranteed the other will have an item. Maybe it's a low tier chest and you don't feel as though its worth the key to open and risk getting crap like the Ruby Bracelet. On the flipside, if you have good weaponry and open a chest with an item it might not be worth opening a lower tier chest that might just have a Makarov or Plunger, especially later on when you have lots of guns and items become more valuable. These decisions are important for saving valuable keys for later, you never want to run into a Black or Red chest and not be able to find any keys to open it. In a similar fashion, if you kill the Boss of a floor and you have not found any weapons on that floor, the Boss is absolutely guaranteed to drop a weapon and not any kind of item. Work this into your considerations as you move through the floor, it could be better to entirely ignore very low tier chests if you are a character with a good ability to kill bosses from the start like the Bullet or the Hunter to try and force the Boss to drop something better. Generally though, you'll want to be in the best possible shape you can be in before facing the boss so you can try and get those all important Master Rounds, so be careful. Because of the quirks in the way keys drop I highly recommend finding and entering the shop as the first main objective that you have when you enter the floor, this will help in managing keys and I will return to this in the section on shops. Having at least one key on your person at any one time is a good idea. The main reason for this is because you may blunder into a chest room where the chest has a fuse, which it will blow up after a few seconds. If its a high tier chest that can be particularly galling, in fact because of this I recommend not entering a room at all if you are sure its a chest room and you don't have a key or haven't found the shop (you can often tell by looking at the edges, as well as your general position on the map, if it looks like two entrances are leading to one room and one of the entrances is blocked off with a pressure mechanism, it is definitely a chest room). In cursed runs this is even more of a concern because of the amount of extra fuses. In the room-to-room combat it's important to organize yourself to get the best value from your weapons. Typically you'll want to save more powerful weapons for later in the game, and especially for boss battles. Make a decision on two weapons that you think are best suited for clearing through most of the floor and put them on the quick select, alternating between them. Some weapons are very ammo efficient, and some aren't, but they might have good support use, ie, the Molotov launcher will set an area on fire and you can use it once per room to make it easier to kill things while an AK-47 will do most of the actual killing. Try to get a sense of what weapons are good for room clearing, boss killing and support. The reason you'll want to mostly stick to a small number of weapons is because ammo drops are random and sometimes rare, and can only refill one weapon, so its best to have one weapon on low ammo you can fill up all the way as opposed to having tons of weapons you're switching between that are have small amounts of ammo to refill, you won't get as good mileage out of each individual ammo drop. As tempting as it is to save ammo I would say you shouldn't use your infinite ammo weapon much beyond floor 1, though that depends on the situation and weapon. When planning in these kinds of ways it very much helps to know the small quirks about the individual pickups, which I will go into in some detail in the next section... Pickups Pickups are generic resources that you find through the game, health and ammo and such. They frequently drop as a result of a floor drop system that is controlled by a stat called 'Coolness', we will go into more detail on that in the Hidden Stats segment. Pickups can also be found in shops, low tier chests, secret rooms and as part of the reward after killing a boss. Before I get into pickups proper, I want to first mention this little bastard:
这是资源鼠,如果你把枪支、物品和某些拾取物留在地上,在你离开房间后它会偷走这些东西。如果你足够快地返回并向它射击,它会逃跑且不会拿走物品,但如果你不拿走物品再次离开房间,它仍会回来。偷走东西后,它会在物品原来的位置留下一张嘲讽的纸条。它的作用似乎是迫使玩家当场决定拾取什么和留下什么,例如,如果你已经有一个主动道具,就无法把宝箱里的物品留在地上之后再回来拿。不过,它不会拿走击败 Boss 后仍在基座上的物品。你会渐渐讨厌这家伙! 现在,是关于各种拾取物的一些信息:
红心用于补充空的生命容器。它们可能是除金钱外最常见的拾取物,遗落在地面上时不会被老鼠叼走。红心分为完整红心和半颗红心,用完整红心补充只缺半颗的生命容器可能不太划算,会浪费半颗红心。商店中半颗红心的售价更低,但购买完整红心更经济。被干扰敌人的攻击会扣除一整颗红心,而其他攻击只会扣除半颗红心。
护甲是在常规心容器基础上额外增加的生命值,被击中时会优先消耗护甲,因此比心更有用。护甲不会受到被干扰攻击的额外伤害。通常,护甲的掉落比心稀有得多,但经常会出现在秘密房间、商店以及击败 Boss 后。护甲比心更贵,如果留下不管会被老鼠偷走,所以你应该总是拾取它们。护甲会保留到过去关卡中。 在遗忘墓穴中,一个名为旧纹章的特殊房间里可以找到一件独特的护甲,它会一直显示在你的生命值条末尾。这件护甲是进入修道院所必需的,我会在秘密楼层部分详细介绍它,它的外观如下:
钥匙可以让你打开上锁的箱子、上锁的大门,还能用来购买弗林特的商品(稍后详述)。它们是相当稀有的掉落物,不会被老鼠偷走。关于钥匙和商店有一些奇怪的特性,我会在商店部分展开说明。此外,一种名为【钥匙弹怪】的特殊敌人被击杀时会掉落一把钥匙,若其处于堵塞状态,则会掉落两把钥匙。这些敌人如果放置太久就会消失,外观如下:
当你使用互动按钮拾取弹药箱时,它会完全填满你当前持有的武器的弹药。你无法对已满弹药的武器使用弹药。弹药是常见的掉落物,除了常规的物品房间掉落外,实际上还有一个完全独立的弹药掉落系统。这有时意味着同一个房间内会出现两次弹药掉落。如果弹药被遗留,会被老鼠偷走。
空白(Blanks)的作用类似于其他弹幕射击游戏中的炸弹,会完全清除当前房间内的所有子弹(包括你自己的子弹),并轻微击退敌人且对其造成伤害。默认情况下,每次进入新楼层时你会拥有2个空白,但空白不会叠加,例如:若你离开一个楼层时拥有2个空白,进入下一楼层后不会获得4个空白,仍然只有2个。空白可以通过弹药护符(Ammolets)进行升级,升级后每层获得的空白数量也会增加。空白可用于揭露秘密房间,且不会被老鼠夺走。空白会被携带到过去。
玻璃古翁石在游戏中被视为被动道具,但更像是拾取物。拾取后,它们会围绕玩家旋转,阻挡并摧毁任何与之接触的子弹。若玩家受到伤害,其持有的所有玻璃古翁石都会被破坏。它们是购买价格最低的拾取物,掉落概率相当低(与钥匙掉率相同),若被遗留会被老鼠偷走。玻璃神龛会给予玩家3个该道具。
金钱,在游戏中被称为弹壳,可用于从商店和其他商人处购买物品(详见商店部分),也可用于与部分NPC和祭坛互动。弹壳最常见的获取方式是击杀敌人,敌人死亡时有几率掉落;此外,棕色宝箱、房间掉落物和 Boss 掉落物中也会出现弹壳。弹壳分为三种类型:铜弹壳最常见,价值1个弹壳;银弹壳较为稀有,价值5个弹壳;金弹壳极其稀有,价值50个弹壳。与其他两种弹壳不同,金弹壳似乎从不会从敌人身上掉落,仅能在棕色宝箱、房间掉落物和 Boss 掉落物中找到。【骑士】类敌人必定会掉落弹壳,通常是银弹壳,是重要的收入来源。这类敌人包括枪手狂热者、铅之少女、蹒跚子弹、骷髅兵和左轮幽灵,它们通常比普通敌人强大得多。被干扰的敌人掉落的弹壳也比普通敌人多得多,这就是为什么诅咒模式是很好的刷钱来源。如果你受到敌人造成的红心伤害,将不会从该敌人身上获得任何弹壳,包括前面提到的骑士类敌人。我常听人说,如果敌人掉进坑里,它们掉落的钱就永远消失了。这绝对是100%错误的!我真的很讨厌看到这种错误信息被反复传播,本版块的其他一些指南也这么说。如果你仔细观察就会发现,掉进坑里的钱会重新出现在玩家上方,并立即进入他们的钱包,所以不用担心把敌人推到坑里会损失金钱,这是一种很好的击杀方式。清理完房间后,金钱会自动归玩家所有,不会被老鼠拿走。
霸权币是一种特殊货币,通常在击杀 Boss 后一次掉落三到四个。它们也是极稀有的房间掉落物,还可通过现金公文包道具获得,以及作为裂隙中弗里夫勒和灰毛瑟狩猎任务的奖励。这些货币可用于从裂隙商人(如凯登斯、牛或道格)处购买物品解锁,也可用于开启裁缝的捷径、激活裁缝的 Boss Rush 模式、大辅的挑战模式和女巫的祝福模式,这些我们之后会详细介绍。老鼠不会偷走霸权币,即使玩家在房间中未拾取而离开,霸权币也会自动添加到玩家 inventory 中。 宝箱 宝箱将是你在游戏中获取枪支和物品的最佳来源。宝箱分为多种等级,每种等级通过颜色来区分。通常来说,高等级宝箱会包含更好的物品,但需要特别注意的是,这并非绝对规则——有些低等级物品异常强大,而有些高等级物品则效果平平。 大多数(但并非全部)宝箱需要钥匙才能开启。它们通常在每层的两个宝箱房间中出现(除了【子弹地狱】层),不过也可能作为物品掉落系统的一部分,在任何房间中稀有掉落。它们也经常出现在秘密房间中,击败暗影法师后可能掉落,通过赢得温彻斯特的游戏可以生成,会出现在镜像房间,由挑战、空白神龛和骰子神龛生成,当方向键弹药耗尽时会生成,还会出现在带锁门的额外宝箱房间中(这些宝箱通常不值得获取,因为它们需要额外的钥匙才能打开,而且等级永远不会达到红色或黑色)。 以下是宝箱类型及说明:

棕色宝箱,包含D
棕色品质物品通常被认为是可用物品中最弱的。它们对应的宝箱也是最常见的,并且是除彩虹宝箱和阿尔伯恩宝箱外唯一能包含多个物品的宝箱,有时能开出3个、4个甚至更多。额外物品通常是金钱或生命值等拾取物,绝不会包含多个被动道具、主动道具或枪械。在宝箱房间外发现的棕色宝箱总是处于已解锁状态,但这些解锁的宝箱不一定会包含道具或枪械,可能只有拾取物。人们常说应该忽略棕色宝箱,但我不同意,它们可能会开出一些非常好的东西(如普通霰弹枪、温彻斯特步枪、投石器、双重视野),而额外拾取物的可能性更是锦上添花。如果你打开一个箱子,而其中一个物品是钥匙,那么打开这个箱子实际上等于没花钱。记住这一点,但如果你钥匙有限,且有更高等级的箱子可用,那么优先打开那些高等级箱子。

蓝色宝箱,包含C级物品。比棕色宝箱更高一级,通常物品更强大,也更稀有。与棕色宝箱不同,在秘密房间或房间掉落中发现时仍处于锁定状态。

绿宝箱,品质和稀有度比蓝宝箱更高,包含B级物品。
红箱子比绿箱子拥有更强大的内容,包含A级物品。
黑色宝箱,代表物品品质和稀有度的最高级别,内含S级物品。

彩虹宝箱。极其稀有的宝箱,几乎能让你直接赢得本局游戏。开启时无需钥匙,打开后会掉落8件物品和枪械。这些物品和枪械只会是B级、A级和S级,概率大致为15% S级、54% A级和31% B级。宝箱本身的生成概率为0.0333%,因此你可能连续游玩数十小时都无法遇到一个。任何宝箱都有可能被彩虹宝箱替代,但作为楼层掉落系统一部分生成的宝箱,其被替代的概率会略高一些。

故障宝箱。会以极低概率(0.1%)替代普通宝箱。在黑火药矿井之后或秘密楼层中不会出现。打开后会立即将玩家传送到下一层,但在该层玩家只能与故障版 beholster 战斗,即同时对抗两个 beholster!赢得这场艰难的战斗后, bosses 会掉落大量枪支(8 把)和道具,通往下一层的电梯也会解锁。
阿尔伯恩的箱子。这是NPC兄弟阿尔伯恩独有的箱子,更多信息请查看NPC部分。 普通箱子有较低的基础概率是拟态怪。如果你尝试打开拟态怪,它会激活并攻击你,前三个等级的拟态怪在打开时会释放一次强力的堵塞爆炸。之后它会开始正常攻击你,拟态怪是少数会跟随你进入不同房间的敌人之一,而且相当棘手。拟态怪的一个有用之处在于,如果你杀死它们,它们仍然会掉落其外观对应的箱子品质的物品,所以你不必为它们花费钥匙。【拟态牙项链】物品利用了这一点,将所有箱子转化为拟态怪,以面对棘手敌人为代价为你节省钥匙。红宝箱怪和黑宝箱怪的行为模式与棕、蓝、绿宝箱怪不同,它们会发射同心环状弹幕,而非普通宝箱怪的双左轮射击模式。因此,红黑宝箱怪通常更难对付,但移动速度较慢。宝箱怪的生命值会随其宝箱品质提升而增加,它们甚至可能出现卡壳现象。玩家的诅咒等级越高,宝箱怪出现的概率就越大。初始状态下,宝箱怪替代普通宝箱的概率为2.25%,每提升一级诅咒,该概率就会增加2.1%。如果你仔细观察,宝箱怪会通过细微的动作暴露自己,此外,猎人的狗也会对着它们吠叫。通常来说,用威力较弱的武器攻击任何宝箱是个不错的主意,这样如果它是宝箱怪,你就能先发制人,这还能让你获得一个成就并解锁【宝箱解剖学之书】。如果你拥有【宝箱怪友谊戒指】,它们就不会发动攻击,任何宝箱怪都会变成一个已解锁的宝箱。如果你没有这个物品,但在宝箱房间(通常这里的宝箱都是上锁的)看到一个未上锁的棕色宝箱,那它肯定是宝箱怪。彩虹宝箱不可能是宝箱怪,即使装备了【宝箱怪牙齿项链】也一样,阿尔伯恩的宝箱也是如此。 以下是所有种类的宝箱怪。
Chests can also have Fuses, the likelihood of which also rises with curse(by 5% per point). If left too long the fuse will blow up the chest and it's contents. They can be stopped by either opening the chest or putting out the flame of the fuse with liquid (Robot's Coolant leak is good for this). When destroyed by weapon fire without being opened chests will often drop the Junk item. This is usually useless, but can be sold for 3 casings. Junk also gives the robot a small damage boost (5% more), will buff Ser Junkan, can be given to the Ser Junkan shrine for a piece of armor, will synergize with the Trashcannon and can be needed by the tailor when building shortcuts. As such collecting junk can be preferable than opening poor chests if the player is the robot or has Ser Junkan, or both! Junk is less likely to drop if the player holds no keys (60% likelihood on chest destruction that case, normally its 72%). If junk does not drop it can be pickups like armor, or even very low tier items and weapons. Sometimes the chest will just blow up, leaving nothing and damaging the player if they are too close, so stay back if you decide to destroy a chest. Hidden Stats There are a number of stats and modifiers in the game that are rather poorly conveyed to the player. Even intermediate players are sometimes unaware of the existance of stats like Coolness, so to make things clearer I will try and go into as much detail as possible for the benefit of everyone. Hopefully you'll know exactly what these hidden stats are, how they effect the game and how you can bend them to your benefit. Coolness We touched upon this slightly in the Pickups section, coolness controls for three things, drop rates for pickups after clearing a room, the likelihood for chests to have fuses and recharge rates for active items. It doesn't effect chest quality or item quality in shops, sadly. Coolness is very useful to increase, higher coolness means more drops, things like keys and health will be more common. It also means that active items can be used much more liberally. Each point of coolness will reduce active item cooldown by 5% (up to a max of 50%), reduce the likelihood of a chest fuse by 2.5% and increase room drops. Room drops work on a system where your chance for the next room you clear to have a drop will increase with every consecutive room that you clear that drops nothing, when something does drop the system resets back to the base chance. Coolness causes the base chance of something to drop to be higher and for the increase in that chance with every room that drops nothing to be higher too. Curse and Coolness work in opposition to each other so you will need to 2 points of coolness to cancel out 1 point of curse when it comes to controlling chest fuses, and curse will also reduce the rate at which non-ammo items drop from the room clear system. As such higher coolness will help overcome some of the problems of high curse runs. The player's coolness is entirely based on holding specific items and guns and a few item synergies. The item's description will often hint at whether it will increase coolness, ie Shade's Revolver says 'Anyone who uses this handgun would look pretty cool.' which is hint for the +2 coolness that this gun carries. The Cigarettes active will increase coolness every time it's activated at the cost of damaging the player while the Sixth Chamber will increase coolness with curse and remove curse's usual depression of drop rates. The Vorpal Gun will also be more likely to fire it's special bullet as coolness increases. There is no in game counter or effect to tell you how much coolness you have at any one time or whether you gained it from picking something up, but there is no way to decrease coolness beyond the effects of curse. The Following items, guns and synergies all increase Coolness by the stated amounts: Old Goldie +1 Heart of Ice +1 Magic Sweet +1 Cigarettes, +1 per use Iron Coin +2 Orange +2 Rad Gun +2 Sunglasses +2 Sixth Chamber +2 with each point of Curse Ballot +3 Ice Cube +3 Shade's Revolver +3 Box, Ration and SAA synergy +3 Magnificence Magnificence is very well hidden stat that controls the amount of high tier items you will receive over the course of a run. In short it restricts the spawning of Red and Black tier chests and items if you've already picked them up. Every time you pick up a Red or Black tier item the magnificence counter will increase by one (Note: dropping and picking up the item again does not increase magnificence again, but dropping the item will not reduce magnificence either), decreasing the likelihood for high tier items to drop from bosses, spawn in shops etc. Chest Magnificence is also a factor, each high tier chest spawned in a normal chest room will increase Chest Magnificence and reduce the likelihood of more high tier chests spawning in the future. This also effects chests that drop as part of the room drop system and still applies even if you don't open the high tier chest in question. However if you do open the chest in question than Chest Magnificence drops by one point, so you have even more incentive to open such chests so you can you increase the chances of high quality items dropping later. Magnificence rises very rapidly and already reduces the chance of high tier items spawning by more than 95% with only two points of magnificence. Magnificence does not effect Winchester or his rewards, and Red and Black chests can be forced to spawn regardless with the 7 leaf clover. The Red chest item Spice also subverts the usual mechanics, showing up everywhere with repeated use regardless of magnificence. Curiously, in spite of magnificence chest quality also tends to increase as the you go through the floors, so by the time you get to the Forge chests tend to be almost exclusively Green. The Lament Configurum will increase Magnificence in spite of being a Green chest item (likely because it can provide the player a lot of higher tier items), while the Heart of Ice and generic Red Chest health upgrades like the Heart Holster will not increase Magnificence. Like Coolness there is no way to keep track of magnificence in-game. Curse Curse is better communicated to the player than the above stats but still has a lot of opaqueness in terms of the ways in which it effects the game. I will only give a brief overview here since I want to go into much more detail in the sections dedicated to it and cursed runs. Curse is gained from a wide variety of ways, primarily item and gun pickups, and its main effect is in creating 'Jammed' enemies, which look like regular enemies but are covered in a red, shadowy aura. Jammed enemies move faster, shoot faster, will do a full heart of damage unlike regular enemies and have up to three times more health. As mentioned, it also depresses the rate at which non-ammo pickups drop from room clears, in opposition to coolness and makes Mimics and fuses more likely to appear. High Curse is dangerous and will call in a powerful, invincible enemy called the Lord of the Jammed if you let it get out of control, but there are certain benefits too, chiefly the fact that enemies drop more money. Through the rest of the guide I will often mentioned cursed runs, which are runs where you start off with the highest curse you can have without calling in the Lord of the Jammed. There is a lot more to talk about in this subject, so skip to the 'Curse' and 'Cursed Runs' segments if you want more details. Default Characters, part one As we know by now, each character has certain advantages and disadvantages relative to others, but those quirks can get further accentuated as you shift away from more regular play. Generally speaking though, there's not a vast amount of variation between the characters, and as you go through the game their differences get more blurred as you pick up items and weapons. The Robot is an exception to this, but we'll get to him. The Marine

海军陆战队员的副武器 补给空投 军事训练 除了上述内容外,他在初始生命值基础上还拥有一件护甲,这对于默认的枪牢角色来说是独一无二的。 在常规玩法方面,海军陆战队员最重要的特点是他的【军事训练】被动技能。该被动能减少 reload 时间并提高精准度,这一点在他的副武器上体现得尤为明显,这把副武器的射程比其他默认初始武器更远。这一被动在游戏后续进程中也大有帮助,尤其适用于 reload 较慢、精准度不高的武器,因此他很适合使用诸如【毒刺】这类单发武器,或是任何拥有宽散射的霰弹枪武器。不过,对于【战斗齿轮】或【辐射枪】来说,该被动可能会略微不利,因为它会缩短 reload 窗口。遗憾的是,除了【军事训练】外,海军陆战队员相当平庸。他的额外护甲长期来看作用不大,整个游戏过程中只能多承受一次攻击。同样,他的补给空投只能召唤一次弹药补给,之后就会失效。如果你需要钱且不需要额外弹药,卖掉它可能有用。他的副武器在最初几层相当强力,但到第二层结束时就会变得乏力。我个人不会依赖它,并且如果可能的话,我更倾向于在对付第一层 Boss 时不使用它,因为这会使战斗拖得太久。 总体而言,使用海军陆战队员不会让你获得或失去太多东西。他的【军事训练】赋予了他很高的稳定性,但与其他角色相比,他没有更具风险或更华丽的技能。在诅咒模式中,他的表现并不突出。副武器普遍缺乏伤害的问题在此处最为明显,因为你可能要花大量时间来慢慢消耗被干扰的敌人。不过,他的【军事训练】技能仍能帮助你保持距离,弹药掉落也可能派上一点用场。【军事训练】在祝福模式和挑战模式中同样非常有用,但【补给空投】在祝福模式中几乎毫无价值。他那平平无奇的初始武器在首领速通中表现不佳,但【军事训练】同样可以增强那里的实用枪械。 罪犯

【经济型左轮】 【短管霰弹枪】 【燃烧瓶】 【激怒照片】 罪犯角色与安全但略显无聊的 marine 不同,她的设计核心在于风险与回报的平衡。她的物品会将玩家置于高风险情境中,但同时也提供摆脱困境的手段。她的两把初始武器精准度都很低,这迫使玩家必须冒险靠近敌人。不过,短管霰弹枪能造成可观的爆发伤害,若所有弹丸命中,足以在第一层秒杀子弹小子;而左轮手枪射速极快,其每秒伤害(DPS)远超初看时的预期。她的燃烧瓶投掷后会在大片地面上燃起火焰,能造成巨额伤害,但如果玩家不小心,自身也会被火焰点燃。最后,【激怒照片】在玩家受到攻击时会提供大幅伤害加成,短时间内使玩家伤害翻倍,并立即重新装填武器。 罪犯角色常因仅在受到攻击时才能触发增益效果而受到批评,据称这会鼓励玩家为获得全部收益而采用草率的玩法,但这种说法并不公平。事实上,【激怒照片】的效果在游戏最艰难的部分,即与巫妖、老国王和高阶龙骑士的 boss 战中,变得绝对至关重要。尤其是前两个阶段,大师子弹并非重点,生存才是关键,而受伤时获得的双倍伤害对于尽快结束那些艰难战斗绝对至关重要。实际上,罪犯角色能从对其他角色而言纯粹是负面的情况中获得显著的正面效果。这在子弹地狱或锻造厂中那些更大、更困难的房间里也非常有帮助,在这些地方你可能会陷入危险境地,受伤时的伤害加成能让你比其他角色更快地消灭棘手的敌人。话虽如此,照片在前三四层作用不大,它最大的用途是终结 Boss 战,但在非隐藏 Boss 战中受到伤害会让你无法获得大师子弹,这绝对不值得为了那点额外伤害而冒险。罪犯角色在游戏后期而非初期表现最为出色。 她的燃烧瓶也有些不稳定,虽然能很好地快速消灭大群敌人,但充能需要承受大量伤害,而且你必须小心不要让自己着火。它能对 Boss 造成巨额伤害(尤其是在杀戮之柱进行密集攻击时,因为它们会停留在一个地方),这可能会让你想把它留到对付 Boss 时使用,但很多 Boss 对其效果免疫,包括子弹王、老国王、Blobulord、Gorgun、Wallmonger 和 High Dragun。不过,你也可以选择卖掉它,尤其是当有更好的主动道具可用时。 如前所述,【廉价左轮】拥有惊人的高 DPS,比大多数其他初始武器都要好,因此它的实用期可能比你预期的更长,甚至能一直用到第 3 层,不过其较差的精准度在一定程度上抵消了这一优势。相比之下,短管霰弹枪作为武器的实力衰减得很快。如果没有伤害升级,即使所有弹丸都命中,在第一层之后也无法一击消灭子弹怪。因此,通常不值得为了使用它而靠近敌人,毕竟它的射程和精准度都很差。在第一层之后,它最好的用途就是喂给枪械吞噬者或者卖给商店NPC。一般来说,如果你在第一层 Boss 战前没有其他武器,使用左轮手枪来输出伤害会更好,短管霰弹枪会迫使你靠得太近(不过在加特林海鸥的导弹攻击时它可能有用)。在诅咒模式中,罪犯的优势变得更加显著,她的每秒伤害更适合击杀被干扰的敌人,她的燃烧瓶也能造成更高的总伤害,而照片提供的伤害加成在快速击败被干扰的 Boss 时变得更加有用(相信我,被干扰的第二阶段巫妖可不是闹着玩的,照片在那里真的能帮上大忙)。在祝福模式和挑战模式中,情况基本保持不变,她在 Boss 速通中表现出色,因为如果遇到困难,她可以依靠照片的伤害加成。 默认角色,第二部分 猎人
生锈的侧臂 十字弩 狗 与其他角色相比,猎人初始只有一件物品——她的狗,以及她的十字弩和生锈的侧臂。尽管如此,她的灵活性和适应性很强,她的装备能让她在游戏初期就拥有强大的实力。当房间被清理干净后,狗有很小的几率会找到额外的物品(当它找到物品时会做出挖掘的动画,所以如果你注意到这个动画,不要太早离开房间)。这是在房间清理完成后物品正常掉落几率之外的额外机会,因此在整个游戏过程中,猎人能够比其他角色获得更多的额外资源。实际上,有时在同一个房间里,狗会找到一件物品,同时正常的房间清理掉落系统也会掉落一件物品。如果狗在早期楼层(比如第一层)挖出钥匙,你就可以打开宝箱,还能选择进入遗忘墓穴。狗还能找到空白弹药、生命值、护甲、金钱、弹药,偶尔也会找到地图。这些额外物资的持续获取在整个游戏中都非常有用。 狗还会对着拟态宝箱吠叫,帮你快速识别它们。 虽然狗很有用,但猎人最大的优势是她的初始十字弩,这是游戏中最好的初始武器之一。这是一把单发武器,在第一和第二层能一击杀死子弹家族敌人,无论距离远近。与同样是弹药有限的武器“短管霰弹枪”相比,十字弩对囚徒来说实用得多。尽管十字弩是单发且弹药更少,但它的射程更远,单发威力也更大。十字弩是对抗 bosses 的绝佳武器,凭借其射程和威力,它可能是初始武器中第二好的 boss 杀手(仅次于“亵渎”)。搭配合适的升级(如欧米茄或阿尔法子弹、腰侧枪套),它在游戏后续阶段仍能保持实用性。如果没有升级,到第 3 层时它就会变得乏力,因为无法再一击消灭普通子弹怪。由于十字弩擅长击杀一层 Boss,猎人在一层就不太需要刻意寻找更强的武器。因此,如果没有找到额外的钥匙,她可以放弃开箱子,转而通过遗忘墓穴获取那里的额外物品。生锈副武器还算不错但相当普通,其子弹速度比其他初始武器慢,但造成的伤害相对可观。 遗憾的是,猎人的实际装备选择有点受限,但她现有的装备都很有用,尤其是在早期,而且一直都值得使用。在诅咒模式中,狗的额外掉落有助于弥补普通房间清理掉落(非弹药类)通常较少的问题,而十字弩有足够的伤害来应对早期的精英敌人和精英 Boss。此外,狗会提醒玩家注意拟态怪,而拟态怪在干扰模式中数量更多。猎人对十字弩的依赖使其在祝福模式中实用性大幅下降,此时她唯一的优势就是她的狗。挑战模式基本保持不变,前面提到的十字弩对 bosses 的有效性在 Boss Rush 的早期阶段对她有帮助,但由于房间数量少,狗在那里几乎没什么用。飞行员
潜行者特长 可靠的开锁器 隐藏隔层 令人安心的性格 飞行员或许是游戏中最依赖随机数生成的角色,其特质和物品使该角色初期非常弱势,但随着游戏推进能积累大量优势。总体而言,该角色的玩法围绕获取比其他角色更多的物品,并储存金钱和钥匙等资源供后续使用,但必须应对糟糕的初始装备。 首先,潜行者特长极其糟糕,它威力弱、射速慢、精准度极低,是所有初始武器中每秒伤害最低的。用它来对付普通的第一层敌人已经够麻烦了,所以为了你的精神健康,我强烈建议不要用它去面对任何 Boss(用它杀死第一层的 Boss 都要花很长时间,而且它的攻击范围也不大,你必须靠近到不舒服的距离才行)。因此,在游戏初期,你的主要目标是获得一把真正好用的武器,这时候随机数生成(RNG)的影响就开始显现出来了。 飞行员最重要的物品是他的开锁器,当用在任何锁上时,有百分之五十的几率要么免费打开锁,要么弄坏锁并永久阻止你打开它,即使你有备用钥匙。飞行员的前期游戏体验在很大程度上依赖运气。如果没找到额外钥匙,你可能会忍不住用开锁器打开品质较低的箱子,同时节省钥匙——尤其是如果你想进入遗忘墓穴,因为那里需要两把楼层钥匙。如果开锁失败,你就彻底没辙了;但如果成功,你就能在不消耗钥匙的情况下打开箱子,获得不错的前期增益,这总是很棒的。然而,你无法控制哪个箱子里有急需的武器,也无法控制武器的种类,这是飞行员的一大痛点。对他来说,打开箱子却拿到像【小写r】或【克洛伯手枪】这样的武器,那种痛苦是其他角色无法想象的。这样一来,你就不得不再用一段时间的劣质武器,这可能会让你无法达成第一层无伤。更糟的是,如果撬锁使用不当,很可能会导致装有武器的宝箱无法打开,迫使你只能用盗贼的特殊技能来对抗 Boss。通常情况下,与其他角色相比,如果运气不佳,飞行员想要进入隐藏楼层会非常困难。尽管在第一层会遇到这些麻烦,但撬锁器仍然非常有用。如果钥匙掉落情况不好,它们能提供一个额外的选择,而且往往能帮上忙。它们还可以用于那些通常封锁着 NPC 房间的上锁门。如果你随机获得了宝箱掉落,撬锁器尤其有用,因为其他角色通常没有足够的钥匙来打开这些宝箱。【讨喜性格】能提供不错的价格折扣,从长远来看能帮你省钱,还能让原本昂贵的物品更具吸引力。这在后期会带来回报,你最终会比其他角色拥有更多金钱,用于在可用的商人处消费,尤其是铁匠可能会出售有用但昂贵的物品,而飞行员或许有能力购买。【隐藏隔间】还能提供更多主动道具栏位,因此与其他拥有主动道具的角色不同,当飞行员从宝箱中获得主动道具时,不必被迫在携带哪个道具之间做出选择,他们可以同时携带新的主动道具和【开锁器】。额外的弹药量虽少,但很有用。总的来说,飞行员只需度过初期的难关,之后他更高的储蓄和空间优势就会开始显现,通常最终他会比其他角色拥有更多物品。不过,他在诅咒模式的初期阶段表现尤为糟糕,所有劣势都会被放大,尤其是在对抗被干扰的敌人时,他的武器装备较差。此外,与其他角色相比,他从诅咒模式中获得的收益更少,【卸除武装】特性的作用也相对有限,因为诅咒模式比普通模式提供的金钱要多得多,多到你可能根本不需要额外的储蓄。此外,拟态怪数量的减少减轻了钥匙的压力和对开锁器的需求,但另一方面,大量装有保险丝的箱子可能会促使你用开锁器打开它们以减少损失,因为反正它们最终还是会爆炸。相比之下,在祝福模式中,不依赖盗贼职业特性是非常有利的,盗贼的其他优势仍然有用。在头目速通模式中,只有隐藏隔间有作用,而盗贼职业特性依然很弱。 秘密角色:子弹
Blasphemy Live Ammo The Bullet is unlocked by finding Red Caped bullet kin after defeating at least one past. If you see such a bullet kin don't hurt it and wait until it vanishes(they will not attack you), after you do this five times the Bullet will be unlocked. The Hunter's dog will bark if such Bullet kin are present in the current room, so the Hunter can be good for unlocking the Bullet. The Bullet has by far the best defensive capabilities of any Gungeoneer, especially for more experienced players who are generally good at avoiding damage. His play style revolves around his starting Sword, Blasphemy, which is probably the very best starting weapon for any character. Blasphemy has the ability to destroy bullets with every swing, in the area where the swing would damage enemies bullets are eliminated. Additionally if you double tap the reload button all bullets nearby will be destroyed for a short period, this is more powerful than the standard sword swing for removing bullets and is a useful panic option if you feel as though you are being overwhelmed but don't want to use a blank, but it only works if you have full health. Blasphemy will damage enemies within the sword swipe, but in addition to that so long as you have full health it will also shoot a projectile straight ahead (the sword has infinite ammo). This is important in the early game since it gives the bullet good long range capabilities, but you must ensure your health is topped off to maintain this, luckily the aforementioned defensive upsides of the sword help a lot in this regard. Additionally Armor is very useful for the bullet because you will only lose the projectile if you take red heart damage, so armor can provide some extra insurance if you get hit. If you are close enough to enemies both the sword's swipe and the projectile fired at full health will stack together, doing significant amount of extra damage to enemies. This can be somewhat risky since losing health will make the Bullet much less powerful, especially before they find another gun without full health the Bullet will only be able to fight at very close range and will be hamstrung in his defensive capabilities. Fighting bosses in particular is extremely difficult without the projectile since you'll need to be so close you'll likely get hit much more and further lose the Master Round, but with projectiles the sword is very effective at putting down early bosses. As a result getting hit early on can put the Bullet in a harsh death spiral he'll have trouble getting out of unless you can quickly replenish your health, but so long as long as you exploit your powerful defense and good offense you'll have a very good time with the Bullet, to the point that he's probably the easiest of all the characters for more experienced players. As well as Blasphemy the Bullet also has Live ammo, which vastly increases dodge roll damage and provide immunity to contact damage, further reinforcing his defensive advantages. In floor one dodge rolling into a bullet kin will instantly kill them, but overall its too risky to use dodge rolling as an actual method for killing enemies since you have to get dangerously close. Having said that the lack of contact damage makes Live Ammo very useful against enemies that can only do contact damage, like Blobulons, Spents and Tazies, who will be only able to feebly bounce you around, when fighting these it might be better to just roll into them until they die rather than wasting ammo against them. If you find a particular item called Armor of Thorns your roll damage will be further augmented, combined with Live Ammo it gets to the point that you can kill a full health gun nut by rolling into them! Wow! Overall the Bullet's upsides are massive, giving him unparalleled defense, so long as your health is maxed Blasphemy will remain useful all the way through to Bullet Hell, especially with damage upgrades, and with a bit of skill he'll quickly seem like the easiest character in the game to play. In cursed runs he is very, very powerful, the lack of contact damage helps even more against cursed Rubber Bullets or Blobulons, who otherwise can be very annoying but against the Bullet can't do anything. The defensive and offensive capabilities of blasphemy will be even more pronounced against enemies that have triple health and do double damage, but because getting hit can be so much worse the death spiral if you do get hit, especially early on, will also be worse, and can be unrecoverable in a cursed run. In Blessed Runs the Bullet's dependence on Blasphemy puts him at a distinct disadvantage, though Live ammo is still useful. The Bullet is probably the very best character to use in a challenge run because his advantages can nullify several difficult modifiers, especially Blobulin rancher (since they do no damage), Hammer Time, Shockwave, Pot shots and Final attack (since you can destroy the extra bullets that are created, especially with the reload). Blasphemy is also a powerful weapon to use in Boss Rush, just make sure you don't get hit. Secret Characters: The Robot The Robot

Robot's Right Hand Battery Bullets Coolant Leak In addition to the above the robot does not start with any red hearts, instead he starts with 6 pieces of armor, and, uniquely, cannot acquire any red hearts by any means at all, the only way he can get more health is through finding extra armor, though master rounds will give him one piece of armor each. To unlock the Robot the player must find the Busted Television and bring it to the Blacksmith in floor 5. The Television can be found in the elevator shaft of floor 2 after the shortcut for that floor has been unlocked, it will occupy the active item slot and can be thrown whichever direction you are facing by pressing the active item button, it will also be dropped every time you dodge-roll and can fall pits and no longer be obtainable for the rest of the run. As a result it can be very frustrating trying to bring the TV to the blacksmith, some rooms have heavy platforming requirements which means you'll have to carefully throw it over pits. Make sure you don't forget it when you've finished clearing a room where you have had to dodge roll a lot. A flying item, such as Wax Wings or the Jetpack, can help immensely since you won't have to worry about rolling over obstacles and pits so much. Bring it to the Blacksmith and the Robot will be permanently unlocked. Where the Bullet was probably the easiest character to use in the game the Robot is by far the hardest, he cannot make use of red hearts like all of the other characters can and must rely on armor instead. This makes him extremely brittle, armor is much rarer than hearts and as a result the robot will have a lot less health overall than other characters. As such it is absolutely imperative to make sure your dodging and evasion abilities are on point with the Robot, more so than with any other character. Because health is useless to him the following items have absolutely no effect for him and are useless as a result or have their upsides reduced: The Blood Brooch (heals the player after 1200 damage is dealt) Medkit (heals 4 hearts) Every health upgrade (ie Heart Locket, monster blood, Pink Guon stone, Orange) Meatbun (heals 1 heart, though the extra damage is still very useful) Ration (heals two hearts) Bottle (holds extra health and ammo) Heart Synthesizer (more heart drops) Magic Sweet/Riddle of Lead (extra health, but lots of other upsides) Ring of Chest Vampirism (chance to heal on destroying chests) Old Knight's Flask (can heal the player one heart twice per floor) Heart of Ice (extra health, but also more coolness and damage when hit) Gun Soul (extra health, but revive still applies) Yellow Chamber (two extra heart containers, but charming enemies still useful) Green Guon Stone (chance to heal upon taking damage) Antibody (chance to heal for more when you pick up health) Super Meat Gun (extra heart container, but still a powerful weapon) Blasphemy (because the robot has no hearts the projectile can never be fired) Additionally the Peace shrine has no benefit, the Angel shrine can't be used and the Dice shrine's heal abilities are useless, though the downside where heart containers are removed will also do nothing. On the other hand, because of his reliance on armor certain items have outsized usefulness for the Robot compared to other characters, these include: All Gunknight armor pieces, ie Gunknight Helmet (provide one piece of extra armor per floor, stacks with other Gunknight pieces) Armor Synthesizer (more armor drops) Spice (adds hearts initially but takes them away starting fourth use, this has no effect on Robot so he can keep using it for the damage and curse) Nanomachines (gives two pieces of armor on pickup, gives an extra piece or armor after every fourth hit) Bionic Leg/Armor of Thorns (both grant an extra piece of armor on pickup) Old Knights Helm/Shield (both grant two pieces of armor on pickup) Full Metal Jacket (activates blanks when hit, effectively substituting blanks for armor, very useful with items that increase blanks like Ammolets) Pig (revives the player with 6 armor on death) Clone (restarts the entire game from floor 1 with all items you have picked up and 6 armor upon death) All Master Rounds (gives one piece or armor each) Additionally the Ser Junkan shrine can be useful since it will give one piece or armor for each piece of Junk you give it, while the dice shrine has a chance to give you a lot of extra armor. When playing the Robot it is very important to keep in mind the above qualities of each item and how they do or do not effect the Robot so you don't waste money on worthless health upgrades or so you can see how useful something like a piece of gunknight armor is for him. Because health is at such a premium for the robot any defense upgrade is useful too him, for example invincibility actives like the potion or lead skin, Dodge-roll upgrades like the Cloranthy Ring or Guon stones (the Glass Guon shrine is a good find). If it comes to it you may consider buying armor at the shop, but this is expensive and will reduce the amount of money you can spend on keys and items. With all of these difficulties regarding the robot its tempting to ask why ever play him? Well he actually has some very powerful upsides to offset his intrinsic brittleness. First of all his default weapon is very, very good, Robot's right hand has the highest clip size and DPS of all of the starting weapons, and lets him easily handle early enemies and bosses. It remains useful through to around the fourth floor which is a major boon. Additionally he also has Battery Bullets, which raises his accuracy by 50% and causes water to get electrified if his bullets pass over it, damaging enemies standing in the water(robot is immune to electricity). Although it has no effect on flying enemies like Bookllets this can apply a lot of extra damage to enemies standing in water, and synergizes very well with the Robot's Coolant leak, an active that spreads water over an area you are facing, all of this means the Robot has probably the best ability of all of the characters to apply heavy, consistent damage in the early game without running the same risks the Convict has to. The Coolant leak can also put out fires or override poison, most usefully this lets you put out the fireplace in floor one to get access to the Oubliette grate without the water barrel (which often get accidentally destroyed), and it even lets you put out fuses attached to chests, preventing them from blowing up without using a key. Any water weapon is very useful with the Robot, especially the Mega Douser which will create huge electric pools to tear through groups of enemies. The Robot is hard to use normally, but his upsides actually get much more pronounced in Cursed runs, to the greatest extent of all the characters. He does not take extra damage from jammed enemies who can only do one point of armor damage, his weapons and electricity can apply a lot of much needed damage to jammed enemies, his coolant can put fuses and the extra money makes it easier to buy more armor in shops. In many ways he's more powerful in a cursed run than normal. His brittleness is a poor fit for challenge runs though, where there are more ways to get hit, but his good offense is not bad in Boss Rush and Blessed Runs. Overall he is very skill dependent, but rewarding. Shops, part one Understanding shops and how to get the best use out of them will be terrifically helpful over the course of the game. There will always be one shop in each floor, except for Bullet Hell which will never have a shop. Sometimes extra merchants can spawn in or out of the main shop, they often carry the best items you will be able to get from shops and are worth investigating. Bello
Bello is the default shopkeeper who will appear on every floor between floor 1 and 4. His shop mostly carries basic resources, chiefly pickups like health, this is important to keep in mind, you usually won't find a whole lot of unique items and guns in the shop and its main use is keeping stocked up on the basics. I would recommend against buying Health, Blanks and Armor in normal runs, generally speaking it is better to save money for good items and weapons if they are available and resorting to buying health is a bit of crutch, as you get better you'll find that you won't need to buy extra stuff just to keep you alive and will be able to operate with whatever the boss or floor drops naturally. The shop will always have at least three generic pickups on the left side, Armor, Keys, Health etc. On the right side it will have more variety, including guns and items. but it can just be more pickups too that you won't need. Finally there's often a table that will sell Blanks, Glass Guon Stones and Maps. Personally I don't think its a good idea to spend money on this stuff either, its just not worth it and you can use the money later. If you have bad luck the shop might only have the three left side pickups that you may not need, but generally speaking its worthwhile to examine the shop. The highest priority item that should be bought in Bello's shop are keys. Keys are generally rare drops from finishing a room or killing a boss (though sometimes you get lucky) and are critical for opening chests and getting those weapons and items you need to keep moving along. The way keys in the shop work is kind of strange, if you enter a floor and do not pick up a key before reaching the shop then the shop is absolutely guaranteed to have at least one key available for sale. This touches on what I talked about earlier in the planning section, you generally want to maximize the amount of keys you get, especially early on, so you can always open chests, so if a key drops in a room before you find the shop it's generally better to find the shop first so you can buy the guaranteed key there and then go back and grab the key that dropped to get the most keys. If you do pick up a key that drops it doesn't prevent a key from spawning in the shop, but it does mean it will no longer be guaranteed to spawn, which can often catch you out and reduce the number of keys you get. However if you have a glut of keys you don't think you'll need it might be better to pick up a key drop so you can reduce the chances of it spawning in the shop and hopefully replace it with something else. Sometimes the shop will have multiple keys to buy. Generally, you will always find enough money over the course of a floor to buy at least one key from a shop, even if you come into the floor with nothing, just make sure you don't get hit, especially from 'Knight' enemies like the Gun Nut or Lead Maiden. The shop will only sell items and weapons up to green tier quality (and also the Heart of Ice, which can be found in Red and Black chests), they will also be more expensive as tier increases, and prices increase slightly as you go from floor to floor. The Pilot has the best ability to make use of shops, due to his discount, but overall he'll also usually want to hold off on buying stuff till later. In cursed runs shops become much more useful, the player will have a lot more money and can consider spending some on health or ammo more easily (since you will likely be going through both a lot more), as well as weapons and items earlier, just watch for curse! In Blessed runs never ever buy a gun, from any shop, it will just vanish after a while, put that money into items instead. In challenge mode using the shop is basically the same as normal. Another option is to steal from the shop, this can bypass spending money if you don't have any or want to save it for later, but carries some risks. Stealing an item will always increase curse by 1 (in addition to any curse the item itself may have), the first time you steal from the main shop it will always succeed, but afterwards the chance to succeed will rapidly get progressively lower and if it fails you won't get the item and the Shopkeeper will eliminate all of the items in the shop and disappear for the rest of the run. However this only applies to Bello when you are trying to steal from, other ones will still work normally. As such you may want to consider trying to steal items from the floor 4 shop since if you fail you will have minimum loss (the blacksmith will still be there in floor 5), or non-Bello shops since they won't remember you if you fail. Do not steal in a cursed run, especially from Bello, I can't think of any item which is worth having the Lord of the Jammed hunt you down. The list of items that you can use to steal can be found can be found here.[enterthegungeon.gamepedia.com] Bello's shop often also has extra features, such as other Vendors, Gun Munchers and the Sell Creep, but we'll talk about them in the next section. The latter two will still operate if you anger Bello. Speaking of which, do not try and attack Bello, he is invincible and will absolutely murder you, it will also prevent you from buying more items. If you shoot within his shop he will first give you a warning, if you keep at it he'll double his prices and if you still don't get the hint he'll pull a gun on you and prevent you from buying anything else, his shop will be empty in later floors. Keep that in mind when looking for secret rooms. The Blacksmith
铁匠是在锻造间里的特殊店主。你可能还记得她,就是你需要带给她能杀死过去的子弹部件,从而让你能够进入过去以及子弹地狱的那个女孩。如果你带给她电视机,她还会解锁机器人;激活任务并带回公牛的手臂,就能解锁克隆体。通常你会把钱存起来给她,因为她总是有强大但昂贵的物品,能在面对红龙和子弹地狱前给你提供急需的后期增益。 她的商店总是有6件物品,包括枪支、道具和拾取物的组合。她的房间左侧总会有三个道具拾取物,右侧则有三把枪和一些物品,其中部分会达到红黑级品质。因此,她比贝罗更可靠,这也是她作为商人更实用的原因。根据我的经验,她的库存似乎有些有限,但她所拥有的物品通常都非常有用,尤其是她有很多子弹和伤害提升道具(如+1子弹、阿尔法子弹、火箭动力子弹),这些都非常有帮助,此外还有一些枪支可供选择。关于她没什么太多好说的,通常当你遇到她时,你可能不再需要钥匙之类的道具,但可能需要生命值。而且由于她是进入【子弹地狱】前的最后一个商人,如果你有剩余的钱,全部花在她这里也没什么损失。不过,还是要先在楼层里找找其他商人,看看他们是否有更好的东西。当然,在【诅咒模式】中你能买到更多东西,但在【祝福模式】中从她那里买枪仍然没什么意义,而【挑战模式】基本保持不变。 与【贝洛】不同,【铁匠】似乎并不在意你向她开枪,但如果你偷窃,她会注意到,结果和其他商人一样。 商店(第二部分) 除了【贝洛】和【铁匠】,游戏中还有各种各样的其他商人。它们都拥有遵循特定主题的独特物品池,并且能携带游戏中一些最有用的物品。它们通常是你获取特定【黑阶】物品和武器的最佳来源。一般来说,它们不出售补给品,但也有少数例外。如果你向这些商人或他们的商店开枪,他们只会用刻薄的话语回应,但如果他们发现你偷窃,就会禁止你再购买任何东西! 古普顿教授

古普顿教授是大家最喜欢的、风趣的、说着《飞出个未来》风格台词的章鱼形外星生物。他主要出售黏液或生物相关的武器和物品,这些物品在使用时通常会留下大量液体。他不是最强力的商人,但有时会有好东西,而且售价有小幅折扣。在我看来,他最好的物品是压缩空气罐、生物薄膜、侧移枪、管道胶带(目前为止获取它的最佳来源)和冈德罗马菌株。机器人也能从他那里买到超级喷水器。他还在枢纽区域经营着一家商店,可用霸权点数解锁物品。老雷德
这个目光短浅但乐于助人的老子弹人主要售卖空白弹和与空白弹相关的物品,以及其他摧毁子弹的方法。在某些情况下,他出售的东西可能是目前最有用的,但问题在于这些物品需要组合使用才能发挥全部效果。因此,你可能需要购买多个极其昂贵的物品才能获得完整效果,例如猫头鹰饰品与黄金弹药护符的组合,这种组合威力极大,能让猫头鹰每隔一段时间就随机杀死房间内(甚至相邻房间!)的所有敌人。但这两件物品都非常昂贵。所以,如果你遇到他,诅咒模式能帮你获得所需的金钱,当然,直接偷窃也是一种方法。即便无法达成此类连招,他依然是个非常实用的商人。弹药护符通常都很有用,他的完整物品清单可在相关游戏资料中查询。在我看来,他携带的部分最佳物品包括【重装石】、【黄金弹药护符】、【猫头鹰】、【长老空白】、【桌式科技空白】、【全金属外壳】和【混沌弹药护符】。他有时也会出售普通空白和护甲,并且他的物品在几乎任何类型的游戏流程中都非常有用,尤其是诅咒流程。 弗林特
弗林特,他就是个“锁匠”,弗林特锁匠,懂了吗?哈!(我过了好久才发现这个梗,唉)。弗林特出售与钥匙和宝箱相关的物品,但特别的是他不卖钱,而是要用钥匙来购买。根据物品品质不同,玩家每件物品需支付1、2或3把钥匙,但如果可能的话,他们也可以偷走这些物品来节省钥匙。这是个有趣的机制,它实际上给了你一个选择,不用再为开宝箱的未知性而烦恼,而是可以直接用钥匙购买你眼前看到的东西。他最大的潜在用途是购买那些能无视游戏中大多数锁的物品,也就是【骷髅钥匙】、【AKEY-47】和【拟态牙项链】,这些物品很快就能回本你花掉的钥匙。就像老雷德一样,他卖的一些物品之间能产生很好的协同效果,例如【宝箱吸血戒指】和【拟态齿项链】,或者【宝箱友谊戒指】和【AKEY-47】。如果你很早就找到他,并且能买得起合适的物品,从长远来看会有巨大的回报。【AKEY-47】和【骷髅钥匙】实际上是能决定 runs 走向的物品,它们意味着你可以打开每个宝箱,而且再也不用买钥匙了,这样就能省下一大笔钱去购买更强大的物品。不过在诅咒 runs 中,他的一些最有用的物品会被诅咒锁定(哈哈),而在祝福模式下,【AKEY-47】的效果持续不了多久。同样,挑战模式对这些情况没有太大影响。在我看来,他出售的最佳物品是AKEY-47、骷髅钥匙、支架钥匙和拟态齿项链。克苏拉
克苏拉售卖的物品或许可以用“令人愉悦”来形容,但代价高昂。她出售的每件物品都会附加2.5点诅咒值,而且她还售卖许多常规的诅咒物品,比如【凯西】,这会让诅咒值迅速累积。不过,她的商品折扣力度很大,这使得它们更具吸引力。从克苏拉那里购买物品时要小心,虽然价格便宜,但如果购买过多,你可能会积累过多难以控制的诅咒值,甚至可能召唤出【果酱领主】。尽管如此,她确实有一些不错的物品,不过我认为她的库存总体上是所有店主中最差的,但她的50%折扣确实能帮上大忙。她出售许多通常带有诅咒的物品,包括会造成魅惑效果的物品(例如魅惑之弓)、生命值提升道具,还有空白弹(考虑到她带来的所有诅咒,从她那里购买空白弹简直是个滑稽的馊主意)。有趣的是,从她那里偷取物品总是比购买更好,不仅能免费获得物品,偷取时获得的诅咒值(1点)实际上也远低于购买时获得的2.5点诅咒值!总体而言,她的物品或与她相关的联动效果并不出色,不过【诅咒子弹】(能随诅咒值提升攻击力)和【第六弹巢】(能随诅咒值提升冷静值)或许算是例外。在诅咒模式下,你绝对不应该从她那里购买任何东西,她的物品都不值得让果酱之王追杀你。至于祝福模式和挑战模式,除了常规情况外没有太多可说的。她的物品清单包含【爱心霰弹枪】、【诅咒子弹】、【第六膛室】、【括号钥匙】和【蜡翼】,这些可以说是她最好的东西了。
特罗克是一个非常直率但人很好的商人。他主要出售军事装备,这些装备恰如其分地简单却非常有效。游戏中一些最强大的武器以及一些有用的攻击性升级都可以从他那里获得。他是本页列出的唯一一个不会出现在黑市或普通商店的商人,但他也在裂隙中用霸权币出售物品解锁。他的库存大多是非诅咒物品,而且价格昂贵,因此在诅咒模式中他能提供很大帮助,但由于他出售的大部分物品都是武器,所以在祝福模式中他的作用就有限得多了。和往常一样,挑战模式基本相同。商店,第三部分 售卖爬行者 在我看来,他售卖的最佳物品有M16、遥控火箭、Com4nd0、双重视觉、全金属外壳、晨星和A.W.P.
【售卖怪】在任意普通商店中出现的概率约为四分之一,是游戏中唯一可以出售物品的途径。他给出的价格略低于物品原价的一半,因此高品质物品的售价会远高于低品质物品。对于【杂物】,他总是只给3个【贝壳】,这可能足够你购买其他东西。如果你需要钱,他可以帮你处理掉较差的武器和物品。我建议【囚徒】在需要钱时卖掉她的【短管霰弹枪】(可能还有她的【燃烧瓶】),【海军陆战队员】卖掉他的【补给空投】。【机器人】也可以卖掉像【心形吊坠】这类无用的生命相关物品来换取更多钱。如果你拥有一个主动道具且没有多余的道具栏位,在开启宝箱或与 Boss 战斗前,前往商店查看【Creep】是否在那里通常是个好主意。如果他在,当你获得另一个主动道具时,可以通过他卖掉你不想要的那个,至少能收回一些钱。这需要你动作迅速,因为你得在【Rat】偷走其中一个道具之前往返于 Boss 房间/宝箱房间和商店。记住,你也可以通过打开地图并选择要丢弃的道具来扔掉被动道具。向【Creep】出售诅咒道具也是控制诅咒等级并获得回报的好方法。记住,出于某些原因,他不会收取某些道具,包括【Trusty Lockpicks】和【Bloodied Scarf】。
与其他商人截然不同,温彻斯特会收取费用,让你有机会玩他的射击场游戏,赢取宝箱……呃。在这个游戏中,你必须在一个坑上方的游戏区域内击中四个看起来很诡异、酷似他脸庞的目标。你得到的枪配备激光瞄准器,精度极高,子弹可以反弹数次,但你只有四发子弹,且每发子弹击中目标后就会消失,所以你的瞄准必须非常精准。有些目标需要你让子弹绕过障碍物反弹才能击中。舞台上排列着三种类型的方块:蓝色方块会使你的子弹正常反弹;绿色方块被击中一次就会被摧毁,并能为其他射击开辟道路;红色方块则会立即摧毁任何击中它的子弹。如果你用分配的子弹至少击中一个目标,将获得一个未上锁的非 mimic(即使你佩戴了 mimic 牙齿项链)宝箱,宝箱的品质由你击中的目标数量决定:击中1个目标会获得棕色或蓝色宝箱,击中2个会获得蓝色或绿色宝箱,击中3个会获得绿色或红色宝箱,击中所有4个目标会获得红色或黑色宝箱。如果你能熟练掌握 Winchester 的游戏,它将成为游戏中获取红色和黑色宝箱最可靠的来源。通常情况下,你不能走出游戏区域,否则会受到坠落伤害并在起始位置重生。并且你不能使用温彻斯特给你的武器以外的其他武器,否则会立即失败。不过,子弹升级和飞行道具可以用来轻松通过游戏。例如,【腰侧枪套】和【散射】升级会使每发子弹的数量翻倍和三倍,大大增加命中目标的几率;而【弹跳子弹】和【愤怒子弹】会使子弹弹跳次数更多,效果类似。最后,【蜡翼】和【喷气背包】可以让你飞到目标附近,轻松完成挑战,温彻斯特不会在意这些,仍然会给你奖励。温彻斯特的游戏有折扣优惠,但和其他商店一样,越往后玩花费越高。刚开始大约需要30发子弹,在我看来这游戏总是值得一玩的,尤其是当你技术提升后,投入的钱性价比很高,至少能获得一个绿色宝箱,更不用说红色和黑色宝箱了。 三次达成温彻斯特游戏的【Acing】(击中所有四个目标)将解锁极其强大的【Seven Leaf Clover】,它能使所有宝箱强制变为红色和黑色等级。 黑市

在2至5层的非隐藏楼层中,你偶尔(大约每10次游戏会遇到1次)会看到一张滑稽的恶魔脸。这是通往黑市的入口,但你需要拥有100个贝壳或至少1点诅咒值才能进入巨口。如果不满足这些条件就进入,巨口会对你造成伤害并将你弹出;若满足条件,你将被传送到主地图外的黑市。在黑市主房间里,古普顿教授、老雷德、库苏拉和弗林特都会出售他们的商品,而温彻斯特则在相邻区域设有游戏室。除弗林特外,包括温彻斯特在内的所有商人都会半价出售商品,因此这是一个获取一些更强大物品甚至偷窃它们的绝佳机会。在楼层内时,你可以随时传送回市场。 如果用像塞壬这样的水属性武器射击那张脸,它会被摧毁,你将无法前往市场,但会留下一件高品级的枪械或物品。 Resourceful Rat

那只老鼠或许算不上真正的店主,但管他呢。作为对你遗落在地上的所有物品被偷走的一点小小补偿,如果你使用电梯前往3层、4层和5层,老鼠就会在这几层的开始阶段出现。在这里,它会给玩家提供免费武器:3层1把,4层2把,5层3把。这些武器通常是3层的蓝色品质箱枪,以及其他两层的绿色品质武器,能给玩家带来一些优势,毕竟他们原本只有初始装备。有趣的是,你可以像往常一样从老鼠那里偷走一些枪,并且每次你完成该楼层及其 boss 战后,捷径开始时可用的枪都会发生变化。非玩家角色 游戏世界中存在各种与商店无关的非玩家角色,他们可能会提供很大帮助,下面来看看他们能提供什么。 枪手之王与曼瑟万特斯
这对组合由一位傲慢、阶级至上且可能有近亲关系的左轮王室成员和他忠诚而长期受苦的仆人组成,他们会向你提出带有特定限制的房间挑战赌注,具体如下: 1. 不使用翻滚完成房间。 2. 不受伤害完成房间。 3. 仅使用提供的武器完成房间(武器包括克洛布左轮、德林格手枪、豌豆射手、钉枪或凯西球棒)。 要激活他们的挑战,你需要向国王支付少量金钱,大约15-20发子弹壳,如果你赢得挑战,你将拿回所付金钱并获得一件随机物品。如果你在地图上看到【枪手之王】(他由皇冠图标标记),我强烈建议你接受他的挑战。闪避翻滚和武器限制挑战通常相当简单,而且在游戏中的大多数房间里,你应该不难赢得房间伤害挑战。如果你遇到困难,确保使用你最好的武器、主动道具和空白弹,赢得挑战远比担心浪费这些道具更值得。 枪手之王的奖励似乎并非来自特定的道具池,这意味着任何道具都有可能出现。有时我从他那里获得了整个游戏中最强大的道具,包括冈瑟,所以这真的很值得。在诅咒模式中,它们有时会带来麻烦,这不仅是因为房间本身难度更高,还因为你获得的物品会直接进入背包。如果该物品带有诅咒,你将无法拒绝它。你可以丢弃物品来降低诅咒等级,但【果酱之王】肯定会生成,并且只有进入下一层才能摆脱它。在挑战模式和祝福模式中,国王的机制基本相同,但在某些挑战模式的 modifier 下,无伤挑战会变得更加困难。 失落的冒险家
在游戏中遇到的最有用的NPC可能就是这位看起来异常眼熟的英雄了,他会让你为他绘制整个楼层的地图并返回。实际上,你只需要像平时一样玩游戏(而且正如我所说,你应该总是探索完楼层里的每个房间,以最大化获得金钱和掉落物),他就会为此给你一件物品。你不需要击败 Boss,地图也会被视为已完成,他依然会因为你探索了所有其他房间而给予奖励。如果你在实际探索完整个楼层之前就拥有了地图,无论是来自楼层地图、制图师之戒的效果还是枪牢蓝图,他也会因此给你奖励。秘密房间不在考虑范围内。就像【枪王】一样,他似乎会从整个游戏物品库中给你奖励,同样我也从他那里获得过极其强大的物品(包括【克隆体】),但和【枪王】类似的是,他会直接把物品放进你的背包,如果是在诅咒关卡中,这可能会带来麻烦,因为物品可能带有诅咒。【探险家】通常被锁在门后,或者地图中需要探索的部分(比如商店)可能是锁着的。在我看来,你应该总是用钥匙去找到他或者完成地图,因为奖励实际上相当于打开任何箱子的成本,但有机会获得【黑色箱子】或【红色箱子】级别的物品。在和他对话前不要向他射击,否则他不会提供任务。
这对资质存疑的医生会一次性完全治愈玩家在当前楼层受到的所有红心伤害。在早期楼层,尤其是当你技术提升、受伤减少时,他们不会特别有用,但当你深入游戏后,生命值问题愈发突出,找到他们会让人松一口气。他们对【子弹】角色尤其有用——如果他受到严重伤害,想要恢复满血以便再次使用剑几乎是不可能的任务,但帕奇和门迪能立即帮他恢复。相反,他们对【机器人】角色相当无用,不过他们会给机器人一件垃圾(微小伤害提升)、一件护甲或【瓶子】主动道具。如果不是处于危急情况,最好先探索完整个楼层再使用它们,因为它们会在最后为你恢复所有额外受到的伤害,这样你能最大限度地利用它们。它们在诅咒模式中尤其有用,因为在那种模式下你可能会承受更多伤害;在挑战模式中也能提升生存能力,在祝福模式中虽然效果稍弱,但同样有帮助。 ——阿尔伯恩修士
阿尔伯恩人兄是首个仅在秘密房间中出现的NPC,也是秘密房间里最常见的NPC。他总会出现在【真枪修道院】隐藏楼层的某个秘密房间中,通常位于宝箱房间附近,但也可能罕见地出现在其他楼层的秘密房间里。当玩家靠近时,他会向玩家提出各种无意义的问题,并声称只有给出正确或真实的答案才会打开宝箱。尽管如此,他提出的所有问题都没有错误答案,无论玩家说什么,他最终都会打开宝箱。宝箱内的物品差异极大,可能包含生命值、空白弹、枪支、护甲、金钱和道具等。有时宝箱内会有多个物品,且等级可能高得惊人(例如,我昨天就发现了一把狙击步枪和一个护甲合成器),但有时里面可能只有半颗心。尽管如此,无论你在修道院进行何种类型的游戏流程,寻找宝箱通常都是值得的,毕竟只需消耗一发空白弹。如果你射击并摧毁宝箱,会留下一个名为【谎言】的物品,它基本上和垃圾没什么区别。 老人
老人只会出现在秘密房间,而且极为罕见(不过我注意到,在遗忘墓穴中,连接着有敌人房间的秘密房间里,他出现的概率似乎更高)。他非常有用,会像枪王和失落的冒险家一样,无条件给你一件随机物品,除非你在玩合作模式。在诅咒模式下,由于他会把物品直接放入你的物品栏,所以通常的问题依然存在。 女巫

最后一个秘密房间里只有NPC,这些女巫和老人一样稀有。你给她们任何一把枪,她们都会把枪放进锅里,然后还给你一把品质相同或更高、带有额外诅咒的不同枪支。可想而知,在诅咒模式下你应该避开这些女巫,这很可能不值得。除此之外,她们可以帮你把不太有用的武器换成可能更好的武器。 神龛 神龛散布在枪牢各处,通常有特定的增益效果,但与它们互动会有某种代价。单个神龛的实用性会根据你的游戏方式(例如你使用的角色或游戏模式)而发生巨大变化。它们和NPC一样,有时会出现在秘密房间或锁着的门后,但不同的是,如果你向它们射击,它们不会有任何反应。如果通往某个房间的路径旁有绿灯,那么这个房间就是神龛房间。大多数神龛只能使用一次,但也有一些例外,我会特别提到。我将按字母顺序列出各个神龛、它们的效果以及一些游戏玩法说明: 弹药神龛

弹药神社将把你所有枪械的弹药完全补充至最大容量,但会使你的诅咒值增加3.5倍(有关这个“小礼物”的更多信息,请参考诅咒部分)。这个神社的整体实用性差异很大,显然你应该等到武器弹药量尽可能低时再使用它。因此,如果你发现了一个弹药神社,但弹药仍很充足,你可能需要先跑完当前楼层的剩余部分再使用它,不过也可以在 Boss 战前使用,让你最好的武器处于弹药充足的状态。弹药掉落的随机性可能让它要么相对无用,要么成为绝对的救命稻草,但总体而言,随着你游戏水平的提升以及对弹药资源管理能力的增强,它的作用可能会比刚开始时看起来小一些。诅咒是一个重要的考量因素,如果你初始诅咒为零或很少,这可能不会造成太大问题,你甚至可能会喜欢遇到一些更强的敌人并获得更多金钱;但如果你之前积累了大量诅咒,情况就会变得非常困难。如果你在诅咒模式或祝福模式中遇到它,那绝对不能选。在诅咒模式中,它会让你被果酱领主追杀,这完全不值得消耗弹药;而在祝福模式中,弹药补充毫无意义,因为你的武器无论如何都会改变,这实际上是在没有任何好处的情况下增加了你的诅咒值。 天使神龛
【天使圣坛】会永久减少你一整颗心的生命值并增加1.5点诅咒值,作为交换,你使用任何武器的伤害都会获得25%的固定提升。我个人觉得这个权衡非常诱人,伤害提升在这款游戏中非常有价值,这是一个不错的伤害来源。同时值得注意的是,它与其他能显著提升伤害的物品类似,因为它们通常也带有某种缺点或类似的限制(例如【重型子弹】会降低子弹速度,【眼罩】会大幅降低你的精准度,【镀金子弹】需要你不花钱才能充分发挥其效果等)。生命值的削减仍然相当严重,但如果你能在前三个左右的关卡稳定获得大师子弹,那么总体来说还是值得的,否则你可能应该放弃它。与其他神龛相比,这个诅咒的影响相当小,除非你已经被大量诅咒缠身。不过,同样地,如果你不想让果酱领主跟着你,那么在诅咒 runs 中就不应该选择这个神龛。 遗憾的是,由于机器人没有生命值,它完全无法使用这个神龛,即使与神龛互动也不会有任何操作选项。 空白神龛
与其他神龛不同,你无需直接与该神龛互动即可获得其效果。若你在神龛所在房间使用空白弹,神龛有十分之九的概率掉落宝箱,且可重复使用。不过,在第一个宝箱出现后,每多使用一次空白弹,后续宝箱的生成概率就会降低45%,直至降至四分之一。此外,这些宝箱也可能是宝箱怪,需格外小心!如果你在某一层发现了这个神龛,那么尽可能保留空白弹将是最佳选择,即便在 boss 战中也是如此(但不要因此过于执着而被击中,导致失去大师回合)。如果我找到这个神龛,我更愿意在这里把所有多余的空白弹药都用掉,而不是用它们去找秘密房间,因为这样总体上更可靠。大多数箱子都会是未上锁的棕色箱子,如果你有多余的钥匙,蓝色和绿色箱子仍然不错。不过我从没见过这个神龛掉落红色或黑色箱子,这可能只是我运气不好。在诅咒模式中,要记住这个过程可能会遇到更多的拟态怪。 挑战神龛

挑战神龛在互动后会让你对抗三波强大的敌人,击败所有敌人后会掉落一个未上锁的宝箱。宝箱品质总是优于棕色,但可能是宝箱怪。这些波次通常是你在当前楼层能遇到的最难战斗,例如至少会有一波包含两个铅制少女,这在其他情况下是闻所未闻的。不过,随着你游戏水平的提升,击杀这些敌人应该不会有太大困难,你甚至可能从中获得比其他情况更多的金钱(尤其是在高诅咒值时,不过战斗难度当然也会更高)。即使你受到几次攻击,我认为在几乎任何情况下使用这个神龛都是值得的,这样你就能获得那个宝箱,除非你确实只剩下一击的生命值。净化神社

在我的体验中,这是一种较为稀有的神龛。我认为,如果你没有诅咒,这类神龛根本不会生成;即便你有很多诅咒,也不常见到它们。该神龛会将你的总诅咒重置为零,代价是你每有1级诅咒,就需要支付5个弹壳。遗憾的是,这是一个要么全要、要么全无的选择——你不能决定只减少1级或2级诅咒并支付更少费用,必须将诅咒降至零,并支付尽可能多的费用来消除尽可能多的诅咒。如果你只想稍微减少一点诅咒,或者没有足够的钱支付全额费用,这可能会成为一个问题。这是整个游戏中仅有的两种无需丢弃诅咒物品即可降低诅咒值的方法之一(另一种恰好是下一个神龛),所以如果你找到它,对于防止诅咒失控会很有用。如果你在诅咒局中找到它,可以将状态重置为正常,这样就能利用那些会增加诅咒的选项,比如购买或偷窃某些物品,同时还能保留截至此时从本局中获得的额外金钱。我通常会避开这个神龛,因为我喜欢高诅咒值,除非我运气好,在诅咒局中发现它时,知道当前楼层有需要承受诅咒才能获取的贵重物品,比如【骷髅钥匙】。对于新玩家来说,使用神龛时如果你的诅咒值过高,它能提供一个很好的喘息机会,并大幅降低难度。可以查看诅咒相关部分了解更多信息。 净化神龛也是游戏中唯一能直接告知你诅咒等级的东西,根据激活前的描述,具体分类如下: 0-2诅咒值:幽灵不会打扰你。 3-4诅咒值:你被黑暗触碰。 5-6诅咒值:你被黑暗笼罩。 7-9诅咒值:不要停留,它们来找你了。 10+诅咒值:无人能帮你。 正如最后一点所示,当你的诅咒值达到10或以上时,神龛将完全无法使用,请注意! 神龛,第二部分 骰子神龛
这或许是所有神龛中最复杂的一个,使用它会给予玩家一个随机增益,同时也会附带一个随机负面效果。正面效果如下: 净化:移除随机数量的诅咒 强化:给予玩家1或2点永久生命值提升 恩赐:生成一个宝箱(可能是宝箱怪) 恢复:恢复随机数量的缺失生命值 报酬:获得20至99枚弹壳 迅捷:移动速度提升 护盾:获得1至3点护甲 空白补给:获得1至10个空白 装填:所有枪械的弹药容量提升至125%或弹药全满 负面效果如下: 限制:所有枪械的弹药容量减少30% 诅咒:诅咒值增加5 不稳:增加 reload 时间 缴械:夺走你当前持有的武器 抢劫:夺走你25-100%的弹壳 痛苦:对玩家造成1至2颗心的伤害 空白剥夺:夺走随机数量的空白虚弱:永久移除一颗心的生命值 无价:不会施加负面效果 如你所见,使用这个神龛就像是玩老虎机,会随机获得一个正面效果和一个负面效果,除非你获得了【无价】修饰符。是否使用这个神龛完全取决于玩家,以及他们是否愿意相信随机数生成器并为了一些收益而承担风险。不过我得说,使用神龛很容易让你遭受严重损失,有些增益效果可能用处不大(如果你的诅咒很少或生命值损失不多,【净化】和【恢复】效果就几乎没用;而如果你获得了【受限】、【被掠夺】或【不稳】效果,可能会严重阻碍你并影响整个游戏流程)。我尤其不建议在诅咒模式中使用它,因为获得诅咒词条可能是致命的。不过,如果你决定使用它且骰子点数对你有利,它会非常有用,而且值得记住的是,你可以采取某些方法来提高成功几率。使用神龛前,如果你花光了所有钱,用完了所有空白(比如寻找隐藏房间或与 Boss 战斗),且知道当前楼层某处至少有 2 格心的生命值,同时持有像小写 R 这样的低价值武器,这将大大减少许多负面影响,而且,你甚至可能获得【Priceless】。如果你选择机器人角色,那么所有与生命值相关的负面效果都不会对其产生影响,但正面效果同样也不会生效。有时这些效果会相互抵消,最终不会产生任何实际变化,例如当你同时获得【强化】和【虚弱】状态时,最大生命值会保持不变。 关于这个神龛的最后一点说明是,使用它时有极小的概率(0.1%)会导致神龛爆炸,这会将你的心容器减少到只剩1个,但同时会使你的伤害提升4倍!我通常看到这个神龛时会选择避开,但如果你想在你的枪牢冒险生涯中增添一些刺激,不妨尝试这个赌博,让事情变得更有趣。 【玻璃神龛】
玻璃神龛会给予玩家3个玻璃果恩石道具,且没有任何负面效果,更多信息请参考拾取物部分。有趣的是,这是少数几个使用时完全没有任何代价的神龛之一,所以只要看到它,一定要使用以获取这小小的收益。 英雄神龛
在一楼第一个房间中可以找到【垃圾神龛】。如果你已击败玩家角色的过去,与该神龛互动会将你的诅咒值设为9,更多信息请参见【诅咒模式】部分。
这是一座纪念传奇人物瑟·琼坎的雕像,这座神龛会收取你背包中的垃圾,并将其兑换成护甲片。这对机器人角色尤其有用,能为他提供充足的护甲。需要记住的是,机器人每持有一件垃圾获得的5%伤害加成,在你将垃圾交给神龛后并不会消失。你可以多次使用神龛来处理背包中的多件垃圾。如果你在某一层发现了这座神龛,同时又遇到了一些低品质的箱子和数量有限的钥匙,或许可以考虑破坏这些箱子获取垃圾,然后将垃圾交给神龛以获得更多价值。不过,如果你拥有被动道具瑟·琼坎,将垃圾交给这座神龛会削弱他的能力,这样做是不值得的。和平神社
和平神龛会在你与之互动时拿走你当前持有的武器,作为交换,它会为你恢复一整颗心的生命值,并且可以重复使用。如果你伤势严重,这实际上是一笔相当不错的交易,你可以献祭一些低品质的武器,比如那把你可能在通过前几层后就再也不会使用的【囚徒霰弹枪】,否则这些武器最好还是卖掉或者扔进武器吞噬者里。当然,如果你生命值已满,它就不会有任何效果;而且如果你拥有被动道具【团结】,拿走武器会让你变得更弱,这一点需要记住。 在【祝福模式】中,你可以利用这个神龛无限献祭武器,直到生命值达到上限,不断变化的武器似乎被视为无限供应,可用于此目的! Y.V.神龛
Vlambeer的粉丝们肯定会喜欢这个家伙,可惜没有气喇叭和黑帮说唱!通过在这个祭坛供奉弹壳,Y.V.会让你的枪械在射击时随机发射额外子弹,供奉的弹壳越多,发射额外子弹的几率就越高。额外子弹的数量也是随机的。这能大幅提升你的整体伤害输出,因为随机射出的大量额外弹道会让敌人的日子不好过。不过,每次使用祭坛来增加弹道,都会使祭坛的费用增加10个弹壳(第一次使用需要10个弹壳,第二次就是20个,以此类推),所以祭坛很快就会变得极其昂贵。因此,在诅咒模式接近尾声时找到这个物品会非常有用,此时你可以消耗数百发额外弹壳来触发Y.V.的技能,以此消灭周围所有敌人,或者搭配【现金公文包】道具,亦或是配合【战利品袋】道具使用效果更佳。如果某次射击未触发该效果,那么下一次射击触发效果的概率会提升,每次提升3.7%(叠加在基于你使用神龛次数的基础触发概率之上)。额外子弹的数量将是单颗子弹的2到4倍,且不消耗额外弹药。 弹药量少但威力强大的武器能最大程度发挥其作用,看到【毒刺】或【BSG】喷射出大量 projectile(原词)造成远超平时的破坏,那场面十分壮观。我建议你每次发现这个神龛时,至少使用几次。 隐藏房间 在《挺进地牢》的大多数楼层中都藏有隐藏房间,通常每层一个,但有时可能会有更多。它们是获取额外资源的有用来源,还可能包含一些有用且意想不到的秘密。 要找到隐藏房间,你需要用非无限弹药的武器射击墙壁,这样会露出一道裂缝,你射击的次数越多,裂缝就越大。此外,敌人的子弹也能露出裂缝。当裂缝显现后,你可以使用空白(Blank)炸开隐藏房间的墙壁,此时会发出铃铛声;或者你也可以使用爆炸物,比如火箭筒(RPG)导弹来炸开墙壁,这样可以节省空白。穿着护甲时受到攻击有时会暴露秘密房间,但在激烈的战斗中很难注意到。这种情况在机器人角色身上尤其常见,当你在战斗中失去护甲后,应该快速检查一下是否有房间被暴露。
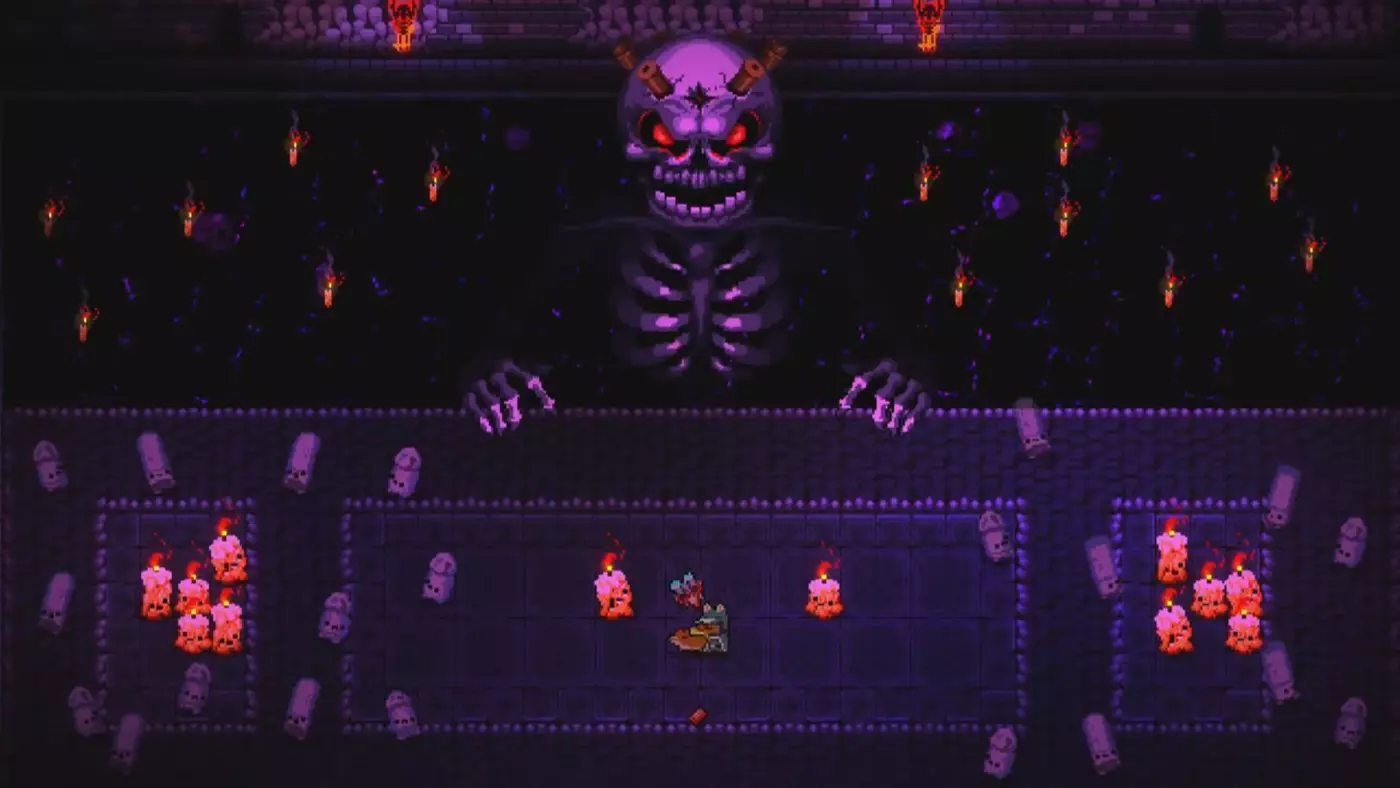
Typically, secret rooms lead away from the Gungeon, into open areas not surrounded by other rooms. As such it's best to look for them in the Gungeon's extremities, especially in chest rooms, the elevator room after the boss room, the Shop and extra vendor rooms or gun muncher rooms. If you want to be quick it might be a good idea to shoot the walls of the chest rooms and elevator room and if its not there blowing your blanks off in the Shop (since shooting in the shop will anger the shop-keep) and/or a random room around the edges of the gungeon. They do also spawn off of such random enemy rooms, and in my experience it feels like those Secret Rooms have rarer stuff in them, its usually worthwhile to scan the walls of a room you've had an intense fight to see if the bullets of you or the enemy have revealed a crack in the wall. As stated above the Abbey often has an easy to find secret room containing Brother Albern, usually off of a chest room. It's good to find secret rooms early, like most things that give extra resources that has a bigger impact at the start of the game, especially with regards to keys. As you get better at fighting first floor bosses you may want to consider avoiding the use of blanks there and saving them for secret room searches after killing them. A map will always reveal secret rooms, as will the Gungeon Blueprint and the Brick of cash (which will have an easily noticeable snitch brick standing beside the room entrance), but generally the map is too expensive to be worth buying just to find secret rooms (though this can change in cursed runs). Secret rooms have an extremely wide variety of possible layouts. The most common ones typically have a small number of pickups like health, armor or keys. Extra chest rooms are also common, and can provide an alternative if the floor's chests are otherwise underwhelming. A lot of chest rooms can spawn with the chest surrounded by a pit, this can be dangerous if the chest is a mimic, especially in cursed runs, since when the mimic dies the contents often fall into the pit and are unobtainable, so be careful not to push the mimic off of the platform when fighting it. Much rarer rooms can contain NPCs, as well as the secret room only NPCs listed above (Albern, Witches, Old Man) this can include the merchants listed in the second part on shops, Winchester and the lost adventurer. Shrines can also rarely be found as can evil gun munchers. Finally some rooms have specific combinations, such as a large room with three chest mimics, or a room with a skeleton, a note, a key and a brown, a blue and a green chest. In Bullet Hell there will always only be one, very difficult to find secret room, and it will always contain an evil Gun Muncher. One last little thing, in some shrine rooms you'll see a path lead straight into a wall, this is a dead giveaway of a secret room at the end of the path. Secret Floors I guess secret rooms weren't enough, so there are also entire secret floors too! Secret floors can extend your run and give you the opportunity to find even more items than normal, but they also have high costs to entry and can be much more difficult than other floors. The two floors are the Oubliette and Abbey of the True Gun. The Oubliette This grotesque, fetid sewer seems to be where the gungeon's detritous ends up, including malformed gundead and lot of disgusting blobs. It can be entered through the first floor by finding a room with the fireplace, putting out the fire (either by shoving a nearby water barrel into the barrel, shooting a water weapon at the fire or prompting a blobulon type enemy to move too close to it), pressing a button behind the fire that lowers a wall to a special secret room somewhere in the floor, finding said secret room and unlocking the grate to the Oubliette by using two keys on it. When you fall down the resulting hole you will be instantly transported to the Oubliette, and when you are finished and take the elevator at the end of the floor you'll go to the Gungeon Proper like normal. As such if you want to go down to the Oubliette you'll need to save two keys to get there. As we have already talked about there you can always find at least two keys on floor 1 to get down there, but doing so may entail not opening some chests. The Pilot can try and lockpick the grate locks, but if he fails there's no way down. Regardless the Oubliette will have two chest rooms, a shop and a boss that drops an item just like any other floor, in addition to any other secrets or pickups that present themselves, so in my view its worth it to go down and in the long run you'll get more stuff by doing so. The floor is big step up in difficulty, especially since its so early in the game, so you'll need good experience if you want to do well, many of the enemies are very tough and dangerous for that point in the game, especially Poopulons, Spogres and Veteran Shotgun kin. One of the big gimmicks of the floor is that there is a lot of poison around and enemies that either create poison or are immune to it. I would say it's roughly as difficult as floor 3, the Powder Mines. There are also some surprisingly tough rooms that require good platforming skills. Luckily the Boss (there is only boss, no variation between three like in other floors) is fairly easy, the Blobulord. You don't have to worry so much about getting hit by him, since there is no Master Round for the Oubliette, but he will still drop an item. In Cursed runs the Oubliette becomes much, much harder, I would say the only floors that cause me more trouble are the Forge and Bullet Hell. Considering it's so early in the game you have little health and good weaponry to work with, but as well as that some the enemies, particularly the Poopulon and Spogre, can be far more problematic when jammed thanks to their ability to fill the screen with bullets and withstand much more damage. As well as that though, as curse goes higher in the Oubliette in particular a lot of the regular bullet kin enemies get replaced by the deadly Veteran Bullet kin, who can also be jammed and will endeavor to make life much more difficult with their predictive shots. In challenge mode the Oubliette is best avoided, an already difficult floor is made worse, while in blessed runs it might be alright depending on what weapons you end up with. Of course one last thing about the Oubliette is a little room than houses an item called the Old Crest. You can pick it up, but what can you do with it? Well... The Abbey of the True Gun In comparison to the Oubliette the Abbey seems clean, well maintained and filled with historical artifacts. It also has giant pools of what look like blood, insane gun cultists and Skeletons rising out of their tombs, oh well, close enough. To gain entrance to the Abbey you'll need to carry that crest you found in the Oubliette all the way through the Gungeon proper into a special crypt with tombs for important looking bullets and an alter to place the crest upon at the end of the room. When you do this the closest tomb will shift and reveal a staircase down to the Abbey. This is harder than I've made it sound, because to get the crest to the alter you need to make sure you take absolutely no damage between picking up the crest and placing it on the alter, or else it will break and the Abbey will be inaccessible. As such its best to leave the crest until you have cleared the Oubliette and killed Blobulord, so that you have the smallest chance of getting hit. When going through the Gungeon Proper it's best to double down on what strategies work best for avoiding damage, use your best weapons, pop off Blanks if necessary, use active items liberally. The crypt room usually comes off of Chest rooms or shops, so make sure you find them first and don't get waylaid looking for the boss, the longer it takes to find the crypt the higher the chance will be that you get hit and lose the crest. The crest room in the Oubliette is often locked behind a gate, so consider whether or not you want to spend a key to go down to the Abbey. The Abbey has a high difficulty wall, mostly courtesy of it's Boss, so you'll need a lot of experience. If you do go through it and succeed it can really help you out with more items and weapons over the long run, but that boss... we'll get back to him. The Abbey is quite similar to floor 4 in its enemies, lots of Bookllets, Skullets, Spents, Gunjurers and Bloodbulons as well as more unique Cardinals and Gun Cultists. Uniquely a lot of the enemies will be jammed, regardless of the level of curse you have. Despite this I would say that the regular rooms in the Abbey are easier than Oubliette, if mostly because the player will have better weaponry and items by this point. The Abbey has a couple of quirks, there is always a secret room with Brother Albern who will give you some more stuff, and secret rooms seem more common in general here too, I've found three secret rooms in one run in the Abbey before. Like the Oubliette it operates like a normal floor with a shop, two chests, and a boss drop, which can beef up your inventory nicely. The Boss is by far the biggest concern. The Old King has the third highest health of all of the game's bosses, only lower than the Dragun and Lich. Effectively it's an endgame worthy boss halfway through the game. At this point you still won't be as well armed as you would be going up against the Dragun or Lich, which adds to the difficulty. In addition he is one of only two bosses (the other being the Kill Pillars) which has a jammed attack without having to be jammed himself. His attack are modeled after the Floor 1 boss the Bullet king, but are far tougher and more complex. Suffice to say the Old king is very hard, and if you don't feel that you have a good enough weapon to face him before going down to the Abbey you may want to give it a miss. If you do beat him Floor 3 will seem like a very nice respite afterwards. Do keep in mind the Robot won't take more damage from his jammed attacks. Compared to the Oubliette the Abbey doesn't get especially more difficult in cursed runs, especially since bullet kin aren't replaced with their Veteran counterparts. A number of the enemies are already cursed regardless as has been stated, so it can be fairly similar. A difficult part can be simply getting the crest to the crypt due to the tougher enemies. The biggest problem is the possibility that the Old King will be cursed, and not many people want to have to face down this monstrosity:

天啊,我就算是死对头也不会想遇到这种事。对于挑战通关来说,想要进入修道院可能会非常困难,尤其是因为额外的潜在伤害来源,而且通常来说根本不值得这么痛苦。弹幕地狱
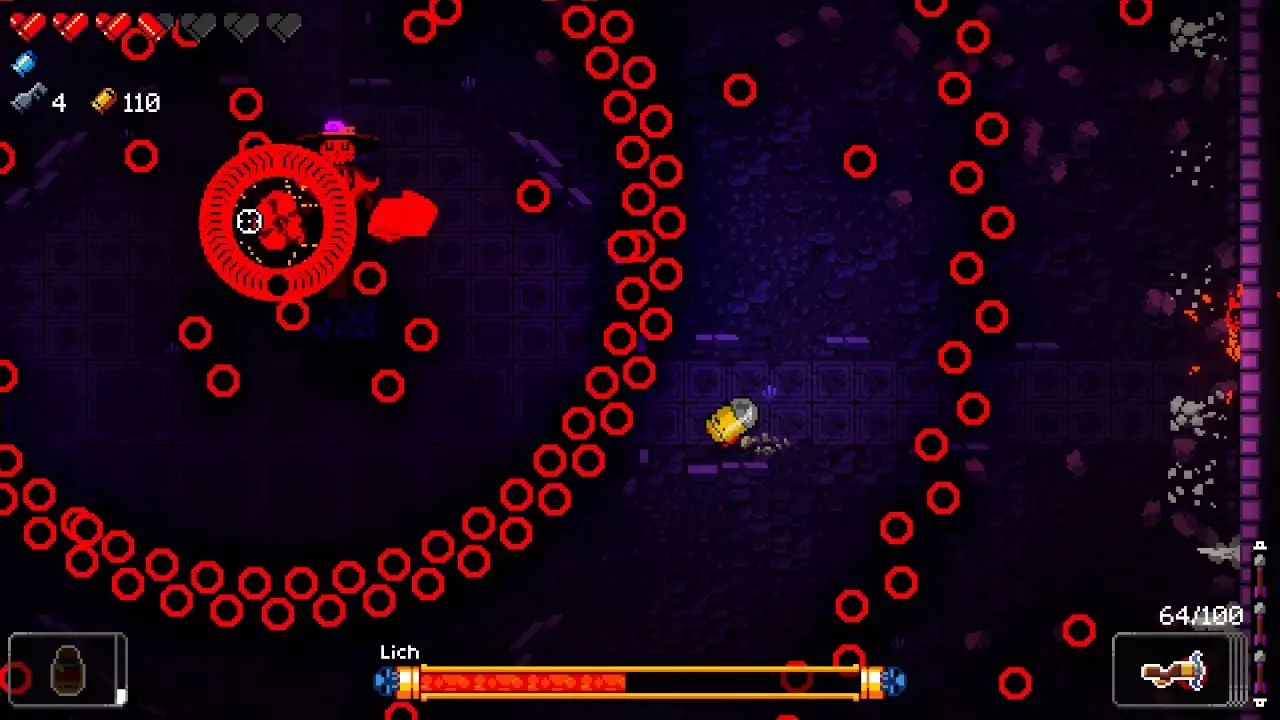
Bullet Hell is the final and hardest floor in the game, the way through to the true final boss and real ending, and just generally a culmination of all the horrors the Gungeon has to throw at you. To gain entrance to Bullet hell all of the four default Gungeoneer's pasts must be defeated. After you do so, in the special area that contains the gun that can kill the past there will be a distorted looking tear in the floor just before the Staircase that leads to the Chest containing the gun. If you walk into this hole a giant skeletal hand will grab the player and pull them down to Bullet Hell. Bullet Hell is crushingly difficult. With a couple of exceptions every previous enemy encountered in the earlier floors can appear, usually in very difficult combinations. Each individual room is usually very large and has multiple waves of numerous enemies, in addition to having large rooms Bullet Hell also has a lot of them, as a result it is by far the longest floor, and can often take up to half an hour to clear everything. There are lots of dead ends and complex pathing which makes it very difficult to get to the Boss room quickly, generally speaking you want to spend as little time as possible fighting in the enemy rooms and need to beeline towards the Boss chamber since you will mostly only be losing health and ammo if you spend too long fighting. Sometimes you'll get lucky and find the Lich in short order, which gives you the best chance to kill him while you still have relatively high resources. The main reason you don't want to spend much time searching room to room, in addition to the difficulty, is because Bullet Hell does not have the usual useful stuff that other floors do. There are no chests rooms, no shops of any kind, no NPCs, no shrines, no extra chest rooms, and only one secret room that will always hold the same thing, an Evil Muncher. All you'll find are seemingly endless grueling rooms filled with enemies. Bullet Hell will push your resource management to the absolute limit, considering the extreme length of the floor and number of tough enemies you won't be able to count on extra resources or new guns from the shop or chests. All you will have (unless you get a few lucky chest drops) will be what you started Bullet Hell with. The only thing you can count on are room clear drops that might give you some much needed Ammo or health, but this is erratic and you'll need to carefully conserve what ammo you have as well as desperately trying to avoid getting hit. Keep in mind my advice from the planning section, all of your previous careful actions to minimize RNG and get the best value in previous floors was to prepare you for the slog through Bullet Hell. Use your best weapons, you should have been saving them and keeping them topped off for this occasion, now you can let rip, especially with more ammo-efficient stuff. Killing enemies quickly with your good stuff is important since it means you'll be less likely to get hit overall, so being fast and clearly rooms quickly is very useful. Do no get bogged down plinking away with lousy starting or Brown chest items, all it will do is draw out the run and increase the likelihood that you get hit. Balance ammo drops carefully around your needs, remember you need to kill the boss (we'll get to him), so your very best boss killing weapons need to be topped off even though you shouldn't use them in Room-to-room fighting. Its mostly for bullet hell you'll want to collect as many master rounds and general health upgrades as possible, earlier flawlesses will start to pay off as they give you better margin for error since you can't rely on health drops or the shop as much as earlier. Keys are almost entirely useless here, ideally you should have spent them all by the previous floor, likewise with money, hence why you ought to buy as many things as possible from the Blacksmith. The resources needed to kill the Dragun and clear the Forge, themselves no mean feat, can really eat into what you have available for Bullet Hell, keep that in mind and be sure not to leave anything behind before you go down. The Lich is True final boss, the Gungeon Master and bane of your life. He is by far the hardest boss in the game and will take the most to kill, much more so than the Dragun. He has three distinct phases, each with very unique attacks and visuals, personally I think Phase 2 is the hardest because of a particular attack of alternating bullet rows that is very hard to dodge. Unload everything you have left on him, you have nothing left to lose at this point, and save blanks and active item uses for this fight. He'll push your dodging abilities to the limit, but keep at him and he'll eventually break. Defeating him will Unlock the Riddle of Lead and Gungeon Blueprint and end the game, blasting him with the Bullet that can kill the past and vanquishing his evil. Conquering Bullet Hell is basically the final goal of this game that occurs only after killing the initial Final Boss of the Dragun and the pasts, but its not quite the limit of what you can do in the game. In the next sections I will start to talk about alternate game modes that can make everything, especially Bullet Hell, that much harder. Curse
凝视深渊过久,深渊亦将回以凝视。 在隐藏属性部分我们略微提及了诅咒,并且在本指南中也多次在不同情境下提到了诅咒模式。接下来我将在此处及下一部分对两者进行详细阐述。 诅咒 以下情况会使你获得诅咒值: 持有以下物品和枪械。【大家伙】【刀盾】【支架钥匙】【猎人】【独角兽角】【鲜血胸针】【霰弹枪】【悲叹魔盒】【诅咒子弹】和【骷髅钥匙】均提供+1诅咒值(由悲叹魔盒生成的任何物品也会额外提供+1诅咒值)。【长老空白】【第六膛室】【黄色膛室】【警徽】(仅在与死去的警察对话后)【凯西】和【光剑】提供+2诅咒值。【王者之剑】提供2.5诅咒值。丢弃这些物品中的任何一个都将移除玩家身上的诅咒。使用天使神龛(+1.5诅咒值)、弹药神龛(+3.5诅咒值)、骰子神龛(若触发诅咒效果则+5诅咒值)和英雄神龛(无论玩家已拥有多少诅咒值,均将诅咒值设为9)。通过射击或(推荐)打开其反射的宝箱来打破镜子(参见杂项物品部分),每次打破镜子会增加3.5诅咒值。向女巫(参见NPC部分)提供枪械,增加2诅咒值。从任何商店偷窃,每偷窃一次增加1诅咒值。从克苏拉处购买任何物品,在物品本身已有的诅咒值基础上额外增加2.5诅咒值。长时间过于靠近诅咒坩埚,增加1诅咒值,且该效果可重复触发。使用香料,首次使用增加0.5诅咒值,之后每次使用增加1诅咒值。收集所有污秽骑士碎片后变身为鸬鹚。+3诅咒。
此效果表示你已通过上述某种方式获得诅咒。 除了丢弃诅咒物品外,唯一移除诅咒的方法是向净化神社支付金钱(不过当你的诅咒值达到10或以上时,净化神社将无法生效),或者运气好的话通过骰子神社获得净化。如果你找到净化神社,它们是游戏中追踪诅咒的最佳方式,可参考神社部分了解其如何衡量诅咒值。 诅咒的效果多种多样,以下是我认为的所有效果: 敌人可能会被“干扰”。被干扰的敌人会带有暗影般的 reddish aura。它们会造成双倍伤害,即一次造成一整颗心的伤害,相比普通敌人(不过少数敌人本身就有不会被强化的干扰攻击,例如幽灵枪兵)。被堵塞的敌人生命值也会变为三倍,移动和攻击速度加快,并且如果原本没有接触伤害的话(例如橡胶怪),现在会造成接触伤害。像持枪疯子这类“骑士”型敌人,相比霰弹枪怪等普通敌人,生命值提升幅度似乎更小,大约只有两倍。被堵塞的敌人通常会掉落更多金钱。 宝箱更有可能装有保险丝或是宝箱怪,有时两者皆有。 房间清理后获得掉落物的概率降低。但弹药除外,其掉落概率会随诅咒值增加而提高。 拥有至少1点诅咒值即可正常进入黑市(参见商店部分3)。根据诅咒等级,特定楼层会出现更多特定类型的敌人。尤其是在遗忘墓穴和子弹地狱中,老练子弹兵会取代其他类型的子弹兵。当诅咒等级至少为7时, Boss也有几率像普通敌人一样被干扰并获得类似的增益效果(不过被干扰的Boss生命值只会增加约20%)。

当诅咒值超过9时,会出现名为【果酱之王】的特殊敌人。这家伙会跟着你从一个房间到另一个房间,从一层到另一层,并且完全无法被杀死或 incapacitated。他会定期向玩家发射子弹,这会让情况变得更加困难,遇到他通常会毁掉当前的游戏进程,所以你绝对不要让诅咒值超过9。他还会导致店主消失并摧毁他们的商品,这意味着在剩余的游戏进程中无法使用商店。果酱之王本身不会被 jammed,不会造成接触伤害,也不会阻挡你的移动。如果你将诅咒值降低到至少9以下,他会在下一层消失,但在当前楼层他仍然会跟着你,让你苦不堪言。上述效果会随着诅咒值的增加而增强。当诅咒值为1点时,敌人被干扰的概率为1%,房间掉落物出现的概率降低1%,弹药出现的概率提高5%,宝箱怪和融合宝箱出现的概率分别提高2.10%和5%。当诅咒值达到10点时,50%的敌人和 Boss 会被干扰,宝箱是宝箱怪和融合宝箱的概率分别为23.25%和50%,房间掉落物出现的概率降低10%,弹药出现的概率提高50%。因此,如果你不想被敌人压制,小心控制诅咒值非常重要。留意你拥有的物品或已执行的会增加诅咒值的操作,并根据此处给出的数据大致估算你的诅咒等级。如果你能将诅咒值控制在5点以下,它就不会对游戏产生显著影响,你还能充分利用其带来的优势。 对于技术欠佳的玩家,我建议在游戏初期严格控制诅咒值。但随着游戏进程推进,你可以根据自身实力的增强适当放宽限制。如果你拥有极其强大的装备配置,就能更轻松地克服诅咒,并在游戏后期利用其主要是金钱方面的优势。这对于为真正的诅咒模式(Cursed Runs)做准备是很好的练习。当然,现在我们需要进一步了解所谓的真正诅咒模式……

Throughout the guide I've made a lot of references to Cursed runs, so lets grapple with this madness head-on. At the start of the game, in the very first room there is a statue called the Hero's Shrine, left, that I'm sure you've noticed. If you are playing a character whose past you've already killed then you can interact with the Shrine (use the 'pray' option) so that it will automatically set your curse to 9. You must do so before you leave floor 1, and if you do then that is what I have been calling a cursed run. 9 curse is the highest level you can have without calling in the Lord of the Jammed so it is important to avoid any means of increasing curse if you want to keep things stable. 10 curse also massively increases the amount of Jammed enemies and bosses so I think its very important to avoid it. Cursed runs provide a significant extra challenge for players who have completed Bullet Hell and want something more. In many ways it also lets you cut loose, especially in the amount of extra money and ammo you get which means you can buy almost everything, usually you'll find at least 100 casings per floor, and use weapons more liberally. However, the lower drops mean less health in general is available, combined with the harsh jammed attacks you'll need to make sure your dodging skills are absolutely impeccable. The extra money lets you overcome this a bit since you can buy more health and armor, and I would recommend buying any armor available as the robot since armor is generally hard to come by. Almost every room you encounter will have at least one jammed enemy, they have a roughly 1 in 4 chance of spawning at this level of curse. Because they have so much extra health it tends to take a lot longer to complete a cursed run than a regular run. For a lot of people this may just make the entire endeavor tedious so keep that in mind if you already find the game a bit slow. Of course, the first few floors (Especially the Oubliette) can be very harsh, especially if you're playing as an initially weak character like the Pilot, and health upgrades are even more sought after than they were previously. Personally, I think if you lose out on the first master round its probably not worth bothering to try and finish the run, you might as well just restart and try again. Luckily, despite their appearance, cursed bosses are typically more bark than bite, you'll want that flawless either way so whether or not they hit you for half a heart or a full heart makes little difference, they also only have a little more health and speed so if you're good at flawlessing regular bosses jammed bosses won't be much different. The exception to this are bosses that create a lot adds, primarily the Beholster and Treadnaught. I believe adds created by jammed bosses are guaranteed to be jammed themselves so they can be a serious hindrance and add a huge amount of extra health in the encounter, as well as that the Beholster also shoots twice as many rockets out if he's cursed and its hard to tell if he's cursed from his appearance before he attacks. The hardest bosses of the Old King, Dragun, and Lich will of course be more difficult when jammed but shouldn't prompt any changes in strategy compared to normal runs. There's a lot of tips that can help when fighting in regular rooms during cursed runs. First of all clear out any non-jammed enemies in the room before targeting the jammed ones. It takes a long time to kill jammed enemies so its better to make sure you aren't being fired upon from multiple angles so you can then concentrate on bringing down the jammed enemies. Weapons and items that freeze, stun, charm and transmogrify (ie Snakemaker, Witch pistol or other magic weapons that transforms enemies into chickens) are very useful. Freezing mean you can slow down and stun jammed enemies that would otherwise cause you trouble for quite a while, keeping them out of the fight while you clear out weaker enemies (they also take lots of damage when unfrozen). Stun works similar to freeze, its a bit less useful since it doesn't slow enemies and do extra damage when they leave the effect, but nonetheless takes them out of the fight for a while. Some weapons that stun include the Barrel and Anvillain. Charm lets you turn enemies against each other, this is far more useful in cursed runs than otherwise because jammed enemies will also do double damage to other enemies, including other jammed enemies, and will be able to withstand a lot more enemy fire, while even non-jammed enemies targeting their jammed comrades will be a much needed source of extra damage that's also not targeting you. Finally transmogrify helps since it can immediately turn a jammed enemy into a chicken, effectively killing them far faster than otherwise and ignoring most of their health. Extra bullets for transmogrifying weapons from items like Scattershot and Helix bullets can increase the chance that your shots will transform, but be careful, the chickens themselves that are created can be jammed and do contact damage. Poison and fire can help, but overall aren't as useful since they aren't as good at actually killing jammed enemies than regular enemies (any extra damage will help though, no matter the source). Explosives can be dangerous since they'll sometimes fling enemies right at the player for a full heart of contact damage. A very good way to quickly kill grounded jammed enemies is to push them into pits where they die instantly, use a weapon with strong knockback like the T-shirt cannon for this. Certain passives are exceptionally useful in cursed runs. Most obvious is Silver Bullets, which more than doubles damage against jammed enemies, effectively rendering most of their extra health moot. It also synergises with the Crossbow to do even more damage so its good to find as the Hunter and does more damage to bosses. Gilded Bullets also has outsized usefulness, because you find a lot more money in cursed runs you will get a much higher damage boost from its effects. By the time you get to Bullet Hell the damage boost in a cursed run from Gilded Bullets can be astronomical, one of the highest damage boosts in the game. However, you may want to spend that money on stuff in shops, so be careful how you balance what you do with the money. Just generally anything that boosts damage is highly sought after, but don't pick up anything already cursed in these runs no matter how powerful. Keep a wide eye open for mimics and fuses and remember what I said concerning them upguide. Make sure you take full advantage of things like tables, exploding barrels and pits to defend yourself and kill enemies, anything that can give you even a little bit of an edge will always help in cursed runs. If you can't hack it a cleansing shrine will let you bring things down to normal, but remember they do not work at 10 curse or higher. Do everything right and eventually you'll even be able to crush a jammed Lich and become a god to the Gundead. Of course, if you're really crazy you could try combining cursed runs with other modifiers like Blessed Runs and Challenge runs. Speaking of which... Challenge Mode Runs
要激活挑战模式,你首先需要从枪牢中解救出大辅(左侧)。和你遇到的其他NPC一样,他最初会被困在一扇特殊的锁着的门后,通常在枪牢本体(第二层)。像铅之少女这样的强敌、首领或小首领,会掉落一把特殊的金钥匙,用它可以打开他的牢房。之后,他就会作为常驻角色出现在避难所。他会位于避难所右上角靠近枪牢入口的房间里,与他对话即可选择激活挑战模式。 首次激活挑战模式需要花费6枚霸权币,但当你尝试至少30次后,费用会降至仅1枚霸权币。挑战模式会在每个需要战斗的房间(包括 Boss 房间)自动激活各种独特的随机修正效果。这些修正效果会改变游戏玩法,使整体难度大幅提升,第 4 层和第 5 层的 Boss 总是会有特定的独特修正效果。 修正效果按字母顺序如下: 神圣 runs (待定)