换一换
换一换 


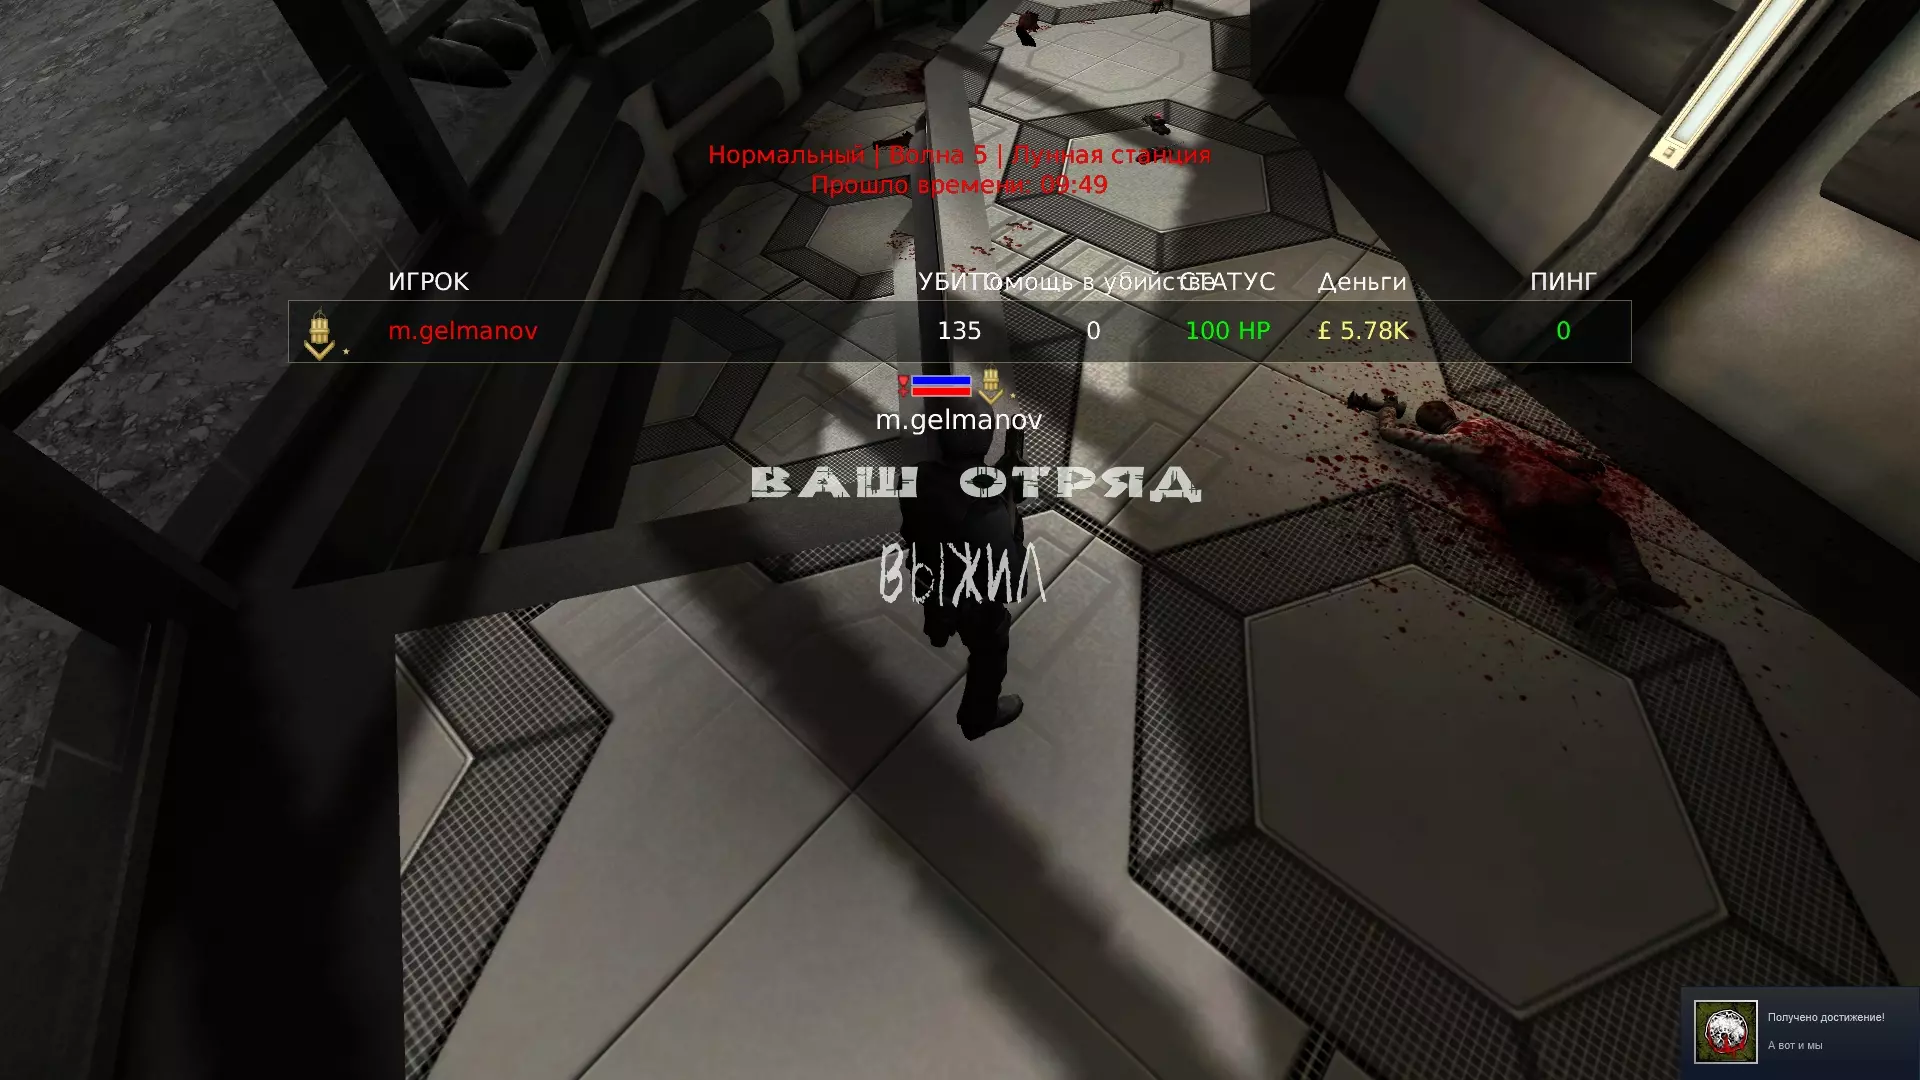
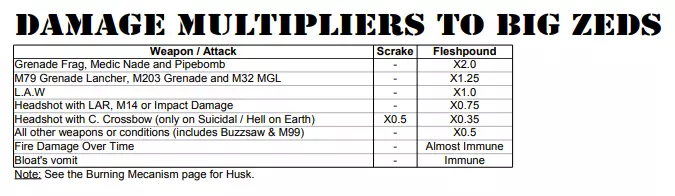
一份包含所有基础职业大型zed击杀方法的合集,附带详细说明,以及任何可靠击杀方法所涉及的细节和指南列表。 免责声明: 本指南的内容仅围绕一名玩家执行击杀的情况。如果您对击杀的细微差别不感兴趣,请直接跳至您感兴趣的职业,以查看该职业的击杀方法列表。本指南并未声称涵盖所有可能的击杀方法。除非另有说明,所有测试均在以下参数下进行:基础游戏内容、专用服务器、无突变模式、最高难度、6人生命值、60 tickrate。 术语定义: 以下是指南中按字母顺序使用的术语: 仇恨:当zed的注意力集中在特定玩家身上时。钝击:近距离内不会引爆的爆炸投射物。 屏幕中心:屏幕上准星所在的位置。使用瞄准镜可以找到它。 连击:一系列攻击或命中。 持续伤害(DoT):“Damage over Time”的缩写。 每秒伤害(DPS):“Damage per Second”的缩写。 快速收枪:猎枪特殊开火模式特有的漏洞,可在任何时候跳过换弹动画。 近战硬直:由近战武器造成的严重硬直。 跨职业使用:使用非当前职业的武器来提供辅助功能或弥补该职业的弱点。 雷管重触发:旨在多次引爆雷管炸弹造成大量伤害的漏洞。 预伤害:为使击杀更容易或优化弹药消耗而造成的预先伤害。击倒:有效击杀大型僵尸的计算型战术安排。 服务器刷新率:服务器更新游戏状态的频率。 指南: 任何可在原版游戏中使用的可靠大型僵尸击倒战术需遵循以下指南: 1. 该击倒战术需在专用服务器中测试:专用服务器是玩家共同游戏的最常见方式,与单人游戏和监听服务器(模拟单人模式)相比,这类服务器在 hitbox 和机制上存在差异。 2. 该击倒战术需在最高难度和僵尸生命值设置下测试(HoE难度,6人生命值):未经任何修改的服务器最多可容纳6名玩家,而游戏中与玩家数量成比例缩放的参数之一就是僵尸生命值。将难度和僵尸生命值设置为最高,可以确保在最高难度下对最强大的僵尸也能成功施展击倒技。 击倒大型僵尸所需的时间应控制在10秒以内:这样玩家在施展击倒技时,虽然大部分注意力集中在大型僵尸身上,但仍能更快地应对所在路线上的其他僵尸。 击倒技的施展范围理想情况下应较小:由于路线空间宝贵,这样可以确保击倒技在大多数坚守点都能生效。 成功施展击倒技时玩家损失的生命值应接近或为0:这是为了确保玩家在成功施展击倒技时不会被大型僵尸杀死。参与击倒的武器不会显著影响技能的效果:这是为了确保相关技能仍能完成预期任务。 单独进行的击倒不应依赖不受控制的机制:这是为了确保击倒在大多数情况下都能一致地重复进行。 注意:这些准则并非一成不变,可根据实际情况进行解释;它们旨在概括可靠击倒的概念——因此,对于因特定交互导致的 hitbox 错位以及其他玩家和僵尸等外部因素可能带来的细微差别,本准则不涵盖具体细节。同样未包含武器的各项属性(射速、单发伤害、弹匣容量、换弹速度、重量、后坐力、射击后收枪速度等)。 详情[1/2]: 信息:有两种击杀大型僵尸的方法: 1. 使用爆发伤害或高DPS武器通过DPS检查 2. 利用畏缩、重度畏缩、击晕、停滞或灼烧机制 根据上述规则,碎甲者可以通过两种方法干净利落地击杀,而血肉碾磨机的击杀主要需要通过DPS检查。不过,停滞和灼烧机制对两者仍然适用,尽管不推荐使用。 在6人地狱难度游戏中,碎甲者和血肉碾磨机的身体及头部生命值如下: 碎甲者:头部生命值2843.75,身体生命值6125 血肉碾磨机:3062头部生命值50,身体生命值5906。爬行者和血肉打击者对特定伤害来源(来自武器或其他方式)有伤害倍率,具体数据可参考相关资料。
Damage DealingBecause Head HP and Body HP are 2 separate pools of HP, wherein a decrease in Head HP also gets applied to Body HP but not the other way around, perks can usually be categorized based on their preferred method of dealing damage with the weapons at their disposal. These categories are: Precision Perks:Perks that primarily focus on dealing Head HP damage against zeds. Perks include: Sharpshooter, Commando Chaotic Perks:Perks that primarily focus on dealing Body HP damage against zeds. Perks include: Support Specialist, Berserker, Firebug, Demolitions NOTE: There's more nuance to the categories above since other chaotic perks have weapons that allow them to focus more on dealing Head HP damage, particularly against large zeds. Large Zed MechanicsIt is important to understand how large zeds behave as this will determine the approach for killing them. The mechanics for each large zed are as follows: Scrake:Scrakes can be flinched and stunned an unlimited number of times, but Heavy Flinches only happen once, and it disables regular flinches. Flinches and Heavy Flinches are reliable in canceling their attacks. Stuns rely on Heavy Flinches to cancel attacks; therefore it is only as reliable as a Heavy Flinch. Scrakes rage when its remaining Body HP is less than 75% of the Body HP Total. Rage does not reset when the HP threshold is reached.Fleshpound:Fleshpounds can be flinched an unlimited number of times, and Heavy Flinches only happen once, but they are immune to stuns. Flinches and Heavy Flinches are not reliable in canceling their attacks. Fleshpounds rage when it takes more than 360 Body HP damage within 2 seconds or less. Fleshpounds also rage when it has not attacked a player within line of sight, successfully or not, at a random interval of 11 to 15 seconds. When raged by reaching the damage threshold, rage resets when a random interval of 15 to 33 seconds has passed since it started raging. Rage also resets when it has successfully connected its attacks against either players or doors. NOTE: In Hard difficulty and lower, the Scrake Rage HP Threshold sits at 50%. The threshold is only at 75% in Suicidal and HoE. While the Fleshpound's Line of Sight Timer stays the same across all difficulties, the Fleshpound's Rage Reset Timer is shorter on lower difficulties. Scrake Takedown DetailsWhile Scrakes can be killed safely by simply using Burst Damage or High DPS Weapons, it's considered a riskier approach since this method does not employ attack canceling. Therefore, the main principle of Scrake takedowns is interrupting their attacks and neutralizing their rage mechanics. The following mechanics are usually employed: Flinch:Flinches last for 0.67 seconds on average, and the damage threshold against Scrakes is 150 damage per hit. Flinches are used to cancel their attacks or chained together to prevent them from attacking entirely. Heavy Flinch:Heavy Flinches last for 1.25 seconds on average, and the damage threshold against Scrakes is 500 damage per hit. However, for melee weapons, it's 150 damage per hit while within a distance twice the Scrake's melee range. This flinch variant can only be applied once and disables regular flinches. This is usually used in conjunction with burst damage. Stun:Stuns last for 3 seconds, and the damage threshold against Scrakes is 667 damage per hit. Stuns also apply Heavy Flinch, which will disable regular flinches, but stuns can be reapplied. Stunned Scrakes do not move and are completely vulnerable to attacks. Slowrage:Slowrage is an exploit that disables the speed buff applied to Scrakes when raged, allowing players to easily damage it. Slowrage happens when a Heavy Flinch is applied to induce rage or when a Heavy Flinch or a Stun is applied while raged, given that the Scrake is not attacking. Slowrage will reset when the Scrake performs an attack. Slowrage can potentially reset from any source of panic, including stasis, harpoon headshots and being crisped up by fire. NOTE: While there are weapons that deal a lot of damage, like Shotguns, the damage is evenly distributed across a large number of hits; therefore they don't meet the damage thresholds for flinches and stuns. Fleshpound Takedown DetailsBecause flinches are unreliable in canceling Fleshpound attacks, and they are immune to stuns, the main principle of Fleshpound takedowns is dealing damage fast enough to the point where there's no chance they're able to land a hit. The following methods are usually applied: Explosives:Fleshpounds take more damage from Grenade Launchers, Frag Grenades, and Pipe Bombs. Not only that, Demolitions get 60% extra explosives damage at Lv6, and Support Specialist receive a 50% damage buff on Frag Grenades at Lv6. High Burst Damage/High DPS:Due to Fleshpounds having damage resistance to most weapons and having a lower amount of Head HP compared to Body HP, weapons with high base damage and high headshot multipliers are used to kill it. These weapons deal high amounts of damage either in bursts or in continuous hits. DETAILS [2/2]: Stasis MechanicApplying stasis to any zed using the Zed Gun or Zed Gun MKII will temporarily make the zed unable to rage, make it take 25% more damage, amplifies fire DoT, and induces panic which will make the zed take erratic pathing that disrupts precision perks trying to headshot said zed. Due to zed panic possibly disrupting precision perks, this is mostly used to pacify large zeds and to make focus fire more effective. However, for each time stasis is removed, it gets harder and harder to re-apply. Fire MechanicsZeds can be burned by either a Husk or most Firebug weapons. When a zed is burned, they move 20% slower and take afterburn damage every second. The burn duration lasts for 10 seconds. When 6 seconds have passed since it was initially burned, it will panic and be crisped. The burn duration cannot be extended, and the timer must finish first before reapplying the burn. Crisped zeds while burning do not rage, which is useful when performing focus fire. The crisp state does not reset, even when the zed texture showing a crisped state does not show. Due to burning inducing panic and zeds taking a while to crisp, this mechanic is often neglected and is usually a detriment to other players relying on headshots and mechanics involving flinches, heavy flinches, and stuns. Certain zeds have unique interactions with fire, such as: Scrake:It is possible to slowrage Scrakes by taking aggro immediately after the burn duration is over. Some slowrage setups exists wherein a Scrake is raged a few moments before the burn duration is over. Due to the burn duration being 10 seconds and panic causing erratic pathing, these setups are rarely used. Fleshpound:It is still possible to rage Fleshpounds by its Line of Sight timer while crisped and burning. Only the damage threshold for rage gets overridden. Patriarch:When being crisped up, the Patriarch does not panic, unlike with Stasis. Scrake Flinch and Stun Cancel MechanicsDue to flinches, heavy flinches, and stuns being important for Scrake takedowns, it's important to understand how these mechanics could potentially be nullified: Flinch Cancel:When a zed takes damage, there is a 0.5s cooldown before any proceeding pain animation can be played. However, the internal logic of the Scrake forgets to consider that no pain animation plays when it takes less than 150 damage. Therefore, when a Scrake takes any form of damage, any form of flinch (regular or heavy) gets canceled due to this cooldown, since flinches play a pain animation to the zed when inflicted. There's a good amount of weapons which deal less than 150 damage per hit like Assault Rifles and Flamethrowers. Stun Cancel:There are 2 ways a Scrake's stun could be canceled: Active Stun Canceling:Involves damaging a stunned Scrake as it's being knocked back. Explosives are the main culprit, but a ZED Thrower could cause the same effect. Induced Stun Canceling:Involves removing the Heavy Flinch as the Scrake is getting stunned, allowing a flinch to override the stun animation. Aside from pain animation cooldown, stuns originating from behind or to its side can remove the Heavy Flinch. PRACTICE: There's 2 ways to practice large zed takedowns: Join a Dedicated Testmap Server online:There are available testmap servers in almost every region: NA, SA, EU, Asia, and Pacific. They either run a version of SteamyTestMap or TheTestMap-2, both of which allow HP modifications and showing of head hitboxes. Install a Dedicated Server locally and host it:Here is a Tripwire Wiki guide[wiki.tripwireinteractive.com] on how to install a Dedicated Server locally. After installing, here are the testmap files[cubealert25.s-ul.eu] for SteamyTestMapLE, a modification of SteamyTestMap made by Skell, modified by Joabyy. Simply drag the .rom file into the Maps folder, the .u files into the Systems folder, and modify the .bat file to run the map. FIELD MEDIC, SCRAKE TAKEDOWN: The Field Medic is a support perk that specializes in healing players and tanking damage. While the perk receives no damage buffs, Scrake Takedowns are available to them, provided the right weapons are used. As for Fleshpounds, they must rely on the Pipe Retrigger exploit to kill them safely. Flinch:Lever Action Rifle/S.P. Musket + Flare Revolver, Flinchlock:1 Rifle Pre-damage to add a timing window for attack cancel caused by flinches and add additional pre-damage to make room for any margin of error with the Flare Revolver Flinchlocking. Make sure to pre-damage the Head HP so that the Body HP is close to 75% but still higher. Aim center of screen at the chin, walk forward until close, and flinch to cancel the attack. Crouch, then point the tip of the Flare Revolver to its left eye. Fire the revolver, matching the pace as shown in the video due to hitbox movement. Lever Action Rifle:
S.P. Musket: M14EBR, Flinchlock:1 M14 Pre-damage to add a timing window for attack cancel caused by flinches. Aim center of screen at the chin, walk forward until close, and flinch to cancel the attack. Fire the weapon at a pace where adjusting for the recoil is possible since M14EBR off-perk has a substantial amount of it. There's an option to either stay still or walk backwards if there are other zeds behind the Scrake. Static: Retreating: Heavy Flinch:Medguns + Any Trader Melee:Pre-damage the Head HP with any medgun such that the Body HP is close to 75% but still higher. Heavy Flinch with a melee weapon of choice. While the Katana can Heavy Flinch with an AltFire bodyshot, the Machete requires an AltFire headshot. Therefore, aim center of screen above its right shoulder and at eye level. Time the melee flinch and walk so that it cancels the attack. Finish off the remaining HP with the other medgun. There's an option to either stay still or walk backwards if there are other zeds behind the Scrake. Static: Retreating: Hunting Shotgun + Medgun + Machete, Uppercut:Pre-damage the Head HP with any medgun such that the Body HP is close to 75% but still higher. The Machete requires an AltFire headshot; thus, aim center of screen above its right shoulder and at eye level. Time the melee flinch and walk so that it cancels the attack. Crouch and aim the tip of the shotgun barrel below the chin. Aiming center of screen at its right eye works as well. AltFire to decapitate the Scrake. Hunting Shotgun + Medgun + Machete, Standing:Pre-damage the Head HP with any medgun such that the Head HP is <2200. The Machete requires an AltFire headshot; thus, aim center of screen above its right shoulder and at eye level. Time the melee flinch and walk so that it cancels the attack. After flinching, sidestep to the right to adjust for its hitbox. Wait for the head sway to stop, aim the tip of the shotgun barrel at the mask below its left eye, then AltFire to decapitate the Scrake. Slowrage:Compound Crossbow + Any Medgun:Pre-damage with any medgun to a point where the Scrake will rage in 1 Crossbow headshot. Backpedal a good distance before shooting the head with a Crossbow. Once set, shoot, backpedal, and jump when the Scrake is close to properly set the Slowrage. Use either the medgun or the Crossbow to decapitate the Scrake. FIELD MEDIC, FLESHPOUND TAKEDOWN: Explosives:Schneidzekk + Pipe Bomb:NOTE: This must be done with a high fire rate weapon. Set the pipe bomb ahead of the Fleshpound and back off a good distance from it to not get caught by the explosion. Aim iron sights at the center mass of the pipe bomb and shoot a few bullets to cause a pipe bomb retrigger. If the Fleshpound lives, spam it with the medgun to kill it, as it usually has <1000 Body HP left. SUPPORT SPECIALIST, SCRAKE TAKEDOWN: The Support Specialist is a chaotic perk that specializes in trash clearing and flexible damage dealing since they can either focus on Head HP damage or Body HP damage, depending on the circumstance. All Shotguns are projectile-based weapons, meaning aiming center of screen at the head does not guarantee headshots. Main downsides are its high skill floor for large zed takedowns, slow reloads, and each miss punishing the perk harder compared to the Sharpshooter. Flinch:Lever Action Rifle + Hunting Shotgun:1 LAR Pre-damage to add a timing window for attack cancel caused by flinches. Aim center of screen at the chin, walk forward until close and flinch to cancel the attack. Aim the tip of the shotgun barrel at its right eye and AltFire. S.P. Musket + Hunting Shotgun:Walk forward and shoot the Musket at any part of the body to flinch the Scrake, causing the attack to cancel. Aim the tip of the shotgun barrel at its right eye and AltFire. M32 Grenade Launcher + Hunting Shotgun:Walk forward and shoot the M32 at any part of the body to flinch the Scrake, causing the attack to cancel. Aim the tip of the shotgun barrel at its right eye and AltFire. Heavy Flinch:Any Trader Melee + Any Shotgun, Uppercut:If the Shotgun in hand does not fire fast or does not have high burst damage, pre-damage the Head HP such that the Body HP is close to 75% but still higher. After this, Heavy Flinch with any melee weapon bought from the Trader using AltFire. If the weapon in hand is a Machete, then aim center of screen above its right shoulder and at eye level. Time the melee flinch and walk so that it cancels the attack. Crouch and aim the tip of the shotgun barrel below the chin. Aiming center of screen at its right eye works as well. Shoot to kill the Scrake. Hunting Shotgun: AA12: Combat Shotgun: Vlad the Impaler: HSG-1 Shotgun: Pump Shotgun: Any Trader Melee + Hunting Shotgun, Standing:Heavy Flinch with any melee weapon bought from the Trader using AltFire. If the weapon in hand is a Machete, then aim center of screen above its right shoulder and at eye level. Time the melee flinch and walk so that it cancels the attack. After flinching, sidestep to the right to adjust for its hitbox. Wait for the head sway to stop, aim the tip of the shotgun barrel at the mask below its left eye, then AltFire to kill the Scrake. Back Head Sway: Right Head Sway: Left Head Sway: Knockback:Multichamber ZED Thrower + Hunting Shotgun:Walk and bait the attack, then AltFire with the ZED Thrower to push it back. Backpedal and walk forward at the right timing to not take damage. Aim the tip of the Hunting Shotgun barrel at its right eye and AltFire. Multichamber ZED Thrower:Pre-damage the Head HP such that the Body HP is close to 75% but still higher. Walk and bait the attack, then AltFire with the ZED Thrower to push it back. Backpedal and walk forward at the right timing to not take damage. Aim the tip of the Shotgun barrel at its right eye and spam Fire until it dies. High Burst Damage/High DPS:Any Secondary Shotgun + Hunting Shotgun, Jumpshot:In a 60-tick server, deal a minimum of 500 Head HP pre-damage to the Scrake. If the server is 30-tick, deal a minimum of 750 Head HP pre-damage to the Scrake. If it's unsure what tickrate the server runs on, assume the worst and pre-damage with 30-tick in mind. After pre-damage, align your position slightly to its right, wait for the Scrake to walk close, then press W and Jump at the same time. When the jump is at its peak, aim center of screen at its right shoulder and AltFire. 60 Tick: 30 Tick: Any Secondary Shotgun + Hunting Shotgun, Uppercut:Deal a minimum of 750 Head HP pre-damage to the Scrake. After pre-damage, align your position slightly to its right, crouch, and walk towards the Scrake. When the Scrake attacks, aim the tip of the shotgun barrel at the armpit and AltFire. Wide Swing Attack, 60 Tick: Double Swing Attack, 60 Tick: Wide Swing Attack, 30 Tick: Double Swing Attack, 30 Tick: SUPPORT SPECIALIST, FLESHPOUND TAKEDOWN: Explosives:Most Shotguns + Frag Grenades:If the Fleshpound does not rage in 1 hit, do enough pre-damage such that the next hit will rage the Fleshpound. After this, make sure you're close and throw 1 Frag Grenade, wait a while, then rage the Fleshpound. This is done to properly prime the grenade explosion. If the server runs on 60-tick, you have an option to throw 0, 1 or 2 Frag Grenades depending on the takedown you would execute as shown below. If it's unsure what tickrate the server runs on, assume the worst and throw 2 Frag Grenades. Make sure the Grenades collide with the zed and land in the area near or in between its feet. Backpedal to not take damage from the explosion. Afterwards, simply damage the Fleshpound until it dies. When the Fleshpound gets close, jump and shoot downwards to deal more damage. Hunting Shotgun + 3 Frag Grenades: AA12 + 3 Frag Grenades: Combat Shotgun + 3 Frag Grenades: Hunting Shotgun + 2 Frag Grenades, 60 Tick: Hunting Shotgun + AA12 + 1 Frag Grenade, 60 Tick: Secondary Shotgun + Hunting Shotgun, 2 Fleshpounds:NOTE: Depending on the separation between both Fleshpounds, more Frag Grenades are needed to compensate for the separation. If the separation in between is small, wait for the Fleshpound in front to spin fully so that it doesn't drift away from the Grenades. Afterwards, get close and throw 1 Frag Grenade, then AltFire when the shotgun view model shows up. This is done to properly prime the grenade explosion and to prevent a bug where the Hunting Shotgun does not shoot in certain circumstances. Move to the left and jump throw 2 Frag Grenades in between the 2 Fleshpounds. Jump throws allow Frag Grenades to be tossed faster. Backpedal to not take damage from the explosion. Use your secondary shotgun to kill the Fleshpound in front or to weaken it, and make sure to line them up to also deal damage to the Fleshpound behind. When the Fleshpound in front dies or is weak enough, equip the Hunting Shotgun, wait for the Fleshpound behind to get close, then jump and AltFire while aiming downwards. w/ AA12, 30 Tick: w/ Combat Shotgun, 30 Tick: w/ Multichamber ZED Thrower, 60 Tick: w/ Vlad the Impaler, 60 Tick: w/ HSG-1 Shotgun, 60 Tick: w/ Pump Shotgun, 60 Tick: High Burst Damage/High DPS:Secondary Shotgun + Hunting Shotgun:Rage the Fleshpound with 2 consecutive hits and headshot the Fleshpound using the Hunting Shotgun. Backpedal to make space for the Hunting Shotgun reload. Once reloaded: Stop and wait for the Fleshpound to get close, then backpedal and aim the barrel at the head and AltFire. Aiming center of screen above its right shoulder in line with the eyes, works as well. For more specific details, check out this guide. Crouch: Standing: Standing w/ Fast Holster: AA12 + Hunting Shotgun, Fast Holster:NOTE: Fast Holster only works on the Hunting Shotgun AltFire for Support Specialist. Rage the Fleshpound using the AA12 by shooting it twice in the stomach. Crouch and AltFire with the Hunting Shotgun, aiming the tip of the barrel at the tip of the zeds' head. Fast holster the Hunting Shotgun by throwing a grenade and canceling the grenade throw by quickly switching to the AA12. Uncrouch, backpedal, and fire 3 AA12 shots at the head. After firing, backpedal further to make way for the Fleshpound moving. Backpedal, aim the barrel of the AA12 at the head, and shoot to decapitate the Fleshpound. Fire 4 AA12 shots at the stomach to kill it. SHARPSHOOTER, SCRAKE TAKEDOWN: The Sharpshooter is a precision perk specializing in large zed takedowns. Its downsides are its high skill floor and the necessity to hit headshots. Flinch:M14EBR, Flinchlock:1 M14 Pre-damage to add a timing window for attack cancel caused by flinches. Aim center of screen at the chin, walk forward until close, and flinch to cancel the attack. Fire the weapon until it dies. Any Heavy Pistol, Flinchlock:1 Pistol Pre-damage to add a timing window for attack cancel caused by flinches. Aim center of screen at the chin, walk forward until close, and flinch to cancel the attack. Fire the weapon until it dies. Dual Pistols: Single Handcannon: Single MK23: Single .44 Magnum: Any Heavy Pistol + Hunting Shotgun:1 Pistol Pre-damage to add a timing window for attack cancel caused by flinches. Aim center of screen at the chin, walk forward until close and flinch to cancel the attack. Aim the tip of the shotgun barrel at its right eye and AltFire. Stun:Lever Action Rifle:Stuns also apply Heavy Flinch, so head hitbox will not move downward for 1 second, given that the Scrake has not been Heavy Flinched before. Simply shoot to kill. To kill the Scrake in 4 LAR shots, simply do 3 9mm Pre-damage shots. S.P. Musket:Stuns also apply Heavy Flinch, so head hitbox will not move downward for 1 second, given that the Scrake has not been Heavy Flinched before. Simply shoot to kill. Compound Crossbow:Stuns also apply Heavy Flinch, so head hitbox will not move downward for 1 second, given that the Scrake has not been Heavy Flinched before. Simply shoot to kill. Crossbow Only: Crossbow + HC: Crossbow + MK: 0 Crossbow Arrows Spent: M14 + Lever Action Rifle:Using both weapons for the takedown allows for a better distribution of ammo. Stuns apply Heavy Flinch, so the head hitbox will not move downward for 1 second. Simply shoot to kill. 2 LAR + 4 M14: 3 LAR + 2 M14: M14 + S.P. Musket:Using both weapons for the takedown allows for a better distribution of ammo. Stuns apply Heavy Flinch, so the head hitbox will not move downward for 1 second. Simply shoot to kill. 2 Musket + 3 M14: 3 Musket + 1 M14: Lever Action Rifle/S.P. Musket + Dragon's Breath Trenchgun:Stuns also apply Heavy Flinch, so head hitbox will not move downward for 1 second, given that the Scrake has not been Heavy Flinched before. 2 LAR/Musket shots so that the Trenchgun shot kills the Scrake. Get close to the Scrake, wait for the moment the head hitbox goes down, then point the Trenchgun barrel at the head and shoot. w/ LAR: w/ Musket: High Burst Damage/High DPS:M14EBR:Make sure to have good separation between you and the Scrake. Aim center of screen at the chin and fire the weapon until it dies. M99 AMR:Not much to say here. Just shoot once to the head, and the Scrake dies. The high cost of bullets makes this weapon impractical, regardless. SHARPSHOOTER, FLESHPOUND TAKEDOWN: High Burst Damage/High DPS:M14EBR:Fleshpounds always perform the same rage animation, so head tracing is a viable strategy. Different firing patterns are shown below: 10 Firing Pattern:The fastest and most flexible way to kill a Fleshpound. Also the hardest to learn. 4/5/1 Firing Pattern:An easier way to kill a Fleshpound. Trades flexibility for ease of execution. 1/9 Firing Pattern:An awkward firing pattern to train properly hitting headshots during early rage animation onsets. Lever Action Rifle:Less demanding head trace than M14EBR, but misses are punished harder. 2 9mm Pre-damage shots first so that the total LAR headshot count is 6 instead of 7. On 30-60 tick, it's best practice to delay the 5th shot to make it easier to land. S.P. Musket:A less demanding head trace than LAR and has a wide margin of error due to its high damage per hit. It's best practice overall to delay the 5th shot because of its slower fire rate. Compound Crossbow:Despite a 0.35x damage multiplier against Fleshpounds, this weapon still hits hard enough and fires fast enough to kill it. 4 Crossbow arrows kill it. In most cases, 1 Pistol Pre-damage will decapitate it within a real game scenario with 3 Crossbow arrows, leading to a decapitated Fleshpound that has erratic movement. To cleanly kill a Fleshpound while conserving arrows, do enough Pistol pre-damage such that the remaining Head HP is <3000 and either wait for the light to go red to shoot 2 arrows in quick succession or continue shooting and do a jumpshot on the 3rd arrow and properly line up the 4th to deal 1000 Body HP damage on the decapitated body. 4 Crossbow Arrows Spent: 3 Crossbow Arrows Spent: 2 Crossbow Arrows Spent: M14EBR + Lever Action Rifle:Using both weapons for the takedown allows for a better distribution of ammo. This combo requires proficiency in head tracing and spatial awareness. 8 M14 + 1 LAR: 5 M14 + 3 LAR: M14EBR + S.P. Musket:Using both weapons for the takedown allows for a better distribution of ammo. This combo requires proficiency in head tracing and spatial awareness. 8 M14 + 1 Musket: 6 M14 + 2 Musket: 4 M14 + 3 Musket: Any Heavy Pistol + Hunting Shotgun:Do enough pre-damage so that the Fleshpound rages with 2 consecutive hits. Get close, crouch, then headshot the Fleshpound using the Hunting Shotgun by aiming the barrel at the tip of its head. Backpedal to make space for pistol headshots. Simply decapitate the Fleshpound with your pistol and use the Hunting Shotgun to kill it afterwards. M99 AMR:Not much to say here. Just shoot twice to the head, and the Fleshpound dies. The high cost of bullets makes this weapon impractical, regardless. COMMANDO, SCRAKE TAKEDOWN: The Commando is a precision perk that specializes in trash clearing. Its main downside is having finicky large zed takedowns, particularly with Fleshpounds. Flinch:M32 Grenade Launcher + Any Assault Rifle:Pre-damage the Head HP such that the Body HP is close to 75% but still higher. Reload so there are enough bullets to kill the Scrake afterwards. Walk forward and shoot the M32 at any part of the body to flinch the Scrake, causing the attack to cancel. Finish off the remaining HP with your assault rifle. Heavy Flinch:Machete/Kat + Assault Rifles:NOTE: These 2 melee weapons are usually used by the perk for their low weight. Pre-damage the Head HP such that the Body HP is close to 75% but still higher. Heavy Flinch with the melee weapon in hand. While the Katana can Heavy Flinch with an AltFire bodyshot, the Machete requires an AltFire headshot. Therefore, aim center of screen above its right shoulder and at eye level. Time the melee flinch and walk so that it cancels the attack. Finish off the remaining HP with your other assault rifle. There's an option to either stay still or walk backwards if there are other zeds behind the Scrake. Machete, Static: Katana, Static: Machete, Retreating: Katana, Retreating: Slowrage:Compound Crossbow + Any Assault Rifle:Pre-damage with any assault rifle to a point where the Scrake will rage in 1 Crossbow headshot. Backpedal a good distance before shooting the head with a Crossbow. Once set, shoot, backpedal, and jump when the Scrake is close to properly set the Slowrage. Use either the assault rifle or the Crossbow to decapitate the Scrake. High Burst Damage/High DPS:FNFAL ACOG + Any Assault Rifle:NOTE: More separation is needed the faster the Scrake moves. Pre-damage the Head HP such that the Body HP is close to 75% but still higher. It's important to maximize the amount of Head HP damage for this takedown. Make sure to have good separation in between before shooting. Once well separated, use the FNFAL on Full Auto to kill the Scrake, aiming slightly left to compensate for hitbox movement. COMMANDO, FLESHPOUND TAKEDOWN: The Commando does not have any other means of killing Fleshpounds at 6p HP aside from throwing 5 Frag Grenades on 1 takedown attempt, using the Pipe Retrigger Exploit, or off-perking an M32, which is an expensive weapon even on-perk. Explosives:FNFAL ACOG + 5 Frag Grenades:NOTE: This can be done with a SCARMK17. Pre-damage with 4 bullets to set up for the rage. Throw 1 Frag Grenade and then rage. This is done to properly prime the grenade explosion. Backpedal, then jump throw all grenades at your disposal. Jump throws allow Frag Grenades to be tossed faster. This will leave the Fleshpound at low enough Body HP so that it can be spammed to death. FNFAL ACOG + Pipe Bomb:NOTE: This must be done with a high fire rate weapon. Set the pipe bomb ahead of the Fleshpound and back off a good distance from it to not get caught by the explosion. Aim ACOG sights at the center mass of the pipe bomb and shoot a few bullets to cause a pipe bomb retrigger. If the Fleshpound lives, spam it with the assault rifle to kill it, as it usually has <1000 Body HP left. M32 Grenade Launcher + Frag Grenade + Any Assault Rifle:Unload 3 M32 grenades, aiming at the head, throw a Frag Grenade, then unload the rest. Finish off the remaining Body HP using any assault rifle. BERSERKER, SCRAKE TAKEDOWN: The Berserker is partly a chaotic perk against trash and a precision perk against large zeds. They have good survivability and mobility, perfect for kiting. Its downside is its limited ranged options, leaving them vulnerable against Sirens and Husks outside their melee range. Heavy Flinch:Katana:Contrary to old beliefs, a Katana is still a strong weapon against Scrakes. Simply hit 1 AltFire headshot, then spam the head with regular attacks, taking advantage of attack canceling using Heavy Flinches when it rages. For 6 HP, it's necessary to pre-damage the Scrake with 1 9mm headshot to optimize the takedown. Chainsaw:Aim center of screen at the head, AltFire, and time the walk so that the Heavy Flinch cancels the attack. Once canceled, hold primary fire and wait until the AltFire attack finishes its cooldown. Once complete, AltFire and switch back to holding primary fire. Repeat until the Scrake dies. Stun:Heavy Melee Weapons:A good amount of melee weapons will stun the Scrake. Stuns also apply Heavy Flinch, so head hitbox will not move downward for 1 second given that the Scrake has not been Heavy Flinched before. Simply follow the distribution of AltFires and regular attacks in the video. Axe: Scythe: Dwarfs!? Axe: Claymore Sword: Buzzsaw Bow + Any Trader Melee:While the Buzzsaw is best left for killing far away threats and Fleshpounds, it can be used to quickly kill Scrakes as well. Stuns apply Heavy Flinch, so head hitbox will not move downward for 1 second, given that the Scrake has not been Heavy Flinched before. Simply deal enough pre-damage such that the remaining Head HP is <2000. Aim slightly higher than normal due to projectile offset. BERSERKER, FLESHPOUND TAKEDOWN: High Burst Damage/High DPS:Buzzsaw Bow + Any Trader Melee:Buzzsaw shoots fast enough to decapitate a Fleshpound. Simply deal enough pre-damage such that the remaining Head HP is <3000. Afterwards, shoot 3 saw headshots. Aim slightly higher than normal due to projectile offset. Finish off the decapitated Fleshpound with a melee weapon in hand. Buzzsaw Bow + Scythe, 2 Saws Used:Follow the pre-damage combo shown in the video. It is important not to get too close, so you don't accidentally Heavy Flinch the Fleshpound pre-rage. When the Scythe AltFire hits the head, backpedal to make space, then headshot with the Buzzsaw when the head has gone up. Aim slightly higher than normal due to projectile offset. When it has started running, headshot it again with the Buzzsaw, leading to a Heavy Flinch. This will slow it down temporarily due to baiting an attack right after the Heavy Flinch animation ends. Finish it off with 1 AltFire headshot and 1 AltFire to the body. Buzzsaw Bow + Claymore, 2 Saws Used:Follow the pre-damage combo shown in the video. It is important not to get too close, so you don't accidentally Heavy Flinch the Fleshpound pre-rage. When the Claymore regular attack hits the head, backpedal to make space, then headshot with the Buzzsaw. Aim slightly higher than normal due to projectile offset. The Buzzsaw headshot will apply Heavy Flinch, slowing it down temporarily due to baiting an attack right after the Heavy Flinch animation ends. After the attack animation ends, headshot it again with the Buzzsaw to decapitate it. Finish it off with 1 AltFire to the body. FIREBUG, SCRAKE TAKEDOWN: The Firebug is a chaotic perk in most situations, specializing in trash clearing. Aside from the MAC10 and Husk Gun requiring headshots, all other weapons do not necessitate it. While the Firebug has good range, most of its weapons are projectile-based. The perk's downsides are bad Fleshpound takedowns, Fire DoT causing panic, head hitbox and flinch cancel issues. Flinch:Dual Flare Revolvers, Flinchlock:Flare revolvers deal more damage when the player is very close to the target. Walk forward and aim center of screen at the chin to not only flinch the Scrake for the attack cancel but also to have some projectiles hit the head. Simply spam afterwards to kill it. Stun:Husk Fireball Launcher:The Husk Gun is also an effective weapon against Scrakes because of its high damage per hit, allowing stuns to happen. Since charging a fireball takes time, the head hitbox floating for 1 second when it's first stunned should not be relevant in most cases. Aim slightly top left with moderate space between them to properly compensate for projectile offset. Stasis:1 Incendiary Grenade + ZED GUN MKII:Stasis amplifies Fire DoT significantly, allowing for an easy takedown. Simply throw 1 grenade and set it off with a Flare Revolver or Husk Gun. Immediately apply Stasis afterwards. Apply stasis again when it's about to expire. FIREBUG, FLESHPOUND TAKEDOWN: While the Firebug has a way of killing Fleshpounds at 6p HP, it's a difficult takedown to perform. Using the Pipe Retrigger Exploit or off-perking an M32 (an expensive weapon even on-perk) allows for an easier takedown. Explosives:MAC10 + Pipe Bomb:NOTE: This must be done with a high fire rate weapon. Set the pipe bomb ahead of the Fleshpound and back off a good distance from it to not get caught by the explosion. Aim iron sights at the center mass of the pipe bomb and shoot a few bullets to cause a pipe bomb retrigger. If the Fleshpound lives, spam it with any High DPS weapon in hand to kill it, as it usually has <1000 Body HP left. M32 Grenade Launcher + Dual Flare Revolvers:Unload all 6 M32 grenades, aiming at the head. Finish off the remaining Body HP using Flare Revolvers. High Burst Damage/High DPS:Husk Fireball Launcher, <=5 HP:NOTE: THIS ONLY WORKS AT 5 HP AND BELOW. Fully charge the Husk Gun before firing. Aim center of screen, above and slightly left of the head to compensate for projectile offset. Make sure there's a good amount of space between each other whenever you're shooting. After firing, backpedal significantly to create space for another charge. When ready to fire, make sure to time the firing a short while after it flinches from the Fire DoT to ensure the projectile hits. Aim the same way as before to compensate for projectile offset. Husk Fireball Launcher + Lever Action Rifle, 6 HP:Deal 1 LAR headshot Pre-damage to reduce its Head HP such that it can be killed it with 1 LAR headshot later. Fully charge the Husk Gun before firing. Aim center of screen, above and slightly left of the head to compensate for projectile offset. Make sure there's a good amount of space between each other whenever you're shooting. After firing, backpedal significantly to create space for another charge. Fire when a good amount of time has passed when the Fleshpound first flinched. Aim the same way as before to compensate for projectile offset. Afterwards, switch to the LAR and hit a headshot during its flinch animation or attack animation. DEMOLITIONS, SCRAKE TAKEDOWN: The Demolitions is a chaotic perk specializing in trash clearing and killing multiple Fleshpounds. The main downside is being weaker in self-defense whenever a zed gets close compared to other perks, most weapons needing space to properly detonate its projectiles, slow reloads, and often struggles against Scrakes if not using the L.A.W. or the Pipe Retrigger Exploit. Stun:L.A.W. + 1 Frag Grenade:Get enough distance in between to guarantee the projectile detonates and ensure you don't take damage. Aim center of screen at the head to deal more damage. Fire 1 rocket, then throw a grenade whenever possible. Make sure to adjust the trajectory of the nade such that it detonates close to the Scrake while it's moving. Aim the same way as before and fire to kill it. L.A.W. + Pipe Bomb:Set the pipe bomb ahead of the Scrake and back off a good distance from it to not get caught by the explosion and to properly fire the L.A.W. Aim center of screen at the head to deal more damage. Fire 2 rockets in succession to kill the Scrake. Slowrage:M32 Grenade Launcher:There are 2 ways to slowrage the Scrake depending on the distance: Long Distance:1 Headshot, 1 Bodyshot Short Distance:3 Blunt Headshots For short-distance slowrages, jump when the Scrake rages so that it does not get too close at the end of the Heavy Flinch duration. Simply kill the Scrake with any means available afterwards. Long Distance, Short Distance: 4 M32 Blunt + 4 MK23, Short Distance: High Burst Damage/High DPS:Schneidzekk + Pipe Bomb:NOTE: This must be done with a high fire rate weapon. Set the pipe bomb ahead of the Scrake and back off a good distance from it to not get caught by the explosion. Aim iron sights at the center mass of the pipe bomb and shoot a few bullets to cause a pipe bomb retrigger. If the Scrake lives, throw 1 or 2 Frag Grenades and detonate with any explosive weapon to kill it, as it usually has <2000 Body HP left. DEMOLITIONS, FLESHPOUND TAKEDOWN: Demolitions players ideally should aim at the head to improve visibility while still dealing the same amount or more damage, similar to hitting it at its center mass. Explosives:M32 Grenade Launcher, Frag Grenades, Pipe Bomb, 1 Fleshpound:A rule of thumb to follow is: the sum between the amount of M32 Grenades and Frag Grenades used should be 5 in total. There's a variety of ways to do it, so long as the Frag Grenades collide with the Fleshpound and land near or in between its feet. Jump Throwing is a good technique to apply as a Demolitions to allow for faster grenade placement, leading to faster kills and better damage distribution. w/ Frag Grenades, No Jump Throws: w/ Frag Grenades, Jump Throws: w/ Frag Grenades & Pipe Bomb: L.A.W., Frag Grenades, Pipe Bomb, 1 Fleshpound:While the L.A.W. is a clunky weapon to use in general, it's still a viable weapon to use regardless. There are 3 ways of approaching the takedown depending on space and ammo constraints. L.A.W. + 1 Frag Grenade: L.A.W. + 4 Frag Grenades: L.A.W. + Pipe Bomb: M32 Grenade Launcher + SealSqueal Harpoon Bomber:The Harpoon has a Dedicated Server bug where zeds do not bring alongside with them any impaled harpoons. To counteract this, simply prime impaled harpoon bombs to detonate as early as possible by placing a primer harpoon near where the Fleshpound will walk. Following the rule of thumb earlier, each harpoon impaled to the head is roughly equivalent to 2 M32 Grenades damage-wise. SeekerSix Rocket Launcher + 3 Frag Grenades:Jump throw 2 Frag Grenades, colliding with the Fleshpound and landing near or in between its feet. AltFire to detonate. Reload, then throw 1 Frag Grenade and AltFire to kill the Fleshpound. Following the rule of thumb, 1 SeekerSix AltFire is equivalent to 1 M32 Grenade damage-wise. M79 + Frag Grenades:For 3 Frag Grenades: Jump throw 2 Frag Grenades, colliding with the Fleshpound and landing near or in between its feet. Fire to detonate. Wait for the reload then throw 1 Frag Grenade and Fire to kill the Fleshpound. Following the rule of thumb, 1 M79 projectile is equivalent to 1 M32 Grenade damage-wise. For 4 Frag Grenades: Throw 1 Frag Grenade near the Fleshpound so that it'll rage. This will buy enough time to optimally place Frag Grenades optimally later. When it rages, jump throw 3 Frag Grenades, colliding with the Fleshpound and landing near or in between its feet. Fire to detonate. L.A.W., M32 Grenade Launcher, Frag Grenades, Pipe Bomb, 2 Fleshpounds:Sometimes spawns in Wave 9, always spawns in Wave 10. When a Fleshpound is present behind another Fleshpound, it will spin and cause head hitbox placement issues to any precision perk trying to kill it. Therefore, the Demolitions is almost always preferred to take any amount of Fleshpounds greater than 1. Shown below are ways to do it. w/ M32 Grenade Launcher & Frag Grenades: w/ M32 Grenade Launcher, Frag Grenades & Pipe Bomb: w/ L.A.W., Frag Grenades & Pipe Bomb: Pipe Retrigger: M32 Grenade Launcher, Frag Grenades, Pipe Bomb, 3 Fleshpounds:They rarely spawn in Waves 9 and 10, but they pose a significant threat to the whole team. Grenade and Pipe Bomb placement starts to become more important starting at this amount. It is important to make sure each Frag Grenade can damage 2 or more Fleshpounds at a time. w/ M32 Grenade Launcher & Frag Grenades: w/ M32 Grenade Launcher, Frag Grenades & Pipe Bomb: Pipe Retrigger: M32 Grenade Launcher, Frag Grenades, Pipe Bomb, 4 Fleshpounds:One of, if not, the rarest spawns possible in Wave 10. This amount of Fleshpounds in 1 lane at once usually leads to a team wipe. Grenade and Pipe Bomb placement is key. w/ M32 Grenade Launcher & Frag Grenades: w/ M32 Grenade Launcher, Frag Grenades & Pipe Bomb: Pipe Retrigger: REFERENCE: "Draw head hitboxes" causing unintended Xbow Instakill w/ 3 arrowsFlinch, Heavy Flinch and Stun Behavior to ScrakesKFChar.FleshpoundZombieController[github.com]KFChar.ZombieScrake[github.com]KFChar.ZombieFleshPound[github.com]KFMod.KFMonster[github.com]KFMod.ZombieFleshPoundBase[github.com]KFMod.ZombieScrakeBase[github.com]v1043 KF Weapon & Zed Stats[mega.nz] CREDITS: ProofreadersBaltazar raddan Johnnymode BigWreckage Nikolay DJ Archus naksiloth TestMap FilesSkell Joabyy CHANGELOG: March 15, 2025Initial upload. March 19, 2025First complete draft. April 28, 2025Finished proofreading. Initial release. May 6, 2025Minor edits.