换一换
换一换 


OUTDATED AS LEAGUES IS NO LONGER AROUND. A guide on how to get all the steam achievements while leagues is happening which has Prifddinas unlocked, 4x base xp multiplier and more. Leagues runs until the 10 November and this guide will allow you to unlock all the steam achievements assuming you start soon. The Jagex Launcher You do have the option to play the game by downloading the Jagex launcher directly from the website below. https://www.runescape.com/launcher That way you can avoid the game affecting your Steam average completion until you know that you’ve met all of the requirements. You can sync up your Steam account with your Jagex account which will trigger any achievements you’ve unlocked once you load into the game on Steam. Why leagues? Leagues is a cheesy faster way to earn the 100% on steam, if you want a more pure experience for sure, play regularly and take your time as normal. Leagues has an xp multiplayer that increases as you go through allowing you to reach necessary skills quicker, likewise, Prifddinas a high level area locked behind multiple quests is automatically unlocked and you just need some basic travel to get there, unlocking an achievement in 20 minutes that usually takes hundreds and hundreds of hours. Runescape for those that never played before is a very big complex game with many moving parts, the wiki is almost an essential part of the game, if you ever feel lost or overwhelmed the wiki is a good place to get an idea of things. I will be linking the wiki and multiple relevant guides throughout but here is the wiki's main page. https://runescape.wiki/ In the leagues game mode you have access to Relics, basically powerful unlocks that you earn by completing objectives big and small, we shall be using the power of relics to our advantage when going for the steam 100%. I will mention this again in later sections, but briefly if you need any help levelling any skills, the RS Guide, found here https://thersguide.com/guides/skill-training is extremely helpful as a starting point. While this guide will mention Meele as the combat style to focus, it is by NO means the only viable one! Just a very simple one to to progress up the gear. While this guide is a path to get all steam achievements, feel free to branch out explore and have fun! To Access leagues you must purchase membership, this is already needed for the 100% as some achievements DO require membership, however if you start soon you can get the steam 100% while leagues is still running. Completion Times will vary from person to person and its hard to properly estimate but I would say maybe around 50-70 hours of active play, and then at Most very Un-optimal about 40 hours of semi afk playing, but easily pushed to under 20 hours with the tier 5 Relic and some level 70 onwards weapons. the Semi afk portion is because of the Kill 1000 bosses achievement where you will need to check the screen, move around and heal every now and then, but my guide will reduce this kill time massively.). There is also a time gated achievement which will take around 1-2 weeks doing a daily 5-10 minute task (In the worst case, this can be done after leagues in a normal world as you can set this up early, but it does require a paid membership for the achievement). A lot of this guide can be used outside of leagues but the idea is to cheese and speed up your 100% thanks to Prifddinas being unlocked and the massive xp increase. WARNING, leagues is a LIMITED MODE meaning you have until 10th November 2025 to make progress with your character, after leagues your character is GONE and progress DOES NOT transfer to main game (however cosmetics earned through the leagues reward system will). This is why I wanted to get this guide out there so people quickly earn steam achievements while leagues is on. It's worth noting as well that in Leagues your character is an Ironman, this means that you will not have access to the Grand exchange (the player-wide auction) or have the ability to directly trade with other players, however the insane benefits of Leagues far outweigh this fact in my opinion. Another added benefit of leagues is that the shops have infinite stock instead of being limited on how much they can sell to you. We can use this to our advantage and buy as many resources as we would need for things like fishing bait, feathers, etc. There is also a food vendor available in the Brimhaven pub in Karamja called Alfonse the Waiter, he sells cooked fish of various levels so you can buy as much of his food as you would like. Finally achievements working on leagues is probably an oversight by the devs and COULD be fixed, although I would consider that to be extremely unlikely given that there's been no updates to the steam achievements or comments regarding them since their release. I will update the guide if this does happen. Leagues is a TIME LIMITED MODE until the 10th of November Just to say this again and Reinforce the message. Leagues is a LIMITED MODE meaning you have until 10th November 2025 to make progress with your character, after leagues your character is GONE and progress DOES NOT transfer to main game (however cosmetics earned through the leagues reward system will). This is why I wanted to get this guide out there so people quickly earn steam achievements while leagues is on. It's worth noting as well that in Leagues your character is an Ironman, this means that you will not have access to the Grand exchange (the player-wide auction) or have the ability to directly trade with other players, however the insane benefits of Leagues far outweigh this fact in my opinion. Finally achievements working on leagues is probably an oversight by the devs and COULD be fixed, although I would consider that to be extremely unlikely given that there's been no updates to the steam achievements or comments regarding them since their release. I will update the guide if this does happen. Progressing through Leagues and which Relics to pick Progressing through leagues with your tasks can be a background thing to do but I suggest some pushing into at least Tier 2 early on, , and then towards tier 5 as you get towards the end of your Steam achievement journey and into Boss grinding. Going past tier 5 is not needed for basic boss grinding but you can continue pushing to get more powerful and to experience more of what leagues has to offer. If you need more league points at any time to reach a certain tier, you can use this guide for an early game progress route. https://thersguide.com/leagues/day-1 Or follow along this guide focused on working through the quests in the game alongside progressing through leagues tasks. https://docs.google.com/spreadsheets/d/1krPMDabTlQxFnlHobHtf380AFpfIhEzbelYICmZmgQM/htmlview#gid=2041254868 Finally you can head to the Wiki and you can filter the list by % of player completed for tasks that the majority of the player base has completed. https://runescape.wiki/w/Catalyst_League/Tasks RELIC RECOMMENDATIONS Tier 1, Excavator Going with Excavator is really useful for the rest of your achievement journey it provides you with quick mining and crafting XP as well as other convenient benefits like instantly Smithing and teleporting loot to your bank so it does not fill up your inventory, mining and crafting is a crucial part of working through the melee gear so grab this one. PLEASE NOTE, you need to have the Excavator Pickaxe on you and wielding it in order to get the benefits while Mining. Tier 2, Golden Footed, 750 League points needed Getting Tier 2 unlocked sooner rather than later for the Golden Footed relic, it gives you constant agility xp as you play and a is very passive way to earn a 99 in a skill whilst you do everything else, and a nice money maker, giving you money when you complete an agility course lap. Tier 3, Assassin's Insight , 2,000 league points needed These are all pretty equal, Being useful teleport relics to places around Runescape but i would go with Assassin's Insight as can teleport you nearby to some bosses i recommend grinding the 1000 kills on. I will mention the teleport locations here but not later to free up some clutter. Tier 4 Production Master 3,500 league points needed Grants various boosts to skilling skills, but for the purposes of steam achievements, helps with smithing and crafting, needed while going through the melee upgrades. Tier 5, Barbarism, 6,000 league points needed Barbarism is the combat perk for melee and adds tons of useful passive effects and increase of damage, should try and reach this towards the end of your achievement journey when just working on grinding bosses and upgrading melee gear. PUSHING PAST TIER 5 IS NOT NEEDED, but if wish to continue exploring what leagues has to offer, these tiers would provide more benefits to Melee. Tier 6, Perkfection, 13,000 league points needed Allows you infinite invention materials to try and max out augmented gear, useful if you choose to push your gear past tier 70 or acquire rarer gear. Invention will not be covered in this guide at all but feel free to explore. https://runescape.wiki/w/Optimal_PvM_perk_setup Tier 7, 22,000 league points needed If you somehow reach Tier 7, all the relics are completely OP for melee so really down to personal choice. One achievement that cannot be earned on leagues (Castle in the Sky) Note that there is one achievement that cannot be earned in leagues which is Castles in the Sky. This is because clans are disabled on league worlds. This achievement also requires a paid membership. Luckily you can do it in about 5 minutes from a fresh account, feel free to do this now or whenever you want. For this achievement simply go to a non-league world. Go through the basic tutorials if needed, and head towards the clan hub near Port Sarim.
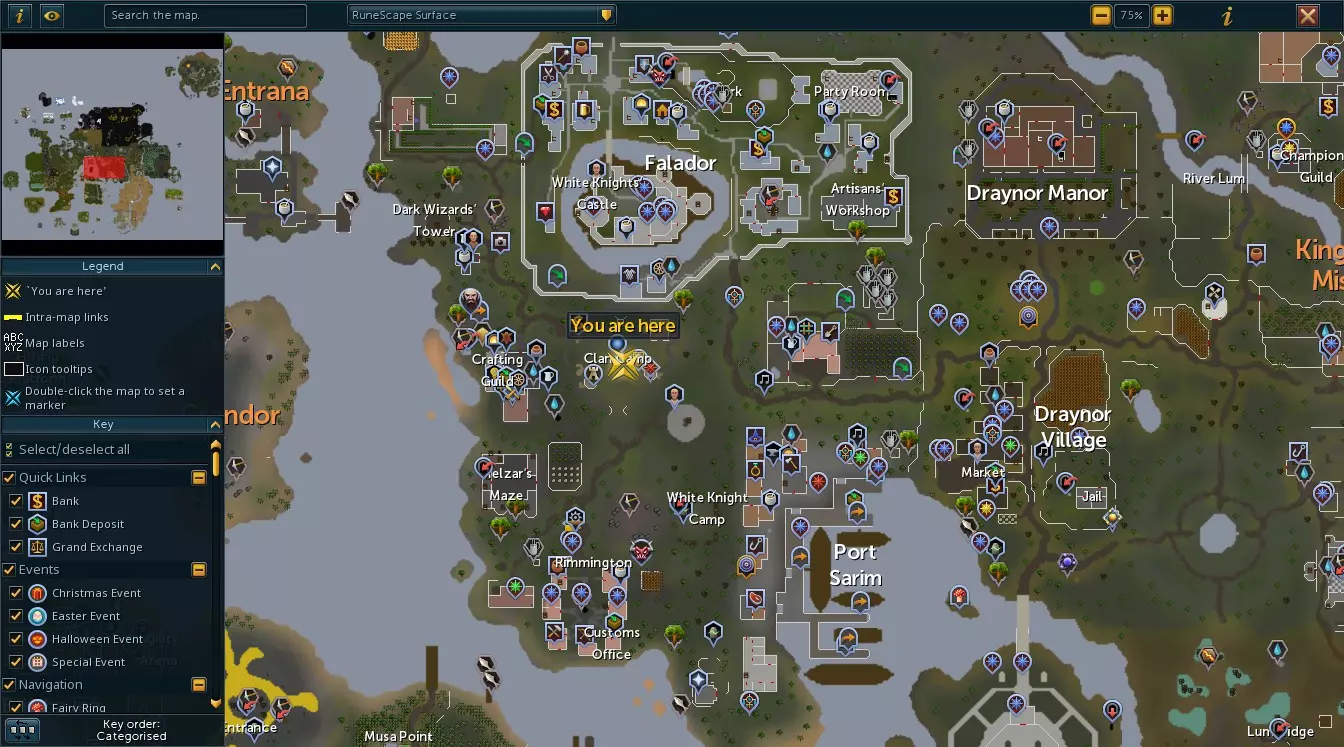
Head here, click on the portal and press 3 “take a tour of clan citadel”, this should make you type in a clan name. Thanks to another achievement guide for this information, type in "fates pulse" and you should be given a tour and unlock the achievement. Thanks to this guide for the clan info. https://steamcommunity.com/sharedfiles/filedetails/?id=3119598166 A Quick note on UI A quick note on UI After the Initial tutorial, it is a good idea to spend some time tweaking the UI to your liking. Runescape has a very complex and crazy UI, however it is extremely customisable and can be changed to your liking, My video starts with me showing some recommended settings like keybinding Area loot, this allows you to press a key to see what loot is nearby which can then be picked up instead of manually picking it up. Making sure that combat xp is set to receive xp for all combat skills, I don't know if it was a bug but when I first started leagues, defence xp was turned off. I also recommend my preferred camera style, freedom classic . It allows you to zoom out wider whilst playing. Also turning off loading screens will allow you to load straight into areas instead of having to sit through the generic loading screens. Feel free to spend as long as you need looking through the settings and feel free to copy the UI that I am using if you prefer, I'll show how to do this in the video. If you want more suggestions, QOL features and an in depth look into the settings and UI, feel free to watch this video. https://www.youtube.com/watch?v=hMMeLXTg8gU Or read through this. https://pvme.io/pvme-guides/getting-started/interface-guide/ Now onto the start of leagues! 1. Start of leagues This is a video I made showing an initial path from spawning in on leagues, unlocking you 6 steam achievements, unlocking lodestones (fast travel locations) and picking up items for quests and useful starter items. Text instructions and explanations below to use alongside the video. If any Steam Achievements do not unlock after completing the route, close the game and re-launch, it should unlock anything missing. (Quick note, the achievement Jack of Spades is tied to an auto completed quest during leagues, you should get that achievement upon playing randomly or shortly after closing and re-launching the game.) The video is not perfect due a few things but the general pathway will work. 1. I had already completed the quest progress on Dragon Slayer before filming this video so will not be able to show the relevant chat options. But I still go to the people you need to speak to, consult the below notes for the dialogue options. 2. I had already claimed the free clue scroll from Zaida. 3. I have already killed the enemy that you need to fight at the end of this guide so there is no footage of the fight, but will still have food and gear, etc before fighting it so that you’re prepared. https://youtu.be/KkZOfjYOMck 1. I recommend choosing Excavator for the Initial relic 2.Complete the initial spawning in tutorial. 3. After the tutorial, go through the settings and customise it to your liking, or to copy mine, type in Slendermant where shown in the video. The main settings I make sure to set are: . KEYBIND AREA LOOT . MAKE SURE ALL SKILL TYPES ARE TURNED ON FOR COMBAT XP . CAMERA STYLE SET TO FREEDOM CLASSIC . NO LOADING SCREENS (More info in the UI section of the guide.) 4. Head to the Lumbridge lodestone and unlock it. (steam achievement, might be unlocked by default) 5. Head to the Lumbridge Swamp and claim the Ghostspeak amulet from Father Urhney. Talk to him and choose option 3. (Needed for the Creature of Fenkenstrain quest later on.) 6.Head to the Al Karid lodestone and unlock it. 7. Head to the Varrock Lodestone and unlock it. 8. Outside Varrock near the lodestone, right click May, open shop and claim all rewards to get a quest dice, roll it to get a free item and some starter money. 9.Head to the champions guild nearby to start the dragon slayer quest. Talk to the Guildmaster, choose option 2 and accept the quest. https://runescape.wiki/w/Dragon_Slayer/Quick_guide - Use this for more info but the only relevant part is the starting out section and obtaining an anti-dragon shield section, shown in video. 10. Walk back and through Varrock to claim a free clue scroll from Zaida by speaking with them (1/10 for the complete 10 clue scrolls achievement). 11. Head to the Edgeville lodestone to unlock it . 12. In Edgeville, continue the Dragon Slayer quest by speaking to Oziach. Choose options 1,1,1,1 in dialouge. 13. Head back to the Varrock champions guild and speak to the Guildmaster for more dragon slayer quest progress. Choose options 2,1,1,1,2,3,2,3. 14.Head to the Draynor village lodestone to unlock it. 15. Harvest some Pale wisps at the edge of Draynor Village until you get some Memory Strands in your inventory after a few actions. (Used for fast travel later on) Feel free to get rid of the wisps by converting them in the divination hole. 16. Head to the Port Sarim Lodestone and Unlock it. 17. Speak to Gudrik in Port Sarim and choose Do you have anything for me?, 3 times for a collection of basic gear, equip it all and use whatever combat style you want. I go with melee/sword for this starter section. 18. Head to the Falador Lodestone and unlock it. 19. Climb to the top of the Falador castle for the "Sir Mitt" steam achievement . 20. Head to the Taverley lodestone and unlock it. 21. Head to the Burthorpe lodestone and unlock it. 22. Nearby, claim the wicked hood from Tam McGrubor by speaking to him (allows quick teleporting to rune altars around the map, the nature altar specifically is needed for an achievement). 23. Do 2 laps of the Burthorpe agility course here giving you enough xp to reach agility level 5 and to unlock some basic movement abilities. The 2 abilities you have unlocked are: Surge which allows you to dash forward many steps upon use. Escape which allows you to dash backwards many steps upon use. 24. Keybind these new movement abilities. - Bottom right - Powers section - Magic section - Drag the surge ability (man running symbol) onto your combat bar on a empty slot - Right click the ability on the bar - Customise keybind - Choose your preferred key - Bottom right - Ranged abilities section - Drag the escape ability (man running backwards symbol) onto your combat bar on an empty slot - Right click the ability on the bar - Customise keybind - Choose your preferred key (You might need to repeat this process if you change combat styles) (Movement abilities are not needed for achievements but are a QOL feature) 25. Attack and Kill Rabbits in Burthorpe and pick up the Raw Rabbit meat until your inventory is full. 26. Walk to the nearby range inside of a house, click on it and cook all rabbit meat. (This is for healing for a combat encounter at the end of this section) 27. Right click on the memory strands from your inventory to teleport (looks like green seaweed). 27b. If you already clicked on the strands to add them to your currency pouch - Click the gold square symbol under the inventory. - Click on the setting wheel to the right to bring up global currencies. - Click on the distraction and diversion section. - Right click on memory strands (looks like green seaweed) - Choose teleport 28. From where you spawn make your way to Eagles Peak lodestone and unlock it. 29. Head to East Ardougne and unlock the Lodestone here. 30. Shovel manure here until 25 farming for a Garden of Tranquillity requirement later, skip this if you wish to do it later. 31. Click on the H symbol on the bottom left of your minimap to bring up the lodestones you've found. 32. Click on the Eagles Peak Lodestone, left side of the map. 33. Head to Priffdinas lodestone through the mountain Arandar path into the east entrance of the city. (Unlocks a steam achievement that usually takes hundreds of hours!) : ) 34. Click on the H symbol on your minimap to bring up the lodestones. 35. Teleport back to Lumbridge (right side of the map) and speak to the Duke on the 1st floor of the castle to claim an anti dragon shield. Choose options 1,1,1,2 (steam achievement). 36. Click the H symbol on your minimap, teleport to Varrock. 37. From the Varrock lodestone make your way to Silvarea. 38. Head inside the dungeon at the edge of Silvarea nearby the temple. 39. Ignore the hound, enter through the gate towards the middle. 40. PREPARE FOR COMBAT, you will need to fight an enemy to progress but you should have some levels thanks to the rabbits killed and inventory of food. Click on the food in your inventory to heal if needed, make sure you have equipped all of your pathfinder gear, ring, cape, and weapon and be ready to heal with food if needed. 41. Fight the creature blocking access to the next area and once the creature is dead head through the barrier and into the next area. 42. Walk to the Canifis Lodestone and unlock it (this area is needed for future quests related to achievements). 43. Initial Route complete! Head back to Lumbridge, have a little dance and continue your Runescape Adventure! 2. Starting the arc for Uncharted achievement It is important to start the arc early if you want to 100% the game as it requires multiple irl days to complete the achievement. Luckily there is a pretty chill way to get this done and it only takes maybe 10 minutes each day till you have it. (As mentioned earlier, worst case scenario is that you have to do this in a normal world after leagues but keep in mind that you do need a paid membership to have access to this content). First unlock the area with the easy quest https://runescape.wiki/w/Impressing_the_Locals/Quick_guide Then head to Waiko island and claim the free supplies from Rosie in a chest next to her. The basic idea is to use supplies to discover random generated islands with resources and loot, usually high level stuff. However the achievement is just to visit 50 islands, do as many short trips as you can, running around the islands picking up shells, wood, and anything else that you can pick up from the ground. Then head back to the Waiko, go to the vendors in the central hub and sell what you picked up for chimes which you then use to buy more supplies from Rosie. The first time you visit her she will give you 50 free supplies. Each new IRL day Rosie has 5 free supplies in the chest next to her. So grab the daily supplies, make a short trip and get resources back while on the islands and hopefully you can do this achievement in a week or 2. Here is a video of me completing the quests and showing the basic route for the arc.
3. 阿纳克朗尼亚石碑 完成此成就只需完成一个简短的引导任务和小型教程。然后将所有10名工人分配去挖掘黏土(你应该已经拥有石头了),等待15-20分钟让资源收集完成,之后在那里建造石碑。 4. 天坑 虽然没有时间锁定,但这要求你完成每30分钟进行一次的活动,这是一种需要与其他玩家一起完成的迷你地下城。首先,从塔弗利出发前往附近的码头,右键点击布丽尔·托克sdottir航行前往达蒙海姆。首先爬上那座山,找到地下城导师,他会给你情谊之戒,让你可以快速传送到这个区域。 在营地和塔尔萨尔对话,可以得知下一个天坑出现的时间和地点,也可以查看维基百科获取位置和时间信息。 留意聊天频道中提示天坑即将出现的消息是个不错的主意。

然后前往 daemonheim,找到 talsar,当即将有天坑生成时,他可以立即将你传送至天坑。 开始天坑活动至少需要一名其他玩家参与,随机玩家也可以加入。 生成后,从生成点的道具栏中获取一些 armor、武器和食物,然后四处移动完成目标。 这些目标包括收集一定数量的图腾并将其放置在宝藏门旁,或者在地下城各处放置管道。图腾分为以下三种: 1. 探索图腾:在探索地下城时可在地面上找到。 2. 战斗图腾:击败敌人后拾取他们掉落的图腾。 3. 技能图腾:通过采集必要资源获得,例如收割植物、树木和矿石。要完成一个天坑,只需完全达成其中一个目标即可。成功完成天坑后,成就应该会解锁。 5. 完成10份 clue scrolls 1. 向Zaida领取免费的 clue scroll clue scrolls会在进行技能训练或战斗时随机掉落,因此你可以跳过此部分,将这个成就留到以后,希望在进行其他活动时能获得 clue scrolls。 获取剩余 clue scrolls的一个简单方法是将偷窃技能提升到20级,然后扒窃HAM成员,其掉落几率为2%。后续指南中提到的某个任务需要25级偷窃技能,你可以在进行当前内容的同时提升该技能。 完成 clue scroll 时,使用 wiki 来解决任何你遇到的线索,部分步骤需要特定技能等级、特定物品或表情动作。 如果遇到不想完成的 clue scroll 步骤,可以直接摧毁它并重新开始,继续从 HAM 成员那里扒窃。 如何快速将偷窃技能训练至20级以及 HAM 成员的位置: 1-5级:在 Taverley 石碑旁的傲慢商人处进行扒窃。 5-20级:在 Lumbridge 的面包店摊位进行偷窃。 之后,前往 HAM 藏身处,扒窃 HAM 成员(不是守卫),直到获得所需的全部简易 clue scroll。如果你因多次扒窃失败而被打晕,就会被扔进附近的监狱。你只需撬开监狱大门,继续扒窃里面的成员,直到获得足够的线索卷轴。然后使用维基来解谜。 6. A lick of paint 要完成这个成就,你需要完成一些任务,满足一些基础技能要求,还要进行一些战斗,所以一定要准备好食物。如果你想轻松碾压所有敌人,可以先提升一下近战技能,但这并非必需,只要准备好治疗用的食物,即使穿着基础装备也能击败必要的敌人。 如果你需要进一步帮助,可以查看技能指南,我也会在过程中推荐一些快速提升的方法。所需任务 1. 完成任务【格特鲁德的猫】 该任务的文字攻略或视频攻略。 2. 完成任务【芬肯斯坦的造物】 (你需要进入莫尔坦尼亚/访问卡尼弗斯石碑,并拥有从伦布里奇沼泽的厄尔尼神父处获得的幽灵语护身符。如果你在联赛的初始路线中没有获得这两样东西,下面是获取这两样东西的快速视频) 需要20级 crafting(在城市北部的阿尔卡利德矿场开采普通/稀有矿石,并切割你开采的宝石。)如果你选择了挖掘者遗物,这个过程会更快,因为它会自动为你切割宝石并将其存入银行。
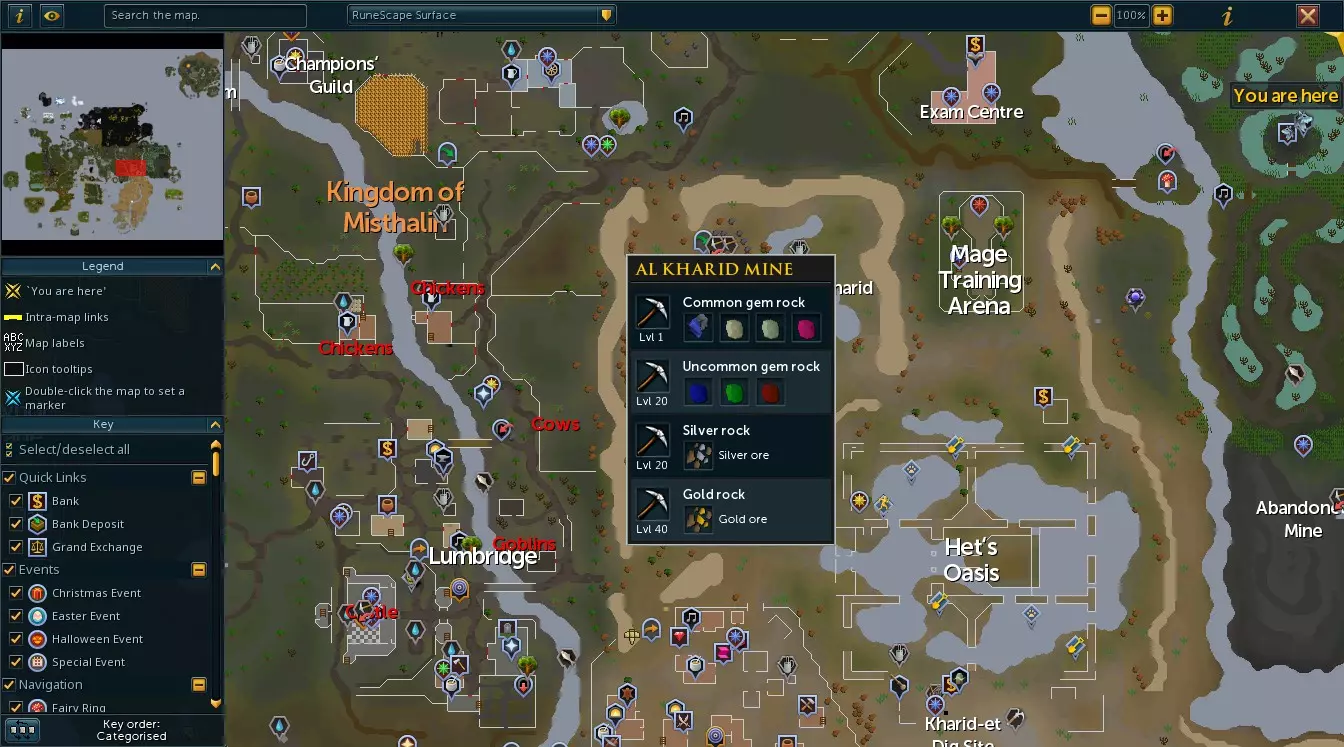
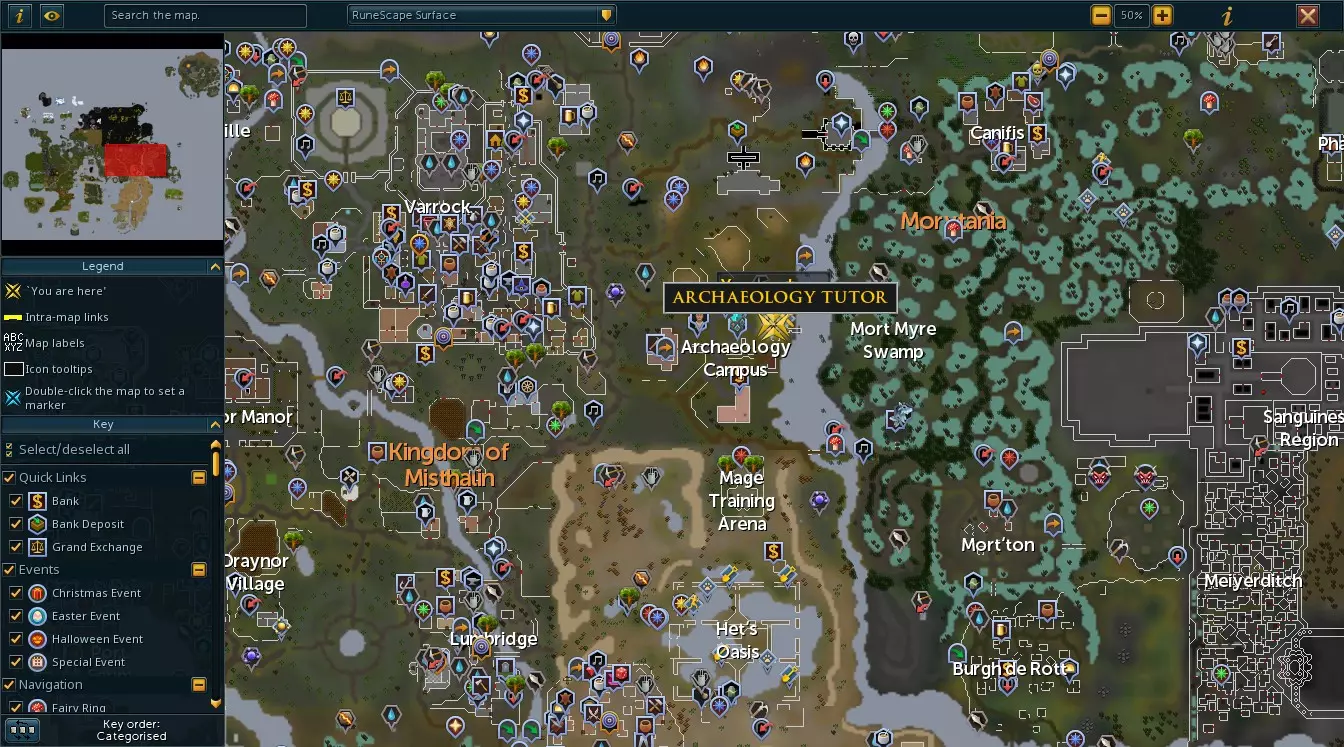
25 thieving required (Check previous section for thieving). Written guide for the quest. https://runescape.wiki/w/Creature_of_Fenkenstrain/Quick_guide Or if you prefer a video guide. https://www.youtube.com/watch?v=h5XC9lh7HQY 3. Then start the quest Garden of Tranquillity. 25 farming required (For a quick no effort farming method, shovelling manure at the Ardougne farm will get you to 25 in no time, video below). https://youtu.be/2uKpNdqpWS0 You do not need to complete this quest or have any of the required items to complete it, just 25 farming to start the quest and get an item needed for the Steam achievement. Simply progress through the quest up until you get the ring of Charos upgraded, this is in the first part of the quest.. Written guide for the quest. https://runescape.wiki/w/Garden_of_Tranquillity/Quick_guide Or if you prefer a video guide. https://youtu.be/3V3eKQJZoAE?si=LO2rCwF1t-FIycu_ Once you have the Ring of charos (a), head back to Gertrude in Varrock and request to choose the colour of your cat. You might need to retrieve your cat from your bank, drop it on the ground from your inventory and click on it and choose the option to shoo it away before Gertrude will let you have a new one, sorry if you where attached to it. : ( 7. Lumbridge Tasks Completing all Lumbridge tasks and claiming their rewards will grant 4 Steam achievements. You can use the wiki to track and tick off tasks as you go. https://runescape.wiki/w/Lumbridge_achievements Here is a quick video showing where you can find the Lumbridge achievements/tasks in game. https://youtu.be/bti0OpWI1XM You will need to reach certain levels in various skills for some of the requirements to complete all tasks. The levels needed to complete them are all shown below and the wiki will have a full list of items that are needed. You can visit the specific items wiki page to find out how to acquire them. Ill Briefly mention training methods for some of the skills. 20 Mining - Mine Common and uncommon gem rocks from the Al-Kharid mine. 40 Smithing - Go to an anvil after mining and craft an inventory full of highest tier gloves. 40 Fishing - Fish at spots around Lumbridge, buy a rod, bait and a cage from Lumbridge Fishing Shop. 50 Cooking - Cook the fish gathered from fishing. - Level 1-20 Raw Crayfish, fished from Burthorpe. - Level 20-50 Fly fishing from Lumbridge with Fishing Rod and Bait. 60 Firemaking You need to get 70 Woodcutting for a Lumbridge Task, so Burn/ add to bonfire, the logs you chop while you level up your Woodcutting. 50 Crafting - Mine common and uncommon gem rocks from the Al-Kharid mine and then cut the gems. (These are cut automatically and sent to your bank with the excavator relic which allows you to afk your way to level 50) 45 Prayer - Start doing the prayer Nexus and you can get this with no resource cost. At the entrance of the Lumbridge Swamp, claim the Charmed Sack from Ysondria. Fill it up by clicking in the middle of the nexus, when it is full go to one of the pillars around it to empty the sack, rinse and repeat until you have enough prayer. 59 Magic -Buy all of the magic armour and weapons from Betty in Port Sarim. Equip the higher tier gear as you reach the required levels. Use the Revolution bar recommendations from the wiki if needed. https://runescape.wiki/w/Revolution/Bars - level 1-10 Wizards robe, wizards staff. - Level 10-20 Imphide Robe, Imp horn wand, Imphide book. - Level 20-30 Spider Silk Robes, Spider wand, Spider orb. - Level 30-40 Batwing robes, Batwing wand and Batwing book - Further gear for magic will not be mentioned as it should be redundant with the xp multiplier and magic combat is not the focus on this guide. Fight these enemies - Level 1-30 Troll brutes in the cave behind the Burthorpe lodestone. - Levels 30-40 Zombies just north-east of the Wilderness lodestone. - Level 40-59 Fetid zombies outside of Fort Forinthry to the north (go to the Edgeville Lodestone and cross the wall into the Wilderness and run east towards the area). Alternatively, you can earn all of the magic xp needed by completing the quest Evil Dave's Big Day out, but it does require multiple other quests albeit early game ones to be completed beforehand, check under the requirements on the wiki page for more information. https://runescape.wiki/w/Evil_Dave%27s_Big_Day_Out/Quick_guide 57 Runecrafting - Do Runecrafting at the Runespan, this is Located in a portal at the top of the Wizards tower south of Draynor Village. (Use the Wicked Hood to instantly teleport there). - Runespan involves grabbing rune essence from the floating essence, then click on the nearby creatures or elemental nodes to turn that essence into Runespan runes. You can travel around to different islands by using the correct rune types to cross. When you are out of essence, grab more from the floating essence and repeat. Prioritise elemental nodes around the area as they give more xp than the creatures. Full details below. https://runescape.wiki/w/Runespan 70 Woodcutting As you level up your woodcutting skill, be sure to upgrade your woodcutting hatchet every 10 levels. Hatchets up to level 40 can be purchased from Bob's Axes in Lumbridge and then added to your Toolbet to replace your current axe. You can then buy a level 50 hatchet from Scavvo's Rune Store in the Champions' Guild near Varrock. Burn logs/ add to a current to clear inventory and level up Firemaking alongside this. - Levels 1-10 Normal trees found everywhere. (Bronze hatchet) - Levels 10-20 Oak trees can be found in lumbridge.(Iron hatchet) - Levels 20-30 Willow trees can be found in Lumbridge. (Steel hatchet) - Levels 30-40 Teak trees can be found west of Yanille or you can stay at willow trees till 40. (Mithril hatchet) - Levels 40-50 Maple trees can be found in Seer's Village. (Adamant hatchet) - Levels 50-70 Arcadia trees can be found north of Al Karid. (Rune hatchet) (It isn't needed but you can smith an Orikalkum hatchet for 60+ woodcutting, this will also require you to have 60 smithing and 60 mining.) For further information on skills, check out the below link. https://thersguide.com/guides/skill-training Here are some videos for all of the tasks being completed if you’d prefer to follow a video guide. https://youtu.be/Dyyxtb4FY4c?si=R6wJPJ_2tehOb5il https://youtu.be/c_1xlaFfyc4?si=gp_hoAsbUMenb5mH https://youtu.be/9fT4CKe3RrU?si=OXbPzFCSesmmpyUL https://www.youtube.com/watch?v=8lv_fFkF-2E 8. Embrace the Chaos This requires you to delve a little into archaeology and complete some mysteries. Mysteries are a one-time mini quest tied to the Archaeology Skill. 1. Head to Archaeology Campus to complete the Archaeology Tutorial. https://runescape.wiki/w/Archaeology_Campus https://runescape.wiki/w/Archaeology_tutorial
2. 前往第一个挖掘点
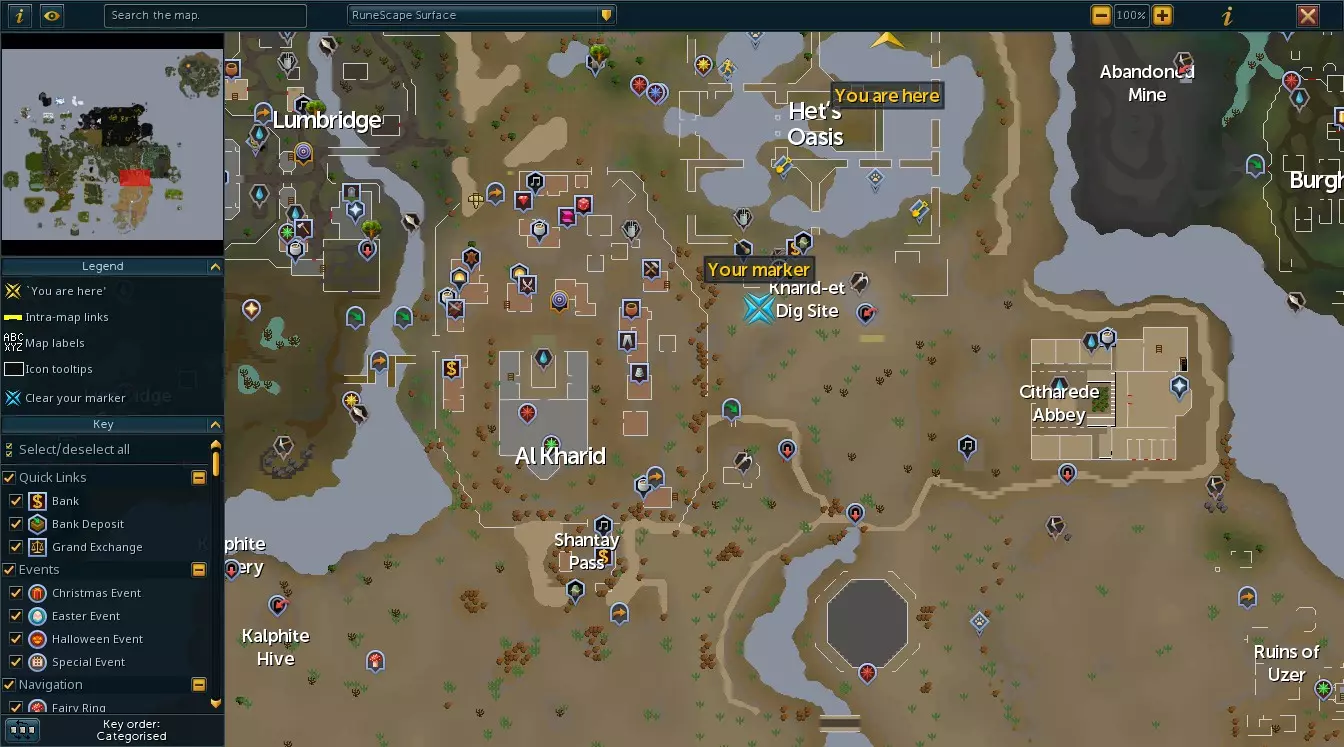
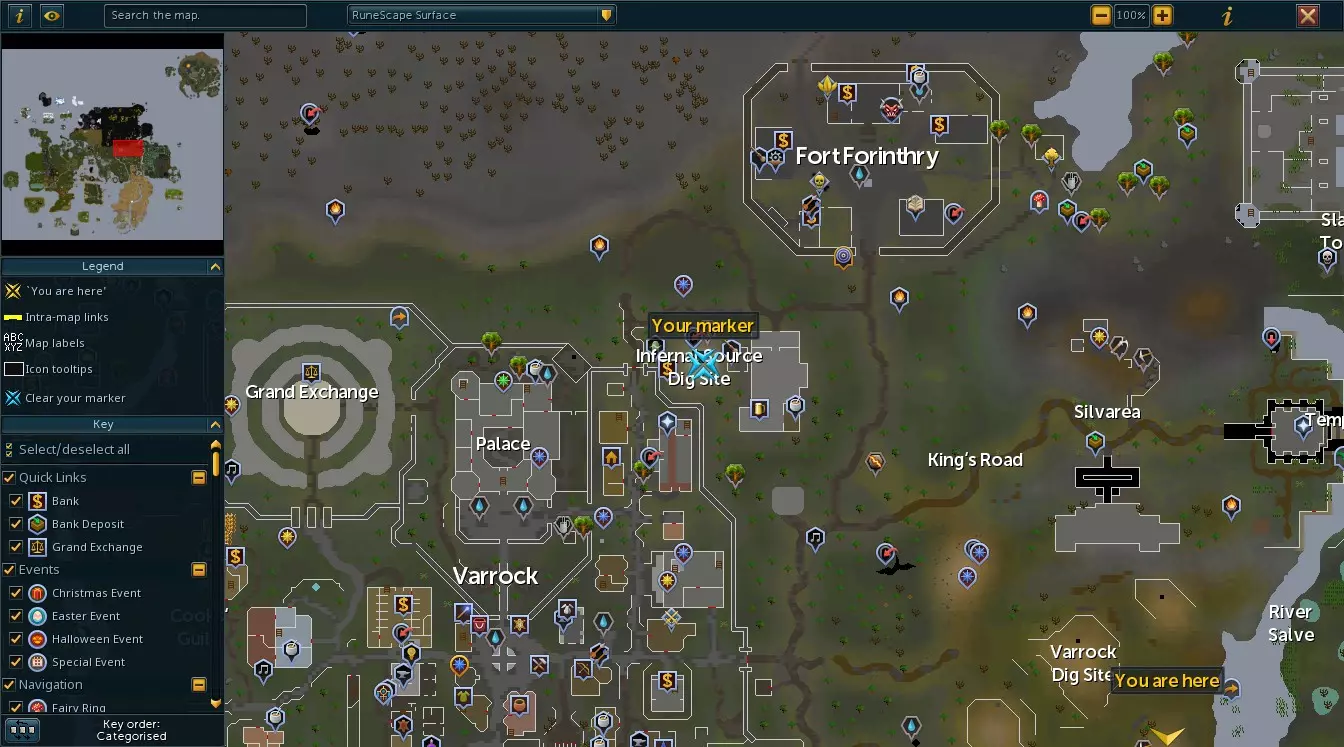
3.通过挖掘堡垒废墟墙壁并在需要时修复一些文物,在该挖掘点达到24级考古学。 4.当你的考古学等级达到24级时,前往新的挖掘点。
5. Complete the mystery, Eyes in Their Stars. https://runescape.wiki/w/Eyes_in_Their_Stars 6. Complete the mystery, Embrace the Chaos. https://runescape.wiki/w/Embrace_the_Chaos The achievement should unlock once you complete the mystery. 9. Upgrading your gear and levelling up Melee Upgrading your melee gear for killing 1000 bosses. This section will run through getting your melee build set up to the point where you can do bossing efficiently and fast. Always use the highest weapon and armour that you can equip for your level and the wiki recommended revolution bar. You will be doing a few quests and a good deal of Mining and Smithing along the way. You can start boss grinding around level 60-70 with the appropriate armour and weapons, and the Tier 5 Relic. You can then work on upgrading your weapons and armour as needed for faster kills. There is a quick video below of me showing you where to buy all of the weapons and armour mentioned in the guide if want visual help. (note when going to purchase armour and weapons the red crossed out circle does not mean you cannot buy it, just means you don't have the skills for it yet) https://www.youtube.com/watch?v=6rBYz_RHuB0 Combat Food For combat food, feel free to buy as much Swordfish as you need from Alfonse the Waiter in the Brimhaven pub in Karamja and return when needed. Can use the tier 3 relic Skull of Slaying, for faster teleport, Slayer Dungeons- Brimhaven Dungeon. If you need money and have the tier 2 relic golden footed, run a few laps of the Burthorpe agility course Alternatively complete a few quests (some recommendations for combat ones are below) to reach 50 quest points and roll another quest dice from May. You can get a new dice every 25 quest points. Revolution Bar A "Revolution" bar is basically what you use to auto attack so setting up your bar correctly is very important, luckily the wiki has some nice recommendations for revolution bars as you level up your melee skill. https://runescape.wiki/w/Revolution/Bars Emergency Teleport's An "Emergency Teleport" is an item that allows you to teleport away even while in combat in one action, these are Useful for escaping without dying especially in the Abyss. two ones i would recommend. Ectophial Unlocked after the Ghost Ahoy Quest, https://runescape.wiki/w/Ghosts_Ahoy/Quick_guide or if prefer video guide https://www.youtube.com/watch?v=UfjxhYolY5M Takes up an inventory slot but can put it on your action bar and keybind it War's Retreat Teleport Free teleport, Unlocked after defeating 10 bosses and having overall Combat level 60 found in your magic section bottom right and can be added to your combat bar and Keybinded Melee Armour Starter Pathfinder armour and Keenblade are good options for the most basic combat, received from Gudrik in Port Sarim (acquired during the initial path). Then purchase all armour from Horvik's Armour Shop in Varrock, this will be your entire armour from level 1-40. Then from Scavvo's Rune Store in the Champion Guild outside of Varrock, this will be the level 50-60 armour. Higher tier armour will be made through smithing, mining the relevant ores and having the required levels to wear them. Orikalkum at 60 (You can then start bossing around here.) Necronium at 70 Bane at 80 Elder Rune 90 Primal 99 Do your Smithing in the Artisan Workshop in Falador as you can get bonus xp from fixing pipes and earning upgrades while smithing. To level up Smithing, fill your inventory with the highest of tier gloves you can make, Then Smith the same inventory to +1,+2 all until max, Then smith them in the Burial section of the Workshop to destroy them but good gain massive XP gains. Melee Weapons We will be using 2h halberds all of the way and then switching to Sunspear once tier 5 relic is unlocked. Travel from Port Sarim to Port Tyras. (Speak to a charter crewmember southeast of the Port Sarim lodestone) Buy all of the halberds from the store the camp. These will be our weapons all of the way up to level 60, swap out what you’re using when you reach the next level. For level 70 weapon, you can purchase a crystal bow for 1 million coins, from Islwyn in the Isafdar forest, then revert that to a crystal weapon seed at the singing bowl in Prifddinas, in order to make a Crystal halberd, you can skip this if you wish to just get Sunspear when availabe. Then at 78 attack and tier 5 leagues relic can claim Sunspear from the Sage outside Lumbridge castle, this will be more than enough for the basic bosses we will be grinding. Cape, Ring and Necklace Slot There are better options than these but these are low effort and will be the ring and necklace earned from completing the Lumbridge achievements. Cape – Use the Bladestorm cape dropped from killing Troll Chuckers in the Burthorpe cave, this is behind the lodestone. Switch to a 99 cape when you reach 99 in any skill, you should be able to get a 99 passively with the golden footed relic. Ring – The Explorer ring 4 is received after completing all of the Lumbridge Achievements and claiming the ring from Ned in Draynor Village. Necklace – The Amulet of strength is acquired whilst doing one of the Lumbridge achievements. Training the melee skill A good afk way to train all combat is in the Abyss but it does require you to be around level 60 to do comfortably so I’ll provide some recommendations up to that point. Level 1-40 There are a few early game quests that will get you over level 40 in all melee skills thanks to the minimum 4x xp multipliers in leagues, these are: Witch's House https://runescape.wiki/w/Witch%27s_House/Quick_guide or visual guide https://www.youtube.com/watch?v=DTbm9Co9iOg Holy Grail https://runescape.wiki/w/Holy_Grail/Quick_guide or visual guide https://www.youtube.com/watch?v=eavlxvB2qig Scorpion Catcher https://runescape.wiki/w/Scorpion_Catcher/Quick_guide or visual guide https://www.youtube.com/watch?v=R0TeRj0_rFI Haunted Mine https://runescape.wiki/w/Haunted_Mine/Quick_guide or visual guide https://www.youtube.com/watch?v=v_qUaXVdo7E Fight Arena https://runescape.wiki/w/Fight_Arena/Quick_guide or visual guide https://www.youtube.com/watch?v=aqFLCvzbVHM Tree Gnome Village https://runescape.wiki/w/Tree_Gnome_Village/Quick_guide or visual guide https://www.youtube.com/watch?v=t9oFipeNY-E Level 40-50 If needing levels before being able to comfortably do the abyss, kill Flesh Crawlers in the Stronghold of Security level 2. The dungeon is located in the middle of the Barbarian Village, level your combat here until you’re able to survive in the abyss. Level 50+ When possible, start killing monsters in the abyss, unlock the abyss with this very quick mini quest, https://runescape.wiki/w/Enter_the_Abyss_(miniquest)/Quick_guide Head to the Mage from the quest and right clicking to teleport to abyss, the creatures there aggro on to you for about 15 minutes. After that you will need to move around for them to attack you again. They give incredible xp rates, chill here and work on your combat skills until you’re ready for bossing. bring some food and an emergency teleport to leave or find an entrance alongside the wall to the inner abyss or teleport with the m out when the enemies have de-agroed. Keep an eye out and pick up a nature talisman if dropped as need it for an achievement. 10. Crafting Nature runes at the Nature Rune altar To access the nature rune altar you will need a nature talisman, Luckily these drop from all enemies in the abyss. Then feed the talisman to your wicked hood and use it to teleport to the nature rune altar. Use the wicked hood to create some rune essence if need some and enter the nature altar, use the rune essence on it and craft some nature runes. If need to manually go to the Nature Altar, Use the Port Sarim Lodestone, run east and pay fare to Captain Tobias, then run towards the nature altar on the island 11. 99 with a flake Reaching 99 in a skill during leagues is no issue thanks to the relics and xp multipliers! Play around and see what skills you like and would want to focus on. Feel free to look at the skills guides here for any fast training methods and useful information. https://runescape.wiki/w/Catalyst_League/Guide As mentioned earlier, the tier 2 “relic golden footed” gives near constant agility xp whilst you walk around or do any other skill. This allows you to achieve 99 passively or at least close to 99 whilst you do anything else in the game. Once you have reached 99 in any skill, head to Prifddinas and make your way to the max guild.
到达那里后,进入花园,找到你已练至99级的技能对应的旗帜并展开它,即可获得成就! 12. 首领刷怪 假设你至少拥有60-70的近战属性、盔甲套装和武器,以及5级遗物,以下是我推荐的一些前期游戏首领供你刷怪,如果你需要更多信息、技巧和配置,可以查阅它们的维基页面。 在我们开始讨论刷哪些首领之前,先快速完成【杀死5次巴罗尔】的成就。这是一场简单直接的战斗:有6个坟墓,逐个进入直到找到正确的那个,穿过一个简短的迷宫和解谜区域,击败那里的巴罗尔以获取战利品。当你累计击败10个Boss后,将解锁【战争枢纽】。通往该区域的传送门位于【德雷尔村石碑】后方。一旦击败某个Boss一次,你就可以在此处设置一个通往该Boss的传送门,以便直接传送过去,无需手动前往。此外,你还将解锁一个紧急传送功能,可让你快速返回该区域。 我推荐两个适合刷1000次击杀的简单Boss: 1. 混沌元素 携带满背包物品,尽量不要留有过多空槽位,因为该Boss会使你的装备强制脱下。这是我自己冲击成就时主要刷的Boss。他的生命值比Arch Glacor低,但他的卸装机制可能有点烦人,而且他的移动有些不稳定,你还可能吸引到附近的怪物。 使用杀戮头骨快速找到他——通过斯拉ayer大师曼德里思,然后沿着海岸向东跑,在盗贼城堡外面,混沌元素就会在那里游荡。 2. Arch-Glacor 零机制 这是一个可自定义的 Boss,你可以为其添加机制以获得更好的战利品。如果你只对 Boss 击杀成就感兴趣,那么你可以轻松地以零机制半挂机的方式进行战斗,只需做一些简单的移动来躲避一些冰系攻击。他的生命值比混沌元素高,但没有烦人的机制,所以可能更适合挂机。使用【杀戮头骨】快速到达他所在位置 - 【杀戮者地下城】- 【森提斯特(大教堂)】 然后向南朝着【冰寒前线】跑去,无视小怪并进入 Boss 房间。 指南结束 这就是本指南的全部内容!希望它对你有帮助。