换一换
换一换 


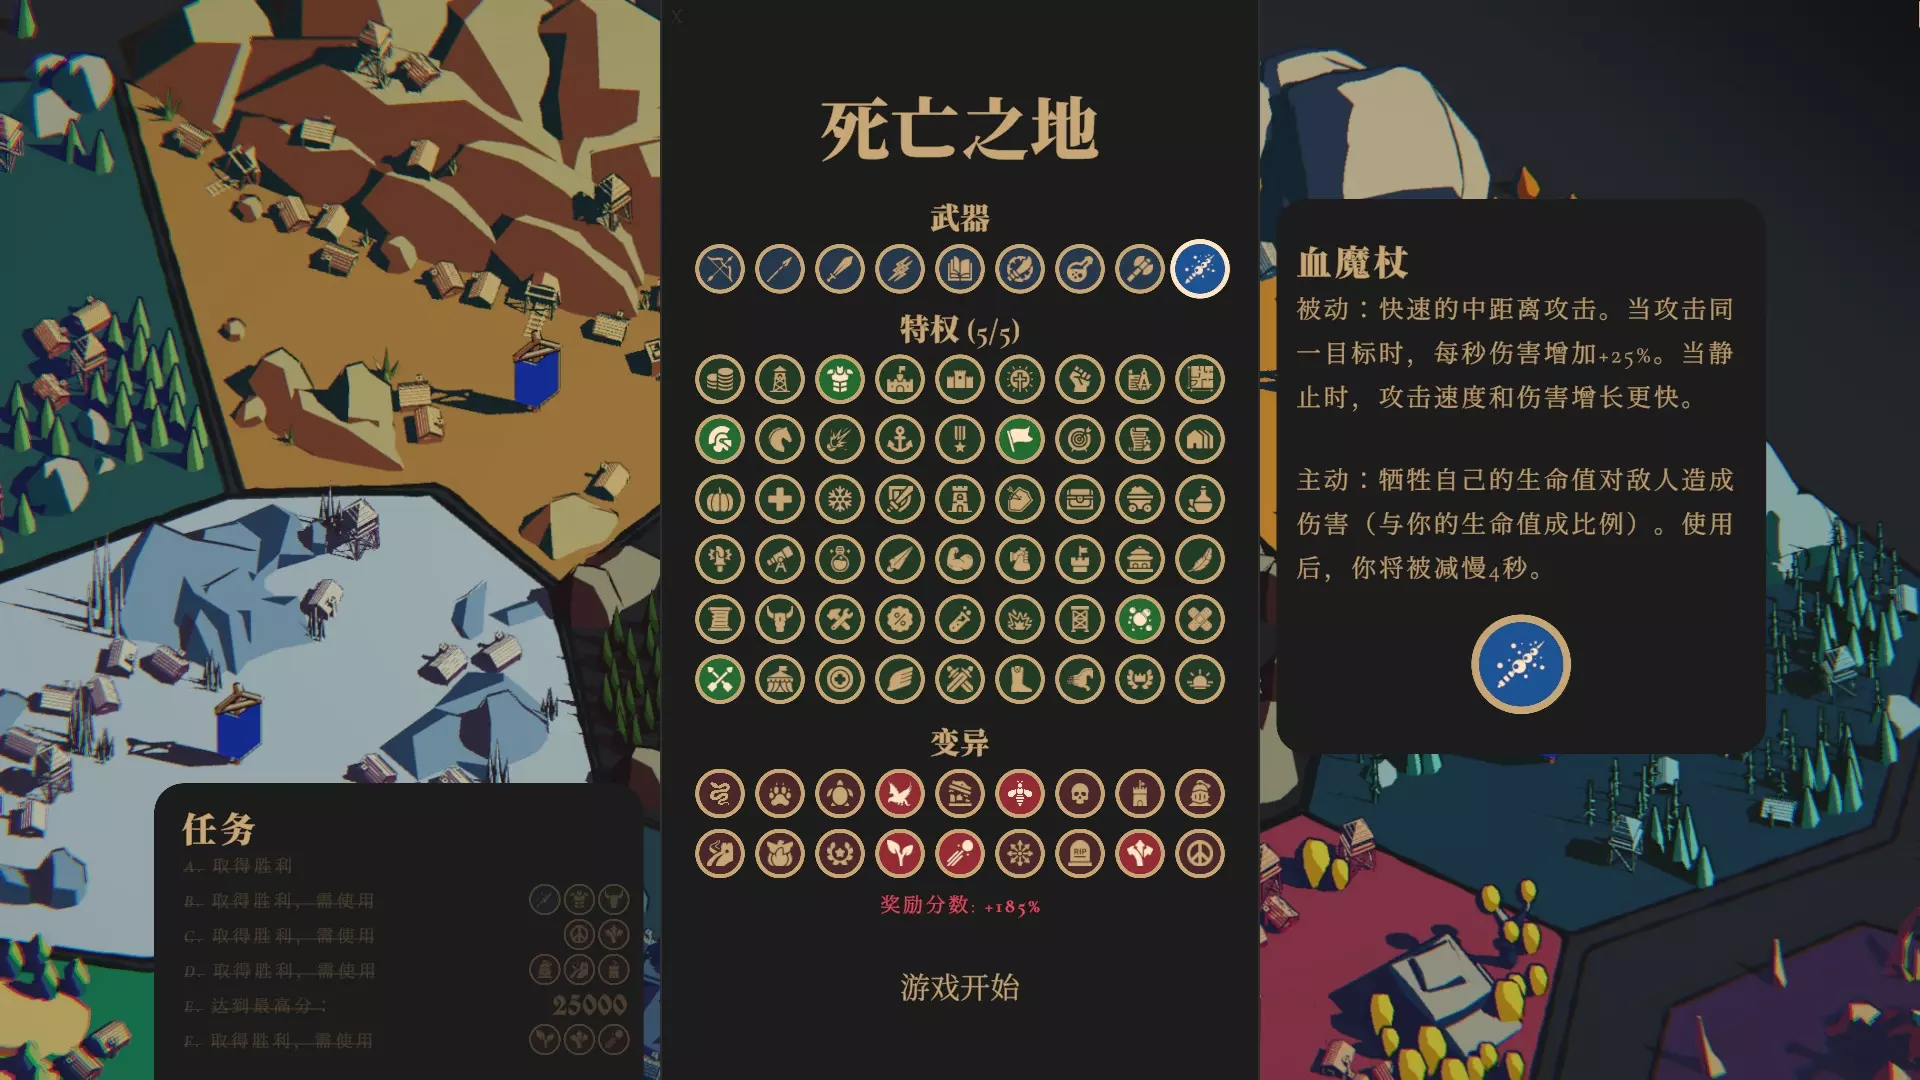
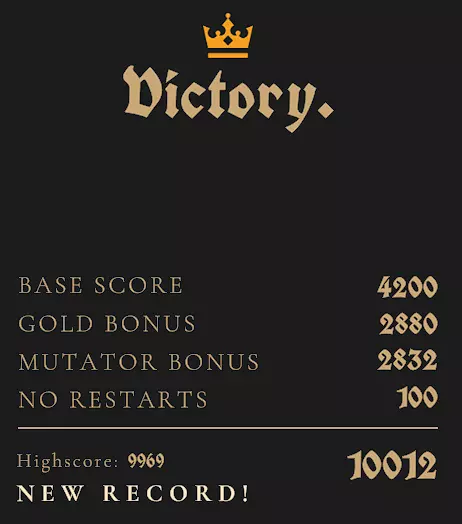
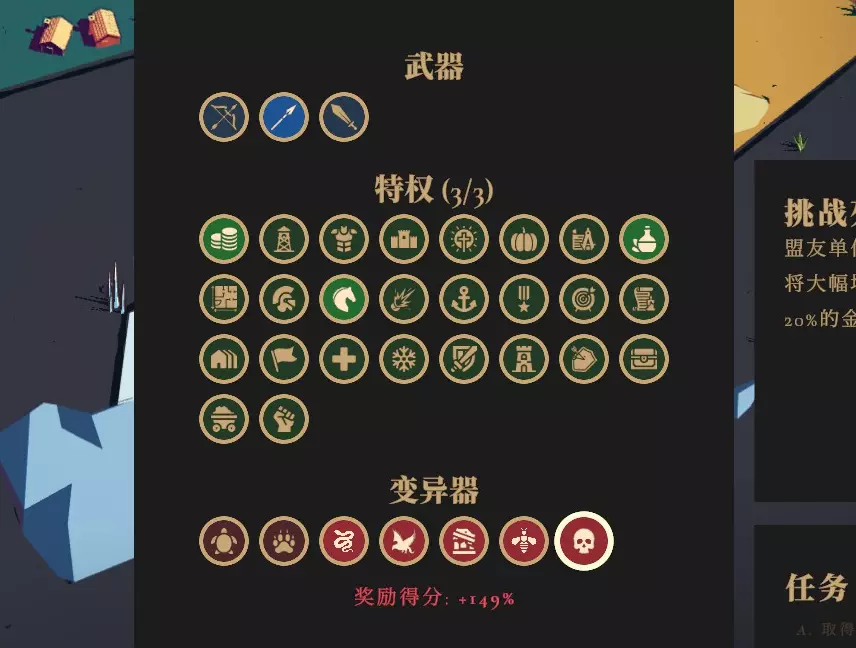
One way to complete Durststein emphasizing the player character as a main combatant while still protecting economy. Build Your Character Weapon Heavy Sword (switch to the Light Spear for quest-specific challenges) Perks Heavy Armor War Horse Melee Resistance Modifiers Challenge the Snake God Challenge the Falcon God Challenge the Wasp God Could add another (especially if shooting for Quest F - 12000pts). This will build your character to be a major combatant in your fights. Trample damage from War Horse, coupled with being more resistant and durable will ensure you can survive getting hit and pulling aggro from your buildings. This capability will be improved later throughout the level. Day One Setup After building the castle, buy the following: The closest Gold Mine Spearmen from the Barracks The closest north farm and a fieldhttps://steamuserimages-a.akamaihd.net/ugc/2036242598629179738/A7A3E618DBB7B264547C30F4FFAE840874297125/?imw=256&&ima=fit&impolicy=Letterbox&imcolor=%23000000&letterbox=false You will have to use the Spearmen and yourself to stop the cavalry coming from the south. Easy peasy. Early Eco Strategy For the first several days of Durststein, the Farms to the north are very safe. The overall goal is to selectively get Gold Mines which will provide you with enough money by Day 4 to do the following: Buy up Farms and Fields (Improved Plow) Level up the Castle with Royal Training https://steamuserimages-a.akamaihd.net/ugc/2036242598629250719/EDF0E9349CE3C693EFC7D335A538C1315B908EDB/?imw=256&&ima=fit&impolicy=Letterbox&imcolor=%23000000&letterbox=false In this early period, prioritize getting the stable income of 2 farms and some fields going as well, with leftover money. Your spears will help protect the south, where you can put a single wall and a tower to block the fast-movers. Between these very light defenses, you, and the upgrades, things are starting to look pretty. Don't be scared to use the arrows from your castle in this early period if you need to, though it shouldn't be necessary. By the top of Day 5, you should have 2 goldmines, 2 farms, Spearmen, several towers (2 at the north), a south-western wall, an upgraded castle giving you more potency in combat, and enough gold to upgrade even more. At this point, with 20 knights and 5 exploders coming from the south, I used my 16 gold for the following: Upgrade both farms (4gp each), and add 2 fields Buy a tower right next to the castle But the southern wall The wall and tower mainly give the exploders something to run into, don't worry if they get broken. Remember, you are a frontline tank. Charge the enemy and run into them for more damage, and aggro them on you to slow them down! https://steamuserimages-a.akamaihd.net/ugc/2036242598629305707/6D35CA986F476DBDB8221792551B7DFE0E743A48/?imw=256&&ima=fit&impolicy=Letterbox&imcolor=%23000000&letterbox=false Day 6 into Mid Game Day 6Day 6 allows you to get the 3rd northern farm, make more upgrades, add a field. At this point I also buy a wall to the north, a tower upgrade, and buy the 3rd tower in the middle of the farms. This strategy relies on you keeping the farms up so you can buy the last gold mine for another eco spike, while placing your Spearmen in places you can't be to slow the enemy down. Using this strategy it's common for your soldiers to lose a fight, and for you to have to run back to where they were defeated to clean up the mess. Fortunately, your economy will still be protected if you choose your fights right, as the farms are protected by multiple towers and a wall. Day 7It's very important now to get Magic Armor for 20gp from the castle, as your southwestern wall is about to be hit with exploders, giants, and some archers. On Day 7, you should also have enough to get a couple more fields to the north. I never bother with the southwestern farm + fields, that area is too difficult to wall off. Instead, with the last 3 gold, I buy a single tower facing down at the exploder entrance, and place my Spearmen to the south in the pass to the bottom-right of the castle to protect against the fast-moving cavalry. Magic Armor is what kicks this tanky build into high gear, massively increasing your damage output as long as you keep getting hit. Your perks, resistances, etc., should all start really coming into play here and your soldiers and defenses are there to stall in places you can't fight on your own. Using your own tankiness, you should be able to nearly solo the giants and archers without too much help from the tower and wall. Remember to keep running into, in circles, all over the place on top of your enemies using this build, you will damage them just by moving. Your sword's active ability is another area-of-effect attack, so you should be doing plenty of damage to keep up with these enemies. Day 8Upgrade 2 farms again. Buy the upgraded wall to the northeast of the farms (prioritize the farms -- you NEED to keep the farms going. Handle the fights there before moving on to other places. To the northwest, we've so far bought nothing. Buy a cheap wall and tower with your last 6 gold and call it a day. Those two defenses won't hold forever, but it'll be just enough for you to finish the fight near the farms and return to save the day. Running this, I went into the night here with 0 gold. Day 9 into Late Game Day 9You should be at the Day where 3 groups of 35 cavalry are charging you from 3 different directions. Playing through this level as I made this guide, I had 33 gold to work with here. Cavalry if left to their own devices will utterly destroy your economy, going out of their way to target it and the Castle. Upgrade your Barracks to get another group of Spears, place them to the southwest. Upgrade the wall there. Send 4 Spears to the Southeast/South (right below the castle) pass Upgrade the wall there also. You should now have about 10 gold left if you haven't made any massive eco losses. I used my last bit here to buy another upgraded tower to the northeast and buy some fields. This should be some of the last eco we buy. You'll take the fight to the north by yourself for PART OF IT. You can stay there for about half the battle's worth of guys, then leave your upgraded walls and towers to handle it. As you come back to your castle, you may see that the southwestern gate has already gone down, and cavalry are coming in. This is okay, just aggro them by charging in, and do your best to keep them away from your farms, castle, etc. They're fast, but you should be able to catch them and get them (or at least some of them) to chase you. Your 4 Spears should be able to handle the fights to the south, or at least stall long enough for you to be able to return. Doing this, I lost no economy buildings on this night. Day 10Upgrade the 3rd farm because there is no attack coming from the north here. After this, I had 32 gold left. Again, we're basically maxed on economy now, so this is a case to prioritize defenses. The wave is also coming from the opposite direction, which has been a little neglected. To remedy this: Buy 2 towers Upgrade both towers behind the wall (should be 5 gold each) Buy Fire Archers to the southwest, have them hold position behind the wall Buy Berserkers to the southwest, have them charge out at the catapults that are about to come Last 3 gold, buy southernmost tower Remember, you are the fighter here. You'll have to face tank a lot. I immediately rushed the catapults this night, and then go back to clean up the other stuff. The giants are important to take out next. Always remember to try to aggro enemies off of structures, clump them up in a group around you, and then charge through them with your AoE attack, your trample damage, and your AoE Special Ability. Not to mention Magic Armor kicking in here, so everything attacking you is hurting itself. This wave is actually pretty easy since everything is coming from the same side except the fast-movers to the north. Put half your spears up there, the other half to stall the exploders and other fast guys southward. Day 11Actually forgot to get the last gold mine here on Day 11, whoops. So I bought it real quick. It'll give you your money back + 1. Feel free to find a better spot to put it somewhere else earlier on. You'll have to tank the 12 giants to the north on this wave, but don't worry. We're getting our first Ballista to help out. Upgrade one of those towers to the north to a Ballista. Send your spears south to deal with the 35 fast movers, and if you're worried throw down the Barricades to slow them down further. With my remaining 17 gold, I bought the row of towers along the cliffside next to the Castle, and bought the wall south immediately south of the farms (just in case something breaks in from the south). This might be overkill, but we're swimming in money right now. But the final tower on the little precipice to the right of the castle, and you should be out of money. From here, I send my Berserkers and fire archers to the north to help me with the giants. Note that because of the help from the Ballista, and your upgrades from earlier, you should be able to tank all 12 giants and charge directly into them without dying. The Last Wave I went into Day 12 with 47 gold on my hands. Bought final upgrade for Spearmen (up to 12) Upgraded the lone tower to the northwest once (5gp) Upgraded 2 ridgeline towers (5gp each) Spent final 16gp to upgrade the southwest Barracks and Archery Range Split 12 spearmen across southeast and northwest where some real fast guys are. You can go half and half. Berserkers and Fire Archers are going to have to stay to the southwestern wall. This fight is long and staggered. The catapults to the southwest are important to kill, but don't come out for a while, so you can spend your time switching between fights as needed. You want to move back and forth, killing a few, removing pressure from the walls which need to stay up. I started the early part of this wave southwest and northeast often. The walls on the northwest and southeast (next to the castle) are likely to go down first, but if you are doing a good job alternating between fights, your defenses can otherwise take care of themselves for the most part. If you've had a good run up to this point, it's chill. Make sure to focus the catapults, giants, and exploders when you see them. Other enemies can be handled by defenses, except when there's a LARGE mob piling up. That is a good opportunity to rush in with your tank build and wrack up AoE damage. Conslusions I was able to use this player character build to handle other challenges on all of the maps, not just Durststein. Of course build orders will vary wildly depending on which map you're talking about. On the Durststein run I did as I was writing this guide, I achieved a score of 11601 using the following modifiers: Challenge the Snake God Challenge the Falcon God Challenge the Wasp God I'll do future runs with it, or maybe throw in Challenge the Tiger God, to achieve 12000 for Quest F. Hope this helps anyone get a fun time and do some more active fighting as opposed to a more commander-style tower defense mode. Glhf
杜斯特斯坦前线坦克建造顺序

2026-02-19 04:00:22
发布在Thronefall
转载

导读
这是杜斯特斯坦前线的坦克流玩法攻略,涵盖角色养成(重剑、战马等配置)、首日布局、各阶段经济与防御策略,以玩家自身为核心战斗单位,兼顾经济发展,可应对各波敌人并冲击高分。

评论
共0条评论

dnf体力 DNF手游体力加血吗 深度解析血量机制与坦克流玩法
一、核心机制解读 体力属性与血量关系 在DNF手游的伤害计算体系中,体力属性直接决定角色生命值上限。每点体力可转化为固定数值的生命值加成,这个转化比例受到角色基…
2025-11-21 14:300赞 · 0评论

《鸣潮》索拉里斯怎么养号?养号日常记录贴 角色养成攻略 资源规划技巧
《鸣潮》索拉里斯养号日常记录贴,泳圈叮咚咚镇楼!分享我的角色养成、资源规划与探索心得,一起见证账号成长之路。
2026-06-02 05:300赞 · 2评论

《异环》安魂曲怎么养成?番茄百分百美味百分百!VTuber超细致角色养成攻略
2026-06-02 00:360赞 · 0评论

《绯色回响》攻略大全 绯色回响新手攻略 绯色回响角色养成攻略
2026-06-01 03:000赞 · 5评论

《鸣潮》琉音音擎怎么搭配?昨夜来电专武与替代音擎推荐,琉音暴击率堆叠与养成攻略
作为物理属性的速切击破型角色,琉音通过【强化特殊技】与【终结技】能有效积累敌人的失衡值。以下针对音擎搭配方案进行详细推荐。 一、专属音擎【昨夜来电】优势分析…
2026-05-29 11:110赞 · 0评论
胜利女神迪赛尔冬日甜心怎么配队 冬日草莓糖迪赛尔养成攻略 角色技能阵容搭配
《胜利女神》迪赛尔冬日甜心怎么配队?角色养成攻略来了!冬日草莓糖迪赛尔作为强力辅助,其配队思路与技能搭配是提升战力的关键。本攻略将详细解析她的技能机制、装备选择…
2026-05-28 03:120赞 · 0评论

《绝区零》星徽比利怎么玩?星徽比利攻略 星徽比利养成 星徽比利阵容搭配 影画提升
【视频素材录制于创作体验服】感谢各位收看本期《绝区零》星徽比利的攻略! 音擎推荐: 专武>仪玄专武/般岳专武/精5真斗专武/青漪灵鼎>幻变魔方 驱动盘推荐: 套…
2026-05-27 20:050赞 · 0评论

《胜利女神》爆裂一角色排行 胜利女神角色梯度 胜利女神周年庆角色推荐 爆裂一角色养成攻略
《胜利女神》国服爆裂一角色梯度排行出炉!在第一次周年庆前,哪些角色最值得培养?本文将从就业面、保值率、养成难度三大角度,为你深度分析爆裂一角色的强度与优先级,帮…
2026-05-27 03:100赞 · 0评论

《胜利女神:妮姬》11月16日强度榜 娜由塔/水母/德尔塔/莉贝/雷利奥 角色养成配队阵容攻略
2026-05-26 23:050赞 · 0评论

《妮姬:胜利女神》国际服新版本角色强度榜 最新节奏榜一图流攻略
-
2026-05-26 07:560赞 · 0评论
暂无更多
最新更新
- 《Thronefall》开发更新 — 各位女王与国王们, 非常感谢大家在玩家调查问卷中提供的所有反馈——这些反馈对于我们确定游戏中需要修复和新增的关键内容优先级非常有价值。 获取IP的商业流程以及建…
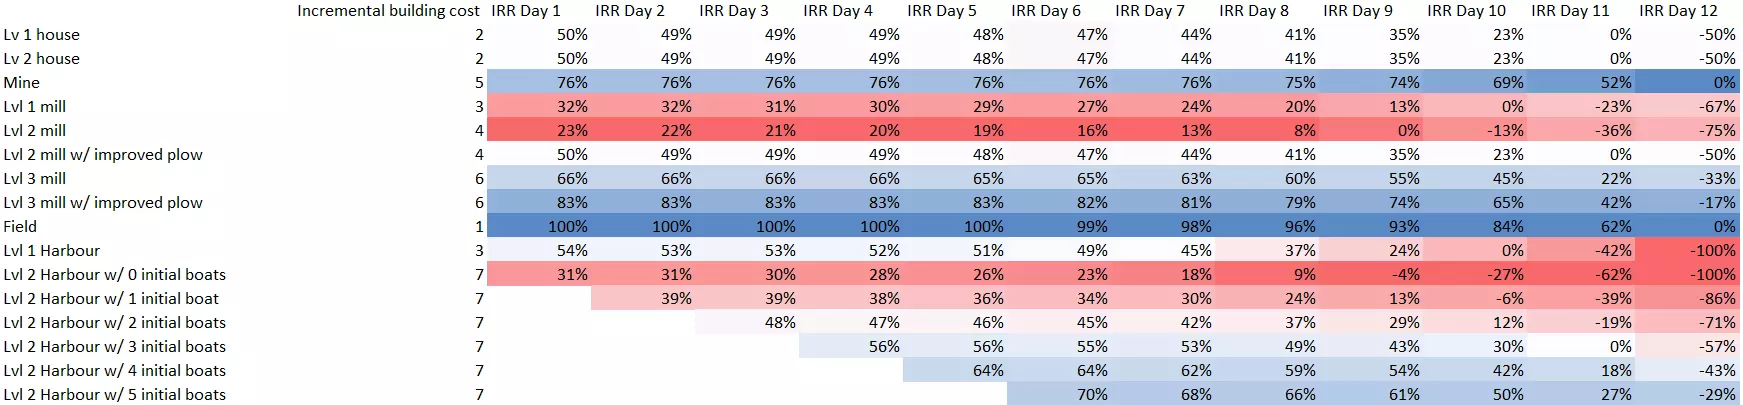
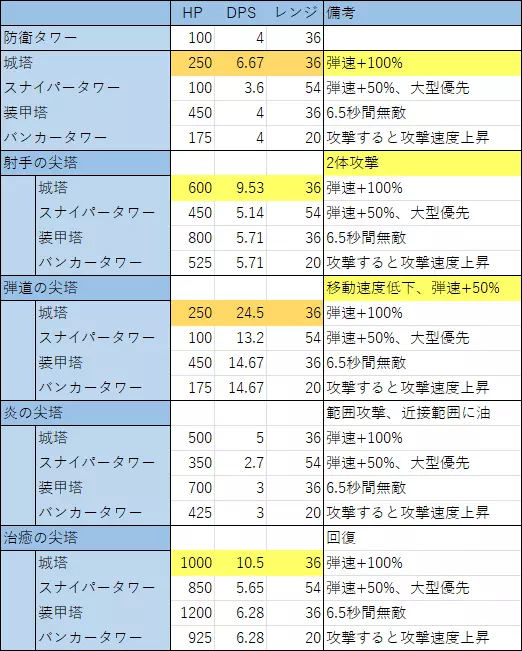
- 全单位详细数据 — 全单位详细数据 塔
- 如何精通《王座陨落》 — A complete guide on how to deal with the many difficulties of endless mode Intro…
- 《王座陨落》 perk指南与概述 — Having amassed hundreds of hours in the game and obtained multiple High Scoring …
- 通用技巧 — 经济管理的一些小建议和想法 通用技巧 1. 这对几乎所有即时战略游戏都适用,但我还是提一下: 【前期游戏应尽可能专注于经济发展,同时在保证安全的前提下,防御设施…
- 关于我如何在《托腾德》中获得25000分的视频 — 这是一个关于我如何攻克游戏中最难挑战的视频攻略:在托滕德(Totend)获得25000分。要解锁所有成就,你必须达成这一目标。 你好,如果你也在为我认为是游戏中…
- 构建一个动态经济体系 — 在本指南中,你将看到一个非常简单的策略,适用于《王座陨落》的每张地图,无需依赖技能或优化,就能动态构建王国经济,每次都能获胜。不需要图表或电子表格! 动态经济入…
- 建造与升级技巧 — 【过时内容(于UFERWIND更新后)】 关于建造、升级选择以及部队武器配置的通用建议 升级主基地 - 主基地可升级2次,分别消耗7枚和20枚金币。 - 每次升…
- 《王座陨落》1.21版本弗罗斯特湖任务F指南 — 本指南将帮助你达成【Frostsee Quest F】胜利。现已更新至1.21版本,助力完成【Ruler of Frostsee】成就。 准备工作: - 武器:…
- 《王座陨落》施图尔姆克拉姆任务A、B、C、D、E及F指南 — 本指南将帮助你完成施图姆克拉姆任务A、B、C、D、E和F的胜利。以助力达成【Ruler of STURMKLAMM】成就。 配置A和B: 武器:弓和匕首 技能:…