换一换
换一换 


This Guide will tell you everything you need to know about the weapons in X4. How they work, what they are good at, bad at, and what kind of special effects they have. This knowledge has been gathered in over a year of digging through the files, testing the values found and how things actually work out in-game, and of course, tons of actual playtime. NOW ON THE WIKI The weapons guide has been integrated into the official wiki. As a result i will no longer update this guide! There is no point in maintaining the same thing twice. Main guns -> https://wiki.egosoft.com:1337/X4%20Foundations%20Wiki/Manual%20and%20Guides/Objects%20in%20the%20Game%20Universe/Equipment/Ship%20Weapons/BeamGun%20Forward%20Weapons/#HKingdomEndWeapons-2 Turrets -> https://wiki.egosoft.com:1337/X4%20Foundations%20Wiki/Manual%20and%20Guides/Objects%20in%20the%20Game%20Universe/Equipment/Ship%20Weapons/BeamGun%20Turrets/ Missiles -> https://wiki.egosoft.com:1337/X4%20Foundations%20Wiki/Manual%20and%20Guides/Objects%20in%20the%20Game%20Universe/Equipment/Ship%20Weapons/Missile%20Weapons/ Introduction Hello and welcome to my humble little pile of data. Four years after the release of X4 i still see plenty of confusion about how weapons work in X4, which is no suprrise with how little information is given to the player to begin with. So little that it left me wondering just too many times and i started digging and testing. Then more digging and testing. The result you see here, a detailed data sheet for all the weapons in the game and how exactly they work. Enjoy! Updates 27.05.24Finally added the new guns from the 7.0 Beta S Needler Gun M Plasma Cutter Beam L Ravager Main Battery M Needler Turret L Seismic Charge Turret L Kyon Turret 9.08.236.20 Beta 7 Boron Ray Ion Project: Nerfed Hard. Heat management is no longer possible. The weapon now overheats the moment it stops firing, even if you fire for just 1 second. You will now only do Overheat DPS, which is pretty darn bad. Sustained DPS is now equal to a Phoenix vs shields and half a Phoenix vs hull. Mass Driver / Boson Lance: You can no longer hold a shot and have the weapon cool down to receive in extra shot. This is a questionable nerf to weapons that desperately need buffs to be actually worth their cost. 18.07.23Fixed a big error i had with heat management, specifically Sustained Damage Output. Added a more detailed explanation for it. Check the Heat Management section. No changes to weapons in the 6.20 Beta as far as i can see. 14.06.23Added the Venture reward weapon. 2.06.23Added maximum damage and shots until overheat. 14.04.23Added Boron weaponry. 22.03.23Expanded DPS breakdown further. Fixed typos and little oopsies in the math. Added placeholders for Boron equipment. 6.0 BETA Only numbers change i found so far is an update to make the Meson Stream more consistent. The only effective change is a dps increase of the M Mk1 variant. The Encyclopedia (And its bugs) The In-game Encyclopedia is the only place where you can see some informations about the weapons, ships etc. in X4. Sadly, it is severely lacking in the amount of info that is displayed, and the things that are displayed are written in a rather confusing manner. So let's get explaining. Burst Damage Output = The raw damage per second of the weapon. Sustained Damage Output = The damage per second with heat and cooldown calculated in. Against Shielded Targets = The raw damage per second against a target with shields. Some weapons have shield penetrating damage or extra damage against shields. Against Unshielded Targets = The raw damage per second against targets without shields. Some weapons deal more/less damage to hull than to shields. Area Damage = Blast damage applied around the impact per projectile. Rate Of Fire = How often the weapon fires per second. Doesn't count multiple projectiles. Max Rate Of Heat Buildup = The heat generated per second. Cooling Rate = Base value of heat removed per second. Projectile Speed and Effective Range should need no further explanation. BUGS! Those are the reasons why you will see different numbers here than in-game! The encyclopedia appears to have a bug in it's calculation for weapons with ammo clips, like the Pulse Lasers and Bolt Repeaters. It seems to calculate one shot-interval too many, resulting in a lower rate of fire and dps displayed than the weapons actually have. It essentially fails to consider that the first shot in a magazine is fired instantly and has no delay. For example, the TER Mk1 Pulse Laser is shown to have a rate of fire of 1.33 shots per second with 82 damage per second, while it actually has 2 shots per second and 124 dps. This appears to apply to ALL weapons with burst magazines. The heat build up is incorrect for the Shard Battery and Tau Accelerator. It only considers the heat generation of a single bullet while actually all bullets generate heat. The numbers for the alpha strike weapons, Mass Driver, Boson Lance and Meson Stream, are completely wrong. Likely a result of how very different those weapons work and the formula can't figure them out. The L Pulse turrets and the Terran L Bolt turret also have incorrect numbers, They have values for burst clips, but they are never used since the reload time of the weapon is longer than the burst clip reload. The encyclopedia though still calculates the unused values into it's damage formula. The Terran L Bolt turret can use it's burst clips though if you apply a reload-mod to it at the workbench. Once the reload time is lower than one second, the burst clip will become functional. Additional Terms There are many, many more statistics and values for weapons than what is listed in the Encyclopedia and I will use slightly different terms, along many new ones to describe a weapons performance. Statistics and terms you will see in this list are: Damage Burst DPS : Raw Damage per second of a weapon firing normally without considering heat. Sustained DPS : Sustained Damage per second by letting the weapon cooldown fully when overheating. Overheat DPS: Damage per second when firing the weapon after overheating and immediatly firing again when possible. Damage: The damage a single shot will deal. ROF: Rate of fire. How many shots the weapon fires per second. Used for fast firing weapons like Bolt repeater Reload: The time the weapon takes to reload a single shot. Used for slow firing weapons like Plasma +Shield: A weapons bonus damage against Shields. +Hull: A weapons bonus damage against Hull. Shield Ignoring. +Blast: A weapons explosive blast damage, enabling it to damage objects in an area. Blast Range: The range of the blast damage. Blast damage is reduced by distance from the impact. Charge Time: Time until a weapon is fully charged and deals full damage. Otherwise it will result in reduced damage. Sticky Ammo: The weapons ammo will stick to the targets hull and deal damage over time. For example, if a weapon has 25 damage and a stick time of 5 seconds, the target will take 5 damage per second. Magazines/Clips Clip Size: How many shots the weapon can fire before it has to pause to reload. Clip ROF. How many shots are fired per second by the weapon within a clip. Clip Reload: The time it takes to reload the clip/magazine. Range and Accuracy Speed: Projectile Speed. How quickly the bullet moves. Higher speeds allow the target less time to evade. Range: How far the bullet flies until disappearing. Dispersion: How accurate the weapon is. The larger the number, the bigger the bullet spread and less accurate the weapon is.. Anything below 0.30 is GOOD. Anything above 0.40 is BAD Heat H-Shot: Heat per shot. The heat generated per bullet fired. H-Second: Heat per second. The heat the weapon generates per second when continuously firing. Initial Heat: Heat generated BEFORE the weapon is fired. If this causes overheat. No shot is fired. Cooldown: The speed at which the weapon gets rid of heat. CD-Delay: Cooldown Delay. Time added after overheating before the cooldown will begin. Reactivate: The heat level at which the weapon is able to fire again after overheating. Every weapon has a max heat of 10.000 so i won't list it. Missiles Missiles have their own list of specific values, like: Salvo Size: How many missiles are released per launch Max range: The maximum distance a missile will fly before self destructing. Can be influenced by ships speed. AI Targeting Range: The range at which AI controlled ships and turrets will fire missiles. Lock-on Range: The range at which guided missiles will start obtaining a target lock. Only applies to the player. Mobility: The turn rate and strafing speed of the missile. Flare Resistance: The chance of a missile to not be distracted by a flare. Keep in mind a single unit of flares launches multiple. Taken from the files. Extremely hard to test if accurate. Heat Management The heat mechanic is simple enough, but still has some quirks. There are three ways heat is generated. 1. Standard: After every bullet fired heat is applied. 2. Initial Heat : Heat is applied before the bullet is fired. If it overheats, no shot is fired. 3. Constant Heat: Applies to beam weapons only. Heat is applied per second rather than per shot. All weapons have a maximum heat of 10000. Once a weapon reaches that number, the weapon overheats and cooldown will be stopped for a time. 1,13 seconds + reload time for most weapons. Only then it will start cooling down. Weapons only start cooling down once they are ready to fire. A Plasma Cannon Mk1 for example will only start cooling down 4 seconds after its last shot. Most weapons cool down at 2000 heat per second, needing 5 seconds + cooldown delay to return to zero heat. For every weapon that has heat, the base cooldown gets divided by an increasing amount. For two weapons the cooldown speed would be 1000 per second. For three 667 per second. for four 500 per second. And so on... That means the more weapons you have, the more Burst DPS you will do, but your sustained DPS will receive diminishing returns. As an example we will use the M Bolt Repeater Mk2. In Yellow you can see how how the cooling speed reduces with each additional gun that has generated heat, and therefore increasing the time needed to fully cool down. In Blue you can see the long-term damage decreasing with each additional gun that has generated heat. While with one M Bolt Repeater Mk2 you have close to 300 sustained dps, you only get slightly above 900 with a full load six guns. Because every weapon generates heat at a different rate, have different rate of fires etc, there is no universal ratio. Every weapon has a different scaling.
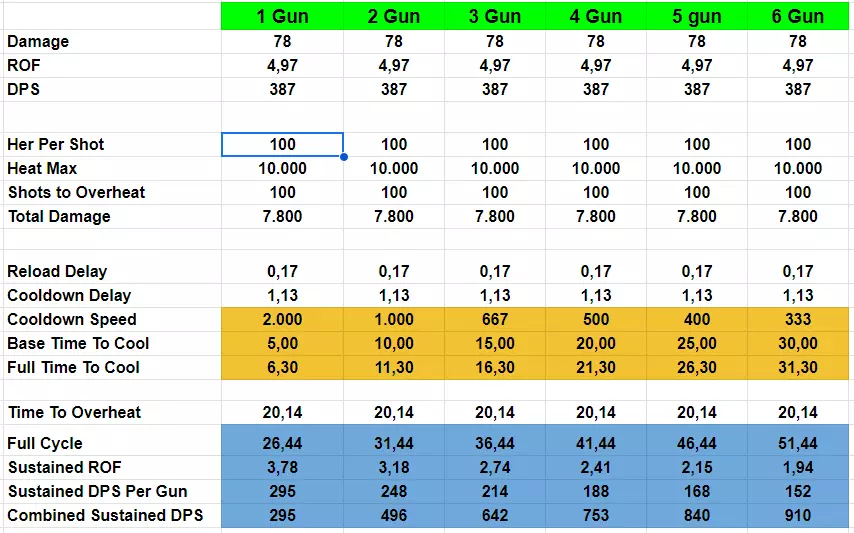
--- Base Game Weapons --- Pulse Laser Info The Pulse Laser stands as the quintessential entry-level weapon, requiring no specific reputation unlocks. It fires in short, relatively accurate bursts, though the dispersion can cause a few shots to miss at a distance. The dispersion is especially noticeable when targeting very small targets like mines and laser towers, as a good number of shots will miss. The damage output is modest, but he Pulse Laser is very heat efficient and can be fired for a very long time. Overheating is usually not an issue in most engagements. The high projectile speed makes it also very reliable in closer-quarters dogfights. The Pulse Laser performs best on space superiority fighters, enabling them to hit other fighters reliably. Xenon fighters are prime targets for the Pulse Laser due to their weak protection. But it struggles to deal damage to heavy fighters like Ares and Chimera. Most medium-sized targets can take Pulse Laser fire for quite some time. Anything larger will easily shrug off the damage. The Pulse Laser will serve you very well as primary weapon for your space superiority fighters. Advantages: - Cheap to buy and produce - Very heat efficient - Effective against most fighters - Available from most factions - No reputation requirement Disadvantages: - Low damage output - Accuracy falls off at range. Pulse Laser Stats Small Mk1 Small Mk2 Medium Mk1 Medium Mk2 Burst DPS 99 174 165 286 Sustained DPS 90 158 147 254 Damage Per Shot 32 47 58 86 Rate of fire 3.11/s 3.72/s 2.86/s 3.33/s Burst Clip Size 2 4 2 4 Burst Clip Firerate 7/s 8/s 5/s 6/s Burst Clip Reload Time 0.5s 0.7s 0.5s 0.7s Bullet Speed 4147m/s 4147m/s 4562m/s 4562m/s Max Range 3110m 3110m 5018m 5018m Dispersion 0.30° 0.34° 0.21° 0.24° Tracking Speed 165° 165° 106° 106° Heat Per Shot 53 46 73 61 Heat Per Second 164 171 208 203 Damage Until Overheat 6048 10246 7946 14104 Cooldown Speed 2000 2000 2000 2000 Cooldown Delay 1.13s 1.13s 1.13s 1.13s Reactivates At 9500 9500 9500 9500 Bolt Repeater Info The Bolt Repeater is the big brother of the Pulse Laser, offering more firepower at the cost of worse heat efficiency. The in-game description of the Bolt Repeaters' performance is very much on point. As the description mentions, the Bolt Repeater doesn't perform as well in a dogfight as the Pulse Laser due to the slower projectile. Recommended is a boom-and-zoom approach where you pick a target from a distance, close in rapidly, unload your damage, and then boost away again before lining up for another strike. This gives the target little time to dodge while managing your heat. Heat management is a genuine concern for this weapon, unlike the Pulse Laser, as it only offers about half the damage potential in a heat cycle. Firing discipline is a must; otherwise, you will struggle to do damage while you constantly overheat. Interestingly, the Small Bolt Repeater is much more accurate than the Pulse Laser. In contrast, the Medium sized variant is slightly less accurate. If you fit this weapon, your primary targets should be Heavy Fighters, Corvettes, and Gunboats. Light Fighters are rather hard to hit with the slow projectile unless you surprise them. In the hands of an experienced pilot, the Bolt Repeater can rapidly destroy enemy S and M targets, using the increased firepower to its full potential. Advantages: - Small variant is very accurate - Relatively high damage output - Effective against most fighters and lesser protected mediums - Available from most factions Disadvantages: - Slow projectiles make dogfighting more difficult - Medium variant struggles at range due to reduced accuracy - Heat management can be troublesome - Small Mk2 is surprisingly expensive Bolt Repeater Stats Small Mk1 Small Mk2 Medium Mk1 Medium Mk2 Burst DPS 111 220 198 387 Sustained DPS 92 179 155 297 Damage Per Shot 15 32 33 78 Rate Of Fire 7.45/s 6.9/s 6/s 4.97/s Burst Clip Size 18 20 21 24 Burst Clip Firerate 12/s 10/s 8/s 6/s Burst Clip Reload Time 1s 1s 1s 1s Bullet Speed 2400m/s 2400m/s 1920m/s 1920m/s Max Range 3000m 3000m 4800m 4800m Dispersion 0.17° 0.14° 0.34° 0.26° Tracking Speed 124° 124° 71° 71° Heat Per Shot 45 55 75 100 Heat Per Second 335 379 450 497 Damage Until Overheat 3345 5824 4422 7800 Cooldown Speed 2000 2000 2000 2000 Cooldown Delay 1.13s 1.13s 1.13s 1.13s Reactivates At 9500 9500 9500 9500 Beam Emitter Info The Beam Emitter fires, suprise surprise, a beam! This comes with certain advantages but also some big disadvantages. However, there is quite the potential with this weapon. This is a weapon of extremes. The damage output is very, very low, and destroying anything with this weapon will take a long time. It is only effective against fighters with the lightest of protection. The tracking speed is also somewhat lacking and slow. Fast dogfights will result in your beams wildly swirling around, trying to compensate for the rapid maneuvers, and won't deliver a lot of damage. The Beam Emitter requires smooth and precise flying to be effective. Now for the good stuff. This weapon is extremely heat efficient. The only variant that effectively can overheat is the Small Mk1 version, as it fires a constant beam with the reload time being equal to the beam duration. All the other variants never overheat unless used in large numbers. When the beam stops firing to reload, the heat dissipation kicks in and generally manages to get rid of all heat until you use four or more Beam Emitters. Overheating is essentially not an issue with this weapon. This extreme heat efficiency can result in quite a respectable sustained damage output with which you can keep melting down your targets. Still, anything larger than a Heavy Fighter will take some time. Of particular note is the Medium Mk2 variant, which actually has a pretty high damage output. Four are enough to destroy Xenon N or M in a single salvo from long range. But now, for the one thing that turns the Beam Emitter from an okay, niche weapon into quite the powerhouse that has to be feared on the battlefield. Modifications. Specifically, Slasher. With Slasher, it is possible to increase the damage of the Beam Emitter to 300%. This can result in the Medium Mk2 achieving a whopping 471 damage per second. The decrease in heat dissipation is not much of a problem due to how heat-efficient the Beam Emitter is. With Slasher applied, just three Medium Mk2 Beam Emitters can already break the shield regeneration of a Xenon K. Not to mention how quickly it melts fighters. Trivia: The description mentions that the Beam Emitter deals more damage the closer the target is. This used to be the case when beams still had a slow travel time and didn't hit instantly. Meanwhile, beams have been changed to be instant hit, and they deal their full damage at any range. Advantages: - Perfect accuracy - Extremely heat efficient - Instant hit - Very high damage potential via modifactions - Available from most factions Disadvantages: - Relatively Slow tracking makes dogfighting difficult - Very low damage unless modified Beam Emitter Stats Small Mk1 Small Mk2 Medium Mk1 Medium Mk2 Burst DPS 50 97 80 157 Sustained DPS 45 97 80 157 Damage Per Beam 200 488 480 1256 Reload Time 4s 5s 6s 8s Max Range 3000m 3000m 4364m 4364m Tracking Speed 60° 60° 60° 60° Beam DPS 50 122 120 314 Beam Duration 4s 4s 4s 4s Heat Per Shot 440 636 1168 936 Heat Per Second 110 159 292 234 Initial Heat 1000 1000 1000 1000 Damage Until Overheat 4200 --- --- --- Cooldown Speed 2000 2000 2000 2000 Cooldown Delay 1.13 1.13 1.13 1.13 Reactivates At 7500 7500 7500 7500 Shard Battery Info Everyone likes shotguns. Every game has one. This one is ours. Throw any pretense of finesse out of the window. Now we go charging in and start blasting! It is the straight-up opposite of the Beam Emitter. With the Shard Battery, you get an insane damage output, but only for a limited time. Still, even the sustained damage output is very respectable and can even threaten capital ships if employed by a relatively small number of fighters. The usage of the Shard Battery is straightforward as well, consisting of getting as close as possible to the target and then pulling the trigger to blast it to bits. It can dismantle fighters very quickly. Medium targets also get ripped rather quickly. However, the heat efficiency is atrocious! You will be overheating in less than 10 seconds, and if your target is not dead, something has gone horribly wrong. The heat efficiency is so bad that you need at least three Small Mk1 installed to have the damage potential to destroy a fighter in a single heat cycle. You still need at least two for the Small Mk2. The Medium variants aren't much better. Make your shots count! The rather large spread of the projectiles doesn't help this tight damage potential. It is a shotgun, after all. Even if you have the theoretical damage within a heat cycle to destroy a target, enough bullets likely miss, and the target survives the onslaught. And you sit there, slowly cooling down. Using the boom-and-zoom approach is highly recommended as the high heat generation prevents effective use in extended dogfights. Advantages: - Very high damage output - Mk2 variants can threaten capital ships - Fast projectiles - Available from most factions Disadvantages: - Extreme heat generation - Very high dispersion, only effective at close range - Low total damage per heat cycle Shard Battery Stats Small Mk1 Small Mk2 Medium Mk1 Medium Mk2 Burst DPS 245 475 374 730 Sustained DPS 136 258 209 407 Damage Per Shot 5x 49 4x 95 6x 78 5x 146 Rate Of Fire 1/s 1.25/s 0.8/s 1/s Bullet Speed 2880m/s 3456m/s 4032m/s 4838m/s Max Range 2304m 2305m 3685m 3687m Dispersion 1.25° 1.00° 1.25° 1.00° Tracking Speed 107° 107° 71° 71° Heat Per Shot 1225 976 1464 1170 Heat Per Second 1225 1220 1171 1170 Damage Until Overheat 2205 4180 3276 6570 Cooldown Speed 2000 2000 2000 2000 Cooldown Delay 1.13s 1.13s 1.13s 1.13s Reactivates At 9500 9500 9500 9500 Plasma Cannon Info The Plasma Cannon is the heavy hitter and the primary anti-capital weapon for small and medium craft. It is very much a one-trick pony. It fires a single, high-damage shot over a decent range. The projectile is very slow, and each shot generates a stupidly high amount of heat. Expect to fire only two or three shots before you overheat. The usage of the Plasma Cannons is straightforward: Equip a fighter swarm with those and point them at a capital ship you wish to no longer see on your radar screen. That is pretty much all it is good for. The projectile being so very slow and the fact that, at maximum, you get only three shots before overheating makes it an abysmal choice in a dogfight. This is very much a weapon for fighter swarms to alpha-strike enemy capital ships into oblivion. The use on fighters is preferred because the entire package is much cheaper than on medium ships. Note: Because of how the heat generation lines up, you get higher damage output by firing as soon as possible instead of letting it cool down fully. You still get the same number of shots. Sustained dps is calculated from this method. Because of the few shots per heat cycle, it may be best to ignore the burst damage per second and look only at the sustained damage per second. Advantages: - Very high damage per shot - Can threaten capitals if employed in swarms - Small variants are very cheap - Can hurt mediums somewhat hard - Available from most factions Disadvantages: - Extreme heat generation, can only fire two or three shots, depending on Mk - Very slow projectile, - Very low total damage per heat cycle Plasma Cannon Stats Small Mk1 Small Mk2 Medium Mk1 Medium Mk2 Burst DPS 256 443 460 797 Sustained DPS 120 233 215 419 Damage Per Shot 1024 1331 1841 2393 Reload Time 4s 3s 4s 3s Bullet Speed 1229m/s 1229m/s 983m/s 983m/s Max Range 4056m 4056m 6488m 6488m Dispersion --- --- --- --- Tracking Speed 47° 47° 25° 25° Heat Per Shot 5122 3414 5756 3836 Damage Until Overheat 2048 3993 3682 7179 Cooldown Speed 2000 2000 2000 2000 Cooldown Delay 1.13s 1.13s 1.13s 1.13s Reactivates At 2000 2000 2000 2000 Ion Blaster Info The Ion Blaster is a support weapon designed to break shields and, as such, one of the first weapons with different damage values for shields and hulls. As one would expect, the damage to shields is very impressive. A single Small Mk2 can almost defeat the shield regeneration of a Xenon K! The damage against the exposed hull is non-existent, though, meaning the Ion Blaster can't destroy ships. Or it will take a very, very long time, at least. With high precision, a medium rate of fire, and a slow to medium projectile speed, pilots can use the Ion Blaster effectively against most targets. But it performs exceptionally well against capital ships. Fighters will lose their shielding within seconds. Medium shields won't last that much longer. The Ion Blaster would work very well with heavy missiles or torpedos when engaging capital ships. The Ion Blaster will quickly strip the shields, and the missiles will vaporize the hull. Advantages: - Extremely high shield damage - Very effective against capital ships - S and M ships will lose their shields in seconds - Very accurate Disadvantages: - Rather high heat generation - Basically no hull damage - Very expensive Ion Blaster Stats Small Mk1 Small Mk2 Medium Mk1 Medium Mk2 Shield Burst DPS 410 1056 759 1676 Shield Sustained DPS 295 774 556 1225 Hull Burst DPS 50 32 75 24 Hull Sustained DPS 36 23 55 18 Shield Damage Per Shot 82 264 253 838 Hull Damage Per Shot 10 8 25 12 Rate Of Fire 5s 4/s 3/s 2/s Bullet Speed 1920m/s 1920m/s 2496m/s 2496m/s Max Range 2880m 2880m 4618m 4618m Dispersion 0.07° 0.06° 0.04° 0.03° Tracking Speed 110° 110° 74° 74° Heat Per Shot 122 151 190 284 Heat Per Second 610 604 570 568 Shield Damage Until Overheat 6724 17688 13409 30168 Hull Damage Until Overheat 820 536 1325 432 Cooldown Speed 2000 2000 2000 2000 Cooldown Delay 1.13s 1.13s 1.13s 1.13s Reactivates At 9500 9500 9500 9500 Blast Mortar Info The Blast Mortar is the Plasma Cannon's big brother. It is better in every way to a large degree, offering twice the damage output for a similar cost. It is easily one of, if not the most powerful gun available to fighters. And only fighters. There is no variant for medium size. Decent projectile speed for a weapon of this type, very high damage, and comparatively good heat efficiency make this the prime choice for fighters if their job is to destroy capital ships. The damage is split 50/50 between direct hit damage and explosive damage. The explosive part can allow for a good chunk of extra damage against shields, as the damage can be multiplied if the explosion hits multiple objects sharing the same shield. The only real downside is the reduced range compared to the Plasma Cannon. And the limited availability. If you ever need a gun to take on capital ships, take the Blast Mortar. It will serve you very well. Advantages: - Very high damage per shot - Very high sustained damage per second - Explosive damage can shred shields of surface elements, hitting multiple objects - Extremely cheap for the firepower it offers - Higher projectile speed than the Plasma Cannon Disadvantages: - Very Slow tracking - Explosive damage is not affected by +damage modifcations - Short range for an anti-capital gun Blast Mortar Stats Small Mk1 Small Mk2 Burst DPS 385 751 Sustained DPS 233 456 Damage Per Shot 443 864 Explosive Damage Per Shot 443 864 Reload Time 2.3s 2.3s Blast Radius 100m 120m Bullet Speed 1440m/s 1440m/s Max Range 3312m 3312m Dispersion 0.02° 0.02° Tracking Speed 12° 12° Heat Per Shot 2216 2216 Heat Per Second 963 963 Damage Until Overheat 4430 8640 Cooldown Speed 2000 2200 Cooldown Delay 0.2s 0.6s Reactivates At 8000 5000 Mass Driver Info The Mass Driver is essentially a sniper rifle and the longest-ranged weapon of the game. It also features an extremely fast projectile and perfect accuracy, as expected. That is, however, where the good news already ends. The in-game description greatly oversells the Mass Driver and what it can do. Let's start with the most significant problem: Zero tracking. The gun is completely fixed, and you must move the entire ship to aim the weapon, which is rather tricky despite the fast projectile. This lack of tracking makes it impossible to focus multiple mounts on a single target. If you fire an entire loadout of those, you must line them up and fire one at a time. If you fire all at once, only one shot will hit the target. Small targets are almost impossible to hit. And if you somehow manage to do that, the damage is not high enough to leave a lasting impact. Fighters that have two shield generators are essentially immune to this weapon. Even the relatively flimsy Xenon fighters take three shots from the small variant to go down! They still need two shots from the medium variant! Many medium ships will already be immune to sustained fire from this weapon and unable to be destroyed. Or at least it will take a very, very long time. That is pitiful for a weapon advertised as having a "High-energy projectile with destructive force." It is very difficult to make this weapon work and the result is generally disappointing. There are much better choices out there, and all of them will outperform the Mass Driver in damage output, cost-effectiveness, and practicality . Advantages: - Perfect accuracy - Extremely fast projectile - Longest ranged weapon in the game, outside of missiles - Has a zoom-effect when charging a shot, allowing for better aiming at distant targets Disadvantages: - No tracking. The entire ship has to be maneuvered to aim - Very low damage per second - Extremely high initial heat generation. Can only fire one or two shots, depending on Mk - Extremely slow heat dissipation and therefore rate of fire - Second most expensive weapon for S and M ships, only the Meson Stream is more expensive - Damage per shot is not sufficient to offset the drawbacks, needing multiple hits to destroy even light fighters Mass Driver Stats Small Mk1 Small Mk2 Medium Mk1 Medium Mk2 DPS 77 138 124 220 Damage Per Shot 1500 1500 2400 2400 Time For Full Firing Cycle 19.4s 21.8s 19.4s 21.8s Reload Time 3.4s 3.4s 3.4s 3.4s Charge Time 0.1s 0.1s 0.1s 0.1s Bullet Speed 10000m/s 10000m/s 10000m/s 10000m/s Max Range 12000m 12000m 16000m 16000m Initial Heat 8000 4500 8000 4500 Damage Until Overheat 1500 3000 2400 4800 Cooldown Speed 500 600 500 600 Cooldown Delay 4s 3s 4s 3s Reactivates At 500 5000 500 5000 Muon Charger Info For the Muon Charger the in-game description is spot on, there isn't too much to add. The charging mechanic can be somewhat awkward and clunky to use for player, but for AI controlled ships that is of no concern, they will fire the weapon in perfect rythm. The Muon Charger is also one of the most accurate weapons available to fighter pilots, but because of the slow projectile it is rather hard to use against enemy fighters. It very much excells against medium-sized targets and capital ships. The damage output can be a bit deceiving at first. Inconsistent as well due to the high chance of projectiles harmlessly bouncing off and doing no damage. But, due to the fact that the Muon Charger is pretty much impossible to overheat, each additional gun installed is a flat 100% increase in damage output. All other guns have diminishing returns on the sustained damage output because of decreasing heat dissipation for each installed gun. The Muon Charger doesn't care about that. It doesn't overheat. So, while a single Muon Charger seems a bit weak at first, having a larger number turns them into a very powerful weapon against mediums and capitals. Advantages: - Very high damage per second - Good damage per salvo - Impossible to overheat, each gun provides 100% of it's Burst Damage as Sustained Damage as well - Very Accurate - Very cheap for the firepower it offers - Higher projectile speed than other anti-capital guns, can work against fighters in a pinch Disadvantages: - Slow tracking - High chance for shots to bounce off harmlessly, making damage unpredictable - Very limited availability - Awkward to use for the player - Short range Muon Charger Stats Small Mk1 Small Mk2 Medium Mk1 Medium Mk2 DPS 204 396 330 644 Effective DPS 142~ 277~ 231~ 450~ Damage Per Shot 3x 91 3x 176 3x 165 3x 322 Time For Full Firing Cycle 1.33s 1.33s 1.5s 1.5s Reload time 0.33s 0.33s 0.5s 0.5s Charge Time 1s 1s 1s 1s Stick Time 1s 1s 1s 1s Ricochet Chance 30% 30% 30% 30% Bullet Speed 1571m/s 1571m/s 1257m/s 1257m/s Max Range 2357m 2357m 3771m 3771m Dispersion 0.13° 0.13° 0.09° 0.09° Tracking Speed 58° 58° 30° 30° Heat Per Shot 225 225 387 387 Heat Per Second 169 169 260 260 Damage Until Overheat 12285 23760 12870 25116 Cooldown Speed 2000 2000 2000 2000 Cooldown Delay 1.13s 1.13s 1.13s 1.13s Reactivates At 7500 7500 7500 7500 Burst Ray Info The Burst Ray is a highly effective weapon against capital ships. Though not by quickly destroying them outright. The damage output of the Burst Ray is pretty pathetic. But it gains a gigantic damage multiplier against surface elements. Turrets, shield generators, and engines will be destroyed in just a few volleys, leaving the capital ship vulnerable and unable to defend itself. Against any other target, even light fighters, the Burst Ray will struggle to do any meaningful damage. It is highly specialized to strip capital ships of all their equipment. That is all it is good at. Outside of that specific niche, it is not very useful. The Burst Ray is the player's best friend in the early game if they come across a marauding Xenon K. A single fighter equipped with those can easily remove any threat from the destructive Xenon ship, leaving it utterly helpless against any force, no matter how small. A part of the damage ignores the shields and damages the hull directly, so don't worry about the shielding on surface elements. Advantages: - Very cheap compared to the power it provides against capitals - Extremely high damage against surface elements - Heat is not an issue for its singular purpose Disadvantages: - Extremely low damage output against ships - Only useful in destroying surface elements - Rather short range Burst Ray Stats Small Mk1 Small Mk2 Shield Burst DPS 20 +8 Hull 32 +21 Hull Hull Burst DPS 28 53 Shield Sustained DPS 18 +7 Hull 26 +16 Hull Hull Sustained DPS 25 42 Shield Damage Per Shot 11 +5 Hull 7 +5 Hull Hull Damage Per Shot 16 Hull 12 Hull Rate Of Fire 1.84/s 4.67/s Module Damage Increase 700% 1300% Burst Clip Size 3 7 Burst Clip Firerate 6/s 6/s Burst Clip Reload Time 1.5s 0.5s Max Range 2000m 1800m Dispersion 2.00° 2.00° Tracking Speed 180° 180° Heat Per Shot 108 108 Heat Per Second 199 504 Cooldown Speed 2000 2500 Cooldown Delay 1.13s 1.2s Reactivates At 7500 7500 Impulse Projector Info The Impulse Projector is the only weapon used by the Xenon fighters and corvettes. It is best compared to the Bolt Repeater Mk1 of both sizes, offering slightly improved damage output and similar heat efficiency while having faster, longer ranged and similary accurate projectiles. Being similar to a Mk1 weapon, the Impulse Projector is rather weak and isn't much of a threat, especially considering that Xenon fighters only come equipped with two of them. What makes them dangerous is the large number of Xenon fighters that swarm their target which somewhat nullifies the low damage. The result is a stream of accurate projectiles from all directions, pinning a target down, preventing travel drive, and ending in a death of thousand tiny cuts. Against fighters and mediums, the Impulse Projector is relatively effective, considering the amount of Xenon combat ships that tend to engage a target. But against most capital ships, it will hardly dent the shields. Advantages: - Very accurate - Relatively long range Disadvantages: - Low damage output - Low heat efficiency Impulse Projector Stats Small Mk1 Medium Mk1 Burst DPS 113 231 Sustained DPS 94 183 Damage Per Shot 18 28 Rate Of Fire 6.3/s 8.26/s Burst Clip Size 7 8 Burst Clip Firerate 13/s 22/s Burst Clip Reload Time 0.65s 0.65s Bullet Speed 2800m 2304m Max Range 3600m 5760m Dispersion 0.20° 0.14° Tracking Speed 101° 129° Heat Per Shot 54 52 Heat Per Second 340 429 Damage Until Overheat 3348 5404 Cooldown Speed 2000 2000 Cooldown Delay 1.13s 1.13s Reactivates At 9500 9500 Needler Gun Info The Needler Gun is a clear upgrade from the Impulse Projector, with each shot packing a heavier punch, boasting higher DPS, and featuring superior projectile speed, the Needler Gun outperforms the Impulse Projector in pretty much every aspect. While it may not quite rival the firepower of the S Pulse Laser Mk2, it still poses a significantly greater threat than the Impulse Projector. Fighter pilots beware! Currently, it appears exclusively outfitted on the new and rare Xenon F heavy fighter, carrying four Needlers. This configuration grants it much more firepower, something that Xenon fighters lacked until now. Advantages: - Very accurate - Relatively high damage per shot - Effective against most fighters and lesser protected mediums Disadvantages: - Heat Efficiency is rather bad - Below average damage per second Needler Gun Stats S Needler Gun Burst DPS 156 Sustained DPS 119 Damage Per Shot 40 Rate Of Fire 3.9/s Burst Clip Size 8 Burst Clip Firerate 4/s Burst Clip Reload Time 0.3s Bullet Speed 3400/s Max Range 3400 Dispersion 0.17° Tracking Speed 125° Heat Per Shot 120 Heat Per Second 468 Damage Until Overheat 3360 Cooldown Speed 2000 Cooldown Delay 1.13 Reactivates At 9500 Plasma Cutter Beam Info The Xenon Plasma Beam Cutter is a weapon with short duration but high burst damage capabilities. With its pin-point accuracy, it can heavily damage fighters, and do decent damage aginst medium-sized targets as well. However, repurposed from a construction tool, it carries significant drawbacks. Its firing range is notably limited for a weapon of its caliber, a consequence of its origin as a metal-cutting tool rather than a combat-oriented weapon. While it delivers accurate and powerful strikes, prolonged use leads to rapid overheating. Considering the lower than average cooling speed , the sustained damage output of multiple Plasma Cutters is quite sad and it will have a hard time trying to break the shield regeneration of capital ships. The Plasma Cutter Beam is found on the Xenon B, which mounts four of them. Advantages: - Perfect accuracy - Instant hit - High burst damage Disadvantages: - Very slow tracking speed, making dogfighting difficult - Lower than average cooling speed - Below average sustained damage output Plasma Cutter Beam Stats M Plasma Cutter Beam Burst DPS 240 Sustained DPS 212 Damage Per Shot 1200 Reload Time 5s Beam DPS 600 Beam Duration 2s Max Range 2750m Tracking Speed 15°/s Heat Per Shot 5000 Heat Per Second 1000 Damage Until Overheat 12000 Cooldown Speed 1500 Dooldown Delay 0.1s Reactivates At 6000 Kyon Emitter Info The Kyon Emitter of the Kha'ak was once a feared and devastating beam weapon that ripped capital ships and stations apart. But today, it has been left behind by technological advances and is one of the weakest weapons found in the galaxy. While the damage output is meager compared to modern weaponry, it shouldn't be underestimated. The Kha'ak swarm their target with countless fighters, and all that unavoidable beam damage begins to stack up quickly. Fighter pilots should try to avoid Kha'ak swarms as much as possible, lest they be focused down and destroyed surprisingly quickly. Against anything larger, the Kyon Emitter already shows its age and struggles to do any meaningful damage. Advantages: - Perfect accuracy - Instant hit Disadvantages: - Very Low damage output Kyon Emitter Stats Small Mk1 Medium Mk1 Burst DPS 72 115 Sustained DPS 64 107 Damage Per Shot 51 220 Reload Time 0.7s 1.9s Beam DPS 138 314 Beam Duration 0.3s 0.7s Max Range 2100m 4500m Heat Per Shot 138 204 Heat Per Second 194 106 Cooldown Speed 2000 2000 Cooldown Delay 1.13s 1.13s Reactivates At 7500 7500 Mining Laser Info The Mining Drill is a tool for mining, making it a naturally poor choice for combat. It deals minimal damage to non-asteroid targets. The most dangerous thing is that it blinds players when they get shot by them. Mining Laser Stats Small Mk1 Small Mk2 Medium Mk1 Medium Mk2 DPS 1 3 2 6 DPS Against Asteroids 300 900 600 1800 Reload Time 4s 4s 4s 4s Beam Duration 4s 4s 4s 4s Max Range 3000m 3000m 4364m 4364m Tracking Speed 90° 90° 90° 90° Boron Small Mk1 Boron Medium Mk1 Xenon Medium Mk1 DPS 2 4 2 DPS Against Asteroids 600 1200 600 Reload Time 4s 4s 4s Beam Duration 4s 4s 4s Max Range 3000m 4364m 3960m Tracking Speed 90° 90° 105° Interbranal Transducer Info Despite its fancy name, the Interbranal Transducer (Gesundheit!) is a relatively simple weapon. It has a slow rate of fire with hard-hitting projectiles that partially bypass shields. It is a relatively powerful weapon with good statistics across the board, but the heat efficiency leaves a bit to be desired. Having a fast projectile and very low dispersion, the Transducer is very potent against fighters. The DPS is high enough also to be a threat to medium-sized ships. With the shield penetrating damage, it can also deal with capital ships by quickly destroying turrets and shield generators. Only the heat efficiency leaves a bit to be desired, as the Transducer has a limited damage potential in each heat cycle. The biggest problem, though, is the availability. Only the players that participated in the Ventures Beta Season 2023 can access a reward fighter carrying two Transducers. They can't be produced or obtained any other way. If you remove the weapons from the fighter, they are gone for good. Advantages: - Good damage output - Excellent accuracy - Good projectile speed - Partially bypasses shields Disadvantages: - Bad heat efficiency Interbranal Transducer Stats Small Mk1 Shield Burst DPS 330 +58 Hull Hull Burst DPS 388 Hull Shield Sustained DPS 213 +38 Hull HullSustained DPS 251 Shield Damage Per Shot 363 +64 hull Hull Damage Per Shot 427 Rate Of Fire 0.909/s Bullet Speed 3770m/s Max Range 3694m Dispersion 0.04° Tracking Speed 165° Heat Per Shot 848 Heat Per Second 771 Shield Damage Until Overheat 4356 +768 hull Hull Damage Until Overheat 5124 Cooldown Speed 2000 Cooldown Delay 1.13s Reactivates At 9500 --- Split Vendetta Weapons --- Thermal Disintegrator Info The Thermal Disintegrator is the Split version of the Pulselaser with a faster rate of fire and the feature that some of the damage bypasses shields. It is a strange all-purpose weapon that can engage all kinds of targets but not super effectively. The fast rate of fire makes it viable against fighters, but the large spread of the projectiles and their slow speed make it still a bit of a struggle. It is pretty effective against medium targets, but the low heat efficiency on the Small version can be troublesome, requiring multiple cooldowns to take down a single target. Surprisingly, it might be most effective against capital ships as it can ignore their strong shielding and directly melt the hull underneath. It is also quite effective against surface elements thanks to the shield penetrating ability and the fact that turrets have very little hull strength. The Thermal Disintegrator is also one of, if not the cheapest, weapon in the game, making it very easy to mass produce. If you want a cheap weapon to slap on your fighter swarm and don't want to worry about target selection, the Thermal Disintegrator is a good choice. Advantages: - Large portion of the damage bypasses shields - Surprisingly effective against capital ships - Decent against fighters - Relatively high damage output against hull - Very cheap Disadvantages: - Slow projectiles make dogfighting more difficult - Large dispersion makes it less effective against fighters beyond 1km - Very bad heat efficiency for Small variant - Shield damage is a bit lacking Thermal Disintegrator Stats Small Mk1 Small Mk2 Medium Mk1 Medium Mk2 Shield Burst DPS 78 +31 hull 127 +71 hull 145 +32 hull 302 +55 hull Hull Burst DPS 109 198 177 357 Shield Sustained DPS 65 +26 Hull 96 +53 Hull 136 +30 Hull 252 +46 Hull Hull Sustained DPS 91 149 166 298 Shield Damage Per Shot 20 +8 hull 18 +10 hull 64 +14 hull 76 +14 hull Hull Damage Per Shot 28 28 78 90 Rate Of Fire 3.93/s 7.1/s 2.31/s 3.98/s Burst Clip Size 5 11 3 7 Burst Clip Firerate 7/s 8/s 10/s 7/s Burst Clip Reload Time 0.7s 0.3s 1.1s 0.9s Bullet Speed 1728m/s 1728m/s 1901m/s 1901m/s Max Range 2592m 2592m 4148m 4148m Dispersion 0.53° 0.50° 0.75° 0.69° Tracking Speed 165° 165° 106° 106° Stick Time 2s 3s 2s 3s Heat Per Shot 83 73 56 80 Heat Per Second 326 518 129 318 Shield Damage Until Overheat 2420 +968 hull 2466 +1370 hull 11392 +2492 hull 9500 +1750 hull Hull Damage Until Overheat 3388 3836 13884 11250 Cooldown Speed 2000 2000 2000 2000 Cooldown Delay 1.13s 1.13s 1.13s 1.13s Reactivates At 9500 9500 9500 9500 Neutron Gatling Info The Neutron Gatling is the Split variant of the Bolt Repeater. But somehow, they managed to make it oh so much worse. The Neutron Gatling is a downgrade in almost every regard. Don't be fooled by the high DPS numbers. You will hardly ever see them in practice due to the primary shortcoming of this weapon: the hilariously large spread of the bullets. You must plant your barrel right in the enemy's face to ensure all bullets hit. If the target is more than 400 meters away, don't bother firing; it is just a waste of time and heat. Even then, if all bullets hit the target by some miracle, the heat efficiency is so bad you might not even destroy your target before you overheat. The Neutron Gatling is not a good choice for extended fights either. It might perform better against capitals, but the lack of accuracy can be felt even there. The damage output might still not be enough though. If you want a high-damage, short-range weapon, try the Tau Accelerator. It is better in every single regard. Yes, even accuracy. Avoid using the Neutron Gatling as much as possible. Advantages: - Very high base damage per second Disadvantages: - Slow projectiles - Small variant is very expensive - Terrible heat efficiency - Very high heat generation - Extremely inaccurate Neutron Gatling Stats Small Mk1 Small Mk2 Medium Mk1 Medium Mk2 Burst DPS 136 276 238 473 Sustained DPS 96 192 163 321 Damage Per Shot 8 12 34 43 Rate Of Fire 17/s 23/s 7/s 11/s Bullet Speed 2160m/s 2160m/s 1728m/s 1728m/s Max Range 2700m 2700m 4320m 4320m Dispersion 1.28° 1.73° 0.92° 1.45° Tracking Speed 124° 124° 71° 71° Heat Per Shot 40 31 106 69 Heat Per Second 680 713 741 759 Damage Until Overheat 2000 3876 3230 6235 Cooldown Speed 2000 2000 2000 2000 Cooldown Delay 1.13s 1.13s 1.13s 1.13s Reactivates At/th] 9500 9500 9500 9500 [/tr][/table] Tau Accelerator Info Everyone likes shotguns. Every game has one. The Split turned the concept up to 11. The Tau Accelerator is a straight upgrade over the Shard Battery and easily the most powerful gun in the Split arsenal. Compared to the Shard Battery, the Tau Accelerator provides slightly higher damage output but slightly worse heat efficiency. The main difference is that it only fires three bullets per shot but at a much faster rate. This gives the pilot more control over the heat generation. Otherwise, it is the same as the Shard Battery and is employed similarly. You speed in, blast a target apart with insane damage output, and then boost away again to cool down and prepare for the next attack. Avoid extended dogfights as the heat generation is too high for that. Advantages: - Very high damage output - Mk2 variants can threaten capital ships - Fast projectiles Disadvantages: - Extreme heat generation - Very high dispersion, only effective at close range - Low total damage per heat cycle Tau Accelerator Stats Small Mk1 Small Mk2 Medium Mk1 Medium Mk2 Burst DPS 270 524 414 810 Sustained DPS 146 287 226 446 Damage Per Shot 3x 30 3x 50 3x 69 3x 10⁸ Rate Of Fire 3/s 3.5/s 2/s 2.5/s Bullet Speed 2592m/s 3110m/s 3266m/s 3919m/s Max Range 2074m 2074m 2939m 2978m Dispersion 1.25° 1.00° 1.25° 1.00° Tracking Speed 107° 107° 71° 71 Heat Per Shot 450 384 648 519 Heat Per Second 1350 1344 1296 1297 Damage Until Overheat 2070 4050 3312 6480 Cooldown Speed 2000 2000 2000 2000 Cooldown Delay 1.13s 1.13s 1.13s 1.13s Reactivates At 9500 9500 9500 9500 Boson Lance Info The Boson Lance is the Split version of the Mass Driver and could be considered a sidegrade. It offers a slightly increased damage output at the cost of reduced range. Otherwise, the two weapons are pretty much identical. As with the Mass Driver, this is a highly impractical and overpriced weapon and shares all the downsides. The Boson Lance has no tracking and is fixed in place, making it very hard to hit small and moving targets. Focusing all guns on a single point is also impossible. The DPS is still lacking, and capital ships aren't viable targets. Also note that because of how the heat mechanic works, the Boson Lance's cooldown time gets multiplied for each gun you use. Using 2x Boson Lance Mk2 increases the cooldown time to 29 seconds. 3x to 43 seconds, and so on. Making this weapon work is very difficult, and the result is generally disappointing. There are much better choices out there, and all of them will outperform the Boson Lance in damage output, cost-effectiveness, and practicality. Trivia: The ability to hold a shot and let the weapon cool down, as described in-game, has been removed in update 6.20. The Boson Lance will no longer cool down while holding a shot ready to fire. This applies to the Mass Driver as well. Advantages: - Perfect accuracy - Extremely fast projectile - Long range Disadvantages: - No tracking. The entire ship has to be maneuvered to aim - low damage per second - Extremely high initial heat generation. Can only fire one shot - Extremely slow heat dissipation and therefore rate of fire - Extremely expensive weapon. Only the Mass Driver and Meson Stream are more expensive - Damage per shot is not sufficient to offset the drawbacks, needing multiple hits to destroy even light fighters Boson Lance Stats Small Mk1 Small Mk2 Medium Mk1 Medium Mk2 DPS 107 206 171 331 Damage Per Shot 1875 3000 3000 4800 Time For Full Firing Cycle 17.5s 14.5s 17.5s 14.5s Reload Time 1.5s 1.5s 1.5s 1.5s Charge Time 0.1/s 0.1/s 0.1/s 0.1/s Bullet Speed 10000m/s 10000m/s 10000m/s 10000m/s Max Range 5000m 5000m 7000m 7000m Initial Heat 8000 8000 8000 8000 Cooldown Speed 500 600 500 600 Cooldown Delay 4s 3s 4s 3s Reactivates At 1000 1000 1000 1000 --- Cradle Of Humanity Weapons --- Terran Pulse Laser Info The Terran Pulse Laser is a straight upgrade to the standard Pulse Laser, offering higher damage output and faster projectiles. The main difference is the slower rate of fire but higher damage per shot. But otherwise, it very much fills the same role as the primary anti-fighter weapon for space superiority fighters. The heat generation is also somewhat higher, but not too much of a concern. Use it just like the regular Pulse Laser. Despite the in-game description saying the Terran Pulse Laser can only be fitted to Terran ships with High Energy equipment slots, this is not the case, The Terran Pulse Laser can be mounted on any S and M ship except those manufactured by the Boron. Advantages: - Good damage output - Good heat efficiency - Very accurate - Very fast projectile Disadvantages: - Less heat efficienty than standard Pulse Laser - Projectiles are very small, causing a surprising amount of misses. Note: Both the Small and Medium Mk1 versions have a firing rate equal to or lower than the reload time of the burst clip. The burst clip is disabled unless the weapons are modified at a workbench, and the rate of fire is increased. Terran Pulse Laser Stats Small Mk1 Small Mk2 Medium Mk1 Medium Mk2 Burst DPS 124 198 183 319 Sustained DPS 104 170 153 274 Damage Per Shot 62 99 122 195 Rate Of Fire 2/s 2/s 1.5/s 1.64/s Burst Clip Size 2 4 2 4 Burst Clip Firerate 2/s 2.3/s 1.5/s 1.725/s Burst Clip Reload Time 0.5s 0.7s 0.5s 0.7s Bullet Speed 6220m/s 6220m/s 6842m/s 6842m/s Max Range 2737m 2737m 4394m 4394m Dispersion 0.09° 0.10° 0.06° 0.07° Tracking Speed 160° 160° 100° 100° Heat Per Shot 145 127 194 168 Heat Per Second 290 254 293 275 Damage Until Overheat 4278 7821 6344 11700 Cooldown Speed 2000 2000 2000 2000 Cooldown Delay 1.13s 1.13s 1.13s 1.13s Reactivates At 9500 9500 9500 9500 Proton Barrage Info The Proton Barrage is a straight upgrade of the Bolt Repeater it is based on, providing a higher damage output, higher accuracy, faster projectiles, and improved heat efficiency. This weapon will shred fighters, chew through mediums, and put a noticeable dent into a capital ship's shields. The Proton Barrage is easily one of the best weapons in the game, though this comes with some pretty significant downsides. It is pretty expensive, making it relatively costly to outfit an entire group with this weapon, and it also can only be fitted to Terran ships, requiring their High-Energy equipment slots. Additionally, only the Terrans offer the Mk2 version, as the Pioneers are limited to Mk1. Advantages: - Very high damage output, Mk2 variant can threaten capital ships - Good heat efficiency - Good accuracy - Fast projectile Disadvantages: - Rather expensive - Can only be mouned on Terran ships Proton Barrage Stats Small Mk1 Small Mk2 Medium Mk1 Medium Mk2 Burst DPS 144 281 228 444 Sustained DPS 112 216 179 344 Damage Per Shot 42 95 52 113 Rate Of Fire 3.43/s 2.96/s 4.4/s 3.93/s Burst Clip Size 18 20 21 24 Burst Clip Firerate 4/s 3.3/s 5.3/s 4.5/s Burst Clip Reload Time 1s 1s 1s 1s Bullet Speed 3600m/s 3600m/s 2880m/s 2880m/s Max Range 2646m 2646m 4236m 4236m Dispersion 0.17° 0.14° 0.23° 0.19° Tracking Speed 120° 120° 70° 70° Heat Per Shot 132 161 100 117 Heat Per Second 452 476 440 459 Damage Until Overheat 3192 5985 5200 9718 Cooldown Speed 2000 2000 2000 2000 Cooldown Delay 1.13 1.13 1.13 1.13 Reactivates At 9500 9500 9500 9500 Meson Stream Info The Meson Stream is the Terran variant of the Paranid Mass Driver and Split Boson Lance. It increases the damage output even further, to the point it might actually be useful. The Meson stream fires a beam instead of a projectile, removing the need to lead the target and making scoring hits much more manageable. It also carries one of the highest single-shot damage of any weapon in the game. Only missiles and the Asgard Beam can deliver more damage in a single salvo. The Medium Mk2 variant especially delivers massive damage, enough to potentially one-shot even some large targets! This makes the Meson Stream viable as an alpha-strike weapon. There are two significant downsides with this weapon, though. The first is that it has the same lousy heat dissipation, resulting in a very low rate of fire. Up to 80 seconds cooldown time if using four guns! The second is its insane price. Only the Asgard Beam is more expensive. This makes using the Meson Stream somewhat questionable since four of them cost as much as a small fleet. Advantages: - Perfect accuracy - Instant hit - Extremely high damage per shot Disadvantages: - No tracking. The entire ship has to be maneuvered to aim - Extremely high initial heat generation. Can only fire one shot - Extremely slow heat dissipation and therefore rate of fire - Extremely expensive. Meson Stream Stats Small Mk1 Small Mk2 Medium Mk1 Medium Mk2 DPS 158 308 264 515 Damage Per Shot 2911 5675 6282 12250 Time For Full Firing Cycle 21.5s 21.5s 23.8s 23.8s Reload Time 1.3s 1.3s 2.05s 2.05s Beam Damage Per Second 2911 5675 3590 7000 Beam Duration 1s 1s 1.75s 1.75s Max Range 4200m 4200m 6800m 6800m Heat Per Second 3000 3000 2000 2000 Initial Heat 6500 6500 6500 6500 Cooldown Speed 500 500 500 500 Cooldown Delay 0.13s 0.13s 0.13s 0.13s Reactivates At 2000 2000 2000 2000 --- Tides Of Avarice Weapons Astrid Main Gun Info The Astrid's primary weapon is an upscaled version of the small Mk1 Pulse Laser. It has the same damage output but a slightly faster projectile and more range. Aside from being very heat efficient, there isn't much to it. The firepower is very lacking for a weapon of this size. That is unsurprising, considering it is mounted on a Yacht, not a combat ship. You won't be destroying anything tougher than a light fighter with this. Advantages: - Very heat efficient - Relatively long range Disadvantages: - Very low damage output, same as S Mk1 Pulse Laser - Only available for the Astrid as the only option - Because of how the burst clip is set up, reload boosting modifications like Cowboy have no effect. Astrid Main Gun Stats Astrid Cannon Burst DPS 100 Sustained DPS 94 Damage Per Shot 10 Rate Of Fire 10/s Burst Clip Size 1 Burst Clip Firerate 10/s Burst Clip Reload Time 0.1s Bullet Speed 4500m Max Range 4950m Dispersion 0.30° Tracking Speed 106° Heat Per Shot 10 Heat Per Second 100 Damage Until Overheat 10000 Cooldown Speed 2000 Cooldown Delay 1.13s Reactivates At 9500 --- Kingdom End Weapons --- Phase Gun Info The Phase Gun is the primary anti-hull weapon of the Boron Navy and plays a critical role in actually destroying the target after it has been stopped and stripped of all it's shields by the Ion Gatling. The two weapons go hand-in-hand. Or tentacle-in-tentacle i suppose. The Phase Gun is a very straight forward weapon designed to do one thing, destroying hulls. And it does that very well. For this it of course offers very high damage output against hull, but struggles against shields. While the rate of fire is a bit on the lower side, each shot hits relatively hard. The weapon is also very accurate, has very good heat efficiency and a reasonable fast and long ranged projectile. Just pair it up with an Ion Gatling and rip enemy fighters apart. Simple and effective. Advantages: - Very high hull damage - Very Good heat efficiency - Very good accuracy - Good projectile speed and range Disadvantages: - Very low damage against shields - Can only be fitted to Boron fighters Phase Gun Stats Phase Gun Shield Burst DPS 107 Hull Burst DPS 240 Shield Sustained DPS 95 Hull Sustained DPS 213 Shield Damage Per Shot 64 Hull Damage Per Shot 144 Rate Of Fire 1.67/s Burst Clip Size 10 Burst Clip Firerate 2/s Burst Clip Reload Time 1.5s Bullet Speed 2800m/s Max Range 3192m Dispersion 0.15° Tracking Speed 165° Heat Per Shot 120 Heat Per Second 200 Shield Damage Until Overheat 5376 Hull Damage Until Overheat 12096 Cooldown Speed 2000 Cooldown Delay 1 Reactivates At 9500 Arc Gun Info The Arc Gun is the general-purpose weapon of the Boron Navy for when you don't want to mess around with specialized anti-shield or anti-hull weapons. The Arc Gun deals respectable damage to both, but that comes at a severe cost of heat efficiency, limiting its usefulness in extended fights. The Arc Gun has a fast projectile and is one of the most accurate guns in the game, but the range is pretty short, just a hair over 2km. The Arc Gun has a special effect that reduces the target's mobility with each hit, reducing its ability to turn and dogfight. Generally, it isn't as valuable as the Ion Gatling's engine disruption since the Boron fighters are the most maneuverable ones in the game and can out-turn any other fighter already. Advantages: - Good damage output - Excellent accuracy - Very good projectile speed - Mobility disruption reduces targets ability to maneuver and turn Disadvantages: - Bad heat efficiency - Very short range Arc Gun Stats Arc Gun Shield Burst DPS 225 hull Burst DPS 180 Shield Sustained DPS 167 Hull Sustained DPS 134 Shield Damage Per Shot 150 Hull Damage Per Shot 120 Rate Of Fire 1.5/s Bullet Speed 4000m/s Max Range 2080m Dispersion 0.02° Tracking Speed 100° Heat Per Shot 350 Heat Per Second 525 Shield Damage Until Overheat 4350 Hull Damage Until Overheat 3480 Cooldown Speed 2000 Cooldown Delay 1 Reactivates At 9500 Arc Gun Mobility DisruptionThe effect stacks with each hit. Mobility Debuff vs Small Mobility Debuff vs Medium Mobility Debuff vs Large Mobility Debuff vs Xtra Large Reduction Amount 6% 4% 2% 2% Duration 6s 3s 2s 2s Ion Gatling Info The Ion Gatling is the primary space superiority weapon for the fighter pilots of the Boron Navy. With a very high rate of fire and shield damage, it will chew through the shields of enemy fighters in seconds. Medium-sized targets should be wary as well. The damage output is even high enough to threaten capital ships. The Ion Gatling is also rather heat efficient, allowing pilots to fire for extended periods. The accuracy is also excellent. The only real downside is the low damage against the exposed hull of a target. While the Ion Gatling will strip shields very quickly, actually destroying the target is where it struggles. This makes it a natural choice to pair it with the Phase Gun to deal with the target's armor plating. The one thing that turns the Ion Gatling from a good weapon into a deadly one is its ability to slow down the target. Each projectile that hits the target reduces its maximum speed, and the effect stacks with each hit. This will turn mobile enemy dogfighters into sitting ducks, unable to move. Even medium ships get their engines disrupted, though to a lesser degree. This ability allows for devastating one-two-punch combos involving heavy missiles or other heavy weaponry. Do not underestimate this ability. Once the Boron catch a target, it won't be able to escape. Advantages: - Very high shield damage, can threaten capital ships - Good heat efficiency - Very good accuracy - Good projectile speed and range - Engine disruption leaves targets completely helpless Disadvantages: - Very low damage against exposed hull - Can only be fitted to Boron fighters Ion Gatling Stats Ion Gatling Shield Burst DPS 267 Hull Burst DPS 94 Shield Sustained DPS 229 Hull Sustained DPS 80 Shield Damage Per Shot 40 Hull Damage Per Shot 14 Rate Of Fire 6.68/s Burst Clip Size 36 Burst Clip Firerate 9/s Burst Clip Reload Time 1.5s Bullet Speed 3200m/s Max Range 3200m Dispersion 0.2° Tracking Speed 125° Heat Per Shot 40 Heat Per Second 261 Shield Damage Until Overheat 10000 Hull Damage Until Overheat 3600 Cooldown Speed 2000 Cooldown Delay 1.13 Reactivates At 9500 Ion Gatling Speed DisruptionThe effect stacks with each hit. Speed Debuff vs Small Speed Debuff vs Medium Reduction Amount 3% 1.5% Duration 3s 3s Phase Cannon Info The Phase Cannon is the big brother of the S Phase Gun and the primary anti-hull weapon of the Boron Navy and plays a critical role in actually destroying the target after it has been stripped of all its shields. The Phase Cannon is a very straightforward weapon designed to do one thing: destroying hulls. And it does that very well. As with the Phase Gun, the Phase Cannon struggles greatly against shields. Maybe even more so comparatively. Against fighters, it may be sufficient since most of them have weak shielding. But anything larger will prove troublesome without any anti-shield support. The weapon is also very accurate, has excellent heat efficiency, and fires a fast and long-ranged projectile. Just pair it up with fighters carrying Ion Gatling and rip enemy fighters and corvettes apart. Simple and effective. Advantages: - High hull damage - Good heat efficiency - Very good accuracy - Good projectile speed and range Disadvantages: - Very low damage against shields - Can only be fitted to Boron mediums Phase Cannon Stats Phase Cannon Shield Burst DPS 128 Hull Burst DPS 360 Shield Sustained DPS 100 Hull Sustained DPS 281 Shield Damage Per Shot 170 Hull Damage Per Shot 480 Reload Time 1.33s Bullet Speed 3250m/s Max Range 4875m Dispersion 0.2° Tracking Speed 100° Heat Per Shot 500 Heat Per Second 375 Shield Damage Until Overheat 3400 Hull Damage Until Overheat 9600 Cooldown Speed 2000 Cooldown Delay 1.13 Reactivates At 9500 Ion Pulse Railgun Info The Ion Pulse Railgun is the Boron variant of the Mass Driver and Boson Lance. But unlike those, the Railgun is actually usable. Quite effective even. As a sniper-type weapon, it, of course, comes with high-speed projectiles, long-range and pinpoint accuracy. Unlike the others, though, it can fire up to 5 shots before overheating and can track a target! It also comes with the standard heat dissipation rate! This makes it leagues more effective and quite potent in combat. And that despite the damage per shot being lower than the Mass Driver. Even though it can track targets, the tracking speed is still very slow, and engaging targets at range is preferable. The Ion Pulse Railgun is effective against most targets. Fighters will be left on low health if not outright destroyed by a single 4-gun salvo, mediums take a heavy beating, and sniping the turrets of capital ships and stations is also very easy and effective with this weapon. Beating a capital ship's shield regeneration might still be difficult. The Ion Pulse Railgun is the only actually effective sniper weapon in the game, and it performs that role very well. Sadly, it is only effective on a single ship, the Boron Hydra. The Boron Thresher only has a single weapon slot, which somewhat limits the potential of this weapon. No other ship in the game can mount this weapon. Advantages: - Good damage output - Excellent accuracy - Very good projectile speed - Very long range - Suprisingly good heat efficiency - Can track targets unlike other snipers Disadvantages: - Limited damage output against hull of medium and larger targets - Very slow tracking speed - Only effective on one ship in the entire game, the Boron Hydra. Ion Pulse Railgun Stats Ion Pulse Railgun Shield Burst DPS 473 Hull Burst DPS 307 Shield Sustained DPS 284 Hull Sustained DPS 184 Shield Damage Per Shot 1420 Hull Damage Per Shot 920 Reload Time 3s Bullet Speed 8000m/s Max Range 8800m Dispersion 0.1° Tracking Speed 20° Heat Per Shot 2000 Heat Per Second 666 Shield Damage Until Overheat 7100 Hull Damage Until Overheat 4600 Cooldown Speed 2000 Cooldown Delay 2s Reactivates At 4000 Ion Atomiser Info The Ion Atomiser is a peculiar weapon with many things going on. Let's start with the main feature: The timed fuse. The projectiles fired by this weapon will explode after they travel the distance the target was at at the moment of firing. For example, if the target is 2km away when firing, the projectiles will explode after traveling 2km. As the in-game description states, this makes hitting fighters very difficult as the projectiles tend to explode in front of or behind the target. This usually results in complete misses. Against medium targets, the Ion Atomiser is much more effective simply because they are so much larger. Direct hits are more likely and deliver a heavy punch. The engine disruption is also strong enough to prevent the target from escaping. However, the low hull damage output makes it difficult to destroy the target. Similar to the Ion Gatling, pairing the Ion Atomiser with the Phase Cannons is a good idea. Against large targets, the primary focus should be removing turrets, which the Ion Atomiser is very good at. Turrets have little hull strength, and most of their health comes from shields. You can also fire from cover and hit turrets with the explosion, thanks to the timed fuse. Aiming for the primary shield generators is also a good idea as that would multiply the damage of the explosive part, as it hits multiple objects sharing the same shield health. Advantages: - Very high shield damage, can threaten capital ships - Good heat efficiency - Engine disruption slows down targets of all sizes - Very effective against turret groups - Timed fuse allows for trick shots around corners Disadvantages: - Very low damage against exposed hull - Can only be fitted to Boron corvette and gunship - Timed fuse makes hitting fighters very difficult - Very low accuracy Ion Atomiser Stats Ion Atomiser Shield Burst DPS 463 Hull Burst DPS 178 Shield Sustained DPS 380 Hull Sustained DPS 146 Shield Damage Per Shot 200 Hull Damage Per Shot 100 Explosive Shield Damage Per Shot 320 Explosive Hull Damage Per Shot 100 Rate Of Fire 0.89/s Burst Clip Size 4 Burst Clip Firerate 1/s Burst Clip Reload Time 1.5s Bullet Speed 1500m/s Max Range 4650m Dispersion 1° Tracking Speed 106° Blast Radius 100m Heat Per Shot 350 Heat Per Second 311 Shield Damage Until Overheat 15080 Hull Damage Until Overheat 5800 Cooldown Speed 2000 Cooldown Delay 1.13 Reactivates At 9500 Ion Atomiser Speed DisruptionThe effect stacks with each hit. Speed Debuff vs Small Speed Debuff vs Medium Speed Debuff vs Large Speed Debuff vs Xtra Large Reduction Amount 10% 7% 1% 1% Duration 6s 5s 3s 3s --- Capital Ship Main Batteries --- Behemoth Main Battery Info The main battery of the Behemoth-class Destroyer is easily the best one available in the base game and the second or third best in the entire game, only behind the Terran main battery and, depending on your view, the Rattlesnake main battery. It fires accurately in three-shot bursts, and its sound damage output and excellent heat efficiency result in a lot of damage delivered before an overheat occurs. Overall, this makes the Behemoth main battery (and the ship) one of the most cost-effective destroyers to siege down stations, if not the most cost-effective. Advantages: - Good damage output - Best in class heat efficient - Very accurate - Outranges Large Plasma turrets Disadvantages: - Slow tracking can make hitting fighters difficult Behemoth Main Battery Stats Behemoth Burst DPS 2122 Sustained DPS 1668 Damage Per Shot 2588 Rate Of Fire 0.82/s Burst Clip Size 3 Burst Clip Firerate 1.2/s Burst Clip Reload Time 2s Bullet Speed 1659m/s Max Range 10452m Dispersion 0.03° Tracking Speed 32° Heat Per Shot 486 Heat Per Second 398 Damage Until Overheat 54348 Cooldown Speed 2000 Cooldown Delay 1.13s Reactivates At 9500 Phoenix Main Battery Info Despite the in-game description stating that it is very similar to the Argon Behemoth main battery, this couldn't be further from the truth. This is just another example of not trusting the Teladi advertisements. The Phoenix main battery is easily one of the worst, if not the worst, of all destroyer main batteries. It even falls below the Boron Ray's Ion Beam. While the heat generation is not too bad on paper, the low damage output results in Phoenix's having the worst heat efficiency. A complete heat cycle delivers less damage than a single shot from the Boron Ray and does less than half the damage of most other destroyer main batteries. The only saving grace of the Phoenix Main battery is that it keeps the 10km range, enabling it to engage and besiege stations safely. However, it may take a while until results become visible. Advantages: - Very accurate - Outranges Large Plasma turrets Disadvantages: - Slow tracking can make hitting fighters difficult - Worst in class damage output - Worst in class heat efficiency despite the low heat generation Phoenix Main Battery Stats Phoenix Burst DPS 1683 Sustained DPS 1163 Damage Per Shot 1169 Rate Of Fire 1.44/s Bullet Speed 1659m/s Max Range 10452m Dispersion 0.03° Tracking Speed 29° Heat Per Shot 475 Heat Per Second 422 Damage Until Overheat 25718 Cooldown Speed 2000 Cooldown Delay 1.13s Reactivates At 9500 Odysseus Main Battery Info The main guns of Odysseus behave more like oversized sniper rifles, able to tear medium ships apart, obliterate fighters, and effectively destroy the turrets on enemy capital ships. While the sustained damage output is relatively low (only beating the Teladi Phoenix) all that damage is very frontloaded and delivered in just a few salvos. This can result in devastating alpha strikes, especially when using multiple Odysseus if one can get them to behave. This main battery benefits greatly from the Odysseus's high speed, allowing for hit-and-run attacks and sniping key surface elements. However, the lack of sustained damage output and heat efficiency can cause some trouble in a direct confrontation. Advantages: - High damage per shot - Best in class accuracy - Outranges Large Plasma turrets Disadvantages: - Low sustained damage per second - Bad heat efficiency Odysseus Main Battery Stats Odysseus Burst DPS 2001 Sustained DPS 1219 Damage Per Shot 5669 Reload Time 2.833s Bullet Speed 2157m/s Max Range 10871m Dispersion 0.01° Tracking Speed 35° Heat Per Shot 2301 Heat Per Second 812 Damage Until Overheat 28345 Cooldown 2000 Cooldown Delay 1.13s Reactivates At 9500 Rattlesnake Main Battery Info The Rattlesnake's main battery is quite powerful, providing the second-highest damage output of all destroyer main batteries. However, it suffers from some heat efficiency and range problems. Technically, it barely outperforms the Behemoth main battery in sustained damage output. However, the Rattlesnake can mount four of them, elevating its performance to a different level. With four of them, a Rattlesnake has the highest burst damage output of all destroyers and the second highest damage maximum per heat cycle, only behind the hard-to-acquire Syn-class destroyer. The only downside is its lack of range, almost 4km less than other destroyer main batteries. As such, it isn't as well suited to engaging Commonwealth stations. Xenon stations are still safe to engage since the Rattlesnake will outrange the Graviton turrets by slightly more than 1km. That is not an awful lot of wiggle room, though. Advantages: - Second best damage output - Four guns on the Rattlesnake results in highest burst dps of all destroyers - Good heat efficiency - Good accuracy Disadvantages: - Lowest range of all destroyer guns, doesn't outrange Large Plasma turrets Rattlesnake Main Battery Stats Rattlesnake Burst DPS 2717 Sustained DPS 1801 Damage Per Shot 1608 Rate Of Fire 1.69/s Burst Clip Size 5 Clip Firerate 2.04/s Burst Clip Reload Time 1s Bullet Speed 1327m/s Max Range 6688m Dispersion 0.15° Tracking Speed 32° Heat Per Shot 464 Heat Per Second 784 Damage Until Overheat 35376 Cooldown Speed 2000 Cooldown Delay 1.13s Reactivates At 9500 Terran Main Battery Info The Terran battery is easily the best, with the highest damage output, compensating for the lack of large plasma turrets in the Terran arsenal. It fires a near-constant stream of medium-damage projectiles, and that damage piles up quickly, resulting in the game's most damaging destroyer main battery. With a very high damage output, the same excellent heat efficiency as the Behemoth's main guns, and a fast rate of fire, the Terran main battery is very flexible. It can effectively engage any target, whether a fighter, corvette, or capital ship. The only downside is that it has the same range as the large plasma turrets of the Commonwealth factions, which can make besieging their stations a bit tricky. The Terran main battery is also the only one to be used on multiple ships, the Osaka, Syn, and Asgard. Advantages: - Highest damage output of all destroyer guns - Very Good heat efficiency - Three guns on the Syn result in highest sustained dps of all destroyers - On the Syn, also has highest maximum damage in a heat cycle Disadvantages: - Lower range than other destroyer weapons, same range as Large Plasma turrets - Least accurate of all destroyer main batteries Terran Main Battery Stats Terran Burst DPS 3250 Sustained DPS 2357 Damage Per Shot 988 Rate Of Fire 3.29/s Burst Clip Size 18 Burst Clip Firerate 4.896/s Burst Clip Reload Time 2s Bullet Speed 1440m/s Max Range 8893m Dispersion 0.21° Tracking Speed 30° Heat Per Shot 183 Heat Per Second 602 Damage Until Overheat 54340 Cooldown Speed 2000 Cooldown Delay 1.13s Reactivates At 9500 Ray Main Battery Info The Boron Ray's Ion Orojector is quite a complex weapon, both good and bad. It has the longest range of all destroyer weapons, allowing it to besiege any station safely. It is the only destroyer main battery that outranges the Heavy Dumbfire Mk2 missile, 11km vs 10km range. The high accuracy of the beam also allows it to swat down fighters relatively easily if one can line up the gun. Medium ships will also have a bad day but usually need at least two shots to go down. Being a beam also makes it very easy to snipe surface elements. The damage per shot is also relatively high, delivering more shield damage in a single beam than the Phoenix or Odysseus main batteries in their entire heat cycle. Lastly, the slowdown effect on enemy ships is quite significant. It can quickly stop any ship, even capital ships, dead in its tracks and make it unable to move at all, especially if multiple Ray stagger their beams. However, all this good stuff comes with one significant downside. The damage per second is relatively poor. The Ray only gets a single main gun and has even less DPS than a Phoenix. Just two heavy fighters with 4x Blast Mortar or Muon Charger deliver more sustained damage. A single heavy fighter with Blast Mortar deals more hull DPS than the Ion Projector. Moreover, unlike other beam weapons, the Ion Projector doesn't hit instantly and has a small travel time, reducing the damage it deals at maximum range even further. The Ion Projector will not destroy anything quickly. Xenon Stations, in particular, will take a very long time to dismantle. Use the Ion Projector to pin down enemy capital ships and make them easy targets for your torpedo bombers to rip apart. Or very, slowly destroy enemy stations from a safe distance. Advantages: - Perfect accuracy - Longest range of all destroyer main batteries - Very strong slowdown effect, can keep ships pinned in place - High damage per shot Disadvantages: - Slow tracking can make hitting fighters difficult - Very slow rate of fire results in very low dps - Extremely bad hull damage output. - Loses up to 12.5% of damage output at max range Ray Main Battery Stats Ion Projector Shield DPS 1947 Hull DPS 1067 Shield Damage Per Shot 29200 Hull Damage Per Shot 16000 Time For Full Firing Cycle 15s Charge Time 4s Beam Shield DPS 7300 Beam Hull DPS 4000 Beam Duration 4s Max Range 11000m Tracking Speed 10° Heat Per Shot 10000 Heat Per Second 2500 Cooldown Speed 2000 Cooldown Delay 2s Reactivates At 1 Ion Projector Speed DisruptionThe effect stacks with each hit. The beam hits 10x per second. Speed Debuff vs Small Speed Debuff vs Medium Speed Debuff vs Large Speed Debuff vs Xtra Large Reduction Amount 20% 10% 3% 3% Duration 7s 7s 10s 8s Asgard Main Battery Info Say "Hello" to the most powerful gun in the game, And the most powerful gun ever to be put into the hands of the Players in the history of X. (Except the Phased Shockwave Generator, maybe) There isn't too much to say about the gun. I know why you are looking at this page. You want to see the big damage numbers. With almost a million damage per shot, the Fusion Beam Cannon can destroy nearly every ship in the game in a single shot. The only exceptions are the Xenon I Battleship, which will survive with a sliver of health left, and the Boron Shark, which will survive with about half its hull left intact. It still takes four shots to destroy a Xenon Station Module, though. This is the ultimate siege weapon. With a 14 km range, it outranges any weapon that can be placed on a station. Against non-Xenon stations, a well-controlled shot can destroy multiple modules. It will make all your capital ship and station problems simply...disappear. However, this weapon is extremely late-game and very expensive to acquire because you can't just buy it- or rather, the Asgard that carries the Fusion Beam Cannon. You need to purchase the blueprints for the ship, the gun, engines, thrusters, and the XL Fabrication module and build it yourself, which will easily set you back over a billion credits. But a bold individual may be able to convince the captain of an Asgard to hand over their ship—either one belonging to the Intervention Corps Fleets or one defending humanity's home, Earth. Advantages: - Perfect accuracy - Longest range of all guns in the game - Stupidly high damage per shot. Can destroy all but two ships in a single shot. - Extremely high DPS despite the long reload Disadvantages: - No tracking, the entire ship has to be moved to aim - Extremely long cooldown time - Extremely expensive to obtain Asgard Main Battery Stats Asgard Beam DPS 12242 Damage Per Shot 954931 Time For Full Firing Cycle 78s Beam DPS 330246 Beam Duration 2.89s Max Range 14000m Heat Per Shot 10000 Heat Per Second 3460 Cooldown Speed 133 Dooldown Delay 0.13s Reactivates At 2000 Erlking Main Battery Info The main battery of the Erlking-class battleship is a bit of a letdown for how much of a hassle it is to acquire. The damage output isn't too bad, both the DPS and damage per shot. But in the end, it only equals about one and a half Behemoth's worth of firepower. The charging mechanic also makes it a bit awkward to operate and usually results in slightly less DPS than on paper simply because of the delayed reaction times of biological creatures. The heat efficiency is pretty good, allowing the Erlking to deliver as much damage in a single heat cycle as the four guns on the Rattlesnake. However, the DPS is significantly less, so delivering that damage potential will take much longer. However, all that only comes into play if you can actually use the gun. Because it is so huge, half of the Erlking's entire size is just the gun. It is very easily destroyed and rendered inoperable. The only way to obtain this gun (and all other Erlking-specific equipment) is to find the blueprints in data vaults randomly placed in the Windfall and Avarice sectors. And they can be very troublesome to find. Then you have to get the blueprints for at least an XL Maintenance Bay to refit the Erlking. Considering all this work to get the weapon, it is somewhat underwhelming. Don't get me wrong, it is a pretty good weapon... if it hasn't been destroyed yet again. It's just underwhelming for the effort that is needed to acquire. Advantages: - High damage per second - High damage per shot - Very good accuracy - Outranges Large Plasma turrets - Very good heat efficiency Disadvantages: - Slow tracking can make hitting fighters difficult - Very large size and unshielded, easily destroyed - Charging mechanic can be a bit awkward to use - Extremely annoying to obtain Erlking Main Battery Stats Erlking Cannon Burst DPS 4807 Sustained DPS 3705 Damage Per Shot 12979 Reload Time 1.7s Charge time 1s Max Range 9221m Dispersion 0.03 Heat Per Shot 915 Heat Per Second 338 Cooldown Speed 2000 Cooldown Delay 1.13s Reactivates At 9500 Ravager Main Battery Info The Ravager's primary weapon, the fearsome Kyon Emitter, is a force to be reckoned with. It delivers devastating damage, capable of reducing an average destroyer to a cloud of debris in seconds. Larger ships may withstand the Kyon Emitter's onslaught for a few seconds longer but will still suffer severe damage. It's range is also on par with the Asgard's main battery, sharing the longest range of any non-missile weapon in the game. If a Ravager starts turning its Kyon Emitter toward you, you better make sure you are very quickly somewhere else. Fortunately, the Kyon Emitter has a lengthy recharge time, providing a window of opportunity for large groups of ships to mount an effective counterattack against the Ravager while its weapon is offline. Advantages: - Perfect accuracy - Longest range of all guns in the game, tied with the Asgard - Extremely high damage per shot. Can destroy most ships in a single shot. - Extremely high DPS despite the long reload Disadvantages: - No tracking, the entire ship has to be moved to aim - Very long cooldown time Ravager Main Battery Stats Ravager Beam DPS 18462 Damage Per Shot 360000 Time For Full Firing Cycle 19.5s Beam DPS 90000 Beam Duration 4s Beam Charge Time 5.5s Beam Reload Time 10s Max Range 14000m Heat Per Shot 8000 Heat Per Second 2000 Cooldown Speed 1000 Dooldown Delay None Reactivates At 1 --- Medium Turret Weapons --- Medium Pulse Turret Info The Pulse Turret is the basic entry-level turret and is freely available from all factions without any reputation requirements. The accuracy is on the average side of things, with a solid enough projectile speed, so a good number of the near-constant stream of projectiles will hit the target. It only lacks in damage output, being less than an S Mk1 Pulselaser. Destroying targets will take a while. Heavy Fighters can already shrug off the damage for quite some time. Anything larger will only feel a tickle. Overall it is a solid turret that is capable of defending a ship from light fighter threats. Don't expect it to repel a dedicated fighter strike though, especially not one done by heavy fighters loaded with heavy weapons or missiles. Advantages: - Reasonably accurate - Fastest tracking speed of all turrets - Effective against light fighters - Relatively long range Disadvantages: - Very low damage output Medium Pulse Turret Stats ARG Pulse TEL Pulse PAR Pulse SPL Pulse TER Pulse DPS 86 86 86 86 86 Damage Per Shot 2x 12 2x 12 2x 12 2x 12 2x 12 Rate Of Fire 3.6/s 3.6/s 3.6/s 3.6/s 3.6/s Burst Clip Size 3 3 3 3 3 Burst Clip Firerate 6/s 6/s 6/s 6/s 6/s Burst Clip Reload Time 0.5s 0.5s 0.5s 0.5s 0.5s Bullet Speed 1855m/s 1855m/s 1855m/s 1855m/s 1855m/s Max Range 3421m 3421m 3421m 3421m 3421m Dispersion 0.32° 0.32° 0.32° 0.32° 0.32° Rotation Speed 210°/s 105°/s 105°/s 150°/s 110°/s Hull Strength 500 750 750 425 800 Medium Bolt Turret Info The Bolt turret is a shadow of the S and M main gun variants. Gone is the high damage output and good accuracy. What is left is a spread of low-damage projectiles that tend to miss their targets more often than not due to the horrible accuracy. A projectile speed closer to Plasma Cannons than a practical point-defense weapon doesn't help either. The Bolt turret is only effective against medium-sized targets where the large dispersion is not quite as much of an issue. Against fighters, it struggles hard to land any meaningful damage. Capital ships don't even notice it. It performs slightly better on gunships and frigates since they are closer to the target than capital ships, making the dispersion less of an issue. Advantages: - Average damage output - Relatively long range Disadvantages: - Very bad accuracy - Very slow projectile speed Medium Bolt Turret Stats ARG Bolt TEL Bolt PAR Bolt SPL Bolt TER Bolt DPS 112 112 112 112 112 Damage Per Shot 2x 9 2x 9 2x 9 2x 9 2x 9 Rate Of Fire 6.25/s 6.25/s 6.25/s 6.25/s 6.25/s Burst Clip Size 15 15 15 15 15 Burst Clip Firerate 10/s 10/s 10/s 10/s 10/s Burst Clip Reload Time 1s 1s 1s 1s 1s Bullet Speed 1074m/s 1074m/s 1074m/s 1074m/s 1074m/s Max Range 3301m 3301m 3301m 3301m 3301m Dispersion 0.54° 0.54° 0.54° 0.54° 0.54° Rotation Speed 180°/s 90°/s 105°/s 135°/s 95°/s Hull Strength 500 750 750 425 800 Medium Plasma Turret Info The Plasma Turret, like all other Plasma weaponry, is the heavy hitter. It provides the highest damage per shot and damage per second of all medium turrets, not counting missiles. The damage output is relatively high, but the projectiles are painfully slow, and the range is somewhat short to be a true help in capital vs. capital fight, making it more of a brawling weapon. It is utterly useless against fighters, and Mediums can get hit occasionally for a decent chunk of damage. The Plasma turret also gains the full benefits of the Slasher mod, allowing it to achieve a damage output that comes close to the L Plasma turrets. Advantages: - High damage output - Relatively long range - Good damage potential with Slasher mod applied Disadvantages: - Extremely slow projectile - Range is a bit short for capital vs capital fights. Especially against Xenon. Medium Plasma Turret Stats ARG Plasma TEL Plasma PAR Plasma SPL Plasma DPS 315 315 315 315 Damage Per Shot 2x 741 2x 741 2x 741 2x 741 Reload Time 4.7s 4.7s 4.7s 4.7s Bullet Speed 550m/s 550m/s 550m/s 550m/s Max Range 4463m 4463m 4463m 4463m Dispersion 0.01° 0.01° 0.01° 0.01° Rotation Speed 40°/s 30°/s 30°/s 45°/s Hull Strength 500 750 750 425 Medium Beam Turret Info The M Beam Turret is easily the worst turret available in the game. While the near-constant damage output and perfect accuracy seem tempting initially, the damage output is so low that the Beam Turret cannot do meaningful damage to anything but unshielded drones. Even fighters with the lightest of shielding can easily shrug off the damage of this turret. Don't expect it to protect your ship from more than a single, lone, light fighter. Maybe two light fighters on a good day. The only niche that the M Beam turret fulfills better than any other turret is intercepting incoming missiles. Funnily, the in-game description mentions this being an "entry-level" turret for captains on a "tight budget," even though it requires the +10 license and is one of the more expensive medium turrets. Or straight up the most expensive turret in if you go Terran. Advantages: - Perfect accuracy Disadvantages: - Extremely low damage output - Very short range - Slow rotation speeds Medium Beam Turret Stats ARG Beam TEL Beam PAR Beam SPL Beam TER Beam DPS 24 24 24 24 24 Damage Per Shot 72 72 72 72 72 Reload Time 3s 3s 3s 3s 3s Beam DPS 72 72 72 72 72 Beam Duration 1s 1s 1s 1s 1s Max Range 2550m 2550m 2550m 2550m 2550m Rotation Speed 120°/s 60°/s 60°/s 90°/s 75°/s Hull Strength 500 750 750 425 800 Medium Shard Turret Info Sadly, the turret version of the Shard Battery doesn't inherit the power of the S and M versions and performs significantly worse. The damage output is slightly higher than the Bolt Turret but has a terribly large dispersion radius. While it makes sense, being a shotgun, the meager damage output does not compensate for that. The Shard Turret will struggle to damage anything. Fighters are just too small. Mediums are too tough, and most bullets still miss them anyway. Capital ships don't care about that little bit of damage. Only when one applies the Slasher Modification might the Shard Turret be worth it, as it gains the full benefit of that mod. Without Slasher, though, the Shard Turret is completely ineffective against any target and should not be installed anywhere. Advantages: - Good damage potential with Slasher mod applied Disadvantages: - Extremely bad accuracy - Damage output does not compensate for lack of accuracy - Very slow projectiles Medium Shard Turret Stats ARG Shard TEL Shad PAR Shard SPL Shard DPS 123 123 123 123 Damage Per Shot 5x 29 5x 29 5x 29 5x 29 Reload Time 1.17s 1.17s 1.17s 1.17s Bullet Speed 1288m/s 1288m/s 1288m/s 1288m/s Max Range 3301m 3301m 3301m 3301m Dispersion 1.25° 1.25° 1.25° 1.25° Rotation Speed 180°/s 90°/s 105°/s 135°/s Hull Strength 500 750 750 425 Medium Flak Turret Info The Argon Flak is by far the best gun-based turret in the game. It shreds fighters and chews through mediums pretty quickly and even provides okay damage against capitals if one should get close. The high accuracy and heavy burst damage make it a very effective all-round weapon, and no other turret comes even close. If you have access to the ARG Flak, there is no reason to install anything else on your M Turret slots. The Split Flak, though, performs a lot worse despite the increased damage output. The dispersion is so bad that most shots miss even stationary fighters. But it serves better against mediums and capitals. They work somewhat better when installed on medium ships since they are closer to the target, making the dispersion less of an issue. When installed on capital ships, though, their lack of accuracy makes them surprisingly ineffective at defending against fighter attacks. Advantages: - High damage output - Very accurate (Argon Only) - Effective against most targets - Relatively long range (Argon Only) Disadvantages: - Only available from a few factions - Split Flak has very large dispersion and struggles to hit fighters - Split Flak has very short firing range Medium Flak Turret Stats ARG Flak SPL Flak DPS 175 215 Damage Per Shot 55 44 Explosive Damage Per Shot 55 44 Rate Of Fire 1.59/s 2.45/s Blast Radius 128m 128m Burst Clip Size 9 13 Burst Clip Firerate 3/s 4/s Burst Clip Reload Time 3s 2.3s Bullet Speed 1500m/s 1350m/s Max Range 3000m 2565m Dispersion 0.09° 0.61° Rotation Speed 180°/s 135°/s Hull Strength 500 425 Medium Impulse Turret Info The Xenon Impulse Turret is a highly potent weapon, unleashing a continuous barrage of high-speed projectiles. Although the damage per projectile is low, its rapid rate of fire results in pretty high DPS. It is quite accurate as well. The Impulse Turret significantly outperforms most other turrets and poses a considerable threat to attacking fighters. Advantages: - High damage output - Good accuracy and very fast projectiles for a turret weapon - Relatively long range - Effective against most fighters and lighter mediums Disadvantages: - Low damage per projectile Medium Impulse Turret Stats XEN Impulse DPS 140 Damage Per Shot 2x 14 Rate Of Fire 5/s Bullet Speed 2448m/s Max Range 3241m Dispersion 0.21° Rotation Speed 160°/s Hull Strength 800 Medium Needler Turret Info The Xenon Needler Turret is the turret variant of the Needler Gun found on the Xenon F fighter. It trades some projectile speed and slightly longer reload times for the flexibility of a turreted mount. Its performance is comparable to the Xenon Impulse Turret, offering similar damage per second, range, and projectile speed. The main distinction is that the Needler Turret fires at a slower rate but delivers more damage per shot. Advantages: - High damage output - Good accuracy and very fast projectiles for a turret weapon - Relatively long range - Effective against most fighters and lighter mediums Disadvantages: - Relatively slow rotation speed Medium Needler Turret Stats XEN Needler DPS 142 Damage Per Shot 40 Rate Of Fire 3.55/s Burst Clip Size 8 Burst Clip Firerate 4/s Burst Clip Reload Time 0.5s Bullet Speed 2500m/s Max Range 3250m Dispersion 0.21° Rotation Speed 60°/s Hull Strength 800 Medium Positron Turret Info The Xenon Positron Turret, a beam-based weapon, manages to inflict even less damage than the Commonwealth Beam Turrets. It stands out as possibly the weakest damaging weapon in the game, excluding mining lasers. This turret faces significant challenges in dealing substantial damage, struggling against even unshielded drones, let alone well-equipped and protected fighters. Despite its limited offensive capabilities, the Positron Turret proves relatively effective at intercepting incoming missiles. This turret is predominantly encountered on Xenon Stations, with a few instances of it being mounted on the Xenon I Battleship as well. Advantages: - Perfect accuracy Disadvantages: - Extremely low damage output - Very short range - Slow rotation speeds Medium Positron Turret Stats XEN Positron DPS 20 Damage Per Shot 60 Reload Time 3s Beam DPS 60 Beam Duration 1s Max Range 3241m 2200m 4500 Rotation Speed 90°/s Hull Strength 800 Medium Kyon Turret Info The Kha'ak Kyon Emitter Turret is a direct replica of its ship-mounted counterpart, sharing identical stats. While the ship version may be considered somewhat weak compared to other weapons, the turret variant actually boasts relative strength when compared to other turrets. As a beam-type weapon, it possesses perfect accuracy at all ranges, with a higher damage output than most other turrets. Additionally, it flaunts an impressive range of 4.5km, making it one of the longest-ranged medium turrets. Exclusive to Kha'ak Installations, which are heavily fortified with them, the Kyon Emitter Turret proves devastating. Small and medium craft are dispatched within seconds. It is advisable to approach these Kha'ak Installations only with destroyers, as they provide the necessary firepower and protection. Exercise caution in Low Attention Mode, though. If your destroyer happens to approach the Installation too closely, the excessive number of Kyon Turrets can and will overpower even the most well-protected ships. Advantages: - Perfect accuracy - High damage output - Very long range - Very fast rotation speed Disadvantages: - Damage is not high enough to threaten capital ships - Only found on Kha'ak stations Medium Kyon Turret Stats KHK Kyon DPS 115 Damage Per Shot 220 Reload Time 1.911s Beam DPS 314 Beam Duration 0.7s Max Range 4500 Rotation Speed 210°/s Hull Strength 500 Medium Mining Turret Info The Mining Drill is a tool for mining, making it a naturally poor choice for combat. It deals minimal damage to non-asteroid targets. The most dangerous thing is that it blinds players when they get shot by them. Medium Mining Turret Stats ARG Mining TEL Mining PAR Mining SPL Mining TER Mining BOR Mining DPS 1 1 1 1 1 1 DPS vs Asteroids 300 300 300 300 300 300 Rate Of Fire Constant Constant Constant Constant Constant Constant Max Range 2550m 2550m 2550m 2550m 2550m 2700m Rotation Speed 120°/s 60°/s 60°/s 90°/s 75°/s 120°/s Hull Strength 500 750 750 425 800 600 --- Tides Of Avarice Medium Turrets --- Medium Erlking Turret Info The Erlking Medium Turret represents a highly upgraded iteration of the Bolt Turret, offering significantly enhanced performance. It features a unique mechanic where damage is slightly reduced with increased range, although the reduction is relatively minor. The Erlking Bolt Turret excels in delivering substantial damage over extended distances, with efficacy dropping to approximately 80% at maximum range. This turret excels at dismantling small and medium targets while still managing to inflict meaningful damage against larger ones. The only drawback lies in its accuracy, causing the turret to still miss small targets quite frequently. Advantages: - Very high damage output - Extremely long range - Very fast projectiles Disadvantages: - Bad accuracy - Only available to the Erlking Battleship Medium Erlking Turret Stats Erlking Bolt DPS 283 Damage Per Shot 2x 26 Rate Of Fire 5.45/s Damage At Close Range 2x 26 Damage At Mid Range 2x 24 Damage At Max Range 2x 21 Burst Clip Size 15 Burst Clip Firerate 8/s Burst Clip Reload Time 1s Bullet Speed 3221m/s Max Range 9222m Dispersion 0.43° Rotation Speed 120°/s Hull Strength 900 Medium Astrid Turret Info The Beam Turrets equipped on the Astrid stand out as the most potent in the game, boasting the highest damage output among all Beam Turrets. Additionally, these turrets feature an exceptional range for a medium turret, rivaling that of the Large Beam Turrets. This characteristic renders them highly effective in engaging enemy fighters and, to some extent, enemy medium-sized vessels Advantages: - Perfect accuracy - High damage output - Very long range Disadvantages: - Damage is not high enough to threaten capital ships - Only found on the Astrid Yacht Medium Astrid Turret Stats Astrid Beam DPS 120 Rate Of Fire Constant Max Range 4500m Rotation Speed 105°/s --- Kingdom End Medium Turrets --- Medium Arc Turret Info The Arc Turret utilized by the Boron Navy stands out as excellent, easily capable of neutralizing fighter threats. Its impressive damage output, combined with a superb hit rate resulting from minimal dispersion and fast projectiles, makes it perhaps the most effective anti-fighter medium turret in the game. Notably, the Arc Turret goes beyond mere damage, disrupting the mobility of its target with each hit. This added effect makes it even easier for subsequent shots to connect. The only real downside is the very low firing range. The hull damage against targets larger than fighters is also slightly underwhelming. Advantages: - Very high shield damage - Good hull damage - Excellent Accuracy - Very High projectile speed - Very effective against fighters Disadvantages: - Very low firing range - Relatively slow tracking speed Medium Arc Turret Stats Arc Turret Shield DPS 220 Hull DPS 109 Shield Damage Per Shot 200 Hull Damage Per Shot 90 Rate Of Fire 1.1/s Bullet Speed 3300m/s Max Range 2376m Dispersion 0.05° Rotation Speed 120°/s Hull Strength 600 Arc Turret Mobility Disruption The effect stacks with each hit. Mobility Debuff vs Small Mobility Debuff vs Medium Mobility Debuff vs Large Mobility Debuff vs Xtra Large Reduction Amount 6% 4% 2% 2% Duration 6s 3s 2s 2s Medium Phase Turret Info The Phase Turret employed by the Boron shares notable similarities with the Argon Flak turret. Although the Phase Turret exhibits a comparable damage output against hulls, it performs suboptimally against shields. Its accuracy is acceptable, and the projectile speed is above average. By itself, one can anticipate the Phase Turret to yield slightly worse results compared to the Argon Flak in most scenarios, yet it still outperforms other standard turrets like Pulse or Bolt. The Phase Turret finds its strength when used in limited numbers, providing the hull damage that other Boron turrets lack. Advantages: - Good hull damage - Good Accuracy - Relatively high projectile speed - Effective against small and medium hulls Disadvantages: - Very low damage against shields - Relatively slow tracking speed Medium Phase Turret Stats Phase Turret Shield DPS 72 Hull DPS 177 Shield Damage Per Shot 45 Hull Damage Per Shot 110 Rate Of Fire 1.61/s Burst Clip Size 5 Burst Clip Firerate 2.5/s Burst Clip Reload Time 1.5s Bullet Speed 2100m/s Max Range 3150m Dispersion 0.25° Rotation Speed 100°/s Hull Strength 600 Medium Ion Pulse Turret Info The Boron Ion Pulse Turret is designed as a long-range, high-velocity weapon, ideal for engaging targets early and with a reasonable degree of reliability. The high projectile speed minimizes the target's ability to dodge, and each shot carries substantial impact. However, it has a surprisingly large dispersion, resulting in notable inaccuracy, especially at longer ranges where fighters are frequently missed. While the DPS against shields remains quite good, it falls short against hulls. The turret's very slow rotation speed makes it ill-suited for gunboats and corvettes, as their constant maneuvering hinders the Ion Pulse turret from obtaining a proper target lead and often doesn't get to fire at all. It performs more effectively when installed on Destroyers and Carriers, where the extra range can be fully utilized. Advantages: - Very high shield damage - Extremely high projectile speed - Very long range - High damage per shot Disadvantages: - Slow firing rate - Low accuracy - Low hull damage - Very slow tracking speed Medium Ion Pulse Turret Stats Ion Pulse Turret Shield DPS 195 Hull DPS 90 Shield Damage Per Shot 650 Hull Damage Per Shot 300 Reload Time 3.33s Bullet Speed 5500m/s Max Range 4675m Dispersion 0.5° Rotation Speed 30°/s Hull Strength 600 --- Large Turret Weapons --- Large Pulse Turret Info The Large Pulse Turret is essentially an all-purpose weapon, excelling in defense against small and medium targets with its fast, hard-hitting, and accurate projectiles. While its damage output is high enough to pose a small threat to large targets, those of an extra-large size possess too much health to be significantly affected by it. The factional differences are relatively minor. The Argon and Teladi versions are typically average, serving well in an anti-fighter role. The Paranid variant boasts faster projectiles and slightly extended firing range, but its slow reload speed and low damage makes it the least effective among all versions. The Split version stands out as the best performer against enemy fighters, offering high DPS and a rapid firing rate that proves very effective against small and medium craft. The shorter range may only present a slight issue when engaging large targets. The Terran version is the best option against large targets with the highest damage output. However, it shares the shorter range of the Split version, and its slow reload speed hampers its performance against fighters. Advantages: - Decent damage output - Relatively long range - Very accurate - Effective against fighters and mediums Disadvantages: - Lower range than L Plasma turrets - Damage output is lacking against capital ships Large Pulse Turret Stats ARG Pulse TEL Pulse PAR Pulse SPL Pulse TER Pulse DPS 306 293 295 351 399 Damage Per Shot 2x 367 2x 293 2x 501 2x 334 2x 619 Reload Time 2.4s 2s 3.4s 1.9s 3.1s Bullet Speed 2041m/s 2041m/s 2652m/s 1837m/s 2449m/s Max Range 6570m 6570m 6831m 5913m 6063m Dispersion 0.02° 0.03° 0.02° 0.09° 0.02° Rotation Speed 40°/s 20°/s 20°/s 30°/s 20°/s Hull Strength 2300 3450 3450 2000 3600 Large Beam Turret Info The Large Beam turret is essentially an upscaled version of the M Beam turret. Although its damage output remains quite poor, the extended firing range allows it to provide consistent pressure on enemy fighters, reliably destroying them albeit at a slower pace. However, these turrets prove essentially useless against anything larger than a fighter. Even a Heavy Fighter can endure over a minute of direct fire without being destroyed. Across the various factions, all versions are practically identical, except for the Terran variant, which boasts a slightly higher damage output. For those interested in creating an anti-fighter ship with Large Beams, it is highly recommended to visit the workbench and apply the Slasher mod to the turrets. The resulting damage increase transforms the Large Beam Turret from a mere tickle into a devastating death ray against fighters. Advantages: - Pefect accuracy - Relatively long range - Effective against fighters - Benefits greatly from the Slasher modification Disadvantages: - Very low damage output - Useless against anything but fighters - Most expensive turret in the game Large Beam Turret Stats ARG Beam TEL Beam PAR Beam SPL Beam TER Beam DPS 88 88 88 88 105 Damage Per Shot 441 441 441 441 528 Reload Time 5s 5s 5s 5s 5s Beam DPS 147 147 147 147 147 Beam Duration 3s 3s 3s 3s 3s Max Range 5000m 5000m 5000m 5000m 5000m Rotation Speed 40°/s 20°/s 20°/s 30°/s 20°/s Hull Strength 2300 3450 3450 2000 3600 Large Plasma Turret Info The Large Plasma turret serves a singular purpose: unleashing fiery destruction upon enemy capital ships and stations. With a high damage output and one of the longest firing range among all turrets, it becomes the primary choice for most capital ships engaging in battles against other capital ships and stations. However, the extremely low projectile speed renders it virtually impossible to hit anything smaller than a destroyer. When piloted by the player, large ships can easily maneuver to avoid being hit as well. There are subtle differences between faction versions. The Argon Large Plasma turret is among the better options, offering a reliable choice despite being technically inferior to the Paranid Plasma turret in every aspect. As the differences are negliable. The Paranid version is generally regarded as the best, delivering the second-highest damage output, the longest firing range, and the fastest projectile. However, the slow firing rate makes missed shots more costly. The Teladi version features the lowest damage output among all Large Plasma turrets but maintains the same firing range as the Argon version, making it a solid choice still. The Split version is arguably the least favorable. While it technically boasts the highest damage output, it sacrifices 2km of range compared to other turrets, and the increased damage is insufficient to offset this drawback. In practical terms, other turrets outperform it by being able to fire earlier and longer. The shorter range also poses additional risks when engaging Commonwealth stations. Split Plasma only outranges the turrets of the Xenon and Terrans. Advantages: - Very high damage output - Very long firing range - Very accurate - Effective at engaging capital ships and stations - Outranges Xenon and Terran turrets Disadvantages: - Extremely slow projectiles, unable to hit small and medium targets Large Plasma Turret Stats ARG Plasma TEL Plasma PAR Plasma SPL Plasma DPS 1030 951 1057 1103 Damage Per Shot 2x 2420 2x 1855 2x 3751 2x 1985 Reload Time 4.7s 3.9s 7.1s 3.6s Bullet Speed 440m/s 440m/s 572m/s 440m/s Max Range 8569m 8569m 8911m 6855m Dispersion 0.01° 0.01° --- 0.02° Rotation Speed 40°/s 20°/s 20°/s 30°/s Hull Strength 2300 3450 3450 2000 Large Graviton Turret Info The Large Graviton turret is a deadly weapon employed by the Xenon, capable of destroying capital ships with ease. Boasting an exceptionally high damage output and fast projectile speed. However, its lacking accuracy limitation rendersy fighters relatively safe from it. Medium-sized ships face near-instant destruction within a few seconds, while destroyers risk being torn apart if they drift too close. The primary weakness of the Graviton turret lies in its limited range. Its very short reach allows destroyers to remain outside its effective range, gradually dismantling the Xenon ship or station from a safe distance. Advantages: - Extremely high damage output - Fast projectiles - Deadly to capital ships and especially mediums Disadvantages: - Very short range for a large turret - Low accuracy Large Graviton Turret Stats XEN Graviton DPS 2153 Damage Per Shot 2x 3229 Reload Time 3s Bullet Speed 1958m/s Max Range 5183m Dispersion 0.51° Rotation Speed 35°/s Hull Strength 3500 Large Seismic Charge Turret Info The Seismic Charge Launcher is an unusual weapon found on the Xenon H. It deals area-of-effect damage using a timed fuse similar to the Boron Ion Flak, but its projectiles travel at a much slower speed. While it is a flak-type weapon, its projectiles are too slow to reliably hit most fighters. While it inflicts substantial damage per shot, the damage per second is not as overwhelming as that of the Xenon Graviton turret and is only slightly higher than L Plasma turrets. The Seismic Charge Launcher is most effective against slow, heavy fighters, slower medium ships, and capital ships. The explosion from the charge can easily strip off turrets and engines, making it a significant threat to larger vessels. Advantages: - High damage output - Large explosive effect - Very effective against slow small and medium targets - Can destroy entire turret groups thanks to explosive damage radius - Surprisingly accurate Disadvantages: - Relatively short range for a large turret - Damage might not be enough to destroy L/XL targets Large Seismic Charge Turret Stats XEN Seismic Charge Shield DPS 1375 Hull DPS 1125 Shield Damage Per Shot 3500 Explosive Shield Damage 2000 Hull Damage Per Shot 3500 Explosive Hull Damage 1000 Reload Time 4s Bullet Speed 1100m/s Max Range 5500m Dispersion 0.15° Blast Radius 150m Rotation Speed 25°/s Hull Strength 3500 Large Kyon Turret Info The Large Kyon Turret is exclusively found on the Kha'ak Ravager and is an exceptionally dangerous weapon. While the Kyon Emitters on the smaller Kha'ak fighters may lack significant damage output, the large turret belongs in a league of its own. Combining the perfect accuracy of beam weapons with very long firing ranges and high damage output, the Large Kyon Turret poses a deadly threat to small and medium ships. Although most capital ships can withstand its damage for a while, the Kyon turrets have a tendency to destroy all surface elements, leaving the ship without turrets and engines. Moreover, one of the most frustrating aspects of these Kyon turrets is their invulnerbility. Advantages: - Pefect accuracy - Very long range - High damage output - Extremely deadly to small and medium ships - Very effective at sniping surface elements Disadvantages: - You will only ever be at the receiving end of it Large Kyon Turret Stats KHK Kyon DPS 800 Damage Per Shot 2400 Reload Time [td3s[/td] Beam DPS 1600 Beam Duration 1.5s Max Range 8000m Rotation Speed 40°/s Large Mining Turret Info The Mining Drill is a tool for mining, making it a naturally poor choice for combat. It deals minimal damage to non-asteroid targets. The most dangerous thing is that it blinds players when they get shot by them. The Large Mining turret is slightly more effective at mining than 4 Medium Mining turrets. Large Mining Turret Stats ARG Mining TEL Mining PAR Mining SPL Mining TER Mining BOR Mining Shield DPS 2 +1 Hull 2 +1 Hull 2 +1 Hull 2 +1 Hull 2 +1 Hull 2 +1 Hull Hull DPS 3 3 3 3 3 3 DPS vs Asteroids 1350 1350 1350 1350 1350 1350 Rate Of Fire Constant Constant Constant Constant Constant Constant Max Range 2550m 2550m 2550m 2550m 2550m 2700m Rotation Speed 40°/s 20°/s 20°/s 30°/s 20°/s 40°/s Hull Strength 2300 3450 3450 2000 3600 2100 --- Cradle Of Humanity Large Turrets --- Large Bolt Turret Info The Large Bolt turret is a unique design exclusive to the Terrans and raises questions about its practicality. While it offers a higher damage output than Large Pulse turrets, it compensates for this advantage with a painfully slow projectile speed and an unusually short range for a large turret. It barely outranges the deadly Graviton turret used by the Xenon. The Large Bolt turret is most effective against medium-sized ships. It also performs reasonably well against most large ships, though extra-large vessels can easily shrug off the damage, and fighters can easily evade the slow projectiles. In an unusual departure from other Bolt weapons, it doesn't operate as a rapid-fire gatling-type weapon; instead, it fires a single shot for each reload. Advantages: - Higher damage output than Large Pulse - Very accurate - Large hitbox of projectiles enable a surprising amount of hits against fighters Disadvantages: - Very short range for a large turret - Very slow projectile speed - Rather expensive Large Bolt Turret Stats TER Bolt DPS 481 Damage Per Shot 625 Reload Time 1.3s Burst Clip Size 18 Burst Clip Firerate 0.77/s Burst Clip Reload Time 1s Bullet Speed 1288m/s Max Range 5590m Dispersion 0.04° Rotation Speed 20°/s Hull Strength 3600 --- Tides Of Avarice Large Turrets --- Large Erlking Turret Info The Large turret exclusive to the Erlking-class battleship stands out as the most potent turret in the game, serving as an anti-everything powerhouse. It boasts unparalleled damage output, ranking as the highest among all turrets, coupled with the longest range. Not counting the Ion Net Launcher. With the same projectile speed and accuracy as the Large Pulse turret, it proves effective at engaging any target. This turret effortlessly shreds through fighters, medium-sized vessels, capital ships, and stations, leaving no room for mercy. However, such formidable power comes with a significant limitation, as it can only be mounted on the Erlking Battleship, reserving its immense capabilities for this unique ship. Acquiring the blueprints may prove somewhat annoying, and the installation requires an Extra Large Maintenance Bay or Fabrication Bay. Interestingly, despite the description mentioning a potential damage drop-off at range, it seems this isn't the case in practice. The turret maintains the same damage output at maximum range and at close range. Advantages: - Highest Damage output of all turrets - Extremely long firing range - Fast projectiles - Very accurate - Very fast tracking speed for a large turret Disadvantages: - Only available on the Erlking Battleship Large Erlking Turret Stats Erlking Pulse DPS 2306 Damage 2x 2652 Reload 2.3s Damage Falloff 100% up to 1.85km 70% up to 4.6km 10% towards max range Speed 2040m/s Range 9220m Dispersion 0.02° Rotation Speed 76°/s Hull 4140 --- Kingdom End Large Turrets --- Large Phase Turret Info The Large Phase turret assumes the same role as its Medium turret counterpart, specializing in dismantling the exposed hulls of enemy ships. It boasts a relatively high damage output against hulls, but its performance against shields is notably lacking. Featuring an extended firing range and faster projectiles compared to the standard Large Pulse turret, it sacrifices some flexibility in return. Most effective against fighters and less shielded mediums, the Large Phase turret destroys these targets relatively quickly, especially when supported by anti-shield weapons. It proves particularly effective against Xenon and Split fighters, which lack robust shielding. However, its utility diminishes against capital ships, rendering it essentially useless due to its abyssmal damage output against shields. The damage against hulls is also insufficient to pose a serious threat to capital ships. Given the absence of the typical Plasma turrets, the Phase turret emerges as the Boron's best and essentially only option for station sieges. While only moderately effective with less than half the damage output of Large Plasma turrets, it manages to outrange the dangerous Graviton turrets. Fittingly, the Large Phase turret appears most effective against ships and stations of the Split, outmatching their heavy weapons in range and proving less hindered by their weaker shielding. Advantages: - High hull damage - Very long firing range - Very fast projectile - Good accuracy - Very fast tracking speed for a large turret Disadvantages: - Low shield damage - Despite the good accuracy, it is less accurate than Large Pulse or Beam turrets - Basically useless against capital ships Large Phase Turret Stats Phase Turret Shield DPS 160 Hull DPS 440 Shield Damage Per Shot 200 Hull Damage Per Shot 550 Reload Time 1.2s Burst Clip Size 6 Burst Clip Firerate 0.8/s Burst Clip Reload Time 1 Bullet Speed 3000m/s Max Range 7200m Dispersion 0.25° Rotation Speed 25°/s Hull Strength 2100 Large Ion Flak Turret Info The Large Ion Flak turret stands as the crown jewel of Boron turret weaponry, excelling as an anti-fighter weapon with its ability to inflict largel shield damage and create a big explosion radius. The projectile features a timed fuze, ensuring it explodes at the distance the target was at when the turret fired. Combined with the very fast projectile speed, this ensures the target is consistently caught in the blast radius. The Large Ion Flak turret has the added advantage of disrupting the engines of any small and medium target within the blast, slowing them down. However, its hull damage output is rather lacking, and anything heavier than fighters will require a considerable amount of time to be destroyed by the Ion Flak alone. This is further worsened by the very high dispersion, making direct hits unlikely. As a result, the effective damage output is significantly lower than it may appear on paper. Also note that due to most of the damage being explosive, +damage modifications have very limited effect. Since explosive damage is not modified. Advantages: - High shield damage - Very fast projectile - Very fast tracking speed for a large turret - Large blast radius Disadvantages: - Low hull damage - Extremely inaccurate, making direct hits on small and medium targets unlikely Large Ion Flak Turret Stats Ion Flak Turret Shield DPS 540 Hull DPS 180 Shield Damage Per Shot 450 Explosive Shield Damage 900 Hull Damage Per Shot 50 Explosive Hull Damage 400 Reload Time 2.5s Burst Clip Size 3 Burst Clip Firerate 0.4/s Burst Clip Reload Time 1.5s Bullet Speed 4660m/s Max Range 5825m Dispersion 2.1° Blast Radius 200m Rotation Speed 50°/s Hull Strength 2100 Ion Flak Turret Speed Disruption The slowdown effect stacks with each hit! Speed Debuff vs Small Speed Debuff vs Medium Reduction Amount 7% 5% Duration 6s 4s Large Ion Net Launcher Turret Info The Large Ion Net Launcher turret is an unconventional weapon, bordering on being more aptly labeled as a tool. It claims the title of the longest-ranged turret weapon in the game, delivering considerable shield damage per shot while severely lacking in hull damage, and explosive hull damage is completely missing. Its primary function revolves around disrupting enemies. Any ship caught in the very large blast radius experiences a substantial reduction in maneuverability, with its travel engines and boosters being completely disabled, preventing escape. This enables other Boron ships to engage the disabled target and easily destroy it. The Ion Net Launcher itself is unlikely to outright destroy any target. At most, it can strip the shields of fighters. However, be careful regarding friendly fire due to the large blast radius, making its use in fleet settings somewhat questionable. Employing this weapon, or rather tool, demands a degree of creativity. Advantages: - High shield damage per shot - Extremely fast projectile - Extremely large blast radius - Disables boost and travel drives Disadvantages: - Low hull damage - Extremely inaccurate, making direct hits on small and medium targets unlikely - High chance of friendly fire - No hull damage in the explosive damage, making it extremely unlikely to destroy small and medium targets. Large Ion Net Launcher Turret Stats Ion Net Turret Shield DPS 361 Hull DPS 76 Shield Damage Per Shot 400 +1500 Blast Explosive Shield Damage 1500 Hull Damage Per Shot 400 Rate Of Fire 0.19/s Burst Clip Size 3 Burst Clip Firerate 2.5/s Burst Clip Reload Time 15s Bullet Speed 7100m/s Max Range 10650m Dispersion 2° Blast Radius 400m Rotation Speed 30°/s Hull 2100 Ion Net Turret Mobility Disruption The slowdown effect stacks with each hit! Mobility Debuff vs Small Mobility Debuff vs Medium Mobility Debuff vs Large Mobility Debuff vs Xtra Large Reduction Amount 30% 25% 20% 20% Duration 12s 10s 8s 8s Boost/Travel Disable 30s 30s 30s 30s --- Missiles And Launchers --- Missile Launchers and Turrets Missile Launchers don't have many stats. They only enable the ability to fire missiles as well as increasing the missile carry capacity with the Mk2 variant. Mk2 Missile Capacity Increase Boron Launcher Capacity Increase S Dumbifre Launcher +2 +1 S Tracking Launcher +2 +1 S TorpedoLauncher +1 +0 M Dumbifre Dumbfire +4 +2 M Tracking Launcher +4 +2 M TorpedoLauncher +2 +1 Missile Turrets Are only available for L and XL ships and Stations. Missile Capacity Increase Medium Dumbifre Turret +30 Medium Tracking Turret +10 Large Dumbifre Turret +300 Large Tracking Turret +100 Dumbfire Missiles Dumbfire missiles are simple, rocket propelled projectiles with an explosive warhead. They have no tracking and fly in a straight line similar to how a gun works. They offer increased damage output and range at the cost of having a limited ammo supply. They also generate no heat, making them excellent secondary weapons. Light Dumbfires can provide a fighter with a big extra punch against medium targets while also enabling them to snipe turrets off capital ships from a safe distance. Heavy Dumbfires provide much increased damage against capital ships and have the longest range of all weapons that can be mounted on turrets. They can provide firepower that rivals a Large Plasma turret on a Medium Turret slot. Cluster missiles are for dropping big damage spikes on capital ships, especially XL targets are easy to hit. The missile carries over the speed from the launching ship, so a fast fighter is recommended. The light variant is kind of the worst missile in the game with pitiful damage, slow speed and long reload. Scatter missiles are only available from the Split. It's essentially a missile based shotgun. Extremely inaccurate with a high damage potential. Terrans can not produce this missile. Light Dumbfire Mk1 Light Dumbfire Mk2 Heavy Dumbfire Mk1 Heavy Dumbfire Mk2 Light Cluster Heavy Cluster Heavy Scatter DPS 733 800 880 960 157 270 1200 Damage 1100 1200 3960 4320 2361 12141 12x 400 Reload 1.5s 1.5s 4.5s 4.5s 15s 45s 4s Speed 1071m/s 1181m/s 233m/s 259m/s 165m/s 36m/s 918m/s Range 10km 11km 21km 24km 8.1km 17km 46km AI Targeting Range 7km 8km 9km 10km 5.5km 7km 3.5km Blast Radius 128m 128m 128m 128m 128m 128m 128m Tracking Missiles As the name suggests, those missiles can track and home in on their target, giving them much greater chances to hit moving targets. However, most of them can be distracted by Flares. Standard Missiles Heatseeker missiles are simple fire-and-forget weapons. You pick a target, launch and hope for the best. They have the best flight performance and damage, but the least Flare resistance. Guided missiles use a proper guidance system to track their target and require a target lock. They are harder to distract with Flares but lose overall flight performance compared to the Heatseeker. They are the cheapest tracking missile available. Smart missiles are the most advanced using an intelligent targeting AI. They are completely immune to flares and automatically acquire a new target if the current one should be destroyed. They are the best weapon in the game to defend your destroyers from fighters. Swarm missiles fire a group of eight missiles per launch. Each individual missile only deals a little damage, though the combined damage gives the Swarm the largest punch of the standard missiles. They are generaly more effective against at least medium sized targets, as their flight pattern prevents them from reliably hitting fighters. They are somewhat vulnerable to Flares, but also acquire a new target like the Smart missile. Torpedos are some of the most expensive weapons in the game but they provide a massive damage potential for even the smallest of craft. Use fast ships to give them an extra speed boost. Light Heatseeker Light Guided Light Smart Light Swarm Light Torpedo DPS 349 343 329 268 479 Damage 698 685 657 8x 134 4791 Reload 2s 2s 2s 4s 10s Speed 998m/s 887m/s 782m/s 826m/s 100m/s Range 10km 8.8km 7.8km 8.3km 5km AI Targeting Range 5km 4.5km 4km 4km 3km Lock-on Range --- 4.5km --- --- --- Turn rate and Strafe 22° - 12m/s 22° - 10m/s 21° - 9m/s 10° - 13m/s 1° - 0m/s Flare Resistance 81% 87% 100% 86% 98% Blast Radius 128m 128m 128m 128m 128m Heavy Heatseeker Heavy Guided Heavy Smart Heavy Swarm Heavy Torpedo DPS 599 587 563 460 575 Damage 3592 3520 3378 8x 690 17246 Reload 6s 6s 6s 12s 30s Speed 217m/s 191m/s 170m/s 180m/s 67m/s Range 9.4km 8.3km 7.4km 7.8km 12km AI Targeting Range 7km 6km 5.5km 5.5km 9km Lock-on Range --- 5.5km --- --- --- Turn rate and Strafe 3° - 2m/s 3° - 2m/s 2° - 2m/s 3° - 3m/s 0.3° - 0m/s Flare Resistance 81% 87% 100% 86% 98% Blast Radius 128m 128m 128m 128m 128m Special Missiles These missiles fill a very specific role or come with a special ability, making them not too useful in normal combat situations. Interceptor missiles are designed to pull targets out of travel drive. It also disables the travel drive and boosting for a time. Disruptor missiles prevents the use of boost and travel drive of the hit target, as well as deactivating the engines completely for a short while. The engines will gradually return to full performance. EMP missiles prevent the use of boost and travel of the hit target but it is stupidly fast, making it extremely difficult to hit anything smaller than a destroyer. Starburst missiles appear to be very similar to the Heavy Guided missile. The only notable feature is it's much improved maneuverability compared to other heavy missiles. All the missiles are only available from the Split and are not possible to be produced by Terrans. Only the EMP Missile is available everywhere. Interceptor Disruptor EMP Starburst DPS 250 89 0 475 Damage 5x 100 896 0 3800 Reload 2s 10s 22.5s 8s Speed 4630m/s 964m/s 57887m/s 192m/s Range 138km 14km 578km 8.3km AI Targeting Range 39km 5km 20km 6km Lock-on Range 29.5 5km 20km 5.5km Turn rate and Strafe 22° - 10m/s 4° - 12m/s 3° - 3m/s 10° - 9m/s Flare Resistance 75% 80% 74% 87% Blast Radius 128m 128m 128m 128m Boost/Travel Disable 30s 30s 30s --- Engine Disable --- 4s --- --- --- Space Suit Weapons --- --- Deployable Weapons ---