换一换
换一换 


关于游戏和雇佣兵build的实用信息。 简介
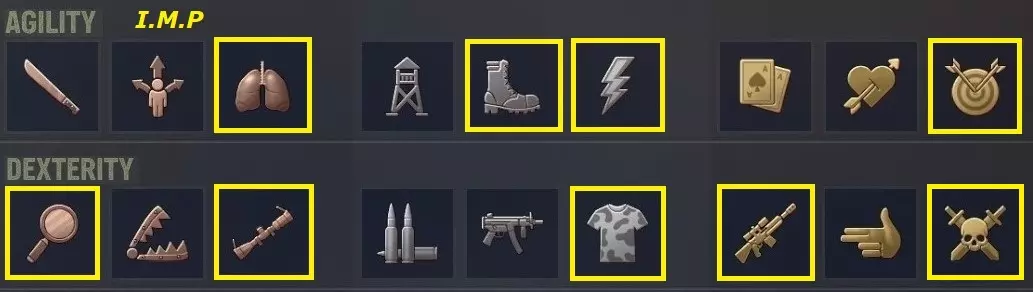
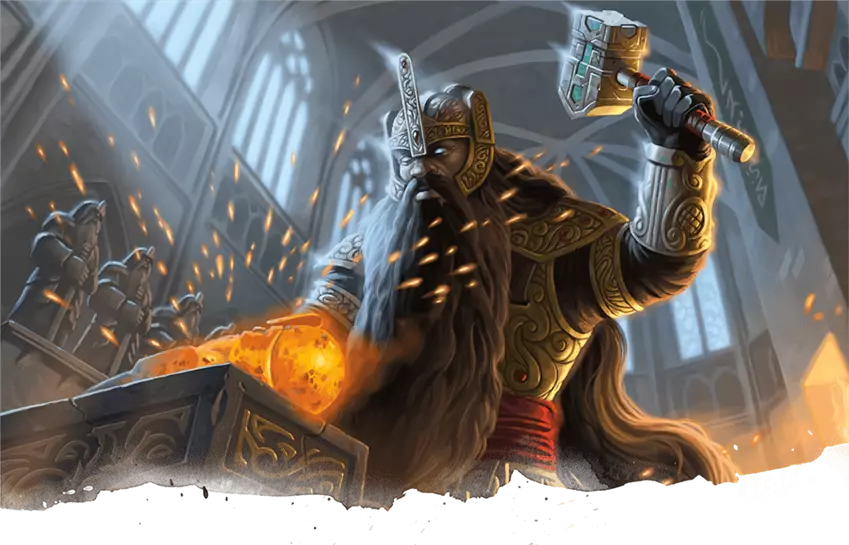
Welcome to my Jagged Alliance 3 Steam page. On this page you'll find useful information on how to make character builds for the game. I made this page mainly for my own amusement, and for me to refer to. I shared it to be helpful to others. If you have any questions, please post them in the comments section. Update (08/02/2026): I am in the process of creating a third team, it might take me a while so bear with me. I've updated my recommended mod list. ▬ ♠ Op. Mongoose: Overview ♠ ▬ Stealth is utilised heavily, trivialising many levels right off the bat as you can just move around the entire map picking off squads of enemies one by one. Snipers are also heavily used, forming 50% of the entire team - this weapon type is a little too strong in JA3 honestly, allowing you to dominate firefights from relative safety. Finally it's worth mentioning that Barry is pretty much a one-man army, with his explosive capabilities often destroying entire enemy squads without the help of anyone else on his team. Note: these builds are not meant to be used with any overhaul mods such as Vanilla Redux or Rato's Overhaul. Squad Roles IMP: Stealth Sniper Blood: Melee Striker Barry: Heavy Grenadier Meltdown: Overwatch Specialist Ice: Combat Sniper Buns: Support Sniper Order Of Merc AcquisitionI recommend picking up Barry and Buns first, for the maximum amount of days in order to get the best daily rate. Then hire Livewire for the minimum number of days possible. You should be able to afford this and have $1121 remaining (as long as nobody haggles you... grrr!). Barry provides insane combat benefits, destroying entire groups of enemies with his grenades which is very useful for clearing Ernie Island. He also allows you to easily clear minefields. Buns offers excellent marksmanship at a very affordable price, so she should be your second pick. She also has some healing skill which you will need eventually. Livewire is the only starting merc that can find the hidden terminal in the complex at the top of the hill, and this terminal can yield $1500 as a reward, plus she has a set of lockpicks which our IMP will 'borrow'. Try not to let her get hurt, so that you can reclaim her medical costs. After that you should probably pick up Blood, then Ice (you need at least $10k to hire Blood). Together they should give you enough power to finish Ernie Island completely. You should hire Meltdown before you liberate Fleatown, or at least before you ask Lalee about the meaning of life. Bear in mind that some mercs sometimes refuse to join your squad no matter what - this is determined at the start of the game and it doesn't change, unless they have a mitigation factor that you can fulfill. For example, there is a 20% chance when you start a new game that Fox will be unavailable for the entire game - whenever you contact her, she will say something about being busy, and she'll only accept being hired if you have Wolf on your team. So when you start a new game, check that Meltdown will actually talk to you, otherwise you'll need to wait until you have $50k before being able to hire her (not a huge deal but pretty annoying). Also check that none of the mercs you want are offline. Some Alternative OptionsIf you prefer not to get Mechanical on your IMP, you could explore some different options for your starting mercs. For example, swapping out Blood and Ice for Dr Q and Vicki gives you roughly similar strengths in terms of having a melee merc and a good ranged merc, but gives you very high skills in MEC and MED. These two mercs are much, much more expensive than Blood and Ice, so obviously you have to be a lot tighter with your budgeting. They also have some locked perks that don't quite fit the builds I've designed, so you would have to tweak them a bit, but they are very strong mercs so you should be fine. Mid-to-Lategame OptionsI personally prefer to keep my starting mercs and invest in training them. In addition, I like the high degree of control you get with recruits/veterans over what perks they have. If you care less about this, or would like to explore some different mercenaries for other reasons, then there are a few powerful mercs you could look at hiring when you have more cash. There are many options to choose from, take a look at my merc tier list if you want some ideas. A Note On MobilityI've chosen Flanker, rather than Fast Runner, on a lot of my mercs because I like to have them armored up a bit more heading into the midgame (and you can't benefit from Fast Runner if you equip medium/heavy armor). If you prefer to run a more risk/reward strategy, you can opt to take Fast Runner instead. It's entirely your choice. I know a lot of people in the Discord favour light armor exclusively. Ammo Utilisation Reference 7.62x39mm (Warsaw Pact) used by: IMP/Meltdown (AK-74), Ice/Buns (Dragunov) 7.62x51mm (NATO) used by: IMP/Ice/Buns (PSG1), Meltdown (HK21) 5.56x45mm used by: Barry (G36) 1A: "GHOST" (I.M.P.) [Stealth Sniper] A stealthy sniper who can roam the map and take out unsuspecting enemies who are separated from their comrades, while also being a devastating combat sniper. Initially Stealth Kills are a bit challenging, but once your Marksmanship has improved a bit and you have a good sniper rifle, you'll be able to dispatch enemies from range, extreme range even once you have the right perks. In combat, you'll have tons of free movement in order to reposition, and re-engage stealth. You have two different weapons which have different benefits - the PSG1 offers significantly higher damage and a night-vision scope; it's better versus harder targets where you aren't sure if you will succeed on the Stealth Kill, so you'd better do enough damage to kill them outright. The AK-74 does less damage so you should use it versus weaker enemies who are guaranteed to get Stealth Killed, that way you'll have extra AP remaining to reposition, or even take another shot. It also has a 40mm grenade launcher for those extra-special moments. This build is definitely designed to exploit the 'bootcamp' meta, that is to say you want to spend a good bit of time training your mercs up so that they have powerful stats. If you dislike (some might use the word 'hate') doing this, then you might want to alter some of it. Attribute Distribution
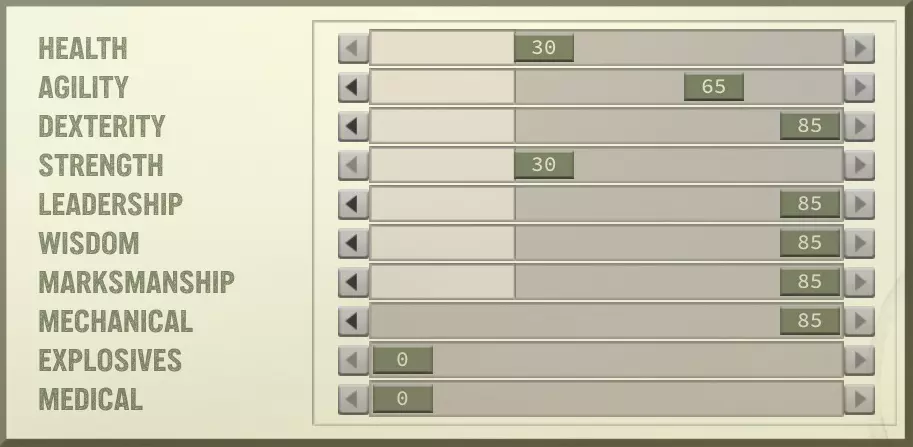
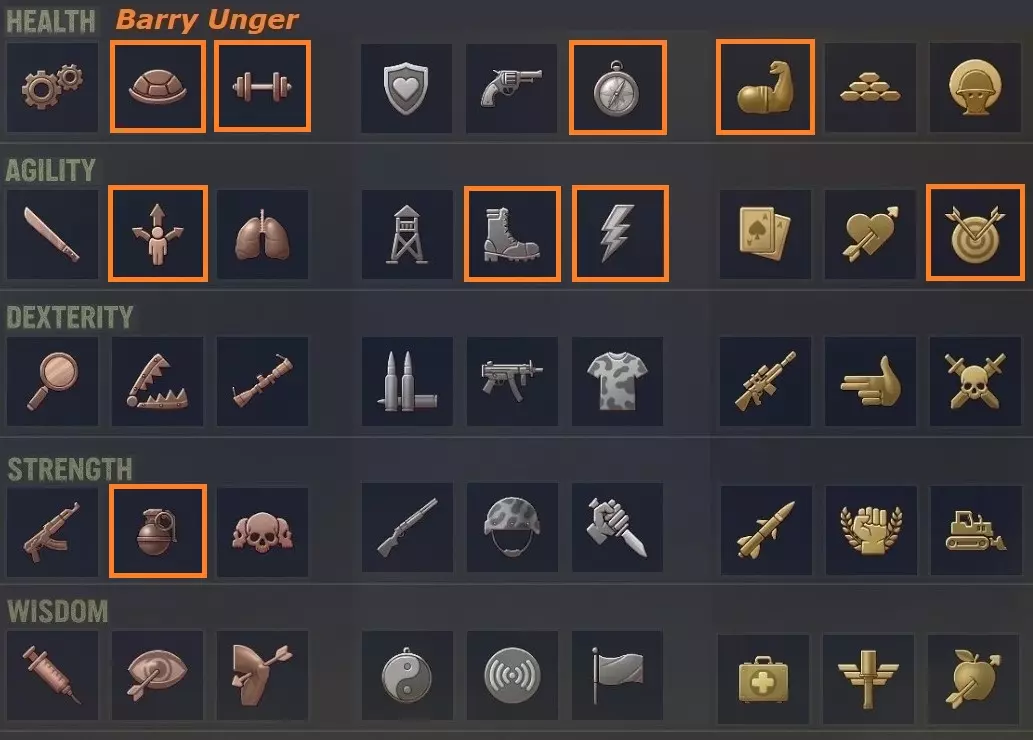
生命值: 30。对于这个build来说,生命值初期并不是那么重要,因为你本就不应该经常被击中。当然,能承受住攻击还是很重要的,但后续可以通过其他佣兵来提升。 敏捷: 65。敏捷对行动点(AP)来说非常重要,而且其自身提升速度比较慢。不过,这个队伍配置需要85点机械技能,所以敏捷不得不降到65。你要尽快将IMP的敏捷点满,这样就能快速训练其他敏捷较低的佣兵,所以当你有空闲时间时,让布拉德(Blood)来训练你。 灵巧: 85。无论是近战潜行击杀还是一般的远程攻击,灵巧都相当重要。 力量: 30。将这个属性升到满级确实很有用,因为背包空间小了会非常烦人,但其他属性必须优先于它——之后再升级它。 领导力:85。游戏中最重要的属性之一。它会极大地影响地图上的移动速度,还能控制许多其他事情,比如训练民兵以及你的小队效能。它还会显著影响你教导其他雇佣兵的速度。 智慧:85。在《铁血联盟3》中,智慧是一项神级属性,因为它控制着你提升自身技能的速度。这个属性无法通过训练提升,但你可以通过成为发现野生草药以及可能的其他隐藏物品的人来提升它。 射击术:85。显然,这是使用远程武器击中目标所必需的。 机械学:85。这个技能对于你的IMP雇佣兵来说并非最佳选择,因为它仅用于技能检定,不提供任何战斗增益。然而,在游戏初期很难获得一名合格的MEC雇佣兵,除非你雇佣Livewire(我已经开始不喜欢她了,主要是因为她的独特天赋过于强大,而且……听了20多个小时后,她的语音台词会变得很烦人)。所以很遗憾,我们不得不投入这个技能。这样做的好处是能挑选到游戏中目前为止最好的初始雇佣兵团队。不要为了最大化敏捷而将其降至65——你需要将这个技能点满。另一个需要注意的是,让你的IMP拥有这项技能后,很容易将其传授给像拉里这样的自由佣兵。这样他们就能独自驻守重要区域,因为在击退巡逻队后,他们可以自行修理装备。 爆炸物: 0. 巴里会负责这项技能,但团队中的多名佣兵掌握这项技能也很有用。这是因为爆炸物种类繁多且非常实用,一个角色无法使用所有爆炸物。这些包括闪光弹、烟雾弹、照明弹等等,更不用说还有许多不同类型的爆炸物品。一旦你拥有一些钻石矿并获得些许喘息空间,就抽出时间训练布拉德、梅尔特唐和你的IMP佣兵掌握这项技能。之后你可以使用配备下挂40毫米发射器的AK-74,当经验值达到60以上时,使用该武器的失误率为0%。作为参考,一名经验值为65的雇佣兵使用手榴弹时约有5%的失误率。 医疗: 0. 这项技能会由队友负责。虽然他们的能力不算出色,但在大多数情况下你并不需要很高的医疗技能。只有在特定的技能检定(例如诊断拉里的医疗问题)时,你才真正需要较高的医疗值。为此,你可以雇佣MD一周左右——无论如何,他在训练民兵队伍方面也很有用。 个人特长与战术特长 特长 备注

恶棍 每回合首次切换武器无需消耗行动点。解锁对话选项。 这个专长不仅对对话/任务选项很有帮助,其价值不止于此——对于这个build而言,每回合能免费切换武器的效果绝对非常出色。

潜行高手 潜行时更难被发现,潜行击杀的成功率略有提升。 此专长对保持不被发现的能力有巨大影响,以至于除非拥有它,否则几乎不值得费心潜行。它还能提供10%的潜行击杀几率加成。

教学 提升雇佣兵训练行动中获得的经验值,为小队额外提供10%经验值(不可叠加)。 这是你的精英雇佣兵必备的终极战术专长。能让你有效地将自己极高的属性/技能传授给团队——如果团队成员拥有高智慧,效果会更好。此专长对教学经验获取的提升效果相当显著。 推荐装备 主武器栏位: PSG1步枪:重型枪托、热成像瞄准镜、EE弹匣、两脚架、紫外线红点、消音器(2个芯片,1个管道) 获取位置:完成兰茨巴赫任务线(将柴油交给邦斯而非齐格飞)可获得一把PSG1作为任务奖励,另一把可在上校堡垒中找到,最后一把为随机战利品。副武器槽: AK-74:消音器、榴弹发射器、快速瞄准镜、战术装置(1个芯片、2个钢管、1个镜片) 获取位置:D17(需要高忠诚度)、B17或B10(准备好一场艰难的战斗)。 护甲槽: 轻型迷彩护甲 夜视仪 防弹裤 1B:“幽灵”(I.M.P.)【潜行狙击手】 主要特长
特长 说明

疾跑者 未装备护甲或装备轻甲时,自由移动范围增加。 疾跑者在游戏后期可能是一个危险的专长,但凭借该角色的潜行能力,你应该能轻松与敌人拉开距离,然后启动潜行来躲避他们。

蛙跃 从掩蔽物后开始回合时,增加自由移动范围。 蛙跃是一个极其强大的技能,尤其是与快速奔跑者搭配使用时。你将获得可观的自由移动量,并且能够轻松地重新部署位置。

闪电反应 战斗中可使用一次,通过卧倒躲避敌人的首次攻击。 如果敌人打你个措手不及,这个专长能救你一命。你要是想冒险,也可以选择【优势点】,但它只能增加约10%的瞄准率,而且比较看场合。

完全专注 击杀后攻击伤害提升30%,直至未命中。 每场战斗中,你的首次潜行击杀将确保此效果激活,而且……你不会打偏的,对吧?

无法追踪 潜行时降低敌人侦测速度,且【潜行击杀失败时造成20%额外伤害】。 这实际上是一个非常强大的专长。要解释这一点,有必要了解游戏中一些强大的敌人对潜行击杀具有免疫能力。不过,它们仍然会受到潜行攻击的影响——它们会承受所谓的【潜行暴击】。这实际上是对这类敌人的潜行击杀攻击,虽然自动失败,但可以对它们造成暴击。无法追踪专长会提升这种伤害,效果相当显著。在潜行时,它也能带来不错的体验优化。

神射手 每级瞄准(用于提升精准度的行动点消耗)增加5%暴击率。 这是对伤害的直接提升,简单且有效。

伏击者 潜行时潜行击杀概率额外提升10%,且未被潜行击杀的敌人会被压制。 每一点潜行击杀概率的提升都很有帮助,尤其是在游戏后期,敌人会变得更难通过这种方式击杀。当潜行失败时,压制效果会很有用。

神射手 每回合的首次攻击额外获得2次瞄准机会。每回合首次攻击额外造成27%伤害。 这是一个简单但有效的专长。它能让你的首次攻击极具破坏性,对于狙击手build来说显然非常好用。注意,此专长在战斗外无效,因此无法用于初始的潜行突袭。

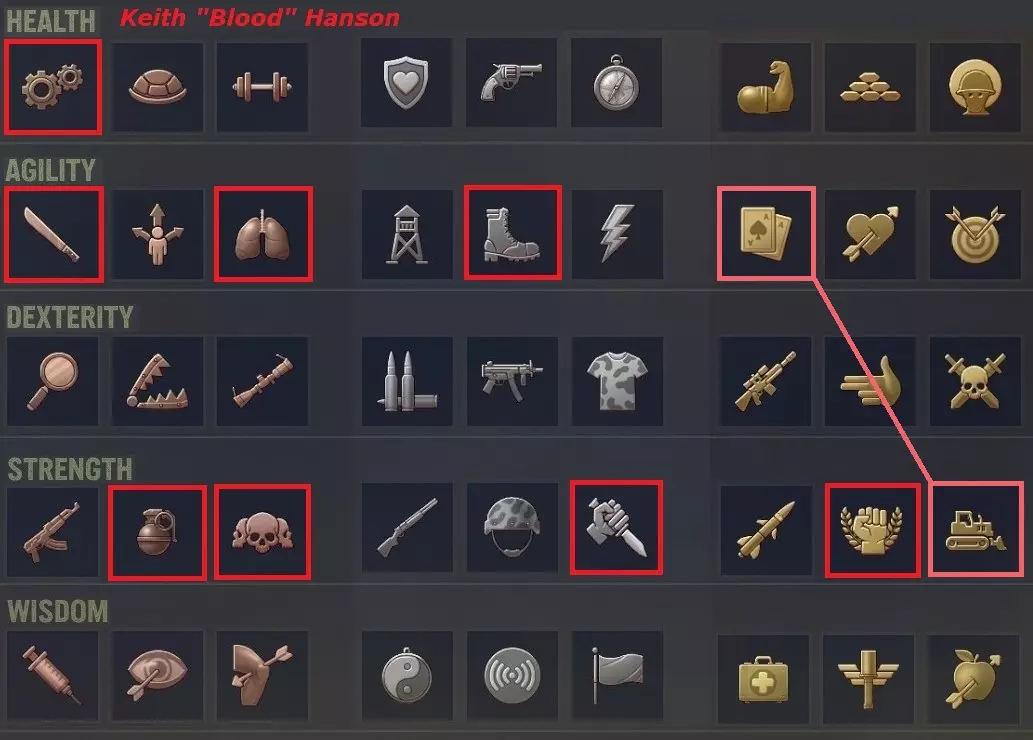
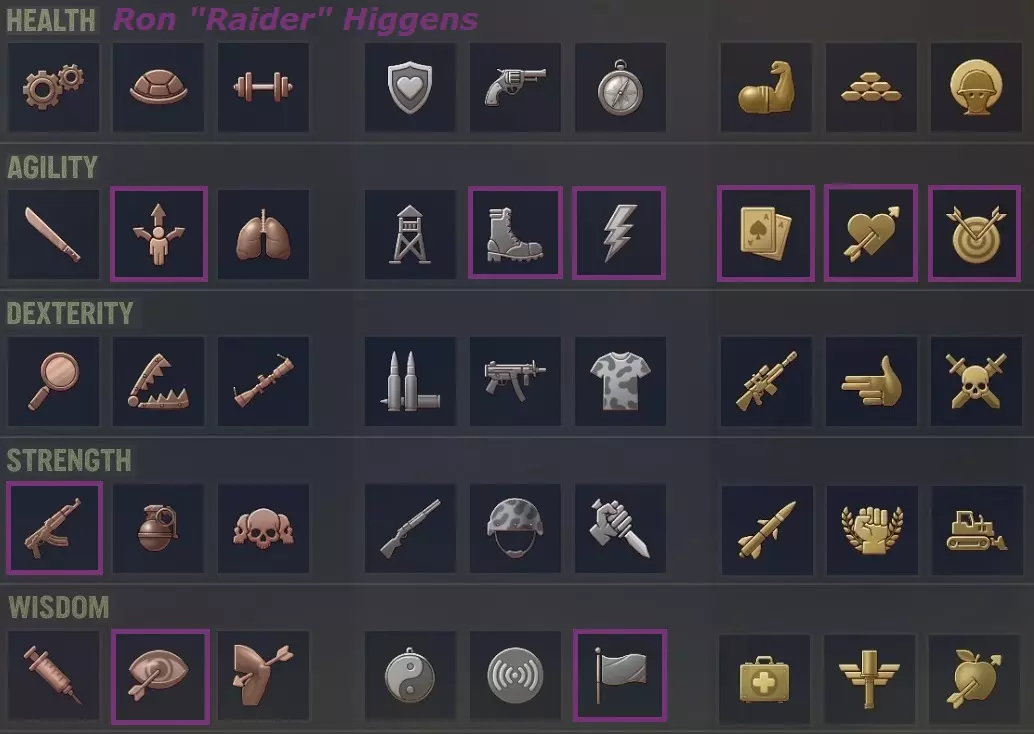
暗杀 增加15%的潜行击杀/潜行暴击几率。 这对于在对抗更强敌人时保持较高的潜行击杀/潜行暴击几率非常重要。有关潜行击杀机制的更多详情,请参阅提示与技巧部分。 2:【杀手】(布拉德)[近战突击手] 布拉德凭借杀手流派能成为一名极其强大的渗透者/突击手佣兵。他的投掷天赋使他每回合可以消耗1点行动点使用飞掷匕首(同一回合第二次使用则消耗3点行动点),这让他拥有出色的机动性,同时能标记敌人目标,以便由邦斯或艾斯进行消灭。他也可以消耗一半行动点投掷手榴弹,同样能带来大量的自由移动机会(一旦他接受了一些爆破训练,感谢巴里!)。当他进入近战范围时,会用“那玩意儿”彻底击溃敌人。他也可以跑到目标身后,为侧翼射击创造机会,只要站在那里就能提升盟友的伤害(不过要小心友军火力!)。注意:你可以选择粉色标记的两个金色特长中的任意一个,因为它们的效果基本相同。
推荐装备 主武器槽: 【异物】 获取位置:从弗利敦开始的任务线,与“路易吉”相关。 副武器槽: 无尽飞刀(固定装备) 任意你喜欢的爆炸物或战术 grenades 护甲槽: 轻型迷彩护甲 夜视仪 防爆护腿 3:“SAPPER”(巴里)【重型掷弹兵】 巴里装备死亡小队护甲套装后极为坚韧,同时仍有足够的机动性进入有利位置向敌人投掷爆炸物,然后撤退到安全地带。完全专注会增加爆炸伤害,且可通过爆炸击杀触发。他能在掩体后造成不错的远程伤害,如果目标未被击杀,会被标记以便团队狙击手完成击杀。注意不要完全失手,否则会失去TC buff。
推荐装备 主武器栏: G36:重型枪托、榴弹发射器、热成像瞄准镜、扩容弹匣、加长枪管、红点瞄准镜(2芯片,2管道) 获取位置:G36可能比较难找到,因此你也可以使用带有相同升级的AR-15。两者基本相同,但AR-15射程和伤害较低,暴击率较高。 副武器栏: 塑性炸药及任何其他爆炸物或自选战术 grenades 护甲栏: 死亡小队护甲 死亡小队头盔 死亡小队护腿 获取位置:与难民营的萨满对话并给他一些metaviron。之后,他会奖励你这套装备。确保在难民营事件发生前获取。4:"炮手"(熔毁)【守望先锋】 熔毁可以利用"坚守阵地"指令在拥有剩余行动点时安全进入守望状态。她可以在掩体后使用AK-74,或在掩体外用HK21卧倒,"先锋"技能提供的"坚毅"效果能让她获得出色的生存能力。无论哪种方式,她都拥有极强的韧性。她还能用AK为团队的狙击手标记目标以便击杀,或使用40毫米榴弹发射器。需要注意的是,熔毁处于守望状态时不会触发"反应射击",但当敌人耗尽所有守望行动点时仍可触发,因此该技能依然有用。当熔毁受伤时,她失去的行动点会比其他角色少,并且能造成更高伤害——但注意不要让伤势失控。“熔毁”没有自动武器特性这一点对她的表现有一定影响,但后坐力控制有所帮助,因为当她因“杀戮地带”触发第二次攻击时,其精准度会更高。
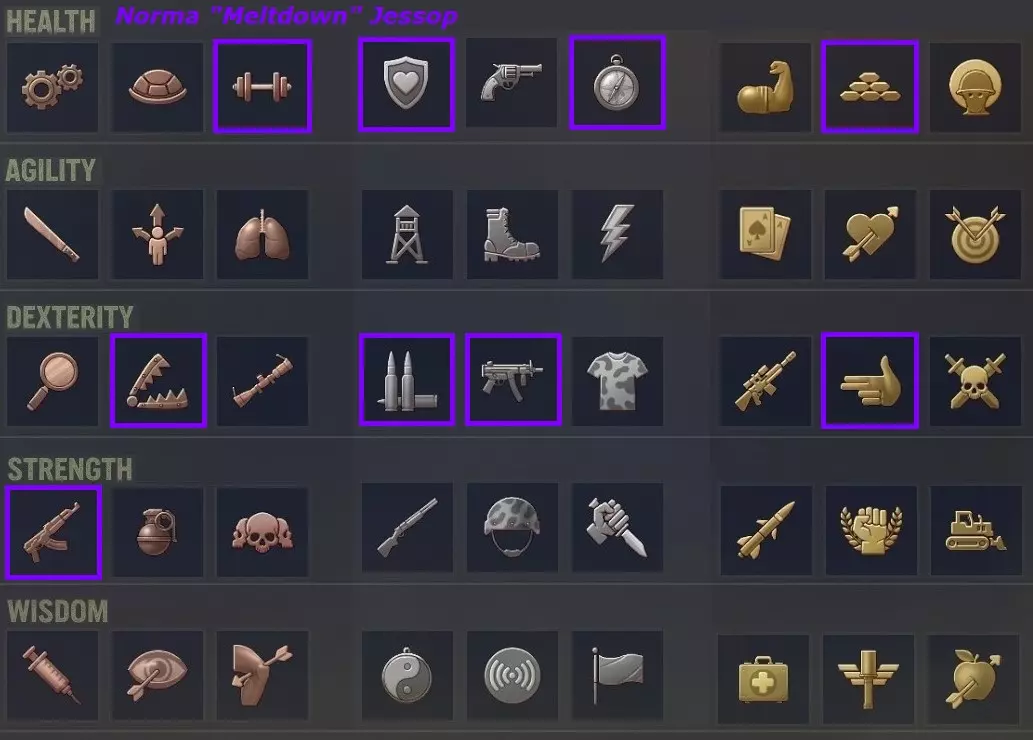
推荐装备 主武器槽: AK-74:后坐力增强器、榴弹发射器、反射式瞄准镜、扩容弹匣、轻型枪托、红点瞄准镜(2个芯片) 获取位置:D17(需要高忠诚度)、B17或B10(准备好一场恶战)。 副武器槽: HK21:重型枪托、反射式瞄准镜、扩容弹匣、战术握把、手电筒、加长增益扭距枪管、补偿器(1个芯片,1根钢管) 获取位置:可以在弗莱敦的战利品箱中获得。这只是有几率获取——你也可能得到其他枪支,例如AUG或AK-SU。 你也可以在她的 inventory 中准备一把RPG以应对特殊情况。 现在你可以在这把枪上使用UV Dot,因为Haemimont已通过补丁使其可用于Overwatch。护甲槽位: 重型护甲 重型护甲头盔 重型护甲 leggings 5:【DEADEYE】(冰)【狙击手】 冰与I.M.P.雇佣兵组成搭档发起战斗。I.M.P.率先开火,若其潜行击杀尝试成功,敌人将陷入惊吓状态。随后冰可从潜行状态消灭另一名敌人,无论该次攻击是否技术上成功达成潜行击杀,凭借【无法追踪】特性,他都必定能造成足够伤害消灭第二名敌人。此策略确保每场战斗开始时至少有2名敌人被击倒,若找到与其他同伴分离的两名敌人,你可以轻松将他们两人消灭而不触发地图上其他敌人的警觉。冰的【冰风暴】技能相当强力,能以极低的行动点消耗轻松消灭敌人。总体而言,他是一名非常出色的雇佣兵,而且价格也不算贵。
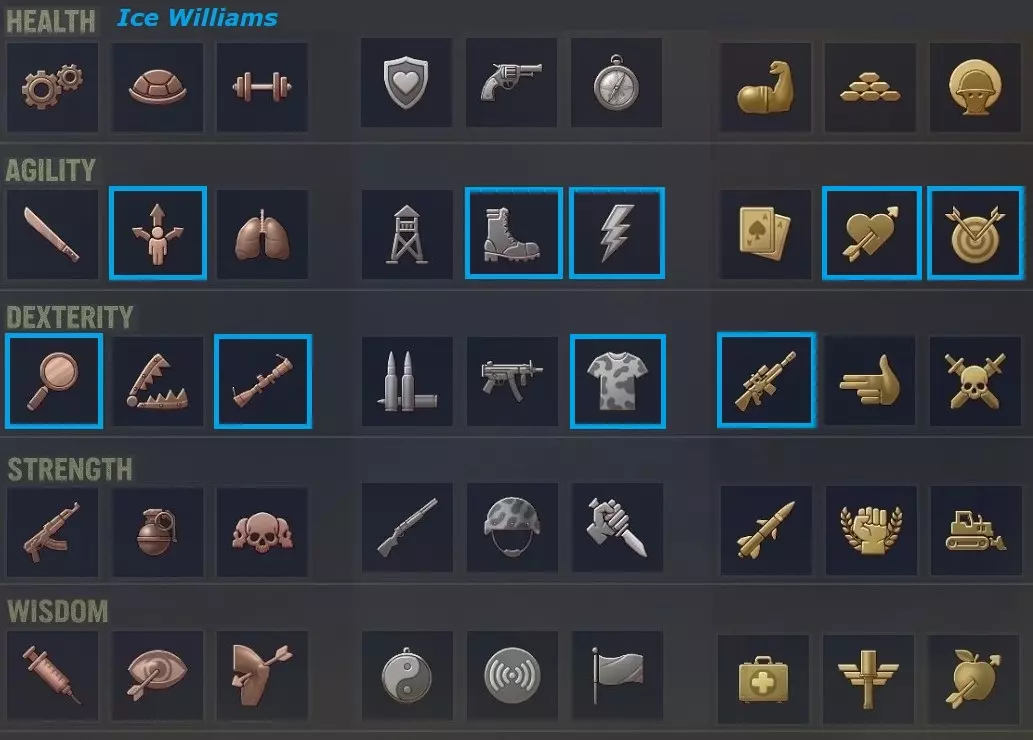
推荐装备 主武器槽: 德拉贡诺夫:重型枪托、热成像瞄准镜、扩容弹匣、 bipod、消音器(1芯片,1管道) 位置:可在C5购买附带热成像瞄准镜的德拉贡诺夫。 副武器槽: PSG1步枪:重型枪托、QP瞄准镜、EE弹匣、bipod、UV红点、消音器(1芯片,1管道,1镜片) 可通过兰茨巴赫任务线获得一把PSG1作为任务奖励(将柴油交给邦斯,而非齐格弗里德),另一把在上校堡垒,最后一把为随机战利品。 护甲槽: 中型迷彩护甲 凯夫拉头盔 凯夫拉 leggings 6:"EXEMPLAR"(邦斯)[狙击手] 邦斯可常规进行高额伤害射击,以触发激励打击,无论发生什么情况都能保持小队士气高昂。当布拉德处于近身格斗状态并移动到目标身后时,目标将受到侧翼伤害加成,此时邦斯无需布拉德动手即可消灭目标——只要他站在那里就能获得35%的伤害提升。闪电反应和中型护甲应能保护她免受敌人火力伤害,同时通过蛙跳为她提供一定的机动性。
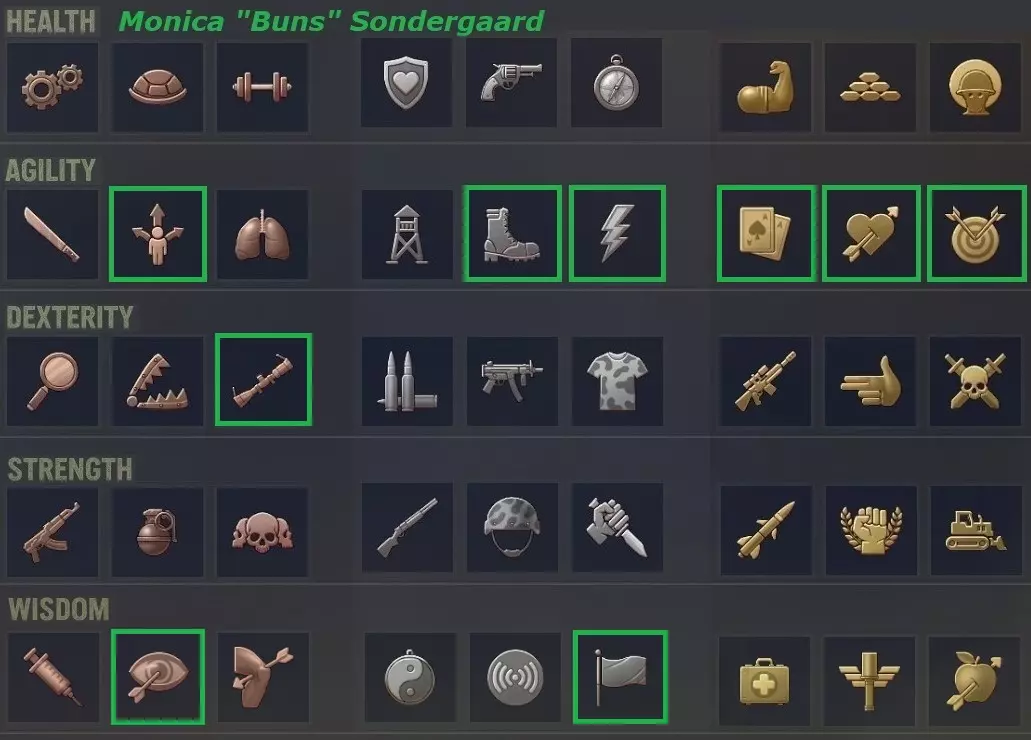
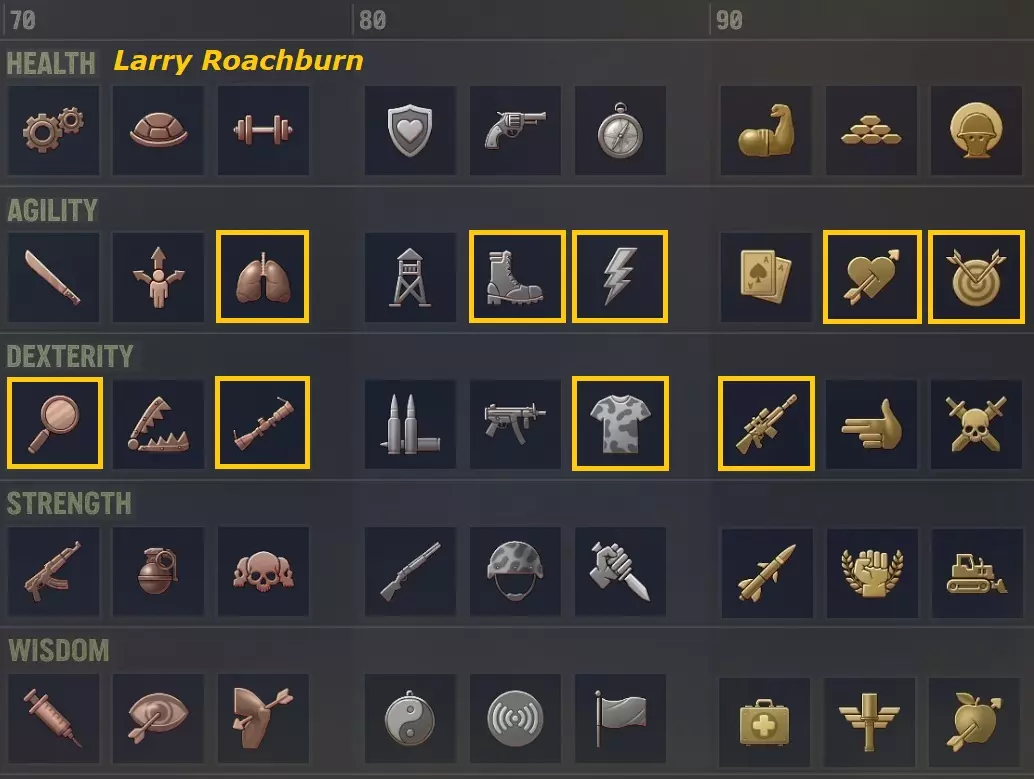
推荐装备 主武器栏: 德拉贡诺夫:重型枪托、热成像瞄准镜、扩容弹匣、 bipod、消音器(1芯片,1管道) 位置:可在C5购买附带热成像瞄准镜的德拉贡诺夫。 副武器栏: PSG1步枪:重型枪托、QP瞄准镜、EE弹匣、bipod、UV红点、消音器(1芯片,1管道,1镜片) 可通过兰茨巴赫任务线获得一把PSG1作为任务奖励(将柴油交给邦斯,而非齐格弗里德),另一把在上校堡垒,最后一把为随机战利品。 护甲栏: 凯夫拉护甲 凯夫拉头盔 凯夫拉护腿 免费雇佣兵#1:拉里·罗奇伯恩 招募拉里的剧透: 可通过清理F7营地、通过医疗检查确认其病情(医学技能对此有帮助),然后给他一些metaviron来招募拉里。你可以使用MD来通过检查。你可以从多个地方获得美他雄酮,但最简单的可能是从弗莱镇的拉莉那里,在他的某个战利品箱里。之后你可以带拉里去H12的医院治好他的病,这会提升他的属性——注意你不需要先完成这个地点的任务。拉里是个相当有趣的角色,非常值得带他一起执行任务。 以下是为他推荐的build:
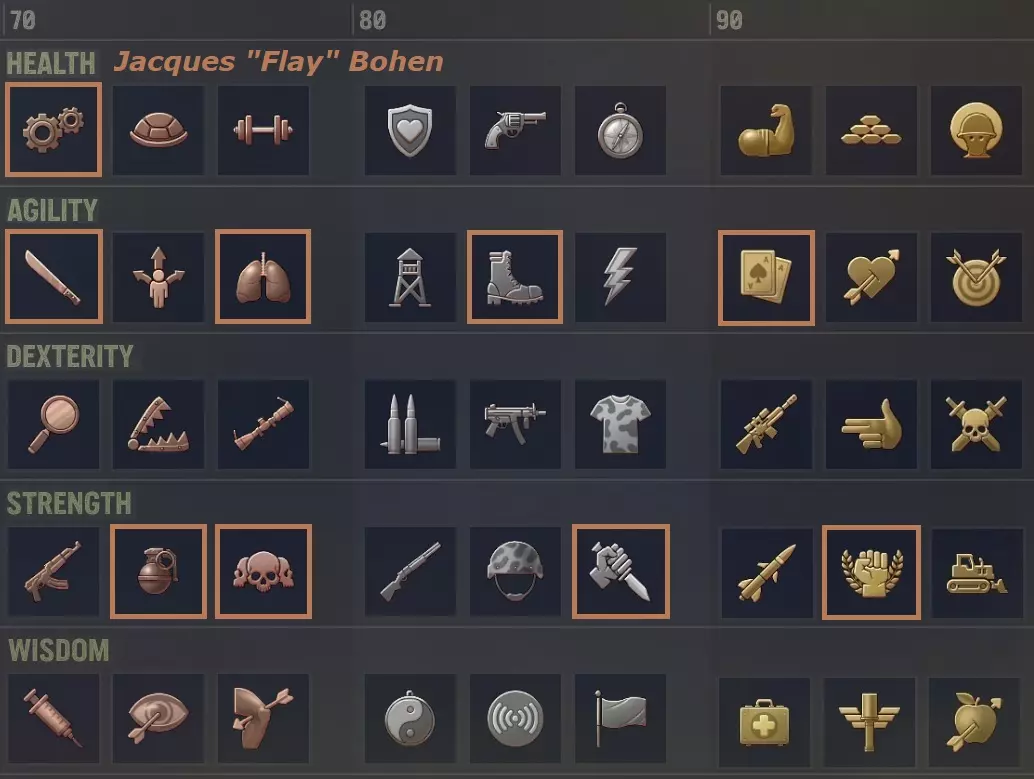
免费雇佣兵 #2:雅克·“剥皮”·博恩 招募剥皮的剧透: 前往C5区域并消灭所有军团士兵,然后与偷猎者头目对话,他会告诉你有个家伙一直在骚扰他们。接着前往C6和B4区域,调查那里的尸体。之后剥皮会出现,你需要通过90点的智慧检定,然后询问他是否愿意和你一起狩猎。 以下是为他推荐的build:
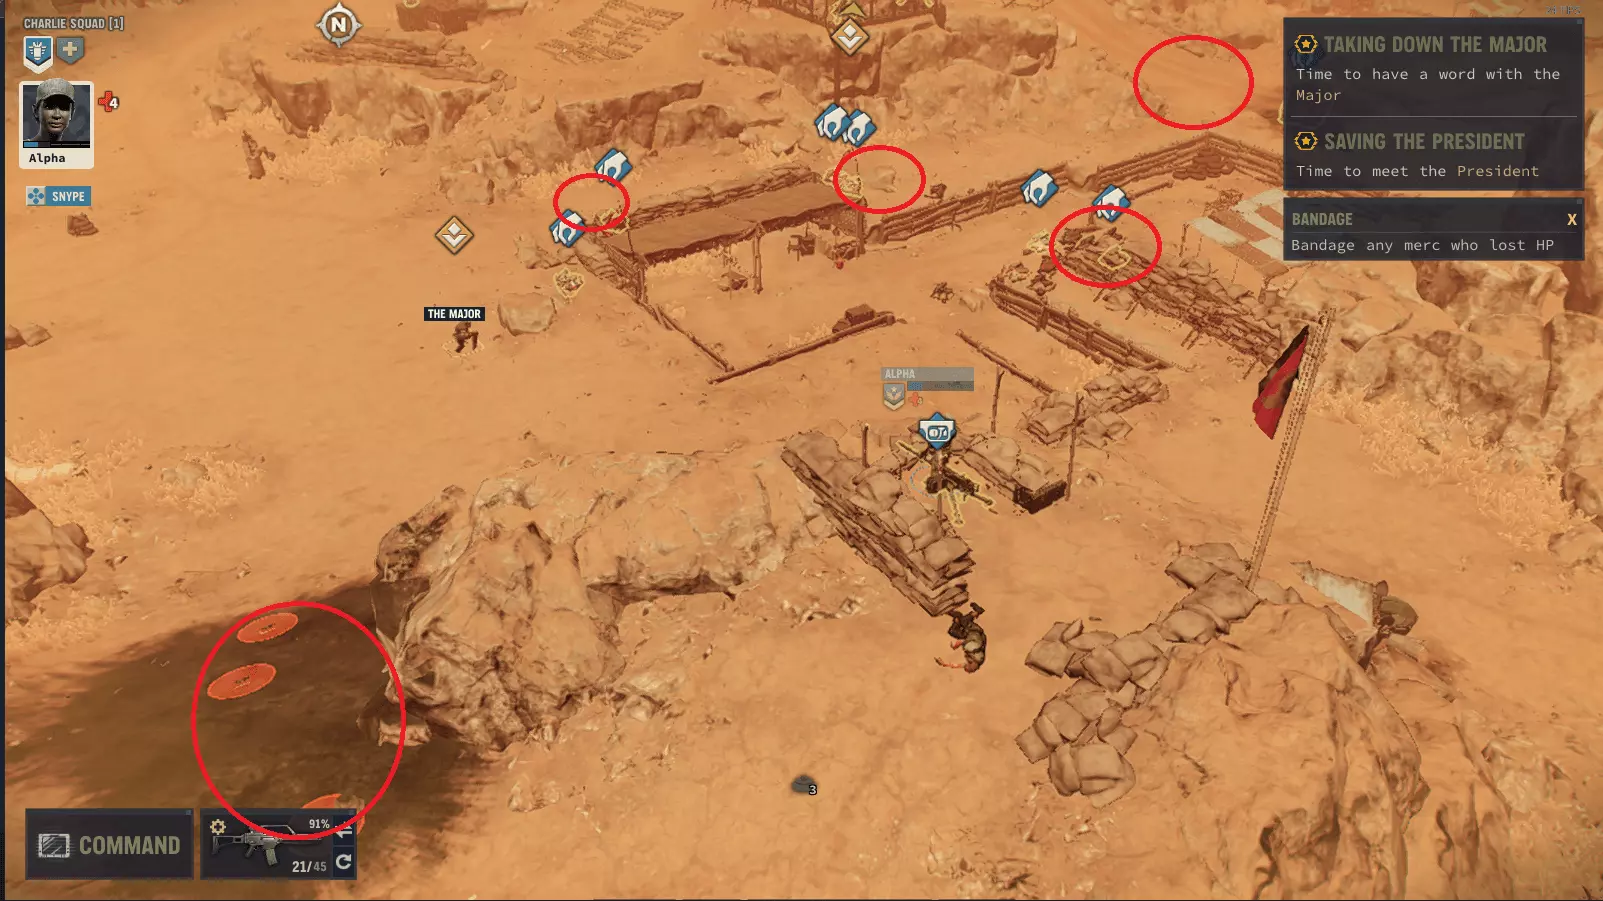
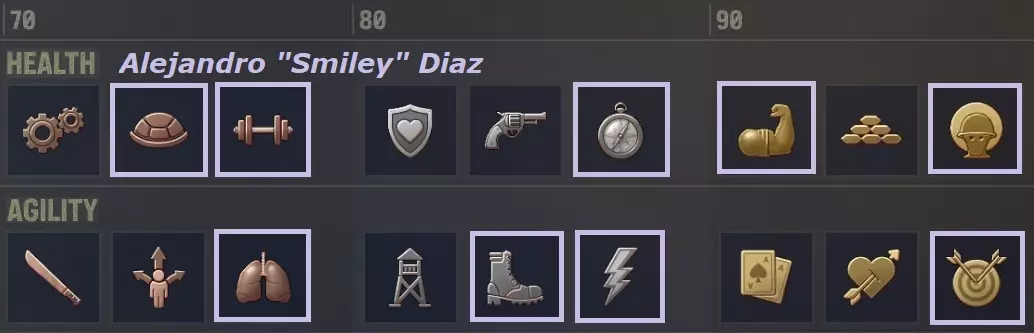
免费雇佣兵 #3:亚历杭德罗“笑脸”迪亚兹 《铁血联盟3》中人气最高的雇佣兵“笑脸”招募攻略: 你需要通过以下方式收集关于笑脸位置的各种线索: 1. 前往潘塔格鲁尔贫民窟(D7)的妓院和附近的澡堂。 2. 与弗利敦(H9)和弗利敦拉布埃(H8)的NPC对话。 3. 前往林维尔(I9)见布劳伯特,建议先完成路易吉的任务,因为完成该任务后布劳伯特的部分守卫可能会死亡,这将非常有帮助。 之后,前往H8与神父交谈以找到笑脸,随后教堂内会立即发生战斗。战斗结束后,去见布劳伯特并协助笑脸进行对峙。这是一场非常艰难的战斗,但我想出了一个相当不错的获胜策略。以下是为他推荐的配装:
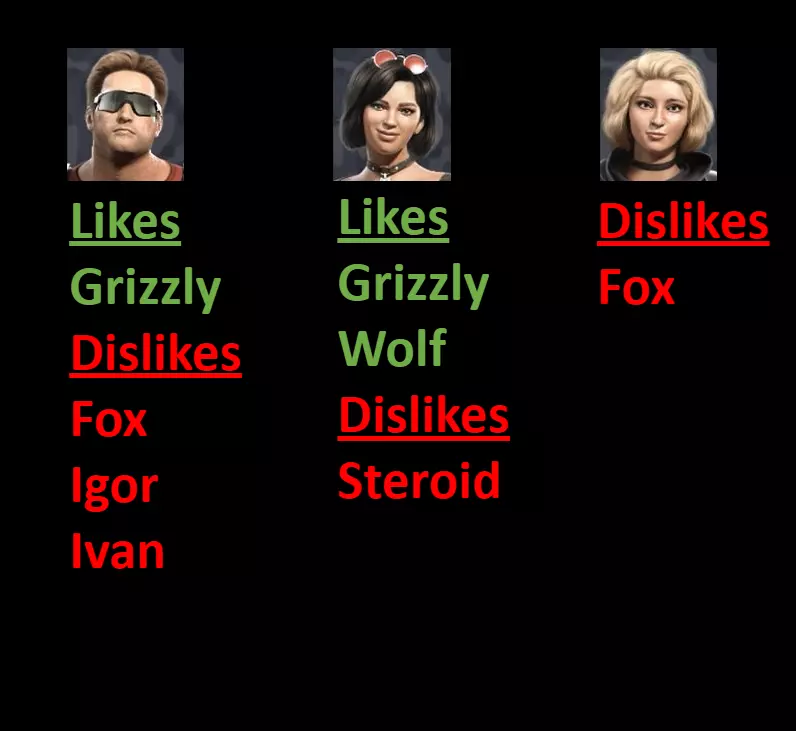
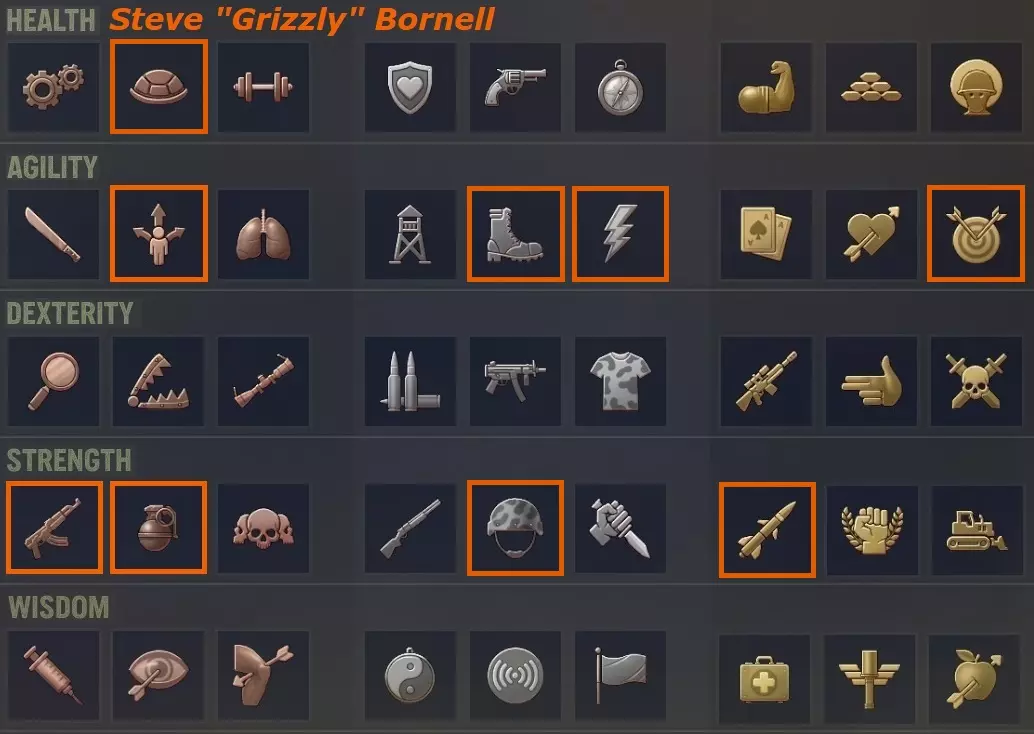
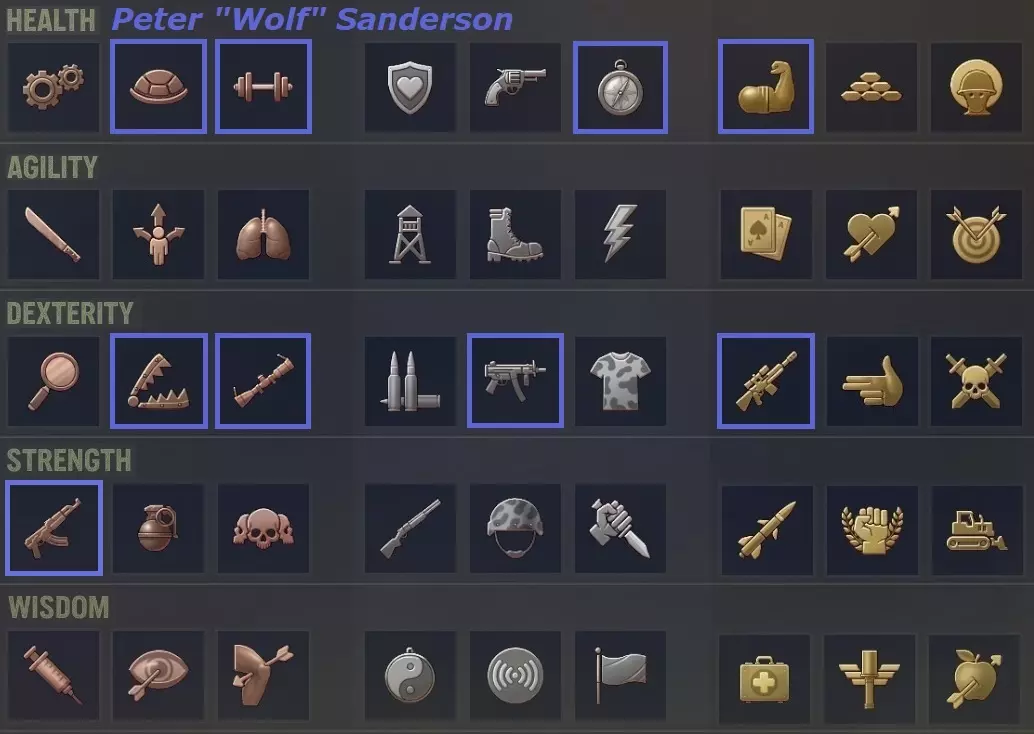
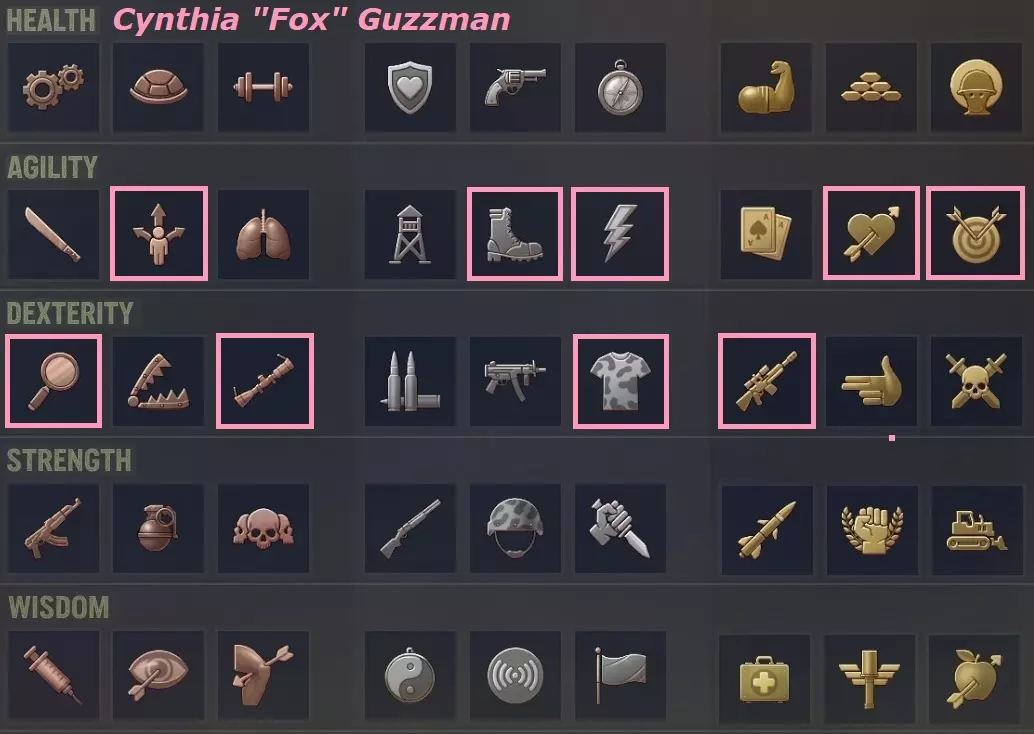
▬ ♣ Op. Rolling Thunder: Overview ♣ ▬ NOTE: this team is a WIP, I never got around to finishing the playthrough so it's not fully tested. Bear that in mind. I will be overhauling this team once the Vanilla Redux mod is completed. Squad Roles (*: modified from vanilla) Grizzly: Point Man (MG/AR, Explosives/Heavy Weapons) Personal/Tactical: Heavy Weapons, Throwing*, Auto Weapons* HLT: Hit The Deck AGI: Flanker, Frogleaping, Lightning Reactions, Total Concentration STR: Recoil Management, Breach and Clear*, Ironclad, Collateral Damage Nails: Grenadier (Melee, Grenades) Personal/Tactical: Psycho, Throwing*, Mr Fixit* HLT: Full Body Contact AGI: Hit and Run, Fast Runner, Frogleaping, Total Concentration STR: Breach & Clear*, Sudden Strike*, Line Breaker, True Strike Raider: Marksman (AR) Personal/Tactical: Negotiator, Teaching, Auto Weapons* AGI: Flanker, Frogleaping, Lightning Reactions, Lucky Streak, Total Concentration, Anatomical Precision STR: Recoil Management* WIS: Distracting Shot*, Inspiring Strike Raven: Overwatch Specialist (AR, MG) Personal/Tactical: Auto Weapons, Night Ops*, Heavy Weapons* HLT: Beefed Up, Hit The Deck, Vanguard, Hold Position DEX: Deadeye, Opportunistic Killer, Fire Routine, Killzone STR: Recoil Management Wolf: Heavy Sniper (HPR, AR/Mortar/MGL/RPG-7) Personal/Tactical: Teaching, Auto Weapons*, Heavy Weapons* HLT: Hit The Deck*, Beefed Up, Vanguard, Calm Under Fire DEX: Opportunistic Killer, Deadeye, Reactive Fire, Sharpshooter Fox: Stealth Sniper (PR/Dual Revolvers) Personal/Tactical: Scoundrel, Stealthy*, Ambidextrous AGI: Flanker, Frogleaping, Lightning Reactions, Total Concentration, Anatomical Precision DEX: Untraceable*, Deadeye, Ambusher, Sharpshooter Ammo Utilisation Reference 7.62x39mm (Warsaw Pact) used by: 7.62x51mm (NATO) used by: 5.56x45mm used by: Difficulty Settings Difficulty: Mission Impossible Forgiving Mode: No Active Pause: Yes Dead Is Dead: No To The Bitter End: Yes Lethal Weapons: No These game rules provide a nice blend of tension in combat, especially some late-game combats which are extremely long and punishing where death means restarting from the beginning, without turning the game into Ironman which I personally am not a fan of. Body Count: Yes A.I.M. Always Online: Yes Heavy Wounds: Yes All other advanced rules: No I personally find the game economically challenging enough early on, and I don't much care to have tension in that element of the game for the entire playthrough, so I keep Union Rules off - if you prefer the opposite, I recommend turning it on. Body Count is a nice way to increase the difficulty of the game. Possible starting mercs: Fox: $6320 (14d) Grizzly: $5040 (14d) Barry: $4940 (14d) Igor: $5630 (14d) [Sometimes haggles] Livewire: $2750 (3d) [Medical: $1100] Total: $24680 1: "GLADIATOR" (Grizzly) [Point Man] Built to cause mayhem and destruction a variety of different ways. Can use grenades, RPGs, machine guns, underslung grenade launchers, or just plain assault rifle burst fire to massacre the enemy. Little need for DEX because typically you don't spend much AP aiming. This build is used instead of the free IMP merc, so I use that point to justify tweaking Grizzly quite a bit to make him more fun to use (yay rationalizing). First of all I get rid of his trash unique perk and replace it with Fauda's, which allows him to free move while wearing cumbersome gear & weapons, and gives him Grit generation. Then I take those useless 32 points in MEC and MED and redistribute them to AGI (80), WIS (80) and EXP (50). A little bit overpowered? Maybe, I don't care!
个人特长与战术特长 特长 备注

投掷 提升投掷距离,每回合一次大幅降低手榴弹的行动点消耗(-3)。 这极大地改进了手榴弹投掷效果,而降低行动点消耗是最出色的方面——烟雾弹和闪光弹仅需1行动点,让你能额外进行一次移动。标准手榴弹的行动点消耗则从6降至3。

自动武器 减少使用连射和全自动模式时的精度惩罚。 在使用Rato的平衡模组游玩时,这个专长更为重要。

重型武器 降低重型武器和机枪的开火及架设行动点消耗。 非常灵活的战术专长,不仅降低特定武器的开火行动点消耗,还有助于武器架设。与该build以大规模破坏为核心的设计理念高度契合。 推荐装备 主武器栏:机枪、突击步枪 副武器栏:破片手榴弹、闪光弹/烟雾弹、RPG-7 护甲栏:重型护甲、重型护甲头盔、重型护甲护腿 2:“硬汉”(钉刺)【榴弹兵】 快速获得真打击技能,大幅提升近战伤害。通过如“游击战术”等专长提升机动性。“精准命中”和“完全专注”专长均能提升近战/爆炸伤害,并可通过近战/爆炸击杀触发。生存能力极差,面对大量敌人时需格外小心。消耗1点行动点使用烟雾弹或闪光弹以保持移动。需要尽快进行敏捷训练。

个人特长与战术特长 特长 备注

狂怒 受伤时额外获得1点行动点,选择单发射击时有极低概率使用连射。解锁对话选项。 这个专长对于对话/任务选项来说很有用,但其他加成非常微弱。注意,受伤时的行动点加成不会消除士气惩罚,只是抵消它。
投掷 提升投掷距离,每回合一次大幅降低手榴弹的行动点消耗(-3)。 这极大地增强了手榴弹投掷能力,而降低行动点消耗是最显著的优势:烟雾弹和闪光弹仅需1行动点,让你能额外进行一次移动。标准手榴弹的行动点消耗则从6降至3。

修理大师 提升15点拆除陷阱、骇入装置和撬锁技能。 奈尔斯的机械工程学和经验技能初期较低,因此该技能几乎是让他有效胜任这些角色的必备技能。 推荐装备 主武器栏: 【异物】 获取位置:从弗利敦开始,跟随与“路易吉”相关的任务线。 副武器栏: 破片手榴弹 闪光弹/烟雾弹 护甲栏: 皮甲背心(锁定装备) 夜视仪 防弹 leggings 3:“特工”(掠夺者)【神射手】 利用瑞文的守望标记能力,通过连射攻击轻松打出暴击,进而触发激励打击。凭借高领导力大幅提升陆上移动速度。由于装备了死亡小队护甲,该角色非常抗打,同时保持了不错的机动性。注意:需要提升一点智慧属性以获得第二个智慧专长,可以通过让他发现大量草药和隐藏物品来实现,或者直接在编辑器中给他分配几点(从医疗/机械/经验等无用属性点中扣除)。需要尽快进行敏捷训练。
个人特长与战术特长 特长 备注

谈判专家 降低区域行动和船只旅行的费用。解锁对话选项。 这个专长在对话和任务选项方面很有用,降低的费用使掠袭者成为训练民兵的不错选择,前提是时间不是问题(否则狼嚎是更好的选择)。
教学:增加雇佣兵训练行动中获得的经验值,为小队提供10%的额外经验值(不可叠加)。此效果对教学经验的提升相当显著。
自动武器 减少使用连射和全自动模式时的精度惩罚。 这个专长在使用Rato的平衡模组时更为重要。 推荐装备 主武器槽:突击步枪 副武器槽:突击步枪 护甲槽:死亡小队护甲、死亡小队头盔、死亡小队护腿 获取位置:与难民营的萨满对话并给他一些元铁。之后,他会奖励你这套装备。确保在难民营事件前获取。 4:【哨兵】(渡鸦)[守望] 守望专家,可为小队其他成员标记目标以获得免费暴击和额外精度。杀戮地带能造成大量伤害。凭借护甲和专长非常抗打。力量属性较低,因此是训练的优先项。

个人特长与战术特长 特长 备注

夜战行动 在夜间行动或地下区域时,精度惩罚减半。 这是一个实用的技能,能让渡鸦(Raven)在没有夜视镜或热成像瞄准镜的黑暗环境下依然保持战斗力。
自动武器 降低使用连射和全自动模式时的精度惩罚。 降低连射攻击和对同一目标重复攻击产生的后坐力影响。
重型武器 降低使用和架设重型武器及机枪的行动点消耗。 是有效使用机枪的重要专长。 推荐装备 主武器栏位:机枪 副武器栏位:突击步枪 护甲栏位:重型护甲、重型护甲头盔、重型护甲护腿 5:【斯巴达】(狼)[重型狙击步枪] 旨在穿戴重型护甲并携带诸如M82这类笨重步枪。作为标准的神射手狙击手行动,从掩体后对远距离目标造成暴击。由于出色的坚毅值生成和护甲,也能相对安全地在掩体外用卧姿行动。反应射击可能产生大量伤害输出,且得益于智能守望,其效果比原版好得多。拥有使用MGL、RPG-7或迫击炮等重型武器的选项。
个人特长与战术特长 特长 备注
教学:增加雇佣兵训练行动中获得的经验值,为小队提供10%额外经验值(不可叠加)。使沃尔夫能更有效地将其属性/技能传授给团队,对教学经验获取的提升效果相当显著。
自动武器 减少使用连射和全自动模式时的精度惩罚。 对于使用突击步枪很有帮助,本build会时不时需要用到。它还能减轻后坐力的影响,这在触发反应射击时会发挥作用。
重型武器 降低使用和架设重型武器及机枪的行动点消耗。 此专长专为让佣兵能轻松部署MGL、迫击炮或RPG-7等重型武器而设。你也可以使用机枪,但这并非该build的重点。 推荐装备 主武器栏位: 带瞄准镜的步枪,尤其是M82或PSG1等重型步枪。 副武器栏位: 带下挂式榴弹发射器的突击步枪 MGL、RPG-7、迫击炮 护甲栏位: 重型护甲 重型护甲头盔 重型护甲护腿 6:“SIREN”(Fox)【 stealth狙击手 】 作为小队的发起者,能通过精准射击消灭至少一名敌人,且不在意 stealth击杀是否成功。可用于侦察。必要时可使用双左轮进行近距离战斗。初期最大的问题是她缺乏【射击】属性,需要在该方面进行一些训练才能真正发挥实力。此外,还需要进行【力量】训练,以便能有效使用更大的步枪。
个人特长与战术特长 特长 备注
恶棍 每回合首次切换武器无需消耗行动点。解锁对话选项。 此专长不仅对对话/任务选项有帮助,其价值不止于此——对于该构筑而言,每回合能免费切换武器非常实用。
潜行高手 敌人更难在你潜行时发现你。潜行击杀几率提升约10%。 这个技能对于安全潜行非常有用,提升的潜行击杀几率虽然对这个小队来说并非至关重要,但仍然很实用。

Ambidextrous Reduces AP & accuracy penalties when dual-wielding firearms. Allows Fox to remain effective in close quarters if the enemy gets too close for her to use her scoped rifle. Note that dual-wielding is much more effective with Rato's mod. Recommended EquipmentPrimary Weapon Slot: Scoped RifleSecondary Weapon Slot: Dual RevolversArmor Slots: Kevlar Armor Kevlar Helmet Kevlar Leggings ▬ ♣ Op. Bullet Hell: Overview ♣ ▬ This team is designed to be played all of my recommended mods installed. The goal of these mods when combined is to produce an improved vanilla experience. I chose mercenaries for this team based on their ranking in my tier list (see below). I have deliberately chosen weaker mercs, or mercs that are much more expensive than they should be, in order to create a more challenging run. The idea here is to find out how hard Mission Impossible difficulty can be if you choose some of the worst mercs in the game. I still chose mercs that work well together and fill roles that are needed, so it's not like its the absolute worst team ever (for that you'd choose mercs that hate each other, for example). Squad Role Overview IMP: machine gun/heavy weapons & overwatch specialist Hitman: marksman, leader/trainer Tex: ??? Red: explosives expert Steroid: mechanical expert Grunty: ???? Squad Roles Detailed (*: default perk) I.M.P.: Point Man (MG/AR, Explosives/Heavy Weapons) Personal/Tactical: Scoundrel, Auto Weapons, Heavy Weapons HLT: Hit The Deck, Beefed Up, Vanguard, Hold Position, Battle Focus DEX: Opportunistic Killer, Fire Routine, Reactive Fire, Killzone Hitman: Reactive Sniper (AR/SR) Personal/Tactical: Teaching HLT: Hit The Deck*, Vanguard DEX: Deadeye, Reactive Fire, Opportunistic Killer, Sharpshooter, Killzone STR: Recoil Management* WIS: Arterial Shot* Tex: CQC Specialist (Shotgun/Pistols) Personal/Tactical: CQC Training, Ambidextrous, Claustrophobic HLT: Hit The Deck*, Vanguard AGI: Fast Runner*, Frogleaping DEX: Opportunistic Killer* STR: Breach & Clear, Shock Assault, Recoil Management, Line Breaker Red: rolenamehere (weapons, weapontypes) Personal/Tactical: AGI: Flanker, Frogleaping, ????, Total Concentration DEX: Deadeye* STR: Breach & Clear* WIS: Arterial Shot*, Inspiring Strike Steroid: Tank (Shotguns) Personal/Tactical: Mr Fixit HLT: Beefed Up, Vanguard, STR: Recoil Management, Shock Assault, Breach & Clear, Line Breaker Grunty: rolenamehere (weapons, weapontypes) Personal/Tactical: Heavy Weapons HLT: Beefed Up*, Vanguard* AGI: Ammo Utilisation Reference 7.62x39mm (Warsaw Pact) used by: 7.62x51mm (NATO) used by: 5.56x45mm used by: Difficulty Settings Difficulty: Mission Impossible Forgiving Mode: No Active Pause: Yes Dead Is Dead: No To The Bitter End: Yes Lethal Weapons: No These game rules provide a nice blend of tension in combat, especially some late-game combats which are extremely long and punishing where death means restarting from the beginning, without turning the game into Ironman which I personally am not a fan of. Body Count: Yes A.I.M. Always Online: Yes Heavy Wounds: Yes All other advanced rules: No I personally find the game economically challenging enough early on, and I don't much care to have tension in that element of the game for the entire playthrough, so I keep Union Rules off - if you prefer the opposite, I recommend turning it on. Body Count is a nice way to increase the difficulty of the game. Starting Team IMP: $6999 Hitman: $8770 (9d) [including Medical: $900] [Sometimes haggles] Barry: $4940 (14d) [Sometimes haggles] Livewire: $2750 (3d) [including Medical: $1100] [Sometimes haggles] Total: $23459 ($1441 remaining) 1A: "ZERO" (I.M.P.) [Heavy Weapons Specialist] A tough-to-kill machine gunner and heavy weapons specialist. Mostly you'll sit in overwatch, but you can run and gun a fair bit too when needed. Attribute Distribution
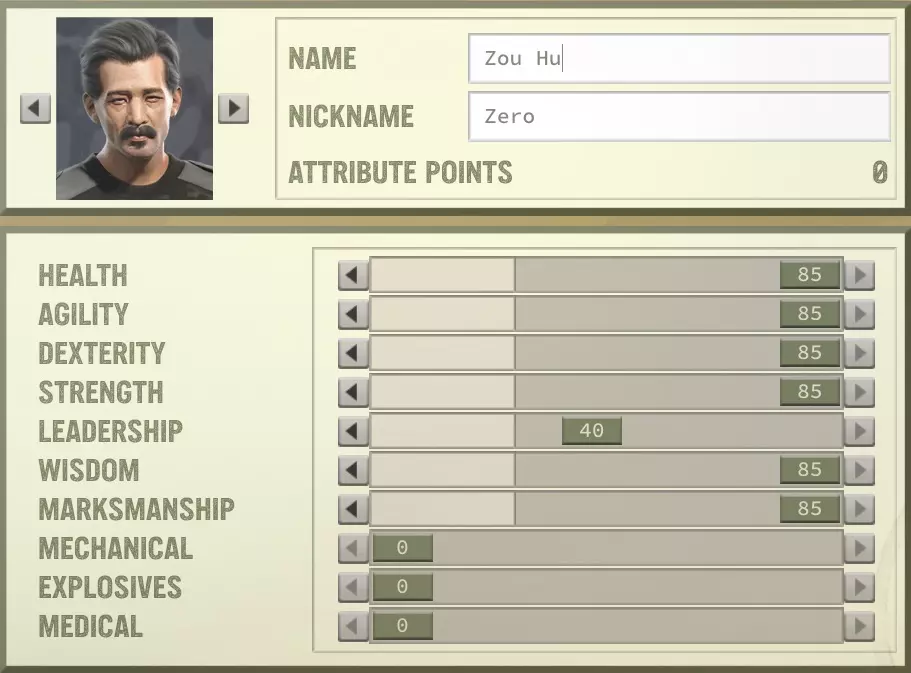
生命值:85 敏捷:85 灵巧:85 力量:85 领导力:40 智慧:85。在《铁血联盟3》中,智慧是一项神级属性,因为它控制着技能的提升速度。该属性无法通过训练提升,但可以通过发现野生草药或其他隐藏物品来升级。 射击术:85。显然,使用远程武器命中目标需要射击术。 机械:0 爆破:0。拉里会负责这个技能,但团队中多名佣兵拥有此技能会很有用。因为游戏中有大量不同且非常实用的爆破物品,单靠一个角色无法全部使用。这些包括闪光弹、烟雾弹、照明弹等,更不用说还有许多不同类型的爆炸物。一旦你拥有了一些钻石矿并获得些许喘息空间,就花些时间训练部分雇佣兵掌握这项技能。后期你可以使用配备下挂40毫米发射器的AK-74,而60以上的经验值能让你以0%的失误率使用它。作为参考,一名拥有65经验值技能的雇佣兵使用 stick grenade 时约有5%的失误率。 医疗: 0. 这项技能将由拉里负责。他的分数不是很高,但在大多数情况下你并不真的需要这项技能的高分。只有在特定的技能检定(例如诊断拉里的医疗问题)时,你才真正需要较高的医疗值。为此,你可以雇佣 MD 一周左右。个人特长与战术特长 特长 备注
恶棍 每回合首次切换武器无需消耗行动点。解锁对话选项。 这个专长不仅对对话/任务选项很有帮助,其价值不止于此——每回合能免费切换武器对该构筑来说简直太棒了,实际上,它对任何构筑都很强力。
自动武器 使用连射/自动射击时降低精度惩罚。 此专长对精度的影响相当显著,是任何使用突击步枪或机枪的雇佣兵的必备专长。
重武器 使用重武器进行攻击和架设所需的行动点减少。 此专长在使用机枪进行警戒时节省的行动点效果显著,绝对是必备专长。 推荐装备 主武器栏位: AK-74:配备后坐力增强器、榴弹发射器、反射式瞄准镜、扩容弹匣、轻型枪托、红点瞄准镜(消耗2个芯片) 获取位置:D17(需要高忠诚度)、B17或B10(准备好一场艰难的战斗)。 副武器栏位: HK21:配备重型枪托、反射式瞄准镜、扩容弹匣、战术握把、手电筒、加长增益缠距枪管、补偿器(消耗1个芯片、1根钢管) 获取位置:可以在弗莱镇的战利品箱中获得,不过这只是有一定几率,你也可能获得其他枪支,例如AUG或AK-SU。 此外,你也可以在她的物品栏中常备一把火箭筒,以应对特殊情况。现在你可以在这把枪上使用UV点,因为Haemimont已经修复了它与守望先锋的兼容性。 护甲槽位: 重型护甲 重型护甲头盔 重型护甲 leggings 额外信息
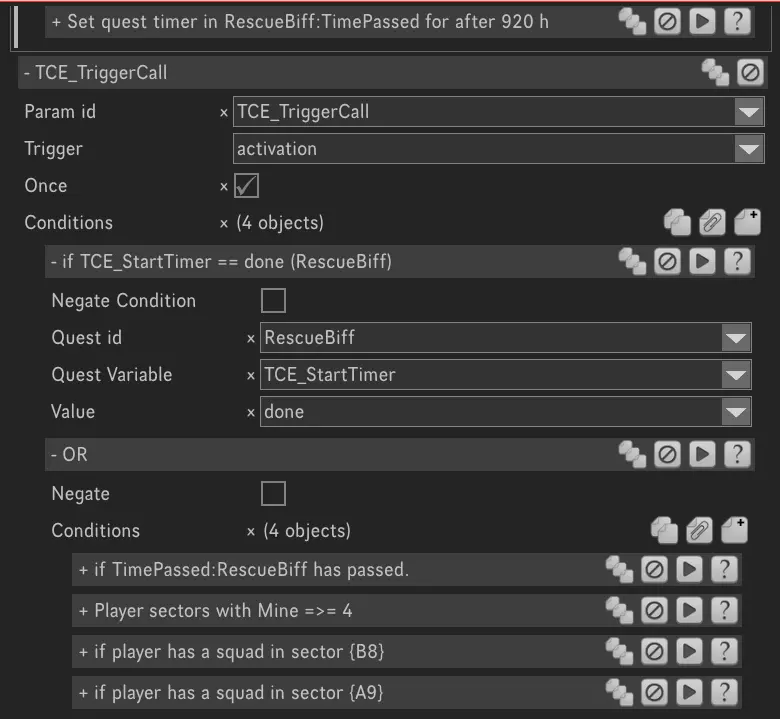
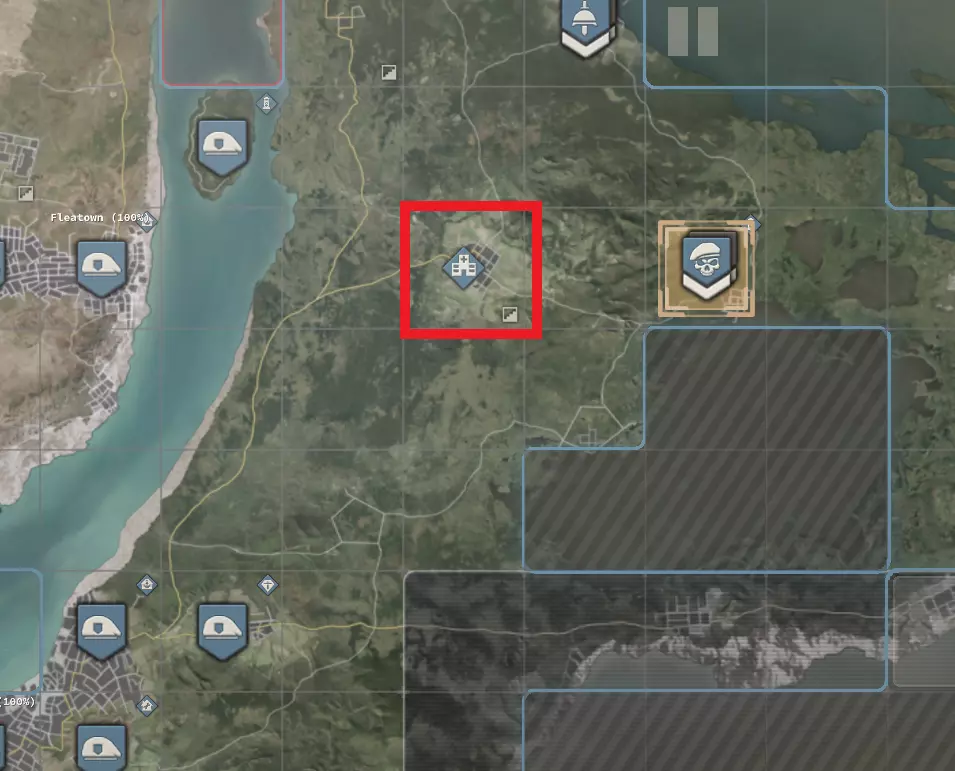
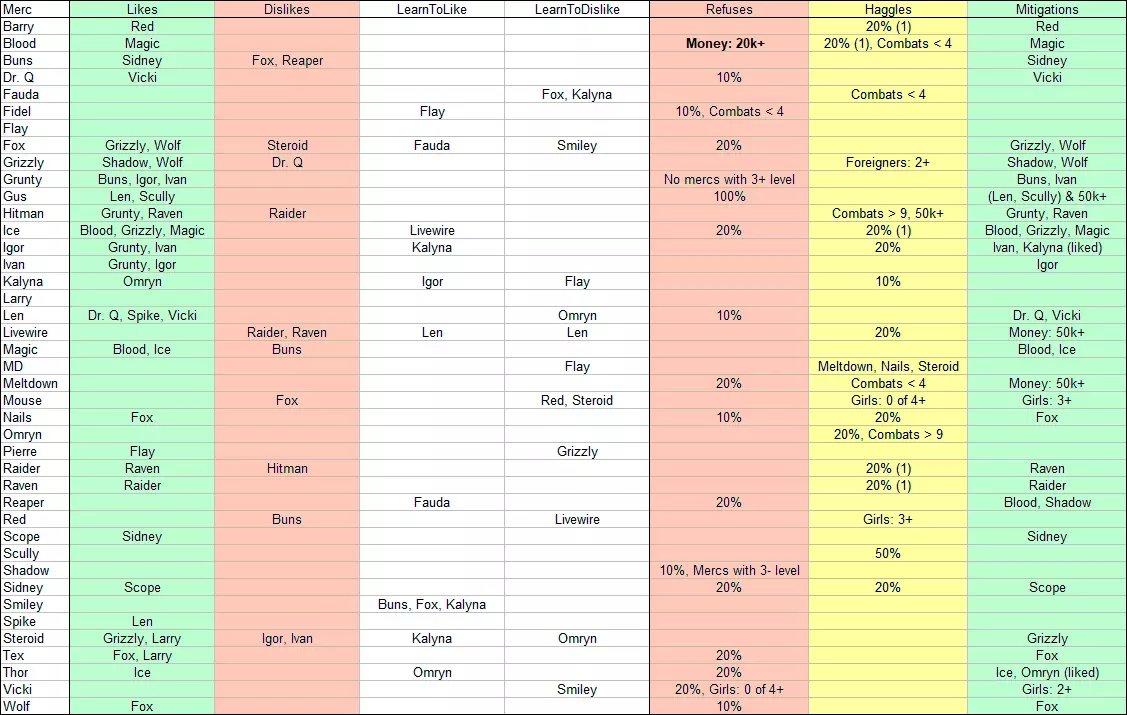
Merc Tier List I sourced most of this tier list from Trolleur_Durden's list on the Steam discussion forums, so feel free to check out his list first if you like. There's lots of good info in that thread about various mercs, and it helped inform my judgements on some mercs that I haven't used much. That said, I found some specific mercs to be inaccurately placed so I made some adjustments of my own. S-Tier Livewire Livewire's unique perk is incredibly powerful, and she has very high WIS which means she can quickly develop extremely high levels in MRK and other attributes. She is also is dirt-cheap for what she brings to the table. Knowing where every enemy is just fundamentally changes the way you play the game. Raven Raven's ability to mark large groups of enemies is incredibly powerful and makes her pretty much the best overwatch merc in the game. She is a little pricey, but worth the cost for the free crits she hands out to the rest of your squad. Fox Fox's unique perk is extremely powerful, fundamentally changing the way your squad will open fights and giving them a huge advantage. She's also a decent Doctor, and very cheaply-bought. Ahem. Thor Thor's unique perk creates consumables that any mercenary can use at any time to restore their energy levels and gain grit. This is a very powerful at-will buff that carries very little risk. In fact, you don't even need to have Thor in your current squad in order to use his perk. Barry Barry just represents insanely high value for money, being another high WIS merc with very decent attributes and a very powerful unique perk that produces grenades which not only are free, but do more damage than standard grenades and have a more optimal blast shape. Ivan Quite simply the most broken merc in the game. The ability to generate AP on-kill, when combined with the right perks and equipment, has the potential to completely trivialise nearly every encounter in the game. Almost needs a separate tier above S, just for him. Is very expensive which is the only thing keeping him remotely balanced. Ice Ice earns his spot simply due to being dirt-cheap for the high attributes he has and his very decent unique perk. He also 'likes' Blood, which makes him even better because of how powerful Blood is. He simply makes the game very easy from start to finish. Blood Inexpensive, insane mobility from his unique perk, uses the most broken weapon type in the game, perfect starting perks, and most importantly, he's just very cool. This guy trivialises most fights, and unlike Ivan, you can get him right from the start of the game. Simply one of the best mercs in the game.A-Tier Wolf Excellent unique perk, and good attributes. He has to go down a rank purely because he's missing a good LDR score, so you have to fix that in order to realise his full potential. Also, his WIS is lacking, and he's a little pricey. Vicki A great merc, but she has at least one wasted perk, she's very expensive, doesn't 'like' any other mercs, and is Claustrophobic. If you desperately need a mechanic, you can do a lot worse, providing that you have a fat wallet. One trick with her is to switch out the whole squad's weapons and armor while travelling, in order to save money by getting free repairs; if you're willing to do this, then she's probably closer to S-tier because of how much money you'll save. Dr. Q His unique perk is not the best fit for a melee playstyle since he can't use The Thing, and he has a useless WIS perk allocated. Still, melee is always strong, and he's a great Doctor. Buns Buns, similar to Ice, brings very powerful marksman abilities for an extremely cheap salary, and has the rare Negotiator perk along with capable Doctoring. What puts her lower than Ice is the fact that her unique perk is a little underwhelming, and she hates Fox who is a very good merc, so she doesn't fit into some meta team comps. Igor Igor is mostly great because he's a melee archetype. His unique perk is a little weird since Full Body Contact is a standard pickup for melee builds, and they don't typically need extra damage once they have access to True Strike. He's friendly with Ivan which is a big benefit since Ivan is so strong, and his stealth abilities are useful. Meltdown The second best overwatch merc, a very solid pick for that role and also the heavy weapons role. Since machine guns are so good in this game, this raises her up somewhat despite her average unique perk. Len Sidney Shadow NailsB-Tier Raider Raider is a great merc to fill that Leadership hole you might have, but the issue is that typically IMP builds tend to fill that role. His stats are also a little low for how expensive he is. If you're not running a LDR IMP build, then he's much more valuable, probably high A-tier. MD Superb WIS and a great Doctor, but his unique perk is a little lacking. He has the potential to become a great merc with a little training, and he's dirt-cheap. He can also teach MED to other mercs effectively. The issue is that you really don't need a very high MED skill most of the time, aside from a few key moments during certain quests. He's also competing with Buns, who is a much better shot and isn't too expensive. Reaper Reaper's unique perk is pretty decent, but there are many ways to generate crits quite easily in this game, and the panic effect that results has quite a small radius. He's also very expensive. Grizzly Very underwhelming unique perk, but he earns this spot simply by virtue of being dirt-cheap, and pretty good at using machine guns, which are a powerful weapon type. If you can get him on a team with Wolf, and spend some time boosting his weaker stats, he can be decent. Red A great explosives expert, but pretty expensive, and Pessimist is annoying. Scope Scully A very powerful merc with good starting perks, but he is just way too expensive to get a higher tier. When you're drowning in cash, he's a good option - one of the best, in fact. Mouse Hitman Has some use as a temporary merc to train up your main mercenaries' Marksmanship. Other than that, is really underwhelming with his terrible DEX. His unique perk is quite good.C-Tier Gus Insanely expensive, hard to obtain, terrible perk allocation. Overall a very overrated merc. Magic His unique perk is incredibly overrated, and his perk allocation isn't the best. Too expensive. Kalyna Pretty terrible stats, although her unique perk has some uses. Can get surprisingly expensive. Fauda Too expensive. Goofy perk allocation. Fidel This guy is such a pain to deal with. Steroid A walking meme, and not a good one. It doesn't help that his abilities are pretty terrible. Omryn Has an interesting unique perk, but ultimately is just too underwhelming. Grunty This guy's unique perk is almost always either useless or a detriment to the team. His dialogue is also really annoying. He is very cheap though. He could rise a tier or two if you intend on not using Stealth Kills, but there are much better mercs. Tex His unique perk has some potential, but his terrible attributes and high cost bring him down significantly. Tips, Tricks & Useful Info Biff Rescue & Refugee Camp Event TriggersCourtesy of Dreepa. Link. This guide explains what triggers two key story events that can occur quite a ways into the game, or quite early, depending on what actions you take. It can certainly feel like the story is progressing very fast, not giving you the breathing space to do the content you want to do (although it actually doesn't affect the game world until you do the camp event, and you have all the time you want to go and visit the camp once you get the invite - however if you haven't gone to the camp yet and done the quests there, e.g. the Deathsquad Armor, you might lose those forever). So it's useful to know the triggers. I have summarised the important part here in as spoiler-free of a manner as I can: Corazon will invite you to visit the Refugee Camp if any of these is true: 1) You have captured 12+ cities. 2) You have captured four diamond mines. Depleted mines count towards this total. 3) You currently have possession of 70+ sectors. Relationships GuideCourtesy of JVA's guide here. Please give him an upvote.
打捞指南 - 何时保留或出售物品

潜行击杀机制指南 一份讲解潜行击杀机制的优秀指南,尤其说明了敌人的【感知】对潜行击杀效果的重要影响。他们还制作了一个显示潜行击杀概率的模组。 自然属性增长机制 佣兵的属性会根据在战斗或地图中采取的行动自然提升。每种属性在多次执行对应行动后会得到提升;例如,可能需要多次发现草药后,你的【感知】属性才会提升。部分行动在每张地图中的触发次数有限制。此信息由Audaki提供。HLT 累计造成80点生命值伤害 从重伤状态恢复(失败概率额外增加10%) AGI 移动7个体素(每张地图仅一次) 隐藏状态下进入战斗 每消耗20点行动点(包括免费移动行动点) DEX 用瞄准射击杀死敌人(失败概率额外增加75%) 用近战攻击杀死敌人(失败概率额外增加50%) 潜行状态下杀死敌人(失败概率额外增加25%) 用飞刀杀死敌人 STR 用近战暴击杀死敌人 累计造成50点近战伤害 在同一场战斗中用近战攻击杀死2名敌人 WIS 发现草药/可回收物资(每张地图仅一次)发现陷阱(每张地图一次) 每训练佣兵12小时 每训练民兵12小时 累计枪械伤害达到110点 使用单次射击击杀敌人,最终命中率小于等于30% 每修理物品24小时 拆除机械陷阱(每张地图一次) 升级武器 同时击中2个敌人(失败概率额外增加10%) 制作爆炸物 拆除爆炸物(每张地图一次) 每进行医疗手术24小时 使用绷带治疗25点生命值 复活倒地队友 技能等级列表(开发中!) 生命值技能 生命值技能树有点特别,因为大多数青铜和白银技能的影响并不显著(除了【全身接触】)。金色特长效果非常好,但你必须选择一大堆较弱的特长才能解锁它们,所以整体来说有点不尽如人意。 特长 备注

全身接触 成功进行近战攻击时获得15点坚韧值(坚韧值可代替生命值承受伤害)。 对于近战雇佣兵而言为S级技能。这为专注于近战的雇佣兵提供了可靠的坚韧值来源,只需攻击敌人即可——而这正是他们的常规行动。在攻击链结束时,你的雇佣兵将拥有满值坚韧值(30点),并有望安全地处于掩护状态。

卧倒 卧倒不消耗行动点。卧倒时受到的爆炸伤害降低20%。 最多算B级 perk。免费卧倒还行,但只对少数特定build有用。20%爆炸伤害减免有特定场合的价值。注意,如果你使用战术AI mod,这个perk会变得非常有用,因为敌人会更多地使用爆炸物。

强化体质 额外增加20%最大生命值。 B级。额外生命值肯定有用,但通常不是一个非常有影响力的技能,除非你经常犯错,或者你的雇佣兵一直在承受伤害,在这种情况下,你会希望他们不需要额外生命值,因为他们有很好的伤害减免或良好的坚毅值缓冲。不过,在青铜级的生命值技能中没有太多其他选择(除非你是近战),所以这通常是一个不错的选择。

狂怒 每承受一处创伤,伤害增加10%,最高可达50%。 C级。这可以提供出色的伤害加成(顺便一提,不适用于爆炸物),但让佣兵承受多处创伤是相当危险的,尤其是会受到士气惩罚,从而降低最大行动点。不过,对于狂战士佣兵来说,这个技能稍好一些,因为他们有行动点加成,尽管仍然会损失士气。

复仇 受到敌人攻击造成伤害后发动中断攻击。其机制基于某种无人能懂的奇怪公式。 F级。我测试这个 perk 时完全无法使其生效。不确定还能说什么。 这些反应类 perk 相当糟糕,因为游戏似乎无法判断装备的武器是否真的能击中正在攻击自己的目标。

先锋 回合结束时若处于掩体之外或敌人相邻,获得15点坚毅值。 A级。这是一个出色的特长,能在你身处掩体之外时提供极佳的生存能力。对于机枪手来说是个很棒的特长。

临危不乱 可将最多3点未使用的行动点(AP)结转至下一回合。每点行动点可获得5点坚韧值(Grit)。 在特定不使用“守望”或“压制”,而是希望吸引敌人火力以使用“反击射击”或“复仇”进行还击的build中属于A级 perk。此perk与“先锋”perk结合,意味着你每回合最多可生成30点坚韧值(坚韧值上限)。

坚守阵地 使用守望或压制技能时,可获得最高50%的伤害减免(基于生命值)。 对于经常使用守望技能的佣兵来说,这是S级技能,但要注意该效果仅在佣兵仍有守望行动点时生效。如果你总是耗尽行动点,那么这个技能显然毫无用处。记住,你可以控制大多数守望的扇形区域,避免在无法命中的射击上浪费行动点。如果你的首要目标是确保佣兵存活,只需将守望扇形区域设置得小一些,这样他们就不会耗尽行动点。

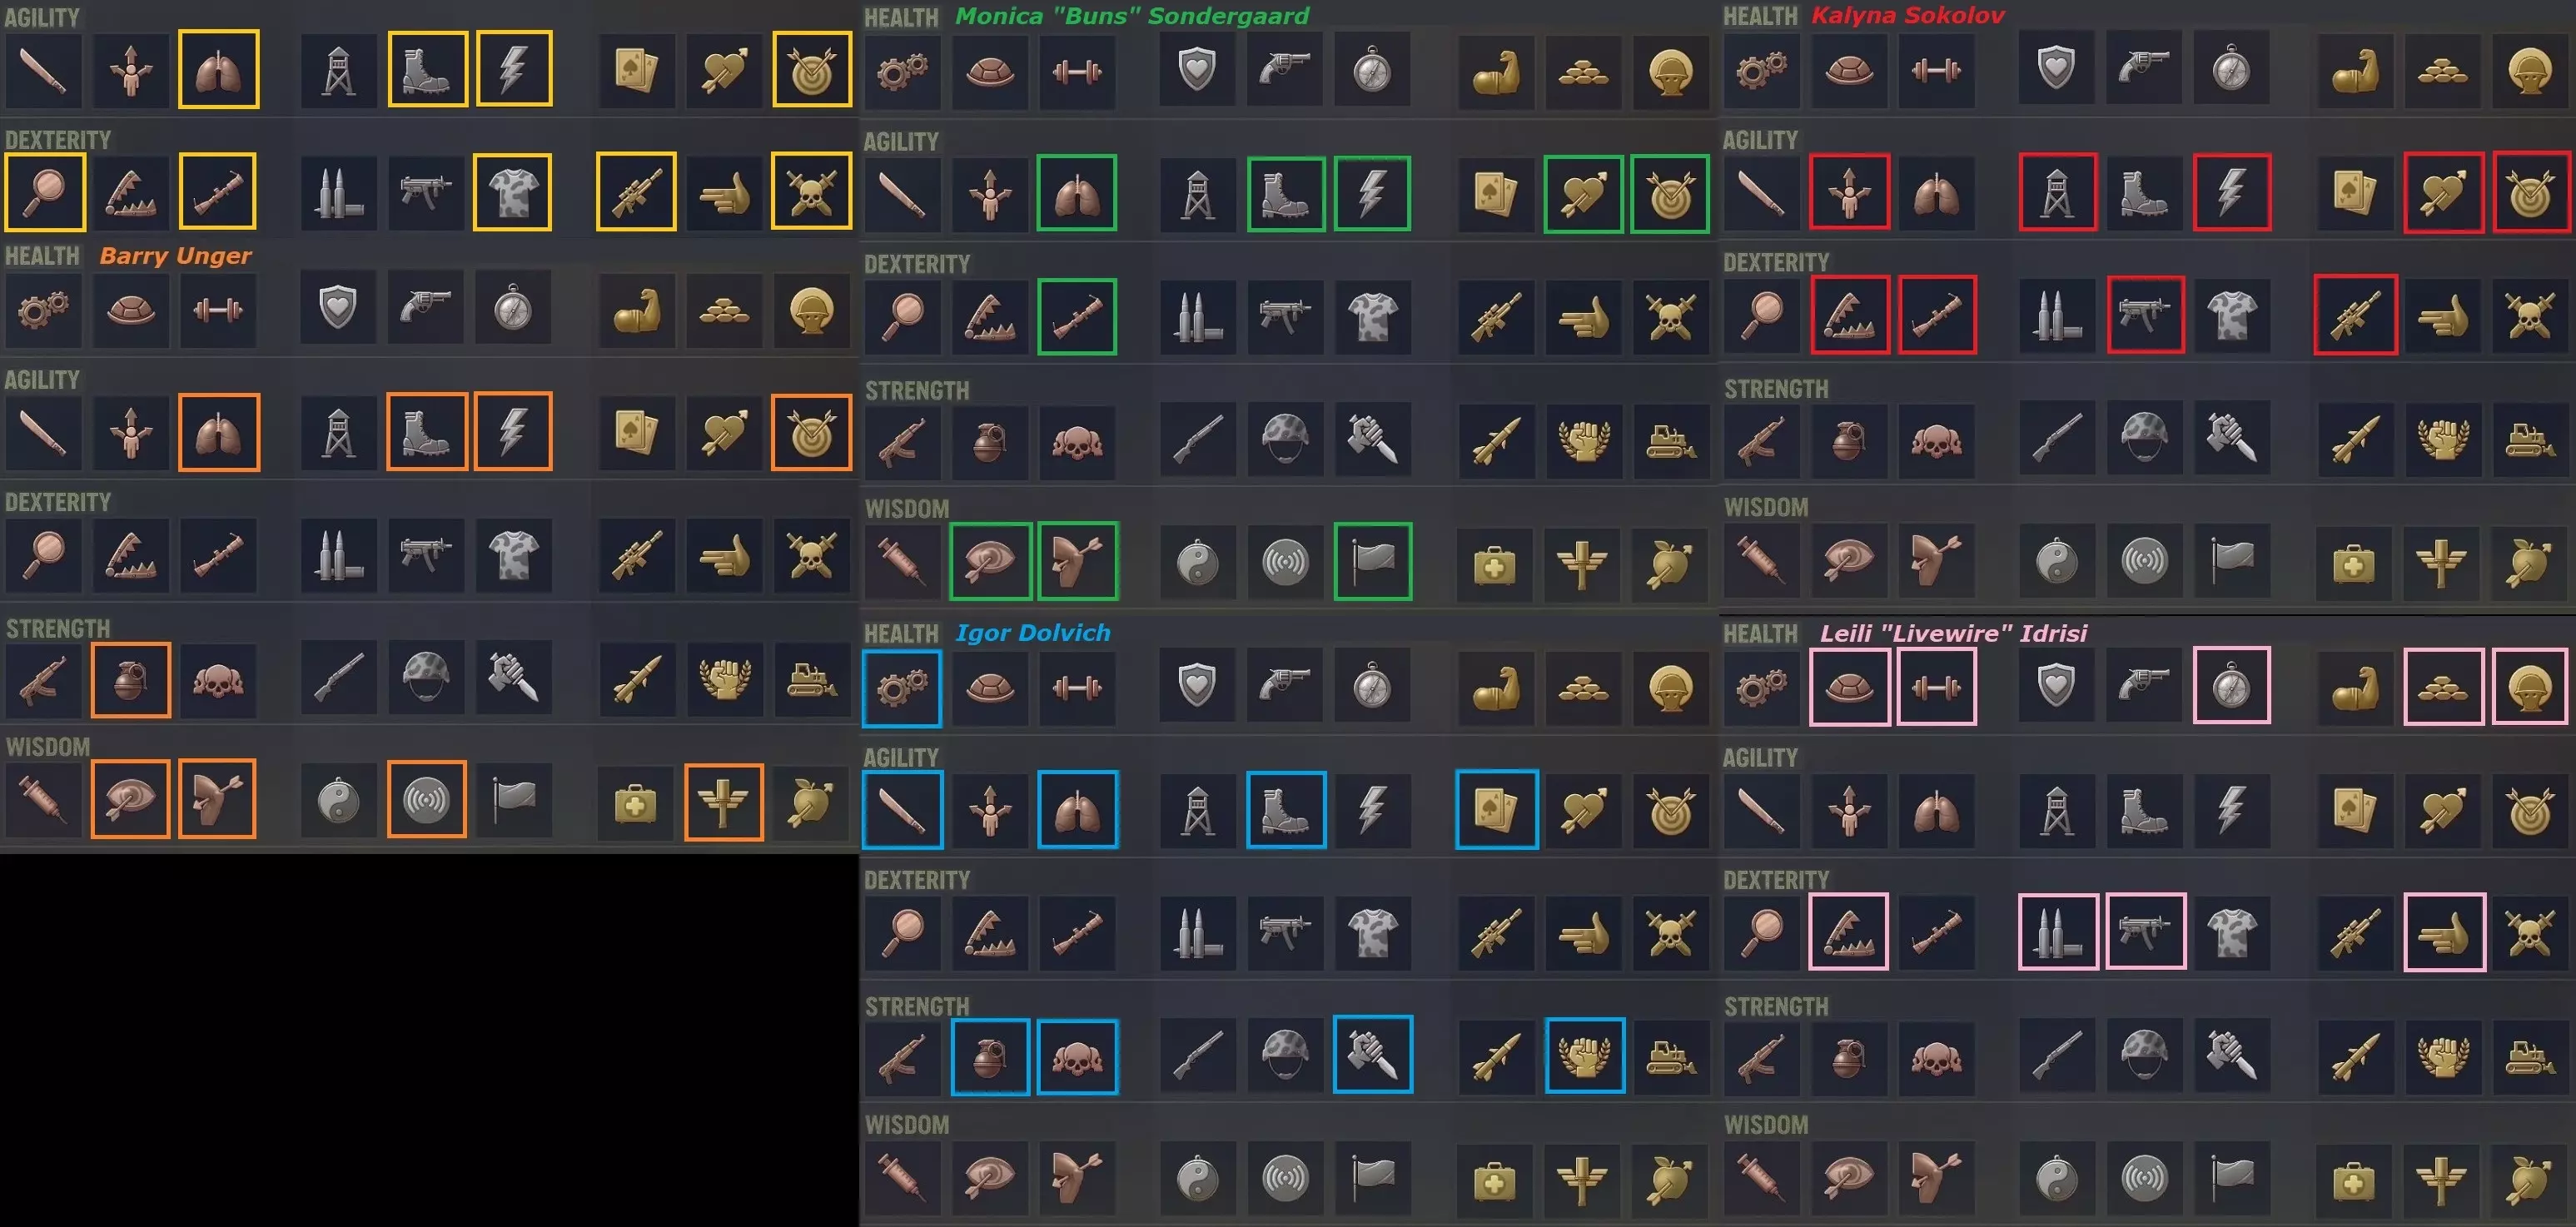
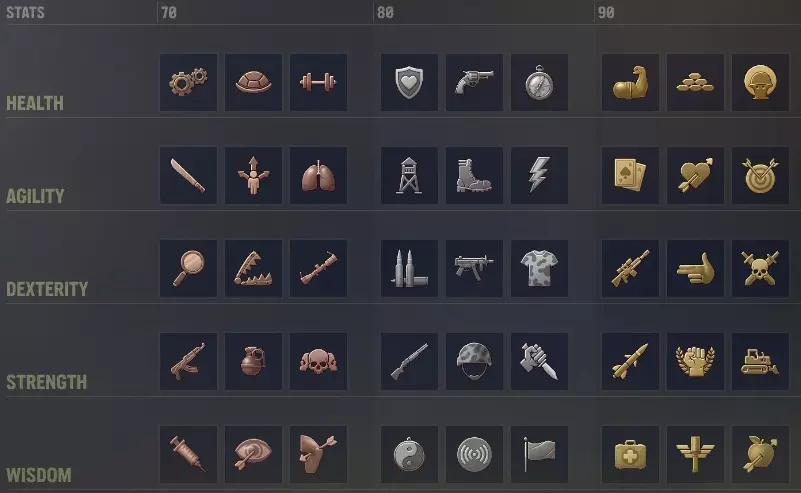
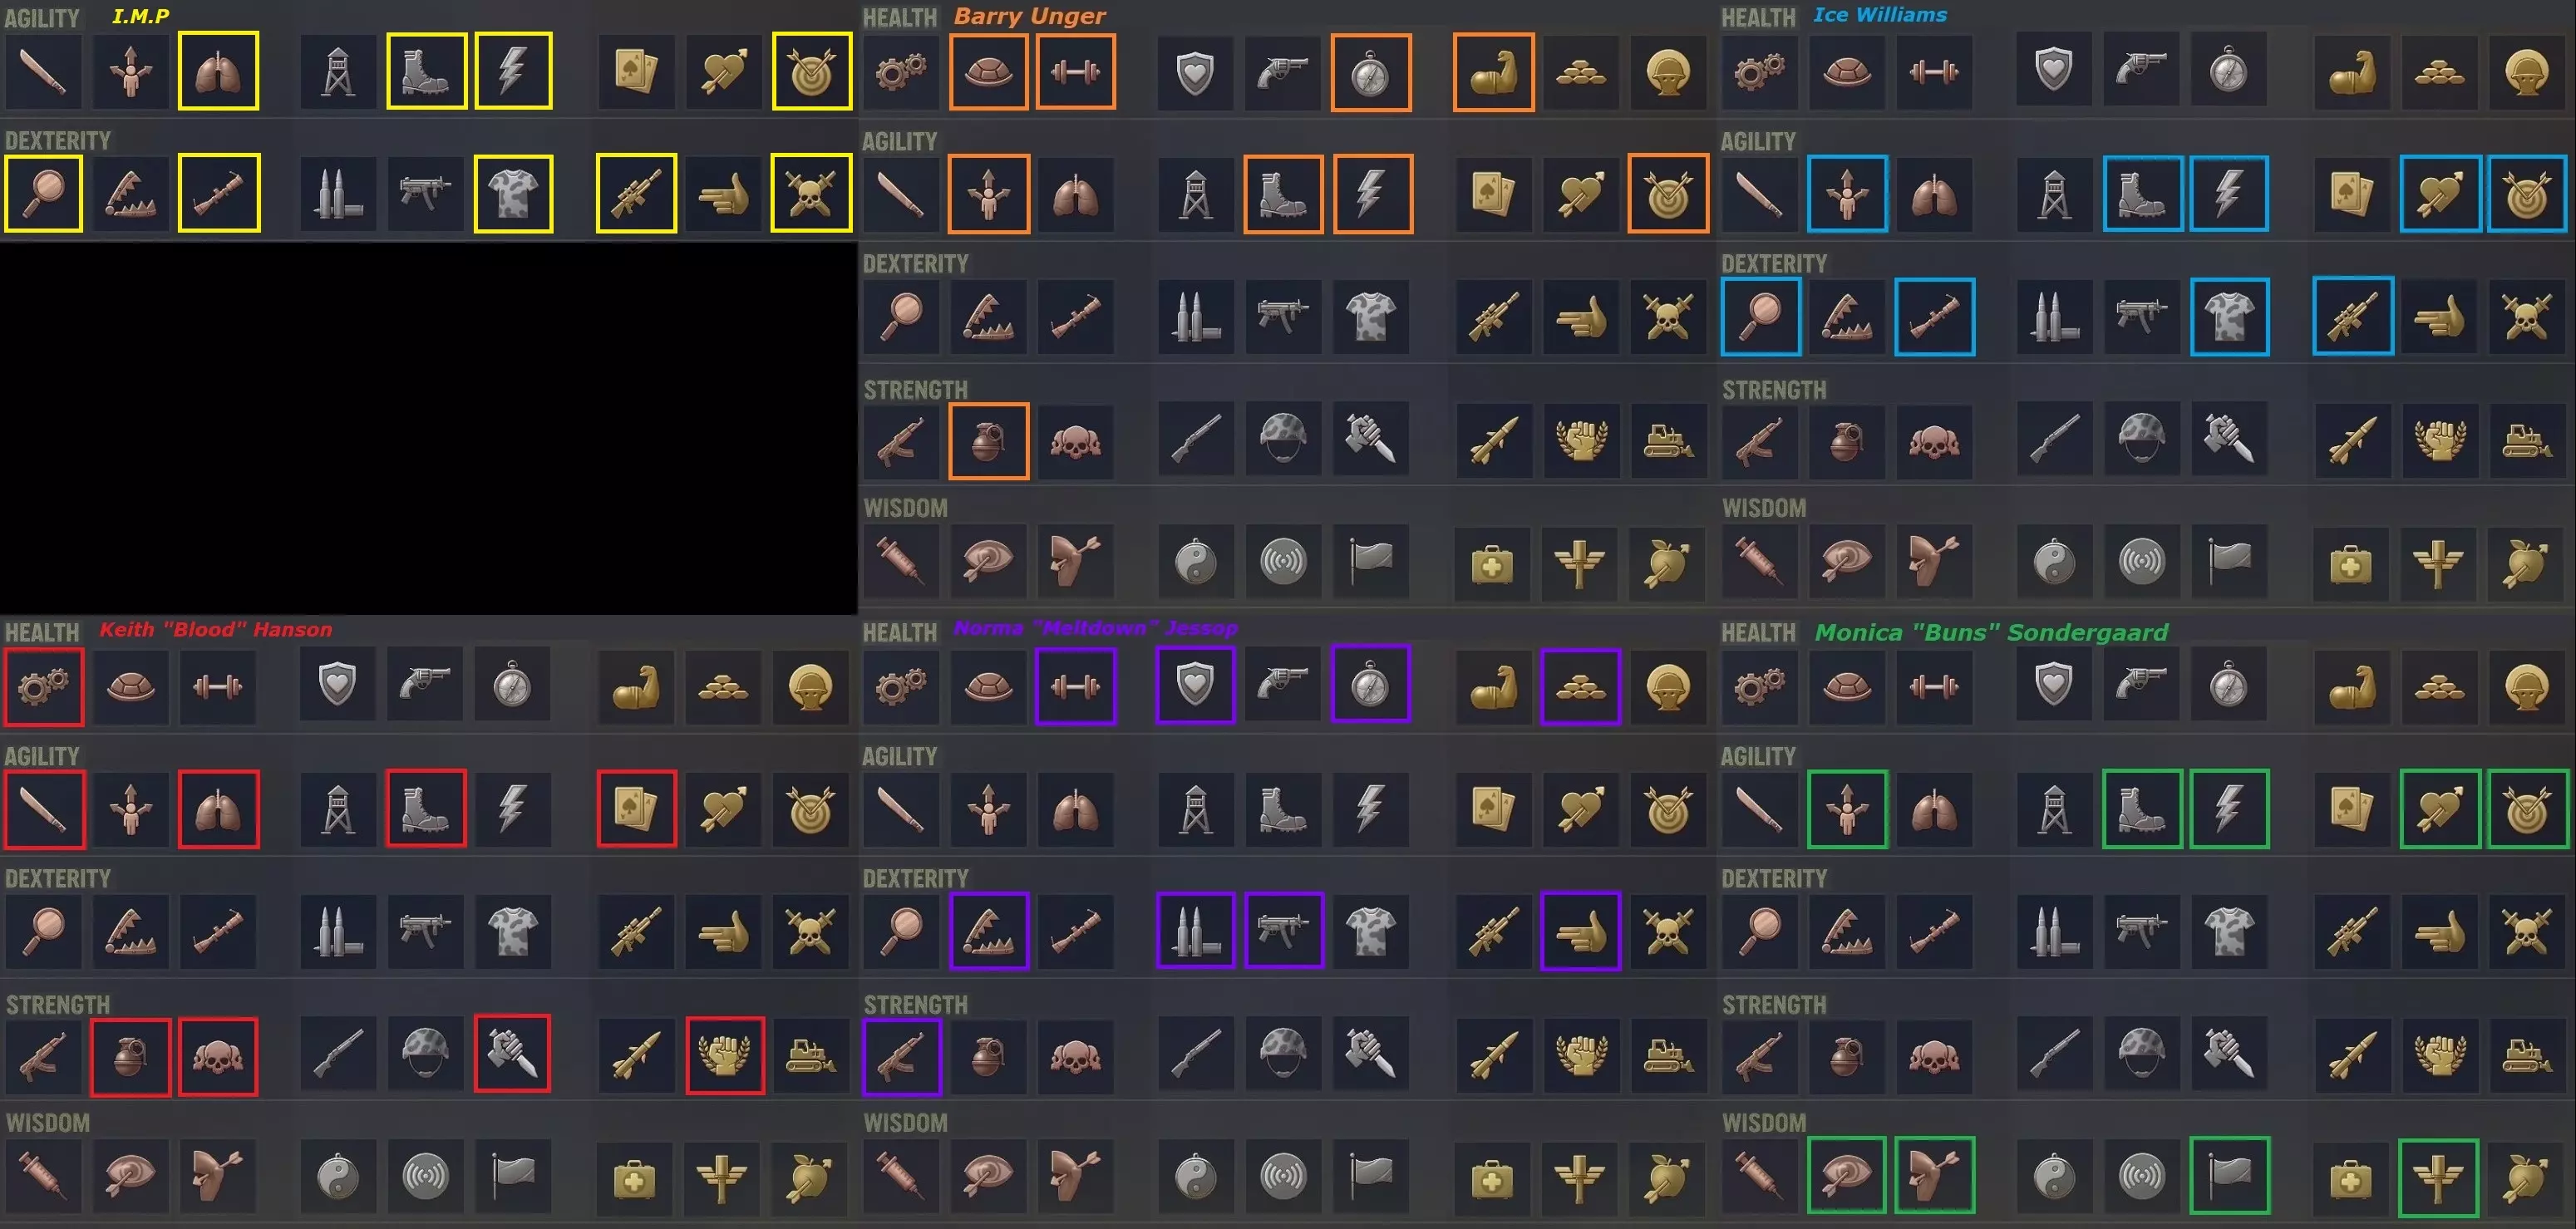
Battle Focus Gain +2 to max AP when first hit in combat, lasts until the end of the combat. A-tier for any merc that's likely to get hit, bonus AP is always excellent. The problem is that the other two gold perks are so good, that you might not be able to afford to get this. Recommended Mods Installation Instructions For Nexus Mods: Download the mod and unzip the mod folder. Move the mod folder to Users/<username>/AppData/Roaming/Jagged Alliance 3/Mods. Correct file structure example: Jagged Alliance 3/Mods/SmartOverwatch/ Don't forget to enable the mod in-game in the Mod Manager menu. C: Users Yosharian AppData Roaming Jagged Alliance 3 Mods Flashbangs 2.0 by Rock Flag & Eagle, fixed by Shimmy Workshop ID: 3584178232 [Balance] Rebalances flashbangs so that they inflict a temporary debuff for 2 rounds. Dual Wield Rebalance by Rock Flag & Eagle, fixed by Peterowsky Workshop ID: 3607313691 [Balance] Rebalances dual-wield shots to consume less AP. Lower APs for Pistols&MPs by RETRO Man Workshop ID: 3108997830 [Balance] This mod reduces the AP consumption of weapons such as revolvers, SMGs and the FAMAS. LightningReactionsFixed by Cockadoodledoo Workshop ID: 3464395354 [Fixes, Balance] Enemies who possess the Lightning Reactions perk can only use it if they are 'Aware'. PerkFix:ShockAndAwe by Cockadoodledoo Workshop ID: 3663747371 [Fixes] Fixes the Shock And Awe perk to correctly increase morale to High at the start of combat. Light Stock Fix by RETRO Man Workshop ID: number [Fixes] Fixes a vanilla bug: weapons with Light Stocks apply the +1 max Overwatch Attacks even when they are secondary weapons or in the backpack. JA3_CommonLib by various modders Workshop ID: 3216215248 [Fixes] Fixes bugs in the game and allows some other mods to function correctly. Respec Perk Points by NDA712 https://www.nexusmods.com/jaggedalliance3/mods/226 [Balance] Uses an internal game cheat to remove a mercenary's existing perks and grant them perk points equivalent to the number of removed perks. Hotkeyed to CTRL+F12 by default, can be changed. Note that you may need to press the hotkey twice in order for it to work. Currently I recommend this mod over Lioncat's mod due to better compatibility, although you can't change traits with this mod. Descriptive Chance to hit by Lobo Workshop ID: 3005453998 [Quality of Life] Describes your chance to hit the target using words such as 'Likely' or 'Unlikely'. A nice compromise between vanilla's close-to-zero-information design, and the slightly-too-cheaty percentage CTH mod. Workshop version recommended. Recommended setting: everything on except the Wisdom/Marksmanship labels Legion Variety Pack by LionCat Workshop ID: 3198915410 [Visuals] Introduces 100+ variants of Legion troops with greater variety in outfits, ethnicity, etc. Currently adds on to all Legion classes. Trustworthy Gunsmith by Lucjan Workshop ID: 3210326646 [Quality of Life, Balance] A good mechanic is still required to perform all upgrades but losing scraps and the condition of a weapon is impossible. This mod is a little cheaty, but honestly given that you can just reload your savegame upon failure, it makes sense to remove that mechanic. It's also very frustrating that even with 100 Mechanical, you can still fail to perform upgrades, so that's another reason to use this. Smart Overwatch by Lucjan & Vlsodqwe https://www.nexusmods.com/jaggedalliance3/mods/151 [Balance, Fixes] Instead of always firing at the torso, even when it is blocked by an obstacle, units making interrupt attacks will fire at an open body parts or a specifically choosen part for each equipped weapon. It is incredibly annoying that overwatch often fails and hits cover instead. This mod fixes that. Nexus version recommended at the moment since it is more up-to-date. Recommended settings: Icon: ST_Wisdom Make off combat machine setup cost 0AP: ON Hide Smart Overwatch elements of user interface: OFF Use WIS to find best body part: ON Permanent overwatch: OFF Movement interrupt: STEPS Shoot out of the cone: OFF Rato Fix: ON Nocturnal Beauty by MyOneGod Workshop ID: 3274783005 [Visuals] Allows the choice of a variety of color palettes for night operations, increasing immersion. Recommended setting: default (Melancholy Calm, Strong) Less Intrusive Healthbars by Sir Ni & Morianthi Workshop ID: 3277519019 [Visuals] Reduces the size of healthbars to make them less visually intrusive. Zota6's Weapon Soundpack by Zota6 Workshop ID: 3119118977 [Audio] Replaces most of the game's weapon firing sounds. JA3's weapon sounds are pretty good, but this is an improvement. Audaki's UI Enhancements (1.5.1 Compatible) by Lucjan Workshop ID: 3159404303 [Tweaks, Quality of Life] Shows additional information in the UI regarding tired/rested status, XP and lvl, Free Move AP, morale influences, ammo and option sliders. Recommended setting: everything on Additional/Future ModsI recommend checking out these mods if you're looking for a more radical overhaul of JA3's vanilla mechanics. In the future I will create a team built specifically for Vanilla Redux. Rato's Gameplay Balance and Overhaul 3 by Rato Workshop ID: 3021320057 [Balance, Overhaul] This mod aims to provide a balanced but very challenging experience, improving depth of gameplay, increasing lethality and incorporating some realistic mechanics. Auto fire modes have full bullet damage, and single shots have more chance of critical hit. Guns are balanced by their score and are unique; explosives are not perfectly accurate; and fights realistically lead to incapacitation prior to death by new wounding and bleeding mechanics. Note: you must start a new savegame after installing this mod. Vanilla Redux: Weapons & Progression Rebalance by Boiadeiro Workshop ID: 3580190673 [Balance, Overhaul] Vanilla Redux is a comprehensive rebalancing of Jagged Alliance 3 without any new quantitative additions to the game. At its core this mod is intended to take what vanilla Jagged Alliance 3 has to offer in terms of itemization (weapons, attachments etc.) and rebalance it to make a little more sense - no more odd combinations of weapons and calibers; no arbitrary and wildly different damage numbers for weapons using the same calibers; weapon components are now more coherent across all platforms and somewhat more realistic (as far as videogames go) with their properties. Note: you must start a new savegame after installing this mod. In-Game Merc Editor by LionCat & Wait4Friend Workshop ID: 3144009091 [Balance, Fixes, Cheats] Customize the stats and perks of Merc according to your preferences, and also unlock character-specific items (such as Nail's vest), at any time without restarting the campaign. For example, you can replace some of the initial perks of a Merc with some other talents you prefer. Note: when installing this mod, you must restart the game completely before using it; also, you must not have it active when creating your IMP merc at the start of the game. Lastly, do not change any merc salaries as that function appears to be bugged at the moment. Unlocked Personal Items by Farbeimer Workshop ID: 3598762629 [Balance, Quality of Life] Unlocks all personal equipment such as weapons and other items that some mercs come equipped with. This mod may not play nicely with Lioncat's In-Game Merc Editor mod so be aware of that. Starting Mercs Done Right! v2 by RETRO Man Workshop ID: 3102080510 [Balance] This mod changes some starting perks of some A.I.M. mercenaries, with the goal of giving the player more viable options. Don't use this mod with Vanilla Redux. Build Summaries Builds that I've used, summarised in one .JPG that you can refer to easily while you're playing, store on your phone, etc.
这是我修改前使用的配装,或许有人需要这些信息。