换一换
换一换 


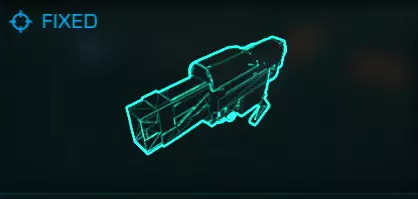
这是一份面向《精英:危险》采矿爱好者的基础综合指南。本指南涵盖了所有采矿类型的基础知识,以及一些更复杂的采矿相关主题。 精英采矿简介 在《精英:危险》中,采矿是一种不错的游戏内赚钱方式,不过它比 bounty hunting 和其他赚钱方式稍慢一些。 从技术上讲,采矿可归类为贸易,并且会影响你的贸易等级。 只要配置正确,你可以在任何飞船上进行采矿。 采矿的基本需求 共有4种采矿类型: 基础表层采矿、高级表层采矿、亚表层采矿和深层核心采矿。以下是各种采矿方式所需的硬件清单。 任何类型的采矿均需满足以下条件: - 货舱空间:用于存放采矿时提炼出的物品 - 精炼器:用于提炼采集到的矿石块 基础地表采矿还需额外配备以下硬件: - 采矿激光:用于从 asteroid 上炸下矿石块
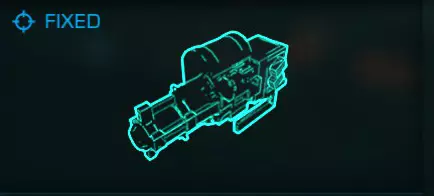
对于高级表面采矿,需要以下额外硬件: 磨损爆破器 - 用于从 asteroid 表面矿脉炸下矿块。
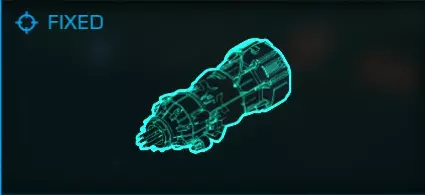
对于地下采矿,需要以下额外硬件:亚表层位移导弹——允许你开采小行星中的地下矿床。
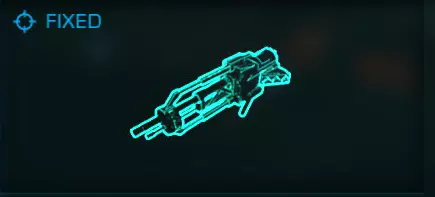
对于深层核心采矿,需要以下额外硬件:地震电荷发射器——可将小行星击碎以获取核心矿石。
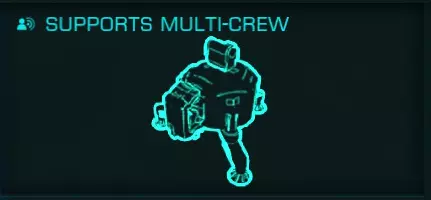
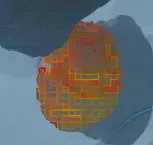
For assisting in mining and making your life easier, the following hardware is recommended: (For all limpet controllers, a more detailed explanation of their workings is further in the guide) Collector Limpet Controller - Sends limpets to chase after bits so you dont have to Prospector Limpet Controller - When attached to asteroid, shows ore makeup and internal structures and fissures, if any are present NOTICE: If you plan to do anything other than Basic surface mining, a Prospector Limpet Controller and Pulse Wave Analyzer is required Before heading out to mine, make sure you have the correct hardware for the type of mining intended. Picking Mining Tools All Mining Tools come in 2 sizes, Small (Size 1) and Medium (Size 2). The exception being the Seismic Charge Launcher, which only comes in Medium (Size 2) and the Pulse Wave Analyzer, which takes up a utility slot. Mining tools take up one hardpoint on a ship. The only noticable difference between the two sizes is the speed at which they break off chunks, the power draw, and the ammo capacity of tools that require it. Some Mining Tools come as fixed or turreted. Turreted Tools are used in multicrew, your gunner position will have control of them. If you are alone using turreted mining tools, navigate in your right side menu and switch turret mode to forward fire to use them like normal fixed mining tools. Picking a Refinery Refineries are a bit complex. The higher the grade and size of refineries dictate 2 features that are important to keep track of: Bin count - refers to the amount of bins that the refinery has available to store ore to refine. In a simpler sense it dictates how many different types of ore you can be refining at any one time. The best refineries have 10 bins Power Draw - an important thing to keep in mind. The better the refinery, the more power it takes to run. You need to balance your power usage with bin amount, so your ship doesnt turn off critical modules whenever you try to mine.!IMPORTANT! When you target a chunk, it will say that it is comprised of __% one ore and __% another ore. When you collect a chunk, the ore it is made up of will be seperated into the refinery bins. The percentage the chunk showed is how much it will fill a bin. So if you collect a chunck that is made of 13% Gallite and 2% Silver, it will fill a refinery bin 13% with gallite, and another bin 2% with silver. Once the bin reaches 100% of an ore, it will then be refined into 1 unit (ton) of that ore, and it will place it in your cargo inventory. This will empty that bin, freeing it to be used by more ore. Ring Types There are 4 types of rings: ROCKY, METAL RICH, METALLIC, and ICY. Each one has its own type of resources that you can't find in any other ring type. These classifications also apply to belts. You can find out what type of ring a planet has by going into system view, selecting the planet and then selecting the info tab on the left side of the screen. Scrolling down, it will list what type the rings of the planet are. Rocky Rings - typically are rich in mineral type ore, things like Gallite, Lepidolite or Bertrandite. Typically minerals do not sell for very high. However, some missions may require you to mine a decent amount of minerals, and the payouts are many times more than what you would get if you were to just sell the minerals on the market. Metal Rich Rings - are kind of an in-between of rocky ring and a metallic ring. They have a mix of metallic ore and mineral ore. You can find most mineral ores here, along with some more common metallic ore, such as Indium or Gallium. You can also find rare metal ore, like Silver or Gold. Metallic ore sells for a decent bit more than mineral ores. Metallic Rings - are the second best type of ring to mine. These types of rings are decently rare. They contain a small amount of mineral ore and large amounts of of metallic ore. You are more likely to find rare ore in these belts, such as Painite, which sells for 40k a ton. Icy Rings - These are THE best type of ring to mine. They have their own sets of minerals ores, which can only be found in icy rings. You can mine water from these rings, along with a large number of rare ores like Low Temperature Diamonds, Void Opals, and Alexandrite. System Reserves A very important thing to look at when scouting out a system to mine in is system reserves. This essentially means how depleted the ore reserves are in the system. This can be found by opening the system map, selecting the info tab and selecting a planet. Even a planet without rings will tell you reserve status. Reserve status is uniform throughout a system. There are 5 reserve states: Pristine, Major, Normal, Low, and Depleted. These are from best to worst, respectively. Most of the time anything normal and above is a good mining spot. Pristine reserves are decently rare finds. These are the best spots to mine, as it increases the chance that you will find rare ore. Any system outside of human occupied space is pristine. The trade off being that you have to fly a bit to get out there. Ring Hot Spots It is possible to scan planetary rings, which will show you where the ring's 'Hot Spots' are. These hot spots will have asteroids that contain better/rare ore and you are more likely to find asteroids that can be deep core mined. Finding ring hotspots requires you have a Detailed Surface Scanner module installed. This will take up an internal slot. Once you have selected a system and a planet ring to mine, fly towards it in supercruise. Fly until you are about 2 LS from the planet. Slow down to slowest speed and trigger your Detailed Surface Scanner. Launch a probe so that it will land in the ring you want to mine in. Once the probe makes contact, you will see a scan line race around the entire ring. After the scan finishes, the game will highlight the ring hotspots in a orange-ish color. Additionally, these hotspots will become visible in your navigation panel, and you can target them as a drop location. Hotspots wil also show what ore is in high quantity. Once a ring has been scanned, you will not need to rescan it, even if you leave the system and come back. You still need a Surface Scanner installed to see the hotspots. NOTICE: As people mine in a system/planet ring, hotspots will become depleted and disappear. This can happen extremely quickly if a nearby statioon is having a 'Gold Rush', which is something that can happen since the introduction of Chapter Four. How to Use: Pulse Wave Analyzer
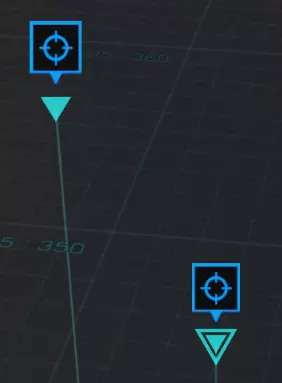
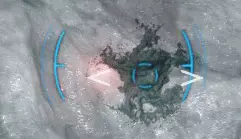
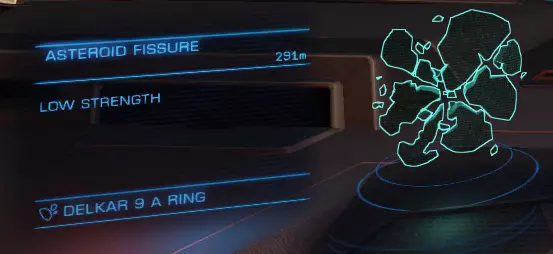
脉冲波分析仪 - 允许你扫描小行星带区域并高亮显示可能存在裂隙/矿床的小行星(占用一个实用装备槽位) 切换至分析模式并展开武器舱。切换到装备有PWA(脉冲波分析仪)的武器组。点击一次相应的开火键。 你会注意到小行星会被块状图案覆盖。几秒钟后,含有矿床的小行星会发出从黄色到红色的光芒。这种光芒会持续几秒钟。你可以利用这段时间将飞船对准小行星并释放勘探者无人机。 岩石发光的强度决定了小行星上“目标物”的数量。 微弱/暗淡的光芒通常表示可能存在一到两个低储量的矿床。
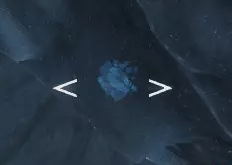
极其明亮的发光现象是大型矿床/裂隙的指示标志。
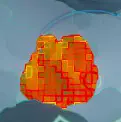
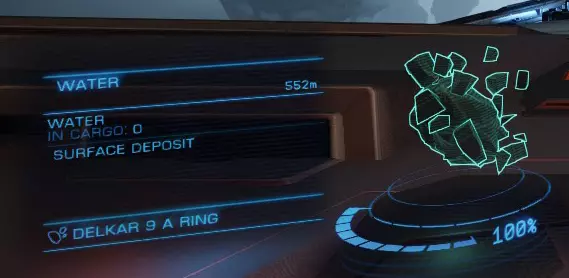
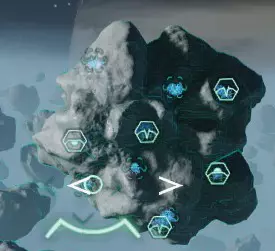
当PWA下方的进度条清空后,你可以触发下一次脉冲。你拥有无限次脉冲,因此请尽可能多地使用它们。 如何使用:精炼厂(矿仓与分配) 采矿时,你可能需要进行矿仓分配操作,尤其是当你的精炼厂矿仓数量较少时。 在正常运行过程中,精炼厂会自动将矿石分配到矿仓。偶尔,当你采集到某种矿石却没有空闲矿仓时,飞船会在左下角显示【矿石未分配】来提醒你。 要进行分配,请打开右手菜单。 导航至飞船 inventory 界面,然后向下找到精炼厂选项。 在那里你可以选择矿仓来分配矿石。 如果没有空闲矿仓,选择某个矿仓将会排空其中的所有矿石。这样做是为了为等待装入货舱的其他矿石腾出空间。 如果你的精炼机只有2到3个货舱,你将不得不频繁分配矿石。这就是为什么我建议使用带有6个或更多货舱的精炼机(并非所有飞船都能配备)。 如何采矿:基础表面采矿 这是最简单/最快的采矿方式。回报率/产量相当低(每块矿石约5-20%),但如果你是新手,这是一个很好的入门方法。 步骤1:展开武器挂架和货舱 scoop 步骤2:切换到采矿激光(如果尚未切换) 步骤3:飞向最近的岩石,直到采矿激光进入射程 步骤4:向岩石发射采矿激光,岩石会碎裂成矿块 步骤5:瞄准矿块它会告诉你它由什么组成 步骤6:追逐矿石块并用货舱 scoop 捕获它 重复步骤4到6。 当小行星不再掉落矿石块后,飞往另一颗小行星并重复此过程。 如何采矿:高级表层采矿 这是次快的采矿方式。从表层矿床掉落的矿石块通常比基础表层采矿的更大(每个矿石块约35-60%),因此回报/产量远高于基础表层采矿,但仍低于深层核心采矿。 高级表层采矿与基础表层采矿类似,不同之处在于需要装备勘探者机械臂控制器才能进行采矿。脉冲波分析仪也可以辅助此过程。 如果装备了脉冲波分析仪,切换到该设备并发出脉冲。向带有光芒的小行星发射探测器。(确保你离得足够近,以便探测器能在超出与飞船的最大距离前抵达目标) 如果你没有PWA,只需向小行星发射一个探测器无人机。 一旦探测器附着在小行星上并完成扫描,你就能看到该小行星的所有结构。对于高级表层采矿,你只需关注一种名为【表层矿床】的结构。 小行星上的表层矿床:
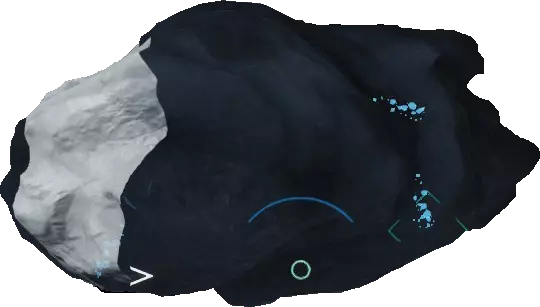
After finding an asteroid with some Surface Deposits, follow these steps to mine. Make sure your hardpoints are deployed and you have the fire group with the Surface Abrasion Blaster selected. Step 1: Target the surface deposit. Step 2: Maneuver your ship into position. Your ship has to be in front of the deposit for any of this to work Step 3: Line up the lead indicator on the deposit with the dot of the SAB. picture reminder Step 4: Press and hold the fire key. The SAB will fire once it has reached full charge. Step 5: Chase after and scoop up the chunk that was blasted off. (Or make use of collector limpets if you have any) Repeat for all deposits on the asteroid. How To Mine: Subsurface Mining This is a slower way to mine. The chunks dropped from subsurface deposits are normally larger (~65-85% per chunk) than those dropped from Advanced Surface Mining, so return/Yield is better, but is still lower than Deep Core Mining. SubSurface Mining requires a Prospector Limpet Controller to be able to mine. A Pulse Wave Analyzer can also aid in the process. If you have a PWA equipped, switch to it and send off a pulse. Fire off a prospector towards an asteroid with glow. (Make sure you are close enough that your prospector can reach it before exceeding max distance from ship) If you don't have a PWA, just fire off a prospector limpet towards an asteroid. Once the Propsector latches onto the asteroid and completes its scan, you will be able to see whatever structures the asteroid has. For Sub Suface Mining, the only ones you care about are called SubSurface Deposits. SubSurface Deposit on asteroid:
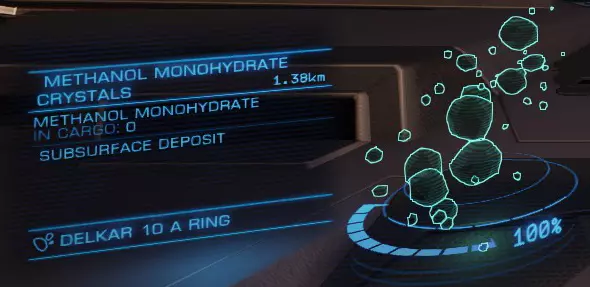
找到带有地表下矿床的小行星后,请按以下步骤进行开采。确保已部署武器挂点,并选择配备有地表下位移导弹的武器组。 步骤1:瞄准地表下矿床。 步骤2:操控飞船进入位置。飞船必须位于地表痕迹前方,才能开始提取过程。
步骤3:瞄准表面的痕迹。 步骤4:按住开火键。即使炮弹命中后,也需要继续按住开火键。(如果瞄准不正确,炮弹会弹开并爆炸。没关系,尝试稍微调整瞄准后再次开火) 步骤5:如果炮弹命中正确,左下角会收到开始提取过程的通知。继续按住开火键。 步骤6:随后左下角会弹出以下画面:
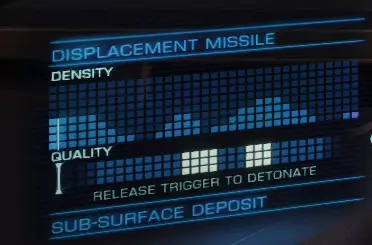
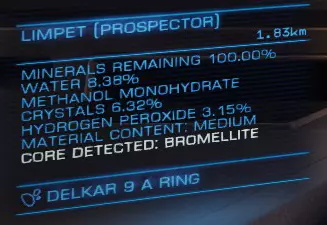
下方的进度条显示品质。当光标(看起来像一个大写的I)位于明亮区域时,你需要松开开火键。上方区域显示密度。该区域的结构越低,下方进度条移动得越快。请记住这一点。 当光标位于明亮区域时松开开火键。如果成功提取出矿石块,屏幕会提示你。 步骤7:追逐并收集被炸飞的矿石块。(如果你有收集无人机,可以使用它们) 对小行星上的所有矿脉重复此操作。 注意矿脉的生命值。每个矿脉可以进行2-5次提取。如果提取失败,会损坏矿脉并减少可获取的矿石数量。如何采矿:深层核心采矿 这是最慢的采矿方式,但回报极高。掉落的矿石块纯度几乎总是超过90%。此外,某些矿石只能通过这种采矿方式获取。在我看来,这种采矿方式最有趣。 深层核心采矿需要【勘探者 limpet 控制器】和【脉冲波分析仪】。 切换到脉冲波分析仪并发送脉冲。向带有极亮光芒的小行星发射勘探者(确保你离得足够近,勘探者能在超出与飞船的最大距离前到达小行星)。
当勘探者锁定小行星并完成扫描后,你就能知道该小行星是否可开采。若要开采核心,小行星必须有裂缝。
此外,如果小行星核心可被开采,那么当瞄准核心时,勘探者会显示其构成成分。
找到可开采的小行星后,请按以下步骤进行采矿。 确保已部署武器挂点,并选择配备有震荡电荷发射器的火力组。 注意:以下操作有时间限制。放置第一枚电荷后,你需要在限定时间内完成整个流程。 步骤1:瞄准裂缝。瞄准后,下方
左侧信息界面会显示裂缝的强度等级。共有三个强度等级:低、中、高。裂缝的强度很重要,因为它决定了你需要放置的炸药量,以获得理想的产量。步骤2:按住开火键为地震发射器充能至正确数值,然后松开以发射炸药。

准星两侧各有3个标记。按住开火键的时间越长,标记就会从下往上填充。最下方的标记代表低强度,中间的标记代表中等强度,最上方的标记代表高强度。 将充能强度与裂隙强度相匹配。 步骤3:放置充能后,
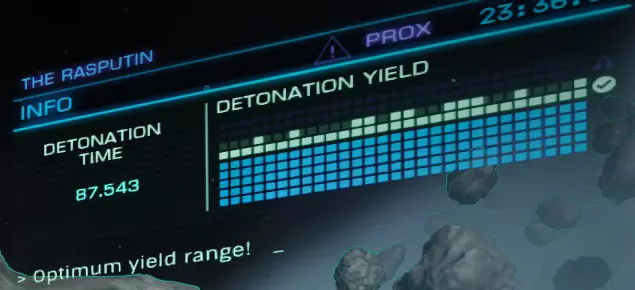
following screen will appear in the upper right: Go around the asteroid and keep placing charges on fissures until the upper right screen gives you the message 'Optimum Yield Range!', similar to the screen shown here. You have a finite amount of time to place the needed charges. NOTICE: It is possible to place too many charges on an asteroid. If that happens, the upper right screen will indicate that you are too far above the ideal range. You can diffuse a charge by going into the Left Panel and contacts, then highlighting a charge and selecting diffuse. Once diffuse is selected, you will have ten seconds to cancel the charge diffuse. TIP If you are having trouble getting into ideal range, try placing a lower power charge on a fissure. It can help boost the meter just enough to get you into the ideal range. Don't do this too much on one asteroid, the more unmatched charges there are, the more variance there is in the meter. Step 4: Once the needed charges are placed and the upper right screen informs you that you have reached ideal range, move your ship slightly away from the asteroid. If its your first time cracking an asteroid, do yourself a favor and sit about 700M away from the asteroid. As you become more experienced, you will find the perfect range to sit at. Make sure you are looking directly at the asteroid. Step 5: You can now either wait for the timer to run down, or you can navigate into the left panel into contacts and select one of the charges and select Detonate. This will jump the timer down to 10 seconds. Also, if you have a Ship Launched fighter, I would recommend docking it before detonating Step 6: Once the cracking process completes, chase after and scoop up the chunks that were blasted off during the cracking. (I would recommend having collector limpets if you are cracking asteroids.) If this is your first time cracking an asteroid, don't forget to turn your sound up a bit and quiet any background noises. The Wonderful Limpets and Their Controllers Limpets are essentially little drones that you can deploy to do a variety of tasks. The task they complete depends on the controller that you have installed in your ship. The ones we focus on are Prospector and Collection limpets. You can purchase limpets at stations in the Advanced Maintenance section. They are listed in the Resupply Ammo tab Alternatively, you can craft limpets in your ship while flying. They are under the synthesis section Prospector limpets can be useful, but i would only recommend these for mining ships that have large amounts of cargo space (200 tons or more). When used, it shoots a limpet straight in front of the ship. When it hits an asteroid, it latches on. Targeting that limpet will then display the makeup of that asteroid, and how much of its ore is left. The prospector will also show any internal structures that the asteroid has along with any fissures. Prospector limpets significantly increase the amount of chunks an asteroid drops Prospector limpets are required for subsurface mining Prospectors are one-offs, so you will go through your limpets very fast. This is why i recommend them for large ships that can carry a large amount of limpets. However, considering they boost the amount of ore you get from an asteroid they can be extremely useful.The different tiers of controllers dictate how many prospecting limpets can be active at one time, how far away they can be and how long they last. Collector Limpets do as the name implies, they collect stuff and return it to your ship.This controller is the best for mining, as it saves you from chasing down every little piece of ore you break off. They have 2 modes: Target Retrieve mode is activated by targeting a chunk or container and then launching a collector. The collector will travel to the target, pick it up, and then return it to your ship. Once it places it in your cargo, the limpet self-destructs. Search & Return Mode is the default mode of collectors. Make sure you have no container or chunk targeted and launch a collector limpet. The limpet will fly around looking for chunks or containers to pick up. It will automatically target the closest one. It will collect it, return to the ship, deposit the container or chunk, then return to searching. This mode is the most useful for mining.The different tiers of controllers dictate how many collectors can be active at once, the max distance from the ship they can go and how long they remain active in the Search & Return mode. Being Picky Now obviously when you mine, you dont want to spend time collecting ore that will sell for little money. You want the big bucks, the ore that will buy you that new anaconda or type 9 or whatever you want to get. That is why when you get a bit more proficient with mining, you can start being more selective. This definitely comes into play when you have a refinery that only has 2 or 3 bins. You want to balance between expensive ores, and how easily the ore is found. It's a balancing act that is made a little easier by getting a refinery with lots of bins. However you still will have to juggle bins at some point and occasionally your cargo space. Another angle you have to work with is what type of mining do you want to do? Deep core is by far the most lucrative, but you can also fly around for a long time and not find any destroyable asteroids. Basic surface mining is the fastest, but your return is low. Your ship type will also limit you to certain types of mining, so you have to make the decision of which type to stick with. Tips and Recommendations The following section contains various tips for mining provided from other commanders along with recommendations. If you have a tip/recommendation for someone starting out, put it in the comments below. The best will be added. "If you are planning on doing deep core mining, take along a Surface Abrasion Blaster. Cracked asteroids have a lot of surface deposits, you'll miss out on a lot of ore if you don't have one." - Cmdr 666Savior "Positioning of your ship is very important when using collector limpets. Collector limpets always fly around to the back of your ship to drop off material, which can take up to 15-20 seconds if you're facing the asteroid. If you rotate your ship so the back is facing all the fragments you mined, the limpets can zip back and forth to your ship in as little as 3 seconds. This little trick can potentially cut your time spent mining in half." - Cmdr Osmium "If setting up a ship for solo mining, I recommend to stick to fixed lasers. Only buy the turreted if you're 100% sure you'll have a friend manning them." - Cmdr Anarch157a Thank you all commanders who have posted tips. Conclusion These are the basics to mining in Elite. As you do more mining you will develop your own tricks and things that make it faster or easier for yourself. Dont be afraid to try things.