换一换
换一换 


WIP ### USEFUL INFORMATION ### --- Links --- { Interactive Map }https://gamingwithdaopa.ellatha.com/duneawakening/map/ https://duneawakening.wiki.fextralife.com/Interactive+Map https://awakening.wiki/Interactive_Map { Deep Desert Survey Map }https://www.planetologist.app { Unique Schematics Map }https://www.openworld.gg/dune-awakening/interactive-map { Class Builder }https://dune.gaming.tools/skill-builder https://www.openworld.gg/dune-awakening/skill-builder { Spreadsheet }| Weapons & Armors Stats | Item Prices | Landsraad Tasks | Deep Desert Base Progression | Check the Spreadsheet[docs.google.com] --- Official/Private Servers --- { How the Servers is Setup }Currently there are 5 [Regions], each region with multiple [Worlds], a world consists of several [Sietches/Servers] which all share the same Deep Desert and Social Hubs. Each server has its own persistent Hagga Basin (99% PVE Zone) with 60 Players slots. The Player can create 1 character per World, and that character can move between Servers in that world. Maintaining all the Gear, Level, Skills and Inventory. The Player can establish bases in only ONE Server, which will be considered the Home Server. Now the Player can have multiple bases in different servers! { The Deep Desert and Factions Social HUBs }Those are the locations where a high number of players from all the Servers may meet. The Deep Desert Map (50% PVP Zone) will reset every week on Tuesdays, changing the map entirely and destroying all the buildings. { Regions, Worlds and Servers }[ Region ] Asia [ Worlds ] = 5 [ Servers ] = 20 per World [ Region ] Europe [ Worlds ] = 35 [ Servers ] = 20 per World [Region] North America [ Worlds ] = 40 [ Servers ] = 20 per World [Region] Oceania [ Worlds ] = 5 [ Servers ] = 20 per World [Region] South America [ Worlds ] = 2 [ Servers ] = 20 per World Players from Official Servers CANT meet Players from Private Servers { Official Servers } [ Interconnected Servers ] - Official Servers in the same World are interconnected, which means you can freely move to another Sietch and meet people from all the other Sietches in the Social Hubs and The Deep Desert. [ Can Build in Multiple Sietches ] - The Player can have multiple bases in different Sietches. (Need to check if the number of Sub-Fiefs is still limited) [ Higher Population ] - Official Servers tend to have more players than Private Servers, that can be a problem when fighting for resources or to build your base in a specific place. The game will feel more alive and populated, offering multiple opportunities to meet new people. [ Higher Player Slots ] - Currently all the Sietches have a max capacity of 40 Players, the Devs confirmed they might increase it in the future. [ Default Settings ] - All servers have PvP Enabled in some areas, Taxation and Sandstorms are Enabled. Currently there’s no plans to add Official Servers with different settings. { Private Servers } [ Interconnected Private Servers ] - Private Servers in the same World are interconnected, which means you can freely move to another Sietch and meet people from all the other Sietches in the Social Hubs and The Deep Desert. [ Can Build in Multiple Sietches ] - The Player can have multiple bases in different Sietches. (Need to check if the number of Sub-Fiefs is still limited) [ Lower Population ] - Private Servers tend to have less players than Official Servers, which can be great when fighting for resources or to build your base in a specific place. [ Possible Lower Player Slots ] - Private Servers player slot is defined by whoever bought the hosting, it may vary from 6 to 40 Players. [ Custom Settings ] - The Host can choose to enable PvP everywhere, disable Taxation and Sandstorms. --- Gameplay --- There’s no need to rush the content. PVP isn’t essential to access all the End-game content. On day one after the Coriolis Storm, big guilds will rush to control the resource nodes of Titanium and Stravidium in the PVP Sectors. This will also happen in the PVE sectors where any individual player can build a base around Resource nodes. (FIX THIS FUNCOM, I cant destroy bases in PVE zones...) Ringmouth Spice Fields may be a dangerous place when big guilds are active harvesting it with their Carryall + Sandcrawler and multiple Assault Ornithopters defending the operation. Landsraad dominance can be achieved by doing either PVE or PVP tasks. --- Classes --- { Choosing your Class }The best classes to pick in the Character Creation are: [ Mentat ] = High Ranged Damage, clear POIs solo easily. [ Bene Gesserit ] = High Mobility and Survivability Passives (The mobility aspect of this class for exploration will get obsolete really fast after the early-game.) Don’t choose [ Trooper ] or [ Planetologist ] when creating your Character, those 2 classes can quickly be unlocked in the first area of the game (Hagga Basin South). [ Swordmaster ] is better late/endgame when the enemies are tougher and use shields, it will also require more player skill to deal with multiple melee enemies at the same time. You can unlock and mix all the Classes skills by completing the Trainers Questlines. { Skills }[ Max Level ] = 200? [ Total Skill Points ] = 200? [ Skills Shapes Meaning ] Rhombus = Equippable Abilities (Max of 3 Active) Octagons = Equippable Techniques (Max of 3 Active) Circle = Passive Effects (All Active) { Class Builders }https://dune.gaming.tools/skill-builder https://www.openworld.gg/dune-awakening/skill-builder --- Survival --- { Hotbar Setup }Short / Long Blade Sidearm / Disruptor / Drillshot / Flamethrower Rifle / Spitdart / Vulcan Cutter / Dew Harvester / Compactor Healkit Blood Harvester / Binoculars / Compactor Vehicle Backup Tool Welding Torch / Resource Scanner / Construction Tool / Probe Launcher { Player Status }[ Unsheltered ] = You are totally exposed to the elements. [ Sheltered ] = You are protected from Sandstorms. [ Enclosed ] = You and your vehicles are protected from Sandstorms. [ Watersealed ] = You and your vehicles are protected from Sandstorms, you can learn Schematics, your water consumption is highly decreased. { Hydration }Summary High Hydration = Bonus Stamina Bar. Blood Extractor = Extract Blood from a dead enemy body and stores it in a Blood Bag. Blood Purifier = Purifies the Blood deposited inside of it from a Blood Bag. Literjon = Stores Water. Stillsuit = Drinkable Water over time. Dew Harvester = Harvest water from plants at night. (Infinite water anywhere… with plants) Windtraps = Passively generates water from the air, need a consumable Filter to work. Fremen Deathstills = Deposit bodies to extract dozens of liters overtime.How to Gather it? [ Water Plants ] Drink Water directly from some plants. [ Blood Harvesting ] Use a Blood Extractor on dead enemies bodies and store it in a Blood Bag. [ Dew Harvesting ] Use a Scythe tool to gather water from Plants at night and store it in a Literjon. This is the best method of gathering water anywhere, grab a Dew Harvester and ~3 Literjon and you will be fine for a long time. [ Windtraps ] Passively harvests Water from air humidity. Need a Filter to work. [ Fremen Deathstills] By completing the 8th Trial of Aql you unlock the Deathstills, which harvest all the water from a corpse.How to Produce it? [ Blood Purifier ] Stores blood from Blood Bags and turn it into Water over time. [ Stillsuits ] Recycle water over time from your body moisture and make it drinkable.How to Store it? [ Literjons ] Manually stores water from Blood Purifiers or automatically stores water gathered with a Dew Harvester. [ Water Cisterns ] Automatically stores purified water from Blood Purifiers. You can also use the method with the Dew Harvester to fill out your cisterns, just grab ~10 Literjon and go out hunting for plants at night. { Heatstroke }Summary Shade = No Heatstroke / No Dehydration Heat Protection Gear = Slower Heatstroke Effects Heat Level = Biomes have different Heat Levels.What causes it? [ Sun Exposure ] Long time exposure to the sun without a Heat Protection gear set. [ Biome Heat Level ] Different biomes have different Heat Levels.What it does? [ Dehydration ] Fast dehydration when the bar turns red.How to get protection from it? [ Shadows ] Stay in the shadows. [ Heat Protection Gear ] Stillsuits give you some Heat Protection slowing down the Heatstroke bar. { Sandstorm }Summary Sunlight = Sandstorms may happen. Damages = Unsheltered Player and Sheltered Vehicles (Sheltered Players and Enclosed Vehicles are good)What causes it? From time to time during daytime a Sandstorm will sweep the map.What it does? Sandstorms will damage the players, exposed vehicles and buildings with inactive shields.How to get protection from it? Find a [ Sheltered ] area or better. Vehicles need to be in an [ Enclosed ] area or better to prevent getting damaged. { Sardaukar Search Ship }Summary Searchlights = Stay out of it. Caught = Run/Drive fast after Stun Effect.What are they? They are the Sardaukars looking for people to punish.When do they show up? [ Night ] They tend to patrol the Tier 2+ Sectors during the night with powerful searchlights. The searchlight color changes based on their awareness of their target: White Light = They are Searching Red Light = They are pursuing someone Yellow Light = They recently lost track of their target What if they spot me? [ Stun ] A bubble will stun you in place for a few seconds and the ship will launch some Jetpack Troopers after you.How do I evade them? [ Run ] Look where the ship is and run far from it. { The Sandworm }Summary Open Sands = Worms Habitat. Find the closest gaps between Rocky Areas to cross. Vibration = Aggros the Worm. Softstep Boots = Decreases Worm Threat by almost half (-45%), which means you can collect Flour Sand or Spice for a longer time. Powered/Suspensor Gadgets = Extremely increases the Worm Threat. Drumsand = Extremely increases the Worm Threat when over it. Quicksand = Slows you down and stuck your vehicle, don’t get near it!Where does it live? What does it eat? It lives in the Open Sands areas. It eats everything including vehicles and buildings.What increases it Attraction Chance? [ Vibration ] Running or using Vehicles in the Open Sands. [ Powered Gadgets ] Don’t use Powered/Suspensor Gadgets in the Open Sands, it extremely increases the Worm attraction to you. [ Drumsand ] Increases the Worm Attraction. Increasing the speed the Worm spawns. [ Quicksand ] Slows you or a vehicle down while also damaging the vehicle parts over time.How do I know if I'm in Danger? When you enter the Open Sands a Vibration Graph will show up at the bottom of the screen. [ White Graph ] = You are Safe. [ Orange Graph ] = You are Detectable. [ Red Graph ] = Worm spawned and will chase you. How to prevent it? [ Taking Cover ] The Rocky Areas are your friend, don’t run too far from it and the Worm won’t even spawn. [ Ground Vehicle ] If you are driving a vehicle you are fast enough and will be safe if you stick to the Rocky Areas and choose the closest gaps to cross the Open Sands. [ Threat Reduction Gear ] Some Schematics can give you Threat Reduction, like the Softstep Boots which reduce the Worm Threat by -145%.How to survive it? [ Running ] Run to the closest mountain with everything you got (Stamina, Skills, Powered Gadgets) and hope for the best, and don't look back. :) [ Vehicle Boost Module ] Equip your vehicle with a Boost Module, use it to increase your speed even more, but don’t overheat the engine!Can it be killed? Currently no? --- Combat --- { Holtzman Shield }How to Acquire it? Find or Craft and equip a Holtzman Shield and a decent Powerbank.How to Drain it? [ Overwhelm ] High RPM Weapons or Melee Fast Attacks block the Shield from recharging. [ Stunlocking ] Multiple fast light attacks with a blade make the enemy incapable of reacting while being hit, draining their Shield Power with each hit.How to Bypass it? [ Short/Long Blade ] Heavy attacks with blades bypass the shield, damaging the user. [ Disruptor Guns ] High RPM disruptor guns make some Darts to pass through the shield and damage the enemy. [ Drillshotgun ] A shotgun capable of firing a burrow-dart that penetrates the shield and damages directly the enemy. [ Skills/Effects ] Damage over Time effects (DoTs) like Poison and Bleed damages directly the user. { Player Death / Loot } When a Player gets killed by the Sandworm, everything is lost. When a Player dies in PVP/PVE only the Resources/Schematics/Solaris are dropped, the Gear Durability will get slightly damaged, 10%?. (Even in the Deep Desert) A Landsraad Decree may enable Full PvP Loot during the week in the Deep Desert, making it possible to loot everything someone is carrying. { PvP Areas }Currently ALL servers have PVP enabled in some specific Sectors or Zones [ Hagga Basin ] Only ~10% of the area has PVP Enabled, specific POIs like [Green POIs] Shipwrecks and T5 [Outposts].[ Deep Desert ] ~50% of the area has PVP Enabled. Ringmouth Spice Fields will always be inside the PVP zone, all the Control Points and Shipwrecks no matter where they are will be a PVP zone. { Respawn Points }[ Previous Visited POI ] The last POI you visited will show up as a respawn point.[ Respawn Beacon ] You can place multiple Respawn Beacons, but only the last one placed will be active.[ Subfiefs (Bases) ] You can interact with your Subfief and enable the respawn on it.[ Vehicles ] Your last used vehicle can also be used as a respawn point, but beware where you park it. --- Storage ---

{ Circuit Setup } While building your base with a Construction Tool all resources will be pulled from your Inventory or a Circuit 1 Storage. [ Inventory Selection ] You can switch from your Backpack inventory to a Vehicle inventory in the same interface, click the “Backpack” button and choose which vehicle inventory to display. This way you can easily move resources around your base without moving your character. [ Input/Output ] Storages and Machinery have a specific Circuit Number assigned as their Input and Output. For example you can choose where the production of an Ore Refinery should be stored after the ores get refined, or from which storage the Ore refinery should get the ores from. To force a Machine to output to the desired location simply manually place a single item in each slot of the machine. (Use 1x Salvaged Metal in each slot for example) --- The Deep Desert --- { The Layout }The Deep Desert is a 3x3 Grid with each grid containing 9 Sectors, a total of 81 Sectors. Each Grid has a Player Capacity of 100 players. The whole Deep Desert has a Maximum Player Capacity of 300 players. You can move freely between the Grids as long as that grid doesn't have 100 players already in it. Each Sector requires a Survey Probe to be fully explored. The Sectors in row "A" is PVE, some other Sectors may be flagged as PVE depending on the week. (Lately PVE sectors is extended from row "A" to half of row "E") The rules from Hagga Basin still apply for Shipwrecks, which is PVP. Also all the Control Points is PVP. This is a great area to build your Temporary Outpost or Refinery, where you can drop or refine anything before transporting back to Hagga Basin. Sectors "A" PVE Imperial Testing Stations is a great source for T5 Unique Schematics and equipment, the weapons and gear might be damaged but its still useful. Testing Stations and Shipwrecks from row "B" to row "I" are extremely difficult to solo, those POIs where meant to be cleared in a group of 4 players, but its still possible to solo it with T5 Gear, Weapons, a good Build, player skill and tactics. Loot takes only 20min to respawn compared to Hagga Basin which is 40min, in PvP areas only the first one to loot will get the items. There’s multiple NPC Houses Control Points, which can be captured by the players from a Playable House. As long as it stays under your control your Guild/House will get points over time. (10 Points per minute) Those Control Points will be highly contested by Player Guilds, where they will usually build a base on top of it to hold it for as long as possible. (Never seen anybody do that, but the Devs said it would happen) [ The Coriolis Storm ] They strike each Tuesday morning during the server daily restart. This is when the wipe happens. You’ll see them rise on the horizon the hours before and the Communinet will warn you. This is the visual warning. The entire Deep Desert is wiped: bases and environment alike. A new layout for the Deep Desert is revealed with new POIs and locations. A new Landsraad cycle begins. Bases in Hagga Basin remain unaffected by the Coriolis Storm. You will need to survey the area for resources again because some of the nodes in the Hagga Basin may have changed. ### BEGINNER SECTION ### --- Locations : Trials --- { 1st Trial }[ Hagga Basin South ] - Mihna Cavern { 2nd Trial }[ Eastern Vermillius Gap ] - The Deep Struggle Cave { 3rd Trial }[ Western Vermillius Gap ] - Cave of the Lost Pilgrim { 4th Trial }[ Eastern Vermillius Gap ] - Mirzabah's Head Cave { 5th Trial }[ Hagga Rift ] - The Hidden Test Cave { 6th Trial }[ Jabal Eifrit Al-Sharq ] - Devil's Eye Cavern { 7th Trial }[ Hagga Rift ] - The Red Maw Cave { The Footsteps of the Fremen }[ Mysa Tarill ] - Sietch Ta'lab Cave DOOR ANSWERS: Nilotic Al-Ourouba Poritrin Salusa Secundus Bela Tegeuse Rossak Thurgrod Harmonthep BOULDERS Right > Left = Objective Right > Right = Lore + Container Right > Front = Lore Left > Left = Water + Trap + Container Front > Left = Trap + Container Front > Front = Container RUNES Look at the 4 murals in the walls for the words. Listen to the record and choose the Runes in the order that is said.

BIND - DUNE - GRASS PLANT - SHELTER - DOWNWIND ANIMAL - AERATE - SAND BLOOD DISC Start from the Inner Ring then outwards. Outer Ring moves alone. Middle Ring also moves the Outer Ring. Inner Ring also moves the Outer Ring. --- Locations : Class Trainers --- { Trooper } [ Level 1 ] = Hagga Basin South > Griffin’s Reach Tradepost [ Level 2 ] = Arrakeen - Kara Valk (In the 2nd Floor Balcony) [ Level 3 ] = Arrakeen - Kara Valk [ 1st Capstone ] = Arrakeen - Kara Valk [Gunnery - Energy Capsule?] [ 2nd Capstone ] = Arrakeen - Kara Valk [ 3rd Capstone ] = Arrakeen - Kara Valk { Planetologist }[ Level 1 ] = Hagga Basin South > Chinara’s Camp - Derek Chinara [ Level 2 ] = Western Vermillius Gap > Imperial Testing Station No.197 (In the Entrance down the hole) [ Level 3 ] = Jabal Eifrit Al-Janub > Imperial Testing Station No.76 (In a Cage inside the Lab near the Entrance) [ 1st Capstone ] = Hagga Rift > Imperial Testing Station No.29 (Inside the Lab in the Entrance) [Explorer - Spice Surveyor?] [ 2nd Capstone ] = The O'odham > Imperial Testing Station No.71 (Inside the Lab in the Entrance) [Mechanic - Heat Management] [ 3rd Capstone ] = The O'odham > Imperial Testing Station No.163 (Inside the Lab below the circular stairs) [Scientist - Conservation of Energy] { Mentat }[ Level 1 ] = Hagga Rift > Riftwatch (Harkonnen Fortress) [ Level 2 ] = Arrakeen - Zayn the Witte (In the Bar) [ Level 3 ] = Arrakeen - Zayn the Witte [ 1st Capstone ] = Zayn the Witte [Assassination - Hunter-Seeker?] [ 2nd Capstone ] = Zayn the Witte [Tactician - Power Source?] [ 3rd Capstone ] = Zayn the Witte [Mental Calculus - Shield Overcharge?] { Bene Gesserit }[ Level 1 ] = Eastern Shield Wall > Helius Gate (Atreides Fortress) [ Level 2 ] = Harko Village - Jocasta Cleo (Near Weapons Vendor) [ Level 3 ] = Harko Village - Jocasta Cleo [ 1st Capstone ] = Harko Village - Jocasta Cleo [Body Control - Litany Against Fear?] [ 2nd Capstone ] = Harko Village - Jocasta Cleo [ 3rd Capstone ] = Harko Village - Jocasta Cleo { Swordmaster }[ Level 1 ] = Jabbal Eifrit Al-Gharb > Pinaccle Station Tradepost [ Level 2 ] = Harko Village - Seron Varlin (In the Beast's Bend) [ Level 3 ] = Harko Village - Seron Varlin [ 1st Capstone ] = Harko Village - Seron Varlin [ 2nd Capstone ] = Harko Village - Seron Varlin [ 3rd Capstone ] = Harko Village - Seron Varlin [The Way - Prescient Strike?] --- Locations : Factions Representatives --- { Playable Factions } [ Atreides ][ Eastern Vermillius Gap ] - The Anvil Tradepost [ Harkonnen ][ Eastern Vermillius Gap ] - The Anvil Tradepost [ Smugglers? ]Currently Unknown --- Making Money (Solaris) --- { The Tradeposts }[ Pinnacle Station ]100% Demand for Weapons and Armor. Sell looted Mk5/Mk6 Weapons and Armor, repair it before selling if you have spare resources to get more Solaris. [ Crossroads Tradepost ]100% Demand for Vehicle Parts. Sell looted Mk5/Mk6 Vehicle Parts, repair them and sell! (Around ~2000 per part, Treads not included) [ Anvil Tradepost ]100% Demand for Water and Blood Harvesting Tools. The ExchangePeople tend to throw items in the Exchange with random prices, keep an eye for items that could be sold directly to the Tradepost for profit, or relist it with a higher price! Sell Mk5/Mk6 Vehicle Parts, Weapons, Armor and Unique Schematics. Sell high demand resources like Duraluminum and Plastanium. Sell Landsraad Tasks materials. Buy anything that is under the Tradepost prices and sell it there instead! Sometimes its worth to buy Uniques, craft it and sell it in the Tradepost. (People are randomly pricing stuff, sometimes way over -90% what they could get if sold directly in the correct Tradepost) === Progression Guide === { Notes } If you are playing in a GROUP you have enough DPS to rush and explore all the POIs earlier. Research the Schematics as you need them! Don't unlock random stuff and if possible coordinate with your group who's unlocking what. Minor POIs are = Scavenger Camps, [Red POIs] Caves, Outposts. Major POIs are = [Blue POIs] Testing Facilities, [Green POIs] Shipwrecks. POIs Chests resets every 40min. --- Character Creation --- Create a Character with Unlocked Research Don't waste time doing Journeys to unlock the Researches, you will still be able to follow the Journeys if you want. --- [T1] Hagga Basin South --- While you follow the Guide do the following:Discovering POIs gives you Intel points to unlock research Discover all the POIs in your path. Give priority to those items when looting and don’t hold on too many of the heavy items: Solaris. Schematics & Spice Infused resources. [Red Tech] EMF Generator & Micro-Sandwich Fiber. (From Caves) [Green Tech] Mechanical Parts & Plasteel Microflora Fiber. (From Shipwrecks) [Blue Tech] Advanced Servoks & Particle Capacitor. (From Testing Stations) Research and Craft: Makeshift Clothing = 1x Makeshift Set. Maula Pistol Kit = 1x Improvised Maula Pistol + 30x Light Darts[x30]. Healkits = 20x Healkit. Binoculars = 1x Binoculars. Basic Exsanguination Kit = 1x Improvised Blood Extractor + 5x Small Blood Sack. Respawn Beacon = 1x Respawn Beacon. Extract the Blood of everyone you kill.
Go to the Outpost “Broken Stone Station”. Location = Center-South of Hagga Basin South, check your map for the Hammerhead Mountain Landmark, it's directly south of it at the bottom of Hagga Basin South. Get the Schematic “Aren’s Vengeance Rifle”. Search for the Intel Object. Complete the First Trial in “Mihna Cavern”, located in the Center-South mountain area. Location = North-East from “Broken Stone Station” at the same area. How to Complete = Hide from the Big Eyes and cross the exposed areas when it closes, keep following the path. Explore [Green POI] Wreck of the Alcyon. Loot Solaris, Schematics, Spice-Infused Copper and Tech Parts. (Mechanical Parts & Plasteel Microflora Fiber) Get the Schematic = [Short Blade] Kallef’s Drinker. Get the Quest Item = Holtzman Amplifier. Explore [Blue POI] Testing Station No.2. Loot Solaris, Schematics, Spice-Infused Copper and Tech Parts. (Advanced Servoks & Particle Capacitor) Find the Secret Room behind the Bookshelf with a Glowing Yellow mark on it. Get the Quest Items = Automated Poison Snooper, Imperial Testing Station Records, Mysterious Vials, 1x Sandbike Engine, 2x Sandbike Tread Mk1. (Save the Bike Parts for a Contract) Before leaving, check the now accessible room between the stairs next to the exit. Complete the Planetologist Questline. Quest Pickup Location = Chinara’s Camp. Deliver the Quest Item = Imperial Testing Station Records. Build a 3x3 Base around the Center-North mountain area, or the Tradepost. Research / Build / Craft the following: Basic Construction Kit = 1x Construction Tool + Build the Base + 2x Fuel-Powered Generator. (Fill it with Fuel Cells) Storage Container = As many as you need. Blood Purifier = 2x Small Blood Purifier. (per player) Small Ore Refinery = 2x Small Ore Refineries. Fabricator = 1x Fabricator. Surveying Kit = 1x Survey Probe Launcher + 9x Survey Probe. Scavenger Stillsuit = 1x Scavenger Stillsuit Set. Unique Schematic Aren’s Vengeance. Unique Schematic Kaleff’s Drinker. Survey Hagga Basin South. Climb high enough to be able to use the Survey Probe Launcher, one per Sector is enough Go to the “Griffin's Reach Tradepost”. Location = Center-Northwest of Hagga Basin South. Buy [Schematic] 2x Hajra Literjon Mk1 ($500 each) from the Merchant. Get all the Contracts and Deliver the Completed ones. Get the Trooper Quest. Craft a proper Sandbike. Research / Build / Craft the following: Unique Schematic Hajra Literjon Mk1 = 2x Hajra Literjon Mk1 Small Chemical Refinery = 1x Small Chemical Refinery [Small Chemical Refinery] Craft 2x Medium Sized Vehicle Fuel Cell Sandbike Mk1 Assembly = Craft 1x Sandbike Parts + 1x Welding Torch Mk1 + 300x Welding Wire Use the Booster Mk2 you got as a reward from the Contract. (Fast Travel Speed is more important than Inventory Size right now) Craft 1x Vehicle Backup Tool to store your Sandbike inside of it. Complete the Trooper Questline Quest Pickup Location = Griffin’s Reach Tradepost Go to and kill everyone inside: [Red POI] Kaleff’s Stand [Red POI] Shamal Tunnel [Red POI] Edgeway Cavern Dismantle your Base and move to Vermillius Gap! You really don't need a base here anymore, but If you want to keep your base and complete the journey task, just remove and replace the Subfief Console. Bring with you only the most important Items, leave the rest behind. Extract all the water you can carry. Remove the Sub-fief Console. (And the blocks if you want, otherwise the base will perish over time){ Optional }Optional stuff to do before leaving Hagga Basin, but you can always come later flying a beautiful Scout Ornithopter and do it faster! Complete the Journeys. Find the Fremen The First Trial of Aql A New Beginning Getting Equipped The Attitude of the Knife Shelter and Shields Water from Blood Echoes of the Past A Touch of Civilization The Wreck of the Alcyon Across the Gap Miscellaneous A Backup Plan Location, Location, Location Get/Complete the Contracts. Granite Delivery [Atreides] Fresh Recruit [Harkonnen] Fresh Recruit Planetologist: Basics Planetologist: Advanced Salvage Junket Scrap Mettle The Anvil Trooper: Basics Vial RetrievalExplore the remaining Scavenger Camps to get more Intel Points. --- [T2] Eastern/Western Vermillius Gap --- While you follow the Guide do the following: Discover all the POIs in your path. Deposit everything you got in your Base whenever you get a chance. Give priority to those items when looting and don’t hold on too many of the heavy items: Silicon Iron Ingot Flour Sand Solaris. Schematics & Spice Infused resources. [Red Tech] EMF Generator & Micro-Sandwich Fiber. (From Caves) [Green Tech] Mechanical Parts & Plasteel Microflora Fiber. (From Shipwrecks) [Blue Tech] Advanced Servoks & Particle Capacitor. (From Testing Stations)
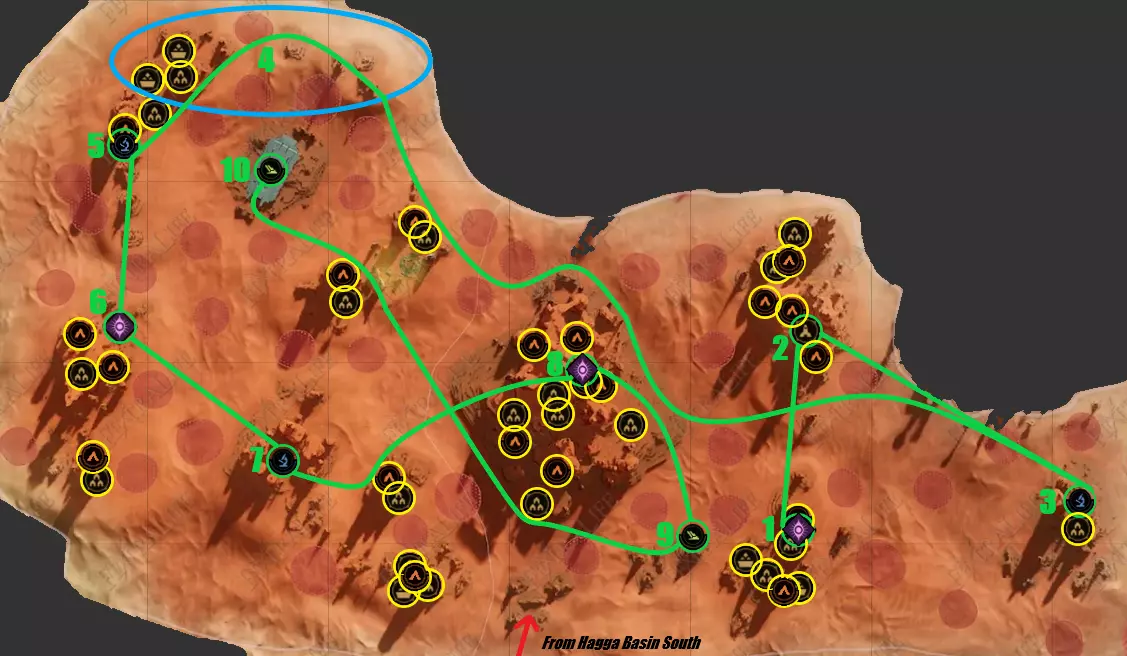
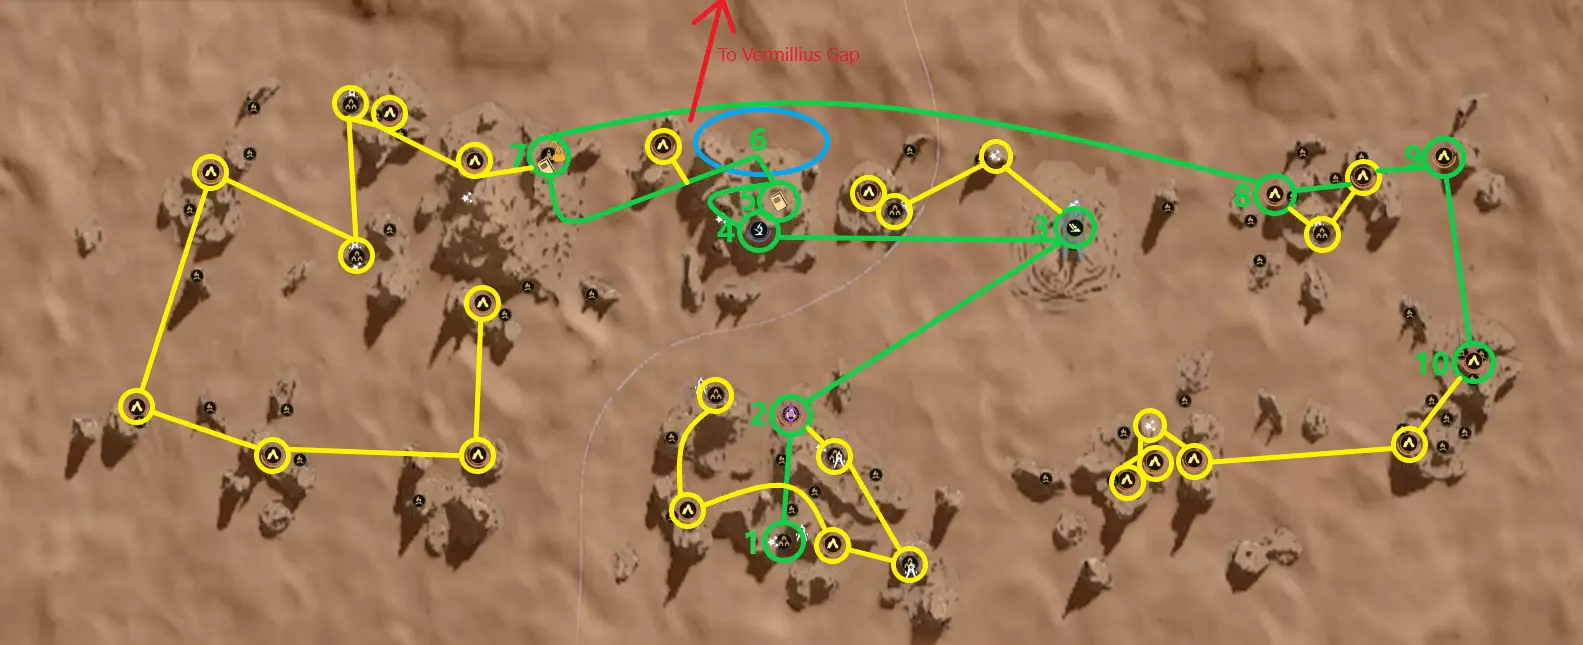
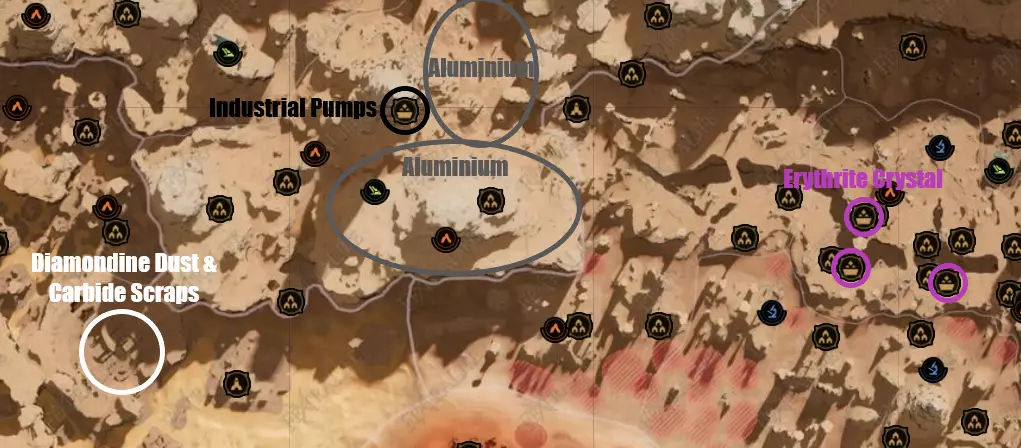
完成深层斗争洞穴的第二次试炼。 位置:东弗米利厄斯峡谷中南部山区。调查东弗米利厄斯峡谷。 探索附近的前哨站和洞穴。 前往铁砧贸易站获取所有合约并与家族代表交谈。 位置:米尔扎巴赫之首东部(锤头山)。向商人购买: 1个切割器MK2。 1个露水收集器MK2。 1个霍尔茨曼护盾MK2。 1个血液提取器MK2。 探索附近的前哨站和洞穴。 探索【蓝色兴趣点】10号测试站。 位置:东弗米利厄斯峡谷东部山区。这里会刷新一辆越野车,使用焊枪获取零件。 在西弗米利厄斯峡谷西北部建造一个小型基地。 该区域是后期采矿地点之间的中心位置。调查西弗米利厄斯峡谷。 暂时将其用作仓库,之后再进行扩建。 探索【蓝色兴趣点】13号测试站。 位置:西弗米利厄斯峡谷西北山区。探索附近的洞穴。 完成失落朝圣者洞穴中的第三个试炼。 位置:西弗米利厄斯峡谷西南山区。探索附近的前哨站和洞穴。 探索【蓝色兴趣点】197号测试站。 位置:西弗米利厄斯峡谷东南山区。探索附近的前哨站和洞穴。 与洞穴底部的行星学家训练师交谈,获取里面的任务物品,之后将其送回他在奇纳拉营地的营地。(哈加盆地南部) 完成米尔扎巴赫之颅的第四个试炼 位置:锤头山内部。攀爬山脉,直到找到一条由巨大光滑石块组成的“路径”,上面系着绳索。沿着路径一直走,进入山脉内部,即可到达仪式室。 爬上米尔扎巴赫之颅的顶部,在一架损毁的扑翼机后面可以找到一个蓝图宝箱。 探索【绿色兴趣点】阿克泰翁号残骸(PvP区域) 位置:东弗米利厄斯峡谷中南部山脉。 探索【绿色兴趣点】帕拉斯号残骸(PvP区域) 位置:西弗米利厄斯峡谷中北部。 【可选】继续前进前可做的事情:完成任务旅程。找到弗雷曼人 阿克尔的第二次试炼 阿克尔的第三次试炼 阿克尔的第四次试炼 弗米利厄斯峡谷 继续前进 为弗米利厄斯的生活做准备 沙丘的形态 收割与储存 战争武器 峡谷巡游 弗米利厄斯契约 维护 室内装饰 埋藏的宝藏 杂项 更广阔的世界 税收 日光银行 获取/完成契约 处决令 寻找塞莫 敌意收购 报复 巅峰站 手枪交付 奴隶贩子任务 怪物猎杀 探索剩余的拾荒者营地以获取更多情报点。 ---【T3】钢铁与赤铁矿--- 【碳】带白色碎片的岩石 贾巴尔·埃弗雷特·阿尔·加尔布 贾巴尔·埃弗雷特·阿尔·贾努布 【赤铁矿】带粉色发光碎片的岩石 哈加裂谷 - 矿物提取设施内部。制作你的第一辆越野车:向任何贸易站的扑翼机飞行员支付2500,飞往阿拉基恩或哈科村,从交易所购买一辆二手越野车卡特雷Mk5,价格不会太高(大约15000左右)。考虑到你从资源节点获得的收益,这完全值得,你会一直用到游戏后期。 [T4] 铝 [铝]灰色岩石 东部盾墙 制作你的第一架扑翼机:[铝]可以在东部盾墙区域找到。 [钴 paste]由小型化学精炼厂使用赤铁矿生产。 [金刚砂粉尘]和[碳化物碎片]可以在迈萨塔里尔的邪教建筑群中 loot(十字路口贸易站以西)。 [工业泵]可以在东部盾墙的哨兵城 loot。注意:使用推进器而非库存模块进行移动,推进器能帮助你更快获得高度并大幅减少燃料消耗。
--- [T5] Duraluminum --- Duraluminum is a combination between Aluminum and Jasmium.[ Jasmium ]Radiation Suit is required! Craft Iodine Pill ASAP (Agave Seeds can be found in O'odham) Jasmium can be found in Sheol in some green glowing radioactive pools. Use your Scout Ornithopter with a Inventory Module (500V) to bring more Jasmium. Mine Jasmium using a Buggy, you get more Jasmium and less Radiation. Build a small garage with some Storage using a Sub-Fief Console. Use your Ornithopter to transport the Jasmium back to base. Craft a Assault Ornithopter with a Inventory Module (1000V) if you want.{ Farm Duraluminum Unique Schematics } Syndicate Set Acheronian Set --- [T6] Plastanium --- { Stravidium and Titanium }Found in the Deep Desert, between Grids "F" and "I" you will find a higher amount of resource nodes. Use a Mk5 Assault Ornithopter w/ Booster & Inventory to get Resources like Spice, Stravidium and Titanium. Assaults are tougher than Scouts and can get to higher altitudes faster thanks to the Booster. Use a Mk5 Scout Ornithopter w/ Booster to run POIs, remember to store it in the Vehicle Backup Tool when landing. You can also use it to escape from death if your Assault Ornithopter gets destroyed. Build a Processing Facility/Storage in the Deep Desert soon after the weekly reset. Best place for a base is around Column 4, 5 or 6 at the edge of the PVE zone, a central area. Move everything from the Deep Desert back to Hagga Basin on Sunday before the weekly reset on Monday/Tuesday. (Check your region for the accurate reset time){ What to Bring to the Deep Desert every Week }If you don't want to look at the charts, bring the following every week to build a Base in the Deep Desert: Fuel Cells and Low-Grade Lubricant (To Power the Base) 100x Corpses or more (For Water) [4 Stacks] 2000x Silicone Block [4 Stacks] 2000x Cobalt Paste [3 Stacks] 1500x Duraluminum Ingot [2 Stacks] 1000x Plastanium Ingot [1 Stack] 500x Salvaged Metal [1 Stack] 500x Steel Ingot 750x Spice Melange (If its your first base 18x is enough for the Medium Chemical Refinery) 525x Complex Machinery 250x Calibrated Servok 100x Copper Ingot (For Recycler and Probes) 100x Aluminum Ingot (For Storage Containers) 39x Industrial Pump (For Large Water Cisterns) 20x Iron Ingot (For Repair Station) 15x Thermoelectric Cooler (For the Advanced Survival Fabricator, which can be used to craft Advanced Machinery or other Advanced Materials needed) 48x Advanced Machinery (For the Large Ore Refinery and Large Spice Refinery) Silicone Block is also used in the production of Fuel for the Base and Vehicles. Cobalt Paste/Duraluminum Ingot are also used in repairs of items made with it. Salvaged Metal is also used for Welding Wires to repair vehicles and ammunition for weapons. Steel Ingot is used mainly for the Wind Turbines and Pentashield. Copper Ingot is also used to craft Probes and repair the Launcher. Aluminum Ingot is only needed if you are still using Storage Containers. { Base Progression Stage 1 to Stage 5 }https://docs.google.com/spreadsheets/d/1icNjscBY1iFSBs5DgzCOgB-RhbkpazwY9Km5uvtF4AY/edit?usp=sharing === Unique Schematics === --- Hagga Basin South --- { Armors | Stillsuits } [Stillsuit] Hollower Stillsuit Set (Mask, Garment, Gloves, Boots) = [Outpost] The Dewgap. [LightArmor] - Aren's Light Armor Set (Mask, Chestpiece, Pants, Gloves, Boots) = Top of the Rock Pillar Northwest of the Wreck of the Alcyon. { Tools & Utility } [Storage-Literjon] - Hajra Literjon Mk1 = [Tradepost] Griffin's Reach Merchant for $500. [Storage-Literjon] - Hajra Literjon Mk1 = Top of the Rock Pillar Southeast of the Wreck of the Alcyon. [Tool-Cutteray] - Sim's Cutter = [Outpost] Keyhole Rock. [Utility-Powerpack] - Old Sparky Mk1 = [Outpost] Keyhole Rock. [Utility-SuspensorBelt] - Emperor's Wing Mk1 = [Blue POI] Testing Station No.2. { Vehicles } [Vehicle-Sandbike] - Mohandis Sandbike Engine Mk1 = [Outpost] Keyhole Rock. { Weapons } [Pistol-Maula] - Way of the Fallen = [Cave] Old Griffins Hideaway. [Rifle-Karpov] - Aren's Vengeance = [Outpost] Broken Stone Station. --- Eastern/Western Vermillius Gap --- { Armors | Stillsuits } { Tools & Utility } [Bloodbag] - Scipio's Bloodbag = [Tradepost] Anvil Merchant for $8.5K [DewHarvester] - Buoyant Reaper Mk2 = [Tradepost] Anvil Merchant for $7.5K. { Vehicles } [Sandbike] - Night Rider Sandbike Boost Mk2 = [Tradepost] Anvil Merchant for $16K. { Weapons } ### ADVANCED SECTION ### === Fast Progression === WIP === The Landsraad === { How it Works? } Currently there are 2 Playable Factions (Atreides and Harkonnen), a third one will be announced eventually. (Smugglers?) The Playable Faction who win the vote of 5 NPC Houses in a row Vertically or Horizontally will win. The Playable Faction who have the support of the majority of the NPC Houses will win. The NPC Houses have multiple tasks that can be completed to gain their support. (PvE and PvP tasks) After a Playable Faction is declared the victor, the Guild Leaders of guilds whose members contributed will have to choose between 3 Decrees to place their votes on. The elected Decree will be active for the next week. The Decree will affect EVERYONE in that World. --- Minor Houses Representatives --- { NPC Houses Location }[ Hagga Basin South ] [ Argosaz ] - Outside Griffin's Reach Tradepost. [ Eastern Vermillius Gap ] [ Hurata ] - Near Imperial Testing Station No.10. [ Tseida ] - Inside of Anvil Tradepost. [ Western Vermillius Gap ] [ Novebruns ] - Near "The Eye" cave. (West of the Anomaly) [ Hagga Rift ] [ Dyvetz ] - Northwest of Riftwatch. [ Ecaz ] - Northeast of "The Gasp" cave, but on the surface. [ Moritani ] - In Riftwatch. [ Thorvald ] - Under the Wreck of the Kytheria, at the bottom of the Rift. [ Jabal Eifrit Al-Janub ] [ Mikkarol ] - South of [Outpost] The Slant. [ Jabal Eifrit Al-Sharq ] [ Imota ] - East of the Wreck of Tisiphone. [ Jabal Eifrit Al-Gharb] [ Sor ] - Pinnacle Tradepost. [ Eastern Shield Wall ] [ Hagal ] - East of 8th Trial of Aql, on top of the cliff. [ Richese ] - Helios Gate, left of the vendor. [ Vernius ] - Helios Gate, in a separate tower. [ Western Shield Wall ] [ Lindaren ] - North of Imperial Testing Station No.60. [ The O'odham ] [ Kenola ] - Southeast of Outpost "House of Fiqh". [ Mysa Tarill ] [ Taligari ] - Crossroads Tradepost. [ Sheol ] [ Wydras ] - North of Edge of Acheron. [ Faction Cities ] [ Mutelli ] - Arrakeen, Right side Balcony on the 2nd Floor. [ Varota ] - Arrakeen, Inside the Imperial Consulate. [ Wallach ] - Arrakeen, In the Residency Approach next to the Atreides Vendor. [ Alexin ] - Harko Village, Inside the Imperial Consulate. [ Spinette ] - Harko Village, Right side Balcony on the 2nd Floor. [ The Deep Desert ] [ Maros ] - Northwest Corner of A8/Southwest Corner of B8. [ Wayku ] - Northeast Corner of A2. --- Decrees --- { Decrees } CHOAM Production Contract (Crafting costs is reduced by 25%) CHOAM Refining Contract (Repair costs and refining time are reduced by 75%) Exclusive Armor Import Rights (Access to a Landsraad Armor Vendor) Exclusive Vehicle Import Rights (Access to a Landsraad Vehicle Vendor) Exclusive Weapons Import Rights (Access to Landsraad Weapons Vendor) In Honor of the Fallen (Melee Weapon Damage Increased by 33%) Scholarly Collaboration (Experience Gain is Increased by 50%) The Right of Salvage (All items are dropped and can be looted by anyone when defeated in the Deep Desert) --- Tasks --- Check the Spreadsheet[docs.google.com] NOTE: (07/20/2025) Delivered some tasks and got ~16.800 points instead of 14.000. Maybe its a bug or Funcom changed it and forgot to update the reward points in the UI. { Elimination Tasks }PER KILL = X POINTS Task Points Amount Required for Rewards Amount Required for Goal Scavengers 23 609 3044 Kirab 23 609 3044 Deserters 23 609 3044 Sandflies 23 609 3044 Maas Kharet 23 609 3044 Atreides Troops 23 609 3044 Harkonnen Troops 23 609 3044 { Delivery Tasks }PER ITEM = X POINTS [ GATHER ] Task Points Amount Required for Rewards Amount Required for Goal Agave Seeds 23 609 3044 Ship Manifest 52 270 1347 Spice-Infused Iron Dust 35 400 2000 Spice-Infused Steel Dust 75 187 934 Spice-Infused Aluminum Dust 44 319 1591 Spice-Infused Duraluminum Dust 69 203 1015 Spice-Infused Plastanium Dust 83 169 844 [ REFINE ] Task Points Amount Required for Rewards Amount Required for Goal Plastanium Ingot 5 2800 14000 Spice Melange 6 2334 11667 [ COMPONENTS ] Task Points Amount Required for Rewards Amount Required for Goal Calibrated Servok 16 875 4375 Heavy Caliber Compressor 33 425 2122 Holtzman Actuator 26 539 2693 Industrial Pump 20 700 3500 Insulated Fabric 9 1556 7778 Light Caliber Compressor 18 778 3889 Opafire Gem 52 270 1347 Range Finder 117 120 599 Stillsuit Tubing 39 359 1795 [ CRAFT ] Task Points Amount Required for Rewards Amount Required for Goal Iodine Pill 63 223 1112 Healkit Mk6 221 64 317 Melange Spiced Wine 48 292 1459 Literjon 95 148 737 Dew Reaper Mk6 1221 12 58 Full Suspensor Belt 1178 12 60 Radiation Suit Mk5 424 34 166 House Rapier 840 17 84 Adept Dirk 1091 13 65 Adept Kindjal 1091 13 65 Adept Sword 1066 14 66 Adept Disruptor M11 1748 9 41 Adept Karpov 38 1627 9 44 Adept JABAL Spitdart 1453 10 49 Regis Kindjal 677 21 104 Regis Rapier 640 22 110 Regis Sword 640 22 110 Regis Maula Pistol 1598 9 44 Regis GRDA 44 1237 12 57 Regis JABAL Spitdart 1359 11 52 Scout Ornithopter 1824 8 39 --- Rewards --- { Possible Rewards }700 = 10.000 Solari 700 = 25x Atmospheric Filtered Fabric 700 = 25x Diamondine Blade Parts 700 = 25x Fluted Heavy Caliber Compressor 700 = 25x Improved Holtzman Actuator 700 = 25x Improved Watertube 700 = 25x Irradiated Core 700 = 25x Plasteel Composite Armor Plating 700 = 25x Plasteel Composite Blade Parts 700 = 25x Plasteel Composite Gun Parts 3500 = 1x Acheronian Helmet 3500 = 1x Acheronian Chestplate 3500 = 1x Acheronian Pants 3500 = 1x Acheronian Gauntlets 3500 = 1x Acheronian Boots 3500 = 1x Adept Tripleshot Repeating Rifle 3500 = 1x Batigh Stillsuit Mask 3500 = 1x Batigh Stillsuit Garment 3500 = 1x Batigh Stillsuit Boots 3500 = 1x Buoyant Reaper Mk5 3500 = 1x Cope 3500 = 1x Extravagant Message 3500 = 1x Filter Extractor Mk5 3500 = 1x Focused Buggy Cutteray Mk5 3500 = 1x Hajra Literjon Mk5 3500 = 1x Hawkeye Scanner Module Mk5 3500 = 1x Kharet Viper 3500 = 1x Mohandis Sandbike Engine Mk5 3500 = 1x Moisture Sealer 3500 = 1x Jolt-Knife 3500 = 1x Jolt Sword 3500 = 1x Pardot's Drinker 3500 = 1x Piter's Disruptor 3500 = 1x Sandflies Carver 3500 = 1x Shaitan's Tongue 3500 = 1x Steady Assault Boost Module Mk5 3500 = 1x Syndicate Helmet 3500 = 1x Syndicate Chestplate 3500 = 1x Syndicate Pants 3500 = 1x Syndicate Gauntlets 3500 = 1x Syndicate Boots 3500 = 1x Way of the Desert 3500 = 1x Young Sparky Mk5 7000 = 50x Advanced Machinery 7000 = 50x Atmospheric Filtered Fabric 7000 = 50x Ballistic Weave Fabric 7000 = 50x Carbide Blade Parts 7000 = 50x Diamondine Blade Parts 7000 = 50x Fluid Efficient Industrial Pump 7000 = 50x Fluted Heavy Caliber Compress 7000 = 50x Fluted Light Caliber Compressor 7000 = 50x Improved Holtzman Actuator 7000 = 50x Improved Watertube 7000 = 50x Irradiated Core 7000 = 50x Overclocked Power Regulator 7000 = 50x Plasteel Composite Armor Plating 7000 = 50x Plasteel Composite Blade Parts 7000 = 50x Plasteel Composite Gun Parts 7000 = 50x Precision Range Finder 7000 = 50x Thermo-Responsive Ray Amplifier 10500 = 100x Improved Holtzman Actuator 10500 = 100x Irradiated Core 10500 = 100x Plasteel Composite Blade Parts 10500 = 1x Albatross Wing Module Mk6 10500 = 1x Buoyant Reaper Mk6 10500 = 1x Cauterizer 10500 = 1x Circuit Gauntlets 10500 = 1x Compact Compactor Mk6 10500 = 1x Hajra Literjon Mk6 10500 = 1x Hummingbird Wing Module Mk6 10500 = 1x Idaho's Charge 10500 = 1x Indara's Lullaby 10500 = 1x Kynes's Cutteray 10500 = 1x Penetrator 10500 = 1x Perforator 10500 = 1x Pincushion Helmet 10500 = 1x Pincushion Chestpiece 10500 = 1x Pincushion Pants 10500 = 1x Pincushion Gauntlets 10500 = 1x Pincushion Boots 10500 = 1x Plasma Cannon 10500 = 1x Power Harness 10500 = 1x Regis Burst Drillshot 10500 = 1x Replica Pulse-Sword 10500 = 1x Tabr Softstep Boots 10500 = 1x The Baron's Bloodbag 10500 = 1x Villari's Stillsuit Mask 10500 = 1x Villari's Stillsuit Garment 10500 = 1x Villari's Stillsuit Boots 10500 = 1x Walker Sandcrawler Engine Mk6 10500 = 1x Yueh's Reaper Gloves 14000 = House Stillsuit Armor Swatch 14000 = House Light Armor Swatch 14000 = House Heavy Armor Swatch === Other === --- Class Builds --- { Weapon Combinations } Blade + Drillshot + Spitdart { PvE Builds } [ Balanced Build ] https://dune.gaming.tools/skill-builder/Aw4RhDKrWzywExIMwpcFqsKSDAtdNbQpMMfTOcHOCZXW4AFkrQA4B2TgNgCcA1AFYgA [ Ranged Build ] https://dune.gaming.tools/skill-builder/Aw4RhMPbtTbngJmQZnR4q3cn7VYDdVMEk5bKKo+cXeCOW+kAFmAA50uB2LgDYAnMLQBWIA [ Melee Build ] https://dune.gaming.tools/skill-builder/Aw4RhDIZlPTFCTgCZXVSW6eTSFlmhpmJhuuomEVrPNvg1MfACxmoCcwAHGG4BWaEKA [ Melee DeepDesert POIs Build ] T5 Sword + T5 Drillshot + T5 Spitdart | T5 [Unique] Syndicate Set https://dune.gaming.tools/skill-builder/AwZgjMFhySsMg6iahBhnE9gJmAOVFnkzz2jALzN1NgniVCZmszAA4wBOYXgFYQgoA { PvP Builds } [ PvP Ranged Build ] https://dune.gaming.tools/skill-builder/Aw4RhMM9siqinATAZjelI3W6ULHXYNHdDCXMbfA8MuZUM7OYdYADhTC4HYuANi4BONAFYgA [ PvP Melee Build ] https://dune.gaming.tools/skill-builder/Aw3CMrgzGUuSDGOgJmuks1LXYLfYNXQkU9fXRazWAxBCFiyaSW+tADnB4CcAgOzQArEA --- Contracts --- { Hagga Basin South }[ Griffin’s Reach Tradepost ]All the contracts can be found in Griffin's Reach Tradepost Scrap Mettle 40x Copper Ore Holtzman Amplifier (Found in Wreck of the Alcyon) 3x Micro-sandwich Fiber + 3x EMF Generator Automated Poison Snooper (Found in Testing Station No.2) 1x Sandbike Engine Mk1 + 2x Sandbike Tread Mk1 (Found in Testing Station No.2) Do Not Open Mysterious Vials (Found in Testing Station No.2) [ Caves ]Salvage Junket Contract can be found in Cave of Ghosts, West of Hagga Basin South Deliver 100x Salvaged Metal to Griffin's Reach Tradepost [ Outposts ]Granite Delivery Contract can be found in Dewgap Gateway Outpost Deliver 50x Granite Stone to Griffin's Reach Tradepost --- Weapons/Armor/Tools Stats --- WIP https://docs.google.com/spreadsheets/d/1icNjscBY1iFSBs5DgzCOgB-RhbkpazwY9Km5uvtF4AY/edit?usp=sharing --- Resources Farming Locations --- How to read: [Region] Location = 1st item Amount / 2nd item Amount / Solari (Total Number and Type of Chests) [T4] [ Carbide Scraps & Diamondine Dust ] [Mysa Tarill] Mysa Tarill Landmark = ~16 / ~40 / ~2000 Solari (1x Unique Chest) [T4] [ Heavy Caliber Compressor & Light Caliber Compressor ] [Eastern Shield Wall] Sentinel City = ~32 / ~41 / ~6000 Solari (1x Unique Chest) [T4] [ Industrial Pump ] [Eastern Shield Wall] Sentinel City = ~24 / ~6000 Solari (1x Unique Chest) [T4] [ Sandtrout Leathers & Stillsuit Tubing ] From Maas Kharet NPCs around The O'odham and Mysa Taryll. [Mysa Tarill] Mysa Tarill Landmark = ~15 / ~15 / ~2000 Solari (1x Unique Chest) [T5] [ Hydraulic Piston & Military Regulator ] [Mysa Tarill] The Beast's Claw = ~19 / ~29 / ~5000 Solari (3x Chests/1x Big Chest/1x Unique Chest) [Western Shield Wall] The Aegis = ~34 / ~37 / ~5000 Solari (4x Chests/2x Big Chest/1x Unique Chest) [Western Shield Wall] Passage of Artemis = ~55 / ~13 = ~5000 Solari (5x Chests/1x Big Chest/1x Unique Chest) [Sheol] Edge of Acheron = [T5] [ Irradiated Slag ] [Sheol] Shipwrecks = ~20