换一换
换一换 


想建造一座现实世界的城市吗?在Steam创意工坊里找不到你想要的区域地图?本指南将逐步教你如何基于任何现实世界地点创建自己的游戏地图。简介
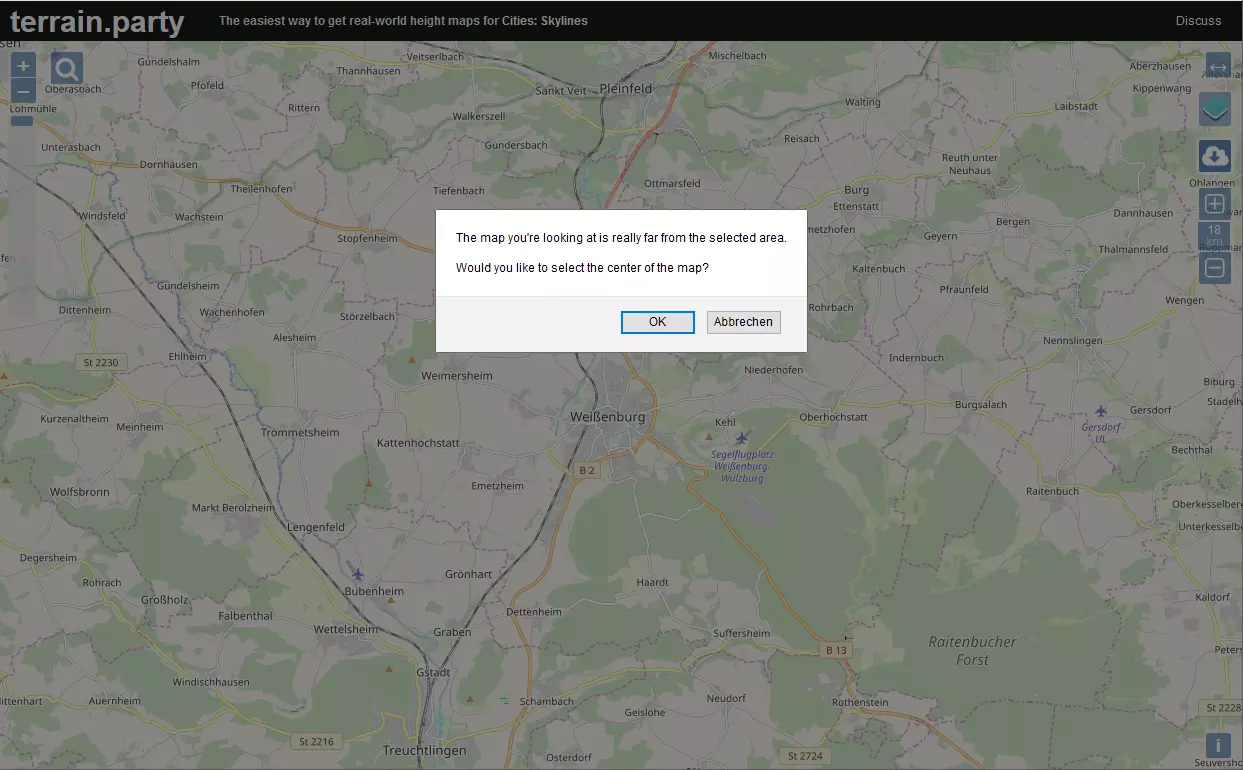
My finished map of San Francisco is available in the steam workshop at http://steamcommunity.com/sharedfiles/filedetails/?id=760867153 This guide covers some of the key points (and includes some things I learned along the way) but it's no real substitute for watching the first seven episode of Skye's series. That said... Get a starting point from Terrain Party If you'd ever like to model a real world city, the best place to start is by importing a terrain map from Terrain Party. http://terrain.party/ The default setting for Terrain party is 18 Sq KM. Keeping that dimension exactly gives a pretty fair 1:1 scale map in-game. If you'd like your map to cover more terrain, you can change that but be aware that Cities:Skylines roads are already overscaled at 1:1 and any scale that crams more territory into the same sized playing area will complicate placing roads etc a bit. Plus, you'll need to find assets of a scale that will "fit" with your city. SkyeStorm did his build of London on a 60% scale on You-tube and if you watch his videos you will see him struggle a bit with the issues that his choice of scale results in. Prepare for using Better Image Overlay Be certain if you DO import a map from here, go into readme.txt and make note of the exact numbers for Left Longitude and Right Longitude (for US maps you'll notice that the more negative the numbers, the further WEST you are) and Top Latitude Bottom Latitude. These will be essential later if you plan to use Google Maps Downloader to grab a satellite or map image to use as an overlay in helping you more accurately position Streets and Railroads, The Better Image Overlay mod is great in helping you get these features more exact. It even helps with coast-lines. http://steamcommunity.com/sharedfiles/filedetails/?id=421400880 Google Maps Downloader The Google Maps Downloader will download images at a zoom of 13 for free which is precise enough for most users. The image for an 18 Sq Km section comes in 30 segments which can be stiched together via the Map Combiner tool that is part of the program. The program can be purchased for about $35 for those wanting more precision. For further details, surf over to http://allmapsoft.com/gmd/ Skye's Building Zurich https://www.youtube.com/watch?v=XwgNnWf5-IM (which I strongly recommend viewing) uses a precision that yields 512 map segments. Once downloaded that image must be rendered into a PNG. An interlaced PNG image will work but there's really no need for it to be interlaced and I believe a non-interlaced PNG may be a bit smaller. I don't recall exactly what PNG is an acronym for, but I once heard it described as Probably Not a GIF. I use Adobe Photoshop for converting the map image but I understand that it can be done in MS Paint just as well. The image must be made a perfect square. Be aware that even though you supply perfect co-ordinates to the Google Maps Downloader, the stitched-together image you end up with is NOT a PERFECT fit for your map. However, it does include all your map's area and can be tailored into a perfect square that DOES fit your map. I suggest that you crop the stitched together Tif file into a perfect square but slightly larger than your map's borders. Convert that to your first overlay.png The Google Maps Downloader gives you a choice of the type of map to download. Both the MAP and the COMPOSITE are viable choices and both have advantages and disadvantages. I ended up downloading both and using whichever one was best for the task at hand. but be prepared, there are a few differences due to the nature of the way imagery is collected. For the Better Image Overlay tool to work, the image must be named Overlay.Png and placed in ...Steam Steamapps Common Cities_Skylines Files Finally... The Map Editor Now Launch Cities Skylines Map Editor and Create your map by importing the best height map. For me that was the MERGED one. Check the overlay image out in-game. By sizing the image to fit your in-game terrain map you can then determine just exactly how much should be trimmed away in a kind of "final fitting." Time spent getting this image as close to EXACTLY right as possible will pay for itself in-game whenever you have to adjust the overlay to perfectly align to your map. I'm NOT the OCD artist some folks are and I always end up having to make some small adjustments whenever I do detailed work on an area but knowing that my image is a perfect square, I know that it's basically correct if I just expand the overlay to fill out to the last square at the map edge. Once you're relatively certain that your overlay is as close to perfectly fitted to your map as possible it's on to Terrain adjustments... Water features Generally the first thing is to dig out any water features that were missed by the satelite data. This can be small ponds, aeration basins, and even some canals will need work. Roads will resist all subsequent attempts at terrain building so may be used to help define straight coast-lines. Laying a road, contouring near it, then deleting the road and making any fine adjustments will often be faster than simply trying to get it right using the terrain tools alone. Just Add Water Once your water features are carved out. It's time to place water sources. It's generally important that your starting square at least has some access to water so that sewage may be disposed of. Fresh water for intake is good as well. Since its important that water intake NOT be polluted you may wish to ensure that its possible in your map to place a water intake upstream from any sewage outlets you allow for. Since my San Francisco Bay map had water all the way to the edges in several directions and I wanted a strong outflow from the bay to the ocean as in real life. I took liberties with the terrain and added a tiny strip of land all the way around my map borders so as to "enclose" the bay that way any water sources I placed in it would flow through the Golden Gate channel toward the ocean. Since the strip was as tiny as I could make it and just a bit above sea level it's almost unnoticeable unless one goes looking for it. When placing water sources first choose the capacity of the water source and then place it. After that you must set the area that it will flood by adjusting the height of the water column. While that is estimated as a white cloud on the map, any sources that are reasonably far from land will not flood as much as they think. This means they can be set higher than those close to shorelines that you care about. Be sure and let time run in the map editor so that you can see how the water will settle down over time and don't be too alarmed at any initial flooding. Smoothing the Ground The terrain maps imported via terrain party are not perfect for use in -game. Some smoothing is required to eliminate the most jagged terrain and to make the majority of the playable area buildable. The area outside the 25 center square may be left a bit rougher but with the advent of the 81 square unlocking mod you may want even those to be buildable. Two watchwords for terrain smoothing: Go Easy it's better to have to smooth an area repeatedly than to obliterate legitimate terrain features that should really be retained. Also remember that CTRL Z will undo the last terrain change. Highway Feeders It's generally important that every map have a highway feeder so that commercial business and industry can import inputs and industry can export their outputs. I generally use the Better Image Overlay to help me get highways placed approximately right and then go back without the overlay on and redo any sections with jagged curves or weird height anomalies. Once this is as close as I can get it. I look for major road connections that must pass under my freeways and lay in temporary roads so as to check that I've left room for underpasses. Generally 12 Meters is a good height for these. Sometimes it will be necessary to bulldoze a few highway segments, place a temporary underpass road and then re-lay the highway so as to make allowances for the highway pillars. Just be sure to go back and bulldoze the temporary roads when you're done. This is mostly for aesthetics as any roads laid in the map builder can be bulldozed by the player (with NO refunds) as soon as they start playing a map. Railway Feeders If its appropriate for your map, next lay the railway feeders just as you did the the highways. Given Cities:Skylines objection to surface level railroad crossings I put several sections of my railway feeders underground to simplify their routing and to keep them out of the player's way. The Map Editor Tunnels Enabler made that easy http://steamcommunity.com/sharedfiles/filedetails/?id=645390478 Ship and Air Feeders Ship and air feeders are the last feeders to rough in as they are much more general and its only required that you get them "close enough" to where airports and harbors can connect to them. Be sure to make the air feeders connect from the outside edge of the map at one end only. Air feeders that connect at two locations outside the map will NOT result in any air traffic for your airports. Not sure but I'm guessing that it works similarly with ships. Got Wood? Add TreesThere are a number of standard tree types that are native to the climatic region you selected when you started the map. Be sure and add a good sprinkling of the various types so as to make your map look natural and with some areas more densley forested if you intend to make forest industry possible. If you elect to use custom tree types be sure to add a link in your finished map so that that asset is downloaded by anyone looking to play your map. Other Resources? Use the associated tools to add Oil, Ore and Fertile land areas as appropriate for your map. Finishing Touches Designate your starting square and take a snapshot to go along with the map you save. Maps that you create are stored (on windows machines) in C: Users userid AppData Local Colossal Order Cities_Skylines Maps under the name you choose Play-tested? Before sharing any maps you make on the Steam workshop, try playing it yourself make sure that everything works the way that you intended. Share it in the Steam Workshop When you ARE ready to share your map, be sure and write up a description beforehand as the text area in the Steam Share window will hold lots of text but is not formatted very well. To make your map more appealing to others you might wish to take a number of screenshots and include those as additional images. Closing Comments I hope that this guide has been helpful. I appreciate and welcome any comments, critiques and suggestions. This is only one method of creating a realworld map in Cities:Skylines. For an alternate approach check out this guy's you-tube presentation https://www.youtube.com/watch?v=CWwJSmzPJOo