换一换
换一换 


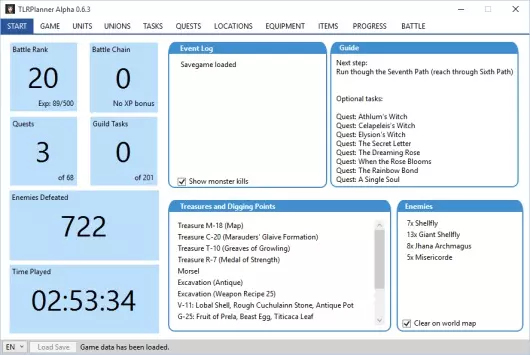
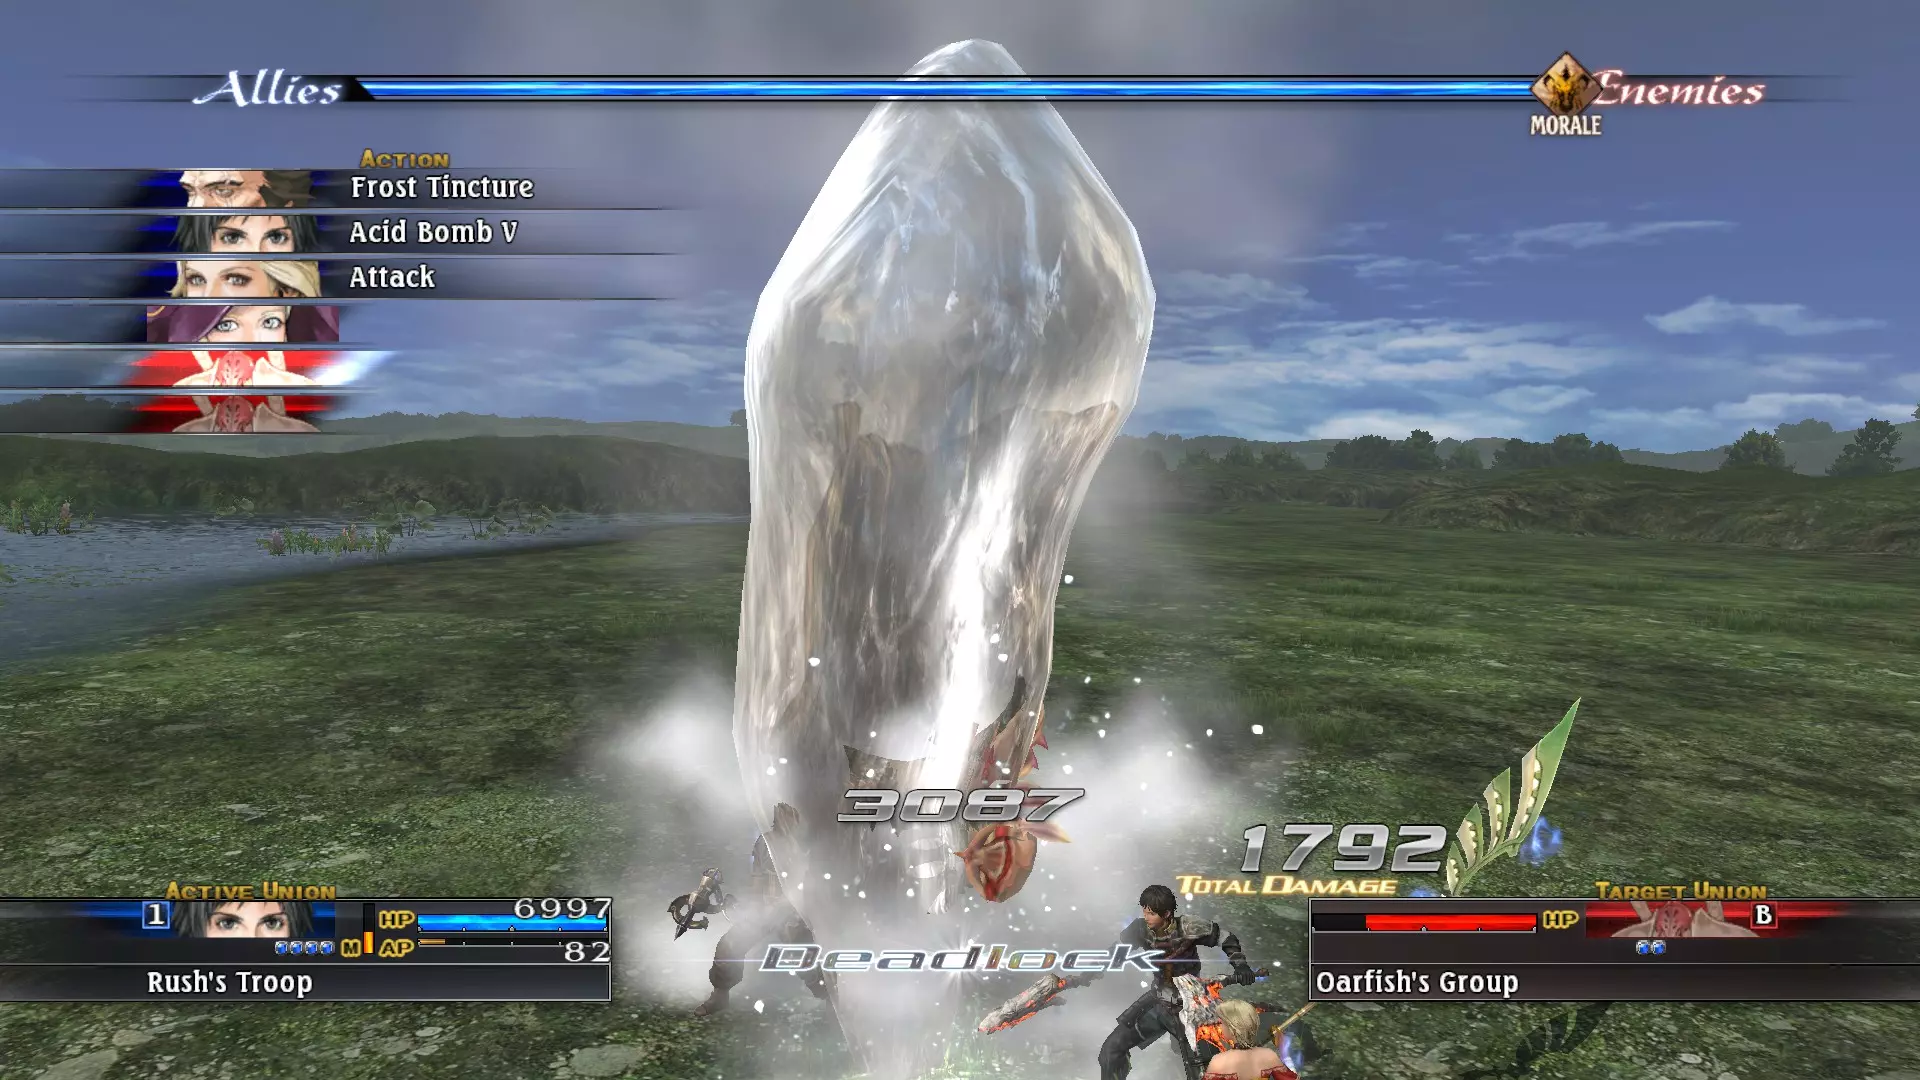
一份简洁但完整的攻略,旨在以最小的努力打造一支装备精良的强大队伍。其中还包含了实现这一目标所需的游戏机制的深入解析。 简介 本攻略面向以下玩家: - 已完成首次通关但过程艰难,现在准备进行更高效通关的玩家。 - 首次游玩,不想在主线/支线任务的最佳流程、单位培养方法以及装备升级捷径上自行摸索的玩家。本指南主要内容:提供一个简洁但完整的攻略,按照最优顺序引导完成主线和支线任务,同时兼顾难度和队伍单位的培养;解释游戏中对于快速培养队伍单位至关重要的基础知识;给出单位选用建议,以减少通过收集材料来升级武器的需求,因为在本游戏中收集材料升级武器通常非常繁琐。 本指南不包含:从完美主义者角度出发的攻略。虽然我们会完成所有任务和支线任务,但本指南不涵盖完成所有公会任务或找到所有宝箱及秘密;不详细介绍支线任务本身。通常仅提供任务标题作为链接(指向维基页面),以提醒当前需要完成的特定任务。存档可用于对比,或在存档记录出错时让你从特定进度重新开始游戏。它们还可能为你提供关于单位技能启用/禁用的提示(对于拉修需谨慎参考,因为我曾长时间禁用他的许多技能以让他转成学者职业)。 《最后的神迹》重缩放模组:有一个由RebornSamurai190制作的模组,它能根据不同规则集(曲线)使敌人的战斗等级(BR)保持固定。该模组主要用于防止敌人的战斗等级随玩家的战斗等级而提升。在未打模组的游戏中,当玩家面对比预期更高的战斗等级(BR)时,许多敌人的术攻击伤害会显著增加,因此需要更高的属性才能生存。这常常让采用“全灭式”玩法的玩家感到沮丧。这种玩法会导致战斗等级过高,却没有培养出高战斗等级所应有的属性和技能提升,因为这些敌人太容易对付,通常1-2回合就能击败,无法带来显著的属性和技能成长。 在我看来,这个模组可能很棒,但前提是你知道自己在做什么。 如果只是简单地将敌人的战斗等级锁定在过低的水平,会导致属性成长不足,进而使队伍在游戏后期发展不良。将它们锁定在过高的BR会导致噩梦般的难度体验,这里所说的难度并非可以通过技巧克服,而只能依靠运气或大量刷级。 好在你可以在多种不同的BR曲线类型中进行选择,这使得控制游戏难度、根据自身需求调整难度成为可能,而这在以前是无法做到的! 根据我的测试,对于新玩家来说,以下版本似乎相当合适: - 30级128和96线性静态(不包括最终超级 bosses)+106.4%移动速度 怪物的BR高于正常水平,这使得即使在高BR下也能刷它们。稀有怪物和任务怪物仍保持最低BR。重要提示:当战斗难度出现异常时,请对比启用和未启用该模组时的战斗情况。 生存还是毁灭,这是一个问题! 下面让我们从一些需要先解释的基础知识开始本指南: 战斗等级成长 战斗等级(BR)主要表示你已击败的敌方佣兵团数量。在大多数情况下,战斗时间的长短无关紧要,大约每消灭25个敌方佣兵团,你就会获得1点BR。 但这一基本规则有一些值得注意的例外情况:当敌方与你的队伍之间的BR差值为正时(敌方BR高于你),BR的获取量将按BR差值每级增加3%。例如:若你与一个比你高出50战斗等级的敌人战斗,战斗等级的提升量将为正常情况下的2.5倍(比正常情况高出150%)。 当敌人与你的队伍之间的战斗等级差距为负数(即敌人战斗等级低于你)时,战斗等级的提升量会大幅下降,当差距达到11或以上时,提升量可能仅为正常增长的10%。 例如:若你与一个比你低11战斗等级的敌人战斗,战斗等级的提升量将仅为正常情况下的10%(但属性提升也会如此,这一点将在后面说明)。 队伍及 guest 单位的击倒次数会使战斗等级提升量降低,最多可降至正常增长的20%。 例如:复活25个或更多单位会使战斗等级提升量降至正常增长的20%。 若敌人佣兵团数量减去击败这些佣兵团所用的回合数等于或大于2,战斗等级提升量将最多降低20%。例如:在3回合内击败12个敌方佣兵团会使战斗等级(BR)的增长降低至正常值的20%。 战斗通常会提升你的战斗等级(BR),而这在多数情况下会增加游戏难度。不过,战斗也能带来非常积极的效果,那就是提升你的属性: 属性成长:一方面,属性(生命值、行动值、力量、智力等)基本上会随着行动次数(对应回合数)的增加而提升,这意味着战斗时间越长、使用的技能越多,属性提升就越多。 另一方面,还会增加一个基础属性经验值,该数值会乘以链接数量。了解这一点非常重要。BR差值也会显著影响属性成长:当敌人与我方队伍的BR差值为正值(敌人BR高于我方)时,属性成长会提升,在BR差值达到45以上时,提升倍数最高可达3倍。例如:击败强大的Boss可获得3倍属性成长;考虑到这类战斗通常比普通战斗持续时间更长,实际收益甚至会更高!当敌人与我方队伍的BR差值为负值(敌人BR低于我方)时,属性成长会迅速下降,即使BR差值仅为11,属性成长也仅为10%,当差值超过65时,属性成长则为零!例如:当BR达到90时去清理加斯林洞穴,将无法获得基础属性经验值(BR经验值也仅为10%)。综合以上要点,得出以下结论: 与BR值高于自身的敌人战斗,会同时提升属性值和BR值,但属性值的提升幅度略大。 与BR值低于自身的敌人战斗,会大幅减少属性值和BR值的提升;除非战斗数量极多,否则可视为停滞不前。如果遇到敌人就战斗,最终你的BR值会高到既无法提升属性值也无法提升BR值,只能获得技能。不过技能的提升仍有助于你进一步推进游戏,尽管此时属性值和BR值的增长已陷入停滞。 有利于属性值相对BR值提升的战斗情况: 稀有敌人及 Boss:敌方佣兵团数量较少,因此BR值提升有限;而战斗所需回合数较多,能带来大量属性值增长。战斗等级(BR)差距较大时,会放大这一有利结果。 与上述情况相同,但额外的复活操作会进一步减少战斗等级(BR)的提升。 链接至少12个战斗等级(BR)不低于我方,但仍能在最少回合数内击败的敌方佣兵团: 利用上述战斗等级(BR)表中的第4条:当链接数量通常为7-9个时,战斗等级(BR)的提升仅为正常情况下的20%,同时会放大属性成长。 例如:尽可能多地链接陆行虫,并以最快速度击败它们。 对属性成长与战斗等级(BR)提升不利的战斗情况: 每个链接包含多个敌方佣兵团的敌人: 大量的敌方佣兵团会带来大量的战斗等级(BR)提升,而较少的链接数量只会产生较差的属性成长。较大的战斗等级(BR)差距只会放大这一不利结果。 例如:古代遗迹中的安克博尔德与洛克格雷特。上述示例基本适用于地图中大多数四处游荡的怪物,只是战斗等级差异不是很大,会稍微减轻负面影响。因此尽量避开普通怪物,但遇到稀有怪物时要尝试击败它们! 不过也不用太担心:当被弱小敌人伏击时,战斗是没问题的,不用软重置游戏。这样你大概能避开95%的怪物,这已经足够好了。 但如果你遇到至少7个可链接的生物组成的群体,并且有信心在3-4回合内击败它们,那么也可以迎战。 刷级 关于这款游戏最常被问到的问题之一:通关是否需要刷级(或者刷级到底有没有益处)? 这么说吧:这取决于具体情况。本指南将展示如何高效达成以下目标:完成所有支线任务,从而解锁最高等级的最终 boss;解锁圣杯与剑公会的所有等级(迷宫公会投入产出比过低,故不包含在内);解锁所有 DLC boss;解锁商店中的所有武器,包括帝王武器;主要通过使用掉落或商店购买的武器,无需为寻找组件升级武器,即可为队伍成员获取更好的装备。按照本指南的方法操作,你将组建一支强大的队伍,轻松应对所有 boss!而且这一切只需最少的精力,寻找组件完全是可选的。该游戏的玩法大致有以下几种: 按开发者设计游玩:你会与挡路的敌人战斗,同时通过战斗解锁不少公会任务并完成大部分支线任务。 这其实是大多数玩家初次游玩时的选择。战斗等级(BR)和属性会按开发者的设计正常成长,通关时战斗等级约为100。在这种玩法下,大部分主线和支线任务难度适中,而游戏中后期最难的DLC Boss即使并非完全无法击败,也极具挑战性。 低战斗等级玩法(大致如下):你会尽可能避免与怪物战斗,只完成那些不涉及怪物战斗的公会任务,但会完成所有支线任务。为了弥补错过的战斗,你会愿意进行大量战斗来“训练”,比如与遇到的任何稀有敌人战斗,甚至进行一些特定的刷怪,同时不会大幅提升战斗等级。许多玩家决定尝试这种方法,要么是因为他们在第一次游玩时遇到了困难(如上文所述),要么是因为他们了解到高战斗等级的负面影响(主要是因为这在Xbox版本中曾经是个问题)。这种方法会使战斗等级的增长减少约一半(通关时战斗等级约为50),同时像力量/智力这样的属性会高于正常水平(更大的战斗等级差距会使它们提升更快),而像生命值这样的属性则会低于正常水平(如果没有额外训练的话)。同时可以观察到,在方法1中,由于经历了大量战斗,早期单位相对于后期单位显得“过度培养”,而在方法2中,早期单位与后期招募的单位相比则显得“培养不足”。 因此,如果你采用我推荐的方法2,我建议进行一些非常具体的“属性培养”(我不喜欢称之为“刷级”,因为这个词意味着反复不停地做同一件事。我这里建议的内容大约需要1-2小时,对于一款50小时以上的游戏来说并不算多)。 在本攻略中,我们将把这一点与解锁商店可购买的最高等级武器——【Imperator's weapons】相结合。 战斗技巧(或隐秘的治疗方式) “为什么游戏偏偏在我需要的时候,就是不给我那些该死的治疗指令!?”没错,这是游戏中最隐蔽的战斗技巧章节之一:明显缺乏治疗指令。 但实际上情况远没有看起来那么糟;游戏提供了几种“隐藏”的方式来触发治疗技能(Arts),如果需要的话。 那么让我总结一下治疗系统: “恢复生命值!” 这是一个通用指令,用于让一个小队(Union)摆脱僵局,并在回合结束前重整旗鼓。当敌人非常强大,能够一击击溃你的小队时,将一到两个小队设置为该指令。他们会在回合结束前复活已倒下的小队。 “提升生命值!/使用道具技能(Arts)治疗自己!/使用神秘技能(Arts)恢复!” 快速紧急恢复。会脱离僵局,因此仅在紧急情况下使用。 “保持生命值!/坚持住!”陷入僵局时尝试一边攻击一边治疗,这不是个好选择,因为经常会失败。更好的方式是“交叉治疗”: “无论如何都要救活他们!/快给他们治疗!/治疗其他人!” 这是首选的治疗方式,因为它不仅能治疗其他佣兵团,还能在该单位倒下时将其复活。 “清除他们的状态异常!” 需要注意的是:此指令不仅能为目标佣兵团解除负面状态,任何其他治疗者也会重新评估自己的指令,转而进行治疗。 上述指令都很常用,你可能已经熟悉了。拥有【治疗者】技能的职业(巫师、治疗师、主教、学者、斥候或猎人)会优先使用这些指令,这意味着如果你将此类单位放在队长位置,该单位几乎总会给出这些指令。现在让我们来看看一些不太明显的治疗方法。 “从侧面攻击!/从背后攻击!”(黄色指令) 执行此指令时,所有尚未被分配战斗技能的治疗者,都会在需要时重新评估是否进行治疗。因此,要利用这一点,可以在侧翼队伍中安排魔法治疗者,并禁用他们所有的攻击性战斗技能! “加强防御!” 拥有【防御者】技能的职业(僧侣、骑士、守护者、牧师或圣骑士)会额外提供一个“防御!”指令。1-3号位单位受到的伤害将减少至50%,4-5号位的单位则可能在需要时重新评估是否进行治疗。如果该单位尚未被分配战斗技能,这种情况发生的可能性会更高。因此,这也是安排未启用攻击性战斗技能的魔法治疗者的好位置。这套build能为你打造完美的【自我治疗】坦克小队! 支援指令:【发起攻击支援!/提供掩护!/发起防御支援!/布置战场!/快去支援!/支援队友!】 当某个单位执行支援指令后,其所在小队的其他成员也可能会重新评估并进行治疗。获取支援指令最简单的方法是使用药水,所以它们终究还是有用的:-) 如果队友尚未受伤,要指挥队伍在下一回合立即进行治疗往往比较棘手。因此,了解可以提前设置治疗的最后两种方法就显得尤为重要。例如,如果我知道敌人会在第一回合开始时发动全场范围攻击,我可以让我的佣兵团执行防御和支援指令,这样他们就能立即进行自我治疗。 下一个技巧:不要陷入单纯选择消耗最多行动值选项的误区。 对抗强敌时,稳扎稳打更有效:在这款游戏中,快速结束艰难战斗并没有奖励。而且你的单位也需要治疗经验,所以要稳妥行事,始终让一半的佣兵团执行治疗指令。如果这些指令不能持续出现,你可能需要将佣兵团团长更换为以下职业之一:术士、治疗师、主教、学者、斥候或猎人。 交叉治疗是首选的治疗方式(“治疗他人!”)因为它无法打破僵局,但这只有在剩余生命值足以承受敌人一到两次攻击的情况下才有效。否则,最好脱离僵局,让一个佣兵团完全自我治疗,即使冒着被围攻锁定的风险。 再次强调:不要陷入单纯选择消耗最多行动值选项的误区。 在上述情况下,你可以让另一个佣兵团治疗第一个佣兵团,即使这意味着不消耗行动值。通常该佣兵团在下一回合会拥有更多行动值,从而能够进行强力反击! 然而,如果你已完全恢复,并且可以在多个同样有吸引力的攻击选项中选择,那么选择拥有最多技能数量的那个。这将提升更多单位的战技/技能,并减少其中一次攻击被闪避时的损失。 要让这种情况更频繁发生,你需要禁用等级较高的战技,直到较低等级的战技或多或少完全提升为止。详见下一章:战斗单位的提升。 使用普通攻击或任何战斗战技,都会为单位特定的武器使用风格增加战斗技能经验值。最初会解锁C级战技(消耗约7点行动值),该战技本身可以提升(最高至第五阶)。随着武器使用风格经验值的增加,会解锁B级战技(消耗约17点行动值),然后是A级(约24点行动值),最后是S级(约33点行动值)。 你可能已经注意到,我还没有涵盖武器专属的战斗战技(A级和SS级)。天下没有免费的午餐,如果你真的想表现出色,就应该愿意进行一次1-2小时的属性培养(你可以称之为“刷级”),这将是普通队伍和顶尖队伍之间的区别。 你也可以只将本指南用于流程部分,直接跳过基础部分,跳转到【流程】章节即可。 我编写本指南的动机: 我在这款游戏上投入了超过2000小时,以各种设置完成了25次以上的通关:多次普通模式、多次困难模式、仅使用拉修和戴夫的通关、极限伤害通关、速通、大量刷级的通关、无刷级的通关等等。它们的开发并非那么简单,因为这取决于武器技能,而武器技能的提升需要使用战斗技艺。从伤害角度来看,两个A级技艺的伤害是相同的,而且我发现开发SS级技艺所需的努力要高得多,所以并不值得,除非某些单位天生就拥有该技艺。 我发现开发战斗技艺的基本规则应该是:首先只开发单位的C级技艺,直到解锁S级技艺(对于纯战斗单位,不包含治疗型)或A级技艺(对于有其他用途的单位,比如治疗型)。一旦出现更高级别的技艺,就立即停用C级技艺,专注于开发那个更高级的技艺。这也意味着,一旦B级技艺(以及A级技艺,具体取决于单位类型)出现,就要立即跳过它们。这也能防止游戏初期每个回合可用行动点数不多时,B级/A级技能不必要地从其他单位那里抢占行动点数,否则可能只有联合领袖的技能能得到发展,而其他单位都为此付出代价。 此外,这在一定程度上限制了伤害输出,延长了战斗时间,也有助于提升属性。 可能有极少数单位会偏离这一基本规则,主要是因为它们加入游戏较晚,并且已经具备预先开发好的战斗技能。 五级技能的【行动点数伤害比】比基础技能高得多。以下是我进行的一些伤害测试得出的大致数据: 基础等级 强效I 强效II 强效III 强效IV 强效V 无双V 100% 159% 181% 268% 418% 458% 速度修正技能(敏捷/迅捷)的数值会低7-8%,但它们的执行速度更快,且更不容易被闪避。 因此,基本目标是为每个战斗单位培养一个选定的A/S级技能,直至达到迅捷/无双V,以应对游戏的最终 boss 战。武器 本表格列出了本指南中各单位可轻松获取的武器: 单位 装备路线/武器 获取方式 拉修:战斗_1 指挥官之剑 努莫尔矿坑的宝箱 舍施尔刀或塔克剑 宝箱或掉落 维斯佩蛇星剑 维斯帕利亚掉落 基地6掉落 拉修:战斗_2 大头棒或棍棒 埃利西昂购买 乳香锤 香闺宝箱 方阵钉头锤 弗劳梅洛塔宝箱 执政官战锤 昂德尔瓦尔特购买 拉修:魔法 战斗戟 布莱克代尔45%掉落 标枪 购买或掉落 玛利斯特里克斯 古代遗迹 帕格斯 精英法杖 布莱克代尔宝箱 阿玛基法杖 古代遗迹 布罗克 BR17战斗:刽子手斧 埃利西昂购买 萨加里斯战锤 巴巴罗萨掉落 普拉托里乌斯剑 武器配方53 鲍尔森 巴迪切斧 巴尔特罗萨购买 古旧长柄刀 奖励圣杯 BR36战斗:骑士长枪 行会:75 纳加普尔购买 达里恩 BR37战斗:帝王之矛:于安德尔瓦尔特·紫罗兰处购买 BR 17 神秘系:帝王法杖:于安德尔瓦尔特·塞姆里处购买 守护者·卓越双手剑或古老高布兰:水道区宝箱,易于锻造,73%掉落率 贾哈纳王室·菲:分裂者×1,战斧×2:于戈尔购买,于纳加普尔·加布里埃尔处购买 指挥官的 rapier:维斯佩 帝王之剑:拉什使用,由维斯帕利亚掉落,于安德尔瓦尔特·佩内思处购买 忍者刀+3:弗劳梅洛塔宝箱,莉萨 帝王之剑:于安德尔瓦尔特·雅格处购买 Schiavona:遗迹神器,帕里斯 古老法杖:BR 45 战斗系:胜利边缘,BR 45 神秘系:灵魂权杖(若平衡:古老短杖):于埃利西昂购买,奖励(梅尔菲娜的女巫),工坊制作(15%由单极怪掉落) 高乌:黑曜石:基地2掉落 埃米:夜之花/塔克/乳香→芬斯特尼斯:基地4掉落,安德尔瓦尔特任务,伊琳娜 古 Ji:于埃利西昂购买罗伯托·霜刃在锡巴尔基地掉落,代达罗斯在古代遗迹掉落,戈尔公爵,比尔吉斯初始持有。花括号中的武器意味着获取它们可能相当耗时,不建议获取。另一方面,缺少该武器也意味着此时要将该单位从活跃队伍中移除,因为当前武器可能比其他单位的武器弱很多。 对于拉什,我列出了多种武器路线,称为战斗1、战斗2和神秘。这三种路线各有其强大之处。由于在普通游戏中(与新游戏+相反),拉什最适合非神秘角色,因此我建议选择战斗1或战斗2路线。 战斗1武器路线使用速度修正,而战斗2路线使用力量修正。2F技能风格 本指南将遵循战斗1武器路线。 装备侧重:HP和AP是最难提升的属性,因此我们应尽可能让多个单位采用【均衡】装备侧重,这样配饰就能增强HP/AP。 单位会在特定战斗等级(BR)时询问选择哪条路线。你的回答应是【均衡】,但以下例外情况除外(否则他们无法获得指定武器): 薇奥莱特(魔法)、达里恩(战斗)以及帕里斯(拥有全部3个选项,选择战斗最简单,但选择魔法效果最佳) 当游戏后期他们第二次询问时,一旦他们获得了武器,我们可以再次将他们设为【均衡】。神秘单位培养指南 要在《最后的神迹》中表现出色,你的队伍基本上需要具备以下三点: 1. 保持高昂士气 2. 通过【虚弱】控制行动值(AP)——将【 hexes】(诅咒系技能)提升至最高等级 3. 培养一些高度发达的战斗技能 值得培养的技能只有用于士气转换的【心灵系】和同时满足上述两点的【诅咒系】。 在我看来,其他神秘系技能并不值得投入。论伤害,它们无法与战斗技能相比;既然其他神秘系技能的伤害并不比诅咒系高,你不妨只专注培养诅咒系。因此,它们唯一的价值可能在于实用性。但遗憾的是,只有【心灵系】和顶级的【诅咒系】技能能提供合理的实用效果(士气转换和行动值控制)。 【麻痹毒气】/【混乱】/【麻痹之网】/【沉默毒气】/【沉默者】实际造成麻痹/沉默的概率仅约30%(当然,敌人使用时除外,多么不公平!)因此,你不能依赖它们的效果;这使得它们或多或少只能用于造成神秘伤害。而对于这一点,【诅咒术】和【灵能术】的消耗要低得多。【扰乱术】消耗12点行动值,且几乎总能改变士气。【麻痹之网】消耗48点行动值!对于一个只有30%概率能如描述般生效的技能来说。 【咒怨术】只会诅咒弱小的单位,那些本就会死于其伤害的单位。毫无用处…… 【祈咒术】除了伤害外通常没有其他有意义的效果,而且消耗相同行动值的话,【战斗技能】更为优越。 神秘技能的培养:神秘技能也需要从基础开始培养:始终保留最低阶的实用技能,一旦高阶的“弱小技能”达到二级(需要二级才能进阶到下一级技能),就将它们关闭。 例如:为了学习【永冻术】(在我看来是唯一有用的咒术),你可以先使用【火花术】(C级法术)直到习得【风切术】(B级),然后使用【风切术】直至其达到二级(这是解锁A级法术的必要条件),之后停用【风切术】并持续使用【火花术】(因为它消耗低且效率较高)。最终【腐蚀冲击】会出现,此时你可以立即停用它(因为A级法术已解锁),继续使用【火花术】直到【永冻术】出现。 最后,一旦神秘单位的战斗技能出现,应立即将其全部关闭。这些单位的力量值非常低,启用这些技能只会从更强的单位那里夺取行动点,却只能造成很少的伤害。 关于【奥秘术】,在我看来攻击性的奥秘术完全没有必要,所以我认为它们只是用来娱乐的。在我的游戏过程中,我积累了不少关于这款游戏的知识,能够分辨重要与次要内容,也想和大家分享一些不太为人知的信息和技巧(比如熔岩守卫的刷取)。 我一直觉得游戏中最烦人的部分就是收集海量不同材料来升级武器。更糟糕的是,某些材料的掉落需要先完成公会任务,以解锁那些每周和每日的杂志。 游戏最初在Xbox版本中,原本只打算设置少数领袖,这使得升级他们的工作量小很多。但PC版本允许所有18名成员都成为领袖,因此现在要全部升级他们就需要更多的工作量了。而且它们对属性/技能成长没有帮助,仅凭这一点就应该避免使用它们。 如果你确实需要大规模杀伤性武器,游戏中还有很多其他选择:大卫的【盖博尔格】,以及解锁基地后:帕格斯的【超级新星】、高乌的【热情之德】、罗伯托的【雪盲】,这里仅列举几个。 不过有一个异常实用的秘奥:【生命之水】。 这个秘奥确实有助于技能/技艺的提升,因为它不仅能恢复所有存活佣兵团的生命值,还能将行动值充满。 这会让战斗中出现更多可使用的技艺,这自然对队员的成长非常有利。 因此,我强烈建议让一些队长学习【生命之水】,比如拉修、艾蜜莉、帕里斯或帕格斯。在本攻略的后续内容中,当剧情发展到最适合进行此操作的时机时,我会再次提醒你这个机会。 学习【活力之水】: 组建1号小队,仅包含一名速度(SPD)属性最高的最快单位,并采用近战阵型。该单位本质上是炮灰,其作用是快速阵亡。 组建2号小队,由你的受训者担任队长(需启用【恢复V】和/或至少【复苏II】),以及另外三名仅启用【恢复】技能的单位。这些单位中必须有一名能够复活。这个受训者小队的行动速度需要大幅降低,因此可将他们部署在【五角星】阵型中,或使用【亚托鲁姆之箭】阵型的1/3/4/5号位。如果拥有【神秘护盾】阵型,使用其1/2/3/4号位效果更佳。第三小队应配置4-5个单位,这样能避免快速团灭,并且必须具备复活能力,但最好采用不完全治愈被复活单位的方式(使用草药/药水而非生命之吻)。 将剩余单位编入后备队。 这一次,禁用所有小队的攻击性技能,以延长战斗时间,从而获得更多机会。 现在去挑战一个强度适中的敌人,战斗持续5-10回合,且不会一击消灭整个小队。当队伍拥有18个单位后,象牙峰的嗜血野兽非常合适。英雄壁垒的哈拉玛——同样是迅猛龙——是另一个不错的选择,从入口就能看到。此外,它可以重生,因此你可以训练多名队长。对我来说,这似乎太过繁琐了,我一直在寻找能减少这种麻烦的方法。 普通模式与困难模式 本指南不适用于困难模式。在困难模式下,敌人的攻击力更高,但你也会从上一轮游戏中继承大量金币、材料和阵型,能够为队伍打造一些非常强力的饰品(比如【拉格纳岩】!)和武器,从而提升他们的防御力。而在普通模式下,获取这些东西要困难得多;你必须谨慎花费金币和使用材料。因此,你需要优化自己的玩法,这正是本指南的目的:提供一份简洁的攻略,告诉你如何在正确的时间做正确的事,以及雇佣哪些单位来减少武器升级的需求,最终让游戏变得不那么耗时。单位组建 队伍并非主要围绕“常见”领袖构建,而是选择能利用我们获得的“免费”武器或购买得起的武器的单位。遗憾的是,我发现早期索瓦尼领袖没有这类适用武器。它们虽是优秀单位,但常规升级是其唯一选择,因此我们只在初期使用,之后仅作为后备单位。 当然,不使用建议单位也能遵循本指南,只是武器升级需自行负责。 主线与支线任务 本指南中的任务标题前缀MQ代表主线任务,SQ代表支线任务。 本指南不会深入讲述故事情节或支线任务本身的细节。相关内容可参考Wikia页面。重要提示:本指南中的支线任务顺序并非表示任务实际可接取时间,而是从难度和单位培养角度考虑的最佳完成顺序。剧透说明:我不会过度纠结于可能的剧透内容。虽然已尽量避免涉及主线剧情的剧透,但不会为了隐藏首领名称、区域或武器等信息而将30%的文本设置为剧透标签。既然你选择阅读攻略,那么接下来可能会有一些轻微剧透!实用工具/存档 本游戏仅通过正常游玩即可获得良好体验,无需依赖外部工具。 不过,若想深入了解游戏内部数据,推荐以下工具: 【TLR Planner】 可显示诸多实用信息,例如当前区域已生成的敌人、游戏进度、可接取或即将过期的支线任务等。 甚至还能提示主线剧情的下一步流程。 【RemnantAssistant】《最后的神迹》相关信息: 1. 可用于查看职业相关的属性和技能等级。 2. 单位的武器升级路线。 3. 存档位置:游戏将存档放置在【%USERPROFILE% Documents My Games The last remnant RushGame Save】。
Next we have to set up things correctly, which means we want union 1 dead, union 3 well alive and the trainee union 2 somehow damaged (< 70% health). For this we must not issue any cross-healing nor support commands, no Potions, no yellow flanking commands etc., until we have achieved this. As soon as union 1 is dead, the trainee union is sufficiently damaged and has at least 153 AP, send both the trainee union and union 3 to revive. The quicker union 3 will arrive first and revive. Our trainee union will arrive later and will reassess to healing (either themselves or the freshly revived but only partially healed unit) and thereby trigger the Synergy needed to learn RW. Once RW has been taught to a leader, only two more mystic units (of any type!) are needed in the same union to make use of it. Rush's Skill and Class Development Rush does not excel in any particular skill. While he will learn a lot of different skills, there are better units than him in any particular discipline. What makes him special however are his special arts which make him a natural leader. His most important special art is Omnistrike. This art scales with his STR stat as well as the ATK stat of his weapon. Therefore it's wise to develop his skills and weapons more towards combat rather than mystics. In a normal game (opposed to a new game+) the better kind of mystic arts come quite late in the game; another reason to focus him on combat development. Also it's important to choose his class wisely in order to get the desired type of commands when using him as leader. For an overview about classes see this: http://lastremnant.wikia.com/wiki/Classes The following class list for Rush assumes him to be in Power Grip stance. Rush starts out as a fighter and, depending on which arts you disable, can progress into the following classes:If you disable his Combat Arts, he will most likely become Marauder, Healer or Bishop g. Swashbuckler (if equipped with swords) If you disable his Remedies, he will most likely become Scout (more herb use) or Mysticknight (more invocations use) If you disable his Herbs, he will most likely become Cavalier (more remedies use) or Mysticknight (more invocations use) Actually this is not what you want.I prefer the following classes for Rush:Scholar[lastremnant.wikia.com]: Preference for healing commands, No Instakill Quite difficult to get: First disable all his mystic arts and go light on combat arts. So use him more as a healer. Develop Herbs until Life Powder, then disable them (except maybe for occasional Vivification) and start using Restore. As you reach Rejuvenate check for Mystic/Item balance AND 'Mystic only' significance. This condition can be fulfilled for example by having Mystic at 7, Items at 6 and Weapons at 5 (check using RemnantAssistant). Do as neccessary to achieve it, otherwise he'll end up as Scout or Cavalier. After that you may reenable Remedies and to a lesser extent items, e.g. Vivification, and use Rush's combat arts without limits. After he learns Wards, go easy on them or he might 'advance' into Commander (not!). Scout[lastremnant.wikia.com]: Preference for healing commands Easy: Leave his Herbs enabled, go light on mystics use or disable them altogether. Cavalier[lastremnant.wikia.com]: Additional 'Defend!' command (thereby reducing damage suffered by half) Easy: Switch off his Invocations and after having gained Vivification Herb his Herbs as well, enable Remedies and you're set. This is the class I'd recommend the most, since it's easy to get and since good mystic healers are not as common as item healers. Guardian[lastremnant.wikia.com]: Additional 'Defend!' command, Power Play Immunity (= immunity from critical hits) Rather difficult to get: Rush's wield style must not be Dual-Wield. Next you need to disable mystic arts completely. As he gets the herb art 'Life Powder' switch off the herbs too. He will become a tier 3 combat class at some point, e.g. Swashbuckler, Axman. As he becomes 'Legendary' in that class AND has gotten one of the following level S combat arts: Double Slash, Dragon's Flight or Dragon Crush, reenable his herbs. Eventually he will become Guardian and you may enable whatever arts you want. BTW, this class can also make sense for Blocter and is achieved the same way, with the only exception that the herbs have to be disabled from the very beginning! So there's no point in developing his INT stat and a mystic oriented class. And his freely available weapons also do not support a mystic oriented focus for him. Team Building Tips Generally: Don't make unions with less than 3 units, unless you are sure about keeping them out of deadlock. Smaller unions are much less likely to survive, when they get drawn into deadlock. Only in certain situations, like fighting a single boss, can they be kept out of deadlock, and only so if the leaders class is chosen appropriately. For the defensive aspect, each union should contain: Exactly one item healer who is also able to revive. More is a waste, because in the end game item healing is too weak. At least one mystic healer with high INT. I'm talking about really good mystic healers here, like Pagus, Irina, Rhagoh, Paris, Megeleus, Kimberly, McGrady or a mystic Rush. These will fully heal a 9999 HP union in the endgame with one single Revitalize. Best to use them with all offensive arts disabled, so they can reassess to healing when needed. But do not rely on Remedies of low INT units like Glenys/Violet/Darien/Caedmon or even worse Baulson. Their Remedies are more or less wasted and will top at about the levels of item healing arts. This 'at least one remedies per union' rule can be bent: They may be unevenly distributed, e.g. gravitate towards dedicated healer unions or towards dedicated flanking unions. If you haven't enough proper units to fulfill this, you have too many unions. Every healer must be trained to heal an entire union at once! In the end game only mystic healers can do this.Item healing arts tend to be quicker than mystic ones, so most of the times they get applied BEFORE the enemy hits you, while Remedies tend to get applied AFTER the enemy has hit, also because these are often reassessed from a 'Standby' command, as needed. By combining both within one union, a damaged union most of the times can finish a turn fully healed using a 'Keep your HP up!' command. For the offensive aspect, this is up to your creativity! FormationsThe early game formations are almost useless: they boost one or two stats by 5%-10% but in return impose a penalty of -40% on another stat. Not worth it, except for nerfing a union on purpose. I recommend using Cup of Celapaleis for all unions until we unlock Orb formation later, which by reducing both damage and AP cost brings a real benefit for the development of our units. Then there's the old discussion about having a dedicated mystic team versus mixing the mystics into the unions: The game is completely capable of providing useful battle commands, if there are no more than two types of arts in an union: Combat & Mystic, Combat & Item, Mystic & Item. This means that it's OK to combine two types of arts in one union, and there are more reasons to do so: Mystic units tend to have more AP and less HP. So if you create a pure mystic union, it will have a huge AP pool but little HP and gets killed easily. Also a single 'Silencer' can make the whole union useless for several turns! I found that it's best to either put two mystic units in each union of 4/5 or none. Their high AP help fueling the combat units, in case the mystic arts are not needed. Vice versa the high HP and physical defense of the combat units help the weak mystic units survive. You, the player, can control by issuing the commands, which type of art shall be applied in a particular situation. As an example: At the beginning of the battle use mystic arts for raising morale: Bluff, Addle, Mixed Message, Bewitch, etc. A single mystic union would not have the AP in the first turn, to fuel three or four of these arts. But if put into different unions, there is enough AP to fire off all these commands in the first turn. After morale has been raised, there's probably no need anymore for mystic arts, and the combat units can take over, with a lot of help from the mystic unit's AP. WALKTHROUGH Pt.1: Beginning MQ: Cavern/AthlumAs soon as you have access to the menu, make sure Rush's wield style is set to Power Grip. This wield style is suited to accommodate the best free weapons of the game for a Mitra like Rush. As you enter Athlum buy 10 Cureleaf and Relaxing Herb. Do not buy any weapons, since some good ones are being dropped for free soon. Talk to the barkeeper and enter Athlum Castle afterwards. Choose to go to Robelia Ruins first in order to receive the Invocations arts and build some experience before going to Gaslin Caves. MQ: Robelia RuinsEnemy: Anti-Remnant Activist (BR>2, HP>1552) Go to Robelia Ruins with Pagus[lastremnant.wikia.com]. In the boss battle use mystic arts against the support troops and combat arts against the boss. MQ: The Bandits in Gaslin CavesEnemy: Slaver (BR>2, HP>1552) Go to Gaslin Caves with Blocter[lastremnant.wikia.com]. In the boss battle again use mystic arts against the support troops and combat arts against the boss. MQ: DillmoorEnemy: Vicious Plant (BR>6, HP>5168) Defeat one of the Jhanas on the bridge for guild task 63. Easy boss battle on top of the hill. After the cutscenes the guild opens but do not hire any units yet! Go to the pub instead and accept the following side quest: SQ: A day's beginningDeliver the letter to the Yama in Robelia Castle Afterwards talk to the bartender in Athlum Pub. Do not accept the side quest from Baulson yet. MQ: Talk to the bartenderLeave Athlum: Celapaleis opens Go there, talk to the merchant with the red bubble, then move over to Lamberro District and turn in the guild task. Hire Semry[lastremnant.wikia.com], a generic leader. He is the strongest of all the early game leaders and has a good chance to receive some great end-game weapons during the game. Do not hire any more units since gold is scarce at the moment! Open the union board and build a union with Rush and Semry. Go to the pub to do the quest Mr. Diggs[lastremnant.wikia.com] (Use the Digging Spot) Talk to a soldier with a red bubble, but don't go to Athlum Castle yet, first we need to do another side quest in Athlum: SQ: Baulson[lastremnant.wikia.com]This quest can easily be done using Rush & Semry only. Put them in a single union using Rush as leader. Make sure Rush's wield style is Power Grip. After the battle hire Baulson [lastremnant.wikia.com]und put him into your existing union. Baulson also will receive some strong weapons during the game. Switch off his herbs immediately, because we want to accelerate Rush's herb development towards early vivification. Also without herbs, Baulson will end up in Lancer class, boosting his damage output by +15%, and later can be developed into the very useful Bard class, after Potions become available. Now our first union is complete. Stock up on herbs and progress in the main story at Athlum Castle -> Blackdale. Vivification for RushThis is now the most important task we have to achieve: Getting Vivification for Rush asap. It takes ~18 successful uses of herbs for that. To accelerate this, make sure that it's only him that has healing enabled in his union. MQ: Defeat Jager and the Third CommitteeMystic arts against the minions and combat arts against Jager will finish this quickly. Battle tips:First attack default union. After reinforcements have arrived, target enemy union H (or if you lack HP, then any other which will give you the necessary 'Keep your HP up!' command. MQ: Crossing Blackdale:Pick up the Combat Francisca -1[lastremnant.wikia.com] from a chest at D-11[lastremnant.wikia.com] and equip Rush with it (afterwards make sure he's still in Power Grip!): MQ: Fiery Idol fightEnemy: Fiery Idol (BR>10, HP>8467) Not much to say here: Kill the support troops first, try to keep your unions fully healed and you need a lot of luck too... 'Keep your HP up!' is your friend here. Only so much: If you die, it's probably not your fault but of the unbalancedness of this battle. The game has barely begun and there's nothing you could have done better up to this point! Just retry until you prevail... Battle tips:First attack default union. After turn 1, only 4 enemy unions should be left. If so, attack union B next. After the scene in Athlum Castle talk to a soldier with the red bubble in the city. Back in Athlum Castle:You're allowed 9 active members in your party. ...but don't put much thought into building your unions yet. Now it's best to progress in the main story, in order to further increase the number of active members of the party, and save the sidequests for later. MQ: Crossing Ivory Peaks:Walk across Ivory Peaks without engaging any monsters. There is a chest with a Leraje Princeps[lastremnant.wikia.com] at J-24[lastremnant.wikia.com], which Torgal will request after a few battles As you leave on the other side, Elysion will show up on the map. MQ: Elysion:Progress in the main story: Talk to receptionist of the Academy (Entrance Hall) Enter Tula Street Talk to Court Lady (Assembly Plaza) Enter Ark Gate Run through Sacred Lands Go to the Temple of Elysion's (Genaade District) and enter the Catacombs.Proceed until the next area loads, after the first two landworms there is a digging spot at the wall to the left. Make a savepoint and keep digging until you harvest two Shadow Metal. Leave the Catacombs back where you came from, suspending the story quest. Go to Athlum guild, turn in the guild task and hire Perneth[lastremnant.wikia.com]. Also in Town Square hire Neales[lastremnant.wikia.com] (an Athlum Soldier). Go to Celapaleis guild and hire Faye[lastremnant.wikia.com]. She and Neales have Vivification, which is very important in this game. Also buy herbs for that in Athlum. It's the only city which always has all the herbs stocked. If you lack the gold, go to Blackdale, turn right and there's some gold in a chest behind the spiders and the vultures. If you still need more, start hunting rares and sell the captured ones. If you follow weapon path 'Combat 2' buy a Bludgeon[lastremnant.wikia.com] for Rush. Now build two unions each with one of the revivers. They might look like this: Union 1:PernethPagusSemryBlocterNealesUnion 2:RushBaulsonDavidFaye Switch off Perneth's Poison Gas in favour of Paralyze Gas. As long as Rush has not gotten Vivification, keep Restorative Herb switched off on all other units in his union, only Vivification on. Head back to Elysion, go to the Temple and enter the Catacombs again. Play through the Catacombs part. http://steamcommunity.com/sharedfiles/filedetails/?id=521281721 This video shows the suggested playing style: Avoid the mobs, but fight the fatties. Don't sweat it when you're getting ambushed once in a while. As long as the battles you fight remain challenging, the development of the units will be fine. After the cutscenes you're back in Elysion. Instead of directly going with Emma, go to the Pub first and talk to the Gloomy Man, accepting the side quest 'The Secret Letter'. WALKTHROUGH Pt.2: 12 Active Members SQ: The Secret Letter[lastremnant.wikia.com]Elysion Pub: Speak to the Gloomy Man, accepting his quest. Exit the city and the Southwestern Road appears on the map. Walk across it to Balterossa and deliver the letter to the receiver in the pub. Rush will now have Remedies. MQ: Numor Mine with EmmaGo back to Elysion, talk to Emma and go with her to Numor Mine. Grab the Commander's Rapier[lastremnant.wikia.com] to the right after the crank lift and equip Rush with it. Make sure he's still in Power Grip! Second to last branch to the right has the key to the final door. Before entering the boss fight, disable Rush's combat arts & invocations and remove Emma from the party. She will join the battle as a guest union with 2.5 times her normal HP! So let HER do the dirty work and use Rush only for healing her. This battle may take around 20 turns and might be a good opportunity for Rush to get the 18 herb uses needed to achieve Vivification. This battle seems a little weird to me because sometimes Rush consistently has a standby/healing option every turn, sometimes not and every second turn there is no other option than attacking, which almost always results in his instant death. I haven't found out why, it definitely helps enabling every possible healing art on both units. Otherwise just restart and retry and all of a sudden the standby commands are there consistently. ): http://steamcommunity.com/sharedfiles/filedetails/?id=573168842 MQ: 12 active membersAfter Numor Mine you'll be in Athlum. Your allowed active party size has increased to 12. Don't forget to reset Rush's arts according to your class choice. Don't leave the city but go to the pub and do the following side quest: SQ: The Trade Route[lastremnant.wikia.com]Athlum Pub: Speak to the Yama Enter Gaslin Caves and turn right immediately. You'll end up in The Great Sand Sea, immediately exit it by the closest exit in front of you. A series of locations now open up on the world map: Numor Mine Heroic Ramparts The Great Sand Sea If you are on a mystic path with Rush, it's very important to go back to Numor Mine, go straight ahead instead of taking the lift to the right, and get the Blood Chalice[lastremnant.wikia.com]. This accessory will double the EXP towards all mystic skills! MQ: The Meeting in NagapurCross the Heroic Ramparts: The northeast exit leads to Nagapur, the southwestern one to Ghor. Enter Nagapur and talk to the dock worker in Flussbahn. Visit Nordenalm & Sudenalm and tell Emma & Pagus that you're finished Cutscene in Flussbahn Talk to Oswald in Sudenalm Enter FlussbahnLeave Nagapur and go back to Athlum but DO NOT ENTER Athlum Castle or the quest 'Bravery and Loyalty' will expire for good! If Rush hasn't gotten Vivification yet, you can go to Town Square and hire another Athlum soldier: Sutherby[lastremnant.wikia.com], a pretty good healer/reviver Now build your unions. SQ: The Dreaming Rose[lastremnant.wikia.com] (Celapaleis)1 easy battle at Ivory Peaks SQ: Bravery and Loyalty[lastremnant.wikia.com] (Athlum Pub)1 battle at Robelia Castle: Remove Emma from the active party and she'll join the battle as guest union with much higher HP. Send all units on the Third Committee Soldiers; let Emma handle one of the birds... SQ: For Love the Bell Tolls[lastremnant.wikia.com] (Balterossa)Enemy: Hitman (BR>18, HP>6713) 1 Battle with Paris at Mojcado Castle MQ: Open the neighbouring CitiesGo to Elysion and talk to the bartender in the pub about the cities. This will open up Berechevaltelle (-> Melphina) and Vale of the Gods (-> Baaluk), if not already done so. Also run into Darien[lastremnant.wikia.com] on the upper floor and accept his side quest. Go to Berechevaltelle and use the south exit to reach Crookfen. There use the opposite exit to reach Melphina. Enter Cobalt Plaza take the first stairs down to the right and pick up the Book of Remembrance. While you are in Melphina finish the Darien[lastremnant.wikia.com] side quest. Talk to the Geography-Savvy Knight in the guild to unlock Fourth Path. Side QuestsSQ: Darien[lastremnant.wikia.com] (Elysion -> Melphina)Get his chalice from his hometown. Go to Melphina and talk to: Festival Head 2x Salesgirl Goster 2x Goster's Wife 2x Goster 2x Bino Festival HeadReturn to Darien in Elysion Pub. New HiresFirst hire Caedmon[lastremnant.wikia.com] in Balterossa Hire Darien[lastremnant.wikia.com] in Elysion as soon as you have the gold. SQ: The Silent Soul[lastremnant.wikia.com] (Balterossa)If you exit The Great Sand Sea you'll unlock two neighbouring cities: West exit -> Vale of the Gods[lastremnant.wikia.com] -> Baaluk[lastremnant.wikia.com] South exit -> Lavafender[lastremnant.wikia.com] -> Royotia[lastremnant.wikia.com]You can shorten your ways to unlock them by suspending this quest after two poles: C-4, then exit west, resume the quest, B-E, exit south, resume and finish A-1 You can make a small detour between pole C and 4 and pick up the morsel and the map: http://lastremnant.wikia.com/wiki/The_Great_Sand_Sea At this point the unions may look as follows: Union 1:PernethRushBlocterCaedmonUnion 2:FayePagusTorgalBaulsonUnion 3:DavidSemryDarienEmma Important guild task:Cross Lavafender until you reach Royotia. While you cross Lavafender kill 5 Vultures for a later guild task which will unlock Rank 1[lastremnant.wikia.com] of the Sword of Three Realms[lastremnant.wikia.com] guild. SQ: Slumber of the Lost Fragment[lastremnant.wikia.com] (Ghor)If you haven't already done so, cross the Heroic Ramparts and take the southwestern exit to Ghor. Objective: Find six treasures in Blackdale Second Entrance There's an Elite's Rod[lastremnant.wikia.com] for Pagus in an chest which you need to pick up. Also pick up the Boots of Remembrance[lastremnant.wikia.com]. WALKTHROUGH Pt.3: Nest of Eagles SQ: Into the Abyss[lastremnant.wikia.com] (Royotia)Talk to the Guardian In Lavafender immediately turn right. If you haven't defeated your 5 Vultures yet, this might be one more opportunity. SQ: The Wanderer[lastremnant.wikia.com] (Royotia)Find Milton and fight some rather easy battles. SQ: The Losing Game[lastremnant.wikia.com] (Baaluk)Kill the grand beetle between posts 4 & 5 SQ: After a Day's Work[lastremnant.wikia.com] (Elysion)Link the first group of 4 albic qsiti in the Catacombs and defeat them. Important guild task:Go to Ivory Peaks until you meet the Ruler of the Dawn[lastremnant.wikia.com] and defeat him. He looks like a Rosefly and is at about half distance of the road across Ivory Peaks, slightly to the right, sitting on the top of the hill. Defeating him unlocks Rank 2 of the Sword of Three Realms[lastremnant.wikia.com] guild, which is needed for hiring our second hex unit. CelapaleisSQ: A Single Soul[lastremnant.wikia.com]Find the flowers for Rhagoh: 1 battle. Do not attack the treant until the other enemy unions are down. Paralyze him as much as you can because his Natural Gas can instakill any of your unions. Hire Rhagoh[lastremnant.wikia.com] in Celapaleis. He will be needed later in the game for triggering a side quest. Put him into your unions if you have a lack of healers, but it's also no big deal not to use him at all. SQ: When the Rose Blooms[lastremnant.wikia.com]Location: Gaslin Caves, in an extension of the area where you went with Blocter earlier. Now you must really put a good team together, because this battle can be quite difficult. Your unions need to have at least 1700-2000 HP. It's better to have only 2 unions with 2000 HP than 3 unions with 1500. If you go with 2 unions, send both to the Vile Lizard union C. If you have 3 unions, send union 1 to C, union 2 to A and union 3 to D. After the first turn keep all of the deadlocked unions on their respective enemies using commands like 'Keep your HP up!' or 'Hang in there!'. It's important that your unions will not be raidlocked. New HiresTake Emma out of the active party. Big spoiler: she won't be available from a certain point in the story anyways Hire Wyatt[lastremnant.wikia.com] in Celapaleis. Immediately disable his Poison Gas and Smoke Canister. In order to reach Cachexia[lastremnant.wikia.com] at the earliest possible time (an art we need against the strongest bosses), it's important to use his hexes arts as often as possible. Switch off his combat arts and put him as union leader in Union 1, so he gets the most usage. This way you don't have to 'grind' for Cachexia, just heavy usage during the normal game quests will do. When the art Dispirit shows up, develop it until Disprit II, disable it afterwards because it's a weak art (has the same morale shift as Addle but costs twice as much and cannot even be used long range). Keep using Paralyze-/Silent Gas until Bewitch shows up. That is a much better art and we keep that one enabled. Eventually you'll reach Cachexia. Hire Gabriel[lastremnant.wikia.com] (he has Vivification) if you can afford him, replacing Sutherby / Neales. Since Gabriel will not be used any more in the later game, a cheaper alternative would be Jorgen (Adventurer)[lastremnant.wikia.com] who is going to be introduced in the following side quest. Hire Violet[lastremnant.wikia.com] as soon as you have the gold. Her INT is low, thus it's better to turn off her remedies, so she becomes Runemaiden[lastremnant.wikia.com] instead of Cavalier[lastremnant.wikia.com]. More Side Quests Balterossa SQ: Amnesia[lastremnant.wikia.com]Find three rememberance items: Get the Book (Melphina - Cobalt Plaza), the Boots (Blackdale Second Entrance) and the Bandanna (The Southwestern Road - E4[lastremnant.wikia.com]): Give these three things to Jorgen. He will remember himself as an Adventurer. Hire him if you are not going to hire Gabriel. SQ: The Hero[lastremnant.wikia.com]Disable the steles Enemy: Mantroskylo (BR>24, HP>15772) SQ: The War of a Thousand Years[lastremnant.wikia.com]Defeat the boss Enemy: Absolute Queen (BR>24, HP>21935) SQ: Goodbye Sweet Love[lastremnant.wikia.com]Find the seer Enemy: Seer (BR>32, HP>19054) During this quest, before going in the area where the seer is located, you should go back to the place you fought the two bosses before. In the chest there is a Shamshir and 10000g Equip Rush with the Shamshir and set his wield style to Power Grip. Later David or Gabriel will request his Commander's Rapier; only give it to Gabriel. Other that that, it's important not to upgrade your weapons at this point, because it would diminish the lengths of the battles and therefore reduce the stat increases. SQ: Blooming Flower, Singing Bird[lastremnant.wikia.com] (Balterossa)Find Hinnah and bring her the Tarnished Earring. SQ: The Silver Falcons - Part One[lastremnant.wikia.com]Defeat the enemies. You may have to re-enter Balterossa from the world map several times until Caedmon has a red bubble over his head. Keep doing this until he no longer appears outside but inside the pub. SQ: A Voice from the Past[lastremnant.wikia.com] (Melphina)Enemy: Souleater (BR>32, HP>34040) Find the book and defeat the Souleater (Enter the Catacombs, then turn left) Continuing the main story: Go to Athlum Castle MQ: Battle at the Nest of EaglesBattle Tactics: Let David lead a union (with at least one reviver). Wait until the guest union gets killed, then have David's union revive it and let the other unions move in. The very next turn David's unions should be out of deadlock and thus be able to fire Gae Bolg. After the support unions are finished, let one union, preferably the guest union, target Roeas and the others Castanea. As soon as one of them dies, the surviving one will use Overdrive. David's team should be on healing/standby as often as possible, because his special arts are not usable when in deadlock. It's Castanea who should be terminated first because otherwise his AoE attacks under Overdrive could be deadly for the entire party. Union setup might be as follows: Union 1:RushWyattSemryDarienUnion 2:FayePernethCaedmonBaulsonUnion 3:DavidVioletPagusGabriel Example of this battle (not done with our team, but an even weaker one): http://steamcommunity.com/sharedfiles/filedetails/?id=523215854 WALKTHROUGH Pt.4: 15 active members MQ: 15 active membersEmmy has joined the party. Replace David with her. His best days are over, because Gae Bolg will no longer be needed and there are better units than him. If you follow weapon path 'Combat 2' go to the upper floor of the Celapaleis Pub and talk to the Sweet-Scented Maiden to get an Olibanum for Rush. MQ: Go to Nagapur and enter the Aqueducts in Sudenalm.Proceed to East Waterway Control. At the end of it you'll see a city map transporter. Proceed to the next section (Central Sluiceway) and open the first chest. It contains the Defender, a good, defensive sword for Semry. DO NOT GO FURTHER, as the next door is the beginning of Disc 2 and all the unfinished Disc 1 sidequests expire at this point. Go back to the transporter and leave the Aqueducts. Hire Gaou[lastremnant.wikia.com] in Baaluk as soon as you have the gold. Union setup might be as follows: Union 1:WyattVioletCaedmonGaouFayeUnion 2:EmmyPernethSemryBlocterDarienUnion 3:RushRhagohBaulsonPagusGabriel Getting Orb formationSQ: Wisdom's Echo[lastremnant.wikia.com] (Nagapur)Enemy: Mantroskylo (BR>36, HP>39909) Go with Glenys and enter Aveclyff. Immediately leave, suspending the quest. Aveclyff appears on the world map. Enter Aveclyff using the world map and defeat 13 Arachnids. They can be found in the first room, then through the door and to the left in the first and second room. While you are there go to the digging spot at A-12, make a savepoint and dig until you have 3 Royotian Alloy for another guild task. Go back to the Sword guild in Celapaleis and then to the guild in Athlum to turn in the guild tasks and unlock Orb formation. While you're in Athlum hire Liza[lastremnant.wikia.com]. Make sure she has only 'Smash' enabled. Orb formation reduces AP necessary for arts but reduces ATK as well. This makes the battles longer and more arts can be used, accelerating skill and stat growth. From now on only use Orb formation for all fights, except when you struggle with beating the harder bosses! Go back to Nagapur Pub and resume the quest with Glenys. In this walkthrough we will not grind the landworms: http://lastremnant.wikia.com/wiki/PC_Ultimate_Grind We will soon use a different spot for achieving both stat gains and a lot of commerce points, killing two birds with one stone. Once you are at the bottom with the landworms, you have to either aggro-pull them or timeshift-link them (running away, avoiding fighting) and run into the Mantroskylo to start the boss battle. Afterwards hire Glenys[lastremnant.wikia.com] in Nagapur. Roberto quest chain in Melphina3 Roberto quests: Agree with Roberto at least once; better every time (greater reward). SQ: The Broken Seal[lastremnant.wikia.com]Find the 3 broken seals SQ: The Disappearing Knights[lastremnant.wikia.com]Find the soldier. SQ: The Reviving Legend[lastremnant.wikia.com]Defeat the enemies Go to the Melphina guild and hire Roberto[lastremnant.wikia.com]. SQ: The Standoff[lastremnant.wikia.com] (Ghor)Help Blocter win the tournament Enemy: Wild Dragon (BR>28, HP>17600) Enemy: Ferocious Lion (BR>28, HP>27991) Enemy: Hero Slayer (BR>28, HP>40254) Take Blocter out of the active unions and he will join the battle as a guest union with 2.5 times his normal HP. Blocter must leave us now, since there is no easy way to get a powerful weapon for him! Unlocking Useful Things and Stat Building Guild rank unlockingTo unlock the first two ranks of the Union of the Golden Chalice (which we must fully unlock to fight the Cyclops Standard Model later) we need to defeat: Dominator[lastremnant.wikia.com] (Blackdale) Prometheus[lastremnant.wikia.com] (Lavafender): Enter Lavafender, first right into the next area, then second right.You can use TLRPlanner to see which rares have spawned. For Prometheus reenter Lavafender until no rare has spawned in the first area and if that's the case proceed to the second area to check for him. To unlock Rank 3 of the Sword of Three Realms[lastremnant.wikia.com] guild, we need to defeat 12 Spiritwoods. Make a savepoint in the World Map and go to Numor Mine. Proceed to the last crank lift behind the door at the end of the left side of the tunnel, into Operations Area Nr. 5. If there are Spiritwoods kill them, otherwise soft-reset, reload your savepoint and re-enter Numor mines. Do so until you have defeated 12 Spiritwoods and turn in your guild task in Celapaleis. The captured Spiritwoods sell for a handsome amount, so they also help raising gold for new units and weapons. Also in Numor Mine: Ore Cruncher[lastremnant.wikia.com]On the way down to the Spiritwoods, check for Ore Cruncher, a rare Vile Lizard, which you need to defeat to unlock Rank 3 of the Chalice guild. He's down the crank lift in the first dead end to the right. Defeating Spiritwoods and keeping all unions alive at the end of the battle is not easy, because they gather AP and then use Natural Gas multiple times, which almost always results in an instakill. You remember the rule that after having a lot of units revived, BR growth is reduced (down to only 20% if 25 units revived)?? http://lastremnant.wikia.com/wiki/Battle_Rank#KOs Here's the opportunity (and need) to apply that. In this area the stat gains are insane, but so are the BR gains! That's why you need to revive a lot here, in order to minimize BR gain. The tactic therefore is as follows:Bring plenty of reviving herbs to these battles !!! Do not heal, let the damaged unions attack and die, but always be ready to revive!! Have only healers lead your unions (Gaou, Pagus, Blocter), so they will always have standby commands. As long as multiple enemy unions are alive, attack one enemy union with all but one of your unions, use a healing command for the latter. When only one enemy union is alive, let only one of your unions attack, all the others must stand by ('Recover Your Health!')Do not use Paralyze Gas, because it will suppress their Natural Gas which is needed to instakill your unions. VIDEO: Spiritwood Grind Increasing trade rank in equipment: The Lavafender GrindWhat we are going to do now is increase Commerce Points and stats at the same time. The following families of regular monsters contribute to an increase of Commerce Points towards equipment: Anthrovore, Butterfly, Colossus, Crab, Demon, Fenris, Fly, Homunculus, Hydra, Landworm, Leap Frog, Oculus, Phantom, Vile Lizard and Wyvern. The bold ones, Crab and Landworm, are best suited for aggro-pulling and mass-linking. Usually it's the Wisdom's Echo side quest which is used for stat grinding. But it has some distinct disadvantages: The Landworms in Aveclyff cannot be captured and sold for Commerce Points There is no control over the quantity of the stat raising, you can easily 'overdo' it! Glenys only takes part as a guest union and stats/skills are not increased for those.None of these disadvantages apply for the proposed procedure in Lavafender. This is how it works: VIDEO: Lavafender GrindNotice the huge stat gains at the end of the video AND the number of captured Landworms! (I cut out most of the battle footage, so the video stays shorter) IMPORTANT NOTE FOR PS4 USERS: Due to a gameplay change (bug?) in the PS4 version (Landworms not following in Lavafender after being aggroed) the above method will not work. Therefore a different method is suggested, using Crabs in the Vale of the Gods (thanks to akaonimark for providing the tip): VIDEO: Mass-Linking Crabs It's better to build more but smaller unions (as an exception, only for this procedure): Union 1:WyattSemryFayeUnion 2:LizaGaouDarienUnion 3:EmmyRobertoBaulsonUnion 4:PernethPagusGabrielUnion 5:RushVioletGlenys A few tips:In order for this procedure to be efficient (stat-wise) you need to link at least 8 creatures. More is safer. The aggro-pull has to be done at the right distance from the creatures, just outside of the white ring that appears after the pull. Make a savepoint each, the first one before passing the vultures, because that can be tricky and the other one just before the final linking, as shown in the video. The aggro-pulled creatures remain in that state even after reloading a savegame. If you're constantly struggling passing the Vultures, you can also split it in two halves: Pull the first four Landworms, wait until they are in reach of the Vulture/Landworm group, timeshift and link these 8 creatures. Fight the battle, then proceed, pull and link the rest of the Landworms in the map. Immediately leave and reenter if you see or hear Wyvern being present. It's almost impossible doing this when they are flying above your head. With Evil Eyes present it's harder but still somehow possible. The smaller rares like Vodianoi or Scarlet Beetle are easy and can be linked together with the landworms. Deatheater should be left alone and defeated seperately, because otherwise he will make the battle quite longer and increase the BR gain a lot. On average the shown procedure should be done ~10 times (~150 Landworms linked -> 600 chains in total), until the Waraxe appears in Baaluk. This will take around 90 minutes in Turbo Mode (and you want that enabled! It makes no sense optimizing your critical triggers here).Sell your captured landworms at Malliem's Shop[lastremnant.wikia.com] in Baaluk. You can see the progress of your equipment trade rank by checking for the following weapons: Slasher: Rank D (45 equipment relevant creatures sold) Commander's Broadsword -1: Rank C (62 equipment relevant creatures sold) Waraxe: Rank A (105 equipment relevant creatures sold)Buy the Waraxe right away as soon as it pops up (for Faye). This is what we need for now to achieve rank SS in Imperator later on. By following this procedure, we have efficiently raised the stats of our party by a very defined amount and at the same time paved the way for unlocking the best equipment in the game that gold can buy! If you still like to do a little more, switch the shop to observe the achievement of the last trade rank: Schneid's Armory in Elysion Blackjack: Rank S (129 equipment relevant creatures sold)This is the only 'grind' we ever need and it takes only 1-2 hours; not much for a 50+ hours game! Actually the game expects you to do some fighting for your stats; we were avoiding that so far, but now is the time to catch up in a very compact and dense way! WALKTHROUGH Pt.5: Aqueducts/Wyrmskeep Time for better weaponsNow that we have finished 'stat raising' (but strictly by tasks which were very useful anyways!), it's the time to beef up the weapons: If Faye hasn't yet requested the Waraxe, buy her a Splitter in Ghor from Balfey's Armory of Junk for 8,800g Buy a Bardiche for Baulson in Balterossa from Beru's Fine Armory for 17,400gWhenever a weapon specific combat art for Rush pops up (specific for sword use), disable it. We will later switch him over to a Katana, so keep only generic Power Grip arts enabled! SQ: Emotions[lastremnant.wikia.com] (Royotia)Help Raphus (this one will cost you 10000g) After accepting the quest from Raphus in Royotia, talk to Rainn in Balterossa Pub Alyssa in Baaluk: Pay her 10000g Rainn in Balterossa Pub: Decline the first offer to get a Tuck for free Beauson in Genaade District of Elysion: Decline the first offer Alyssa in Baaluk: Map is near the guild entrance Confront Beauson Back to Alyssa: She'll hand over the Ring of Morning Calm Back to Raphus in RoyotiaImportant: If you talk to Rainn in Balterossa for the second time, decline the trade once to get a Tuck for free. Liza will request that Tuck after a few battles. Disable her 'Smash' and enable 'Crossbreak' and 'Dragon's Tail'. Now it's time again for some real battles!The union setup may look as follows: Union 1:GaouWyattLizaVioletFayeUnion 2:EmmyPernethSemryRobertoDarienUnion 3:RushGlenysBaulsonPagusGabriel SQ: The Silver Falcons: Part Two[lastremnant.wikia.com] (Balterossa)Defeat the enemies Here as well you may have to re-enter Balterossa from the world map several times until Caedmon has a red bubble over his head. Keep doing this until he no longer appears outside but inside the pub. Can be a pretty hard fight if your units are underdeveloped; just a taste of what's ahead... Now we're ready for sidequests with the hardest fights (Some rare dragons). But I think you should know by now how to handle enemies that instakill your unions: SQ: The Rainbow Bond[lastremnant.wikia.com] (Melphina -> Royotia)Kill the Ancient Dragon Enemy: Ancient Dragon (BR>38, HP>96671) SQ: The Fiery Revolt[lastremnant.wikia.com] (Royotia)Defeat Vespalia Enemy: Vespalia (BR>37, HP>61696) She gives you a Vespe, a quite nice sword. If he's on equipment route 'Combat_1' equip Rush with it, after the fight! During the dialogue you can't set wield style to Power Grip, which is of course necessary. SQ: The Ancient War[lastremnant.wikia.com] (Balterossa)Defeat the Mantroskylo Enemy: Mantroskylo (BR>40, HP>98291) SQ: Frustrations[lastremnant.wikia.com] (Baaluk)Kill Validus. Defeating him is a requirement for fighting The Fallen later; defeating that one is a requirement for accessing the Ancient Ruins. Enemy: Validus (BR>45, HP>84436) SQ: Next finish the 'Xxx's Witch' side quests, before they expire:Athlum's Witch[lastremnant.wikia.com] Celapaleis's Witch[lastremnant.wikia.com] Elysion's Witch[lastremnant.wikia.com] Nagapur's Witch[lastremnant.wikia.com] At this point one of the hex units should have at least achieved Dispirit II. After the weapons have been brought to mid-game levels, we are ready to go to the Aqueducts for real! MQ: Aqueducts/WyrmskeepFill your herbs up to 90, except Relaxing Herb to 60. There will be a chest with a lot of herbs, so don't overpay to fully fill up. Enter the Aqueducts again in Nagapur/Sudenalm. Proceed until the location where you turned back earlier on. Make a savegame, since there will no turning back if you get stuck during the coming fights. HarpyliaNothing special, their only really annoying art is Blaster, so try to use Silent Gas as much as possible. Gates of HellThis battle actually is a showcase how to use summons in this game, that's why they give you the Cyclops for! After finishing the Hypnos don't go all in on the Gates of Hell! Always let only one union, the one with the most damaging arts, attack and let the other two unions heal the others. This way the Cyclops will tank and your best team will deal the damage. That team will always be revived, before the Gates can enthrall them with Pandemonium. And for once don't worry about the low morale, there's no point in trying to raise it! Optional: Rush can be removed from the active party and will join the battle as guest union with much higher HP. JagerKill the support unions first until only Jager and the Lob Omen remain. The Lob Omen ALWAYS will flank the union deadlocked with Jager. Thus that union would need the strength to survive both attacks which is improbable. So avoid targeting Jager like the plague and gang up on Lob Omen instead, using 'Heal the others!' type of commands. Then Jager will flank and maybe kill one of your unions, but one of your other unions instantly will heal or revive them. The damage of the Lob Omen flanking is much worse than that of Jager flanking. As always attempt these battle in Orb formation; only when you struggle too much, use Cup of Celapaleis WALKTHROUGH Pt.6: 18 Active Members MQ: Fornstrand/Athlum/Elysion Congress/Athlum/ElysionTalk to David Fornstrand Athlum Castle Enter any Elysion district: After the cutscene enter Tula Street. Buy reviving lotions for Gaou at Avielle's Items. Athlum Castle Talk to soldier with red bubble in Athlum city Athlum Castle: 18 active party members; Irina[lastremnant.wikia.com] joins Enter any Elysion district Enter Celapaleis Castle Enter Ghor Castle, talk to the Duke afterwards Important: Do not go to Athlum Castle yet or you'll miss some cool rewards from another quest!!Hire Zolean[lastremnant.wikia.com] in Balterossa and switch off his Invocations. If you lack the gold, do the 'Cosmos Maiden' side quest below, keep defeating and selling Bai Ze's. Buy the consumables for Irina's Retreat Flare in Melphina. Now is the optimal time for teaching Rejuvenating Water to these leaders, which have Remedies (at least Restore V or Revitalize II). See previous chapter 'Development of Mystic Units' Rebuild your unions. SQ: The Cosmos Maiden[lastremnant.wikia.com] (Nagapur)Escort Sheryl This side quest should be used to raise gold for buying accessories. Defeat the big dragon in the middle of the map, Bai Ze[lastremnant.wikia.com], he sells for 66760g. Leave the map where you came from, suspending the quest. Sell the captured Bai Ze, buy the accessories/weapons or whatever and resume the quest in Nagapur Pub. Usually ~10 of them should be sufficient. After you finish this quest, Bai Ze has to be spawned by repeatedly entering Crookfen from the world map. On average you have to enter 10 - 20 times to spawn him, but if you set the character clipping distance to high in your graphic settings, you can see him from the entrance. So spawning him takes usually between 1-3 minutes. SQ: The Fated One[lastremnant.wikia.com] (Ghor)Enemy: Yerva (BR>56, HP>81727) Start the quest in Athlum Pub and move over to Town Square. You know the trick: Remove Emmy from the active party and she will join the battle as a separate union with much higher HP. Hire Jager[lastremnant.wikia.com] in the new guild in Athlum SQ: Love Will Rise Again[lastremnant.wikia.com]Balterossa Pub -> Royotia Castle -> Lavafender Hire Paris[lastremnant.wikia.com] in Royotia SQ: The Silver Falcons: Part Three[lastremnant.wikia.com] (Balterossa)It's important to do this sidequest right now, after the upgrade to 18 party members, but before returning from Ghor to Athlum Castle. You get 30000g and a Wishing Coin, compared with only 15000g if done after the bases show up! Some unit will request the Wishing Coin. Let him have it and his union will be immune against Curse. At this point the unions are as follows: Union 1:WyattLizaGabrielGaouUnion 2:EmmyPernethRobertoDarienUnion 3:RushSemryBaulsonParisPagusUnion 4:ZoleanVioletJagerIrinaFaye MQ: Celapaleis Castle/Ghor CastleAthlum Castle Six Bases appear on the world map SQ: The Successor[lastremnant.wikia.com] (Royotia)Enemy: Syndicate Leader (BR>54, HP>66030) There is a 'cheaty' solution to this quest: After the dialogues, when the race begins, soft-reset the game and reload the autosave. All the characters will stand still now and you can pick out the syndicate leader (the guy running in front), who is the only one that needs to be defeated to finish this quest. SQ: The Assistant[lastremnant.wikia.com] (Melphina)Enemies: Yvalock/Yvalmock (BR>48, HP>32074) Try to link as many Yvalmocks as possible, so the battles last longer. Also use Orb formation. Remember to make use of Paralyze/Silent Gas a lot, to advance hexes EXP. This is the list of the items needed: Part 1: 8 Parasitic Oil, 10 Blackrose Nectar and 5 Shadowood Seed Part 2: 25 Blackrose Nectar, 15 Shadowood Seed and 6 Cosmosand Part 3: 30 Parasitic Oil, 18 Cosmosand and 1 Nightblossom SeedSQ: The Tablet of Marshall[lastremnant.wikia.com] (Athlum)Enemy: Namul Niram (BR>50, HP>130954) Your mother wants you to follow her to Numor Mine. Go right, not through the door, but down the crank lift, where the two Quien are standing. Follow that path to the area where the Namul Niram fight took place early in the game. Afterwards collect the Rubber Soul[lastremnant.wikia.com] in Dillmoor as well as the Liafort[lastremnant.wikia.com] in Ivory Peaks, where you found Violet in 'The Dreaming Rose'. Violet will request the Liafort, Glenys the Rubber Soul. If you're not using them in your active party, keep these accessories for Rush. They are among the best 'free' accessories in the game. Also get the Schiavona[lastremnant.wikia.com] in Blackdale: Cuspate Post; Jager will request it. SQ: Kate & Rhagoh[lastremnant.wikia.com] (Celapaleis)You have to re-enter Lamberro District from the world map several times until Rhagoh has a red bubble over his head. Keep doing this until he switches location into the pub and start the quest. Collect the Flâchonelle[lastremnant.wikia.com] in Robelia Castle afterwards. SQ: The Desert's Legend[lastremnant.wikia.com] (Balterossa)Enemy: Mantroskylo (BR>60, HP>76124) Go straight through the middle door and teleport to the next section. Proceed to the next area until you hit a T. Go left and pick up the Ninja Katana +3[lastremnant.wikia.com] (which Glenys, Wyatt or Perneth will request. Make sure it's Perneth who gets it, since he'll be able to upgrade it further to a Tataraichi[lastremnant.wikia.com]). Go back and proceed at the other side of the T into the next area. If you want to pick up the Phalanx Mace[lastremnant.wikia.com] (only necessary for weapon path Combat 2): At the next T, go to the right and take the teleporter. From there you can't miss the chest containing Phalanx Mace. Go back to that last T you came from. Equip Rush now with the Phalanx Mace and as always set his WS to Power Grip.Go through two doors (on the left side of the T, looking from the direction where you arrived) and then turn left. From there it's straight ahead, two teleporters and finally the boss battle. SQ: The Slave Traders[lastremnant.wikia.com] (Nagapur)Enemy: Slaver (BR>56, HP>70051) Unlocks Gifts of Remembrance in Nagapur, a Yama standing on the main square next to the guild. Buy more weaponry (if you feel underpowered and/or have plenty of gold): Buy one more Waraxe for Faye at this store. WALKTHROUGH Pt.7: Six Bases Accessories: In Athlum at Martha's Items you can buy some Metallic Token[lastremnant.wikia.com] for your balanced units. One or two Metallic Stud[lastremnant.wikia.com] for your combat oriented units. In Ghor you can buy a Power Belt[lastremnant.wikia.com] for them.Keep defeating Bai Ze for the gold. One of the hex units, most probably Wyatt, should have Bewitch by now. If not, you have to really push the use of hexes now! The coming fights will provide ample opportunities to do so. Wyatt should be the leader of a union, the best would be union 1 so he gets the most usage. Reaching Bewitch means that 87% of the experience points (XP) for Cachexia have been achieved. http://lastremnant.wikia.com/wiki/Developing_Arts SQ: Infestation![lastremnant.wikia.com]Talk to the Rift's Owner in Baaluk Pub MQ: Six Bases:The tactics are the same for all the bases: Outside battles: In order to keep BR gain low, try to finish these battles fast. Don't stay on your toes in the beginning to build up AP. Inside battles: Defeat the support unions as fast as possible, but then go slow on the boss. Only let two unions attack and the others on standby/heal. The best sequence (in regard to weapon drops) is as follows: IMPORTANT: Talk to Duke Ghor Base 2[lastremnant.wikia.com]: Zuido Drops an Obsidian[lastremnant.wikia.com] for Gaou IMPORTANT: Talk to Duke Ghor Base 5[lastremnant.wikia.com]: Young Drops a Frostblade[lastremnant.wikia.com] for Roberto. If you want to fight the big Dragon, you have keep one or two unions behind until he appears. Once a union has moved, it's impossible for them to reach the Dragon. Base 4[lastremnant.wikia.com]: Hannah & Hinnah Drops a Nightbloom[lastremnant.wikia.com]; seize it from Irina and give it to Emmy! If Irina keeps requesting it, remove her from the active party temporarily. IMPORTANT: Talk to Duke Ghor Base 6[lastremnant.wikia.com]: Milton Use Deadlock Rotation on him: Two unions attack, the others stay back on healing. Milton kills the first attacking union and the second one gets one 'free' attack without Milton retaliating. Drops a Wonder Bangle[lastremnant.wikia.com] for Blocter and a Serpent Star[lastremnant.wikia.com] which we will equip to Rush Base 3[lastremnant.wikia.com]: Ludope IMPORTANT: Talk to Duke Ghor Base 1[lastremnant.wikia.com]: Snievan The reason for this enemy being treated last is that after this battle another enemy has to be defeated without the ability to save in between and Snievan is the most 'predictable' one in case you have to repeat this battle . CyclopsMy BR at the end of the bases: BR 35. (Only to be used as a guideline. There is no problem if it's 10-20 higher) Rush should now be equipped with the Serpent Star[lastremnant.wikia.com]. Changing the weapon type to Katana is no problem at all, since the wield style stays the same: Power Grip He'll only miss the highest ranked weapon specific combat art (the one that costs 45 AP), but still gets the highest ranked generic one (the one that costs 33 AP). MQ: KoenigsdorfIrina leaves after the battle. Hire Sibal[lastremnant.wikia.com] in Royotia and replace her. Sixth Path available if the First, Second, Fourth, and Fifth Paths have been unlocked MQ: Darken ForestAfter this story quest, Irina will come back to the party. I put her back to her usual spot and switched in Sibal for Gabriel, who does not have an easy way of getting an endgame weapon. SQ: The Gates of Deceit...[lastremnant.wikia.com]Enemy: Third Committee Combat Squad (BR>??, HP~105000) Talk to Duke Ghor first (although he has no red bubble), then to his messenger in the Ghor Pub, then back to Duke Ghor again. In Numor Mine take the first door to the right. Afterwards always follow the Demons. Finally take the crank lift up and the battle begins. Decision TimeWe now need to choose a leader to go in reserve in order to hire Duke Ghor[lastremnant.wikia.com]. I'd suggest to pick the least developed combat unit (without healing). We just hired Sibal and his purpose is basically to be the wildcard in our party: If any unit fails in acquiring his designated weapon (according to the table in the 5th chapter) he jumps in, for example if you forgot to set Darien to Combat or Violet to Mystic. His final weapon lies in the Ancient Ruins and it'll be a great one. But apart from that, his stats are way behind the others and if there's no unit we must drop because of a failed weapon upgrade, we leave Sibal in reserve. I made it a temporary decision and put Semry in reserve, because his AP were the least and his weapon was the weakest, but he'll soon get a better one and I'll reconsider him again as soon as he has got it. So do not judge it on the weapons alone; they all will get great weapons once we are in Undelwalt/Ancient Ruins. Defeat 16x Manhunter in Sixth Path:Remember that these enemies are quite bad for your BR (3 unions but only 1 link, together with a high BR diff) so try to get as many units KOed and revived as possible. If you happen to meet Jurupari[lastremnant.wikia.com], from the Demon family, save and fight him until he drops an Auld Bardiche for Baulson (30% chance per fight, or 75% if you fight 4 times). He's quite strong (~350000 HP in my case) and it takes 6-8 turns in Orb formation to defeat him, so you might want to leave Orb formation if you want to fight him repeatedly. SQ: Hearts[lastremnant.wikia.com]Enemy: Tamas (BR>75, HP>144757) Enemy: Rajas (BR>70, HP>75655) Enemy: Sertva (BR>75, HP>217000) Talk to Haruko in the Pubs of Elysion, Melphina, Celapaleis, Athlum, Nagapur and finally Celapaleis again. SQ: UFO!?[lastremnant.wikia.com] (Nagapur)Enemies: Lob Omen (BR>79, HP>293911) Defeat 4 Lob Omen; each one is hidden in one member of the manticore groups. So save and try each one until the Lob Omen is among the unions. Getting Primordial Alloy[lastremnant.wikia.com]Hopefully Perneth requested the Ninja Katana +3 from Flaumello Tower. To upgrade his weapon to a much better Tataraichi all he needs is some Pest Toxin (from Pest in Robelia Castle: Underground Tier), one Divine Metal (harvest in Darken Forest) and one Primordial Alloy. The latter can be harvested in Ivory Peaks, where the Liafort was collected. But you have only one chance, that's why you have to save and retry until you are successful. (This kind of upgrading - going to a specific location, harvest and you're done - is acceptable IMHO and does not fall under the 'tedious' label) Unlock DLC FightsTalk to the Knowledgeable Yama in Athlum (Virtus Parish) to open up Second Path. Go there to slay 20 Weredragons to unlock the Enlightened Seven[lastremnant.wikia.com]. Remember that these enemies are quite bad for your BR (2 unions but only 1 link, together with a high BR diff) so try to get as many units KOed and revived as possible. WALKTHROUGH Pt.8: The Fallen SQ: Seeker of the Ancient Path[lastremnant.wikia.com] (Melphina)Enemy: Charged Idol (BR>83, HP>286930) This quest might be quite hard at this point, but still if you followed this guide so far, should be quite doable. Our time in Orb formation is more or less over, now let's have some fun and unleash our true powers! Let's switch the formation for all unions to Cup of Celapaleis. SQ: The Ladies of Bloody Alice[lastremnant.wikia.com] (Melphina)Requirement: Nora[lastremnant.wikia.com] must be hired in Athlum Make everybody with a battlefield affecting special art a leader: Pagus -> Megalore, Gaou -> Zeal's Virtue, David -> Gae Bolg, Roberto -> Snowblind, if he already has it, and see if one of these shows up (on non-deadlocked unions). Focus your first-turn attacks on the two leftmost unions; leave the Hypnos alone, since they will respawn multiple times. DLC: Beat the Jhana Royals[lastremnant.wikia.com] at Heroic Ramparts!Requirement: Ring of the Labyrinth - Task 59 - Bind 50 treasure chests If you're adventurous and/or very confident about your party, you can try to beat the Jhana Royals, BEFORE facing The Fallen. The reason is that there might be some great weapons dropped as reward, which might be useful for that battle. Depending on the development of your team this battle might be well possible or just a tad too hard. Definitely use the best formations for your unions. The battle went well for me and I managed to knock off an Auld Highbrand for Semry, an Ancient Tataraichi for Wyatt and an Auld Demonblade. Now Semry is back in business and it's Liza who is going in reserve for a while. Details about this battle further below, because usually it's done after having been to the Ancient Ruins. SQ: The Fallen[lastremnant.wikia.com]Enemy: The Fallen (BR>90, HP>389804) You cannot access the Ancient Ruins (which is the area in the game with the highest BR enemies and where a lot of powerful things can be gotten) if you enter Undelwalt without having beaten this boss. And you have to finish him within 10 turns. Hint: By now you MUST have gotten Cachexia!! You often hear people say that The Fallen[lastremnant.wikia.com] can be beaten without Cachexia. Of course it can, you need some luck and a team with a lot of HP. Half of your units are constantly healing, morale is low and you won't get proper attack commands because of that. All you can do is sit there and pray for a special art coming up. This is not the proper solution. And it's not fun at all. The problem to be solved is The Fallen's EOT attacks, the game offers a solution to prevent those and that is Cachexia. Just one unit flanking with this art will halve the number of turns needed to beat The Fallen. Fortunately we planned ahead and are well prepared...! Team building: There will be three deadlock unions (1...3) and one flanking team (4) with Cachexia. The deadlock unions should be in a normal formation: Cup of Celapaleis The flanking union must be in last position AND slow so it consistently arrives last. Either it's slow by nature or must be slowed down by formation: Batwings First I built the flanking team led by the Cachexia unit: Wyatt, complemented by some units with very high AP: Perneth, Sibal and Pagus Bottom line here: You must get at least 67 AP for Cachexia and try to achieve that with as few union members as possible. Also you don't want to waste strong combat units or strong morale shifting units here, since nobody else except Wyatt will be able to spend AP. Item healers are great here; they heal the damaged unions without AP cost. Build the three deadlock units as you like, using the usual team building guidelines. Switch off all useless arts for this fight: All mystic arts except morale shifting and Restore (Revitalize/Kiss of Life are too expensive in this short battle!) Combat arts which have not been sufficiently developedUnion setup for The Fallen: Union 1:GhorGaouBaulsonSemryIrinaUnion 2:YuniverEmmyParisDarienUnion 3:RushVioletJagerRobertoFayeUnion 4:WyattPernethPagusSibal Only for this one battle I hired Yuniver and replaced Zolean because of his Bluff III art, which is a lot cheaper than Dispirit II, Zolean's best morale shifting art at that point. But that was only for speed's sake. Keep using Zolean if you don't care about finishing the Fallen as fast as possible. Rush was equipped with the Rubber Soul and the Cloistral Belt. Union 4 was actually quite slow by nature, so I put them from Batwings into Catapult formation, boosting mystic output. Union 1, geared towards damage dealing, was optimally suited for Pincer's Grip, in fact all conditions were met for variant formation Claw's Grasp II (4x Yama). Irina was in that union because of her high AP, which sometimes made Duke Ghor's weapon art available on the second turn. The tactics with this team against The Fallen are as follows: First turn: Use all available morale shifting arts. Second turn: Go all in; only issue healing commands if this does not diminish damage output Third turn: Finish him off, most of the times using special artsThe Fallen went down in the second turn...! Even if things didn't go perfect, he could be defeated in the third turn consistently. Not bad for the almost nonexistent weapon upgrading and the very limited grinding...! After the battle hire Wyngale in Baaluk and replace your weakest unit (in my case it was Pagus) with him. If you like, you can upgrade his offhand Shax Dominus to a Gaap using: Divine Metal x1, Holy Water x1, Pest Toxin x2 We can go back to Orb formation now. Union setup after The Fallen: Union 1:ZoleanGhorSemryBaulsonGaouUnion 2:PernethVioletJagerLizaRushUnion 3:ParisRobertoIrinaEmmyUnion 4:WyngaleWyattFayeDarien MQ: Visit UndelwaltGo to Undelwalt and talk to the Curious Qsiti in the guild, opening Third Path. After already having talked to her in Athlum → Celapaleis → Elysion → Nagapur → Ghor, finish the Khrynia quest chain in Undelwalt → Balterossa → Royotia → Melphina → Baaluk Verge of Victory for Paris (Combat:BR45) or if you missed setting him on Combat route, try to get the Auld Quarterstaff, a 15% drop from the first one of the two Monopole in Sacred Lands. Now that you have plenty of gold from the Fallen battle, it's time to boost your party's HP. Buy some Manifer (HP +35%) in Undelwalt/Gefyri. Your active party members will request them one after another. MQ: Go to CastellumGo to Undelwalt Castellum and take the teleporter to run through Beneath Undelwalt. SQ: Kosmosfest[lastremnant.wikia.com] (Nagapur)You need to close the Cosmos Maiden quest to open this one. So fight Bai Ze until you have enough gold and exit Crookfen at the opposite exit. Accepting the quest brings you to Fornstrand. Try to link as many Rockshells as possible to minimize BR gain! I managed to finish this by twice linking 8 Armorshells each; it almost felt like grinding Landworms! WALKTHROUGH Pt.9: Holy Plain Buying Imperator's EquipmentSell these captured creatures. Your Trade Rank[lastremnant.wikia.com] now should be SS for both Imperator and Equipment. Buy an Imperator's Sword for Liza, an Imperator's Katana for Zolean, an Imperator's Lance for Darien, an Imperator's Staff for Violet and an Imperator's Shield for Semry, if you keep him in your party. If you were following the Combat 2 path for Rush, buy him a Imperator's Hammer along with an Imperator's Bangle. Getting Mystic Seal Formation[lastremnant.wikia. To get it you have to defeat Spiritbeast Rin[lastremnant.wikia.com] on Mt. Vackel, a rare monster which is not very hard to fight, but the hard part will be getting it spawned. It's a creature that looks like a Vánargand and sits in the last area of Mt. Vackel on top of the hill, meaning you have to run through Mt. Vackel countless times (if you happen to be unlucky). Fortunately there are some other useful things you can do while crossing Mt. Vackel: Defeat two Brynhildr to unlock Rank 5 of the Chalice guild, which you need to fight the DLC boss Cyclops Standard Model[lastremnant.wikia.com] Left of the bridge before you leave the first area, there's a dig spot to obtain 3 Holy Water, needed for Task 45 of the Chalice Guild (unlocks a DLC boss: Eldritch Dragon). If you happen to meet two Venomspewer[lastremnant.wikia.com] (they look like spiders), link both and they may drop an Auld Rod for Pagus (28% probability, if you link both) Austri[lastremnant.wikia.com] (a Colossus guy), drops an Auld Longsword (15% probability). But he's too strong to keep trying for the drop. Deadly Swooper[lastremnant.wikia.com] (a Wyvern) drops an Auld Bast@rdsword (15% probability) Sugriva[lastremnant.wikia.com] (an Imp) drops an Auld Kiteshield (15% probability) for Semry or GabrielSo keep fighting those rares and they might drop something useful! Once you got Mystic Seal, start putting the one or two most powerful combat unions in that formation. As you progress, eventually all unions can be toned down using it. SQ: The Distant Promise[lastremnant.wikia.com] (Athlum)Enemy: Dharma (BR>80, HP>129672) Defeat Dharma The perfect opportunity to practise Mystic Seal! A battle which would normally be finished within 4 turns now took me 18 turns! SQ: The Villain and the Sightless Girl[lastremnant.wikia.com] (Athlum)Enemy: Welkin Dragon (BR>75, HP>290583) Loki[lastremnant.wikia.com] must be hired in Athlum to start this quest. Reenter Virtus Parish 5 times from the World Map until Loki has a red bubble. Talk to him and repeat this procedure. After having talked three times, go to Town Square and talk to Reya. Then go to Athlum Pub and start the quest with Loki. Also talk to the Seasoned Adventurer in Athlum Pub next to Loki to open the last remaining section in Numor Mine. Defeat the Welkin Dragon: It took me 34 painful turns to beat him in Mystic Seal, so I'd recommend Orb formation for this one... MQ: Holy PlainQuite a long battle, have fun and enjoy your strong team! SQ: History's Boundary[lastremnant.wikia.com] (Nagapur)Glenys must be hired in Nagapur and you need 450,000g. Spending spree in Undelwalt! Emmy will request the Finsternis for her off-hand. MQ: To the Sacred LandsTalk to Oswald in Nagapur Pub. Enter Sixth Path and proceed to Seventh Path. Fight Gojun and the Icy Idol. In this fight you will defeat 11 Glagonos; you should defeat 3 more of them later in the Sacred Lands to open the guild task for The Lost (Sword guild). Bind the Ark and run through Sacred Lands: If you forgot to set Paris to Combat or Mystic route and he has not yet gotten a decent staff, you can save and keep defeating the first one (important!) of the two Monopoles for an Auld Quarterstaff (15% chance). If not, there's one last chance for a decent weapon by buying him an Auld Greatstaff in Genaade/Elysion after the next and final quest, but it's very expensive! Pick up the Demonblade (Katana). Would have been nice for Rush on mystic route but it comes too late, unless you're willing to upgrade it. Soon you'll stand in front of a big, mystic door. Behind it awaits the final battle of the game. If you've had it with this game go ahead and finish it. If you're keen on continuing with the most challenging parts this game has to offer, turn around, use the next teleporter behind you and take on the DLC bosses. SQ: Things Unchangeable[lastremnant.wikia.com] (Athlum)Listen to a story and collect your well deserved reward! DLC Pt.1: Ancient Ruins As we start to fight the so called DLC bosses of the game, you might also want to read this very good guide about the DLC, written by Zloth: http://steamcommunity.com/sharedfiles/filedetails/?id=129125443 DLC: Ancient Ruins Part I:Enter the Ancient Ruins[lastremnant.wikia.com] via Second Path and collect the remnant weapons. The good part: Finally we're allowed to clean the room! The bad part: But only of single union monsters, otherwise BR gain is way too big! This leaves us the rares, the Brynhildr, the Oblivion Wings and the Observers, all of them great punchbags to train your party's skills. The basic strategy against the Observers is either using one or two Cachexia per turn or if they manage to use Overdrive, doing the same thing we did earlier against the Spiritwoods: You need a healer as leader in all but one union. In the beginning let two unions attack and the rest 'Recover your Health!'. As soon as you run the danger of terminating the enemy while another union lies dead on the floor, only let one union attack and all others stand by. Also this is the opportunity to improve your team's Cachexia skill levels, since at least one successful Cachexia per turn prevents the Observer from overdriving. Northeast room: Daedalus for Sibal Western room: Grammy key Southern room: Foxtail Formation Central room: YmirGrammi Tier: Nothing to see in Anatoray, proceed to Disith Just as you enter: Malystrix, a large spear, requested by Haruko. (Would be nice for Paris too, but you need to equip it manually) Defeat one Observer in Anatoray, three in Disith Southwest room: Metopon key Central-east room: Holy ServantMetopon Tier: Boreas Defeat three Oblivion Wings Eastern room: Ama-Gi for Pagus or Madd0xMetopon Tier: Notus Defeat four Oblivion Wings and Terror Wing Northeastern room: Chest containing 2x Jewel Steel, the Valiant Eardrop and the Goddess Wristlet.These Jewel Steel will be copied to every member of the party, as are those you get by disassembling a weapon, which contains them, in a workshop. Next we should exit the ruins at that point, so the party members can request their weapon. DLC: Cyclops Standard ModelRequirement: Union of the Golden Chalice - Rank 5 & Task 23 - Defeat Heaven's Lord Location: Aveclyff In order to unlock Rank 5 of the Chalice Guild, you need to have unlocked Rank 4 (defeat Death Tank in The Aqueducts) and defeat 2 Brynhildr (Ancient Ruins). Enemy: Cyclops Standard Model (BR>100, HP>575331) Uses Gae Bolg at the beginning of every turn, so always let at least one union heal the others. DLC: Eldritch Dragon[lastremnant.wikia.com] in FornstrandRequirement: Union of the Golden Chalice - Task 45 - Obtain 3 Phials of Holy Water http://lastremnant.wikia.com/wiki/Holy_Water Enemy: Eldritch Dragon (BR>90, HP>584707) This is a nasty one, he knows every trick in the book and has a lot of HP... DLC: The Fiery Gates[lastremnant.wikia.com]Requirement: Sword of Three Realms - Task 57 - Have a party member with 45+ INT Location: Aqueducts Enemy: The Fiery Gates (BR>94, HP>548518) A beefed up version of the Gates of Hell with a lot of HP. Plus two lines of Remnant Guards which are quite powerful. Very difficult to keep morale high in this fight, so your damage output will be much lower and the battle may take quite long... After the guards are down take your time and always let two fully healed unions attack and let the two others heal them. Summons are quite helpful here. Union setup: Union 1:GhorZoleanSemryBaulsonGaouUnion 2:RushRobertoLizaVioletIrinaUnion 3:JagerPernethParisSibalUnion 4:EmmyWyattWyngaleDarien DLC: Beat the Jhana Royals[lastremnant.wikia.com] at Heroic Ramparts!Requirement: Ring of the Labyrinth - Task 59 - Bind 50 treasure chests Enemy: Ala Melvilana Fusion (BR>92, HP>673900) Enemy: Jhana King (BR>92, HP>97605) Enemy: Jhana Queen (BR>92, HP>97605) For the battle itself, the final part is quite hard and it's recommended to make everybody with a battlefield affecting special art a leader: Pagus -> Megalore, Gaou -> Zeal's Virtue, Roberto -> Snowblind. But it pays off big time because usually multiple 'Auld' weapons are dropped, which some in your team will pick up. I managed to knock off an Auld Highbrand for Semry, an Ancient Tataraichi for Wyatt and an Auld Demonblade. The probabilities for Auld weapons from this fight are as follows: 73% Auld Highbrand for Semry 62% Auld Soulshield for Semry 48% Auld Smiter for Synope 45% Auld Glaive for Baulson 45% Auld Demonblade for Ynfry 30% Ancient Naginata for Yuniver 22% for either an Auld Wand or an Ancient Tambo for Pagus or Madd0x (mystic focus) 11.5% Ancient Tataraichi for Wyatt, Lukorra or Glenys 11.5% Auld Blackjack for NoraSo Semry has a 90% chance to get something good at least in one of his hands. If after this battle he hasn't gotten a new sword, you can craft him a Superlative Zweihänder[lastremnant.wikia.com]. Only give those weapons to your team if there's a sufficient benefit from it. Normally, Auld/Ancient weapons are actually not meant for fighting, but for disassembling for precious components. An Auld Demonblade for example yields 3x Jewel Steel and the cool thing is, disassembling copies it to every member of your party! So think twice before letting a non-essential unit claim an Auld weapon. DLC Pt.2: The Super Bosses DLC: The Idols[lastremnant.wikia.com]Requirement: Ring of the Labyrinth - Task 56 - Have 1 Commander in the party (hire Aquarius at the Union of the Golden Chalice in Athlum) Enemies: 3 Idols (BR>130, HP>171668) Enemy: Divine Idol (BR>130, HP>624769) Tempest Insignia hits hard and you can't prevent it by Cachexia. So try to keep morale up. DLC: The Enlightened Seven[lastremnant.wikia.com]Requirement: Union of the Golden Chalice - Task 12 - Weredragon x20 Enemies: The Enlightened Seven (BR>180, HP: 330000…370000, Zuido: 545000) Also no major problems here; as always the critical point is the entrance of Ludope and Zuido. Once you finish Ludope, you can sit back and handle it with care. Don't go all in; always issue enough healing commands. As far as the twins are concerned, fear the Twin Snowpetal (because our barebones weapons offer only suboptimal MDEF), so kill one of them quickly. If you bring Hinnah into the red first, Hannah might heal her fully up to three times, if you kill Hannah, Hinnah usually enthralls one of your unions. So be prepared to deal with that. Final Union Setup:From now on we only have to face single unit bosses with End-of-Turn attacks, like The Fallen we defeated earlier. So it's time to adapt our union setup. The following setup worked great for me: Union 1:GhorGaouBaulsonSemryIrinaUnion 2:RushParisEmmyRobertoUnion 3:JagerLizaDarienZoleanUnion 4:WyattWyngaleSibalFayeUnion 5:PagusUnion 1 are the heavy hitters in Claw's Grasp formation, union 2 & 3 are mixed unions for morale shifting, Cachexia and some additional combat. Union 4 is the flanking Cachexia union with some additional morale shifting. And last but not least I brought back Pagus as a healer (In the meantime he has gotten herbs as well and even can revive!). In union 2 Paris can be switched for Perneth if an additional Cachexia unit is preferred over morale shifting. DLC: Ancient Ruins Part II:Go straight through Apex and Grammi Tier, as before only fight the Observers/Oblivions. Then proceed to Metopon Tier: Boreas and enter Notus. Go to the northeastern room and grab the Jewel Steel and the accessories. Defeat Demigod[lastremnant.wikia.com]:Enemy: Demigod (BR>180, HP>1198520) A copy of the Fallen but with triple the HP and no turn limit. In addition he spams Curse and Bewitch (the enthralling kind). Because of that this boss is nothing but annoying, completely unfun to play against. Control him with endlessly spamming Cachexia and you will win. He clearly shows off the worst part of TLR: The kind of bosses you can beat either with luck or with having a Cachexia unit in every union...! I tried it 4 times, I gave up twice because he instakilled my healing/revive unions but took him down twice within 7 turns, thanks to Duke Ghor's Bel'kwinith's Fury. DLC: The Lost[lastremnant.wikia.com]Requirement: Sword of Three Realms - Task 15 - Glagonos x14 Enemy: The Lost (BR>200, HP>722076) He went down in three turns at first try. With our barebones weapons without major upgrading; must have been embarassing for him :-) See this video. Also you can see how well the union setup with one dedicated healer works. DLC: The White Conqueror[lastremnant.wikia.com]Requirement: The Ancient Ruins - Defeat Demigod Enemy: The White Conqueror (BR>200, HP>869270) Unfortunately this enemy is the pinnacle of unfairness! Some of his arts are just so uber-cheap...! Seal with 10,800 damage, seriously??? 10,500 War God on all unions all over the battlefield?? Crimson Flare, even if your last union successfully cast Cachexia at the very end of turn?? This guy knows no rules! Another example of The Computer is a Cheating Bast@rd[www.google.com] 10500 damage at fullest morale against very well trained and equipped unions - just at random - for me is the official admission that Square Enix decided to show you the finger at random. No matter how good your team is, at times we will officially screw you... HE is the sole reason, why we had to foster 3 Cachexia units. If you happen to have only one or two Cachexia units in your whole party, you will suffer pain, just because this boss is so unbalanced, it's so tilted towards Cachexia. He can only be defeated by constantly preventing his attacks or by having loads of luck! Without Cachexia he will instakill one union with Seal or Obliterate and damage another one to half HP and finish it off with his EOT attack. Photon field will make him dodge every attack, unless you are lucky and/or have a special art which cannot be dodged. So this is a very important point in building your unions! In this battle the only difference between total domination and total defeat is just: Luck ! Which arts he randomly uses, how many times he dodges your arts. He will win whenever he gets to do what he wants to do. So make it quick and just restart the battle as soon as a union dies. Anyways, after trying almost ten times (but instantly restarting as soon as he killed a union), he went down in four turns and I was happy not having to bother any longer with this SoB. [rant] I hate to say this, but how can one make a game this unbalanced, that there is only ONE way to properly beat it? Have you ever seen a rare who wasn't immune against Stun Trap?? Item arts only get serious when the game is almost over. The damage randomizing in this game is about a factor of 10 and all they give you is buffs that are max. 15%?? Pathetic. It makes the whole potions thing not even worth bothering... In this game, you basically need just one type of mystic art, that is Hexes -> Cachexia. Because it's the only art that reliably works in preventing an enemy doing his stuff. Palsy Skein costs almost as much and all it does is preventing physical attacks 30% of the time (except if an enemy does it, then it's 95%! TCiaCB!). How do you compare that to Cachexia, which actually works ~97% of the times and both with physical & mystic arts including Arcana? It's the only art (besides morale shift and combat) worth developing! Did I mention in the beginning of this guide that in this game you only need three things? - High morale - Cachexia - Highly developed combat arts[/rant] So finally let's enjoy this: Come my Heart and Soul: Bilqis !!! There is no Limit to my Strength! The second video is from the previous one. Only difference is Lukorra instead of Zolean, two members of the Seven and no Imperator's weapons) Final Battle / Afterword MQ: The True Conqueror[lastremnant.wikia.com]Enemy: Rank 8 Conqueror (BR>255, HP>1979784) This is the end..! For you or most likely him... He's basically the same as the White Conqueror only with much more HP. Fortunately he lets you a little more room to breathe than the WQ, thus all in all he's not quite as hard. Only a small hint: As long as he hasn't used Savage (meaning you have brought him down below 50% his HP), don't go all in, building up AP. Because later when he uses Photon Field you want to be able to fuel all these special arts he cannot dodge. Union setup: Union 1:GhorGaouBaulsonSemryDarienUnion 2:RushRobertoLizaPernethFayeUnion 3:JagerWyngaleZoleanSibalUnion 4:EmmyWyattParisIrinaThe battle took 10 turns, 2 for his minions, 8 for finishing him (and the game)... Have fun in your final battle and enjoy the credits afterwards! AfterwordI hope you enjoyed the game and also the assistance offered in this guide. Thanks to SenMithrarin85 for proof-reading and providing some valuable additional input to this guide. Also many thanks to all who help to keep this great game alive!