换一换
换一换 


这份简单且深入的指南将帮助你了解游戏的所有基础知识,从而获得更好的体验,避免频繁遇到困难。《神界:原罪》系列没有固定的玩法,但要在 Rivellon 更好地生存,有一些总体规则需要了解。有了这份指南,你会感觉自己不再是处于劣势的新手,而是成为了游戏高手! 简介

《神界:原罪2》是一款内容丰富的游戏,玩家有许多事情可以做,也有许多困难需要克服。对于部分玩家而言,这款游戏几乎肯定会让人感到难以应对,本指南正是为了帮助你而存在。游戏的玩法并非只有一种,因此我会尽力提供一些非常通用的建议,记住,这并非唯一的游戏玩法。 本指南将涵盖游戏的所有基础知识,并分为不同的部分。如果你只对某个特定主题感兴趣,可以直接跳转到相应的部分。 让我们开始吧!
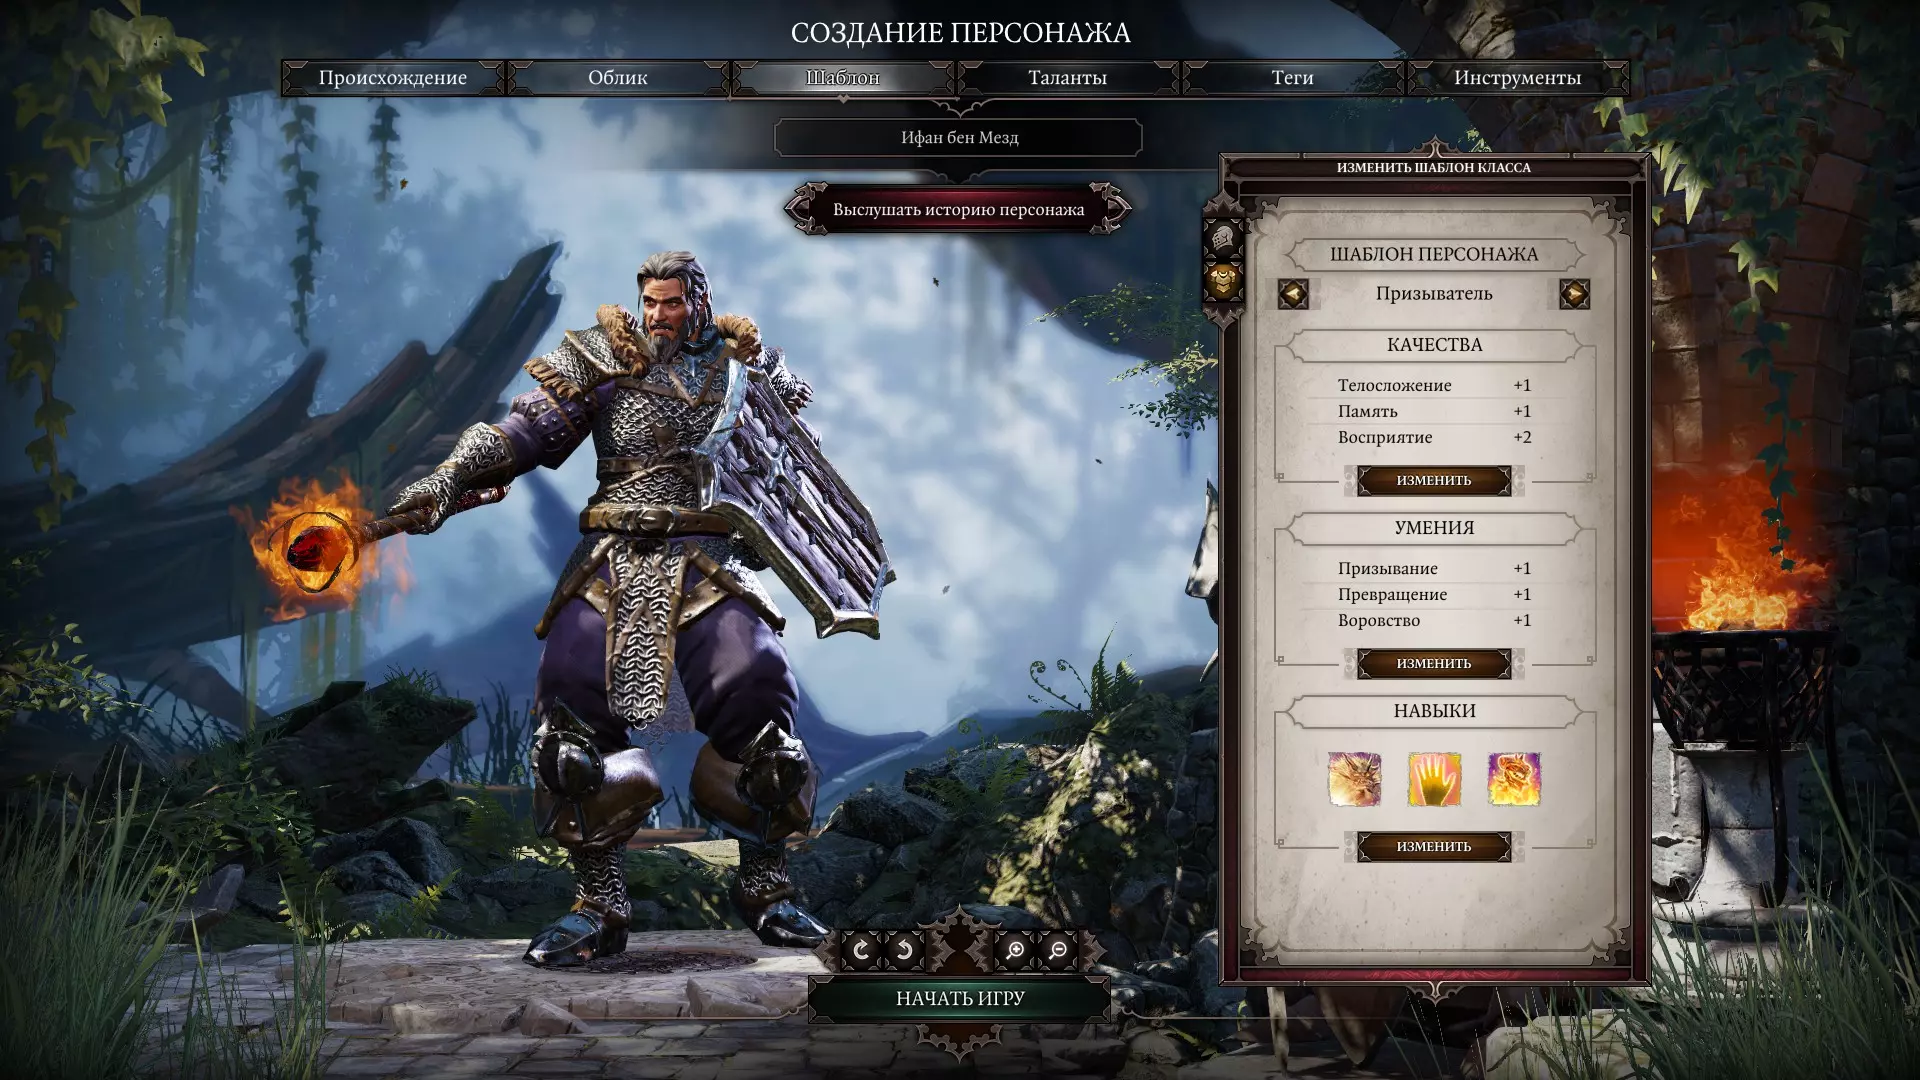
Creating your Character Whether you play alone or with other people, the first step is always the character creation. In this game, you create by default only 1 character per player in the game at the start. Those characters created at the very beginning are called Avatars by the game. It is how the game differentiate the main character(s) from companion(s). Avatars and companions will react differently depending on the situation. You see the story from the point of view of your avatar(s) while the companion(s) are here to make the journey with you. The first thing you decide for your character is whether you want it to be custom or to be an origin story. Custom characters, as the name implies, are characters you tailor yourself by choosing a race, gender and their backstory while origin stories are fully fledged characters with a developed background and a past. Origin stories offer specific content related to their adventures throughout the game as they all pursue a specific goal. While you can help them achieve their goals as companions (as stated above) if you play them as avatar(s) you will have full control over your dialogue options and your decisions. Let's start with the origin stories and then detail the customisation options in general. There are 6 different origin stories to choose from:Ifan ben-Mezd, a male human Lohse, a female human The Red Prince, a male lizard Sebille, a female elf Beast, a male dwarf Fane, a male undead eternal (an ancient race not existing in the world of Rivellon anymore)I won't get into the details of their stories as you can see them in the character creation screen but know that you can customise both their appearance and skills entirely, only their back-story and sex are pre-determined so your Lohse may look entirely different from another player's Lohse! So after choosing what type of character you want you can choose the appearance of your character which has no impact on the gameplay, it is only cosmetic. Then comes the choice of your preset. Each preset are pre-made archetypes to help you start the game with a somehow organised character. You can fully customise your starting attributes and skills and go entirely away from the preset if you want. I would still strongly recommend that you pick the preset closest to your desired character as the starting weapons are influenced by it. You can then customise your starting attributes, abilities and skills. Attributes are your typical stat points you find in most RPG. There are 6 attributes in DOS2, here is the listing of the attributes and their effect: Strength: each point gives +5% for all strength-based weapons Finesse: each point gives +5% for all finesse-based weapons and skills and +1% chance to dodge physical attacks Intelligence: each point gives +5% of all intelligence-based weapons and skills Constitution: each point improves your vitality (maximum health points) by 7% Memory: each point gives a new memory slot to learn new spells, the stronger the spell the more memory slots are required Wits: each point gives +1% of critical chance and +1 Initiative on top of giving a better chance to detect hidden traps and treasures Attributes in this game are interesting because they are both rather easy to understand and pretty impactful. I recommend you focus mainly on one of the 4 first stats depending on what type of character you want to build and then add Memory and Wits whenever you need. If you start to feel you need to broaden your tactical range but don't have enough memory slots then get enough Memory to do so and never forget that Wits affect your Initiative (which determines the turns order in battle, the highest initiative goes first). You don't want to let the opposition controlling the battlefield before you can even play your first turn or you may get in trouble very quickly. Some builds can balance a bit more Attributes but to begin with, I really suggest you try to focus your strategy for your character on one specific thing (depending on what you like to do). You will get 2 Attributes points per level for the rest of the game. Abilities determine what your character can do and are of two types: Combat Abilities and Civil Abilities. You have two Combat Ability points and one Civil Ability point to spend when you create your character and can't transfer points from one type of ability to another. Combat Abilities can do two things: They can give you access to a skill school in the case of Skill Abilities (for example you need at least 1 point in Hydroshophist to learn Regeneration) They give you a bonus perk for each point spent no matter the type of Combat Ability (including skill abilities!). In our Hydrosophist example, each point spent gives +10% of healing effectiveness and +10% of magical armour given through the use of skills.I recommend when you start the game to focus on only one type of weapon per character and to begin with a maximum of 2 types of skills to build a cohesive strategy. You can later pickup other skill schools to get access to some specific spells that go well with your initial idea but it is best that you first focus on one articulated strategy for your character. There are no true bad combinations of skill schools thanks to how the battles are handled but you need to know what your goal is for your character or you will end up going in all directions and be good at nothing. Civil Abilities are used mostly outside of battle for your interactions with your environment whether it is having better prices when you trade, persuading others, stealing etc. Overall you never want to have the same civil abilities on two different characters unless you have a very specific idea in mind. It is best to have one good Lore-master, one good barterer and so on. When you play in Multiplayer it is best that you make sure that you are working along with your comrades to avoid having 4 characters all very average in everything and not gaining any benefit from Civil Abilities (such as better prices in the shop, better items found in the wild etc.). Skills are pretty straightforward: you can pick up to 3 skills from the one or two skill schools you chose just before in your Combat Abilities. As always it is best to have an idea in mind as to what your character will be doing in battle. If you are meant to do a lot of physical damage try to pick skills that do physical damage and inflict effects when the physical armour of enemies is down (more on that in the combat section of the guide). You also automatically acquires two spells based on your race and your type of character. Each origin character gets its very own spell while all custom characters share the same. These unique spells are Source spells (check the combat section for more info on what a source spell is) and therefore are not used as often as other spells but have stronger effects. Racial skills, on the other hand, are regular skills that can be used during every fight and are pretty decent. I still suggest you choose your character because you like it and not because of its special racial and story skills as they are not a game changer and can be used on any-build one-way or another! Talents are strong passive perks that can modify your character in many ways, be very careful when you pick those as you gain new talents very rarely during the game and some can have a very drastic effect (Zombie, for example, transform any healing into damage and poison damage into healing). Finally, Tags allow you to choose what type of background your character has in the case of a custom character (origin stories have predetermined ones) which leads to brand new dialogue options that can sometimes drastically change how people see you.
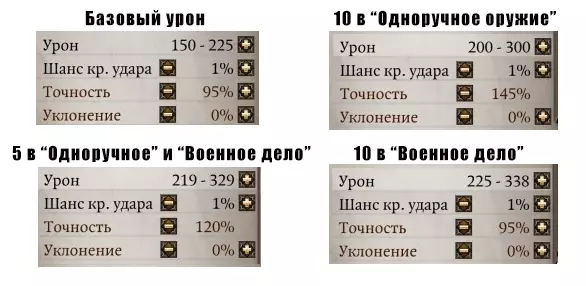
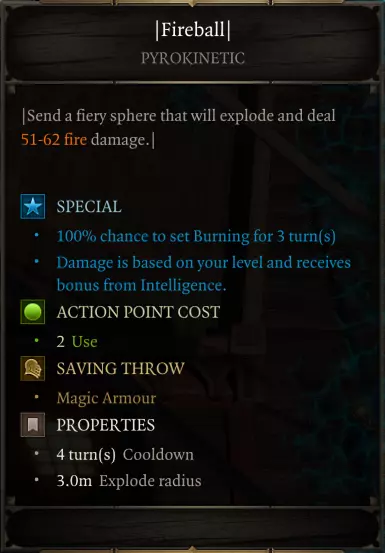
战斗第一部分 - 基本规则与站位 战斗介绍 《神界:原罪2》中的战斗为回合制。每个角色按照屏幕顶部的时间轴行动, initiative(先攻值)最高的角色率先行动。 在每个回合中,角色可以消耗行动点(AP)执行多种行动。这些行动主要包括:攻击、技能、移动以及使用物品。只要拥有足够的行动点,你可以按任意顺序执行行动。当行动点耗尽或按下结束回合按钮时,你的回合结束。默认情况下,每个角色在回合开始时获得4点行动点。你可以保留部分行动点至下一回合,以执行更多行动,最多可累积6点行动点(通过肾上腺素或血肉献祭等特殊技能可突破此上限)。在大多数情况下,你只需击败所有对手即可赢得战斗,但有时某些特定事件也可能结束战斗(例如,在对话后你使用武力让被附身的角色冷静下来)。 站位 确保你的队伍在正确的时间处于正确的位置,是避免快速且痛苦死亡的关键。显然,当你的队伍对火焰、毒药和其他负面效果敏感时,你不会希望他们停留在这些区域。话虽如此,关于站位还有很多特殊的知识需要了解。 高地是一种增益效果,当你所处的位置比目标足够高时,所有远程攻击和技能(包括魔法咒语)都会获得该增益。它不仅会为你的行动提供额外伤害效果,还会显著增加你的攻击或技能的射程。如果你的位置低于目标,将受到伤害惩罚,因此尽量将远程角色放置在尽可能高的位置,并确保其在战场上拥有良好视野。
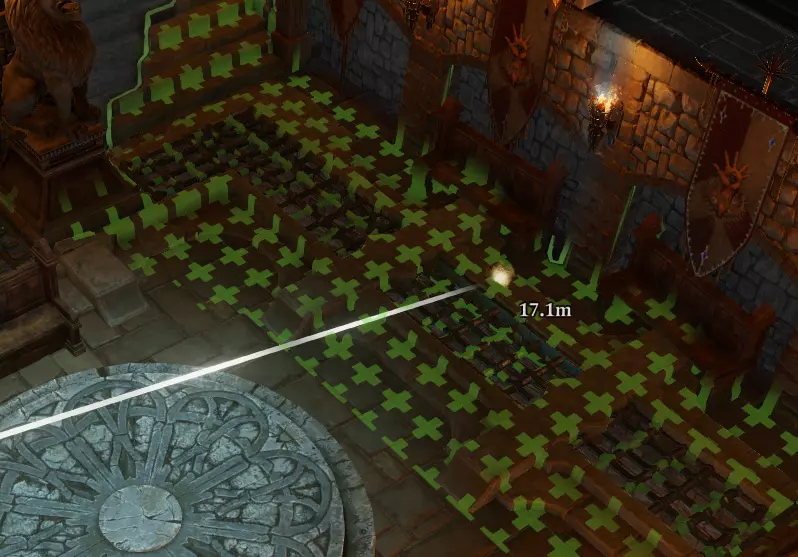
以下是技能【射手之牙】的高地加成示例。绿色符号表示因高地获得的额外射程。在此示例中,目标距离约为17米,而不是所装备武器通常允许的13米。 请记住,无论你进行攻击还是尝试抵御敌人攻击,投射物都会被环境阻挡。如果你发现自己受到远程敌人的大量伤害,尝试利用墙壁、岩石、柱子等完全阻断敌人的视线,迫使他们浪费行动点移动以获得更好的视野。 最后要注意,某些技能会与目标的朝向产生互动,任何持匕首的角色从目标背后攻击时都能保证暴击。战斗部分2 - 护甲与元素领域 生命值与护甲
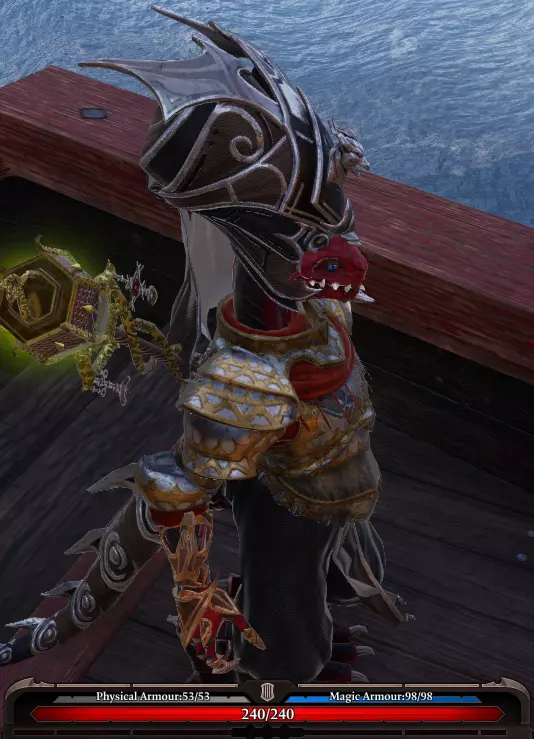
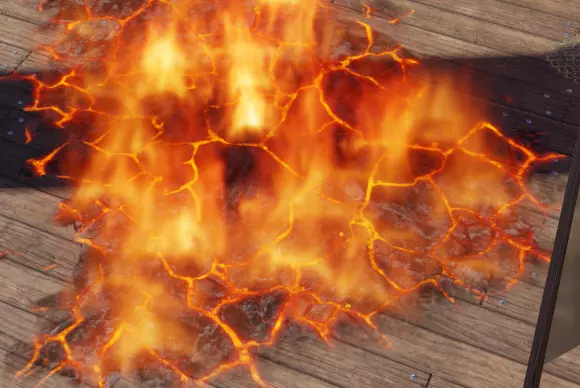
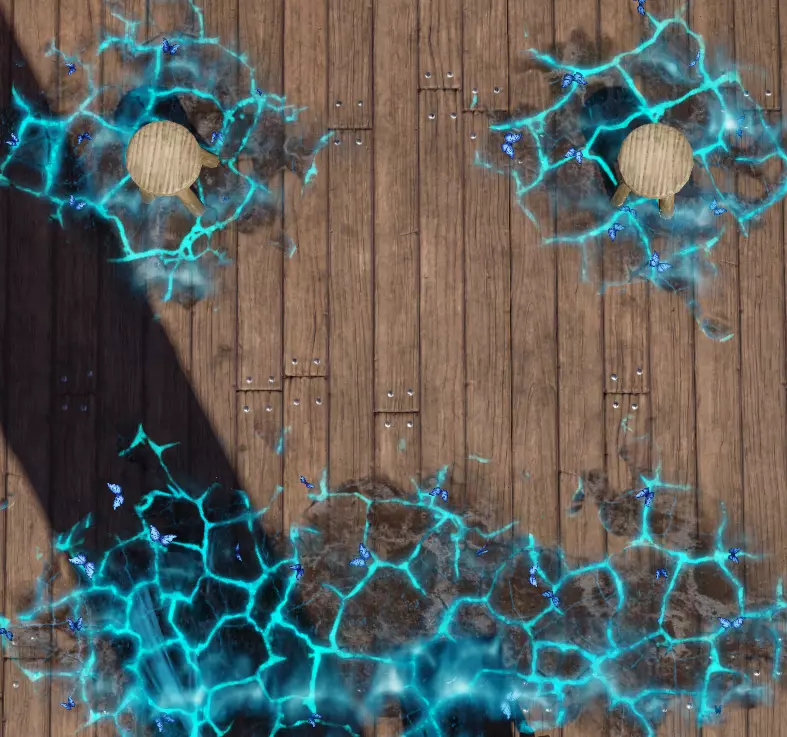
Here you can see our fancy Red Prince with more magical armor than physical armor. DOS2 battle system is pretty unique and features a very interesting interaction between Health, armour, and Crowd Control effects. The idea is that every character has a Vitality score which translates to a number of Health Points and whenever they reach 0 the character dies. But on top of that Vitality armour is protecting your character. There are two types of armour: Physical armour and Magical armour. Both work as a barrier to sponge damage before reaching your Health Points. If you received Physical damage your Physical armour will have to go down before it reaches your Health Points (same for the Magical armour). Typically every character tends to have one type of armour much higher than the other or an average mix of the two. Obviously, you want to take advantage of the weakness of each enemy and destroy the weakest of their two armour types to kill them as fast as possible. This is even more interesting because of how Crowd Control (CC) work. CC are effects that will affect your targets negatively whether by slowing them down, knocking them down or applying very unique effects. The catch is that CC work against saving throws. The idea is that each type of CC is connected to one type of armour or the other and as long as that armour is intact the CC won't take effect. For example, the skill Hail Strike chills any target hit by it if their Magical armour is down. This means that not only your target will start taking damage when you get rid of at least one of their armour but it will also become sensitive to all associated CC, those effects can potentially make a target completely harmless! Many strategies can work but I would suggest when you start the game to have 1 party member focused on physical damage (targeting low physical armour enemies), 1 party member focused on magical damage (targeting low magical armour enemies), 1 supportive party member that will make sure to help allies whether at getting rid of enemies or protecting them (giving them more armour, healing etc.) and 1 last party member that will cover his allies to avoid them being CCed. Be careful as enemies will most of the time used your weaknesses against you and any target with a dangerously low armour will become an easy target and very likely become disabled soon enough. Make sure to also balance your skills that are mostly meant to do heavy damage and skills that have particularly strong CC effects. For example a Rogue with Scoundrel and Polymorph will first use Throwing Knives to get rid of his target's armour (as it is a high damage skill with no CC associated to it) and then use Chicken Claw on his target only when his Physical armour is down as this skill does no damage but turns the target into a chicken for 1 turn as long as it doesn't have Physical armour. Note that the CC applies after the damage are dealt which means that if you deal 10 damage and the target has 5 armour the CC effect will work so you can use Skills with CC effect on low armour targets if you can destroy it at the same time (Tentacle Lash from the Polymorph is a good example of a decent mix of damage and good CC effect). Master the elements, master the fieldsI don't want to go too much into details with the elemental fields as they are actually pretty intuitive but they still are extremely important and can turn the tides radically whether for good or for worse. The elements can effect not only the characters but also the environment. A harmless pool of water can quickly turn into a deadly area if you cast an electric spell in it. Elemental fields can be there because of the environment or created by characters in combat (works outside of combat too and has impacts in many puzzles). In DOS2 as you can expect if you read the previous section elemental fields work in relation with armour. Most elemental fields are connected to the Magical armour (not every though, Ice is Physical for instance) and moving in a harmful field will both deal Magical Damage and eventually CC you depending on the field. There is so much to say about fields that I won't add too much (a full guide on fields should be required and I will do it if you are interested) but note that there is one major addition to DOS2 concerning fields that DOS1 didn't have which is the effect of Bless and Curse. Bless and Curse are effects (and also spells, let's make it simple for now) that will transform a field entirely to modify its effects. If you bless a field of fire it will turn into a blue Holy Fire that will not only remove all burning effects but also heals characters in it. Overall Bless will turn any field into a positive effect and Curse will create very destructive and impairing fields. Fire for example will turn into Necrofire which can't be extinguished by normal means and requires to wait its natural end or to use Bless on it to counter the effects.
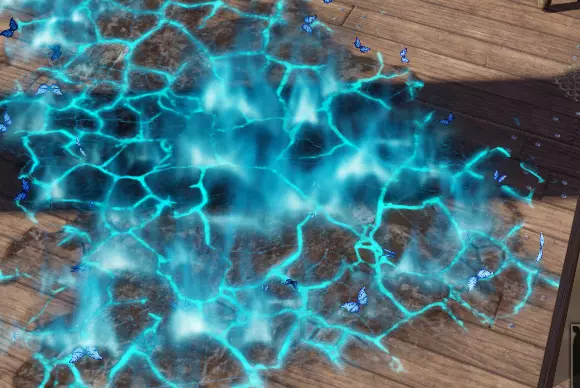
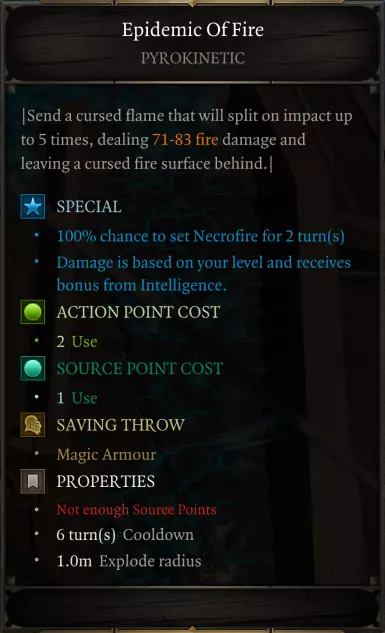
Here is an example of fire turned into holy fire, note the blue butterflies as a visual clue to tell you this is a good field (because obviously butterflies are your friends right?) Those two effects start to be available towards the end of the first Act and can change drastically your strategies. They can be used both on a single target (which will then transform the fields it walks inside) or on a specific field to affect this one only. Be very careful with those effects as both affect enemies and allies alike! Combat Part 3 - How to prevent death in battle and what to do when it happens How to prevent party members dyingThe game is over whenever all your party members die in combat. As trivial as it sounds in Divinity Original Sin 2 it has interesting interactions in combat. First of all, it is really important to not be overly aggressive but also have decent defensive options to avoid death. This is particularly crucial during fights where you are meant to be at a disadvantage (ambushes for example). Try to get at least one good mobility option for each of your party members so they can get out of trouble if needed (Cloak and Dagger, Tactical Retreat, Phoenix Dive, Nether Swap, Spread your Wings are some strong options but there is more). On top of mobility, it is good to balance out your defensive skills across your team even if one character is more inclined to defend and support the team. The reason behind it is simply that if your supportive character gets heavily focused by the enemy you still have the option to defend yourself and survive thanks to the support of the rest of the team. One very important factor in Divinity Original Sin 2 combats is armours as you already know (if not read the part about it in this very guide). Traditional games invite you to lower the amount of damage incoming thanks to tanks and then heal yourself thanks to healers. In this game, it is best to be proactive and prevent damage to happen at all. Yes being defensive means healing your team so they are not too low on health but it mostly means to check at all time the level of armours of all your party members and make sure that there is no big weak spot for your enemies to exploit (the AI will always use your weakness against you). This explains why you may always have the same character dying on your team. Aside from adding armours to your team don't neglect buffs and status effects. Slowing your enemies can make it harder for them to kill you. Knocking them down can get rid of them entirely for at least a turn and so on. Lastly, use your environment wisely to avoid as much damage as possible (cf other parts of this guide). Don't let ranged enemies get higher ground than your team, try to use clouds, walls and such at your advantage to break enemies lines of sights, try to spread out your team as much as possible to avoid being killed by big area of effect attacks. What to do when a party member dies?Obviously, this is all theory and when it comes to real battles you can't always have everything going perfectly well. So what to do when a party member dies? The first thing important is to not resuscitate party members instantly every time they die. If you do so you will end up using 3 action points at the very least and end up with a target with very low health and no armour at all. Be very careful with the timeline and identify when enemies will play their turn before trying to resuscitate. Try to wait for your defensive cooldowns to resuscitate a party member and eventually save 2 action points during a turn to resuscitate and then heal/shield your ally with your 6 stacked action points. In most cases, you will be safer finishing the combat with 3 party members rather than trying to resuscitate the 4th fallen member. Also, resurrection scrolls are far from being free so try not to waste them over and over during fights or you will end up have no money to get items and skills (that would make you avoid death entirely by being stronger). Source powers Your characters whether they are custom made or origin stories all are sorcerers which means that they all have access to the Source. The Source is essentially the energy behind the creation of life in Rivellon and as you can imagine gives access to great powers to whoever has access to it. In terms of gameplay, the Source is not only connected to the previously mentioned effects Bless and Curse as you need access to the Source to use those but also gives access to special skills much stronger than the others. Those Source skills cost you a Source point to use on top of the normal conditions such as Action point cost and cooldown. Source points can be acquired by different means such as walking in a Source pool that you can find regularly around the world, by draining the Source out of corpses or by draining the spirit of the dead thanks to your Sorcerer ability to talk with spirits. But beware as draining the Source from the deads may lead you to become dark and have terrible consequences ... As you can imagine using the Source is not something you do often and should be done only in the toughest encounters or you may regret being out of Source points during the direst situations. You start up with one maximum Source point per character as soon as you remove your Source collar during the Prologue on Fort Joy's island and then as you become stronger may eventually get access to up to 3 Source points stored at the same time. As general advice aside from not randomly using Source skills, I would recommend you to specifically wait for the right window to do so. Always use your Source skills when you know the correct armours are removed on your targets (or that your skill will remove them in the process as most of those skills are very powerful) to maximise its effects. Or wait to be able to target as many enemies as possible if you use a big skill that can impact several targets. Here is a comparison from the same character of a Fireball regular skill and Epidemic of Fire, a source skill. At first, they look not so different in terms of damage but Epidemic of Fire can bounce up to 5 times and also leave a cursed fire field instead of regular fire making it a very deadly weapon melting down your opponents.
这听起来可能有点微不足道,但尽量只使用那些能真正发挥你优势和策略的源力技能,不要仅仅因为你能用就去使用源力技能。例如,如果你有一个法师,其火焰伤害特别高,而其他元素的能力则很一般,那么尽量(如果不是只)使用他的火焰源力法术,因为这些额外伤害能迅速累积并击溃你的敌人。 起初,考虑到源力技能的消耗,它们可能看起来有些不起眼,但如果你在合适的时机使用,并且有一个能充分发挥其作用的build,它们就能产生毁灭性的效果,仅凭一个源力技能就能扭转战局,对你有利。
冒险、对话与任务 本节将聚焦战斗之外的冒险内容。《神界:原罪2》绝非一款纯战斗游戏,其冒险系统极为丰富,无论是对话交流还是探索发现都充满深度。 探索是游戏的重要组成部分,却很容易被忽略。你当然可以直接从A点前往B点,但这样会错过大量内容,包括许多有趣的事物(无论是奖励还是娱乐性方面)。总的来说,我建议你翻遍每一块石头,走遍每一个地方(我指的是让你那些可爱的角色亲自前往,而不是只移动镜头,你这个小懒虫!)。首先,这样做你往往能发现一些原本可能错过的东西;其次,隐藏的宝藏和可互动元素(比如拉杆、陷阱等等)并不少见(所以记得在背包里备一把铲子!)。另外,当你探索新区域时,建议几乎一直开启可互动物品显示功能(默认按键是键盘上的左Alt键),这不仅能显示可收集物品,有时还能帮你发现可能遗漏的可互动元素(显示为红色的物品属于他人,除非你想偷窃,否则显然不要点击)。AI 通常会自然地避开危险区域,但有时还是会意外踏入。尽量不要让你的角色在无人操控时长时间乱跑,否则可能会在你毫无察觉的情况下发生爆炸。 虽然这里还可以列出无数细节,但游戏内教程也会提供帮助。你还可以进行许多其他操作,比如潜行、扒窃,以及看着你那傻乎乎的角色独自摔进小冰池里。 对话与交易 和本指南其他部分的建议一样,强烈推荐你与所有 NPC 和生物交谈(没错,甚至包括动物,尤其是当你拥有【宠物伙伴】天赋时,而且你至少要让一个角色学习【宠物伙伴】天赋)。这款游戏中的每个NPC都有自己的台词,即便是那些只有寥寥数语的NPC,你也常常能从他们那里获得一些有用的东西(比如当你说了他们喜欢的话后,交易时就能获得特别折扣)。你应该【始终】查看每个NPC的可交易物品(我建议你在对话一开始就这么做,免得因为对话太有趣而忘记)。几乎没有NPC的交易物品是毫无吸引力的,因为大多数情况下,每个NPC都会倾向于交易特定类型的物品(例如,有的会出售地卜师技能书,有的则会出售无赖技能书等等)。我强烈建议你立即打开地图,在NPC所在位置标记并注明其出售的物品类型,这样当你几小时后需要找那个水法师商人时,就能轻松记起位置。 这款游戏的对话内容丰富且重要,所以请花时间阅读。如果你开始觉得跳过了太多对话,不妨休息一下再回来玩,相信我,这样你会更享受游戏。首先,对话本身非常有趣;其次,游戏中有很多隐藏内容,只能通过选择特定对话选项才能发现,甚至连孩子(还有狗、猪、牛等等)都能引导你找到秘密!任务 关于任务,没什么太多可说的,除了游戏不会一直手把手指导你完成它们。经常打开日志(默认L键)来查看你忘记的、现在可以轻松处理的任务是个好习惯。我强烈建议你密切关注同伴的任务(在某些情况下,你需要与他们交谈或进行其他操作来激活任务或推动任务进展),因为这些任务会在游戏过程中持续进行,而且你肯定很喜欢那些非常想让你死的同伴,对吧? 另外,别忘了你可以在地图上放置标记,这些标记对任务也很有帮助。
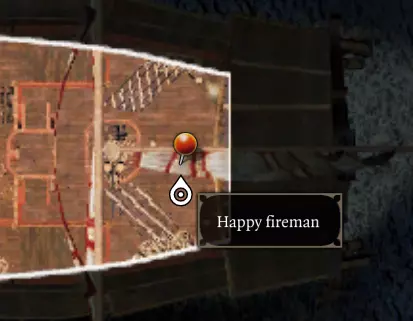
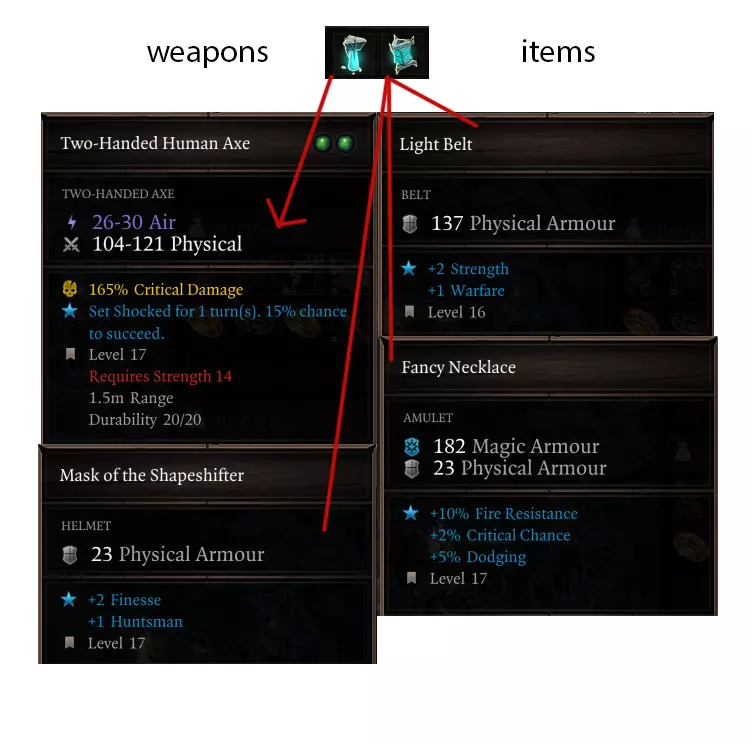
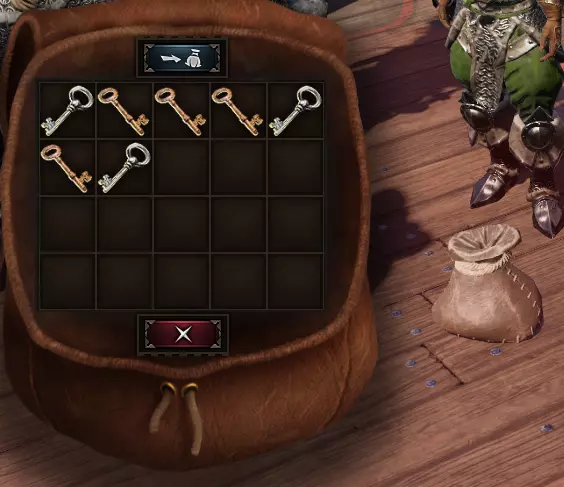
If you find something particular such as this really captivating piece of art, write it down on your map with a marker! Inventory and inventory management What is inventory management and is it really important to bother with it?Inventory management in a videogame is typically to organize your inventory in order to make sure it is tidy and convenient to use so you don't spend forever to look for a specific item. Typically you would see such activity in an MMO where players carry on their characters for hundreds of hours and naturally pile up items along the way. Modern RPG tends to simplify inventory management as much as possible for practical reasons, it is always more enjoyable for the player to have a clean and easy to use inventory right? Well, Divinity Original Sin 2 goes all out on the old school when it comes to Inventory (with a few modern ideas here and there still). This part of the guide is not only for people that underestimate the comfort of having a tidy inventory but also to show you much you can benefit from making good use of your items in general. It is worth noting before going into details that in this game each character has its own inventory instead of having one big inventory for the party. "Magic pockets" allow for characters to automatically gain access to key items from allies' pockets when they need it such as a shovel, keys to open locks or quest items. Lastly, each character has a limit of weight he or she can carry around depending on his or her Strength attribute. It is recommended to have your dedicated Strength character to carry the most. How to keep a tidy inventory on each of your charactersThis part of the guide is probably the most subjective and is a reflection of my strategies to keep my inventories tidy. Just like you would for your own house or anything else we all have our own techniques, the idea is simply to give you new ideas that can make your time easier. There is no need for you to apply everything literally. First I highly recommend specialising each character's inventory to satisfy one purpose. As said before your highest strength attribute character will do most of the lifting while the others will tend to carry the few but interesting things you particularly like. There are at least 3 types of inventories you can distribute across your characters: the crafting inventory, the wares inventory and the interesting items inventory. The crafting inventory will be the one where you throw all the items you can use for crafting. If you tend to gather everything for crafting all the time you will very quickly have a very heavy inventory so it may be good to put this inventory for the Strength character. However, this inventory is also by default the one with the most items in it so for comfort reasons you may want to make it your "Avatar" inventory (i.e. main character) in solo play as it will be with this character you pick up items most of the time if you play "classically". If not you can either switch to your strong character to pick up the items or gather the items with a drag and drop motion onto the strength character's picture in the party screen which will indeed gather the items with your Avatar but automatically transfer the item to your other character thanks to the magic pockets. I will throw it here half randomly but I can't stress enough that you will want to take your time to gather items rather than dumping everything you find on your main character, it will make your game much better (including for combat! see the crafting section as for why). Your second type of inventory is the "Wares" one. This inventory is meant to be used for Bartering with the various traders in the world to get good items and sell yours in exchange. If you go often enough to traders this inventory should never get too heavy so it doesn't matter the strength stat the only thing that matters is that it is your character with the best Bartering stat so you can buy at lower price and sell at higher price (it quickly ramps up and items start to get pricier and pricier as you go through the game making its effects even more interesting). What is "Wares" you may ask? Wares in the game specifically is the term for all your "trash" items you want to sell right away when you see a trader. You can right-click any item you can normally sell in your inventory and click "Add to wares" which will tag the item as Wares. Then click "Send to XXX" (XXX being your character with the best Bartering) so the item goes in your "Wares inventory character". When you are trading at the top of the screen an icon allows you to add all your wares from the inventory automatically in the sell window, this will save you a lot of time and make your inventory so much tidier. I strongly recommend you "add as wares" immediately all items you plan to sell later on. This will most of the time be pieces of equipment, eventually skill books (don't learn all spells you come across if you don't plan to use them much, they are quite expensive and are a very solid source of money). The last inventory being the "interesting items" is straightforward. You usually will have good pieces of equipment you can't equip yet, alternative stuff you don't always use, maybe quest items etc. Containers are your friends, use them!Containers in this game not only logically allow you to get items when you explore but you can also use them for your inventories. You can indeed pick containers and add them to your inventory directly (you can add many things including useless items like flower pots). In order to do so hold left click on the item and drag and drop it in your inventory (like you would move an object in the world basically). What is important about containers is that they are all bottomless meaning that you can add an infinite amount of items in them and not just the basic 24 slots shown by default. I STRONGLY suggest that you gather many light containers (bag, pouch etc. as opposed to crates and such) and specialize each of them for one purpose. Each of your party members should have one container to stash all his/her consumables (you can then drag the container in your hotbar to open it quickly in combat and use the item, just right click and press use on the item then and voilà!). Then you can use a bag for all the keys put on a character on your team, you can also put all the books in another bag and so on. Containers will make inventories so much tidier and if you are clever with which containers you use you should easily remember which contains what. Good containers are pretty rare to find so whenever you see one grab it! Below is an example of a pouch being one of the best type of containers as it is very light so doesn't encumber you.
Crafting is a thing Never underestimate the possibilities offered by craftingCrafting in this game is not particularly original and can seem a bit underwhelming and tedious to some. This part of the guide is meant to make you change your mind and come to like crafting for its benefits and find it less tedious and actually practical to use. If you skipped the part on inventory management you should read it if you are interested in crafting as inventory management is particularly connected to crafting. Crafting in DOS2 works by combining from 2 to 5 items to create a new item. You can craft items as long as you have the ingredients for it, no recipe is necessary. That being said whenever you do craft a new item you did not have the recipe before you automatically learn that recipe for later uses. You can also gain new recipes by reading the various crafting books all around the world (they often are pretty colourful and have "funny" names). For that reason (and also for quests and secrets) I recommend you read everything that is readable as you adventure, you don't necessarily need to carry the books with you since you can simply read them in the environment by using right click and read. While at first crafting may seem like something you will never do because you don't have much recipes and they are not the easiest to guess (seriously why a tooth and an arrow stick creates a shocking arrow ?). Keep piling on crafting items as you will eventually get interesting recipes that will naturally make you guess other similar recipes and from there you will start to fully exploit the potential of crafting. Crafting serves several purposes. The first being that you will save money by crafting your own items rather than buying them. For example, it is cheaper to craft your resurrection scrolls, potions and other consumables you use very regularly. Crafting can also give you access to stuff you wouldn't have otherwise such as new skill books or even very special skill books and parchments that are source powers without any source cost associated to it! (basically, you enter god mode) Lastly crafting is also particularly interesting for your characters that like to use consumable items such as arrows, grenades or parchments quite often as you can start to quickly refill your stocks when you get the hang of crafting. Just a quick word on runes while I am at it as it is in the same menu. Runes can be inserted and extracted for free in any rune slot (you can have slot only on the rarest items, you will find plenty eventually). You don't even lose the runes when you extract them from an item so be crazy with your rune slotting and try many things. Each rune gives a different bonus whether it is inserted in a weapon, in a piece of armour (shield included) or in a piece of jewellery (ring, necklace). Bonuses can be very varied and even give you access to new skills which can be particularly interesting since runes can be moved around from items to items easily. A word on skillcraftingSkill-crafting is a type of crafting that basically combine an elemental school of skill with a non-elemental school to create a combination of the two in one skill. There 2 results possible per combination one obtained with regular skills while the other is obtained if one of the skills used for the combination is a source skill (the result will also be a source skill as you can imagine). So try to combine any Water, Fire, Air of Earth skill-book with any other skill-book not from those 4 elements and enjoy the surprise (you can quicksave before doing so if the result doesn't excite you). Note that in order to use the skill you will logically have requirements in both schools used to make the skill (such as Necromancy + Hydroshopist lvl 2 for example). Companions and relationships with them Throughout the course of the game, your companions will regularly intervene and ask if they can handle a situation. This can lead to very diverse results depending on the situation such as new information on a topic or someone dying. Letting your companions intervene is a good way to raise their attitude towards you. The attitude your companions have towards you impact how their appreciation of you and it has much deeper impacts that you may first guess. First, it will change the dialogues with them. Generally, a companion with a good attitude towards you will agree more often and go in your direction while companions with a bad attitude towards you will have to be convinced to follow your plans more often. Even though it seems not having much importance for a good part of the game it actually has bigger and bigger consequences throughout the course of the game leading to moments where you can lose forever your companions simply based on a disagreement that could have been avoided by having good relationships. Without spoiling why all other companions that are not in your active party can die and be "lost forever" on several occasions choose carefully your main party. The first choice happens at the end of the first Chapter of the game when you escape Fort Joy. The game is quite subtle about this and warns you that you should choose your companions carefully, so please do it or you may have regrets dozens of hours later on. If you happen to lose one or several companions you have the possibility to replace them with (which are essentially here mostly for combat and eventually civil skills but never have impact on story) or if you are in the position where your party is of only 2 people you can use the talent Lone Wolf on both your characters and turn your party into a deadly overpowered duo (which can be quite sweet RP-wise as it can be because your duo is actually now a couple in a cute romance).
多样的冒险体验 最后为各位冒险者提供一些小技巧,助你轻松冒险: 1. 背包里常备一把铲子,虽然是显而易见的事,但还是要提醒一下(不过蜥蜴人其实不需要,它们的爪子就能挖东西)。 2. 一看到【床袋】就赶紧捡起来并放在 inventory 里(游戏一开始的船上就能找到一些)。这个堪称神器的物品能立即将你周围所有队友的生命值回满,而且只要不在休息状态也不在战斗中,就能无限使用。这比每次战斗后狂按治疗法术方便多了,对吧?(另外,在战斗前使用还能获得一个不错的增益效果)。 3. 别忘了学习【动物伙伴】天赋,动物们可是藏着很多秘密等着分享呢! 4. 快速保存(默认 F5)和快速读取(默认 F8)是你的好帮手。随时按下F5键来保存那些一旦失败就需要重新进行的操作,比如战斗、长时间的交易等。相信我,这样做能节省大量时间。(顺便说一下,你可以在选项中设置保留多少个快速存档作为备份!) 移动环境中的物体时,你可以旋转它们(默认情况下,按住左键移动物品时,通过鼠标滚轮进行旋转)。这听起来可能有些奇怪,但某些挡住去路的重物,通过旋转往往比直接移动更容易挪开(例如障碍物)。 你可以在菜单中更改队伍阵型,这不仅会改变角色们作为一个团队的移动方式,还会影响战斗开始时的站位。在欢乐堡救下黑猫会获得独特奖励,该奖励在某些情况下非常实用,因此我强烈建议你这么做。这本身也是一个很好的教程,能让你学会经常快速存档,并留意周围发生的事情。
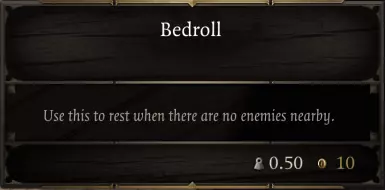
你的最佳伙伴睡袋,拿起一个,你的生活将更轻松! 通用技巧与窍门 以下是一些随机但实用的技巧,能帮助你在战斗中表现更好: 一个角色=一种策略 最好让每个角色各司其职,而不是让每个角色尝试做所有事情。 做好准备,随机应变 让角色专精是好事,但不要过于依赖同一种策略,否则在某些情况下你可能会遇到大麻烦。你将面对各种各样的遭遇战,例如,如果你的主要伤害来源是火焰,那么任何拥有厚重魔法护甲或高火焰抗性的队伍都会彻底击败你。让每个角色稍微做一些与其定位不符的事情也是不错的选择,比如让高物理伤害的角色装备一件带有控制效果的魔法护甲(反之亦然),这样当你只能使用特定类型的控制时就能派上用场。 协同是关键 角色之间以及每个角色自身的build之间的协同作用能让你应对各种情况。如果你觉得角色缺乏协同,试着找出原因,有时可能是因为他们的 initiative score( initiative score),例如你通常希望先施加中毒效果再使用火焰伤害,有时可能是因为他们的技能过于重复,有时则可能是完全其他的原因。在团队层面,尝试统计你拥有的控制技能数量、它们的护甲类型以及由哪个角色持有,防御选项的数量,还有每个队员拥有的移动选项。在角色层面,确保你的输出角色拥有能快速破除护甲的优秀技能,以及足够廉价且冷却时间合理的控制技能,以便在需要时使用,确保你能保持优势。 创造力是你最好的朋友。为了纯粹的乐趣而稍微改变一下策略不仅很好,有时当某个特定策略不起作用时,彻底改变策略可能会突然带来意想不到的结果!便利性提升内容 本部分刚刚开始创建,未来随着我发现更多能让冒险更顺畅的便利性技巧,会持续更新。 获得复仇女神号控制权后的技巧 在复仇女神号上,你可以找到两个传送金字塔。这些物品是小型彩色金字塔,使用它们可以在彼此之间进行传送(战斗中使用需消耗6点行动点)。最容易找到的一个在达莉丝私人房间内,塔昆面前的桌子上。另一个也不难找到,你可以直接使用传送器到达第二个金字塔的位置(或者在船上寻找,其入口与第一个金字塔在同一个房间)。 黄色的传送金字塔位于赖克 mansion 的地下室。获取它的最佳方式就是按他的要求去做,无论最后与他的对话结果如何,你都能获得它。它位于一个封闭房间的源力宝箱中(入口可通过大房间里的杠杆打开)。 绿色的那个位于血月岛的档案馆里,和黄色的那个一样,它也在一个源力宝箱中,当你在档案馆里时,你不太可能错过它。如果你找不到档案馆的入口,可以使用你的法术查看鬼魂,然后绕着岛屿四处走走,你应该能找到进入的路。 如何随时轻松获取大量源力 当你获得至少2个金字塔传送器(查看上文了解如何获取它们)后,你可以设置一个技巧来随时轻松获取源力。在漂流之森与导师一同推进剧情,获得进入她地下室的权限后,在那里放置一个金字塔传送器,并将另一个留在你的物品栏中。当你需要时,只需使用金字塔就能立即传送到地下室的源力分配器前,就是这么简单! 使用这个技巧的最佳方法是至少拥有第三个金字塔。这样你就可以在来时的任何地方放置第三个金字塔,以便传送回该位置,而不必返回最近的传送点再步行回来。如果是多人游戏,只需在两个不同角色身上各放置一个传送器,第三个放在地下室,让玩家依次快速进入地下室,然后传送回另一个玩家身边。显然你可以对任何你喜欢的东西(比如特定商人等)这样做。
你的反馈很重要!你对本指南(在一定程度上也包括游戏)的反馈非常重要!欢迎在指南下方留下建设性评论,无论是指出遗漏内容,还是分享你喜欢或不喜欢的地方。我会根据反馈以及游戏的更新来完善本指南。希望你喜欢这份指南,并祝你在里维伦度过愉快的时光!编者注
大家好。 希望大家觉得这份指南内容丰富且易于理解。 我现在会尽我所能编辑这份指南。希望这能让所有以往存在语法问题或难以阅读的部分变得更易读。我不会更改任何与游戏玩法相关的内容,除非终极版在某些方面对其进行了修改。总体而言,我尽量保持原作者的语气,所以除非我有意让大家知道,否则大家应该无法分辨各部分的作者是谁。 我的全部指南选集