换一换
换一换 


以下是我目前收集到的关于法术及其修饰符如何相互作用的信息,以及我发现的到目前为止构建终局法杖的最有效方法。 法杖基础 每个法杖会以其施法延迟的速度发射其槽位中的所有投射物法术,若消耗的法术有施法速度修饰符则会叠加;当所有槽位法术发射完毕后,法杖需要经过充能时间才能再次发射法术。法术施法也会消耗法力,每个法术有其自身的法力消耗加上应用的修饰符,且每个法杖有其独立的法力池和恢复速率。
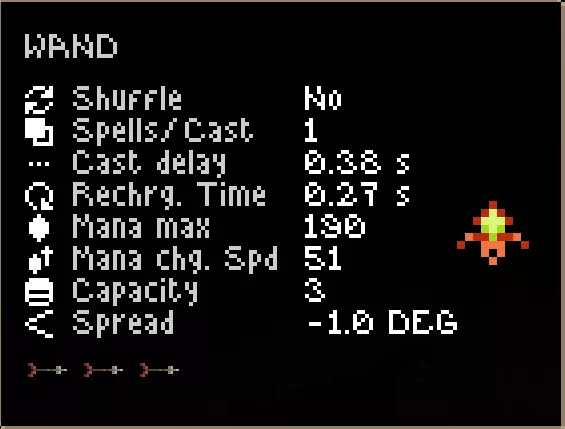
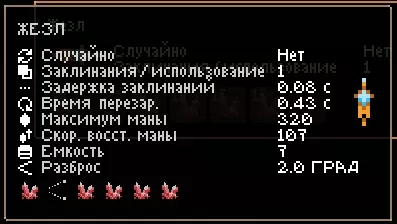
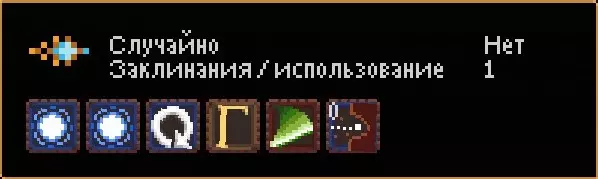
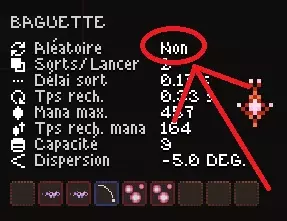
The actual wand attributes specifically are as follows: Shuffle - If Yes, the wand will choose a random spot in the list of slotted spells and execute it. I will go into more detail about how modifiers interact, but shuffled wands effectively just shoot all of the spells in the list with the included modifiers in random order until all have been spent, and then the wand will recharge. If No, the wand will apply each spell slotted in order before recharging, and i will go into depth about how modifier, timed, triggered and passive spells all interact later. Spells/Cast - Determines how many spells in the list get cast per mouse click. This gets confusing even for me when the wand is a shuffled wand or you're using tons of simultaneous modifiers, but in essence, the wand chooses the first two available independent projectiles/bombs to cast and casts them. Cast Delay - The amount of time that passes between consecutive firing of spells, and each individual spell adds its own modifier to the time. For example, spark bolt has +0.05s to the cast delay, whereas the arrow has +0.17s, so if you slotted three of each into the same wand, holding left mouse and rapid firing the spark bolts is significantly faster than the arrows. Recharge Time - The amount of time a wand takes to refresh its spell list. Once you've shot all the spells slotted in the wand, you will not be able to use the spells (you will see a yellow "Recharging..." pop up over your head if you click while the wand is recharging) until this amount of time has passed. Mana Max - The maximum amount of mana a wand can have. Mana Charge Speed - The rate at which mana recharges. *quick note about mana, if your wand does not have enough mana to cast the next spell in its list, it will just skip it if there is another castable spell after it. Capacity - The number of spell slots in the wand. Spread - If you draw an imaginary line extending out from the tip of your want, it represents the amount of variation in the paths of projectiles from that line. Negative values mean that it brings the paths of projectiles closer. Spell Interactions (Basic) I won't go too much into the spell's keywords, they feel pretty self explanatory, but the interactions with modifiers, triggers, and timers are much less clear, but i think i've gotten a pretty good grasp on how it works and how to make it work really well. To start, the main things you actually shoot at enemies are the projectiles themselves, like the starting spark bolt. A single standard projectile will just shoot out that projectile upon casting. Things get funky when you add projectile modifiers, and even funkier when you add triggered or timed spells into the mix. but FEAR NOT for i will try and explain it as fully as possible. First i'll explain what these all do and then what to expect when used together as well as the most useful interactions (in my experience so far). Also ALMOST ALL OF THIS INFORMATION IS MOSTLY USELESS WITH SHUFFLES WANDS AS YOU HAVE NO CONTROL OVER HOW THE MODIFIERS/TRIGGERS/TIMERS INTERACT, SO IN GENERAL, LOOK FOR NON-SHUFFLED WANDS, also assume when i say things about order, i'm always referring to non-shuffled wands. Projectile Modifiers - These are spells that modify a projectile. They modify the speed, damage, trail, direction, etc of a spell, and the spells are "read" by the wand from left to right. This means you can stack as many projectile modifiers you want (if you have the mana) to the left of a projectile, and they will all affect the first spell placed to the right of the last modifier. Example: You put a damage mod, speed mod, and crit mod all in a row, and then you have two spark bolts following. When you shoot the first time, the wand will read all of those modifiers and add them to that first spark bolt, and then the second spark bolt is read next with no modifiers, and it comes out a plain bolt. Multicast - These spells interact like modifiers, but instead of affecting only the next spell read, they affect however many are listed. This means that if you have a double scatter spell slotted first, it tells the wand to pick the next two projectiles spells and the wands shoots those. same for the formation multicasts, like the front-back, hexagonal, up-down-and-front, etc. They look for a projectile spell after the modifier to fill each direction. I haven't figured out the order in which each direction is assigned from the spell list, but i find myself trying to fill the directions with the identical spell, so that would need some science to figure out. Example: You place a front-back formation modifier, and you put three spark bolts in the next slots. The first shot will read the modifier, look for two projectiles and choose the next two spark bolts, and those two spark bolts will get shot out in front and behind you. The next shot will be just the single spark bolt alone, and then the wand will recharge. Triggered and Timed - Triggered spells are projectiles that auto-cast the next spell to its right upon hitting a wall or enemy. If the spell reaches the end of its range without contacting anything, nothing casts. Timed spells are the same as triggered spells in that they also cast on contact, but instead of just expiring at the end of their range, they will auto-cast the next spell at that range also. Besides that extra function of the timed, these two do the same thing and interact with other spells and the order the same way. Example: You slot a Timed spark bolt, timed spark bolt, and a normal spark bolt in order. The first shot will shoot a spark bolt, and when that bolt hits something or its range, it will cast another spark bolt. The new spark bolt will do the same thing, casting the third spark bolt, but this normal spark bolt will be the last. I will go specifically into detail about modifiers here, because that was the most confusing part as i was figuring it out, and once you use it properly, it yields fat damage. Passives- Spells that do something to your character or the wand itself all the time at the cost of some mana. These effects are only active when you have the wand in which the passive is slotted currently equipped. Also i don't know if this is a bug or not, but if you have the passive in the last slot, it will take cast delay to get through, so it feels like your wand hangs at the end of what you are actually shooting. If you reslot the passive to the start, it removes this delay. (Always slot your passives in the first slots.) Example: You slot a torch passive into the first slot of your 10 slot wand with all kind of other stuff going on in the later slots. Now, when you pull that wand out, your wand will be on fire like a torch, and it can be used to interact with the environment i.e. light wood or oil on fire. Spell Interactions (Advanced) For the sake of space and attention span, i won't go through every possible combination of modifier, multicast, and trigger, but ii'll go through the most useful and worthwhile ones that i found the most satisfying to actually get a handle on. There are primarily 3 interactions that make the biggest difference in the spells that you use/ try to achieve. Modifiers and Multicast - Say you want a shotgun blast of three flaming spark bolts. The way you achieve this by placing the Multicast/Formation -> Modifier -> Projectile 1 - 2 - 3. The formation will get read first, then all of the following modifiers will get collected, and then the next three projectile spells will be selected and shot out in formation with all of those collected modifiers between the projectiles and the formation applied to all of projectiles shot out. Example: Triple Scatter Spell -> Fire Trail -> Spark Bolt -> Bouncing Bolt -> Magic Bolt. When you left click, the scatter spell is read, then the fire trail is read and added to the collection of modifiers, then the next three bolts are all read. Your wand will shoot out all three of those bolts (i haven't scienced the order of the bolts and how it determines position) in a shotgun-esque blast, all with the fire trail applied to them individually. UNIQUE - Arc modifiers are unique to formations/scatter multispells, they cause whatever element it is to jump between all of the projectiles that get shot out together. Does nothing when used on a single projectile. I find these modifiers to be so self-destructive yet useless against enemies that i would recommend never using them until you have immunity to that element, but even then, i think it's a waste of a slot. Modifiers and Triggers - A modifier will affect the next projectile to its right, but nothing past it (unless like above, where it's being "collected" by a multicast modifier). This means with triggers, that if you put a fire trail trigger in front of a magic bolt trigger that has a normal spark bolt after it, the magic bolt will have the fire trail, but the spark bolt that is casted from the first bolt will not. You can do that the other way around as well, where the original magic bolt is unmodified, but the spell it casts next is modified. This is where you start getting the most utility and damage out of all of your spells. Now put those two concepts together to get a sort of cluster spell and you get great damage and range. Modifiers and Multicast and Triggers - Because a trigger "casts" a spell upon contact/expiration, it also takes in modifiers and multicasts. This means you can have a trigger bolt with a scatter multicast after it, and the trigger bolt casting the next spell will read the multicast and then cast however many the scatter (or formation) dictates after it. Example: Timed spark bolt -> Triple Scatter Shot -> Spark bolt -> Spark bolt -> Spark bolt. This will shoot out one spark bolt, and when that spark bolt hits something, three spark bolts get shot from its place. Now add in modifiers to that mix - Modifiers only affect the right most projectile unless being collected by a multicast modifier. Consider Fire Trail -> Timed Spark -> Triple Scatter -> Damage+ -> Crit+ -> Sawblade -> Sawblade -> Sawblade. The damage spikes right about here, so the first spark bolt will shoot out with a fire trail, then when it hits something or goes a certain distance, three damage boosted and crit boosted sawblades shoot out from the spark bolt. This means if you know the approximate distance the bolt travels before shooting out super sawblades, you just put yourself a little farther than that range away from an enemy, and then when you shoot the bolt at them, sawblades will shoot from the bolt just before hitting the enemy, stacking all of those projectiles' damage from a good controlled distance. ***************************************************************************************************************** HALT. THIS IS IMPORTANT. Before i get into this last interaction, i think the above strategy of having one solid and accurate timed bolt that casts a scatter or formation of more powerful stuff is by far the smartest way to go. It doesn't take too many slots to be strong, it doesn't take toooooo much mana, and the control you have over when your powerful shots come out makes for great usability. You can even stack up some crazy destructive spells you would otherwise avoid this way (with a good wand that has a lot of mana) because you can be much farther away from the blast zone and you can reposition yourself in the flight time of the first started bolt. Okay onto the convoluted stuff: ***************************************************************************************************************** One step further - Now consider you have a multicast/formation that selects three timed spells that all select their own spells. This is where it starts to get rabbit hole-y where you can go as many layers deep as your wand/spells allow. To describe the process of selection by the multicast, lets do a mental flowchart of an example. Consider this array of spells in a huge wand in this exact order: Fire Trail -> Triple Scatter -> Timed Magic Bolt -> Summon Arrow -> Timed Magic Bolt -> Summon Arrow -> Timed Magic Bolt -> Summon Arrow. Starting with the left click, the first thing that is read is the fire trail applying to everything actually cast by the triple scatter. The triple scatter looks for three projectiles, so first it finds the first timed bolt, but now the magic bolt looks for its spell to cast, so the next spell that is read after the timed bolt is what comes out of the timed bolt, modifiers and all. I excluded modifiers in my example for simplicity, but say there was an acid trail after the first timed magic bolt, that would apply to the arrow that comes out of one of the three magic bolts that gets initially shot out. Once the timed bolt find the projectile after itself to shoot out, then the multicast keeps looking for more projectiles to shoot, so that process repeats for the next two magic bolts. Then, when you shoot that wand, it will shoot three magic bolts like a shotgun, and then each of those bolts that get shot out will shoot their own arrow with whatever modifiers you place between the timed bolt and the projectile after it. Madness - Wands realistically don't have the slots or mana for this, but in theory, this would get realllly wacky if you were to have a scatter shot of several timed shots, and each timed shot had another multicast and several projectiles following as its following modifiers, causing a shotgun blast of cluster shots effectively, but as far as i've played and tried to make wacky wands, the most convoluted i've gotten them is the example above, where i had a scatter shot of trigger bolts that all shot another bolt afterwards with all kinds of modifiers inbetween. Practical Application/What to Look for To start, again, the biggest thing to look for in general is NO for shuffle. The only thing shuffled wands tend to be good for is rapid fire low damage wands. On that note, i'll break this into early and late game for what to really keep an eye out for. EARLY GAME 1. Wands with at least 200 mana, 50 regen, and as close to zero recharge rate as possible. Wands with close to zero recharge rate can be equipped with one spell alone shoot it at ridiculous speed even if the cast delay is higher, since cast delay is only between other spells. The glaring downside to this is it burns through mana, so you can't just hold left mouse forever with most spells. Sometimes you'll get a wand that shoots pretty quickly that recharges faster than something like a spark bolt burns through, but generally this only works with weak spells. The starter bomb wand is a good example of this. Throw spark bolt into it and it'll blip blap pretty fast but burn through the small mana pool. 2. Wands with scatter or multicast modifiers, trigger spells (long range and quick spells like magic bolts or magic arrows are top tier), or your favorite explosive/powerful shot. Even if the wand is hot garbage itself, hang onto those valuable mods to craft a late game wand. With the cluster shot method i talked about earlier, you only need one timed or triggered spell of preference to support a multishot that comes out of it, so keep out for one of those as well as the most powerful spell you can support with the wands you have and the multishot you've found, so either in groups of 2 or 3 most often. 3. Tentacle. It's not got the highest range or attack speed in the world, but it does 25 damage, one shotting pretty much everything in the first two stages, with almost no real drawback like explosive damage or ailment. Other than those 3, the wands you use early game are pretty irrelevant, since you'll most often find unusable shuffled trash, bomb wands, firebolt wands, or aura utility stuff, so most wands can be basically ignored other than the one you're actively using and the wands containing the key stuff. LATE GAME All need to be NOT shuffled as far as i'm concerned at this point. If it's shuffled, only grab if it has a specific spell or modifier you really want within it. 1. Wands with 10-13 capacity with mana of around 1.5k and 50 or so recharge. The recharge time will suck if it's really high, but pretty much anything sub 1 second is fine. These wands are great for supporting a beefy cluster shot that can easily carry you through late game. 2. Nukes. Just be careful. Also meteorite strike and greater magic missile are up there too. EXAMPLE OF GOOD LATE GAME CRIT WAND 10 slots, 1k mana, 52 recharge rate, not shuffled. In this order Energy Shield -> Reduce Recharge Time -> Spark Bolt with Timer -> Formation - Trifurcated -> Damage Plus -> Critical Plus -> Homing -> Spark Bolt x3. This wand is effectively what i took to my deepest run so far, and it was dishing out FAT damage. The shield on the user keeps projectile damage to a minimum. The reduced recharge time makes it so that after each shot single timed bolt, the wand goes right to recharge, and that modifier speeds up that recharge time, making it so fast that mana was the only concern (a similarly built backup wand is good for mana recharging). The timed version of spells is objectively better than the triggered imo, so you can both bank the shots off of walls as well as use it like an airburst shell of the clustered spells. The damage, critical, and homing mods all make a trio of sparks do anywhere between 20 and 80 damage per cluster depending on crits. The spark bolts were useful because they have a good speed, low spread, and low mana cost. ***************************************************************************************************************** EDIT START I had a good run since making this guide, and i specifically put together a few wands to illustrate a few interactions.
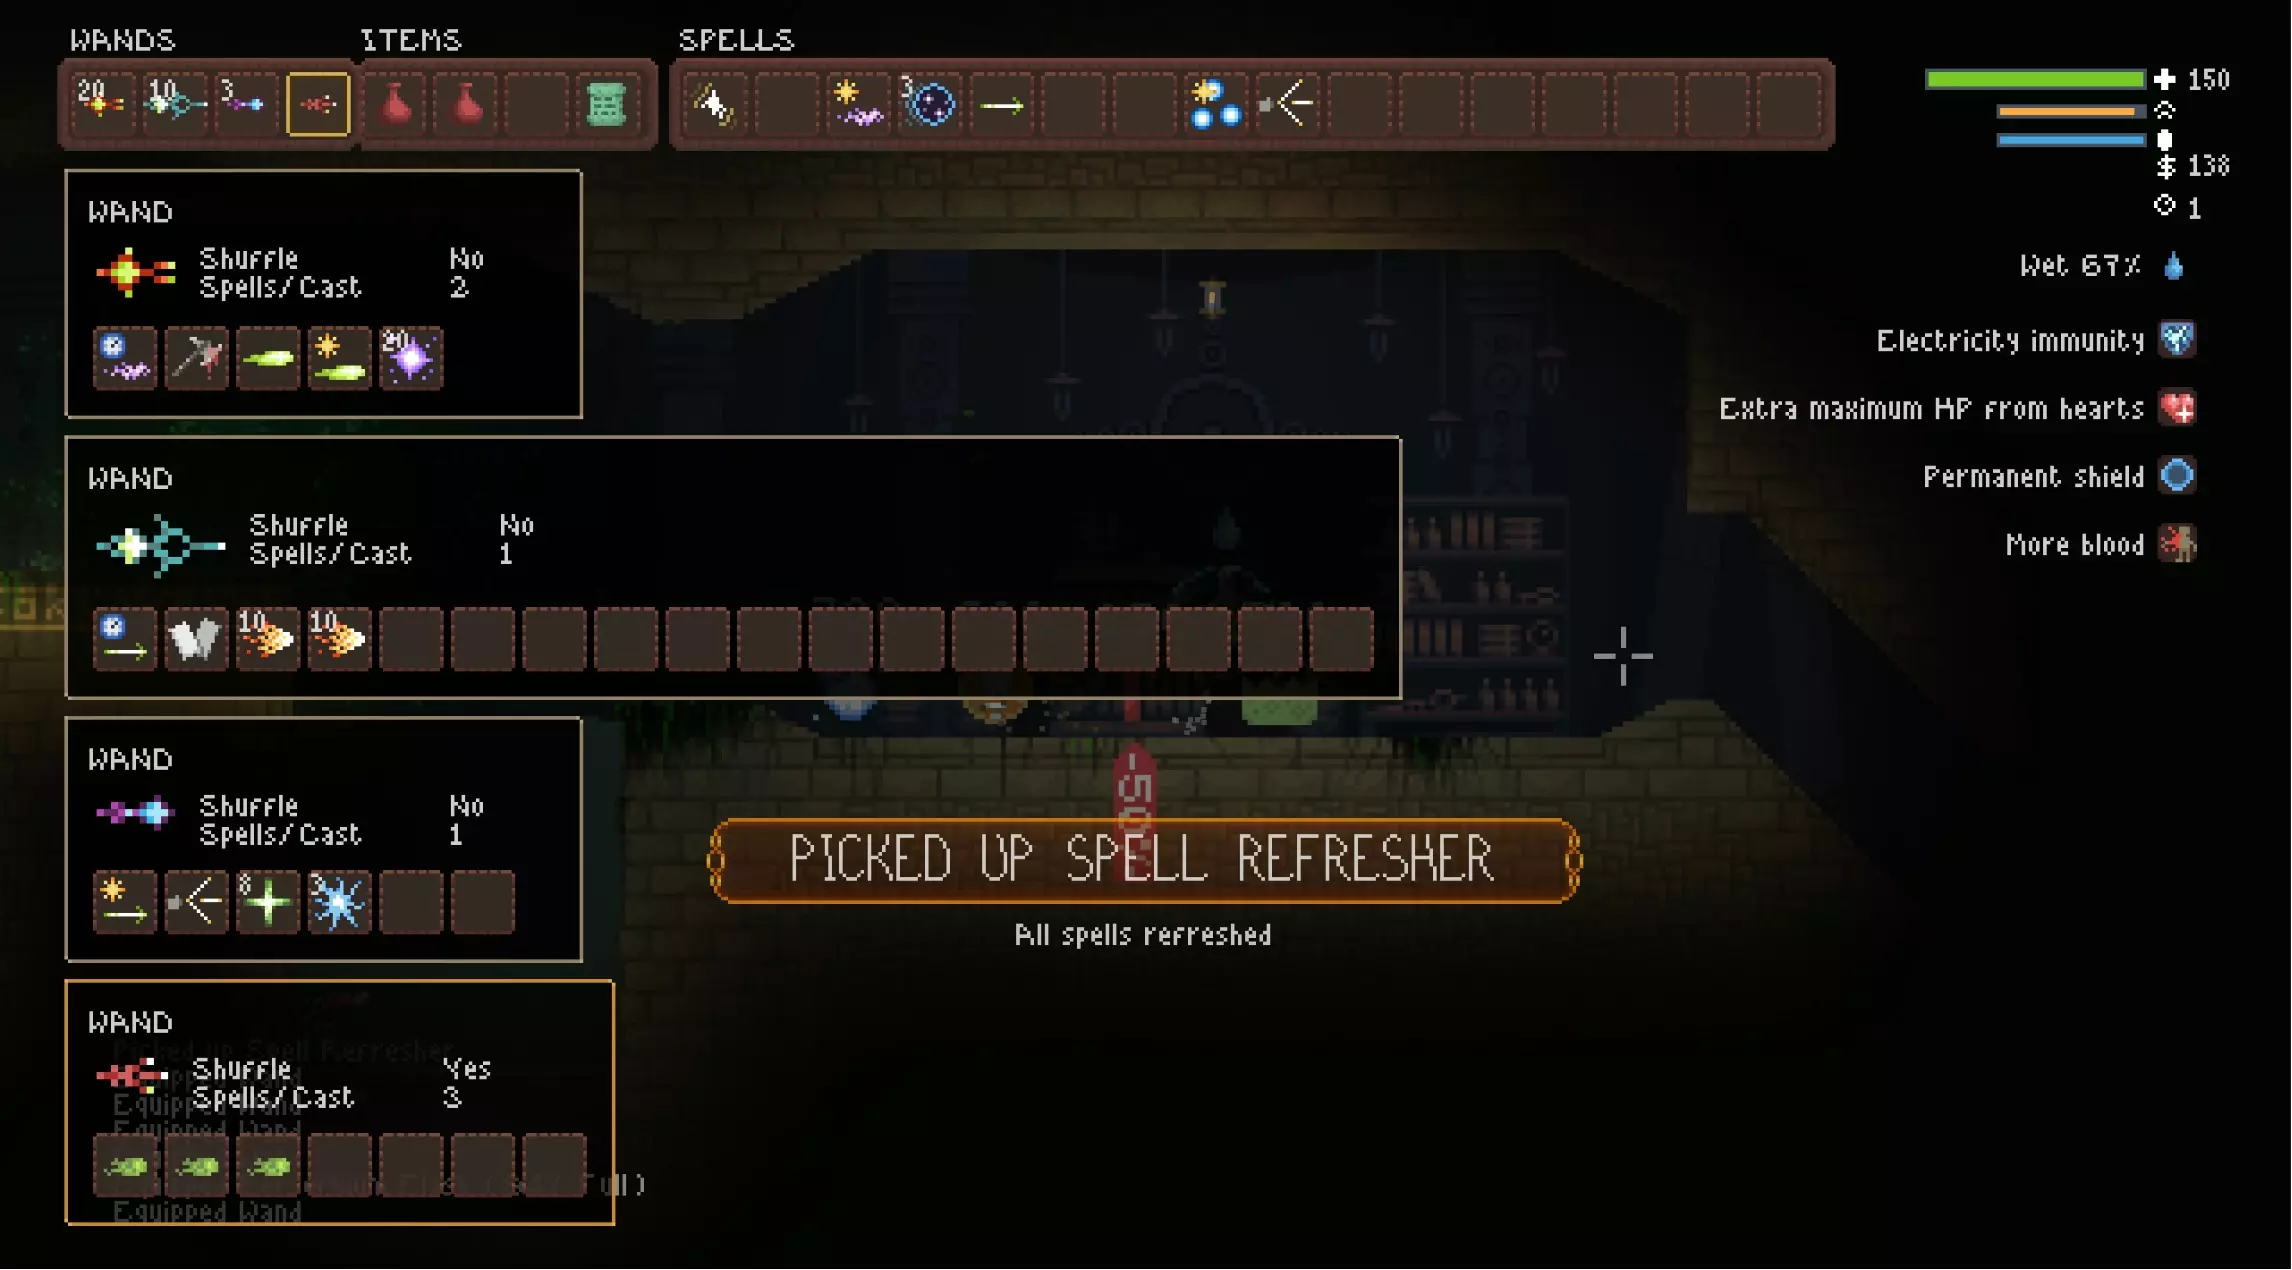
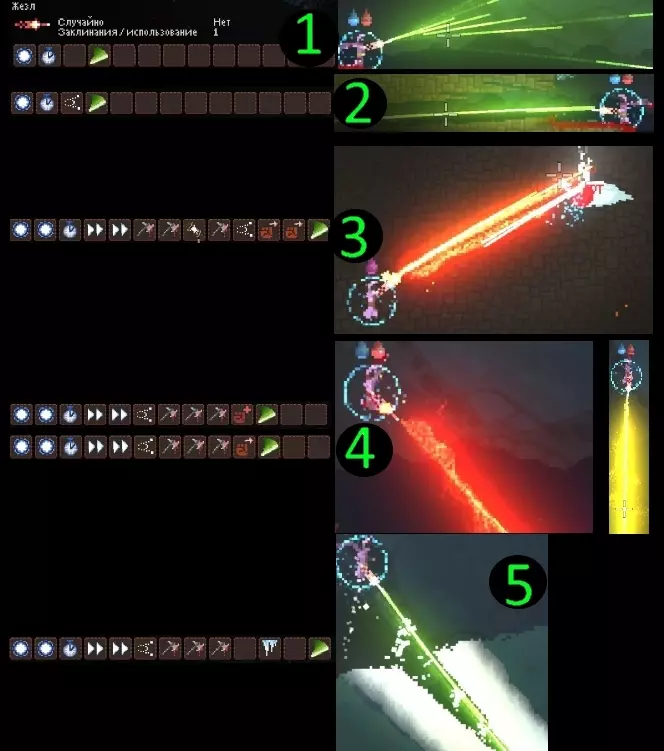
第一根法杖发射两枚投射物。第一枚是定时火花,第二枚是触发式魔法箭。火花会发射带有暴击加成的魔法箭,而第一枚魔法箭击中目标后会释放巨型火焰箭,所有效果协同作用,能在低扩散或低风险的情况下实现极高的每秒伤害。 第二根法杖仅发射一支魔法箭,但在施法约一秒后,会从箭体射出两枚伤害极高的魔法飞弹,可在远处进行精准可控的高额伤害输出。 第三根法杖的效果不太明显,它发射的魔法箭击中目标后,会在接触点生成“千兆死亡十字”(笑),相当于一次200伤害的空袭,其位置由最初的箭体落点决定。第二个法术,也就是那个电气超级球,和千兆死亡十字一样有着极高的法力消耗。因此,这根法杖在接触时只会释放千兆死亡十字,直到耗尽充能,之后接触时才会释放超级电气球。当你无法即时重新排列法杖时,这样能让你高消耗的超级法术发挥最大价值。 第四根法杖只是一根随机组合的法杖,它能三重释放史莱姆球,并且有着不错的射速,以防其他所有法杖都耗尽充能或法力。不过剧透一下,我还没来得及使用这根备用法杖就死了。当你发现火花弹的伤害不足时,【发光长枪】、【大型火球】和【魔法飞弹】是很好的替代品,只是使用时需要更加小心。这些法术更为稀有,法力消耗更高,且使用次数有限。 关于定时螺栓的知识也能与【云雾术】和【圆环术】搭配出有趣的玩法——你可以施展类似云雾和圆环这类作用于自身的法术,却将其当作远程法术来使用。尝试使用定时/触发类法术能带来各种精彩的效果,永远不要停止探索和尝试。