换一换
换一换 


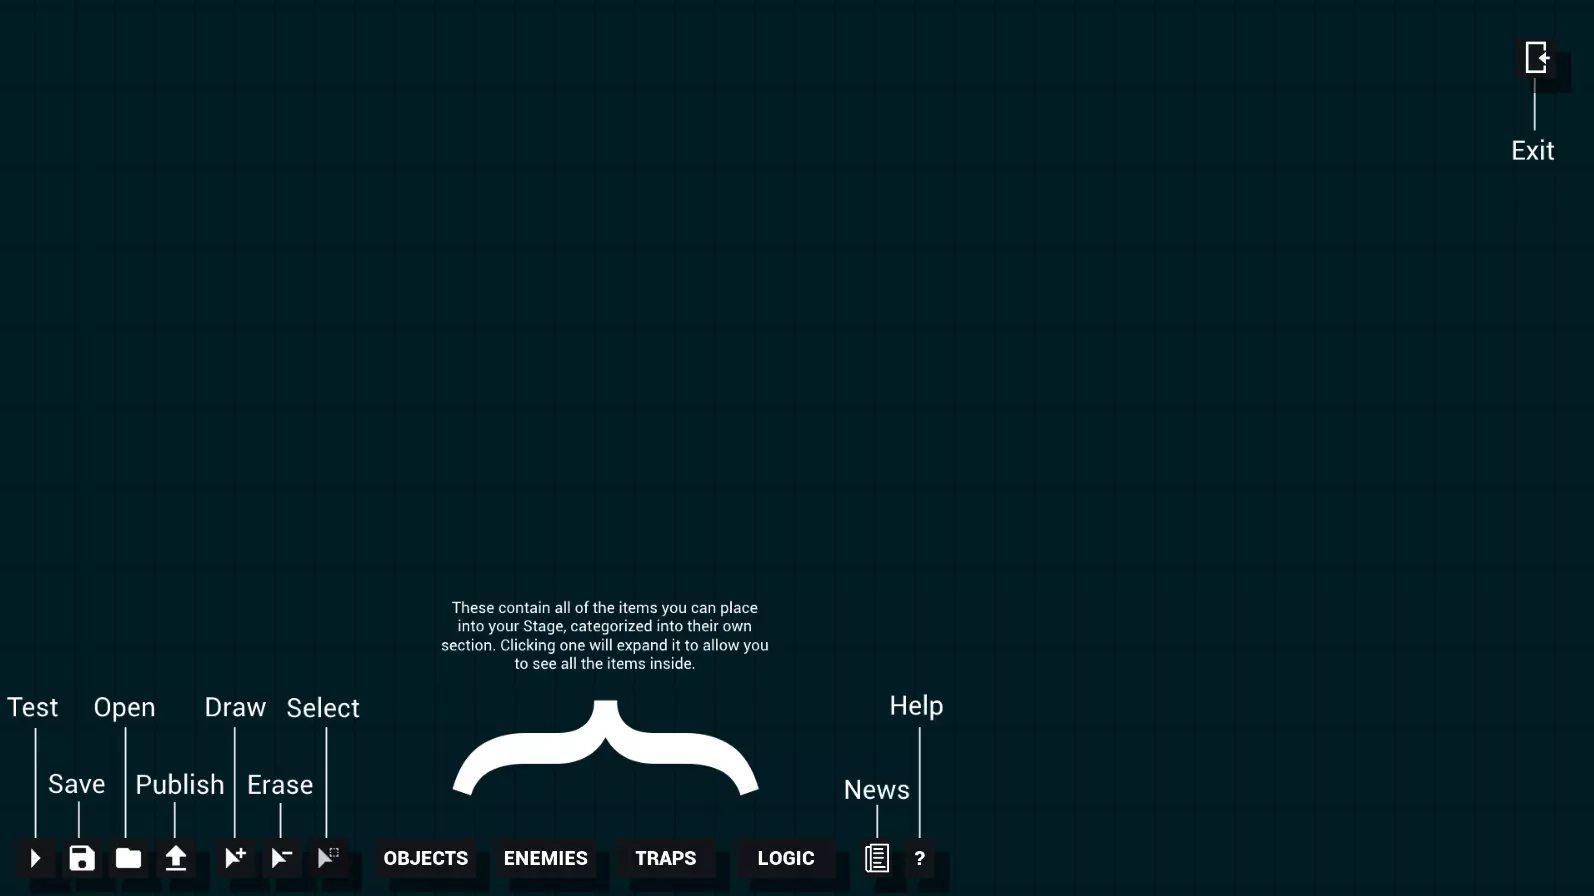
This guide explains basic editor concepts for creating scenarios and how to upload them to multiplayer. Create campaign Create campaign The scenarios must belong to campaigns, which can be made up of one scenario or several. To create a campaign follow the following steps, inside the game, go to: Editor, then click New, fill the sections and check the Create in Multiplayer folder box, click Proceed. For the next steps go to the section below and Create scenario section. Notes -If you want a singleplayer scenario, do not select the Create in Multiplayer folder box. -In the singleplayer scenarios, you will only be able to play as the red player. -For the Hotseat Mode (play two players on the same PC), it is better to do it from multiplayer mode. This way it is not necessary for both players to be together watching what the other player is doing, which makes it impossible to hide units. Because you can create a multiplayer game and then enter in it, to also control the other side, it is advisable to play with another player on the same PC in this way. Create scenario Load campaign To load a campaign you have to go to the Editor, click on the campaign you created and click Select. Create scenario A panel will open to select the campaign scenarios, as you have not created any yet, click <New scenario> and click Select. Next, a panel will appear to choose the map size, we recommend leaving it at 32 tiles in both width and length, click Make new empty map (the Base Terrain Style section can be changed later). 800 points are recommended for small games, 1,2000 for medium and 2,000 for large games. Next to the name of the units, their price appears in parentheses. Basic tips for the scenario editor Using the mouse -Everything is done with left click, the left button. The right button can cause unwanted things such as combining two units into one unit. -To change the elevation of the terrain you must have the Tile placement mode icon selected, hold the CTRL key and left click to raise the terrain, while right clicking lowers it. -To delete units you must have the Unit placement mode icon selected, hold the DEL/SUPR key and click on the desired unit. Basic icons At the bottom left are the icons to exit, save, load and create a new map. Other icons Unit placement mode: by default it is set for side 0 (red player), clicking again changes it to side 1 (blue player). To the right of this icon it indicates which side is selected. Unit textures: change the textures of the unit you have selected in the list. Toogle Deployment mode: determines whether the units used in the scenario can be changed positions. -Two flags with circles: there will be no deployment phase, so both players will not be able to change their formation (change units to other tiles). -Two flags with arrows: the red player will be able to change his formation and then move, the blue player will not be able to change his formation. -One flag with circle and other with arrow: there will be deployment phase, so both players will be able to change their formation (change units to other tiles). Generals: Here the generals for the army are added. To assign a general to a unit you must select the general in the list, then click on the desired unit and click Place General. Up the campaign to multiplayer Enable the scenario 1. In your pc, go to: C: Users (your user name) Documents My Games FieldOfGlory2Medieval MULTIPLAYER 2. Enter in your campaign folder. 3. Open the CAMPAIGN archive (you can do it with a notepad). 4. Delete all the text and paste the following text: NOSKIRMISH TYPE 0 [MissionName] SIDE0 0 SIDE1 1 5. Rename [MissionName] with the name of the scenario you want to play, keeping the square brackets. Example: if the scenario is called MultiplayerBattle, you must write [MultiplayerBattle]. 6. Save the archive. Share the scenario 1. Return to: C: Users (your user name) Documents My Games FieldOfGlory2Medieval MULTIPLAYER 2. Copy your campaign folder and share it with the other player, he must also put it on the same route. Create the multiplayer battle 1. Inside the game, go to Multiplayer, sign with your Slytherin login details, go to My Challenges, New Challenge, in Choose Battle search for the name of your campaign (it will appear in yellow) and below it is the scenario you created, select it, configure the sections how you want (center of the screen) and click Create. 2. The scenario will appear in the My Challenges section (the game will not show it until you move to another section or enter multiplayer again). The other player joins the game He must go to Multiplayer, Accept Challenge, search the scenario, select it and click in Accept Challenge. Change campaign from multiplayer to single player Change folder route 1. In your pc, go to: C: Users (your user name) Documents My Games FieldOfGlory2Medieval MULTIPLAYER 2. Copy your campaign folder. 3. Go to: C: Users (your user name) Documents My Games FieldOfGlory2Medieval CAMPAIGNS 4. Paste it. Start the scenario Inside the game, go to: Battles, Epic Battles, choose your campaing and click in Launch. You will only be able to play as the red player. Change campaign from single player to multiplayer Change folder route 1. In your pc, go to: C: Users (your user name) Documents My Games FieldOfGlory2Medieval CAMPAIGNS 2. Copy your campaign folder. 3. Go to: C: Users (your user name) Documents My Games FieldOfGlory2Medieval MULTIPLAYER 4. Paste it. 5. Enter in your campaign scenario. 6. Open the CAMPAIGN archive (you can do it with a notepad). 7. Delete all the text and paste the following text: NOSKIRMISH TYPE 0 [MissionName] SIDE0 0 SIDE1 1 8. Rename [MissionName] with the name of the scenario you want to play, keeping the square brackets. Example: if the scenario is called MultiplayerBattle, you must write [MultiplayerBattle]. 9. Save the archive.
如何创建场景并上传至多人游戏

2026-02-19 07:00:20

导读
这是《Field of Glory 2 Medieval》的场景创建及多人游戏上传指南,含创建战役、场景的步骤,编辑器操作技巧,还介绍了将战役在单人、多人模式间转换的方法,以及多人场景的上传、对战设置等内容。

评论
共0条评论

使用场景编辑器
如果你是编辑器新手,本指南将帮助你熟悉基础操作及更多高级功能! 开始使用 要创建新地图,请在主菜单中选择【编辑器】按钮。恭喜!你已创建一个空场景。在编辑器中,你…
2026-03-31 04:000赞 · 0评论
《帝国时代3:决定版》成就列表及指南
除非成就描述中另有说明,否则所有成就都可以通过使用作弊码和利用【场景编辑器】获得。 【故事模式】
2026-02-18 16:000赞 · 0评论

Dungeon Full Dive: Game Master Edition-视频介绍
2026-03-04 17:300赞 · 0评论
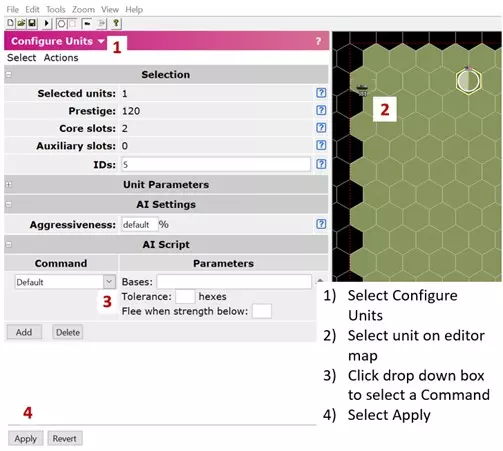
场景编辑器 - AI脚本指令
本指南将帮助使用场景编辑器的玩家更好地理解AI脚本命令。这些命令位于“配置单位”部分的底部,决定AI单位在战斗中的反应方式。 AI脚本命令 默认:因单位类型/职…
2026-02-18 13:000赞 · 0评论
如何使用场景编辑器(基础)
Covers all core editor tools: placing units/objects, configuring teams and objec…
2026-02-15 07:000赞 · 0评论
Unleash-视频介绍
2026-04-21 17:300赞 · 0评论
创建场景
关于如何在创意工坊创建和分享场景的说明与提示 如何进入场景编辑器 要进入场景编辑器,首先启动或加载一个游戏。 在游戏中按F1键打开调试界面,然后点击屏幕右下角的…
2026-04-06 04:000赞 · 0评论
场景编辑器建筑建造入门指南
BCoF社区的共济会成员要求制作一份关于建造各类大小设施的入门指南,以便在更广泛的BCoF社区中传播。这些内容旨在教导有抱负的建筑建造者如何建造他们的作品,并使…
2026-03-20 22:001赞 · 0评论
不会使用概率器?看完本期视频让你成为概率器大拿!
2024-07-16 07:51123赞 · 18评论
暂无更多
最新更新
- Field of Glory II: Medieval-视频介绍
- 派克·基尔斯 — 瑞士长矛方阵和德意志雇佣长矛方阵拥有特殊规则——涉及控制区域以及侧击与背击冲锋。本文将概述这些规则,并提供对抗这些精锐单位的一些基本技巧。主要
- 如何在一回合内击破稳定的单位? — 在本指南/教程中,我将为你讲解如何在1回合内击破(消灭)一个单位。我们将使用常规单位并在1回合内将其击破。我会展示多种方法并解释它们的优势。 如何在1回合内击破…
- 设置跨时代对决 — 如果你想使用阿契美尼德波斯对阵加洛林法兰克人,或是十字军对阵凯撒军团,以下是实现方法
- 地形指南 — 地形指南 在本指南中,我将解释游戏中地形的运作方式及其影响的所有内容。
- 基础教程(视频指南) — 在本指南/教程中,我将为你讲解《荣耀战场2:中世纪》的基础知识。我会介绍游戏目标、达成方式以及部队的操作方法。 基础内容
- 如何创建场景并上传至多人游戏 — This guide explains basic editor concepts for creating scenarios and how to uplo…
- 黑斯廷斯难度4 — 哈斯丁战役深度获胜指南 哈斯丁战役 战斗难度:4 将步行骑士和重装步兵从中路调至右翼,重组中路和右翼的步兵,并将骑兵集中部署在右翼新重组步兵的前方。 让骑兵每回…
- 长枪兵:概述 — 《全面战争:罗马2》中世纪模组中各类长枪兵及长枪相关单位的基本概述 长枪兵概述
- 凝聚力测试 - 你需要知道的一切 — 在本指南中,我将介绍什么是凝聚力测试、何时会触发该测试以及相关的额外细节。我还会分享一些技巧,帮助你利用这些知识更快地击败敌人。 凝聚力测试