换一换
换一换 


你想每2回合建造一台KV128风暴 surge吗?你是否厌倦了乌托邦彻底摧毁你的整个经济?那么别再犹豫了,我将教你如何摧毁乌托邦,并像其他任何派系一样快速让KV128风暴 surge充斥整个地图! 简介 作为一名终极单位爱好者,我玩这款游戏就是为了大量生产终极单位。当我得知因为乌托邦,我无法在战锤40K中用我最喜欢的派系做到这一点时,我彻底疯了。我像个疯子一样愤怒咆哮,猛烈冲击着乌托邦制造的束缚我的枷锁和牢笼。在像个狂躁的疯子一样哭喊了几个月后,我终于做到了!我终于挣脱了乌托邦的枷锁和牢笼,亲手摧毁了它。因为这件事,我变得视野狭隘。如果事情与摧毁乌托邦和让地图布满风暴潮无关,我就一无所知。我不懂如何在PvP中使用钛族,不懂如何正常游玩钛族,也不知道大多数钛族单位的作用或能力。除了如何摧毁乌托邦,我什么都不知道,也不想知道。一想到不仅要复活乌托邦,还要再次忍受它,只为了学习如何正确游玩钛族,我就感到非常非常恶心。 这就是为什么我永远无法制作一份全面的钛族指南。所以如果你想学习正统的钛族玩法,去别处看看吧。本指南非常简短简单,旨在教你如何击败并瓦解乌托邦势力,以便我们能在游戏中大量部署KV128风暴 surge。 本指南适用于标准速度游戏。指南中的所有数据和表格均来自标准速度游戏。 乌托邦及其为何让我如此困扰 《战锤40K:角斗士之战争圣器》中所有经济体的瓶颈在于人口增长速度。这意味着建筑建造时间和每个建筑的成本都无关紧要。构建经济的最佳方式是确保每建造一个建筑都能带来最大收益,从而充分利用每一个人口,因为人口增长速度是经济的瓶颈。 假设每个资源建筑能使收入增加6,同时减少1(维护费用)和1%(人口忠诚度)。每个额外的忠诚度建筑能使收入增加6%,同时减少2(维护费用)和1%(人口忠诚度)。那么何时建造资源建筑更好,何时建造忠诚度建筑更好呢? 为了找到答案,我将常规派系的经济模型转化为一个方程式。
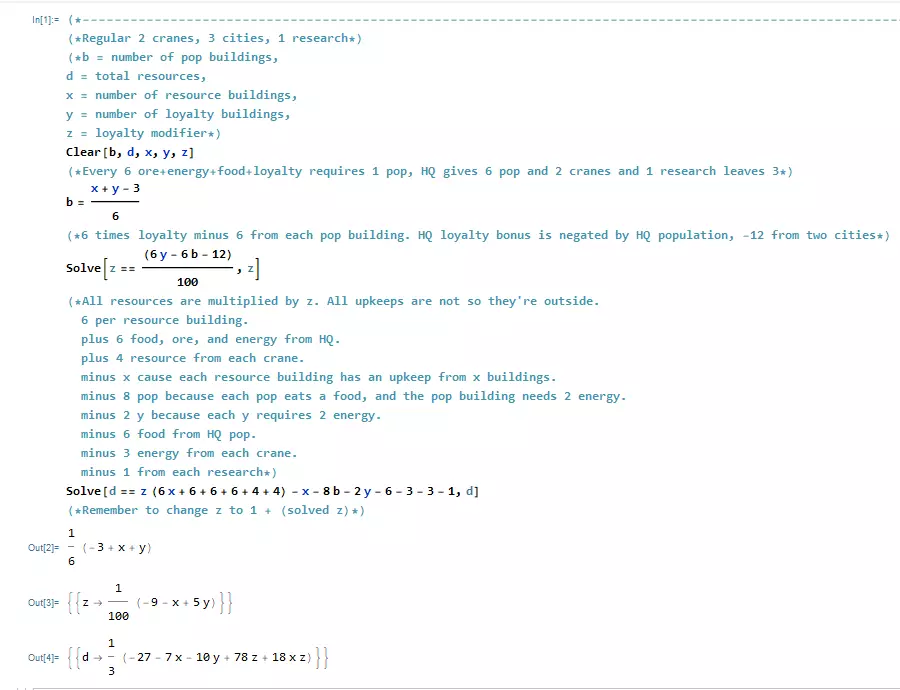
我使用上述公式制作了一个电子表格,突出显示了资源建筑与忠诚度建筑的最佳比例,以实现最理想的经济增长。

我对钛族经济也做了完全相同的处理,包括乌托邦相关内容。
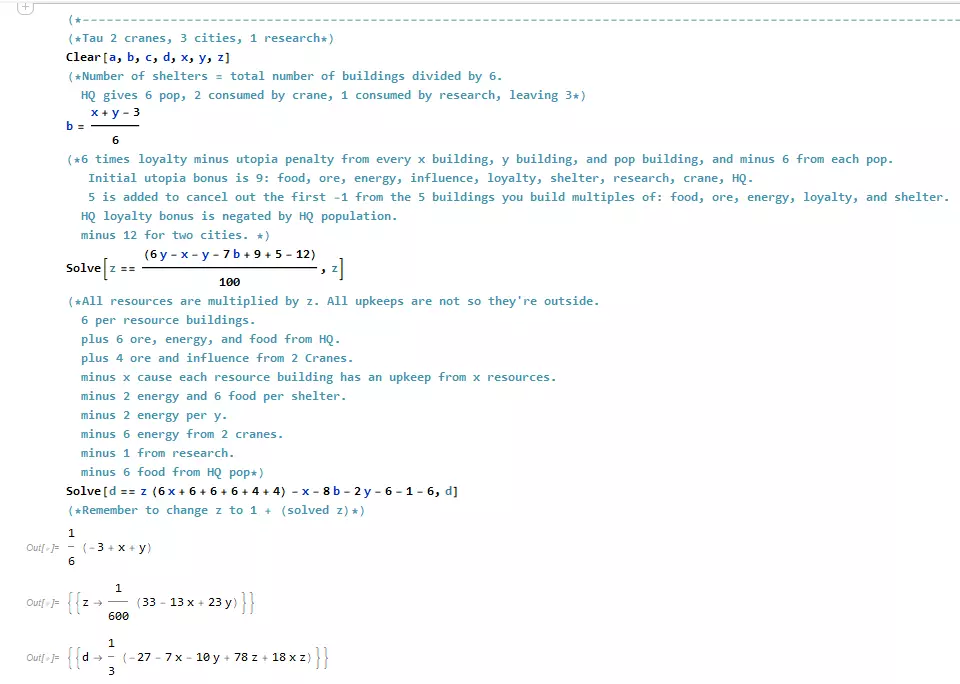

现在对比这两个表格数据,在前10个资源/忠诚度建筑时,乌托邦协议能让钛族经济更具优势。但在超过10个资源/忠诚度建筑后,钛族经济便会彻底下滑。 当建筑数量达到20个时,钛族经济仅为常规经济的76.9%。 当建筑数量达到30个时,钛族经济仅为常规经济的64.3%。 当建筑数量达到40个时,钛族经济仅为常规经济的57.6%。 而且情况会越来越糟。 这是我用3座钛族城市进行直接测试得出的结果。 注:测试特意在草地地形进行,且未使用任何前哨站加成。此外,也未使用任何 cadre fireblades。因此,若在火山地形,结合前哨站加成以及几个 cadre fireblades,数值应该会更高。

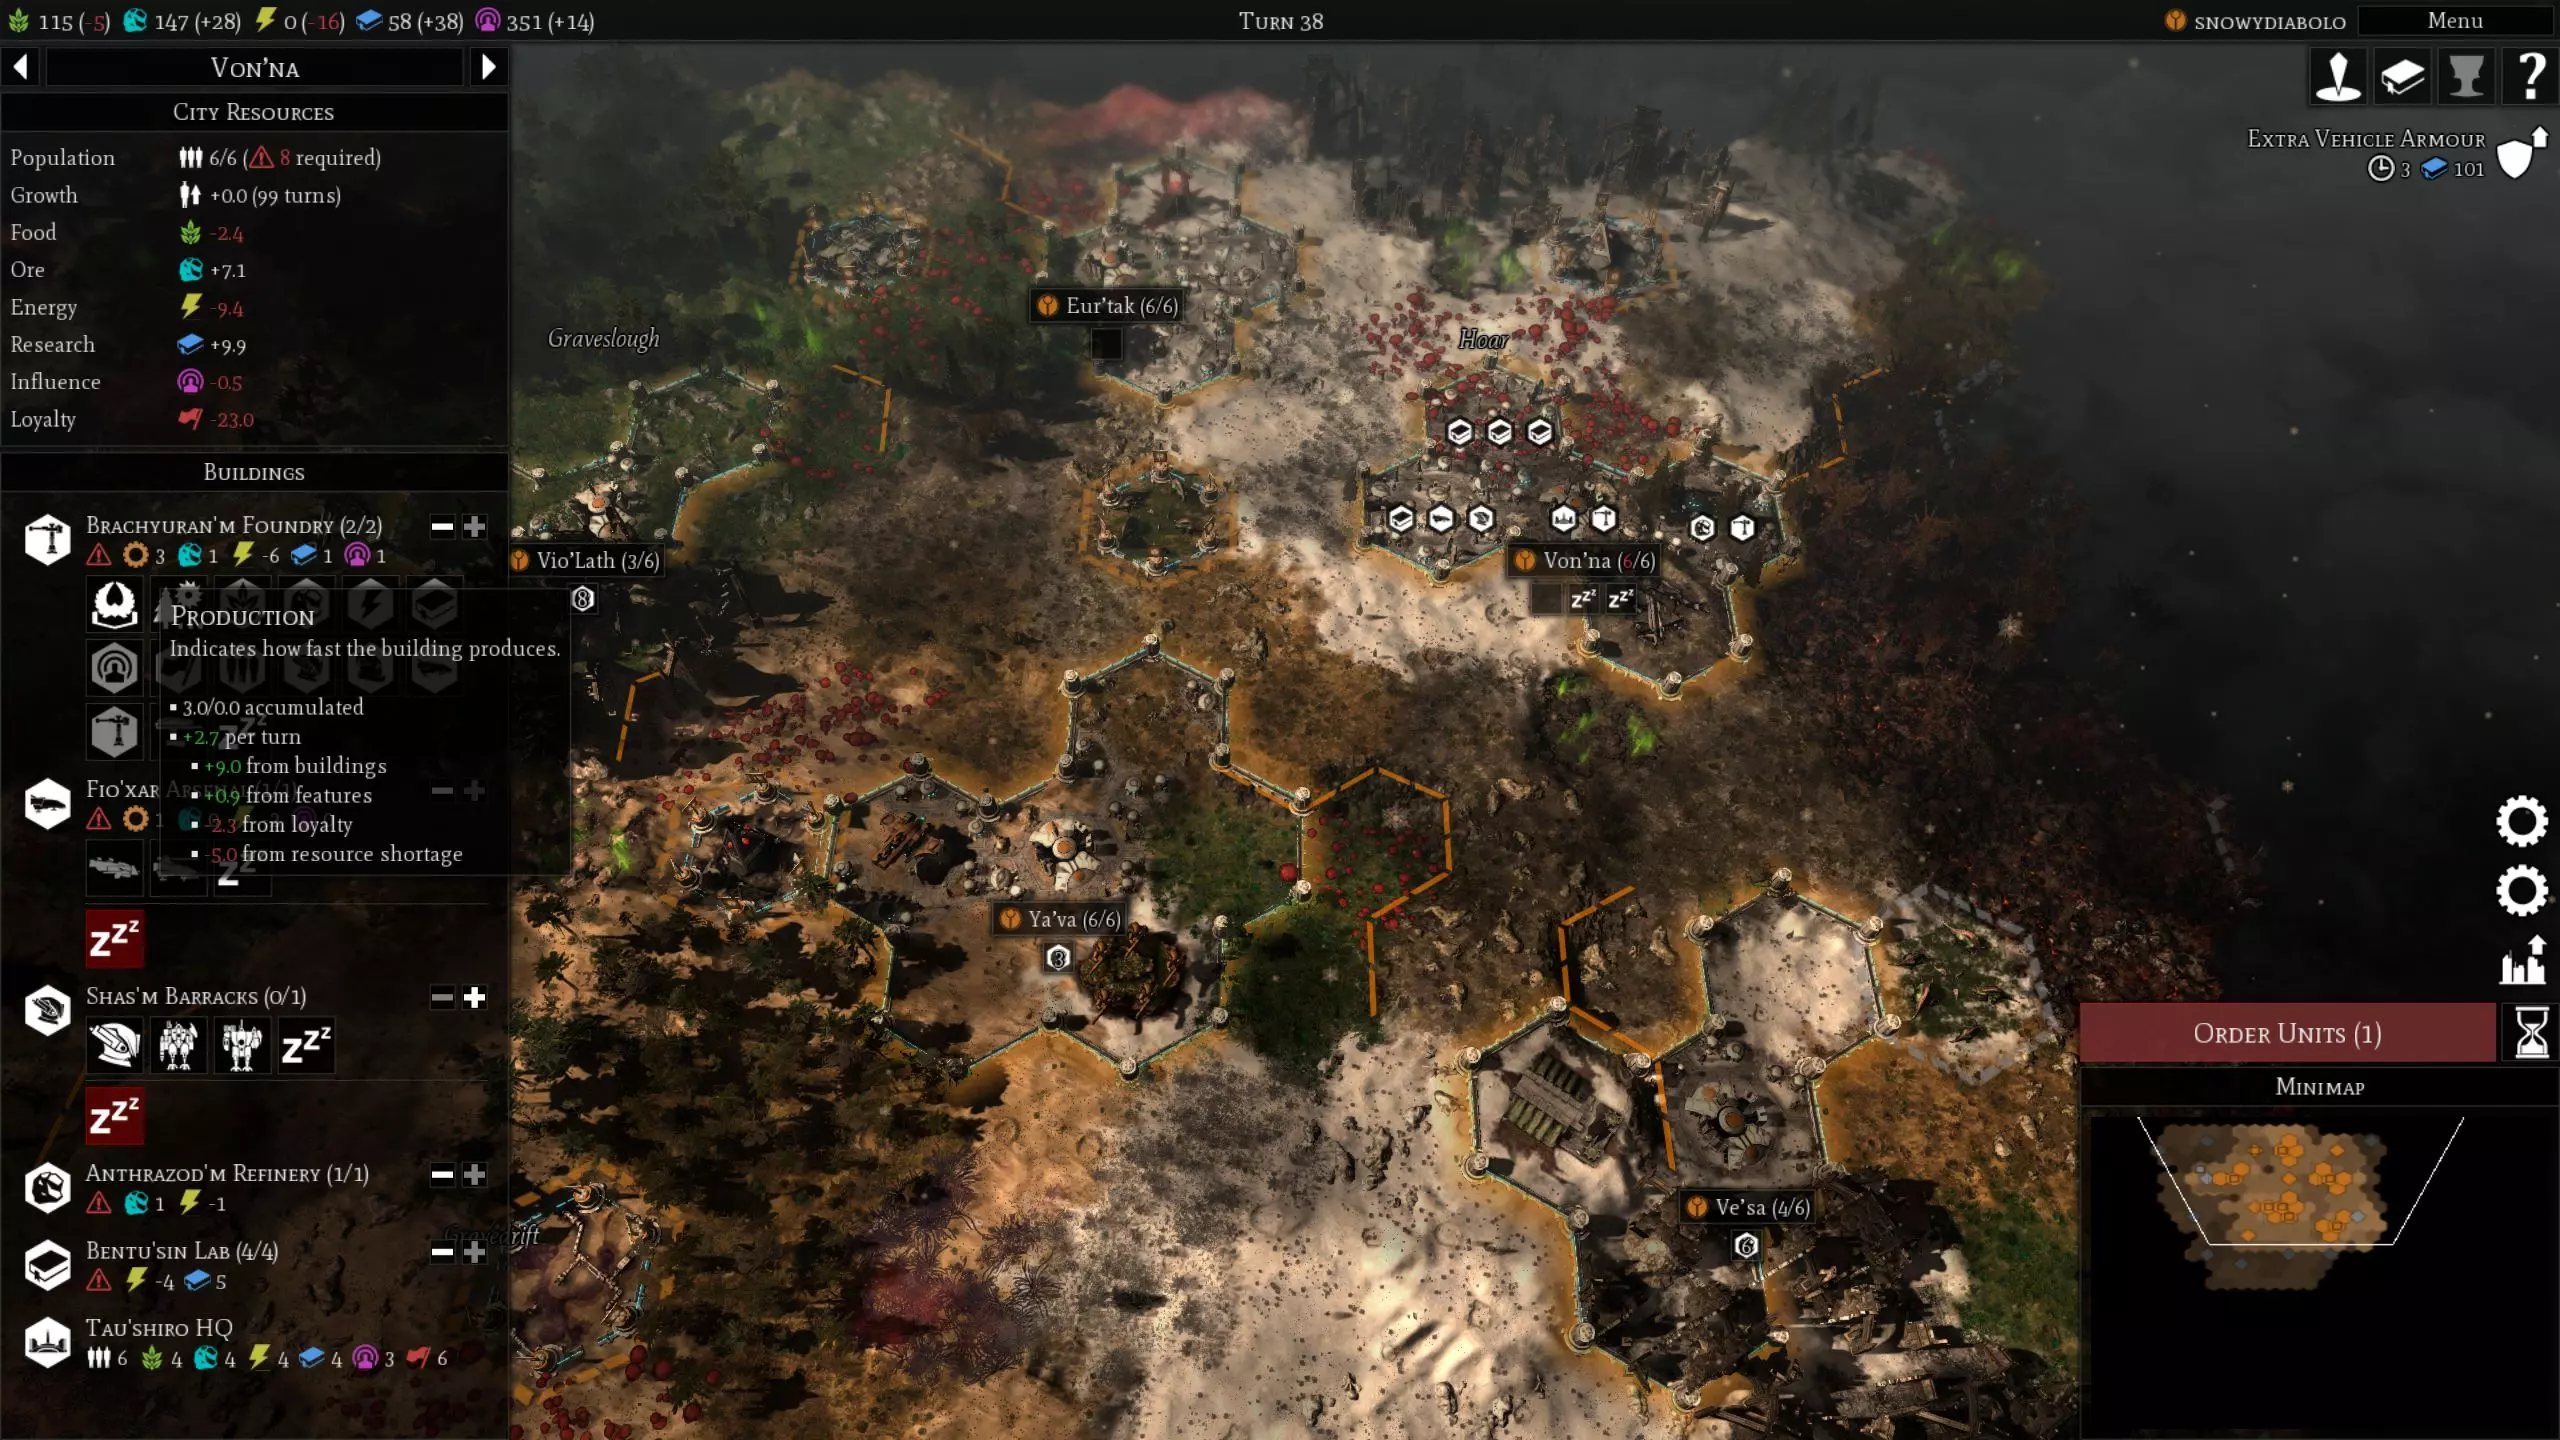
你看到数据了吗?在第100回合,钛族经济以最优方式发展,也只能负担2台幽灵战蟹和4台riptide!这简直太可悲了。 而到了第150回合,这种建造方式最好的情况是每5回合产出1台KV128风暴 surge。 太令人难过了。绝对令人难过。这就是为什么乌托邦让我如此痛苦。乌托邦彻底摧毁了钛族的经济,使其永远无法——我是说永远无法与其他派系竞争。拥有21个资源建筑和19个忠诚建筑的钛族经济,仅相当于常规派系经济的57.6%。因此在中期游戏中,拥有3座城市的钛族将以1:2的数量劣势面对所有派系。 原因我们都清楚。因为每座建筑除了人口忠诚度消耗外,还有额外的忠诚度消耗,所以你需要建造比其他派系多一倍以上的忠诚度建筑才能勉强维持平衡。而且由于忠诚度建筑有着高达2点的能量维护费用,这就迫使你建造双倍数量的能量建筑,这会进一步降低你的忠诚度,忠诚度惩罚的恶性循环会越来越严重,让你永远无法享受到其他派系经济所拥有的二次增长。 解决办法?无视维护费用! 那么乌托邦的解决办法是什么?如何挣脱乌托邦的枷锁和牢笼?如何“消灭”乌托邦?答案就是……无视维护费用。 通常情况下,一个单位的维护资源与其购买资源是相同的。例如,一台XV88阔边战斗服需要消耗40食物、40矿石,并且维持费用为4食物。因此,如果你每回合食物为-100,那么你永远无法购买XV88阔边战斗服,因为你无法积累到40食物。 但钛族可以用影响力购买资源,而且没有任何单位或建筑需要消耗影响力作为维持费用。这意味着即使钛族每回合食物为-100,他们也可以用影响力购买40食物,然后立即购买XV88阔边战斗服,尽管食物处于严重负值!这意味着钛族可以完全忽略食物,只专注积累影响力,然后源源不断地在地图上部署XV88阔边战斗服,因为XV88阔边战斗服不需要消耗影响力作为维持费用。 但这是有代价的。当食物为负时,人口增长速度会减半。由于人口增长速度是经济增长的瓶颈,因此经济增长速度也会随之减半。在这种情况下,再加上乌托邦进一步抑制增长,当拥有40座建筑时,你的经济实力将仅为常规经济的34.7%。 但作为交换,凭借每回合46影响力和5座兵营,即使人口增长为0,你也能每2回合建造一台配备支援系统的XV88阔边战斗服,并且可以无限持续下去。我认为在此时刻,这足以完全弥补那65.3%的差距,因为大多数派系在游戏后期之前都无法负担每2回合建造一个高等级单位的消耗。当你拥有46点影响力和5座兵营时,尽管经济明显较弱,但此时你已经领先于其他派系。 不过,【舷侧炮】无法为你赢得游戏,甚至差得远。你需要的是【KV128风暴 surge】,它使用矿石作为维持费用。想象一下每2回合建造一台【KV128风暴 surge】!所以问题是,你能忽略矿石维持费用吗?经过数月尝试,我发现答案是肯定的! 如果忽略矿石维持费用,你的能量会减半。如果能量减半,就会变成负数。如果能量为负,你的忠诚度、影响力和危机中心都会减半。要实现每2回合建造一台配备3个【战斗服支援系统】的【KV128风暴 surge】,你需要每回合196点影响力和10个减半的危机中心。要达到每回合196影响力,你需要60个减半影响力建筑和60个减半忠诚度建筑。这需要130人口。以你减半的增长速度……这永远不可能实现。 但如果你不忽视能量呢?那样你就需要30个影响力建筑、27个忠诚度建筑和24个减半能量建筑。这需要81人口,仍然太多了。 但后来我意识到,有了这么高的影响力收入,我可以负担多个 cadre fireblades!有没有可能从 cadre fireblades 获得100%的忠诚度?答案是……可以! 通过直接的游戏内测试,要实现每回合196影响力并每2回合建造一个 KV128 Stormsurge,你只需要
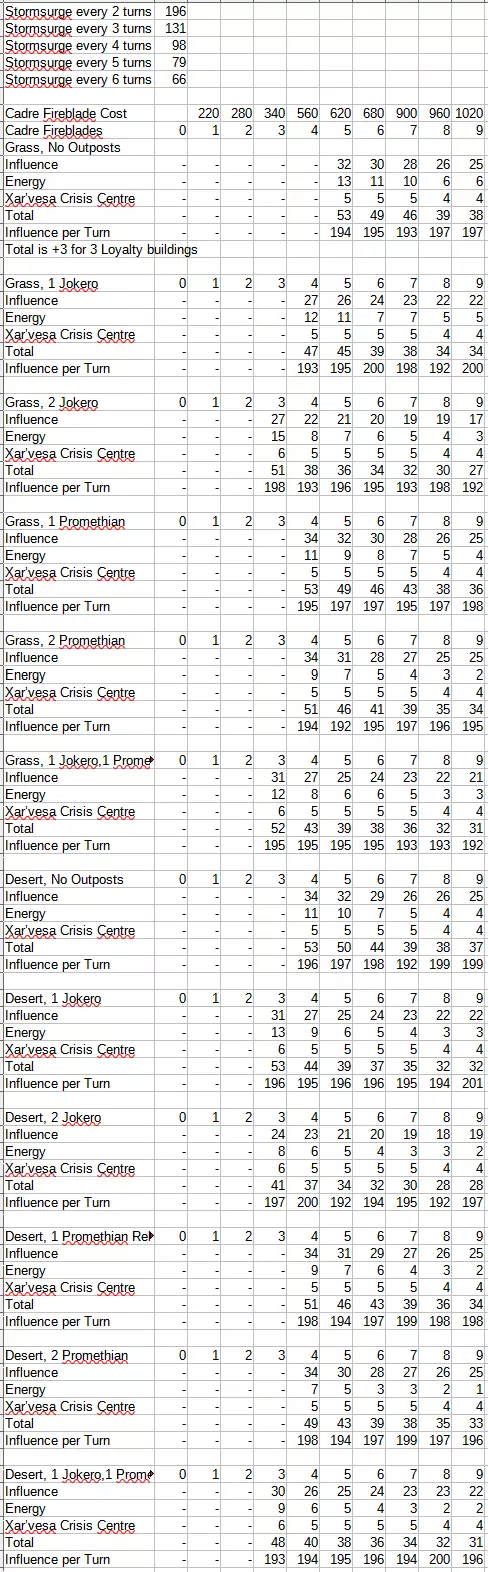
如果你注意到,上面表格中的数值并非恰好是196,有时会略低一些。我认为,如果每40回合需要暂停1回合的生产,那已经足够好了。因此,192影响力就足够了(每49回合暂停一次)。 上面表格中的数字应被视为近似值,而非确凿事实。当我为该表格收集数据时,我尽量将能量收入控制在接近0的水平,但实际上,建造能量建筑和影响力建筑之间并没有实质区别,因为影响力建筑本质上相当于半个能量建筑。80影响力可以购买40能量,所以一个影响力建筑实际上每回合提供3能量,这与半个能量建筑的效果相同。因此,无论你建造刚好能实现每回合0能量收入的能量建筑,还是建造远超所需的能量建筑,结果都没有区别。 这意味着,1个普罗米修斯中继管道本应与1个小丑族营地一样,能同等程度地减少所需建筑数量,但上述表格中的情况并非如此。 现在,如果你认为在沙漠地形上,将能量提升到每回合40,从而获得每回合116影响力,比获得每回合196影响力更好,这种想法有一定道理。虽然你说得对,这样做能最大程度减少所需建筑的总数,但你也需要注意,这会使你失去积攒资源购买 cadre fireblades 的能力。在你派出4-6个 cadre fireblades 后,每回合将只能获得116影响力。在此之前,你每回合会获得大约60-70影响力。要攒够建造一个的资源,需要大约10回合不进行生产,所以虽然每回合获得10-20能量是个好主意,但追求每回合40能量就不太合适了。 因此在实际游戏中,所有情况下你需要的建筑数量都应该低于上述表格中的数值,这也是为什么我说要将其视为一个近似值。 收集数据时,我在乔克罗城市和非乔克罗城市之间平均分配了影响力建筑,并使用了所需的最少数量的地块和庇护所。 我不会选择建筑数量低于40(16+12+12)的方案,因为当你有能力建造大量 cadre fireblades 时,第二和第三座城市应该已经各有12座建筑了。第一个城市选择16(而非18),因为我希望第一个城市保持两个蟹型铸造厂在线,以建造大量建造者无人机来修复我的KV128风暴 surge。而且我不会将建筑数量超过52,因为那样耗时太长。 如果你按照本指南操作,只需3个城市,每个城市仅配备1-2个避难所,就足以每2回合稳定建造一架KV128风暴 surge。所以如果你不喜欢在游戏后期管理大型城市,这个建造方案非常适合你! 我最多建造6个 cadre fireblades。建造第6个 cadre fireblades 需要暂停生产2回合来收集足够的矿石和食物,而建造第7个则需要3回合,在我看来这不值得。第7到9级的条目只是为了说明升到6级以上其实并不值得。需要注意的是,每2回合生产1台KV128风暴 surge是理论上的全球最大生产速度,因为每回合最多只能购买40单位矿石。所以,不可能以快于每2回合1台的速度建造KV128风暴 surge,也无法用其他单位来补充生产,因为所有钛族单位都需要矿石。在我目前最好的1v1最高难度游戏中,最早在第110回合达到每2回合生产1台KV128风暴 surge。当时我已经建造了所有建筑,造好了3名 cadre fireblade,还有2名 cadre fireblade在建造队列中,并且有5台KV128风暴 surge和13台阔剑机甲防御我的城市。我会说,在第130回合左右,平均每2回合就能触发1次风暴潮,此时我拥有7个风暴潮和12-15个舷炮。 早期战争建造顺序(第一部分) 城市布局

As you only need 7-8 tiles from each city, you have the luxury of placing the Tau cities at the literal corner of the map and as close together as possible. Use the above diagram to help you place your 1st city away enough from the edges for your two other future cities. Outpost Priority 1. 1st city Ruins of Vaul 2. 3rd city Jokero Encampment (so if there's only 1 Jokero encampment, give it to your 3rd city instead of 1st.) 3. 1st city Jokero Encampment (you need 2 Jokero Encampments and no Ruins of Vaul for this to take effect) 4. 2nd city Promethium Relay Pipes 5. 1st city Promethium Relay Pipes In my opinion, Snow Terrain is the best Terrain for this build followed closely by Desert Terrain. Volcanic Terrain is 3rd place as you do struggle with ore quite a bit, and Grass Terrain is the worst. This build order prioritizes getting your first XV8 Crisis Battlesuit out as early as possible and maximizing your infantry production speed over everything else which is why the 2nd and 3rd cities are delayed in favor of earlier barracks. If you wish to prioritize getting your 2nd and 3rd cities up first then check the Tech Rush section. This build order is ideal for players who want to war all game instead of hiding in a corner and rushing to endgame units. For example, players who want to 1v1 Ultra Hard AI on default settings (tiny map, medium settings for everything), players who want a free for all with lots of AI on a cramped map, etc. For players who want to play against impossible AI, see the Tech Rush section. 1st City - Grass, no outposts 1. Research 2. Influence 3. Ore 4. Barracks (turn off until XV8 Crisis Battlesuit is researched) 5. Barracks (turn off as needed to stay above 0 energy) 6. Builder Drone 7. Builder Drone (Queue together with 6) 8. Brachyuran'm Foundry 9. Barracks 10. Loyalty 11. Shelter 12. Energy 13. Barracks 14. Energy 15. Barracks 16. Energy 17. Shelter 18. Influence 19. Xar'vesa Crisis Centre (Turn off immediately) 20. Influence 21. Xar'vesa Crisis Centre (Turn off immediately) 24. Xar'vesa Crisis Centre (Turn off immediately) 23. Shan'ar'tol Stasis 22. 4 Influence 26. 2 Xar'vesa Crisis Centres ***Do not be underpopulated by more than 3 pops. If you are then build builder drones and Xar'vesa Crisis Centres to wait for pop to catch up. I like building a builder drones after step 12 to heal my units and clear tiles. 2nd City - Energy city 1. Energy 2. Research 3. Ore 4. Influence 5. Shelter 6. Loyalty 7. 1 Energy 8. Shelter 9+. Energy 3rd City - Influence city 1. Research 2. Energy 3. Ore 4. Influence 5. Shelter 6. Loyalty 7. 1 Influence 8. Shelter 9+. Influence ***It's important that you follow the 2nd and 3rd city build orders exactly to avoid any stalls in XV88 Broadside Battlesuit production. If you deviate from this you will find that you have too much ore and not enough influence, or too much influence and not enough energy, etc. Research **1:Wisdom Shared 1:Fio'xar Arsenal 2:MV1 Gun Drones 2:Many Mouths 3:Builder Drones (Wisdom Shared) 3:Ta'aun Totem (Wisdom Shared) 4:XV8 Crisis Battlesuit 4:Brachyuran'm Foundry 5:Extra Infantry Armor 5:Xar'vesa Crisis Centre 6:XV25 Stealth Battlesuits 2:Tio'ur'm Pods 6:Seeker Missile 7:Equal Under the Sky 7:Vectored Retro-Thrusters 8:XV88 Broadside Battlesuits 8:Stimulant Injector 9:Anthrazod Foundations 9:Flechette Discharger (Filler tech. Does nothing. Other techs clutter up my menu) 10:In Diversity, Unity **1:Shan'ar'tol Stasis ***3:A Shield For All 10:KV128 Stormsurge 10:Shield Generator 8:Blast Phasing 6:Brachyuran Assembles 4:Mor'tonium Accelerators 8:Hammer of Wrath 7:Blacksun Filter 5:Proselytise 1:Bonding Knife Ritual **If you're on Snow Terrain or next to a Ruins of Vaul, skip Wisdom Shared and get Shan'ar'tol Stasis instead. ***Depending on the game, sometimes you're short of ore while swimming in influence. If that's the case then research A Shield for All after XV88 Broadside Battlesuits. I like to keep my 2nd city building only energy because I have severe energy problems at the start, energy buildings are far more efficient than influence buildings while I'm at positive ore income, halved energy buildings are just as efficient as influence buildings so it doesn't really make a difference which one I build, and I can't really tell how much +energy I need to stay above 0 after my ore income hits negative. I do switch my 2nd city to influence if I feel like my energy income will exceed +20 per turn after ore income hits negative. See previous section on why it's not a good idea to get +40 energy per turn. Before ore upkeep hits negative, acquire all tiles. 10 tiles in 1st city, 7 tiles in 2nd and 3rd cities. Less if you have favorable terrain. More if you have lots of rocks next to your cities. Once you are at negative ore income, store all your ore by queuing up buildings and tile acquisitions and cancelling them as necessary. For example, after buying 40 ore, buy a building and queue up 2 tile acquisitions. Do this again. And after you buy your 3rd batch of ore, cancel all 4 tile acquisitions and buy 2 buildings. Build some builder drones to heal your infantry. Don't bring them to the front. Have wounded infantry retreat because builder drones drop like flies. Use Proselytise to fill up your city pops at the end Once you research KV128 Stormsurges shutdown all 5 barracks, turn on all your Xar'vesa Crisis Centres, and start buying ore with your influence to pay for your KV128 Stormsurges. You shouldn't have to buy energy for a while as you should have stockpiled a lot of energy by this point from your 2nd city. You will no longer be producing anymore broadsides from here on out. Changing from Broadsides to Stormsurges completely changes your gameplay. After about 4-5 Stormsurges you can no longer grow both your economy and your military at the same time. You have to choose either to stall Stormsurge production to produce Cadre Fireblades and buildings or stall them to produce Stormsurges. You should always have 3 Cadre Fireblades either built or queued up by the time your KV128 Stormsurges start rolling out. The first 3 Cadre Fireblades are mega cheap when you have a positive ore income so get them built/queued up before your ore income takes a nosedive. It only takes 98 influence per turn to produce a Stormsurge every 4 turns complete with battlesuit support systems, 58 if you have a large stockpile of energy, or 77 to produce a Stormsurge every 3 turns with a large stockpile of energy, so I recommend fully stopping your economic growth here to build 7-8 Stormsurges first before going back to growing your economy to 196 influence per turn. When paying for Cadre Fireblades, save excess food via queuing up Fire Warriors. 1. Buy Cadre Fire Blade 1, Queue Fire Warrior 1 2. Buy Cadre Fireblade 2 3. Cancel Fire Warrior 1, buy Cadre Fireblade 3 4. Buy Cadre Fireblade 4, Queue Fire Warrior 2 5. Buy Cadre Fireblade 5 6. Cancel Fire Warrior 2, buy Cadre Fireblade 3 If you're building infantry at this time, then you're going to have to juggle the Fire Warriors by cancelling them, queuing up the infantry, and then queuing up the Fire Warrior behind it. If it wasn't obvious already, to buy a KV128 Stormsurge with influence 1. Queue up a Ghostkeel 2. Next turn cancel the Ghostkeel and build a KV128 Stormsurge. Early War Build Order part 2 The best battlesuit support systems on your KV128 Stormsurges are Stimulant Injector, Shield Generator, and Vectored Retro-Thrusters. The reason is because the defensive support systems virtually halve all damage inflicted on the Stormsurge while the offensive support systems do not give a noticeable difference in damage. It won't let the KV128 Stormsurge one shot what usually requires 2 shots to kill, nor will it allow the KV128 Stormsurge to 2 shot what usually requires 3 shots to kill. So there's no point in giving the Stormsurge +1 accuracy, so instead we give the KV128 Stormsurge increased movement because that actually makes a difference. If you follow my build, this will be your army.
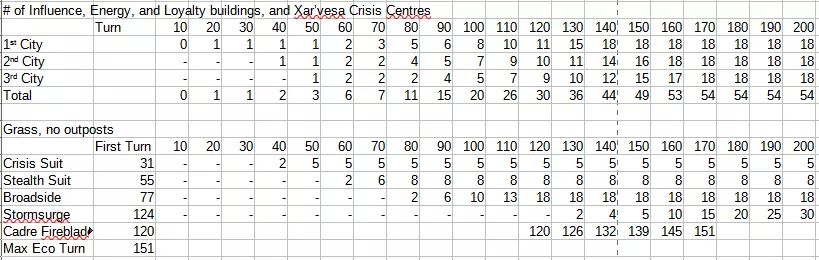
上述表格存在一定的不准确性,因为数据是在空世界中收集的。因此,我直到第120回合才能建造任何【Cadre Fireblades】,因为它们在6级时才会解锁。此外,我优先建造建筑而非单位,是为了让你了解如果不间断建造,每个回合总共能拥有多少建筑。 在实际游戏中,我会建造12-15个【Broadsides】,数量刚好足够用位于城市 tiles 上的【Broadsides】完全包围我的城市。然后,我会将剩余的影响力用于建造【Cadre Fireblades】,直到研发出【Stormsurges】,通常会建造3个。之后,我会暂停建筑生产,全力生产【Stormsurge】,直到拥有7个。接着,我会暂停【Stormsurge】的生产,以将经济提升到每回合196影响力。因此,表格显示你在第151回合时每回合获得196影响力,但实际上,由于干部火焰刃出现得早得多,我平均在第130回合左右就能达到这一数值。 我最初也收集了许多其他地形和前哨站的数据,但最终发现结果都一样。它们都不会影响我的单位数量,所以我没有在这里包含这些数据。无论我使用什么地形,拥有什么前哨站,我的单位数量都完全不受影响。唯一的变化是我能多早达到196影响力,以及多早能转而生产XV88阔边战斗服和KV128风暴 surge。 雪地和瓦尔遗迹决定了你能多早开始生产XV88阔边战斗服和KV128风暴 surge。有关时间安排,请参见科技速攀部分。此外,科技速攻流的总建筑数量应略高于上述表格,因为你会更早建造2座城市。 小丑族营地、沙漠地形和普罗米修斯中继管道决定了你能以最快第几回合达到最大风暴潮产量。在我进行的一场1v1不可能难度游戏中,在沙漠地形上,拥有1个小丑族营地和1个普罗米修斯中继管道的情况下,我在第110回合就达到了每2回合生产1架KV128风暴潮的速度,当时只拥有5名 cadre fireblades,同时已建造了5架KV128风暴潮和13架XV88阔剑。因此,上述表格中的151回合再次说明,该数据是在空荡世界中收集的。科技速攻流派 在面对不可能难度的AI时,我发现XV8危机战斗服和XV25隐形战斗服基本没用,因为它们太脆弱且伤害不足。所以我制作了这个表格

By "Tech Rush" I mean completely abandoning your military and spending 100% of your influence on Wisdom Shared. Even after researching XV88 Broadside Battlesuits I just continued to spam Wisdom Shared all the way to KV128 Stormsurge in the above table. In a real game I would stop at XV88 Broadside Battlesuits. As you can see you can get XV88 Broadside Tech researched within an acceptable amount of time if you spam Wisdom Shared. So my suggestion is against Impossible AI is to just rush XV88 Broadside Battlesuits and spam only it until KV128 Stormsurge. Against Ultra-Hard AI the XV8 Crisis Battlesuits and XV25 Stealth Suits perform just fine. I'd advise against building more than 1 research building in each city. When I built 2 on Grass, No Outpost, it only made me reach XV88 Broadsides 3 turns earlier at the cost of an entire Barracks. I'd rather have 3 Barracks up than 2 Barracks and a 2nd Research when I unlock XV88 Broadsides. The tech rush build is basically the same as the above section's build order except you build 2 builder drones before any of your barracks and you build a research and influence building in all 3 cities before you build anything else 1st City 1. Research 2. Influence 3. Ore 4. Builder Drone 5. Builder Drone 6. Brachyuran'm Foundry 7. Shelter 8. Builder Drone (to clear tiles for my Broadsides in preparation for the AI siege) 9. Barracks 10. Barracks 11. Barracks 12. Loyalty And from here on out it's the same as the previous build order. Energy is the next building. 2nd & 3rd Cities 1. Research 2. Influence 3. Energy 4. Ore And from here on out it's the same as the previous build order. Specifically against 1v1 Impossible AI on a tiny map, with this build, you have to have both very high wildlife density to delay the AI as much as possible and very high wire weed density to prevent the AI from fully surrounding and focus firing excessively on your Broadsides. Infantry is really bad against Impossible AI because since you're so outnumbered and out teched you need tanky vehicles to hold the line and unload their firepower. Infantry can't do that because they're not as tanky and after a hit their damage output takes a massive nosedive requiring you to have a critical mass of infantry so you can cycle them around after they take a hit. If you only have a handful of Broadsides the AI will kill a broadside every turn via excessive focus fire even while said Broadside is under a city tile, preventing you from amassing more broadsides while under siege so you really need very high wildlife density to get as many Broadsides as possible before making contact with the Impossible AI and very high wire weed density to prevent the AI from excessively focus firing on your Broadsides. I make my 3 cities at a literal corner of the map in a perfect triangle and I acquire tiles in a way so that the entire perimeter of my 3 cities is not only a city tile, but also a completely straight line and then place a broadside on each and every one of them. 12-15 broadsides usually do the trick. I then stall my economy to acquire about 7-8 Stormsurges a.s.a.p. and replace the frontline broadsides with them. Cycling the damaged Stormsurges out with freshly healed ones with 3 builder drones doing the healing is more than enough to defeat the entire Impossible AI stockpiled army. I've pretty much won the game at this point. The Impossible AI is literally incapable of penetrating my defenses at this point. Afterwards I then focus solely on my economy to achieve 1 Stormsurge every 2 turns. After I achieve that I finally then go on the offensive while stalling my Stormsurge production a turn every 6 turns to continuously build builder drones and slowly grind my way to the AI cities (usually about 7 cities) and achieve victory. I think 8 builder drones is a good number to stop at. Compared to other factions, in my personal experience, I have a much easier time against Ultra-Hard AI than other factions because the early crisis suit and stealth suit army does absolute wonders to the point I welcome an early war as Tau, but against Impossible AI, the crisis suit and stealth suit army fails me really, really badly forcing me to skip to Broadsides, and since I can't just tech rush ultimate units like other factions, I have a much, much harder time against Impossible AI with this build than other factions to the point I have to increase wire weed density to very high. My average win turn against 1v1 impossible as Admech is turn 120 where as with Tau its 160. But I don't care. Tau is my favorite Warhammer 40k faction so I will play Tau even if Utopia makes me cry my eyes out every single day!