换一换
换一换 


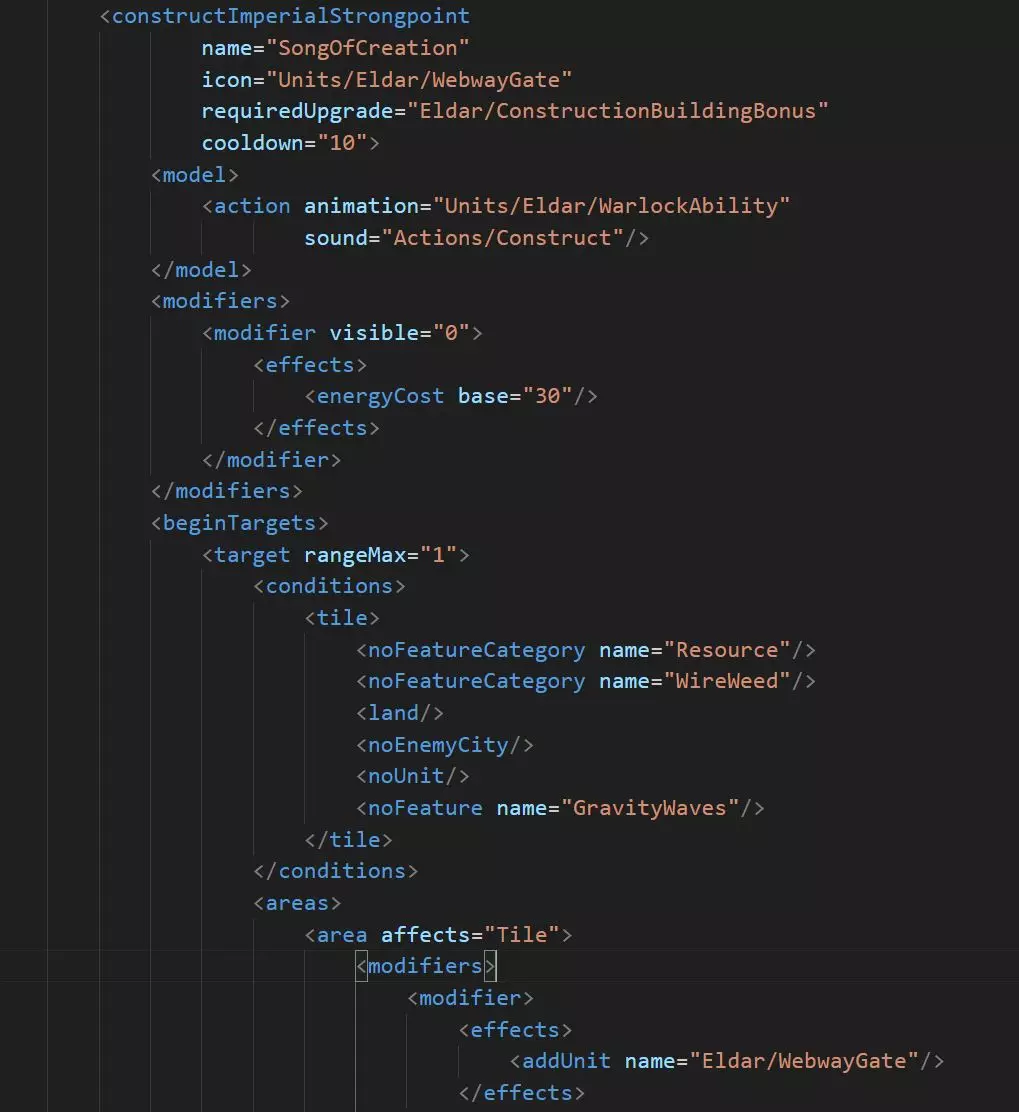
This guide is intended to help complete novices learn to build their own units in Gladius. I'm hoping to make your life a little easier by sharing the pitfalls and successes I encountered when learning to build a mod. If I can do it, you can too! Introduction When I started making my Gearheads Mod, I knew next to nothing about modding this game, except some basic familiarity with the file structure from modding the City Names, Unit Names, etc. Thanks to the generosity of the community, most especially Devian, I was able to cobble together a fairly adventurous mod which used a lot of tricks and techniques to make new units for each faction. I’m hoping I can share my experience and perhaps make modding more approachable. There are already basic guides on how to create new units, and I suggest you include those in your reading. If you’re trying to learn the basics of modding like I am, maybe you can learn from my mistakes and successes. To best use this guide, I recommend you subscribe to my Gearheads Mod and look at the files and units I've created while reading along. Yes, that’s shameless self-promotion, but it will really help! This guide does not include creating and importing new meshes, which is quite possible but involves a completely different skill set! Getting Started Source FoldersYou will be working out of the Data folders to both find your material and build your mod. The Steam source files will be in this folder: … steamapps common Warhammer 40000 Gladius - Relics of War Data…. And the Data directory for your mod will be in this folder in your operating system drive: C: Users the_w OneDrive Documents Proxy Studios Gladius Mods Doc's Gearheads Data… Mods you’ve subscribed to (including your own) will be in … steamapps workshop content XXXXXX YYYYYYY… The XXXX’s represent the Steam ID of the game (Gladius for me is 489630), followed by the YYYYY’s, which are the Steam IDs of the various mods you have installed. Naturally, this can be confusing! You really only need this location if you’re using other people’s mods as examples for your work. So I needed it a lot…thanks again, Devian. Recommended Programs The only program you really need to download is Paint.net so you can work on icons. For ProgrammingFor working on the .xml, I did about 60% of this mod in Notepad, but switched to Visual Studio Code (a freebie from Microsoft) eventually which provided a little better environment for comparing files and for block commenting. I wouldn’t start with that, though, because the sheer simplicity of Notepad actually makes it more friendly to beginners (in my opinion.) Icon CreationA more sophisticated paint program can be handy for icon work. The GIMP is free and emulates Photoshop well, but you’ll need to use it a while before it becomes intuitive. Organizing for Success FoldersHaving a good organizational structure will save you time and heartbreak. Many of the files will have the same names (including my tinkering files, I have a half dozen named OilSquig), and many will even have the same file type (OilSquig.xml). It is distressingly easy to accidently copy old work over new work, erasing progress. Equally, you need to keep known working copies of your files so that you can revert if you end up in some sort of unsolvable error. Don't Tinker Directly in Your Mod FolderCreate a Tinkering folder for files you want to work on in various formats, such as icon files. This should also be a safe spot for the “last known working version” of the entire Mod folder…in my case, the Doc’s Gearheads folder and all subfolders. I back this up all the time! I learned the hard way…it’s like one of those games where you wish you’d saved right before the boss fight, but you didn’t, and so now you’ve got to do all that jumping puzzle stuff again. In the Tinkering folder, make a folder of shortcuts to all the various Gladius subfolders you’ll be returning to frequently (at a minimum, the three Data folders for your mod, the base game files, and for downloaded mods). Test GamesYou’ll need to test your mods as you go, so a good structure for test games will speed this along. I recommend the following game settings: Mods: All disabled except the one being tested. Player Name: Something consistent (I put “Bug” in all my names) so you can distinguish them from other saved games. Game Speed: Very fast. Difficulty: Easy. Advanced: Neutral forces to Very Low Researched Technology to 10. This allows you to quickly build the building you need to generate the unit you’re investigating. Other settings don’t matter much. Once you’ve started a game, I recommend you find a spot with +10% production for your city. This will speed the next few turns somewhat. Save a Test file 1 at the opening of the game. Save another file again right before the unit building is produced, and again right before the unit itself is produced. If you start with the building already built, then changes to the building file will crash the game even if there’s not an error; similarly, if you start with the unit created, then changes to the unit file may crash the game. Time CommitmentFor me, creating a new unit from scratch took many hours for the most complex ones, like the Talos (Squigs were a little simpler). By the end, I could add an action to a unit in about an hour, including all the associated testing, icons, traits, descriptions and sounds I needed. Give yourself some peace while working. If you’re distracted, you’ll forget what you were doing, and may end up taking fifteen minutes just to get back where you were in the process. If you get stuck, walk away. Get some exercise, food, or sleep. Many times an answer would pop into my head when I wasn’t even (intentionally) thinking about this stuff. Keeping up with the Data Folders Take a systematic approach to editing, because you’ll probably screw up the folder hierarchy at least once and spend an hour realizing that it should have been : Users ... ... Documents Proxy Studios Gladius Mods Doc's Gearheads Data Video Textures Icons Units Orks instead of : Users ... OneDrive Documents Proxy Studios Gladius Mods Doc's Gearheads Data Video Textures Units Orks. Bleh. Source FoldersYou’ll be working out of three main folders (and maybe occasionally a fourth) within the Data folder: World, Core, and Video (plus possibly Audio). None of these is particularly helpfully named. WorldThis is where most of the programming construction happens. You create files which describe to the game what you want Units, Traits, etc. to do (i.e. attacks, effects, etc.). Most crashes are the result of problems here. CoreNot really the Core of anything, this is where the language files live. Your unit may work perfectly, but the player won’t see any text descriptions if you haven’t written them here. Errors here result in question marks (?) where text should be. VideoHere’s where you have mostly graphics, such as icons and textures. You can borrow graphics assets from the main game by referring to them in your World files, or you can move them to your own Video section which makes them a little more portable with the mod. You probably won’t be working with the meshes, but if you’re daring, you can at least tinker with the colors and icons of your units. Errors here often result in questions marks (?) where icons should be, but these can cause crashes as well. My Procedure for Building a Unit When I’m building a unit, I like to keep a relatively standard approach to help me not miss anything. While doing this I'm often keeping folders open in both the game’s original files and my own at the same time to make sure I keep up with all the folder layers. Most of the following need a folder with the name, and a subfolder with the faction name (e.g. Units/AdeptusMechanicus). 1.Open the World folder within both the game files and your own mod files. You’ll be working in your mod folder, and using the games files as a structure guide. 2.Build the unit file. Usually this begins as a copy of the unit file which will use the graphics options I want, and then I fill in the text with the actions and traits I need. 3.Edit the building file. Nearly all units need a building to produce them. (This can be done by writing to Infantry.xml.ext and just adding your changes instead of editing Infantry.xml, which will make it more compatible with other mods which use the same building.) 4.Edit the Traits files. 5.Edit the Weapons files (if you want to use your own weapons). 6.Open the Core folders. 7.Edit the Language files (for my monolingual self, it’s always the English folder). Write descriptions for the Actions, Traits, and Units (and maybe weapons) in their separate files. 8.Open the Video folders. 9.Edit the Materials and Texture files. (Assuming you’re not into 3D modeling, only edit the Animations and Meshes if you’re copying these from somewhere else (like a mod which has new animations and meshes not in the core game), or if you want to use the same meshes with a different name.) 10.In Materials, dig down to Units/Orks (or whatever faction) and edit your material “pointer” files to indicate where your skins are coming from. 11.In Textures, go into Icons and fill in icons for Actions, Overlay, Traits, Units, and Weapons. All of these are 160x160 pixels, white and transparent, and .dds files. The sole exception is the Overlay, which is the same except 30x30 pixels. 12.Still in Textures, go to Units and make sure each unit has a HairSquigDiffuse.dds, HairSquigNormal.dds, HairSquigSIC.dds file, which are the targets of the text in the Video/Materials folder (obviously, use YOUR unit name here😊 ). Now try to run it, and be ready for the crashes! Crashes & Fixes CrashesAs frustrating as they are inevitable, these can tell you valuable information, or none at all. Generally: Crashes just after the launcher are often somewhere in the World folder (mine were usually in the Units file). The pop-up crash report is often so vague as to be useless, but sometimes will point you to a specific problem. For example, if you see the word “World” in the crash report, then the error is in one of those data files. Crashes when loading the test game are usually easier to find and fix, because they aren’t in the complicated Unit.xml file, and the crash log is more likely to be useful. Make absolutely sure there aren’t any other mods loaded which could be incompatible with your test game. Also, if you've changed your mod substantially, you may need to start a new game or the units in the old save won't be compatible If you crash when you try to use a unit ability, then the problem is obviously there somewhere. Check and make sure you have all abilities and traits in order. Fixes Start with simple grammar checking. When copying and pasting, it’s easy to leave off a quotation mark or a closing carat />. Keep a similar known-to-be-working file open as you scan line by line to look for little errors like this. You’ll have less and less of these as you practice. Look for bad file references. Again, copy/paste is handy, but you can accidentally throw in a Neutral/Kroot reference when you meant to do Tau/Demiurge instead. Check file structure, and make sure every opening “argument” has a close…<unit> must have a </unit>, etc. Make one change at a time. If you’re not sure where to start, comment out sections of your code to see if that eliminates the issue. If it does, you know where to look. Don’t worry about icons and text descriptions at first. The game will start even if those are messed up, so they can wait until the main .xml file is functioning. Text Mods - A Good Place to Start I recommend you start as I did, by modifying the text files found in …steamapps.. Data Core Languages English. Maybe you’re asking: Why should I start here when I just wanna make cool units!?! The text files require no programming to point to other files. You’ll begin to understand the folder structure of mods. Mistakes don’t crash the game (well, as far as I know…) It’s all contained in one file, so you can start slowly on learning how to organize yourself. You can learn the Mod upload system within the game itself, and how to edit a mod once you’ve put it in the Workshop. Creating New Units Ready to take the plunge and try to make some units? To best use this guide, I recommend you subscribe to my Gearheads Mod and look at the files and units while reading along. Yes, that’s shameless self-promotion, but it will really help! How to take the Techpriest from the Astra Militarum and allow it to be produced as an Anointed Techpriest in the Auxiliaries building of the Adepta Sororita: ProcedureOpen the Gladius folder in the Steam Directory to find the Techpriest Enginseer. .../SteamLibrary/...Data/World/Units/AstraMilitarum/TechpriestEnginseer.xml Put this file in your Mods folder: C: Users… Data World Units SistersOfBattle Rename the unit to "AnointedTechpriest.xml;" this will be the core name that the game will use. Locate the Auxiliaries Building in the game files, and copy to your Mod subfolder: C: Users… Data World Buildings SistersOfBattle Auxiliaries.xml In order to make the unit trainable in the building you want, you just have to add this line with the other units produced by the building in the Auxiliaries.xml file (or better yet, in the Auxiliaries.xml.ext file). <produceUnit unit="SistersOfBattle/AnointedTechpriest"/> Now give your Anointed Techpriest an official name/description/flavor to display when selecting the unit in-game. You’ll add some language files in the Mods "Core" folder. C: Users …Data Core Languages English Units.xml This will be the "Units" file that will be useful and the following entries will do the job: <entry name="SistersOfBattle/AnointedTechpriest" value="Annointed Techpriest"/> <entry name="SistersOfBattle/AnointedTechpriestDescription" value="The description you want"/> <entry name="SistersOfBattle/AnointedTechpriestFlavor" value="The flavor you want"/> Correcting the Icon in the Unit BuildingAfter all of the above steps, you’ll be able to build the unit, but the icon in that production building will be a question mark placeholder. To fix this: Locate a suitable Icon file in C: Users …Data/Video/Textures/Icons/Units/AstraMilitarum/TechpriestEnginseer.xml And move it to your equivalent folder in your Mod, renaming it to match your unit. …Data/Video/Textures/Icons/Units/SistersOfBattle/AnointedTechpriest.xml Hints & Tips:•CAPITALIZATION MATTERS!! •Your mod folder will initially have no subfolders. Create only the ones you need, and make sure you’ve got all right layers of subfolders to avoid crashes. •Units may not need the same type of currency to build. Make sure that they use either requisitions or ore depending on the faction. •The game uses forward slashes / to indicate directory locations, whereas Windows will use backslashes when you identify a directory (maybe programmed in Linux?). •You don’t need the whole file you’re replacing in most cases, just the new parts. •If you use the .xml.ext method, only add the new lines. If not, use the whole file in Buildings. •For errors, look first for small mistakes such as spelling mismatches, missing quotation marks, or forgetting to close a process like </action>. Use comments liberally to remind yourself of changes you’ve made, and the reasons you made them. This is the syntax: <! -- Your comment here --> Put comments between sections, as the end brackets seem to interfere with some commands. Use white space to separate out sections of code for easier readability. Spaces and line breaks don’t affect the code at all, but help you distinguish different sections. Creating Custom Actions First, you can’t create a custom ability name in the Unit.xml file. (Well, I’m sure someone can, but it isn’t me.) The ability name is important for two reasons: 1) the effects it creates when activating, so you may want to pick one that matches the effects you’d like to see. 2) The AI won't use genericUnitAbilities, so only use this for passive abilities. I’ll use the example of my Bonesinger unit, which is derived from the Aeldari Warlocks infantry unit. (Gladius uses the term “Eldar” to identify Craftworld Aeldari items in the file structure). I filled all of the folders noted in the description of the Anointed Techpriest above. I added a unit production line to the Bonesinger’s Chantry (the building building building) to create the Bonesinger unit. Then, to transform the Warlocks into a repair unit, I added the following text into the Bonesinger.xml file (I’ve left out the unchanged Enginseer text in the middle). The lines are only there because Steam Guides don't put in tabs, apparently :) <! -- REPAIR BASED ON TECHPRIEST ENGINSEER --> <genericUnitAbility cooldown="1" -------------------- name="SongOfRestoration" ---------------------icon="Actions/Eldar/SongOfRestoration"> -------------------------- <model> ---------------------------------<action animation="Units/Eldar/WarlockAbility" … </genericUnitAbility> A few important notes on this step: •GenericUnitAbility is a good option for custom abilities, but you can use other existing ability names, and you won’t get any effects if you use the generic one. You just can’t make up your own; this is apparently hard coded. •Don’t forget the < and > to close out sections of the code. It took me much debugging to properly place the carat after the icon pointer. •If you get a question mark in the ability area of your unit in game, it means that either you didn’t create an icon, or you put it in the wrong folder. •Most units have an “Ability” animation which can be used so your unit doesn’t just stand there when it takes an action. Adding the Ability for one Unit to Build Another Next, I wanted the Bonesinger to be able to build new Webway Gates, as the Aeldari currently have no way to do this and can “run out” of gates to build cities on. The Techpriest Enginseer can build Imperial Bastions, so the code for this action is a natural source to build the Webway Gate. The Webway Gate icon is already in the files as an Eldar unit, but you’ll need flavor text for the name=”SongOfCreation” or it will default to the text for the Imperial Bastion. I have also included a technology requirement. Here the “Construction Building Bonus” is the technology “Bonesingers’ Convocation.” Unlike most files in Gladius, Upgrade (technology) names are often quite different than the actual technology name. The image below is from Visual Studio Code, which is the free .xml editor I mentioned.
更改单位外观 更改单位外观对于减少混淆非常重要,尤其是当新单位与你“借用”单位属于同一阵营时。在这个例子中,我希望让骨歌手看起来与术士有所不同。简单的更改包括将单位数量减少到一个,并增大该单位的尺寸,这些都可以在World Unit.xml文件中快速完成。 要更改颜色或添加标记则需要更多工作。创建3D动画模型极具挑战性,但我可以更轻松地更改单位的“涂装”。如果某些区域会根据玩家的阵营颜色而变化,我倾向于保持这些区域“原样”(在这个例子中,骨歌手的长袍颜色与玩家选择的颜色相同)。不过,头发是固定颜色且非常显眼,所以我选择将其作为自定义的目标。 为此,我使用了Paint.net程序,它是免费且相对容易使用的。这让我能够打开包含单位涂装的.dds文件。 查找文件 首先,我从游戏数据文件夹的Video/Textures/Units/Eldar路径中找到了WarlockDiffuse.dds文件。其他两个文件不需要用于此次颜色更改。然后我将副本保存到工作文件夹(即非游戏文件夹)中,命名为BonesingerDiffuse.dds。幸运的是,Paint.net有一个出色的重新着色工具,所以我用它将术士的红发重新着色为金黄色。 现在,修改后的BonesingerDiffuse.dds文件可以放入Mods的texture文件夹(Mods/.../Data/Video/Textures/Units/Eldar)中。接下来,你需要重写单元文件所引用的.xml文件(如下方【】所示)。(网格文件应继续指向术士,因为我没有修改该单元的结构。) 【<unit mesh="Units/Eldar/Warlock" ---------------------material="Units/Eldar/Bonesinger"】 此文件位于……Mods……Data Video Materials Units Eldar目录下。修改该文件,使其引用你的新BonesingerDiffuse文件。其他文件指针可以保持不变,因为你没有修改高亮或法线(即3D纹理)文件。 注意:WarlockSIC文件对于显示哪些部分将被重新着色以匹配玩家的派系颜色非常有用。如果SIC文件中该部分为蓝色,它将被转换为派系颜色。 这是我使用的材质文件: 【<?】材质 ---------- <纹理> ------------- <纹理名称="单位/灵族/骨歌者漫反射"/> ------------- <纹理名称="单位/灵族/术士法线"/> ------------- <纹理名称="单位/灵族/术士SIC"/> ------------- <纹理名称="阴影贴图颜色"/> --------- </纹理> </材质> 好了,她的头发变成金色了!(在最终模型中,我还在她的肩膀上添加了骨歌者的符号。) 用自定义图标实现一个单位强化另一个单位 接下来是星际战士。虽然他们的支援单位阵容没有明显短板,但我总为风暴爪炮艇感到些许遗憾……在背景设定中,它们英勇无畏,但在《战锤40K:格雷迪厄斯 - 遗迹之战》里,它们往往被忽视。为了契合该阵营的主题,我希望风暴爪战机在相邻时能够为另一架风暴爪战机(以及风暴鸦战机)提供增益效果。这能鼓励玩家建造更多小型战机,并助力该阵营的空中作战。 创建编队飞行图标 这一步意外地颇具挑战性。首先,在经历了一些失误后,我成功为该单位的被动技能创建了首个自定义图标,该图标以《角斗士》的风暴爪战机图标为基础,展示了两架风暴爪战机并肩飞行的画面。此步骤的小贴士: •在Paint.net中打开一个尺寸正确的现有图标文件(本案例中为160x160像素)。 •通过将所需图像拖入该文件并将其添加为新图层的方式来制作并保存图标。在Paint.net中对其进行调整,直至满意为止。•我发现如果尝试从头创建图标(不在现有的.dds文件中),会出现错误提示Stormtalon.dds“不是.dds文件”。这可能是格式不兼容导致的。 •如果以默认的.dds格式保存,图标会显得有锯齿。使用高斯模糊来柔化边缘(或其他你喜欢的方式),然后至少保存为BC3(线性,DXT5)格式。非BC文件类型可能会导致游戏无法读取该文件。 将此文件放在Mods…DataVideoTexturesIconsActionsSpaceMarines文件夹中,以便你可以引用它。它也可能放在Traits或其他位置,只要你正确引用即可(在这个案例中,它既是一个动作也是一个特性)。 特性
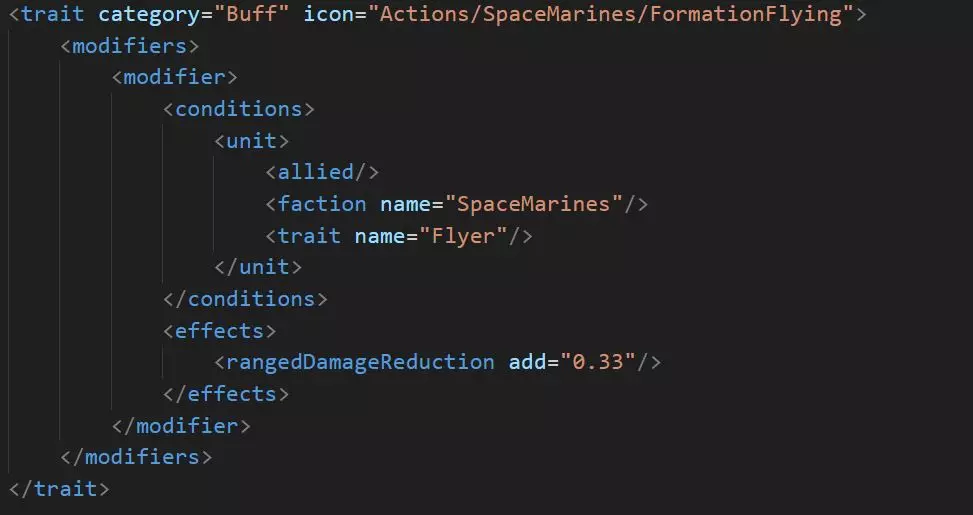
现在,这将允许单位引用此【编队飞行】特性,并将其适当地应用于所有友方星际战士飞行器。相反,你可以去掉派系名称,将其范围扩大到所有友方飞行器。 现在,打开单位文件并添加一个【动作】以使其应用该增益效果。

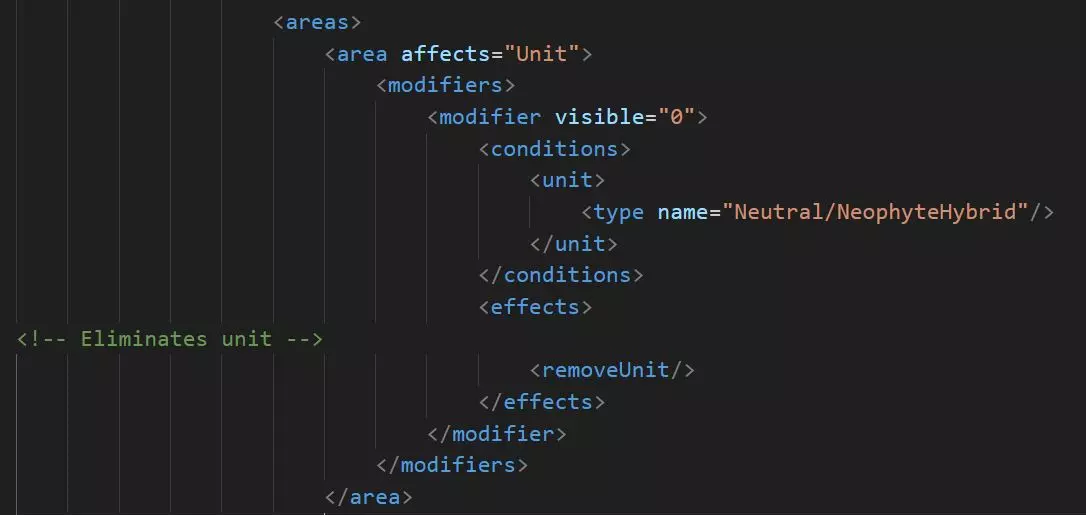
This creates a passive ability for the Stormtalon.xml unit to create a zone around itself which will grant the Formation Flying trait to the units described in the FormationFlying.xml file. I added excludeRadius=”0” when I noticed it was buffing itself. There are probably other ways to make this work, but this seemed fairly straightforward. Finally, you need to make sure you have a description file as usual, this time in Mods/...Data/Core/Languages/English/Traits.xml, which gives custom text to your new trait. Creating Complex Buffs – The Cadian Sergeant Major Now, on to the Astra Militarum. I’ve always loved the Guard, but they are so weak! How about a unit to improve them? I decided they needed a Sergeant Major to show them the way. I created his actions (both passive and active) along with icons for each. Below are some tips I discovered while building these: Hints on trait & buff descriptions Watch subfolders when adding traits and their descriptions! For example, below note the need for a subfolder in the Core description of the Veteran’s Discipline trait but not in the Formation Flying trait. This is because the Discipline trait is itself in a subfolder in the World folder. <entry name="FormationFlying" value="Formation Flying"/> <entry name="FormationFlyingDescription" value="Increases ranged damage reduction when adjacent to a Stormtalon or Stormraven."/> <entry name="FormationFlyingFlavor" value="Stormtalon pilots are particularly adept at flying in formation with other aircraft. The elegant maneuvers serve to distract enemy weapons and radar while the Stormtalon relentlessly closes with its target."/> <entry name="AstraMilitarum/VeteransDiscipline" value="Veteran's Discipline"/> <entry name="AstraMilitarum/VeteransDisciplineDescription" value="Provides damage reduction to the Sergeant Major and nearby infantry."/> <entry name="AstraMilitarum/VeteransDisciplineFlavor" value="Good discipline in the field is the key to surviving a firefight...a fact not obvious to new troopers. The Sergeant Major's presence is an anchor of calm in the chaotic sea of battle."/> Granting a Buff to TWO other unit typesThis one was a challenge, and I was lost until some community mentors stepped in to help. There’s a command found in the Spiritmark trait which can easily allow you two buff two (and only two) units: <conditions> <unit> <allied/> </unit> <unit match="Any"> <type name="Eldar/Wraithblade"/> <type name="Eldar/Wraithknight"/> </unit> </conditions> This match=”Any” command turns the usual “and” function into an “or” function (i.e. makes it inclusive, rather than exclusive. This should obviously work for more than two units. Creating the Sergeant Major’s Icons I created the two ability/trait icons using the same steps as for the Stormtalon’s Formation Flying above. The new challenge was creating an icon for the Sergeant Major himself, as I wanted it to be completely custom. I first started with a picture I liked, then cut out the image using Photoshop CS3 (I bought it years ago as a student, and I refuse to buy it again 😊 ). I colored it completely white. To draw the collar and facial features, I freehand “drew” using an eraser. I resized it to 160x160 saved it as a .png to preserve transparency, and opened it by dragging it within an existing icon in Paint.net (this ensures that all features will be correct). •To match the format used by the game, use only white and transparent pixels. •To remove any jagged pixel edges, use the paint.net Gaussian blur to create anti-aliasing (radius 3 or so). •Save the file as a 160x160 (the icon used by the Infantry building) and 30x30 (the overlay icon used on the game map). •Use the Linear DXT5 save format (others may work also) to preserve anti-aliasing and transparency. •Place these files in the appropriate folders (under Video/Textures…) I initially forgot to place the Overlay icon, and was quite stumped for a while until I figured it out. •Keep icons simple! They are too small for complexity…you’ll just end up with a confusing mess. Editing the Sergeant Major’s WeaponThis was probably the most straightforward change in that it worked the first time! I copied the Lasgun file from World/…/Weapons, put it in the equivalent place in Mods, changed the name to Cadian MG IA Lasgun, and edited it to be a better weapon (he’s a single unit, so overall damage still isn’t much). In Mods/…/Core/…/Weapons, I created a short file describing the new gun. In the CadianSergeantMajor.xml unit file, I referred to the new weapon, but left all other references the same. Done! Editing the Sergeant Major’s AppearanceHere's a guide to point you in the right direction for editing the Diffuse and SIC texture files: https://gladiusrelicsofwar.fandom.com/wiki/Modding:Textures For the Sergeant Major, I wanted to make him more distinctive with a green camouflage helmet and pants. Basically, this meant picking out a pattern, dropping it into the GuardsmanDiffuse.dds, and cutting out cloth pieces which fit the pants and helmet. Because the helmet defaults to player color in the SIC file, I had to edit the helmet area in that file by painting black over the helmet region, which tells the file to not paint over that area with the player’s color. Adding Visual and Sound Effects to the Nanoscarabs’ Action Visual EffectsThe below code is the beginning of the Nanoscarab Repair action. <orationOfRestoration cooldown="1" ----------name="NanoscarabRepair" ----------icon="Actions/Necrons/NanoscarabRepair"> As I’ve noted, the first-line name can’t be customized, but you can customize the in-game name easily with the next line. Using Generic Abilities versus Specific You can always use genericUnitAbility for the name, but that won’t create an effect. Sometimes that’s a good thing, especially with passive traits. But sometimes you want a little feedback. The “Effect” is tied to the name, so by using orationOfRestoration, I can get that effect when I use the Nanoscarab Repair. I’m not completely sure, but I think some of my crashes were related to the effects used by my choice of action, so go with genericUnitAbility if you are getting hard locks when using an ability. Sound EffectsSounds are selected under the model section of an action: <model> -------<actionanimation="Units/Necrons/CanoptekScarabsMeleeDefense" --------------------bone="Bone018" --------------------sound="Actions/MechanicalBuff"/> </model> You have a wide range of sounds to choose from in the Audio folder. Simply refer to the one you want, and it will play along with the action. Alternately, you can record or download other audio and use that. If you follow the custom path, I recommend you use an online audio trimmer to cut it down to around 4 seconds, and give it a fade in and out. Replacing One Unit with Another One fun trick I decided to try with my Biophagus was turning one unit into another. The good Doctor can overcharge the DNA of his Neophytes and turn them into Aberrations. How to do that was a challenge, because I couldn’t figure out how to do two actions like that at once. Once again, Devian came through and showed me like it was nothing! Below I’ve put in some code snippets…you’ll need to look at the mod itself to see the whole thing. First, make sure you’re only targeting the right unit (if you don’t do this, you’ll be able to target any square, and the action will be used, but nothing will happen if the Neophytes aren’t on it.)

然后,瞄准单位本身,并将其消灭:
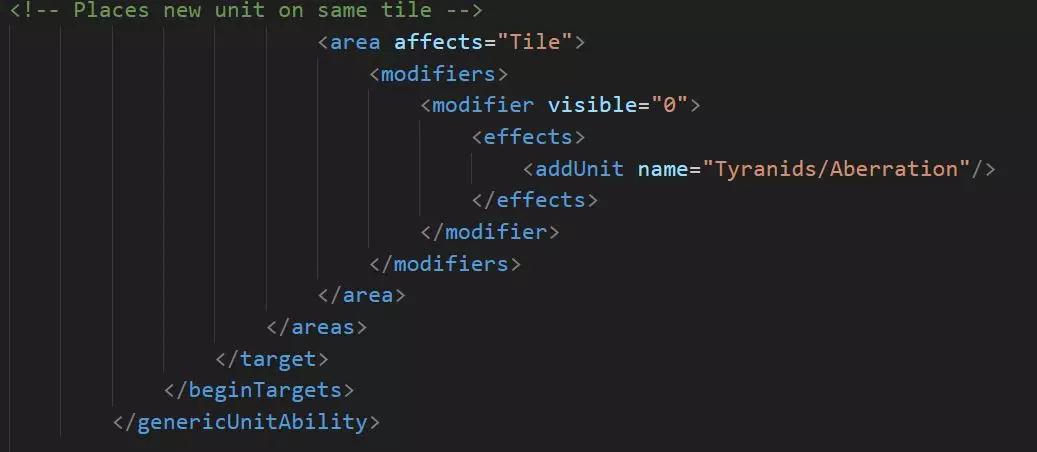
然后你需要用畸变体来替换它
Grenade Tips Grenades are common to many units, and they're easy to add to any unit. In general, add this in the weapons section: <weapon name="PlasmaGrenade" slotName="PlasmaGrenade" enabled="0"> <model> <grenadeWeapon muzzleBone="Autarch_Hand_R"/> </model> </weapon> And this in the actions: <throwGrenade weaponSlotName="PlasmaGrenade" cooldown="10" requiredUpgrade="Eldar/PlasmaGrenade"> <model> <action animation="Units/Eldar/AutarchGrenade" beginFire="1.0"/> </model> </throwGrenade> Simple enough, right?....as long as you make sure that keep all the upgrade requirements and animations consistent with the unit you're working with. But you'll often find that some grenades act weirdly. Most commonly, your krak grenades are useless because they do less damage to all targets than your primary target. Or maybe that melta you gave to your hero isn't doing anything. Why is this, and how do you fix it? Krak GrenadesKrak grenades are essentially like frag grenades with lower damage and more armor penetration, but they are missing a key trait which helps the fragmentation grenades: Blast. This trait adds to the "members hit," which often lets frag grenades wipe out whole units. So, groups of units don't often hit the "sweet spot" where the krak is helpful because they have either very low armor (Kroot Hounds) or very high armor (Space Marines). In the former case, the frag is much better, and in the latter the primary weapon often wins. To fix this, you can either create your own weapon or mess with the unit file. Changing the unit fileLet's start with the easy method of working with the unit file, which is quick but less tailored to your new unit. By increasing the number of meleeAttacks (in the "modifiers" section), you will also increase the number of krak grenade attacks. Yes, this also helps the frags, but since the cooldown is 10 turns on both, the kraks may be more useful. Alternatively, you can increase the "count" of krak grenades (in the "weapons" section), and now your unit will throw more of them (a count of 2 doubles the total, for example). This is more specific, but can look a little odd in the stats within game...why does that unit throw three grenades? Note that "count" is defaulted to "1," and does not appear in the weapons section by default. Simply add the line count="2" within the grenade code. Creating a custom weaponFirst, you *don't* need any sort of mesh materials to create a weapon. The weapon is just a projectile which emanates from a bone in your model, and you should feel free to use existing bones. If you pick a "Head" bone, for example, then the projectile will originate from the center of the head. Unconfirmed, but you may need to use a bone with a period in the name to get correct directionality...i.e. .Muzzle. So take the KrakGrenade weapon .xml file, and give it a new name (I used PrimarisKrakGrenade, for example). Copy the KrakGrenade icon and rename it to the same name. Finally, create a description in the Core.../Weapons file so that your new weapon has in-game descriptions. Creating a Technology to produce a Building to build your Custom Unit This process is every bit as complicated as the title of this section. To do it, you need multiple files and multiple interdependencies. Despite having done this at least a dozen times, I tend to forget at least one step and end up asking myself...why can't I build my unit? Suggested Workflow Create the Unit file. Let's use MechanicusReaver. Create the "Upgrade" file (i.e. the Technology). In this case, it's MechanicusTitanForge. Do this by copying a similar file into the AdeptusMechanicus Upgrades folder, and renaming it and editing it to include the icon. Create the "Building" file from a similar file, and place it in the Building folder. Here, it's also called MechanicusTitanForge. Review the file to adjust build costs and resource output to your liking. Make sure you add your custom unit in the Actions section at the bottom. Create the "Construction.xml.ext" file, add your new building, and place the file in your Buildings folder. Only write code for the Actions section!! This will add your code to the existing Construction.xml file (the Building Building Building). Create and place icons for the Building and Upgrade (they can be the same). Create descriptions for the Upgrade and the Building in the Core/Languages folder. Test your creation by starting a game with a zero level of researched technology, and one with all technologies researched. You can quickly make sure that you didn't accidently make the building instantly available, or impossible to build. Caution!! If you overwrite the Construction.xml file, you will cause a lot of interference with other mods. Use the .ext suffix to prevent that. Generally, you don't need to have upgrade requirements anywhere in your code except the Construction.xml.ext file. I have several times accidentally required a technology to research itself. Not so smart :) Working with Features Features are the various terrain additions, ranging from Desert to Holy Sites. Each of these has an effect, and those effects can be modified. For my Magos Explorators, I wanted them to be able interact extensively with the landscape. You can do that in two ways…if you just want to remove a feature, then you just need to create an action and use the command removeFeature = “OrkoidFungus” for example. Then, I created a self-targeting action so that the unit could benefit from the feature removal. Editing the Features If you want a movement change (i.e. eliminate movement penalties), you need to edit the feature itself. You can instruct the feature to ignore your unit when removing movement. This is why Flyers can move over all terrain easily, for example. The feature itself can also grant traits, such as the way the Orkoid Fungus adds a little mushroom icon to an Ork Boy when he enters the tile. That trait, for example, lets the Ork heal while sitting on the tile. Another feature item is Exploration. Looking at the Ruin of Vaul (ruin.xml), for example, you can see that the file awards a unit a random boon from a long list. This can be further limited, like with the Sisters’ Hospitaller unit, so that only that particular unit can get the reward from the Holy Site. Icons - Creation and Frustration Icons are a critical part of modding in Gladius, as each one gives your custom traits, actions, and units a unique feel. I've created well over 100, and have a reasonable workflow...but they still take a while to create. Using existing icons sort of works, but is visually confusing when the original unit shows up. So how to create your own? Icon files (found in the Texture folder) are almost all 160x160. The exception is the overlay icon, which is only used for the unit symbol on the main game map. How to do it: Find an image that you like on the internet or wherever. It should be stylized (i.e. cartoony), because detail will be lost at the low resolution...mainly focus on the outline of the image rather than any internal details. Open it in your image program of choice and cut out the outline of the image, deleting any background. Create a black layer underneath your image (once the image is filled with white it will be very hard to edit otherwise). Remember to turn this off when saving your icons...Gladius uses a transparent background for its icons. Work with the image in its native resolution to get what you want. Now, fill it completely with white (on a transparent background) and shrink it to 160x160. At this point, I usually import a sample icon from Gladius onto a new layer. This "sample" should vaguely resemble the one I want to create. This gives me an idea about how much detail to try to create, orientation of faces, sizes, etc. This will help make your icon look right at home with the ones from the game. Using the game's icon as a guide, tweak your custom icon to the correct style. Save it (and convert to .dds with Paint.net if needed). Place them in the correct Data/Video folders. Only for unit icons: shrink it to 30x30 and save an Overlay version. Do not save over your master file with this tiny image! In the game, these icons will almost certainly be too sharp. You'll need to carefully blur the image: Open in Paint.net (you can also use GIMP or Photoshop). Use the Gaussian blur feature, setting somewhere around 1.5 to 2.5 radius (no two are exactly alike). Traits are the easiest because they only appear at very small sizes. They usually require a fair amount of blur. Units are the most finicky because the same icon is used at a very large size for the compendium and a much smaller size for the build menu. I blur them until they resemble the ones in the compendium, which usually leaves the others slightly sharper than I'd like. Actions are somewhere in between. Texturing - Diffuse, Normal, and SIC files The models in Gladius are "low polygon," which means most of the look of the units is created by the textures (i.e. skins) of the units rather than actual three dimensional details. DiffuseDiffuse is the easiest to understand...changing the images here will directly change what shows up on the unit. Use a paint program to alter this file, and the unit will look different but have the same shape (because the mesh underneath will be the same). Comment from DexGattaca: Transparencies in the Diffuse file will make the mesh see-through - effectively removing that part of the mesh. The only issue is it will still cast a shadow. Which is not a big deal if the parts are small. NormalDon't mess with these unless you're a bit advanced. They are automatically generated in texturing programs such as Blender or Substance Painter. You can also create them in GIMP using greyscale images as a source. Unless you're ready to jump into this world, create the illusion of depth in the Diffuse files by using drop shadows and beveling. Create a dummy normal file which is entirely 8080ff in color. SIC filesThese are NOT typical image files like the other two, but rather a neat trick specific to Gladius to combine a bunch of effects into a single file. The RGB color codes effects into the Diffuse file: Red Red makes the image more "metallic," or reflective. Values around 100 or so give reasonable metal textures. Often, very "red" colors are used to allow the texture below to shine through (i.e. an aquila or Evil Sunz decal) but this works more through the lack of the green and blue values. In other words, 0, 0, 0 black works also if you just want the underlying colors to come through exactly as in the Diffuse file. Green Green regulates "emission" or glowiness :) High green values produce a weird blinding effect, but moderate values are good for headlights, etc. Blue Blue is a unique Gladius variable (as far as I can tell), indicating "team color." In other words, if you are playing the Yellow team, then a high blue value in the SIC file will make your surface more Yellow. A bit confusing, but it works. In summary, choose SIC colors by individually picking values of Red, Blue, and Green, rather than trying to use the actual resulting final color. Choice of ResolutionsFirst, last, and most important: Don't overdo it!!!!! If 1K (i.e. 1024 x 1024) is good, then 4K must be like a million times better, right? Absolutely not! This not only makes your mods overweight, it actually worsens the results. Very high resolutions will produce final textures with a weird jitter around the edges. My advice? Work with your images in 4K, but resize them to 1K (or at most 2K) for use in the game. You'll get clean texturing and all the detail you need for these tiny units. Tips about resolution choice: The textures don't need to be square...i.e. you can have a Diffuse file in any dimensions you want as long as it fits the UV map of the mesh file. This only applies if you're messing with the 3D file, of course. The sizes of the Normal and SIC files can be a lot smaller than the Diffuse, but they do need to have the same dimensions or they won't line up. It's no problem to have a 2K Diffuse with a 1K Normal and a 0.5k SIC. Even though I use multiples of "K" in my examples, images can be any dimension, such as 848 x 324 pixels. "K" is used for convention, though, and most Gladius files are 1K. Tips for creating good-looking UV maps (i.e. textures)In layered image programs, you can non-destructively adjust the red and blue for easy use on large areas of your model (hulls, armor, etc.) Decals and logos should be done individually. Any areas which you want to be "Team Colors," make greyscale in the Diffuse image. Create a layer above the diffuse image composed entirely of red (set to 255,0,0) [255=FF in hexadecimal], and one of pure blue. Select the areas you want to be team colors, trim the blue layer to match, and use an Add setting (sometimes called Linear Dodge) on the blue layer. You can adjust how much blue will go through using the fill percentage. Repeat this process with the red layer, adding a bit of red into the blue of the SIC image to make it shine somewhat. A little goes a long way! The areas you don't want to be team colors, do the same by creating and trimming a new red layer above the non-colored areas. This doesn't have to be greyscale in the Diffuse, as you're not trying to overwrite the native color with the team color. You may want to remove all Green from your SIC, except areas which are specifically meant to glow. To do this, create an all-green layer and use Subtract to remove any trace of green from your SIC file. This will remove any unwanted glowiness. Headlights, etc. can be on their own layer and thus retain their glow. I'll say it again: SIC and Normal images do *not* need to be as detailed as Diffuse files to work perfectly. If you're using a 4K (probably don't) or 2K texture, then you can go with a 1K or half-K Normal and SIC file. Changing the Colors of Weapons and Effects When I did the Banewolf, I wanted the tank to have two gas attacks, one for infantry and the other for armor. But it would be confusing if the attacks were exactly the same. I had toyed with the idea of trying to figure out how to change colors, but this unit finally kicked me into actually doing it. This is advanced! Don't tangle with it until you've got the basics of unit modding. First, figure out which effect you want to mess with. I wanted the gas effect, which is the "Toxic Miasma" effect, which in turn traces back to the "Flames" effect. Find a unit with the effect you want. In this case, I wanted to the use the Malanthrope's gas breath as my base effect. Now look in a folder you won't often use: Data/Scene/Blueprints/Effects/ToxicMiasma.xml This .xml file uses the material "Flame," which you can view in the Data/Video/Textures/Effects folder. Like unit textures, it also has a corresponding Flame.xml file in the Video/Materials/Effects folder. You won't need this for method one. Leave the Emitter files alone...they don't appear to mess with color (I think they describe the way the animation works). Method OneThis method takes the graphic file and overlays the color of your choice on top of it. With this I took a green gas cloud and turned it red, for example. I copied the Scene file and renamed it "Bioprimidazole" to fit my custom weapon. Within that file, it directs the effect to use the Flame material, but then later in the file it has a section called <colorAffector> This has a range of numbers you can alter, but what are they? I'm basing the following on experiment, and I could be wrong: The first four numbers represent R, G, B, and transparency. 1.0 represents full color (i.e. Red 255), 0.5 represents half color (e.g. Red 128). Use a paint program to mix a color you like, look at the RGB values, and divide each by 255 to get the fraction to plug into the .xml file. (Using all 1's seems to keep the original color of the graphic in the Textures/Effects folder.) I believe that the beam (or cloud, or whatever) can change color as it animates, and this is controlled by the "progress" percentage. So you could change your red beam to green halfway through the animation, for example. When I wrote this, I hadn't tried this trick, so best of luck. Method TwoIf you want to avoid reprogramming colors as numbers, you can directly edit the .dds graphic file in the Textures/Effects file. This is a little more complicated but gives you more control over having multiple colors in the effect. I used when editing the Questor's weapon color. Open the file and change the colors to whatever you want. You'll have to change any MuzzleFlash files to match, or they will clash. The Questor uses Melta Beams, which use the RedBeam as their source texture. In my case, for the Questor I copied the RedBeam graphics files to create PurpleBeam and PurpleMuzzleFlash files, which are--unsurprisingly--purple. (I did this by using GIMP to do a color shift from red to purple.) Now, copy the two MeltaBeams files from Scene/.../Effects, and rename them to PurpleMelta (I chose the name to help me remember the source file, so I'd remember what it looked like). The only change in these two new files is at the beginning of the file...change the Material from RedBeam to PurpleBeam (or PurpleMuzzleFlash). This refers to the files you're about to create. Don't mess with the <colorAffector> numbers. The numbers should all be 1 if you want to keep your base colors from your custom graphics files. Finally, create a third pair of new files for the Video/Materials/Effects folder. These will be called PurpleBeam and PurpleMuzzleFlash and will refer to the appropriate .dds files which you created first. All the new files are done; you need to edit your weapon file (in this case, the Tormentor Cannon) to refer to the PurpleMelta files instead of the Melta files. And wow, my Titan shoots pretty purple beams to match the crazy Slaanesh-themed livery! Method Three - Not Recommended!I only include this because it's the method used by one of the most popular mods..."Red Laser Beams." It's incredibly simple...the author just overwrites the base Scene file for LasBeams, by changing the line simpleParticleSystem material="Effects/YellowBeam" to RedBeam. Now, full credit...this brilliant bit of editing gave the Guard a much-needed upgrade to red lasers! By changing the core file, however, *all* lasers in the game are now red. For lasers, this is probably fine. For most of the other effects, you probably don't wan't to do this. If you do, be a good modder and warn your users that everything will change! Conclusion This is complicated work; I strongly recommend downloading my Scrapyard mod to see these files for yourself so that you can have a "checklist" of all the files to change. Editing Mesh Files After noodling with this for awhile, I decided to at least attempt to play with the .msh files to alter units. This is quite a long road, but here's the path if you decide to try it. I want to especially thank DexGattaca for his advice and assistance. It boils down to using an app that the developers gave us, but that I didn't know about. In Blender >Edit/Preferences/Addons -> Install. Point it to: C: Program Files (x86) Steam steamapps common Warhammer 40000 Gladius - Relics of War Resources Blender.zip This will give Blender the option to export as Proxy Studio Mesh (.xml). You put that mesh into the game's mesh files folder, and Gladius will convert it into a game mesh file when you launch it. Blender is a free 3D editor which is very powerful but also has a steep learning curve. Still, folks have created some amazing things with it, and the price is right. Errors and Fixes I changed the code, but the unit is exactly the sameThis is probably a misspelling of the unit.xml name, or the file is in the wrong folder. Alternately, if you simply load a game with an existing unit, it may not have changed (it usually does, however). Go back to a save before you built the unit, build it, and the changes should be there. My new unit isn't visible to build!New units need an entry in the Buildings Folder to add them to a production building. Also, any building built before you add a new unit won't be able to produce it. My new unit has weird glowy textures!Your textures aren't linked correctly...make sure the Materials file points to the right folder, and make sure everything is spelled right and has the correct suffix (i.e. SistersRhinoDiffuse, SIC, etc.) My new unit has the right textures but they move when the unit moves!You're trying to use animated textures, which means you have to line everything up correctly or you get this weirdness. The easy fix is to change the uvAnimated="1" to a zero in the Unit.xml file. I see the new unit, but I can't build it (greyed out).Did you copy it from another faction, say one that uses requisitions to build new units? That's the problem. Crashes on start! Help!Read the error message! These are actually incredibly helpful once you get used to them. They often tell you which folder to start with, such as World or Video. For unit file errors, the error may even include the line number of the missing code. Errors which mention "expected" often point to a missing closing statement in an action. Crashes after I load a game and move the new unit! Help! This is a good sign overall...these errors are usually quite fixable. Most commonly, you're trying to use an old save and it's conflicting with a change. Try starting a new game and building your unit from scratch. If that doesn't do it, I often find the errors in the Weapons section. Traits are applying unpredictably I had a strange error where I could apply Ancient Glory to allied units after the Cerberus moved, but the trait would vanish after the affected unit moved, even if it ended in a hex next to the Cerberus. It turns out that I was applying the condition "allied" twice, and this was somehow resetting the trait. The ProblemLook at the highlighted portion of the code:
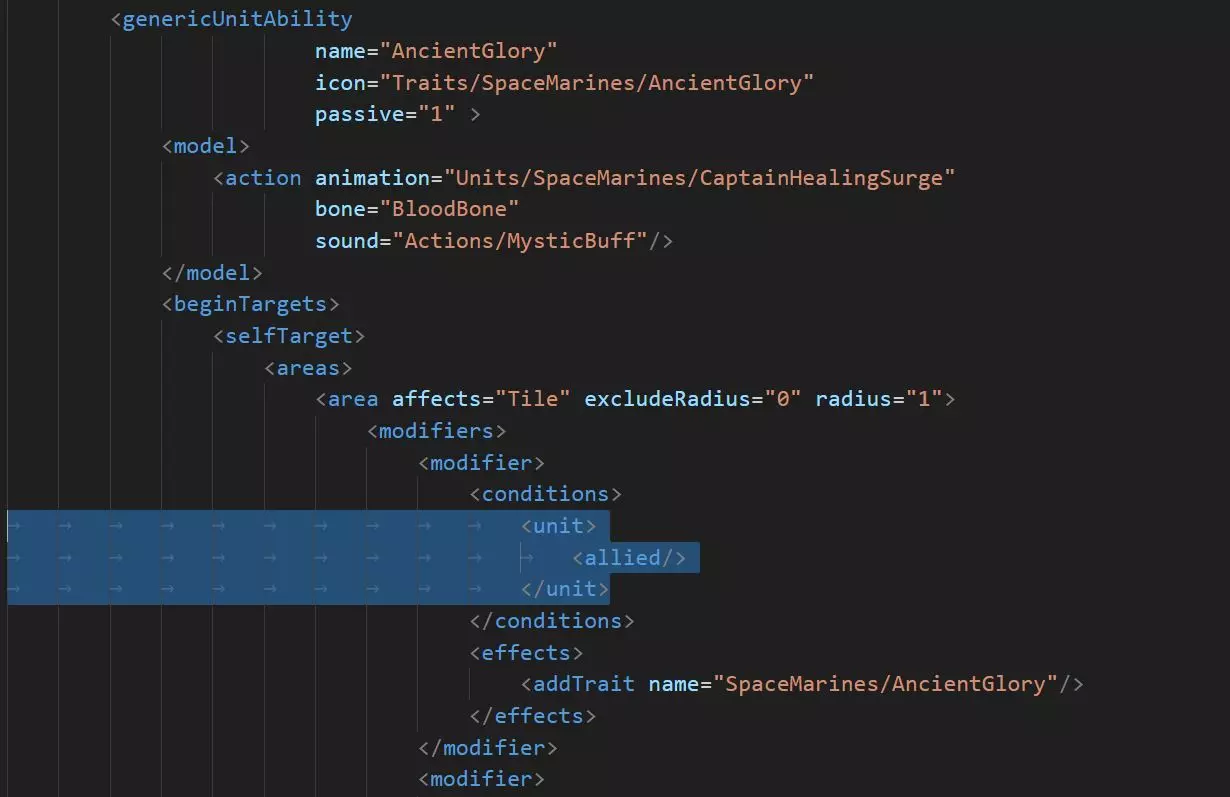
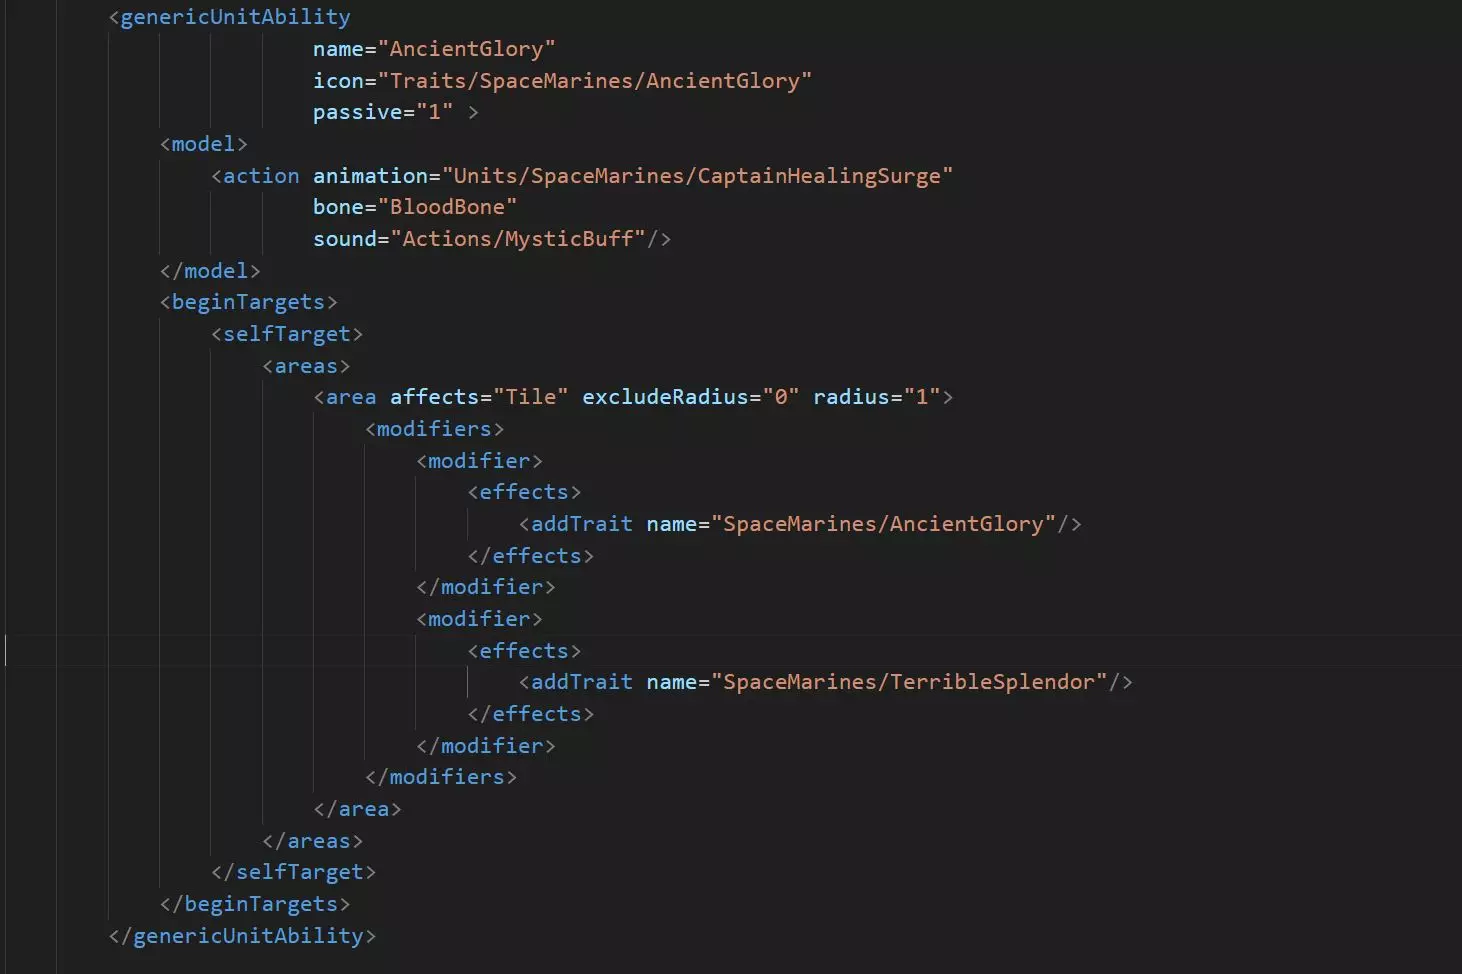
该特性本身已经在检查相同的“友方”条件,因此这部分是多余的。我不确定为何它还会出现问题,但这无疑证明了尽可能精简代码以避免出现奇怪冲突的原则。已修复代码
Conclusions I have alternately been overjoyed and frustrated by modding this game. You can get stuck for an hour on a trivial detail, and then suddenly be amazed when the unit does exactly what you hoped it would do! My hope is that this guide will help ease some of the pain of the initial learning cliff, and it will encourage you to add to this great community. If you remember one thing from this guide, remember this: One thing at a time! If you try to incorporate too many things at once, you’ll never know what caused that latest crash… Good luck with your own projects, and please give feedback and suggestions based on your own experiences. Acknowledgements: Many thanks go out to various people who helped me along the way: Xazeru for getting me started Devian (and others on the forums) for helping me solve specific issues and having infinite patience with my noob questions Nimajneb for playtesting ...and anyone who's tried my mod! Appendix A: General Thoughts on Coding in Gladius As I’ve struggled my way through all these units and features, I’ve picked up a few generalities that have helped me understand the system we’re using. This stuff is a little wonky, so feel free to skip this whole section if you just want practical information. Is .XML a programming language? Well, yes and no. The “L” stands for language in Extensible Markup Language, so technically it is. But .XML by itself doesn’t do computations, it mostly just tags data for other programs to use. This is what makes it simple, but it also limits it. The Importance of Traits Essentially, what we modders are doing is feeding conditions into the mysterious black box that is the Gladius engine. Traits (and unit types) are probably the main currency we use when making our custom units, so you should make extensive use of them. They can be used to program your units, because the Engine will see these and react. Tags like these allow you to do AND and OR statements that you couldn’t normally use in .XML. For example, the Spiritseer’s Spiritmark can affect the WraithKnight OR the Wraithblade, by using the type=any modifier, whereas the Haemonculus’ Fleshcrafting ability requires the unit to be both Allied AND a Drukhari. So, use lots of traits! Once a unit has a trait, you can tell other things what to do to it just by adding the condition trait=”Rare” for example. A trait doesn’t even have to do anything to be useful at identifying the unit. Modifying the Unit MeshesThe game uses .msh files to indicate its meshes. This is not a standard file type like .jpg, but rather a "package" that Proxy uses to compress its Blender files into a useable mesh. This has the side effect of making them hard to use for regular folks because you can't just import .msh files into Blender. However, the game provides tools to export animations and meshes from Blender into .msh and .anm files for use in the game. I may write a tutorial on this at some point, but this is a much more complex path than editing the abilities of existing units. Blender is actually quite intuitive and easy to use....after using it for 100 hours :) Appendix B: Rationale and Lore for Gearheads Units My thought process for building units within the lore: Astra MilitarumGameplay I felt the poor Guardsman needed a hand, as they are all but useless against stronger enemies. The Cadian Sergeant Major supports basic Guard troops with his Veteran’s Discipline, giving them the fortitude to finally survive against harder threats and shoot back. This aura works as well from the Chimera as on the battlefield. He can also bolster Guard and Scions with Cadian Resilience, which sends them into the fray with new resolve. Lore Cadia was finally destroyed in the Black Crusade, opening a galaxy-spanning rift in the Warp and throwing the Empire into chaos. Obviously, seasoned veterans of Cadia are now among the rarest and most valuable of Astra Militarum, and they can inspire your basic troops to acts of bravery and discipline…and even survival. NecronsGameplay I felt that the Necrons have limited infantry healing outside of their own regeneration. The Nanoscarabs are inexpensive and fast, and can quickly get to a group of wounded Necrons. Once there, they self-sacrifice to heal all units nearby both immediately and over the next two turns. Lore The Scarabs are often the first creatures encountered by those foolish enough to enter a Necron tomb. Although some are like the Scarabs in Gladius (essentially disposable melee units) others are depicted as incredible builders. Nanoscarabs fill that role, repurposing their own mass to restore their fellow Necrons. Space MarinesGameplay The Space Marines are already well balanced in their lineup of units, so I wanted to elevate an existing unit. Stormtalons are rather underutilized compared to Stormravens in my opinion, largely due to their fragility. This new trait gives them substantial protection against ranged damage when escorting another aircraft, which allows them to support their fellows more effectively without every mission being a suicide mission. Lore These pilots are incredibly brave and steady, and are experts at tight maneuvers. I hope to see them used more like they are shown in the Warhammer lore, and so now they can fly in formation with their kindred. OrksGameplay I wanted to give the Orks a chance to use more squigs. Yeah, the Warboss has a pet squig, but now you can breed them to explode in combat, power your vehicles, and even build the confidence of your units by wearing hair squigs (one of my favorite sillinesses in the Warhammer universe.) Lore Squigs make varying degrees of appearance in the lore, but there’s a huge number of types. Now you can add three more types to your squig menagerie. They’re cheap and very useful, if a bit fragile, just like in the books. Craftworld AeldariGameplay The Aeldari can be one of the most powerful factions in the very late game, but a nagging frustration is the inability to heal your buildings and vehicles. Another is the gradual disappearance of all the Webway gates, which give the Aeldari their greatest asset in mobility. The Bonesinger assists with both, able to sing songs of Restoration to help vehicles (particularly those early fragile ones) and Creation to make new Webway gates, ready for travel or settlement. Lore Bonesingers are a familiar part of Aeldari society, but they are only represented in the abstract in the game of Gladius (in the form of the Bonesingers’ Chantry.) Now they are functional units in their own right, practicing their arts on your units and structures. Chaos Space MarinesGameplay I always felt like those neutral Chaos cultists ought to respect a real Chaos power, like you (the player). The Daemonhost can finally dominate those pests. On the battlefield, the Host erodes morale in a large radius and can directly invade the minds of the weak-willed around it. Naturally, they are quite rare. Lore Cults of Chaos are depicted as desperate people foolishly willing to pledge themselves to powers they barely understand. A Daemonhost is a Warp creature incarnated into a human vessel, and thus can walk freely in the material reality. They sweep up those weak Cultists into minions, and then stalk out to fascinate and terrorize everyone from the Militarum to the Inquisition. TyranidsGameplay Those Neophyte hybrids wandering around are supposed to be waiting for the arrival of the Tyranid Overlords. So why are they trying to kill you? The Biophagus can create the hybrids, indoctrinate them into the Broodmind, and even tinker with their genes to transform them into something far worse. Lore One of the most sinister aspects of Tyranid invasion is the “pre-invasion,” where citizens are unknowingly infected with Tyranid genes to ease the takeover and erasure of their planet. In Gladius, these are represented by the quasi-human Neophyte Hybrids. The Biophagus is key to spreading the genetic curse as far as possible and then aiding the various Gene Cults into joining together when the Broodmind signals. DrukhariGameplay What if you could do what the Haemonculus does, hand-crafting creatures to do your will? The Talos can be just a lab assistant and bodyguard…but, if you’re willing to feed it a few of your more expendable allies, you turn it into a truly terrifying monster. Lore The dark Aeldari, bound to a vampiric life of torturing others for sustenance, are probably best exemplified by the Haemonculus. This twisted physician can heal, certainly, but is at his best when using his art to extract fluids and soul-essence from victims. The Talos is both the ultimate reagent dispenser and cage, swallowing victims and using their forms to enhance its own. Adeptas SororitasGameplay The Sisters share with the Aeldari a lack of vehicle repair. This means lots of time sitting in the back line, healing, rather than smiting the heretics. Their infantry already have many buffs and heals; I felt there was no reason the Sororitas couldn’t work with Techpriests to fix their vehicles and thus make them a little more fun to play. Lore Martian Techpriests have a rather uneasy relationship with the Sisters because of their belief in the Omnissiah; however, the Sororitas need vehicle repair and maintenance just like every other branch of the Empire. So they come as reinforcements to help the same way Enginseers help the Astra Militarum…by keeping the gears turning and the machine spirits appeased. Adeptus MechanicusGameplay I wanted to see more interaction with map features, and the Mechanicus can use a more flexible source of income in the early game since they are best played when confining a single type of building to each tile. The Explorators allow a player to scoop up some otherwise-heretical sources of various incomes, easing early game pressure on the economy. Lore Belisarius Cawl is a truly ancient Archmagos Dominus who has finally emerged from sequestration to show off truly new discoveries and technologies, such as the stronger Primaris Space Marines. I imagined that this would inspire other Techpriests to push the limits of old Martian orthodoxy, even sampling some xenos technology. In this mod, they explore Gladius’ xenos elements, and then produce an applied benefit from each of them. Appendix C: Getting Help I love helping people fix their mods! It wasn't long ago when I didn't understand even the very basics of modding, and help from other modders was critical to encourage me to keep at it. So please ask about any problems your hitting. With that said, do a couple of things to help me help you: Carefully check all spelling for capitalizations and spaces in unit names. If you are having multiple new files, make sure that all the names are correct and in the right folders. Please consider using Visual Studio Code, as it will find some errors for you and at least really help you see the structure of the file when we discuss it. If I download any of your code, that's how I'll be looking at it. It's free and lightweight. Posting the exact error message is incredibly helpful. It looks like gibberish at first, but eventually you'll realize that these messages actually often point directly to the problem. Unfortunately, there's no good way to "cut and paste" these. For me to really look, I need all your code! Vague statements about errors are very hard to troubleshoot. The best way to do this is to upload your mod and post a link; I can then download it to see if I can find the errors. Consider downloading one of my mods, because I've had to deal with most of the problems you'll encounter, and I can often point to a specific unit in one of my mods where I created a custom unit which does the thing you're trying to do (or a variation of it).