换一换
换一换 


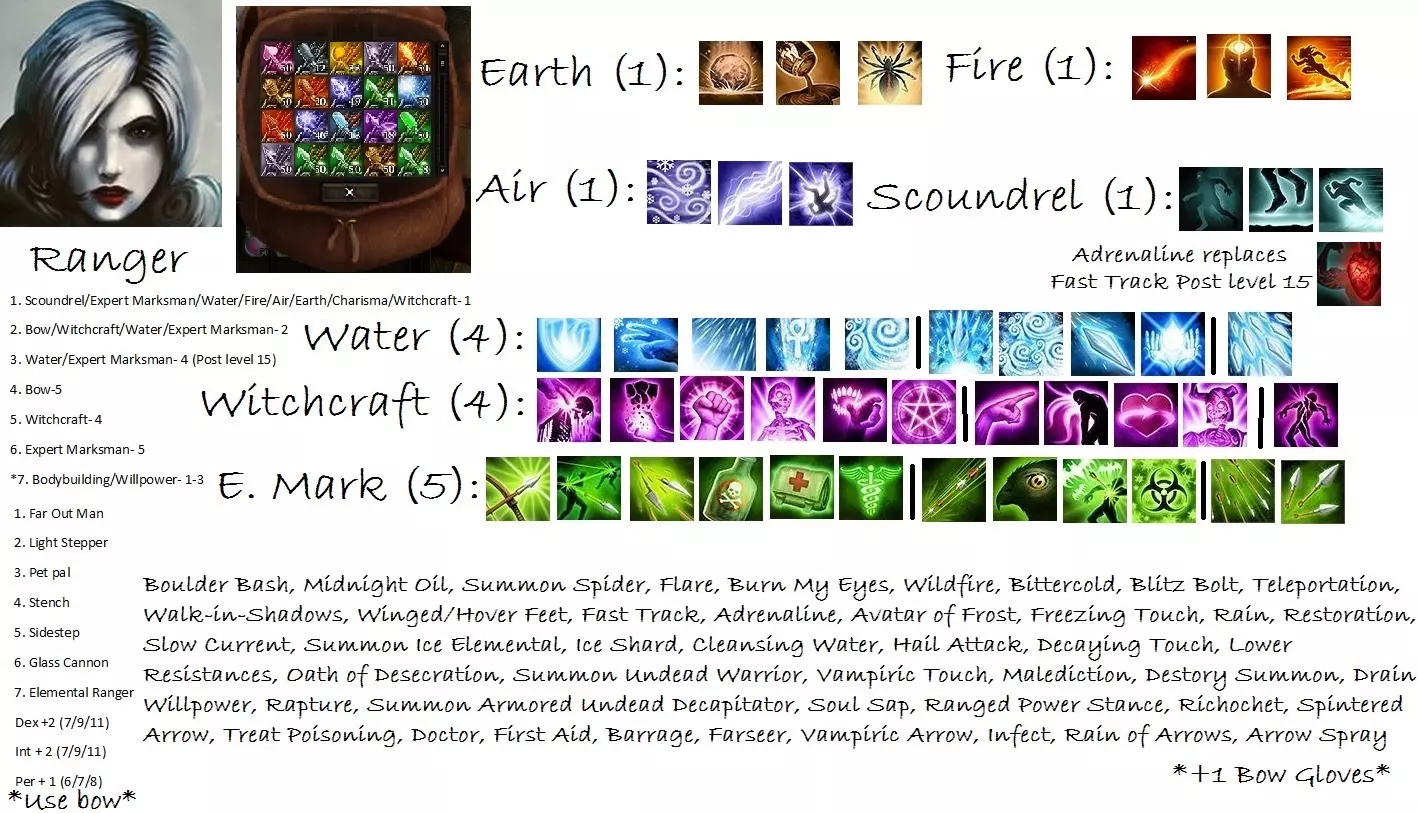
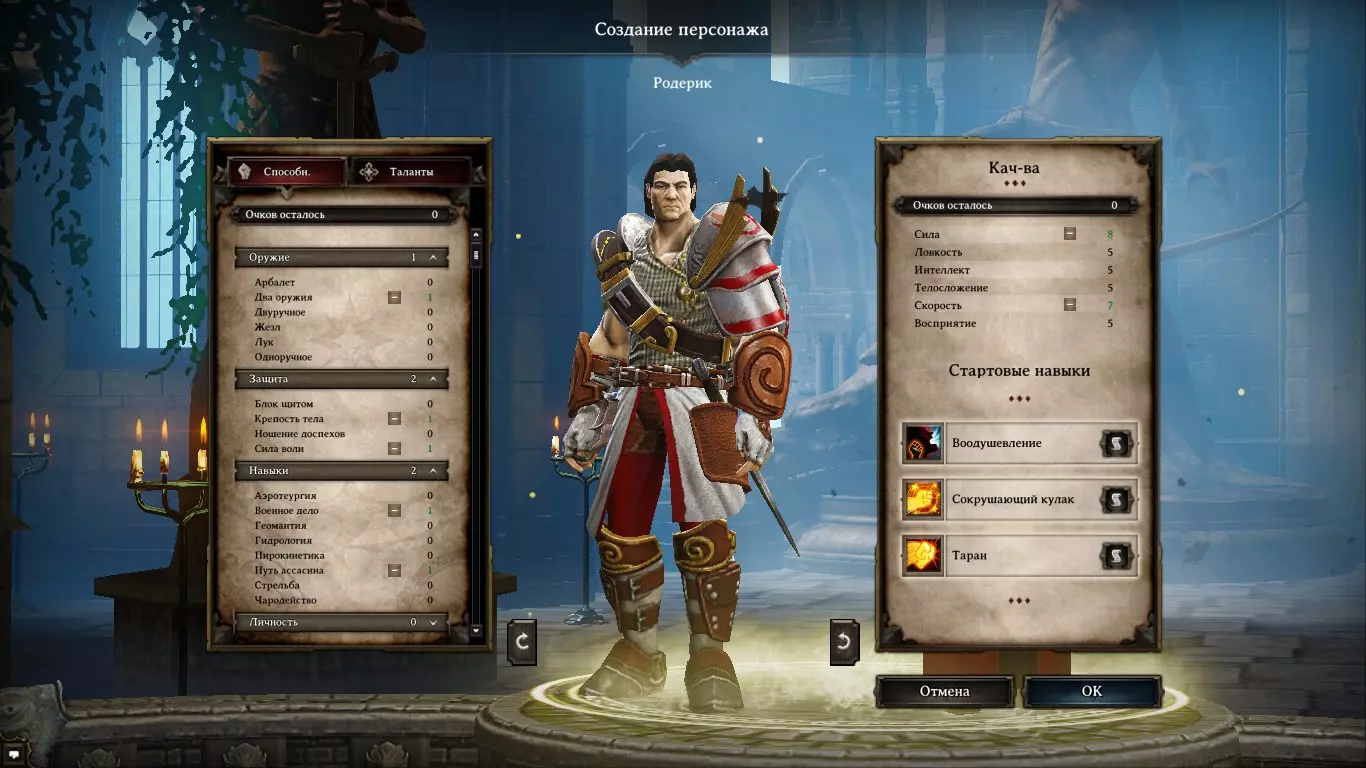
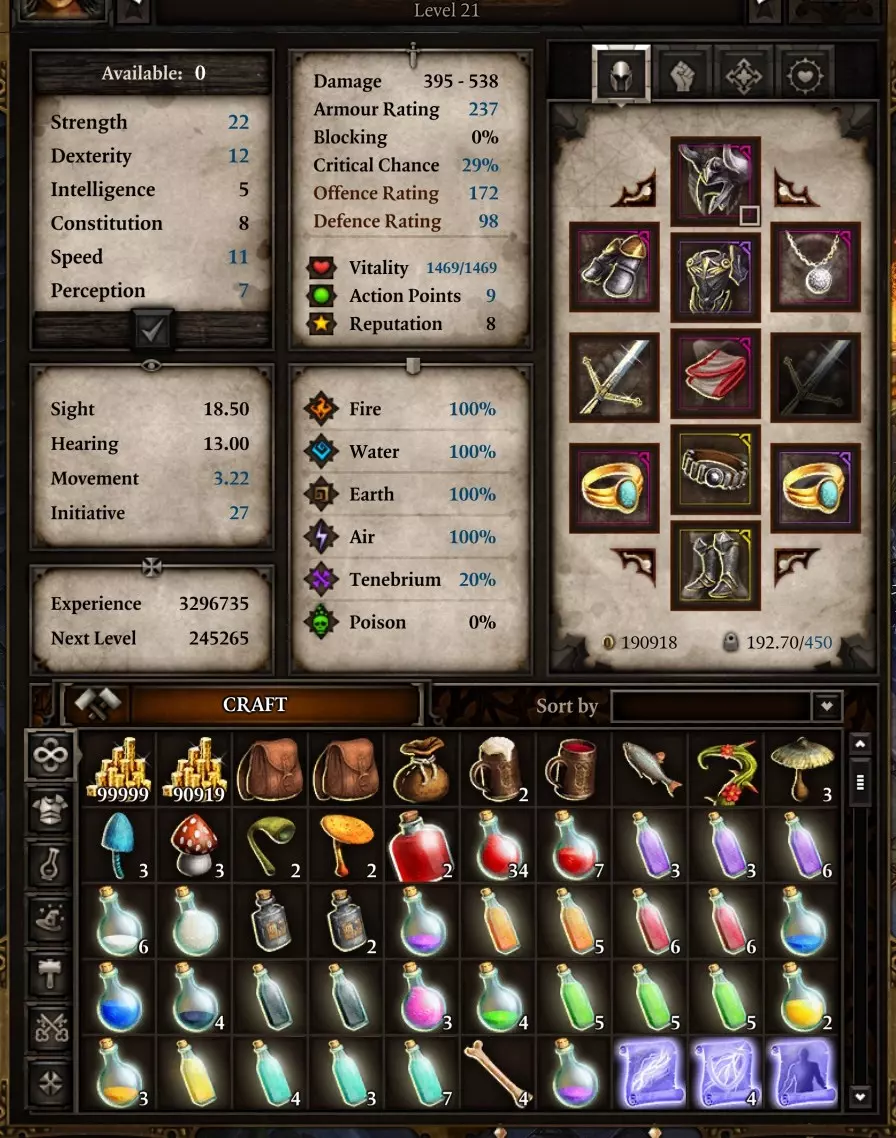
A guide about adventuring in Rivellon while hurting things with metallic objects. Includes general advice, a set of simple and effective builds to beat Tactician/Honour without many issues, as well as walkthrough notes and videos. Introduction Here are the goals of the party build featured: Lazy builds that function well on Tactician/Honour.Lazy as in not requiring taking 1-2 point dips in 4 different schools for some arbitrary skills to glue the build together. 3 out of 4 characters have a single main attribute (outside of Speed/Perception, obviously – AP is AP, everyone is action-dependant), so there’s less need to agonize over the problem of getting 4+ stats sky high. Function well as in low average combat duration with medium to high safety.Tactician+ simply because I’ve never touched lower difficulties. All of the video material is Honour mode, although it’s stitched from 2 parties (I made some stupid choices and died, that happens). Consistent tactics throughout the entire game.Keep it simple, do one thing, do it well. Your battle plan at lv.5, lv.10, lv.15 and lv.20 will look more or less the same. Tools get progressively fancier, but the core loop remains unchanged. Reasonably low learning curve and minimal crafting/stealing dependency.If you’re new to the game, this party will get you through just fine. Maybe not quite as spectacularly as it would with a Custom Greatsword Of Pwnage +5™, but it will. It’s pretty easy to get the hang of how to approach combat “correctly” with this setup (and at the end of the day, just walking into combat is totally fine most of the time). Similarly, if you’re not a fan of the “we’re saving the world, so all the stuff in it naturally belongs to us” school of thought, you’ll get by. Focus on melee as damage source.Cursory googling out of curiousity to see what people do with this game gives me pretty much universally triple ranged setups, environmental manipulation or some combination thereof. When I say cursory I mean top results - digging deeper reveals a whole lot more. Steam guide section for sure does not seem to have much love for melees (at the time of writing, anyway), so I’ve decided to cook up something about good old “smack things with big, pointy, quite possibly flaming toothpicks” strategy. Is this guide for me? First and foremost, this was originally intended for anyone who would like to give Honour Mode a "fair" shot (i.e. without speedrunning techniques), but isn't sure his/her party would make the cut. Don't do utterly stupid things, and this build WILL get you through. If you're new to the game and are struggling with making a working party - as I've said above, this will work just fine. You will not find much help with questing/puzzles here though. This is not a walkthrough, but it does contain a suggested order of battles/content exploration. If you're looking for some new innovative build - this is decidedly not it. This is an accurate account of some fairly straightforward effective builds - nothing more, nothing less. If you're looking for ranged dps builds, you won't find them here. Which should be pretty obvious, but still. Party overview A quick rundown of party builds so you know what you’re getting into (and whether or not you’re even interested to begin with). This is a double melee dps x double bfc support party. Source Hunter 1 (henceforth “Knight”): 2H Man-At-Arms/Scoundrel Combat: dps, hard cc Non-combat: trap/puzzle navigation, stealth (recon, stealing). NPC 1 – Madora: 2H Man-At-Arms Combat: dps, hard cc, Leadership Non-combat: Lockpicking Source Hunter 2 (henceforth “Enchanter”): Wand, Wand/Shield, Dual-Wand, Dual Dagger Hydrosophist/Aerotheugre/Witchcraft Combat: Summoning, hard/soft cc, recovery, buffing, debuffing Non-combat: optional Crafter, trap/puzzle navigation assistance NPC 2 – Jahan: Wand, Wand/Shield, Dual-Wand, Dual Dagger Hydrosophist/Aerotheugre/Pyrokinetic Combat: Summoning, hard/soft cc, recovery, buffing, debuffing Non-combat: optional Crafter, trap/puzzle navigation assistance More info on crafter choice in crafting section. Multiple listed weapons for mages because those are mostly for stats and make more or less sense in different parts of the game. More on that elsewhere. What this setup is good at: swift assault, not taking much damage, OHKOs, arson and burglary, fat crits, evil laughter and other basics of murderhoboingsaving the world. What this setup is not good, but passable at: traps. To hell with traps, nothing fun about’em. What this setup is not good at: perception-related stuff (i.e. finding hidden loot, doors and switches), at least until mid-game or so. What this setup generally does not do: ranged combat ([cross]bows, special arrows, grenades). If you’re thinking “well, this party is missing a character/weapon/follower/something else I really want to play” - check out “Adaptations” section. Build tables - Lv.20 Complete build tables for each character. Only base values (no item bonuses). Talents are listed in order of acquisition. Spells are listed by school -> tier -> approximate order of acquisition. Individual levelups and a mid-way Lv.10 builds are present in walkthrough section. Attribute point totals are listed as "starting from 5", but actual points are listed from lv.1 for Hunters and pick-up stats for NPCs. Tables are in pairs for 2 melee characters and 2 mages. Skill tiers are marked (N)ovice, (A)dept, (M)aster. Skills are listed by tier > rough order of acquisition. Random underscores is just me padding tables so that text aligns nicely, not some optional slots or anything else. Source Hunter 1 (Knight) and Madora's tables SH1 - KnightMadoraAttributes (total 17 pts): Str: 8->13 Dex: 5 Int: 5 Con: 6->8 Spd: 6->11 Per: 5Attributes (total 16 pts): Str: 8->12 Dex: 5 Int: 5 Con: 7->8 Spd: 6->11 Per: 5Talents: Bully Opportunist Bigger And Better All Skilled Up Picture Of Health Walk It Off flex(*)Talents: Comeback Kid Opportunist What A Rush Bully Bigger And Better Picture Of Health Walk It OffAbilities (total 54 pts): Two-Handed 5 Tenebrium 2(**) Armor Specialist 3 Bodybuilding 3 Willpower 3 Man-At-Arms 4 Scoundrel 3 Bartering 1 Loremaster 2Abilities (total 49 pts): Two-Handed 5 Tenebrium 1 Armor Specialist 3 Bodybuilding 1 Willpower 3 Man-At-Arms 4 Leadership 4 Lockpicking 1(***) Skills - Man-At-Arms: Crushing Fist (N) Battering Ram (N) Melee Power Stance (N) Encourage (N) Cure Wounds (N) Helping Hand (N) Crippling Blow (A) Whirlwind (A) Rage (A) Flurry (M)Skills - Man-At-Arms: Crushing Fist (N) Battering Ram (N) Melee Power Stance (N) Encourage (N) Divine Light (N) Helping Hand (N) Crippling Blow (A) Whirlwind (A) Rage (A) Flurry (M)Skills - Scoundrel: Walk In Shadows (N) Fast Track (N) Winged Feet (N) Adrenaline Rush (N) Cloak And Dagger (A) (*) Lv.19 slot suggestion list: Thick Skin, What A Rush, Swift Footed, Light Stepper, Morning Person. Or Expert Marksman 1 + Avoid Opportunists (pull a point from Tenebrium 2 or wait for lv.21). (**) Tenebrium 2 is worthless on its own, included in case you don't want to craft a Tenebrium weapon for a certain quest (and bought/looted ones sometimes require Tenebrium skill). Also note that Tenebrium skill gives you a free "boost" point, even though it's listed in black colour as a regular point, so upgrades cost 1 point less (1 for rank 2, 2 for rank 3 etc). (***) Assuming 4 lockpicking items. If only found 3, build will be Bodybuilding 2, Willpower 2, Lockpicking 2 instead. Source Hunter 2 (Enchanter) and Jahan's tables Jahan (Crafter variant)SH2 - Enchanter (non-crafter variant)Attributes (total 18 pts): Str: 5 Dex: 5->8 (****) Int: 8->14 Con: 7 Spd: 5->9 Per: 6Attributes (total 17 pts): Str: 5->6 Dex: 5 Int: 7->13 Con: 5 Spd: 7->11 Per: 6Talents: Elemental Affinity Far Out Man Scientist Bigger And Better All Skilled Up Know-It-All Lightning RodTalents: Pet Pal Know-It-All Far Out Man Bigger And Better All Skilled Up Walk It Off Lightning RodAbilities (total 51 pts): Tenebrium 3 Bodybuilding 1 Willpower 1 Hydrosophist 5 Aerotheurge 5 Pyrokinetic 4 Blacksmithing 2 Crafting 2Abilities (total 54 pts): Wand 2 Tenebrium 1 Bodybuilding 2 Willpower 2 Hydrosophist 5 Aerotheurge 5 Witchcraft 5 Skills - Aerotheurge: (*****) Teleportation (N) Bitter Cold (N) Blitz Bolt (N) Shocking Touch (N) Thunder Jump (N) Summon Air Elemental (A) Tornado (A)Skills - Aerotheurge: Teleportation (N) Bitter Cold (N) Blitz Bolt (N) Avatar Of Storms (N) Thunder Jump (N) Wind Of Change (N) Netherswap (M)Skills - Hydrosophist: Regeneration (N) Slow Current (N) Rain (N) Ice Wall (A) Mass Slow (A) Mass Disease (M) Hail Attack (M)Skills - Hydrosophist: Regeneration (N) Slow Current (N) Avatar Of Frost (N) Freezing Touch (N) Cleansing Water (A) Ice Wall (A) Water Of Life (A)Skills - Pyrokinetic: Wildfire (N) Avatar Of Fire (N) Burning Touch (N) Burn My Eyes (N) Fireball (A) Smokescreen (A) Purifying Fire (A) Meteor Shower (M) Skills - Witchcraft: Oath Of Desecration (N) Summon Undead Warrior (N) Malediction (N) Vampiric Touch (N) Rapture (A) Destroy Summon (A) Drain Willpower (A) Summon Armoured Undead Decapitator (A) Soulsap (M) Resurrect (M)Skills - Special: Summon Zombie Nick (****) Dual-wield daggers + robe/leather variant. For other weapon/armour choices, put those points into other stats as needed. (*****) Mages will have some missing slots in skills. Fill those out to taste. If not sure - just mirror what one has, and the other doesn't for Aero/Hydro. Tactics This section briefly describes how this setup works and gives main details on important tools. The general routine is to make your mages focus on controlling the battlefield, while Knight and Madora dish out the pain. For practical applications take a look at videos in the walkthrough section. Pre-combat Choose engage type based on battlefield layout and initiative win/loss (high=goblins, orks, bosses; low=undead, humans, vermin). Exact initiative count is available at loremaster 5. Everything written here applies to just about any party composition, unless specifically noted. 1) Direct engage - walk into the encounter.Good when: you want to trigger the fight asap (attacking lone member of the group, so most enemies enter combat far away) enemy is mostly melee on open ground (no need to worry about access to ranged opponents) you want to test waters (e.g. not sure about initiative order)Downsides: no control over enemy formation poor backline access on the 1st round 2) Summon engage – use a summoned creature to trigger the encounter at 1.5-2x range.Good when: you want to delay turn and make enemies walk towards you (possibly into a trap/environmental hazard) enemy has multiple scattered ranged combatants enemy has high initiative and reach (speed/range) you want a safe buffing round (e.g. to prep for environmental effectsDownsides: no immediate battlefield control zero backline access (no chance to interrupt/prevent enemy buffing), potentially poor backline access on 2nd turn 3) Hybrid “direct summon” engage – summon while almost walking into the encounter.Good when: you want to deliver summon to the middle of the enemy you want something from your summon (like a spell), but not the waiting round or backline access issues of summon engage. summon has high AP cost (relevant if you obtain strong summons before getting decent AP)Downsides: many enemy mages know Destroy Summon skill, so if using the best summon might backfire poor backline access on the 1st round4) Teleportation kidnapping engage – use Teleport to yank someone and put them near your melees.Good when: you want that one enemy dead right nowDownsides: having less initiative than the one you just TP’d under your feet may end badly more often than not - no/poor control over targets other than the TP’d5) Spell engage – use a spell that isn’t displacement or summon (most likely). This could be a direct “blasting” or through environmental interaction (e.g. tp some oil barrels + fireball).Good when: you want to set up an environmental trap (or there already is one) the spell itself is a strong source of crowd control (e.g. Hailstorm)Downsides: a spell on cooldown likely zero to poor backline access (distance at least that of direct engage + environmental hazard)6) Invisibility split engage – use some form(s) of invisibility to get party member(s) into more desirable positions.Good when: you want good backline access you want to get the best positioning for area spells and control effectsDownsides: party compositions with few invisibility options will have to rely on potions/scrolls potentially unsafe if there’s too much split7) Teleporter pyramid drop engage - use some form of invisibility to position one member carrying a pyramid and TP others in with another pyramid.Good when: you want a “lazy” invisibility engage you want to bypass environmental hazards, choke points etc. you want good access to backline in general or a particular enemy you want to use short-range skills ([X] Touch, Avatar Of [X], cone-based spells)Downsides: unsafe if you lose initiative potentially weird auto-application of formation (you have to chain everyone you teleport in) Of course, you can mix and match elements of these forms of engage to fit the situation. Here's a video showcasing the differencies in battle flow of 3 main strategies - direct encounter, tp kidnapping and pyramid drop-in. https://youtu.be/B9FDurCkXJ0 General (all levels) Melees:Power Stance on at all times. Whenever “attack” is mentioned, target selection is Execute > High value target > Prone from Ram > Slowed/Crippled > About to shake off hard cc > Other. Any and all parts are skippable as needed. Whirlwind range scales with weapon range (= spears hit larger area) Basic routines: Battering Ram multiple targets -> Move -> Whirlwind Battering Ram -> Attack Crushing Fist -> Battering Ram (on different targets for maximum cc) -> Attack Battering Ram -> Crushing Fist (on same target if Ram fails to connect through resist) -> Attack Move -> Battering Ram (look for optimal angle/reach) Special routines: Fast track -> any basic routine (at the battle start with 10 AP) Encourage -> Battering Ram/Crushing Fist/Attack (early game at 7 AP) Any routine -> Fast track (end-of-turn haste if you ended up not needing AP for movement) Battering Ram is a ground target skill. It's vital to use targeting to its maximum efficiency to affect as many targets as required.
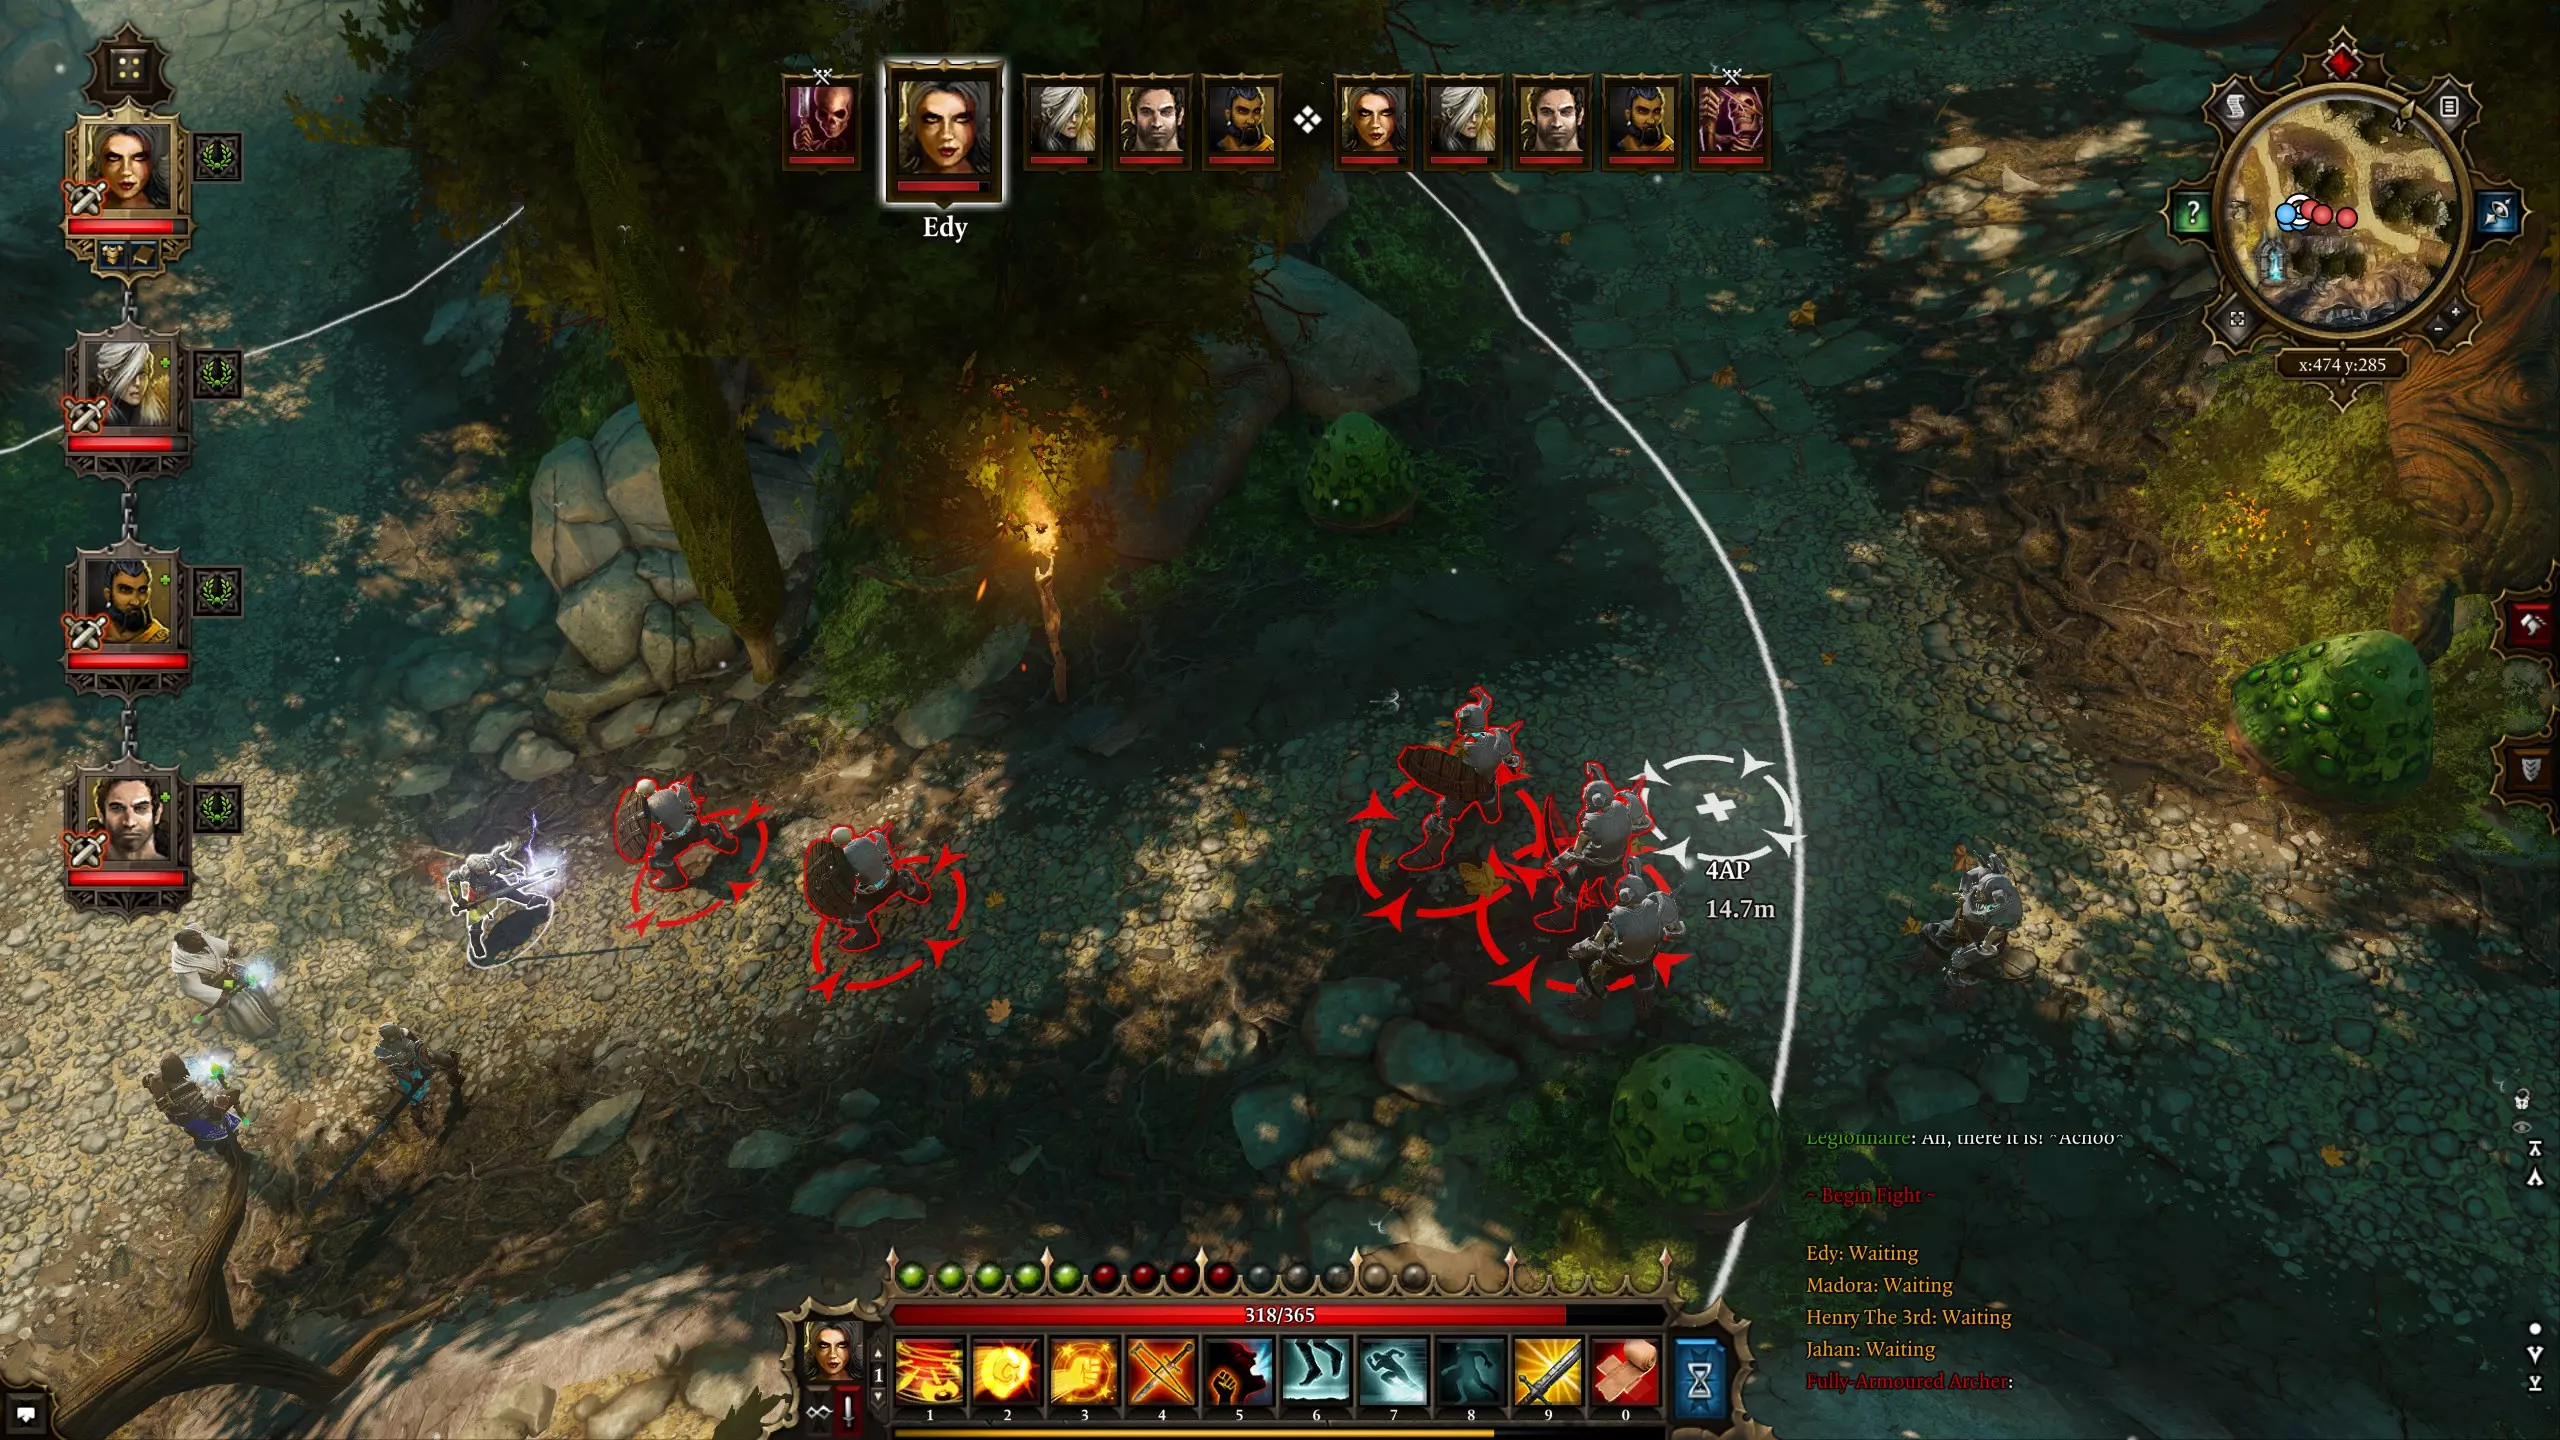
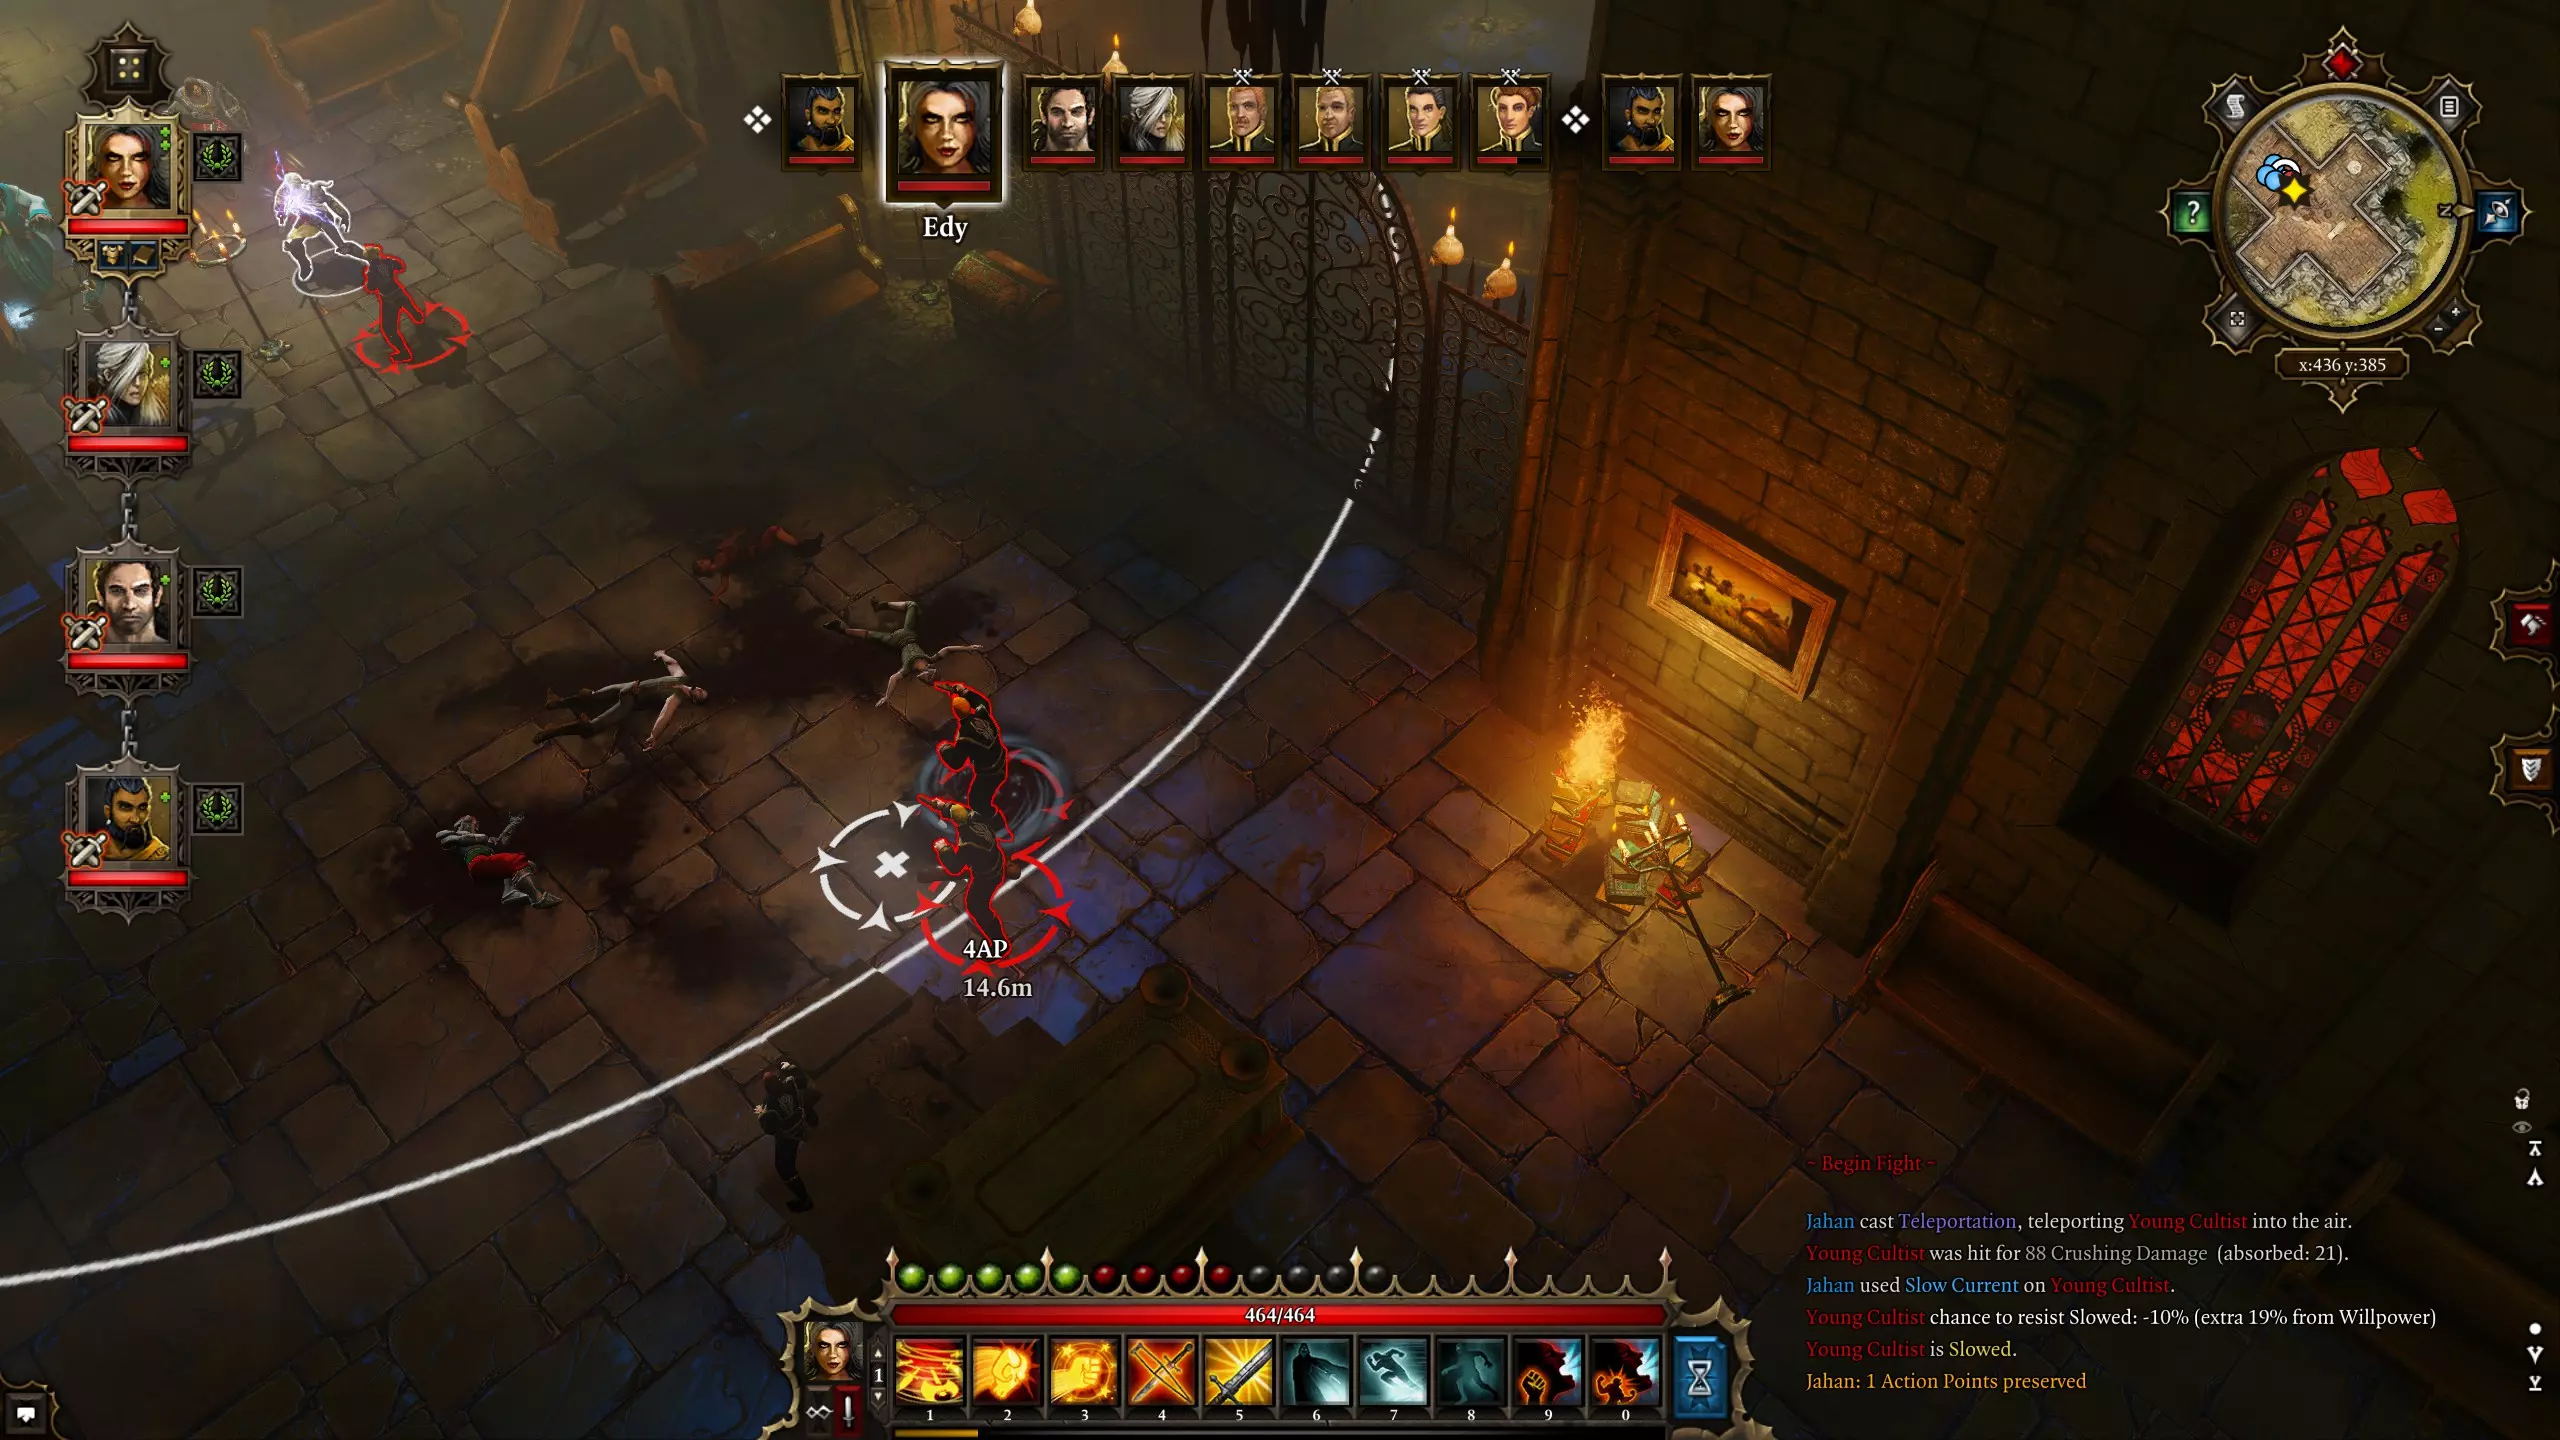
Apply recovery skills (Helping Hand, Cure Wounds) as needed in emergency situations. Use Adrenaline for extra AP either in an emergency or if you are certain it will reduce enemy forces enough to compensate for effectively losing next turn (in practice, if you think you can clean up the encounter in 1.5 turns). Apply Winged Feet as needed based on battlefield (not really necessary all that often in my experience) or during exploration. Mages:Environmental effects are, generally, not your friends. You want to keep battlefield free of oil, static clouds, electrified water and so on, because melees need room to move around safely. This, however, does not mean you can’t use a well-placed effect to your advantage. Electrical/Fire wands interact with other elements when ground-targeted. You can light oil on fire, explode poison clouds, electrify water pools etc. Oath Of Desecration based on initiative order and cc status of melees. Wildfire – same, priority on Madora (no self-haste). 2x(Slow Current -> Bitter Chill) can reliably prevent half of any encounter from doing much. Prioritize slow on melee targets, freezing on ranged targets. If mage initiative > melee initiative, imagine what Battering Rams will look like and prioritize unaffected targets. Charm/Rapture - prioritize casters if you want buffs/cc, melees for meatshields, ranged units for free special arrows. Regeneration/Avatars as needed. Wildfire works as unfreezing option. Summons work both as tanks and flankers to reduce AC. Thunder Jump is your way to catch up with melees, when they rush too far away. Not entirely predictable landing, but still an option should you need to urgently deliver Avatar Of Frost or somesuch. Teleportation can be used not only as engage tool. Lining up enemies for Battering Ram, saving your melees the need to chase faraway/running enemies, forcing AI to waste time walking towards you instead of taking other actions – all those are often worth the AP cost. Summoned Air Elementals offer you the non-damaging version. Lv. 6-11 (+Crippling Blow, +Rage) Melees:Crippling Blow is effectively an attack that does not miss, does not crit, has higher than normal range and deals a fixed damage type. It’s trivial to get it on 1-turn cooldown as long as you pay any attention to equipment at all. Crippling Blow range scales with weapon range (= spears hit from really far away). Use cases: you don’t want to or can’t walk (save AP, avoid AOOs) enemy has vulnerability to Crushing damage (most undead and just about every boss) you want to ignore miss chance (i.e. when you are Raging and your target is not cc’d)Rage primarily against prone/frozen/stunned targets. Mages:Silverglen and Homestead elementals provide a nice variety of support spells. The most notable is Ice Wall – the “break line of sight, freeze unlucky schmucks and make frozen ground area” all-in-one glorious package. The only downside is that it stops Battering Ram. Other than that, a fresh batch of summons - Air/Fire/Ice Elementals and Undead Decapitator. Lv. 12-14 (+Flurry, no top-tier spells) Melees:Flurry is the “I want you dead” button. Effectively, 4 separate attacks that can miss, can crit, deal fixed damage type. Not effective without setup. Lazy setup – Oath Of Desecration + Power Stance + Slowed OR Crippled – can miss. Basic setup – Oath Of Desecration + Power Stance + Knocked Down OR Frozen/Stunned, Crippled – no miss chance, usually enough for regular targets. Full setup – Oath Of Desecration + Rage + Power Stance + Knocked Down OR Frozen/Stunned, Crippled – no miss chance, maximum damage.Mages:From here on a bit more emphasis on setting up Flurry (stun/freeze whatever didn’t get knocked down). Lv. 15+ (+top-tier spells) This is the point where you can open combat with Hailstorms to freeze everything, charge in + Meteor Shower once you have 100% Fire resist + Burning immunity, and so on. All previous tactics still work, but you can skip a lot of the planning hassle and fiddling with single-target cc. Displacement tools are expanded with Netherswap. Applications include swapping Knight and Madora after one has already dashed in the middle of enemy formation, or just straight up sending one of them towards the enemy as the battle opens, while the other deals with whoever was unlucky to get swapped towards the party. Line of Sight notes There are three different requirements to distinguish in DOS:EE regarding line-of-sight skill usage: Caster LOS - the caster must have clear vision of the skill casting point. Examples include most summons and Ice Wall. Party LOS - anyone from the party must have clear vision of the skill casting point. This is how most ally buffs work (you can cast Regeneration on ally regardless of conditions, because said ally "sees himself"), and that's how, for example, Slow Current and Bitter Cold work. Caster Line of Effect - caster must have a clear line without obstacles to its target. That's how your Raptures, Blitz Bolts and similar spells work - a skill can be blocked by units, obstacles and level geometry. No LOS - your Hailstorms, Meteor Showers and cone skills can just be cast whereever you like. Equipment All characters Boots: Can be a mixed bag early on. Lategame boots sometimes come with +1 AP, which is oddly listed under “AP Cost” section, so grab whatever boots have that. Barring that, priority is Spd > Move > Resists. Just make sure you don’t forget to add Slipping immunity so you can walk on ice (if you don’t use frost grenades much – can be delayed till Hiberheim). Immunities:Burning immunity is the single most important one for melee characters. Why? Because it means that you can grab 100% fire resist from items (and maybe a potion at mid-levels), and be literally invulnerable against explosive traps and lava. I’ve said it before, I’ll say it again: to hell with traps, nothing fun about’em. Also opens up the ability to Meteorstrike away. The good old “Black Dragon X Armageddon ” style. The only downside is that Burning + Fire immunity means you can no longer be unfrozen via fire damage spells that don't explicitly give you "warm" status effect. For example, Burning Touch will not unfreeze you, because it gives "burning" status, but not "warm" status. But you can still be unfrozen by Wildfire, because it makes you "warm", rather than "burning".
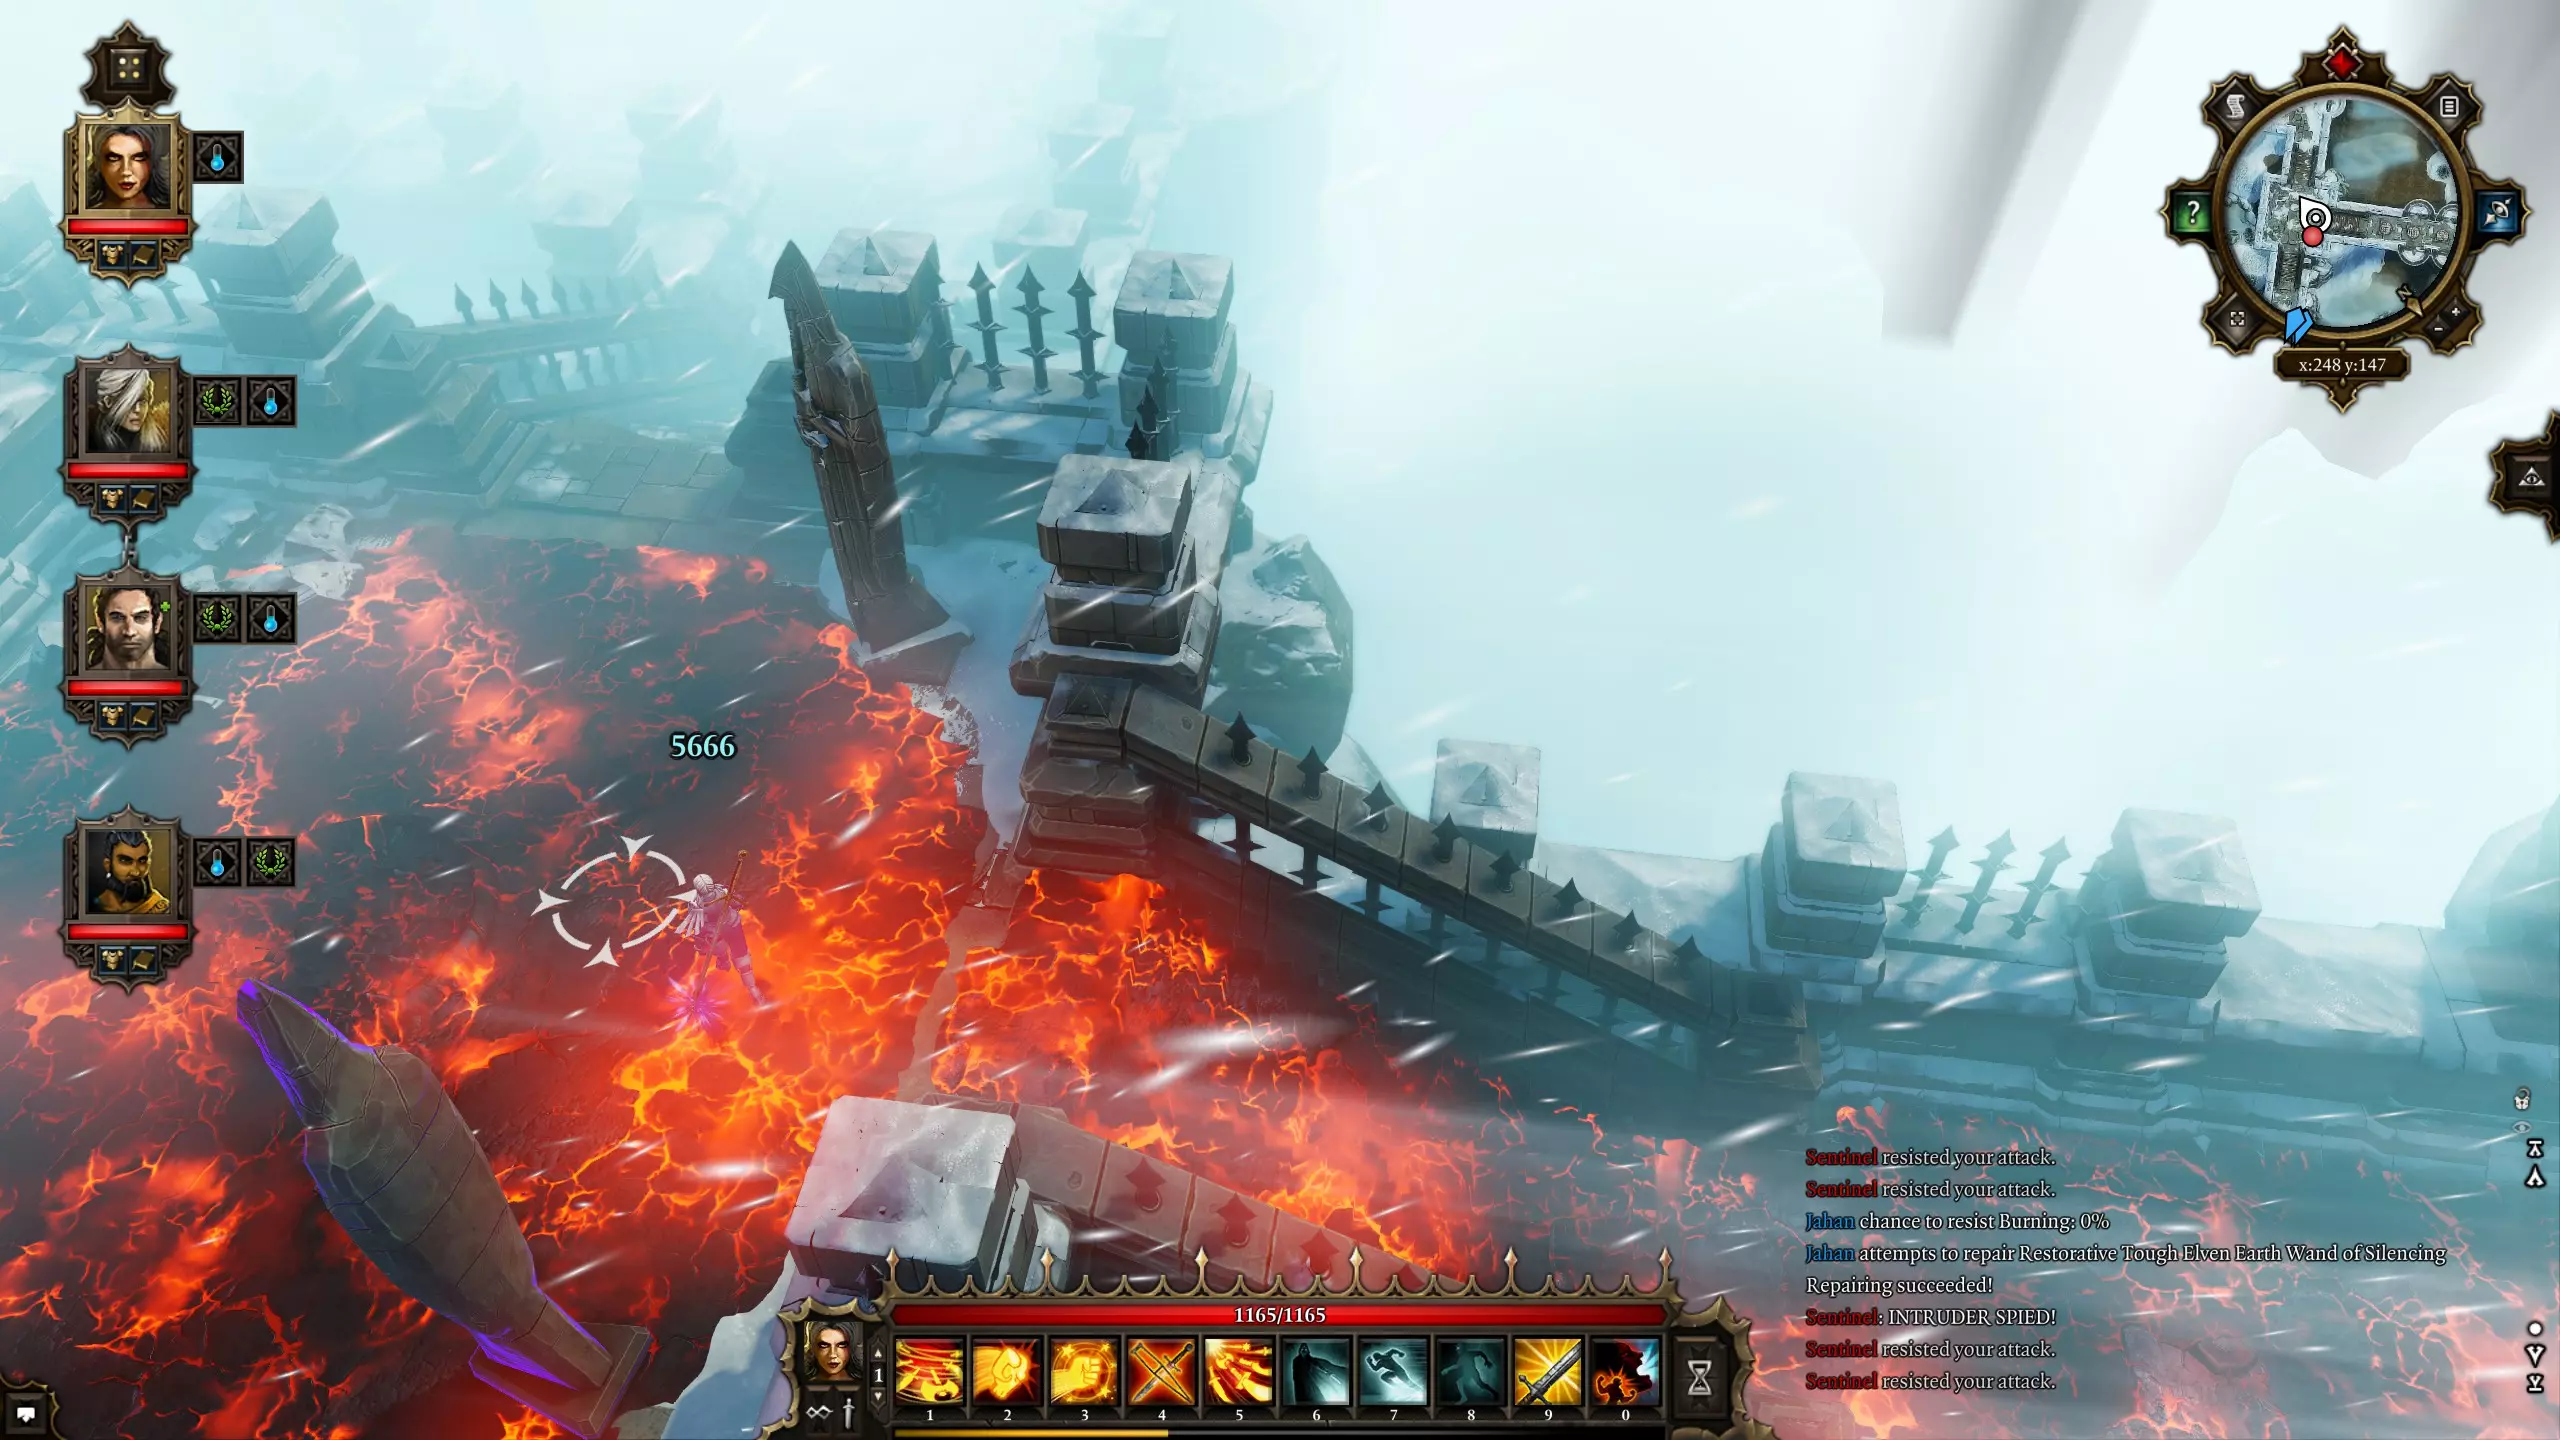
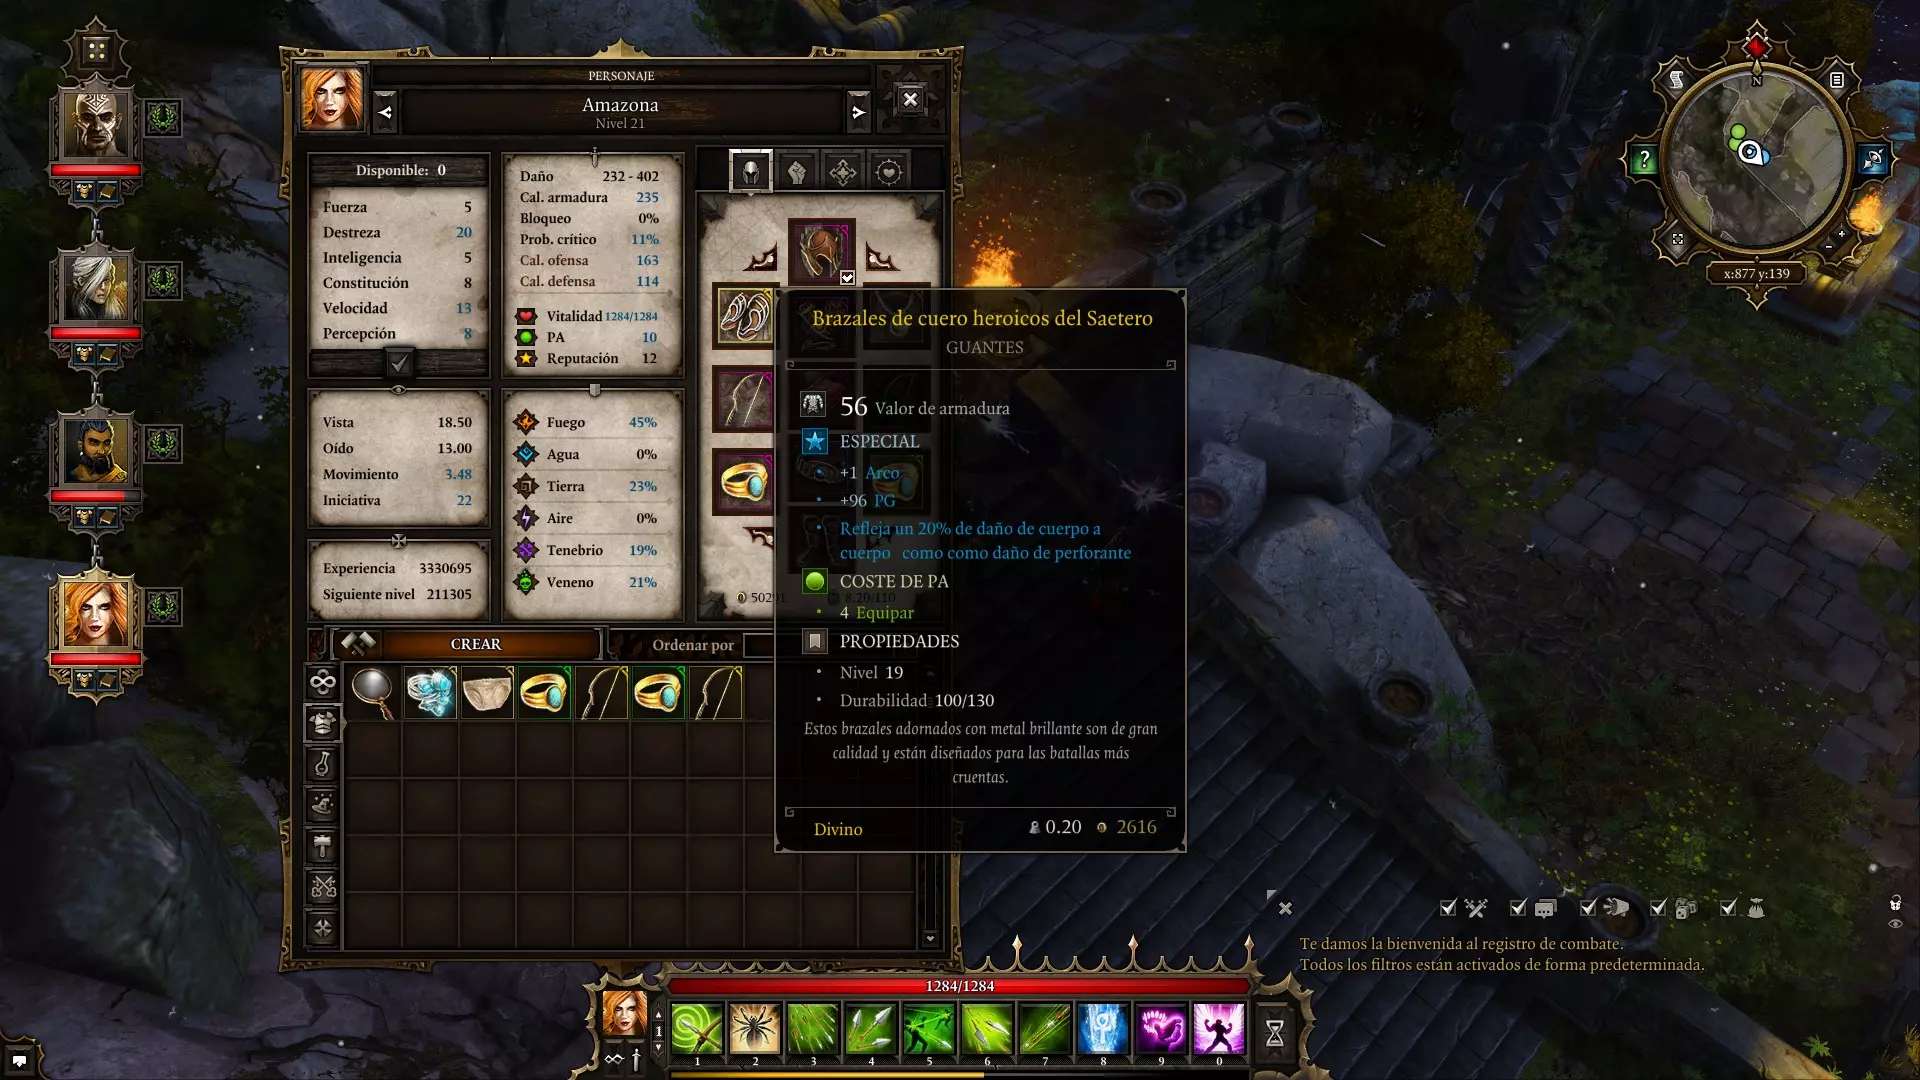
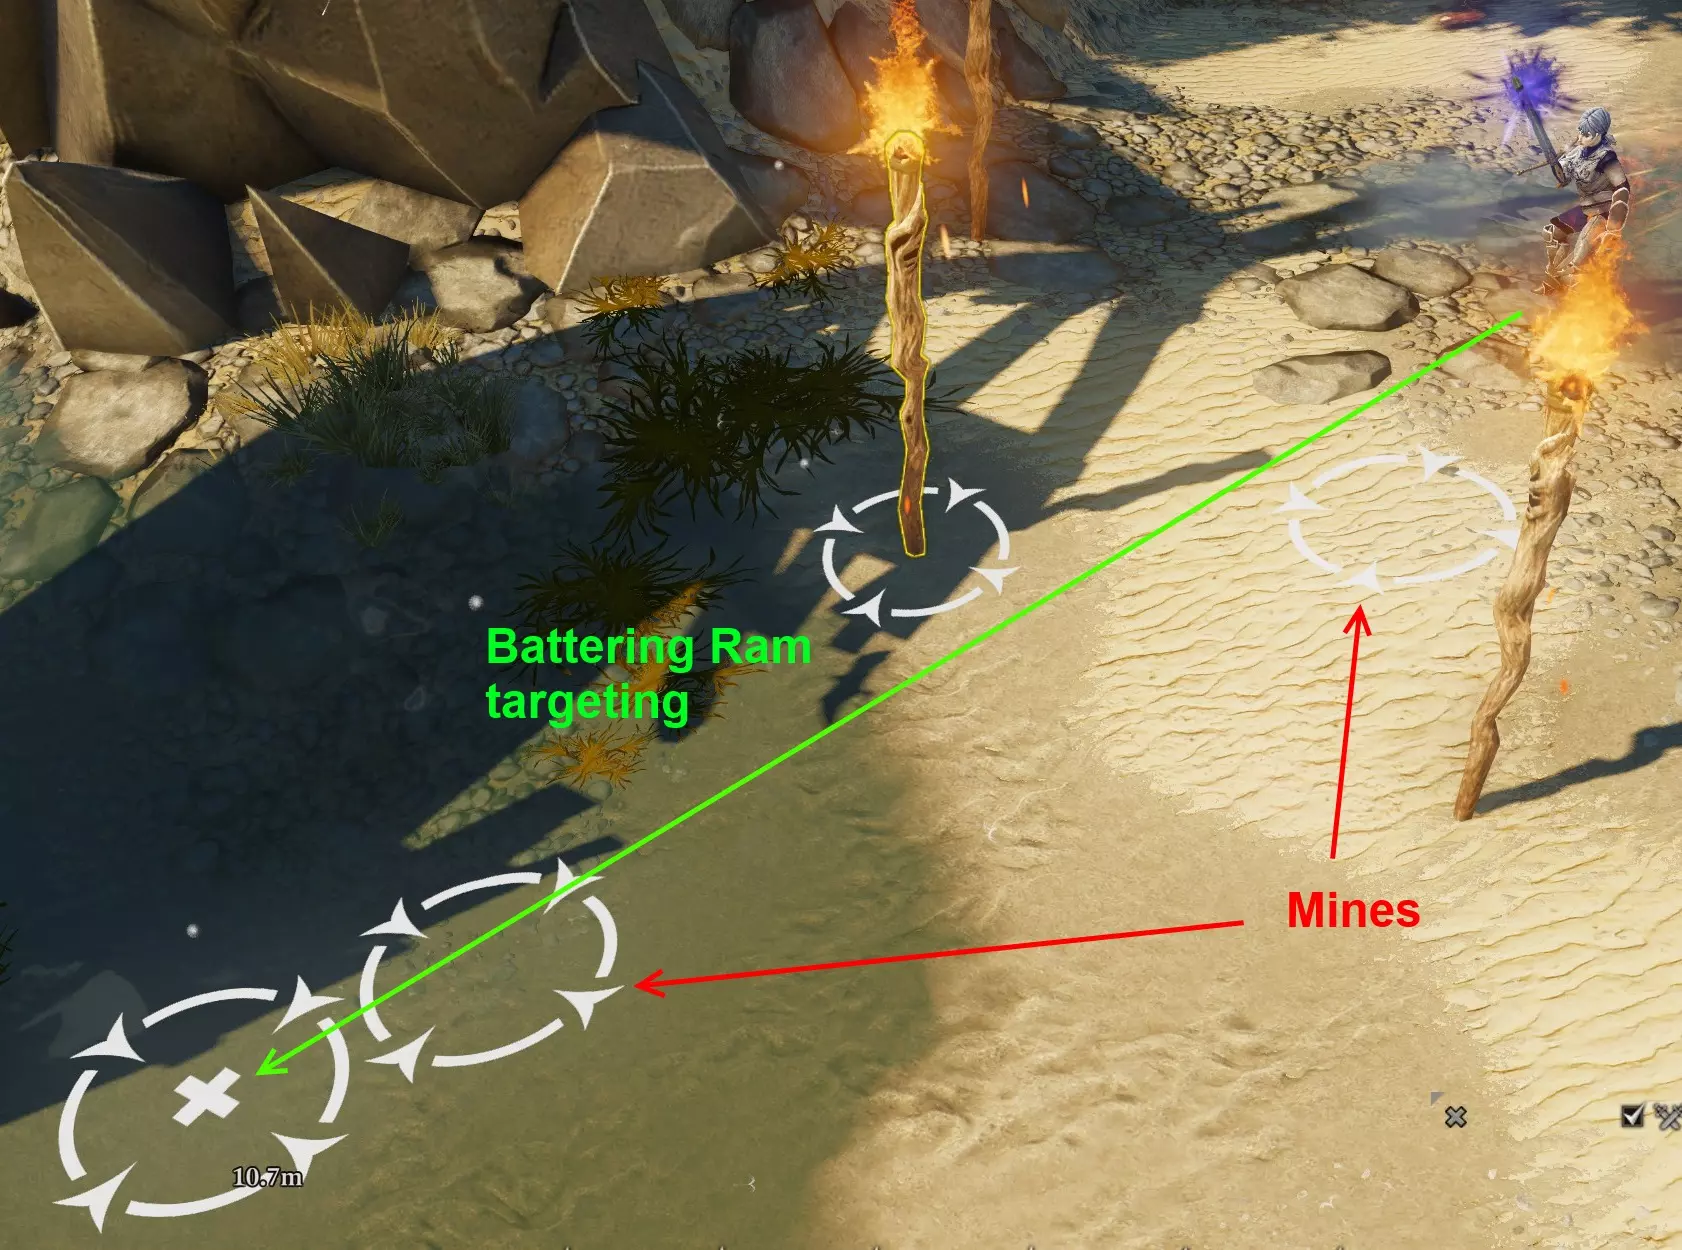
Lava baths are best healing Stunning immunity is the second thing you should try to incorporate in your builds, so you can safely electrify blood/water and indiscriminately set up static clouds if desired. Fear immunity is paramount for NPCs (Madora/Jahan) in several boss fights. If you don’t metagame the trait for Fear immunity on Hunters – try to grab this immunity for them as well. Freezing immunity is most important past lv.15, because Hailstorm is not entirely predictable when it comes to outer edge. Resists:Hitting 100% with 4 main elements should be fairly straightforward by the end of the game. You can enchant Armour, Belt, Bracers, Tunic, Helmet and these enchants stack with any native resists those items have. Effectiveness is item level-based, so don’t bother much with early items. Source Hunter 1 (Knight) and Madora You need 8 Dex to use Scoundrel skills at 100% chance. Lategame it isn’t an issue, but early on having at least 2 items (7 Dex) is advisable. Throw in something out-of-combat (like a picked up 1H weapon/dagger) to avoid Walk In Shadows activation failures. If you want to add Trip skill into the mix, you’ll need more Dex to have any success. General stat priority:- Str > Spd/Per >Dex/Move > HP/Con for aggressive playstyle - Str > HP/Con > Spd/Per > Dex/Move for safer playstyle. Saving throws Bodybuilding and Willpower are a not a priority on Tactician, to your taste on Honour mode. Just make sure you don’t sacrifice too much for defensive stats on your dps characters. Weapons: You generally want a crafted 2H weapon. A good weapon will comfortably work for about 2-4 levels. If you’re starting to see dropped/sold weapons with higher damage than your crafted ones, there’s your cue to definitely go craft a new one. This won’t work much past lv. 14-ish though, as crafted weapons with 5 Smithing will have minimal values higher than maximums on dropped ones. I prefer swords over axes/spears, because I’m in a habit of picking the best minimal damage. Axes should give the most spectacular crits, spears are better at zone control (attacks of opportunity and attacks from longer range) and offer piercing damage type. Armour/Accessories: Priorities are Move/Stat(as above)>Armour. Keeping mobile is key to your target selection, so keep an eye out for penalty-less armours (and further enchant them for a bonus). Getting hit is not on the list of things you like to do (that’s what summons are for, that’s why we have 2 dedicated controllers). In practice, Ork Armour (lv. 6) that can be obtained at lvl. 2 easily lasts me until around lv. 13-14 if no decent replacement happens to exist. For tankier setups pick armour over stat (in which case crafted ones should be good enough). Madora equips same as Knight, except no need to itemize Dex. It’s probably a good middle ground to run one of them with tankier gear and the other with a dps-ier gear - as long as their Str and weapon are similar enough, you will barely notice the difference in damage output. Also once you start investing into Leadership on Madora, try to keep it at 4+ from gear (+10 initiative). SH2 (Enchanter) and Jahan General stat priorityInt > Spd/Per > Move > Con/HP > Str/Dex. You want status application chance/damage, more spells and being able to keep up with your frontliners’ assault (so they are always in range for buffs and retreating enemies are in range for bfc). Weapons:Early on use single wand (carry multiple elements). Deals relevant damage + there is low spell selection and often “spare” 3 AP after main spell(s) for the round. Once you can craft +2 Int wands – switch to dual wield for stat-hoarding. Single-wield when you need to proc elemental reactions for cheap (see tactics). There are also +speed wands for lategame dual-wield. “Desperation”/defensive options are Con/Leadership/HP (common drops, if you don’t feel like crafting). More defensive option – shield+wand, but will require Str investments from mid-game on if you want to keep upgrading your shields. Decent shields come with Con or Lucky Charm and some resists. Ideally, you’ll grab a shield with an immunity (freezing is the most common I’ve seen). Avoid shields with Move penalties. Double +3 speed daggers as lategame AP hoarding option. This will require gearing into dexterity to put them on (12 for crafted lv.20 daggers). Armour/Accessories:The full spectrum is Cloth vs Robe(Int) vs Leather(Dex) vs Plate(Str). Early anything goes. Initiative, Move and +Wand are common on Cloth, Robes are mostly HP/Move, Plate is for taking hits, Leather if you get some Per/Spd/Dex. Once you start hitting Str/Dex issues for equipping in mid-game – switch to Robes. Past lv. 15 you can get some +2 str/dex gear (e.g. belts, tunics), so options should open up again, although Plate will require Armor Specialist (1, 2). Item sets It’s generally a good idea to keep sets of items that give particular utility bonuses, so that you can reequip into them to achieve maximum ranks while keeping point investments to a minimum. Here’s a quick list: Perception: Ring(x2), amulet, helmet (*1), bow(**) Blacksmithing: belt, bracers Crafting: belt, bracers Lockpicking: Ring (x2), belt, bracers Pickpocketing: Ring (x2), belt, bracers Loremaster: Ring (x2), amulet, bow (*2) Charisma: Ring(x2), belt, amulet Lucky Charm: helmet (*3), shield, boots, belt, amulet Everything in italics is craftable. Everything marked with an asterisk (*) exists on a guaranteed non-random item. (*1): Ork helmet (*2): Adventurer’s Bow III (2 upgrades) gives +1 Loremaster, but requires high Dex. (*3): Rift Oglers, hidden on the starting beach in the red backpack behind some crates. (**) Having a +Perception bow that doesn’t require high Dex is possible by combining low-level bow (just buy/find one early) with Scope (unique item, no guarantees on this one). Crafting This is by no means comprehensive. I only cover essentials that directly synergize with the idea of the build and a few optional ones here. If you’re an experienced player, you can probably think of a few extra things. General notes:Many equippable items (weapons, armors) have a set of “variations” on their stats when crafting. This generally means you should craft multiples of the same item to get bonuses you want (and sell the rest). There’s also a no-bonus item version, which typically has more damage/armor. Magic Ink Pot and Quill, Magic Needle and Thread, Hammer are never expended in their respective crafting recipes (you only need to make one of these ever). Non-magical Needle and Thread is expended in consumable crafting. Whetstone is a one-time consumable. Thankfully, there aren’t many crafting stations to remember: Whetsone Wheel, Furnace, Anvil, Portable Kitchen. Portable Kitchen works as a Furnace and you don't need to place it. Weapons:[X] Ore + Any Furnace = [X] Bar Sword + Any Furnace = Iron Bar Iron Bar + Any Furnace = Steel Bar Iron Bar + Iron Bar = Large Iron Bar Steel Bar + Steel Bar = Large Steel Bar Large Iron Bar + Anvil = Two-Handed Sword Large Steel Bar + Anvil = Two-Handed Axe Knife + Anvil = Dagger Dagger + Brach = Spear Inert Wand + [X] Essense = [X] Wand Weapon + Whetstone|Whetstone Wheel = physical damage up (slashing/piercing) Weapon + [X] Essense = add elemental damage Weapon + Joshua Spice = add fire damage Weapon + Tenebrium Bar = add Tenebrium damage Weapon + Tormented Soul = add Str, Dex Bow+Scope = Add Perception (see item sets) Notes: 2H sword is you “base” weapon. Axe has wider damage range (lower min, higher max). Spear has wider damage range, more reach and different damage type (piercing). Reach works for attacks, attacks of opportunity, and some skills (i.e. Whirlwind). For melee weapons, early in the game you want the +Str version, as Tormented Souls may be hard to come by. However, if you want the best possible weapon, go for the raw damage version and enchant it up the wazoo. Tenebrium gives more damage than essences. The final boss, however, has 150% Tenebrium resistance, so consider having 2 swords for endgame. Joshua Spice is a unique drop that is essentially a “fire Tenebrium”, in that it gives a stronger bonus than fire essense, which makes it probably the best endgame option. You can also enchant with Tenebrium first, and the re-enchant with essense. This will convert increased Tenebrium damage bonus to the essense type. Crafted wands are a stat-hoarding option for mages. That is, take dual +Int wands and forget about attacking with them altogether (in this build, obviously). Same deal with daggers, if you want to spec into tons of Speed for AP (will require Dex shenanigans to equip though). Try to combo Wand/Dagger + shield, if you want extra survivability (Look for shields with +Con and/or elemental resists). Armours:Animal Hide + Knife|Dagger = Leather Scraps Leather Scraps + Anvil = Leather Boots Leather Scraps + [Magic] Needle and Thread = Leather Armour Leather Armour + Metal Scraps|Portable Kitchen = armour class up Cloth Scraps + Needle and Thread = Cloth Armour Cloth Armour + Leather Scraps|Metal Scraps = armour class up Cloth Scraps + [Magic] Needle and Thread = Robe Cloth Scraps + Mystery Dye = Trethon’s Robe Metal Scraps + Anvil = Metal Boots Metal Scraps + Hammer = Metal Armour Metal Armour + Scale Scraps|Plate Scraps = armour class up Metal Armour + Anvil = add movement Any Armour + [X] Essense = Add [X] Resist Any Armour + [Glass] Ruby = Add 4 elemental resists (no poison/Tenebrium) Notes: Metal armours and Robes are extremely efficient money-printing machines from mid-game on. Try to save/buy as many Cloth Scraps as possible early. Leather armours don’t sell quite as lovely, but they sell nevertheless. Crafted armours can’t have such effects as Burn/Stun immunity, Inflict X on contact, so you’re generally better off fishing for good armours at vendors. Same for elemental resist – you can add essense to improve already existing resist, so hitting 100% in late game is pretty easy (around lv. 14-15). Trethon’s Robe is +Int +All resists (even poison/tenebrium) unique, so consider crafting it as late as possible if you get your hands on Mystery Dye (unique ingridient). Accessories/Jewelry:Mortar and Pestle + Bone|Skull = Bonedust Mortar and pestle + Stardust Herb = Stardust Stardust + Bonedust = Faerie Dust [X] + Faerie Dust = Magic [X] Magic [X] + Rope = X Belt Magic [X] + Thread = X Amulet Magic [X] + Ring Kit = X Ring [X] – stat bonus (non-exhaustive, only listing some useful ones): Skull – Int (Amulet), Con (Belt|Ring) Feather – Dex (Belt) Fancy Feather – Dex+Initiative(Belt) Chicken Claw – Initiative (Amulet), Movement (Ring) Tooth – Charisma(All) Rabbit Paw – Lucky Charm(Amulet|Belt), Speed(Ring) Lucky Rabbit Paw – Speed+Movement(Ring), Lucky Charm+Movement(Amulet) Tusk – Loremaster(Amulet), Bodybuilding(Belt) Large tusk – Int+Resists(Ring), Int+Loremaster+resist(Amulet) [Sharp] Claw – Str (Amulet|Belt), Con(Ring) Scrolls:Faerie Dust + Paper = Blank Witchcraft Scroll [X] Essense + Paper = Blank [X] Scroll Blank [X] Scroll + Blank [X] Scroll = Blank [X] Skillbook Blank [X] Scroll + Magic Ink Pot and Quill = [X] Skill Scroll Blank [X] Skillbook + [X] Skill Scroll = [X] Skillbook Notes: Not all bought scrolls craft into books (I.e. Charm scroll =/= Rapture Skill) Random witchcraft scroll can be a Magical Unlock scroll. Farming them via save/load is annoying, but if you absolutely need to get in, there’s the option. Does not work on locked trapdoors though (i.e. Loic’s basement in Silverglen). Primary crafter considerations Either Enchanter or Jahan can be the primary crafter. There's slight variance in build (ability point distribution). If you use traits as stat tools rather than roleplaying, better go with Enchanter and make sure you're Pragmatic (+1 crafting), otherwise go with Jahan and Romantic (+1 Lucky Charm). Jahan already has Scientist (+1 crafting, +1 smithing) Getting rank 5: 2 ranks Smiting/Crafting from gear (Bracers and Belt) 1 rank Smiting/Crafting from scientist (Jahan already has it, Enchanter will need to pick up the talent) 1 rank Crafting from trait for Enchanter Thus, investment is 3+3 ability points for Jahan, 1 talent + 1+3 ability points for Enchanter with trait, 1 talent+ 3+3 ability points for Enchanter without trait. All leveling tables assume Jahan as primary crafter. An extra question - is it worth to have a "crafting mule"? That is, a character who only exists for crafting and does not adventure with your party? My answer is "no", simply because going to Homestead, reconfiguring your parry, then going shopping, then going crafting, then doing all that again with your other main party member is just a big NO. Because let's be honest, comparing items while shopping and doing calculations for the entire character sheet of the person you've left at Homestead out of your memory is a pretty damn amazing feat if you can pull it off. That, and being able to craft on the fly in the wilderness is useful sometimes. Dealing with exploration and traps Traps in DOS are, franky speaking, the worst kind. They either kill you outright or force you to waste time putting out fire, healing at a snail’s pace being unable to cast 2 spells simultaneosly etc. They don’t take any meaningful resources away from you (no, resurrect scrolls are not a meaningful resource the moment you made it to Cyseal, and neither are potions), so as far as I'm concerned it’s purely a time hog that stands between the party and fun (combat and loot). This party build does not have a dedicated “spotter” type character. Before you roll your eyes and go “well OF COURSE you hate traps if you don’t have one” – approaching the trap minigame correctly works out just fine. Perception is an issue only early on, later there's a fair share of gear for it, especially if you go dual-wielding with mages. Here’s a short list of trap-related things to keep in mind: If you’ve walked into a trap, there’s probably another one nearby. Unshackle your facechecker, move the party back. If you need to get out asap, toss a pyramid back the way you came and teleport out. Things to always carry around: +Perception gear and potions, empty Barrels, Ornate Chests. Pits (sources of oil/toxic ooze and cloud, lava) are always in the dead center. If the zone looks stretched to one side, there are probably 2. Pits of anything other than lava can be covered with barrels/boxes. Mines do not posess a concept of height. Throwing a barrel “over” a mine will trigger it. As will a fireball. Or a summon trying to walk to you through the minefield. Winged Feet allows you to ignore surfaces, including lava (mines still trigger). Teleporting a party member is a thing. Cloak And Dagger allows you to teleport directly without taking damage. Netherswap allows you to summon a minion and switch places. Pyramids can be tossed around. There’s no need to get the entire party over on foot. Teleporter pyramids are lovely. Black Ornate Chests are indestructible. Carry and use them in place of Barrels to block pits where you don’t want to risk accidentally destroying them with explosions. As mentioned in equipment section, 100% Fire resistance + Burning immunity = walking over fire/lava and literally ignoring mines. The best feeling ever. Sentinels in Hiberheim react to visibility. Any form of invisibility or line of sight denial will prevent them from triggering. Sentinels, including indestructible ones can be teleported. Resistance potions (mainly fire and poison) can substitute for not having good enough gear. Always be ready to react with Regeneration/Cure Wounds/Rain to prevent character deaths, especially in Honour mode. Make sure these spells are in a well known position on a convinient hotkey. Thankfully, there’s a bug (most likely a bug) in the game that allows to speed things up. Any skill with AoE targeting (Battering Ram, Fireball, Ice Blast to name a few) will outline objects it’s hitbox collides with. Yes, that includes things you can’t see because of low Perception. Like mines. It will not, however, detect invisible units in combat and pressure plates. Whether you want to use this minesweeper functionality of AoE skills or consider this too much of an exploit is up to you.
以下是使用装备覆盖坑洞的示例:

你可以将头盔、剑等其他物品也这样操作。 另一个我逐渐开始非常喜欢的探索技巧——使用快捷栏。

当然,戒指无法通过快捷栏很好地装备(总是装备到第一个槽位),所以如果你需要装备两个戒指,无论如何都得手动拖放,但其他装备的切换会变得快速简单。需要幸运 charm 来 loot 时?滚动到快捷栏,按 1-2-3-4,拾取物品,再滚动到战斗装备,按 1-2-3-4,然后去战斗(没错,我知道图中战斗快捷栏上没有头盔,就当它在那儿好了)。 实用技能推荐 这里有一个简短列表,回答同样的问题——投入等级点到……是否值得: 【开锁】1点就够了。剩下的4点可以通过获取2个戒指、护腕和腰带(来补充)。 通常,大多数东西都可以通过找到钥匙或强行破坏来打开。至于门,通常来说,是炸开的还是撬开的,区别不大。关于宝箱——好吧,你会失去幸运 charm 触发的机会。现在你摸着良心告诉我,你在游戏中打开每个宝箱前都特意换上了幸运 charm 装备吗?超过某个阶段后,这么做就不值得了。 【潜行无赖 1】+8 点敏捷 +【暗影步】是轻松潜行的组合。它还能让你在白天扒窃或偷窃时自动潜行成功。你简直可以在隐形状态下把一个宝箱直接揣进兜里,之后想怎么处理都行。 大多数角色都能轻松获得 8 点敏捷——护腕、腰带、戒指和项链都可能带有敏捷属性,【羽毛腰带】是低等级可制作的+1 敏捷物品,任何近战武器最终都能通过【痛苦之魂】附魔获得敏捷加成。你的敏捷系角色(匕首/弓/弩)初始值可能为8。 我能想到的唯一需要考虑潜行技能的客观原因,是为了利用【游击】天赋(潜行时造成额外伤害)。如果你只是喜欢潜行的设定,而非隐形,或者不喜欢“极致优化”那些“不符合”角色设定的技能——那我也不拦你。 偷窃2件戒指、护腕和靴子能给你4点。【叛逆者】特性会提供5点。出售大量无用战利品以及制作盔甲出售,能让你获得后期所需的所有金钱。
The only time you may find yourself seriously needing to pickpocket is around level 10-ish, when prices go up and you need your starting money pool by plucking every trader. But it really barely matters, whether you do it with 3 or 5. Either way it's enough of a sum to get you going. CharismaCarrying a couple items to boost your party face skills? Sure. Points? Nah. Unless you maybe want to optimize XP gains by winning all dialogues first and then murdering unfortunate targets, but you probably wouldn't be reading this if that was your plan. Either way, you can just craft 2 rings and an amulet and be done with it. Loremaster2 rings + Tusk Amulet give you an easy 3. Adventurer's Bow III and/or Materialistic trait give 4-5. I tend to throw 1 point in that at character creation so I don't have to struggle with identification during my clearing of Cyseal though. TelekinesisI tend to forget this even exists, so... there's your answer. Traders Traders generate new gear at every levelup and once per hour. Since the game has limited amount of guaranteed generations and the gear is randomized, I recommend making a shopping round at least every levelup. For anecdotal case, I've had a run where even with that I've only had 7 Tormented Souls at levels 1-19. Then I dropped another 6 at 20-21. Cyseal:**Condrad (ship, Cyseal harbour) ***Charla (Ork beach exit) Leutenant Selenia (legion camp) Legion Quartermaster (kitchen 2f, across Selenia) Captain Aureus (legion HQ 1f) ***Arhu (legion HQ 2f) Fletcher (Cyseal market) Cylia the Enchanter (Cyseal market) *Gerome (Cyseal Market) * **Fish Vendor (Cyseal market) *Cheese Vendor (Cyseal market) *Vegetable Vendor (Cyseal market) Shereth (King Krab inn 2f) ***Anna (King Krab inn 1f) ***Esmeralda (Esmeralda's shop) * ***Thelyron (clinic) Silverglen:Hassat (inn shed) Windmere (inn shed) Nadia (Nadia's shop) Sebi (Nadia's shop) *Marisa (inn 1f) Mikhail Solomatin (inn 1f) *Elwyn (inn 1f) Ellary (inn 1f) *Aramintai (inn 1f) *Trethon (inn 1f) *Hiver (inn 1f) *Vometia (inn 1f) **Bjorn (smithy at Nadia's) ***Goblin trader (outside smithy) Sacred Stone (Immaculate village)Goblin Apprentice Attenbrah Goblin Village***Shaman (hidden cave) ***2 Goblin traders Hunter's Edge:***Hortun (Hunter's Edge outskirts) ***3 Ork traders (main square) Alchemist (Temple Of Death) End Of Time:Arhu Weaver Of Time 4 elementals (portals unlock by collecting Blood/Star stones) Trader (Emporium) * not much in terms of items for sale (does not generate wearable equipment, only consumables/skillbooks), but carries a sizable sum of gold to pilfer ** resolving a quest in their favour = bonus attitude *** will/may disappear upon clearing certain sidequests/story progress Things you're always looking to buy off of any and every vendor:Tormented Souls Essenses Rubies Animal Hide, Leather Scraps, Metal Scraps, Cloth ScrapsArmors are the best money-making mechanism. Early on I recommend selling leather ones (the cheapest) and crafted staves (wooden logs into branches, then branches into staves), save Cloth Scraps until you get Crafting 5 and Magical Needle And Thread to make mage robes. Always remember to check inventory of anyone you talk with. Random people typically generate something useless, but sometimes there are hidden gems, including certain uniques. Checking the "storefront" of a prospective enemy removes the need to identify items after they are dropped as loot. Honour Mode Walkthrough This part of the guide contains a sample playthrough of the game. Have's and have nots are listed below. The whole thing is split into segments that go roughly by levelups. I provide a complete set of levelup tables. it's not a full build every level, but rather what you should pick. The first few levels are strung together in tables, because you gain them fast and there's a lot of waiting for points to pile up. There's a compilation build at lv.10 point, and lv. 20 corresponds to the table in the beginnig of the guide. There are quick notes on most combat encounters for each segment. Earlier notes are more detailed, later notes are more scarce and situational. I don't detail exploration much, because there are a lot of guides on questing and particular puzzles out there that do a great job. This playthrough deviates from "expected story progress" on several occasions. It's pretty easy to go into "unintended" locations and sometimes the story doesn't quite handle that correctly in terms of logic.This is, first and foremost, a fairly efficient way to beat Honour mode without speedrunning. I provide video compilation of a variety of battles for each segment. Not all battles - this is a showcase, not a let's play. I do include most bosses (the only notable missing is Pontius Pirate, because apparently I didn't hit the record button). Videos are all from Honour mode, although they are from 2 playthroughs. My first party met and untimely end in Hunter's Edge due to me making a couple reeeeally bad decisions and a string of bad luck right when I made them. Thus, my 1st party will be featured in combat starting with Braccus Rex and finishing before Hunter's Edge, whereas my 2nd party (identical builds to 1st one) will be featured pre-Braccus and from Hunter's Edge till endgame. Oh and in the bonus feature on breaking Luculla Mines' scripts :) 0. Starting builds SH1SH2Class: Knight (2H)Class: Enchanter (1H Wand)Attributes: Str: 8 Dex: 5 Int: 5 Con: 6 Spd: 6 Per: 5Attributes: Str: 5 Dex: 5 Int: 7(+1 if K-I-A) Con: 5 Spd: 7 Per: 6Talents: Bully OpportunistTalents: Pet Pal OR Know-It-All Far Out ManAbilities: Two-Handed 1 Man-At-Arms 1 Scoundrel 1 Armor Specialist 1 Bodybuilding 1Abilities: Wand 1 Hydrosophist 1 Aerotheurge 1 Witchcraft 1 Willpower 1Skills: Crushing Fist (MAA) Battering Ram (MAA) Walk In Shadows (SC)Skils: Teleport (AT) Regeneration (HS) Oath Of Desecration (WC) +8 int is the 1st point of cooldown reduction for spells. Obviously, don't make your Enchanter party trader if you go with Know-It-All. Sometimes builds will read as "X or Y", because some levelups don't necessarily have a clear "best" way. Generally assume the 1st option as the "default" choice. If you think there's a better use for those points in your real situation (i.e. you REALLY need an extra point in Pickpocketing) - try it out. 1. Pre-Cyseal tutorial dungeon, beach (lv. 1-2) Oath on Knight, Crushing Fist close targets, Battering Ram faraway targets. Teleport as necessary to set up either combo (put 2 in a row or bring 1 close), dps with wand/scrolls after. Don't stand in water for the tutorial dungeon boss. It's a good idea to burn both starting consumables (fire grenade + blitz bolt) on the 1st fight. Ork beach fight - tp and ignite oil barrel, don't charge in, dps with wand, Knight can charge to pick up stragglers or shoot a bow (lv.1 bow is usable at 5 Dex). 2. Gearing Up in Cyseal (lv. 2-4, looting Cyseal) General plan - do all quests you can get your hands on, loot everything via invisibility. Paintings and golden chalices will pay for plenty of starting gear. Should be able to reach lv. 4 and a half in the city, so at least 2 trader resets to look for gear (probably will hit at least one hourly reset if you're "practiced" (read - failed honour mode and retrying), or even more on first try). Lv.2-4SH1SH2Lv.2 Spd +1 (7) Loremaster +1 (1)Lv.2 Int +1 (8) _Lv. 3 All Skilled Up MAA +1 (2)Lv. 3 Pet Pal to not miss related quests or Know-It-All if started with Pet Pal Hydrosophist +1 (2) or Aerotheurge +1 (2)Lv. 4 Str +1 (9) 2H +1 (2)Lv.4 Int +1 (9) _ JahanMadoraLv. 4 Int +1 (10) if no jewelry, Spd +1 (6) if yesLv. 4 Spd +1 (7)Optional Pyrokinec +1 (1)_ This part is 90% exploration, so as an exception I will have some words about stuff here. Preparation in Cyseal is key to not ending your Honour run prematurely. Notable trait decisions and lootPick up Ishmashell = +1 Egoistical, gives +1 Barter Other traits as you desire, maybe consider Romantic over Pragmatic for early looting (lucky charm) Rift Oglers that you can pick up in the very starting area (before the 1st dungeon) are a guaranteed point in Lucky Charm on a helmet, which isn't something I see drop a whole lot. It's sort of a pain to loot stuff with them on (pop them and your main helmet on a hotbar), but extra special arrow drops are a blessing. Beach waypoint shrine or cemetery - Shovel Quartermaster (legion's kitchen) - Identifying glass (on the table) Arhu's study - Ink & Pot (elsewhere on desks too), Hammer (if you somehow missed one in tutorial dungeon), Magical Unlock Scroll Cylia's shop stand - Mortar & Pestle 2x Glass Ruby in Esmeralda's 2F stone collection - save for later crafting You will need an Axe to chop wood logs. Pickaxes for mining are not guaranteed in Cyseal, but they might actually generate on a trader. Don't forget to visit Charla on ork beach. Digging up Cyseal cemetery gives combat vs. solo lv.8 opponents (exploskeleton, mage and 2h warrior), who may drop lv.7-8 loot (anecdotal evidence - I've had runs where they dropped nothing as well). Armor pieces are usable without any penalties for raw defense numbers, if you don't find anything with stats you really want for that slot. Weapons over your lv. can help break fat doors/chests faster out of combat. Can also dig up Ork Armour lv. 6 set from The Grieving Ork quest (you can dig up stuff from other totems safely if you lock the ork up in initial conversation, he will play his "Liars!" line, but will not turn hostile). Priority loot/buys (worth investing paintings/gold chalices to get):+Crafting, +Smiting - You'll want +5 asap. Decide whether to make Jahan your crafter (already has Scientist talent), or your Enchanter (will need to pick up Scientist at 6). This walkthrough assumes Jahan is your crafter. Earth Wand - Summon Wolf before combat for extra body on your end. +Lucky Charm, +Bartering - will obviously pay for itself with better loot/prices. +Dex for Knight - Yes, Dex, because base 5 = low invis and haste chance, which we don't want. Based on Knight's Dex, pick a bow to carry. Even lv.1 bow is fine - only needed for 1st turn or clearing hazards with special arrows (see Adaptations). +Int for mages - Int 10 = +1 turn cooldown reduction on many of your spells. Skillbooks:Knight MAA - Melee Power Stance, Whirlwind + whatever else you like and can spare cash for (Helping Hand, Cure Wounds) SC - Fast Track, Trip, Winged Feet - If you invest in 2H 2 instead of Scoundrel 2, ignore Trip. If you know your way around Adrenaline usage - pick that over Trip. Enchanter HS - Avatar Of Frost (Freezing arrows are somewhat common on skeleton archers in the lighthouse area), Slow Current, optional Rain (if you don't plan on having Jahan - easy way to remove burning and Exploskeleton threats), Freezing Touch. AT - Avatar Of Storm (need stun immunity), Blitz Bolt, Thunder Jump WC - Malediction, Vampiric Touch, optional Summon Undead Warrior (not guaranteed, check Charla's random assortiment) Jahan Slow Current, Freezing Touch, Avatar Of Storm, optional Pyro spells (Wildfire, Flare, Avatar) Madora none required, fill up MAA as desired/as budget permits. Optional gear:Spears for 2H fighters vs Ghoul-That-Guards-The-Lighthouse (-25% piercing/crushing, lots of 100+ elemental resits) Wildfire/Burning Touch scrolls to unfreeze vs frost arrows Notable dangers:Exploskeleton from the grave. Don't panic if you've forgotten how to deal with them (or never seen them before) - just TP him away. I lost my very 1st Honour party to that bastard, because I forgot after lategame that I can actually take damage again. Exploskeleton ambush in tunnels below Cyseal - they pop behind your back, so keep tactical mode on and rain spell/water grenade on the ready. 3. The lighthouse trip (lv. 4-5) General strategy - plenty of barrels to work with for initiation (tp + fire arrow). Care when dashing around bloated corpses. Opening ambush:Bum rush whatever you like, tp away or freeze with bitter cold whoever you don't want to deal with. Avatar to avoid stuns when atacking ligtning-stricken zombies. Escort mission:Archers carry lots of unpleasant stuff (incl. freezing arrows), so prioritize them. Corner-shaped Houses:Barrels, choke or straight tp. There is a free guaranteed Crippling Blow skillbook in one of the basements (the Strongman quest location). Speaking of that quest, be sure to barter with that guy to see if he has some good items on him. He won't give you those as quest reward, so trade those out or just attack him instead to "intentionally fail" the quest. Hill fight (3x Archers, 3xMelees, 1xMage): Now this one is probably the most unpleasant. Decide whether to focus mage, archers or melees. Freeze/slow whatever you can't knock down. Lighthouse boss fight:Optional - Drop 2 barrels in a way that they ignite from torch. Will damage dogs/skellies, won't trigger combat. Straightforward - drop 2 barrels in a way that cuts off Archers and Exploskeleton, ignite with arrow/wand to initiate combat. Dogs will stack up running towards the party, Archers/Explo will struggle to path through fire and most likely die in a fiery explosion. Knight or Madora can bum rush the Ghoul, the other one gets Oath Of Desecration and dash/whirlwinds dogs. Mages mop up or freeze/slow survivors. From there just physical dps knocked down Ghoul, ignore Magic ward completely, your main damage is physical anyway (lowest resist with ward up is 60% Air, if you want some extra dps). Lv. 5This levelup is pretty "dead" - no attributes, no talents, no real key breakpoints for skills. Just save points for 6, where Crippling Blow will be available to your Knight and Madora (req. lv.3 MAA for no AP penalty). Make a merchant round trip to fish for good jewelry and cheap +crafting/smithing. https://youtu.be/R_RMibJy4cc 4. Odds and ends (lv. 5-6) At this point you can consider going to the ork beach, but twin dungeons, northern forest and eastern trap-filled villa are easy pickings. There's both level-appropriate loot (because you probably need fresh weapons more so than armor to safely tackle orks), as well as 2 chests and a relatively easy encounter in Withering Gardens - lv. 7 skeleton gate guards are surprisingly easy to rush down, even though a couple of them are immune to knockdown (hint - slow is cheap AP-wise and procs bully). Now, twin dungeons CAN go sour if you split your party 2-2 (not impossible, but risky for honour mode). There will most certainly be 2 summons on the side of your opponent, so split 3-1 and leg it after beating the 1st dungeon, or use pyramids to fight as a whole party. Villa trapfest should be fine, as long as you keep what I've written about traps in mind and split your party to not get instagibbed by some explosion. Worst case - not like there should be much else to spend Resurrect scrolls on, might as well make them useful. The last thing to do before going to face orks or SparkMaster is to round out some XP by yanking a few of the fire skeletons at the church with TP. If you don't aggro more than 1-2 of them and pull them far from the church to avoid patrols joining battle, it becomes a simple exercise in dismantling prone enemies. Lv. 5,6SH1SH2Str +1 (10) or Dex +1 (6) based on drops (Dex if still lacking good %chances on Scoundrel spells)Str +1(6) or Int +1 (10) based on gear (Str 6 covers a lot of shields/heavy armors)MAA +1 (3)Witchcraft +1 (2) JahanMadoraSpd +1 (6) or Int +1 (10) (opposite of levelup 4). Won't give AP at this point, but 7 is the goal.Str +1 (9) or Con +1 (8). Crafted 2H swords will already require around 10 StrPyro +1 (2) (dropping Wildfire to 2 AP from 6)MAA +1 (3) Skillbooks:Knight, Madora - 2xCrippling Blow Enchanter - Rapture Jahan - Burn My Eyes, Burning Touch At this point, the core build is 90% online, the only thing missing being Bully on Madora until lv. 7. https://youtu.be/NFylPtB_VWo 5. Ork beach & Black cove pt. 1 (lv. 6-7) I generally choose this area over SparkMaster & Secluded beach, because it has more exciting battles. It's a good opportunity to test and get used to your party composition in what is almost its "final form" for the next 4-6 levels (until you start hitting Master spells and gain a bunch of summons to tank for you). Mines on the beach:Can be safely traversed via minesweeper + pyramids or tossing things in front of you. Non-boss beach encounter:Has a number of approaches, from starting the battle at long range and letting orks line up to kidnapping and dropping the shaman in the middle of your party to get rid of fire immunity. For the beach boss battle:The safe way would be to play around big bodies of water for stun zone, preemtively dropping oil barrels behind water to slow and then deny vision, and a flanking position (split one of your melees to the side) to drop into the backline out-of-combat once the majority of melees advance into the oil field. Big cave fight:Contain guardroom skeletons with some grenades, let the orks/undead soften each other up on the 1st round, dash both melees in to whirlwind the massive horde of enemies. Care with gas pits under boxes. Source abomination:Easy mode - drop oil barrel to light it up from torch and watch it burn, burn, burn... for 50% hp... then open with explo arrow for extra burn. Normal mode - spread out to avoid aoe splash, aggro with arrow/summon, cripple and tp away after it uses own tp, round 2 heal up/buff as needed and go ham. Mimics and crabs:Tp & cripple mimic to death asap (negative crushing resist), because it hurts a lot. Lesser Abomination:it's best to approach this battle from behind, so you can get rid of the crab-spawner before even entering combat, and then having the entire enemy roster spawn on top of your party for minimizing required movement. Other than that, high initiative (15-16) will allow you to chain crowd control on abomination and get rid of it, avoiding mass slow it brings. If you lack this kind of initiative, consider not starting the fight surrounded by enemies. It's completely possible to buy enough time even with just cheap cc you have on hand (2xSlow Current+Bitter Cold, 2 AP cost), or throw some fancy combo with barrels/rain+fire/lightning/wand. Pontius Pirate:Has a ridiculously huge battle initiation radius + will drop barrels on you, so my "safe" tactic of choice is to split back and front fighters, sneak (invis) Knight in a good spot to dash across the field (alt. just as close as possible to Pontius), then pyramid Madora in to open combat. After hitting 7 wait before going through with the metal door to face the spider. Shopping trip and a few more odd ends await. Lv.7SH1SH2Save talent pointAero +1 (2), Wand +1 (2)Save skill pointsSave talent point (see next levelup) JahanMadoraAll Skilled Up into crafting OR Bigger And Better -> Spd +1 (7). Decide based on crafting equipmentBully _Crafting +1 (1) Smithing +1 (1)2H +1 (3) _ Skillbooks:Jahan or Enchanter - Ice Shard Jahan - Smoke Screen, Fireball https://youtu.be/o85B8NVP_Hc https://youtu.be/PUloMmI4dF8 6. Mortician's Hut, Withered Gardens, Black Cove pt.2 (lv. 7-8) It's a good time to visit Mortitian's Hut (and clean up a couple related fights (wolf pack and some skeletons), purely because it has lv.7 loot. Guaranteed Summon Undead Warrior (WC Novice) is the most interesting item, which, honestly, may be worth it enough to push this particular place higher up the priority list. The direct route is, however, cordoned off by 6 lv. 7 skeletons, so taking on them earlier than lv. 5 might be a tall task (barrel shenanigans nonwithstanding). You can, however, sneak past them via Walk In Shadows + Pyramids to bring party over. After that, a lv.7 Baron Of Bones awaits at withered gardens. Not a very difficult fight at this point, but a very unfortunate initiation trigger. There's a pause after ending conversation and combat start that pretty much must be used to advance from stairs into the arena. LOS to everything on the 1st turn is more or less vital to properly distribute crowd control and avoid getting petrified, frozen and dismantled. Charming archers proved to be the best use of Rapture, because burning enemies' special arrow allowance in your favour is always a pleasant sight. Of course, there's the option of unshckling one of your Hunters and positioning everyone else as desired while s(he) is locked in conversation with Baron. The Source spider... thing in Black Cove is the last stop to push the entire party to lv. 8, and it stands no chance. Freeze/Stun and Slow/Cripple all work wonderfully to make this boss a complete non-factor (as far as my experience goes, it consistently just fails to do ANYTHING at all). SH1SH2If you already have 15 str from gear (10+5) - talent point from 7 into Bigger and Better, Spd +2 (9) If you need +1 Str to 15 with items (10+4) - Picture Of Health, Str +1 (15) If you need +2 Str to 15 (10+3) - Bigger and Better, Str +2 (12)Int +1 (11)2H +1 (3)If you can get Int to 15 with items - talent point from 7 into Bigger and Better, otherwise All Skilled Up for lv.3 magic school or smithing 2. Alternatively - Walk it Off OR Scientist if primary crafter. Best wait until merchant trip to see if you need to round out Int.If still struggling with money from poor bartering/pickpocketing drops - throw a point in one of those, otherwise save or get willpower 1 for some freebie status resist in combatSave skillpoints if not going All Skilled Up/if not primary crafter JahanMadoraStr +1 (6) if you find good armors that require it and no spare rings, Int +1(11) otherwiseStr +1 (10)School of Magic +1 (3) of choice or CraftingArmour Specialist +1 (1), Willpower +1 (1) 15 str = 1-turn Cripple cd. 9 Spd = 9+8/turn ap (always guaranteed 2 4-ap actions, which is 2H attacks and most MAA skills) Around this point is the time you can consider pickpocketing gold off of all traders in Cyseal, which should net you around 10-11k gold (with 3-4 pickpocketing from gear), which is a nice sum to comfortably buy that-one-thing-that-just-generated. This is also the point by which you should be getting 5 crafting to be able to a) enchant your weapons (lost souls & essense damage) and b) make top quality armours for selling. https://youtu.be/_R_leJ2Zyko 7. SparkMaster, Secluded beach, Evelyn's lair (lv.8-9) SparkMaster - talk to NPCs with Enchanter so they will follow him around, rather than Knight. Walk Shadows Knight behind skeleton mages, open combat and drop Madora in through pyramid. SparkMaster can be Frozen or Stunned - just keep throwing Bitter Cold, Lightning and so on at him. Include Rain to make it easier. The forest and beach themselves, a lower level (6) area, is not much to write home about. The only thing worth of note is that Bellegar generates the stock of a full-blown merchant, so don't forget to check him out. Entrance to Evelyn's lair fight should not give you much trouble, as just about everything is susceptible to the usual Charm/Slow/Freeze cc barrage. Not to mention that decent swords by level should one-shot sand golems with Cripple. Evelyn - well, Shackles Of Pain are annoying, but you can just freeze her and teleport out of Whirwind area.If you're in Honour mode - keep in mind that Rams explode. Lv.9 SH1SH2Scoundrel +1 (2)Finish Crafting/Smithing OR save points JahanMadoraSchool of choice +1 (3) OR finish Crafting/Smithing +1 (2)2H +1 (4) OR Scoundrel +2 (2)* Skillbooks:Knight - Cloak And Dagger, Adrenaline Rush Madora - none or the same setup as Knight *At this point, Madora is already fully online as melee dps, so there's a choice to make with regards to the rest of the build. The simplest way is to just keep her as-is and continue maxing out 2H and MAA, then switch to Willpower/Bodybuilding/Leadership (essentially go a bit more more tanky), or mirror Knight's build to double up on sneaking/robbing merchants/pre-combat positioning. This guide will assume the MAA-only route from here on. https://youtu.be/wXKUE1J5acc 8. Burning church premises, burning forest, church cemetery, Braccus Rex (lv. 9-10) BCP - rain = 200% water vulnerability + Weak. Boss - 25% crushing (cripple) vulnerability. The only thing to watch out for is not getting teleported into lava. Incandescent Wanderer - knock down, finish off with ranged attack (generates lava upon death). After getting Star Stone from the forest - get fire elemental in Homestead, buy Rage x2 (for Knight & Madora), 1st Flurry (for later). Long-dead Troll, Exploskeleton ambush, pre-church undead - the former two should be simple to handle if you've made your way this far. The fight with latter was showcased before for engage types demonstration. Church cultists - standard tactics. From here on I will simply mention "standard" for fights that have no notable elements, meaning that as long as you follow basic routine of Knock Down->Attack, you will win with 0 issues. Outright insignificant fights will most likely be omitted completely. Braccus Rex - -25% crushing, bait meteor strike on a summon. Bonus points if it kills Baron Of Bones (see video how to set that up, 100% reproducable). Lv.10 Both stat books from Teller Of Secrets (+1 Attribute point, +3 Ability points, ~13-15k gold in Honour mode) go to Knight if you don't have the imminent need to fix stat breakpoints. SH1SH2Spd +2 (11)Spd +1 (8)2H +1 (4)2 Schools of choice +1 (3), 1 if crafter JahanMadoraSpd +1 (8)Spd +1 (8)2 Schools of choice +1 (3), 1 if crafterSave points Skillbook shopping will be in Silverglen, so save school choices till then. https://youtu.be/6RWYQwxGJrE https://youtu.be/yyd09ig5aTI 10. Silverglen premises (lv.10) If you don't want to go to Silverglen imediately and wander around, you'll bump into a couple fights, all of whihc feature poison-spewing plants and some extras (earth elementals, goblins, fireflies). Fortunately, between Zombie Nick and Undead Warrior you should have 0 problems tanking flowers. They tend to attack the closest unit. 11. Arrival at Silverglen - Lv.10 build recap Assuming 2 stat books for Knight (see above), no equipment, after 1st Silverglen shopping. Underlined skills = core (frequent usage), others = supplemental (situational usage) for getting through Cyseal. Mirrored situational abilities don't have to be on both people. SH1 - KnightMadoraAttributes: Str: 8->10 Dex: 5 Int: 5 Con: 6 Spd: 6->11 Per: 5Attributes: Str: 8->10 Dex: 5 Int: 5 Con: 7 Spd: 6->8 Per: 5Talents: Bully Opportunist Bigger And Better All Skilled UpTalents: Comeback Kid Opportunist What A Rush BullyAbilities (1 unspent point): Two-Handed 4 Man-At-Arms 3 Scoundrel 2 Armor Specialist 1 Bodybuilding 1 Bartering 1 Loremaster 1Abilities (2 unspent points): Two-Handed 4 Man-At-Arms 3 Bodybuilding 1 Skills - Man-At-Arms: Crushing Fist (N) Battering Ram (N) Melee Power Stance (N) Encourage (N) Cure Wounds (N) Helping Hand (N) Crippling Blow (A) Whirlwind(A) Rage(A)Skills - Man-At-Arms: Crushing Fist (N) Battering Ram (N) Melee Power Stance (N) Encourage (N) Divine Light (N) Helping Hand (N) Crippling Blow (A) Whirlwind(A) Rage(A)Skills - Scoundrel: Walk In Shadows (N) Fast Track (N) Winged Feet (N) Adrenaline Rush (N) Cloak And Dagger (A) Jahan (crafter variant)SH2 - Enchanter (non-crafter variant)Attributes: Str: 5 Dex: 5 Int: 8->11 Con: 7 Spd: 5->8 Per: 6Attributes: Str: 5->6 Dex: 5 Int: 6->11 Con: 5 Spd: 7->8 Per: 6Talents: Elemental Affinity Far Out Man Scientist Bigger And BetterTalents: Pet Pal Know-It-All Far Out Man Bigger And BetterAbilities: Hydrosophist 2 Aerotheurge 2 Pyrokinetic 2 Willpower 1 Blacksmithing 2 Crafting 2Abilities: Wand 2 Hydrosophist 3 Aerotheurge 3 Witchcraft 2 Willpower 1 Skills - Aerotheurge: Teleportation (N) Bitter Cold (N) Blitz Bolt (N) Shocking Touch (N) Thunder Jump (N) Tornado (A)Skills - Aerotheurge: Teleportation (N) Bitter Cold (N) Blitz Bolt (N) Avatar Of Storms (N) Thunder Jump (N) Wind Of Change (N)Skills - Hydrosophist: Regeneration (N) Slow Current (N) Rain (N) Freezing Touch (N) Avatar Of Frost (N) Skills - Hydrosophist: Regeneration (N) Slow Current (N) Avatar Of Frost (N) Freezing Touch (N) Cleansing Water (A) Ice Wall (A) Water Of Life (A)Skills - Pyrokinetic: Wildfire (N) Avatar Of Fire (N) Burning Touch (N) Burn My Eyes (N) Fireball (A) Smokescreen (A) Purifying Fire (A)Skills - Witchcraft: Oath Of Desecration (N) Summon Undead Warrior (N) Malediction (N) Vampiric Touch (N) Rapture (A) Skills - Special: Summon Zombie Nick Bonus points if you can get your hands on Summon Ice/Fire/Air Elemental and Undead Decapitator. 12. Luculla Forest pt.1 (Goblins & Trolls, Witch cabin, Southern Hiberheim) (Lv. 10-12) This inevitably turns out to be a lengthy segment. I assume a trip home after levelup 11. Nectar-Drunk goblins - convinient oil barrel + tank plant with undead summon as discussed in pt.10. TROLL TOLL - yeah no. Not with 50% crushing vulnerability. Boars ain't helping you either. Orks at the broken Astarte mirror - standard works, but I highly recommend using this lovely fight with varied opposition to test out new spells. Garkulda Nightbringer - needs good initiation and attention to enemies in bushes. Random goblins on the way to troll cave waypoint - no comment. Witch cabin void creatures - keep Avator Of Storm at hand (get/craft a couple scrolls for various members as a safety net), stay away from crystals at the beginning of combat (they pop into static clouds), line critters up for battering ram with teleport. Summoner & void spiders - stacked spawn -> whirlwind + aoos, remove stun and clean up. Witch cave - standard all the way. Mechanical guards - pop explosive little ones in one turn if you damage them, so they don't get primed. Freeze whatever you don't want to deal with. Worst case TP them away. The biggest concentrated source of metal scraps to make Armours from. Lv.11 SH1SH2Scoundrel +1 (3)Witchcraft +1 (3)Picture Of HealthAll Skilled Up -> Bodybuilding +1 (1) OR Willpower +1 (2) JahanMadoraAerotheurge +1 (3) OR Hydrosophist +1 (3)MAA +1 (4) save 1 point (2H 5, but will delay MAA 4 and Flurry by 2 levels)All Skilled Up -> Willpower +1 (2) if not picked up at lv.7, Bigger And Better -> Spd +1 (7) otherwiseBigger And Better -> Spd +1 (9) Lv.12 SH1SH2Str +1 (11)Spd +1 (9)MAA +1 (4)Bodybuilding +X (2) and Willpower +Y (2), based on previous levelup JahanMadoraSpd +1 (9)Str +1 (11)Hydrosophist +1 (3) Or Aerotheurge +1 (3)Willpower +1 (1), Leadership +1 (1), save 2 points Skillbooks:Enchanter - Summon Armoured Undead Decapitator (if you don't have it yet, at lv.12 scrolls should spawn en masse on random merchants to craft a book from), Decaying Touch + Drain Willpower, Lower Resistances. Jahan - fill up Hydrosophist Adept with what you prefer. Knight & Madora - Flurry (MAA) Knight - Adrenaline This is the point of being fully online as far as melee builds go. There are various options as to how one can round out the remaining 8-10 levels - that's 24-30 ability points, so at least one maxed ability without gear or many more dips. https://youtu.be/TCyJ__dk4oc 13. Hiberheim castle outskirts(lv. 12-13) Stock on some fire damage (get wands, respec swords into fire). Armor + Anvil = bonus movement/penalty negation, if you haven't done that yet. Wolves & Ice elemental - a nice entry fight to get used to new movement speed and the idea of casting Avatar Of Frost. Prisons - snowmen are annoying but generally useless. Fireball/fire elemental as needed. Single enemies (prisoners) are outnumbered so can easily set up Flurry (cc -> all damage buffs -> RIP). Shambling Oak - Crushing -50%. 'Nuff said. The Guardian - the worst fight of the game. Not difficult. Just slow and boring. High-hp sponge that has 0 damage, tons of immunities, sky-high saving throws so you can't reliably affect him with anything (drain willpower helps) and tons of cc to bog you down with defrosting, de-fearing, standing up etc. The simplest way to speed things up is to cover the battlefield with ice, because he loves to run around and will eventually slip on the ice for good 3 turns, giving you free time to buff up and whack away. Alternatively, it's better to break the game flow and make way to the Immaculate village for Tenebrium skillbook (see next section on how to get there), so you can grab Oak Control wand. Or bring Bairdotr along for this one. Or just fix Rot with a Blood Stone if you have one on hand. Elementals at the castle bridge - imune to knockdown and do lots of freezing (surprise, I know), but useless nonetheless. Take on triples rather than all 6 at the same time to avoid dealing with 100500 unfreezing issues. Cultist camps, wolves & druid - they line up. So. Much. Lv.13 SH1SH2Save points (3)Save points (4) JahanMadoraSave points (3)2H +1 (5) https://youtu.be/geLfcnX3jYg 14. Hiberheim - Forge and castle, Silverglen - Immaculate village, Immaculate cathedral, path into mines (lv. 13-15) Forge first, because screw sentinels, lava and all that. Boreas - reasonably high resistance to physical damage but, ultimately, he's alone and not nearly strong enough to pose a challenge. Bjorn's escort questcan be solved with Blood Stone from Iron Maiden in castle prison, correctly answering Loic to get permission for Immaculate trial (if not done already) and mopping up the path guards should give lv. 14 (if not - go further in or clear some goblins near Troll King cave) It's a waste of good Tenebrium to go into mines without Tenebrium skill. So we're going to the village first. Which is why lv.14 Madora takes lockpicking - opening trapdoor at the Cathedral requires 5 (open lock scroll does not work on the hatch, sadly). There is a way to reach Immaculate village without that investment (see screenshots for a jump spot), but some lockpicking ability won't hurt.
Pick up whatever in village, clear the prison, grab Tenebrium skillbook from Attenbrah's workshop. To turn her into a trader you must pass 3 speech checks, 2 back-to-back, so save, stock up on +Cha stuff and use Charm option. Traps before the temple - tp/cloak&dagger/avatars combo should get you through. Temple itself - demons have decent saving throws and lots of AP, so Mangoth battle can go south. Tank with summons, bfc with ice/static clouds/etc. Mine path - lots of underleveled goblins with weak saving throws but high initiative (19). Lv.14 SH1SH2Str +1 (12)Int +1 (12)2H +1 (5), Tenebrium +1 (2) once you get your hands on the bookWitchcraft +1 (4) JahanMadoraInt +1 (12)Str +1 (12)Pyrokinetic/Hydrosophist +1 (4), Tenebrium +1 (2) (crafter), save 1 pointArmour Specialist +1 (1) Lockpicking +2 (2), save 1 point. If already have 4 lockpicking items (2 rings + belt + bracers), take Lockpicking +1 (1), Leadership +1 (2), no points left Lv.15 SH1SH2Walk It OffWalk It OffWillpower +1 (1) Bodybuilding +1 (2)Aerotheurge +1 (4) Save 1 point JahanMadoraKnow-It-AllPicture Of HealthHydrosophist/Pyrokinetic +1 (4) Based on previous levelup: Leadership +1 (2) OR Armour Specialist +1 (2), save 1 point Leadership +1 (3), no points left Skillbooks:Enchanter - Soulsap, Netherswap Jahan - Mass Slow or Mass Disease, Meteor Shower https://youtu.be/z-2l4N5Ziy4 https://youtu.be/P7oNgoUONH0 15. Luculla mines, Luculla highlands, Immaculate Trial, Goblin village, Troll King, Void Rift (lv.15-17) Not much worthwhile to write about combat in mines (even if you come at "appropriate" lv. 12-13). Lots of doorway-based chokepoints and small rooms, which this party is pretty much designed to storm. Throw in a charm and a couple summons inside, dash in, Whirlwind, mop up. Insert Meteor Showers, Hail Attacks or whatever else you've picked up to taste. If you win some of those dialogue minigames, you get to freely position and one-shot any target of choice. To sneak past death Knights - use Walk In Shadows in the 1st area to get to the waypoint shrine, then move the entire party there. In the 2nd area (before lots of oil barrels and landmines), just move your party one by one after exploding the whole place (a couple fire resist potions + burning immunity and just trigger the explosion). To run away from the final encounter - 2x Ice walls + summons to keep Death Knights busy. Or, you can break the game completely by... teleporting over the stairs. This will let you use the mirror, grab Death Knight Bane spell component, craft it and go back to mines to pick up 6k XP per death knight. Because as long as Leandra's convo doesn't fire, mines will not be filled with lava and waypoints will keep working, no matter what quest log says. Highlands - try to get slow immunity on casters. Enemies themselves are weak, but rush is impeded by lack of AP, "ranged initiation -> let enemies burn AP on walking to you" tactic also doesn't quite work as most spiders have ranged attack capabilities. Throw in summons & good positioning for AOOs to keep damage output up. Queen - 25% crushing vulnerability. Nuff said. Rafflesia (Maradino's cave) - a rare boss somewhat resistant to physical. Not nearly enough though. Troll King - 50% crushing vulnerability. Think I've seen that somewhere before... Goblin village - Lots of enemies with high initiative -> start combat in a way that blocks direct LOS. Leadership 4 (+10 initiative) should make things a lot easier, but manageable without that. Void Rift - standard, assuming you go left. Lv.16 SH1SH2Con +1 (7)Int +1 (13)Armour Specialist +1 (2), save 1 pointHydrosophist +1 (4) JahanMadoraInt +1 (13)Con +1 (8)Tenebrium +1 (3), save 1 pointArmour Specialist +1 (2), save 1 point Lv.17 SH1SH2Willpower +1 (2) Loremaster +1 (2) if Spiritual, save points (2) if Materialisticsave points (3) JahanMadoraAerotheurge +1 (4) Bodybuilding +1 (2) Willpower +1 (2) OR pick one and save 2 points Skillbooks:Jahan - Chain Lightning/Netherswap/Make Invisible SH2 - Mass Slow/Mass Disease/Hail Attack https://youtu.be/ZZf0P3jPJ2Y https://youtu.be/9anuT5xSieo https://youtu.be/sbakfQpgSmU 16. Phantom Forest - path to Hunter's Edge, Hunter's Edge questing (lv. 17-19) Bridge, Mud hunters, Forlorn passage, Rat King - trivial All of Jarhl's forces are immune to Knockdown, so freeze instead. Hunter's Edge questing is much like Cyseal questing - not a whole lot of combat, and whatever there is is solved by standard methods. The only thing of note for this party is that Knight's Tomb might be annoying. Need around 14 perception to uncover the path, so stack some items/potions/burn my eyes. Outside of Honour mode, might as well just save a lot and play the hot-cold minigame. The battle with Grutilda is mostly an exercise in abusing Hailstorm and Meteorstrike to wipe as many of Mountain Warriors as possible. Because they give XP and don't turn hostile if you hit them with friendly fire for a veeeery long time. If you want some extra thrill, let them gather together and try to defeat Mountain Warriors after they're done with orks. Hunter's Edge is also the place for the last riddle chest, so you should be able to get another set of stat tomes from the Homestead chest. Lv.18 SH1SH2Con +1 (8)Spd +1 (10)Bodybuilding +1 (3)Witchcraft +1 (5), save points (1) JahanMadoraSpd +1 (10) OR Dex +1 (6) if you want to go dual daggersSpd +1 (10)Hydrosophist +1 (5)Leadership +1 (4) Lv.19 Homestead ability point statbook to SH2 SH1SH2Armour Specialist +1 (3) Hydrosophist +1 (5) Save points (2)Save talent point (1) OR pick one from the list to taste: Thick Skin What A Rush Swift Footed Light Stepper Morning PersonSave talent point (1) JahanMadorasave points (3)Armour Specialist +1 (3)Save talent point (1)Walk It Off Skillbooks:SH2 - Death Punch or Resurrect, Mass Disease Jahan - Hail Attack For these and next levelups, SH2 and Jahan are equal in ability to go dual daggers. I've picked Jahan because why not. https://youtu.be/nI06tjPnpNI 17. Phantom Forest swamp, Source temple outskirts, Source Temple (lv. 19+) Shambling Oak - crushing -50% Flying explodey eyes - win vs initiative 29, so either tank with 100% fire immunity or pop with long ranged skill before battle starts (stay perpendicular to their course to safely do that). Balbereth - no physical resists. Mud Queens, Mud Lords - standard. Mud Lords have good saving throws (5 each), but it's not stopping Hailstorm. Or Drain Willpower, for that matter. They do have a lot of AP though, so make sure to cc them proper. Death Knights - engage via summon. They run far and hurt. Source-tainted spider ambush - can be soloed in one turn by Knight. Source-tainted Knight and KO - no comment. Cursed spirits - freeze on contact. Void Demons - same as Mud Lords. Imal the Squealer - decent resists on a boss for once, even 50% crushing, but it just doesn't matter at this point. Weresheep - 6k HP that can't do anything, because Knocked Down... Incidentially, Weresheep Helmet gives +1 Turn AP, so you might want that. Temple Of The Dead - poison, lava, stun mines... all the things you don't really give all that much damn about at this point. Adding insult to proverbial injury, a crafting station 10 steps away from the portal... in the final part of the final big location. Gud Jyob. Cassandra - literally twice as weak as Weresheep. Azalberothsomething demon - high initiative, explosive tamed rams. Trial Of Ascension requires ~14 Perception to find the switch in trapdoor puzzle. Lv.20 Homestead attribute point statbook to Jahan/SH2 if dual daggers, if not - round out Spd or Con for anyone. SH1SH2Str +1(13) OR Con +1(9) OR Spd +1 (12), pick speed only if it gives odd value with gearSpd +1 (11)Willpower +1 (3) OR Expert Marksman +1 (1), save points (2)Aerotheurge +1 (5)If saved talent point at 19 and picked Expert Marksman - Avoid Opportunists* Optional - save talent point until final battle for Glass CannonLighting Rod JahanMadoraSpd +1 (11) OR Dex +2 (8) for dual daggers routeStr +1(13) OR Con +1(9) OR Spd +1 (12), pick speed only if it gives odd value with gearAerotheurge +1 (5), Bodybuilding +1 (1) Lightning RodBodybuilding +1 (2), save 1 point OR Willpower +1 (3) * I know, I promised no dips to glue build together. This is more of a cherry on top that will make your life a bit easier when running circles around Death Knights in endgame battles, but ultimately the final talent is 100% optional. Crafted daggers require 12 Dex and give +4 themselves, so 8 native Dex is the value you want to have. Then you can equip 4 dex, put daggers on and take 4 dex off, replacing it with mage-relevant stats. Post 20 do whatever you feel like with remaining points. Round out Willpower/Bodybuilding to 3+, Man-At-Arms 5 to maximize Picture Of Health bonus (and whatever other MAA-based talent you've picked, if any). Something like going Scoundrel 3 at lv. 21-22 with the same skillbook set as Knight is, in principle, good for everyone for extra options in final battles (cheap self-haste, long invisibility, repositioning). Complete lv.20 build listing is at the beginning of the guide, not going to put it twice. https://youtu.be/8pZ1CaxCOmw 18. Endgame Bosses There isn't much to talk about here, so I'll just let you see for yourself. Trife, Leandra, Death Knight squad:https://youtu.be/-5fLOPIvcJI Void Dragon:https://youtu.be/wozVGbh-I7o Adaptations In this part, as promised in the beginning, I will talk about fitting other things into the concept. I’ve put it at the end so that you look at it hopefully having a better idea of the way base concept works. I can’t say I’ve tested extensively everything presented here, but here are my thoughts on what to do if you really want to play… 1) Sword & Board FighterIn terms of CC, it all works off of MAA skills and Str. So in this regard, running Sword/Shield vs 2H is the same. Damage output vs tankyness profile will be obviously different though. You get less fat crits, but more attacks in. You get an extra elemental resists + stat slot. I suggest running Madora with Knight build at 51 point (no statbook, drop Bodybuilding 3/Willpower 3/Loremaster 2+Tenebrium 2), and Fighter with 54 point build, something like this: 1H 5/Shield Specialist 3/Armour Specialist 3/MAA 4/Leadership 4/something 3/something 1. Another option would be a “Dagger & Board” backstabbing fighter. Tankier than a dual-wield rogue, stabbier than 1H fighter because extra multiplier. In fact, since both get bonus from 1H, you can mix and match 2 styles based on situation. 2) Dual-Wield characterIf it’s a 2xStr-based dual wield – knock yourself out. The principal part is, in fact, having access to 2 Battering Rams. Str + Dex (Dagger and Sword) is more stat-dependent, but you should be able to get nice damage output out of Scoundrel skills that “require dagger”. 3) Blasty mageThere’s more than enough free skill slots to fit your favourite damage spell in. But if you find yourself blasting your melees or thinking “I can’t walk up to anything to smack it” – don’t say I haven’t warned you. I did say this guide was about having melee as dps after all. 4) Something with Geomancer in itOh sure. There’s a lot of nice stuff in Geo. I didn’t include it mostly to avoid instant and inevitable associations and temptations of oil-fire-poison combos. Again, oil may very well turn out to be counterproductive for melees moving from target to target. But things like bless, cone petrification and elemental that applies crippled status on-hit can all synergize nicely with the concept I’ve demonstrated. 5) Grenade-wielding characterOutside of the already mentioned environmental hazard friendly-fire issues, grenades can work, especially with high-initiative casters being delivered in grenade range via pyramid engage. That and, well, the fact that your high Int magics probably have better saving throw difficulty. Frost Grenades are hilarious for setting up Knocked Down though. 6) Using special arrowsGive any character a low-level bow without high Dex requirements. Enjoy your special arrows. Reequipping weapons costs AP, but a well-placed Static Cloud can give you all the time you need to take out your sword and execute whoever was unlucky enough to get caught in it. Environmental hazard disclaimer still applies. 7) BairdotrHigh Dex/Con and Bully built-in, so with some fiddling around to get her Str up and running making her a melee character is not a far fetched idea. If you want to replace Jahan both Hunters will be Mages, and if you want to replace Madora – well there you go. Alternatively, a 3x2H + archery Bairdotr is a silly quadriple physical damage party with 3 Battering Rams to remove any and all accuracy issues for archery. It's fun, believe me. 8) WolgraffJahan will always be a better mage, Bairdotr will probably always be a better dual-wield melee stand-in. And the obvious dual-wield Dex backstabber… there’s a mountain of material on why rogues in EE require hard work. A lot of effectively wasted points. He easily makes a fine archer for the 3 melee + 1 ranged strat though. 9) Even more melee charactersFor 3 melee characters – consider making your Enchanter a MAA + Witchcraft hybrid. Oath Of Desecration, summons and Drain Willpower to assist Jahan with control could likely get you through quite a lot. Maybe throw in a point or two in Hydrosophist for Slow/Regeneration early on and a backup Ice Wall later. Or see the Bairdotr version above. Closing words Thank you for reading this far. I hope the guide was informative and helpful. If you find a mistake or have a question - please leave a comment here or PM me.