换一换
换一换 


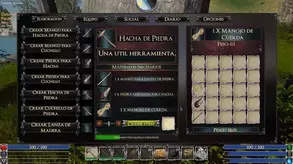
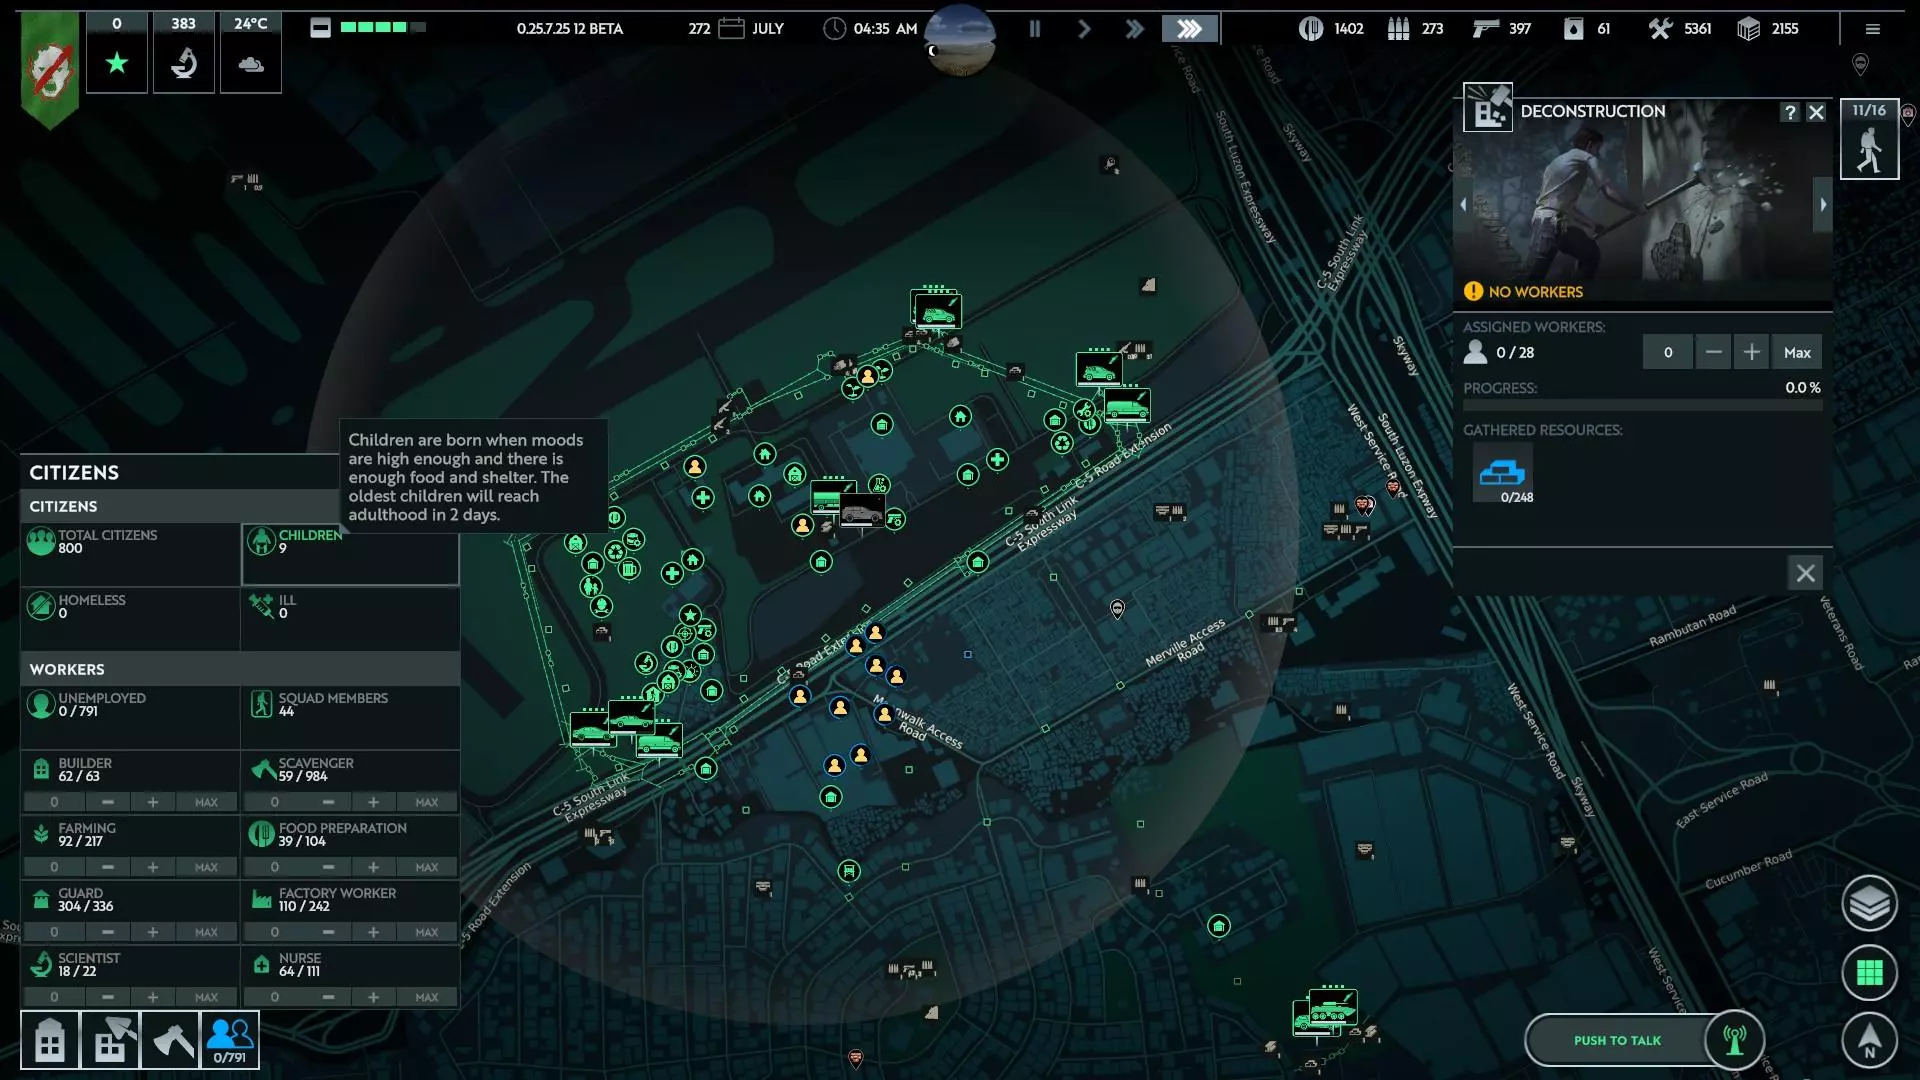
那么,你已经在狭窄封闭的地堡中坚持到安全信号响起了吗?恭喜!这份专利指南将为你提供所有*重建社会所需的基础知识、信息和指导,助你踏上这段危险却意义重大的旅程! 简介 本应急指南是为全球所有操作员编写的,作为IFZ应急行动的一部分。尽管整个世界正迅速被感染者攻陷,但我们已与专家合作,整理了所有在全球彻底崩溃的情况下,建立和管理成功安全区并最终重建社会所需的信息。这些信息分为多个部分,涵盖了你将面临的不同挑战领域。你的任务至关重要,因此请仔细研究。 (本指南将随着游戏更新和抢先体验阶段不断完善,同时我们也会进一步了解游戏机制的具体细节。如果你有任何需要补充或更正的内容,请发表评论。任何特别需要补充或测试的信息将在括号中指出) 区域 为你的地堡以及最终的安全区选择一个好位置非常重要: 根据最新更新,选择地图上会显示你潜在区域的相关信息,如下方截图所示。这也会估算难度,并且感染者和幸存者的数量将与建筑数量成一定比例(具体是基于建筑的总体积,但建筑数量也能给你一个大致概念)
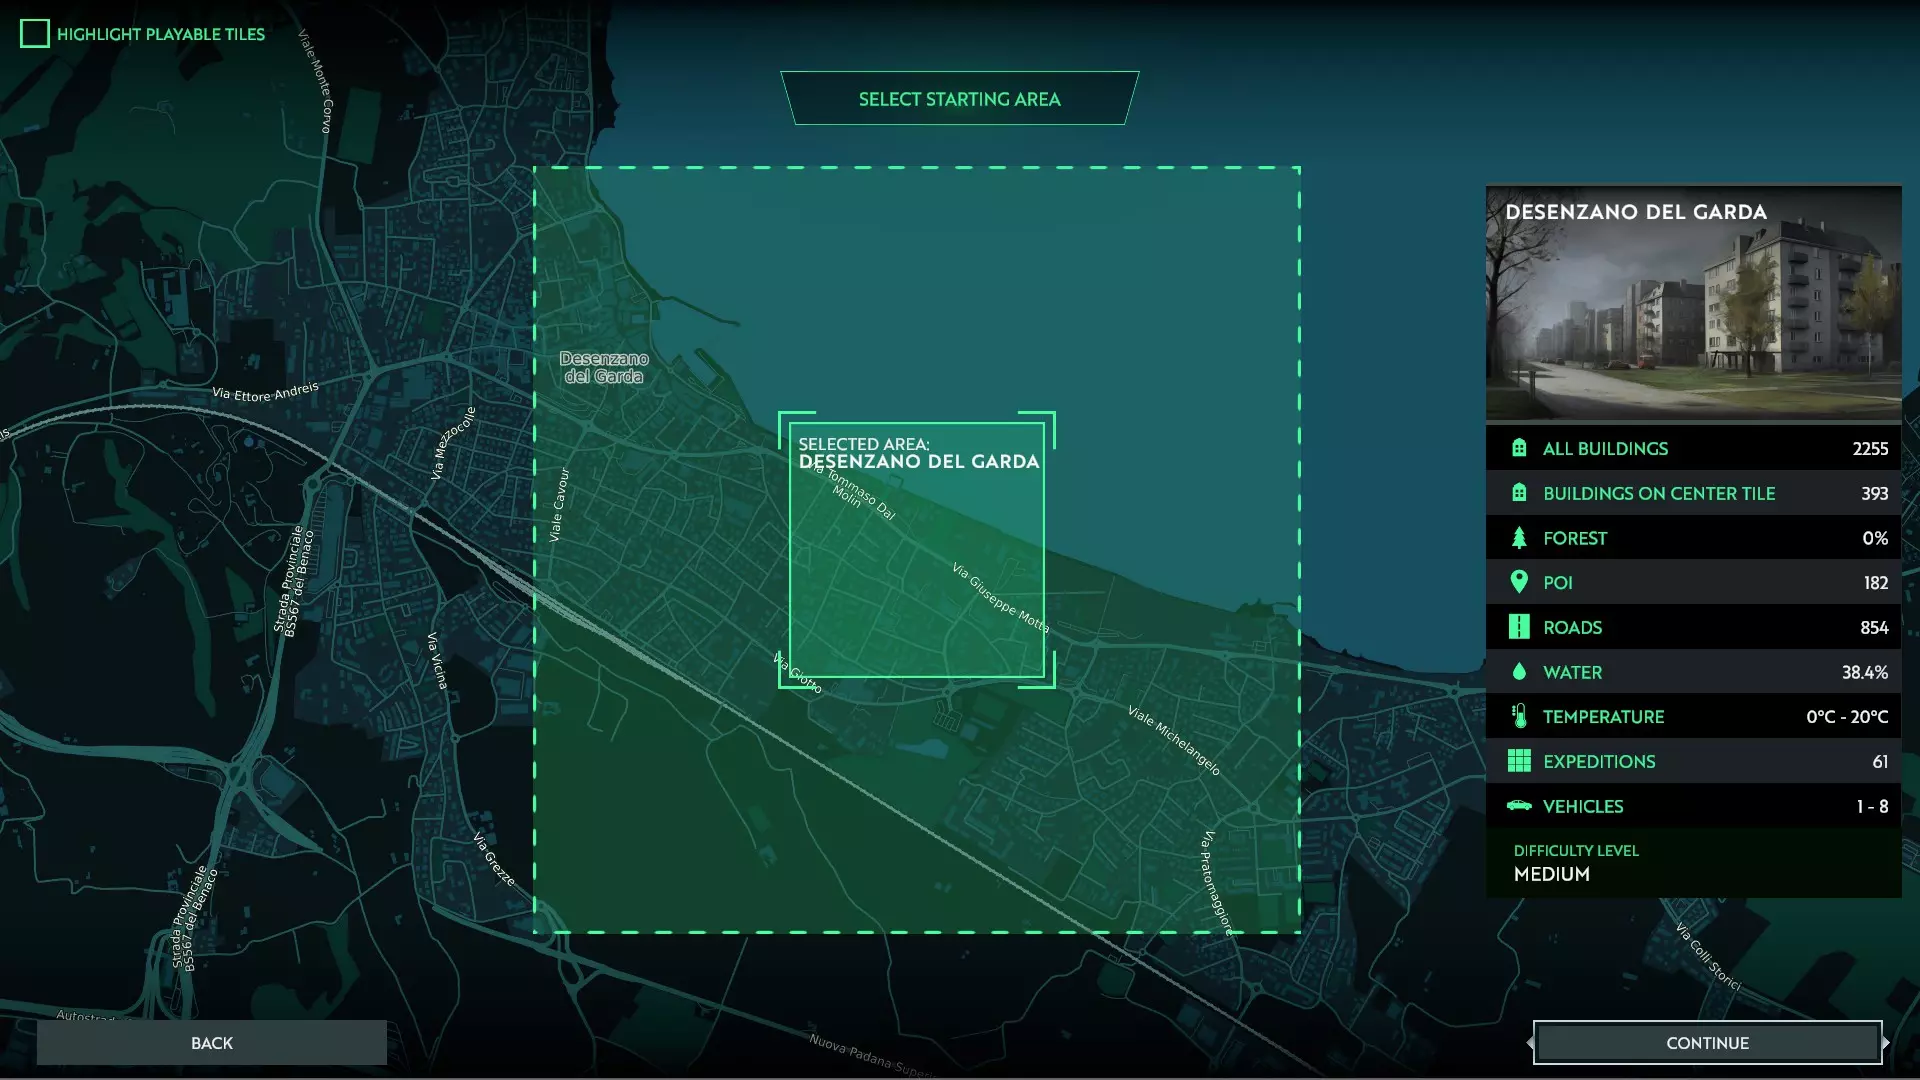
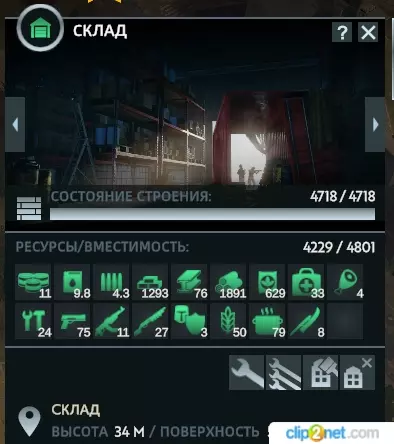
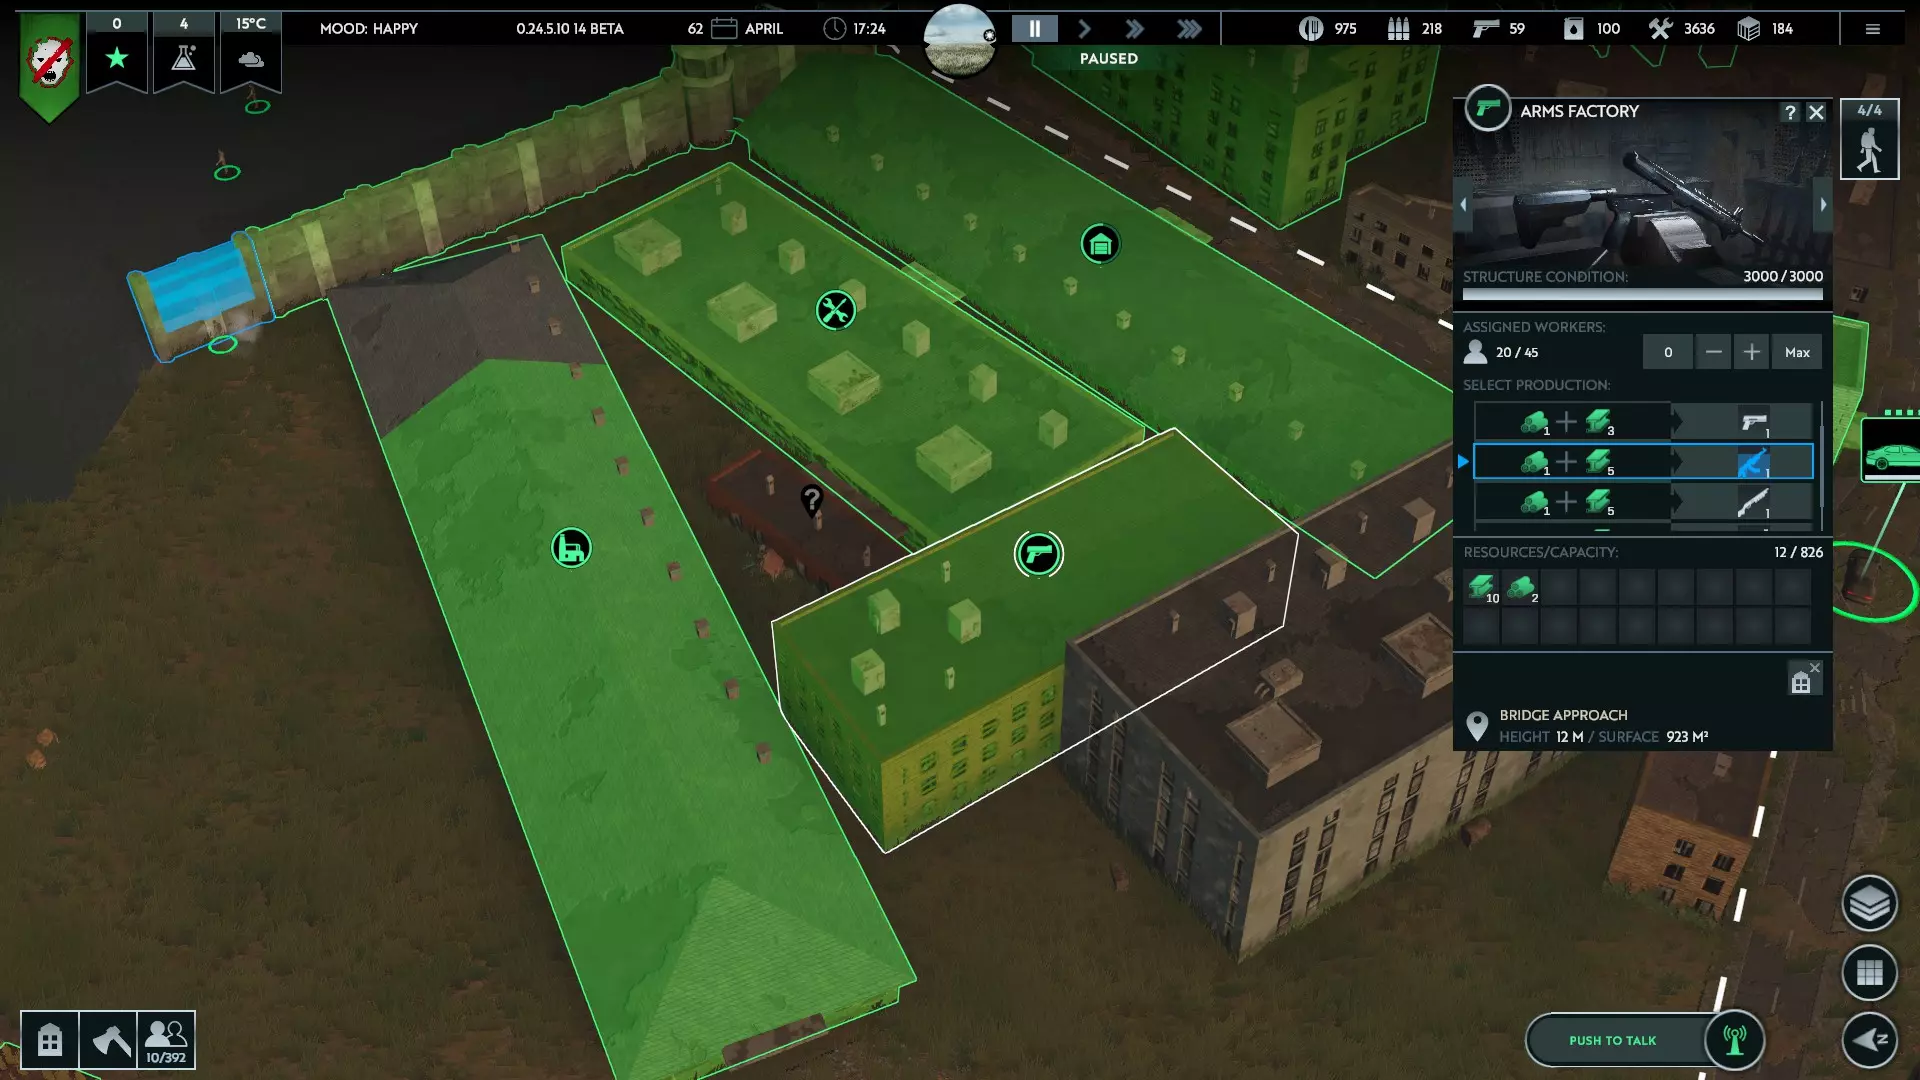
More built up areas (cities, large towns) will have more infected to deal with - dependant on the setting chosen in game set up - but more buildings and thus more supplies. Inversely, smaller areas may not have enough buildings or supplies to get by. You'll need a variety of supplies to survive and thrive, so make sure local areas have the variety of buildings (food, tools, security supplies, etc.) you'll need. Each square seems to be around 1 square kilometer, so you can use other tools like Google Maps to look for good locations and then find them in game (as the in-game map loads somewhat slowly and buggily) Make sure there are appropriate buildings close by: this is one the most important points. Your HQ should ideally be in a small building, with a variety of small to large buildings around it. This is because the HQ is severely limited in how much space it takes up at game start (to prevent super easy starts with a tonne of shelter and storage space), and you'll want smaller buildings to start your zone with decent options to expand to. If there aren't enough close by, you could have to grow your zone very large quickly, just to get set up, and then struggle with defence (see Buildings section for more) Infected are seen to have an incredible ability to swim; even zones on islands or mostly surrounded by water are likely to fall under attack from the water. However, bridges or thin spits of land can act as effective bottle necks, and swimming will slow the infected down to be more easily picked off from a distance (when the water is not frozen over) With the latest update location on the globe will now affect the climate of your zone. Ergo, zones closer to the equator will be easier, as the productivity of farms will be less affected, and winters are less likely to freeze water Weather & Time The seasons will pass and the weather will change from hot to cold and back, and in addition the times of sunrise and sunset will also change. This is critical, as the infected are averse to sunlight. They will hide during the day, and come out at night - this naturally makes days safer, and nights more hazardous, with some exceptions. Heavy storms can give enough cloud cover to let the infected step outside during the day On the clearest nights, the reflected light of a full moon can cause the infected to continue hiding, giving you a reprieve - though they tend to come back twice as hard the next night. As winter sets in, the shorter days will mean less sunlight for your workers, and the lower temperatures will reduce the effectiveness of your farms. It can also cause water to freeze, allowing fast movement over rivers and lakes; for both survivors, and the infected. (Currently temperature doesn't affect survivors - no heating needed, squads don't get cold) Time also passes in the game specifically; each day lasts a month (and so a year lasts 12 days). As such winter might sneak up on you, so make sure to prepare for the cold. Fog of War You'll only be able to see a small area around your zone, specifically around your squads, workers, and owned buildings. Squads will be critical to explore the region around your new zone, for locating useful supplies, vehicles, groups of survivors - and for spotting infected. Sometimes a heads up of incoming swarms will be the difference between fighting them off successfully, or falling to the horde. Expeditions The area around your zone will be made up of 9 map squares, with your HQ (and most of your zone) inside the central square. This main area is where buildings, NPC, infected etc. will spawn and where you can scavenge/fight in view. Beyond this is the rest of the region around your area, which can be accessed by squads to gather supplies without the micromanagement of choosing individual buildings, and can be done by zooming out enough to see the map view. Squads can sometimes face infected or hostiles in these expedition zones, and so need to be kept an eye on. They can only be directed to leave that square, not micromanaged in combat. Buildings (general) Adapting Your relatively small zone won't have the heavy equipment or supplies for new construction (at first), and so will have to rely on adapting existing buildings to suit their needs. Many of these will require you to find equipment (exploration locked) or rediscover lost techniques (research locked). There are a number of different adaptations you can make: Headquarters: this is where your zone is commanded from, squads are created, and houses a few people and can store some resources. Extra HQs can be set up, which can work well as forward bases for scavenging/dismantling Warehouse: stores resources, fairly cheap to build, and is where workers will bring and pick up resources Shelter: a basic home for survivors, enough to keep people content (as long as there's enough room) House: a more advanced, comfortable home with creature comforts. More expensive, but makes people very happy (research locked) Squad quarters: a safehouse which generates more Squad slots (see Combat section below) Field: requires open space instead of a building, produces food but has lower effectiveness in the winter and cold months (exploration locked) Barn: keeps animals for raising, producing meat and fertilizer (exploration locked) Cookhouse: turns grain or meat into food rations, using wood as a fuel source Cannery: turns food rations from the cookhouse into canned food (research locked) Greenhouse: similar to a field (requires open space instead of a building), with same basic production stats but unaffected by temperature - weaker and more expensive as a downside (research locked) Tool factory: uses wood and metal to create tools (research locked) Arms factory: uses wood and metal to create weapons (research locked) Chemical factory: creates fertilizer out of wood/fuel, and fuel out of wood/fetilizer (research locked) Protective Gear Factory: a place to make protective equipment for your squads (research locked) Walls: impassable structures to block infected reaching your buildings, with gates to allow survivors and vehicles to pass through (some research locked) Towers: fortified fighting positions to defend against infected (some research locked) Antenna: used to invite other survivors to your Zone, and recall all squads to base with one click (research locked) Medbay: heals squad members (when staffed, only during working hours) and produces medkits (research locked) Hospital: heals squad members much faster (when staffed, only during working hours) and produces vaccines (research locked) Research centre: used to study, and generate, research materials which unlock (rediscover) new buildings and increase effectiveness (exploration locked) Weather centre: forecasts the weather over the coming days/months (research locked) Mast: a decoration to show off the power of your mighty zone (social media thing required) Kindergarten: somewhere for children to be watched and raised while parents work (exploration locked) Bar: a relaxing space to create and enjoy some alcohol. The first settlements in history were founded to farm hops for beer, so if you've got one of these up and running you know you're doing well (research locked) Repairmen shop: a centre for maintenance workers to repair buildings in your zone, and allows you to set priority on which type of buildings to repair first - these still take resources to repair, but are automatic Building Characteristics Buildings come in many varieties, shapes and sizes, from small houses or sheds to massive superstores or skyscrapers, which are displayed in the game: Height: taller buildings allow squads to shoot over smaller buildings or walls, giving clear lines of sight for ranged attacks Surface: the surface area the building takes up Volume: easy maths, this is the height multiplied by the surface, and determines how much the building costs to adapt, the space you will have when adapted (and thus how many workers can be assigned, and how quickly it will produce), and how many resources it will give if dismantled. Name: the game takes data about what the building was before the pandemic, which can determine what loot spawns there, and help with roleplaying purposes There are some important tips to consider: Damaged buildings can be repaired, the repair cost being based on the original cost multiplied by how damaged the building is. E.g. if a building is at 75% health, it will cost 25% of the original costs to repair *(clarification needed) Buildings have health points, which seem to be made up of a base value with additional points based on the volume, but the second part of this calculation is very small; an HQ twice the size of another HQ won't have twice the hit points (something like 1.1x the hitpoints), so it's still better to keep multiple smaller buildings For the most part, when buildings are being repaired they stop functioning; warehouses lose storage space, towers don't attack, shelter/houses lose their capacity, etc. Keep this in mind before queuing up repair orders Buildings can be partially adapted to still get some use out of them, without the higher costs - this is handy in a pinch, but it's less efficient as the un-adapted part can't be used for anything else, so you're losing either productive space or the resources from a building that could be dismantled (where a smaller building could be used) Dismantling The main way to get resources for adapting and production is from dismantling old buildings. Not all buildings in your area will be useful; some are too small, some are too large, some could be cleared to prevent nesting places for the infected or make clear lines of sight for defence. Just remember, the further they are from your zone, the further workers will have to travel to bring the recovered resources back (more on that later) New construction With some research (Advanced Masonry), the citizens of zones will be able to construct simple new buildings. The area/shape/size can be determined by picking points on the map, which will become corners of the building. Using the build menu you can choose the height, up to 30m - we're not building skyscrapers just yet - whether the roof is flat or angled (and how steeply), the general building material, and the colours of the wall and roof. New buildings are costly, but sometimes your best option Customization Buildings can now have their wall and roof colours changed, to make your zone a bit prettier or more decorated. Additionally, buildings can be reinforced using either metal or brick, to increase hit points by +30% for a corresponding cost, based on the size of the building. Buildings (specifics) This table will list the different buildings, their hit points, costs, and (where applicable) workers accepted. Area is given in cubic meters, but the conversion to imperial is to multiply by 1.308. Resources are abbreviated as W (wood), M (metal), B (brick), and BT (basic tool). As of Major Update 2, hitpoints are partially determined by building size. It seems that all buildings have a base set of hit points (included in the table), and a minor increase based on their volume. The exact calculation for this increase is not yet determined Building Base Hit points Cost per 100m³ Workers per 100m³ Effectiveness per 100m³ HQ 9000 1.0W / 0.3M / 0.6B - 0.56 living quarters / 7.6 storage space Warehouse 2000 0.5W - 18.5 storage space Shelter 2500 1.6W - 1.2 living quarters House 2500 2.1W / 0.3B - 1.2 living quarters Squad quarters 2500 1.6M - Increases squad limit by +2, and then another +1 for every ~600m^3 volume Field 2000 4W / 1BT 2 max - Barn 3000 0.8W / 0.3M 0.26 1 storage space Cookhouse 2000 0.5W 0.4 1 storage space Cannery 3000 0.4W / 1M / 0.4BT 0.47 1 storage space Greenhouse 1500 4W / 8M / 1BT 2 max - Tool Factory 3000 0.6W / 0.7M 0.47 1 storage space Arms Factory 3000 2W / 1M / 0.3BT 0.4 7.4 storage space Chemical Plant 3000 0.4W / 1M / 0.4BT 0.47 1 storage space Protective Gear Factory 3000 1W / 2M / 04.BT 0.4 1 storage space Antenna 5000 20M (set) - - Medbay 3000 0.8W / 0.3M 0.2 0.5 storage space, 0.6 healing slots Research Center 3000 0.4W / 0.5M 0.2 - Weather Center 3000 0.4W / 0.5M - - Kindergarten ??? 1.4W / 0.3B 0.1 - Bar ??? 0.9W / 1M / 0.5B 0.25 - Repairmen shop 3000 0.5W / 0.5M ~0.4 - Resources Types of Resources A successful zone will rely on a variety of different supplies, that fall into different categories. FOOD Crates of Canned Food: found by scavenging, or made using the cannery building to save food for later dates Food Rations: made in cookhouses, and eaten first if available Bag of Grain: made by farms, and rarely found while scavenging (which unlocks farms if playing story mode), used by cookhouses to make rations Raw Meat: made by barns, used by cookhouses to make rations at a greater efficiency than grainEach crate of cans/food ration feeds 4 adults (or 8 children) for 1 day. Currently, food rations don't expire OR provide extra happiness over canned food, so the main benefit is turning them into canned food (which takes 2 rations + 1 metal to give 3 canned food, giving a 50% gain albeit while using a non renewable but abundant resource) CONSTRUCTION MATERIALS Various supplies used in adapting or constructing buildings, making repairs, and as raw resources for production buildings. Wood: one of the most vital resources in the game, as it's used to cook food as well as consruct most buildings. Harvestable from trees using workers, and by dismantling buildings Raw Metal: used for advanced production and buildings, harvested from scrap in the streets (car wrecks, streetlights) and dismantling buildings Bricks: abundant building material, but very useful for strong walls. Harvested from building ruins, and by dismantling buildings Basic tools: used for your fields and most factories. Found semi-rarely in scavenging, and made in the tool factory using metal and wood WEAPONS & AMMO Arguably some of your most vital supplies to survive the infected and hostiles Ammo: needed to supplies your squads, towers and gates that use firearms, each unit of 1 ammo is 100 rounds (a gate holding 300 ammo will take 3 units to resupply). Pistols; fairly weak, but also commonly found in scavenging, beating hostile humans, and made in the weapons factory. Assault Rifle: more rare, scavenged in security buildings and rarely from some hostiles, and made in the weapons factory. Shotgun: short range and best for fighting inside buildings, found rarely in scavenging or made in the weapons factory. Sniper Rifle: long range and high damage, this can only be made in the weapons factory.See the Combat section for more details on using weapons, and their pros and cons. EQUIPMENT & MISC The odd bits that make up the rest of your general supplies. Fuel: vital to run your vehicles, can be found by scavenging buildings or emptying vehicles found in your area. Can also be made in the chemical factory, from either wood or fertilizer (and used to make fuel) Fertilizer: a multi-use optional resource, produced by barns or from chemical factories using fuel or wood. Can be used to boost field production, make ammo (tool factory), or make fuel (chemical factory) Medkit: used directly, and only, by squads, this can be done manually by dragging a medkit on to a squad member's picture, and is used automatically if they drop below 30% health (according to the tool tip - I haven't seen this happen yet, possible bug). Found in scavenging, and produced by medbays when not healing squads. Vaccine: produced in hospitals (after the right research), and used by sick citizens to cure them (WIP) Protectors: old sports gear and protective clothing, scavenged from certain buildings (stores, stadiums, etc.) or made in the zone. Has 100HP. Riot gear: modern police equipment, found in police and security buildings after the collapse, or made in the zone. Works as a medium armour, with 200HP Plate armour: medieval armour found in museums and other historical buildings or made in the zone, provides much greater protection and has a lot more health (300HP) but will slow your squad down.(It's worth noting that the armour pieces can be "recharged" - as they take damage they deplete, and will be refilled when the squad picks up more, from scavenging or entering an HQ/warehouse when you have some spare) INTANGIBLES These aren't tracked "resources" as such, but will help your zones in different ways. Weather Forecasting: this is generated by having people work in a weather centre, and each "unit" will show the weather of upcoming days and nights in advance, up to a limit of 8 days ahead (16 units available). Usually only needs 8 people or so to keep at maximum Childcare: generated by citizens working in a Kindergarten, your zone will have a need for childcare based on the number of children. If this isn't met adequately, mood (and productivity) will drop as people have to look after their kids while working. If met well, it will boost mood (and productivity) Brews: generated by citizens working in pubs, and takes grain to do so. The need for brews will begin after having a large enough population (a few hundred in my latest game), and will give a mood malus if not met but a mood boost if satisfied properly. Production Production Naturally, not everything you need will just be sitting in some house waiting for your scavenger teams, and even for some of the things that are, there won't be enough. You'll need to start producing supplies yourself inside your zone. Below are a few tables of all current production orders in the game, and base figures: Food Building Input Output Base production Field N/A 3 grain (4 grain with "Farming") 40 hours (1 worker) Field 1 fertilizer 9 grain 40 hours (1 worker) Cookhouse 2 grain + 1 wood 4 rations 20 hours (1 worker) (16 hours with "Efficient Cooking") Cookhouse 3 meat + 1 wood 5 rations 16 hours (1 worker) (12.8 hours with "Efficient Cooking") Barn 1 grain 2 meat + 1 fertilizer 14 hours (1 worker) Cannery 2 rations + 1 metal 3 canned food 4 hours* (1 worker) Manufacturing Building Input Output Base production Medbay N/A 1 medkit ??? hours* (1 worker) Hospital N/A 1 vaccine ??? hours* (1 worker) Tool Factory 2 wood + 1 metal 1 basic tool ??? hours* (1 worker) Arms Factory 1 metal + 1 fertilizer 4 ammo ??? hours* (1 worker) Arms Factory 1 wood + 3 metal 1 pistol ??? hours* (1 worker) Arms Factory 1 wood + 5 metal 1 assault rifle ??? hours* (1 worker) Arms Factory 1 wood + 5 metal 1 shotgun ??? hours* (1 worker) Arms Factory 1 wood + 7 metal 1 sniper rifle ??? hours* (1 worker) Chemical Plant 2 wood 1 fertilizer ??? hours* (1 worker) Chemical Plant 3 fertilizer 1 fuel ??? hours* (1 worker) Chemical Plant 6 wood 1 fuel ??? hours* (1 worker) Chemical Plant 1 fuel 3 fertilizer ??? hours* (1 worker) Protective gear factory ??? ??? ??? hours* (1 worker) * Figure needs confirming
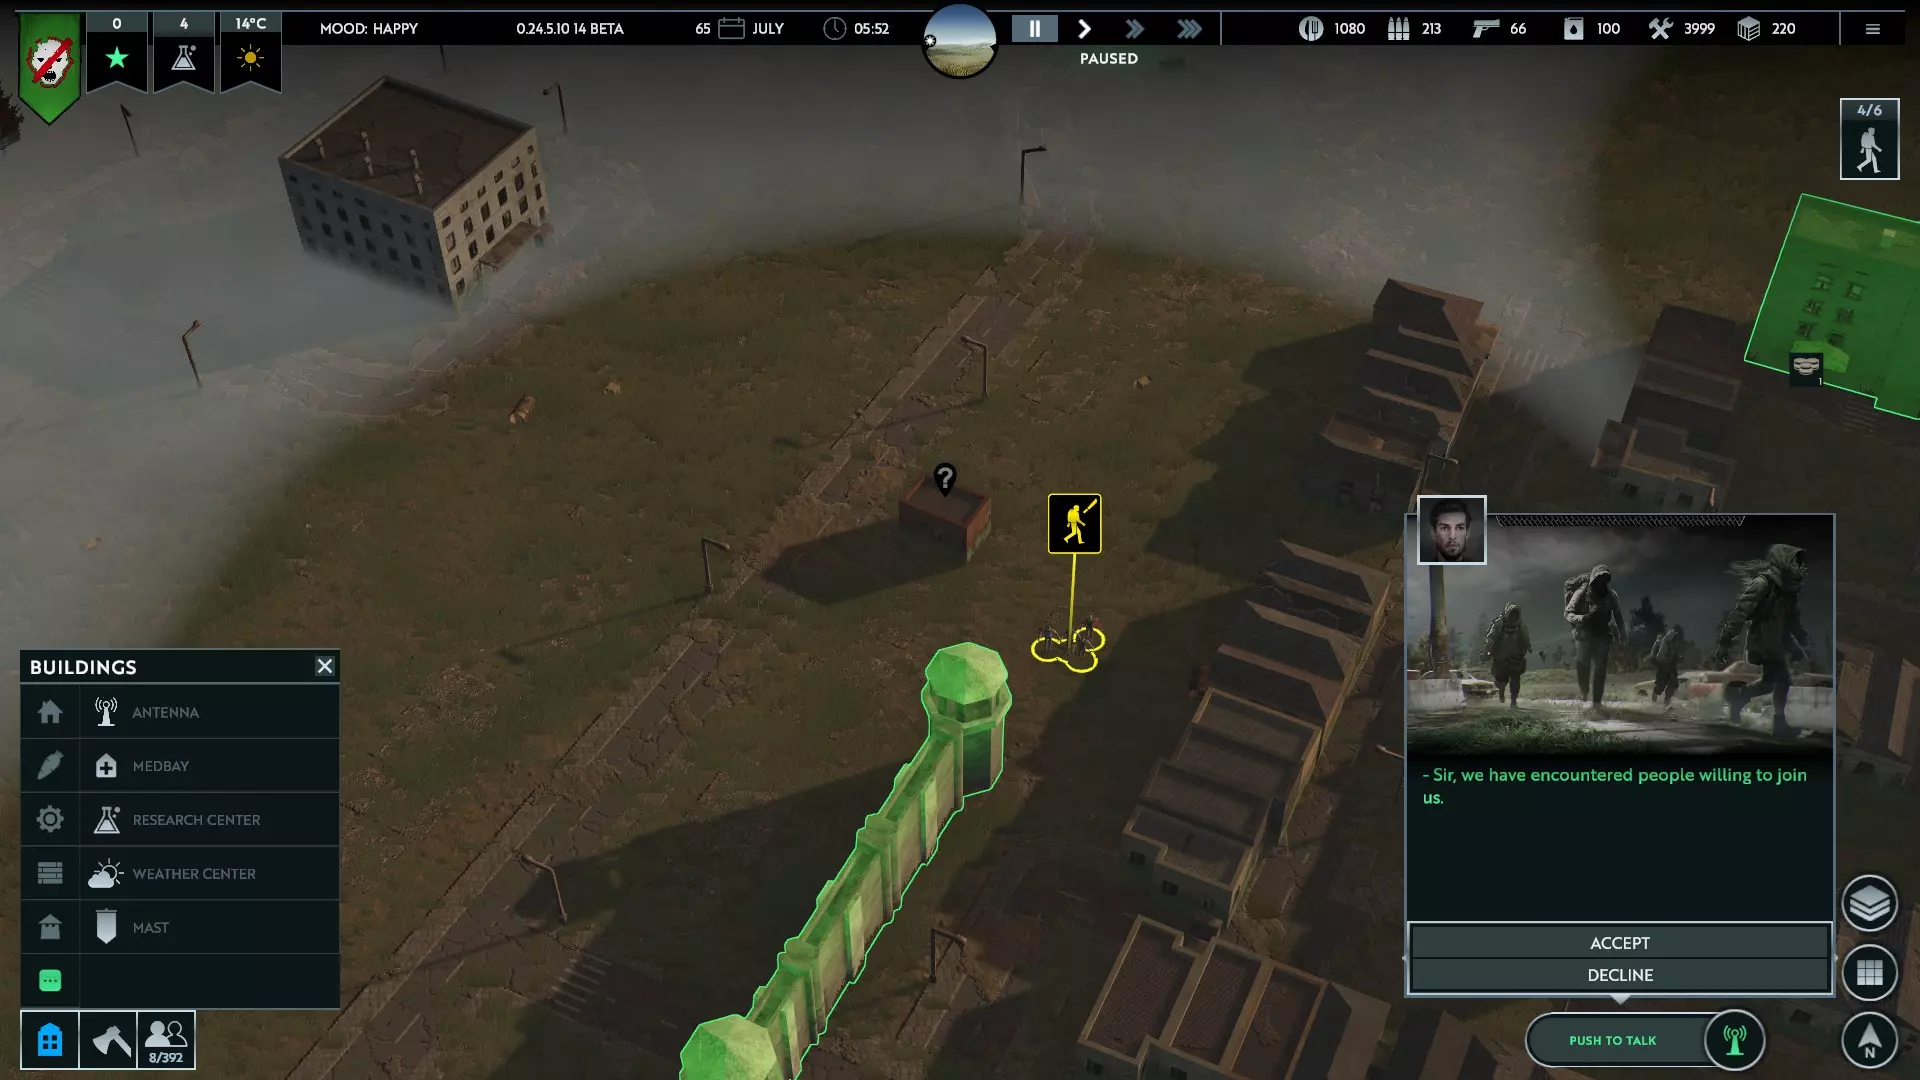
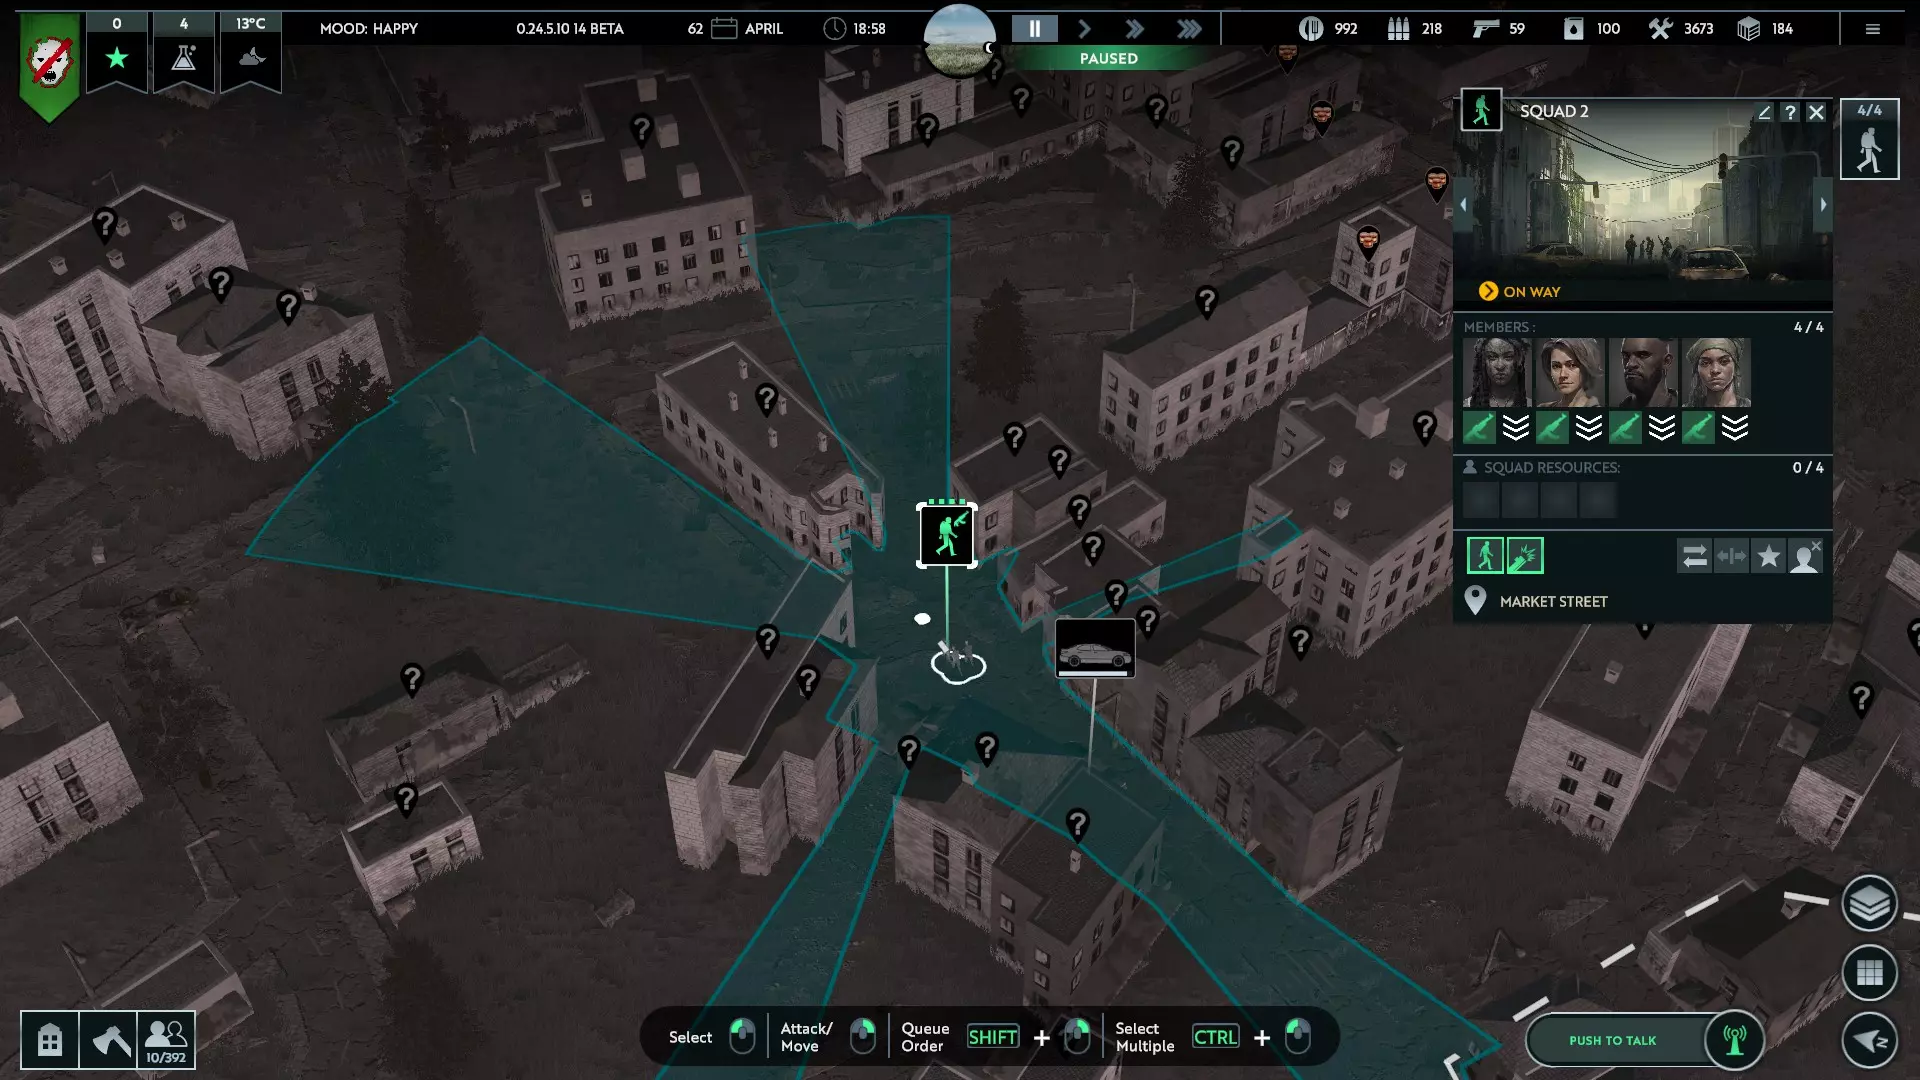
The time taken to complete a production cycle is (mostly) dependant on how many people are working in that building. This scales very simply, as the time taken to produce the resource is inversely proportional to the number of people working on it. Put simply: doubling the amount of people, halves the work time: 1 worker : 40 hours > 2 workers : 20 hours > 4 workers : 10 hours > 8 workers : 5 hours etc. Eventually you get marginal returns, so it ends up being better to have multiple of the same building rather than 1 super building with the same amount of workers. Tips Efficiency is affected by mood; the best way to maximise production is provide everyone with houses, brews and childcare, as this makes them happy and gives a flat 40% boost to ALL production. Can't stress enough, this is huge The number of people that can be assigned to a building depends on it's size. Bigger buildings = more people = faster production. Only the fields are set at 2 people max Speaking of fields, their efficiency will also be affected by temperature, dropping by 80% in winter - this is mitigated to 40% drop if everyone is kept happy (their positive attitudes thaw the fields) Production time is specifically when people are working; a rifle that needs 24 hours to be built will take 3 days (assuming 8 working hours per day). Workers only come out during the day for safety, Workers take precious time to walk to their workplace, so fields and factories should have homes nearby to get the most productive time out of workers - and don't have water between them, as workers will path straight through water and not across bridges/around the water Food Production Chain Given the details in the above section you can work out what number of workers and resources you need for production of certain things, but I've taken the liberty of detailing two example food production chains for a zone of 100 survivors - one for grain rations, one for meat rations - since there's multiple steps and factors that complicate it. You can then multiply this for the number of survivors you have Each different option presumes base level production efficiency (no bonus or malus), and 8 working hours a day. Exact maths gives fractions of production cycles, so these have been rounded up to leave some margin for extra production. As the greenhouse has the same base production as fields, you can use them interchangeably here (with less need for margin-for-error if you use greenhouses, as they're not affected by the cold) GRAIN No research 9 Fields: 18 workers - N/A > 10.8 grain Cookhouse: 13 workers - 10 grain + 5 wood > 20 rations Cannery: 5 workers - 18 rations + 9 metal > 27 canned food All research 7 Fields: 14 workers - N/A > 11.2 grain Cookhouse: 10 workers - 10 grain + 5 wood > 20 rations Cannery: 5 workers - 18 rations + 9 metal > 27 canned food No research (fertilizer) 3 Fields: 6 workers - 1 fertilizer > 10.8 grain Cookhouse: 13 workers - 10 grain + 5 wood > 20 rations Cannery: 5 workers - 18 rations + 9 metal > 27 canned food All research (fertilizer) 3 Fields: 6 workers - 1 fertilizer > 10.8 grain Cookhouse: 10 workers - 10 grain + 5 wood > 20 rations Cannery: 5 workers - 18 rations + 9 metal > 27 canned food MEAT No research 5 Fields: 10 workers - N/A > 6 grain Barn: 11 workers - 6 grain > 12 meat + 6 fertilizer Cookhouse: 8 workers - 12 meat + 4 wood > 20 rations Cannery: 5 workers - 18 rations + 9 metal > 27 canned food All research 4 Fields: 8 workers - N/A > 6.4 grain Barn: 11 workers - 6 grain > 12 meat + 6 fertilizer Cookhouse: 7 workers - 12 meat + 4 wood > 20 rations Cannery: 5 workers - 18 rations + 9 metal > 27 canned food No research (fertilizer) 2 Fields: 4 workers - 0.8 fertilizer > 7.2 grain 11 workers - 6 grain > 12 meat + 6 fertilizer Cookhouse: 8 workers - 12 meat + 4 wood > 20 rations Cannery: 5 workers - 18 rations + 9 metal > 27 canned food All research (fertilizer) 2 Fields: 4 workers - 0.8 fertilizer > 7.2 grain Barn: 11 workers - 6 grain > 12 meat + 6 fertilizer Cookhouse: 7 workers - 12 meat + 4 wood > 20 rations Cannery: 5 workers - 18 rations + 9 metal As you can see, the most efficient method is using a Meat production chain with fertilizer, as this gives a net gain in fertilizer which can be used for fuel and ammo production, and uses the minimum number of workers (26 to feed 100) - but is the most complex Efficiency will drop during winter as the fields produce more slowly, but with the 40% boost for happiness (from building Houses) and the margins for extra production, it's very easy to quickly build up a surplus of food Shout out to Raven's guide on food production calculations that helped to lay out this example. People You'll start with a group of survivors who have managed to hide and wait out the end times with you (exact amount depending on the option chosen at game setup). These people make up your squads and workers, and will be reffered to collectively as citizens. Treat them well - they could just be the future of humanity. Keep in mind, you're likely (and hopefully) not the only people still around by the time the all clear is given, and you'll need help to grow your zone and rebuild society. At least anyone still alive is likely to be immune... right? Squads These are micro-managed groups of up to 4 people, who carry weapons and equipment, and each have 1 inventory slot - a squad of 4 will have 4 slots (as well as their weapon and equipment). They are sent to scavenge in buildings for supplies, scout out what's left of the world around your zone, and fight hostiles. The number of squads you can field is determined by how many HQs and Squad quaters you have, which each increase the capacity depending on building size. It's inevitable that they will see conflict, so managing squad equipment is important to their survival and success. They will auto equip any weapons/equipment they find when scavenging or entering warehouses, but you can use the "transfer" option on a warehouse/HQ to swap out their gear. If you have no specific weapons, squads will default to using machetes, but this means they'll be fighting infected hand-to-hand - a poor choice (see the Combat section for further details). Squads will gain experience as they survive. This will be in four distinct categories; driving, melee, scavenging, and shooting. These range from 0 to 100, and when reaching 100 the squad member will unlock one of two skills for that class (list below). Each one has a 50/50 chance of being earned, and there is no bonus until the skill is maxed out. Each member can only learn 3 skills - most won't need driving. Note, only the squad member doing the driving will build skill - this will be the first listed squad member. Additionally, each citizen will earn 2xp in shooting or melee skill for a successful kill using a weapon of that type. Skill class Skill name Bonus Driving Economic Driver -20% fuel consumption Driving Race Driver +20% driving speed Melee TOUGH +50% health (+50 hit points) Melee Slasher +50% melee damage Scavenging Shoplifter +20% scavenge speed Scavenging Rummager 10% change for additional scavenge Shooting Hawk eye +20% view range Shooting Sharpshooter +50% accuracy Workers These are the macro-managed citizens that make up most of the population of your zone. You'll see them walking around, and each person has unique pictures and names (based on the location of your zone). Workers don't go out at night; it simply isn't safe enough for non-combatants. When resting (or not working, if unassigned) they will rest in shelters/homes/HQ. When happy and well taken care of (plenty of food, housing space, and amenities), citizens will have children, which will increase the population of your zone over time. It takes 12 days in game for children to grow into adults; until then, they take housing slots and and half as much food as adult citizens. Migrants/survivors There will be neutral "squads" moving around the map identified by yellow markers, scavenging for supplies to get by, hiding in buildings at night, and occasionally fighting with the infected. If a squad or normal workers get close to neutrals (or if the neutrals approach one of your buildings), they'll likely ask if they can join your zone. They can be accepted to increase your workpool or turned away, if you don't have room. Sometimes they may just want to do their own thing, and patrol around by themselves. It's also possible to transmit invitations for your zone out to anyone listening, using an antenna (once researched and built). Sometimes people that hear this transmission will just head toward your zone, sometimes they'll have a radio to answer and identify themselves, and you can ask them questions. This includes how many there are, and how they've survived (this currently always gives the same answer, and doesn't identify whether they are "good" or "bad" - all survivors that answer are good and don't betray or attack, yet). You can then offer to have them wait so you can send an escort squad to help them reach your zone, or tell them to make their way to you by themselves. (Note: as far as can be seen, neutral survivors don't actually consume resources across the map.)
掠夺者/敌对势力 总会有一些与你合不来的人,在没有中央秩序或权威的情况下,你很可能会遇到准备攻击你的小队或区域的敌对团体。 这些人可能比感染者更危险,因为他们可能使用远程武器——不过,他们的人数可能有限。此外,如果在战斗中被击败,他们会掉落可使用的弹药和武器。 军方 很可能还有其他有组织的团体幸存下来,包括国家军队。目前无法确定在一切明朗之时,还会存在什么样的指挥链,但任何军方力量都将拥有精良的武器和装甲。 在剧情任务中,你最终会收到一名军方指挥官的通讯,他会请求你的帮助。这包括请求物资和人员,作为回报,他们可以被召唤来帮助对抗感染者——不过他们并非随时都有空。你也可以对他们采取敌对态度,拒绝提供帮助。 (关于军事互动/故事的更多细节将在后续添加) 战斗 这是残酷的生存现实:没有秩序和社会,就会有暴力。当然,你需要担心感染者,还有野生动物,以及敌对的幸存者或掠夺者。在本节中,我将列出有效战斗的细节,以及让你的小队存活下来的不同战术。 为了明确区分,【小队】指的是你直接控制的幸存者,而【工人】则指那些操作防御建筑(塔楼和大门)的人员。非战斗人员不会战斗或自卫,因此大多不包含在本信息内。 小队: 1. 小队在总部和小队宿舍建筑中组建。 2. 小队的最大数量由总部和小队宿舍建筑的数量决定,建筑规模会增加容量。 3. 小队成员通过远程或近战击杀获得战斗经验,将鼠标悬停在其头像上会显示相关菜单,经验最终会提供战斗加成。在【人员】板块下查看技能 小队可以进入载具并驾驶,也能从载具内射击,但会有-30%的命中惩罚,即使静止不动时也是如此 将鼠标悬停在小队的UI图标上,可以查看小队远程攻击的射程和视野,以确保他们能够击中目标
防御墙会创建无法通行的区域,以限制进入你的区域。塔楼提供安全的射击点来对敌人造成伤害(取决于所配备的武器)。大门也是安全的射击点,同时允许友方通过。 你可以为每个塔楼/大门选择使用的武器,这会影响射程/伤害/弹药消耗。如果没有可用的该类型武器,塔楼/大门将无法攻击——可以切换为弓箭。 塔楼/大门由工人操作;和大多数建筑一样,只有工人在场时它们才能运作,但工人不会离开去睡觉。这些幸存者似乎不会从塔楼中的战斗中获得经验。 塔楼/大门使用枪支时需要消耗储存的弹药。塔楼可储存200发子弹(2单位弹药),大门可储存300发子弹(3单位弹药)。工人会前往仓库补充物资,但仅在白天进行——在经常受到攻击的基地周边区域附近设置仓库会很有帮助。 墙壁会“吸附”到其他墙壁的末端、大门的侧面以及建筑物的侧面,但不会吸附到塔楼。 建筑物大多无法直接通行,因为它们有固定的入口,因此可以用作区域围墙的一部分,减少你用于防御某一区域所需的资源。但要注意敌人可能会利用建筑物作为掩护。 与小队一样,将鼠标悬停在塔楼/大门上时,你可以看到它们的视野范围和射程。 为简单起见,建筑物分为两种类型:已加固和空置。所有已改造建筑均为安全状态,其他建筑则为空置状态。 小队可以进入所有建筑;敌人只能进入空置建筑。因此,安全建筑比空置建筑更适合防御,因为敌人会对建筑造成破坏,而你的小队受到保护并可以进行反击(只要他们拥有远程武器)。空置建筑容易被感染者或掠夺者进入,与你的小队进行近距离战斗,这是极其危险的。 建筑高度具有重要影响。武器射程固然重要,但小队也需要对敌人有“视线”才能瞄准他们。在较高的建筑中部署小队可以让他们射击矮建筑,甚至可以越过你自己的墙壁,从而安全地支援你的塔楼和大门。
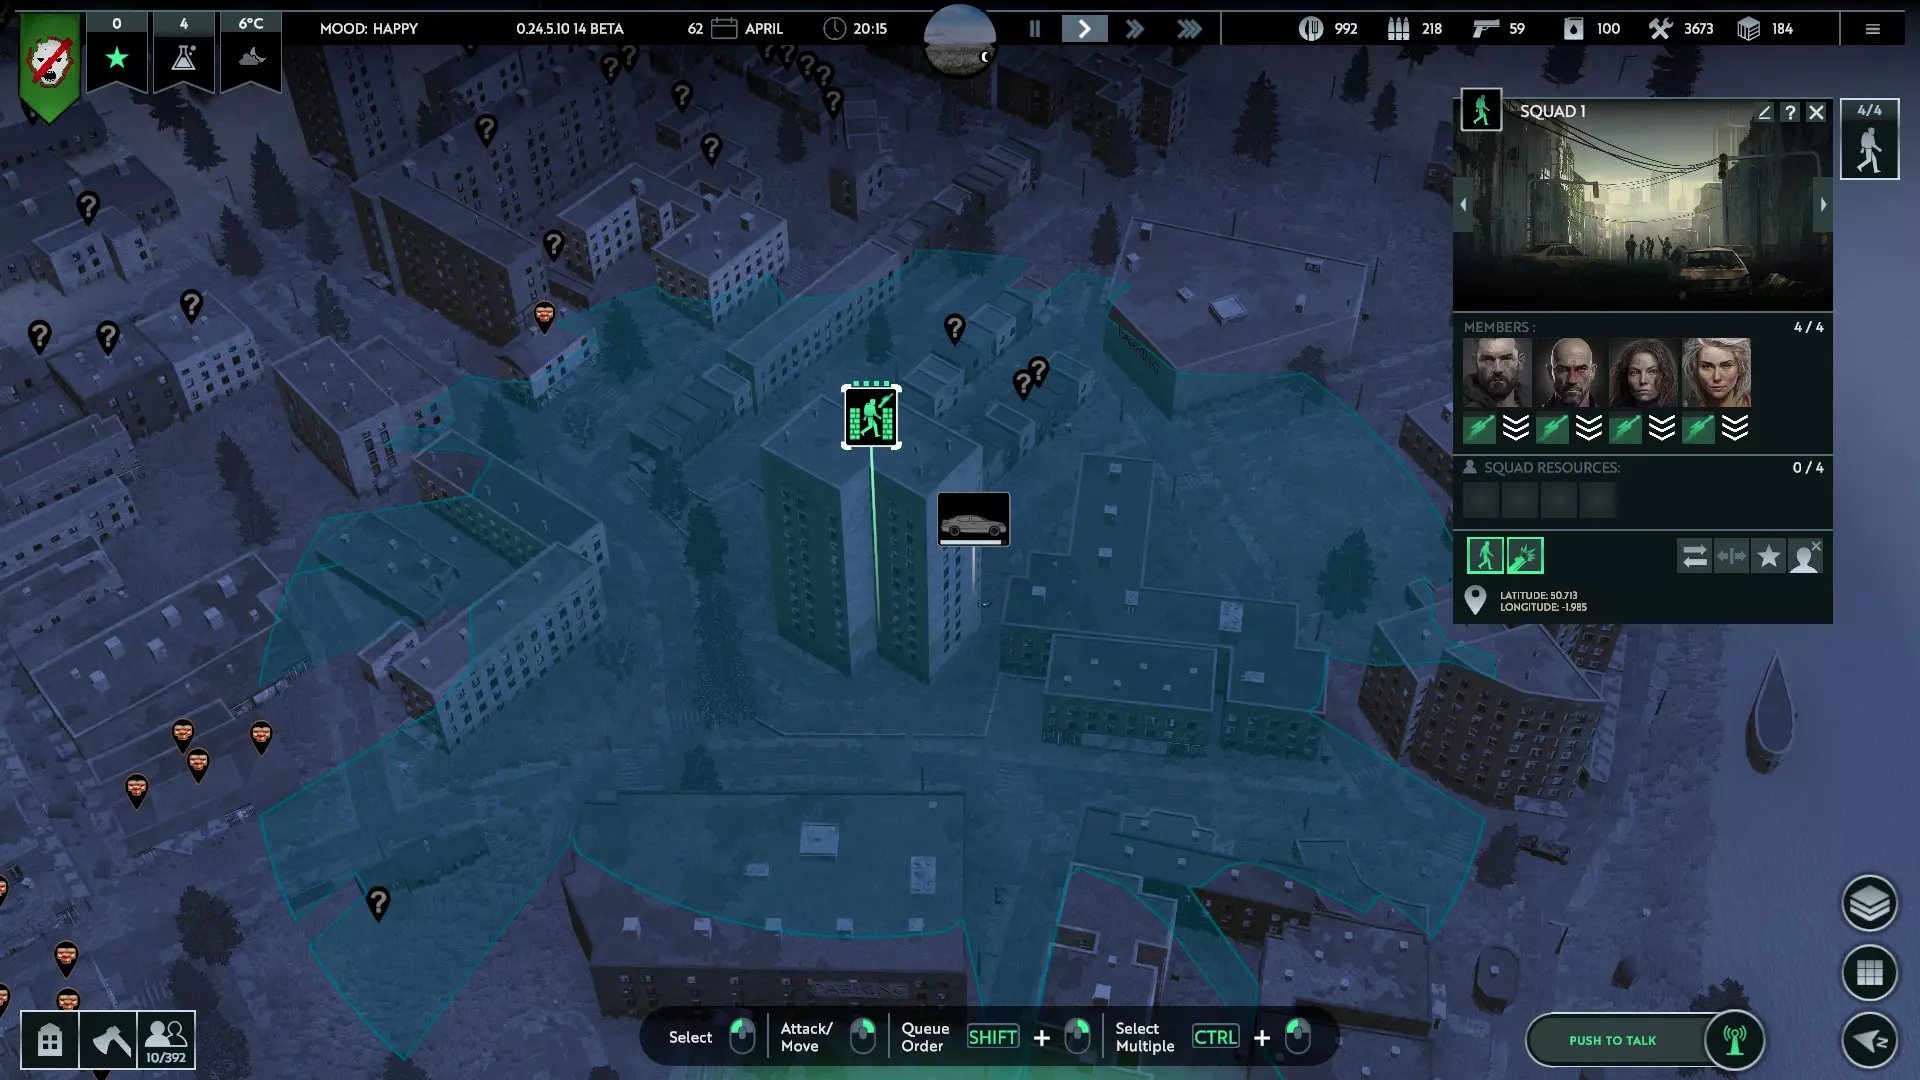
Units have to enter buildings through entry points, the number of which depends on the size (larger buildings having more). You can see where these are based on where your squad will path to, if told to enter the building. Keep this in mind if they are running from hostiles - it might just be safer for them to go to a further away building where the door is closer Squads can now move around inside buildings. This is shown by their path turning blue, with a small x to show their stop. Make sure your squads are near the edges of buildings to have enough range to hit outside targets Combat TacticsFight Smart: this goes without saying, and takes experience to get good at. Don't fight infected in melee when you can hit them from range. Stay out of the line of sight of raiders with guns by hiding behind buildings, until you can engage them from within a building where you have cover. Infected run faster than your squads can on foot - make sure they stay far enough ahead to get to a safe spot. Fortress: the idea of building up walls, towers, gates and barbed wire to protect your zone and direct hostiles to a specific area to fight back. Obviously resource intensive, but with careful planning and a good choice in area it's possible to make strong defences, especially if you can get squads in high buildings to bring more firepower to bear in specific spots Hit & Run: using at least 2 squads equipped with vehicles, have one stopped (and exiting the vehicle to remove the -30% aim malus) to fire at approaching infected while the other squad speeds ahead to get out and prepare to shoot. Micromanage intensive to stay ahead of melee, but this leapfrogging will let you do damage safely for as long as ammo holds out (though well prepared Operators will store ammo in the vehicles, to resupply the squads). Kiting: if a group or swarm of infected is large enough to overwhlem your zone or a specific defensive point, you can use squads in vehicles to approach the swarm just close enough to draw off some the groups, so that your defences can handle a few at a time. One squad can also kite infected around a building manned by other ranged squads, that can fire on the infected without fear of them storming the building Hunt & Clear: infected will hide during the day, usually in buildings but also occasionally in the ground. Though you can't do much if they bury themselves, you can clear them out of buildings quite easily by sending squads in. Overwhelming firepower is good - multiple squads can be sent in at once. If a swarm is too big to fight in the night, you can clear them group by group during the day to stop them overwhelming your walls that night Building peeking: this is a cheesey tactic, but infected will hide in the centre of buildings - for very large ones, it takes time for them to come to the entrance your squads enter, giving the squad time to shoot (all buildings are treated as hollow for line of sight). When the infected get close, your squad can step outside and let them crawl back into their nest, to avoid damage. Very micro-managey and feels a bit like cheating, but you could explain it away as squads luring the infected out of buildings or into ambushes inside, you do you Weapons Weapon Damage Attack speed Damage/sec Range Ammo capacity Notes Melee - Default 35 1.3/sec 45.5 0.6m N/A Default, and fall back if ranged weapon runs out of ammo Meelee - Polearm 55 2.5/sec 137.5 5m* N/A More advanced melee weapons that do a lot of damage, but put your survivors at risk Bow & arrow 20 0.6/sec 12 45m N/A Only available for tower/gate workers, but uses no ammo Pistol 35 0.6/sec 21 50m 50 Basic and abundant ranged weapon Assault Rifle 105 0.3/sec 31.5 75m 70 Claims to have less chance to hit, so best assigned to experienced survivors Shotgun 80 0.6/sec 48 60m 30 Possibly has better effectiveness indoors, but needs to be confirmed Sniper Rifle 200 0.3/sec 60 110m 25 Enough damage to one hit most infected/people, but expensive *This range is estimated based on the range shown when hovering over your squad icon when equipped with polearms, as the game now only says "short" for range. They are still vastly better than default machetes Vehicles Your squads will find old, pre-pandemic vehicles scattered throughout the region. Not many can be recovered due to deterioration, but those that can are invaluable for developing your zone and rebuilding society. Vehicles are recovered by moving a squad on to them, and take a moment to get running - the squad will then be attached to that vehicle until you specify otherwise, and will use it when moving around anywhere outside. Each one has 4 seats, to fit a full squad, but will have variable other stats - hit points, fuel, storage, etc.The chart below lists their details; each vehicle has a specific max speed, acceleration rate, and fuel usage which can be seen by hovering over the stat bars, but I've narrowed these down to general "speed", since it gets a little min-maxxy for this guide otherwise - but the info is there if you want it. "Use" is also fairly subjective, your mileage may vary (pun intended) Vehicle Hit points Fuel capacity Storage Speed Use Compact 300 2 4 Fast Weak, tiny, only really good for moving a squad around quickly Sedan 600 3 10 Fast Small storage, but relatively common Combi 700 3 15 Fast Less common, and slightly more storage space - not as cool though Pickup 800 4 20 Medium Classic utility vehicle, and fairly common compared to "better" vehicles, albeit slower Van 1000 5 25 Medium Better for longer scavenging runs, thanks to the bigger storage and fuel tank Truck 2000 6 40 Slow Aside from being slow as hell, the ideal workhorse for scavenging and expeditions Tanker 2000 20 4 Slow An old fuel truck that somehow still has fuel in it - useful for stocking up your zone, or taking fuel out to multiple vehicles that have run dry far from home Armoured vehicle 30000 12 10 Slow An incredibly strong IFV, slow and low storage mean it's not great for scavenging, but perfect for fighting. Can only be obtained by defeating the military that tries to raid you. Strategy and tips Smaller, faster vehicles are naturally better for hit and run tactics with fighting squads, for keeping out of range of hostiles Vehicles will automatically refuel when stopped near HQs or warehouses Fuel can be taken out of vehicles, and into squad inventories - good for if you find the tanker Vehicles can be found in expedition zones, so even if your immediate area doesn't have many, there's still hope Summary Hopefully this information helps you build a successful, safe zone for humanity. With raw information you can optimise your play style, but remember to have fun and play around to see what works. Please feel free to leave comments with your own tips or strategies, and don't forget to favourite and rate if this helped! (And thank you for the awards!) Last updated for game version 0.24.10.31 11 Beta (November 4th 2024) Sections to be added: Story events, and further details about the Military faction - most of my games seem to have events get bugged or not trigger, so any info on these would be excellent Factory production times (one day, I promise) Technologies and their effects