InfectionFreeZone(无感染区)


《无感染区》修复更新公告 1. 新增新加坡服务器。下载新地图时,游戏会自动检测并切换至最佳服务器。 2. 为以车队模式开始的游戏中的载具增加了初始资源。 3. 移除了禁用地形高度选项的新游戏开始功能。 4. 调整了砍树所需时间,砍树时间减少30%。 5. 调整了感染犬的属性,其移动速度提升100%,同时伤害降低50%。《无感染区》更新内容 1. 调整后【狗巢】将更易被摧毁(此前其难度远高于普通感染者巢穴)。 2. 优化了游戏首次启动或重置设置时对默认画质的自动检测功能。 3. 修复了可在本应不可放置区域建造塔楼的漏洞。 4. 修复了重置设置后游戏自动设为超高画质的漏洞。 5. 修复了在非英语语言环境下,从下拉菜单更改“自定义”画质等级无效的问题。 6. 修复了新游戏中【车队】模式无法选择的漏洞。 7. 修复了【车队】模式开局食物缺失的问题。 8. 修复了【车队】模式开局研究中心处于禁用状态的问题。《无感染区》更新内容 1. 修复了另一批可能导致【科学家剧情线】卡住或剧情启动明显延迟的问题。 2. 修复了另一批可能导致游戏崩溃或稳定性下降的问题。 3. 重大更新预览:你是否在等待【重大更新#6】?我们有好消息!我们将尽力在下周发布下一个重大更新预览。届时将详细介绍《无感染区》即将迎来的激动人心的新变化。开发团队正努力带来实质性改进,其中包括大幅减少微管理操作等内容。 4. 【Solar Expanse】发售:我们的好友【Solar Expanse】开发团队刚刚发布了他们的游戏。如果你拥有《无感染区》,购买他们的游戏可享受额外折扣。如果你是太空主题游戏的爱好者,或者阿耳忒弥斯二号的发射最近激发了你的兴趣,那么《Solar Expanse》或许是你的理想之选!顺祝商祺,Jutsu Games Team

本指南为Fungi 的作弊码指南翻译版 感谢原作者的授权~ 译文 本指南自Fungi的指南翻译而来,略有修改,另外我懒得分章节编辑了 ,所以全部塞到一章里 写在前面:游戏会在输入框下面显示作弊码,所以你不需要输入完整作弊码,打一两个字母然后根据提示找到想用的作弊码点击就好。 有些作弊码的效果可能有改变或者先前看起来没作用的作弊码能用了,在我下次更新前可以在留言里写上。虽然我看到了之后也不一定改。 (室友省考上岸了呜呜呜,感觉自己好垃圾 而且去游戏里验证就要重进指南的编辑界面,懒癌犯了) 介绍 想享受沙盒游戏风格吗?这本指南更适合你! 在本指南中,我将解释如何使用作弊码以及它们的作用! 使用前: 在使用这些作弊码之前。记住:开启作弊使用作弊码过多后游戏可能会变得无聊。尽量用作弊手段来测试和了解游戏内容。如果你对对游戏变得无聊不太在意,那就使用它吧。 请先在不作弊的情况下尝试几次游戏,实在打不过再用。 如何激活作弊: 1.一定要在游戏中激活,因为你只能在那里激活它们。主菜单界面不行。 2.按“ ` ”键。这将显示调试菜单。(在AZERTY键盘上,控制台命令菜单以“!”打开) 3.输入Enable cheat后回车 即可。输入框下面会有提示,点击下面的提示会自动执行开启作弊指令 成功!你已经开启了上帝的力量,虽然他是有限的。 快速PSA 在本节中,我们将介绍作弊的行为。 快速PSA:记住,使用作弊进行游戏不是游戏的本意,但我不是你的父母,所以你可以随意使用。 好吧,我们有很多作弊码。大约54条(截至1月份,但译者我要写论文懒得把更新的东西自己列出来了就不直接补充了)。我要把这些分成几个部分。 重要提示:当你点击作弊时,会有一个类型和数量,你可能需要填写,比如:“AddResourcesToBuilding res_cans 10” 当使用命令并按ENTER键时,请确保存在调试菜单以实际使用您的命令!(我犯了这个错误) 然后右键单击退出作弊!(比如生成小队或者往除总部外的建筑物放东西) 【建筑作弊-添加作弊】 =建筑作弊= -AdaptBuilding 它的作用:立即将建筑改造成你选择的建筑。 使用方法:左键单击建筑物。 另:让你可以把建筑物改造成你喜欢的建筑,无论是否有研究过。 -CreateFarmLand 它的作用:建造农田 使用方法:选择并单击“bld_farm”。然后退出调试模式用鼠标左键建造 额外:每个农田需要2名工人,给你的电脑带来更大的压力。用生成食物和物品代替就好。但看着好看,可以拿来做视频效果。 -CreateGate 它的作用:立即建造大门。 使用方法:选择并选择所需的类型。然后退出调试菜单用鼠标左键建造。 额外:比瞭望塔更好,因为它们实际上可以立即建造。(可以用来禁止敌人在大门提供的视野范围内生成。 -CreateWall 它的作用:立即筑墙。 使用方法:选择并选择所需的类型。然后退出调试菜单用鼠标左键建造。 额外:如果你想创造一个没有敌人的大空间,这很有用。 译者注:据说围的太大里面还是会刷怪?但这点暂时没时间验证了 =事件类= -CompleteActiveMissions 它的作用:完成所有当前正在进行的任务。 使用方法:左键选择,立即生效。 额外:使用前请务必保存。 -EndMission 它的作用:结束一个任务。 使用方法:点击作弊码后,选择任务。 额外提示:一定要结束一个活动任务。 -StartAction 它的作用:开始一个动作。 如何使用:选择并选择一个事件。 Extra:我不明白。但这是一个很好的小秘密代码,可以看看开发者们的计划。 -StartEvent 它的作用:启动事件。 如何使用:选择并选择一个事件。 额外:更多的事件代码呵呵。 -StartMission 它的作用:启动事件。 使用方法:选择并选择任务。 额外:干得好。 -StartTransmission 它的作用:启动一条来电任务。 使用方法:选择并选择来电。 额外:一定要完成天线任务并建造一个天线。 =添加类作弊= -AddEventToPool 它的作用是:??(可能是有些事件因为游玩进度不会出现在随机触发池里,比如第一天肯定不能给你触发寻获坦克的事件,用这个代码或许能让你提前获得一些由事件提供的东西) 使用方法:选择 额外提示:小心!第一次我的游戏崩溃了,第二次之后没有,但什么也没发生。小心使用。 -AddMoodModifier 它的作用:增加情绪提升 使用方法:选择它并添加X次 附加:给了我一个Bug,但没用 译者注:或许现在有用了?但我不知道,我没有试 -AddResearchProgressPoints 它的作用:增加当前的研究点数 使用方法:选择并添加所需点数 额外:一定要有一个进行中的研究项目 -AddResourcesToBuilding 它的作用:将特定资源添加到您选择的建筑中 如何使用:选择资源和数量。按Enter键。退出菜单。单击建筑。 额外:每次点击都是1次增加。例如,你的物品数量填了20。在一栋建筑上点两次会得到40个该物品。(一定要点击有库存容量的建筑) -AddResourcesToHq 和上面一样,但直接作用于你的总部,所以你不用左键点击选择建筑了。 额外:你可以用其他作弊码建立多个总部,但这个作弊码只会把物品加到给你的初始总部! -AddScientificMaterials 它的作用:添加用于研究的书籍 使用方法:选择并键入数量 额外:耶,你越来越聪明了! -AddWorkersToHq 它的作用:增加工人 如何使用:选择并键入数量 额外提示:小心,工人越多,电脑越卡 译者注:还有,老外都没考虑一下加一千人的情况,你要那么多人也没有用,还很可能会直接让游戏崩溃......毕竟开发组确实没必要为正常游戏里不会出现的人口数做额外优化不是 [清除类作弊] =清除作弊=(谨慎使用) -ClearNavData 我不知道它是干什么的。当你点击它时,它会自动启用。所以,是的,最好别点。 (黑狼:我认为NavData用于寻路,但我不能100%确定。) -ClearStockrooms 它的作用:从所有存储空间中删除所有项目 使用方法:选择 额外提示:在存档中使用时要小心,如果你不提前保存,可能会直接死档。(在测试时发生在我身上lmao) 强力作弊码= -ScavengeAllBuildings 它的作用:使所有建筑变成已探索状态,并显示里面有什么 使用方法:选择。 额外:地图会变得十分杂乱,屏幕上会多出来许多东西。 -SetDay 它的作用:改变天数。 使用方法:选择并键入数字。 额外:高于9999会导致错误。(我发现了世界末日,呵呵) 另:例如,在超过9999之后,你不能将其更改回第56天。 -SetHour 它的作用:改变时间。 使用方法:选择并键入时间。 额外:没有测试,但最好别输入12/24小时制(根据你的设置)以外的阴间时间。 -SetSoldierHp 它的作用:改变士兵的生命值。 使用方法:选择并键入数值。 额外:我想这对所有的小队都会造成影响。 -ShowAllGroups 它的作用:显示所有小队。 使用方法:选择。 额外:对我没有太大影响。 -ShowAllVehicles 它的作用:显示所有车辆 使用方法:选择。 额外:对我没有太大影响。 -StartWeatherFog(非战争迷雾设置) 作用:使天气变为雾天 如何使用:选择并输入true(译者:理论上这种也会在输入框下面让你选择true 和 false,即开启和关闭) 额外:可能导致错误(不知道现在会怎样) -UnlockContent 作用:它锁了一哥东西,比如需要收集的东西、医院,甚至已经可以解锁的建筑。 如何使用:选择和选择内容 附加:你会建造无用的建筑,因为它们没有任何功能(没法通过正常游戏流程获得的建筑还没实装) (黑狼:它还允许你解锁生产类型,如“木材变肥料”。至于“无用的建筑”,它们中的大多数还没有用处,但有些有用处,所有的塔楼类型(和瞭望塔差不多,但可以容纳更多的警卫,并有更多的生命值)、温室(房子里的农场,生产速度取决于分配的工人。生产2个小麦(不确定研究是否会影响它),如果员工数量可观,其时间效率已经是农场的几十倍)和房屋(高级避难所,价格略高,为“生活在豪华条件下的人”提供更多的住房和情绪奖励)都被证实具有功能。 -UnlockResearchType 它的作用:解锁研究 如何使用:点击之后和选择一个研究项目 额外:可能导致像研究天线这样的任务无法完成,因为你无法再研究它了。 (黑狼:无法解锁“medic(al)”和“infection/infectious(忘了叫啥)”研究树。 作者:我个人不相信你能解锁任何不能通过正常研究解锁的研究) (译者:当然,因为开发组还没做hhh,不过哪个能用会随开发者进度变化,我就不一个一个试了,游戏内没实装的研究用的研究材料数量是9999,如果你无聊到真的刷了足够的研究材料然后设置时间到研究完成,请留言告知后人是否会报错) =生成类作弊= -创建资源光标 作用:在点击的地方产生一个选择的资源 使用方法:选择,退出调试菜单,然后在空地上点击左键。 附加:除了挑战之外,我看不出它有多大用处,因为你可以直接在建筑物中刷东西。 译者注:不过如果你是想做视频的up主用来做剧情效果应该不错 -SetSpawnPointVisualizationState 它的作用:我不知道 使用方法:选择并按true 额外:我想这应该会显示生成物品或东西的标志,但没啥卵用。 (译者:看代码猜测或许是显示晚上刷怪的地方?但我也不确定,因为没用过) -SpawnBigSquadAtCursor 它的作用:根据你的选择产生一辆带有16人的小队的指定载具(我之前看一直都是15人小队,不过作者既然更新之后没改那可能是我看错了?) 使用方法:点击并选择车辆。退出调试菜单,左键在地图中生成 额外:刷的都是大刀队,没武器 (译者注:关掉调试菜单的那一次点击也会算进去,所以如果你只想生成一支小队的话那么关闭界面之后直接右键,再把视角往左上拉动就能找到生成的小队,有一种方法可以绕开这个问题,但我忘了是先按ESC还是先暂停游戏了) -SpawnGroupAtCursor 它的作用:产生一组npc。 使用方法:选择,选择单位数量,选择武器,然后键入1。 附加:不要生成鸟类或盔甲。游戏会出bug。 重要的是:不要生成狙击手!!!!!除非是你自己的小队!!每次他们开枪,游戏都会出bug!! -SpawnGroupInBuilding 它的作用:在一栋楼里产生一群npc 使用方法:选择,选择单位数量,选择武器,然后键入1。 附加:不要繁殖鸟类或盔甲。同样会出bug。 -SpawnImmigrants 它的作用:在地图上产生移民 使用方法:选择 附加:没有出现,所以我认为它们是随机产生的 -SpawnImmigrantsAccept 它的作用:在地图上产生被接受的移民。 使用方法:选择 附加:没有出现,所以我认为它们是随机产生的 -SpawnRandomSquad 它的作用:产生一个随机小队 使用方法:选择 附加:会刷在一个额外产生的随机载具里。他们的武器可能并不是真的被添加了。 -SpawnSquadAt 它的作用:在指定坐标?产生一个小队 使用方法:选择、键入坐标、输入数量 译者注:似乎需要一个坐标?这个没弄明白,可能是基于地图软件的坐标,但我不知道游戏内对应的坐标,建议无视这条作弊码。 -SpawnSquadAtCursor 它的作用:在你点击的地方生成一个小队 使用方法:点击然后选择车辆,退出调试界面用鼠标左键生成 额外:比以上选项更好 译者注:确实,因为不用输坐标,直接左键点地图就行,另外忘记了如果点房子是不会生成还是卡住 -SpawnSquadAtLocation 它的作用:在指定坐标?产生一个小队 使用方法:点击、选择车辆然后输入数量 额外:上一条更好 -SpawnVehicle 它的作用:产生一辆车 如何使用:选择车辆,退出调试模式并在中生成 附加:有些车辆无法正常使用,也没有库存容量。(坦克没用) 译者注:之前看坦克建模只有底盘,而且体积很大(碰撞体积没那么大),攻击上原先是用炮弹,但目前游戏内好像没有了?或许会统一成用弹药箱吧 =删除类作弊= -DestroyResourceCursor 它的作用:删除选择的项目 如何使用:选择,退出调试菜单,然后单击 额外:仅适用于掉落物。不适用于建筑物或原材料采集点,如树木和砖堆 -KillAllGroups 它的作用:杀死所有小队里的人 使用方法:选择 额外:保存保存!!! 译者注:直接清空小队hhh,不过曾用此代码解决了因为被绑架事件bug导致一直处于灰色状态的小队无法回归的问题。 -KillWorker 它的作用:杀死一个随机的工人 使用方法:选择 额外:随机杀死一名工人,并可能导致你的劳动力出现缺口 -RemoveMoodModifier 作用:情绪降低 使用方法:选择,输入数量 额外:似乎不起作用 (译者注:这个也可能有作用了,但是我依旧没试) -RemoveResourcesFromHq 它的作用:在选择某个物品后删除该物品 使用方法:选择 一种物品,输入数量 额外:假设这只适用于主总部 译者注:如果你的总部容量满了的话可以用,另外我也用来删掉小队捡回来的手枪,毕竟已经直接刷完步枪给小队和哨塔了,再存手枪也没用 =调试类码=(非作弊类型)-我不会在这些方面下功夫,因为它们基本上作用是可以不用去设置界面就可以更改设置。 -ChangeLanguage 你知道这意味着什么。(译者注:嗯,我假设你一点都不会英语,所以这是更改语言的意思) 需要一行我不知道的代码。很抱歉 -Show/HideFPS 它显示/隐藏了你的FPS显示 译者注:帧数会出现在左下角 -SaveGame 保存您的游戏 -设置FpsLimit 设置Fps限制 ... -SetResolution 设置分辨率LOL -SetTimeSpeed 这就是您的空格、F1、F2和F3键对应的不同时间流速 结尾 -在尝试了所有这些作弊之后,我现在的存档完全是丧心病狂哈哈哈 -在输入一部分作弊码可以用来做什么的时候,我感觉就像那个被问到“吹风机可以做什么”然后回答“吹风”的孩子。有些命令很明显(译者:当然,对于完全看不懂英语的人不是很明显,不过你在看我的翻译版的时候应该能理解作者) 好的,希望你这个指南对你有用。我花了一晚上的时间才完成,所以如果你能点个赞,我将不胜感激! 译者:给作者点完顺便给我点一个! 如果我能补充一下我的观点,我想其他人也会同意:这个游戏是Project Zomboid缺少的(不过没问题,每个游戏都有自己的特点)。这个游戏是独一无二的,有着巨大的潜力。 译者注:僵毁至少在B41版本及以前,除非你打MOD,否则没有别的幸存者,至少在这里你能见到一大堆活人还能指挥他们了 希望小浣熊速速更新!

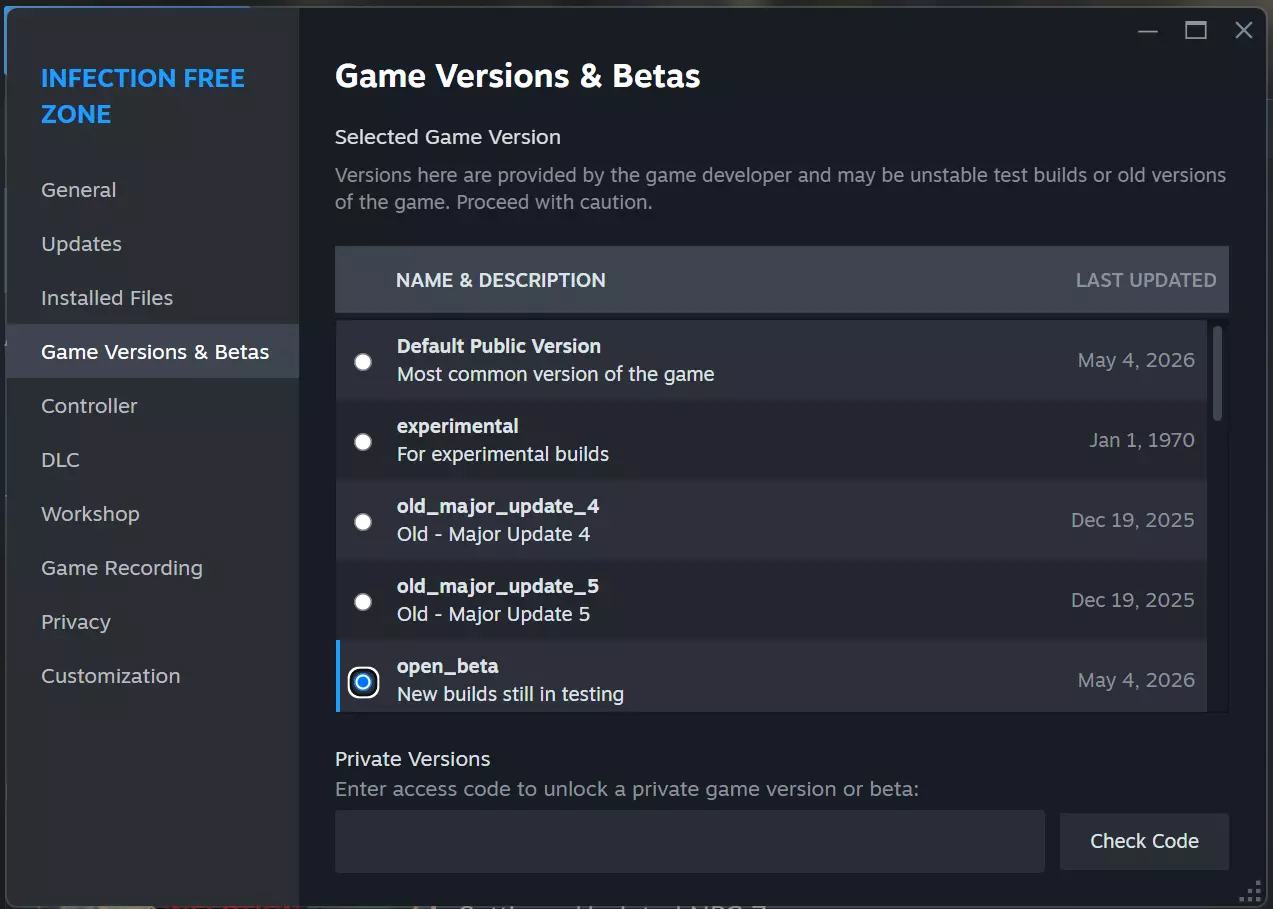
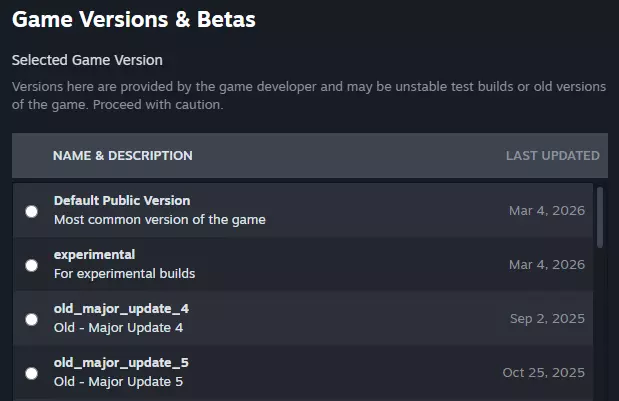
将地图编辑器的兼容pfx链接到主游戏的pfx。 操作步骤: 1. 安装游戏,并确保其能在Proton下正常运行。 2. 打开游戏,点击【附加内容】,然后选择【地图编辑器】。 3. 等待Steam安装编辑器。 4. 确保编辑器能够打开(可能需要对Proton进行一些调整)。 5. 关闭编辑器和游戏。 6. 在操作系统的文件管理器中打开steamapps/compatdata/2202100/pfx/drive_c/users/steamuser/AppData/LocalLow/JutsuGames。 7. 在操作系统的文件管理器中打开steamapps/compatdata/1465460/pfx/drive_c/users/steamuser/AppData/LocalLow/JutsuGames。 8. 将2202100/pfx/.../JutsuGames路径下的【Map Editor】文件夹移动到1465460/pfx/.../JutsuGames路径下。 9. 删除2202100/pfx/.../JutsuGames文件夹。 10. 在2202100/pfx/.../LocalLow路径下,创建一个指向1465460/pfx/.../JutsuGames的符号链接。 11. 打开游戏。- 访问地图编辑器。 - 尽情享受! 实际使用编辑器的指南:【已屏蔽外部链接】

一些助你生存和取得进展的小贴士……希望能帮到你! 小贴士 - 小队需要四人组成,记住这一点 - 游戏初期收集木材,不要费心去收集金属或砖块 - 150到300单位的木材足够你在游戏初期生存 - 用一个小队搜索小型建筑,两个或更多小队搜索大型建筑。建筑内的小队越多,搜索速度越快 - 先拆除小型建筑,再拆除大型建筑 - 拆除建筑不仅是为了获取材料,也是为了清理空间 - 4个人会消耗1单位食物 - 不要收留所有的人群。只有在有食物的情况下才收留他们 - 白天不需要让守卫待在塔楼上,让他们下班并分配到其他地方记得在下午4点到5点之间命令他们返回塔楼! - 解锁车辆后,将一名小队成员转变为机动单位(通过命令他们上车),重命名他们以便你知道他们在车里,然后派他们去城镇其他区域的建筑进行搜刮。 - 要装备更好的武器,长按鼠标左键取下队员当前的武器,然后命令小队返回总部,他们会自动拿起自己拥有的最好武器。 - 不要给小队中的第一个成员配备自动武器,因为他总是司机,开车时无法开火。把自动武器给小队的其他成员。 - 冬季时,将农民数量设置为0。因为天气太冷他们无法工作,所以你可以给他们安排其他事情做。(感谢@Naoral) - 游戏初期收集资源时,你可以建造小型建筑而非大型建筑来节省资源。这样做的缺点其实并不严重,但这类建筑无法容纳太多人。比如,如果你用非常小的建筑作为厨房,那么只能有一个人在那里工作。不过在游戏初期,这确实能帮你和你的仓库节省资源。 - 使用带刺铁丝网可以在感染者和感染犬试图破坏墙壁时对它们造成伤害。将铁丝网放置在墙壁附近或墙壁前方。 - 注意墙壁和塔楼的放置位置:有时可能会出现几乎难以察觉的小缝隙,感染者可能会通过这些缝隙进入你的基地(目前在我20.04版本的游戏进程中就遇到了这种情况)。- 务必在夜晚来临前完成城墙、塔楼和城门的建造,否则即使尚未完工,感染者也会将其摧毁。 - 将小队部署在基地内不同的建筑中,确保每个角落都得到防御。 - 拆除基地内不适合防御或遮挡视线的建筑,这将帮助你的小队更好地瞄准和观察。 - 游戏初期,至少让一座塔楼配备2把手枪,其他塔楼使用弓箭。后期再为它们配备更多手枪。 - 如果食物供应不足,不要接收难民。虽然这是常识,但很多人还是会这样做,结果导致食物耗尽。食物很容易从较多数量迅速降至零。- 击杀掠夺者(土匪)后,记得派遣小队去他们的尸体处搜刮(游戏会自动标记)。你能获得相当不错的物资,尤其是在游戏初期(手枪、弹药等)。 - 将载具用作移动炮塔;把它们部署在感染者或掠夺者附近,观察敌人快速被消灭的过程! - 若要攻击(房屋内的)感染者或掠夺者,务必至少派遣两支小队以防万一。你可以将失业人员编成小队派去战斗,任务结束后让他们返回并解散小队,他们会回到总部重新成为失业人员。 - 确保围墙的每一段都有守卫防守,因为尸潮规模会不断扩大,很容易陷入被压制的局面。 - 让你的小队部署在围墙后方,协助守卫对抗感染者。- 清理基地附近的受感染房屋! - 无需拆除所有建筑即可完成围墙,你可以将围墙连接到建筑上。但感染者可能会进入建筑,所以这是一场冒险。 - 获得卡宾枪后,至少给每个小队配备一把。 - 优先获取食物。拥有的食物越多,你就有越多时间去搜刮含有不同资源的建筑。 - 派遣载具前往城镇的其他区域获取汽油,如果车内有空位,命令它们搜索其他建筑。 - 使用【SHIFT + 右键】选择多个建筑进行搜索。 更新日志 2024年4月20日 新增了几条提示。 2024年4月23日 新增了几条提示。

《无感染区》修复公告 1. 调整了车队模式下巴士总部的容量,从初始设置后的60提升至300。 2. 更新了服务器设置。 3. 更新了分析事件相关内容。 4. 修复了新加坡新服务器可能无法访问的bug。


对于许多玩家来说,藏身处和据点目前有点难对付。以下是应对方法: 藏身处是土匪的生成点。它和你的建筑一样有生命值,并且里面始终至少有一个4人土匪小队。要对付它,你需要确保里面的小队是近战类型。或者你可以带上装甲车来交换火力。 把你的持枪小队部署在最近的建筑里,等待一两天。当所有土匪的枪械单位都被吸引并消灭后,你就可以离开建筑,开始攻击藏身处。一个配备4支自动步枪并额外携带4-6发弹药的小队通常足以完成这项任务。当藏身处的生命值耗尽后,你就可以像往常一样进入里面,对付里面的土匪。之后,如果你确实想的话,可以将藏身处宣称为你的总部,但你需要先修复它。 顺便说一下,重机枪(HMG)在突破藏身处方面并不是很擅长,当4把自动武器能更好地完成任务时,重机枪只是在浪费弹药。另外要记住,当你的小队从车内射击时,只有三个人在开火,因为其中一个人是司机。 巢穴是感染者的生成点。里面要么是人类感染者,要么是狗型感染者。它不像藏身处那样有生命值,但里面通常会有大约100个感染者,再加上1-4个普通小队。要对付它,你需要一些枪支。首先要引出发育点内的小队并解决他们。之后,如果你使用了车辆,需要弃车,然后站在建筑物入口附近。你所需要做的就是让你的小队进入巢穴半秒钟,然后立即让他们退出。我个人会将速度调至2档,并使用狙击手来完成这个操作,让他们在退出前发射一发可被听见的子弹。通过这样循环操作一个小队,你可以轻松清理巢穴。如果速度够快,一个狙击手小队加上轻型装甲,无需重新装备就能清理两个巢穴。


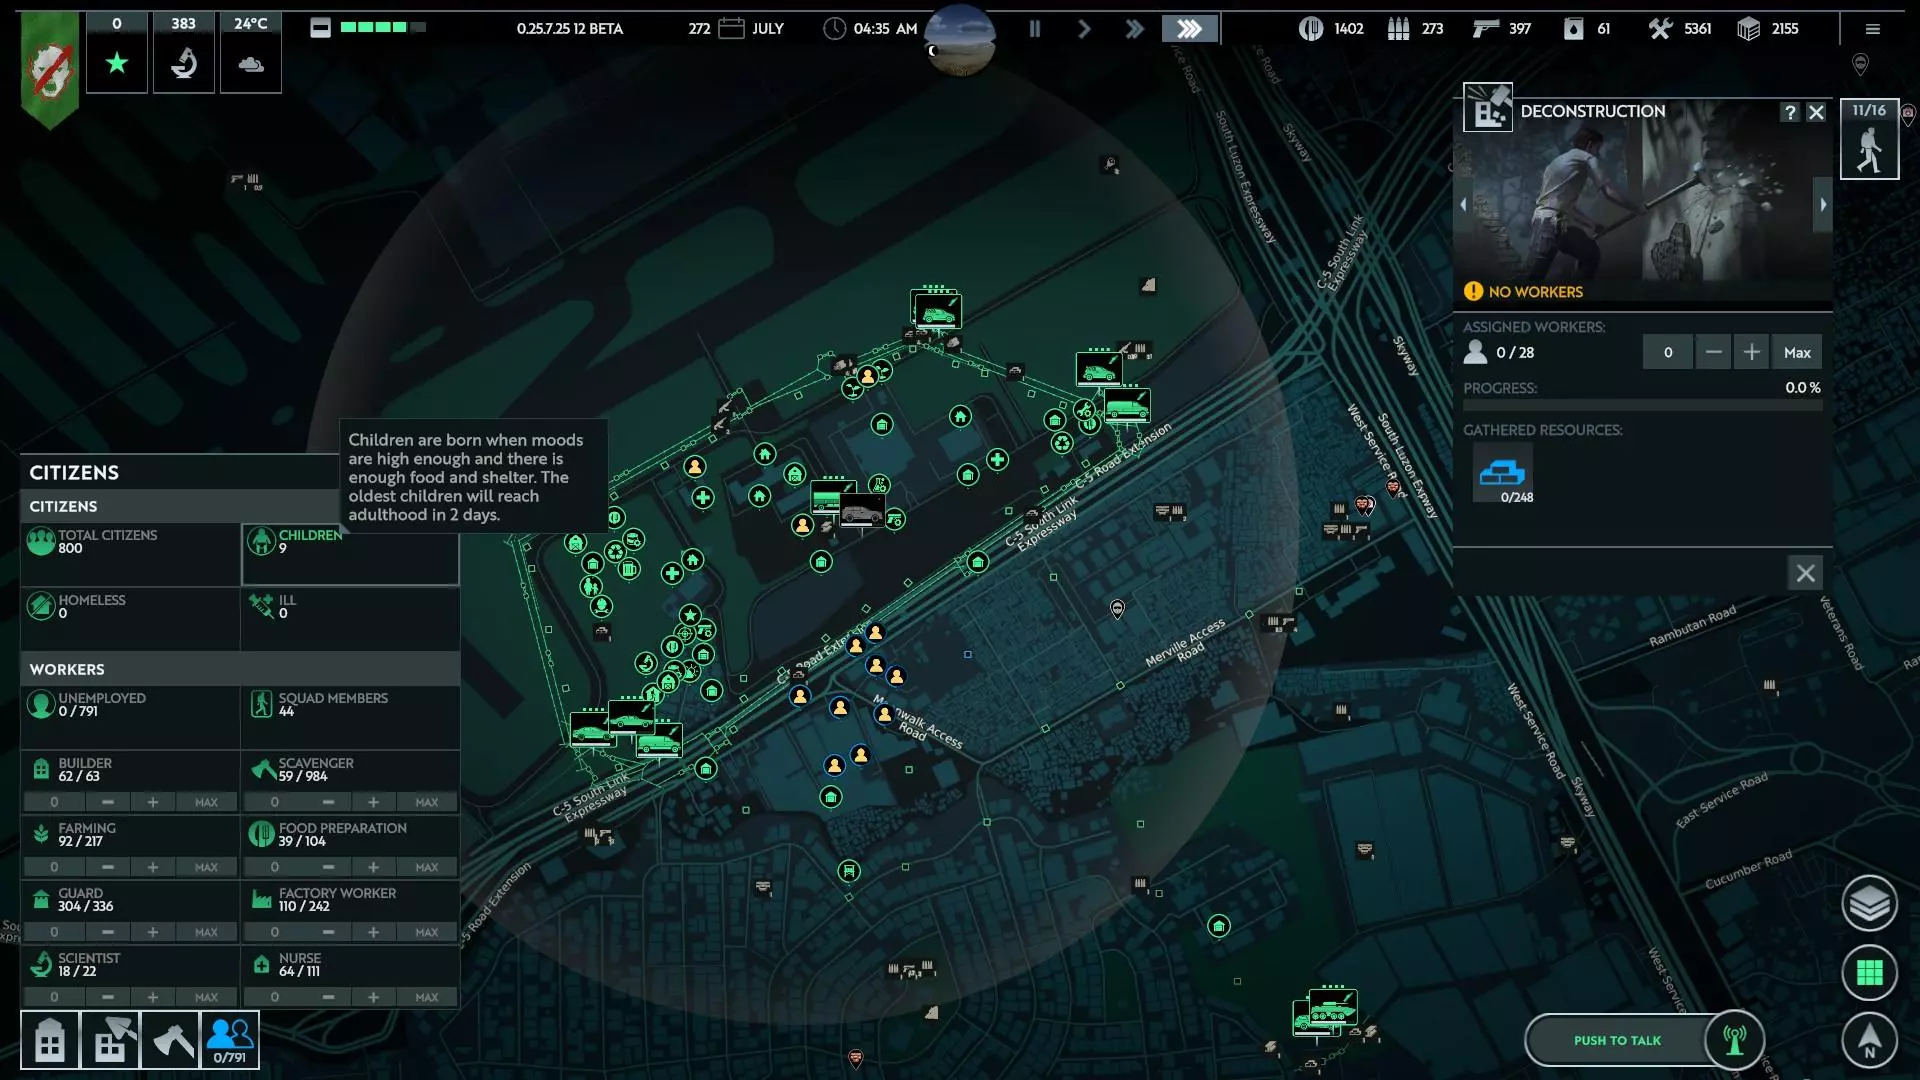

第200天基本情况总结以及初期需要做什么才能撑到第200天 第200天——一切如何? 我在第200天的一些个人见解 首先,不是我想这样,而是因为市民太多会让我的电脑崩溃,所以我把人口控制在400人。 ——怎么做到的?我会把他们派出去送死,让他们不带武器和盔甲去对抗任何来袭的尸潮。 我的人员分配如下: - 28人在谷仓 - 26人在厨房 - 7人在罐头准备处 - 24人在酒吧 - 70人在农场(94减24,对吧?) - 50人在研究部门 - 3人在气象站(不是必需的,但我还是安排了人) - 3人在医院(大约每2小时10份疫苗) - 2人在工具生产处 - 20人在托儿所(上次忘了算其中一个建筑) - 5人在化学部门(肥料转化为汽油) - 3人在武器弹药生产处 - 4人在防御部门装备) - 6支满编小队(AK与狙击手混编)。 - 众多防御塔和大门(最大人口126)。 - 失业人员。可随意安排。若不需要,气象、工具、武器及防御生产也可同样处理。 显然,所有房屋和大型仓库(当前容量66k,其中20k来自砖块……)。 第一周 一切如何开始的简要版本。 最初几天 满编小队搜寻所有物资。日夜不停。 1支小队前往远处,尝试为所有人寻找车辆。若1支寻车小队找到1辆车,便拆分小队并将新车开回。远征队也采用同样方式。 小队 设有“主力”小队和临时小队。 主力小队常驻。前1/2周,之后情况开始变得艰难,便持续增加,直至达到4支主力小队。 临时小队仅在夜间/遭遇袭击时使用。第二周 几天后 从住房、超小型总部(以便更多小队开展工作)和仓库(仅在需要时)开始建设。暂不建造其他建筑。 调查天线,并开始规划你的新区域。拆除总部/仓库附近不需要的建筑,尽量靠近总部/仓库。如有需要,在大型建筑附近建造小型总部。若夜间遭遇袭击,临时组建小队即可。 后续几周及提示 当前机制如下: - 白天:派几支小队完成全地图搜索,尝试寻找车辆和重要建筑。 - 夜间:全员小队仅搜索附近建筑。配备车辆的小队可前往较远的重要地点。 武器: 在拥有防御建筑前,不要生产任何武器。 不要建造围墙,只需建造塔楼和大门。围墙可在后期再建造。骑手会提供武器,而且数量不少。我现在有145把AK用不上,全都是骑手给的。 搜索建筑时注意: 武器——全部带走。 研究点——优先获取。 工具——仅在需要时拿取,但尽量提前储备一些。 食物——即使不刻意寻找,也会自然获得。 汽油——尽量保持一定余量,但并非优先事项。要在车辆使用之间保持平衡,我通常会留50以上。 资源方面: 木材几乎总是需要的。有时也会需要钢材。砖块则永远不需要。 拆除建筑时,留意剩余资源。如果目标资源(比如木材)已经没有了,就没必要继续拆除。这种情况下,取消拆除,去下一个建筑。 如果树木比待拆除的建筑更近,就从树木获取木材。关于钢铁,仅在需要时进行同样操作。拆除建筑通常会获得钢铁,而不是多余的砖块。 小贴士(仅在资源充足时适用): 铁丝网无需操作即可消灭大量骑行感染者。2到3层铁丝网就能将它们消灭。 防御方面: 你的主要防御力量是你的小队,要确保他们装备齐全。必要时,你始终可以从总部进行防御。 塔楼和大门属于后期建筑。 围墙?在基地发展到一定规模前不需要。建造围墙需要时间、资源和工人。所以可以建造带有狙击手的大门(你需要规划好基地布局)。 如果没有狙击枪,就用AK步枪;如果没有AK步枪,就用普通枪支。 优先为小队配备AK步枪,然后再考虑大门和塔楼。 我的玩法是在所有塔楼和大门都部署狙击手。这样更容易覆盖更多区域并观察到所有情况。思路如下: 4个小队(全员配备AK)+1个额外的狙击小队(非常适合骑手) 哨塔和大门。前几周,只能使用枪支,因为你没有其他装备。 幸福度: 这是整个游戏的关键部分之一 住房 > 尽快建造房屋 => 提供高额加成(最高+25%) 啤酒 > 较难(因为需要管理资源)(最高+10%) 托儿所 > 简单(建造建筑和安排工人)(最高+10%) - 幸福度超过20%会提供一些额外加成 - 幸福度超过40%会带来巨大差异 重要事项: - 只在需要时建造建筑。 - 尽量为市民提供合适的“房屋”以提升幸福度。 - 时不时使用天线来吸引更多人口。 - 不要拒绝任何到来的人。 - 食物很容易获取,既然可以让12个小队在夜间搜寻食物,为什么还要建立食品生产设施呢? - 前几周不要建造防御建筑。为什么?小型指挥部可以组建多个小队。若想拥有大量小队,可在(需要拆除的区域)周围建造指挥部。 现在我需要处理砖块,所以我在周围建造砖墙让僵尸去破坏:)(之后再进行修复)

你是否曾想过获得类似电影《我是传奇》中的成就,也就是仅靠一名幸存者存活12天?以下是我的做法: 1. 选择纽约市(哈哈) 2. 将所有人编成小队,让剩余人力开始收集金属废料 3. 派遣小队至少收集30罐食品和30发子弹(确保找到一辆汽车和一把突击步枪) 4. 收集到足够废料后,用两层金属墙包围你的小型总部 5. 确保你的独苗幸存者装备突击步枪,且等级至少达到老兵 6. 开始清除你的人员,确保无人工作,不断组建小队并派他们出去送死(确保他们没有携带枪支或子弹) 7.用一名幸存者抵御一波波敌人,如果尸潮规模过大,那就效仿《我是传奇》中的场景,开车四处移动或碾压感染者,不要让它们开始攻击你的总部。
最终,这位独存者将达到精英等级,并且不会射失目标。如果指挥部受损,立即让你仅有的这名队员开始修理。

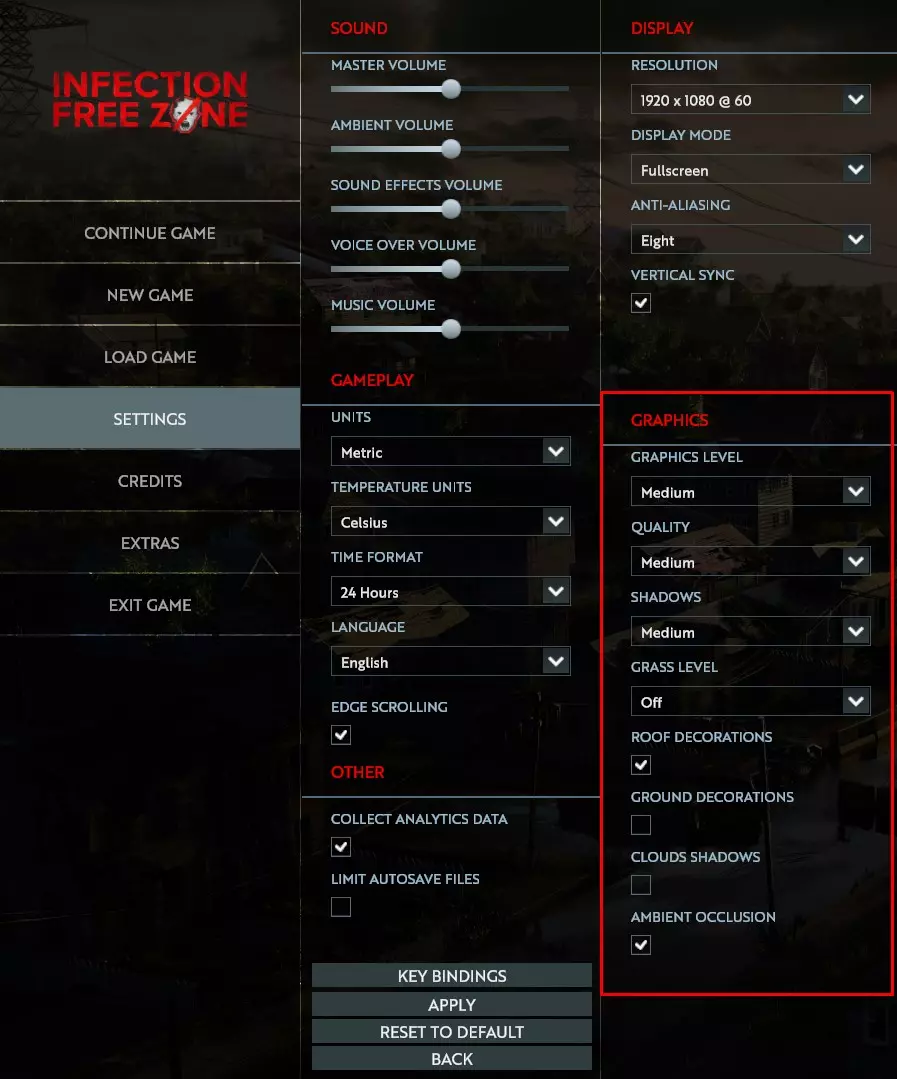
In this guide I'll explain how you can use commands in your game to test stuff out, try techniques or simply have fun with. Introduction: Wanted to enjoy a Sandbox play-style? Than this guide is for you! In this Guide I'll Explain how to use commands and what they do! BEFORE USE: Before using these commands. Remember: after using these cheats the game can become boring after using cheats too much. Try to use the cheats mostly to test stuff out. If you aren't bothered much by this than use it. Please first try the game without cheats for a couple tries before trying them out. How to active cheats 1. Be sure to be inside of a save as you can only activate them there. Not the main menu. 2. Press "`" Key. That press Either A W D S to move in-game. This will make the debug menu appear. (On a AZERTY keyboard the Console Command menu is opened with '!' , So translate ` for !) 3. Press the ? on the bottom right of the menu. 4. Once you see a list. click on "Enable Cheats" 5. Once clicked a bug report will appear. Ignore this. 6. Press "`" again, and move ingame 7. Press "?" again 8. Success! You've unlocked the power of god, If he was limited. Quick PSA In this section We'll cover what cheat does what. A quick PSA: Remember cheating the game Isn't as the game is intended but I am not your parent so use as you please. Okay we have a lot of cheats. About 54. I am gonna split these up into Sections. Important: When you click a cheat, there will be a Type and a Quantity you'll probably need to full in like the resources like: "AddResourcesToBuilding res_cans 10" WHEN USING A COMMAND AND PRESSING ENTER BE SURE TO EXIST THE DEBUG MENU TO ACTUALLY USE YOUR COMMAND! (I had this mistake) AND RIGHT CLICK TO EXIT A CHEAT! [Building Cheats - Add Cheats] =BUILDING CHEATS= (First will appear as incomplete, but after right clicking it puts it all down.) -AdaptBuilding What it does: Instantly adapts a building to a shelter or a cookhouse. How to use: Left click on a building. Extra: Lets you build buildings you like homes and gathering places which u can't research as of now. -CreateFarmLand What it does: Builds Crop Field How to use: Select and click "bld_farm". Go out the debug mode and build Extra: Every field are 2 workers more stressing your pc. Just spawn food and your good. But can be used for visuals. -CreateGate What it does: Instantly Builds Gate . How to use: Select and select what type you want. Than exit debug menu, and then build. Extra: Act as watchtowers and are better cause these actually get instantly build. (can be use to cancel the spawn of enemies in their visual area. -CreateWall What it does: Instantly Builds Wall . How to use: Select and select what type you want. Than exit debug menu, and then build. Extra: Good use if you want to create a big space without enemies. =EVENTS= CompleteActiveMissions What it does: Completes all active missions. How to use: Select. Extra: Be sure to save before using. -EndMission What it does: Ends a mission. How to use: Select what mission. Extra: Be sure to end a active mission. -StartAction What it does: Starts a action. How to use: Select and select a event. Extra: Didn't understand it. But good little secret code to see what the devs have planned. -StartEvent What it does: Starts Events. How to use: Select and select a event . Extra: More secret Code hehe. -StartMission What it does: Starts Events. How to use: Select and select a mission. Extra: goodjob. -StartTransmission What it does: Starts a incoming transmission. How to use: Select and select a transmission. Extra: Be sure to have done the antenna mission and build one. =ADD CHEATS= -AddEventToPool What it does: ?? How to use: Select it Extra: BEWARE! My game crashed and after a second time it didn't but nothing happened. Use With Caution. -AddMoodModifier What it does: Adds a mood boost How to use: Select it and add a X times Extra: Gave me a Bug and didn't work -AddResearchProgressPoints What it does: Adds points to your current research How to use: Select and add the amount of points you want Extra: Be sure to have a active research Project -AddResourcesToBuilding What it does: Adds a certain resource to a building of your choosing How to use: Select a resource and a amount. press Enter. Exit Menu. Click on a building. Extra: Every click is 1X. SO for example u did 20. Pressing 2 times on a building gives it 40. (Be sure to click on a Owned building with a inventory. -AddResourcesToHq Same as above but that its your HQ so u don't have to select it. Extra: U can build multiple HQ's but this cheat only sends it to your first one! -AddScientificMaterials What it does: Adds books which are used for research How to use: Select and type a amount Extra: Yay, you are becoming smarter! -AddWorkersToHq What it does: Adds workers to the main HQ How to use: Select and type amount Extra: Beware, the more workers the more lag [Clear cheats - Debug cheats] =CLEAR CHEATS= (USE WITH CAUTION) -ClearNavData I have no clue what it does. When u click on it it automatically enables it. So yeah, don't just click. (Blackwolf: I think NavData is used for pathfinding but I am not 100% sure about this.) -ClearStockrooms What it does: Removes all items from all storage's How to use: Select Extra: Beware when using in a save, can really screw you up if you didn't save. (happened to me while testing lmao) =POWER CHEATS= -ScavengeAllBuildings What it does: It explores all buildings and shows the items in them like you already went there. How to use: Select. Extra: Map clutter, a lot of things on the screen. -SetDay What it does: Changes the day. How to use: Select and type the amount. Extra: Higher than 9999 causes a bug. (i found doomsday hehe) Also: After going higher than 9999 u can't change it back to day 56 for example. -SetHour What it does: Changes the time. How to use: Select and type amount. Extra: Didn't test but don't do 56:23 or something. -SetSoldierHp What it does: Changes the hp of a soldier. How to use: Select and type a amount. Extra: I assume this does it for all your squads. -ShowAllGroups What it does: Shows all squad. How to use: Select. Extra: Doesn't have much effect on my end. -ShowAllVehicles What it does: Shows all Vehicles How to use: Select. Extra: Doesn't have much effect on my end. -StartWeatherFog What it does: Fog appears How to use: Select and type true Extra: can cause a error -UnlockContent What it does: It unlocks stuff like the gathering stuff, hospital or even already unlockable buildings. How to use: Select and Select Content Extra: You'd be building useless buildings cause they have no function (BlackWolf: It also allows you to unlock production types such as 'wood to fertilizer'. as for the 'useless buildings' most of them don't have a use yet but some do, all tower types (like the wooden towers but able to hold more guards and have more HP), greenhouse (farm inside a house, production speed depends on workers assigned. produces 2 wheat (not sure if tech impacts it) and if staffed with a decent amount is already tens of times more time efficient than farms) and houses (superior shelters that are a bit more expensive, give more housing and a mood bonus 'people living in luxurious conditions'), are confirmed to have functionality. _____________ -UnlockResearchType What it does: Unlocks a research How to use: Select and select a Research Project Extra: Can cause missions like the antenna not to be able to complete cause u can't research it anymore. (BlackWolf: Cannot unlock 'medic(al)' and 'infection/infected (not sure about the name)' research trees. Fungi: Personally don't believe u can unlock any of the researches that aren't already unlocked through normal research) __________________________ =SPAWNING CHEATS= -CreateResourceCursor What it does: Spawns a resource of choosing on the ground where u click How to use: Select and select resource. Exit debug menu and spawn Extra: Outside of challenges i don't see much use for it cause u can spawn stuff in buildings. -SetSpawnPointVisualizationState What it does: I don't know How to use: Select and press true Extra: I assume this should show a marker for what you're spawning but it doesn't do much for me. -SpawnBigSquadAtCursor What it does: Spawns a selected vehicle with a 16 man squad How to use: Select and select vehicle. Exit debug menu and spawn in Extra: Won't spawn with any weapons -SpawnGroupAtCursor What it does: Spawns a group of npcs. How to use: Select, select a amount of units, select a weapon, and type 1. Extra: Don't spawn birds or armor. These create a bug. IMPORTANT: DON'T SPAWN THEM WITH SNIPERS!!!!! ONLY WHEN IT's YOUR OWN SQUAD!! EVERY TIME THEY SHOOT U GET A BUG!! -SpawnGroupInBuilding What it does: Spawns a group of npc's in a building How to use: Select, select a amount of units, select a weapon, and type 1. Extra: Don't spawn birds or armor. These create a bug. -SpawnImmigrants What it does: Spawns Immigrants in the map How to use: Select Extra: Didn't appear so i assume they spawn random -SpawnImmigrantsAccept What it does: Spawns Immigrants in the map. That are accepted to your community How to use: Select Extra: Didn't appear so i assume they spawn random -SpawnRandomSquad What it does: Spawns a player squad with How to use: Select Extra: Spawns in a random vehicles. They have ak's but when clicking on them the ak's are gone. -SpawnSquadAt What it does:Spawns a Squad on cords How to use: Select, type cords, type amount and select vehicle -SpawnSquadAtCursor What it does: Spawns a squad where your press How to use: Select and choose vehicles Extra: better option than above -SpawnSquadAtLatLon What it does: Spawns Squad on cords How to use: Select, type cords and select vehicle Extra: The cursor is better -SpawnVehicle What it does: Spawns a Vehicle How to use: Select a Vehicle, exit Debug mode and spawn in Extra: Some vehicles don't work and don't have a inventory. (no the tank isn't worth it) =REMOVE CHEATS= -DestroyResourceCursor What it does: Removes a dropped Item How to use: Select, Exit Debug Menu and click Extra: Only works on items. Not buildings or raw materials like trees and brick piles -KillAllGroups What it does: KILLS THEM ALL How to use: Select EXTRA: SAVESAVESAVE!!! -KillWorker What it does: Kills a random worker How to use: Select Extra: Kills a random worker and can cause a hole in your work force -RemoveMoodModifier What it does: Removes morale by % How to use: Select with a amount Extra: Doesn't seem to work -RemoveResourcesFromHq What it does: Removes a certain recourse after choosing one How to use: Select and select the recourse Extra: Assuming this only works on main HQ =DEBUG= (Non cheat kind) - i won't put effort in these cause they're basically settings. -ChangeLanguage You know what it means. Need a line of code that I don't know. Sorry -HideFPS It hides your FPS -SaveGame Saves your game -SetFpsLimit Sets a Fps Limit ... -SetResolution This is in your settings lol -SetTimeSpeed This is literally your F1 F2 and F3 keys Ending -After trying all these cheats my current save is totally having a heart attack hahaha -With some cheats and typing "what they do" i feel like that kid that got asked "what does a Wind blower do" and answers "Something that blows air". Some commands were just obvious lmao Alright, Hopefully you had a use to this guide. It took my evening to make it so if u can spare a like I'd appreciate it! If i can just add my opinion and i think others can agree: This game is what Project Zomboid misses (which isn't bad, each game their own thing). This game is a one of a kind and there is so much potential.
How to min max the game during the day, night and gain resources more efficiently. Basic Guide & Tips Hey everyone, I have been playing the ALPHA and now the BETA and have made a very quick guide to help everyone survive. I only have 20+ hours into the game and I love it! So because of this I plan on updating this as and when new updates are released. SQUADS - Aim for 3 squads early on, 2 squads will be full with pistols and 1 will have 2 pistols and 2 machetes. Can loot faster. SCAVENGING - When scavenging, don't loot for metal or brick on the first and second day, scavenge only wood as the first few buildings you will need to adapt only need wood. Until you get some form of production, factories and weapons will need metal and/or tools. NOTE: If you need to build towers, from the 3rd day, only build metal towers and gates at a bare minimum. LOOTING PRIORITIES - Use 1 squad to loot close gun shops and/or police stations, the other 2 to look for food and nearby buildings. Use the squad that only has 2 pistols to loot the gun shops and police stations. Once all CLOSE TO HQ are looted, loot agricultural building and teaching facilities. - The first aid kits are usable but are done manually however they have now added the medical bay which makes this easier. Search for fuel is your fuel amount is 4.0 or less. This should give you enough of a surplus. - You need to find agricultural equipment and tools as early as possible to start construction of farms before the first winter arrives. USE TIME WISELY USE TIME WISELY - Keep an eye on the time, aim to have all of your squads back at HQ and surrounding buildings an hour before sundown. If you have a vehicle, you can use this at night to keep looting as it can move much faster than the zombies however in the new BETA versions, zombie hordes could be a problem but this strategy is situational. NOTE: Every location is different and seasons affect the time of sundown. If you hover over the time, you can see when sundown and sunrise is to min-max your time looting and scavenging. TOWERS - When towers are built, they automatically pick the pistol. If you do not have 2 pistols or 2 automatic weapons, you MUST select the bow and arrow. If you do not, the tower will not attack incoming zombies. - NOTE: As someone previously commented, ammo doesn't seem to refill all the time but they do fill up during the day when BELOW 100 rounds of ammunition. CARS - Cars are NEEDED to survive. The best car is the truck, has 6 fuel and 40 storage slots. The 2nd best car is the combi, it has 15 storage slots, 3500 points of damage and holds 3 fuel. The worst car is the Sedan, it has 10 storage slots, 3,000 points of damage and can hold 3 fuel. There is also the Tanker which carries large amounts of fuel. It holds 20 fuel and 4 storage, ideal for making a secondary HQ in a favourable location. - NOTE: The Sedan is quicker than all other cars and can be used to move quickly if an emergency arises. Worth having at least 1. FUEL - Fuel is also needed to run cars. You can use fuel from cars that you have no need for in the wild. If you have a pickup and see a car you don't control or want like a Sedan, you can take the fuel out of it and put it in your pickup. Easy way to obtain fuel. Also if you find the Tanker, and have no need for it, you could also take the fuel from this also. GUARDS - Guards are useless during the day except to defend against human enemies and during storms when the zombies are out. Use them to work on other things like scavenging, building, farming or cooking. - NOTE: They can't repair the tower during the day if there is nobody in the tower. Aim to have the guards in position an hour before sundown to get ensure they get back. INDIVIDUALS IN SQUADS - Give your 2nd, 3rd and 4th people in the squads assault rifles. When driving, the number 1 is ALWAYS the driver and WILL NOT USE their weapon. Placing automatic weapons on the other 3 will mean maximum damage output. - When you have enough weapons, the 1st and 2nd should have Assault Rifles, 3rd the Shotgun and 4th the Sniper Rifle, this means your squad is a jack of all trades and effective anywhere. - If you need certain squads for certain requirements, like clearing buildings of infected, you should only equip them with shotguns to clear them faster and easier. If you want an 'outpost' away from the HQ in the middle of nowhere with clear line of sight, it's worth having them with Sniper Rifles. - NOTE: I always have the 1st person with an Assault Rifle when I have the weapons as it helps with laying down an effective weapon for all situations. (If snipers have their building entered, you are at a massive disadvantage. If your squad of shotgunners are against a rival sniper unit, they will be ineffective until they are close enough to the enemy. FOOD - 1 can of food or 1 cooked meal supports 4 people a day. This includes the squads. If you start the game on normal with 40 people, you would need to find or create 10 food every day to survive. - NOTE: Farms provide 4 wheat, but with fertiliser that can be increased to 9. 2 Wheat and 1 wood creates 1 cooked meal. 20 wheat and 10 wood will create 10 meals. With this in mind, 5 farms should be enough to keep everyone fed. People will eat cooked meals before eating canned goods. A cannery will improve the shelf life of food. AUTO-SAVES - The game auto-saves every 12 in game hours. At 06:00 and 18:00. Because of this, the potential to reset the night if it is too disastrous is there. Simply reload the auto-save for 18:00. WOOD - Wood is limited, trees in the current build will NOT respawn. Buildings can be deconstructed for wood, brick and metals and will respawn when loading a save. AMMO SAVING - You can save ammo by using bows in towers. GATES - Gates are only good as focus point for zombies also having 4 guards on it counts as a tower, but this also means 4 weapons. Early on a tower behind the gate just in range is a good idea, this with a couple of Sniper Rifles makes it a great place to support the gate. RESEARCH - You can generate research points by having your people in a research centre. Looting buildings with knowledge means an immediate gain in research books. Sorry I haven't updated this, recently bought a new house and moving into it soon. Once that's sorted I will be making a video along with updating this guide. I hope that this helps people in the current build of the ALPHA version of the game. Anything that you have found that can be useful, please add in the comments and I will add it to this list. I will be creating a video on my YouTube channel to highlight these points. Many thanks!