换一换
换一换 


This battle-guide provides UGCW player-generals with an overview of various structural “basics” for each battle in UGCW’s Union/USA campaign: days & phases, times & timers & timing notes (including alerts to EXTRA time available by phase), map(s) used in each phase, force-composition and positioning (including “RE-SET” phases), friendly & enemy reinforcement arrival-times, clarifications of battlefield objectives, notes on geographical locations, offensive/defensive orientations, CAMP availability between phases, special units or officers awarded after battles, alerts to some particular oddities or surprises and secrets, and various other conditions and factors that are part of (or somehow connected with) the tactical situation for each battle. It may contain mistakes or inaccuracies on various counts: please feel free to offer any notes or corrections, etc. May this information help you to achieve victory more enjoyably and effectively on UGCW’s battlefields. (Note that this guide has been built out of analysis of version “1.09 rev. 21114”, although most of its content has now been confirmed for the 1.10 & 1.11 updates. No updates are currently planned in order to conform to changes caused by the various mods now available.) (1) Capture the Train Station (Philippi) - 01 JUN 1861 PRE-BATTLE NOTES: * This is an OFFENSIVE-then-DEFENSIVE minor battle * EXTRA time available after FINISH pops up: see Phase 3 * After this battle, you will receive, as part of your developing army, several of the units deployed here, so you may wish to “conserve” them: the INF bdes of Loomis and Walton, the ART bdes of Woods and Scales. [Thanks to CivWar64 for this info.] * This is often considered to be a very difficult battle, esp for new player-generals: one trick is to start the mission, save it immediately, then reload; this will yield larger-than-otherwise bdes in the reinfs wave [Thanks to pandakraut for this tip.] Also, this battle can be played from both sides via the Custom Battles option, which can help with understanding enemy intentions, etc. [Thanks to Oswaldo for this tip.] * BrigGen John Gibbon becomes available for recruitment (via Reputation Points) after this battle, but he will also appear after (victorious?) Antietam as a new addition to the Barracks DEPLOYMENT: * N/A (all units are automatically assigned to player) PHASE 1: “[Advance!]” TIME: 1015 TIMER: None [:30, in fact] MAP: Philippi, [West] Virginia DEPLOY-FORCE: 1 INF + 2 SKM + General POSITIONING: Pre-positioned at southwest of map OBJECTIVES: Capture Philippi NOTES: * Situation-Overview begins the battle/phase PHASE 2: “[Capture Philippi]” TIME: 1045 TIMER: 5:00 MAP: Same DEPLOY-FORCE: Same + reinfs: 2 INF + 2 ART + 1 CAV + 1 SW POSITIONING: As at end of Phase 1 + reinfs: arriving from west-edge (central) of map OBJECTIVES: Same NOTES: * Brief alert (and pause) announces this phase * Due to as-yet unidentified triggers (possibly the relation of CONTESTED timer to overall time?), this phase may end in VICTORY without any Phase 3 happening PHASE 3: “Hold the Town” TIME: 1615 TIMER: 2:30 MAP: Same DEPLOY-FORCE: As at end of Phase 2 POSITIONING: Pre-positioned along east side of town OBJECTIVES: Hold Philippi NOTES: * Extended Situation-Overview begins this phase, mentioning CSA counter-attacks coming from northeast and east, perhaps including an armored train from the southeast * 1640~: Reinfs arrive from west-edge of map: 3 INF + 2 ART + SW * With VP in hand (but perhaps otherwise too), EXTRA time available after FINISH pops up -- until 2015 ***CAMP now available*** (2) Distress Call - 15 JUN 1861 PRE-BATTLE NOTES: * This is a DEFENSIVE minor battle * Loan-Aux troops are also assigned to player in this battle * With VPs held, EXTRA time available after FINISH pops up -- until 1800 * Per pandakraut: CSA reinfs always spawn/enter from east of map (“in the middle of that eastern island”) but can approach via north or south or, alternatively, “split their forces and go both ways” -- depending on location of our forces * Per pandakraut: reinfs are triggered if the AI captures either of the two forts DEPLOYMENT: * Defend Supply Depot: 8 bdes - 1 deploy-box PHASE 1: “[Defend the Depots!]” TIME: 0830 TIMER: 1:00 MAP: Supply depot area (near Manassas Railroad Junction - northeastern Virginia) DEPLOY-FORCE: 2 bdes + General + SW / Loan-Aux troops: 2 INF + 2 SKM + 1 CAV POSITIONING: Per deployment-box between depots / Loan-Aux troops: pre-positioned near depots OBJECTIVES: Hold Supply Depot 1 / Hold Supply Depot 2 NOTES: * Extended Situation-Overview begins the battle, emphasizing imminent CSA attacks from north and northwest; also, from southeast via lower bridge PHASE 2: “[Reinforcements!]” TIME: 0930 TIMER: 2:00 MAP: Same DEPLOY-FORCE: As at end of Phase 1 + reinfs: remaining elements of deployment corps POSITIONING: As at end of Phase 1 + reinfs: arriving from west-edge of map OBJECTIVES: Same NOTES: * Brief alert starts this phase, advising a counter-attack with arriving reinfs * See again PRE-BATTLE NOTES: reinfs will begin to arrive if CSA captures either of the two VPs ***CAMP now available*** (3) 1ST BULL RUN - 21 JUL 1861 PRE-BATTLE NOTES: * This is an OFFENSIVE grand battle * This battle takes place in northeast Virginia near Manassas Depot, southwest of Washington D.C. * Numerous Loan-Aux units are assignted to player in this battle * The only true geographic VP is the Henry Hill objective: see Phase 3 (and Victory-Conditions in-battle) * EXTRA time available after FINISH pops up: see Phase 3 DEPLOYMENT: * Flank Left: 10 bdes - 1 deploy-box PHASE 1: “[Attack]” TIME: 0730 TIMER: 3:00 MAP: Bull Run River area (from Henry Hill at south to far north beyond Matthews Hill) DEPLOY-FORCE: Loan-Aux units: 3 INF + 2 ART POSITIONING: Pre-positioned east and south of Stone Bridge OBJECTIVES: Capture Stone Bridge / Capture Matthew’s Hill NOTES: * Extended Situation-Overview begins this phase/battle * 0810~: CAV scouts (1 unit) arrive as reinfs from upper east of map * 0812~: Flank Left reinfs arrive from north-edge of map: 5 bdes + General * 0829~: Remaining Flank Left units (+SW) arrive from north-edge of map * 0848~: Loan-Aux reinfs arrive from north-left: 2 INF + SW * 0900~: More Loan-Aux reinfs from same area: 1 INF + 1 ART * 0929~: More Loan-Aux reinfs from upper east of map: 1 INF + 2 ART * 0945~: More Loan-Aux reinfs from upper east: 1 INF * This phase may end early depending on various (unidentified) triggers PHASE 2: “Capture Henry Hill!” TIME: 1030 [or as at end of Phase 1] TIMER: 2:00 MAP: Same, expanded (including Henry Hill and parts west) DEPLOY-FORCE: As at end of Phase 1 POSITIONING: As at end of Phase 1 OBJECTIVES: Capture Henry Hill [NOT necessary for battle to continue] NOTES: * Situation-Overview begins this phase * This phase may end early depending on various (unidentified) triggers, possibly including run-down of CONTESTED timer PHASE 3: “The Confederates Counter-Attack!” TIME: 1230 [or as at end of Phase 2] TIMER: 3:00 MAP: Same as Phase 2 DEPLOY-FORCE: As at end of Phase 2 POSITIONING: As at end of Phase 2 OBJECTIVES: Hold (or, Capture) Henry Hill NOTES: * Situation-Overview begins this phase * Controlling Henry Hill is the ONLY important geographic VP: if phase begins with it unheld, a CONTESTED timer will be running (:40~); if that timer runs out without VP taken, the battle ends in DRAW or DEFEAT * With the VP taken & held, EXTRA time is available after the FINISH pops up -- until 1845 or until all CSA units are eliminated ***CAMP now available*** (4) River Crossing - 25 OCT 1861 PRE-BATTLE NOTES: * This is an OFFENSIVE minor battle * With VPs taken and held, NO extra time available after the FINISH pops up * With VPs untaken (one or both apparently), EXTRA time available after the FINISH pops up -- until 1930 [but once both are taken and held through CONTESTED timers, battle ends] DEPLOYMENT: * Capture Hill: 12 bdes - 1 deploy-box TIME: 1400 TIMER: 3:00 MAP: River Crossing area (somewhere in West Virginia) DEPLOY-FORCE: All bdes + General + SW POSITIONING: Per deployment-box at west-edge (central) of map OBJECTIVES: Capture River Dam Hill / Capture Crossroads Hill NOTES: * Situation-Overview begins the battle ***CAMP now available*** (5) Crossroads - 17 FEB 1862 PRE-BATTLE NOTES: * This is a DEFENSIVE minor battle * Up to 10, not 9, bdes can be deployed for this batte * EXTRA time is available after the FINISH pops up -- until 1400 DEPLOYMENT: * Defend Crossroads: [10] bdes - 1 deploy-box TIME: 0600 TIMER: 2:00 MAP: Logan’s Crossroads area (in the Cumberland Gap near junction of KY, TN, VA) DEPLOY-FORCE: 3 bdes + General + SW POSITIONING: Per deployment-box around VP OBJECTIVES: Hold Logan Cross[roads] NOTES: * Situation-Overview begins the battle * 0612~: Reinfs arrive from west-edge of map: up to 7, not 6, more bdes ***CAMP now available*** (6) SHILOH - 06-07 APR 1862 PRE-BATTLE NOTES: * This is a DEFENSIVE-OFFENSIVE grand battle * This battle takes place in southwest Tennessee, in/around Pittsburg Landing on the Tennessee River * Some of the overall force used in this battle is Loan-Aux: see Phases 1.3, 1.4, 2.1 * The number (& size?) of Loan-Aux reinfs may depend on the number (& size?) of the player’s deployment-force * Check Victory-Conditions at upper-right of battle-screen to be clear about what is necessary for victory [Per ComputerCrasherDad, eliminating all CSA units on Day 1 leads to immediate Victory] * When it finally appears, you might wish to protect the Pittsburg Landing VP with a reserve unit… * EXTRA time can be available: see Phases 1.4 and 2.1 * Upon (victorious?) completion of this battle, U.S. Grant is added to Barracks [More details TBD, but his rank will depend on the game-version played: unmodded yields MajGen rank, while a Colonel rank will be used in modded game. Many thanks to 34mlparker and pandakraut for help here.] * Per pandakraut on SCALING: It’s difficult to push up scaling here because various CSA bdes are defaulted to maximum size; thus, “just bringing as much as you can” is recommended. Note, however, that the CSA will not bring SKRM-units to this battle, so adding more SKRM units (use on flanks or as reserve line, etc.) to your own force can have some positive effect on scaling. DEPLOYMENT: * CAMP: 40 bdes - 2 deploy-boxes [only 1 corps required] DAY 1 (Apr 6th) - PHASE 1: “The Confederates Attack Our Right!” TIME: 0630 TIMER: 2:30 MAP: West area around Shiloh Church DEPLOY-FORCE: 7 bdes + General (from 1st deployed corps) POSITIONING: Pre-positioned around Shiloh Church OBJECTIVES: Hold Shiloh Church NOTES: * Extended Situation-Overview begins battle/phase * 0737~: Reinfs arrive from northeast corner: 4 bdes + General (from 2nd deployed corps) 1.2: “The Confederates Attack Our Left!” TIME: 0730 TIMER: 3:00 MAP: East area around Spain & Larkin Bell fields DEPLOY-FORCE: 9 bdes (from both deployed corps, if available) POSITIONING: Pre-positioned around the VPs OBJECTIVES: Hold Spain Field / Hold Larkin Bell Field NOTES: * Situation-Overview begins phase * 0837~: Reinfs arrive from northeast: 2 bdes * 0840~: Reinfs arrive from north/northeast: 2 bdes * 0845~: CSA reinfs (under Breckinridge) arrive from south/central * 1005~: More CSA reinfs are announced to have arrived *** PHASES 1.2+: Additional phases may occur, per unidentified triggers, taking player back to western area then once again to eastern area. Eventually, 1.3 will be triggered: 1.3: “Withdraw to Hornet’s Nest” TIME: 1030 TIMER: 3:00 MAP: Expanded, including west & east maps and northwards around the Hornet’s Nest VP DEPLOY-FORCE: As at end of Phases 1.1 & 1.2 + SW (or SWs, if 2 corps are deployed) POSITIONING: As at end of Phases 1.1 & 1.2 OBJECTIVES: Hold Hornet’s Nest / Hold Shiloh Church NOTES: * Brief Situation-Overview begins phase * Shiloh Church begins phase as CONTESTED * Immediately after phase-start, reinfs (remainder of deployable bdes?) arrive north of Hornet’s nest * 1058~: reinfs arrive from far north: 3 INF bdes of Loan-Aux troops 1.4: “Hold Pittsburg Landing” TIME: 1330 TIMER: 4:00 MAP: “Super Map”: all portions of the battle-field DEPLOY-FORCE: As at end of Phase 1.3 + 2 ironclads (not controlled by player-general) POSITIONING: As at end of Phase 1.3 OBJECTIVES: Hold Pittsburg Landing NOTES: * Situation-Overview begins phase * 1600~: reinfs arrive around Pittsburg Landing: 3 large INF bdes + 1 ART (Loan-Aux troops) * EXTRA time may be available depending on status of VP * Per ComputerCrasherDad, eliminating all CSA units on Day 1 leads to immediate Victory Proceeding to next day: CAMP available * Corps deploy-boxes are now labeled “Counter-Attack” DAY 2 (Apr 7th) - PHASE 1: “Counter-Attack!” *** RE-SET PHASE! *** TIME: 0600 TIMER: 4:00 MAP: Same (perhaps restricted at south) DEPLOY-FORCE: As at end of Phase 1.4 + Loan-Aux: 9-12 INF + 1 CAV + 2 ART + General Buell + SW + 2 (AI-controlled) ironclads [Size of Loan-Aux force seems to depend on size of player’s force] POSITIONING: Pre-positioned around Pittsburg Landing OBJECTIVES: Hold Pittsburg Landing / Hold Shiloh Church / Hold Spain Field / Hold Larkin Bell Field NOTES: * Situation-Overview begins battle/phase * All troops are in same condition as at end of Day 1 * EXTRA time can be available when FINISH pops up if CSA forces remain on-field -- until 1845 (but early cut-off also seems possible, per unidentified factors, even when some CSA units remain) ***CAMP now available*** (7) Secure River - 15 APR 1862 PRE-BATTLE NOTES: * This is an OFFENSIVE minor battle that is part of the Peninsula Campaign * Per TechnoSarge: make sure you are at Army Org level 3 so that you can field all 12 bdes (any fewer and this battle is extra-tough) * NO extra time available DEPLOYMENT: * Capture Hill: 12 bdes - 1 deploy-box TIME: 1015 TIMER: 2:12 MAP: Somewhere in northwest Virginia DEPLOY-FORCE: All bdes + General + SW / 2 ironclads (uncontrolled by player) POSITIONING: Per deployment-box at west-edge OBJECTIVES: Capture Forest Hill NOTES: * Situation-Overview begins this battle ***CAMP now available*** (8) Rendezvous - 27 MAY 1862 PRE-BATTLE NOTES: * This is an OFFENSIVE/DEFENSIVE minor battle * Up to 9, not 8, bdes may be deployed for this battle * EXTRA time is available after FINISH pops up -- until 1230 DEPLOYMENT: * Meeting Engagement: [9] bdes - 1 deploy-box TIME: 0603 TIMER: 2:30 MAP: Somewhere near Hanover Court House (Virginia) DEPLOY-FORCE: 5 bdes + General + SW POSITIONING: Per deployment-box at southwest of VP OBJECTIVES: Capture [& Hold] Meeting Point NOTES: * Situation-Overview begins this battle * 0711~: Reinfs (up to 4, not 3, bdes more) arrive from southeast corner map ***CAMP now available*** (9) Seven Pines - 31 MAY 1862 PRE-BATTLE NOTES: * This is an OFFENSIVE/DEFENSIVE battle * EXTRA time is available after FINISH pops up -- until 1230 DEPLOYMENT: * Protect Center: 6 bdes - 1 deploy-box (Loan-Aux units are also deployed) TIME: 0903 TIMER: 2:00 MAP: Seven Pines (Virginia - southwest of Gaines’ Mill) DEPLOY-FORCE: All bdes + General + SW / Loan-Aux units: 6 INF + 2 ART bdes POSITIONING: Per deployment-box at east / Loan-Aux units: pre-positioned centrally OBJECTIVES: Capture [& Hold] Center NOTES: * Situation-Overview begins this battle ***CAMP now available*** (10) GAINES’ MILL - 27 JUN 1862 PRE-BATTLE NOTES: * This is a DEFENSIVE grand battle * This battle takes place in eastern Virginia as part of the Seven Days Battle * At battle’s start, the first 7 bdes of Defend corps will appear in northwest deployment-area * Note Victory-Conditions: only 2 (geographic) VPs need to be held for victory * NO extra time available once TIMER runs out DEPLOYMENT: * Defend: 20 bdes - 1 deploy-box * Reinforcements: 10 bdes - 1 deploy-box PHASE 1: “[Defend!]” TIME: 1300 TIMER: 2:00 MAP: Gaines’ Mill area DEPLOY-FORCE: Defend corps: up to 14 bdes + General + SW POSITIONING: Pre-positioned: 7 bdes (+General) at northwest; up to 7 bdes (+SW) at south around VPs OBJECTIVES: Hold Boatswain Hill / Hold Boatswain Woods NOTES: * Extended Situation-Overview begins battle/phase, emphasizing CSA attacks from northwest & northeast * VPs begin as CONTESTED: :50 timer for each -- if both are not taken/held, then Phase 2 begins [perhaps in connection with making contact with CSA forces?] * 1309~: CSA force arrives from northwest * 1327~: Alert given about more CSA units arriving from northwest PHASE 2: “Rebels Continue to Attack!” TIME: 1500 TIMER: 2:30 MAP: Same, expanded especially south & east to include new VP DEPLOY-FORCE: As at end of Phase 1 POSITIONING: As at end of Phase 1 OBJECTIVES: Hold Boatswain Hill / Hold Boatswain Woods / Hold McGhee Hill NOTES: * Situation-Overview begins this phase, emphasizing more CSA troops arriving from west/north * 1545~: CSA reinfs approach from northwest * 1550~: Reinfs (remainder of Defend corps, IF AVAILALBE) arrive from southeast corner * 1649~: “Right Flank Attacked!” -- CSA flanking force begins moving on our right flank… PHASE 3: “…Hold Till the End of the Day” TIME: 1730 TIMER: 2:30 MAP: Same DEPLOY-FORCE: As at end of Phase 2 POSITIONING: As at end of Phase 2 OBJECTIVES: Same (but see Victory-Conditions: only 2 of the 3 are necessary for Victory) NOTES: * Situation-Overview begins this phase, emphasizing more CSA reinfs arriving from west * 1803~: Reinforcements corps (entire) arrives from southeast corner * 1814~: Longstreet’s (CSA) forces arrive from north, northeast, or west, or otherwise [ComputerCrasherDad notes some variety here in different plays of this phase] * 1901~: Stonewall Jackson’s (CSA) forces arrives from north or northwest, etc. [Again, point-of-entry may vary, battle to battle] * NO extra time available once TIMER runs out ***CAMP now available*** (11) MALVERN HILL - 01 JUL 1862 PRE-BATTLE NOTES: * This is a DEFENSIVE grand battle * This battle takes place in eastern Virginia (north of Harrison’s Landing) as part of the Seven Days Battle * NO extra time is available after TIMER runs down -- unless VPs remain available to be re-taken(?) * MajGen McClellan is added to BARRACKS after (victorious?) completion of this battle DEPLOYMENT: * Defend: 15 bdes - 1 deploy-box * Reinforcements: 15 bdes - 1 deploy-box [ComputerCrasherDad reports: only 14 bdes, not 15, actually deploy] PHASE 1: “[Defend the North Hill!]” TIME: 1300 TIMER: 1:13 MAP: Malvern Hill area DEPLOY-FORCE: Defend corps: 8 bdes + General + SW POSITIONING: Per deployment-box around North Malvern Hill VP OBJECTIVES: Hold North Malvern Hill NOTES: * Situation-Overview begins this battle/phase, emphasizing difficulty of any CSA flank-attacks and recommending concentration of defense at center * There may be early cut-off of this phase, depending on unidentified triggers PHASE 2: “The Rebels Advance!” TIME: 1413 [or earlier per Phase 1] TIMER: 2:30 MAP: Same, expanded east & south & west DEPLOY-FORCE: As at end of Phase 1 + reinfs: remainder of Defend corps POSITIONING: As at end of Phase 1 + reinfs: pre-positioned southwards of North Malvern Hill OBJECTIVES: Hold North Malvern Hill NOTES: * Brief Situation-Overview begins this phase * CSA reinfs arrive in two waves soon after this phase begins: from north/west * There may be early cut-off of this phase, depending on unidentified triggers PHASE 3: “Hold Malvern Hill before Nightfall!” TIME: 1643 [or earlier per Phase 2] TIMER: 3:00 MAP: Same, expanded south & east to include new VPs DEPLOY-FORCE: As at end of Phase 2 POSITIONING: As at end of Phase 2 OBJECTIVES: Hold North Malvern Hill / Hold East Malvern Hill / Hold West Malvern Hill NOTES: * Situation-Overview begins this phase * 20-25(~) mins after start: Reinforcements corps arrives from southeast (2 waves within a few minutes of each other) [ComputerCrasherDad reports: only 14 bdes, not 15, actually deploy] * NO extra time is available after TIMER runs down -- unless VPs remain available to be re-taken(?) ***CAMP now available*** (12) Kettle Run - 27 AUG 1862 PRE-BATTLE NOTES: * This is an OFFENSIVE minor battle * EXTRA time is available after FINISH pops up -- until 1030~ (but only if VP is held; otherwise, a DRAW ensues -- per godspeedthunder) DEPLOYMENT: * Attack: 7 bdes - 1 deploy-box TIME: 0403 TIMER: 2:00 MAP: Kettle Run area (southwest of Manassas Junction, Virginia) DEPLOY-FORCE: All 7 bdes + General + SW POSITIONING: Per deployment-box at south (central) of map OBJECTIVES: Capture Kettle Run NOTES: * Situation-Overview begins this battle ***CAMP now available*** (13) Thoroughfare Gap - 28 AUG 1862 PRE-BATTLE NOTES: * This is a DEFENSIVE minor battle * EXTRA time is available after FINISH pops up -- until 1800 [Thanks, Schonhult, for time-clarity] DEPLOYMENT: * Defend: 10 bdes - 1 deploy-box TIME: 0930 TIMER: 3:00 MAP: Thoroughfare Gap area (vicinity of Manassas Junction, Virginia) DEPLOY-FORCE: All bdes + General + SW POSITIONING: Per deployment-box at northwest (at VP) OBJECTIVES: Hold Thoroughfare Gap NOTES: * Situation-Overview begins this battle * 0954~: Hood’s CSA division attacks (central) * 0956~: Another CSA division attacks (north) * 0957~: Another CSA division attacks (south) * 1104~: CSA INF bde appears at north/east to attempt flanking attack ***CAMP now available*** (14) 2ND BULL RUN - 28-30 AUG 1862 PRE-BATTLE NOTES: * This is an OFFENSIVE/DEFENSIVE grand battle * This battle takes place along Bull Run River (near Manassas, Virginia) to southwest of Washington, D.C. * There is a “sticky spot” on the river-crossing at the far north of the CSA line: enemy units (perhaps our own) will, when shot while routing across the river, get stuck mid-river and thus become easy prey, etc. It is unclear whether they can/will still fire. [Thanks to Sheldon Cooper.] * After this (victorious?) battle, BrigGens Meade and Hooker (Burnside?) are available for recruitment via rep-points* It seems that 1 bde from the Vanguard corps (on Day 2 when it is re-designated as First Attack Wave) will not appear, even if available for deployment * Special TIMING notes: See Phases 1.1, 2.3, and 3.2 DEPLOYMENT: * Vanguard: 20 bdes - 1 deploy-box * Main Army: 40 bdes - 2 deploy-boxes [only 1 required] * Rearguard: 20 bdes - 1 deploy-box [not required; if you want any 3rd corps assigned here available for Day 2, assign it to the Main Army] DAY 1 (Aug 28th) - PHASE 1: “Capture Brawner’s Farm” TIME: 1830 TIMER: 1:23 MAP: Brawner’s Farm & Groveton area (south/west part of larger map) DEPLOY-FORCE: Vanguard corps: 5 bdes + General (pre-selected for player) POSITIONING: Pre-positioned at southwest corner (arriving) OBJECTIVES: Capture Brawner’s Farm [not nec’y for battle to continue w/o penalty] NOTES: * Extended Situation-Overview begins this battle/phase * 1843~: Stonewall Jackson’s bdes sighted (around Brawner’s Farm) * EXTRA time available after FINISH pops up: with VP held, until 2015; w/o VP held, until 2030 Proceeding to next day: CAMP available * On deployment-screen, deployed corps are now grouped as “First Attack Wave” (20 bdes - 1 corps & deploy-box -- former VANGUARD corps) and “Second Attack Wave” (40 bdes - 2 corps & deploy-boxes - former MAIN ARMY corps). If a corps was previously assigned as REARGUARD, it does not appear here. No new assigning is possible here. DAY 2 (Aug 29th) - PHASE 1: “Attack Jackson / Watch the Left!” TIME: 0800 TIMER: 2:30 MAP: Same DEPLOY-FORCE: First Attack Wave: 6 bdes + General + SW (northern) / 6 bdes (southern) POSITIONING: Per deployment-boxes at east (northern & southern) of map OBJECTIVES: Capture Stony Ridge NOTES: * Situation-Overview begins the phase, suggesting that a division be sent to left to secure flank * Bdes used on Day 1 will be in same condition here, at start, as when that day/phase ended 2.2: “Attack Jackson Again?” TIME: 1430 TIMER: 2:00 MAP: Same, expanded south, west, and east DEPLOY-FORCE: As at end of 2.1 + Second Attack Wave (1st corps) units: 10 bdes + General + SW POSITIONING: As at end of 2.1 + Second Attack Wave (1st corps) units: at east-edge (northern) of map OBJECTIVES: Capture Stony Ridge NOTES: * Situation-Overview begins the phase, suggesting that troops be rested until reinfs arrive * 1530~: Reinfs arrive from east: remainder (up to 10 bdes) of the Second Attack Wave’s 1st corps * 1535~: Reinfs arrive from east: elements of the Second Attack Wave’s 2nd corps, if available * 1610~: Alert that CSA forces (under Kemper) are arriving as reinforcements * 1618~: Alert that more CSA forces (under Hood) are spotted moving on our left 2.3: “Continuing to Attack Jackson!” TIME: 1630 TIMER: 2:00 MAP: Same DEPLOY-FORCE: As at end of 2.2 POSITIONING: As at end of 2.2 OBJECTIVES: Capture Stony Ridge NOTES: * Situation-Overview begins the phase, suggesting that CSA may be forming to attack our left: should the attack on Jackson continue or should we re-orient to our left? * Still undeployed at the start of this phase: up to 8 bdes of First Attack Wave * 1701~: Reinfs (remainder of Second Attack Wave’s 2nd corps, if available) arrive from east * 1648-1713+: CSA forces (under Jones) are arriving off our left flank apparently * If VP is not taken, EXTRA time is available after FINISH pops up -- until 2015 (then next day commences) * If VP is taken and CONTESTED timer is running, battle continues -- until CONTESTED timer runs out * Whatever the status of VP, if all CSA forces are shattered, then battle ends in Victory(?) Proceeding to next day: CAMP available * On deployment-screen, corps-assignments are now labeled as follows: “Assault Line” (60 bdes - 3 corps & deploy-boxes) and “Reserves” (20 bdes - 1 corps & deploy-box), with “Reserves” being the “Rearguard” corps from the initial deployment-screen. DAY 3 (Aug 30th) - PHASE 1: “[Decision: Attack or Prepare to Defend?!]” *** RE-SET PHASE! *** TIME: 1500 TIMER: 2:30 MAP: Same, expanded slightly to west (perhaps also south?) DEPLOY-FORCE: All deployed corps (but status of Reserves corps is unclear) POSITIONING: Pre-positioned at east of map, in two north-south lines OBJECTIVES: Hold Dogan Ridge / Hold Chin Ridge NOTES: * Situation-Overview begins phase, emphasizing our unsuccessful attacks previously and need to hold updated VPs * It is possible that the “Reserves corps” (a 4th corps that can be deployed) will deploy here 3.2: “Protect Henry Hill” TIME: 1730 TIMER: 3:30 [battle actually ends after 3:10 has run out, i.e., at 2040 -- not 2100] MAP: Same, expanded especially east DEPLOY-FORCE: As at end of Phase 3.1 POSITIONING: At at end of Phase 3.1 OBJECTIVES: Capture (or Hold) Stony Ridge / Hold Henry Hill NOTES: * Situation-Overview begins phase * It is possible that the “Reserves corps” (a 4th corps that can be deployed) will deploy here ***CAMP now available*** (15) Crampton's Gap - 14 SEP 1862 PRE-BATTLE NOTES: * This is an OFFENSIVE minor battle * Up to 10 bdes, not 9, can be deployed for this battle * If VP is NOT taken, EXTRA time available after FINISH pops up -- until 1930 * If VP is taken, battle ends when CONTESTED timer runs out DEPLOYMENT: * Advance: [10] bdes - 1 deploy-box TIME: 1100 TIMER: 2:30 MAP: Crampton’s Gap area (southeast of Sharpsburg, Maryland) DEPLOY-FORCE: 4 bdes + General + SW POSITIONING: Per deployment-box at southeast OBJECTIVES: Capture Crampton’s Gap NOTES: * Situation-Overview begins this battle * 1130~: Reinfs arrive from south: up to 6, not 5, bdes [AI selects the next 6 bdes from the deployed corps, starting with 1st Division] ***CAMP now available*** (16) South Mountain - 14 SEP 1862 PRE-BATTLE NOTES: * This is an OFFENSIVE minor battle * If VP is not taken, EXTRA time is available after FINISH pops up -- until 2100 * If VP is taken and CONTESTED timer is still running at FINISH, EXTRA time is available -- until CONTESTED timer runs out DEPLOYMENT: * Advance: 20 bdes - 1 deploy-box TIME: 1730 TIMER: 3:00 MAP: South Mountain area (near Boonesboro, Maryland) DEPLOY-FORCE: All 20 bdes + General + SW POSITIONING: Per deployment-box at east-edge of map OBJECTIVES: Capture South Mountain NOTES: * Situation-Overview begins this battle ***CAMP now available*** (17) ANTIETAM - 17 SEP 1862 PRE-BATTLE NOTES: * This is an OFFENSIVE grand battle * This battle takes place in/around Sharpsburg, Maryland * EXTRA time available after FINISH pops up: see Phase 3 * MajGen John Gibbon and his Iron Brigade (INF, 944 men, 3*, Springfield 1855s) are awarded after this (Victory or Draw) battle. Visible in CAMP after battle concludes, this free bde may generate a free bde-slot in the 1st Corps: it is automatically slotted into the FIRST AVAILABLE slot in the 1st Corps; if all bde-slots are already occupied per the player’s current AO level, a new slot is created. E.g., a 6th slot will be created if the 1st Corps already has all of its divisions filled with 5 bdes apiece. This appears to be true for any AO level. (Note: removing this bde at any time also removes the extra-slot; yet, swapping it out directly with another bde will preserve the extra slot.) * Two new BrigGens (Patrick & Carroll) are available for recruitment via rep-points after this battle DEPLOYMENT: [These designations are named after the CSA positioning] * Attack Left: 20 bdes - 1 deploy-box * Attack Center: 20 bdes - 1 deploy-box * Attack Right: 20 bdes - 1 deploy-box [only 16 bdes may actually appear] * Reserves: 40 bdes - 2 deploy-boxes [optional] PHASE 1: “[Attack the Rebel Left!]” TIME: 0530 TIMER: 2:00 MAP: Top (northern) half of whole map (i.e., right flank of USA) DEPLOY-FORCE: From Attack Left corps: 8 bdes + General + SW POSITIONING: Per deployment-box at north-edge (central) of map OBJECTIVES: Capture Dunker Church / Capture Nicodemus Hill NOTES: * Extended Situation-Overview begins the battle/phase * 0550~: Reinforcements (7 bdes more from Attack Left corps) arrive from north-edge (central) * 0700~: CSA reinforcements (Hood’s division) arrive from southwest PHASE 2: “Attack Sunken Road” TIME: 0730 TIMER: 3:30 MAP: Same, expanded esp. south & west, including Sunken Road & Bridge #1 & part of Sharpsburg DEPLOY-FORCE: As at end of Phase 1 + Reinfs: 6 bdes + General + SW (from Attack Right corps) POSITIONING: As at end of Phase 1 + Reinfs: at east-edge by Bridge #1 OBJECTIVES: Capture Dunker Church / Capture Sunken Road NOTES: * Phase begins with new Situation-Overview of the expanding battle * 0733~: Reinfs arrive at north-edge: remainder of Attack Left corps * 0745~: CSA reinforcements (under McLaws) arrive from south * 0747~: More of our reinfs arrive from northeast: 10 bdes + General + SW (Attack Center corps) * 0755~: CSA reinforcements (under Walker) arrive from Sharpsburg area * 0820~: More of our reinfs arrive from northeast: up to 10 bdes of Attack Center corps * 0835~: CSA reinforcements (Longstreet then Anderson) prepare to counter-attack us * 0856~: More of our reinfs arrive from north/northeast: up to 15 bdes (+ General & SW) of Reserves * This phase may have an early cut-off due to unidentified triggers PHASE 3: “We Must Pass this Bridge!” TIME: 1100 TIMER: 4:00 MAP: Same, expanded still further, especially south and west again DEPLOY-FORCE: As at end of Phase 2 + Reinfs: up to 10 bdes from Attack Right corps POSITIONING: As at end of Phase 2 + Reinfs: east of Stone Bridge OBJECTIVES: Capture Dunker Church / Capture Sunken Road / Capture Sharpsburg / Capture Stone Bridge [but this last is not nec’y for Victory: check Victory-Conditions] NOTES: * Situation-Overview begins this phase * 1103~: Reinfs arrive from northeast: up to 5 more bdes of Reserves corps * 1330~: A.P. Hill’s corps arrives from southwest to reinforce CSA * EXTRA time is available after FINISH pops up -- if CONTESTED timers are still running -- but the phase may end early due to unidentified triggers * If VPs are still not taken, EXTRA time is available -- until 1930 * Whatever the status of VPs, battle will end (in Victory) if all CSA troops are destroyed ***CAMP now available*** (18) Iuka - 19 SEP 1862 PRE-BATTLE NOTES: * This is an OFFENSIVE minor battle * If VP is not taken, EXTRA time available after FINISH pops up -- until 1830 DEPLOYMENT: * Advance: 10 bdes - 1 deploy-box TIME: 1015 TIMER: 3:00 MAP: Iuka Junction area (northern Mississippi) DEPLOY-FORCE: All bdes + General + SW POSITIONING: Per deployment-box at southwest OBJECTIVES: Capture Iuka [J]unction NOTES: * Situation-Overview begins this battle ***CAMP now available*** (19) Perryville - 08 OCT 1862 PRE-BATTLE NOTES: * This is a DEFENSIVE minor battle * EXTRA time available after FINISH pops up -- until 1930 if VP is not yet taken (per godspeedthunder) DEPLOYMENT: * Defend Crossroads: 14 bdes - 1 deploy-box TIME: 1400 TIMER: 3:00 MAP: Perryville area (west of Perryville, Kentucky) DEPLOY-FORCE: All bdes + General + SW POSITIONING: Per deployment-box at south (west) edge of map OBJECTIVES: Hold Perryville [C]rossroads NOTES: * Situation-Overview begins this battle ***CAMP now available*** (20) FREDERICKSBURG - 11 & 13 DEC 1862 PRE-BATTLE NOTES: * This is an OFFENSIVE grand battle * This battle takes place in and around Fredericksburg, (northeastern) Virginia * Check Victory-Conditions for exact requirements for victory * Maps allow for SPILL-OVER effect from (i) Phase 2.1 to 2.3, and (ii) Phase 2.3 to 2.4 * Some EXTRA time is available here: see Phase 1.1 * Per Human72: If all 5 deploy-boxes are filled, then the 1st RESERVES corps arrives from east side of Fredericksburg (during phase ???) while the 2nd RESERVES corps appears in two parts during the Telegraph Road phases (one is in the Marye’s Heights area and another is centered on Telegraph Rd.) * After (victorious?) finish, BrigGens Rosecrans & Sheridan available for recruitment via rep-points DEPLOYMENT: * Secondary Attack: 25 bdes - 1 deploy-box * Main Attack: 25 bdes - 1 deploy-box * Second Wave: 25 bdes - 1 deploy-box * Reserves: 50 bdes - 2 deploy-boxes [optional] DAY 1 (Dec 11th) - PHASE 1: “Capture Fredericksburg” TIME: 0400 TIMER: 2:00 MAP: Fredericksburg (the town’s river-side, with bridges as focus) DEPLOY-FORCE: Elements of Secondary Attack corps: 4 bdes + General + SW POSITIONING: Per deployment-box to northeast OBJECTIVES: Capture Fredericksburg [NOT required for battle to continue] NOTES: * Extended Situation-Overview begins this battle/phase * 0453~: Reinfs arrive from northeast in two waves: 7 bdes from Secondary Attack corps Proceeding to next day: CAMP available DAY 2 (Dec 13th) - PHASE 1: “Ready to Advance” TIME: 1300 TIMER: 3:30 MAP: South, left flank (of Union) area focused on Prospect Hill DEPLOY-FORCE: Main Attack corps & Second Wave corps POSITIONING: Per 3 deployment-boxes: northwest: 8 bdes + General + SW (Main Attack corps) / central: 17 bdes (Main Attack corps) / north: 25 bdes + General + SW (Second Wave corps) OBJECTIVES: Capture Prospect Hill NOTES: * Situation-Overview begins phase * SPILL-OVER effect: any units located west and south of the “triple bridges” (running southwards to just about even with the northern-most CSA fortification for Prospect Hill, thence westward) will appear in the Phase 2.3 map 2.2: “Attack Marye’s Heights!” TIME: 1300 TIMER: 3:30 MAP: North, focused on Marye’s Heights & Fredericksburg (town) area DEPLOY-FORCE: Secondary Attack corps (entire) + Reserves corps (elements) POSITIONING: Per deployment-boxes: Secondary Attack corps in F’burg + Reserves corps east of river OBJECTIVES: Capture Marye’s Heights NOTES: * Situation-Overview begins this phase * TIMER may cut out early per unidentified triggers (likely the CONTESTED timer for the VP) 2.3: “Continue Attacking or Withdraw?” TIME: 1630 [or per end-time for previous phase] TIMER: 3:00 MAP: Same, expanded greatly south to include Telegraph Road area & northwest portion of South map DEPLOY-FORCE: As at end of 2.2 POSITIONING: As at end of 2.2 OBJECTIVES: Capture Marye’s Heights / Capture Telegraph Road * If both are taken and held, then the battle ends with this phase’s end NOTES: * Brief Situation-Overview begins the phase * If taken during 2.2, Mary’s Heights begins here as CONTESTED (:20~) * SPILL-OVER effect #1: Any Phase 2.1 units located south-and-west of the “triple bridges” (running southwards to just about even with the northern-most CSA fortification for Prospect Hill, thence westward) will appear here on this Phase 2.3 map * SPILL-OVER effect #2: units at bottom-edge of this Phase 2.3 map will appear at the top-edge of the next phase’s map * VICTORY-CONDITION NOTE: As noted already under OBJECTIVES, taking both objectives here ends the battle once this phase ends; thus, there would be no Phase 2.4 at all 2.4: “The Fight Continues on Their Right Flank” TIME: 1630 TIMER: 3:30 MAP: South, expanded greatly west and also north to include Telegraph Road area DEPLOY-FORCE: As at end of 2.1 + Any SPILL-OVER units at north-edge of map POSITIONING: As at end of 2.1 & (for any SPILL-OVER units) 2.3 OBJECTIVES: Capture Prospect Hill / Capture Telegraph Road NOTES: * Brief Situation-Overview begins this phase * SPILL-OVER effect #2: units at bottom-edge of the Phase 2.3 map appear at top-edge here * TIMER cuts out early if CONTESTED timer(s) run out (per Victory-Conditions) ***CAMP now available*** (21) Parker's Crossroads - 20 DEC 1862 PRE-BATTLE NOTES: * This is a DEFENSIVE minor battle * Regardless of VP-status, EXTRA time available after FINISH pops up -- until last CSA unit is destroyed DEPLOYMENT: * Defend: 10 bdes - 1 deploy-box TIME: 0500 TIMER: 3:00 MAP: Parker’s Crossroads area (somewhere in western Tennessee) DEPLOY-FORCE: 6 bdes + General + SW POSITIONING: Per deployment-box near VP OBJECTIVES: Hold Parker’s Crossroads NOTES: * Situation-Overview begins this battle, emphasizing imminent attacks led by Nathan Bedford Forrest * 0630~: reinfs (up to 4 more bdes, the first 4 available by order-of-division from the deployed corps) arrive from northeast corner ***CAMP now available*** (22) STONES RIVER - 31 DEC / 02 JAN 1862 PRE-BATTLE NOTES: * This is a DEFENSIVE grand battle * This battle takes place in the area of Murfreesboro, Tennessee (southeast of Nashville) * Consult Victory-Conditions via upper-right link in battle-screen * When VPs are held, there is NO extra time once TIMER runs out * SUPPLY-ALERT: There are no SWs deployed during Day 2. Further, there also seems to be a bug that, after Day 1, uses cash from the CAMP to replenish all SWs for any used-up supply but then never reimburses the player (as is normal) after the battle. [Thanks to ♥♥♥♥♥♥♥♥♥ for this info.] * See Day 2 note [per Kristoph42] on how to take advantage of the fact that no SWs are deployed here DEPLOYMENT: * Left: 20 bdes - 1 deploy-box * Reserves: 20 bdes - 1 deploy-box * Right: 20 bdes - 1 deploy-box DAY 1 (Dec 31st) - PHASE 1: “[Defend!]” TIME: 0600 TIMER: 2:00 MAP: South (CSA’s right flank area) DEPLOY-FORCE: 16 bdes + General + SW (from Right corps) POSITIONING: Per 2 deployment-boxes: 6 bdes + General + SW around northern (Center) VP / 10 bdes around southern (Franklin Road Woods) VP OBJECTIVES: Hold Franklin Road Woods / Hold Center [NOT nec’y for battle to continue] NOTES: * Extended Situation-Overview begins this battle/phase * 0607~: Reinfs (up to 5 bdes + General of Reserves corps) arrive from north of the Center VP * Per CONTESTED timers (& perhaps other factors), the TIME may cut-off & Phase 2 may begin early PHASE 1.2: “We Must Withdraw!” TIME: 0800 [or per end of Phase 1] TIMER: 3:00 MAP: Same, expanded north to include new VP DEPLOY-FORCE: As at end of Phase 1 + Reinfs from Left corps (5 bdes + General + SW) & Reserves corps (4 bdes) POSITIONING: As at end of Phase 1 + Reinfs: pre-positioned around new VP (Left corps bdes) and old Center VP (Reserves bdes) OBJECTIVES: Hold Wilkinson Turnpike Hill NOTES: * Brief Situation-Overview begins this phase * 7 mins (~) after start of phase: Reinfs (5-6 bdes of Reserves corps) arrive from north/west of the VP PHASE 1.3: “Defend Nashville Pike” TIME: 1100 [or per end of Phase 2] TIMER: 3:00 MAP: Same, expanded especially north and west to include new VPs DEPLOY-FORCE: As at end of Phase 2 + Reinfs from Reserves & Left corps (15 bdes + SW total) POSITIONING: As at end of Phase 2 + Reinfs: pre-positioned around Nashville Pike areas (West & East) OBJECTIVES: Hold East Nashville Pike / Hold West Nashville Pike NOTES: * Brief Situation-Overview begins this phase Proceeding to next day: CAMP available * January 1st is a rest-day for both sides: “New Year Celebrated…” -- then conflict resumes on the 2nd DAY 2 (Jan 2nd) - PHASE 1: “[Continue the Defense]” *** RE-SET PHASE! *** TIME: 1600 TIMER: 3:00 MAP: Same as 1.3 but significantly restricted at south (almost all of Phase 1.1 map not included) DEPLOY-FORCE: All (or, almost all?) bdes of the 3 deployed corps + Generals (but w/o SWs) POSITIONING: Pre-positioned around the 2 VPs OBJECTIVES: Hold East Nashville Pike / Hold West Nashville Pike NOTES: * Situation-Overview begins this battle/phase, noting that Jan 1st was a rest-day for both armies * NO extra time once TIMER runs out (if VPs are held, anyway) * Supply-Wagon (SW) note: No SWs are deployed here. So, as glitch/cheat/opportunity, empty SWs of all supply before this day/phase in order to gain back free supply AND the money you would have expended on it [Per K42] ***CAMP now available*** (23) Supply Raid - 09 APR 1863 PRE-BATTLE NOTES: * This is an OFFENSIVE minor battle * All troops used here are Loan-Aux * If CONTESTED timer has not run out at FINISH, EXTRA time is available -- until 1245+(?) * There is a bug that hides any units located in/around the red farm to the Union left, southwest of the main CSA position -- a fortifications site. Units can be invisible inside/around this fortified farm, but they are still present and active [Thanks to MANY generals for their research-n-help on this.] DEPLOYMENT: * N/A (Loan-Aux troops are used here: Stoneman’s CAV corps) PHASE 1: “[Reconnoiter and Wait -- then Attack?!]” TIME: 0530 TIMER: N/A MAP: Somewhere in central/eastern Virginia (between Richmond and Fredericksburg) DEPLOY-FORCE: 3 SKM-CAV bdes + 1 ART bde + General Stoneman POSITIONING: Pre-deployed to southeast OBJECTIVES: Capture Supply Depot NOTES: * Situation-Overview begins this battle * 0601~: Reinfs (4 SKM-CAV + 1 ART) arrive from east-edge of map * 0608~: Reinfs (4 SKM-CAV) arrive from east-edge of map * Phase 2 is NOT triggered simply by taking the VP here in Phase 1 -- although taking the VP is apparently a trigger... PHASE 2: “We are in Trouble! [Defend against Stuart]” TIME: 0800 [but variable, depending on actual end of Phase 1] TIMER: 1:00 MAP: Same DEPLOY-FORCE: As at end of Phase 1 + 2 SWs POSITIONING: As at end of Phase 1 + the SWs: at east/central-edge of map OBJECTIVES: Capture/Hold Supply Depot NOTES: * Situation-Overview begins this phase: Stuart’s force has arrived! * If held at start, VP will begin as CONTESTED (:30) * Phase ends with run-down of CONTESTED timer (but also ONLY after run-down of TIME?) ***CAMP now available*** (24) Nansemond River - 11 APR 1863 PRE-BATTLE NOTES: * This is an OFFENSIVE/DEFENSIVE minor battle * Extra Time? Per ComputerCrasherDad: as long as there is a VP or fort gun not taken, the overall time is extended -- to at least 1405. And from godspeedthunder: regardless of battery statuses, Timer extends to 2100 if VP (Capture Battery Fort) is taken DEPLOYMENT: * Assault: 14 bdes - 1 deploy-box PHASE 1: “[Take the Fort!]” TIME: 0830 TIMER: 1:00 MAP: Along the Nansemond River (in the area of Suffolk, Virginia) DEPLOY-FORCE: All bdes + General + SW POSITIONING: Per deployment-box at south/west of map OBJECTIVES: Capture Battery Fort / Destroy Caskie / Destroy Dearing / Destroy Stribling NOTES: * Situation-Overview begins this battle/phase, emphasizing eventual arrival of ironclad support (three ironclads) PHASE 2: “[Take/Hold the Fort!]” TIME: 0930 TIMER: 3:00 MAP: Same DEPLOY-FORCE: As at end of Phase 1 + 2 ironclads (not controlled by player) POSITIONING: As at end of Phase 1 + ironclads: in river to east & north of the fort OBJECTIVES: Same NOTES: * Situation-Overview begins this phase, noting arrival of three ironclads in our support * TIMER may cut out early depending on CONTESTED timers ***CAMP now available*** (25) Siege of Suffolk - 14 APR 1863 PRE-BATTLE NOTES: * This is a DEFENSIVE minor battle * Some Loan-Aux units are assigned to player for this battle * NO extra time once TIMER runs out (when VP is held, anyway) DEPLOYMENT: * Defend: 18 bdes - 1 deploy-box PHASE 1: “[Hold Out for Reinforcements!]” TIME: 1800 TIMER: 2:00 MAP: East Suffolk (Virginia) area DEPLOY-FORCE: Loan-Aux: 4 INF + 1 ART + General Peck / Defend corps: 6 bdes + General + SW POSITIONING: Loan-Aux: pre-positioned around VP / Defend corps: per deployment-box at west OBJECTIVES: Hold East Suffolk NOTES: * Situation-Overview begins this battle/phase PHASE 2: “[Finish the Defense]” TIME: 2000 TIMER: 3:00 MAP: Same DEPLOY-FORCE: As at end of Phase 1 + 2 ironclads (not controlled by player) POSITIONING: As at end of Phase 1 + ironclads: pre-positioned in river immediately west of VP area OBJECTIVES: Hold East Suffolk NOTES: * Brief Situation-Overview begins this phase * 2002~: remainder of Defend corps arrives from west/north of VP area ***CAMP now available*** (26) CHANCELLORSVILLE - 01-03 MAY 1863 PRE-BATTLE NOTES: * This is a DEFENSIVE-then-possible-OFFENSIVE grand battle * This battle takes place near Chancellorsville, Virginia * In-game date of April 30th is adjusted here to May 1-3 (but see Notes for Phase 1.1) * EXTRA time is available during this battle: see Phases 2.1 & 3.1 DEPLOYMENT: * Vanguard (southeast): 25 bdes - 1 deploy-box * Rearguard (northwest): 25 bdes - 1 deploy-box * Center: 25 bdes - 1 deploy-box * Reserves: 15 bdes - 1 deploy-box (not required) DAY 1 (May 1st) - PHASE 1: "[Hold Fast]" TIME: 1100 TIMER: 2:00 MAP: Centered on Chancellor Farm & the two “Orange” VPs DEPLOY-FORCE: 14 bdes + General + SW (Vanguard corps) POSITIONING: Pre-positioned around Chancellor Farm OBJECTIVES: Capture Orange Turnpike / Capture Orange Plank Road / Hold Chancellor Farm * The capture-objectives are not necessary for battle to continue. Per oswaldo: to win (and end) battle in this phase, the capture-objectives must be taken and then held until the CONTESTED timer runs down completely -- before the overall TIMER runs out. NOTES: * Extended Situation-Overview begins the battle/phase, including general overview, with brief glimpse of April 30th and 1600 start-time, then more particular overview of this May 1st battle * Situation-Overview offers advisory to hold the farm and wait for reinforcements before attacking * Soon after start, CSA reinforcements are reported as arriving 1.2: “Fall Back!” TIME: 1300 TIMER: 1:30 MAP: SAME DEPLOY-FORCE: As at end of previous phase POSITIONING: As at end of previous phase OBJECTIVES: Same * The Capture-objectives are not necessary for battle to continue NOTES: * This phase begins with pause & recon-alert that the “Confederates are too many! Fall back!” * 1305~: From northeast, remainder of Vanguard corps arrives as reinfs Proceeding to next day: CAMP available DAY 2 (May 2nd) - PHASE 1: “Secure the Camp” *** RE-SET PHASE *** TIME: 1730 TIMER: 3:00 MAP: Same, expanded mostly south & west DEPLOY-FORCE: All 3 main corps -- Vanguard, Center, Rearguard POSITIONING: Pre-positioned: Vanguard at Farm, Center east & north of Farm, Rearguard west of Farm Objectives: SAME [ComputerCrasherDad reports that wiping out the CSA here may lead to significant numbers of “resurrected” INF and ART units on Day 3 for the CSA] NOTES: * Extended Situation-Overview begins this phase * Various alerts arrive soon after start about the appearance of more CSA divisions on our right flank * Soon after FINISH pops up, Reserve corps (if any available) arrives as reinfs from northeast * EXTRA time available after FINISH pops up -- until 2215 Proceeding to next day: CAMP available DAY 3 (May 3rd) - PHASE 1: “[Flank Attack!]” *** RE-SET PHASE *** TIME: 0530 TIMER: 3:00 MAP: Reduced & centered on Chancellor Farm DEPLOY-FORCE: Vanguard corps, Center corps, 4 bdes of Rearguard corps POSITIONING: Per deployment-boxes centered on Chancellor Farm OBJECTIVES: Hold Chancellor Farm NOTES: * Situation-Overview begins the phase * This is basically a repeat of Phase 2.1 (presumably per historical battle’s evening-into-next-day flow) * 0745~: Reserve corps (if available) arrives from north * EXTRA time available after FINISH pops up -- until 1130 * ComputerCrasherDad reports that wiping out the CSA’s attack on Day 2 may lead to significant numbers of “resurrected” INF and ART units here on Day 3 for the CSA *** CAMP available *** 3.2: “We have a chance to advance!” *** RE-SET PHASE *** TIME: 1230 TIMER: 3:00 MAP: Centered on the 2 “Orange” VPs (still including Chancellor Farm) DEPLOY-FORCE: 15 bdes from each of the 3 main corps + 10 bdes of Reserves [w/Generals & SWs] POSITIONING: Per deployment-boxes for each deployed corps to north & east of map OBJECTIVES: Capture Orange Turnpike / Capture Orange Plank Road NOTES: * This phase begins with an extensive Situation-Overview ***NEXT BATTLE BEGINS IMMEDIATELY: NO CAMP AVAILABLE*** (27) Salem Church - 03 MAY 1863 PRE-BATTLE NOTES: * This is an OFFENSIVE/DEFENSIVE minor battle * This battle begins immediately upon conclusion of previous battle * If VP is not held, there is EXTRA time after FINISH pops up -- until 2200 DEPLOYMENT: * N/A (Loan-Aux troops are assigned to player: Sedgwick’s VI Corps) TIME: 1800 TIMER: 3:00 MAP: Salem Church area (vicinity of Fredericksburg & Chancellorsville, Virginia) DEPLOY-FORCE: Loan-Aux troops: 2 INF + 1 ART + General Sedgwick + SW POSITIONING: Per deployment-box at east-edge of map map [pekour advises, however, that units start pre-deployed] OBJECTIVES: Capture (and Hold) Salem Church NOTES: * Situation-Overview begins this battle * 1815+: Loan-Aux reinfs arrive from east-edge in several waves (6 more INF + 3 more ART) * 1935: 6 CSA bdes (5 INF + 1 ART) enter from south-east map-border [per update from pekour] ***CAMP now available*** (28) 2nd Winchester - 13 JUN 1863 PRE-BATTLE NOTES: * This is a DEFENSIVE minor battle * Check Victory-Conditions in upper-right corner of battle-screen * If a VP is not held, there is EXTRA time after FINISH pops up -- until 1535 * If VPs are held, there may be EXTRA time after FINISH pops up -- until 1132+(?) DEPLOYMENT: * Defend: 13 bdes - 1 deploy-box [ComputerCrasherDad reports that only 12 bdes deploy] TIME: 0600 TIMER: 4:00 MAP: Winchester, Virginia, and surrounding area (in the lower Shenandoah Valley) DEPLOY-FORCE: All bdes + General + SW POSITIONING: Per 3 deployment-boxes: 5 bdes (west) / 5 bdes + General + SW (south) / 3 bdes (north) OBJECTIVES: Hold Winchester / Hold Military Post NOTES: * Situation-Overview begins this battle ***CAMP now available*** (29) GETTYSBURG - 01-04 JUL 1863 PRE-BATTLE NOTES: * This is a DEFENSIVE-then-possible-OFFENSIVE grand battle * This battle takes place in southeastern Pennsylvania, in and around Gettysburg * Some Loan-Aux units are initially assigned to the player-general * EXTRA time is available in some phases: see 2.2, 2.3, 4.1 * Initial DEPLOYMENT is restricted to 3 corps: from Phase 3.1 forward, 2 more corps may be deployed * Per ComputerCrasherDad: Reinfs may not appear exactly as the Phase-notes below indicate, particularly in Phases 1.2, 1.3, and 2.1, with either more or fewer units appearing. This may be caused by less-than-full corps deployments, but precise explanation is not yet possible. (War is hell. Combat is certainly full of surprises.) DEPLOYMENT: * Early Reinforcements: 25 bdes - 1 deploy-box * Late Reinforcements: 25 bdes - 1 deploy-box * Tomorrow Reinforcements: 25 bdes - 1 deploy-box * [See Phase 3.1: 2 more corps may be deployed] DAY 1 (Jul 1st) - PHASE 1: "[Hold]" TIME: 0900 TIMER: :30 MAP: TOP (McPherson’s Ridge, Oak Ridge, Seminary Ridge, western part of Gettysburg town) DEPLOY-FORCE: Buford’s Loan-Aux force: 6 SKM + 2 SKM-CAV + 1 ART + General Buford POSITIONING: Pre-positioned on north-south axis around McPherson’s Ridge OBJECTIVES: Hold McPh’s Ridge / Hold Oak Ridge / Hold Seminary Ridge NOTES: * Extended Situation-Overview begins this battle/phase (which begins immediately after Sit-Overview) * 0902+: various alerts pop up about arriving CSA reinfs 1.2: “Our First Reinforcements Arrive” TIME: 0930 TIMER: 1:00 MAP: SAME DEPLOY-FORCE: As at end of 1.1 POSITIONING: As at end of 1.1 OBJECTIVES: SAME NOTES: * Simple alert (and pause) begins this phase * 0932~: elements of Early Reinforcements (7 bdes + General) arrive from southeast * 0945~: more elements of Early Reinforcements (5 bdes) arrive from southeast 1.3: “More Reinforcements…” TIME: 1030 TIMER: 1:30 MAP: SAME DEPLOY-FORCE: As at end of 1.2 POSITIONING: As at end of 1.2 OBJECTIVES: SAME NOTES: * Simple alert (and pause) begins this phase * 1032~: more elements of Early Reinforcements (4 bdes) arrive from southeast * 1111~: alert that CSA reinforcements are arriving from northwest 1.4: “More of our brigades deploy!” TIME: 1200 TIMER: 1:30 MAP: Same, expanded esp to east (to include new VP) and north DEPLOY-FORCE: As at end of 1.3 POSITIONING: As at end of 1.3 OBJECTIVES: SAME + Hold Cemetery Hill [this new VP must be held for battle to continue] NOTES: * Situation-Overview begins this phase, noting that the last of our reinfs are deploying and that CSA reinfs are arriving from north/northeast * 1203~: more Early Reinforcements (2-4 bdes [if available] + SW) arrive from south/east 1.5: “The Rebels are attacking from all sides!” TIME: 1330 TIMER: 3:00 MAP: SAME DEPLOY-FORCE: As at end of 1.4 POSITIONING: As at end of 1.4 OBJECTIVES: SAME [with Cemetery Hill as the only necessary VP for battle to continue] NOTES: * Brief Situation-Overview begins this phase, emphasizing more attacks from arriving CSA forces Proceeding to next day: CAMP available * Deployed corps are now re-named: Early Reinfs >>> Center & Right Late Reinfs >>> Left & Reserves Tomorrow Reinfs >>> Reinforcements DAY 2 (Jul 2nd) - PHASE 1: "[Hold the Left!]" TIME: 1520 TIMER: 2:30 MAP: BOTTOM (central Cemetery Ridge south to Round Top areas) DEPLOY-FORCE: From Left-&-Reserves corps: 14-15 bdes + General + SW POSITIONING: Pre-positioned around map (but not around Little Round Top!) OBJECTIVES: Hold Little Round Top / Hold Cemetery Ridge / Hold South Cemetery Ridge NOTES: * Situation-Overview begins this phase * 1531~: CSA’s McLaw’s forces approach from west * 1540~: our far left is threatened by more attacking CSA units * 1713~: reinfs from Left-&-Reserves corps (3 bdes) arrive from east-edge of map (the alert informs us that the reinfs are from the battle’s right-flank area) 2.2: "We are in big trouble!" TIME: 1750 TIMER: 3:30 MAP: SAME DEPLOY-FORCE: As at end of 2.1 POSITIONING: As at end of 2.1 OBJECTIVES: SAME NOTES: * Situation-Overview begins phase, emphasizing approach of CSA Anderson’s division from northwest * 1800~: more reinfs from Left-&-Reserves corps (1 bde) arrive from east-edge (northern) of map * 1853~: entire Reinforcements corps (up to 15 bdes + General + SW) arrive from east-edge of map * 1911~: alert about new CSA attacks (Pender’s division) from northwest towards Cemetery Ridge * EXTRA time available after FINISH pops up -- until 2125? *** CAMP available *** * Deployed corps continue to have new names: Early Reinfs >>> Center & Right Late Reinfs >>> Left & Reserves Tomorrow Reinfs >>> Reinforcements 2.3: "Culp’s Hill Under Attack" TIME: 2030 TIMER: 2:30 MAP: “Northernish”: Culp’s Hill, Cemetery Hill, Gettysburg town, and areas north & west DEPLOY-FORCE: Entire Center-&-Right corps + General + SW POSITIONING: Pre-positioned around the VPs OBJECTIVES: Hold Culp’s Hill / Hold Cemetery Hill NOTES: * Brief Situation-Overview begins this phase, which also takes place on July 2nd * 2041~: Reinfs from Reserves corps (up to 9 bdes + General) arrive from south-edge of map * EXTRA time available after FINISH pops up -- until 2335 Proceeding to next day: CAMP available * 2 more corps may now be deployed: Reinforce Right: 25 bdes - 1 deploy-box Reinforce Left: 25 bdes - 1 deploy-box DAY 3 (Jul 3rd) - PHASE 1: “[Return to Culp’s Hill]” *** RE-SET PHASE! *** TIME: 0800 TIMER: 3:00 MAP: Culp’s Hill (restricted to immediate area around VP) DEPLOY-FORCE: Center-&-Right corps: 9 (8?) bdes + General + SW / Reinforcements corps: 9 bdes + General + SW POSITIONING: Pre-positioned around VP OBJECTIVES: Hold Culp’s Hill NOTES: * Situation-Overview begins this phase * 0843~: Reinforce Right units (??? bdes + General + SW) arrive from south [These units may in fact come from a different deployed corps] *** CAMP available *** 3.2: “Confederates Prepare for Frontal Assault [Pickett’s Charge]!” *** RE-SET PHASE! *** TIME: 1400 TIMER: 3:30 MAP: Central, focused around Cemetery Ridge DEPLOY-FORCE: Center-&-Right corps: 11 bdes + General + SW / Left-&-Reserves corps: 15 bdes + General + SW / Reinforce Right [or Left?] corps: __ bdes + General + SW POSITIONING: Pre-positioned north-to-south around held VPs OBJECTIVES: Capture South Seminary Ridge / Hold Cemetery Hill / Hold Cemetery Ridge / Hold South Cemetery Ridge NOTES: * Situation-Overview begins phase, with mention of possibly counter-attacking and taking South Seminary Ridge (which will end the battle?) Proceeding to next day: CAMP available DAY 4 (Jul 4th) - PHASE 1: “Counter-Attack” *** RE-SET PHASE! *** TIME: 0525 TIMER: :01 [actual timing is triggered by VP-statuses & CSA presence on-field] MAP: SAME DEPLOY-FORCE: Elements of all deployed corps: Center-&-Right corps (13 bdes + General + SW), Left-&-Reserves corps (20 bdes + General + SW), Reinforcements corps (9 bdes + General + SW), Reinforce Right corps (__??? bdes + General + SW), Reinforce Left corps (__??? bdes + General + SW) POSITIONING: Pre-positioned around held VPs OBJECTIVES: Capture South Seminary Ridge / Hold Cemetery Hill / Hold Cemetery Ridge / Hold South Cemetery Ridge NOTES: * Situation-Overview begins this phase, laying out choice to counter-attack or let the CSA go * If Capture-VP is not taken and CSA units remain on the field, EXTRA time is available -- until 1900 * Once the South Seminary Ridge VP is taken (& its CONTESTED timer runs out?), the battle ends * If all CSA units are destroyed, the battle ends ***CAMP now available*** (30) Bayou Fourche - 10 SEP 1863 PRE-BATTLE NOTES: * This is an OFFENSIVE minor battle * If VP is not taken, EXTRA time is available after FINISH pops up -- until 2000 DEPLOYMENT: * Assault: 15 bdes - 1 deploy-box TIME: 1100 TIMER: 3:30 MAP: Bayou Fourche area (south of Little Rock, Arkansas) DEPLOY-FORCE: 10 bdes + General + SW POSITIONING: Per deployment-box at south/west of map OBJECTIVES: Capture Bayou Fourche NOTES: * Situation-Overview begins this battle * 1106~: remaining bdes arrive as reinfs from south/east (on the isolated island-area) (Per Legionary Guard: only 5 bdes show even if initial deployment was fewer than 10 bdes) ***CAMP now available*** (31) CHICKAMAUGA - 18-20 SEP 1863 PRE-BATTLE NOTES: * This is a DEFENSIVE-and-OFFENSIVE (per different phases) grand battle * This battle takes place in northwest Georgia & south-central Tennessee (south of Chattanooga, TN) * Loan-Aux troops are assigned to player-general for Day 1 * Day 3 may be triggered: see Phase 2.4 * EXTRA time may be available here: see Phase 2.4 DEPLOYMENT: * Vanguard: 25 bdes - 1 deploy-box * Tomorrow Reinforcements: 25 bdes - 1 deploy-box DAY 1 (Sept 18th) - PHASE 1: “Hold the Bridges!” TIME: 1630 TIMER: 2:00 MAP: Northeast, focused on area between Alexander’s and Reed’s bridges DEPLOY-FORCE: Army of Cumberland Loan-Aux troops (with Spencers & James rifled cannon): Alexander’s Bridge: 4 INF + 1 ART / Reed’s Bridge: 1 INF + 1 ART POSITIONING: Pre-deployed around the 2 bridges OBJECTIVES: Hold Alexander’s Bridge / Hold Reed’s Bridge NOTES: * Extended Situation-Overview begins this battle/phase * Various alerts arrive over time concerning CSA troop-arrivals and other events * 1705~: CSA forces arrive in front of Alexander’s Bridge * 1720~: Minty’s force (2 CAV bdes) retreat onto map across Reed’s Bridge, entering player control * 1730~: Reed’s Bridge attacked by arriving CSA forces; Alexander’s Bridge may also be attacked * 1750~: Nathan Bedford Forrest’s CAVs appear in various places on flanks & behind lines (esp near Reed’s Bridge); also, CSA SKM-units appear behind Alexander’s Bridge and elsewhere 1.2: “Delay them at the river passages” TIME: 1830 TIMER: 2:30 MAP: Same, expanded (mainly south & west to include fords that are the new VPs) DEPLOY-FORCE: As at end of 1.1 + pre-selected elements of Vanguard corps (7 bdes + General) POSITIONING: As at end of 1.1 + Vanguard reinfs: at east-edge (south) of map OBJECTIVES: SAME + Hold Dalton’s Ford / Hold Thedford’s Ford NOTES: * Situation-Overview begins the phase, emphasizing holding fords to buy time for arrival of reinfs * Our reinfs arrive in two waves as phase begins: the first 7 bdes of the Vanguard corps * CSA cavalry & skirmishers are active in forests central and along west edge of map * Achieving all objectives (i.e., VPs) does NOT apparently end the battle here -- per [UESC] Robert Davidson, who held all 4 yet had Day 2 commence anyway [CONTESTED Timers may still be a factor] Proceeding to next day: CAMP available * Deployed corps are re-named as follows: “Vanguard” is now “Left Wing” “Tomorrow Reinforcements” is now “Right Wing” DAY 2 (Sep 19th) - PHASE 1: “Investigate their right flank” *** RE-SET PHASE *** TIME: 0900 TIMER: 2:00 MAP: TOP, restricted to area immediately around the two new VPs DEPLOY-FORCE: Elements of Left Wing corps: 4 bdes + General POSITIONING: Arriving from map’s west-edge (northern) as phase begins OBJECTIVES: Capture Jay’s Mill / Capture Brotherton Road NOTES: * Situation-Overview begins the phase, which is a RE-SET phase(!) * 0920~: Reinforcements (4 bdes) arrive from west-edge (central) of map * 1010~: “Quickly push them south”; more reinforcements (4 bdes) arrive from same area * 1022~: CSA forces are reported to be approaching Brotherton Road area * 1025~: “More brigades are sent to attack”: 4 more bdes arrive from west-edge (northern) of map 2.2: “We can turn their right!” TIME: 1100 TIMER: 1:00 MAP: Same, expanded west & south to include new VPs DEPLOY-FORCE: As at end of 2.1 + remainder of Left Wing (or, Vanguard) corps POSITIONING: As at end of 2.1 + reinfs: around new VPs OBJECTIVES: SAME + Hold Kelly’s Field / Hold Brotherton Cabin NOTES: * Brief Situation-Overview begins the phase, emphasizing CSA attack towards Brotherton Road VP * 1119~: CSA force under Cheatham is reported to be approaching Brotherton Road VP 2.3: “The rebels may counter-attack” TIME: 1200 TIMER: 2:30 MAP: Same, expanded still further south and west DEPLOY-FORCE: As at end of 2.2 + Right Wing corps: 17 bdes + General + SW POSITIONING: As at end of 2.2 + Right Wing: around new VPs & to southwest OBJECTIVES: SAME + Hold Viniard Field / Hold Lee-Gordon’s Mill NOTES: * Extended Situation-Overview begins this phase * 1202~: remainder of Right Wing corps (5+ bdes) arrives from southwest [ComputerCrasherDad reports that the full number of available bdes in Right Wing corps may not actually arrive on-field: so, with 24 available, 2 bdes may not appear until Day 3, if at all] * 1341~: CSA force under D.H. Hill is reported to be arriving on the battlefield (in Jay’s Mill area) 2.4: “Secure Lafayette Road!” TIME: 14:30 TIMER: 2:30 MAP: Same DEPLOY-FORCE: As at end of 2.3 POSITIONING: As at end of 2.3 OBJECTIVES: Hold Jay’s Mill / Hold-Capture Brotherton Road / Hold Kelly’s Field / Hold Brotherton Cabin / Hold Viniard Field / Hold Lee-Gordon’s Mill NOTES: * Brief Situation-Overview emphasizes that “Longstreet is arriving” as reinfs for the CSA * Where all VPs are held/taken, the FINISH here is immediate * If any VPs are not held, EXTRA time is available after FINISH pops up -- until 2000 * If Jay’s Mill & Brotherton Road are both NOT held, then Day 3 commences after this phase (NOTE: if only one is held, then battle ends in DEFEAT or DRAW, depending on status of other VPs. That is, if all others are held, but EITHER Jay’s Mill OR Brotherton Road is not, then DRAW follows. This guide is not yet clear on the conditions for a DEFEAT here.) Proceeding to next day: CAMP available DAY 3 (Sep 20th) - PHASE 1: “Defend Lafayette Road” *** RE-SET PHASE! *** TIME: 0930 TIMER: 10:30 [yes, this is correct] MAP: Same, expanded west to include Horseshoe Ridge VP but slightly restricted at east DEPLOY-FORCE: Both corps (entire) POSITIONING: Pre-positioned generally north-south around the Lafayette Road VPs (but NOT around the Horseshoe Ridge VP!) OBJECTIVES: Hold Kelly’s Field / Hold Brotherton Cabin / Hold Viniard Field / Hold Lee-Gordon’s Mill / Hold Horseshoe Ridge NOTES: * Situation-Overview begins this phase, which is a RE-SET phase(!) * New fortifications are now in place (and can be occupied) around the VPs * Phase begins with Horseshoe Ridge CONTESTED timer at :20 (must be held for Victory) * Throughout this phase, CSA units attempt flanking & frontal attacks and CAV/SKM units may roam behind lines * Timer may cut out early depending on unidentified triggers -- status of CSA force, most likely ***CAMP now available*** (32) Brock Road - 06 MAY 1864 PRE-BATTLE NOTES: * This is an OFFENSIVE-DEFENSIVE minor battle * This battle takes place in northeast Virginia, as part of the “Wilderness” series of battles * EXTRA time is available after the FINISH pops up -- until 1153+ * From godspeedthunder: defeat happens if CSA captures Hickman’s Field and Timer runs out * Live Free or Die reports: only 14 of 15 bdes of Reinforcements actually arrive in Phase 2 (possibly because of the unit-types of the bdes involved; specifically, Arty?) DEPLOYMENT: * Assault: 25 bdes - 1 deploy-box * Reinforcements: 15 bdes - 1 deploy-box PHASE 1: “[Capture Tapp’s Woods]” TIME: 0430 TIMER: N/A [by default: 1:45] MAP: Centered on junction of Brock & Orange Plank roads (north-central Virginia) DEPLOY-FORCE: Assault corps + General + SW POSITIONING: Per deployment-box at east of map PRIMARY OBJECTIVES: Capture Tapp’s [W]oods NOTES: * Situation-Overview begins this battle * There is NO Timer during this phase (but apparently, by default, it is 1:45) * 0601~: Arrival of Longstreet’s force for the CSA is reported PHASE 2: “Change of Plans!” TIME: 0615 TIMER: 3:00 MAP: Same, slightly restricted from top (& units may be lost if positioned exactly on the map-edge!) DEPLOY-FORCE: As at end of Phase 1 POSITIONING: As at end of Phase 1 PRIMARY OBJECTIVES: Capture Tapp’s Woods / Hold Hickman’s Field / Hold Brock Road Woods NOTES: * Situation-Overview emphasizes that CSA is counter-attacking and the importance of the new VPs * 0619~: CSA reinforcements reported to arrive from southwest * 0620~: Arrival of Reinforcements corps (all bdes + General + SW) from northeast corner, just before or after report of “another rebel division” arriving from southwest * 0730~: More CSA reinforcments are reported to be arriving -- now, from southeast ***CAMP now available*** (33) Mule Shoe - 12 MAY 1864 PRE-BATTLE NOTES: * This is an OFFENSIVE minor battle * This battle takes place in northeast Virginia, as part of the “Spotsylvania Court House” series of battles ** If VP is not taken, EXTRA time is available after FINISH pops up -- until 1830 * Battle ends when CONTESTED Timer runs out (or when all CSA units are swept from the field) * FINISH button may be selected before CONTESTED Timer runs out -- and Victory is still achieved (Many thanks, CivWar64.) DEPLOYMENT: * Assault: 25 bdes - 1 deploy-box * Reinforcements: 25 bdes - 1 deploy-box TIME: 0400 TIMER: 4:00 MAP: Mule Shoe area (part of CSA fortifications northwest of Spotsylvania Court House) DEPLOY-FORCE: Assault corps: all bdes + General + SW POSITIONING: Arriving immediately from north-edge of map as battle begins OBJECTIVES: Capture Mule Shoe NOTES: * Situation-Overview begins the battle * 0453~: Reinforcements corps (all bdes + General + SW) arrive from north-edge (western) of map ***CAMP now available*** (34) COLD HARBOR - 01-03 JUN 1864 PRE-BATTLE NOTES: * This is an OFFENSIVE grand battle (but see Phases 1.2 & 2.2: some defensive success must occur) * This battle takes place around Old & New Cold Harbor, Virginia (northeast of Richmond) * CHECK VICTORY-CONDITIONS at upper-right of battlefield-screen for precise requirements(!) * Not confirmed but possible: 1 bde from the 2 primary deployed-corps may not deploy in some phases * EXTRA time may be available in Phase 3.2 (but see also Phase 3.3) * With FPS-lag in mind (this battle causes some systems to lag), consider using the “Direct3d 9” option when starting the game before this battle DEPLOYMENT: * Right Flank: 25 bdes - 1 deploy-box * Left Flank: 25 bdes - 1 deploy-box * Tomorrow Reinforcements: 75 bdes (25x3) - 3 deploy-boxes DAY 1 (June 1st) - PHASE 1: “[Hold Fast -- then Counter-Attack?]” TIME: 0800 TIMER: 2:00 MAP: South, partial, focused on VPs [this Left Flank area will later be the battle’s Center] DEPLOY-FORCE: Left Flank corps: 5 bdes + General + SW POSITIONING: Per deployment-box around VP OBJECTIVES: Capture Central Breastworks / Hold Old Cold Harbor NOTES: * Extended Situation-Overview begins the battle/phase * 0930~: Reinfs (remainder of Left Flank corps) arrive from north/northeast *** CAMP now available *** 1.2: “Our Right Flank is Under Attack!” TIME: 1830 TIMER: 1:30 MAP: North, partial, focused on VPs [this Right Flank area will later extend eastwards] DEPLOY-FORCE: Right Flank corps: 9 bdes + General POSITIONING: Pre-positioned around held VPs OBJECTIVES: Hold Magnolia Woods / Hold Shady Grove Road / Capture Old Church Road NOTES: * Situation-Overview begins the phase and emphasizes, “Be cautious!” * 1915~: We are alerted that “We are outnumbered!” -- but General Warren’s corps is on its way to help * 1945~: Our reinfs (Right Flank: 11 bdes + SW) arrive from north * 1955~: More of our reinfs (remainder of Right Flank corps) arrive from east-edge of map *** CAMP now available *** [The alert for this indicates -- incorrectly -- that we are proceeding to the next day] 1.3: “Preparing to Attack” *** RE-SET PHASE! *** TIME: 1830 TIMER: 3:30 MAP: South, expanded mainly northwards to include new VPs DEPLOY-FORCE: Left Flank: 23 bdes + General + SW / Right Flank: 11 bdes + General + SW POSITIONING: Pre-positioned mainly around held VPs OBJECTIVES: Capture Central Breastworks / Capture Walnut Grove Road / Capture Walnut Grove Woods / Hold Beulah Church / Hold Old Cold Harbor NOTES: * Phase begins with Situation-Overview of new left-flank situation * Caution: capturing some of the capture-VPs will end the battle here (check Victory-Conditions) * Caution - per Dimwit [WN] / AIJabberwock: if you are using the anti-scaling device of entering the first phase with undersized (etc.) troops then using the first CAMP to beef them up, and if you end the overall battle with a victory here in Phase 1.3, all in-CAMP changes will be lost, including spent money. Units are NOT returned to their “as-is” condition! (For more details, see Comments section at bottom of this guide: 2/13/20.) Proceeding to next day: CAMP available * On deployment-screen, “Tomorrow Reinforcements” corps is/are now “Incoming Reinforcements” DAY 2 (June 2nd) - PHASE 1: “[Attack!?]” *** RE-SET PHASE! *** TIME: 1630 TIMER: 3:30 MAP: South, expanded still further (mainly south) to include new VPs DEPLOY-FORCE: Left-Flank: 23(+) bdes + General + SW / 1st Reinfs corps: 5 bdes + General + SW POSITIONING: Pre-positioned around held VPs OBJECTIVES: Capture Central Breastworks / Capture New Cold Harbor / Capture Turkey Hill / Capture Walnut Grove Road / Capture Walnut Grove Woods / Hold Old Cold Harbor / Hold Beulah Church NOTES: * Situation-Overview begins the phase, describing the new center-n-left-flank situation * New fortifications are available (and occupied) * Caution: capturing some of the stated capture-VPs will end the overall battle * 1820~: Reinfs (1st Reinfs corps: 18[+?] bdes + General + SW) arrive from north-edge (east) * 1835~: More reinfs (2nd Reinfs corps: All + General + SW) arrive from north-edge (center) 2.2: “Monitoring [Our Right Flank]: Attack or Defend?” *** RE-SET PHASE! *** TIME: 2000 TIMER: 2:00 MAP: North (right flank area), shifted east and expanded both east & north DEPLOY-FORCE: Right-Flank corps: All bdes [less 1?] + General + SW POSITIONING: Pre-positioned to north & south of the Bethesda Church VP OBJECTIVES: Capture Old Church Road / Capture CSA Left Flank / Hold Bethesda Church NOTES: * Phase begins with Situation-Overview of new right-flank situation Proceeding to next day: CAMP available * Deployed corps are now re-named (and auto-deployed) Attack Right = former Right Flank corps Attack Left = former Left Flank corps 2nd Attack Wave = former 1st Reinforcements corps 3rd Attack Wave = former 2nd Reinforcements corps DAY 3 (June 3rd) - PHASE 1: “Attack!” *** RE-SET PHASE! *** TIME: 0430 TIMER: 2:30 MAP: Same as Phase 2.1 DEPLOY-FORCE: Attack Left: All + General + SW / 2nd & 3rd Attack Waves: All + Generals + SWs POSITIONING: Pre-positioned around held VPs as well as north & south OBJECTIVES: Capture Central Breastworks / Capture New Cold Harbor / Capture Turkey Hill / Capture Walnut Grove Road / Capture Walnut Grove Woods / Hold Old Cold Harbor / Hold Beulah Church NOTES: * Situation-Overview begins the phase, describing the updated center-n-left-flank situation * Caution: capturing some of the stated capture-VPs will end the overall battle with this phase * End-positioning here is start-position for 3.3 3.2: “The Confederate Left Flank Must Be Breached!” *** RE-SET PHASE! *** TIME: 0430 TIMER: 2:00 MAP: Same as Phase 2.2 DEPLOY-FORCE: Attack Right corps: All bdes [less 1?] + General + SW POSITIONING: Pre-positioned around the held VP and to north & south OBJECTIVES: Capture Old Church Road / Capture CSA Left Flank / Hold Bethesda Church NOTES: * Phase begins with brief Situation-Overview of new right-flank situation * Taking (and holding) either of the capture-VPs will end the overall battle with this phase * With no change in VP status, EXTRA time is available after FINISH pops up -- until 0700 3.3: “The Battle Continues at Cold Harbor” TIME: 0700 TIMER: 3:30 MAP: Same as Phase 3.1 DEPLOY-FORCE: As at end of Phase 3.1 POSITIONING: As at end of Phase 3.1 OBJECTIVES: Capture Central Breastworks / Capture New Cold Harbor / Capture Turkey Hill / Capture Walnut Grove Road / Capture Walnut Grove Woods / Hold Old Cold Harbor / Hold Beulah Church NOTES: * Situation-Overview asks, “Continue the attack or accept heavy losses and defeat?” * It is likely that EXTRA time is available after FINISH pops up -- if and only if necessary VPs are not held (but this has not been tested) ***NEXT BATTLE BEGINS IMMEDIATELY: NO CAMP AVAILABLE*** (35) Fort Stevens - 04 JUN 1864 PRE-BATTLE NOTES: * This is a DEFENSIVE minor battle * This battle begins immediately upon conclusion of Cold Harbor battle * This battle takes place just north of Washington, D.C. * DEPLOYMENT-SCREEN is available before battle begins: one corps may be selected for deployment * Loan-Aux units are also assigned to player-general for this battle * EXTRA time is available after FINISH pops up -- until 1830 DEPLOYMENT: * Defend: 25 bdes - 1 deploy-box TIME: 0600 TIMER: 3:30 MAP: Fort Stevens area of the Washington defense-perimeter DEPLOY-FORCE: Loan-Aux: 7 ART + 6 INF + 2 SKM + 2 SKM-CAV + General McCook + SW / Defend corps: 4 bdes + General + SW POSITIONING: Loan-Aux: pre-positioned around VPs / Defend corps: per deployment-box at south-edge OBJECTIVES: Hold Fort Stevens / Hold King Farm NOTES: * Situation-Overview begins this battle, then CSA units soon approach from the north after its start * 0625~: CSA attacks left Ffank * 0655~: Reinforcements (7 bdes) arrive from south-edge of map * 0700~: CSA attacks right flank * 0755~: More reinforcements (7 bdes) arrive from south-edge of map * 0845~: Final reinforcements (any remaining bdes of Defend corps) arrive from south-edge of map ***CAMP now available*** (36) Harrison's Creek - 15 JUN 1864 PRE-BATTLE NOTES: * This is an OFFENSIVE minor battle that takes place east of Petersburg, Virginia * It seems that only 9 bdes of “Tomorrow Reinforcements” corps actually deploy for the battle [TechnoSarge confirms this: see below] * Pathing/Routing can be tricky in the southeast, given narrow land-areas and waterways, etc. * If no VPs are yet taken, or only one is taken, EXTRA time is available after FINISH pops up -- until 1830 * CONTESTED timers for each VP are “1:00” & may extend past basic Timer (but this is not confirmed) DEPLOYMENT: * Assault: 25 bdes - 1 deploy-box * Tomorrow Reinforcements: 25 bdes - 1 deploy-box [but only 9 bdes actually deploy] TIME: 0700 TIMER: 5:00 MAP: Harrison Creek area (part of the fortified zone east of Petersburg, Virginia) DEPLOY-FORCE: Elements of Assault corps: 16 bdes + General + SW POSITIONING: Per three deployment-boxes at southeast of map: Northern (6 bdes + General + SW), Southeastern (4 bdes), Southern (4 bdes) OBJECTIVES: Capture Jordan Point / Capture Poor Creek NOTES: * Situation-Overview begins the battle, noting CAV reinfs under General Kautz that will arrive later * 0717~: Reinfs arrive from southeast: 4-5 bdes in Southeastern area, 4-5 bdes in Northern area * 0737~: Loan-Aux troops (3 SKM + 3 SKM-CAV + 1 ART + General Kautz) arrive from behind CSA lines at south-edge of map * 0815~: Some “Tomorrow Reinforcements” (5 bdes + General + SW) arrive in Southeastern area * 0849~: More “Tomorrow Reinforcements” (4 bdes) arrive in Southern area * 1020~: CSA reinforcements are noted to be arriving from north/west [exact time of arrival may depend on troop positionining and VP-status, etc.] * [If this tracking is correct, then only 9 bdes of the 2nd corps actually deploy for battle. / TechnoSarge confirms this, with his 9 bdes arriving at 0957~ with 2:00 showing on timer] ***CAMP now available*** (37) Georgia Railroad - 22 JUL 1864 PRE-BATTLE NOTES: * This is a DEFENSIVE minor battle * This battle takes place somewhere east of Atlanta, Georgia * In-battle instructions identify flanks per CSA, not USA, perspective * NO extra time available for this battle DEPLOYMENT: * Defend: 25 bdes - 1 deploy-box TIME: 1400 TIMER: 4:00 MAP: Georgia Railroad area (east of Atlanta) DEPLOY-FORCE: All bdes + General + SW POSITIONING: Per deployment-boxes: West: 5 bdes + General + SW / Central: 15 bdes / East: 5 bdes OBJECTIVES: Hold Troup Hurt Farm / Hold Bald Hill NOTES: * Situation-Overview begins the battle ***CAMP now available*** (38a) RICHMOND - 15 MAR 1865 PRE-BATTLE NOTES: * This is an OFFENSIVE grand battle * This is a what-if battle that posits a Union attack on Richmond (Virginia) to conclude the war * NO extra time available for any of the phases of this battle * See next battle-guide for overview of Day 2 of this battle DEPLOYMENT: * Attack Left [flank of CSA]: 25 bdes - 1 deploy-box * Reinforcements: 75 bdes (25/25/25) - 3 deploy-boxes * Attack Right [flank of CSA]: 25 bdes - 1 deploy-box DAY 1 (March 15th) - PHASE 1: “[Attack the Eastern Command Points A & B]” TIME: 1330 TIMER: 2:00 MAP: Northeast area DEPLOY-FORCE: Attack Left corps: 15 bdes + General + SW POSITIONING: Per deployment-box at east-edge of map OBJECTIVES: Capture Command Point A / Capture Command Point B NOTES: * Extended Situation-Overview begins battle/phase, with emphasis on counterattacks from north once our attack develops 1.2: “We’ve Got More Brigades…” TIME: 1530 TIMER: 2:00 MAP: Same, expanded southward to include new VP DEPLOY-FORCE: As at end of 1.1 + Remainder of Attack Left corps + Attack Right units: 14 bdes + General + SW POSITIONING: As at end of 1.1 + Pre-positioned Attack Left reinfs: east-edge (northern) + Pre-positioned Attack Right reinfs: east-edge (southern) OBJECTIVES: SAME + Capture Command Point C [NOT required for battle to continue] NOTES: * Brief Situation-Overview begins this phase, emphasizing CSA counter-attacks from west, north & south (and these attacks may arrive in different orders depending on the status of VPs and units, etc.) * 1545~: CSA reinfs arrive from west-edge (southern) -- west of Command Point C * 1548~: More CSA reinfs from west-edge (central) -- west of Command Point B 1.3: “Meanwhile, the Advance Continues South” TIME: 1600 TIMER: 1:30 MAP: Southeast & South area outside Richmond (north-south narrow, east-west extended) DEPLOY-FORCE: Attack Right corps: 9 bdes (no General or SW) POSITIONING: Pre-positioned along east-edge of map OBJECTIVES: Capture South Fort [NOT required for battle to continue] NOTES: * Brief Situation-Overview begins this phase, emphasizing “advance fast” against weak defenses before their reinforcements can arrive (but the objective is NOT necessary for battle to continue) * ComputerCrasherDad reports a “fade-off” problem, seemingly connected to having larger bdes (2250 average size) being deployed: the 1st bde of 1st deployed division (from 3rd Corps) fades off the map, although it returns at camp, while 1st bde of the 4th division of a deployed 5th corps (from Reinforcements) fades off and does NOT return… 1.4: “The Battle Rages in the Trenches” TIME: 1730 TIMER: 2:00 MAP: Same as 1.2 DEPLOY-FORCE: As at end of 1.2 POSITIONING: As at end of 1.2 OBJECTIVES: As at end of 1.2 NOTES: * Brief Situation-Overview at start notes that our reinforcements have been delayed * 1750~: CSA reinfs arrive from west-edge (northern) of map -- west of Command Point A * 1803~: More CSA reinfs arrive from west-edge (southern) -- west of Command Point C * 1830~: More CSA reinfs arrive from west-edge (central) west & north of Command Point B * 1900~: CSA CAV attempts to flank our lines from the north and east *** NOTE: ComputerCrasherDad reports arrival times here happening 20-40 minutes EARLIER 1.5: “The Rebel Cavalry Defends the Fort” TIME: 1730 TIMER: 2:00 MAP: Same as 1.3 [South/Southeast area] DEPLOY-FORCE: As at end of 1.3 + 1st Reinfs corps: 11 bdes + General + SW POSITIONING: As at end of 1.3 + Reinfs: pre-positioned along east-edge OBJECTIVES: Capture (or, Hold) South Fort [NOT required for battle to continue] NOTES: * Brief Situation-Overview emphasizes that fort must be held for the offensive to continue (but this VP is NOT yet required) * 1757~: CSA reinfs approach from north-central * 1805~: More CSA reinfs approach from west 1.6: “We Must Prevail” TIME: 1930 TIMER: 3:30 MAP: Same as 1.4 DEPLOY-FORCE: As at end of 1.4 + 1st Reinforcements corp: 13 bdes POSITIONING: As at end of 1.4 + reinfs: pre-deployed at east-edge OBJECTIVES: Capture (or, Hold) Command Points A, B, C [but are these nec’y for battle to continue?] NOTES: * Brief Situation-Overview emphasizes securing trenches before nightfall * All previously-held VPs begin held but with CONTESTED timers running (:20?) * 1945-2015~: CSA reinfs under Ewell arrive from west-edge (behind Command Point A) * Phase-end seems triggered by run-down of CONTESTED timers (untested: what happens if some or all of VPs are not taken or, distinctly, not held for full CONTESTED time) 1.7: “The Fort Must Be Held until Nightfall” TIME: 1930 TIMER: 3:30 MAP: Same as 1.5 [South/Southeast area] DEPLOY-FORCE: As at end of 1.5 + 2nd Reinforcements corps: 9 bdes + General + SW POSITIONING: As at end of 1.5 + reinfs: pre-deployed at east-edge of map OBJECTIVES: Capture (or, Hold) South Fort NOTES: * Brief Situation-Overview begins this phase * If Fort South is already held at start, CONTESTED timer shows “1:00” * 1936~: CSA reinfs (under Gordon) approach from due north * 2023~: More CSA reinfs arrive from north (farther west) * Phase-end is triggered by run-down of CONTESTED timer (untested: if fort is NOT held) Proceeding to next day: CAMP available (38b) RICHMOND - 16 MAR 1865 PRE-BATTLE NOTES: * See previous battle-guide for overview of Day 1 of this battle * All deployed corps are now re-named: Attack Left >>> Attack North Reinforcements >>> Attack East & Reserves Attack Right >>> Attack South DAY 2 (March 16th) - PHASE 1: “Attack from the North!” *** RE-SET PHASE *** TIME: 12:00 TIMER: 2:00 MAP: Outer fortification-zone north of Richmond DEPLOY-FORCE: Attack North: all bdes + General + SW POSITIONING: Per deployment-box at north of map OBJECTIVES: Capture North Fort NOTES: * Extended Situation-Overview begins this day/phase, reviewing 5 forts to be taken (2 forts in “southeast”, the star-fort called Fort Jackson, the further-north fort called Fort Johnson, and the North Fort) and the Richmond VP itself; it also emphasizes counter-attacks to come from north, east, southeast * This phase focuses on the North Fort only 2.2: “Commence the Attack from the East” TIME: 1400 TIMER: 2:00 MAP: Same, expanded east & south DEPLOY-FORCE: As at end of 2.1 + 1st and 2nd “Attack East” corps: all + General + SW POSITIONING: As at end of 2.1 + Reinfs: pre-positioned along east-edge of map OBJECTIVES: Capture (or Hold) North Fort / Capture Fort Johnson / Capture Fort Jackson (the star-fort) NOTES: * Brief Situation-Overview begins the phase * Supply centers along east part of expanded map are CSA-owned at start (place unit on top in order to re-claim them) * Phase may end early depending on unidentified triggers 2.3: “The Attack from the South Has Begun” *** RE-SET PHASE *** TIME: 1400 TIMER: 2:00 MAP: Richmond & southern fortification-zone DEPLOY-FORCE: Attack South & 3rd “Attack East” corps: all bdes + Generals + SWs POSITIONING: Pre-positioned at south & southeast of map OBJECTIVES: Capture Richmond & Fort Rocketts & Fort Almond / Capture [or Hold] South Fort NOTES: * Brief Situation-Overview begins this phase * Even if South Fort was taken earlier, it begins as CONTESTED here -- 1:00 * Phase may end early if all forts are taken, even if CONTESTED timers are still running and CSA units remain on the field 2.4: “The Attack Continues from All Sides” TIME: 1600 [or as at end of 2.2] TIMER: 2:30 MAP: Same as 2.2 DEPLOY-FORCE: As at end of 2.2 POSITIONING: As at end of 2.2 OBJECTIVES: Capture [or Hold] North Fort / Capture Fort Johnson / Capture Fort Jackson NOTES: * Brief Situation-Overview begins the phase, emphasizing counter-attacks by CAV from northwest * Phase may end early depending on unidentified triggers 2.5: “The Attack in the South Continues” TIME: 1600 [or as at end of 2.3] TIMER: 2:30 MAP: Same as 2.3 DEPLOY-FORCE: As at end of 2.3 POSITIONING: As at end of 2.3 OBJECTIVES: Capture [or Hold] Richmond & Fort Rocketts & Fort Almond & South Fort NOTES: * Brief Situation-Overview begins phase, emphasizing counter-attacks by CAV from the southeast * Phase may end early depending on unidentified triggers 2.6: “Now or Never!” TIME: 1830 [or as at end of 2.5?] TIMER: 4:00 MAP: Combination of maps from 2.4 & 2.5 DEPLOY-FORCE: As at end of 2.4 & 2.5 POSITIONING: As at end of 2.4 & 2.5 OBJECTIVES: Capture [or Hold] all 6 forts & Richmond NOTES: * Brief Situation-Overview begins this phase, emphasizing counter-attacks from north & southeast * [Immediately or soon after start of phase]: counter-attack from west of Richmond by “Richmond militia” * Phase may end early depending on unidentified triggers
美国联邦军战斗指南

2026-03-19 13:00:17

导读
这是一份《美国联邦军战斗指南》,针对UGCW游戏中联邦军的多场战斗,涵盖1861-1865年的腓力比火车站之战、布尔溪之战、安提塔姆之战、葛底斯堡之战等,详细介绍每场战斗的阶段部署、目标、增援、额外时间等战术信息,助力玩家在战场取胜。

评论
共0条评论

38场战役中登场的历史将领及其指挥权 - 联邦军
本指南包含以下内容:(1)战役中所有登场的历史联邦将军列表,包括他们的属性、登场时间及获取方式;(2)38场战役中这些将军在军团、师、旅级别的指挥详情概述。联邦…
2026-03-20 01:000赞 · 0评论

南部邦联战斗指南
This battle-guide provides UGCW player-generals with an overview of various stru…
2026-03-19 22:010赞 · 0评论
高效将军(开发中)
本指南汇集了我在战役中使用的各种技巧和战术。即便你只是为了娱乐而玩这款游戏,记住其中一些技巧也能帮助你击败北方联邦军/南方邦联军! 致读者与进度说明: 本指南尚…
2026-03-19 22:000赞 · 0评论
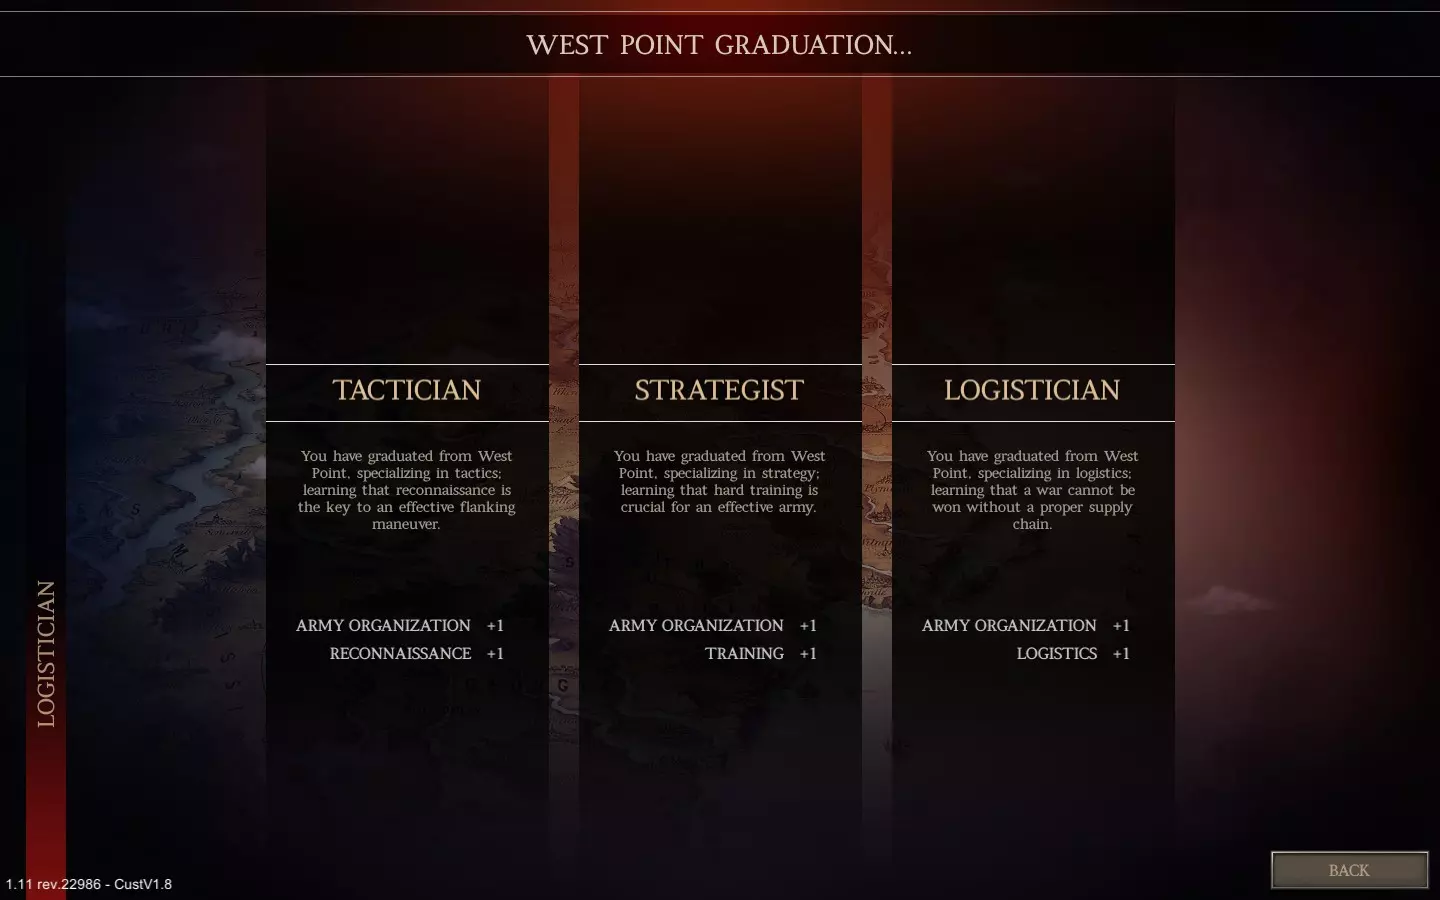
公式手册日文翻译
这是游戏附带的官方手册的日语翻译版本。 目前尚未完成,会随时更新。 由于内容量庞大,暂时中断... 战斗基础 ■ 地图控制 地图移动:按住右键拖动鼠标即可移动。…
2026-03-19 22:000赞 · 0评论

【过时】南部联盟战役指南
避免寡不敌众并赢得南部联盟战役的指南 简介
2026-03-19 22:000赞 · 0评论
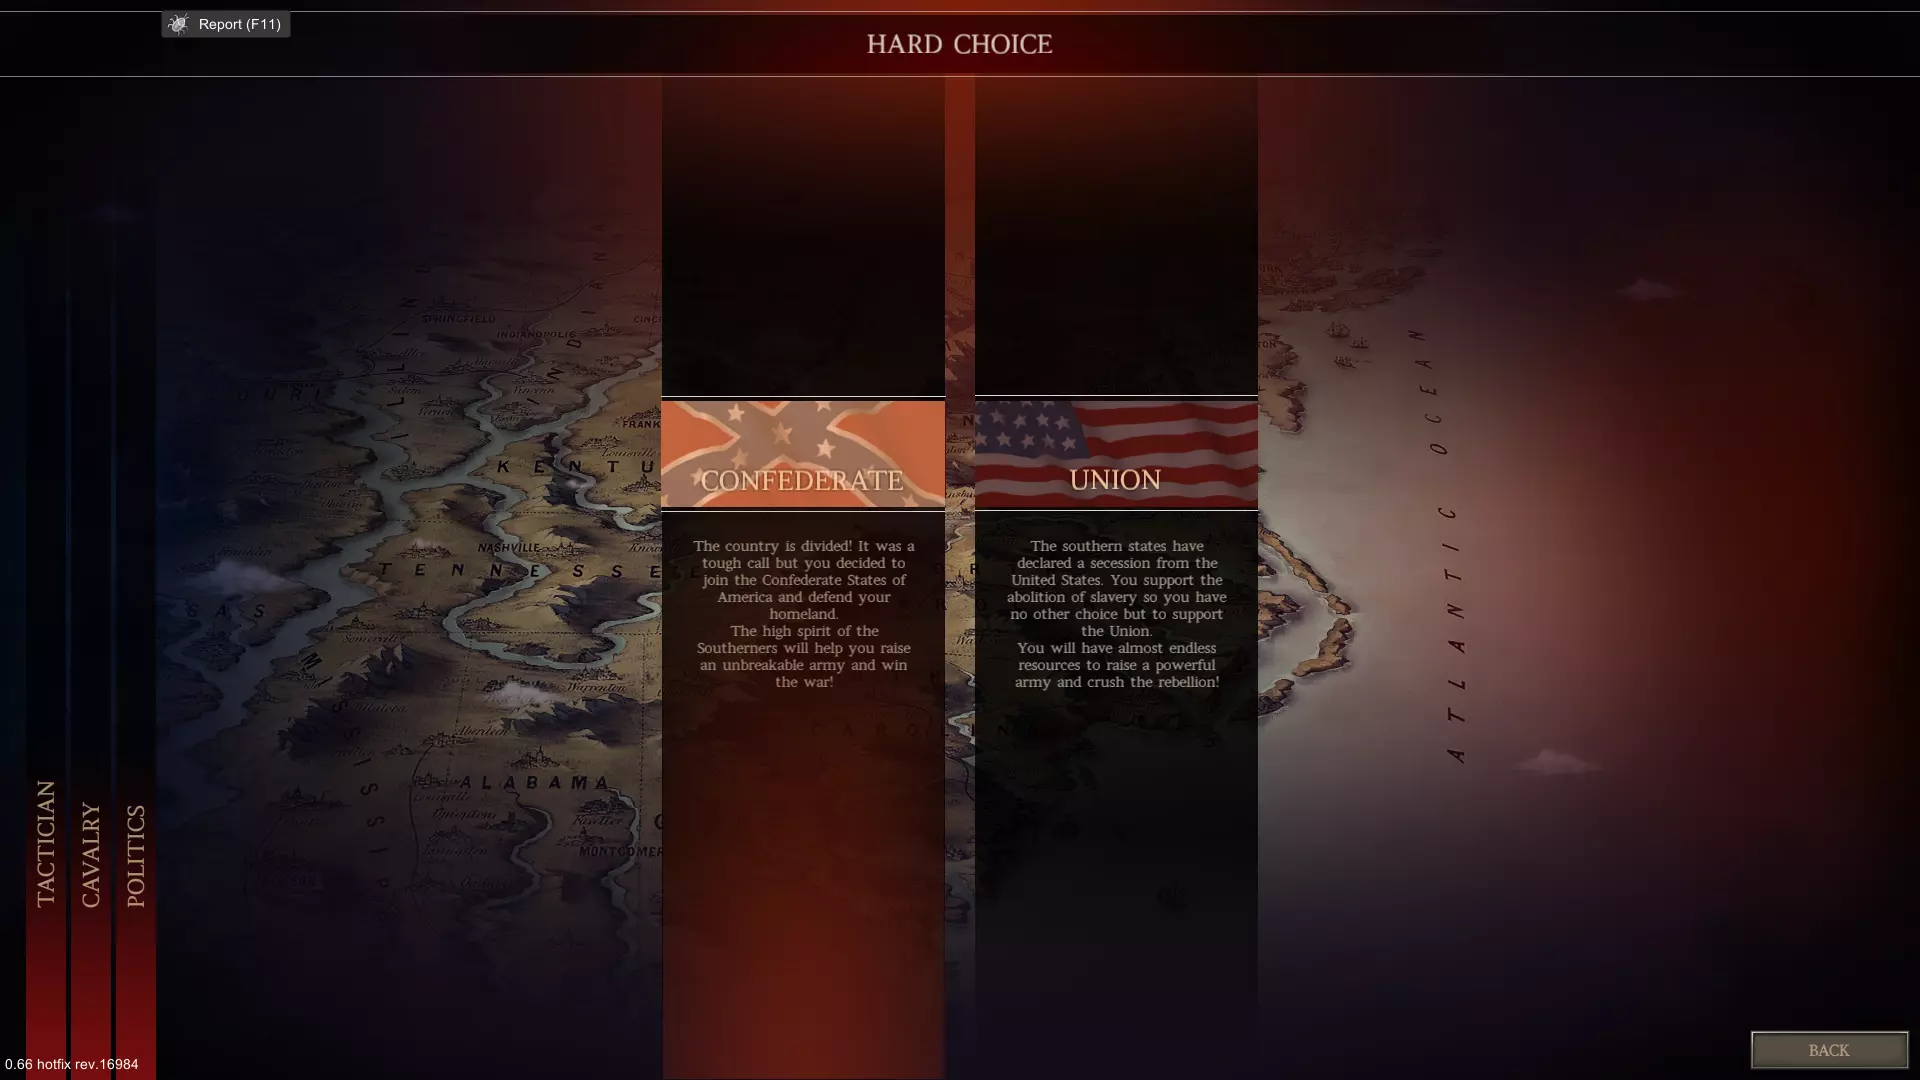
《终极将军:内战》炮兵指南
随着1.04版本更新,火炮的平衡性发生了显著变化。是时候来看看《终极将军:内战》中那些不太受重视的火炮,它们的口碑是否有所提升了。 基本信息 本指南将介绍《终极…
2026-03-19 19:000赞 · 0评论
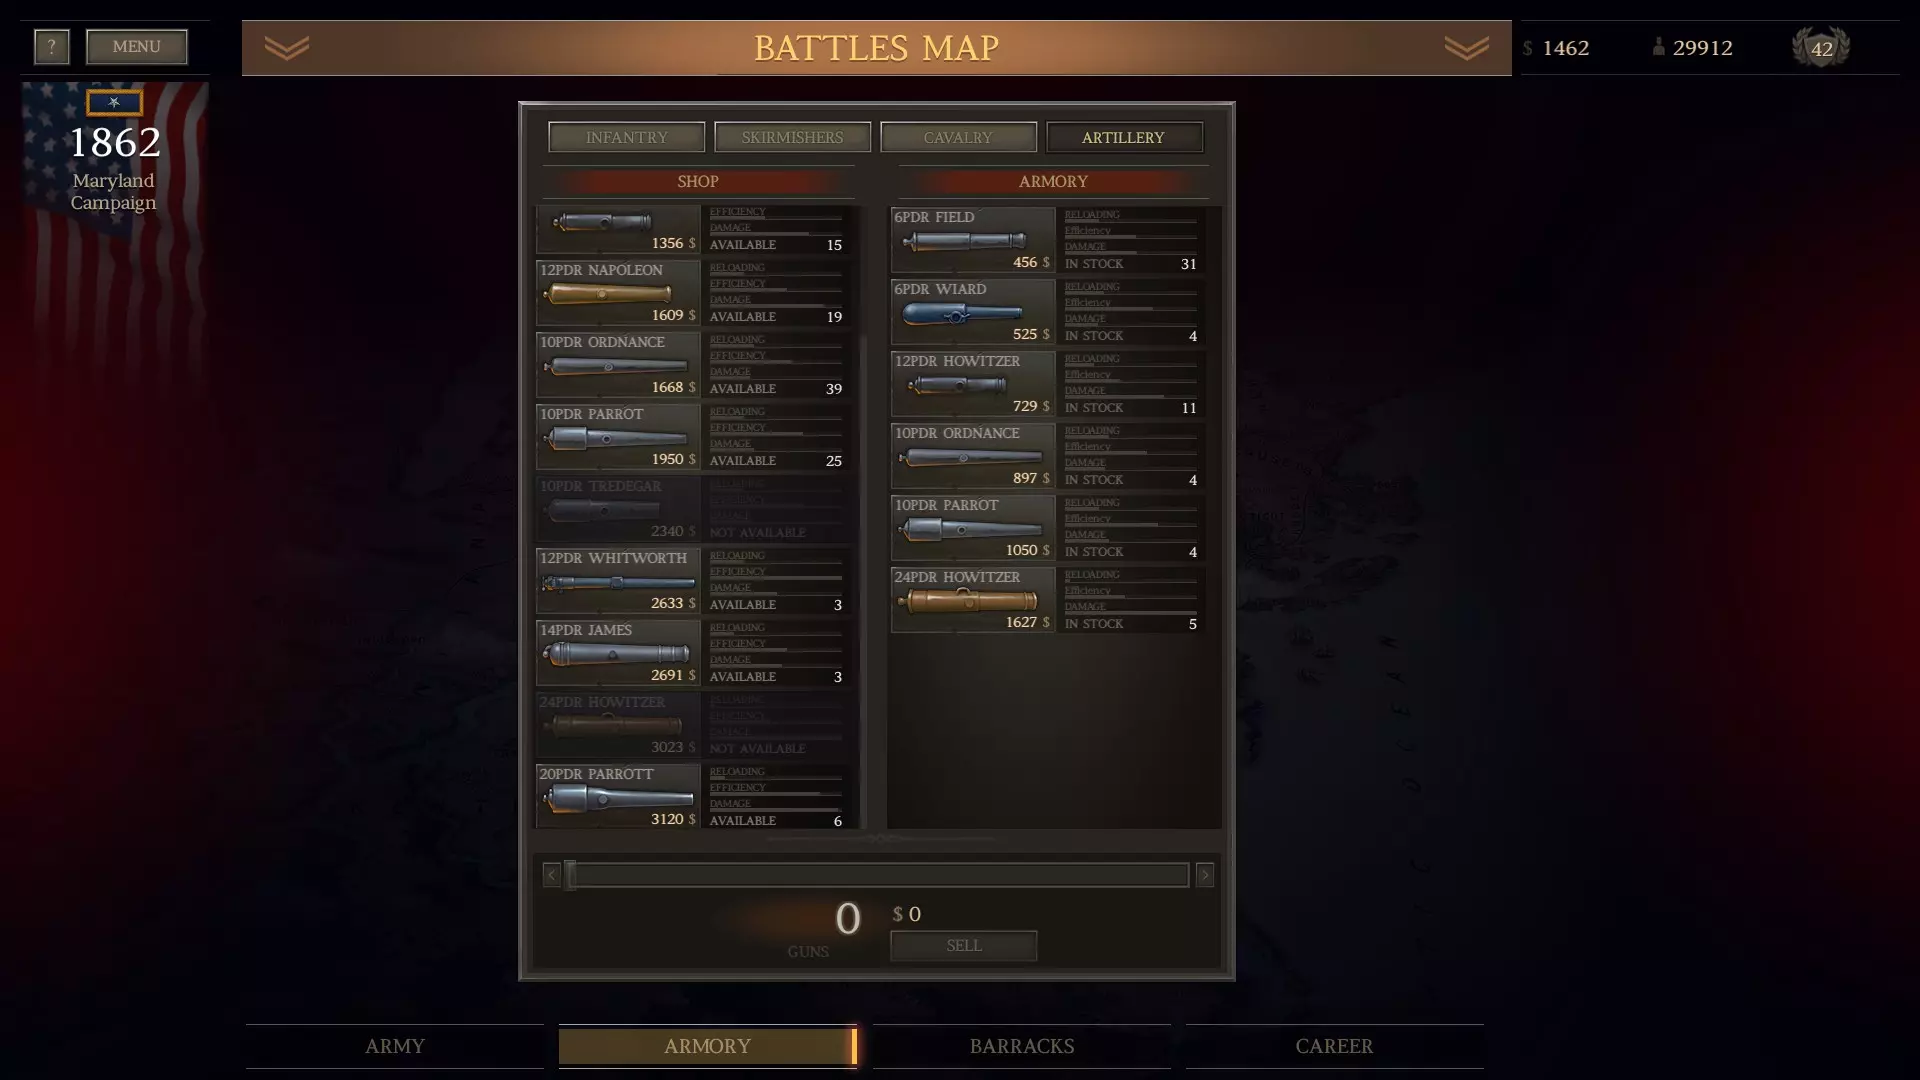
突击纵队指南:大规模步兵军团——正确游玩本游戏的方法
《终极将军:内战》战役模式最强陆军类型指南——能为你带来最佳游戏体验,并为后续每场战役提供最多资源的部队,即大规模步兵军团。 如何使用大规模步兵军团并运用突击纵…
2026-03-19 19:000赞 · 0评论
赢得战斗!!!1!
别整那些定义、列表和空话!赢下战斗! 制胜要点 厌倦了那些枯燥的索引和术语表吗?我以为这是《终极将军:内战》的指南页面!我已经赢了3场南部联盟战役,有些简单的技…
2026-03-19 16:000赞 · 0评论
美国联邦军战斗指南
This battle-guide provides UGCW player-generals with an overview of various stru…
2026-03-19 13:000赞 · 0评论
散兵战术
使用散兵在战斗中斩获数千击杀的技巧 欢迎 应大家要求,我特意撰写了这份关于《终极将军:内战》中散兵使用的指南。本指南可作为我骑兵指南的补充,两者都将帮助读者了解…
2026-03-19 13:000赞 · 0评论
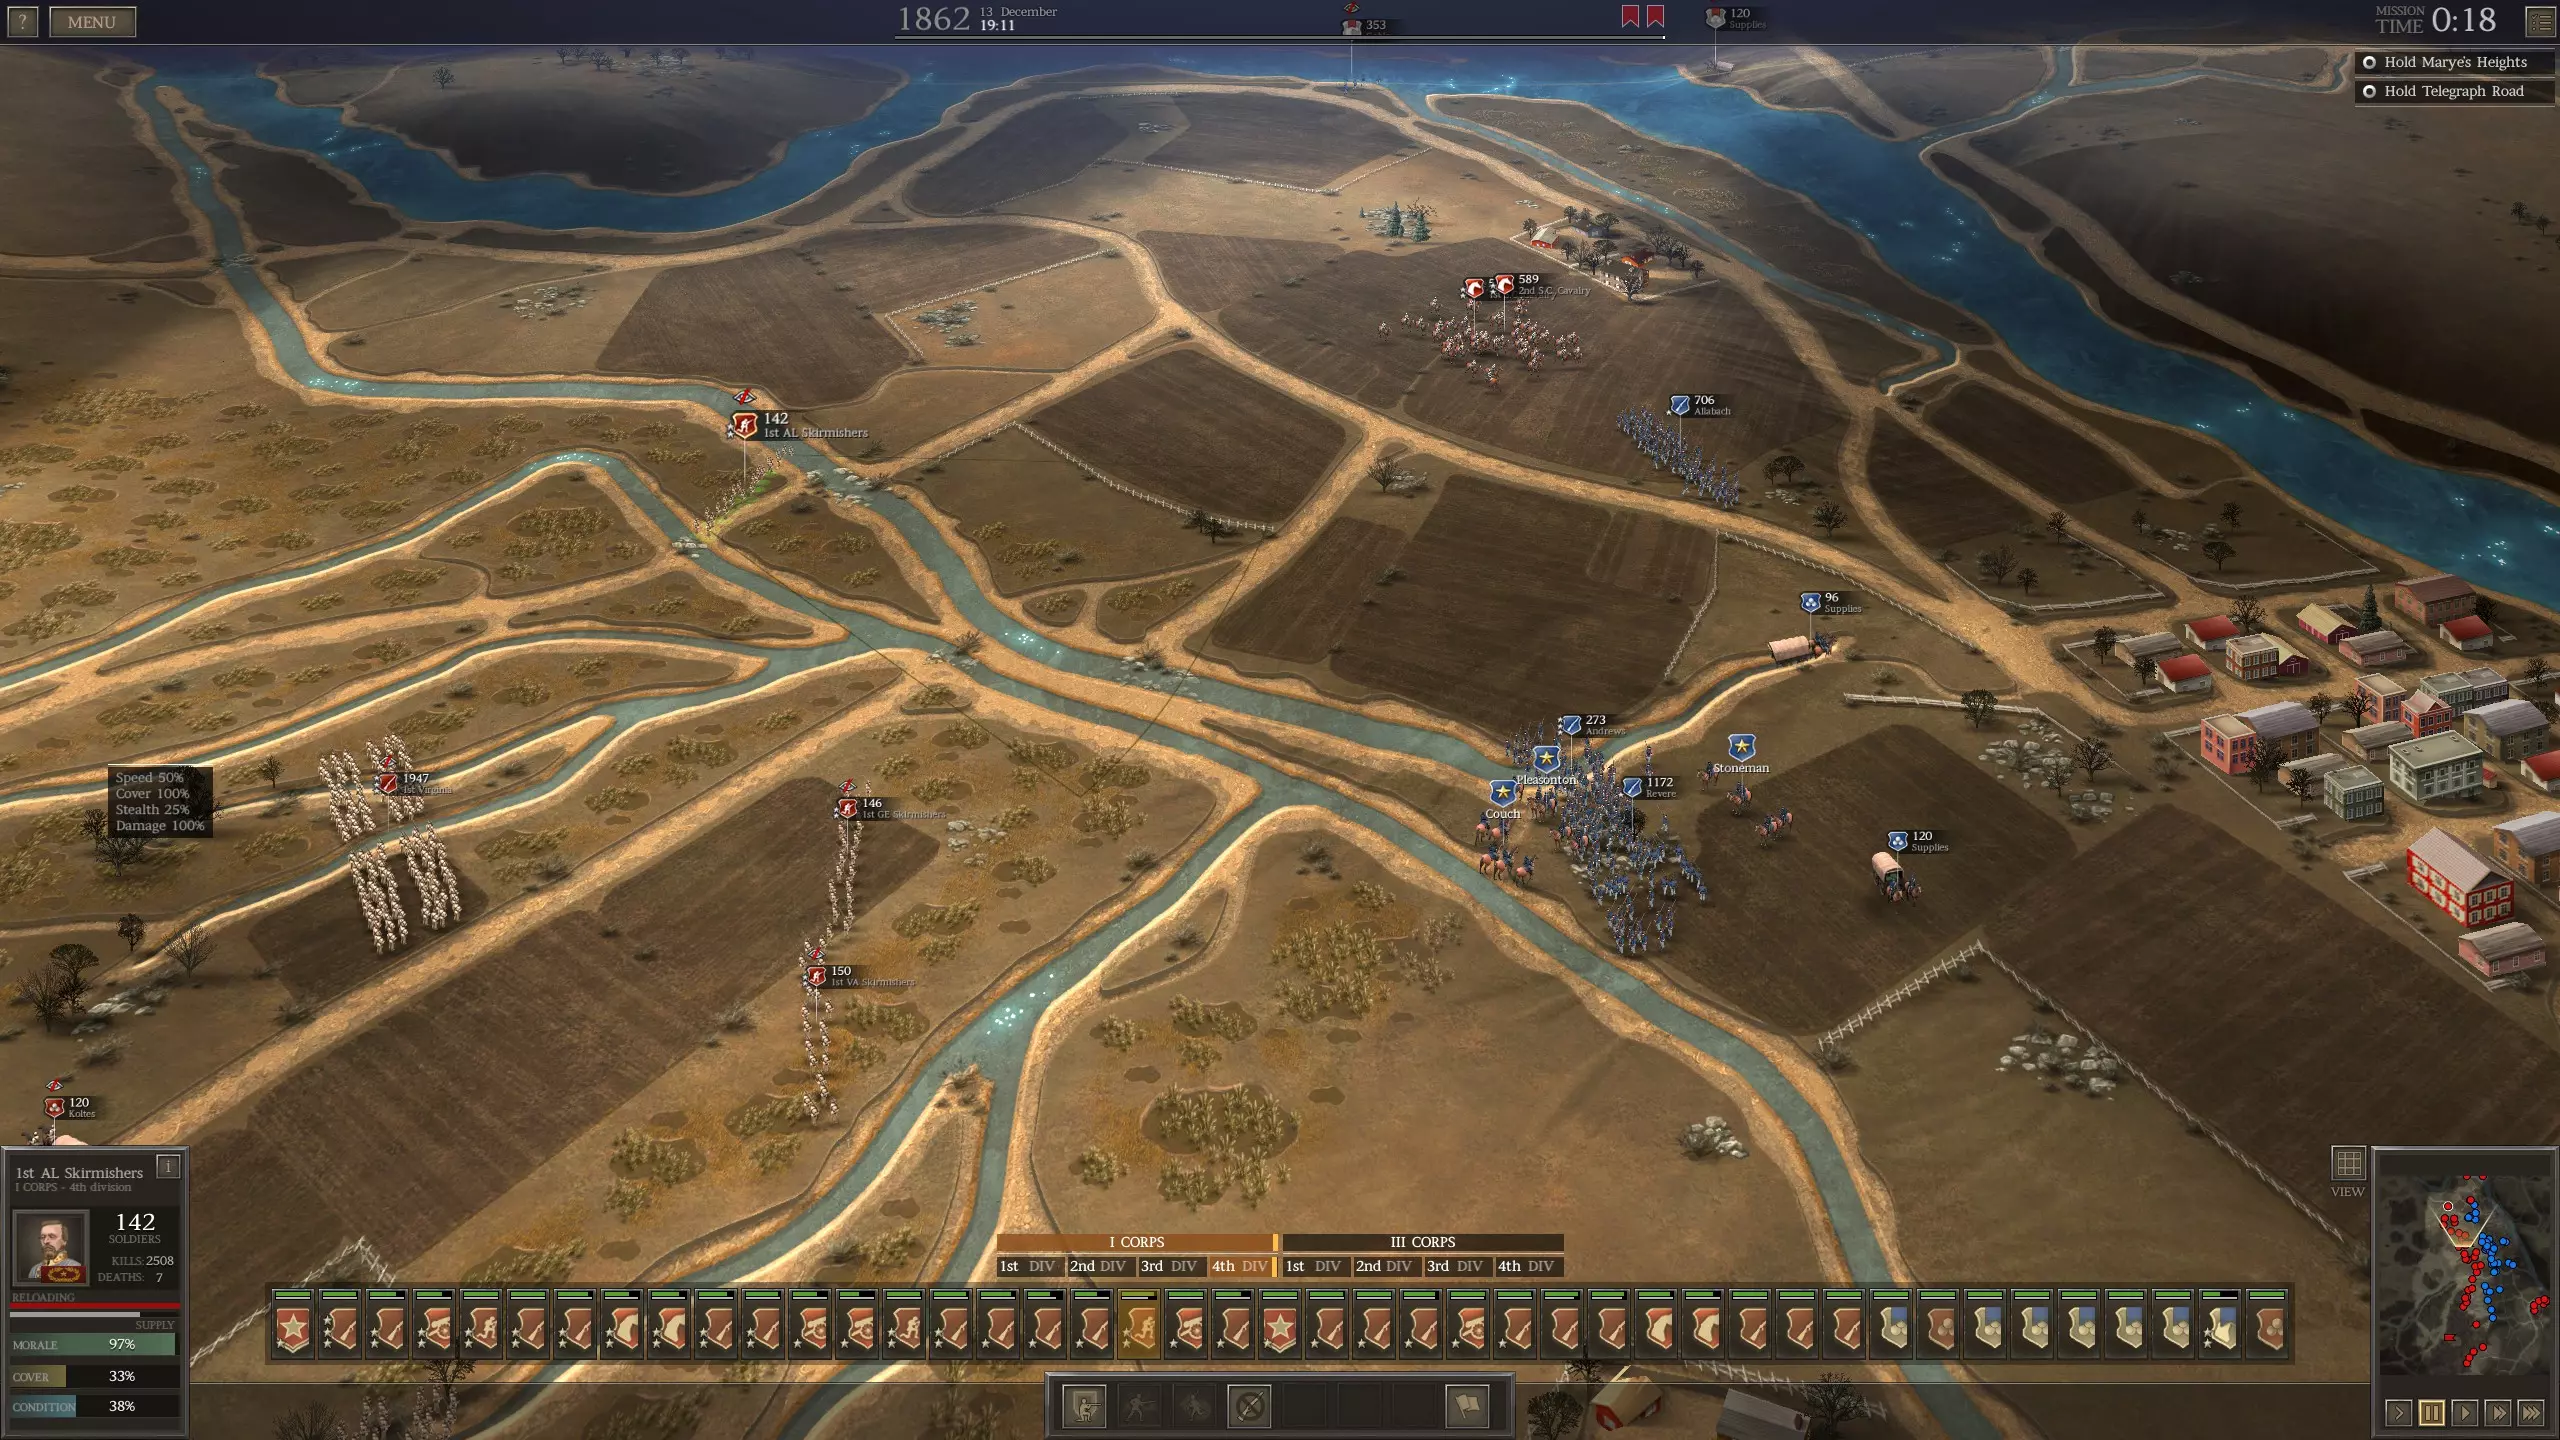
暂无更多