
Uncharted Waters Origin


Information about the game's dispatch mechanic Basics You can have up to three dispatch fleets at a time. One is free, which you should definitely use. One costs 300 blue gems to unlock it for a week. One costs 500 red gems to unlock it for a week. All three also have company level requirements. When a dispatch fleet is unlocked, you can fill it with as many ships as are allowed in your main fleet. Any ships can be used, but the critical thing is to be able to load as many mates onto your dispatch fleet as possible. Ship bonuses to various stats can also make additional dispatch options available. As of this writing, there are 112 dispatch options available in the game. It costs some ducats to send a fleet away on dispatch, and then after a fixed number of hours, you get the rewards. Each dispatch option is associated with either adventuring, trade, or combat. Trade dispatches will generally reward you with massively more ducats than it cost to dispatch the fleet, but only give you ducats. The other two will reward fewer ducats than it cost to dispatch the fleet, but also give other types of rewards. Most importantly, adventuring dispatches will give ship parts, while combat dispatches give mate gear. All three reward mate experience of the type that corresponds to the dispatch. This allows you to use dispatch to level up mates, and then those higher level mates can have improved stats that unlock higher level dispatches. Alternatively, you can swap mates between your dispatch fleet and main fleet whenever your main fleet is in port and the dispatch fleet is not on dispatch. Some combat dispatches with a particular character's name will award tradeable contracts for the named mate. For example, Cornaro Assault awards contracts for Catherine Cornaro. This can allow you to promote and train particular mates all the way up to S or SS grade without needing to draw one particular mate a large number of times in the gachas. It is also the source of the large stacks of contracts available cheaply on the auction house. The particular dispatch options are all listed in game, but in a way that can make it difficult to find what you're looking for. I've sorted then by type below, and then within each type, they are sorted roughly from lowest level requirements to highest. Most require the same stat level for each of the four stats of a given type, but some require slightly higher values of one stat than another. I've listed the latter as using some non-integer stat level, then explain the meaning of values below the main table. For adventuring and trade, the stat level is the fleet stat as displayed on the fleet screen. For combat, they take the sum across all ships in the fleet, then divide by the number of ships, and use the level that that would give on a single ship. Adventuring regionnameleveltimecostspeedseaicemomstatsBaltic SeaBivouac Dispatch1674630040001Baltic SeaInvestigate Coast1224880042101North SeaExplore Land1469360040001West IrelandBivouac Dispatch1674630040001Atlantic OceanInvestigate Coast1899510040001Western MedExplore Land112149260042001Central MedExplore Land1449760042001Black SeaBivouac Dispatch124298510040001Eastern MedInvestigate Coast1234680040001West AfricaInvestigate Coast15462490060004CaribbeanBivouac Dispatch1861014600615004CaribbeanInvestigate Coast18813527006150104West AfricaExplore Land2061073200710034Eastern MedExplore Land24122414900700105East AfricaInvestigate Coast24816099007150105South AmericaExplore Land304967800835005Arabian SeaInvestigate Coast3061451600845005Andaman SeaBivouac Dispatch3081935500845005East AfricaBivouac Dispatch301229032008450205Arabian SeaExplore Land302458063008450205North AmericaExplore Land35822589009554006Andaman SeaInvestigate Coast35123388400965006SumatraExplore Land35123388400965006South AmericaBivouac Dispatch35246776700965006East AfricaExplore Land35246776700955006GreenlandInvestigate Coast351233884009554006South AmericaInvestigate Coast40826299001075006SulawesiExplore Land401239448001075006ChinaBivouac Dispatch402478895001075006North AmericaInvestigate Coast4012399480010110006SulawesiInvestigate Coast45830483001185007KoreaBivouac Dispatch451245724001185007JapanExplore Land452491447001185007ChinaExplore Land4512457240011850407Coral SeaInvestigate Coast50241054210012850507North AmericaBivouac Dispatch5012527110012110007Andaman SeaExplore Land551260410001295008.5Coral SeaBivouac Dispatch5524120820001295008.5KoreaInvestigate Coast6012688210013100008.5KamchatkaExplore Land60241376420013100008.5GreenlandExplore Land651277944001412075010.5GreenlandBivouac Dispatch6524155887001412075010.5Coral SeaExplore Land7524196649001514008012.5 For the half integer stats above, add 0.5 for nature and scouting, and subtract 0.5 for aesthetics and supply. Trade regionnameleveltimecostloadseaicemomstatsAtlantic OceanMarket Research12996001000001North SeaMarket Research141991001000001Baltic SeaMarket Research563090002002103West AfricaMarket Research1542500004007004CaribbeanTrade Dispatch18427060040015004West AfricaTrade Dispatch20642930050010034East AfricaMarket Research24432200050020005East AfricaTrade Dispatch27652930060035005South AmericaMarket Research30877420070035005Arabian SeaMarket Research308774200700350205Arabian SeaTrade Dispatch304387100700450205Andaman SeaMarket Research30658070070045005Andaman SeaTrade Dispatch3512135540080055006SumatraMarket Research40678900090065006South AmericaTrade Dispatch40865760090075006SumatraTrade Dispatch4012157790090075006SulawesiMarket Research4024315580090075006SulawesiTrade Dispatch45691450090085007ChinaMarket Research4581219300900850407KoreaMarket Research4512182900090085007JapanMarket Research4524365790090085007North AmericaMarket Research50814057001000110007Coral SeaMarket Research501221085001000850507Coral SeaTrade Dispatch55244832800100095008KoreaTrade Dispatch601227529001100100008JapanTrade Dispatch602455057001100100008North AmericaTrade Dispatch65246235500120012075010PacificMarket Research70247022300130013006010 Combat regionnameleveltimecostpowerseaicemomstatsAtlantic OceanRegion Patrol126220050000001North SeaRegion Patrol1412440050000001Baltic SeaRegion Patrol56193100100002101West AfricaRegion Patrol154156300300007001CaribbeanPirate Assault1841691003000015001West AfricaPirate Assault2062683004000010031West AfricaPintado Assault258715500400007001.3East AfricaRegion Patrol2442013004000020001.8East AfricaPirate Assault2763308005000035001.8South AmericaRegion Patrol3084839007000035001.8Arabian SeaRegion Patrol30848390070000350201.8Arabian SeaPirate Assault30424200070000450201.8Andaman SeaRegion Patrol3063629007000045001.8Western MedCornaro Assault358967800700000002.3Andaman SeaPirate Assault351284710010000055003South AmericaPirate Assault40865750015000075003SumatraPirate Assault401298620015000075003SumatraRegion Patrol40649310015000065003SulawesiRegion Patrol4024197240015000075003GreenlandRegion Patrol35241694200100000554003.2SulawesiPirate Assault45657160020000085003.2ChinaRegion Patrol458762100200000850403.2KoreaRegion Patrol4512114310020000085003.2JapanRegion Patrol4524228620020000085003.2North AmericaRegion Patrol508878600230000110003.2Coral SeaRegion Patrol50121317800230000850503.2Western MedFlamel Assault351216942001000000003.3East AfricaMancine Assault3512197240015000020003.3North SeaRussell Assault251222862002000000003.5CaribbeanHuxley Assault308175710023000015003.5East AfricaClive Assault4012228620020000020003.5South AmericaEhinger Assault5512228620020000035003.5Coral SeaPirate Assault5524302050025000095004KoreaPirate Assault60121720600280000100004JapanPirate Assault60243441100280000100004Andaman SeaYasuke Assault5012302050025000045004.3South AmericaAsarpay Assault5512302050025000035004.3Chinavan Lodensteijn Assault60246041000250000850404.3Atlantic OceanGhost Ship Assault301234411002800000004.3Kerguelen IslandsGhost Ship Assault75246882100280000450204.3North AmericaPirate Assault652438972003000001207505Sumatravon Speyer Assault5524779440030000065005.3KoreaTakanobu Assault6524779440030000085005.3Coral SeaRobert Wilde Assault701243889003300001400805.3PacificJakob Roggeveen Assault75243500001300606.3 The meaning of the non-integer stats values above is: ListedArtilleryRammingSupportMelee1.321111.822122.332123.233343.343333.543344.354445.365556.37666

这份指南介绍如何从20级快速升到24级。这并非一份全面详尽的升级指南,而是提供一些不同实用性的捷径,帮助你理解并掌握独立升级的方法。尽管这些捷径都是我亲自尝试过的,但数据仅供参考,使用本指南的信息需自行承担风险。 20级到24级快速步骤: 几个步骤: 1. 你至少需要2艘T6船和3艘T5船。(我的配置是3艘盖伦帆船,2艘单桅帆船) 获取途径有两种:自己建造(免费玩家)或通过拍卖行购买(付费玩家)。 第三种途径是抢夺,虽然可行但不推荐,因为抢夺其他船只可能会花费大量时间。为了舒适体验,建议拥有5艘T6船。2.前往西非海岸。 3.找到阿尔金(非洲西海岸)。 4.航行至阿尔金。 5.在此处购买黄金。 6.在阿尔金附近创建仅与海盗的自动战斗(40次),通过战斗获取经验值提升等级。 注意!此处有20-35级的海盗,因此请确保你已准备好能够应对他们的船队。 7.等待自动战斗(40次)结束。 8.再次启航返回阿尔金。 9.出售战斗中获得的非盈利货物。 10.再次购买黄金。 11.重复上述步骤直至达到24级。 12.启航前往任意首都(我倾向于伦敦,因为我在这里建造了船只)并出售所有货物。 13.收益=你将达到24级并获得100万。 捷径:你可以通过创建大量(200次)自动战斗,然后不退出游戏直接去睡觉,来快速完成这一过程。早上你会获得大量经验值和物资,但可能会损失一些贸易商品,或者输掉一些战斗,因此在你醒来之前,在达到24级之前,进度可能会停滞。 免责声明 适用于2023年5月版本 请注意,游戏仍在开发中,贸易路线、商品、交货时间可能会有所变化。本指南作者不对任何行为或使用本指南信息所产生的任何结果承担任何责任。 附言 我创建了TARTARUS公会 TARTARUS——国际公会招募(大西洋服务器,美洲) 主要使用英语。 立即免费加入!

This explains the game's land exploration mechanic. This also lists zone levels, and thus, the implied order of various regions in the game. Basics You can stop near most land in the game for land exploration. Land exploration costs a bedroll each time, but gives you a chance to make discoveries, acquire ship parts, and acquire items that can be turned in at a collector or gifted to mates or inn employees. Land exploration operates by zones. Unlike other Uncharted Waters games, you don't have to drop anchor at particular, small spots to explore. Rather, most of the shore areas are divided into zones. Stopping anywhere within a zone to do land exploration is equivalent to any other place, with only the exception of quests that lead you to a very particular spot. Each land exploration attempt will last two to four days. There are two events per day. Land exploration events are divided between combat, observe, and gather. At the menu to start land exploration, it will give you probabilities of each event type appearing in each particular slot. The last event of the second and third days are always gather events, while the other events are always either observe or combat events. A land exploration attempt continues until either a gather event fails or the fourth day ends. Because gather events take fixed slots, the nominal probability of a gather event is meaningless. The ratio of observe to combat events does matter, though. Every land exploration zone has some difficulty rating. It uses the same difficulty rating for each of the three event types. Your party also has a rating for each of the three event types. Your chances of success at each event depends solely on the difference between your rating and the zone's rating in the relevant event type. All three types use the same formula. I don't know the exact formula, but empirically, this formula seems to be very, very close: success chance (as percentage) = 96.42/(1+exp(-0.05451*((party skill)-(zone difficulty)-18.73)))-1 That formula is so close that the true formula is definitely some sort of logistic curve. It also levels off at something significantly less than 100%. The party skill rating depends mostly on particular skills. The relevant skill, by event type, is: eventskillcombatmeleeobservenaturegathersupply Nature and supply are adventuring skills that have fleet levels. Your skill for land exploration depends on the fleet level, not on the exact skill value. You get 14 points per fleet level in the skill. A table up to level 23 looks like this: skill levelfleet pointsevent skill101428502831490424336056559807069340847134609881832011292393012610302901401141130154125429016813700101821488470196151099402101613462022417162740238181945302521923020026620270000280213159402942236976030823432820322 For levels 3-10, a formula of: 10 * floor(37.4 * level^2 - 74.8 * level + 37) always gives exactly the right number of stat points required. For levels 10-20 (and yes, level 10 fits both formulas), a formula of: 37.425 * level^3 - 76.25 * level^2 + 61.2 * level - 130 is always off by less than 10 points. That formula does not still work at level 21, however. Note that it is only the fleet level, not the total number of points. Having 6300 points in nature or 9300 makes no difference, as either will give you nature level 5. Having 6300 points rather than 6200 makes a big difference, as that's the difference between level 4 and level 5. Combat goes by melee skill, which is calculated separately for each ship. Each ship in your fleet gives a bonus based on its own melee skill. A table up to level 10 looks like this: levelmelee statcombat skill1052870831350124330014562101761218020721220238340502795139032107400040 Thus, which mates are on which ships does not matter for nature and supply, but it does matter tremendously for melee. You can also increase various stats by using exploration items that are sold in item shops. Each land exploration attempt will consume one of each item that you use, so this increases the cost of exploration considerably. The items available to buy are: ItemPriceSkillIncreaseOld Rope2800observe3Hand Axe2800combat3Clean Glass Bottle2800gather3Normal Rope5800observe5Machete5800combat5Flimsy Wheelbarrow5800gather5Superior Rope15200observe7Pancho15200combat7 Prices given are base prices, before the language discount. Every ship gives a large stat bonus to some particular stat, in addition to the stats that the mates in the ship cabins give. The ship stat bonus depends only on the particular ship type, such as a cutter or xebec. You can find the list of them in my ships guide. Be sure to set your ship cabins to have an appropriate mix of adventure, trade, and combat cabins. In particular, you do want some trade cabins, as higher grade trade mates will tend to give you better stats than lower grade adventure or combat mates. You may also want a combat cabin or two on adventure ships so that melee-focused mates can improve your combat rating. Basics (continued) The event difficulty and bedroll type mostly depend on the company level requirement of the zone, at least for zones that do not require seaworthiness of 150 or higher. Rather than listing them separately for each zone, I'll only list the difficulty requirement for the zone. The gear grade is for the highest grade of ship gear available in that zone. There have been some changes to company level requirements since launch, and land exploration parameters generally haven't made corresponding changes. As such, the level requirement in the next table means level requirement at launch, and may not still be accurate today. LevelDifficultyBedrollParts15DC1514DC1814DC2030DC2448DB2765CB3065CB3589CB40108BB45122BB50136BA55155BA60155BA65170AS70175AS75180AS This table fails for top end zones, as those rely on very high requirements of seaworthiness and either momentum or ice breaking to limit access to the zones. Top end zones always require A-grade bedrolls and can give S-grade parts. For top end zones, the difficulty is: SeaworthinessMomentumIce BreakingDifficulty15012001851551250200170012022017013002251851500225200015023521001602602251700310 The name of each zone gives the approximate location. Some are a little misleading, such as that there is a "Near Bahia" zone, but the shore that is actually near Bahia is all part of the "Near Caracas" zone. I give a separate column for my own description of the location. Directions generally mean the coast, so something like "east USA" includes the east coast of Florida but not Vermont, even though the latter is objectively further east. My references to countries use the modern political boundaries, not those from the 1520s. The level column is the company level requirement to reach the zone. As above, that also determines the difficulty rating of the zone, as well as the type of bedroll needed. The S/A/B/C/D columns are the number of discoveries of each grade available in the zone. The sea, mom, and ice columns are the minimum values of seaworthiness, momentum, and ice breaking needed to reach the zone. A lot of zones straddle multiple values of this, so I pick the lowest one. For example, part of "Near Ushuaia" requires 30 momentum and part has no momentum requirement, so I report is as 0. If you just want to get to the zone at all, you don't need any momentum. There are some zone that may spill slightly into a lower level (or seaworthiness or momentum) sea region than the main difficulty rating. These have the level marked with an asterisk. They use the difficulty rating of the main zone level even in the lower level sea zone. I'm not entirely convinced that they really do spill into the lower level region as opposed to the zones marked on the global map simply being wrong, though. Also, Steam censors the name of the largest river in western Africa, which is why I called it the (censored) River below. You can see it for yourself on many real-life maps of the area. Oddly enough, Steam does not also censor Nigeria, which is based on the same root word. Finally, there really are two completely separate regions called Near Cambridge Bay. They should have called one of them near Iqaluktuuttiaq, which would actually be less confusing. Zone list (Europe and Africa) nameleveldiffSABCDseamomicelocationNear Lisboa1501015000Portugal, SpainNear Nantes1501114000west/north FranceNear London1501024000British IslesNear Amsterdam1501023000Netherlands, GermanyNear Bergen1501015000Denmark, NorwayNear Stockholm1501230201Sweden, Finland, PolandNear Archangelsk7017512110130080northeast ScandinaviaNear Narvik7017512110130080northwest ScandinaviaNorth Iceland7017511220130080north IcelandSouth Iceland35891110055040south IcelandNear Marseille1501015000south FranceNear Naples1501015200ItalyNear Athens1501015000Greece, CreteNear Kerch1501211000UkraineNear Trabzon1501015000TurkeyNear Alexandria1501024000EgyptNile River2448012130100Nile RiverUpstream of the Nile River24215102000100Lake VictoriaNear Casablanca1501024000Morocco. AlgeriaNear Arguin151401033000west AfricaNear Benin203001212700Nigeria, Cameroon, Gabon(censored) River2030011131030(censored) River, Benue RiverUpstream of the (censored) River20215121001030western (censored) RiverKongo River24480121215100Kongo RiverNear Benguela2448013121500Angola, Namibia, South AfricaNear Natal2765102133500MozambiqueZambezi River27651022235200Zambezi RiverNear Toamasina2765102123500MadagascarNear Massawa2765013123500Tanzania, Somalia, Red Sea Zone list (Americas and Pacific) nameleveldiffSABCDseamomicelocationNorth Pole Entrance35891000155040east GreenlandSouth Greenland35890121055040GreenlandNear Arviat35890222055040Hudson BayNear Cohasset181401212700east USA, east CanadaBermuda Island18225111001701300BermudaNear Santiago de Cuba1814012121500Greater AntillesLower Mississippi1814012121500south USAMississippi River18140121215100Mississippi RiverUpstream of the Mississippi River182150310015100western Missouri RiverNear Trujillo1814012131500east Mexico, north/east Central AmericaNear Caracas1814012121500north South AmericaLower Amazon18141121215100eastern Amazon River and tributariesUpper Amazon18140121215100western Amazon River and tributariesNapo River182150310015100western Napo RiverNear Bahia3065102223500east BrazilLa Plata River35891102255300Parana, Paraguay, and Uruguay RiversNear Ushuaia3589111215500ArgentinaNear Valparaiso3589111226500ChileNear Tumbes40108111227500PeruNear Guatemala40108112117500south/west Central AmericaNear Acapulco501551121011000west MexicoNear Ohlone6517011301120075British Columbia, Washington, OregonNear Barrow6517011210120075AlaskaAlaska70220111001700120north AlaskaNorth Alaska40260100042100160northeast Alaska, YukonNear Cambridge Bay40260010212100160(Canada) Northwest TerritoriesNear Cambridge Bay40260111102100160central NunavutNorth Cambridge Bay40260012112100160northern NunavutWest Greenland40260012012100160northwestern GreenlandNear Honolulu75185111211501200HawaiiTuamotu Archipelago7017511110130600PolynesiaNear Hagatna7017502110130600GuamNear Suva7518001111140800FijiTongatapu Island75225021001801500TongaNear Whanganui7518002210140800New Zealand Zone list (Asia and Australia) nameleveldiffSABCDseamomicelocationNear Dhofar2765102213500Oman, YemenNear Hormuz3065102214520*0Persian Gulf, Tigris RiverUpstream of the Euphrates River302151110045200Euphrates RiverNear Goa3065102224500west IndiaNear Male40310003102251700MaldivesNear Masulipatnam3489102225500east IndiaA remote island near the Indian Ocean34200002001551250Kerguelen IslandsNear Pegu34891110365*00MyanmarNear Hanoi3489111116500Sumatra, Thailand, VietnamNear Macau37108100417500south ChinaNear Kuching37108112127500BorneoNear Surabaya37108021317500JavaNear Brunei37108112207500Sulawesi, PhillippinesNear Tainan40122010248500Taiwan, east ChinaNear Naha40122020418500OkinawaNear Hangzhou40122111228500east ChinaYangtze River401221121185400Yangtze RiverUpstream of the Yangtze River402150210085400western Yangtze RiverYellow River401221213085400Yellow RiverNear Hanyang40122121208500KoreaNear Jeju40122121118500Jeju IslandNear Nagasaki40122111128500KyushuNear Edo40122121308500HonshuNear Banda37122031307500western New GuineaNear Pinjarra50136030118500west AustraliaNear Port Pirie50136011008500south AustraliaNullarbor Plain50215003008500Great Australian BightNear Kakadu55155021109500north AustraliaNear K’gari55155012119500east AustraliaNear Samarai55155022019500eastern New GuineaNear Yeongil451550213110000east KoreaPaektu Mountain Entrance452150310010000northeast corner of KoreaNear Korf601550020210000Sea of OhkotskNear Ezo451551112110000HokkaidoThe Pacific Northwest601551113110000Kuril IslandsGulf of Anadyr6521501200120075west of KorfChuckchi Peninsula6517011120120075south Chukchi Peninsula, east KamchatkaSiberia70220111001700120north Chukchi PeninsulaNear Dikson40235102012000150north Russia Exceptional zones The general rules above accurately describe most zones, but there are some exceptions. First and most important is the Kerguelen Islands zone. Most zones give one resource when you redo a discovery, but for one of the discoveries, the Kerguelen Islands zone gives five. Furthermore, they're B-grade resources, as that is the lowest grade of discovery. That makes it useful as a way to farm adventuring fame if you're high enough level to get a good success rate. The North Pole Entrance zone gives A-grade ship parts rather than B-grade. It is a small portion of land at the east end of the portion of Greenland that is accessible below company level 70, though it is not clear whether it extends into the level 70 portion of the map. Near Banda is mostly for western New Guinea, which requires 130 seaworthiness. However, you can access the zone at the eastern edge of Seram Island, which requires only 75 seaworthiness. Some other zones that are have only a small portion near the boundary of a level range are genuinely just small zones, however. This includes Near Jeju and the very misnamed The Pacific Northwest, which outside of the game, usually refers to roughly the area of the zone that was instead named Near Ohlone, in spite of not containing Ohlone. C-grade Resources After you make a discovery, if you would have made the discovery again from continued land exploration, you get a resource instead. Such resources can be turned in at collectors for adventuring fame. With the introduction of guild skills, people sometimes want particular resources. Old chests are obtainable everywhere, but other resources are only available in particular zones. The game won't tell you which resources are available where until you make the discovery, but I will. This guide is currently complete, though that can change as new zones are added in future patches. I also include the palace as a source for the resources that are offered there. The zones for a given resource are sorted by increasing order of difficulty. Here are the C-grade resources, other than Old Chest, sorted in the order that the game displays them if multiple such resources are available in the same zone: ResourceLocationsSuperior Writing SuppliesNear London, Near Amsterdam, Near Casablanca, Lower Mississippi, Near Trujillo, Upper Amazon, Lower Amazon, (censored) River, Near Hanoi, Near Tumbes, Near Naha, Near Hangzhou, Yellow River, Near Banda, The Pacific Northwest, Near Honolulu, Gulf of AnadyrSea LobsterNear Marseille, Near Naples, Near Alexandria, Near Amsterdam, Mississippi River, Lower Mississippi, (censored) River, Near Bahia, North Pole Entrance, La Plata River, Near Pegu, Near Guatemala, Near Brunei, Near Naha, Near Banda, Near Pinjarra, Near Yeongil, Chuckchi Peninsula, Tuamotu Archipelago, North AlaskaSculpture by Unknown ArtistNear Athens, Near Trabzon, Near London, Near Casablanca, Near Amsterdam, Near Kerch, (censored) River, Kongo River, Near Hormuz, Near Masulipatnam, Near Ezo, Near Samarai, Near Barrow, Near Narvik, Near Cambridge Bay (west), Near Cambridge Bay (east)Writing Suppliespalace, Near Bergen, Near Nantes, Near Naples, Near Trabzon, Near London, Near Arguin, Near Cohasset, Near Santiago de Cuba, Lower Amazon, Near Dhofar, Near Arviat, Near Pegu, Near YeongilFish CakeNear Lisboa, Near Naples, Near Arguin, Near Trujillo, Nile River, Near Natal, Zambezi River, Near Toamasina, Near Hormuz, Near Valparaiso, Near Macau, Near Kuching, Near Naha, Near Ezo, Chuckchi PeninsulaPicture by Unknown ArtistNear Lisboa, Near Bergen, Near Marseille, Near Casablanca, Near Cohasset, Near Arguin, Upper Amazon, Near Benin, Near Goa, Near Valparaiso, Near Macau, Near Kuching, Near Nagasaki, Near Jeju, Near AcapulcoVillage RecordNear Athens, Near Alexandria, Near Nantes, Near Trabzon, Near Casablanca, Mississippi River, Lower Mississippi, Near Benguela, Near Natal, Zambezi River, Near Toamasina, Near Ushuaia, Near Masulipatnam, Near Pegu, Near Macau, Near Tainan, Near Hanyang, North AlaskaSuperior JournalNear Lisboa, Near Alexandria, Near Amsterdam, Near Benguela, Near Goa, La Plata River, Near Ushuaia, Near Tumbes, Near Banda, Near Korf, Near Dikson, North AlaskaFinNear Athens, Near Lisboa, Near Arguin, Near Benin, Near Natal, Near Goa, Near Hanoi, Near Surabaya, Near Hangzhou, Near Nagasaki, Near Hanyang, The Pacific Northwest, North Iceland, Near Archangelsk, Near Suva, Near Cambridge Bay (west), West Greenland, Near MaleStarfishNear Nantes, Near London, Near Naples, Near Arguin, Kongo River, Near Bahia, Near Dhofar, Zambezi River, Near Ushuaia, Near Tumbes, Near Naha, Near Hangzhou, Yellow River, Near Korf, The Pacific Northwest, Near Hagatna, North IcleandPort RecordNear Bergen, Near Marseille, Near Athens, Near Kerch, Near Trabzon, Near Alexandria, Near Lisboa, Near Nantes, Near London, Near Amsterdam, Near Naples, Near Casablanca, Near Caracas, Near Trujillo, Nile River, Zambezi River, South Greenland, Near Macau, Near Surabaya, Near Tumbes, Near Kuching, Near Tainan, Near Naha, Near Jeju, Near SuvaJournalNear Bergen, Near Nantes, Near Naples, Near Trujillo, Lower Amazon, Near Benin, Near Massawa, Near Valparaiso, Near Masulipatnam, Near Surabaya, Near Tainan, Yangtze River, Near Hangzhou, Yellow River, Near Yeongil, Near Whanganui, Near Honolulu, North AlaskaReptile ScaleNear Trabzon, Near Lisboa, Near Santiago de Cuba, Near Caracas, Near Arguin, Near Bahia, Near Massawa, Near Guatemala, Near Surabaya, Near Tainan, Near Edo, Near K’gari, The Pacific NorthwestClam ShellNear Stockholm, Near Marseille, Near Bergen, Near Athens, Near London, Near Casablanca, Nile River, Near Hormuz, Near Massawa, Near Goa, Near Arviat, Near Macau, Near Brunei, Near Edo, Near Pinjarra, Near Kakadu, Near Cambridge Bay (west), North Cambridge BayBroken RelicNear Stockholm, Near Marseille, Near Bergen, Near Santiago de Cuba, Upper Amazon, (censored) River, Kongo River, Nile River, Near Benguela, La Plata River, Near Hanoi, Near Valparaiso, Near Nagasaki, Near Edo, Near K’gari, Near Yeongil, Near Ohlone, Near Honolulu Higher grade resources Here are the B-grade resources: ResourceLocationsSilk Handkerchiefpalace, Near Nantes, Near Trujillo, Nile River, Near Massawa, Near Masulipatnam, Near Tumbes, Near Yeongil, The Pacific Northwest, Near BarrowGold Butterfly HandkerchiefNear Cohasset, Upper Amazon, Near Bahia, Near Natal, Near Brunei, Near Nagasaki, Near Hagatna, Gulf of AnadyrSeven Treasures Incense BurnerNear Goa, Near Hangzhou, Yangtze River, Near Samarai, Upstream of the Mississippi River, Napo River, Paektu Mountain Entrance, Near DiksonVillage MapA remote island near the Indian Ocean, South Iceland, Near Pegu, Near Korf, Near K’gari, Bermuda IslandSurviving the North Polepalace, Near Stockholm, Near Massawa, Near Kuching, Near Acapulco, Near Cambridge Bay (east), North Cambridge Bay, Near MaleTraveling the WorldNear Santiago de Cuba, Near Dhofar, Near Arviat, Near Brunei, Near Ezo, North Iceland, Near Narvik, Near Archangelsk, Near WhanganuiUrban Topography MapNear Benguela, Near Goa, South Greenland, Upstream of the (censored) River, Nullarbor Plain, West GreenlandGolden Llamapalace, Near Kerch, Near Stockholm, Near Caracas, Near Toamasina, Near Bahia, Near Hanoi, Yangtze River, Upstream of the Nile River, Near MaleFinding India’s MysteryNear Kerch, Lower Mississippi, Near Caracas, Near Guatemala, Near Kuching, Near Port Pirie, Upstream of the Nile River, Upstream of the Euphrates River, Near Honolulu, Tongatapu IslandLinen HandkerchiefLower Amazon, Near Natal, Near Guatemala, Near Hanyang, Near Ohlone, Near Barrow, Near Whanganui, Near MaleBird’s Eye PaintingUpper Amazon, Near Hormuz, Near Massawa, A remote island near the Indian Ocean, Near K’gari, Nullarbor Plain, Near Suva, West GreenlandEmbroidered HandkerchiefNear Benguela, Near Toamasina, Near Masulipatnam, Tuamotu Archipelago, North IcelandMediterranean Sea AdventureNear Santiago de Cuba, Near Benin, (censored) River, Near Hormuz, Near Ushuaia, Near Arviat, Chuckchi Peninsula, Nullarbor PlainSuseokLower Amazon, Zambezi River, Near Dhofar, Near Valparaiso, Near Edo, Near Kakadu, Near Acapulco, Near OhloneJade TurtleNear Trujillo, Kongo River, Near Surabaya, Yellow River, Near Jeju, Near Samarai, Siberia, AlaskaWeather MapMississippi River, Near Benin, Near Benguela, Zambezi River, Near Banda, North Cambridge BayDangerous Poison FangLower Mississippi, Nile River, South Greenland, Near Korf, Near Ohlone, Upstream of the Yangtze River Here are the A-grade resources, sorted alphabetically: ResourceLocationsCeramic CupNear Trabzon, Near Benguela, Near Arviat, Near Pinjarra, Near Barrow, North Iceland, Near Narvik, Upstream of the Euphrates River, Upstream of the Yangtze River, Tongatapu IslandCeramic Flower PotNear Bergen, South Greenland, Near Banda, Near Hanyang, Near Jeju, Near K’gari, Near Suva, Near WhanganuiCeramic PlateNear Amsterdam, Near Brunei, SiberiaClear SloughUpper Amazon, Near Guatemala, Near Surabaya, The Pacific Northwest, Gulf of AnadyrFeathered FanNear Kerch, Near Caracas, Near Massawa, Near Surabaya, Yellow River, Near Samarai, Chuckchi Peninsula, Napo River, Upstream of the Yangtze RiverGneissNear Lisboa, Near Athens, Lower Mississippi, Near Edo, Paektu Mountain Entrance, Alaska, North Cambridge Bay, West GreenlandLimestoneNear Casablanca, Near Hanoi, Near Tainan, Near Hanyang, Near Ohlone, Near Narvik, Near Archangelsk, Paektu Mountain EntranceMahogany PipeNear London, Near Naha, Near Jeju, Near Acapulco, Near HagatnaMarbleNear Trujillo, Yellow River, Near Archangelsk, Upstream of the Mississippi River, Napo RiverMeerschaum PipeNear Arguin, Lower Amazon, Kongo River, Near Arviat, Near WhanganuiMorta PipeNear Cohasset, (censored) River, Nile River, Near Ushuaia, Near Tumbes, Near Banda, Near Pinjarra, Upstream of the Mississippi River, Paektu Mountain EntranceMusa Leaf FanNear Hangzhou, Near Banda, Near Kakadu, Near Samarai, Near Ezo, Upstream of the (censored) RiverOrchid Painting FanNear Nantes, Near Santiago de Cuba, Mississippi River, La Plata River, Near Kuching, Near Edo, Near OhlonePorcelain KettleNear Stockholm, Near Marseille, Near Naples, South Iceland, Near Pegu, Near Port Pirie, Upstream of the Mississippi River, Napo RiverPorcelain PipeNear Alexandria, Near BeninSandstoneNear Nagasaki, Near Pinjarra, Near Kakadu, Tuamotu Archipelago, Upstream of the (censored) River, Bermuda Island, Near Cambridge Bay (west), Near Cambridge Bay (east)Silk FanNear Valparaiso, Yangtze River, Near Yeongil, Near Hagatna, Near Honolulu Finally, the S-grade resources, again sorted alphabetically: ResourceLocationsChamomile TeaNear Ushuaia, Near Pegu, Near Edo, Near BarrowColored StoneLa Plata RiverDiamond BroochZambezi RiverEmerald BroochNear Masulipatnam, Near Hanyang, The Pacific NorthwestFossil PieceYangtze RiverHibiscus TeaNear Jeju, Bermuda Island, Near DiksonLavender TeaNear Valparaiso, Near MacauPatterned StoneNear Bahia, Near Hangzhou, Upstream of the Nile River, Near Cambridge Bay (east)Rose TeaNear Kuching, Near NagasakiRuby BroochNear Guatemala, Near NarvikSapphire BroochNear Dhofar, North Pole EntranceSchneeballNear HonoluluSemiprecious StoneNear Hanoi, Tuamotu Archipelago, North Iceland, Upstream of the (censored) River, Siberia, AlaskaSemlaNear Natal, Near Toamasina, Near HormuzStrange ClawNear Brunei, North AlaskaStrawberry TartNear Goa, Near Ezo, Near Acapulco, Chuckchi PeninsulaWater FlouriteNear Tumbes, Yellow River, Upstream of the Euphrates RiverYanggaengLower Amazon, South Iceland, Near Archangelsk High end stats The current top end land exploration area has difficulty 260, but gives an enormous amount of investment certificates. People farm it for the certificates, but you'll need very high stats to be able to get a good success rate. How high of stats you really need is a judgment call, but I see a threshold of 300 as being about what it takes to justify farming the area. So the point of this section is to explain how to get those very high stats. For observation and gather, it's pretty straightforward. Get nature and supply to level 20, then add in some bonuses from some of the things that you're doing for the sake of your combat level, and that gets you well over 300. Combat is the hard one to get high and always has been. I currently have a clear path to a combat rating of 365.9, which is high enough that you can afford to skip a few points here and there. I can't quite get there quite yet, but as of this writing, will probably be able to within two weeks. So I'll explain the various things that you can stack to add up to a high rating. Let's start with a summary table, then come back for more details later. sourcepointsbase value10ship melee levels224consumables15captain's cabins15flags7national policy3prime minster pledge3mate effects38guild effects9assault rams18Snow10Kirch chronicle6Isaac Newton3golden flying cloud4archaeologists0.9 Some of those values can go higher than I've listed. I've listed what I personally have or will soon get, not the theoretical maximum. Let's explain the values in order. First is the base value of 10 points. Everyone gets this automatically. You get points for the melee level of each ship. I have all ships in my fleet at melee level 8, then use the blue gem buff at a cathedral to raise that to 9. That's 32 points per ship, for 224 points in total. This is the main source of the combat stat, and if you can't at least get all of your ships to melee level 7 without buffs, you're not ready for high end land exploration. If you can't get all of your ships to level 8, then you should rearrange mates to get as many to level 8 as you can, without letting any drop below level 7. There are three consumables that get used on each land exploration attempt. If you use all three, that's 15 points. The table is listed early in this guide. Tier 20 or 21 adventuring ships all give +2 combat in the captain's cabin. A golden flying cloud gives +3. I'm guessing that all flying clouds give +3, but don't yet have a non-golden one. My main fleet has one golden flying cloud and six improved sagyeonseons, which makes 15 points total. Adventuring flags from the investment shop give +1 each. One per ship makes 7 points. If your country has a prime minister and you set all the national policies, then one of them gives 3 combat points. When running for prime minister, a candidate can choose one of the three land exploration stats to give an additional 3 points to. Hopefully he chooses combat. Mate effects are separate for combat against pirates versus beasts. You can theoretically get up to 70 in each. I'm aiming for 38 in each. For beasts, that is done as beast hunting level 10 and beast extermination level 2. For pirates, that is done as pirate hunting level 5 and pirate eradication level 5. Beast extermination and pirate eradication are both potential effects that require the mate to be SS-grade before learning the effect. They also require spending 1000 red gems per mate to learn the effect. Beast hunting and pirate hunting are normal mate effects, so they're easier (and cheaper) to get. In particular, all biologists get beast hunting, as well as a high nature stat, so they're the main way to get your beast hunting level high. If your guild uses adventuring effects, then the novice, intermediate, and high exploration manual effects give 1, 2, and 3 combat points, respectively at level 1. Increase them to level 4 and they add another 1, 1, and 2 points respectively. You're going to have to be in a major guild to get these unlocked. The cap is 10, but I list 9, as that's what CsdaIndia has at the moment. We'll probably get that to 10 within two months of this writing. Each ram from the Maybe Duck assault (weirdly, if I list the whale's real name, then Steam also censors "assault") gives +3 combat, so this can go up to 21 points. The rams mostly give momentum rather than ice breaking, so it is difficult to get 160 ice breaking if you're using momentum rams. I can get a fleet with 6 such rams into the top end areas, so I count 18 points. You can buy various pets for $9 each in the product -> appearance section of the shop. The rabbit named Snow gives 10 combat points. You can only equip two pets at a time, and Snow is the only one that I think is interesting to buy. If you complete the Maria Margarethe Kirch relationship chronicle, you get the "Class 3 Red Eagle Medal" accessory, which gives 3 points to each land exploration stat, but only if equipped on Kirch herself. Furthermore, the three mates from the chronicle each get an extra effect with 3 points to some land exploration stat. Johannes Kepler gets the "Conquer Rough Lands" effect that gives the 3 points to combat. Isaac Newton gives 3 points to each land exploration stat as his unique job effect. He is only available from the season 1 investment shop. The golden flying cloud gets an effect that gives 4 points to all land exploration stats. Finally, each archaeologist in your main fleet gives 0.3 points to combat. I have three of them in my fleet, which adds up to 0.9. In case you want to know which three I use, they are Joseph Eastman, Vasco Nunez de Balboa, and Alvaro de Mendana.


Ничего не понятно, но жутко интересно? Тут несколько ответов на твои вопросы. Несколько неочевидных вещей Если вы собрались в это поиграть, то вот вам несколько советов. - На старте выбирайте американский сервер. На Азии все имена/названия гильдий будут в иероглифах и Корея захватившая большую часть портов. - Выбирайте ПвЕ. Тогда вы сможете играть, не запариваясь тем, что кто-то задонатил и имеет преимущество. - Когда вы в море, время от времени будут происходить случайные неприятности, типа нашествия крыс, ураган или типа того. Чтоб нейтрализовать эти события, вам нужны будут предметы из раздела Tool. Типа крысиного яда и прочих. Они в листе покупок будут идти первыми. Закупайтесь ими, они должны быть в достатке всегда, благо места никакого не занимают. Чтобы не было необходимости кликать каждый раз руками при наступлении такого события. а так же оно не вредило, если вы плывете АФК, вам нужно, чтоб на ФЛАГМАНСКОМ корабле была кабина Aide's cabine и в ней кто-то сидел. Тогда у вас при наступлении этих событий все будет прожиматься само. - Состав кабин в корабле можно поменять. Для тех кораблей, которые у вас открыты к постройке. Для этого заходим в любом порту в Shipyard/Blueprint, там находим кнопку Change cabine. И там для каждого места, есть определенный список кабин доступных для этого места. Кабины меняются сразу для всех кораблей этого чертежа. - У всех кабин помимо бонусов которые они дают, есть важные характеристики. Сколько процентов своей экспертизы дает член экипажа посаженный в эту кабину. Зависит от ЦВЕТА кабины/члена экипажа. Например мачты не имею бонуса к цвету и член экипажа любого цвета будет давать там 80% от своей экспертизы(для С грейда кабины). А кабины, которые сами имеют цвет, например Training room - она красная, в ней синий/зеленый будет давать 50%, а красный 100%. Так что в цветные кабины стараемся сажать с совпадением цвета. - Вторая характеристика кабин, это сколько они дают опыта персонажам определенного цвета. ЛЮБОГО опыта. Т.е. если в красной кабине сидит красный персонаж, то весь опыт он будет получать на 100%. И торговый(зеленый) и исследовательский(синий) и боевой(красный). В большинстве бесцветных кабин весь опыт всем режется на 50%. - Прокачка корабля. Либо много строим и тогда качается уровень Blueprint. Либо много плаваем на этом корабле и растет понимание корабля. Но тут важно понимать, что опыт за плавание кораблю идет только если вы получили его больше 1000. Т.е. пока вы плаваете между рядом расположенными портами, корабль не качается. Нужно плавать на дальняк. И тут можно пользоваться фичей, если вы плаваете не АФК. Пополнить запасы можно не заходя в город. Просто подплыв к нему и выбрать Quick Resupply. Пополянтся и запасы и матросы. - Improved версии кораблей сразу имеют открытыми все кабины и у них чуть лучше рол статов, но они не получают опыта путешествий и стоят синих камней(если вы не в топ-гильдии, которая монополист в этом порту), помимо материалов и донорского корабля. - Trade points. Даются за торговлю, когда профит больше 1кк. Для каждого региона отдельный счетчик, по достижении 1000 вы получаете маленький приз. На начальном этапе не запариваемся, а потом разберетесь. Каждому городу, каждую неделю выдается свой набор товаров, за который вы получите бонус к Trade points, если при продаже товары будут отвечать следующим условиям. Посмотерть можно зайдя в Market и кликнуть кнопку Trade info. Например сейчас у меня Пекин получает 25% к Trade point если в проданном есть 100 гобеленов и 100 стали. Еще 30% дадут если там есть 200 товаров категории Fabric и 200 товаров категории Wares и еще 35% дадут если гобеленов будет 200 и стали тоже 200. Итого +90% к Trade point, если выполнили все три условия. Бывают удобные условия, бывают дрянные. Решаем заново, каждую неделю. когда условия меняются, выполнять их или наплевать и просто торговать. - Так же у каждого города есть постоянный список товаров которые он покупает с наценкой. Или не покупает вовсе. (например порты Арабской культуры не покупают алкоголь и все что со свининой). Или Санкт-Петербург покупает Ваниль с наценкой +100%. Или порты Индусов покупают коров +165%. Посмотреть это можно выбрав город на карте вкладка Trade/Preference. По вкладке Trade/Market можно посмотреть, какие товары город продает. - Торговые события. На карте постоянно есть города, отмеченные ярко желтым. Где определенные группы товаров покупают с хорошей наценкой. Например в городе чума и он покупает с хорошей наценкой Медицину/Текстиль/Сушеное-на-солнце. Соответственно если вы успеете им привезти товары этой категории, то вы наваритесь больше обычного. Акция ограничена по времени и бюджетом. Если туда понавезли уже на 50кк, то акция закрывается. Обычно закупить полные трюмы товара одного типа, займет очень много времени. И тут на помощь приходят деревни. - В деревнях можно обменять кучу обычных товаров, на что-то полезное. Например 3 Raisin (Изюм)+ 3 Pig(Свинья) меняется на 4 Bumbara Groundnut. Неведомая хрень, которая не продается в городах, но относится к лакшери. За 1 обмен можно получить 100 раз по 4 штуки. Количество обменов в день зависит от отношения к вам жителей деревни. При обмене отношение может улучшаться или ухудшаться, будьте внимательны. Позволяет быстро получить полный трюм однородного товара, чтоб отвести его по акции. Товары для обменов обычно не дефицитные и продаются в больших количествах. Чтоб увидеть деревни на карте нужно выбрать вкладку Explore. Вкладка же Port, отображает только порты. - Вкладка карты Route. Позволяет задать маршрут и отправится по нему. Если промежуточной точкой пути указан порт, то вы там пополните припасы и поплывете дальше. Если порт в конечной точке, вы туда зайдете. Но не стоит сразу так уж радоваться. Суточное ограничение 20 пополнений припасов. - Суэцкий и Панамский каналы. Чтобы открыть возможность ими пользоваться, нужно подплыть к ним с обоих сторон. Порт Саид и Суэц, для суэцкого. Портобело и Панама для панамского. Чтобы переправится по каналу нужно в одном из этих городов зайти в иммиграционный офис. Первый раз в день бесплатно, второй раз 1кк за корабль и еще 1.5кк за груз. А следующие разы в этот день за синие камни. - Где брать материалы для постройки кораблей? За выполнение дейликов дают универсальные материалы, открыв которые можно выбрать, что вам нужно доски/мачты/орудийные порты. За виклики дают универсальные чертежи. Так же, что то падает из пиратов. Какие-то крохи можно купить на черном рынке. (с 20-00 до 6-00, в Item Shop появляется вкладка blsck market). Но главным источником являются Treasure fleet. На карте отображается как сундук. Первый можно увидеть между Мальтой и Ливией. Он там постоянно, если вы его не убили. К/д по ощущениям не меньше часа. Если вы его убили на 3 звезды, вам дадут ресов на 1 корабль. Без чертежа и киля. Чтоб его убить вам нужны быстрые корабли, которые на карте ходят по 6 клеток. На каждом должен быть член экипажа со скилом Тарана на 3 клетки, потому что эти корабли будут от вас убегать, кроме одного. Чтоб получить 3 звезды нужно убить все 4 корабля, не дав им убежать. Если кто-то убежал ресов дадут меньше. Если враг пробегал 20 ходов и вы его не зажали и не убили и он не убежал, то вам поражение. Почему таран? Потому что пушки и рукопашный бой имею по ним точность 65%. Как быстро поменять состав флота? Читай дальше. - Вкладка Assign поможет вам сохранить/загрузить состав флота. Import это добавить туда текущий флот. Save сохранить. Apply загрузить выбранный пресет.

加入一个优秀的公会(例如CsdaIndia)会带来诸多好处,且没有任何弊端。 简介 公会成员可享受两类福利。一类适用于所有公会,即使你是公会中唯一的活跃玩家也能享有。另一类则适用于服务器排名靠前的公会。我将分章节分别介绍这两类福利。 在开始之前,我想说明的是,加入服务器排名靠前的公会比你想象的要容易。这并不像其他一些游戏中的 raid 公会那样,仅限于精英玩家或沉迷游戏的玩家。据我所知,在乌托邦服务器上,“Old Sailors”是唯一一个竞争激烈且只招收高等级玩家的公会。 所有公会 加入公会后,你可以访问公会菜单中的几个重要标签页。首先是公会贡献,你可以通过在游戏中进行各种常规活动来获取公会代币。无需执行特殊操作即可获得代币,贡献值来源于登录游戏、海战、贸易利润、陆地探索、投资、完成任务等。每天积累足够的贡献值后,你就可以点击领取公会代币,但这需要你已加入公会。 第二个重要的标签是贡献商店,这里是消耗公会代币的地方。你可以购买 crafting materials、训练书籍、船只蓝图和加速道具。这是获取 crafting materials 的主要途径,且仅对公会成员开放。 第三个重要的标签是制作,你可以在这里制作伙伴装备和船只部件。打造是获取船只特殊槽位船部件的主要来源(几乎是唯一来源)。打造允许你根据属性选择想要打造的物品,而非获得可能并不需要的随机物品。但只有加入公会才能进行打造。 第四个重要的标签是合成。它可以将10个B级船部件合并为1个A级,或将10个A级船部件合并为1个S级。伙伴装备也能进行同样的操作,不过其重要性要低得多。在你达到很高等级之前,合成是获取A级和S级船部件的主要来源,但同样仅在加入公会后可用。 顶级公会 在某个港口拥有最多投资点的公会将成为该港口的垄断公会。部分港口拥有特殊的高价值贸易商品,这些商品仅对垄断公会的成员开放。此外,垄断公会的成员还能在该港口购买更多数量的所有贸易商品。 更重要的是,港口可建造的任何船只都能升级为改进版本,但这仅限垄断公会的成员操作。改进型船只通常拥有略高的属性,更关键的是,它们总会额外增加一个船舱。而且,改进型船只一开始就拥有所有可用船舱,不受蓝图或理解等级的限制。因此,加入在多个港口拥有垄断权的公会是很有好处的,这样你就能建造改进型船只了。如果你的公会控制着一个能够建造特定类型船只的港口,那么这就足以让你升级该船只。此外,还有各种公会效果可以为所有公会成员永久解锁,不过这需要消耗大量的公会捐赠。例如,CsdaIndia 目前为所有公会成员(包括未来加入的成员)提供+2 舰队速度加成。 就我所知,至少在乌托邦服务器上,只有三个公会垄断了相当多的港口。这三个公会分别是 Old Sailors、CsdaIndia,以及一个因使用我无法输入的特殊字符集而无法在此转录名称的公会。其他一些公会控制着一到两个港口,这足够升级几种类型的船只,但不足以升级你想要的大多数船只。因此,加入那些控制大量港口的少数公会之一是很有用的。 如果你想加入顶尖公会,CsdaIndia有很多空位,我们甚至接受等级很低的玩家。我们仅限葡萄牙国籍,但你可以随时移民到任何你想去的国家,这不会影响完成任何海军上将编年史。

So you can obtain another red gem admiral and aren't sure which you want? If you read this guide, you still won't be sure, but you'll at least be more informed. Introduction This is the sort of guide that I really hate. Far too many people write guides saying, "Look at my haphazard build!" Or worse, "Please watch my YouTube video where I ramble on about my haphazard build!" No one cares about your build, just like no one outside of your league cares who is on your fantasy football team. And yet, a lot of players do get a red gem admiral voucher or enough red gems to buy an admiral and then ask which one to get. The canonical, correct answer to that question is, it depends on what you want from the admiral. But leaving it at that is unsatisfying, so I'd like to at least tell you what the various admirals offer. I make no effort at all in comparing adventuring admirals versus trade admirals versus combat admirals. Rather, I put them in separate sections and leave it at that. You should have some idea which of the three is most interesting to you. Within each section, however, I sort the admirals roughly from best to worst. This is pretty heavily a matter of opinion, and even various top end players will often have differing opinions. Different players have different biases about what matters, and that leads to differing opinions. So I'll tell you my own biases, which inform my own opinions. Some players use very different sets of mates for different activities. I don't do that, but use the same mates for nearly everything, only swapping out a few for salvage. This means I can have more SS-grade mates and higher fleet skill levels in a given loadout, but fewer mates specifically optimized for the activity that I'm doing. It also means that I regard far fewer mates as useful, as I only have room for 70 in my main fleet, rather than using well over 100 situationally as some other players do. I do all three of adventuring, trading, and combat. My fleet is probably most optimized for land exploration, so I favor mates with effects that increase your land exploration combat value, but it's hardly a pure land exploration fleet. I also value fishing. For trading, I highly value getting to a 100% negotiation success rate, and that means highly valuing mates with the "natural-born merchant" effect. I mostly ignore effects that benefit only one type of trade goods. Combat for me is mostly skirmish and running consecutive combat overnight, though I also do guild assault. My fleet is not at all optimized for assaults such as the stingray or the whale whose name gets censored here. For each admiral, I'll list five sections. First is who the admiral was in real life, at least if it was a real person. Second is what the admiral's chronicle is about. I regard plot points from early in a chronicle as not really being spoilers, though I will hide key plot points from later in a chronicle behind spoiler tags. I rate the chronicles on how good the story is, on a scale of one to five stars. Third is the benefit from using your admiral specifically as an admiral, which means the admiral's orders that are unavailable when you have a different admiral active. Fourth is the benefit from using your admiral as a mate, from stats, effects, and skills. Admirals have very high stats, and two primary stats as compared to one for other mates, so they often make good mates. This lists the admiral's primary stats, and the admiral will have a higher value in the first stat than the second. The final section for each admiral is any other mates associated with the admiral who I regard as good enough to use in my primary fleet. Most admirals have several associated mates that you cannot obtain without having the admiral. These mates are often useful because you can acquire contracts for them far more easily than high grade mates not associated with any admiral. I assume that you never buy admirals' memoirs. They are as expensive as buying another admiral, and usually far less valuable than actually getting another admiral. If you're willing to spend enough money for memoirs to be a serious consideration, then you're willing to spend enough to buy all of the admirals, so which ones to prioritize isn't really a consideration. Adventuring admirals As I see it, there are four adventuring admirals who are valuable and three that really aren't. You could put my top four in any order and I wouldn't argue that you're wrong. If you rank any of the other three as better than any of my top four, then I would argue that you're wrong. But I promised to sort them all, so here you go. People really don't buy adventuring admirals for the admiral's orders, so I'll skip that section for each admiral in this section. Zheng He Reality: Zheng He was a Ming admiral in the early 15th century. He sailed to southeast Asia, India, Arabia, and eastern Africa. He was sufficiently accomplished that his chronicle required much less embellishment than most others that are based on real people. Chronicle (****): Zheng He travels to southeast Asia, India, and eastern Africa. He is an adventuring admiral with a combat chronicle, as his chronicle includes many battles, especially against pirates. As a mate (nature, scouting): He gets some useful effects, including enchanted ability, skilled sail handling, and short rations lv 2. He also gets two good skills in area ram: quarreling and wild melee: poison lv 2. He also gets Chinese level 5. On net, he's an excellent mate that you should want in your primary fleet. Associated mates: Mei Ling is good enough to be useful. She's an S-grade biologist, so she gets beast hunting and has nature as her primary stat. Her skills and other effects aren't great, Ellizabeth Shirland Reality: Elizabeth Shirland was a real person, but she was probably never a pirate and the legends about her have little basis in reality. Chronicle (*): Elizabeth Shirland goes on an adventure with Olivia Mandeville seeking treasure left by John Mandeville, who is widely regarded as a fraud. The admiral is cruel, a con artist, and otherwise unlikable. That others are willing to go to great lengths to help her is bizarre and jarring. The chronicle tries to fit as many other red gem admirals into the story as possible, and many of the cameos just don't work for the story. Some parts are hard to follow, and I'm still not sure what happened in the ending. As a mate (aesthetics, nature): She gets a lot of very useful effects, including seize opportunity, pirate hunting, and pirate eradication. She also gets several salvage effects. This makes her a valuable mate to have. Associated mates: Olivia Mandeville is hugely valuable and belongs in your main fleet. She gets natural-born merchant, rare exploration, and deep-sea salvage technician lv 2. She also gets the skill area ram: quarreling lv 2. Nui Hoku Reality: As best as I can tell, Nui Hoku is a completely fictional character that the game developers made up. Chronicle (*****): Nui Hoku goes on an adventure with her friends Nani Mahina and La Ikaika. They discover ancient steles that Nani attempts to translate. Along the way, they meet all of the starter admirals, letting you see what they are doing after their own chronicles finish. Nani Mahina gets help from Ranajame to translate the steles, and discovers all seven to learn about some (fictional) ancient history of humanity. This is arguably the best story of any red gem admiral, and Elizabeth Shirland's chronicle obviously tries and fails to copy the formula. As a mate (scouting, nature): Nui Hoku gets some useful effects, with seize opportunity and skilled sail handling. She also gets two excellent skills in wild melee: poison and area artillery: quarreling. Associated mates: None worth using. Pilly Reis Reality: Pilly Reis was the perfect mate in Uncharted Waters: New Horizons. His name there was likely a mistranslation of Piri Reis, an Ottoman admiral and cartographer from the early 16th century. Chronicle (*****): Pilly Reis is the best admiral that the Ottoman Empire has. The sultan knows it and wants him to fight for the empire. But Pilly's uncle bequeathed him a mysterious map and Pilly wants to investigate. For a while, he tries to investigate on the side while still doing his job. After a while, he goes full YOLO, follows the map, and discovers paradise. But if he stays, he'll never be able to leave, so he returns home, then denies that he ever found it. As a mate (nature, aesthetics): Pilly has some valuable effects, including seize opportunity, enchanted ability, pirate eradication, skilled sail handling, and short rations. His combat skills are less useful, though. Associated mates: None worth using. Pietro Conti Reality: Pietro Conti is a fictional admiral from Uncharted Waters: New Horizons. He is the only admiral from that game not to be a starter admiral here. Chronicle (****): This follows the old console game story. Pietro is left with crushing debt inherited from his father, but wants to be an adventurer. Joao's mother offers to pay off his debt if he'll keep an eye on Joao as he sets off on his own adventure. Pietro agrees to the deal, but mostly ignores the terms and goes on his own adventure. He eventually pays off handsomely for the duchess when he finds Raul Franco, Joao's grandfather, and brings him back to Portugal. As a mate (aesthetics, nature): Pietro gets some useful effects, most notably beast hunting. Combined with his high stats, this at least makes him usable in your main fleet. Associated mates: None worth using. Hong Gildong Reality: Hong Gildong is a fictional character from a Korean novel written around the end of the 16th century. Chronicle (**): Hong Gildong's chronicle isn't really a bad story in itself. But it's really lore-breaking, far more so than even Iyolin's chronicle, which is explicitly a crossover with a different universe. Suddenly magic is real, and you need to find some magical gems to ward off ghost ships from a mythical paradise that is actually cursed. You'll need the help of a dragon who lives at the bottom of the ocean, but can bring you to meet him without drowning you. The story would fit much better in a high fantasy world like Azeroth or Tyria than here. As a mate (scouting aesthetics): Hong Gildong has bad stats, bad effects, and bad skills, making him basically useless. Associated mates: None worth using. Owning Hong Gildgong gets you access to Yuldo, a fictional island in the open Pacific. That's the main thing you get from buying him, other than some mates to ship off to your dispatch fleets. Much of his chronicle requires 100 momentum and 150 seaworthiness, so lower level players may be unable to complete it. Miranda Verte Reality: Miranda Verte is a fictional character from an Uncharted Waters game that never had an official English translation. Chronicle (***): Miranda happens to meet legendary adventurer Pietro Conti, and she mistakenly thinks that he asked her to marry him someday. So she sets out on an adventure to find him. At first, she is completely incompetent, but she learns fast. When she finally finds Pietro, she is devastated to learn that he doesn't remember her. But she helps some Incas who were invaded by Spanish conquistadors and eventually Pietro asks her to marry him for real. As a mate (scouting, aesthetics): Miranda does get somewhat useful effects, including rare exploration and skilled sail handling. But they're not useful enough to make up for bad stats and make her worthwhile in a main fleet. Associated mates: None worth using. If you buy Miranda's memoir, she gets an item to equip that gives you +3 to all land exploration stats. That is valuable, and if you buy memoirs, she belongs significantly higher on this list. But without that, all you get is some mates to ship off to dispatch, and my rankings assume no memoirs. Trade admirals All red gem trade admirals except William Adams get an admiral's order that gives +8.5% overcharge to each of three types of goods. This is a larger overcharge than Ali's 7.5%, but it only affects three types of goods, while Ali's skill affects all trade goods. No admiral currently in the game gives overcharge specifically to ores or metals. All of the trade admirals bring significant value for buying them. In most cases, the admiral himself is useful. Kim Mandeok is the glaring exception, but she has some associated mates who are valuable. Imai Saki Reality: As best as I can tell, Imai Saki is a completely fictional character that the game developers made up. Chronicle (****): Saki's father wants her to get married. She wants to sailing around as a merchant. They cut a deal in which her father agrees to allow her to try her hand as a merchant, but if she fails, she has to give up on her dream and get married. Her friend Fuukichi believes in her, so Saki sets out to try her luck as a merchant. Her father eventually comes around when Saki is successful enough to attract the attention of Oda Nobunaga. It takes her brother much longer to accept that she is a skilled merchant, but he eventually does. As an admiral: Saki has an admiral's order that gives +8.5% overcharge to crafts, livestock, and fabrics. She also gets one with +15% overcharge to any type of goods, but only if negotiation is successful. The latter is the primary reason why she is regarded as the game's best trade admiral. As a mate (negotiation, trade): Saki has substantial value due to wondrous ability and area ram: quarreling. Her stats are also excellent. Associated mates: Shiomi Fuukichi is very valuable, with effects of natural-born merchant, short rations, and seasoned sail handling. William Adams Reality: William Adams was an Englishman who sailed to Japan in 1600. He was an advisor to the Japanese shogun Tokugawa Ieyasu in the early 17th century. Chronicle (*****): William Adams starts out shipwrecked in Japan. He gets some help from Yasuemon, then eventually makes himself valuable to Tokugawa Ieyasu. William wants to return to England to see his wife Mary, but Ieyasu regards him as too valuable and won't let him leave. Eventually Ieyasu relents, allowing William to return to England and be reunited with his wife. In real-life, when Ieyasu finally allowed William to leave, he chose not to. As an admiral: None of the admiral's orders that William gets are all that useful. In particular, he does not get an overcharge order like most admirals. As a mate (sales, negotiation): William Adams is an excellent mate, with seize opportunity, enchanted ability, and gifted merchant. Associated mates: Umino Stella is very valuable, as an S-grade negotiator with a high negotiation stat. She also gets techniques of bargaining and expert overcharger lv 2. Kim Mandeok Reality: Kim Mandeok was born poor, but became a wealthy business woman on Jeju Island in the late 18th century. She was known for philanthropy, importing rice to feed the poor during a famine. Chronicle (*): The developers tried way too hard to make this chronicle awesome, and instead made it completely incoherent. There are gaping plot holes in which various characters behave bizarrely. This is also the chronicle that gave shopping list chronicle steps a bad name, as several steps are rather painful to do unless you're willing to burn a lot of blue gems to refresh the market. As an admiral: Mandeok has an admiral's order that gives +8.5% overcharge to dyes, sundries, and liquor. As a mate (sales, purchasing): Once you finish Mandeok's chronicle, ship her off to dispatch and don't look back. She has bad stats, bad effects, and bad skills. You buy Mandeok for her associated mates, not for the admiral herself. Associated mates: Kim Hongdo is an excellent mate, wtih natural-born merchant, dedicated explorer, and angler, as well as a high nature value. Louis Antoine de Bougainville is also a useful mate, with natural-born merchant, seasoned sail handling, and short rations. Leon Franco Reality: Leon Franco is a fictional character from the old console games. He is the father of Joao Franco, one of the starting admirals. Chronicle (****): Leon's father took out enormous loans to fund an expedition that would make him rich. The expedition never returned, leaving Leon with mountains of debt and no father. He tries his best to pay off the loans while also going out searching for his father. He sees Princess Kristina and is smitten with her, even though she is way out of his league. Then the princess gets kidnapped. Leon eventually rescues her, then they are married. As an admiral: Leon has an admiral's order that gives +8.5% overcharge to weapons, seasoning, and luxuries. As a mate (sales, purchasing): Leon does not get good effects or skills. He does get Portuguese level 5, however. Associated mates: Aljeuna is an excellent mate, in spite of being C-grade. In addition to having nature as his primary stat, he gets beast hunting, beast extermination, and deep sea salvage expert. Chand Bibi Reality: Chand Bibi was the regent of Bijapur and later Ahmednagar in the late 16th century while the designated sultans were too young to govern properly. Both sultanates are in western India. She doesn't seem to have ever gone to sea or left India at all. Chronicle (***): Chand Bibi wants to be a general like her brothers. Her father wishes to marry her off in a royal marriage to secure an alliance with a neighboring nation. So she runs away with a Portuguese sailor. They meet Aai Mata, who has a terrifying vision of a fiery future. Chand Bibi ends up being the trade admiral with a combat chronicle. There is a scramble to get control of Roman fire, which is some super weapon that causes an unquenchable fire. Eventually, she saves the world with the help of a lot of pepper spray. As an admiral: Chand Bibi has an admiral's order that gives +8.5% overcharge to food, artwork, and spices. As a mate (negotiation, sales): Chand Bibi has excellent stats, but nothing else particularly notable. Associated mates: None worth using. Date Masamune Reality: Date Masamune was a daimyo from eastern Japan in the early 17th century, where he was an ally of Tokugawa Ieyasu. He funded a voyage to Europe, but doesn't seem to have ever personally left Japan. Chronicle (**): Masamune is a daimyo from Sendai in eastern Japan. He is nominally allied with the shogun Tokugawa Ieyasu. He sets out to become a wealthy trader and make Japan into a wealthy trading nation. He is also completely insane and reckless, with his subordinates often having to rein him in. Ieyasu eventually decrees that agriculture, not trade, is the basis of a stable nation. He orders Masamune to return to Sendai, and all his trade contacts are for naught. As an admiral: Masamune has an admiral's order that gives +8.5% overcharge to firearms, wares, and medicine. As a mate (purchasing, negotiation): Masamune's main value comes from having Japanese language level 5. Associated mates: None worth using. Combat admirals (part 1) Combat admirals are, as you might guess, the best at combat. I have ignored the admiral's orders of non-combat admirals because if what you care about is combat, then combat admirals get better ones. Anne Bonny Reality: Anne Bonny was a real woman who became a pirate in the early 18th century. She wasn't very good at it and died quickly. Then some English man wrote a book about her and Mary Read that was basically fan fiction, which made them famous. Chronicle (***): Anne Bonny is a pirate who is reckless to the extent of having a deathwish. She goes on an adventure with John Rackham, who is a coward and wants to back out of everything, and Mary Read, who is more balanced. Anne finds a treasure map that she is convinced is real and wants to find the treasure. They go all over the world chasing clues before finally finding the treasure at the Galapagos Islands. Anne is excited, but the treasure is worth a lot less than you could get from a mundane trade run. As an admiral: Anne gets some melee orders, but nothing that important. As a mate (melee, artillery): Anne gets a bunch of melee skills and effects. Wild melee: poison is nice, but apart from that, nothing special. Associated mates: Jeanne Baret is one of the best mates in the game and the primary reason why I put Anne as #1 here. In addition to having nature as her primary stat, she gets natural-born merchant, beast hunting, additional durability increase, combative explorer, and celestial sea treasure hunter. Sayyida al Hurra Reality: Sayyida al-Hurra was a pirate and governor of Tetouan (in modern Morocco) in the early 16th century. She sought revenge for having been expelled from Granada by Spain. Chronicle (***): Sayyida initially has to deal with some pirates in her territory. Then she hears that Espana is planning a major invasion and takes many measures to try to head it off or weaken the invaders before they come. As an admiral: Sayyida gets unity for revenge, which is the best admiral's order in the game for healing and damage reduction. She also gets fatal, which is very good for increasing damage dealt. Many top players would make Sayyida the top combat admiral. I don't because battles where healing or damage reduction matter are pretty rare. As a mate (support, melee): Sayyida gets a bunch of support effects, most importantly create opportunity. She also gets cleanse: battle formation, which is usually useless, but very important in certain situations. Associated mates: None worth using Qi Jiguang Reality: Qi Jiguang was a Ming admiral in the mid-16th century. He fought pirates and wrote two books on military strategy. Chronicle (****): The Ming Empire has an enormous problem with corruption. Jiguang tries to fight off pirates with force while simultaneously fending off corrupt bureaucrats who care nothing about the harm that the pirates do. Eventually, he discovers that Dara Sheen is hiring the pirates to go attack so that he can swoop in with relief supplies shortly thereafter and take credit for helping the people, thus convincing authorities to open up trade with him. As an admiral: I haven't used his admiral's orders, but neither have I heard other players saying that they're anything special. So he probably isn't worth much here. As a mate (artillery, melee): Jiguang has some nice stats and area artillery: quarreling. Associated mates: Qin Liangyu is valuable, with melee as her primary stat, as well as great confusion melee and additional melee on melee effects. Her skills of enhanced melee: damage rudder and wild melee: poison are also excellent. Grace O'Malley Reality: Grace O'Malley was the head of a dynasty in western Ireland in the late 16th century. She fought with England, and while she was a seafarer, it isn't clear whether she was ever really a pirate. Chronicle (*****): Grace's country needs her to go to sea and fight. Her children need her to stay with them in Dublin. But she has to go fight, and so she does. Then her children get kidnapped and she has to travel all over the world to find and rescue them. As an admiral: Fleet Charge makes Grace the best admiral in the game for battles that focus on ramming attacks. It's not just that obvious, powerful effects of the order. Using only 50 morale means that she can use it at the very start rather than waiting for it to charge, and then critical hits recharging morale allow her to keep it up all battle long. This is tremendously useful for assaults where ramming is the preferred attack type, such as the ghost ship guild assault. As a mate (ramming, artillery): Grace has seize opportunity and area ram: quarreling, both of which are valuable. Associated mates: None worth using. Zheng Chenggong Reality: Zheng Chenggong was a Ming general who tried to preserve the Ming dynasty as they were conquered by the Qing in the mid-17th century. He ultimately failed and fled to Taiwan. Chronicle (*****): Chenggong doesn't realize that his father, Zheng Zhilong, is corrupt and will do whatever it takes to get ahead, including bribery and piracy. Rather, Chenggong believes in doing what is right. The Ming Empire is facing a Qing invasion. Things look bleak for Ming, so all of the corrupt officials who are in it only for themselves defect to Qing, including Zhilong. Chenggong fights onward in a doomed effort to save the Ming Empire. As an admiral: Chenggong's admiral's orders aren't particularly interesting. As a mate (melee, ramming): Confusion melee and nullify melee damage are nice effects. Meanwhile, enhanced melee: damage rudder and wild melee: poison are excellent skills to have. Associated mates: None worth using. Rozalia Polhem Reality: Rozalia is a possibly fictional character who was supposedly the aunt of Swedish inventor Christopher Polhem. Chronicle (**): Rozalia's father manages a shipyard, but goes on a voyage to North America and never returns. That leaves Rozalia to run the shipyard together with the genius engineer Pia Frode and the tough guy Sven Gustafson, which will cost you quite a lot of ducats. Gustav II Adolf, the king of Sweden, commissions a magnificent new ship that capsizes shortly after its launch, which creates an opening for Rozalia's shipyard to build a replacement, the "Prototype Ship of the Line". As an admiral: Rozalia gets some useful heals among her admiral's orders. As a mate (support, artillery): Rozalia has create opportunity, which is pretty valuable on its own, but nothing else important. Associated mates: None worth using. Combat admirals (part 2) (The combat admirals section had to be split because Steam caps the maximum length of guide sections.) Maribel Reality: Maribel is a completely fictional character invented by the game's developers. Chronicle (***): Maribel is a pirate who is more interested in having fun than in getting rich. She quits working for Edward Teach to set out on her own, then goes hunting for treasure. She eventually learns to think of her loyal subordinates as family. As an admiral: Nothing important As a mate (artillery, ramming): Maribel has nice stats and a bunch of artillery effects. Area artillery: quarreling is nice, but she's perhaps useful in a primary fleet, but hardly special. Associated mates: None worth using. Yi Sun-sin Reality: Yi Sun-sin was a Joseon admiral who fought off the Japanese invasion of Korea in the late 16th century. Chronicle: Yi Sun-sin does not have a chronicle. As an admiral: Nothing special, and I've never heard of anyone using him as an admiral. As a mate (artillery, melee): The key benefit of Yi Sun-Sin is Korean language level 5. Apart from that, he has nice stats, but nothing else of value. Associated mates: There are no mates associated with Yi Sun-sin. Salvador Leis Reality: Salvador Leis is a fictional character from an Uncharted Waters game that never had an official English translation. Chronicle (****): Salvador is the son of the leader of the Algiers pirates, but his mother is dead. He has to work his way up within the organization rather than just having everything handed to him via nepotism. The Algiers pirates fight a long war against Mahomet Sirocco, who betrayed them. Then Salvador has to fight against his fellow pirates after they get control of a "guardian stone", which is way too powerful. As an admiral: Nothing particularly important. As a mate (melee, ramming): Salvador has nice stats, as well as Great Confusion Melee. That's enough to justify using him in your primary fleet, but it's not great. Associated mates: None worth using. Iyolin Pandragon Reality: Iyolin Pandragon is a fictional character from the Korean game The War of Genesis. Chronicle (***): Iyolin somehow ended up on Earth instead of the world that she is from, along with some of her friends. She has to work to figure out how to get home. Her chronicle starts shortly before the starter admirals' chronicles start and is basically an alternate history version of how her sudden appearance would have changed things for the other admirals. It's not as lore-breaking as I expected from an explicit crossover with another universe, but there are some things that notably contradict canon, such as Paula suddenly having a surname. As an admiral: Iyolin has some powerful offensive admiral's orders. They're situational, however, and the inability to get her contracts in an inn makes her very expensive to make usable. As a mate (melee, ramming): Iyolin has good base stats, as well as enhanced melee: damage rudder and wild melee: poison lv 2. The problem is that you can't get contracts for her in inns, which will necessarily leave her weak unless you use a bunch of common contracts on her. She's not the sort of top tier mate who justifies using S-grade common contracts, which means she's pretty useless. Associated mates: There are no mates associated with Iyolin. There kind of were when her event ran, but they were gacha-only and completely unobtainable now.

What you need to know in order to build the ships you want. List of ships There are many ships in the game. You can find out a lot of details about most of the ships from the blueprints section. I've copied some data from there into the table below for ease of reference. I'm ignoring the special ships in this guide, but do cover both eastern and western ships. Additionally, the captain's cabin of every ship provides a large bonus to some stat that varies by ship. All ships give a 10% bonus to your supply stat, plus a numerical bonus to some other stat. Some on which stat a ship gives bonuses to is take from the Korean wiki, which seems to stop at grade 20. I got some higher grade ship information from Maurice and MWest. shipranksidefieldcombatbonusvalTallette1westtraderamPurchasing900Barque1westadvenartilleryNature900Hansa Cog1westcombatmeleeMelee900Budgerow1eastadvensupportSupply900Brigantine2westcombatmeleeMelee1300Cog Redonda2westtraderamPurchasing1200Cog Latina2westtradeartillerySales1200Light Proa2eastadvensupportNature1200Caravel Latina3westtradeartillerySales1400Caravel Redonda3westtraderamPurchasing1400Light Galley3westcombatmeleeMelee1400Kohaya3eastcombatmeleeMelee1400Sloop4westadvensupportSupply1500Felucca4westtraderamSales1500La Pinta4westcombatmeleeMelee1600Sampan4easttradesupportPurchasing1500Cutter5westcombatmeleeMelee1800Pinnace5westcombatramRamming1800Fluyt5westcombatramRamming1800Proa5eastadvensupportNature1700Zouge5eastcombatramRamming1800Nao6westtraderamSales1900Galley6westcombatmeleeMelee2000Sambuk6westadvensupportSupply1900Dhow6eastadvensupportAesthetics1900Maengseon6eastcombatartilleryArtillery2000Schooner7westadvensupportNature2000Heavy Galley7westcombatmeleeMelee2100Heavy Caravel7westtraderamPurchasing2000Tanjaq7eastcombatmeleeMelee2100Light Sha-chuan7eastcombatramRamming2100Carrack8westtradeartillerySales2200Xebec8westadvenramNature2200Frigate8westcombatartilleryArtillery2300Karakoa8eastcombatmeleeMelee2300Joseon Charging Ship8eastcombatramRamming2300Buss9westtradeartilleryPurchasing2300Galleon9westcombatartilleryArtillery2500Victoria9westadvensupportNature2300Fu Ship9easttrademeleeSales2300Jounseon9eastcombatramRamming2500Ottoman Galley10westcombatmeleeMelee2700De Sperwer10westtradesupportPurchasing2500Mayflower10westtradeartillerySales2500Sha-chuan10eastcombatramRamming2700Sekifune10eastcombatmeleeMelee2700Corvette11westcombatramRamming2800Esmeralda11westadvenartilleryNature2700Roman Galley11westcombatmeleeMelee2700Byungseon11eastcombatmeleeMelee2800Tuham11eastcombatmeleeMelee2800Flanders Galley12westcombatmeleeMelee3000Santa Maria12westadvensupportNature2800Saint Gabriel12westadvensupportAesthetics2800Hainan Ship12easttradesupportPurchasing2800Flatbed Ship12eastcombatartilleryArtillery3000 List of ships (continued) shipranksidefieldcombatbonusvalLa Reale13westcombatmeleeMelee3200Heavy Carrack13westtradeartillerySales3000Large Schooner13westadvensupportNature3000Red Seal Ship13eastadvensupportAesthetics3000Nujeon Ship13eastcombatramRamming3200Large Galleon14westcombatartilleryArtillery3400Santa Catarina14westtradesupportSales3100Prins Willem14westcombatmeleeMelee3400Lorcha14eastadvensupportNature3100Araki Ship14easttradesupportPurchasing3100Galleass15westcombatmeleeMelee3500Quebec15westadvensupportNature3300Razee Frigate15westcombatartilleryArtillery3500Large Sekifune15eastcombatmeleeMelee3300Dan15easttradesupportSales3300Large Frigate16westcombatartilleryArtillery3700Golden Hind16westcombatartilleryArtillery3700Bermuda Sloop16westadvensupportSupply3400Junk16easttradesupportTrade3400Higaki-Kaisen16easttradesupportSales3400Long Schooner17westadvensupportSupply3600Neapolitan Galleass17westcombatmeleeMelee3900Nordic Galleon17westcombatartilleryArtillery3600Atakebune17eastcombatmeleeMelee3900Bay Junk17easttradesupportSales3900Flemish Galleon18westcombatartilleryArtillery4200Halve Maen18westtradesupportSales3900Beagle18westcombatmeleeMelee4200Large Sha-chuan18eastcombatramRamming4200Ghanjah Dhow18eastadvensupportSupply3900Norske Love19westcombatramRamming4500Adventure Galley19westcombatmeleeMelee4500Bounty19westcombatartilleryArtillery4500Large Jounseon19easttradesupportSales4200San Buenaventura19eastadvensupportSupply4200La Royale20westcombatmeleeMelee4800Ship of the Line20westcombatartilleryArtillery4800Clipper20westtradesupportTrade4500Sagyeonseon20eastadvensupportSupply4500Large Joseon Charging Ship20eastccombatrammingRam4800Ottoman Galleon21westcombatmeleeMelee5100Neptuno21westcombatartilleryArtillery5100Surprise21westcombatrammingRam5100Dragonhead Ship21eastadvensupportNature4800Treasure Ship21easttradesupportTrade4800Temeraire22westcombatartilleryArtillery5400Endeavor22westadvensupportTrade5100Flying Cloud22westtradesupportNature5100Tetsukabutosen22eastcombatmeleeMelee5400Louchuan22eastcombatrammingRam5400 It was necessary to split the table because Steam caps the length of a single section. Combat ships always give a bonus to their combat type. A Sagyeonseon or Dragonhead Ship also gives land exploration bonuses of +2 combat, +2 observe, and +1 gather. Ship grade data Here's a table of level requirements by ship grade. I've have listed the amount of experience that you gain from building a ship. You gain this much per ship, until the ship blueprint level reaches 20. At that point, experience per ship drops to 10% of the original. You gain double experience the first time you build a particular type of ship. Once you gain enough experience, your shipbuilding gains a level. For each level, I have listed the amount of experience needed to move to the next level. Your shipbuilding level is tracked separately for eastern and western ships. Finally, I have listed the time required to build each ship, in minutes. If your shipbuilding level is at least as high as the grade of the ship that you want to build, the time to build the ship is cut in half. If you don't meet the level requirement, then you can still build the ship, but it just takes longer. gradeexperlevel upminutes115301023011040360150804120230147518015002506250225035074504500490850056307009750900090010800105001200111300175001400122000268002000132600374002400143600525002650154800720002980166100940003660178000125000411018106001740006480191360023000068402017200300000702021221003950007020225100007020 Materials Building a ship requires materials, blueprints, and either ducats or blue gems. You must also be at a shipyard that can build the particular type of ship that you want. The blueprints section has a map pin marker that will show you the locations where each ship can be built, so I won't replicate that here. It takes 10 blueprints to build an unimproved ship, which can be either 10 blueprints for the exact ship type or 10 common blueprints for the ship size. The exact materials depend on the ship grade. I list the materials required for unimproved ships below. You can see how improved ships differ in their own section. Here, every ship requires exactly one keel. In the table below, the wood, mast, and gun columns are the numbers of parts. The wood type and gun type columns say exactly which parts. Mast types always match wood types. I exclude "Wood", "Wood Mast", and "Gun Port" from the names to save space. gradekeelwoodmastgunwood typegun type1small3000cedarnone2small804020cedartraining3small402010sprucesmall4small1407030sprucesmall5medium603010pinemedium6medium704020pinemedium7medium703020alderimproved medium8medium804020alderimproved medium9medium804020beechenhanced medium10medium904020beechenhanced medium11medium804020rosewoodspecial enhanced medium12medium1608040rosewoodspecial enhanced medium13large1005025teaklarge14large1206030walnutimproved large15large1206030ebonyenhanced large16large1206030enhanced cedarspecial large17large1206030enhanced sprucespecial improved large18large1206030enhanced pinespecial enhanced large19large1206030enhanced alderimproved enhanced large20massive1206030enhanced beechenhanced beech21massive1206030enhanced rosewoodenhanced rosewood22massive1206030enhanced teakenhanced teak Ship materials and blueprints come from mostly the same sources. Sometimes they come as exact materials or blueprints for a particular type of ship. Other times they come as vouchers that can be exchanged for any materials of a particular type (e.g., masts) or blueprints up to some particular grade. For blueprint vouchers of high grades, they offer common small or common medium blueprints to cover the lower grades. I summarize the sources of ship materials and blueprints below, as well as what they give you. "Exact" means you get exact parts, such as teak wood. "Vouchers" means you get vouchers that let you pick which parts or blueprints. "Mixed" means some of each, most commonly a combination of blueprint vouchers or common blueprints together with exact ship materials. Keels always come as exact parts, not vouchers. Not all sources of materials release at the same time. I list a delay column to say when they tend to release. A value of 0 means that you can obtain materials for a ship the day that the ship launches. A value of 1 means that they will first become available for one grade when the next higher grade launches. 0.5 is somewhere in between, as they won't be available when the ship first launches, but they will be available before the next higher grade releases. Similarly, 1.5. means that they won't be available when the next higher grade launches, but they will before two grades higher. SourceTypeDelayShip combatexact0Land explorationexact0Login eventsmixed0.5Competitionsvouchers0.5Dailies/weekliesvouchers1Shipyardsmixed1.5Black marketsexact1.5Palace rewardmixed1.5Attendanceexact1.5Dispatchexact2+Guild contribution storemixedforever Materials (continued) Normal ship combat gives small amounts of materials that depend on where you do the combat. Higher level areas give higher grade ship materials. The white elites that spawn for an hour once every six hours give far more ship materials, but are far stronger enemies. White elites in the top end areas are the main source of materials for ships just after they launch, making the ships generally exclusive to the top end combat players at first. Land exploration also gives small amounts of materials. The grade of materials depends on where you do the land exploration, with higher level areas giving higher grade materials. Materials for the top grade of ship will generally be exclusive to the highest end land exploration zones, which makes them pretty exclusive at first, though this source is also available to high end adventurers who are weak at combat. Login events and competitions are more sporadic, but generally available to everyone, including lower level players who are active. You don't have to win the competitions to get rewards, but just have a modest amount of participation. Dailies and weeklies give vouchers for any grade of materials or blueprints up to the lower of either your highest shipbuilding skill (out of western and eastern) or one less than the highest grade of ship that has launched. Dailies give ship materials proper, while weeklies give blueprints. This is the main source of materials for relatively high end ships, but not quite the top end. Shipyards sell unlimited quantities of materials for small ships, including keels, which is the main source of materials for small ships. Above that, there are several cities for each grade, which vary by grade. These sell a limited quantity of materials per week, and it requires some investment in the port to get access to them. This is enough of a nuisance that I only bother buying materials from shipyards for small ships. Members of the monopolizing guild in every capital city can buy three large common blueprints per week. This is only available in capital cities, but if the same guild monopolizes multiple capitals, they can buy three large common blueprints in each capital where they have a monopoly. Black markets at item malls sell particular materials or blueprints only sporadically. Each grade is in the possible loot table for the black market in several cities. This is a significant source of materials for medium ships, but for large ships, they are expensive and require investment in the port, so I advise against relying on black markets as a source of materials for large ships. Palace rewards cost contribution, and most require a minimum admiral rank. Materials for large ships are expensive, so I recommend using your contribution for medium ship components or for large common blueprints instead. This is useful as a way to mass produce medium ships for collections. Attendance rewards and dispatch rewards tend to trail well behind the cutting edge in grade. Attendance rewards don't depend on your own level, so they can be useful for new players to get some higher grade ship components. Take what you get from dispatch rewards, but don't try to turn them into a major source of ship materials. Guild contribution only gives you vouchers for medium grade ship materials and common blueprints. The large common blueprints are useful, but the ship materials are really only useful as a way to build more medium ships to level shipbuilding or complete collections. Materials (old version) This section is deprecated, but still has some data that I want to copy to the new versions above. Once I copy the data, I'll delete this section. Building a ship requires materials, blueprints, and ducats. You must also be at a shipyard that can build the particular type of ship that you want. The blueprints section has a map pin marker that will show you the locations where each ship can be built, so I won't replicate that here. It takes 10 blueprints to build a ship, but I don't focus on how to get them here. I will, however, list the materials required to build each ship. The materials always require one keel, as well as some wood, masts, and gun ports, with only the exception that grade 1 ships skip the masts and gun ports. I'll list the quantities first, then come back to what the materials are and how to get them. gradekeelwoodmastgun1small30002small8040203small4020104small14070305medium6030106medium7040207medium7030208medium8040209medium80402010medium90402011medium80402012medium160804013large100502514large120603015large120603016large120603017large120603018large120603019large120603020massive1206030 The materials required vary by ship. For grades 1-4, that is, the small ships, the materials are purchasable in unlimited quantities and in many shipyards. Furthermore, you can buy the blueprints for those ships in unlimited quantities in any shipyard that can build them. For this reason, when trying to level your shipbuilding level, it's usually best to max your blueprint level in all ships of grades 1-4, at least apart from the golden ships for which you can't buy the blueprints. Grades 1-2 require cedar wood, cedar wood masts, and training gun ports. Grades 3-4 require spruce wood, spruce wood masts, and small gun ports. Materials for most higher grade ships can be purchased in various ports. It generally requires some amount of investment in order to unlock the ability to purchase the parts. Even one the investment is done, you can only purchase a limited amount of each material per port per week. Besides the keel, the other three materials for a given ship grade can be purchased in the same ports. For each set of materials, I'll give a table with the required investment to unlock a part (in millions of ducats), the price per item to buy it once it is unlocked, and the quantity that you can buy per week. I'll also list the ports where you can buy the items. I know the English names for all ports in Europe or northern Africa, but Google translate botches names of some others, so there is some uncertainty for some of the ports. First of all, the medium keels require military investment rank 2 in order to purchase. Once that is done, they cost 1.24 million ducats each, and can be purchased in London, Amsterdam, Lisboa, Seville, Constantinople, Abidjan, and Santo Domingo. That is, all of the starting capital cities, plus two other ports. Grades 5-6 require pine wood, pine masts, and medium gun ports. These are available in London, Amsterdam, Lisboa, Seville, Constantinople, Candia, Bremen, Ceuta, Edinburgh, Casablanca, Abidjan, Luanda, Santo Domingo, and Port Royal. woodmastguninvestment0.511.5price112142quantity30155 Grades 7-8 require alder wood, alder wood masts, and improved medium gun ports. These are available in Syracuse, Bergen, Timbuktu, Rio de Janiero, Buenos Aires, Mozambique, Massawa, Baghdad, and Kozhikode. woodmastguninvestment123price204080quantity402010 Grades 9-10 require beech wood, beech wood masts, and enhanced medium gun ports. These are available in Copenhagen, Beirut, Cape Town, Valparaiso, Lima, Suez, Malacca, and Jayakarta. Gun ports require military investment level 4 in the port to unlock rather than personal investment. woodmastguninvestment810*price4284168quantity20105 Grades 11-12 require rosewood, rosewood masts, and special enhanced medium gun ports. These are available in Venice, Nassau, Porlamar, Merida, Copiapo, Tumbes, Kolkata, Pasay, Palembang, and Manila. Gun ports require military investment level 7 in the port to unlock rather than personal investment. woodmastguninvestment3040*price76152304quantity20105 Grade 13 requires teak wood, teak wood masts, and large gun ports. These are available in Lubeck, Marseille, Trujillo, Banjarmasin, Pangkal Pinang, Ushuaia, Natal, Cohasset, and Pondicherry. woodmastguninvestment80100120price3647271453quantity1684 Grade 14 requires walnut wood, walnut wood masts, and improved large gun ports. These are available in Kokkola, Veracruz, Panama, Hanoi, Okinawa, Ceuta, Nantes, Timbuktu, Karibib, and Jeddah. The port name for Okinawa is likely wrong, but it's something on that island. woodmastguninvestment180210240price3987961591quantity1263 Grade 15 requires ebony wood, ebony wood masts, and enhanced large gun ports. These are available in Hobe, Baghdad, Pinjarra, Ohlone, and Southside. woodmastguninvestment280320360price???quantity1263 You can also buy 1 large keel per week in Southside. It requires admiral level 8. Grade 16 ships require enhanced cedar wood, enhanced cedar wood masts, and special large gun ports. Grade 17 ships require enhanced spruce wood, enhanced spruce wood masts, and special improved large gun ports. These don't yet seem to be available to buy anywhere in the game. Cabins Every ship has several cabins. All ships have a captain's cabin, as discussed earlier. In addition to that, there are five different types of cabins. For lack of an in-game name, I'll call them A, B, C, D, and E. Types A, B, and C allow you to assign a mate to the cabin, in addition to giving some stat bonuses. Types D and E only give stat bonuses, but do not allow you to assign any mate. There are two major benefits to assigning mates to cabins. One is that it makes the mate active so that he'll gain experience from the various things that cause you to gain experience as you play the game. The other is that it adds the mate's personal stats to the ship stats, as well as making his skills available to the ship. For adventuring and trade stats and skills, this generally makes them available to the entire fleet. Combat stats and skills are specific to the ship. All assignable cabins have some stat rates for adventuring, trade, and combat mates. A mate's stat contribution is multiplied by the stat rate for the mate's type. You usually want to switch cabins from the default to something that gives 100% for some type of mate, and then assign that type of mate to the cabin. It's important to understand that the rate is by type of mate, not by skill. For example, a medium rowing cabin is rated at 100% adventuring, 50% trade, 50% combat. An adventuring mate will apply his full stats of all types, including trade and combat, to the ship. A trade mate will only provide 50% of his stats to the ship, even adventuring. Thus, for this type of cabin, an adventuring mate is likely to contribute higher trade stats than a trade mate of the same grade. Some cabins are available from the start, while others are available only after you increase your blueprint or understanding level for a ship far enough. I list cabins available from the start as A, B, C, D, or E, and then those that require higher blueprint or understanding level as B+, C+, D+, and E+. The number of cabins per ship, by ship grade: gradeABB+CC+DD+EE+12002002012201201101320120110142012011015210301210621021121072103012108210211210921030121010210211210112102112101221021121013-1922021211120+220312111 As you can see, the number of cabins tends to increase as the ship size does. However, grades 5, 7, and 9 have more assignable cabins at blueprint and understanding level 1 than the other medium ships do. Grade 11 does not do this. But this does mean that you might not want to be in a hurry to upgrade by a single grade and lose an assignable cabin. Type B and C cabins have the same options regardless of ship grade, at least up to grade 8. The other cabin types of different options depending on whether you have a small or medium ship. They're analogous options, but the medium ship options give higher stats. You can change the cabins from among various options for each type. Changing a cabin on one ship changes all cabins for the same type of ship. For example, if you change a schooner's old aide's cabin to an accounting room, that will change the corresponding cabin for all schooners that you have or will build in the future. Schooners have three type C cabins, however, so each of those three must be changed independently. It typically costs about 10k ducats per ship grade to change a cabin on a small ship, or 100k ducats per ship grade for a medium ship. The exception is that some options for type A cabins cost 10 blue gems per ship grade for a small ship or 20 blue gems per ship grade for a medium ship. Large ships are probably more expensive in both cases, but I haven't yet seen the price tags. For type A cabins, the options available depend on whether the ship is an adventuring, trade, or combat ship. Old rudder and old deck are available on all ship types, but the other options all have stat rates of 100%/50%/50%, and cabins with a stat rate of 100% on some mate type are only available for ships of the corresponding type. The stat rates for various mate types increase by 10% per grade over the base numbers, though they are always capped at 100%. I give the numbers for small cabins only, but you can add 10% for medium cabins, 20% for large, and 30% for massive. Cabins that increase mate stats by some percentage only boost the stats of the particular mate who is assigned to that particular cabin, not everyone else on the ship, let alone the fleet. A mate gains full experience for the type for which his cabin has a 100% stat rate, but only half experience for other types. Or perhaps rather, for which the small ship version of his cabin has a 100% stat rate. Cabins that have something like 100/50/70 for the small version would have 100/80/100 for the massive version, but the mate would only gain adventuring experience at the full rate, not also combat experience. In particular, ship captains gain full experience of all types and mates in an aide's cabin only gain half experience of all types. If your flagship has an aide's cabin, then your aide can automatically use consumables to end disasters for your entire fleet. As such, you generally want your flagship (first ship in fleet 1) to have an aide's cabin. It is generally preferable for other ships not to have an aide's cabin, as a mate in that cabin only gains half experience of all types. If you have an accounting room somewhere in your fleet, then you can negotiate better prices for trade goods. Negotiation will never happen if you don't have an accounting room. Having multiple accounting rooms does not give extra benefit here. You should nearly always have at least one accounting room somewhere in your fleet. Improved ships Every type of ship in the game has an improved version of the same ship. The improved ship has the same graphics, same grade, same captain's cabin, and same classification as a combat, trade, or adventuring ship. Improved ships are regarded by the game as a completely separate time of ship from the base ship, with separate cabin choices, blueprint levels, and so forth. The differences are: The improved ship has an extra type C cabin. All cabins in the improved ship are unlocked from the start, rather than being gated by blueprint or understanding level. The stats range for the improved ship is about half a grade higher than the base ship. The improved ship does not require blueprints or a keel to build, but does require a base ship as part of the building materials. The improved ship build time is half that of the base ship. The improved ship does not require investment or admiral rank to build. If built in a port where you are not part of the monopolizing guild, then the improved ship will cost blue gems instead of ducats. The cost in blue gems is 100 times the ship's grade. Repairing an improved ship with blueprints requires common blueprints rather than blueprints for the particular type of ship. Repairing an improved ship with blue gems costs twice as much as a normal ship. Improved ships cannot be added to collections. High level players have differing opinions on whether it is better to use improved ships or unimproved ships. The extra cabin is a big deal, as that allows each ship to have an extra mate contribute his stats. But the extra repair cost is also a big deal, especially once you get to massive ships. Having to use ship materials to build the base ship and then more materials to build the improved ship makes the materials cost of the improved ship effectively double that of the base ship. This means that if you build many of the same ship, the improved ship will only have half of the blueprint level of the base ship, which can easily mean that it tends to have lower stats than if you built twice as many of the base ship. There is no rule that you must use exclusively improved ships or unimproved. I recommend improved ships for dispatch fleets, as the extra cabin is a huge deal. I personally use improved ships for all but my flagship, so that the flagship can have an aide's cabin without forcing any other ships to have one, and without the flagship having to be a different ship type that I don't want. Players who will build 40+ of the same ship so that they can get some ships with near max stats at blueprint level 20 tend to rely on normal ships for their primary fleet. The blue gem cost of improved ships will mean that players not in a major guild that controls some ports will tend to avoid improved ships as being too expensive. Improved ships are one of the main reasons why it is beneficial to be in one of the top guilds rather than just making your own solo guild. List of cabins The type A cabins are: ship typecabin typeadvtradecombatpriceeffectsmallmedlargemassallRudder707070ducatsramming+3%+6%+10%+15% allDeck707070ducatsmelee+3%+6%+10%+15% scouting+2%+4%+6%+10%adventureIce Breaking Enhancement Room1005050blue gemsice breaking+3+5+7+8 adventureSeaworthiness Enhancement Lab1005050blue gemsseaworthiness+1+2+3+4 adventureMomentum Enhancement Lab1005050blue gemsmomentum+3+5+7+8 adventureRowing Cabin1005050ducatsrowing+3+5+7+8 adventureLuggage Management Room1005050ducatssupplies cost-1%-2%-3%-4% adventure(adventure skill) Lab1005050blue gemsadventure skill+3%+6%+10%+15% tradeSupply Management Room5010050ducatsload capacity+3+5+7+10 trade(trade skill) Strategy Lab5010050blue gemstrade skill+3%+6%+10%+15% trade(goods type) Management Room5010050ducatsgoods type purchase quantity+5%+8%+10%+12% combatDisguise Management Room5050100ducatsadditional ram attack+5+10+15+20 additional ram crit chance+1%+2%+3%+4%combatWeapon Management Room5050100ducatsadditional melee attack+5+10+15+20 additional melee crit chance+1%+2%+3%+4%combatAmmo Management Room5050100ducatsadditional artillery attack+5+10+15+20 additional artillery crit chance+1%+2%+3%+4%combatEnhancement Management Room5050100ducatsadditional repair recovery+10+15+20+25 combatCrew Management Room5050100ducatsmax crew+4+8+12+16 combatLounge Management Room5050100ducatsadditional medical recovery+5+10+15+20 combatBanquet Management Room5050100ducatsadditional mobility+6+12+18+20 combat(combat skill) Lab5050100blue gemscombat skill+3%+6%+10%+15% Note that I've bunched some together to save table space. For example, "Small (adventure skill) Lab" covers "Small Nature Lab", "Small Aesthetics Lab", "Small Scouting Lab", and "Small Supply Lab", which are four separate cabins that each increase one stat. There are analogous cabins for the other skill types. Similarly, "Small (goods type) Management Room" has 20 separate cabins, one for each type of goods in the game. Small and medium ships put the prefix "Old" on the Rudder and Deck cabins. The only massive ships that I have built are adventuring ships, so I don't have the stat gains for the cabins specific to other types of massive ships. The type B cabins are: cabin typeadvtradecombateffect 1smallmedlargemasseffect 2smallmedlargemassMast707070scouting+5%+8%+13%+18%Crow’s Nest1005070scouting+3%+6%+10%+15%artillery+2%+4%+6%+10% Small and medium ships up to and including grade 10 have both the small and medium cabins available, with the former given the "Old" prefix. List of cabins (continued) The type C cabins are: cabin typeadvtradecombateffectsmallmedlargemassAide’s Cabin707070negotiation+3%+6%+10%+15% trade+2%+4%+6%+10%Infirmary707070support+3%+6%+10%+15% Recreation Room707070support+3%+6%+10%+15% supply+2%+4%+6%+10%Chapel707070supply+5%+8%+13%+18% Personal Quarters707070support+3%+6%+10%+15% melee+2%+4%+6%+10%Measuring Room707070scouting+3%+6%+10%+15% artillery+2%+4%+6%+10%Kitchen707070supply+3%+6%+10%+15% support+2%+4%+6%+10%Strategy Room707070scouting+3%+6%+10%+15% negotiation+2%+4%+6%+10%Livestock Pen707070supply+5%+8%+13%+18% Library1006060aesthetics+3%+6%+10%+15% Laboratory1006060nature+3%+6%+10%+15% Lumber Storage1005070support+3%+6%+10%+15% Accounting Room6010060purchasting+3%+6%+10%+15% sales+2%+4%+6%+10%Marine Barracks7050100melee+5%+8%+13%+18% Training Room7050100melee+3%+6%+10%+15% support+2%+4%+6%+10%Gun Port7050100artillery+3%+6%+10%+15% As with type B cabins, small and medium ships up to and including grade 10 have both the small and medium cabins available, with the former given the "Old" prefix. The type D cabins are: cabin typeeffectsmallmedlargemassSupply Storageload capacity+3+8+15+20Weapon Storageadditional melee attack+5+15+25+25Ammo Storageadditional artillery attack+5+15+25+25Concealed Storageadditional ram attack+5+15+25+25Enhanced Storageadditional repair recovery+9+14+19+18Luggage Storagesupplies cost-1%-3%-4%-6%(goods type) Storagegoods type purchase quantity+5%+8%+10%+12% The type E cabins are: cabin typeeffectsmallmedlargemassLoungeadditional medical recovery+3+8+13+13Banquet Halladditional mobility+3+9+15+18Crew’s Quartersmax crew+2+6+10+10Rowing Deckrowing+3+7+10+11 For both type D and E cabins, the cabin name starts with "Old Small", "Medium", "Large", or "Massive", depending on the ship size. Large ships also have the medium options available, but they are clearly inferior to the large ship options. In all ship sizes, as with type A cabins, there is a separate cabin type for each type of trade goods.

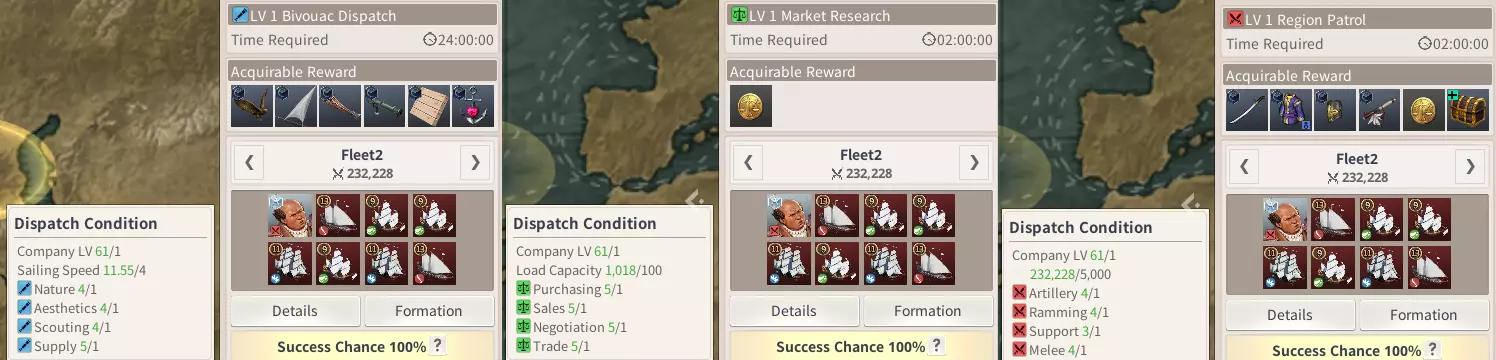
How much experience you need to level Experience table (1-64) Let's start with the table of how much experience it takes to level. The "next" column is how much experience it takes to reach the next level from the current one. The "total" column is how much cumulative experience it takes to reach the current level. There are separate columns for mate levels and company levels. I also give a formula for the experience to gain for mate levels, which as you can see from the table, is very, very close to the correct numbers. It is never off by more than 100 experience, and usually hits the number exactly. I'll explain the formula in the next section. levelmatematematecompanycompanytotalnextformulatotalnexttotal13003000400021100110030016004003200020001400300020004310031003400460050005420042006500620096006550055001070082001580076800680016200102002400088300830023000124003420099900990031300148004660010118001180041200176006140011136001370053000204007900012158001570066600236009940013178001780082400266001230001420000200001002003000014960015222002220012020033200179600162460024600142400368002128001727000269001670004040024960018294002940019400044000290000193190031900223400478003340002034600346002553005180038180021372003720028990055800433600224000040000327100600004894002342800428003671006420054940024458004580040990068600613600254960049600455700744006822002654600546005053008180075660027602006010055990090200838400286630066400620100994009286002973200732006864001098001028000308070080800759600121000113780031890008890084030013340012588003297800978009293001466001392200331072001072001027100160800153880034117400117400113430017600016996003512820012810012517001922001875600361395001396001379900209200206780037151600151600151940022740022770003816440016440016710002466002504400391778001777001835400266600275100040195400195400201320029300030176004121840021840022086003276003310600422427002427002427000364000363820043268300268300266970040240040022004429520029520029380004428004404600453234003235003233200485000484740046353000353000355660052940053324004738380038380039096005756005861800484159004159004293400623800643740049449400449300470930067400070612005048400048410051587007260007735200515200005201005642700780000846120052557400557400616270083600092412005359600059600067201008940001007720054636000635900731610095400010971200556810006810007952100102140011925200567340007340008633100110100012946600577888007888009367100118320014047600588452008452001015590012678001523080059903200903300110011001354800164986006096310096310011904300144460017853400611024400102440012867400153660019298000621087600108750013891800163140020834600631152300115230014979400172840022466000641218800121870016131700182820024194400 Experience table (65+) levelmatematematecompanycompanytotalnextformulatotalnexttotal651287000128690017350500193040026022600661356700135670018637500287792427953000671428200142820019994200371039930830924681501200150130021422400450360034541323691576200157620022923600528651139044923701652600165270024499800607179544331434711737500173750026152400689535750403229721833900183380027889900778043757298586731934700193470029723800870600065079023742040200204020031658500967720273785023752150200215020033698700106967788346222576226480022648003584890011768246941590037723839002383900381137001289273010592724978250760025076004049760014073870118819979792635900263590043005200153130011328938498027687002758800456411001661200014820685081291520029152004840980018029516164818850823077800307770051325000195865741828483668332463003246300544028002122522220243494084342100034210005764910022948318223660162853601600360180061070100247569062466084808637886003788600646717002665469427136538687398140039815006846030028640705298020080 In the next section, I give a formula that fits the data for levels 81-87 extremely well. If we assume that the formula holds up to level 91, then extending the table looks like this: levelmatematecompanycompanytotalformulatotalnexttotal8841805007264080030719540326660785894385600770264003289200035738032590459680081623200351587593902723259148140008643720037521416425431084 I'm guessing that that will start being wrong for level 91, but that's just a guess. Formulas The formula for the experience that a mate must acquire to gain a level is approximately a piecewise quadratic function of the level. That is, there are constants a, b, and c such that the experience required to go from level x to level x+1 is very close to ax^2+bx+c, except that the constants change from one level range to the next. Let's start by giving the table of constants, then come back to explain what they mean: startendabc190.556.5-3.89240.3711.7-35.925393.25-116.5137840546.5-296.3340655708.4-402.253525.3718022.8-229765527.58187+30.4-333099428 The precise formula is 100*floor(ax^2+bx+c), where floor(x) is the greatest integer that is less than or equal to x. For example, floor(3.7) = 3. An example will probably help. Suppose that you want to know how much experience it takes a mate to go from level 20 to 21. Level 20 is in the [9, 24] interval, so that's the row that you use. You compute 0.37*20^2+11.7*20-35.9 = 346.1. The floor of this is 346. Multiply by 100 to get 34600, which is the number in the formula column for level 20 above. You may notice that level 9 is contained in two intervals of the above table. Both lines give exactly the same value and match the correct value, so there is no way to determine which line is the correct one. To get the amount of experience required to proceed to the next company level, you compute 200 * floor(0.0075 * (mate experience required)). This generally means that it takes about 1.5 times the company experience that it takes mate experience, though there is a bit of rounding. This formula is exact up to level 65, as I have directly verified it for 30 separate levels and it hits the correct value exactly for every single one of them. For level 65 and above, you compute that same value, then multiply by sqrt(level - 64), then round down to the nearest integer. I only have two numbers for this from higher level players, but this formula hits the company experience required to level exactly. Because this means that company experience slows down greatly while mate experience does not, your active mates will tend to catch up to your company level at high levels. As of this writing, I'm company level 78, so I can't see the amount of experience required for higher levels. Crux (Utopia server) gave me the data for up to level 87, so I've filled that in. Acquiring experience Nearly everything that you do in the game gives you some sort of experience. However, when you see the game say that you've earned some amount of experience, it may not be immediately obvious where that newly acquired experience goes. Mates have three separate levels for the three types of experience, but a company does not. And there's still the question of which mates get how much experience. There are three basic cases. The first of them is quests. When you complete a quest, the experience that was stated before completing the quest gets scaled up for the nation rank bonus if applicable before the game displays the amount of experience earned on the screen, and then that experience gets awarded in the relevant category to all mates currently in fleet 1, that is, your primary, active fleet. Furthermore, half that amount is awarded as company experience. The second case is dispatch. When you complete a dispatch, the game displays the experience earned before the country rank bonus, but then scales it up by that bonus before applying it. All mates in the fleet that completed the dispatch get the scaled up experience (likely more than the number displayed on the screen), but no company experience is awarded. The third case is everything else. Here, when the game awards experience, the company gets half of the nominal experience. All mates in fleet 1 get some experience of the relevant type, but how much depends on which cabin the mate is in. If that cabin has a 100% stat modifier for the corresponding type of experience, then the mate is awarded full experience. If it has any other stat modifier besides 100%, then the mate is awarded half experience. In particular, any mate in a captain's cabin always gets full experience. Most other mates only get full experience to one type and half to the others. An aide's cabin or some of the junk, default cabins mean that a mate only gets half experience of all types. This is an additional reason why it is so critical to change your cabins on new ships, as if you don't, then a lot of mates get only half experience even in their specialty. It is also a reason why getting ships above your level is less useful than it might otherwise seem, as it will mean that your mates level more slowly than if you could change the cabins to something more appropriate.
How to make friends with the major employees in many inns in order to unlock their personal quests. Basics As with other Uncharted Waters games, many inns have a named employee available that you can meet and befriend. About half of the cities in Europe and the Mediterranean do, as do about a quarter of the cities elsewhere in the world. Each employee has a friendship rating that is initially hidden. If you reach 1000 friendship with an employee, she'll offer you a quest. At 2500 friendship, she'll offer a second quest. At 5000, she'll offer a third quest. The third quest in a line generally offers a B-grade piece of gear. The story of the third quest will always involve the employee traveling with you for a while. Like UW New Horizons and unlike UW Online, in UW Origin, friendship only goes up and never down. Like UW Online and unlike New Horizons, it takes quite a lot of points to max friendship. In New Horizons, the cap was 40. Like UW Online and unlike New Horizons, most but not all of the employees to befriend are female. In New Horizons, they were all female. After you complete an employee's quest line, the game will display her friendship value, which will initially be 5000, as it is capped there until you complete the third quest. That's how I know the number of points that are gained for various things. There are three ways to increase friendship with an employee: give her gifts, tell her about your discoveries, or chat with her. Gifts are generally items that you obtain by land exploration. They can also be given to C-grade mates that you want to recruit. You can only tell one employee about each discovery that you make. Unlike New Horizons, you can report a discovery to an estate and also tell an employee about that discovery. Rather, the restriction is that you can only tell one inn employee about Stonehenge, for example. Each employee has two favorite types of discoveries or gifts. You gain 2.5x the friendship points for discoveries or gifts of the employee's favorite type. The junk that you can obtain in large volume from land exploration generally counts as treasures. Thus, it's easiest to max friendship with employees who are fond of treasures. The game discovery encyclopedia has six main types of discoveries, each of which is divided into 2-5 subtypes. An employee's two favorite types of discoveries will be two subtypes in the same main type. For plants, artifacts, and treasures, there are only two subtypes, so an employee who likes one will also like the other. For architecture, there are four subtypes, but no one likes cities or villages, so everyone who likes one of the other two types will like both. Nature and animals have more subtypes, however. For the other four types, I'll only list the main type of discoveries that the employee likes. When chatting with an employee, she'll ask you a question, and you have three answers available. If you choose her favorite answer, it's similarly worth 2.5x the friendship points of a wrong answer. Whether you get the first question right or wrong, you can then chat two more times for friendship, without the favorite bonus. You can only chat with an employee three times in a day, and only the first of those has a question to which you can give her favorite answer. You can give unlimited gifts or discovery reports in a day, however. It costs 1 energy to unlock any of the options for an inn employee for a day, but once unlocked, you can use multiple options. The daily reset is at the same time as for attendance, dailies, and so forth. The number of friendship points for various things: typefavoriteotherchatting2510S-grade gift7530A-grade gift5522B-grade gift37.515C-grade gift17.57S-grade discovery112.545A-grade discovery7530B-grade discovery5522C-grade discovery37.515D-grade discovery17.57 The game does track half points, but does not display them. Chatting There are ten questions that inn employees can ask you. The first time you chat with one in a day, she'll pick one at random to ask. Some of the questions have some slight variants, but they're so close as to be effectively the same question. There are five possible answers to each question. The game picks three of those five to be available to you. The correct answer that the employee wants to hear is always one of the three, and then the other two are chosen randomly. There are effectively five different employee personalities. Each of the five possible answers to a question is the favorite of one of the personality types. Once you learn which personality an employee has, that uniquely determines her preferred answer to all ten questions. I list her favorite ship type as the personality type because it's the easiest question for which to shorten the answers unambiguously. Admiral, which ship do you think would suit me if I go on a voyage? Favorite shipFavorite answerTalletteA Tallette great for transporting cargo.Caravel RedondaA basic Caravel Redonda.Hansa CogA Hansa Cog to sail through the rogue waves.BarqueAn easy to handle Barque.BrigantineA Brigantine suited for combat. I can’t sleep at night. Do you know a good cure? Favorite shipFavorite answerTalletteDrink something warm.Caravel RedondaCount cute animals.Hansa CogGet some fresh air.BarqueRead a book.BrigantineHow about a little exercise? I don’t know why it’s so hard to get up in the mornings recently. Maybe my stamina has run out? Favorite shipFavorite answerTalletteLet’s watch a little more.Caravel RedondaDo you want to exercise with me?Hansa CogCome join my company.BarqueLet’s go see the doctor.BrigantineHow about changing your job? Did you hear the rumor? Robbers have been appearing in the area. Favorite shipFavorite answerTalletteDon’t walk in dark alleys.Caravel RedondaShould I escort you today?Hansa CogIt’s okay, you’ll beat them.BarqueAlways go with your friends.BrigantineYou’re not thinking of robbing the robbers are you? I want to learn a new hobby? What hobby should I take up? Favorite shipFavorite answerTalletteFind the answer in a book.Caravel RedondaVolunteer?Hansa CogExercising is always the answer.BarqueTry writing a poem.BrigantineA handstand? I can’t stay at the Inn the whole time. Where should I go if I leave on a journey? Favorite shipFavorite answerTalletteA prestigious port.Caravel RedondaA pleasant tourist attraction.Hansa CogAn unknown world.BarqueA comfortable resort.BrigantineAn adventurous pirate island. I can hear a puppy whine every night. Maybe there’s an abandoned puppy? Favorite shipFavorite answerTalletteDon’t get attached too easily.Caravel RedondaHow about looking for its owner?Hansa CogYou should adopt it.BarqueFeed it.BrigantineJust leave it be. It’ll be fine. I received a rather awkward gift from a customer. What should I do…? Favorite shipFavorite answerTalletteLeave it for now.Caravel RedondaYou’ll have to throw it away.Hansa CogYou should refuse and return it.BarqueHide it out of sight.BrigantineThrow it away.Yes, "Throw it away." and "You'll have to throw it away." are separate options and choosing one answer for an employee who prefers the other will get a negative reaction. There are times when I don’t feel confident about my choices. What should I do? Favorite shipFavorite answerTalletteTake some time and think about it.Caravel RedondaBelieve in yourself.Hansa CogYou don’t need to be afraid of failure.BarqueTell me about it.BrigantineWhat if you lack confidence? Just live. Recently, there’s a customer who’s been getting on my nerves. What should I do? Favorite shipFavorite answerTalletteLet’s watch a little more.Caravel RedondaBe honest and say it yourself.Hansa CogGive them a knuckle sandwich.BarqueTell the innkeeper.BrigantineShame the customer. Employee list Below, I list the employees available in the game. The list of ports and their favorite discoveries is taken from the Korean wiki. Their answers from chatting and the English names are from my own observation. A * on the port name means that you can only talk to the employee if the correct admiral is active. The comp column says whether the quest line is currently completable. An answer of "yes" means it is completable at 65 seaworthiness or less. "no" means that there is only one quest in the line, not three. A number means that some quest requires at least that seaworthiness, though it may not be the highest in the line. Numbers are only listed if the seaworthiness requirement is higher than the port where the employee resides. The "join" column is whether the employee can join your crew. "yes" means that she can be recruited at the local inn after completing her quest line, though she'll have perhaps a 1% chance of appearing at all. "$$$" means that she can only be recruited by paying real money. For quest lines that I've completed, I add a very brief explanation of what the story is about in the story column. CityNameFavorite shipFavorite discoveriescompjoinstoryLisboa*LuciaCaravel Redondabirds, mammalsnonoPortoAdelinaHansa CogtreasuresyesnosewingBordeauxHeleneBarquetreasuresyesnoselling wineCalaisPatriceHansa CogartifactsyesnomermaidsAntwerpWandaBrigantineplantsyesnoexciting rumorsLondonLilianHansa Cogtreasuresyesnodate in KozhikodeEdinburghNaomiHansa Cogmammals, fishyesnolearning to paintDublinDoloresBarquearchitectureyesnowriting a bookAmsterdamLilCaravel Redondaartifactsyesnocursed giftGroningenCorneliaCaravel Redondageography, fossilsyesyesgift from admirerBremenRaboutCaravel RedondaarchitecturenonoHamburgKlaudiaHansa Cogtreasuresyesnoplaying hard to getLubeckIngeborgBarquearchitectureyesyesminister friendsCopenhagenSteenTallettefish, invertebratesyesnowants to join militaryRigaNathalieBarqueplantsyesnocookingSaint PetersburgYevaTalletteplantsyes$$$jewelryStockholmAnjaCaravel Redondaartifactsyesnoexotic goodsSevilleAzenethHansa Cogarchitectureyesnopirate brotherValenciaAgustinCaravel RedondatreasuresnonoBarcelonaFloraBrigantinetreasuresyesnonobility and assassinsMarseilleTeresaBarquearchitectureyesnoinvesting in a scamGenoa*MatildaCaravel RedondaplantsnonoVeniceGiannaTallettearchitectureyes-85nofabrics for dressesCandiaKelebekBarqueplantsyesyessurprise partiesAthensMurineTalletteartifactsyesnobooks to readConstantinople*LadiaBrigantineartifactsnonoKerchBehramTallettetreasuresnonoTaganrogAyselHansa Coggeography, weatheryes-130yeswants to go on adventureTrabzonCansuHansa Cogweather, fossilsyesnopirate loverCairoHadiTalletteplantsyesnoplagueAlexandriaNellyTallettebirds, reptilesyesnokidnapped by piratesTunisCevahirBarqueartifactsyesnovery sadAlgiersDeryaBrigantinetreasuresnonoCeuta*AnnaCaravel RedondatreasuresnonoPonta DelgadaBenjaminCaravel Redondaartifactsyesyeshelping adventurersCohassetUlloriaqHansa Cogastronomy, weatheryesyesmysterious chestVeracruzChitraliHansa Cogarchitectureyes$$$fortune tellerNassauNitaBrigantinetreasuresyes$$$pirate troubleHavanaIsabelBrigantinetreasuresyesnodebtor brotherPorlamarAmeliaCaravel Redondaweather, fossilsyesnoprize for festivalRio de JanieroSylviaCaravel Redondareptiles, invertebratesyesnocarnivalLimaTamayaBrigantineartifactsyes-140notreasurePanamaMalinalliBrigantinefossils, astronomyyes-150$$$"dance" competitionOhloneNayeliBrigantineinvertebrates, birdsyes-150yesaggressive lover Ingeborg's first quest says that it requires 85 seaworthiness, but this is an error. It only requires 55. Employee list (continued) CityNameFavorite shipFavorite discoveriescompjoinstoryArguinYerumaCaravel Redondaplantsyesnofake garnetElminaVerisaBarqueinvertebrates, reptilesyesnoanimals from dreamCape TownRudoBarquegeography, astronomyyesnohometown in ToamasinaSofalaHatoraTalletteplantsyesnowampum traderZanzibarGardurBrigantinemammals, reptilesyes-85nohuntingJeddahSaraiTalletteartifactsyesnostray catMuscatElifBrigantineinvertebrates, fishyes-100nowritingBasrahAnisaBarquearchitectureyes$$$remembering the pastGoaKuntiCaravel Redondaartifactsyes-85noinjured legKozhikodeIndumathiBrigantineweather, geographyyes$$$always smilingKolkataAnandBarquetreasuresyesyeshelping the poorMalaccaSunitaHansa Cogarchitectureyes-85nocooking ingredientsMacauYeonheeHansa Cogtreasuresyes$$$gambling on duelsJayakartaPurnamaCaravel Redondaarchitectureyesnowants to marryBandaTitisCaravel Redondaartifactsyes-150nobird rumorsAmbonMawarBrigantineplantsyes-85$$$fragrancesQuanzhouXiang JingBarqueplantsyesnostolen accessoriesTainanCheng LinTalletteartifactsyesyestrade goodsHobeMuyoungBarquetreasuresyesyesmusicHangzhouJaryungHansa Cogartifactsyes-120nosafety inspectionsChongqingSeolCaravel Redondaarchitectureyes-100nogift for sisterChang'anMeihuaBarquefossils, astronomyyesnostolen accessoryHanyangGa EunjeongCaravel Redondaastronomy, geographyyes-100$$$apologiesJejuNamhyeCaravel Redondabirds, mammalsyes-100$$$pirate blockadeNagasaki*OnatsuBarqueplantsyesnobrother lost at seaSakaiSeishichiCaravel RedondaarchitecturenonoEdoTatsumaruCaravel Redondabirds, fishyesyeslife as a geishaK'gariMereHansa Coggeography, fossilsyes$$$the goddess K'gariWhanganuiTamaHansa Cogreptiles, fishyesyesfighting pirates

Even free players can train up C-grade mates to be stronger than natural S-grade mates. Once trained to SS-grade, mates can learn some very powerful effects. Promotion Every mate starts at rank 1 and can be trained up to rank 5. Each promotion increases his stats by perhaps 10% or so. Each promotion also allows having an additional mate skill active at a time, up to 4. Finally, each promotion makes it so that more skills are available to be used, as follows: Rank 2 (silver, two chevrons): unlocks two character effect mate skills if the mate is at least level 30 Rank 3 (gold, three chevrons): unlocks naval combat skill if the mate is at least level 50 Rank 4 (green, four chevrons): unlocks final two job effect skills if the mate is at least level 70 Rank 5 (red with yellow star): unlocks final two character effect skills if the mate is at least level 90. A relative handful of mates have a natural skill that the mate learns at level 99 replace one of the character effect skills that would normally be unlocked at either level 30 or level 90. You can promote mates from the promote tab of the mate screen. Promotion costs contracts, astrolabes, appointments, and ducats. The cost in ducats is generally pretty trivial, but the others are the real cost. For contracts, you need contracts for the particular mate, though you can substitute generic contracts of the same grade as the mate. Generic contracts are fairly rare, though, so you can't do this very often. You always need the same number and grade of astrolabes as appointments. Appointments are generally more common than astrolabes. However, there are separate appointments for adventuring, trade, and combat mates. Requiring appointments makes it more difficult to use your astrolabes to mostly focus on promoting one particular type of mate. The cost in materials of promotions depends on the grade of the mate, as follows: C-grade mates: rankcontractsastrolabesmat grade21020D32030C44040B58050A B-grade mates: rankcontractsastrolabesmat grade21030D32040C44060B58080A A-grade mates: rankcontractsastrolabesmat grade21040D32060C44090B580120A S-grade mates: rankcontractsastrolabesmat grade21050D32080C440120B580160A Training After a mate has reached rank 5, you can train him up to higher grades. That is, you can turn a natural C-grade mate into B-grade, then A, then S, and finally even SS. This takes additional contracts, astrolabes, and appointments. It also takes some training manuals. As before, appointments are more common than astrolabes. Training manuals are also plenty common enough to not really be much of a restriction. Each step of training costs 100 blue gems, but no ducats. When you train a mate, you increase his stats to be in line with that of the next higher grade, which commonly means roughly doubling his stats. The mate also gains some training points. Each training point increase one stat by 10. There are caps on how many training points can be allocated to a given stat for a given mate. Training a mate does not change his mate skills or naval combat skills. Higher natural grade mates tend to have stronger skills, and that does not change. Training does not increase a mate's language skills, either. Again, mates with a higher natural grade tend to have higher language skills, though there are exceptions. The cap on training points in a given stat per mate by mate grade are as follows: gradepointsC0B20A25S40SS70 The number of training points that a mate gains by increasing his grade are as follows: gradepointsC to B75B to A90A to S150S to SS260 Mates with a higher natural grade lose out on the training points that would have been obtained by training the mate from a lower grade up to his natural grade. Thus, for example, a natural C-grade mate trained up to A-grade has 75+90 = 165 training points available, while a natural B-grade mate trained up to A-grade only has 90. When training a mate up to a higher grade, you need two grades each of astrolabes and appointments. You need the same number of each of the four types of items, however. The number of each of these items matches the number of mate contracts that you will need, so it is the same number for each of five items. If you wish to substitute generic contracts for contracts specific to a particular mate, the generic contract grade must be that of the mate's current grade, not his natural grade. For example, if you wish to train a natural C-grade mate from A-grade to S-grade, you can use the mate's own C-grade contracts, but to substitute generic contracts, you would need A-grade. The grade of resources that you need in order to train mates to a higher grade depends on which grade transition you are making, not the base grade of the mate: grademat gradesC to BDCB to ACBA to SBAS to SSAS Meanwhile, the quantity of each resource that you need depends only on the base grade of the mate, and not which particular grade transition it is: gradequantityC50B65A85S110 Because mates with a lower base grade require more transitions to reach SS-grade, they require more resources in total to promote to SS-grade, in spite of each transition using fewer resources. However, the resources tend to be lower grades, and higher grade resources are far scarcer than lower grade ones. As such, it tends to on net be much cheaper to promote mates with a lower natural grade up to SS-grade, or even S-grade. Obtaining materials With gachas removed, the main source for most contracts is inns. Mates that can be hired in inns can subsequently be "rehired" in the same inn for five contracts. Admirals and mates obtained from their chronicles aren't directly hired from inns, but still have a list of ports where they can be obtained, typically ports that they visit during the admiral's chronicle. The other major source of contracts is combat dispatch. Named combat dispatches commonly give large numbers of contracts for the named mate. This allows you to get the 350 contracts that it takes to train a natural C-grade mate up to SS-grade very quickly. Some players have thousands of contracts for a given mate and sell the spares cheaply on the auction house, which makes it possible for newer players to buy bulk contracts for those particular mates cheaply. Mates with contracts that are readily available like this seem to all be natural C-grade mates. The mates in question are: Trade: Catherine Cornaro, Nicolas Flamel, Asarpay, Jan Joosten van Lodensteijn, Matsura Takanobu Combat: Victor Russell, Richard Huxley, William Clive, Ambrosius Ehinger, Hisakajima Yasuke Based on dispatch names, Georg von Speyer, Robert Wilde, and Jakob Roggeveen may also have contracts available from dispatch, but I haven't seen those contracts appear on the auction house in bulk. The Wilde and Roggeveen dispatches require such high level fleets that it is likely that no one does them yet. Astrolabes and appointments generally come from the same sources. There are two major sources of them and several minor sources. One major source is events, though the details vary considerably by event. The other major source is land training, which can be done up to 3 times per day, plus one extra if your country has a prime minister, and 7 more if you buy the Grace of Raphael effect. You get no reward from unsuccessful land training, and a somewhat random but partially predictable reward for successful training. Land training is like land exploration, except that the fourth and sixth slots are always gather (just like land exploration), while the rest of the slots are always explore and never combat. You generally get higher trade astrolabes and appointments for higher difficulty land training. A rough table looks like this: DifficultyMaterial grades5, 14, 30, 48Mostly C, some B65Mostly C, some B, occasional A89Mostly C, some B, some A108, 122Mostly B, some A136, 155aMostly B, some A, occasional S155b, 170, 175, 180Many B, occasional A, occasional S185, 200, 215Mostly A, occasional S220, 225, 235Many A, few S 155a is for 155 difficulty in zones that required company level 55 at launch, which are around Australia. 155b is for 155 difficulty in zones that required company level 60 at launch, which are predominantly in northeast Asia. The types of appointments vary by location, but the boundaries don't necessarily coincide with land exploration zone boundaries. For example, if land training in a given position gives trade appointments, then all appointments from training at that particular location will always be trade and never adventuring or combat. Some other location will always give combat and not trade or adventuring. The exception is that for difficulty 155b and higher, you get some of each type of appointment rather than only one. Until then, this allows you to select the particular type of appointment that you wish to farm. I am not yet able to check the zones that require 200 seaworthiness or more, however. Admirals' mates Some mates are associated with a particular admiral and cannot be obtained without the admiral. In some cases, you obtain the mate as part of the chronicle. In others, after you reach a certain point in the chronicle, the mate becomes available for hire in inns. Every admiral's chronicle has an associated S-grade mate who is unobtainable until you complete the chronicle. Mates associated with admirals are notable because they are easier to acquire contracts for in inns than other mates. Some mates are available in several ports and actually available in the port perhaps 1/3 or 1/2 of the time. Other mates are only available in a single port, but will always be available to hire in the inn in that port. Some S-grade mates not associated with admirals can also be hired in inns, but appear only rarely, which makes it difficult to acquire contracts to rank them up. Many mates that are associated with admirals appear in exactly the same set of ports as the admiral. As such, I list the associated mates in a table below. The first column is the admirals . The second column is the list of mates available in exactly the same ports as the admiral. The third column is mates available in only a single port. The fourth column is other mates that do something different. You must acquire the admiral before you can do the chronicle and acquire associated mates. The ports where an admiral appears are ports where you can acquire additional contracts after you have the admiral. You cannot hire an admiral directly in inns, but only acquire additional contracts. AdmiralSame portsOne portOtherJoao FrancoRocco Alemkel, Enrico Malione, Lopo PereiraAlbertCatalina ErantzoAndreas Paella, Emilio Sanude, Panfilo OridRoberto EzequielAli VezasSalim Jahan, Yazid ShabazOswald RemingtonSaphaOtto BaynesMatthew Roy, Stephan PeronFrancis DrakeErnst Von BohrPaula, Hans Starten, Maurice Laiden*Jean Fleury, James CookPietro ContiCamillo StefanoVasco de GamaMiranda VerteTonio Rossi, CachuapaTinocatlSalvador LeisRiono Aventura, Horace DistardiJoker Da SilverAnne BonnyJohn RackhamMary Read, Jeanne Baret, Miguel Lopez de Legazpi, Azubuike, Howell DavisSayyida al HurraAhmed Ali Wattasi, Antonio Pigofetta, Sher ShahLeo Africanus, Aydin LeisLeon FrancoKristinaRui Costa, Carlotta, AljeunaGrace O’MalleyDonal na Piopa, Doritte Nippers, Loredana Marcello, Marguerite de ValoisAnne Dowriche, Dread Pirate RudolphChand BibiGongsun Baoyue, Tome Pires, Goswami Tulsidas, Bartholomew RobertsGaspar Sintra, Aai MataImai SakiShiomi Fuukichi, Yasuke, Rebecca Rolfe, Tanaka Shosuke, Tan Yunxian, Imai SokyuIzumo Okuni, Imai Sokun, Oda NobunagaDate MasamuneHernan ChavezKatakura Kagetsuna, Hasakura TsunenagaNui HokuNani Mahina, La IkaikaAndres de UrdanetaGaspar Pirelli, Liu KuixingKim MandeokKim Hongdo, Baek Dong-soo, Go YugangLouis Antoine de Bougainville, Marie AntoinetteIm Sangok, Elizabeth Vigee Le Brun, Moon SundeukHong GildongIm Kkeokjeong, Du Chunyong, Seong Chunhyang, Abel Janszoon Tasman, Yi Mongryong, Heo Chohui, Shim ChungJeon WoochiQi JiguangQin LiangyuZhu Hwa Young, Yi Cho, Yu Dayou, Hu ShourenZheng ChenggongWa Shi, Tagawa ShichizaemonAredviAbbakka Chowta, Shi LangMaribelYujiNanamiFirari, Willem Janszoon, Rebecca CartlandZheng HeMei LingQiliner, Wang Jinghong, Ma Huan, Hong Bao, Zhou ManRozalia PolhemSven Gustafson, Pia FrodeClas Larsson FlemingWilliam AdamsIshikawa Yasuemon, Tiago GarciaUmino StellaElizabeth ShirlandLeo Baldwin, Olivia Mandeville, TadodahoWilliam ShirlandYi Sun-sin I mark Maurice Laiden and Tagawa Shichizaemon as being available in the same ports as their associated admirals. They are each available in one extra port that the admiral is not, but that's not worth hunting down. Recommended ports for admirals' mates When you visit a port, you can readily try to recruit (or more commonly, acquire contracts for) all of the mates that are present in the inn in that port. You can try all at once. As such, it is much more efficient to visit one port where you can acquire contracts for several mates at once than to make a separate port visit for each mate. The optimal set of ports to visit obviously depends very heavily on which mates you are trying to acquire contracts for. Admirals and their associated mates are notable here because those are by far the easiest natural S-grade mates to acquire contracts for. I have assembled a list of recommended ports under the assumption that you are interested in all of the admirals and their associated mates. The first column is the name of the port. They are roughly arranged geographically. The second column is the admirals that can appear at that port. Mates that appear at the same ports as an associated admiral (as listed in the previous section) are not listed separately from the admiral. The third column is for mates that appear in only one port, but are guaranteed to appear in that port. The final column is for other mates associated with an admiral. PortAdmiralsSingle portOthersAlexandriaCatalina Erantzo, Pietro Conti, Anne Bonny, Nui HokuLeo AfricanusElizabeth Vigee Le BrunIstanbulCatalina Erantzo, Ali Vezas, Pilly Reis, Elizabeth ShirlandMuezzinzade Ali PashaSaphaNaplesErnst Von Bohr, Miranda Verte, Salvador Leis, Pilly ReisAlgiersCatalina Erantzo, Salvador Leis, Sayyida al Hurra, Pilly ReisOswald Remington, Joker da Silver, Aydin LeisCeutaJoao Franco, Catalina Erantzo, Otto Baynes, Salvador Leis, Sayyida al HurraSevilleCatalina Erantzo, Otto Baynes, Ernst Von Bohr, Salvador LeisRoberto EzequielFirariLisboaJoao Franco, Ali Vezas, Pietro Conti, Leon Franco, Grace O’MalleyAlbert, Vasco de Gama, Kristina, Anne DowricheRui Costa, Carlotta, Aljeuna, Gaspar Sintra, Gaspar Pirelli, Liu KuixingDublinGrace O’MalleyDread Pirate RudolphLondonOtto Baynes, Ernst Von Bohr, Grace O’Malley, Elizabeth ShirlandFrancis DrakeElizabeth Vigee Le Brun, Rebecca CartlandCopenhagenGrace O’Malley, Rozalia PolhemStockholmSayyida al Hurra, Rozalia PolhemClas Larsson FlemingCohassetLouis Antoine de Bougainville, Marie AntoinetteNassauAnne Bonny, Kim MandeokMary Read, Azubuike, Howell DavisVeracruzMiranda VerteTinocatlPort RoyalAnne Bonny, MaribelJeanne BaretSantiago de CubaAredviSanto DomingoPietro Conti, Miranda VerteHernan ChavezPortobeloMaribelNanami, William ShirlandFirari, Rebecca CartlandYuldoHong GildongJeon WoochiEdoDate Masamune, Kim Mandeok, Hong GildongUmino StellaKatakura Kagetsuna, Hasakura Tsunenaga, Gaspar Pirelli, Liu KuixingSakaiImai Saki, Date Masamune, Nui Hoku, Zheng HeIzumo Okuni, Imai Sokun, Oda NobunagaKatakura Kagetsuna, Hasakura Tsunenaga, Gaspar Pirelli, Liu Kuixing, Ma Huan, Hong Bao, Zhou ManNagasakiImai Saki, Date Masamune, Qi Jiguang, Zheng Chenggong, William AdamsKatakura Kagetsuna, Hasakura Tsunenaga, Gaspar Pirelli, Liu Kuixing, Moon Sundeuk, Zhu Hwa Young, Yi Cho, Yu Dayou, Hu ShourenJejuChand Bibi, Kim Mandeok, Hong GildongTome PiresAai Mata, Im Sangok, Moon SundeukHanyangKim Mandeok, Qi Jiguang, Zheng He, Yi Sun-sinIm Sangok, Zhu Hwa Young, Hu Shouren, Wang Jinghong, Ma Huan, Hong Bao, Zhou ManPekingZheng Chenggong, Zheng He, William AdamsIm Sangok, Yu Dayou, Shi Lang, Qiliner, Wang Jinghong, Ma Huan, Hong Bao, Zhou ManHangzhouImai Saki, Zheng Chenggong, Zheng HeIm Sangok, Zhu Hwa Young, Yi Cho, Yu Dayou, Abbakka Chowta, Shi Lang, Wang Jinghong, Hong BaoMacauQi Jiguang, MaribelGongsun BaoyueAai Mata, Katakura Kagetsuna, Im Sangok, Moon Sundeuk, Zhu Hwa Young, Yi Cho, Yu Dayou, FirariHanoiQi JiguangQin LiangyuZhu Hwa YoungManilaImai Saki, Kim Mandeok, Maribel, Elizabeth ShirlandAndres de UrdanetaMoon Sundeuk, Yi Cho, Hu Shouren, Rebecca CartlandTernateBartholomew RobertsAmbonAnne Bonny, Imai SakiJames CookWillem JanszoonSurabayaLeon FrancoMiguel Lopez de LegazpiKozhikodeErnst Von Bohr, Miranda Verte, Leon Franco, Grace O’Malley, Chand Bibi, Date Masamune, Kim Mandeok, William AdamsGoswami TulsidasAljeuna, Aai Mata, Elizabeth Vigee Le BrunDhofarMei LingMa Huan, Zhou ManBaghdadErnst Von Bohr, Pietro ContiJean FleuryRui Costa, Elizabeth Vigee Le Brun Nearly all of the admirals' mates listed that can appear in multiple ports at all are in multiple ports on the list. The only exceptions are: MateList of available portsSaphaIstanbul, BasrahCarlottaLisboa, Madeira, Azores, Porto, FaroGaspar SintraLisboa, Goa, Mombasa, Porto, DiuWillem JanszoonAmbon, Amsterdam, Marseille, Jakarta, Bordeaux, Kakatuwah, Den Helder, AntwerpYi Sun-sinHanyang, Dongnae Potential effects Every mate has two "potential effect" skills that require being trained up to SS-grade in order to unlock them. Unlike other effects, these do not have any level requirements. One skill costs 36.3 million ducats and 30 S-grade training manuals to unlock. The other skill costs 1000 red gems. As these are the ultimate effects, they tend to be more powerful than other effects. As with other effects, you can stack more than one of the same skill. Stacking is again not linear, but I'm not going to post the full tables here. This section lists which mates have which skills, but only the ones that weren't particularly expensive to obtain before the gachas were removed. That is, the only mates listed below are the natural B-grade or C-grade mates that were in the normal mate gacha. With contracts now available in inns, it's less relevant than it used to be, but still a list of mates that high level players tend to already have a lot of contracts for. 1000 gems for a single mate effect is very expensive, so I exclude the red gem skills here. The artillery, ramming, or melee skills are in the table below. Each of the three types of attacks has analogous skills, but different mates have different skills. Each skill uses training manuals of the corresponding type, such as melee manuals for a melee skill. skillartilleryrammingmeleeincrease additional (type) defense by 10%Andreas Paella, TzilacatzinKurushima Michifusa, Panfilo de Narvaez, Juan Sebastian Elcanoincrease additional (type) crit resistance by 55%Kristina Nilsdotter, Victor Russell, Alonso de Mendoza, Pieter Van FuykGonzalo Silveira, Anthony Johnson, Jonathan BarnettViolante Doria, Marcos de Niza, Shimazu Yoshihiro, Hans Staden, Alonso Alvarez de Pinedaincrease additional (type) crit damage resist by 7.5%William CliveMumtaz Mahal, Valpuri Innamaa, Antonio de Saldanha, Robert AmadasMatsura Takanobu, Asarpay25% chance to negate damage when hit by (type) attackFrancisco Serrao, Pero Da Covilha, Todar Mal, Johann HallerFernandez de Enciso, Amerigo Vespucci, Micheletto Corella, Guido de LavezarisMartin Luther, Henrique de Malacayour (type) attack has 50% chance to decrease enemy speed by 3Francisco Javier, Gonzalo de Quesada, Walid Kemal, Jorge AlvaresJan Joosten van Lodensteijn, Francis Le Clerc, Pedro Navarro, Tarabai, Edmund HarveyGaspar de Quesada, Georg von Speyer, Agnes Sorel, Hisakajima Yasuke, Charlotte Cordayyour (type) attack has 30% chance to inflict great confusion for 2 turnsSebastian Cabot, Rachel Wall, Ana Maria de Sotoyour (type) attack causes lethal poison for 3 turnsRichard Huxleyyour attack has 90% chance to decrease enemy additional (type) attack by 55%Joseph Eastman, Panfilo Orid, Juan Vazquez, Mirza Aziz Koka, Julian FelmerLopo Pereira, Jang Anshun, Trifon Korobeynikov, Samuel PallacheGiovanni Ramusio, Ludovico de Varthema, Jacques Broom, Henry Middletonyour attack has 90% chance to decrease enemy additional (type) defense by 35%Sidonia von Borcke, Kenau HasselaerConrad Most trade skills correspond to a particular type of trade goods and a particular type of manual. Purchasing effects reduce the price to buy goods by 2.5%, which is pretty useless. Sales effects increase the overcharge, that is, the price to sell goods, by 2.5%. Trade effects increase the purchase quantity by 13%. GoodsPurchasingSalesTradeFoodMatthew RoySeasoningMatteo RicciJuan de Grijalva, Estevao GomesLivestockKatharina HenotMedicineShen Yunying, Ali Al Mandri, Jeong WoonAnne d’Autriche, Anne BoleynSundriesZheng Zhilong, William WynterJakob FuggerLiquorAnthony ShirleyDiogo de Sequeira, Tajlu Khanum, Jorge de MenesesFrancisco de JerezDyeSalim Jahan, Jean Francois de Galaup, Richard BinghamOreYi EokgiIsabella Cortese, Simon SequeiraCamillo SavonarolaWaresPedro de Quiros, Chen ZuyiLuxuriesHugo OljackAljeuna, Yermak Timofeyevich, Lopo de AlbergariaTextileLuis Bourgeois, Rafael Serrano, Francisco de OrellanaPaula, Francisco de Almeida, Tecuichpoch IxcaxochitzinWoodes Rogers, Benito Gomez, Manuel PerestreloFabricsSamuel BurgessCraftsJoao de CastroAlexander Hamilton, Esteban Ortega, Johannes Gutenberg, Rodrigo de BastidasArtworkIngela GathenhielmSpicesMaurice LaidenMartin Balboa, John RolfeElizabeth Barton, Diogo CaoMetalMiguel de Cervantes, John Davis, Semyon StroganovEdmund Gilbert, Ana de MendozaJan Pieterszoon Coen, Maria BartolaPerfumeGonzalo Pizarro, Joao SerraoJewelryChristian GloriaWeaponsKarshid, Lewis Scot, Wakizaka YasuharuNicolas de Ovando, Nicolaes Coeckebacker, Altan KhanAmbrosius Ehinger, Francisco Alvarez, Giovanni Aldente, Duarte de Meneses, Duarte PereiraFirearmsIsabelle de Lorraine, Pieter Gerardus, Pelonso AguirreEmilio Sanude, Marie Anne, Charles Vane, Abu’l Fazl, Anna Akerhielm Potential effects (continued) Other skills are much less systematic than the ones above. As such, I just give a list of skills, which type of training manuals they require, and who has them. ManualEffectMatesSupportIncrease additional medical recovery by 35%Francesca Caccini, Khusrau Mirza, Jakob Roggeveen, Pedro de Gamboa, Carmine RagussaSupportIncrease additional repair recovery by 35%Diego SosaSupportIncrease max durability of ship by 650Diego de Nicuesa, Maria PitaSupportIncrease all additional defense by 18.5% when hit by attackFernao Gomes Da Mina, Suminokura RyoiSupport15% chance to resist status effectsWalter Laurence, Lucrezia Tornabuoni, Agnes Bernauer, Guido Benzo, Catalina de Erauso, Jakob van NeckSupport35% chance to remove two status effects at the start of your turnHernando de Soto, Nicolas Flamel, Anna Janssens, Cassandra FedeleSupport35% chance to increase speed by 2 at start of turnMartim Afonso de SousaSupport25.6% chance to get extra turn and recover 6.1% mobilityMartin Behaim, Duarte BarbosaSupport35% chance to increase all additional attack by 14.5% after you moveVazquez de Coronado, Fernao Mendez Pinto, Luis Vaez de Torres, Gaspar Corte RealSupport35.2% chance to increase all critical attack by 14.5% after you moveNiccolo Stefano, Xu Hongzu, Francisco Albo, Vasily GolitsynSupport23% chance to increase all additional attack and defense by 7.5% each after you moveHabba KhatoonSupport25.6% chance to reflect 10.7% of incoming damageLaurence Edward, Robert WildeTradeDecrease amity use by 5% in barter quantity negotiationYazid Shabaz, Stephan Peron, Tanneke SconyncxTradeIncrease success rate by 2.5% in barter quantity negotiationKaarina Multiala, Diego Caballero, Antonio de AbreuTradeDecrease amity use by 5% in barter price negotiationIsabella WhitneyNegotiationIncrease negotiation success rate by 3% at marketEnrico Malione, Jeanne de Chantal, Lorenzo Pinto, Axel Oxenstierna, Vira Alakesvara, Gregorio CespedesNegotiationIncrease chance of negotiation by 3% at marketPedro de Mendoza, Sebastian Vizcaino, Catherine Cornaro, Alonso de Ojeda, Balboa Orid, Zaganos BeiNatureIncrease combat power against pirates by 5 in land explorationAlvaro de Mendana, Hans StartenNatureIncrease combat power against beasts by 5 in land explorationPhilibert CommersonNatureIncrease loot by 7% in land explorationJacques CartierScoutingIncrease combat loot by 7% in land explorationWilliam Shakespeare, Kristina Alexandra, Petrus Plancius, Alexander SelkirkScoutingIncrease gather loot by 7% in land explorationNikolaus Federmann, Cabeza de VacaScoutingIncrease ship speed by 2% on galleyJan Janszn Weltevree, Sapha, Paolo Toscanelli, Diogo Pagunds, Joao Goncalves ZarcoScoutingDecrease crew loss chance by 3% in land explorationNicolau CoelhoScoutingIncrease fleet speed by 1%Miguel Corte RealSupplyIncrease food and water obtained by 7% in land explorationAntonio de BerrioSupplyDecrease daily food and water use by 2%Juan Diaz de Solis

A collection of important things for new players to understand early on Simple things Every admiral has a court rank, which starts at rank 1 for most, but 3 for a few. You can increase it by completing a title gain quest at the palace. So long as your court rank is 3 or lower, pirates will not attack you. If your current admiral's court rank is 4 or higher, then they commonly will attack, unless your own level is much higher than the zone requirement. Don't increase your court rank above level 3 (Cavaliero) until you have additional admirals that you can switch to when you want to sail around safely. You should join a guild almost immediately, even if you later decide to leave for a different guild. Even being the only active player in a dead guild is far better than being unguilded. Being in a guild gives you access to crafting, parts combine, and the contribution store. You won't need combine until you're higher level, but you want access to the contribution store immediately, as explained in the next item. Every week, you can get some rewards from the guild contribution store and from the palace. Always get the novice training manuals from both sources. Everything else is optional, but the novice training manuals are scarce and important--as well as very cheap to buy. You won't need them for months, but when you do, you'll be very glad to have several hundred sitting around. Always have an aide's cabin in your flagship of fleet 1. Other ships don't need it, but the flagship does. This allows an aide to automatically respond to disasters. That makes it safe to sail for 20 or 30 minutes without having to watch the screen. Without an aide, disasters could destroy cargo or even sink ships. Always carry around an ample supply of disaster relief items. Your starting capital will sell nearly all of them in the item shop. You don't need them until company level 20, but after that, disasters will strike regularly, and being able to immediately cure the disaster is hugely important. You'll eventually want a stack of 1000 of each item, but if that's too expensive early on, buying 50 is fine. Different disasters are associated with different areas of the game, and some won't strike until you're very high level. But be sure to check your stocks periodically and replenish the ones that get used. You should do land training every day. The usual 3/day goes very fast, and the mostly C-grade astrolabes that you get from it will be useful forever. They also sell well on the auction house, as high level players may do their land training in higher level areas that give higher grade astrolabes, but they'll still need more C-grade astrolabes forever. Your profits per unit from selling trade goods are roughly proportional to the base price of the item times the distance from the nearest port that sells the item. Distance calculated is by sea, so it's quite far from Portobelo to Panama, even though they're quite close as the crow flies. High profits thus require long trade routes, but make sure that you don't ship goods to an area that has a nearby port that sells the goods that you're shipping. You should start dispatch as soon as you can. Even a poorly optimized dispatch is better than no dispatch. Trade dispatch gives you free ducats, while adventuring and combat dispatches cost ducats, but give you ship parts and personal gear. Dispatch also levels whatever mates you put on the dispatch fleet. When to start paying blue gems for fleet 3 is debatable, but fleet 2 is free, so you should start dispatch on fleet 2 as soon as you can. Be sure to level up your shipbuilding. Even though you can buy high grade ships on the auction house, they come with bad cabins by default, and you can't change the cabins on a ship until you've built a ship of that type yourself. Keep building ships just for the sake of leveling shipbuilding until your shipbuilding rank is high enough to build the ships you want. You should donate to your national budget every week. You can get there from the Nation menu, then the Budget option on the left sidebar. If you donate anything, you get at least 50 blue gems for it, and maybe more. You don't necessarily need to donate enough to rank high on the list, but even the minimum donation of 50k ducats is enough to guarantee a weekly reward of at least 50 blue gems. If you're wiling to spend money on the game, most of the packages for sale are red gems a rate of about 91 gems per dollar (or some other mostly fixed rate if you pay in a different currency), plus something else. The most efficient things to buy generally have more red gems as the "something else". These are available as the red gem fixed-term item (which can be repurchased every 28 days) and the double gems initial purchase in the currency section of the store. It rarely makes sense to buy anything else besides these unless you have already bought them and are willing to spend more money. If you're playing a chronicle and told that you need to land somewhere, and going to the pin location doesn't complete the step, then you probably need to click the icon to land. The icon is near the bottom left corner of the screen, just above the steering wheel, and only appears when you're close enough to land that you can land there. Normally, this is one way (but not the only way) to access the land exploration menu. During certain steps of certain chronicles, however, clicking the land button will complete the step and proceed with the story. If playing an event quest and told that you need to do something peculiar in town, you may need to use an emote in a particular place. Click on yourself, then click through the options that appear to get to the emotes. The one that you most commonly need is "look around", but sometimes it will tell you some other emote to use. After you get past level 30 so that you lose the new player tax break, you should apply for a government post. A prime minister can appoint up to 27 people to various government posts, and the people appointed get tax breaks of 5%-20%, depending on the position. You can apply for one by clicking the Nation button, then "Government Post" on the left sidebar, then "Apply for Government Post" near the bottom right corner. All government posts are reset every time a prime minister election ends, so you'll have to reapply every two weeks. But it only takes seconds to apply, and few enough people do that a lot of posts go unfilled. How to approach the game This is a sandbox game in which you will make progress toward a lot of long-term goals in parallel. The game will not tell you what to do next every step of the way. It might look like it does initially with the admiral's chronicle, and you should play through the tutorial part of that, but you'll eventually hit a wall and be unable to progress the chronicle for a while, but have to do something else instead. Don't focus exclusively on one thing for very long. Trying to do too much of the same thing all at once is inefficient, and in some cases, the game will force you to stop. At best, focusing on just one thing will make the game feel painfully grindy. Do some combat, do some trading, do some land exploration, and swap between your activities. You can often multitask by doing a trade run or grabbing a union quest that takes you in the same direction as you were traveling for some other reason. This is a semi-idle game, and you'll need to embrace that to play the game well. Some things require your active attention, but there are also a lot of things that you shouldn't actively pay attention to. If you're sailing to a distant port that will take 20 minutes to reach, then don't just stare at the screen in that time. Tab out of the game and do something else: read a book, go eat dinner, play a different game, or whatever. You can also do consecutive combat or land exploration where you start it and let the game run, sometimes for hours at a time. It will take you some time to get the hang of when this is possible and how long it will take, but it's totally legitimate to start the game on doing something, then leave it running while you go to school or work or sleep or whatever. When it reaches a stopping condition, the game will effectively pause for you, so you won't die if you're not watching when it finishes. Being able to make ten hours of progress in a day while only actively playing the game for two is how to progress quickly.

Catch all the fish Basics Fishing can be done either manually or automatically. Auto-fishing uses one energy per five rods. Manual fishing does not use any energy. To start fishing manually, you can click on your ship to make the menu appear, then click fishing. To start fishing automatically, click the hook icon near the bottom left corner of your screen. In either case, you must select a rod to fish with, and then can optionally add a fishing paste. When fishing manually, click the button near the bottom right corner of your screen to cast your rod. After a while, a fish will approach your hook. When this happens, a yellow bar around the fishing icon will start blinking. If you click the button while it is only blinking, you will chase away the fish. If you wait until it starts flashing more brightly, it will hook the fish. Hooking the fish is very easy to do, and more a way to reject fish of sizes you don't want or prevent macroing than an actual challenge. Once you hook a fish, there will be a large blue bar with a vertical, yellow bar in it that moves back and forth. Part of the large bar will be dark green, and the center of the green portion will be light green. Click the fishing button again to stop the yellow bar. If you click in the dark green section, you make progress toward catching the fish of two times your fishing skill. In the light green section is a critical hit, which gives you progress of three times your fishing skill. I'll explain where your fishing skill comes from in a later secdtion. You get three clicks to reel in the fish. The total amount of progress toward catching the fish depends on the grade of the fish icon. The grade is visible from the fish, with higher grades using larger fish icons. This guide uses the icon for the S-grade fish as its picture, and the grade of the others will be obvious with a little bit of experience. The number of points needed to catch each grade of fish is: GradePointsS220A180B135C110D80 When fishing manually, hooking the fish happens automatically and will always succeed. The game will click automatically for you when reeling in the fish, but will probably tend to do a worse job of it than you would do yourself. If you have accumulated enough damage within three hooks, then you catch the fish. If not, then you fail and the fish escapes. You still consume a fishing rod in the latter case. If you reject a fish by clicking the icon before the fish bites, then this does not consume a fishing rod. If you catch a fish, then there are three possible rewards. One is some food to supply your fleet. This is commonly about half of catches, and far more than that in some areas. The second is 1-5 old chests. This is relatively rare and maybe 10% of the fish that you reel in. The third possibility is a named fish species. The first time you catch a given species, it gives you a discovery for that type of fish. On subsequent times, it gives you some resource. Each fish species has a corresponding resource, generally of the same grade as the fish, except that D-grade fish give C-grade resources. Certain buffs could cause you to get two or even three of the fish resource rather than one. The seas are divided into many zones. Each zone has 2-7 corresponding fish species. You can partially find zone maps by clicking on resources in your inventory, then clicking the pin to see where they can be caught by fishing. This will mostly give you a clear idea of the boundaries of various zones, except for when the same resource can be caught in two adjacent zones. When you start fishing in a given zone, the only fish icons that you can catch are those that range from the lowest grade fish species in the zone to the highest. For example, if a hypothetical zone has an A-grade fish species and a C-grade one, then you could see A, B, or C grade fish icons in that zone. You could not see S-grade because that is too high, nor D-grade because that is too low. You could see B-grade in spite of there not being a B-grade named fish species because that is between the lowest and the highest grade. When you catch a fish and get a named fish species, it can be any species in that zone of a grade no higher than the fish icon that you just caught. In the example above, a C-grade fish icon could only give you the C-grade named species. A B-grade fish icon would also only give you the C-grade named species. An A-grade fish icon could give you either the A-grade or C-grade named species. Any grade of fish icon could still give food or old chests instead of a named species. Fishing skill There are three sources of fishing skill. The first is the rod that you use. Fishing rods are generally bought in item shops, though some shops only sell low grade rods. Capital cities sell all grades of rods. If buying a lot of rods, it is recommended that you buy them from an item shop in a city for which you have a high level of the local language, as this will give you the best discount. The fishing rods available are: NameGradeSkillCostLegendary Fishing RodS4045000Notable Fishing RodA3535000Superior Fishing RodB3022000Intermediate Fishing RodC2516000Basic Fishing RodD2012000 The second source of fishing skill is mate skills. Some mates offer the Angler or Legend of Fishing skill. These are listed as offering 3 and 5 fishing skill points, respectively. They stack across mates, but not in the obvious, linear manner. The amount of fishing skill that you get from each skill as a function of the number of mates is given below. The amount gained from the two separate fishing skills do add in the obvious manner. #AnglerLegend of Fishing1352711381349155152361625718278192992131102842 The third source of fishing skill is various buffs. If your country has a prime minister, you'll probably having a +5 fishing skill buff most of the time. The Shoal of Flying Fish event gives +50 fishing skill, which makes it easy to catch everything with any rod. There can occasionally be other buffs, too, such as a +5 fishing skill buff during the first anniversary event. Higher fishing skill means you do more damage with each hit. It also makes the yellow bar move more slowly when trying to time clicks to catch fish manually. When auto-fishing, it increases the probability that the clicks will be successful. The probability of a successful hook when auto-fishing depends on the grade of the fish icon. The probability is (fishing skill) * (grade constant)/960, truncated at 1 if it would exceed this. The probability of a critical hit does not depend on fishing skill, both only on the fish grade. The grade constants and crit probabilities are are: GradeConstantCriticalS125A1510B2020C3030D3030 What you really care about when auto-fishing is the probability that you catch a fish, not that each hook succeeds. The percentage chances of catching various fish grades at various fishing skill levels, rounded to the nearest tenth of a percent, are given below: skillSABCD2000.16.234.568.42501.019.972.587.7300.311.948.098.999.2352.617.782.01001004012.937.492.61001004524.978.899.11001005031.287.71001001005576.894.61001001006084.499.01001001006590.81001001001007095.71001001001007598.910010010010080100100100100100 Note that there are large jumps at particular thresholds, such as when it only takes two successes rather than three to catch a fish. It's possible to have fishing skill levels that are not a multiple of 5, but those are not included to keep the table from getting way out of hand. Fishing skill 80 or higher makes auto-fishing guaranteed to succeed. Fish zones The seas are divided into many fishing zones. I list the zones below, together with the fish contained in each. Fishing zones don't have canonical names given by the game. As such, I supply my own names. If there is any port in the zone (that is, you'll be in the zone immediately upon leaving the port if you don't move), then I'll use such a port as the name of the zone. If there is no port but there is a village, then I'll use a village. If a zone contains neither a port nor a village, I'll just give as descriptive of a name as I can. Fishing zones often cross boundaries between level, seaworthiness, and other requirements to enter the area. In several cases, a fishing zone contains a port with high requirements to reach the port, but part of the zone has much lower requirements. For example, the zone that contains Whanganui (which requires level 75, 140 seaworthiness, and 80 momentum) extends to the eastern coast of Australia, where it only requires level 55, 95 seaworthiness, and no momentum. Such zones have the port name marked with an asterisk. Nearly all fishing zones contain multiple fish, apart from some exceptions listed later in this section. I list the zone name on the same line as the first fish in the zone, and subsequent lines list other fish in the same zone. Certain villages have very long names, so in some cases, I split the zone name across two lines for the sake of cleaner table spacing. There are also three fishing zones that correspond to the high seaworthiness areas where white elite fleets spawn, which is what "elite zone" refers to. For fish, I list the name of the fish, the grade of the fish, the resource that repeated catches give you, and the big catch requirements. The big catch requirements are generally a range of months and/or a collection of weather conditions. D-grade fish never have big catch requirements, but higher grade fish tend to have more stringent big catch requirements. Some data are missing. The name of any fish that I haven't caught personally via normal fishing is marked with a question mark. In some cases, I can get fish names from elsewhere (usually voyage.tw), but if I don't have an English name at all for the fish, I just leave it as three question marks. If I don't have the big catch requirements, I just leave the boxes for month and weather requirements blank. Weather requirements for a big catch are generally sets of weather conditions that allow the big catch. As a shorthand, I assign a letter to each possible weather status. In addition to the letter, I give the name of the weather, a text description of the icon, and the speed debuff (as a percentage) for your fleet that it applies. The speed debuff is irrelevant to fishing, but I figured that I might as well list it if I'm listing all the weather conditions anyway. CodeNameSpeedIcon descriptionAScorching Hot10sun with large, curved spikesBVery Sunny0sun with spikesCClear0sun with linesDLittle Cloudy0cloud and sunECloudy0cloudFVery Cloudy0two cloudsGMurky0oval cloudsHShower0cloud and three linesIRain10cloud and three raindropsJHeavy Rain20cloud and six linesKStorm30cloud, lighting, and two raindropsLSnow Pellet0cloud, slow, and two raindropsMSnow10big snowflakeNBlizzard20cloud and three snowflakesOSnowstorm30cloud and three snow crystals There are several species of fish that are caught in special, tiny zones. Let's dispense with those first before moving on to the main list. Four species of fish are caught as part of a particular admiral's chronicle. As best as I can tell, those four can only be caught as part of a chronicle. The chronicle takes you right to the exact spot to catch the fish, but if you go back after the chronicle is over, you'll only catch food and old chests, not named fish species. With repeat catches impossible, the resources and big catch conditions are irrelevant. The fish in question are: LocationSpeciesGradewest of Sao TomeIndo-Pacific Blue MarlinSeast of ToamasinaCoelacanthSsouth of UshuaiaAntarctic CodBsouth of UshuaiaAntarctic Colossal SquidB There are also four species of fish that each have several tiny zones. All four fish are S-grade, and always the only fish species in its own zone. Each has several zones, so I won't try to state the location. You'll have to find them by checking maps, whether resource maps or conspicuous holes in the zones of other fish. SpeciesGradeResourceMonthsWeatherGreat White SharkSColored Stonejul-decGIGiant SquidSHibiscus Teajul-janGISperm WhaleSFossil Pieceapr-octDMMako SharkSChamomile Teaapr-octDG Finally, we reach the main list of fish zones. It's broken into several sections because Steam has a maximum length of sections of a guide. All fish zones with a requirement larger than company level 70, 130 seaworthiness, 80 ice breaking, or 60 momentum are in the "high end" section. All zones in the other sections are reachable with those stats or lower--and often much lower. in some cases, most of the zone has higher requirements, but a small chunk is more accessible. Fish zones (northern Atlantic Ocean) LocationSpeciesGradeResourceMonthsWeatherVarnaJohn DorySDiamond Broochapr-octABCLong-spine PorcupinefishBLinen Handkerchiefjan-octDGHISardine*DSculpture by Unknown ArtistallallAntalyaGreen Sea TurtleBJade Turtlemar-novBCDGRemoraCSuperior Writing SuppliesallallSardine*DSculpture by Unknown ArtistallallNubia VillageNile PerchAClear Sloughjan-sepABCNile ArowanaBVillage MapallABCElectric CatfishBDangerous Poison FangallACDRagusaMediterranean Spearfish*AMusa Leaf Fanfeb-octCDSpiny DogfishCPort Recordmar-octBCDRainbow Runner*DVillage RecordallallSardine*DSculpture by Unknown ArtistallallBarcelonaMediterranean Spearfish*AMusa Leaf Fanfeb-octCDBlack Wing Flyingfish*CBroken RelicallallRainbow Runner*DVillage RecordallallSardine*DSculpture by Unknown ArtistallallLisboaSmooth HammerheadSYanggaengapr-octBCIBlack Wing Flyingfish*CBroken RelicallallRainbow Runner*DVillage RecordallallBordeauxSturgeonAFeathered Fanfeb-octCEMLive Sharksucker*CReptile ScaleallallSickle Pomfret*DSuperior Writing SuppliesallallSardine*DSculpture by Unknown ArtistallallLondonKiller WhaleAPorcelain Pipemay-janJLMRainbow Smelt*BSilk HandkerchiefallGHIElf Sculpin*CFish CakeallallSardine*DSculpture by Unknown ArtistallallGdanskWels CatfishBUrban Topography Mapfeb-octCGHIRainbow Smelt*BSilk HandkerchiefallGHIElf Sculpin*CFish CakeallallSardine*DSculpture by Unknown ArtistallallArkangelskHaddockSColored Stonemar-sepCDSalmonBMediterranean Sea AdventureallCDCapelin*DFish Cakejul-decallNarvikEuropean EelBBird’s Eye PaintingallGHMPacific CodBSuseokfeb-sepCDGGoblin SharkBWeather Mapsep-febLMNSticklebackCSculpture by Unknown ArtistallGLMNAtlantic MackerelDFish Cakeallallnorth of IcelandGreenland SharkSDiamond Broochoct-marLMLongneck EelBGolden LlamaallCLMAtlantic HerringCSeven Treasures Incense BurnerallFLMNAtlantic CodDSea LobsterallallReykjavikManta RaySWater Flouriteapr-octCMNMackerelCBroken RelicallallSickle Pomfret*DSuperior Writing SuppliesallallArviatHorseshoe Crab*BSuseokmar-janGHIJMahi-mahi*CPicture by Unknown ArtistallallCapelin*DFish Cakejul-decallnorthern Atlantic OceanMegamouth Shark*BEmbroidered Handkerchieffeb-novHILMSnakefish*BUrban Topography MapallCDMHorseshoe Crab*BSuseokmar-janGHIJMahi-mahi*CPicture by Unknown ArtistallallCohassetSnakefish*BUrban Topography MapallCDMChannel Scabbardfish*CReptile ScaleallallDeepbody Boarfish*DFinallallNassauFrilled SharkSDiamond Broochmar-novIJConger EelAMarbleallEIJYellowfin TunaBBird’s Eye PaintingallACDDeepbody Boarfish*DFinallallPawnee VillageAmerican PaddlefishSSapphire Broochapr-octIJAlligator GarAPorcelain KettleallCDMaracaiboManateeSColored Stoneapr-octABCGreen MorayAMahogany PipeallBCCrinoidDReptile Scaleallall Fish zones (southern Atlantic Ocean) LocationSpeciesGradeResourceMonthsWeatherCayenneRound HerringBFinding India’s Mysteryfeb-octGIJChannel Scabbardfish*CReptile ScaleallallDeepbody Boarfish*DFinallallTucano VillagePirarucuSRose Teafeb-augABCDoradoAPorcelain KettleallABCElectric EelBLinen HandkerchiefallABCRed-bellied PacuBSuseokallABCAnablepidCSuperior JournalallallTambaquiDFinallallBahiaSquirrelfishSYanggaengnov-mayHIUnicorn LeatherjacketBSilk HandkerchiefallCDIBigeye TunaBMediterranean Sea AdventureallCDIRoughear ScadDPort RecordallallRio de JaneiroPilot FishAMusa Leaf Fanjun-marDEGTadpole SculpinBEmbroidered HandkerchiefallGIJSmallspotted DartCSuperior Writing SuppliesallallBuenos AiresGlass CatfishSRuby Broochmar-sepCDAimara Wolf FishAPorcelain PipeallIJBlack ArowanaBJade Turtlefeb-sepBCDCandiruBDangerous Poison FangallHICommon PlecoDPicture by Unknown ArtistallallUshuaiaSawfish*SStrange Clawmar-sepABCFlapjack OctopusAMorta Pipemar-sepGMNSailfin Flying Fish*BWeather MapallABCSwarthy Skate*DVillage RecordallallSierra LeonePortuguese Man o’ WarBTraveling the Worldmar-sepBCLive Sharksucker*CReptile ScaleallallSickle Pomfret*DSuperior Writing SuppliesallallAbidjanCrocodile SharkSChamomile Teajun-novIJKBlue Sea SlugBGolden Llamajan-octBFGSharptail MolaCReptile ScaleallallFlame AngelfishDStarfishallallBeninShortnose SpurdogSSemiprecious Stoneapr-octIJScribbled LeatherjacketBDangerous Poison FangallGIJWhite SuckerfishCReptile ScaleallallFlathead Grey MulletDJournalallallLuandaButterfly RayAMarblemar-decABCLunartail PufferCFish CakeallallStarry ToadfishCSculpture by Unknown ArtistallallTimbuktuElephantnose FishAMeerschaum PipeallBCPolypterus EndlicheriACeramic Flower PotallABCMarbled LungfishBWeather MapallABCCape TownPompano DolphinfishBMediterranean Sea Adventurefeb-decDEIGray Seachub*CVillage RecordallallLonghorn CowfishCFinallallSlender Conger*DWriting Suppliesallallsouthwestern Atlantic OceanBasking SharkAMahogany Pipedec-julCIAtlantic IcefishDPort RecordallallAtlantic Ocean, Island in the SouthCobiaBLinen HandkerchiefallEGIMMetallic LanternfishCPicture by Unknown ArtistallallTarponDReptile Scaleallallfar south of AfricaScissortail SergeantAGneissmay-decCDFGray Seachub*CVillage RecordallallSlender Conger*DWriting Suppliesallall Fish zones (Indian Ocean) LocationSpeciesGradeResourceMonthsWeatherfar south of eastern AfricaHorned SoleBUrban Topography MapallHIDotted GrouperDBroken RelicallallNatalSkinnycreek LanternfishALimestonesep-mayCDIPolka-dot BoxfishBFinding India’s MysteryallBCGStarry Flying GurnardCBroken RelicallallMozambiqueGlowbellyBGold Butterfly HandkerchiefallFGIJPennant CoralfishCFish CakeallallPinecone FishDJournalallallAdenAtlantic TripletailAMeerschaum Pipejul-decABCBlack Pearl OysterASandstonefeb-augCGHCommon Silver-biddyBSurviving the North PoleallABCDJapanese RubyfishBGolden LlamaallABCDSilver BreamCWriting SuppliesallallGoaBroadnose Sevengill SharkSSemiprecious Stonejul-janABLizard FishBTraveling the Worldapr-febABCSilver PomfretBVillage Mapjan-novABCGrey Sharpnose SharkDJournalallallPelagic ThresherDSuperior JournalallallKotteTerapon TherapsBSilk Handkerchiefapr-decCIShortfin CigarfishBGolden LlamaallCICocktail WrasseDReptile ScaleallallBlack MarlinDReptile ScaleallallClownfishDFish CakeallallToamasinaBlue SeachubBLinen HandkerchiefallABCBothus MyriasterCPicture by Unknown ArtistallallBlackmouth AnglerCBroken RelicallallBluespine UnicornfishDClam Shellallallcentral Indian OceanWhale SharkSRose Teaoct-aprJKBombay DuckAFeathered Fanjul-marGHICone SnailBUrban Topography MapallHIMoonfishCClam ShellallGHIJDragon MorayCPort RecordallABCeastern Indian OceanDugongSPatterned Stonemar-sepABAmberstripe ScadAPorcelain Pipemay-decHIKLuna LionfishACeramic Platemay-decBCBoarfishCSuperior Writing SuppliesallGHIJRoyal EscolarDFish Cakeallallsouthwestern Indian OceanRough TriggerfishCJournalallEGIRhinoceros LeatherjacketCSuperior Writing SuppliesallallSmooth BlaasopCFinallallZebra Bullhead SharkCStarfishallallBartail FlatheadDSuperior Writing Suppliesallallsouthern Indian OceanGiant GuitarfishSWater Flouritefeb-augCDIndo-Pacific Sergeant*DBroken RelicallallYellowtail Blue SnapperDWriting SuppliesallallWhite Spotted PufferDSea Lobsterallallsoutheastern Indian OceanManybar GoatfishCVillage Recordfeb-octBCDOriental Flying GurnardCSuperior JournalallGILMThreetooth PufferDFish CakeallallClown TriggerfishDSea LobsterallallBengal SergeantDFinallallMalaccaHoundfishBBird’s Eye Paintingjun-marBCDCardinalfishBDangerous Poison Fangapr-decBCDOscellated WaspfishCStarfishjul-mayCGIScorpionfishCSea Lobsterjan-octABCYellowfish SeabreamDSculpture by Unknown ArtistallallBruneiSpotless Smooth-houndSHibiscus Teajan-junIJBarred SoapfishASilk FanallABCJapanese Gizzard ShadBSurviving the North PoleallBCEBumphead ParrotfishBSeven Treasures Incense Burnerfeb-octBCEBlack Pomfret*CPort Recordapr-decBCDStriped Ponyfish*DBroken RelicallallBigeye TravallyDPort RecordallallHanoiRock BreamSRose Teaapr-octBCMilkfishBGold Butterfly HandkerchiefallBCDKobe FlounderBSuseokoct-febIMMilky Spotted SoleBSeven Treasures Incense BurnerallBCDOlive FlounderCJournalallGHIJSea BassCWriting SuppliesallABCDBlue FlyingfishDClam Shellallall Fish zones (western Pacific Ocean) LocationSpeciesGradeResourceMonthsWeatherTernateSawedged PerchSSapphire Broochfeb-julIJRed Seabream*ASilk Fanfeb-sepCDGRoa ModestaBSeven Treasures Incense Burnerfeb-octGHIBlue-backed FishCSculpture by Unknown Artistoct-augGHIJGolden SpadefishDSuperior JournalallallDiliSlender ShadSFossil Piecefeb-julFGKelp GrouperBVillage Mapjan-sepHIHumphead WrasseBSurviving the North PoleallHIJDogtooth Flathead FishCVillage Recordapr-febCGHYellow-wing FlyingfishDPicture by Unknown ArtistallallYawuru VillageFrigate TunaSStrawberry Tartmar-sepADLined JavelinfishACeramic Flower Potjul-decCDPacific SauryBUrban Topography Mapnov-junABCBlack Pomfret*CPort Recordapr-decBCDStriped Ponyfish*DBroken RelicallallPinjarraRainbow WrasseSEmerald Broochoct-marABPinspotted PinefootAOrchid Painting Fanmay-decCHMegamouth Shark*BEmbroidered Handkerchieffeb-novHILMBarramundiBTraveling the Worldsep-febABCBonefishDClam ShellallallHobartRedbelt Monocle BreamBBird’s Eye PaintingallHIPigfishDPort RecordallallWhanganui*Hairy FrogfishSStrawberry Tartaug-janCDJapanese ScadCWriting Suppliesapr-julBCDBeardieCFish CakeallGHIelite zone east of AustraliaPink Cusk-eelSColored Stonejan-junCDCopper SharkSStrange Clawjun-decCDSnipe EelsALimestonejun-decCEGThread-sail FilefishBFinding India’s Mysteryaug-mayBCEStriped Eel CatfishCSculpture by Unknown ArtistallCEIMPacific PomfretDBroken RelicallallK’gariBlackspotted PufferSDiamond Broochdec-mayDHWhitesaddle GoatfishAMahogany Pipemay-novCDSmallhead HairtailCWriting SuppliesallBCDIStarry HandfishCFish CakeallBCDIObtuse BarracudaCPort RecordallBCDHKakatuwahBluespotted TrevallySLavender Teasep-marABCommon Cuttlefish*APorcelain Kettlejan-junJKPrickly LeatherjacketBEmbroidered HandkerchiefallBCOne-spot SnapperCSuperior JournalallBCDISpiny SeahorseCStarfishnov-augCGIIndo-Pacific Sergeant*DBroken RelicallallHagatnaCommon ThresherSColored Stoneapr-octIJYellowfin GrouperAOrchid Painting Fanmar-octCISmall Yellow CroakerBDangerous Poison Fangjul-mayCDDragon PoacherBUrban Topography Mapapr-novGIJBigeyeCVillage RecordallGHIHangzhouDraughtboard SharkSLavender Teajul-decJKJapanese EelAMorta Pipefeb-augCIFlatheadBGolden Llamamay-febBCDSlender PonyfishBBird’s Eye PaintingallHIJArmorclad Rockfish*BSurviving the North Polemar-decCDIStriped Fangblenny MimicCSea Lobsterjul-aprHIMLargescale Blackfish*CPicture by Unknown ArtistallallYellowback SeabreamDSuperior JournalallallHanyangCatsharkSLavender Teamar-sepABCSo-iuy MulletBDangerous Poison FangallBCDBanded HoundsharkBSeven Treasures Incense BurnerallBCDDivine Dwarf GobyCFinallBCDSchlegel’s GrouperCJournalallBCDChongqingFinless PorpoiseACeramic CupallBCAyuAOrchid Painting Fanmay-decCDGArmored CatfishCPicture by Unknown Artistfeb-novHIJTroutDVillage RecordallallEdoJapanese WobbegongSRose Teafeb-augGHIPrickly LanternfishSStrawberry Tartnov-aprBCFlasher ScorpionfishACeramic Platemar-octCIBrassy ChubBVillage Mapfeb-sepBCDUndulated MorayBSeven Treasures Incense Burnerfeb-octCDEFlying FishCVillage Recordfeb-decCDECrescent SweetlipsDFinallallPinecone SoldierfishDPicture by Unknown Artistallall Fish zones (northern Pacific Ocean) LocationSpeciesGradeResourceMonthsWeatherelite zone east of JapanPelican EelSHibiscus Teaapr-decCDBlackhead SeabreamSStrange Clawjul-janCMArmored WeaselfishALimestonejul-decCDDaggertooth Pike CongerBMediterranean Sea Adventureaug-aprCGMCoral TroutCVillage RecordallCDEIThreadfin PorgyDWriting SuppliesallallYeongilSawsharkSChamomile Teanov-janMNOStriped Red MulletBGold Butterfly HandkerchiefallBCDRichardson DragonetBJade TurtleallBCDGizzard ShadBEmbroidered Handkerchiefoct-mayBCDArmorclad Rockfish*BSurviving the North Polemar-decCDILargescale Blackfish*CPicture by Unknown ArtistallallBlotched EelpoutCStarfishallHILMLavender JobfishDStarfishallallOkhotskDolly Varden TroutSChamomile Teajul-decCMSailfin SandfishBSuseokjul-decGNPinnate SpadefishBGold Butterfly Handkerchiefapr-janHLBlue MackerelCSculpture by Unknown Artistapr-decGMNOBottom SkateCSea LobsterallFGMNOkhotsk Atka MackerelCJournaljan-octCGMsouth of Kamchatka PeninsulaWhitespotted Bamboo SharkSColored Stonenov-aprNORudarius ErcodesBJade Turtlejun-marGLMChameleon GobyBUrban Topography MapallLMNCypselurus HiraiiBSilk HandkerchiefallCEGCloudy CatsharkCClam ShellallGLMNRainbow TroutCWriting SuppliesallCGHKorfLongnose SeabatSEmerald Broochmar-sepLMSpinyhead SculpinASandstonejul-decGMBering WolffishBSurviving the North PoleallCGJapanese SeerfishCClam Shellmay-marCGLMRed StingrayDSuperior JournalallallBering StraitSalmon SharkSStrawberry Tartmar-sepCMStarry FlounderAOrchid Painting Fanaug-aprCDSteller’s Sea Cow*BEmbroidered HandkerchiefallCDElectric RayDStarfishallallYellowfin SoleDWriting SuppliesallallUnalaskaSea RobinSWater Flouriteoct-aprIJArctic LampreyAMusa Leaf Fansep-julIJAtka MackerelBSurviving the North PoleallBCScaly Hairfin AnchovyCFish CakeallBCDSidespot GoatfishDBroken RelicallallGulf of AlaskaGray WhaleSSemlaaug-janNOCrimson SeabreamASandstoneoct-mayGLSteller’s Sea Cow*BEmbroidered HandkerchiefallCDThreespotted SeahorseDPort RecordallallTacomaBluefin TunaSPatterned Stonemay-novCDSnake Eel*AMahogany Pipemay-decCEPacific Sailfish*BBird’s Eye PaintingallCEGGoddess RazorfishDSea LobsterallallOhloneShortspine SpurdogSFossil Pieceapr-octIJAlbacoreACeramic Cupsep-aprCDPacific Sailfish*BBird’s Eye PaintingallCEGBigeye ScadDStarfishallallApache VillageRed TilefishSEmerald Broochoct-marBCSnake Eel*AMahogany Pipemay-decCEPacific Sailfish*BBird’s Eye PaintingallCEGAnchovy*DSuperior Writing SuppliesallallChinook Salmon*DClam ShellallallSouth of MexicoStarry PufferSSchneeballapr-octABCThreadfin ButterflyfishAMorta Pipemay-decBCThreeband PennantfishBWeather Mapfeb-sepBCDStripeyBFinding India’s Mysterymar-octBCGChinook Salmon*DClam ShellallallLimaScalloped HammerheadSYanggaengjul-decIJStarspotted Smooth-hound*AGneissallLMRed-lipped BatfishDSea LobsterallallFlathead SilversideDPort Recordallall Fish zones (eastern Pacific Ocean) LocationSpeciesGradeResourceMonthsWeatherelite zone west of PeruSpotted CatfishSHibiscus Teaoct-aprABGSpot-tail SharkSLavender Teaaug-janAEGLongfinned BullseyeAClear Sloughjun-decABGBlack TriggerfishBMediterranean Sea Adventureaug-febABGOpahCWriting SuppliesallABEGValparaisoSawfish*SStrange Clawmar-sepABCSwordfishAGneissfeb-augBCSailfin Flying Fish*BWeather MapallABCSwarthy Skate*DVillage Recordallallwest of ChileMinke WhaleSChamomile Teajan-junABStarspotted Smooth-hound*AGneissallLMLongspine SnipefishBTraveling the Worldjan-julGISeahorseDSculpture by Unknown ArtistallallLong-eared VillageSharpnose Sevengill SharkSLavender Teaaug-janGMRed Seabream*ASilk Fanfeb-sepCDGAnchovy*DSuperior Writing SuppliesallallSpotted UnicornfishDWriting SuppliesallallMahinaYellow BoxfishSYanggaengjul-decCIBlue-ringed OctopusSSapphire Broochapr-octDEILongtail TunaAMarblefeb-octCISpotted MorayBTraveling the Worldjan-junCDEDusky-banded MorayBFinding India’s Mysterysep-mayCDGAtuonaBlue Emperor ScavengerSLavender Teamay-octGIZebra SoleAFeathered Fanmay-novBCRed-eye PufferBMediterranean Sea Adventurejul-mayABCPrincess Small Porgy*CSculpture by Unknown Artistjul-aprBCDRed Flathead*DBroken Relicallallwest of Tuamotu ArchipelagoSmooth CornetfishSFossil Piecefeb-augCDEMoon WrasseACeramic Cupjul-decDGPrincess Small Porgy*CSculpture by Unknown Artistjul-aprBCDRed Flathead*DBroken RelicallallBluestreak Cleaner WrasseDSea Lobsterallallfar southeast Pacific OceanRosy SeabassSSemiprecious Stonefeb-augGIDeepwater SquirrelfishASilk Fanapr-octCDIndian DriftfishBSuseokmar-octCDEGafftopsail Goby*CSuperior JournalallBCDMackerel Tuna*DPicture by Unknown Artistallallfar south Pacific OceanBlue SharkSHibiscus Teafeb-augEIFloral Egg CrabAPorcelain Pipemar-novCDMa-anagoBMediterranean Sea Adventureaug-aprDEGGafftopsail Goby*CSuperior JournalallBCDMackerel Tuna*DPicture by Unknown Artistallallnorth of FijiTiger SharkSColored Stoneapr-octIJKCommon Cuttlefish*APorcelain Kettlejan-junJKYellowtail SergeantBUrban Topography MapallBCMackerel ScadBBird’s Eye PaintingallCDGreat SeahorseBJade TurtleallCEGPainted SweetlipsDClam ShellallallYuldoStriped GrouperSPatterned Stonemar-sepBCSea CognerBTraveling the WorldallBCSillago AeolusCBroken RelicallBCEGlasseye SnapperDPicture by Unknown Artistallallnorth of New GuineaRaggy ScorpionfishSSemlaapr-octBCSilver GruntAMahogany Pipemar-decIMHalfbeakBFinding India’s Mysteryapr-decCGITaiwan TaiDClam ShellallallLongspine EmperorDJournalallalleast of HawaiiBaird’s Beaked WhaleSWater Flouritesep-marNOYellow ChromisAClear Sloughapr-octCEAlaskan PollockBGolden LlamaallCEGreasy GrouperDSculpture by Unknown Artistallall Fish zones (high end) LocationSpeciesGradeResourceMonthsWeathersoutheast of FijiBlubberlip SnapperBDangerous Poison FangallDIClioneCJournalallGHIJStriped BoarfishDFinallallNorthern WhitingDClam ShellallallAntarcticaAntarctic ToothfishSRose Teajan-junCMRight WhaleACeramic Platejul-decCMPatagonian ToothfishBBird’s Eye Paintingaug-mayCMOMarbled RockcodBSuseokmar-decCMOHonoluluIsland TrevallySSemlamar-sepCDLongfin YellowtailBSeven Treasures Incense Burnermar-sepABShort-nosed Tripod FishCSea LobsterallBCDGStriped BonitoDWriting SuppliesallallBarrowBowhead WhaleSChamomile Teaoct-aprLMNorthern Sand LanceBUrban Topography MapallCDRock SoleDVillage MapallLMCherskyPink Salmon*SHibiscus Teaoct-marCGSilverspotted SculpinBJade TurtleallLMHard ClamDJournalallallBermuda Island VillageOcean SunfishSSemlamar-sepIJGarfishBUrban Topography MapallACDTrumpetfishCSea LobsterallallLuminous HakeDFish CakeallallTongatapu Island VillageDark CardinalfishSRuby Broochjun-decCILemur-tail SeahorseAMeerschaum Pipejan-junJKSpotted HawkfishBSeven Treasures Incense Burnerapr-decGIJAfrican PompanoDStarfishallallPolar Regions, Island of Snowy MountainsPink Salmon*SHibiscus Teaoct-marCGMatron FlatheadACeramic Flower Potnov-junMNCrested SculpinAMorta Pipenov-aprCMVeteran PoacherBBird’s Eye PaintingallLMYakut VillagePink Salmon*SHibiscus Teaoct-marCGPikeBLinen HandkerchiefallGMCanadian spotsSleeper SharkSFossil Piecejan-junMOArctic Char*ASandstonemar-octCMArctic Grayling*BSurviving the North Polejan-octallArctic Cod*CPicture by Unknown ArtistallallCambridge BayArctic Char*ASandstonemar-octCMArctic Grayling*BSurviving the North Polejan-octallArctic Cod*CPicture by Unknown Artistallallfar north of AlaskaStarry Flounder*AOrchid Painting Fanaug-aprCDThreespotted Seahorse*DPort RecordallallMaleVariegated LizardfishSLavender Teajan-junBICommon Pike CongerACeramic Platemay-decGISulphur GoatfishBSuseokallBCIBlack-banded TrevallyCFinallallremovedOarfishAMarbleoct-aprNO Suva is just outside the "southeast of Fiji" zone, so you barely have to move after leaving port to reach the zone. The Antarctica zone is almost entirely not yet accessible, but there is a small chunk of it south of Whanganui that requires company level 75, 140 seaworthiness, and 75 ice breaking. The zone technically does not require momentum, but you must pass through a zone that requires 80 momentum to reach it, so it effectively does. The "Canadian spots" zone is three small spots inside of the larger Cambridge Bay zone. Unlike other very small zones, this one also allows you to catch the all of the same fish as in the larger, surrounding zone. If you want to find the precise spots, then realistically, you need to get a fossil piece from another source and then check the map of where it is obtainable. "Removed" is not a zone, but the Oarfish used to be in the Arkangelsk zone, but was removed. The September patch scrambled a bunch of fish in the Arctic area, but I've made all of the corrections for this that I'm aware of. Exceptional fish Some fish are uncatchable in certain months. I'm not sure if the precise month requirements, but the month restrictions seem to go by temperate seasons. The fish that I'm aware of that seem to have limited months for catch are: ZoneMar-May onlyNot Mar-MayNot Jun-AugNot Dec-FebGdanskWels CatfishReykjavikSickle Pomfret*Manta RayBahiaSquirrelfishUnicorn LeatherjacketBigeye TunaBruneiBlack Pomfret*Striped Ponyfish*Bigeye Trevallywest of Tuamotu ArchipelagoBluestreak Cleaner Wrassesoutheast of FijiNorthern WhitingClione Note that the Black Pomfret and Striped Ponyfish have month restrictions in the Brunei zone, but they're catchable simultaneously in the Yawuru Village zone. The Mediterranean Spearfish is caught as part of Pilly Reis's chronicle. It has something weird going on, or maybe it just used to be bugged and was fixed. I've caught it both during the Mar-May window and also outside of that window. The data on voyage.tw for the Antarctica zone is weird and at least partially wrong. Both B-grade fish have the wrong names. It lists two A-grade fish, one of which has the name Right Whale, and the other of which has the picture of a Right Whale. Only one A-grade resource is available in that zone. Furthermore, if a second A-grade fish exists there, it's extremely rare, so I list the Right Whale as the only A-grade fish.
Just a little bit of information for reflection, obtained as a result of trading first-hand. This is not a complete, exhaustive guide to trading. Here are trade routes of varying degrees of profitability, including non-profitable ones, for understanding and insights on how to trade independently. Although these trade routes were tried myself from the first-hand, the numbers are strictly approximate and you can use this information at your own risk. Award that Guide and maybe i will continue... Fleet Conditions 5 lvl 4 ships (without cannons, 50% trade hull, min crew) Admiral Nation - England, main City - London. Bonuses: all beginners bonuses enabled Total Load Hull: 363 Trade Goods Hull: 183 Crew: 149 Max days of Sailing: 16 Supply Load: Water 23%, Food 23%, Material 2%, Ammo 2%, Trade Goods 50% EUROPE CAPITALS TRADE ROUTS (lvl 1-14) Total 5 capital in Europe - London, Amsterdam, Lisboa, Seville, Constantinople ROUTS to/from LONDON (EUROPE) Am-t 540k, Profit 350k London - Neapol. Steel, Beer, Whisky. 16 days Am-t 450k, Profit 340k Neapol - London. Pasta, Velvet. 16 days Am-t 540k, Profit 350k London - St.Petersburgh. Steel, Beer, Whisky. 12 days Am-t 350k, Profit 211k StPetersburgh - London. Vodka, R.Fur, Felt. 12 days Am-t 180k, Profit -5k London - Ceuta. Steel, Beer, Whisky. 8 days Am-t 256k, Profit 81k London - Calais. Steel, Beer, Whisky. 1 day Am-t 202k, Profit 71k Calais - London Gobelin,A.Vinegar,Oyster. 1 day Am-t 305k, Profit 120k London - Antwerp. Steel, Beer, Whisky. 1 day Am-t 318k, Profit 144k London - D.Helder. Steel, Beer, Whisky. 1 day Am-t 142k, Profit 60k D.Helder - Parsley,G.Bead,Tapestry. 1 day Am-t 190k, Profit 3k London - Algiers. Steel, Beer, Whisky. 10 days Am-t 341k, Profit 158k London - Lisboa. Steel, Beer, Whisky. 8 days Am-t 323k, Profit 182k Lisboa - London. R.Sault, Almond, H.Cannon,P.Material. 8 days Am-t 443k, Profit 252k London - Seville. Steel, Beer, Whisky. 9 days Am-t 437k, Profit 245k Seville - London,M.Gun,W.Cannon,Mercury. 9 days Am-t 490k, Profit 300k London - Valencia. Steel, Beer, Whisky. 11 days Am-t 270k, Profit 169k Valencia - London. Rosemary, Almond, Raisin. 11 days Am-t 487k, Profit 321k London - Palma. Steel, Beer, Whisky. 12 days Am-t 485k, Profit 317k London - Barcelona. Steel, Beer, Whisky. 13 days Am-t 322k, Profit 158k London - Bordeaux. Steel, Beer, Whisky. 5 days Am-t 506k, Profit 340k London - Marseile. Steel, Beer, Whisky. 14 days Am-t 560k, Profit 349k London - Genova. Steel, Beer, Whisky. 15 days Am-t 515k, Profit 394k London - Pisa. Steel, Beer, Whisky. 14 days Am-t 529k, Profit 362k London - Calvi. Steel, Beer, Whisky. 14 days Am-t 451k, Profit 284k London - Sassari. Steel, Beer, Whisky. 14 days Am-t 510k, Profit 344k London - Cagliari. Steel, Beer, Whisky. 14 days Am-t 496k, Profit 330k London - Syracuse. Steel, Beer, Whisky. 15 days Am-t 513k, Profit 349k London - Candia. Steel, Beer, Whisky. 17 days (exceed supply!) Am-t 436k, Profit 302k Candia - London. Oakmoss, Marble, M.Statue,Olive. 17 days (exceed supply!) ROUTS to/from AMSTERDAM (EUROPE) Am-t 412k, Profit 279k Amsterdam - StPetersburgh. P.Herring, Gin. 12 days Am-t 335k, Profit 201k St.Petersburgh - Amsterdam. Vodka, R.Fur, Felt. 12 days Am-t 327k, Profit 195k Amsterdam - Lisboa. P.Herring, Gin. 7 days Am-t 339k, Profit 208k Amsterdam - Seville. P.Herring, Gin. 9 days Am-t 288k, Profit 183k Seville - Amsterdam. M.Salve, Vine. 9 days ROUTS to/from CONSTANTINOPLE (EUROPE) Am-t 393k, Profit 261k Constantinople - Seville. T.Delight, Carpet,Damask. 13 days Am-t 348k, Profit 216k Constantinople - Ceuta. T.Delight, Carpet,Damask. 12 days Am-t 377k, Profit 246k Constantinople - Faro. T.Delight, Carpet,Damask. 13 days Am-t 384k, Profit 252k Constantinople - Lisboa. T.Delight, Carpet,Damask. 14 days Am-t 424k, Profit 292k Constantinople - Porto. T.Delight, Carpet,Damask. 16 days Am-t 329k, Profit 211k Porto - Constantinople. H.Cannon, Azulejo,Cannonball. 16 days Am-t 296k, Profit 153k Pisa - Constantinople. M.Statue,Velvet,W.Cannon. 8 days SEVILLE (EUROPE) Am-t 308k, Profit 178k Athens - Seville. Parchment, Marble,Laurel,Oakmoss. 15 days Am-t 339k, Profit 208k Amsterdam - Seville. P.Herring, Gin. 9 days Am-t 288k, Profit 183k Seville - Amsterdam. M.Salve, Vine. 9 days Am-t 393k, Profit 261k Constantinople - Seville. T.Delight, Carpet,Damask. 13 days Am-t 443k, Profit 252k London - Seville. Steel, Beer, Whisky. 9 days Am-t 437k, Profit 245k Seville - London,M.Gun,W.Cannon,Mercury. 9 days Am-t 308k, Profit 178k Athens - Seville. Parchment, Marble,Laurel,Oakmoss. 12 days Lisboa (EUROPE) Am-t 341k, Profit 158k London - Lisboa. Steel, Beer, Whisky. 8 days Am-t 323k, Profit 182k Lisboa - London. R.Sault, Almond, H.Cannon,P.Material. 8 days Am-t 327k, Profit 195k Amsterdam - Lisboa. P.Herring, Gin. 7 days Am-t 384k, Profit 252k Constantinople - Lisboa. T.Delight, Carpet,Damask. 14 days MINOR EUROPE TRADE ROUTS ROUTS to/from Athens (EUROPE) Am-t 194k, Profit 64k Athens - Antalya. Parchment, Marble,Laurel,Oakmoss. 3 days Am-t 201k, Profit 70k Athens - Lefkosa. Parchment, Marble,Laurel,Oakmoss. 4 days Am-t 202k, Profit 72k Athens - Beirut. Parchment, Marble,Laurel,Oakmoss. 4 days Am-t 206k, Profit 76k Athens - Jaffa. Parchment, Marble,Laurel,Oakmoss. 4 days Am-t 215k, Profit 85k Athens - P.Said. Parchment, Marble,Laurel,Oakmoss. 4 days Am-t 205k, Profit 74k Athens - Alexandria. Parchment, Marble,Laurel,Oakmoss. 4 days Am-t 308k, Profit 178k Athens - Seville. Parchment, Marble,Laurel,Oakmoss. 12 days WEST AFRICA TRADE ROUTS (15 lvl+) CAPITALS TO AFRICA TRADE ROUTS ROUTS to/from LONDON (AFRICA) Am-t 491k, Profit 298k London - Funchal. Steel, Beer, Flannel. 10 days Am-t 249k, Profit 148k Funchal - London. Sugar, M.Wine, S.Cane. 10 days Am-t 472k, Profit 312k London - Arguin. Steel, Brass, Flannel. 12 days Am-t 420k, Profit 305k Arguin - London. S.Wood, Cofee, Rubellite,Gold. 12 days Am-t 470k, Profit 310k London - Bathurst. Steel, Brass, Flannel. 14 days Am-t 435k, Profit 297k Bathurst- London. R.Pea, G.Dust, Nayin,T.Ore. 18 days (exceed supply!) Am-t 466k, Profit 293k London - Praia. Steel, Brass, Flannel. 16 days Am-t 271k, Profit 179k Praia - London. P.Millet, Sugar, F.Meat,S.Cane,P.Craft,Coral 18 days (exceed supply!) Disclaimer ACTUAL FOR VERSION in may 2023 Pay attention to the fact that the game is still developing, and trade routes, goods, delivery time may vary. The author of the guide does not take any responsibility, of any actions, or as a result of using information from the guide. Postscriptum I created TARTARUS guild TARTARUS - international guild recruting (ATLANTIC SERVER, AMERICA) ENG lang main. Join free now!

