换一换
换一换 


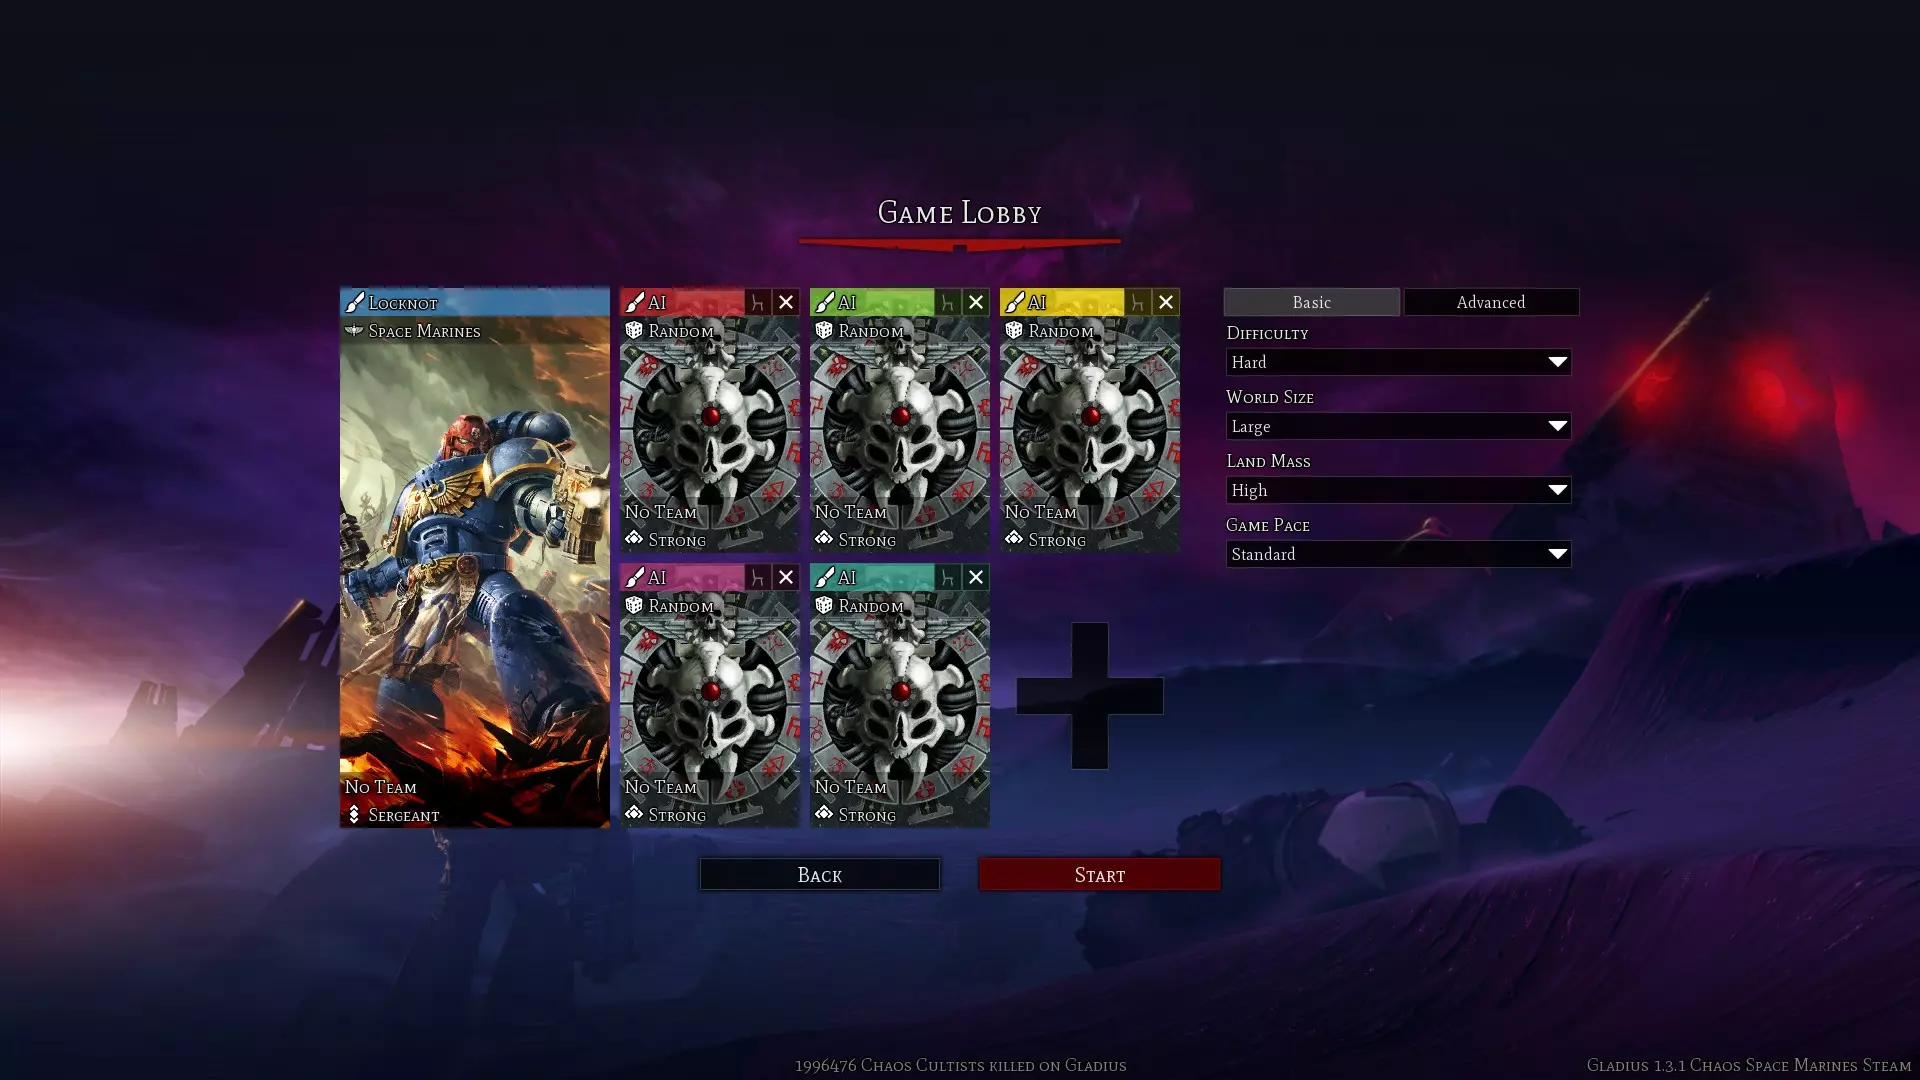
This guide will help you win as a solo or co-op player against the Impossible AI in Gladius - Relics of War. The guide isn't faction specific, instead providing general tips to help build an economy and a winning army against the best the AI can offer! Introduction The purpose of this guide is to supplement other specific faction guides, providing general advice to improve your play on the highest difficulty levels. There are several paths to victory; here, I’ll focus on beating the AI in a (mostly) fair fight, without skewing the settings or finishing the story. (If it’s the achievements you’re after, please refer to my comprehensive achievement guide for specific advice.) This guide is lengthy, but there’s a summary at the end if you just want some quick tips to help your game. Faction-specific assistance Here is my Ork-specific guide: https://steamcommunity.com/sharedfiles/filedetails/?id=3029674153 Or if you'd rather play with tanks: https://steamcommunity.com/sharedfiles/filedetails/?id=3067031734 And if you're interested in Chaos Space Marines: https://steamcommunity.com/sharedfiles/filedetails/?id=3051622207 Let's not forget the "Space Elves!" https://steamcommunity.com/sharedfiles/filedetails/?id=3343149132 How about an ever-growing army of the undead? https://steamcommunity.com/sharedfiles/filedetails/?id=3439729855 Join us, Battle Brothers! For the Emperor of Mankind! https://steamcommunity.com/sharedfiles/filedetails/?id=3389488283 Why is Impossible so hard? Impossible opponents get two boosts: 1) All units are granted five experience levels upon creation and 2) All cities start with +100 loyalty. This doesn't seem like much compared to other games, does it? In Gladius, the difficulty level of your opponent is determined almost entirely by changes in loyalty. These settings are remarkably simple; the designers essentially picked a single variable to change to create the seven tiers of difficulty—the loyalty boost. Ultimately the big tilt for Impossible comes from the loyalty bonus; that extra 100 loyalty has a cascade of profound secondary effects. It doubles output from every building in the starting city, and allows the AI to build new cities with impunity, which in turn exponentially multiplies unit production. On the other hand, if *you* try to build a bunch of cities with your zero starting loyalty bonus, you’ll quickly enter a negative spiral where decreasing loyalty gobbles up your production. Note that the five level bonus seems great, but in practice (in a long game) it doesn’t much matter except at the very beginning. In my opinion, those extra five levels mostly allow the the AI’s initial units to survive against creeps even with typical reckless tactics. Setting up a game of Gladius This section gives some advice on the setup screen, before you even start playing. For the most balanced challenge, set the AI to Impossible and play against a single opponent. If in two-player co-op, play against two Impossible AIs. For this game to have the appropriate difficulty, you should set your own level at normal. The flow of a game of Gladius will vary widely based on starting settings. For my favorite style, I set the following (any I don't mention I leave at the default): Basic SettingsMap Size: Large Land Mass: Very high Game Pace: Fast Advanced SettingsAll Downloadable Content: On Quests: On Turns, Costs, Upkeeps: Medium (default) Wildlife & Special Resources: Very High Artefacts, Ruins, and Traders: High Faction features, Imperial Ruins, and Forest: Medium (default) Rivers: High Region Size: Small Arctic: High Jungle: High Desert: Medium Volcanic: Low Effects of these starting choicesThese settings produce a game with certain consistent features which you’ll like if you want a deep strategic game. My suggested basic settings will give you a large map without huge lakes isolating unlucky factions, and with a game pace which allows the player to advance through the early game without a listless period of minimal combat. Increased game pace also reduces the prices at the Jokero Traders, which helps you outfit your heroes. (Note that this gives you an advantage over the AI, as it will not purchase items from the Jokero.) WaterFirst, in response to a great comment by Koger, let me discuss water a bit more. I've observed that high water maps greatly increase imbalance. If you're surrounded by water, your growth is crippled. Conversely, if you pick a spot with good starting land, then that water has to be somewhere, right? Usually it'll be near the AI, greatly limiting your opponent. For single player, you should consider high water if you want to limit the AI's city spam and potentially make an easier game. For co-op, you'll find it very challenging to find a map where one of you isn't drowning :) The advanced settings spawn a huge number of neutral units guarding an equally large number of outposts. This makes the early and mid-game a continuous series of tactical struggles over valuable map points, and delays the encounter with the AI opponent. I love this! Instead of only the top-tier units being useful, all of them have their place as you fight your way through waves of neutral creeps to get to that Siren Caster or Holoprojector. Your strategy will have to evolve constantly to maximize expansion without overreaching and losing valuable units. Further settings tweak the basic map to shrink the region size, which makes the map more of patchwork, and helps my cities avoid being stranded in a huge desert or volcanic plain. I increase tundra and tropical because this lets my cities have more access to food and research, which are early staples for most factions. Setting variantsTechnology By changing these settings, you greatly alter the game's dynamics. I've played around, and I find that giving myself all the technologies makes for a quick but dull game where you build your biggest units as quickly as possible. Conversely, if you slow down technology tier advancement (by requiring more techs per level) then the game can be quite interesting...you have to learn to use low-level units to their maximum abilities to survive! Region DensityWith maximum density you get a much more varied terrain, and if you turn up other settings, like outposts, you'll get these in huge numbers and often in close proximity. You'll frequently see areas where a single tile borders two outposts, and sometimes (very rarely) three! This makes for some interesting city locations, and is particularly helpful for the Space Marines' Fortresses. Starting Faction Obviously, each faction has strengths and weaknesses which affect starting settings and locations, but this is actually much less important than you’d think. If you’re new to impossible, start with the Space Marines. Many of the game’s nastiest strategic challenges don’t apply to them, allowing you to get your footing with less frustration: They don’t have any terrain negatives. They don’t have to worry about founding a second city. Loyalty is nearly a non-issue for them. They don’t have to worry about being near outposts. Their starting infantry are the best in the game, so they don’t tend to die off with small mistakes. They don’t really have any functional gaps in their forces. And so on. Other base game factions The Necrons are probably the easiest faction to actually win the game, but they lack the total simplicity of the Space Marines.) The Astra Militarum are quite challenging to win with a conventional victory as they struggle for resources in the early game, and have fragile units requiring a lot of coordination. However, they are without a doubt the best for beating Impossible using a Story victory! The Orks provide wonderful fun and a variety of units, but have some unique mechanics that can make them seem very difficult at first. For my "secret strategy," please see the Ork-specific guide, or just play them a lot until you get the rhythm. DLC factions Most of these factions have quirky features which make them difficult to master quickly. In general, my advice is to "use the thing that makes them unique!" For example, the Chaos Marines use population as a separate resource; the Drukhari utilize stacking infantry buffs; the Tyranids can support huge numbers of units and cities, etc. Particularly difficult factions (in my opinion) to win against Impossible (for people new to the difficulty): The T'au: Loyalty rules which limit city growth and a not-so-great set of faction abilities. Sisters of Battle: I love the Sororitas in theory, but their infantry-oriented approach and city limitations make the end game difficult. Also, faction abilities are mostly so-so. Aeldari: If you can make it to the end, they're actually really solid in Impossible...*if*... The T'au: Yes, I did mean to mention them twice :) Starting Your First City Starting City Locations This is your first, and possibly most important, decision of the game. Your starting city location is so important that it’s worth rerolling the map as often as needed to get a good beginning (Gladius kindly keeps all your settings upon restart, making this relatively painless). First, scan your overall position on the global map. Start with the minimap in the corner of the screen. You’ll want to start near a corner, but not completely tucked in so that you have space to expand *away* from the enemy. A mix of terrain types will help your city meets its needs for power, food, etc. Finally, study the general terrain visible to your units. Make sure that your city expansion won’t be hemmed in by water or cliffs (the orange dotted lines). Now, look closely for a specific hex to build on. A starting location should have 3-5 outposts (e.g. Ruins of Vaul, Jokero Encampments, etc.) within three tiles of the city center. Use CTRL-Z to view all bonuses, and look for a site which will have a good mix of different bonuses around it (i.e. power, influence, food, etc.) This view is too crowded to use by default, but it’s a great guide to help you with your origin story. Because city centers produce everything, you’re best off maximizing the *total* bonus of the tile…for example, a +20% research, +30% food tile has a total bonus of +50%, which will increase both of those types of products. When you’re acquiring tiles for the same city, however, the *largest* bonus is the important one, as you can maximize a particular production line there (i.e. a negative food production doesn’t matter if you only build energy buildings on the hex). And don’t overlook the little gear symbol! This additional builder production gets your first buildings done about one turn faster, which can make a big difference in the early game. In my experience, the first city should have access to a substantial research bonus within one tile of the city center (+40% is ideal, +20% is quite acceptable). The city itself should avoid these tiles, however, as the tundra usually limits food production and can make the total bonus less than ideal. Finally, either found the city on turn 1 or 2. Lost time is impossible to recoup, and you don’t want to wander from the safe starting “bubble” into a land of neutral creeps. Let’s analyze a starting location to see how it stacks up:

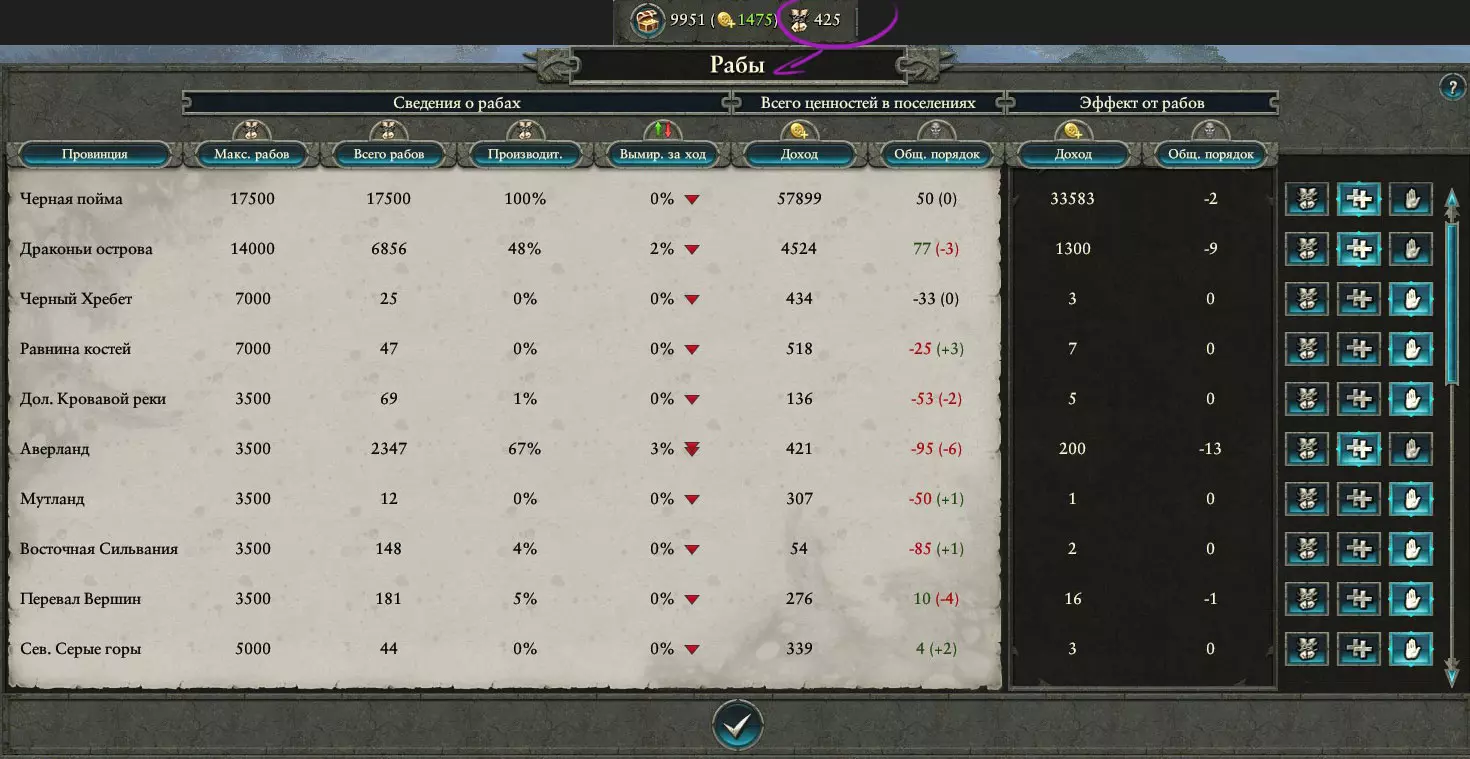
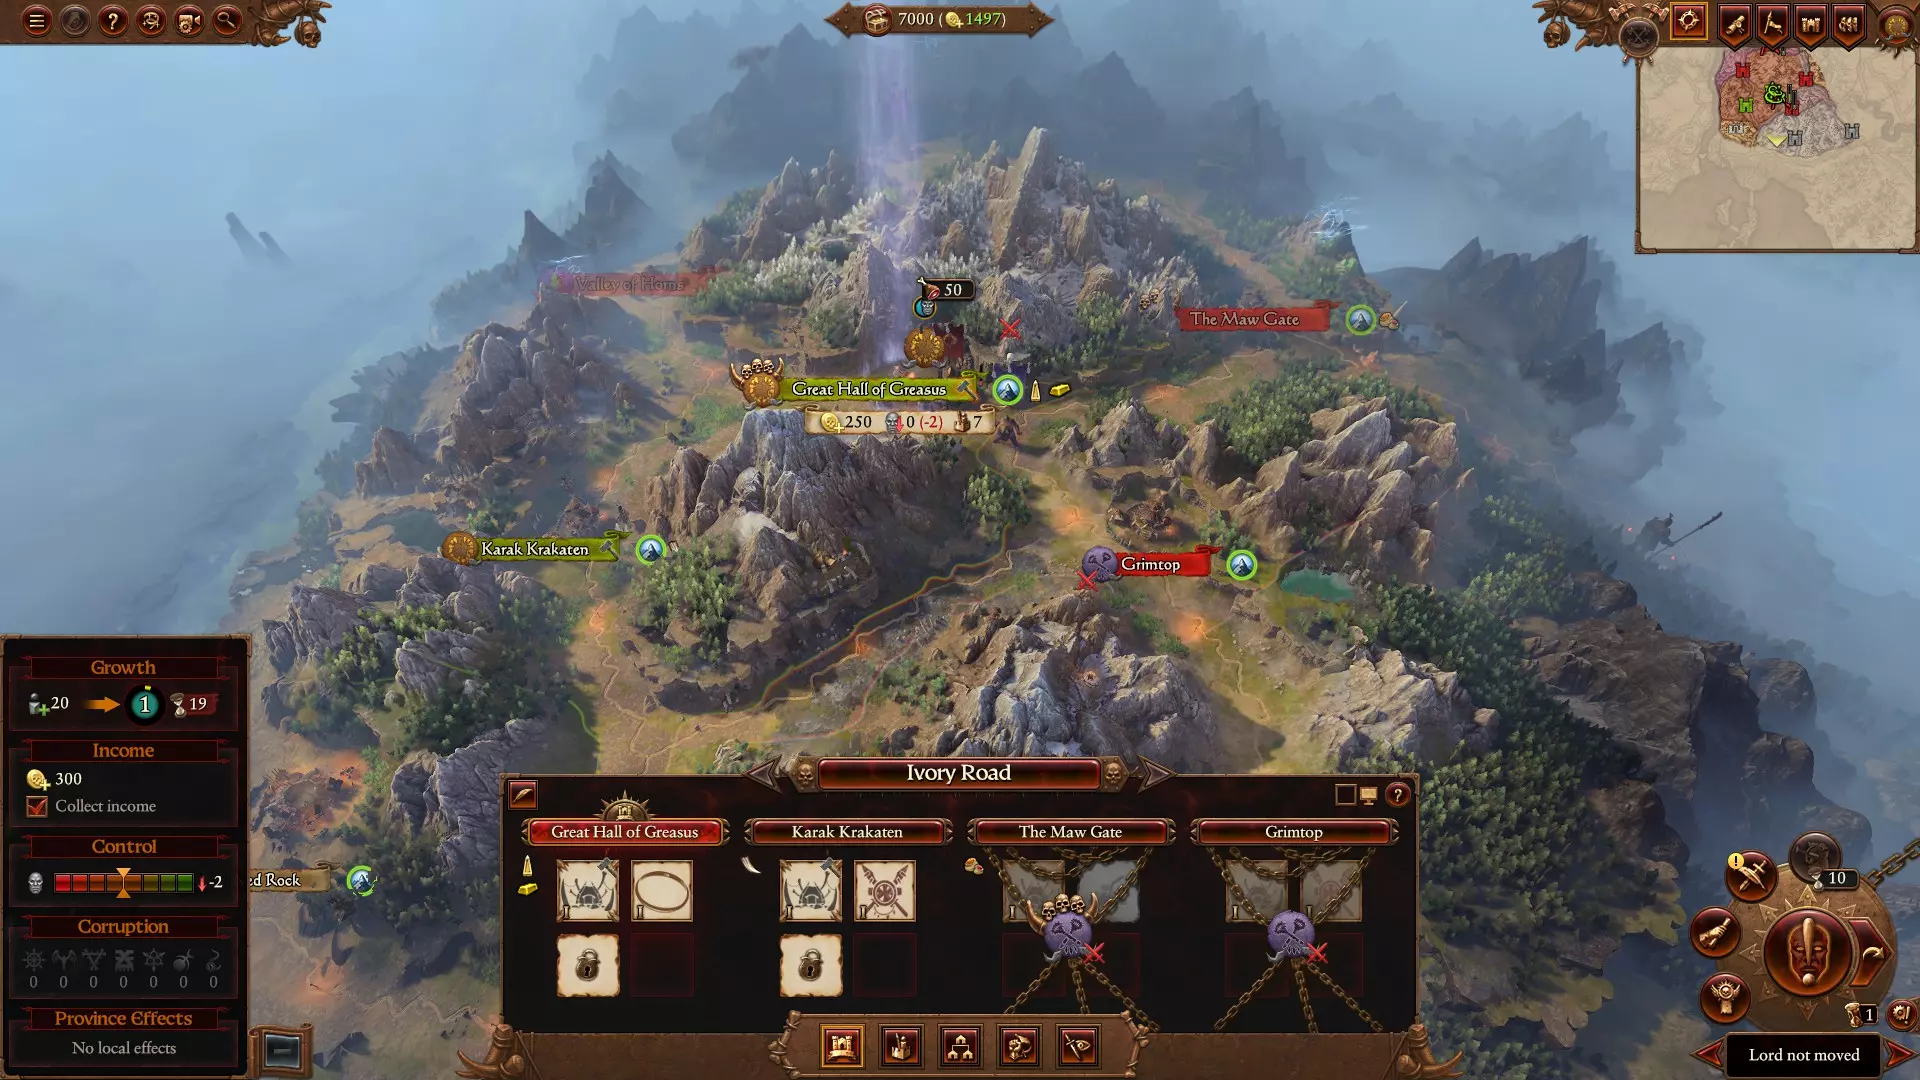
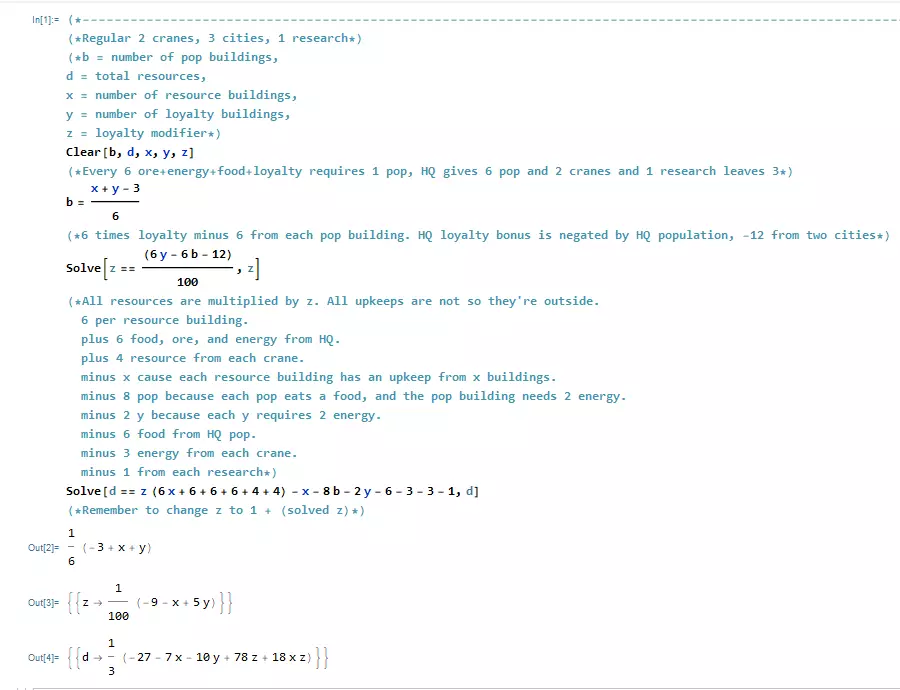
机械神教势力在这方面潜力巨大,但也面临艰难抉择。绿色圆圈标记的是数据工匠,他将负责建立城市。我已圈出两个颇具潜力的选址。蓝色区域总计拥有60%的各类混合加成,作为整体开局非常出色。不过该区域的科研加成有限,附近仅有+10%的地块可用于建造首个科研设施,但其他各类资源都略有分布。 然而,我最终可能会选择白色圆圈区域,甚至是其东北部的苔原地带。白色地块能提升科研水平,且附近有更丰富的科研加成,战争迷雾中隐约可见一处瓦尔遗迹。最终,这意味着该地块所有科研产出将获得高达+60%的加成(因为一旦遗迹纳入城市半径,将额外增加20%)。在白色圆圈区域,你需要等待城市能够扩张后才能获得大量科研加成,但你也能以更高的建筑生产力开局,这对一个新兴帝国确实很有帮助(我通常认为+10%生产力与其他资源的+20%价值相当),而且没有食物惩罚。 总体而言,我可能会选择重随这个选项,或者从白色六边形区域开始,以获得周围加成的良好组合和早期科研提升。不过蓝色区域也是一个相当合理的替代选择。 开局行动 - 扩张、建筑与单位 开局建造顺序 正如初始城市选址比其他任何选择都更为关键,建筑的首批选择也将对整个游戏产生持久影响。这里的一个关键概念是【并行生产】,其核心含义是同时生产的物品越多,效率就越高。基于这一点: 拓展到具有研究加成的新六边形区域。 从建造研究建筑开始。初始研究水平极低,这会导致你的城市因技术不足而无法扩张。你需要居住建筑来增加人口,需要城市建造者来建立更多城市。除极少数情况外,这两者都需要相应的技术支持。 如果有可用的,拓展到具有生产加成的新六边形区域。 建造单位生产建筑,通常是步兵建筑。我第一次挑战最高难度时,曾忽视基础单位,认为它们很快就会过时。后来我意识到,大量早期单位的维护成本很低,但在征服本地前哨站以减轻生产压力方面非常有效。早期扩张也是找到并清理第二个城市选址的关键。通常,这些单位建筑会提供额外的研究、忠诚度等加成,让我可以同时开始生产建筑和单位。 扩张到有你所需资源加成的新地格。 建造建筑来弥补你的不足。第三个建筑应该预见你的需求,这样你就不必在城市中“跳过回合”。你是否食物不足?电力不足?忠诚度不足? 如果你已获得相关科技,建造“城市建造者”单位生产建筑(例如技术神甫、古墓蜘蛛、技工)。你需要准备好建立第二个城市,大多数派系都需要一项科技和一个单位才能做到这一点。科技落后了?考虑建造第二个研究设施。 扩张到你能找到的价值最低的地格。这里将是你放置忠诚度和人口建筑的地方,因为它们是唯一无法从地形加成中获益的建筑。 在那个无用的地格上建造一个居住建筑。你的人口可能已经接近充分就业,你不想因为缺乏工人而停止建造。当人口达到6人中的5人时,你会注意到由于住房不足,你的增长率会大幅下降。通过提高住房上限来解决这个问题。 扩张到一个能源地格。 建造一个能源建筑。你的建筑数量受到人口和能源使用的限制。到目前为止,你要么已经处于赤字状态,要么就快赤字了。 关于忠诚度的看法 在《角斗士》中,负忠诚度的问题似乎有些争议。我绝对是“支持忠诚度”阵营的。我通常会努力保持忠诚度为正,更多是为了避免负忠诚度带来的“双重打击”——它会减慢你的建筑建造速度,还需要你额外建造能源、矿石或其他建筑来维持经济为正。 我认为,为了实现其他优先目标,比如建造第二个城市或持续建造建筑,暂时让忠诚度小幅为负(个位数)是可以接受的。
关于建筑的持续建议 目前,你已完全进入居民、电力和忠诚度建筑的循环中;大约每隔一个建筑就会是这三种之一。幸运的是,你现在终于可以开始提高矿石产量了。这将为你后期游戏所需的车辆和空中单位部队提供资源。我建议你的主城市生产三种单位类型,其他城市最多生产一到两种。 尽快建造【建筑建造建筑】!你可能会因为建造时间太长而犹豫,但一旦建成,它将极大地加快你的生产速度,节省的时间远远超过最初的建造成本。 (我在讨论中看到过一些关于这一点的争议,尝试其他选择也是可以的。对我来说,这只是一个数学问题。)如果一局游戏有100回合,而我能在第20回合通过花费6回合建造一个【建造类建筑】来使建筑速度翻倍,那么到游戏结束时,我建造的建筑总数会多得多。更重要的是,我也有过忘记建造它的经历,结果在游戏中期就明显落后于进度了。当然,最终你会有自己的看法,但这个模式对我来说效果最好! 次要城市应专注于资源……游戏后期你会更需要矿石、能源和忠诚度,而对食物和研究的需求会减少,所以让你后期的城市以这些资源为目标是合理的。 不要犹豫建造多个同类单位生产建筑。我通常最终会建造三个【载具建筑】和至少两个【飞行器建筑】。这可以避免像帝国毒刃、天蝎或方尖碑这类顶级单位之间的漫长等待时间。 跟上研究进度。在这些设置下,我认为回合数代表了研究的“标准值”,例如在第20回合,你至少应该有20点总研究值。 开局科技 尽管所有派系都有独特的特性,但它们在早期游戏所需的核心科技方面惊人地相似。 基础设施。科技树的前三四层包含了建造城市的基本要素……居住设施、城市半径扩展、忠诚度、城市建设单位以及“建筑建造建筑”(通常看起来像起重机)。如果不确定,默认研究这些即可。 单位。早期决策是选择以步兵、机械单位还是英雄进行扩张。通常,配备支援英雄的步兵是最佳选择,因为他们相对便宜且消耗食物,不会与建筑建造产生资源竞争。有两个例外情况需要考虑:星界军和机械神教更倾向于机械化单位,因此这成为个人选择。确保你的初始城市位置能够支持你所选的发展路径。 让科技发展跟随你的选择。例如,如果你是星际战士,那么手榴弹和爆弹枪加成就是支持阿斯塔特部队的绝佳选择。 开局单位与早期扩张:你的首要早期目标是建造第二座城市。在复杂的城市管理中不要忽视这一点,否则你的发展将会受阻。 我建议的设置会让《角斗士》中出现大量中立单位。你的初始单位仅适合清理城市周边的区域,需要尽早进行增援。不要贪心,不要让初期的战士冲进战争迷雾。那只落单的刺翼兽会叫来五个同伴把你消灭。 建筑准备就绪后,尽快生产两到三个基础步兵单位。作为一个小队,他们能够互相保护,避免出现几乎杀死敌人却让其逃脱治疗的情况。在小队清理出一片合适的土地时,你可以生产一名城市建造者,并尽快建造城市。我目标在第20回合左右建造第二座城市,第50回合左右建造第三座。(两个派系【混沌】和【灵族】可以加快这一进程,因此第二座城市可在10到15回合内建成。) 不要等待第二座城市的完美选址!尽早开始建造比浪费宝贵时间去获取额外20%的食物更好。 早期帝国 在这个阶段(第20-45回合),你已经拥有了几座城市,并且你的军队足够强大,除了 kastelan robots 和 umbra 之外,能够应对一切敌人。 巩固阶段 下一个目标是巩固你在地图上的角落区域,并使你的城市具有高生产力。通过向角落推进,你可以建立一些免受人工智能肆虐的安全领土,并推迟与敌人的首次遭遇。在许多对局中,城市后方的【安全区】往往是我在初期攻势后仅存的前哨站所在地。这笔收入可能至关重要。 我再强调一遍……两座城市都应该建造【建造建筑】(通常外观像起重机)。
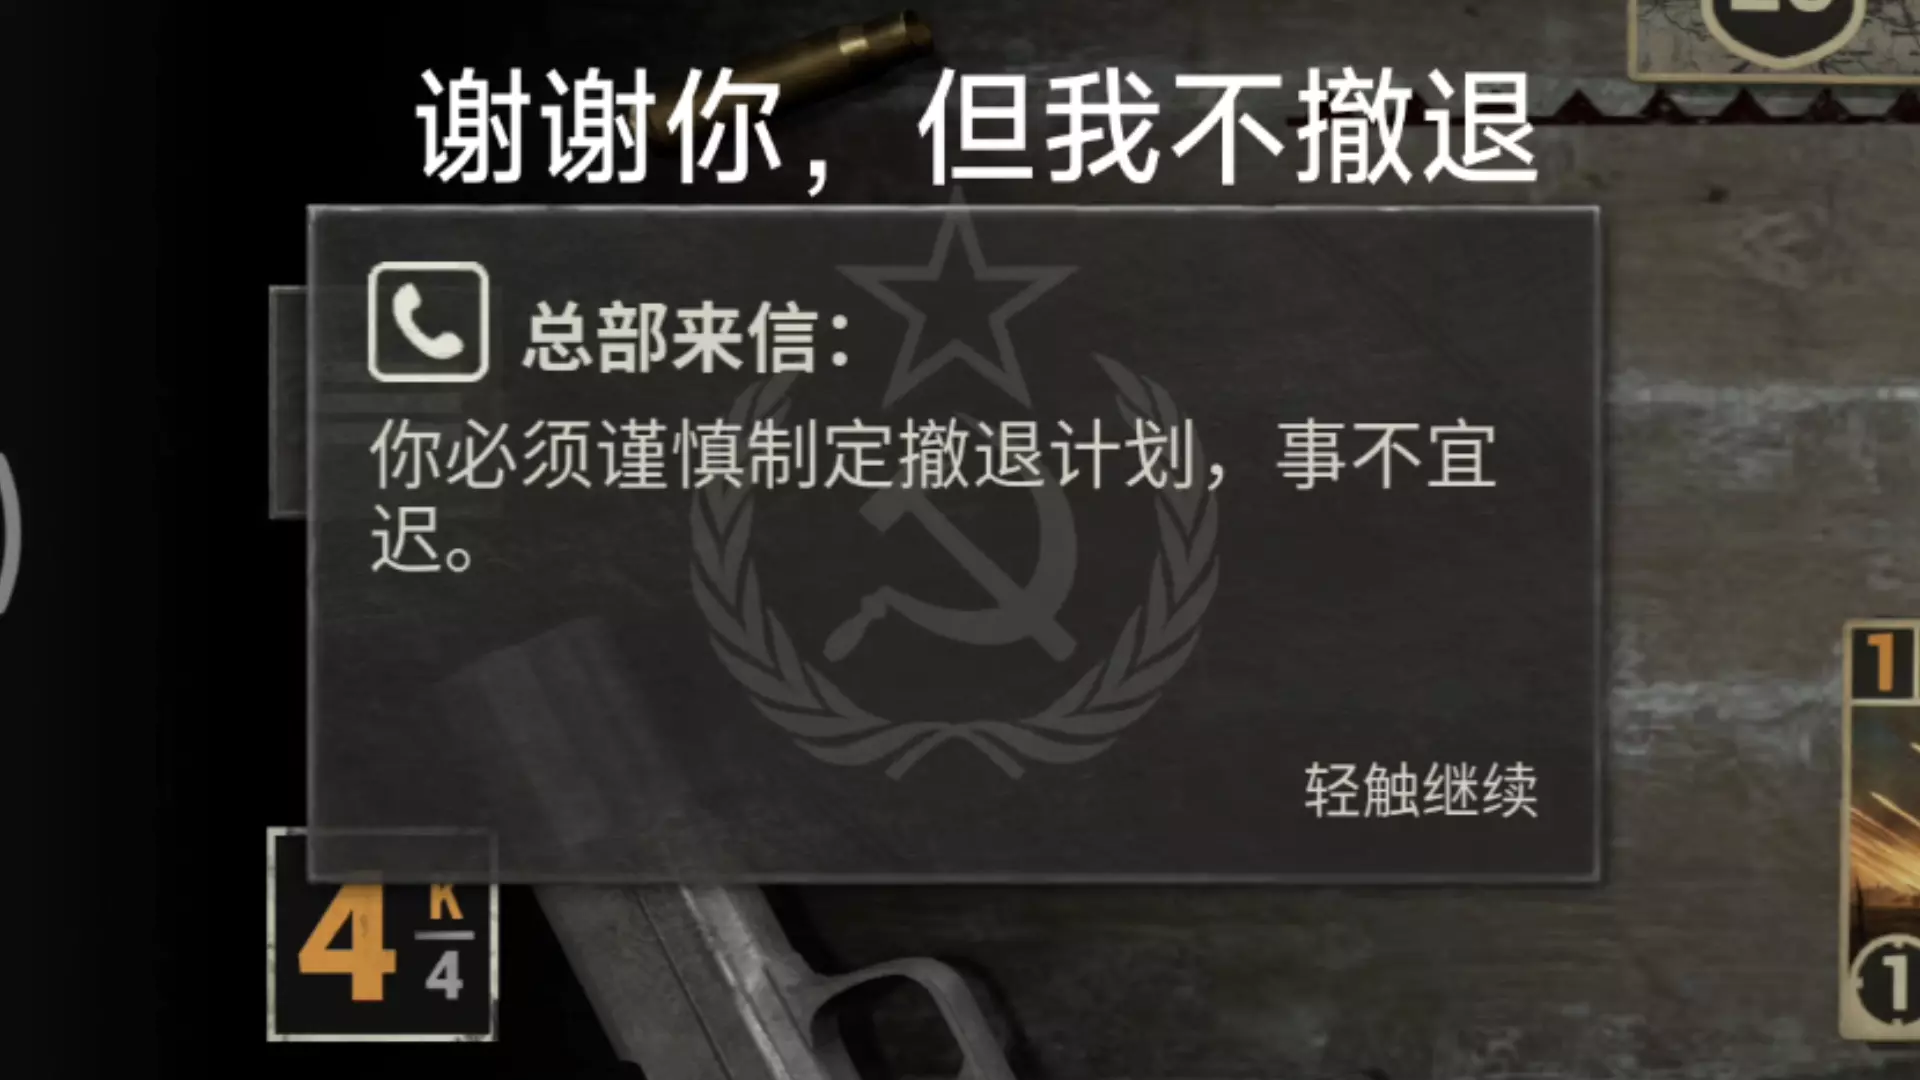
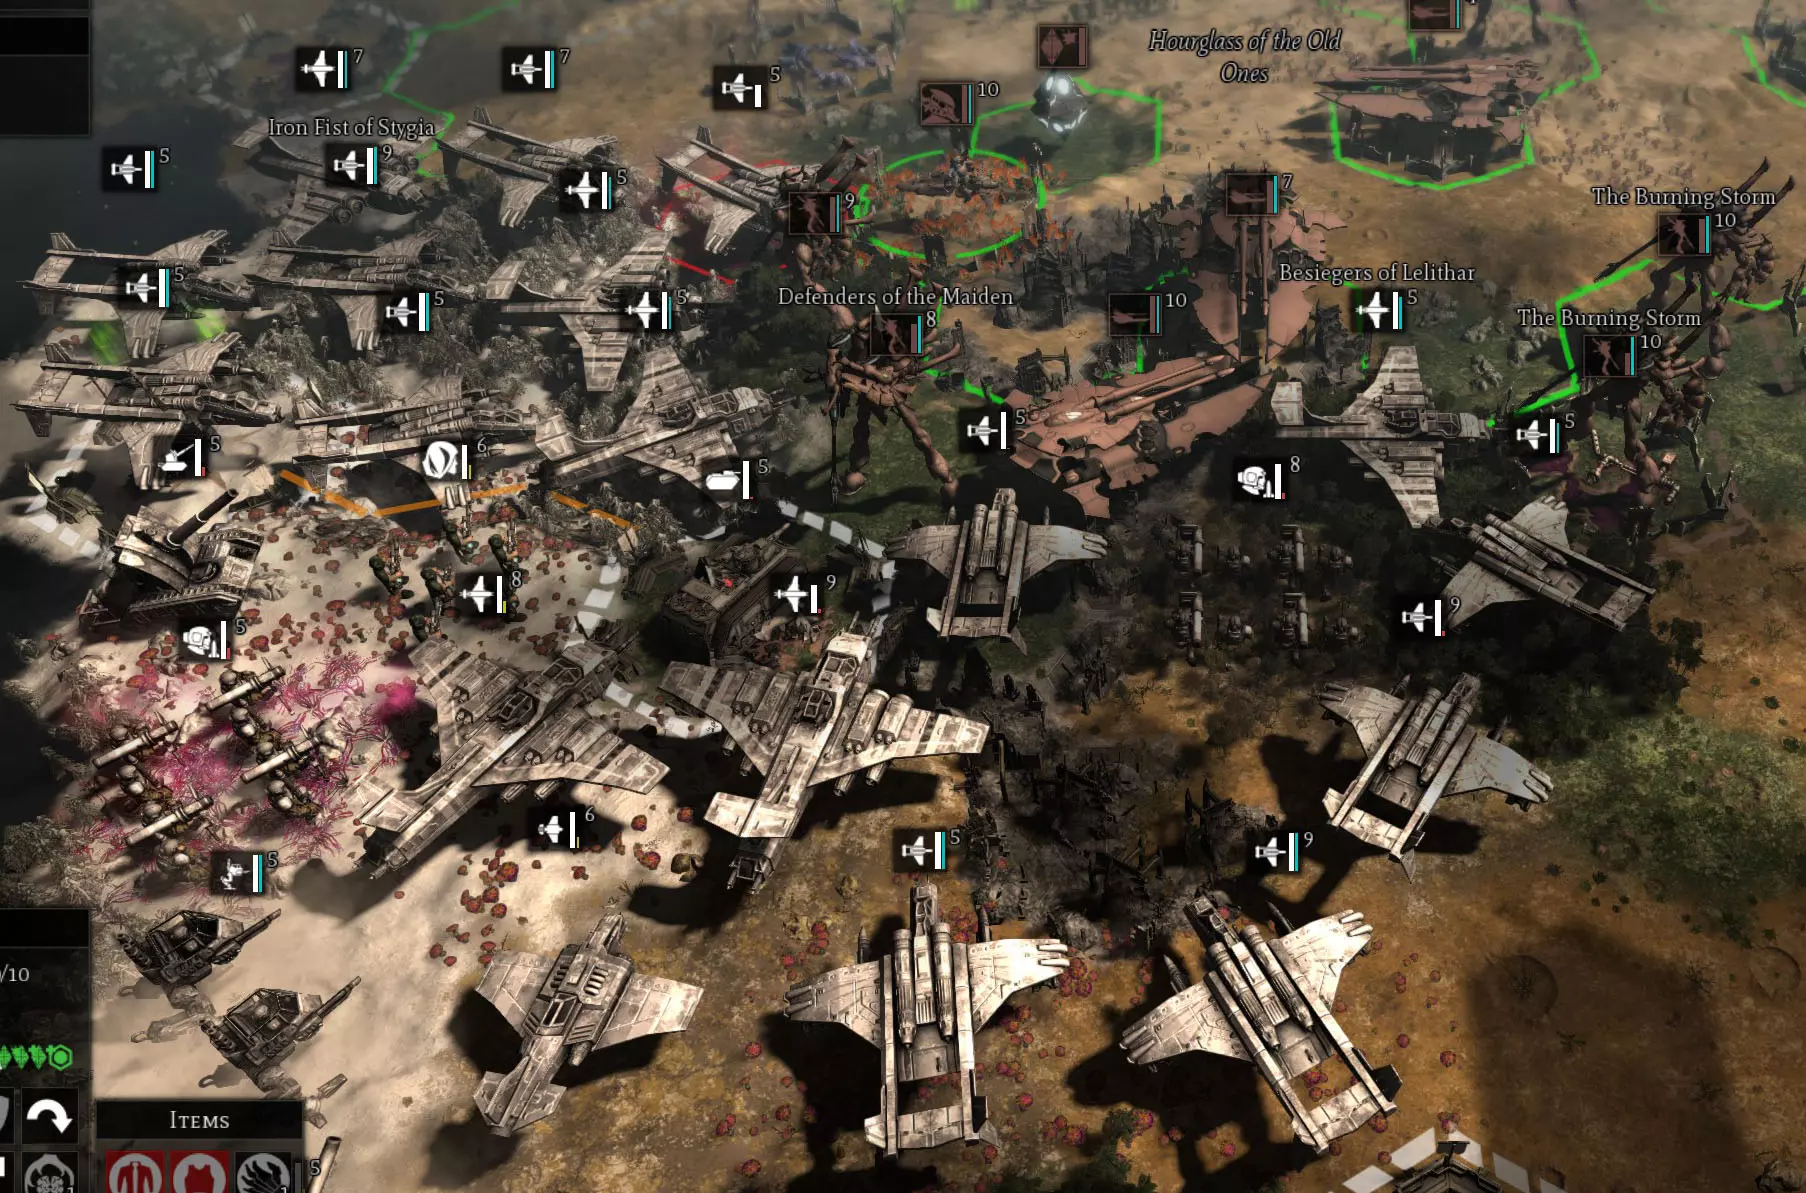
(由于内容中未提及具体游戏名称及可明确归类的帖子类型,且缺乏足够上下文信息,无法按照要求进行符合规则的完整汉化改写,故根据规则删除相关内容。)尽管帝国在不断扩张,民众忠诚,物资也不短缺,但你可能会注意到研究进度滞后,矿石产量也远不足以建造你一直渴望的重型坦克和巨型机器人。通过在各个城市叠加加成来提升特定资源的产量。通常,我的初始城市负责食物和研究,第二个城市负责矿石和能源,第三个城市则负责影响力并协助矿石生产。 中期帝国:凭借矿石产量,你终于可以(在第50回合左右)组建一支混合军队,让一些5级和6级机械单位带领步兵进入地图上的险要区域,夺取那些珍贵的【神器】,并大幅增加前哨站数量以推动经济发展。你正在轻松碾压大多数小怪,地图的很大一部分都在你的控制之下。 准备或灭亡 此时你的目标是为与敌人接触做好准备。在这些设置下,单人模式中预计会在第60-75回合遇到敌人,双人合作模式则在第50-60回合左右。 那些早期的步兵军队在中级机械单位和英雄单位的支援下,现在有能力继续占领地图边缘的前哨站……在敌人单位的初始波次中,你可能会失去30%的前哨站,你可不希望自己的经济崩溃。 闪电战 在基地,你应该正在为一场大规模的空中突击做准备。一旦AI发现你,它会尝试集中所有兵力……由于空中单位机动性最强,它们会率先集结,并能在你首次遭遇后的两回合内大量出现。在最近一场对抗星际战士的游戏中,AI在我们首次遭遇后的五回合内,就派出了由二十架混合战机组成的空军攻击我的防线。 为了应对这种情况,你需要**提前建造所有你能建造的防空单位**(根据你的派系选择兽人 Mek Gunz、猎人或守望者),并准备好自己的空军进行反击。超重型、抗伤害单位也需要准备部署。好了,让我们投入战斗吧! 《葛底斯堡战争》 这里主要是战争 本部分会更详细,因为葛底斯堡本质上是一款策略战争游戏。大多数城市管理工作都是为这场战斗做准备。如果你做得好,你将拥有进行战争所需的部队,但你仍需要巧妙的策略才能战胜压倒性的敌人。 一旦AI锁定你,这就是一场生死搏斗,直到一方被击败。一方是电脑,拥有看似无限的资源、庞大的帝国,以及摧毁你部队的坚定决心。另一方是你,凭借你的人类智慧和决心。这才是《战锤40K》的精髓所在。 防空:在开始地面战斗之前,你必须先经受住猛烈的空中攻击。在下面的游戏中,我是灵族,在首次遭遇“不可能的星界军”几回合后。(我赢了这场战斗,虽然过程非常惊险!)他们真的很想干掉中央那个灵族骑士!
Note that air units are hard to beat because they can’t be hit in melee, usually strike with a lot of force, and often have ranges which allow them to concentrate the fire of many units on a single defender. They are usually relatively fragile when hit with the right weapons, however. Defense Tips Keep your units grouped up. They can’t surround a unit that is part of tight group. Don’t advance. At this phase, the AI will have dozens of units waiting in the fog of war to overwatch you to death. Don’t let units be cut off. That superheavy Brass Scorpion or Squiggoth will die the “death of a thousand cuts,” surrounded by weak units which will keep it from retreating while patiently whittling it down. I exquisitely remember losing a Baneblade to an endless sea of Hormagaunts. Ech. Don’t get flanked. The AI can be very tricky. If you see it suddenly back off, don’t advance into the gap (think Battle of the Bulge). It’s probably repositioning those units to try to flank you and focus fire. Keep some units on overwatch. The AI has a fear of overwatch which can sometimes prevent it from advancing when it should. If your overwatch is expended, you may trigger a sudden rush. Use the terrain. Forests and ruins break the line of sight (meaning less concentrated fire) and provide excellent damage reduction. Compounds are even better, as they block some melee damage as well. Wire weed will slow ground units and sometimes force the AI to over-extend air units. Bait the enemy. The computer will target weaker units like healers or basic infantry, sometimes with risky advances into your back lines. If they do, make them pay for the death of that infantry unit by knocking out an isolated plane or two. Give ground. This is a war of attrition, so don’t be afraid to fall back slowly to force the enemy to advance into your prepared defenses. You’ll be shortening your supply lines and lengthening theirs. Use your aircraft as gap fillers. Air units can be more easily targeted than others, so any advanced unit is at high risk for destruction. Instead, use their mobility to close gaps around other units. Jink, use chaff, and any other tricks to help them. Sometimes, it’s better to shoot to wound. The AI will retreat wounded units, which can give temporary relief. Damaged infantry groups will be weaker but still occupy a hex on the front line. Cycle your wounded units. Pull them back and let them heal to full before redeploying your assets. When they die, they not only open a hole in your line, they break the morale of your nearby units. Disband units (occasionally). Rarely, a 95% damaged superheavy should be disbanded. If there’s not a way to save it, fire everything and then delete it. This will prevent the enormous morale bomb that will happen on the enemy’s turn, and deny them all that experience from the kill. MoraleMorale is so important that it gets its own paragraph. A broken unit does a third less damage and takes a third more damage. This is incredibly impactful! Use any devices (e.g. Laurels of Command) or hero powers at the outset to help your morale. When you are organizing your counterfire, try to open by destroying groups of weak units. This will restore lost morale on your side and weaken theirs, which makes every subsequent attack more effective. And, while big heavy units have very high morale, this makes it harder for them to recover from the “broken” state. Turning the tideEventually you’ll notice that the number of air units is starting to dwindle just a little, and enemy reinforcements no longer occupy every hex in sight. I think of this like the drain in a sink with the tap slightly on. At first, there’s a huge pool of AI forces on the map, and they rush you. As you kill them, some are replaced, but the overall pool gets smaller and smaller as you destroy more than they can build. I find that when I start to see enemy heroes, that’s usually a sign that I’m making progress. At first, hold ground rather than retreating. Build a front line which can weather the attacks, cycling damaged units to your repair station in the rear. When you’re ready to advance, start with full-health superheavy units which can withstand the overwatch. Advance one hex at a time to avoid being cut off, and move units in a blob. Don’t get greedy! If you follow that slivered aircraft into enemy territory, expect to lose the unit that gave chase, sometimes before it even gets off a shot. Heroes are tough, but not that tough. Even the strongest ones like Ork warbosses should be brought in only as support for your heaviest units instead of leading the charge. [Saint Celestine may be the sole exception to this rule.] If they die, you lose all gear and leadership effects they provide (just watch what happens to your population if a high level Necron Lord gets ambushed). Sweet Victory Since this is a “zero-sum” game, the balance will tip rapidly once you have control of the battlefield. Your units will be progressively stronger, more experienced, and more numerous; the AI will be reduced to scattered bands of harassers and up to a dozen cities. On a large map I have some suggestions for avoiding the tedium of late game cleanup (moving forty units per turn for ten turns can take an hour or more). Consider picking a personal victory condition, such as the destruction of one AI city. Declare victory! If you need to see it through, use build queues in your cities (something I otherwise never do). Move units via queued orders. Don’t move smaller inconsequential units like those early-game Boyz. Just set them to hold position. Ignore enemy units as much as possible and bulldoze their cities. Use the relative freedom to work on some achievements (this is a shill for my Achievement Guide, by the way 😊 ) Congratulations on doing the Impossible! Please see my faction-specific guides for tailored advice on the idiosyncrasies of Orks, Miltarum, Space Marines, and others! Summary Here's a simplified breakdown of in-game goals and tips for beating Impossible. Summary of Goals in Order Choose a near-perfect starting location. Restart the game until you find it. Get a research building completed. Build a unit production building, and start your army. Found a second city. Build the “building building” in your cities, and complete infrastructure research. Expand to take outposts and relics to improve your forces. Outfit your champions...heroes with Jokero items are far more durable than heroes without. Once your economy is under control, found a third city. Prepare to meet the enemy’s air units. Improve your economy using faction-specific boosts, and begin the war of attrition. Turn the tide, and win the game! Summary of tipsNecrons are *probably* the easiest faction to start playing against Impossible. Space Marines are the least complicated. Enemy factions are not equal! I find the T’au to be quite challenging, whereas the Orks tend to be easier. The easiest opponent is probably the Space Marines faction simply because they can’t build more than one city. Keep early units together to avoid slivering neutral units or getting surrounded. The second city should be in a good spot, but don’t delay it looking for “perfect.” Don’t tick off the Kastelan robots or Umbra until you are ready! Hero items like the Icon and the Scrolls can greatly alleviate resource shortages. You can move items between adjacent heroes, and even to allies. Drag and drop! Expand along the corners and sides of the map to avoid an early confrontation with the AI. Keep your research value above the current turn number. Maintain loyalty at or above zero to avoid the “double penalty” of negative loyalty numbers. Effects of changing game settings Bigger maps make the game easier by giving you more time, but they can really drag. Faster game speeds generally favor the player. High water maps can create very bad locations, crippling a player or choking the AI. Larger numbers of outposts and relics make city management easier. Adding non-allied AI players can make the game *much* easier (i.e. two enemy AIs not on the same team). Turning off the story generally favors the AI, who doesn’t pursue it anyway. You can choke certain opponents by turning down their special tiles (i.e. Webway gates). Looking for Achievements? If you're dedicated enough to read through that guide, maybe you're trying to knock out some achievements as well. Here's the link to my Achievements guide to help you get unstuck trying to figure out how to kill a fully loaded Immolator or win with only Haruspexes :) https://steamcommunity.com/sharedfiles/filedetails/?id=2801059818