
Half-Life 2: Deathmatch


本指南提供了一种无需使用任何插件,手动更改玩家模型和喷漆的简单方法。 第一章 - 修复方法 由于此问题已存在很长时间,以下是一种无需过多麻烦即可轻松修复的方法: 1) 右键点击游戏,选择【管理】,然后点击【浏览本地文件】,进入【hl2mp cfg】文件夹。 2) 创建一个名为【autoexec.cfg】的文件(如果该文件已存在,则可跳过此步骤)。 打开你常用的文本编辑器(例如记事本)。 点击【文件】,然后选择【另存为...】。 在【另存为...】对话框的【文件名】处输入【autoexec.cfg】,在【保存类型】中选择【所有文件】,然后点击【保存】。 关闭文本编辑器。 如果一切顺利,你应该会得到一个名为【autoexec.cfg】的文件。将其放入步骤1中打开的“hl2mp cfg”文件夹(如果您是高级用户,也可以直接在“.. hl2mp cfg”中创建“autoxec.cfg”文件)。 3) 用文本编辑器打开“autoexec.cfg”(如果您直接在“.. hl2mp cfg”中创建了该文件,它应该已经打开)。 4) 向文件中添加以下行: cl_playermodel "models/humans/group03/male_01.mdl" cl_logofile "materials/vgui/logos/spray_lambda.vtf" alias "rebels" "cl_playermodel models/humans/group03/male_01.mdl;jointeam 3" alias "combine" "cl_playermodel models/combine_soldier.mdl;jointeam 2" bind "F9" "rebels" bind "F10" "combine" bind "F11" "spectate" 5) 保存更改。 6) (可选)将“autoexec.cfg”设为只读。 7) 启动游戏。现在,你可以使用F9键加入反抗军阵营,F10键加入联合军阵营,或F11键单纯观战任何比赛。 第二章 - 代码 现在,让我们逐行了解“autoexec.cfg”代码的工作原理。 在前两行中,我们设置默认玩家模型和喷漆。 cl_playermodel "models/humans/group03/male_01.mdl" cl_logofile "materials/vgui/logos/spray_lambda.vtf" 接下来两行,我们设置加入对应队伍时要使用的模型。同时,我们为“cl_playermodel models/humans/group03/male_01.mdl;jointeam 3”这类长命令赋予一个更短的命令名称(别名),以便在后续代码中使用。 alias "rebels" "cl_playermodel models/humans/group03/male_01.mdl;jointeam 3" alias "combine" "cl_playermodel models/combine_soldier."mdl;jointeam 2" 最后,在最后三行中,我们将前两行的简短命令名称(别名)绑定到相应的按键。 bind "F9" "rebels" bind "F10" "combine" bind "F11" "spectate" 注意,'spectate'命令名称是游戏内置的,我们不需要为此编写代码。 第三章 - 模型 您始终可以通过编辑上述代码中的模型名称来设置您偏好的默认模型、喷漆或加入队伍时的偏好模型。但请注意,加入队伍时的偏好模型必须对应各自的队伍(例如,不要将'police'模型用于反抗军队伍)。 为方便参考,以下是可在上述代码中用作偏好设置的玩家模型和喷漆列表。下一章将举例说明如何在我们的代码中使用这些行。 反抗军 models/humans/group03/male_01.mdl - 男性反抗军凡 models/humans/group03/male_02.mdl - 男性反抗军泰德 models/humans/group03/male_03.mdl - 男性反抗军乔 models/humans/group03/male_04.mdl - 男性反抗军埃里克 models/humans/group03/male_05.mdl - 男性反抗军阿特 models/humans/group03/male_06.mdl - 男性反抗军桑德罗 models/humans/group03/male_07.mdl - 男性反抗军迈克 models/humans/group03/male_08.mdl - 男性反抗军万斯 models/humans/group03/male_09.mdl - 男性反抗军厄丁 models/humans/group03/female_01.mdl - 女性反抗军乔伊 models/humans/group03/female_02.mdl - 女性反抗军卡尼莎 models/humans/group03/female_03.mdl - 女性反抗军金 models/humans/group03/female_04.mdl - 女性反抗军周模型/人类/第三组/女性_06.mdl - 女性反抗军娜奥米。 模型/人类/第三组/女性_07.mdl - 女性反抗军拉基特拉。 联合军 模型/警察.mdl - 国民护卫队(城市警察)。 模型/联合军士兵.mdl - 联合军士兵。 模型/联合军士兵_狱警.mdl - 新星监狱狱警。 模型/联合军超级士兵.mdl - 联合军精英。 喷漆 材质/vgui/标志/喷漆_罐头.vtf - 垃圾桶里的罐头。 材质/vgui/标志/喷漆_联合军.vtf - 联合军标志。 材质/vgui/标志/喷漆_警察.vtf - 城市警察。 材质/vgui/标志/喷漆_狗.vtf - 狗。 材质/vgui/标志/喷漆_弗里曼.vtf - 弗里曼的脸。 材质/vgui/标志/喷漆_头.vtf - 猎头蟹。 材质/vgui/标志/喷漆_λ.vtf - λ标志。 材质/vgui/标志/喷漆_管道.vtf - 马桶砸中玩家。materials/vgui/logos/spray_soldier.vtf - 联合军士兵头部。 第4章 - 示例 现在让我们看一个如何使用上述模型的示例。 假设我们想将【女性反抗军 Châu】作为首选默认模型,【狗】作为默认喷漆,并且在加入反抗军队伍时再次使用【女性反抗军 Châu】作为首选模型。我们的代码将如下所示: cl_playermodel "models/humans/group03/female_04.mdl" cl_logofile "materials/vgui/logos/spray_dog.vtf" alias "rebels" "cl_playermodel models/humans/group03/female_04.mdl;jointeam 3" alias "combine" "cl_playermodel models/combine_soldier.mdl;jointeam 2" bind "F9" "rebels" bind "F10" "combine" bind "F11" "spectate" 让我们仔细看看我们对代码所做的更改。我们将原始代码中的以下行进行了替换: cl_playermodel "models/humans/group03/male_01.mdl" 替换为: cl_playermodel "models/humans/group03/female_04.mdl" 以将【女性反抗军周】设为首选默认模型; 将以下行: cl_logofile "materials/vgui/logos/spray_lambda.vtf" 替换为: cl_logofile "materials/vgui/logos/spray_dog.vtf" 以将【狗】设为默认喷漆; 将以下行: alias "rebels" "cl_playermodel models/humans/group03/male_01.mdl;jointeam 3" 替换为: alias "rebels" "cl_playermodel models/humans/group03/female_04.mdl;jointeam 3" 这样,加入反抗军队伍时将使用【女性反抗军周】作为首选模型。其他模型也采用相同的设置方式。 第五章 - 告别 希望我能帮上一点忙……


Este juego es una versión del Half Life 2 pensado para un modo multijugador con mapas creados por Valve oficiales y podras encontrar muchísimos mapas creados por la comunidad, mapas pequeños como grandes. Despues de tanto tiempo, para ser un poco mas exactos desde su lanzamiento el 30 de Noviembre del 2004 aproximadamente sigue jugando gente y va camino de convertirse en un permanente en nuestras bibliotecas de juego. Aquellos que vengan de otros juegos multijugador mucho más avanzados en gráficos, en mapas y modos de juegos lo veran muy simple pero si sentis la pasión del Half Life que yo creo que somos todos lo encontraran un clasico inmortal. Es un juego diseñado con las mismas bases del Half Life 2, usando el motor Source diseñado para multijugador para plataformas Windows Mac y Linux. Esta mini guía la redacto con la información que se y es con animo de ayudar y las mejores intenciones. No sera una Guía muy larga por que la verdad no hay tanto en el fondo de que hablar pero descubriras que más que una guía es como un diccionario de armas y mapas para aquellos que aun no os habéis aventurado en este juego os podra dar una idea de lo que encontrareis pero poco a poco que jugueis veras como quieres echar otra partida cualquier día. Esta guía la divido en armas y mapas y modos de juego: Armas Vamos con las armas: vereis que seran identicas a las del Half Life 2 pero hay alguna nueva que si podemos encontrar en el Half Life 1, ademas de arma de defensa personal exclusiva de los Combine(las tropas de la alianza), Primero cortas y de larga distancia. Armas Blancas: Palanca: solo estara disponible para los soldados de la Resistencia. Defensa eléctrica: solo disponible para los combine, exclusiva para half life 2 Deathmatch la usan en el juego normal pero no podemos usarla hay, esta muy bien que este incluida aquí. La pistola gravitatoria: Permite como muchos ya conocemos coger y lanzar objetos que no sean muy pesados. Ideal para objetos explosivos como bombonas y barriles explosivos. Pistolas: Magnum .357 Colt Python: revolver muy potente que requiere buena punteria pero un tiro lo deja grave al objetivo y dos casi siempre letal. Pistola USP Match: Pistola estandar semiautomática idsponible para ambos bandos Magnum .357 Colt Python: revolver muy potente que requiere buena punteria pero un tiro lo deja grave al objetivo y dos casi siempre letal. Corta y precisión: Ballesta: Arma que requiere gran puntería pero muy letal, normalmente si el enemigo esta herido un ballestazo lo remata solo con que este un poco herido pero normalmente suele matar de un tiro. Escopeta SPAS – 12: Con un modo de disparo normal de rafaga y un disparo alternativo de gran potencia de fuego ideal para cuando tengas a tu enemigo muy cera de ti, es una arma muy conocida y usada en el juego. Metralleta y rifle especial de asalto: SMG: Metralleta de corta y media distancia con un modo de lanzagranadas con capacidad de 3 granadas que ademas hay que considerarlas para daño en area si los enemigos se encuentran juntos. Rifle de pulso: Arma muy potente de cualquier tipo de distancia sobre todo en la corta y ademas posee un ataque alternativo que lanza una nova de energía que rebota en los objetos y estructuras si consigue matar al enemigo lo desintegra. Explosivos y lanzacohetes: Lanzacohetes RPG: dispone de tres misiles máximo como munición pero lo bueno de esta arma es que el lanzacohetes dispone de un laser que permite apuntado llevar el misil a donde tu quieras lo que lo hace mucho más peligrosa y letal y con puntería facilmente puedes matar a dos o tres enemigos si estan juntos. Granada de fragmentación: la granada estandar emite pitidos y los pitidos se hacen más seguidos cuando esta a punto de explotar, si tienes habilidad mucha gente lanza las granadas sacan rápidamente la pistola anti gravedad y cogen la granada y las lanza a donde quieren, no es muy complicado solo depende de lo rápido que seas. Minas adhesivas: aquellos que hemos jugado el gran Half Life nos resultaran familiar son bombas que se pueden pegar en las paredes con un rayo láser que actúan de detonador, cuando un enemigo pasa se detona, muy potente. Modos de juego Ahora vamos con los modos de juego: Modo por equipos: Los Combine ( la alianza ) contra los soldados de la Resistencia que es todo un clásico, ademas en opciones puedes seleccionar el tipo de personaje que más te guste, diferentes aspectos y para la alianza diferentes trajes. Y luego tenemos la locura total el modo todos contra todos en el que eres tu contra todos, tendrás que ser rápido y usar bien las armas dado que tu esperanza de vida sera corta. Ahora los tipos de mapas Acabemos con los mapas: Podemos encontrar unos mapas oficiales pero lo bueno de este juego son los mapas creados por la comunidad hay muchos muy buenos en los que podremos encontrar armas nuevas y aspectos que no encontramos en los oficiales y nuevos objetos con los que interactuar ademas de incluso modos de juego como juegos de esquivar objetos saltar abismos y otras muchas cosas de descubriras. Hablare de los mapas oficiales y de la ubicación del lanzacohetes de misiles guiaods el arma más potente Empezemos con DM_Resistance Es una extructura con forma de antigua central electrica. El mapa estaremos dentro de la estructura toda la partida excepto el jardin trasero que es al aire libre y donde podremos encontrar el lanzacohetes y munición para él. Vamos con DM_Lockdown Para los jugadores del Half Life sera facilmente reconocible y muy familiar, es la carcel de Nova Prospekt, el lanzacohetes esta camuflado, lo podreís encontrar en una sala en el interior del sistema de aire acondicionado la entrada estara en una pared pegada al suelo en un de los extremos del mapa. DM_Overwatch Tambien reconocible para los fans del Half Life es una zona de ciudad 17 que podemos ver y luchar en el juego, el lanzacohetes estara en la azotea en lo mas alto del edificio central, con la minas que pueden adherirse a la pared te puedes hacerte fuerte arriba, y en la terraza al lado del lanzacohetes encontraras munición. DM_Powerhouse Es mapa factorial en el que estaremos dentro de una estructura siempre, hay una gran sala central con una grúa de hangar en el techo, hay en medio de la grua encima de ella podremos encontrar el lanzacohetes, para llegar debeis subir al segundo piso en la sala central y en un lateral de ella en la pared en una esquina podreis encontrar la escalera que os dara acceso a la parte superior de la grúa. DM_Runoff Mapa tambien conocido en ambientación, es de la zona del canal de Half Life, este mapa tiene forma de U y en el fondo de la del mapa donde el canal toma la curva a ambos extremos podremos ver dos pasarelas, el lanzacohetes estara al final de una de estas pasarelas y la otra munición para el lanzacohetes, Pero lo divertido de este mapa es el edificio central en el que en una de las salas podremos dar a un botón en el iniciaremos una cuenta atras para un bombardeo por todo el mapa y resulta que el edificio es el propio bunker donde sobrevivira en el que se encuentre dentro, las puertas tardaran en cerrarse así que tendras que defenderte dado que todos iran hacía tu posición, usa las minas adhesivas para defenderte y las armas del interior. Es un guiño a un mapa multijugador del Half Life 1. Ahora DM_Steamlab Es un mapa de un refugio de la resistencia en el que podremos encontrar el teletransportador del doctor Isaac Kleiner, ademas funciona si entrais podreis teletransportaros al otro extremo del mapa, el lanzacohetes esta detras de la sala del mismo teletrasportador en otra sala, en la pared hay dos estanterias, en una de ellas esta el lanzacohetes en lo más alto, si pillais una caja o un barril podreis alcanzarlo. DM_Underpass Es un mapa grande en el que sera una fusión de alcantarillas, vías de tren y fabrica, para en contrar el lanzacohetes esta en la superficie en la azotea, podreis acceder por una casa que se encuentra al lado de las vías su subis al tejado vereis una escalera o accediendo a la casa misma vereis la escalera arriba detras del transformador estara el lanzacohetes. Final Como ya dije en el comienzo este juego no tiene mucho que especificar y es rápido de asimilar pero este juego puede enganchar porque aunque sea muchas veces pueda parecer lo mismo es divertido y competitivo en el que siempre buscas superarte. En cualquier caso espero de verdad que os sea útil pero en información general es complicado hacer una guía de un juego en el que no hay mucho que aprender. Pero espero que si no lo tenéis os anime a jugar y espero que os haya gustado la e redactado con todo animo de ayudar. Muchas gracias por leer;) 引用自 author:Durotan FrostWolf ♥ZgZ♥


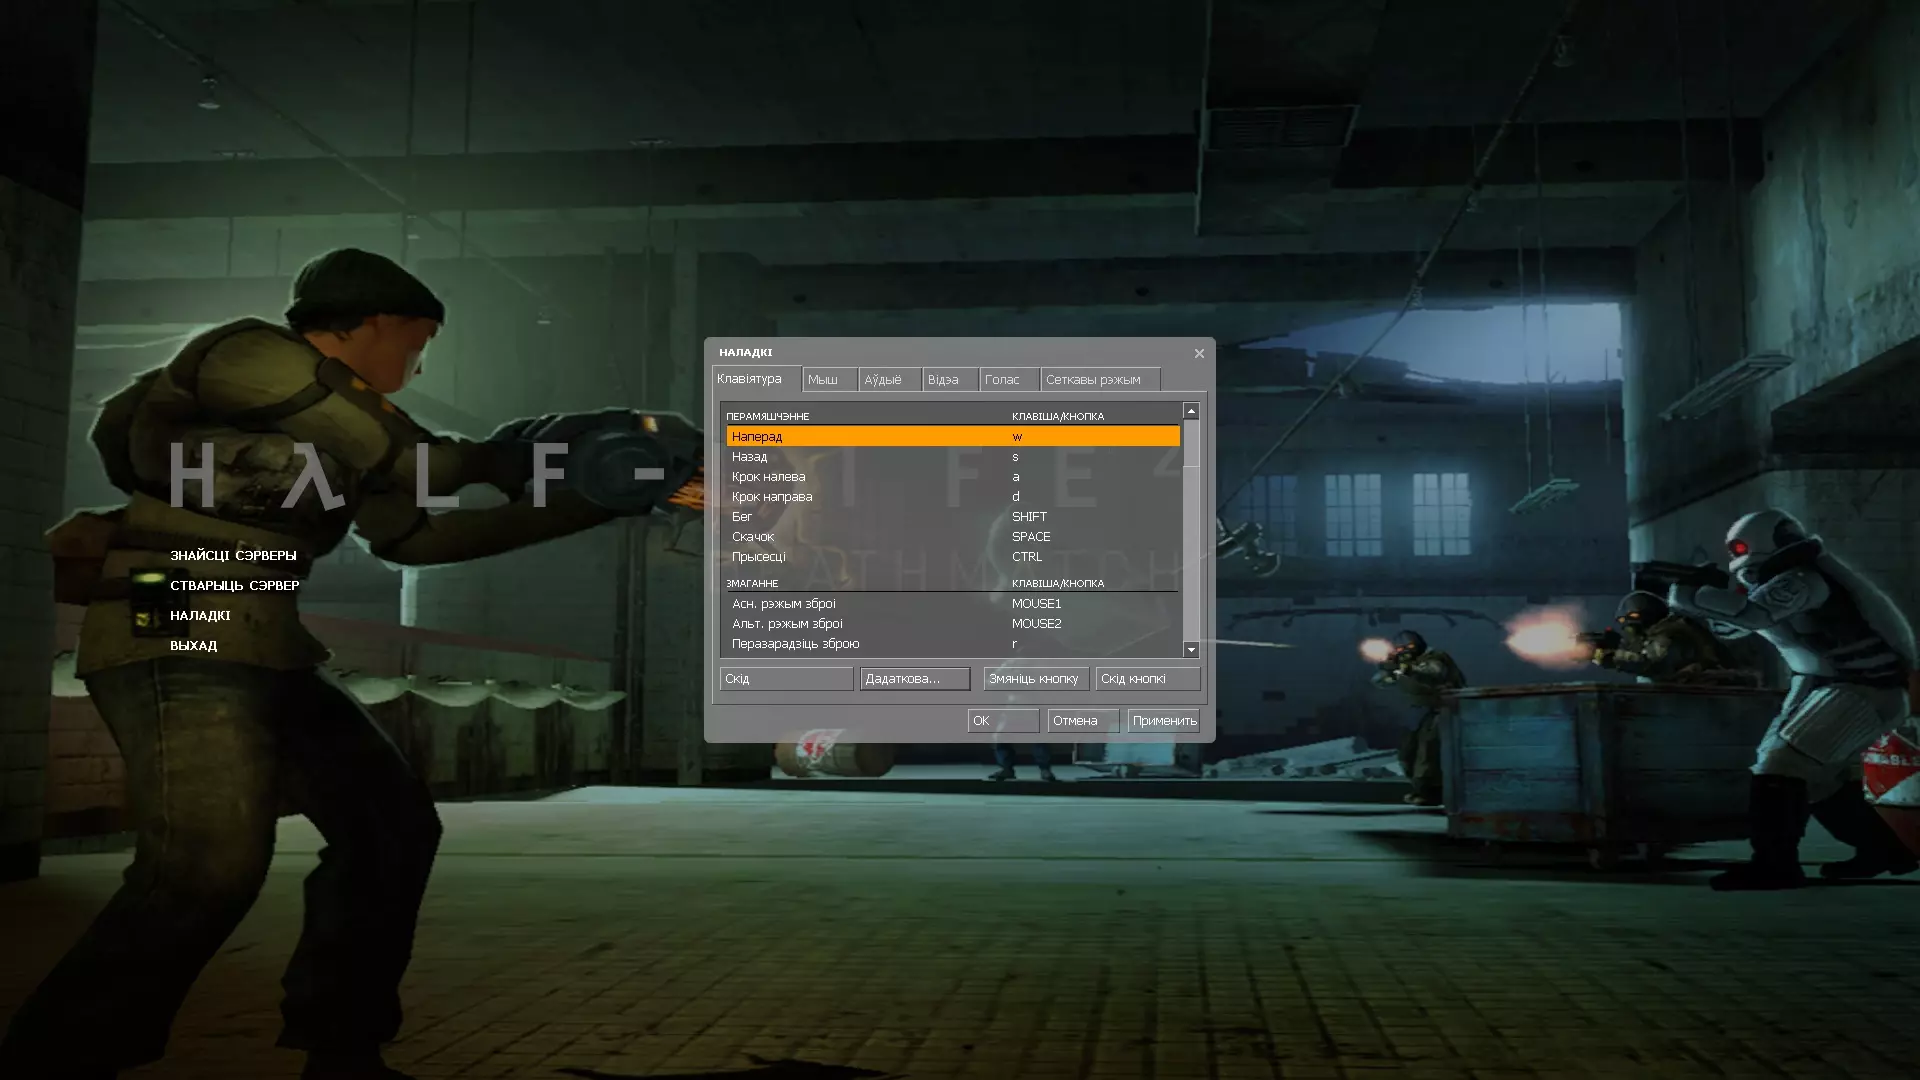
Movement tips, tricks and bugs by Ade. All players can learn these and hopefully how to show them to others. Not meant to be exhaustive, has old and new stuff. More tuts to follow. Also check out: HL2: DM - Weapons Training by Ade HL2: DM - Gameplay Training by Ade (highly recommend it, mechanics go together with decision making in any e-sport) HL2: DM - Glossary by Ade HL2: DM - Level Overviews by Ade Last edited on: 11-02-2024, added video in GGUN PROP JUMP section. SPRINT JUMP what it says.. sprint then jump, will make your jump bit stronger CROUCH JUMP (sprint and) jump then crouch, as you land still crouched you will slide a bit further OVERBOUNCE just sprint+fwd+jump (actually works in any direction, not just fwd), release all keys in mid air, then crouch and land crouched, then tap jump key at any time around landing; repeat, but change the time of jumping at/upon landing to: a bit earlier, a bit later, more earlier, more later and so on; repeat til u find the right time; you'll notice a jump forward or two and you'll notice a considerable difference of distance crossed with no additional sprint and no fwd key, cus fwd will just cause friction and slow you down. can be done standing also, but doesn't take you as far as crouched STRAFE JUMP Normal mode: Strafe jump is based on this engine's biggest bug: changing direction with strafe keys (A/D) and mouse at the same time gives you a speed boost. We use that speed to jump faster and longer (farther). FWD+D+SPRINT, release all and press JUMP, release jump and press CROUCH in air. [For trainees I also draw the circle, tell them where to look and when; and I think it's a good exercise to move mouse at same time while walking, with and without jumping] Make sure you land facing your objective. And if there's a gap, make sure you don't jump diagonally.. shortest distance between 2 points is a straight line. There's also the a5$ landing, basically turning with mouse v fast just before/upon landing, 180 degrees at max, if you don't need to shoot after it and just wanna make it across. STRAFE for DUMMIES: (skippable except for the links)I agree with all the tutorials and videos that are out there so far, in fact, go watch them - again, for some of u - right now, then come back: https://forum.hl2dm.community/ (Training Center), https://university.hl2dm.community/curriculum.html (Official HL2DMU Curriculum), http://web.archive.org/web/20080610075131/http://www.hl2dm-university.com/training_videos.htm (maybe someone still has those archived), http://forum.tsgk.com/index.php?f=27 (Tips & Tricks).Especially the part where you can't be told how to bhop, it just takes practice, u know? But! if over-bouncing really is about bouncing at the right time (see overbounce above if you DO need instructions for this) and requires nothing BUT practice, it ain't the same with strafe jump. I for one was doing something wrong for a long time and practicing the same mistake ofc won't get you anywhere. In the following there is just one example of a step done wrong, in the end it's important you understand all steps, as failing one can mean crippling or failing the entire movement. "Velocity increases when you turn direction with strafe key and add mouse movement in same direction as strafe key". What does that tell us? Mostly nothing - it will get u a bit farther than crouch jump -, if you don't think a little and fill in the spaces.. The velocity actually depends on the angle and on the mouse curve, meaning if you start looking further and further away from where u want to start your jump - and turn your mouse more of course - but start the jump from same spot, you get a bigger jump (angle a in time t with curve c will result in speed s; angle a+1 in time t+0.25 with curve c+1 will result in speed s+1, or something like that :P watch ptrain vids).Plus, in this particular jump, high velocity can be achieved only from the contact you have with the ground, so if you jump too early, like I used to do a lot in the beginning, you won't reach the desired speed. (But ofc if you jump too late aka spend too much time on ground, you lose the sprint.) So: do the whole mouse curve in that one direction, on the ground, complete that whip, THEN jump! (And then maybe change direction in mid air for skate, if you don't want to just land) To some may seem obvious, but to others (noobs like me), it never seemed so. And, like all other tutorials, I suggest you start a local server with map tr_ptrain whichever version (b02_d is nicer) and practice til your hand gets tired or til you finish it.. STRAFE in ZIG ZAG: The zig zag is on the ground, mind you! basically you start facing objective, that being the main advantage, and zig zag once on ground aka do an S parallel to the edge - first part in the opposite direction, 2nd part in the direction of the jump. It's lengthier but can be started closer to the edge and the curve is not so big as the normal look-away strafe jump, it's actually 2 small curves. Narrow STRAFE: This might be called advanced strafe, and is something between the normal strafe jump and the zig zag one, but better since it takes up the least bit space and you start by facing the objective. Once you pass the dummy level and I guess a few more, you will see that you can simulate this curve without looking (so much) away or even starting the jump facing your objective, then do a fast small curve but with a properly synced mouse whip, lifting and throwing your heavy body over that pool lol So the zig zag might still be there, but with the first part of the S reduced to an almost on spot turn. WIGGLE WALK I didn't come up with the name, saw it in a movement guide for another game. It's basically lots of small S's on the ground, with sprint, left and right, like not being decided when to start the jump, or calculating space and postponing til you get to a ledge or the start of a corridor etc. SKATE after strafe jump, in mid air release W and shift (keep D) and press crouch; release D and press A; AFTER pressing A, move mouse to the left; on ground, jump again and release A, press D then move mouse to the right. best vid: http://www.youtube.com/watch?v=pWowdXaHmmg (or search 'HL2DM | Movement Tutorial by Onti') also has written instructions other vids: HL2: DM | jm_psyjumps_r1 lvl 10 slowed down w/ keys https://youtu.be/K-HHs7xp1NA and HL2: DM | jm_psyjumps_r1 lvl 8 slowed down w/ keys https://youtu.be/zpCPgEngpnI I also start to teach this by elements: sprint jump, crouch jump, strafe jump, overbouncing and then adding lefty rigthty and right timing and angles like in vid; or bouncing in a circle and then alternating - use jump_hall map BHOP skate away, just dont press crouch :) It gives more control over the player model and is best used around corners aka abrupt change of direction, or when knowing there's an incoming enemy, because landing crouched will slide you on the ground too far and will make it harder to stop or change direction. Crouch can still be tapped in mid air to avoid obstacles. Can be used as a startup, followed by skate after a few bounces if more space available. On same ground level you can't start with skate then go bhopping, as standing will lead to a full stop. These two techniques can, however, be interchanged in areas with multiple floors. Play level 11 or 12 and so on, on jm_psyjumps_r1 after learning to skate; There are other types of jumps, slides and bounces like vertically on tilted walls/platforms, but they're not so established, they are called in different ways by different people; they can be learned by playing jm_kenira. Both skate and bhop can be controlled with further precision by adding smaller mouse curves, whether partial or full. When intending to reduce speed, these mouse curves can be as small as wiggles and will not be accompanied by strafe keys in the corresponding direction. Example of need of speed reduction: your next 2 hops will end way before a gap and land you at the end of a gap but not over it, so 3 smaller hops are needed, the 3rd will end right before the gap and land you right after it. Drill for Bhop/Skate from 0 VelocityThis drill is good for learning how to preserve sprint, gaining velocity after losing it or simply increasing it if the initial strafe jump wasn't strong enough, and sometimes good for being a ninja and doing a silent skate without sprint nor jump sounds. You start from standing still, no sprint and W/fwd is optional, but I would leave it out as it's a good idea to practice this without any help from forward motion whatsoever. First step can be a short or long strafe key like A or D, or a jump key, or A+jump at the same time, it does not matter. I do recommend the jump key that's used for bouncing, for those that have one bind (space) for initial strafe jump and another bind (mwheel) for subsequent jumps. Since this is a drill starting from 0 vel and really low vel, looking down helps, just like in CS 1.6 etc. https://youtu.be/Ol4WywRtIPY QuickGrab! Check it out in my Gameplay Training guide linked at the top and also the examples in this vid: https://youtu.be/4QfnpnwkPyQ Lostarena bhops around xbow ledgeEven if you land standing on the ledge, it's too far and (more often than not) it forces you to land crouched when bouncing off it. In general, whenever terrain lets you combine standing bhop aka bhop with crouched bhop aka skate, it's better to add in at least 1 standing bhop by using a railing for example that allows you to land standing. Because this gives you options: bounce off it and land standing, or land crouching. You don't want to limit yourself. For one, there might be more railings on that same level, but you no longer have access to them if you landed crouched. And now those railings will look like gates or a maze to go through, and not an obstacle course to go over. They will slow you down tremendously. Secondly, when using standing bhop and running out of speed, gaps are also easier to traverse by landing crouched, a small boost that you don't have access to if you are already crouched. Third, a railing offers more space to curve, so you can gain more speed than a normal standing bhop within an otherwise enclosed space. https://youtu.be/WViVWEB--H0 1-SIDED SKATE/BHOP Couldn't come up with a better name for this. OK if normal skate/bhop looks like an S (if you're going straight - 1 half of the S to the left, the other to the right), then 1-sided looks more like a 3. There's still lefty righty except 1 side is smaller and faster. Imagine you're in the lower half of the 3 and for the most part you're pressing A and moving mouse to the left; now this part is the small and fast one: before touching the ground, u release A to press D and move mouse to the right; and as you jump, you're right in the middle of the 3 (so you basically jump during only 1 of the strafe keys, and not alternate like normal skate); switch back and another curve to the left starts, the upper part; repeat from step 2.It is mostly used to avoid over jumping. https://youtu.be/KPrZFAKwNIE WALL STRAFE Another way to boost your speed (and start a skate or bhop), besides strafe jumping or using any external forces like speed ramps etc, is a technique called wall strafing. It consists in walking (W/S) and strafing (A/D) into a wall at an 8 degree angle. Normal speed of 190 is increased to 285. Start running, aka add sprint and the normal 320 becomes a 480. (W+A+sprint+wall = 480 vel) To see that I'm not pulling these figures out of my 4$$, type 'cl_showpos 1' in console without quotes. The speed aka velocity is the figure on the last line called 'vel:'. The angle to look for is the 2nd figure on the 'ang:' line and since usually walls are in 4 directions, you have your basic angles like this: -180 (actually 179.99), -90, 0, 90 and 180; add and substract 8 and you will get your magic angles at which to look/point at in order to wall strafe: -172, -98, -82 etc. You can look away, but still walk into the wall, if you move backwards. Now certain angles are bugged and feels like you're getting stuck into the wall; that's when the figures might show a vel of 0 and you might not hear your footsteps while jumping. I just wish mappers would consider not making jumps near walls under those odd angles. The most common use for this is in the lockdown corridor, starting from ar2. SPEED CRAWL (gone after ob update, still present in mods) Stand up near a tunnel til u touch it (might be 2 mm behind or so), then move fwd, crouch and when u enter, release crouch and press sprint; you will never lose your speed boost as long as you stay crouched under something, even if you sit still and recharge sprint. CROUCH BUG (a left over of speed crawl aka fast crouch) see http://www.youtube.com/watch?v=zPCyKHbhvhU (or search for 'hl2dm crouch bug') Just after releasing crouch, you press crouch again, fast, before reaching full standing position. Different stances allow shooting at different heights and if you go in a vent you will see things like you're in the map aka no props or models (fun thing, you can't hurt yourself with nades). Highest crouched pos you can reach is 63 since normal player height is 64. Server side looks like you're crouched at minimum and that you're shooting through walls. Fun to shoot behind various covers without being spotted (interesting to combine with silenced mag) AIR HUMP crouch jump in air it makes your hitbox buggy, looking like your player model spreads on 3 heights maybe makes it harder to fly and shoot AIR CONTROL is just skate without jumping, just lefty righty and crouch, but try to be unpredictable in the circles and zig-zag, don't do candles No matter how you ended up above ground, whether it was jump, damage, lift/platform, bouncer, pusher, speed ramps, it is best to: Crouch whenever feet are in the air (unless you wanna brake a bit, for e.g. if you saw a landing spot closer; you can even use fwd/back for a full stop to land on something specific). An important factor is to sync up your playermodel direction with your actual movement direction, so play around with combining A/D strafe keys and the right amount of mouse turn to the left/right to achieve that. You will feel the centrifugal pull just like on the ground. When flying forward, this will mean always looking/facing the direction you are going. When flying backwards, it will be the reverse, namely A/D with mouse right/left. Once these are mastered, a trickier part will be flying sideways (with W if looking forward, or S if looking back) in order to look or shoot, or doing any combination of direction changes while mid air.1 cube & 1 catwalk [air control exercise] - fast/arena settingshttps://youtu.be/R6fkcNm2_Lo 4 platforms & 2 catwalks [air control exercise] - 600 gravity The point of most/all movement videos on my youtube channel is to travel as far, or for as long as possible with one initial sprint, sometimes not even that, accompanied by plenty of overbounce. Whether on the ground, or in the air. This exercise is performed twice in the vid below, is not easy, and the goal is to practice air control in 600 gravity while attempting to finish the exercise, namely take platforms til death. First 2 jumps are technically to gain speed, but they are part of it. The platforms after that are taken standing and with a delayed jump, to achieve verticality. In general it's called 'air control' and not 'flying fast' for a reason, it's important to not overshoot but rather control the landing on specific spots such as a health pack in the middle of the map, or control the flying close enough to grab pickups off cubes and catwalks mid flight. Here it's controlling the landing on platforms and controlling the flying over catwalks without bouncing on the surfaces, in order to avoid friction. And if you're saying 'air control is only for vertical maps or maps with platforms', think of it like this: any time your feet are in the air, even during bhop, you have the opportunity to use air control, such as dodging an incoming prop by turning sharply to the side if your ggun is busy cooking a nade. youtu.be/LdLMdJO8Vs4 SOFT LANDING Basically u take a leap of faith (aka jump) holding an object and as you approach the ground (aprox 1.5 ft, but really depends on the grav), you let go of that object; your model kinda slows down a bit (this is the glitch) and it's like the jump just started, cus you take no fall damage. No matter how high you jump from. Can be a life saver if your health is <=10 (this wasn't tested on real damage settings, but those are rare) and no health pack to grab or land on (or charger to land on!). http://youtu.be/e9G6qEdWmSE Another safe landing (which works better in lower grav) is to make circles upon landing, or go sudden left/right multiple times. Kinda hard to describe - is similar to butt landing - but the point is to prolong flying as much as you can and surveilling the area like a plane to avoid abrupt landing. http://www.youtube.com/watch?v=EWw4YGsQrY8 Also falling on tilted props (or shaped ones like the black hexagon in killbox if it's standing), corner displacements or other angled surfaces (even sliding off chargers but that takes luck) can be used to avoid fall damage. http://www.youtube.com/watch?v=9kNHj5wctUY DAMAGE PUSHER Shotgun blasts and explosions make you fly a bit, use the speed to skate or fly farther in the direction you were just thrown Can also be self inflicted, like: looking in the opposite direction, shooting an smg nade, quickly switching to ggun and punting the nade to explode right near you, then look in the intended direction and enjoy the speed, but make sure you land on some health.. Best if you start this with plenty of health + suit and while already in motion, nading yourself on spot might just end up in suicide. GGUN PROP JUMP More ways that i know of; works better if proper rates of server/client (it's also faster with 100 rates, i think, on 66 tick servers) 1. pick up an object, run at a wall with it, enter the object at a 45 degree like angle (if properly entered, you can't normally jump), then look straight down, right click and jump, repeatedly. (strongly diminished after ob update) 2. better on flat surfaces: simply hop on one edge of the object, run towards other end (if u want an angle jump), look straight down, and then right click with ggun (this might be optional), push object with ggun left click, all this while sprinting; works also if you jump over the full length of the prop, landing on the far edge and shooting it with ggun 3: flat also: just run towards the object which in this case must be flat and thin, and when you get ON it, looking straight down, do same thing as 2 aka push object while sprinting 4. blades: stick one in ground as u run, at a 45 degree, then run over it, right click ofc while looking down and jump right over it; backwards or fwd, doesnt matter. (also diminished after ob update) 5. repeated ggun prop jump: what title says.. for some reason, the prop gets higher under you, as well, so you can shoot it straight down and get quite high with just 1 prop, the bigger the better, but make sure you have lots of health https://youtu.be/IOyfcbsiFgg 6. flower pot bug! http://www.youtube.com/watch?v=1162BQTGiR4 (or search 'hl2dm flower pot bug') this is similar to pt 1 and might work with other props as well but the pot is the best; you go to a curved corner, crouch enter a pot til you're stuck in it, then wait as your velocity increases (max is almost 3000) just by standing still :O meanwhile, players can jump off you like on a trampoline and at one point, the prop will spit you out or you can exit by right click, flying you skybox high GGUN PROP LIFT JUMP (NEVER SEEN ANYONE DO IT BEFORE ME lol) Based on pt 1 from above, it uses the slight push there still is when you enter a prop and exit it with right click. Take a(ny) prop (works best with blades, but the big one might kill you more often - yea they can all kill anyway), go towards a lift, look down, sprint onto the lift and into the prop, then right click and jump. Velocity and angle may vary :) GAMEPLAY TIPS ChasingDon't chase the enemy in a direct obvious path. Here's why: you might not catch them and your window of opportunity for a shot, say half a second, might be too small when they keep turning corner after corner. Whether you want to set up the shot or do it mid bhop. once you lose sight of them completely, anything can happen, they can juke you at an intersection and the chase goes on forever; they can ambush you like wait behind the corner with a shotgun and shoot you in the back as soon as you pass them; they can turn around and prop your face like at the end of my "First shot" Youtube video where I say "chasing is bad"; they can also heal back up by the time you find them; in TDM, a 2v1 might be waiting for you. The exceptions are you are at arms length and you can still partially see them. the maps being circular with many paths looping around and with very few dead ends, you are better off circling around to catch them, way more often than not. Or getting to high ground and shooting down or jumping on top of them. This can happen even if the enemy is slower than you, because again, when you lose sight of them even once, at the next intersection you have no idea which way they went. So you cannot rely on 'oh I KNOW I'm faster and I will catch them or shoot them before they turn the corner'. OTHER BUGS Underwater small tunnel where you have to crouch can be traversed faster if you don't look forward but up and touch ceiling - applied in the rpg tunnel in canale_grande_final. Last edited on: 11-02-2024, added video in GGUN PROP JUMP section.


An organized list of female rebel/citizen animation names pulled from Half-Life 2. A helpful reference for animators, mod creators, and scene builders. Animations names list Here is a sorted list of known animation names used by the female rebel/citizen in Half-Life 2: b_accent_back b_accent_fwd b_accent_fwd_UpperBody b_accent_fwd2 b_head_back b_head_forward b_OverHere_Left b_OverHere_Right base_cit_medic_anim base_cit_medic_postanim broadweaponup canals_arlene_candown canals_arlene_pourgas canals_arlene_tinker canals_mary_postidle canals_mary_preidle canals_mary_wave checkmale checkmalepost cheer1 cover cover_Idle Cover_L Cover_LTtoShootSMG1 Cover_R Cover_RTtoShootSMG1 CoverLow_L CoverLow_LTtoShootSMG1 CoverLow_R CoverLow_RTtoShootSMG1 crouch_aim_smg1 crouch_idle_RPG Crouch_idleB crouch_panicked Crouch_reload_smg1 crouch_run_holding_RPG_all Crouch_shoot_smg1 Crouch_to_stand Crouch_walk_aiming_all Crouch_walk_all Crouch_walk_holding_all Crouch_walk_holding_RPG_all CrouchDToCrouchShoot CrouchDToShoot CrouchDToStand crouchidlehide crouchRUNAIMINGALL1 crouchRUNALL1 crouchRUNHOLDINGALL1 CrouchShootToCrouchD CrouchToShootRPGfake d1_t01_BreakRoom_Sit01_to_Idle d1_t01_BreakRoom_Sit02_Entry d1_t01_BreakRoom_Sit02_Exit d1_t01_Clutch_Chainlink_Entry d1_t01_Clutch_Chainlink_Idle d1_t02_Plaza_Sit01_Idle d1_t02_Plaza_Sit02 d1_t03_LookOutDoor_Entry d1_t03_LookOutDoor_Exit d1_t03_LookOutWindow d1_t03_Sit_Bed d1_t03_Sit_Bed_Entry d1_t03_Sit_Bed_Exit d1_t03_Sit_Bed_Response d1_t03_Sit_couch d1_town05_Jacobs_Heal d1_town05_Jacobs_Heal_Entry d1_town05_Nurse_Open_Door d1_town05_Wounded_Idle_1 d2_coast03_PostBattle_Idle01 d2_coast03_PostBattle_Idle01_Entry d2_coast03_PostBattle_Idle02 d2_coast03_PostBattle_Idle02_Entry d2_coast03_PreBattle_Scan_Skies d2_coast03_PreBattle_Scan_Skies01 d2_coast03_PreBattle_Scan_Skies02 d2_coast03_PreBattle_Scan_Skies03 deathpose_back deathpose_front deathpose_left deathpose_right droprope1 Fear_Reaction Fear_Reaction_gesture Fear_Reaction_Idle g_arlene_postidle_headup g_arrest_clench g_Clutch_Chainlink_HandtoChest g_d1_t03_Sit_Bed_Response g_d2_coast03_PostBattle_Idle01 g_d2_coast03_PostBattle_Idle02 g_display_left g_left_openhand g_punctuate g_right_openhand g_scan_ID g_wave gesture_reload_ar2 gesture_reload_smg1 gesture_shoot_ar2 gesture_shoot_rpg gesture_shoot_shotgun gesture_shoot_smg1 gesture_shootp1 gesture_turn_left_45 gesture_turn_left_45_flat gesture_turn_left_90 gesture_turn_left_90_flat gesture_turn_right_45 gesture_turn_right_45_flat gesture_turn_right_90 gesture_turn_right_90_flat give gunrack Handshake_Alyx_Female Heal hg_handshake hg_nod_left hg_nod_right hg_punctuate_down holdhands idle_alert_01 idle_alert_02 Idle_Alert_AR2_1 Idle_Alert_AR2_2 Idle_Alert_AR2_3 Idle_Alert_AR2_4 Idle_Alert_AR2_5 Idle_Alert_AR2_6 Idle_Alert_AR2_7 Idle_Alert_AR2_8 Idle_Alert_AR2_9 Idle_Alert_Shotgun_1 Idle_Alert_Shotgun_2 Idle_Alert_Shotgun_3 Idle_Alert_Shotgun_4 Idle_Alert_Shotgun_5 Idle_Alert_Shotgun_6 Idle_Alert_SMG1_1 Idle_Alert_SMG1_2 Idle_Alert_SMG1_3 Idle_Alert_SMG1_4 Idle_Alert_SMG1_5 Idle_Alert_SMG1_6 idle_angry Idle_angry_Ar2 Idle_Angry_RPG Idle_Angry_Shotgun Idle_Angry_SMG1 Idle_ar2_aim Idle_AR2_Relaxed Idle_Relaxed_AR2_1 Idle_Relaxed_AR2_2 Idle_Relaxed_AR2_3 Idle_Relaxed_AR2_4 Idle_Relaxed_AR2_5 Idle_Relaxed_AR2_6 Idle_Relaxed_AR2_8 Idle_Relaxed_AR2_9 Idle_Relaxed_Shotgun_1 Idle_Relaxed_Shotgun_2 Idle_Relaxed_Shotgun_3 Idle_Relaxed_Shotgun_4 Idle_Relaxed_Shotgun_5 Idle_Relaxed_Shotgun_6 Idle_Relaxed_SMG1_1 Idle_Relaxed_SMG1_2 Idle_Relaxed_SMG1_3 Idle_Relaxed_SMG1_4 Idle_Relaxed_SMG1_5 Idle_Relaxed_SMG1_6 Idle_RPG_Aim Idle_RPG_Relaxed Idle_SMG1_Aim Idle_SMG1_Aim_Alert Idle_SMG1_Relaxed Idle_subtle Idle_to_d1_t01_BreakRoom_Sit01 Idle_to_Lean_Back Idle_to_Lean_Left Idle_to_Sit_Chair Idle_to_Sit_Ground IdleAngry_AR2_ToShoot IdleAngryToShoot idlepackage injured1 injured1postidle injured2 jump_holding_glide jump_holding_jump jump_holding_land laycouch1 Lean_Back Lean_Back_to_Idle Lean_Left Lean_Left_to_Idle Lineidle01 Lineidle02 Lineidle03 Lying_Down Man_Gun MeleeAttack01 Open_door_away Open_door_towards_left Open_door_towards_right p_arlene_postidle p_arrest_Upright P_balance_toes P_bendover P_bouncing P_Chainlink_Respond P_jumpup P_shiftleft P_shiftright P_stepin P_stepleft photo_react_blind photo_react_startle pickup Pistol_idle Pistol_idle_aim plazaidle1 plazaidle2 plazaidle3 plazaidle4 plazastand1 plazastand2 plazastand3 plazastand4 podpose pullrope1idle ragdoll reference reload_ar2 reload_shotgun1 reload_smg1 reloadpistol run_aiming_all run_aiming_ar2_all run_aiming_p_all run_alert_aiming_all run_alert_aiming_ar2_all run_alert_all run_alert_holding_all run_alert_holding_AR2_all run_all run_AR2_Relaxed_all run_holding_all run_holding_ar2_all run_holding_RPG_all run_panicked_2_2_all run_panicked_all run_panicked3_all run_protected_all run_RPG_Relaxed_all run_SMG1_Relaxed_all Scan_Skies_Respond Seafloor_Poses shoot_ar2 shoot_ar2_alt Shoot_AR2_ToIdleAngry shoot_rpg shoot_shotgun shoot_smg1 shootp1 ShootSMG1ToCover_L ShootSMG1ToCover_R ShootSMG1ToCoverLow_L ShootSMG1ToCoverLow_R ShootToCrouchD ShootToCrouchRPGfake ShootToIdleAngry ShootToStandRPGfake silo_sit Sit_Chair Sit_Chair_to_Idle Sit_Ground Sit_Ground_to_Idle sitchair1 sitchairtable1 sitcouch1 sitcouchfeet1 sitcouchknees1 sitcouchtv1 smgdraw Stand_to_crouch StandToCrouchD StandToShootRPGfake stopwoman stopwomanpre swing takepackage throw1 ThrowItem turnleft turnright turnwheel urgenthandsweep urgenthandsweepcrouch walk_aiming_p_all walk_all walk_all_Moderate walk_AR2_Relaxed_all walk_holding_package_all walk_holding_RPG_all walk_panicked_all walk_RPG_Relaxed_all walk_SMG1_Relaxed_all walkAIMALL1 walkAIMALL1_ar2 walkAlertAim_AR2_ALL1 walkAlertAimALL1 walkAlertHOLD_AR2_ALL1 walkAlertHOLDALL1 walkHOLDALL1 walkHOLDALL1_ar2 Wave Wave_close Wave_SMG1


ItsRikoVR's guide on how to create a SIMPLE Half-Life 2: Deathmatch game/server, play with your friends, use a controller, moderate, or add bot players!!! (This is not a dedicated server setup guide) INTRO The last time I played this game was over 13 years ago-- and just for 45 minutes. I'm SO GLAD I picked it back up because I absolutely LOVE how fun and chaotic it is, ESPECIALLY with friends! Thanks to the 20th anniversary and February 18th update, new life has been given to the game. It's really incredible how now you can just create and host a game through Steam's servers from the main menu, and use community created controller key-layouts! Very user-friendly, thank you Valve! BUT IT NEEDS STEAM WORKSHOP LIKE GMOD'S!!! 🔥 HOW TO BUY THIS GAME This section might seem a bit silly, but due to recent events, Half-Life 2: Deathmatch is currently delisted from the Steam store. That means the only ways to obtain the game currently are to buy Half-Life 2 for $10 USD, or The Orange Box for $20 USD! https://store.steampowered.com/app/220/HalfLife_2/ CREATING A GAME AND INVITING FRIENDS Launch Half-Life 2: Deathmatch, select "Create Server," choose a map, and ensure "Use Steam Networking" is checked. Select the "Game" tab, give your server a name, password, max player count, time limit per match, frag limit per match, and check/uncheck any additional options you desire. Click "Start." You can now invite your friends to play by going online on steam, right-clicking your friend, and clicking "Invite to Play." They can also right-click you on steam and join that way. If you didn't create a password, other players can use the game's server browser to join you. If you would like to change to a specific level, open up console ( ~ tilde button on your keyboard after you enable it in menu>options>advanced ) and type "changelevel levelname" -- replacing "levelname" with the name of the actual map. E.G. "changelevel dm_underpass" and hitting enter. CONTROLLER I made a button layout just for Xbox controllers! The goal was to make the experience feel as close to normal Half-Life 2's controller experience while considering the extra fast-paced nature of Deathmatch. Plug in whatever controller you're planning to use, turn it on, launch the game, open "Options," click the "Mouse" tab, check "Enable the gamepad," and then choose your options. This step is optional but recommended: turn on fast weapon switch to easily swap weapons in the heat of the moment (enable it in menu>options>advanced)🔥 Next, open your steam overlay, and then choose the controller icon on the bottom of your screen in the row with the other options. Under "Current Button Layout," click the big button displaying your current layout. Click "Community Layouts" to find this, or click "Search" at the top, and then paste the following into search: The BEST HL2:DM Gamepad layout (with toggles!) Once that pops up, click on it, and select "Apply Layout." If you need to know what each button does, press every button on your controller when you're in-game! Or, if you're a nerd, click on my layout and then see how each button corresponds to a different function, or keyboard/mouse button. From there, compare what these buttons do when you open up your main game menu's "options" menu, and viewing which keys are assigned on which function. MODERATING PLAYERS Someone named "b̵u̵t̶t̷ ̴h̴e̷a̶d̵" just joined and is being a nuisance! Open up your console ( ~ ), then kick them by typing in "kick" followed by their name exactly as it appears on the scoreboard when you press "Tab." E.G. "kick butt head" The same works with banning. Replace "kick" with "ban" Oh no! Their name has special characters in it and can't be kicked with the name method? Try this! Open up your console ( ~ ), type "status," and see what "userid" they have. Then, kick them by typing in "kickid" followed by their userid number. E.G. "kick id 4" The same works with banning. Replace "kickid" with "banid" This is also a great way to kick bot players! Alternatively, you can "kickall" which will kick every player from your server, including yourself, thus killing the server instance.💀👻 BOT PLAYERS Make sure your map has a navmesh by selecting your map, loading into the game, opening up console ( ~ ), and typing in "nav_generate" This will help the bot players navigate around the map almost exactly like real players would (I say almost because they don't typically use ladders). Then, go to C: Program Files (x86) Steam steamapps common Half-Life 2 Deathmatch hl2mp cfg OR Right click on your Half-Life 2 Deathmatch game listing on steam, click properties, Installed Files, then "browse," open the hl2mp folder, & open the cfg folder. From there, open/create your "autumnbot.cfg" file, then paste the following and click "save." sv_cheats 1 hl2mp_bot_join_after_player 1 hl2mp_bot_quota 4 hl2mp_bot_quota_mode fill hl2mp_bot_gravgun_only 0 hl2mp_bot_ignore_real_players 0 hl2mp_bot_add 4 sv_cheats 0 Replace the two number 4's with how many bots you'd like. After you've done that, create your game through the main menu, open up console ( ~ ), and type the following: exec autumnbot.cfg This will spawn player bots with different playermodels but all the same name, "Bot Name" into your server map. If you would like to press a single button to make this happen, open up console ( ~ ) and type bind o "exec autumnbot.cfg" If you would like to change the difficulty of bot players, open console ( ~ ) and type in hl2mp_bot_difficulty #Where "#" is the difficulty level. 0=easy, 1=normal, 2=hard, 3=expert. The bots are very player-like! They will use their gravity guns to hurl props at you, collect weapons, strafe back and forth, and of course, SHOOT YOU! Yes, they can miss some shots. But they generally have pretty good accuracy, so watch out! I'd recommend having at least one human player playing with you. :> OUTRO I hope this helped! Thank you for reading this far! I love this game and it'd be great if you could thumbs up and send this to anyone you know who might be interested in playing! Show them how easy it is to set up and play! 🔥 Lets get more people interested in fragging with Gravity Guns and toilets!
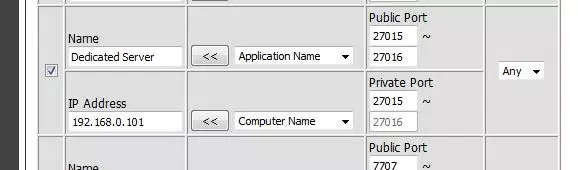
This guide will explain how to download, install and set up a dedicated server on a variety of different platforms. Foreword My previous guide on how to set up and configure a Half-Life 2: Deathmatch server is 5 years old at the time of writing this and is showing is age, combined with that i've recently been running a new dedicated server and been discovering new features and things i wasn't aware of before, instead of forgetting all of this i'd like to write it down and share it with the community, use it as you wish. My previous guide can be found here. (OUTDATED, DO NOT USE) Resources: Valvesoftware developer website. - SteamCMD - Source dedicated server information Sourcemod community[www.sourcemod.net]and Metamod[www.metamodsource.net] Docker Hub[hub.docker.com] Changelog 27 March 2025 Added "hl2mp_allow_pickup 1" to Global FAQ. Moved configuration to separate guide which can be found here: https://steamcommunity.com/sharedfiles/filedetails/?id=3453069427 Added server testing and configuration guide link section. 28 March 2025 Changed the guide description to better match the contents. 5 April 2025 Moved items from FAQ related to configuration to the configuration guide. Choosing a platform This guide will explain how to install the server on the following platforms: Windows Linux Docker on LinuxIf you're looking for long term hosting and not sure what to host your server on i suggest using Linux as it is more reliable on the long run, although the learning curve is a little steeper this guide will try to explain everything as detailed as possible. Platform │ └── Linux └── Machine used for dedicated server ONLY? ├── Yes → Linux └── No → Docker on Linux If you're hosting or running a VM (virtual machine) for the only purpose of running a dedicated server you'll want to chose the one without docker. Windows (Windows) Step 1: Setting up your folder structure. For the installation of the server we're going to need a folder for SteamCMD and a folder for the server itself, take the following as an example: Half-Life 2 Deathmatch Dedicated Server/ │ ├── steamcmd/ │ └── server/ In this example, the Half-Life 2: Deathmatch dedicated server will be installed into the server/ folder and s SteamCMD, which is used to download the server, will be installed into steamcmd/. Note: make sure to create this folders in a place where you have execution rights for example in your Documents folder. (Windows) Step 2: Setting up SteamCMD. The next step is to download SteamCMD, a download link for Windows can be found here, make sure you download the one under Windows, the file is called steamcmd.zip . Afterwards, unzip this file and put all of its content in the server folder, it should now look like this: Half-Life 2 Deathmatch Dedicated Server/ │ ├── steamcmd/ │ └── steamcmd.exe │ └── server/ After downloading, we can double click on steamcmd.exe to run it, following this, a terminal window will open which returns the following output: [ 0%] Checking for available updates... [----] Verifying installation... ... We can tell it has finished updating when we arrive at the prompt: [ 0%] Checking for available updates... [----] Verifying installation... Steam Console Client (c) Valve Corporation - version 1742420332 -- type 'quit' to exit -- Loading Steam API...OK Steam> After it has downloaded updates, checked for updates and verified the installation we can continue. Before logging into SteamCMD we must first set the location for the dedicated server to be downloaded and installed to, note that for this we have to use the absolute path. force_install_dir C: path to your server For example, installing the server onto your D: drive would be: force_install_dir D: Half-Life 2 Deathmatch Dedicated Server server When setting this on Windows make sure to use the back slash " " instead of the forward slash "/". If the installation path is not set, the directory in which SteamCMD is located will be used. The next step is to run steamcmd.exe by double clicking on it, this should launch a terminal window running SteamCMD. SteamCMD should update itself if necessary and it should end up with a prompt in which you can type commands. We can use the anonymous login feature to download the dedicated server as we don't need to make a purchase to download it, the command to login anonymously is: login anonymousFollowing this we should be logged into SteamCMD anonymously, SteamCMD will tell us: Steam>login anonymous Connecting anonymously to Steam Public...OK Waiting for client config...OK Waiting for user info...OK Steam> (Windows) Step 3: Downloading the dedicated server. Now that we are logged in and the installation directory is set we can download the dedicated server, to do this we use the following command: app_update 232370 validateapp_update will download appid 232370 (Half-Life 2: Deathmatch Dedicated Server) and validate the files after downloading. When the download is complete you may close SteamCMD and your server directory should be populated with files like so: Half-Life 2 Deathmatch Dedicated Server/ │ ├── steamcmd/ │ ├── steamcmd.exe │ └── ... │ └── server/ ├── hl2mp/ │ ├── ... │ └── ... ├── srcds.exe └── ... We can see that SteamCMD is downloading our server as the terminal writes the following output: Update state (0x3) reconfiguring, progress: 0.00 (0 / 0) Update state (0x3) reconfiguring, progress: 0.00 (0 / 0) Update state (0x61) downloading, progress: 0.00 (0 / 1049938646) Update state (0x61) downloading, progress: 4.09 (42987117 / 1049938646) Update state (0x61) downloading, progress: 6.80 (71391309 / 1049938646) Update state (0x61) downloading, progress: 12.91 (135573772 / 1049938646) Update state (0x61) downloading, progress: 19.76 (207506150 / 1049938646) Update state (0x61) downloading, progress: 28.76 (301982332 / 1049938646) ... Note: the progress is shown here in % and bytes. Following the download, it will validate the files which looks like this: Update state (0x81) verifying update, progress: 2.56 (26908998 / 1049938646) Update state (0x81) verifying update, progress: 9.25 (97137605 / 1049938646) Update state (0x81) verifying update, progress: 15.24 (160053481 / 1049938646) Update state (0x81) verifying update, progress: 21.81 (229023692 / 1049938646) Update state (0x81) verifying update, progress: 26.41 (277301554 / 1049938646) Update state (0x81) verifying update, progress: 31.65 (332265526 / 1049938646) Update state (0x81) verifying update, progress: 38.77 (407038805 / 1049938646) Update state (0x81) verifying update, progress: 44.93 (471691466 / 1049938646) ... When finished, it will tell us Success! App '232370' fully installed. (Windows) Step 4: Running the dedicated server Inside the server directory there should be a file called srcds.exe which will be used to run the server, to do this we make a .bat file to easily run the server and set parameters. The easiest way to do this is to create text file, enter the following command in this file and then save it as .bat file. srcds.exe -console -game hl2mp -maxplayers 10 +map dm_lockdown Optionally you can omit -console to run the server using a graphical interface. Running the bat file will start the server, we can see that the server is started when the server window tells us: Connection to Steam servers successful. Public IP to Steam is xxx.xxx.xxx.xxx Assigned anonymous gameserver Steam ID [A:x:xxxxxxxxxx:xxxxx]. VAC secure mode is activated. AT THIS POINT YOUR SERVER IS RUNNING, BUT FOR OTHERS TO BE ABLE TO JOIN IT YOU WILL NEED TO PORT FORWARD AND DO BASIC CONFIGURATION. THIS IS EXPLAINED FURTHER IN THE GUIDE BELOW Linux (Linux) Step 1: installing SteamCMD. Modern versions of Linux allow you to install SteamCMD directtly from your package manager, for example on my test setup ruinning Ubuntu, i can use the command: sudo apt install steamcmd Which will return: Reading package lists... Done Building dependency tree... Done Reading state information... Done The following additional packages will be installed: libstdc++6:i386 Suggested packages: steam:i386 The following NEW packages will be installed: libstdc++6:i386 steamcmd:i386 0 upgraded, 2 newly installed, 0 to remove and 0 not upgraded. Need to get 2,125 kB of archives. After this operation, 7,191 kB of additional disk space will be used. Do you want to continue? [Y/n] After this we can type y and press enter to start the installation. If your package manager and or package repository does not include SteamCMD you might have to manually install the dependencies and manually download the package, how this is done is described here. (Linux) Step 2: Creating a user for SteamCMD. Running the server under the root user is a bad idea and a scurity risk, most distributions force you to make a user account which should be used to run the server instead, if you do not have a user account, make one like so: sudo useradd -m newusername sudo passwd newusername Obviously, replaced newusername with a name of your choice. After this, login using the user account and use it from now on. (Linux) Step 3: Setting up your folder structure. After installing SteamCMD, we can set up the folder structure for our server. /home/username/hl2dm-ds/ │ └── server/ In this example, the Half-Life 2: Deathmatch dedicated server will be installed into the server folder. To create the new folders open a new terminal and type the following commands: cd ~ mkdir hl2dm-ds cd hl2dm-ds mkdir server I recommend using the home directory as the permissions will be set accordingly. (Linux) Step 4: Setting up SteamCMD. After installing SteamCMD and sertting up the folder structure, we can run SteamCMD with the following command: [ 0%] Checking for available updates... [----] Verifying installation... ... We can tell it has finished updating when we arrive at the prompt: [ 0%] Checking for available updates... [----] Verifying installation... Steam Console Client (c) Valve Corporation - version 1742420332 -- type 'quit' to exit -- Loading Steam API...OK Steam> After it has downloaded updates, checked for updates and verified the installation we can continue. Before logging into SteamCMD we must first set the location for the dedicated server to be downloaded and installed to, note that for this we have to use the absolute path. force_install_dir /path/to/your/serverFor example, installing the server into your home folder (recommended, permission will be set accordingly) force_install_dir /home/username/hl2dm-ds/serverWhen setting this on Linux make sure to use the forward slash "/" instead of the back slash " ". If the installation path is not set, the directory in which SteamCMD is located will be used. We can use the anonymous login feature to download the dedicated server as we don't need to make a purchase to download it, the command to login anonymously is: login anonymousFollowing this we should be logged into SteamCMD anonymously, SteamCMD will tell us: Steam>login anonymous Connecting anonymously to Steam Public...OK Waiting for client config...OK Waiting for user info...OK Steam> (Linux) Step 5: Downloading the dedicated server. Now that we are logged in and the installation directory is set we can download the dedicated server, to do this we use the following command: app_update 232370 validateapp_update will download appid 232370 (Half-Life 2: Deathmatch Dedicated Server) and validate the files after downloading. /home/username/hl2dm-ds/server/ ├── hl2mp/ │ └── srcds_run We can see that SteamCMD is downloading our server as the terminal writes the following output: Update state (0x3) reconfiguring, progress: 0.00 (0 / 0) Update state (0x3) reconfiguring, progress: 0.00 (0 / 0) Update state (0x61) downloading, progress: 0.00 (0 / 1049938646) Update state (0x61) downloading, progress: 4.09 (42987117 / 1049938646) Update state (0x61) downloading, progress: 6.80 (71391309 / 1049938646) Update state (0x61) downloading, progress: 12.91 (135573772 / 1049938646) Update state (0x61) downloading, progress: 19.76 (207506150 / 1049938646) Update state (0x61) downloading, progress: 28.76 (301982332 / 1049938646) ... Note: the progress is shown here in % and bytes. Following the download, it will validate the files which looks like this: Update state (0x81) verifying update, progress: 2.56 (26908998 / 1049938646) Update state (0x81) verifying update, progress: 9.25 (97137605 / 1049938646) Update state (0x81) verifying update, progress: 15.24 (160053481 / 1049938646) Update state (0x81) verifying update, progress: 21.81 (229023692 / 1049938646) Update state (0x81) verifying update, progress: 26.41 (277301554 / 1049938646) Update state (0x81) verifying update, progress: 31.65 (332265526 / 1049938646) Update state (0x81) verifying update, progress: 38.77 (407038805 / 1049938646) Update state (0x81) verifying update, progress: 44.93 (471691466 / 1049938646) ... When finished, it will tell us Success! App '232370' fully installed. To close SteamCMD we can use the command exit. (Linux) Step 6: Running the dedicated server Inside the server directory there should be a file called srcds_run which we will use to run the server, to run the server from the command line we can use the following command: ./srcds_run -game hl2mp -maxplayers 10 +map dm_lockdown After executing this, the server should start runnuing, we can see that the server has started succesfully because of the following output: Connection to Steam servers successful. Public IP to Steam is xxx.xxx.xxx.xxx Assigned anonymous gameserver Steam ID [A:x:xxxxxxxxxx:xxxxx]. VAC secure mode is activated. AT THIS POINT YOUR SERVER IS RUNNING, BUT FOR OTHERS TO BE ABLE TO JOIN IT YOU WILL NEED TO PORT FORWARD AND DO BASIC CONFIGURATION. THIS IS EXPLAINED FURTHER IN THE GUIDE BELOW Docker (Linux) A docker application is a quick and easy way of deploying an image to do one thing; run a Half-Life 2: Deathmatch Dedicated Server server. A docker container is simple to manage and configuration is easy. Certain operating systems such as Unraid[unraid.net] and or TrueNAS Community Edition[www.truenas.com] allow for application deployement in the shape of docker images from sources such as Docker Hub[hub.docker.com]. Installing such a docker container is relatively simple if you've set up docker containers before, for Unraid and TrueNAS use this link[hub.docker.com]. A docker container/ application can also be ran on Linux itself and is not difficult to set up, the following steps will explain: (Docker Linux) Step 1: Installing docker. Unlike SteamCMD, Docker cannot be installed from most repositories as far as i know and has to be added, we can do this using the following commands: First, login as root: sudo suRun updates: sudo apt updateFetch the GPG from docker and install it: curl -fsSL https://download.docker.com/linux/ubuntu/gpg | gpg --dearmor -o /usr/share/keyrings/docker-archive-keyring.gpgFetch the repository list and install it: echo "deb [arch=amd64 signed-by=/usr/share/keyrings/docker-archive-keyring.gpg] https://download.docker.com/linux/ubuntu $(lsb_release -cs) stable" | sudo tee /etc/apt/sources.list.d/docker.list > /dev/nullUpdate once more: sudo apt updateInstall docker: sudo apt install docker-ceNext we start docker and enable it so it starts every time we reboot our machine: sudo systemctl start docker sudo systemctl enable docker After this, docker should be installed, we can test this by running: sudo docker --versionWhich should return: Docker versions 28.0.1, build 068a01eThe version will be different for you most likely. (Docker Linux) Step 2: Setting up the folder structures. We will need to set up 2 folder structures for the Dedicated Server, one for the Linux operating system and one inside the Docker container, on the Linux system we want the folder structure like this: /home/USERNAME/dockerdata ├─ server │ └─ stamcmd In this case, on the Linux machine itself we have the server and steamcmd folder inside /home/username/dockerdata. Now we need to set up the folder structure inside the docker container which will look something like this: /dockerdata ├─ server │ └── stamcmd These folders don't need to be created as they are created for us when setting up the Docker container. (Docker Linux) Step 3: Setting up the Docker container. First we login as root: sudo suThen, go to the docker directory on your Linux machine, in the example shown above that would be /home/USERNAME/dockerdata, to do this, use: cd /home/USERNAME/dockerdata (make sure to change USERNAME with your username) Then, make docker-compose.yaml using the following commands: touch docker-compose.yamlOpen docker-compose.yaml using the text editor with: nano docker-compose.yamlThen, add the following lines to your docker-compose.yaml file: services: hl2dm: container_name: hl2dm-ds image: ich777/steamcmd:hl2dm restart: unless-stopped ports: - "27015:27015" - "27015:27015/udp" environment: GAME_ID: 232370 GAME_NAME: hl2mp GAME_PORT: 27015 GAME_PARAMS: "+maxplayers 24 +map dm_lockdown" UID: 99 GID: 100 volumes: - /home/USERNAME/dockerdata/steamcmd:/serverdata/steamcmd - /home/USERNAME/dockerdata/server:/serverdata/serverfiles Note: make sure to change USERNAME with your username! Note: the following lines indicate where the server will be installed to on our Linux machine and their respective path on the Docker container: - /home/USERNAME/dockerdata/steamcmd:/serverdata/steamcmd This indicates that /home/USERNAME/dockerdata/steamcmd is linked (:) to /serverdata/steamcmd in our docker container. The paths inside the docker container have to be /serverdata/steamcmd and /serverdata/serverfiles because this is what the image expects! (Docker Linux) Step 4: Running the container Some parts of our server configuration are written inside the docker-compose.yaml file such as the port the server will use and the server parameters including the starting map, this file can be updated when the server is turned of in case you ever need to change these. Next we can start our container using the following command: docker compose up -dAfter running the command and letting the images download, we should get the following output: [+] Running 7/7 ✔ hl2dm Pulled 5.6s ✔ 69fb10dc82f9 Pull complete 3.8s ✔ 05ba2b01b3ef Pull complete 4.0s ✔ dc2b3bbca85d Pull complete 4.0s ✔ 8a56348ea875 Pull complete 4.0s ✔ 1df2777fc818 Pull complete 4.0s ✔ 6e694c0deac5 Pull complete 4.0s [+] Running 2/2 ✔ Network dockerdata_default Created 0.0s ✔ Container hl2dm-ds Started 0.2s Here we can see it has pulled all the required data to set up the docker container and we can see our container name is hl2dm-ds, this name will be important to identify our container. (Docker Linux) Step 5: Reading the logs, interacting with docker and other useful commands. We can see what the container is doing by reading the log, after the container has been created it will start by itself and start downloading the dedicated server, after this it will start the server. To list our containers we can use the following command: docker ps -a This should return something like this: CONTAINER ID IMAGE COMMAND CREATED STATUS PORTS NAMES 4dde2e97d806 ich777/steamcmd:hl2dm "/opt/scripts/start.…" 8 minutes ago Up 8 minutes 0.0.0.0:27015->27015/tcp, 0.0.0.0:27015->27015/udp, [::]:27015->27015/tcp, [::]:27015->27015/udp hl2dm-ds We can open the logs from our container with the following command: docker compose logs -f hl2dm-dsThis should return the following output: hl2dm-ds | ---Ensuring UID: 99 matches user--- hl2dm-ds | ---Ensuring GID: 100 matches user--- hl2dm-ds | ---Setting umask to 000--- hl2dm-ds | ---Checking for optional scripts--- hl2dm-ds | ---No optional script found, continuing--- hl2dm-ds | ---Taking ownership of data...--- hl2dm-ds | ---Starting...--- hl2dm-ds | SteamCMD not found! hl2dm-ds | steamcmd.sh hl2dm-ds | linux32/steamcmd hl2dm-ds | linux32/steamerrorreporter hl2dm-ds | linux32/libstdc++.so.6 hl2dm-ds | linux32/crashhandler.so hl2dm-ds | ---Update SteamCMD--- hl2dm-ds | Redirecting stderr to '/serverdata/Steam/logs/stderr.txt' hl2dm-ds | ILocalize::AddFile() failed to load file "public/steambootstrapper_english.txt". hl2dm-ds | [ 0%] Checking for available update... hl2dm-ds | [----] Downloading update (0 of 49,478 KB)... hl2dm-ds | [ 0%] Downloading update (0 of 49,478 KB)... hl2dm-ds | [ 0%] Downloading update (0 of 49,478 KB)... hl2dm-ds | [ 0%] Downloading update (0 of 49,478 KB)... hl2dm-ds | [ 0%] Downloading update (0 of 49,478 KB)... hl2dm-ds | [ 0%] Downloading update (1,018 of 49,478 KB)... hl2dm-ds | [ 2%] Downloading update (2,225 of 49,478 KB)... ... hl2dm-ds | [----] Installing update... hl2dm-ds | [----] Cleaning up... hl2dm-ds | [----] Update complete, launching Steamcmd... hl2dm-ds | UpdateUI: skip show logo hl2dm-ds | steamcmd.sh[33]: Restarting steamcmd by request... hl2dm-ds | Redirecting stderr to '/serverdata/Steam/logs/stderr.txt' hl2dm-ds | Logging directory: '/serverdata/Steam/logs' hl2dm-ds | [ 0%] Checking for available updates... hl2dm-ds | [----] Verifying installation... hl2dm-ds | UpdateUI: skip show logo hl2dm-ds | Steam Console Client (c) Valve Corporation - version 1741737873 hl2dm-ds | -- type 'quit' to exit -- hl2dm-ds | Loading Steam API...OK hl2dm-ds | Connecting anonymously to Steam Public...OK hl2dm-ds | Waiting for client config...OK hl2dm-ds | Waiting for user info...OK hl2dm-ds | Update state (0x3) reconfiguring, progress: 0.00 (0 / 0) hl2dm-ds | Update state (0x61) downloading, progress: 99.77 (917262123 / 919359275) hl2dm-ds | Update state (0x61) downloading, progress: 99.77 (917262123 / 919359275) hl2dm-ds | Update state (0x81) verifying update, progress: 4.33 (39775643 / 919359275) hl2dm-ds | Update state (0x81) verifying update, progress: 18.78 (172636393 / 919359275) ... hl2dm-ds | Update state (0x81) verifying update, progress: 87.07 (800489212 / 919359275) hl2dm-ds | IPC function call IClientAppManager::GetUpdateInfo took too long: 42 msec hl2dm-ds | Success! App '232370' fully installed. hl2dm-ds | ---Prepare Server--- hl2dm-ds | mkdir: cannot create directory ‘/serverdata/.steam/sdk32’: No such file or directory hl2dm-ds | cp: target '/serverdata/.steam/sdk32/' is not a directory hl2dm-ds | ---No 'server.cfg' found, downloading...--- server.cfg 100%[] 1.76K --.-KB/s in 0s hl2dm-ds | ---Successfully downloaded 'server.cfg'--- hl2dm-ds | ---Please wait--- hl2dm-ds | ---Server ready--- hl2dm-ds | ---Start Server--- hl2dm-ds | Auto detecting CPU hl2dm-ds | Using default binary: ./srcds_linux hl2dm-ds | Server will auto-restart if there is a crash. hl2dm-ds | Setting breakpad minidump AppID = 232370 hl2dm-ds | Using breakpad crash handler hl2dm-ds | dlopen failed trying to load: hl2dm-ds | /serverdata/.steam/sdk32/steamclient.so hl2dm-ds | with error: hl2dm-ds | /serverdata/.steam/sdk32/steamclient.so: cannot open shared object file: No such file or directory hl2dm-ds | Looking up breakpad interfaces from steamclient hl2dm-ds | Calling BreakpadMiniDumpSystemInit hl2dm-ds | 03/15 18:53:20 minidumps folder is set to /tmp/dumps hl2dm-ds | 03/15 18:53:20 Could not find steamerrorreporter binary. Any minidumps will be uploaded in-process03/15 18:53:20 Init: Installing breakpad exception handler for appid(232370)/version(9540945)/tid(182) hl2dm-ds | [S_API] SteamAPI_Init(): Loaded local 'steamclient.so' OK. hl2dm-ds | Using shader api: shaderapiempty_srv.so hl2dm-ds | Using Breakpad minidump system. Version: 9540945 AppID: 232370 hl2dm-ds | Loaded 11 VPK file hashes from /serverdata/serverfiles/hl2mp/hl2mp_pak.vpk for pure server operation. hl2dm-ds | Loaded 11 VPK file hashes from /serverdata/serverfiles/hl2mp/hl2mp_pak.vpk for pure server operation. hl2dm-ds | Loaded 1 VPK file hashes from /serverdata/serverfiles/hl2_complete/hl2_complete_misc.vpk for pure server operation. ... hl2dm-ds | Loaded 5 VPK file hashes from /serverdata/serverfiles/platform/platform_misc.vpk for pure server operation. hl2dm-ds | server_srv.so loaded for "Half-Life 2 Deathmatch" hl2dm-ds | Parent cvar in server.dll not allowed (hl2mp_bot_debug_ammo_scavenging) hl2dm-ds | maxplayers set to 24 hl2dm-ds | maxplayers set to 24 hl2dm-ds | ConVarRef dev_loadtime_map_start doesn't point to an existing ConVar hl2dm-ds | Unknown command "port" hl2dm-ds | Network: IP 172.19.0.2, mode MP, dedicated Yes, ports 27015 SV / 27005 CL hl2dm-ds | Initializing Steam libraries for secure Internet server hl2dm-ds | CAppInfoCacheReadFromDiskThread took 0 milliseconds to initialize hl2dm-ds | Setting breakpad minidump AppID = 320 hl2dm-ds | SteamInternal_SetMinidumpSteamID: Caching Steam ID: 76561197960265728 [API loaded yes] hl2dm-ds | SteamInternal_SetMinidumpSteamID: Setting Steam ID: 76561197960265728 hl2dm-ds | dlopen failed trying to load: hl2dm-ds | /serverdata/.steam/sdk32/steamclient.so hl2dm-ds | with error: hl2dm-ds | /serverdata/.steam/sdk32/steamclient.so: cannot open shared object file: No such file or directory hl2dm-ds | Looking up breakpad interfaces from steamclient hl2dm-ds | Calling BreakpadMiniDumpSystemInit hl2dm-ds | SteamInternal_SetMinidumpSteamID: Caching Steam ID: 76561197960265728 [API loaded yes] hl2dm-ds | SteamInternal_SetMinidumpSteamID: Setting Steam ID: 76561197960265728 hl2dm-ds | [S_API FAIL] Tried to access Steam interface SteamUtils010 before SteamAPI_Init succeeded. hl2dm-ds | Setting breakpad minidump AppID = 232370 We can see above that the container has downloaded and updated SteamCMD, downloaded and installed the dedicated server and started the server. At this point our server is running, we can restart the container using the following command: docker restart hl2dm-dsAnd we can stop the container using this command: docker stop hl2dm-dsAT THIS POINT YOUR SERVER IS RUNNING, BUT FOR OTHERS TO BE ABLE TO JOIN IT YOU WILL NEED TO PORT FORWARD AND DO BASIC CONFIGURATION. THIS IS EXPLAINED FURTHER IN THE GUIDE BELOW Port forwarding Port forwarding is required for to be done for others to be able to join your server from the internet, without port forwarding your server will not show up in the server list and people who are not on the same network as you are will not be able to join. Port forwarding is different for each and every set up, this guide will assume you're hosting a dedicated server from a home network and that you are using a home router and or firewall, if you're paying for a VPS or another server space you will have to figure out with them how to open ports to allow for game traffic from the internet. (Port forwarding) Step 1: Finding your router IP adres. To find our router's IP adres on windows we can open the command prompt and use the following command: ipconfigWhich will return: Ethernet adapter Ethernet: Connection-specific DNS Suffix . : home IPv4 Address. . . . . . . . . . . : xxx.xxx.xxx.xxx Subnet Mask . . . . . . . . . . . : xxx.xxx.xxx.xxx Default Gateway . . . . . . . . . : 192.168.1.1 In this example, my default gateway which is my router, has the IP adres 192.168.1.1. To do this on Linux we can use the following command: netstat -rnWhich will return: Kernel IP routing table Destination Gateway Genmask Flags MSS Window irtt Iface 0.0.0.0 192.168.1.1 0.0.0.0 UG 0 0 0 ens2 192.168.1.0 0.0.0.0 255.255.255.0 U 0 0 0 ens2 In this case we can see that our router's IP adres (gateway) is 192.168.1.1 (Port forwarding) Step 2: Logging into your router's web interface and opening your port. Open a web browser and enter the your gateway's IP adres, this should give you a login page to enter your router's web login. The password for this web login is usually found on the bottom of your router and is not the same as the Wi-Fi password. After logging in we must find the port forwarding options, for me they can be found under Network > NAT > Port mapping. Next step is to add a port mapping/ port forwarding rule, the IP adres to use for this rule is the IP adres of the computer that your dedicated server is hosted on, for example this could be 192.168.1.10, next we must set the port to 27015 (or whatever port you're using) and the protocol to UDP/TCP (both). An example port forwarding rule may look something like this: Enable this rule: ☒ IP: 192.168.1.10 Protocol: TCP/UDP Private Port: 27015 - 27015 Public Port: 27015 - 27015 After doing this, start your server and it should now be joinable from the server list, but we haven't changed configuration yet which is required for changing the name of the server and optionally setting a password, without changing the name it will be very difficult to find your server in the list. To directly connect to your server from the internet you can open the console and use the following command connect xxx.xxx.xxx.xxx:27015, replace the x's with your public ip. Configuration and testing your server Configuration At this point your server will be running and should show up in the server list, to be able to find your server in the server list you will have to change the name and do basic configuration which is explained in my configuration guide, along with that the guide also explains how to install addons and set up a FastDL. https://steamcommunity.com/sharedfiles/filedetails/?id=3453069427 Testing your server Even though your server will be hard to find in the server last if you haven't changed the hostname, w can still test our connection by connecting to it directly. To do this, the console in Half-Life 2: Deathmatch by pressing ~ if enabled in the settings and type: connect xxx.xxx.xxx.xxxMake sure to change the xxx.xxx.xxx.xxx with your public IP address or with the LAN IP address that the server is running on. If you cannot connect to your server check if you've followed all the steps as described or leave a comment below. FAQ (Windows) Where should i install my server? The server can be installed to any directory on any drive as long as you have execution privileges. How do i enable/ disable the server GUI (Graphical User Interface) on the server? When starting the server, you can add or remove "-console" to the startup command in the bat file. How do i run multiple servers/ a server on a different port? If you're running multiple servers they cannot use the same port, to change the port edit your launch parameters like so: srcds.exe -console -game hl2mp -maxplayers 10 +map dm_lockdown -port 27016 FAQ (Linux) Where should i install my server? The server can be installed to any directory on any drive as long as you have execution privileges. How do i run my server in the background? Start a screen named hl2dm-ds: screen -S hl2dm-dsStart the server on this screen by going to your server directory and using: ./srcds_run -game hl2mp -maxplayers 10 +map dm_lockdownMove the screen to the background: CTRL+A+DIf you want to bring it to the foreground use: screen -r hl2md-ds How do i run multiple servers/ a server on a different port? If you're running multiple servers they cannot use the same port, to change the port edit your launch parameters like so: ./srcds_run-console -game hl2mp -maxplayers 10 +map dm_lockdown -port 27016 FAQ (Docker) How do i change server parameters? If you want to change things such as the starting map or the game port, edit your docker-compose.yaml file and make the necessary changes. If you want to change the game port make sure to change all ports in the file. If you want to change launch parameters change them at GAME_PARAMS:. How do i access my game files inside the docker container? In your docker-compose.yaml it will say where your serverfiles and SteamCMD are mounted locally, look for the lines under "volumes:", the part before the colon is where your files are locally mounted. How do i change the mount point for the server files? Your docker-compose.yaml will state where your game and SteamCMD folders are mounted under "volumes:", to change these edit the first part before the colon, for example: - /home/USERNAME/dockerdata/server:/serverdata/serverfiles Can be changed to: - /a/different/path/for/your/server:/serverdata/serverfiles Make sure to not change the part after the colon. FAQ (Global) How do i allow for more player slots on my server? (more than 24) To increase the maxplayers add "-unrestricted_maxplayers" to your launch parameters and set "+maxplayers" to your desired number e.g. "+maxplayers 101" How do i change the tickrate for my server? Add "-tickrate" to your launch parameters like so "-tickrate 100". If you have any further questions, feel free to ask below.

This guide explains the various methods you can use to block the fake servers in the server list on various source engine games, it is written for Half-Life 2 Deathmatch but these methods should also work with other source engine games. How does the spam work and why should you block this? If you are playing a source engine game infected by these fake servers you will see a number of different servers spam your list that will make you end up on a different server than you thought you would join. At the moment of writing the Fastpath community is the primary abuser with this method. When you joined one of these servers you can still join other servers, but because of the large amount of servers they spam and the fact they can use players joining the servers to fake having a high player amount for a long time it is easy to get trapped back in. One of the most important reasons to block these servers outright is that by joining them they can use your steam information to fuel their spamming method. They capture your steam details including the unique authentication you used to join the server, and instead of removing this like other servers do when you leave they will instead put your information and nickname on all the other fake servers for as long as your information is valid. Causing these servers to appear very high up the server list making it hard to avoid them for others because they can spam as many as they want. On top of this they will fake any information they can, different map names, server names, server names of popular servers you like, player numbers and even ping (Although they fake the ping ingame not on the server list). And during the times less HL2DM players are online their effect is amplified since it will be harder for steam's server to detect which server has legitimate players online. Because they constantly change their details and the ports the servers run on blocking them using the ingame blocking buttons is almost impossible. This guide lists 3 different methods you can use to block the spam properly. Automatically blocking the servers in the Windows Firewall The easiest method to automatically block the servers is to block them in the Windows Firewall, to do this automatically download the GameSpamFilter[content.hl2dm.org] file. Once downloaded run this file and allow it administrator permissions. It will now automatically download the current list of IP's that need to be blocked, and update your firewall to block these IP's completely. After running this script you should be able to refresh the server list and no longer see these IP's, if the game you are trying to play uses the steam web API they might still show up, but in that case you will not be able to accidentally connect and they will not show ping. If they create new spam servers you can run the script again without downloading anything, it will automatically download the new list and update the firewall for you. If the IP still shows up please leave a comment on this guide so i can verify the IP and add it to the list. Blocking all servers at once with the ingame Blacklist Because these servers randomize their ports you can not effectively block them using the ingame Add to Blacklist button. It would be a cat and mouse game where you are constantly adding the servers to the blacklist only to get spammed again later. Luckily for the players who do not use Windows the game does allow importing the servers without the ports, you will need to obtain the current Blacklist[content.hl2dm.org] . After downloading the blacklist go to the Blacklisted Servers tab and use the Import to File button, navigate to the downloaded server_blacklist.txt and import. You will now see the blacklisted IP's show up as Spamfilter followed by the IP. If they put up new IP's you will need to download the blacklist again and repeat these steps. Just keep in mind this only blocks the servers ingame, on the steam server browser inside steam itself you will still see all the spam if you use this method. Manually block the servers in the Firewall This part of the guide is not going to be step by step, since i do not know which Firewall you have or if it is even enabled. I just like to point out you do not have to rely on either the GameSpamFilter script or the Blacklist and can use your existing firewall on either your PC or your router instead. If you want to do this you can download all the known IP's here : http://content.hl2dm.org/spamfilter/RogueIPs.txt Anyone wanting to build a solution with this list is free to crawl it at any time, i have plenty of bandwidth on that server. How do i report a new IP and does this work for games other than HL2DM? To answer the last question first, yes especially the GameSpamFilter method absolutely works on other games from valve (and possibly non valve games to). But since i provide servers for the Half-Life 2 Deathmatch community blocking their HL2DM IP's is my priority so they can technically put up IP's for other games without me noticing. If you find an IP that redirects to a server you did not intend to join feel free to post a comment on this guide so i can include it to the list. I only do this for servers that belong to communities that spam the server list with fake servers. If a server simply has a lot of bots, even if these bots are disguised as players ingame i will not add it to the list because you can easily avoid this server yourself and some players may enjoy larger bot battles. If you have any further questions feel free to let me know in the comments.