Panzer Corps 2


I wrote a brief analysis of General's traits you can choose at the start of Spanish Civil War Grand Campaign. I tried to assess their usefulness in this campaign as I wanted to make a quick guide for those who want to start their GC. Most of my remarks hold true for future campaigns but before starting SCW you need to consider that it is very specific. Introduction When choosing the traits for SCW, you need to consider it's characteristics. It's quite different in design from the main campaign and differs a lot from 1939-1942 grand campaigns. First of all, you need to remember that you get no infantry of your own for the whole campaign, so your infantry units will get no XP and can’t level. You will have to buy auxiliaries during every battle. Tanks you have are very early models, and when coupled with the fact that they are inexperienced, they can get hurt easily and don't do much damage. You will need to make sure you only use them in the open terrain, hunting for other infantry, scouts and artillery. Use bombers rather than tanks to fight other armor. You artillery is pretty bad and your strongest point may be your expensive airforce. The only positive is that your enemy isn’t much better than you. Advantages Advantages: Infantry general 0/5 – As you will not get your infantry, only auxiliaries in civil war it is worthless. Gets much better in future campaigns. Panzer General 4/5 – Great overall, not that great in Spanish civil war, as tanks are weak, but still good. Remember that your units will carry over and will be the backbone of your army so field them, get them awarded and experienced. Industry Connections 0/5 – I consider it worthless, as you never get enough to field more than one unit, and once it’s damaged you only have a very limited number of replacements. Also, it doesn’t happen often. Liberator 1/5 – mediocre – If you play well, without needless losses, you will never starve for prestige and will end up having a lot more than you can spend. Deep recon 1/5– It’s a good trait, but hardly great. But it becomes very good if you play with shroud on ("shroud" is a difficulty option separate from generic "fog of war" and it makes the whole map blacked out). Operational initiative 0/5 – worthless Master of Blitzkrieg 5/5 – best trait you can get. Even with SCW bad tanks, being able to move quicker and catch the infantry/artillery in the open is how you want to play. Battle academy 2/5 – Somewhat useful trait. You start very green, but hardly great, you will end up capping exp of your units anyway. You will get more experienced units in earlier missions which will make it a bit easier. There are better options though. Auxiliary 0/5 – Actively avoid it; Thing is, you should avoid auxiliaries unless absolutely necessary (sadly in civil war you are forced to pay for infantry) for three reasons: they cost prestige, steal xp from you units, don’t carry the exp over. Even considering you need to buy auxilliaries in this campaign, only buy as little as you absolutely need. Trophies of war 1/5 or 4/5 – If you’re sure you know how surrenders work, actively seek them, then it’s a very good trait as communist tanks are awesome compared to yours. If you’re not and are able to get occasional surrender here and there.. don’t take it. If you play with The Collector on, where it becomes a must, you won’t have enough surrenders to make it worthwhile. Deadly grasp 2/5 – don’t underestimate it, these penalties hit hard if you manage to surround. Flexible command 1/5 – extremely situational, can very well finish the game without splitting Killer team 5/5 - great, but depends on heroes you get. Heroes can make your campaign (and future ones) easier than having another unit in the field. AA veteran 3/5 - good, but hardly breathtaking; I usually play with one AA as fighters are more versatile. Perimeter control 2/5 (3/5 if with deadly grasp) – great combo with deadly grasp, you can surround without being surrounded a lot easier. Meticulous planning 5/5 – Great, can’t overstate how it helps in setting strategy. It’s the only way to play with fear of unknown disadvantage Force concentration 0/5 – Worthless in Spanish civil war, really good in later campaigns. Terrain expert 0/5 – not worth it; If you’re in a river and someone catches you with pants down, it’s your fault. You are almost always on offensive so sitting in one spot for a few turns works only in two battles (granted, one of them is Ebro - the hardest one in campaigns until Grozny). Aggressive deployment – 3/5 Almost as good as master of blitzkrieg in campaigns later than 1939; You never have to bother with mobile artillery again and can only focus on godly 21s. Your infantry moves and attacks as quickly as tanks do. Not as useful in civil war, but still good. Old guard 0/5 or 5/5 – Must have for ironman; useless otherwise. If you can load/save and undo and still lose units at the end of the battle, try figuring out what you are doing wrong instead. Disadvantages Inept logistics – One of the worst choices there is. You will field 2-3 less units in every single battle No overstrength – can live with it, but pretty punishing. Overstrengthening your most elite units can allow you to break through defenses in no time with fewer loses than fielding two mediocre units without OS. Denied air force – just don’t do it in SCW; Airforce is your main advantage. It’s possible to use AA and artillery instead of fighters and bombers but extremely painful, slow and takes more core slots. Bombers are much better against enemy armor than anything else you can field in Spain. Denied artillery – actually not nearly as bad. Artillery in civil war has low range (except for 201s you can get in two scenarios), mediocre effect and is nowhere near as good as in 39-42. Enemy’s AA isn’t deadly so you can just field more bombers instead. Green army – It's an extremely bad choice for SCW, very punishing. You may be forced to fully retire some units from battlelines not to lose them or lose their xp; Your units are green and will be taking losses. It's not a 1940 army which blitzes over enemy panzer corps losing 1-2 strength. Delayed reinforcements – Almost the same as above, only worse. Retrograde – I haven’t tried this, but doesn’t actually seem bad. For most of the campaign you play the same unit types and upgrades are rarely gamechanging. Sometimes you get chance for new equipment for command points and you can always capture enemy’s equipment. Poor maintenance – doesn’t happen all that often but sometimes catches you just in the wrong moment. If you lack points but not luck, choose this. Chaotic fire – It’s OK to take this in civil war, would be more punishing later. It will be a while until you get steamroller and even longer until you can overrun more than twice in a turn, and that’s pretty much the only case where it plays a role – just don’t get surrounded. Inefficient supply – same as above, shouldn’t change much, just don’t take this and chaotic fire at the same time. Poor ground control – don’t take it; enemy will go right through your lines and pick artillery or break out of surround. Bad luck – safe to take, sometimes makes it a bit harder, depends on random factor % you chose in advanced difficulty options. Trench slog – A really bad option. It’s actually much more punishing in civil war than later on when you will get multiple options for dealing with entrenchment. Slow modernization – When in doubt, take this; you can wait a bit with upgrades, and you usually won’t get all the equipment at the same time anyway. You can also take it if you want to catch enemy units and field them instead, they are better than yours. Fear of unknown – Changes game a lot; you will need more scouts or scout planes, slows your map progress, but if playing ironman you would be moving carefully anyway. Arrogant – In theory doesn’t change any mechanics, but if you can’t see the predictions you have to consider every combat very carefully, checking for entrenchment, artillery support. Gets very tiring quickly. Force dispersion – Not all that bad in civil war but never take it from 1939 on. Ruthless – If you will never use captured equipment and don’t care for prestige (you shouldn’t, there’s plenty unless you play at hardest settings – and then you wouldn’t be reading my tips), choose this. Slow reaction – Never choose this; it’s a nightmare of having every enemy using with a hero with “No retaliation”. Just consider the fact that a 15 strength tank with steamroller, and heroes with 'no retaliation' and 'ignore entrenchment' can clear whole enemy city filled with dug in infantry. I hope it's useful to someone and that you will enjoy the SCW as much as I did!

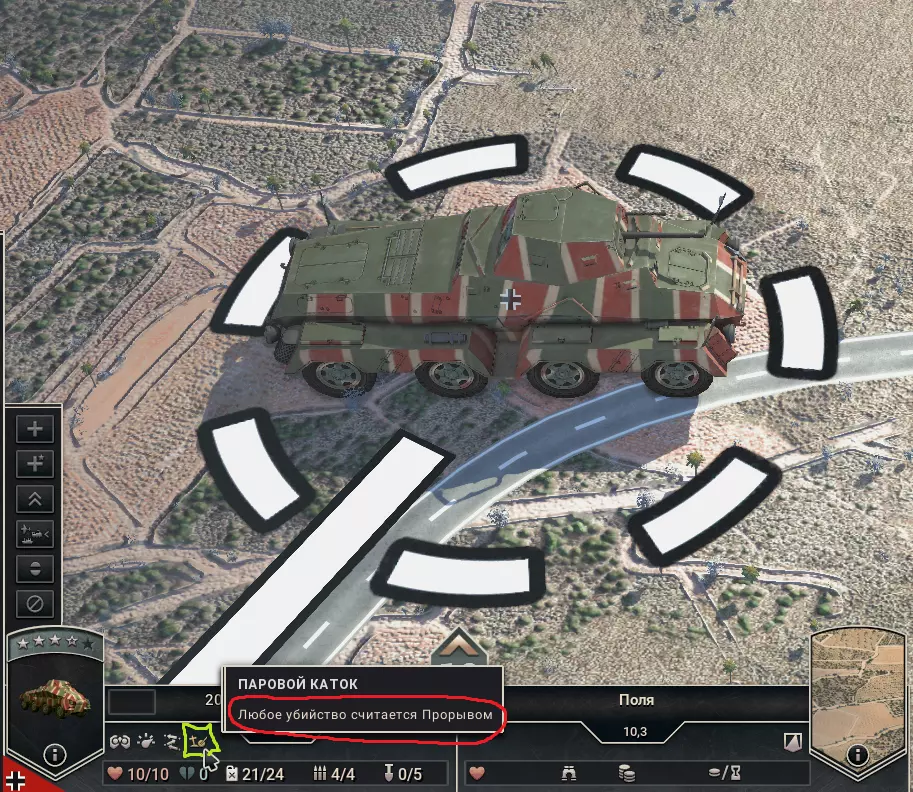
Panzer Corps 2 - моя любимая игра на текущий момент, и уже долгое время. Я не являюсь в ней "асом", не проходил на генералиссимусе, а пока только прошел несколько раз на норме. Для нового игрока и это будет достижением - в игре много тонкостей и хитростей, которые раскрываются со временем. Этот гайд будет посвящен основам - понятным и неочевидным, а также легко забываемым аспектам игры. Если Вы опытный стратег и варгеймер - Вы вряд ли найдете здесь что-то интересное. Остальных - милости прошу. Введение Мы рассмотрим здесь основные принципы и механики, которые Вам будет полезно знать, чтобы пройти полную кампанию хотя бы один раз, а также некоторые хитрости. В игре неплохой туториал, который многое объясняет, рекомендуется его пройти. Также, большую часть информации можно почерпнуть из приложенного к игре руководства. Однако если Вы по какой-то причине не хотите/не можете его прочитать, не беда, все самое важное можно будет почерпнуть из гайда! "Это чит!" Три совета, как упростить себе прохождение кампании Итак, если Вам лень читать полный гайд, а хочется быстрых результатов, вот три совета, как сделать прохождение проще на стратегическом уровне. Читерная комбинация перков Вашего персонажа. Вам нужно взять на старте: Deadly Grasp - перк, удваивающий скорость получения негативных эффектов от окружения у врагов Flexible Command - позволяет Вам сплитить свои войска без траты Core слотов. Trophies of war - дает Вам x2 престижа и техники при сдаче противникаОпционально берем Perimeter Control - позволяет Вам самим не оставаться в окружении, прерывая зону контроля врага в точках где у Вас стоят юниты. Вам придется взять какие-то отрицательные перки для этого набора. Здесь тяжело советовать, поскольку все они достаточно неприятные. Вероятно, можно рассмотреть что-то из retrograde, slow modernization, Bad luck, fear of unknown (последний приводит к весьма раздражающим эффектам, но в целом, если играть аккуратно, не смертельно. Эта комбинация позволит Вам очень быстро окружать и делать беспомощными группы врагов, особенно выдвигающиеся вперед танки противника. Заставляя их сдаться, Вы будете получать огромные суммы престижа, так что недостатка в деньгах у Вас не будет в принципе. Ведь главная проблема новичка - в середине кампании кончаются деньги. (здесь и далее будем называть престиж деньгами, потому что по факту он и есть основная валюта игры). НЕ СТАЛКИВАЙТЕСЬ С РУССКИМИ ТАК ДОЛГО ПОКА МОЖЕТЕ. Ну или хотя бы после Сталинграда. Это не шутка. Оборонительные миссии в PC2 в целом сложны для новичка, а против русских, пожалуй, это самые сложные уровни игры (чисто мое мнение). Особенно если Вы упорствуете и дотягиваете до "Багратиона". Если "тянете" по ресурсам и хотите проще победить - выбирайте альтернативную историю. Тут все упирается опять в оборону. Оборона сложнее для новичка. Если Вы выбираете альтернативную историю - Германия продолжает атаковать, вместо того чтобы переходить к обороне и своему неизбежному поражению. Экономика игры Итак, начнем гайд со стратегического уровня, с концепций, которые простираются через все миссии. В PC2 у Вас основной ресурс - это Престиж (деньги). Есть еще Core слоты, но Вы на них не влияете, и это ресурс более "тактического" уровня - ими надо грамотно распоряжаться в пределах каждой миссии. Престиж же копится и тратится на протяжении всей кампании, и основной способ проиграть кампанию - когда у Вас кончаются деньги и вы не можете докупить новые подкрепления для своих юнитов, чтобы закончить сценарий. Также, как еще один стратегический ресурс можно рассматривать опыт Ваших юнитов. Это более тонкая материя, которая начинает иметь значение ближе к концу игры. Когда Ваш "зеленый" свежекупленный юнит выходит сражаться против 3-5 звездочного противника, результат выглядит грустно. Поэтому основные траты престижа идут не на приобретение новых юнитов, а на элитные подкрепления существующих единиц во время миссий (за некоторыми исключениями, такими как покупка уникальных юнитов типа Густава). Далее будем говорить о базовом ресурсе - престиже. Наличие престижа + выбор правильного пути (см. выше) вполне может гарантировать Вам прохождение кампании на норме, а на легком уровне и подавно. Источники престижа: Вы получаете престиж в самом начале кампании и начале каждой миссии Вы получаете престиж в начале каждого хода (сумму можно увидеть, наведя указатель мышки на свои деньги) Вы также получаете весь оставшийся престиж если заканчиваете уровень рано, плюс бонус, который уменьшается каждый ход (т.е. если закончили за 5 ходов до конца, то получили больше за каждый из этих пяти ходов чем если закончили за 3 хода до конца). Процент бонуса тоже виден в "денежной всплывашке" Вы получаете престиж за каждую взятую клетку с флагом (технически это хекс, далее будем называть клетками или хексами или гексами или тайлами). Если вражеский юнит сдается, Вы получаете бонус престижа, зависящий от стоимости этого юнита и оставшихся у него жизней. Некоторые клетки, в зависимости от сценария, могут помимо разового давать бонус престижа каждый ход контролирующей их стороне. Я таких не помню, но раз в интерфейсе и правилах это есть, значит где-то они есть=) Сколько чего клетка дает можно посмотреть, выделив ее.Обратите внимание! С точки зрения новичка, основной источник престижа - взятие флагов. Тем более, что в большинстве случаев это совпадает с целями миссии. Однако, за флаги Вы получаете 50-100 престижа, обычно. Этого хватит на одно пополнение недорогого юнита! Перк Liberator, который удваивает этот престиж, не сильно меняет дело. Опытный игрок гораздо больше надеется на престиж от взятия в плен вражеских войск. Механика окружения является одной из основ этой игры, и с каждым прохождением Вы будете набирать опыт в этом деле - когда стоит потратить время и рискнуть ради окружения и взятия в плен тяжелого танка или большой группы противника, а когда это слишком опасно, или на это нет времени. Итого, практические советы, как получать больше престижа. Самый простой совет - не забывайте, что элитные подкрепления в начале миссии всегда дешевле чем во время миссии. Заканчивая уровень, отводите своих раненых, и НЕ пополняйте их, если конечно обстановка это позволяет. На протяжении кампании это может сэкономить Вам немалую сумму. Очевидный совет - учитесь играть аккуратнее и не подставлять свои юниты под огонь зря, чтобы не тратить престиж лишний раз. (Да-да, Ваш К.О.) Продолжая капитанить - особое внимание уделяйте самым дорогим юнитам. Для бюджета и для Core слотов более выгодно может иметь сбалансированную группу, а не одних Королевских Тигров (хотя, конечно, все зависит от Вашего стиля игры, героев, перков, миссии...) В начале кампании берегите инженеров. Учитесь и тренируйтесь окружать и заставлять сдаваться вражеские юниты - это Ваш главный источник доходов, когда наберетесь опыта (и, по сути, один из главных навыков игры) В некоторых миссиях у Вас есть выбор - закончить раньше, взяв победный гекс, получив бонусный престиж за оставшиеся ходы, или взять дополнительные флаги, и, что может быть важнее - еще подраться, добыв Вашим юнитам бесценного опыта. Замечайте такие моменты и принимайте взвешенное решение. Основные ошибки новичка (на собственном опыте) Вряд ли можно собрать исчерпывающий список, каждый играет по-своему, кто-то наверняка гораздо аккуратнее чем я, и даже не может помыслить что можно так ошибаться, а кто-то, может быть, и не задумывается о механиках и причинах неэффективной игры. В любом случае вот список, собранный на собственном опыте: Отряд любимчиков. Вам нравятся Ваши юниты такими какие они есть и Вы согласны только апгрейдиться и докупать новые. Вместе с тем, Вам следует иметь в своих резервах самые разные войска и подстраивать свой отряд под миссию. Этому игра учит Вас в Норвегии - миссия проходится гораздо легче, если Вы уберете свои танки в резерв и замените их парашютистами и горнострелками. Есть миссии (и их большинство), где Вам нужен ударный "кулак", но есть и те, где нужно поднабрать недорогих юнитов для обороны. Итого: в начале каждой миссии задумайтесь о том, какой набор войск понадобится Вам под задачи. Беззаботная отправка юнитов вперед Я потерял немало своих войск, преимущественно разведчиков, от внезапно выскочивших из "тумана войны" танков или кавалеристов. Если Вы не на 100% уверены, что ждет впереди, старайтесь двигать свой "ударный кулак" вместе, сильно его не растягивая. Плюс к предыдущему: Неиспользование способности разведчика Помните что фазовое движение разведчика можно использовать не только чтобы проникать в тыл, но и чтобы, разведав несколько гексов вперед, вернуться назад к своим, не подставляясь под удар. Неиспользование особенностей местности или их неверное использование. Это азы, но тем не менее: пехота - королева ближнего боя, любые остальные юниты (в первую очередь танки) должны оставаться и оперировать в чистом поле. Правило тут простое - если клетка имеет признак Close terrain (символ башни), то пехота при атаке и обороне такого гекса бьет по атрибуту Close Defence, который у подавляющего большинства юнитов в игре равен нулю. Повторим про механики в следующем разделе. (И еще, что тоже логично: чем меньше на карте чистого поля, тем меньше ваших танков должно быть на ней и больше пехоты, и наоборот) Неиспользование прикрытия Это конечно важнее всего в обороне, но и в атаке и на марше нужно постоянно прикрывать слабые юниты обычной, ПТ, и ПВО - артиллерией. В частности, больше всего прикрытия требуют Ваши инженеры и полевая артиллерия. Ошибки с транспортом пехоты (и не только) Про транспорт наверное поговорим в отдельной секции, здесь перечислю ошибки 1) опрометчивые марш-броски с оставлением пехоты в транспорте (в то время как есть опция проехать меньше, но вылезти из грузовика. Да, спешка может дать Вам дополнительные деньги за раннее выполнение миссии, но она и несет в себе риск потери юнита или престижа на его лечение 2) Упускание из вида потери транспорта при транспортировке в самолете или прохождении по трудной местности 3) Покупка ненужного транспорта 4) Неапгрейд с грузовиков на sdkfz в России =) Неиспользование окружения (в смысле взятия противн ка в кольцо, encirclement) Тут особо без комментариев. Окружение - важнейшая механика игры, значительно упрощающая совладание с противником и приносящая вкуснейшие награды при правильном исполнении Незнакомство с механиками сплита и усиления (overstrength) Эти механики сугубо опциональные, но чем больше я играю, тем больше понимаю, что сплит открывает порой очень большие возможности. Усиление юнитов дает более безопасную и уверенную игру ценой уменьшения количества самих юнитов под Вашим контролем. Тем не менее, есть важное замечание, о котором я часто забываю в начале кампании! Многие юниты можно усилить на 1 или даже 2-3 без траты Core слотов! Этим несомненно стоит пользоваться! Всегда в начале уровня смотрите на предмет таких "бесплатных" апгрейдов! Пример таких юнитов - стационарное мелкое ПВО, мостоукладчики, первые разведчики, стратегические бомбардировщики.... Их много! Местность В целом, здесь все понятно. Пехота - королева ближнего боя, остальные войска должны по возможности сражаться на открытой местности. Открытая/Закрытая местностьБуду переводить Close terrain как "закрытая местность", хотя мне это почему-то режет слух. Итак, закрытая местность обозначается в свойствах хекса значком башни. Это ПОЧТИ вся местность, кроме равнин. Основные встречаемые типы закрытой местности - поселения и леса. Грамотное использование закрытой местности - один из ключевых навыков Вас как игрока, одна из первых и самых простых вещей, которых вам надо изучить, будучи новичком. Теория: пехота, атакуя хекс с данным признаком или защищаясь на таком хексе, бьет по характеристике Close defence оппонента, против Ground defence в иных случаях. У большинства юнитов в игре Close Defence нулевой! Поэтому даже для самых сильных танков пехота может быть смертельна. Два базовых следствия: 1) Ваша пехота должна естественно стремиться к тайлам с закрытой местностью 2) Ваша техника должна не менее естественно стремиться к тайлам с открытой местностью Если вы на марше, старайтесь двигать пехоту перебежками между лесами и городами. Танки наоборот не должны останавливаться в таких клетках. Города и леса должна штурмовать пехота, за исключением случаев подавления обороняющихся артиллерией и бомбами до невозможности сопротивляться. Оборонять города тоже должна пехота, предпочтительно инженеры. К середине игры у Вас появляются некоторые юниты с ненулевым Close defence, однако все равно никто не сравнится в этом с инженерами и все равно, на мой ЛИЧНЫЙ взгляд огнеметные танки не могут их заменить на 100%. Некоторые тяжелые танки очень тяжело уничтожить и у Вас может не хватать сил на полное окружение чтобы взять их в плен. Хорошей тактикой в этом случае будет заставить отступить такой танк в лес/город, после чего даже базовая пехота наносит ему просто космический урон. Можно также пытаться заманить танк на приманку из хрупких юнитов. Уязвимая позицияЗа этой местностью нужен глаз да глаз, особенно если учесть, что болота часто бывают рядом с лесами, где рекомендуется находиться Вашей пехоте. В первую очередь эта местность - это болота и малые реки. Юнит, находящийся на таком хексе получает бонусный урон от всех атак, поэтому сторонитесь остаться там в конце хода, как огня! И старайтесь загнать туда врагов. РекиВы, думаю, сами можете представить, что это такое - попасть под атаку во время переправы через речку. Если на реке нет моста, то зашедший на нее юнит теряет все очки движения. Это значит, что он не может отступать. А это, вкупе с бонусом к урону означает, что этот юнит очень просто склонить к сдаче=) "Прижмем к реке, накроем пулеметами" - не зря классика. Прижимайте противника к реке, это значительно увеличит вашу эффективность. Большие реки, в свою очередь, непроходимы без моста, и блокируют снабжение. Используйте их для окружения противника и опасайтесь сами оказаться к ним спиной под атакой превосходящих сил! Инженеры-понтонщики ("в брюках пионеры"=) Bruckenpioniere) должны быть в Ваших резервах. Реки есть на подавляющем большинстве карт и умелая переправа часто позволяет эффективно обойти и окружить укрепленные пункты противника. Обязательно дайте им грузовик и берегите - они очень слабые. Атакуют они еле-еле, но чтобы добить отступившую на реку пехоту или поучаствовать в окружении - годятся. Поскольку у них есть хоть какая-то атака, мне они больше нравятся чем вездеход-мостоукладчик, заменяющий их к середине кампании Высоты - холмы и горыВысоты обозначены значком со стрелочкой вверх. У всех пушек на высоте увеличивается радиус, что в некоторых случаях очень полезно (у Штуги тоже, что довольно забавно), а оборона от тех, кто атакует снизу, более эффективна. Также обычно считаются закрытой местностью, так что техника на горе или холме очень рискует. Здесь я хочу обратить внимание на горнострелков (gebirgsjager или как-то так). Обратите внимание, что они получают бонус не только в горах, но и на холмах! Этот бонус, по моему мнению, достаточно велик чтобы брать их в бой на не-горных картах, где есть достаточно холмов вокруг ключевых точек. Например. в Сталинграде горнострелки могут сильно помочь с взятием центра и далее, будучи пехотой, без дела не останутся. ОбщееЯ рекомендую Вам в начале каждой миссии переключаться в стратегический вид и посмотреть, какая местность Вас ждет. В отличие от расстановки сил противника, местность не скрыта туманом войны и Вы можете прикинуть, какие специальные войска вам нужны, а также нужно ли предпринимать что-то по поводу баланса пехоты и техники в вашей группе войск. Если Вы атакуете, а на карте есть реки, прикиньте, не пригодятся ли вам мостоукладчики Оцените количество гор и холмов на карте. Если их много или если они есть в непосредственной близости от целей, рассмотрите взятие горнострелков в отряд Если карта - сплошь леса или горы или холмы, убирайте технику. Возьмите больше пехоты и авиации. Если у Вас самоходная артиллерия, подумайте, не "деградировать" ли ее на конную тягу. Наоборот, если перед вами - поля или пустыни, можно сделать упор на танки и самоходки Транспорт О транспорте поговорим в двух ипостасях - транспортировка пехоты и артиллерии, и дальняя транспортировка юнитов доступными в сценарии средствами. Транспортировка пехоты и артиллерии В целом здесь все ясно и достаточно доступно объясняется в обучении. Без транспорта пехота еле ползает, а артиллерия вообще двигается на единичку. Вы можете выдавать транспорт как при покупке, так и при апгрейде юнита в начале или даже во время сценария (для апгрейда во время сценария юнит должен стоять на supply хексе (наполовину заполненный кружок) Базовый транспорт для пехоты - грузовик, а для артиллерии первый доступный транспорт - лошадки. Обратите внимание! На некоторые типы местности конный транспорт въезжает лучше, чем колесный! Грузовики лучше всего на равнинах, но на грязи после дождя и тем более снегу они утрачивают всякую привлекательность. Поэтому с усложнением игры в более поздних сценариях, особенно в СССР, вы вынуждены пересаживать пехоту на полугусеничные БТР. На них еще и есть пулемет, так что пехота еще и может отстреливаться от напавшей внезапно на нее вражеской пехоты. Но не слишком на это надейтесь. Цена такой роскоши - +1 Core слот и более дорогие подкрепления. Тяжелые орудия обычно идут сразу с полугусеничным тяжелым грузовиком и особо с ними не разгуляешься в выборе. Теперь о важных особенностях: Юниты теряют свой транспорт в двух случаях 1) если заходят в глухой лес или подобную местность. Вместо точки движения там будет четкая иконка с перечеркнутым грузовиком. Дальше юнит будет двигаться на своих двоих 2) Вы можете перебрасывать юнитов между аэродромами на Ju-52. Это можно делать с любой пехотой и самым маленьким артиллерийским/пт орудием. Это перемещение очень быстрое, но цена - лишение транспорта! Это интересная тактическая возможность, но цена за нее не указана в интерфейсе! Лучше бы вам иметь supply-поинт или линию фронта недалеко от аэродрома! Юниты НЕ теряют транспорт при переброске по ж/д или в десантных кораблях Учитывая сказанное, есть две житейские мудрости - НЕ покупайте транспорт парашютистам и горным стрелкам! За исключением случая, когда вы готовы заплатить за то, что первые быстрее доберутся до аэродрома, а вторые - до гор. Парашютисты потеряют грузовик при посадке в самолет, а горнострелки - при движении по горам. Еще небольшой хинт, до которого я додумался только недавно - вы можете и забрать назначенный транспорт! Например, вы собрались засесть в глухую оборону. С грузовиком отнятие много погоды не сделает, а вот БТРы освободят вам дополнительные слоты для других юнитов! Транспорт, доступный на карте (миссии) (корабли, самолеты, поезда)Про эту вещь часто забывается, однако использование этого транспорта частенько позволяет выиграть время. С первых миссий (с Норвегии) игрок знакомится с двумя видами такого транспорта - десантные корабли и транспортные самолеты. Их количество ограничено и зависит от сценария. Поезда доступны, на самом деле, уже в Польше. Сначала общее. Числа означают кол-во штук доступного транспорта этого типа. Если транспорт в результате перевозки уцелел, он возвращается в этот актив. Так что при наличии двух самолетов, вы конечно можете взять на миссию трех парашютистов, но в воздухе одновременно будет максимум два. Если транспорт уничтожается, Вы безвозвратно теряете и юнит и транспорт. Помимо очевидно десантных миссий типа Норвегии, вы периодически можете использовать парашютистов и корабли. К примеру, в Севастополе вы можете преодолеть узкий перешеек на лодках вместо штурма через узкое болото, при том что начинают Ваши юниты на суше. (т. е. миссия в целом не десантная) Самый редко используемый мной как новичком транспорт - поезда. Однако они очень полезны на больших картах. Поезда едут ОЧЕНЬ далеко, правда слезть и залезть можно только в населенном пункте. Особенно хороши поезда на некоторых СССР-овских картах, когда Ваши силы разделены на широком фронте. После зачистки угла карты, например, в Сталинграде, Ваши войска могут присоединиться к своим уже на следующий ход! Не пренебрегайте ими и увидите как это удобно. На самолетах также можно перебрасывать между аэродромами любую пехоту и (на Ju-52) самую маленькую пушку. При этом теряется приданный подразделению транспорт! (Я о грузовике/БТР) Учитывайте это! Также в поздней игре есть другие, более вместительные транспортные самолеты. Тип Ваших самолетов можно узнать, наведя мышкой на соответствующую иконку транспортов. Окружение, отступление, сдача в плен На мой взгляд, эти механики - ключевые для успешной игры. Каждый раз, когда вы играете в PC2 вам следует тренироваться эффективно окружать противника и побеждать его с минимальными оптимальными затратами ресурсов. Почему оптимальными? Потому что в большинстве случаев на окружение тратится время и некоторое количество престижа на лечение после попытки прорыва. В некоторых случаях у вас хватает сил на лобовую атаку, и вы предпочтете сэкономить время. ТеорияОкружение связано с понятиями снабжения (supply) и зоны контроля (zone of control, ZOC). Окружение наступает, когда все пути снабжения к юниту перекрыты вражескими юнитами и их ZOC. Самый простой способ создать окружение - поставить двух юнитов на диаметрально противоположных гексах по сторонам противника. К авиации и кораблям ничего из этого раздела не относится. ZOCС ZOC В принципе все понятно, но на всякий случай запишем: Полностью подавленные юниты не имеют ZOC. Также не имеют его некоторые отдельные юниты и постройки, надо смотреть свойства Юнит, кроме разведчика, входящий во вражеский ZOC, теряет оставшиеся очки движения. Однако, совершив успешный overrun, можно двигаться еще. Поезд не может въехать во вражеский ZOC (важно в одной из миссий против СССР) Supply - снабжениеОдна из центральных тем игры, тут много интересны нюансов. Юнит, имеющий доступ к снабжению, в начале своего хода сбрасывает подавление (supression), и пополняет свои выстрелы и движение. Наличие в соседних клетках противников, даже если юнит не окружен, уменьшает количества восполняемых ресурсов и количество возможных покупаемых подкреплений Снабжение генерируется краями карты (для всех сторон) и точками снабжения (гекс со значком наполовину заполненного круга) - для контролирующей точку стороны Снабжение распространяется по клеткам, где может проехать грузовик. У клеток блокирующих снабжение есть иконка Blocks supply. Это очень важно! В основном такие гексы - это густой лес, широкая река (major river) и глубокая пустыня Снабжение блокируется вражескими юнитами и их ZOC, и вышеуказанными клетками Важно! Об этом в мануале сказано в одном месте и легко пропустить, хотя это один из ключей к Севастополю! Снабжение работает по морю, доставляясь от края карты в порты! Морские хексы и порты блокируются кораблями/подлодками и их ZOC! Тонкий момент: если созданы условия для окружения, но внутри окружаемой области есть supply hex - окружения не будет. Подытожим: Вы можете создать окружение в сколь угодно большой области, если Вам позволяет местность и количество Ваших юнитов. Многие миссии дают такую возможность, предоставляя широкие реки и густые леса в ассортименте. Нужно убедиться, что Ваши юниты стоят максимум в двух клетках друг от друга и цепочка кончается максимум в одной клетке от препятствия. Также, конечно, должны быть заблокированы мосты. Если окружение не возникает - значит где-то есть разрыв (например, болота не блокируют снабжение!). Не забудьте про порты! Повторим полезные эффекты окружения Юнит не восстанавливает выстрелы. Это значит, что можно истощить боезапас какого-нибудь тяжелого юнита, и он не будет вам отвечать, прикрывать союзников и пытаться вырваться Юнит не восстанавливает очки движения. Это значит, что если он должен будет отступить, а очков движения не осталось, юнит сдастся Юнит получает 20% suppression каждый ход. Подавление не сбрасывается, пока юнит остается в окружении. Это значит что за 5 ходов Вы можете сделать абсолютно беспомощным даже самый сильный танк, если, конечно удержите кольцо. Конечно, Вам понадобится меньше ходов, если подавление будут добавлять Ваши бомбардировщики и артиллерия Вообще, для взятия в плен стратегические бомбардировщики хороши, так как они добавляют ко всем трем пунктам - уничтожают топливо и патроны, а также добавляют подавление. Также как следует стремиться к окружению противника, также следует стремиться всеми силами избежать окружения своих юнитов. Наступление группой, избегание одиночных вылазок в туман войны, внимательность к местности и отсечение обходящих врагов помогут Вам в этом. Получаемые дебаффы слишком неприятны, берегитесь окружения!. Отступление и сдачаДля триггера отступления: Нужно нанести урон! Не подавление! Урон должен быть нанесен "прямой" атакой - не самолет, не корабль, не артиллерия Урон должен быть больше или равен 66% неподавленной силы оппонента (пример: у юнита 10 жизней и 4 подавления. Чтобы он отступил, надо нанести 4 и более урона. Если юнит полностью подавлен, достаточно единицы урона) Важное, что я упускал из-за недостатка опыта - показатель окопанности юнита должен быть сведен к базовому для хекса!После получения удара на таких условиях юнит пытается отступить. На отступление тратятся очки движения. Если их нет - юнит сдается. Юнит старается отступить на 1 хекс в направлении, противоположном атаке. Если хекс блокирован, юнит будет искать походящий хекс в других направлениях и на большей дистанции, куда может зайти. Также по возможности юнит будет избегать заходить во вражеский ZOC. Если отступать некуда - юнит сдается. Зная все эти правила, Вы можете манипулировать противником так, как Вам выгодно. Довольно часто в игре Вам не хватает сил добить кого-то и он убегает все дальше и дальше. Загоняйте врагов в реки - это верная смерть Загоняйте их в болота Загоняйте технику на закрытую местность и убивайте пехотой Самый базовый способ взять в плен - полное окружение со всех сторон, изматывание бомбардировками, удерживание до полного подавления и затем нанесение единицы урона. Но это требует больших ресурсов - времени, отвлечения юнитов. Ищите иные способы, которые хоть и редко, но представляются. Например, если противник "выскочил" на вас, потратив все очки движения, а вам удалось на своем ходу внести ему мощный удар - он сдастся и без окружения[/iist] Пожалуй, больше и добавить нечего, кроме как повторить то, что сдача в плен - прекрасный способ заработка престижа и, дополнительно, получения в свой резерв дополнительной хорошей техники. Не брезгуйте, например, тридцатьчетверками и КВ-1 и 2, на начальной стадии войны эти танки обходят Ваши по характеристикам. Нужно только набрать их побольше, чтобы хватило на новый юнит и подкрепления к нему. Также, стоит упомянуть еще раз про разделение (split). Сплит может очень помочь в окружении противника, и нанесении последнего удара, чтобы экономно снять ровно единицу. Он требует дополнительных слотов, если у Вас нет соответствующего перка, так что если у Вас при наборе боевой группы остается один-два слота - вам предстоит тяжелый выбор - потратить их на усиление (overstrength) или оставить резерв на сплит своих юнитов. Окапывание (entrenchment) Тема, в первую очередь, относится к типам местности. Буду откровенен, я раньше, конечно, обращал внимание на entrenchment, но не особенно много. В процессе написания гайда, задумываясь о смежных темах, приобрел несколько инсайтов и новых знаний. Итак, entrenchment - это степень защиты, которую юнит имеет в какой-то момент времени, стоя на какой-то клетке, В ДОПОЛНЕНИЕ к своей родной защите. Как посчитать эту защиту, в мануале не написано - сказано просто, что каждый пункт окапывания делает защиту выше, причем эта защита больше от техники и меньше от пехоты и артиллерии. Далее, важно - многие типы местности дают защиту без предварительных инженерных работ - в лесу Ваши воины скрываются за деревьями и в оврагах, маскируются, а в поселениях просто прячутся в домах. Поэтому у каждой клетки есть показатель базовой защиты. Это - важный ответ на вопрос, стоит ли когда-либо прятать технику в городах и лесах. Если Вы СОВЕРШЕННО уверены что рядом нет вражеской пехоты и пытаетесь спастись от какого-нибудь "зверобоя" - то да, клетки могут дать Вам доп. защиту. Но всегда помните, что обычно базовая защита высока у закрытой местности, в которой пехота порвет Вашу технику на куски! Далее, чем еще важно это базовое число: Юнит не будет убегать или сдаваться, даже если вы внесли ему 99% урона, если его окапывание выше базовой защиты хекса! Когда я осознал это, я еще более полюбил "штугу"... Юнит добавляет к окапыванию единицу каждый ход, когда не сражается и не двигается. Это нужно проверить, так как у каждого тайла есть параметр Entrenсhment speed, и инженеры этот параметр должны удваивать. В руководстве про это не написано, или я не вижу. Единица вычитается из окапывания при каждой атаке на юнит. Атака с абилкой entrenchment killer вычитает больше (привет, stug3b!) Нельзя уменьшить окапывание ниже, чем базовая защита тайла. Пока показатель окапывания выше базовой защиты (зеленые числа при наведении мышки на юнит), юнит не отступает и не сдается Эксперименты показывают, что каждая единица окапывания дает пехоте 10% защиты от техники, примерно вдвое меньше от пехоты и еще меньше от бомбежки. Если удастся посмотреть на цифры для техники - допишу Краткий обзор юнитов. Пехота. ПехотаЛично для меня, при всем разнообразии техники, главным юнитом в игре является инженер (Pioniere). Именно инженеры обеспечивают Вам штурм контрольных точек - населенных пунктов. Происходит это за счет игнорирования окопанности, и за счет того, что как пехота, они используют Close defence оппонентов. Играя через инженеров, я стараюсь иметь по одному юниту на каждом направлении атаки. Инженеры - дорогие, тормозные, и слабы в открытом бою, поэтому их надо беречь, снабжать транспортом и прикрытием. Усиление (overstrength) тоже будет полезно. В результате инженеры занимают немалый кусок слотов моей армии. Вы можете попробовать сыграть без них, используя артиллерию, бомбардировки, обычную пехоту и огнеметные танки. Я так пока не пробовал, но думаю попробовать. Инженеры также сильно бьют по бункерам и другим строениям, плюс одной атакой очищают минные поля. В некоторых миссиях это может быть важно. Обычная пехота, Wehr infanterie (я почему-то называю ее "зверская пехота") Про нее мало что можно сказать - это базовый юнит, который пригодится в любой миссии. Помогать инженерам в штурме, бить пт-пушки, разрывать в закрытой местности в атаке и обороне - со всем этим базовая пехота справляется хорошо. Плюс, имеет абилку "форсаж", благодаря которой может сделать рывок и добежать куда надо, что иногда очень важно. Заметьте что рывок работает также и на транспорт - он увеличивает радиус, куда пехота может доехать и сразу слезть с транспорта. Хоть пехота и быстрая, транспорт ей все равно нужен, сажайте на грузовички и планируйте переход на БТР к середине игры Конница Юнит неоднозначный. Доступен в ранней игре. Имеет встроенный транспорт, на котором неплохо перемещается по лесам и холмам. Имеет форсаж. В результате конница может проскакать и ударить очень далеко по отношению к другой пехоте. В целом не зря конница остается у СССР чуть ли не до конца войны. Расплата за мобильность - цена и уязвимость. Конница дорогая в престиже И имеет минимальную воздушную защиту. Можно поиграть с ней в начале игры, но к середине рекомендуется все же менять на пехоту с транспортом. Конница СССР, атакующая массой - грозная сила. Помните, что даже истребители эффективны против нее, истребляйте на расстоянии и танками, не подпускайте их к закрытой местности. Гренадеры Гренадеры - это чуть более мощная пехота. За увеличенные статы они платят своей ценой и мобильностью. Пешком они ходят всего на 2 и у них нет форсажа. Поэтому транспорт для гренадеров просто необходим, что еще более увеличивает их стоимость. В целом, необходимость гренадеров - большой вопрос. Разве что чуть лучше обороняться. Чтобы сильно бить по городам - есть инженеры, в поле - танки. Обороняются инженеры тоже в целом лучше. Так что, для меня лично, гренадеры - спорный вопрос. Обычно я беру один юнит, а при игре пехотой - по юниту на инженера вместе с базовой пехотой. Предполагаю, что для гренадеров нужен подходящий набор героев, чтобы получить максимальную эффективность. Мостоукладчики Про них написано в разделе про местность. Повторим: иметь и использовать надо, так как рек в игре много. Используем аккуратно, т.к. они слабые, и точно не идем ими в лобовую атаку. Тем не менее, для добивания измочаленной пехоты и окружения - использовать можно. Обязательно посадить на грузовик. В обороне убираем в резерв, если не планируем контратаку через реку. Парашютисты Парашютистов сложно использовать грамотно, в ином случае смертность их весьма высока) Наилучшее применение - для окружения групп противников, но нужно чтобы после этого они пережили попытку прорыва. Поэтому, конечно, лучше всего сбрасывать их на закрытую местность. Также, подобно инженерам, имеют повышенную атаку по зданиям (бункерам),что используется при атаке на Бельгию, например. В общем, использование парашютистов либо подразумевается сценарием, тогда они точно нужны, либо Вы пытаетесь использовать их тактически, и это нечасто получается хорошо. Я обычно беру пару отрядов на Норвегии и храню в резерве, иногда пытаясь использовать. Не забудьте посмотреть на наличие транспортных самолетов! Во многих миссиях их просто нет! Тогда вы получите обычную пехоту слабее обычного и с абилкой bunker buster! Размещайте парашютистов вокруг аэродрома, тогда они сразу будут в транспортах на начало миссии Не покупайте им грузовики, так как они пропадают при погрузке в транспорт. Горнострелковые части Это тоже специфический юнит, однако опыт показал, что сфера его применения шире чем чисто горные уровни. Дело в том, что горнострелки имеют бонус не только в горах, но и на холмах, а холмы есть на гораздо большем количестве карт, нежели горы. Берите их в атаку и оборону, если в местности вокруг ключевых точек наличествуют холмы (ну или горы). Если стартуют на/рядом с горами, не покупайте грузовик - потеряют =) Имейте 1-2 отряда в резерве и применяйте, когда надо. Возможно, заменяя обычную пехоту. Поздняя пехота - Osttruppen и Фольксгренадеры С ними я играл мало и пока не имею четкого мнения. Osttruppen'ами можно дешево затыкать дырки в обороне, размещая в закрытой местности, но даже там они выдержат одну-две атаки и все. Фольксгренадеры появляются еще позже. У них хороший close defence, так что они должны быть получше в обороне закрытой местности, но и стоят они взамен как нормальная пехота. Общее Пехота имеет множество утилитарных функций. Следует задумываться о составе своих пехотных частей на каждую миссию, использовать специалистов по необходимости. К 43-му году вам нужен запас престижа на апгрейд пехоты на пехоту 43-го года. Делать это нужно, иначе вы не сможете выстоять против новой пехоты противника и более мощной техники. Танки Игра сделана с любовью именно к танкам (это все таки Panzer Corps!) и это Ваш самый разнообразный юнит. Однако, механически это просто градиент из характеристик, с увеличивающейся со временем силой и стоимостью. Рассматривать каждый танк нет смысла, ограничимся повторением азов и некоторыми конкретными замечаниями. В остальном, чем дороже танк - тем он лучше, в большинстве случаев нет смысла не апгрейдиться на новые, за исключением того момента, когда тяжелые танки становятся дорогими - скорее всего Вам нужен баланс из средних и тяжелых танков, иначе у Вас получится попросту очень мало единиц на поле, которые будут бешено жрать престиж на пополнения. Легкие танки У некоторых легких танков есть автоматические пушки или пулеметы, благодаря чему есть абилка "1,5 выстрела". Такие танки неплохи против пехоты на ранних стадиях игры. На поздних они скорее всего до столкновения с пехотой не доживут. Ранние трешки и четверки В целом это очевидно из статов, но на всякий случай - ранние Pz.4 вооружались короткоствольной противопехотной пушкой. В целом, для игрока, который не интересуется историей это может быть неочевидно (ведь чем больше цифра тем мощнее?), но на ранних стадиях игры ваши Pz4 - это танки хорошие против небронированных целей - пехоты, артиллерии. Основным противотанковым же средством являются "трешки" (при поддержке "штук" и в крайнем случае 88-ых зениток). К середине игры ситуация становится логичнее - четверка становится ранним тяжелым танком, а трешка становится универсальным средним танком. Огнеметные танки Вы можете попытаться заменить ими инженеров, но сомнительно. Будучи прокачанным, огнеметный танк выдает сумасшедшие уроны по прикрывающей город артиллерии и по ослабленной пехоте, но, как и инженер, он уязвим к атакам. Нужно играть аккуратно, не увлекаясь. Поскольку имеет overrun, то иногда таки да, может выжечь весь укрепрайон. Мостоукладчики Предполагается как замена пехоте. Мне все равно меньше нравится, т.к. вообще не может атаковать и защищаться. "Защищенные" танки К Сталинграду у Вас появляется модификация "трешки" с укрепленными бортами. Имеет смысл брать парочку таких танков на подобные карты, и убирать незащищенные. Трофейные танки Используйте хорошие экземпляры! Играя против СССР, не упускайте возможность взять в плен Т-34 и КВ. Их статы лучше чем у современных им немецких танков. Т-50 тоже неплохой легкий танк. В допе про 36й год это вообще необходимость, т.к. Pz1 - полное г, по сравнению с Т-26. Общее Повторим базу. Танки должны воевать в открытой местности. В закрытой, пехота бьет против Close defence, которая у большинства танков нулевая. Отличительная абилка всех танков - Overrun. Используйте его грамотно, чтобы зачищать много раненных юнитов за один ход. Для оверрана нужно: Открытая местность Отсутствие огня поддержки (т.е. рядом с атакуемым не должно быть ПТ-артиллерии) Чтобы вас не поранили ответным огнем (проверить!)После нескольких успешных оверранов танк получает перк steamroller, который триггерит оверран при любом уничтожении танком врага. Оверран очень хорош, продумывайте его возможность, и пытайтесь сделать цепочку подлиннее, обрабатывая вражеские войска "по пути". Не забывайте, что хоть оверран и восстанавливает движение и атаку, он не восстанавливает топливо и патроны, так что вы не сможете проехать всю карту и перестрелять всех раненых. Смотрите как бы не попасть в засаду без топлива и снарядов! Ближе к концу игры, когда танки становятся ОЧЕНЬ мощными, возникает опасность самому попасть на оверран. Прикрывайтесь пт-пушками! Сюда можно добавить интересную особенность - пт пушки не прикрывают другие ПТ-пушки. Учитывайте это в обороне и нападении. Разведчики Разведчики - очень полезные юниты, особенно в атаке. Отличительная особенность - фазированное перемещение, позволяющее разведчику двигаться, пока у него есть топливо, а также входить и выходить из ZOC. Это позволяет разведчику залезать "за шиворот" обороняющимся, создавая окружение. При этом разведчик весьма уязвим, особенно для танков и ПТ-артиллерии. Разведчики обычно прокачиваются быстрее всех, они прекрасно подчищают разбитые войска и вырезают неприкрытую полевую и зенитную артиллерию. Снабженные хорошими героями, дающими им выживаемость, они являются одним из ключевых компонентов Вашей армии, и еще и стоят относительно недорого. Разведчиков доступно не очень много, отличаются они в основном характеристиками. В большинстве случаев чем позднее и дороже тем лучше. Отдельно стоит отметить мотоциклистов. Они отличаются тем, что они soft target, а значит могут быть более интересны для атаки ПТ-пушек. Тем не менее, мне не удалось применять их столь же хорошо, как бронеавтомобили. Если Вам интересно - попробуйте поиграть с ними. Еще у ранних разведчиков - автоматические пушки и пулеметы, позволяющие вносить х1,5 урона, но на мой взгляд, бронирование более поздних БА важнее. Потрепанные уязвимые враги и из пушечки неплохо добиваются. Также, упомяну тут свою новичковую ошибку. При движении вперед возникает соблазн открыть как можно больше территории и послать разведчика как можно дальше. Не спешите! Используйте фазированное движение чтобы откатываться ближе к своему "кулаку". Ваша скорость продвижения от этого не пострадает, а вот количество убитых внезапно выкатившимся на вас танком разведчиков - уменьшится. Артиллерия ("обычная") Пожалуй самый разнообразный, интересный и спорный класс юнитов в игре Можно поделить ее условно на следующие виды: "базовые" гаубицы, тяжелые пушки, штурмовая, реактивная. А также по способу передвижения на буксируемую и самоходную. Вся артиллерия, кроме тяжелых пушек, имеет способность "артиллерийская поддержка", согласно которой, если на стоящий рядом юнит совершается прямая (не артиллерией, самолетом, кораблем) атака юнитом с типом soft (в 99% случаев это пехота), то орудие стреляет в атакующего перед его атакой. Выстрелы происходят, если артиллерия не подавлена и есть снаряды. Последнее довольно важно - стратегические бомбардировщики могут снизить эффективность обороняющейся артиллерии, уменьшив кол-во выстрелов, а окружение оборвет поставку этих выстрелов в начале хода пушки. Также, обычно, чем мощнее и дороже юнит, тем меньше у него выстрелов в ход. Касательно дистанции, она варьируется от 0 (соседняя клетка) до 3. Важно! Помните, что стоящая на холме или горе пушка получает +1 к дистанции! Иногда это может дать солидный бонус! Также, артиллерия обладает еще двумя способностями. Одна из них говорит, что большая часть урона наносится в виде подавления (supression). Прокачанные пушки, при этом, могут все равно убивать немалое количество единиц противника. Но все же, артиллерия в первую очередь используется для ослабления противника перед атакой основных сил - пехоты или танков. Вторая способность - убийца окапывания (Entrenchment killer). Обычно, каждая атака снимает обороняющимся одну единицу окапывания. Артиллерия снимает как минимум, две. Сколько снимается, показывается точками на способности и во всплывающей сноске. "Базовая" артиллерия Даже в начале игры у вас богатый выбор. От небольших пушечек, стреляющих "через голову" прикрываемой пехоты, до большой и дорогой гаубицы sfh (не говоря уже о тяжелых пушках) По моему ЛИЧНОМУ мнению, SFH 15-см самая клевая. Хоть это самое дорогое орудие (из начального выбора гаубиц) в деньгах и слотах, оно имеет высокие характеристики, и, самое интересное, помимо артиллерийской еще и противотанковую поддержку. То есть, это максимально универсальная пушка. Самая маленькая пушка интересна тем, что ее можно перебрасывать транспортным самолетом. При этом, правда, у нее отнимается транспорт и она начинает двигаться как черепаха, но все равно руки чешутся попробовать какую-нибудь десантную операцию с захватом аэродрома и подвозом туда артиллерии для поддержки) С первых же миссий доступны самоходные варианты, начиная с "Шушпанцера" (sturmpanzer) и далее с течением времени появляются допольнительные - Веспе, Грилле, Sig33... Отдельное внимание на Hummel - это уже упомянутая sfh на гусеницах, сохранившая свои абилки. Что сказать про самоходные варианты? Естественно, они дороже. Они более уязвимы к авиации, особенно штурмовикам. Из плюсов же - во-первых, какая-никакая броня против пехоты, а во вторых, и самое важное - самоходная гаубица может подвигаться на полную дистанцию и затем выстрелить, в то время как буксируемые пушки могут подвигаться только на единичку. В случае транспортировки они теряют выстрел. На мой взгляд, указанное преимущество самоходок намного лучше реализуется в атаке чем в защите. Так что, по моему мнению - самоходки для атакующих миссий, обычные пушки - для оборонительных. Но признаю - вопрос тут спорный. В городской местности, например, добравшаяся до пушек пехота с одинаковой эффективностью разрывает и те и те. Теперь поговорим про большие пушки Их две - побольше и поменьше. Стоят очень дорого, самоходных вариантов, вроде бы, нет, у них отсутствует способность артиллерийской поддержки, зато почему-то есть ПТ-поддержка (видимо из-за возможности настильной стрельбы, в то время как гаубицы стреляют по баллистической траектории ("навесом")). Самая интересная - абилка "контрбатарейная борьба" (КББ). пушка будет стрелять на упреждение по любой артиллерии (полевой, т.е на ПТ и не ПВО), атакующей ваши войска. Выстрел должен быть именно атакующим, выстрел поддержки не в счет. Уроны и радиус у этих пушек самые большие, но цена в 5-6 слотов - тоже ого-го. Личное мнение - я их использую, но немного. КББ срабатывает нечасто. В атаке надо очень аккуратно выводить пушку на рубежи, причем поскольку артиллерия обычно позади атакуемой точки, пушку надо пододвигать наравне с остальной артиллерией. В целом, она конечно, лишней при штурме не бывает, урон всегда пригождается, даже без КББ. В защите тоже впечатления "средние". Не так уж и много едет артиллерии, и не так уж и много ей удается выйти на рубеж атаки не будучи уничтоженной. А цена пушки очень высокая. И бомбят ее нещадно. В общем, учитывая стоимость, пушка должна быть одним из ключевых элементов вашей стратегии - с хорошим эскортом и защитой. Если использовать - то смысла брать более маленькую для экономии одного слота - не вижу. Реактивная артиллерия по характеристикам и абилкам "небельверферы" похожи на обычную артиллерию. Отличает их абилка "х1,5 выстрела". Подразумевающая что реактивная артиллерия дает высокую плотность огня. При этом у них меньше (2-3) выстрелов на ход и они не менее уязвимы. Из реактивной артиллерии мне нравится разве что знаменитый "вурфраммен", апгрейдящийся в панцерверфер. Они заливают клетку уроном и одинаково неплохо подавляют и пехоту и бронетехнику. Проблема однако в том, что, несмотря на броню, они очень хрупкие и дорогие. В целом, неплохо иметь их в атаке. В защите эффективно применять реактивную артиллерию у меня не выходило. Также, несмотря на броню, слабее САУ и активно выщелкиваются любыми вражескими войсками, заставляя тратить большие суммы на их выживание. Если берете - берегите. Штурмовая артиллерия Самая интересная для меня на данный момент разновидность. Не сразу понял, в чем фишка. Казалось бы, какой смысл в stug 3b? радиус единица, занимает клетку возле атакуемой точки, особенно никого не убивает... Секрет кроется в малозаметной абилке. У штуги - Entrenchment killer 4x! Это значит что за один удар она снимает 4 окапывания, в то время как обычная артиллерия и стратегические бомбардировщики - 2. Это практически половина из максимальных 10. Так что "безобидный" выстрел штуги значительно повышает последующий урон соседних с ней войск. Помимо этого у нее действительно неплохое бронирование, так что сидящая в городе пехота особо и ответить не может. При этом штуга еще и обеспечивает артиллерийское прикрытие стоящей рядом пехоте. И стоит всего 2 слота это богатство! Не зря STUG3 были чуть ли не самой массово производимой боевой техникой немецкой армии. Далее STUG эволюционирует в STUH, которая может переключаться между ПТ/артиллерией, а далее в Brummbar и Штурмтигр. Только эти юниты (за исключением спец случаев) имеют 4Х-абилку. Рекомендуется иметь штуги в атакующих миссиях в качестве лучшего друга пехоты Особые юниты В игре есть две (а скорее всего больше) "вундервафли" в артиллерии - Самоходная мортира "Карл"(, Карл!) и железнодородная пушка "Густав". Густавом дают порулить в Севастополе, А Карла можно приобрести при нападении по Центру на Брестскую крепость. Мои личные впечатления: Густав - отличная вещь, я рекомендую Да, это 5000 престижа, но: Его мощь позволяет выключать из игры по одному вражескому юниту в ход. Да, самые тяжелые танки не будут убиты, но совершенно точно станут бледной тенью от своей полной силы Ж/Д транспорт дает Густаву великолепную маневренность плюс возможность "стрелять с колес" - это имба На удивление, Ж/Д ветка есть почти в каждой миссии с момента покупки Густава. Можете не переживать, что он будет бесполезен Огромный радиус гарантирует, что Густав будет находиться далеко от основной линии фронта, что дает ему дополнительную защиту от внезапных атак. Только прикрывайте с воздуха. Вместе с тем, от Карла впечатления хуже. Он, конечно, не привязан к железной дороге, но тормознее, и радиус у него меньше. Урон вроде больше, но на таких числах и Густава более чем достаточно. Не забывайте, что обе вундрвафли имеют признак Single entity - их нельзя чинить (и между уровнями тоже), нельзя пересадить их опытный экипаж на другую артиллерию, зато их урон не страдает от уменьшения здоровья. Есть еще дистанционный танк-камикадзе "Голиаф", но я ни разу не брал его. В Севастополе он не то чтобы впечатлил меня. Противотанковая артиллерия Тут все довольно просто - это пушки с высоким уроном по hard-целям (технике) и весьма низким по пехоте. Относительно недорогие, и все имеют ключевую абилку Antitank support, аналогичную артиллерийской поддержке, только здесь пушка реагирует на атаку рядом стоящего юнита hard-целью (в 99% случаев танком). Как и в случае с артиллерией, атака должна быть "прямой" - т.е. не артиллерией, не самолетом, не кораблем. ПТ-артиллерия не саппортит другую атакуемую пт-артиллерию, так что ставить на защите какого-нибудь "Федю" и прикрывать еще пт-пушками - не работает. Как и базовая артиллерия, бывает буксируемая и самоходная. Самоходками следует прикрывать свои танки в танковых сражениях, буксируемая для обороны. Обратите внимание, что в большинстве случаев напрямую атаковать танк даже мощной пушкой - плохая идея. Это связано с показателем инициативы - у танков он почти всегда больше, что приводит к тому, что танк стреляет первым, нанося пушке урон и подавление. "Быковать" хорошо получается только поздними самоходками. Так что поберегите их, пусть они и недороги. Среди самоходок есть одна или две, умеющие переключаться в артиллерийский режим - не забывайте об этом, дополнительные опции - это всегда хорошо. Я не очень понял, почему какая-то из таких САУ находится в артиллерии, а какая-то в ПТ, ну, видимо, такое было изначальное предназначение этих машин. Итого, мое мнение: буксируемая пт-артиллерия весьма сомнительна, хоть и дешева. Не получалось у меня с большим эффектом применять их в обороне (хотя это в целом моя слабая сторона) Самоходки же надо иметь и прикрывать ими танки. Обычно чем самоходка дороже, тем и лучше. Обратить внимание можно на Nashorn - при очень мощной пушке уж очень он "ватный". Не рекомендую брать его в оборону и нужно беречь его в любом случае. ПВО Как и остальная артиллерия, ПВО можно поделить на 2 типа - буксируемая и самоходная, обычно занимающая грузовик, но к концу игры гоняющая и на танковых шасси. Самоходная ПВО весьма полезна в атаке, чтобы прикрывать хрупкие юниты, типа артиллерии. Однако нет самоходного аналога немецким знаменитым 88-ым, стоящим в этом разделе особняком. (Хотя есть - это Насхорн=) Но он не умеет стрелять по самолетам) Не забывайте, что все ПВО умеют переключаться в "полевой" режим, в котором начинают исполнять роль противотанковых пушек, и получают соответствующую способность ПТ-прикрытия. Так что когда воздух зачищен, а также в дождь и снег, используйте это, но все равно не забывайте что пушки весьма уязвимы, так что берегите их. Иногда (и исторически так и было) тяжелые 88-е будут вашим практически единственным ответом на тяжелые танки. Важно! Помимо этих, выделенных, тяжелых пушек, зенитки разделяются еще на 2 вида - мощные (но не такие как 88-е) пушки и автоматические пушки и пулеметы. Вторая группа имеет способность "атака на малой высоте". Такую же способность имеют все истребители и тактические бомбардировщики. Это означает, что такие пулеметы особенно хороши против этих двух групп самолетов, а вот против стратегических бомбардировщиков, летающих на большой высоте, нужна мощная артиллерия. В общем и целом, на мой взгляд, когда Вы в атаке и Ваш танковый кулак несется по равнинам, сметая всех, для вас наибольшую опасность представляют штурмовики. Поэтому выбирайте скорострельные зенитки на грузовиках. В обороне же начинают играть немалую роль стратегические бомбардировщики противника, ослабляя ваши войска и забирая у них драгоценные выстрелы. Так что берите пушки помощнее. Правда, штурмовики и тут наводят шороху, так что парочка пулеметов тоже не помешает. Самолеты Истребители В большинстве случаев - чем дороже и позднее - тем лучше. К концу войны появляются совсем крутые, но и совсем дорогие. Балансируйте. Имеют абилку, схожую с артиллерией, позволяющую им защищать соседние клетки Тактические бомбардировщикиЭто очень интересный класс, который можно поделить на три подвида Разведички Не пренебрегайте хотя бы одним. Поможет избежать сюрпризов на марше, с большей эффективностью чем бронеавтомобиль. Стоит дешево. Дает бонус, если висит непосредственно над атакуемой целью. Не понятно, почему там не висит Ваш "стратег", но положим целей у вас больше чем стратегов=) В плане бонусов получается немного хуже чем БА, так как тот может дать несколько бонусов за ход, зато бонусы разведки складываются. Тактические головоломки учат нас интересному - можно сплитить разведчика, и каждая половинка будет давать и разведку и бонус, как полный отряд. "Штуки" (Ju-87) Знаменитейший самолет-штурмовик-пикировщик. Сбрасывает дуры на крыши танков. Малая дальность полета, высокая уязвимость - компенсируются огромным уроном. Один из немногих инструментов начального этапа игры, позволяющий выбивать жирные французские танки. Также прекрасно бомбят бункеры. Обязательно надо иметь хотя бы один. Истребители-бомбардировщики Все остальные самолеты "тактиков" - прекрасные многоцелевые ребята. Они могут и бомбить и помогать вашим истребителям добивать вражеские самолеты. Я считаю, что их тоже не помешает иметь, они актуальны на протяжении всей миссии (пусть и не справляются так хорошо как специалисты) Стратегические бомбардировщикиВ целом, тоже достаточно понятный класс. Немногочисленны, обычно чем дальше тем мощнее. Важные детали: Лучшие убийцы кораблей. Садятся не на все аэродромы. Единственный тип войск, который атакой отбирает часть топлива и снарядов цели, помимо того что наносит подавление и снижает окопанность"Стратеги" великолепны в атаке, совместно с артиллерией за 1-2 хода позволяют измотать гарнизон любого укрепления. В защите не так полезны. ОбщееВ туториале говорится, что штурмовики и истребители получают бонус к атаке в зависимости от близости к базе. Учитывайте это, переезжайте на новые аэродромы! Самолеты не летают в дождь и снег. Если аэродром захватывается в такую погоду, все находящиеся там самолеты уничтожаются. Общие советы Соединим все премудрости и опыт ошибок в краткую выжимку. Играйте аккуратно, не подставляйтесь Пехота в укрытиях, техника на открытой местности Используйте прикрытие - ПП, ПТ, АА (ПВО) Меняйте свою группу под миссию с учетом цели (атака, оборона) и особенностей местности Изучите базовые механики - окружение, разделение (split), усиление (overstrength), используйте местность в свою пользу Изучите окапывание, отступление, сдачу. Берите в плен тяжелые танки и другие дорогие юниты противника, по возможности. Получите много престижа и трофейную технику. Используйте ее. Слушайте, что говорит и показывает ваш брифинг-офицер. В большинстве случаев его план битвы - неплохой, но иногда бывает план и лучше. А иногда, поскольку он человек (ну, Вы поняли=) ) случаются и сюрпризы. Запоминая эти сюрпризы, вы в следующий раз проходите миссию лучше. Не забывайте про нюансы транспорта. К середине игры, русской зимой, пехоте на грузовиках становится грустно. Пересаживайте на полугусеничные БТР. Используйте поезда! Знайте про возможность переброски пехоты самолетами, и цену этого - потерю транспорта Экономьте престиж, откладывая лечение на начало следующей миссии, если возможно Если по началу играть трудно и вы быстро проигрываете кампанию, то см. советы вначале. Если вам больше по душе танки - идите по африканской ветке, в ином случае по советской, старайтесь выбрать "фантастический" сценарий и не ходите в ветку СССР после Сталинграда. Непроверенный, гипотетический совет: Если вы быстро получили пятизвездочный юнит - посадите его в резерв и качайте новый. В конце игры опытные юниты на вес золота, вам нужно их как можно больше. Совет по удобству игры для тех, кому не так важна историческая точность и эстетика: Я довольно часто путаю юниты. Герои усугубляют ситуацию, потому что некоторые герои влияют на оптимальный стиль игры (например, должен атаковать первым или что-то этом роде), но наибольшие неудобства возникали у меня с самолетами - они всегда кучкуются на аэродроме и на большом удалении не сильно отличаются. У вас есть следующие средства выделить юниты: 1) Изменить название (щелкнув по нему) 2 и 3) Цвет и логотип. Заметьте, что в большой библиотеке "скинов" есть и однотонные базовые цвета, типа голубого и малинового. Может быть, это портит эстетику, зато вы теперь гораздо легче сможете отличить свои юниты, а значит будете играть эффективнее!


做为一个新的集团军司令,代入进这场波澜壮阔的战争! 新军伊始-1 1939年九月1日凌晨4点 德意志第三帝国 —波美拉尼亚—亚斯特维—第四军指挥部 一位衣着笔挺,身材高挑的军官站在指挥部门前,时不时的看着手中的金制怀表;不难看出他正在等着什么人。 一个身材瘦弱的人抱着一摞文件急急忙忙的往里赶,肩上的军衔表明是一位参谋人员。但其脸却略显年轻。 也许是雨后的土地变得泥泞,也许是怀中的文件过于沉重。 他好歹不歹的撞到了那位军官。文件撒了一地。 “抱歉” “真是该死”他嘀咕道,心中恶狠狠的咒骂着这不长眼的人。 那位军官俯下身,帮着他捡起那些已经沾满污泥的文件。 他接过那位军官手中的文件,眼中的余光扫过一眼面前这位不长眼的军官的领章。 那是用金线刺绣的两朵矢车菊。 “将军!”他赶忙行了一个军礼,一瞬间他就明白了面前这位是刚刚上任不久的第四军军长。 那位军长拍了拍他的肩,点点头。 ”去忙吧” “是”他庆幸着之前没有将那些咒骂的话脱口而出,赶忙进去了。 不久后,一个面容老态的军官迎面走来,肩部的两棵橡树叶表面了他的身份 “你很准时,雷奥·冯·希普林将军”他看了看表,示意跟随他进入指挥部。 希普林一路跟随。 ”现在让我们来讨论一下你在白色计划中所承担的职责吧“ 他走到沙盘面前 ”如你所见,我们的装甲部队部署在贾斯特维以及奇武胡,在第二军的侧翼,我们的第一个目标是向维斯瓦河挺进,从而切断但泽走廊并且在此期间我们还需要协助第19军第三装甲师“ “我们需要拿下海乌姆诺,格鲁琼兹,比德戈兹茨来保证我们能完全控制但泽走廊” 他指了指地图。 “祝你第一次战斗顺利,我可不希望它是你的最后一次。” 注:第四军以及将军的名称皆是虚假的。 将军名称为作者游戏时的命名。 难度为最高。 后面将以日记的方式来叙述 新军伊始-2 1939年八月29日 德国-柏林 今天,我被升任为第四军军长,并在北部协助第四集团军进攻波兰。 事实上这并不是一项好事,据我所知这个第四军刚刚被组建。 虽然纸面的配置很豪华,四个步兵师,两个装甲师,一个防空营,一个炮兵营,一个侦察营。 但事实上所有部队都不是满编,两个装甲师的总共的坦克才100余量坦克,不如说是两个装甲营,好在大部分坦克是2号。 四个步兵师之中有两个是预备役师,其他两个正规师中百分之20是第二预备役。 而且本来每个师就应该有一个侦察营。 这单独的防空营可能是最完备的部了。 希望计划能够顺利。 白色计划-1 九月二日 我们轻松的拿下了普鲁什奇穿过了布尔达河 与23步兵师防御来自图霍拉森林的敌军同时追赶第3装甲师 士兵们在战斗中有些许紧张但却充满热情,这是个好的开始 九月三日 我军驻守在希维切,和第19军于图霍拉森林合围了切尔斯克兵团 在仓库中发现了部分敌军的坦克,一种被称为TSK,另一种则被叫做7TP。 TSK与其说是坦克不如说是移动的大口径机枪塔,这种坦克无法对我们的二号,三号造成威胁;7TP倒是优于二号坦克,但似乎数量不是很多 九月五日 敌方的一支团级别规模的军队突破了我军防御,所幸损失不大 白色计划-2 九月六日 维斯瓦河的湛蓝清澈让我想起了家乡的易北河,我们现在得沿着这条河向托伦进发 九月十三日 部队的进展很缓慢,但是从整个大局来看,敌军的波兹南方面军和波莫瑞方面军已经被合围了 拿下弗沃茨瓦韦克,白色计划成功也只是时间问题了,但这也是最大的问题 九月十五日 敌军已经被压缩到了维斯瓦河南岸和布楚拉河北岸之间的三角地带,士兵们得知这个消息后在营地里开了一场酒会 九月十七日 拉西斯卡到布罗恰夫这只有6公里的地带被突破了,敌军进入了坎皮诺森林,不过我们的空军又把他们逼了出来 九月十七日晚 苏联人发起进攻了,不知是敌是友 九月十九日 集团军总部来电说明了情况,看来我们和苏联人达成了某种协议,但这与我无关 现在最重要的是拿下华沙,可巷战并不是我军士兵的长处 九月二十三日 白色计划成功了,但这场战争才刚刚开始。

《装甲军团2》战斗场景编辑器用户手册 基础操作 新建战斗场景要创建一个新的战斗场景,可使用以下任一方式: 在主菜单中选择 File->New 点击工具栏上的 新建战斗场景 按钮(左数第一个) 使用快捷键 Ctrl+N 载入已有战斗场景要载入一个已有战斗场景,可使用以下任一方式: 在主菜单中选择 File->Open 点击工具栏上的 载入战斗场景 按钮(左数第二个) 使用快捷键 Ctrl+O随后使用标准界面选择你想要载入的战斗场景文件。 保存战斗场景目前所有战斗场景文件存在两种格式: PZ2SCN:编辑器使用的战斗场景文件格式,但该格式不能被游戏直接载入。 MAP:游戏使用的战斗场景文件格式。编辑器可以将战斗场景导出为此格式,但无法重新打开它进行修改。使用 File->Save (As) 、工具栏上的 保存 按钮(左数第三个)或快捷键 Ctrl+S,可将当前战斗场景保存为 PZ2SCN 格式。 使用 File->Export 可将当前战斗场景保存为 MAP 格式。重要提示: 你将无法在今后通过编辑器重新打开并修改此文件。 游玩自定义战斗场景在编辑器中打开战斗场景后,选择 Tools->Play 命令,或点击工具栏上的游玩按钮(左数第四个)。 如果你的键盘带有“Play/Pause”多媒体键,也可以直接按下该按键。 即使你尚未保存该战斗场景,也可以游玩。编辑器会自动写入一个临时的战斗场景文件,并以该文件为基础启动游戏。 导入战斗场景你可以使用 File->Import 命令,将现有的《装甲军团》战斗场景导入编辑器中。导入后的战斗场景可以直接在游戏中启动,也可以进一步编辑并保存为《装甲军团2》的格式。 当前版本的编辑器尚未能完整转换所有《装甲军团》战斗场景的特性(未来版本将进一步改进)。下面的表格总结了这一点。 功能项支持情况说明地图支持地图会旋转90度并且每行裁剪1格,以适配 PzC1 的地图形状到 PzC2。未来我们将提供传统视角模式,使地图在游戏中看起来与 PzC1 保持一致。地形支持PzC2 中的地形种类比 PzC1 更为丰富,因此大多数地形都可以成功转换。但仍存在一些限制: 由于 PzC2 中的断崖是沿六角格边缘设置的,因此目前无法正确转换断崖。 防线会被替换为防御工事六角格。单位支持PzC1 单位会根据 PanzerCorps2/Content/Editor/Data/equipment.pzeqp 文件进行映射转换。若该文件中未找到对应映射,该单位将不会被转换。旗帜支持-特殊六角格部分支持胜利格、次要目标格以及中立格会被转换。撤离格不会被转换,因为《装甲军团2》中尚未引入该机制。战斗场景参数部分支持许多参数已支持,例如日期、回合数、天气、威望、核心栏位和辅助栏位、可用运输工具等,但仍有部分内容尚待完善。单位参数部分支持部分单位参数已支持,例如当前兵力、最大兵力、经验值、工事等级、核心/辅助单位等,但仍有待进一步完善。目前尚不支持增援和部署随机化。图块不支持PzC 的 2D 图块无法应用于 PzC2,因此会被忽略。自定义文本不支持PzC2 目前尚未支持自定义地图文本功能。胜利条件不支持-脚本不支持-AI 设置不支持- 地图绘制及参数设置 随机地图你可以在编辑器中生成一张随机地图,并立即在游戏中游玩,或对其进行编辑并保存为 Panzer Corps 2 格式。 以下指令用于处理随机地图: Tools->Random Map...(快捷键Ctrl+R):打开配置窗口,可在其中设置地图的各项参数。配置完成后点击“OK”生成地图。 Tools->Last Random Map (快捷键R):使用上一次的参数重新生成一张地图。如果你不满意当前地图,可使用该指令快速生成另一张。 随机随机地图 (快捷键Ctrl+Shift+R,无对应菜单项):立即生成一张带有随机参数的地图。该指令适合快速浏览编辑器支持的各种地图类型。只需重复按下该组合键即可查看不同结果。 拖动地图你可以通过以下几种方式拖动地图: 使用地图边缘的滚动条。 按住鼠标中键并拖动地图。 按住空格键的同时按住鼠标左键并拖动地图。 使用方向键或 WASD 键移动地图。 地图缩放你可以通过以下方式放大或缩小地图: 滚动鼠标滚轮上下以分别放大或缩小地图。 在“Zoom”菜单中选择所需的缩放等级。 使用 +/- 键或 PgUp/PgDn 键分别进行放大或缩小操作。 编辑器面板编辑器提供了多种面板,可用于在地图上绘制不同元素。如下表所示:(LMB 表示鼠标左键,RMB 表示鼠标右键) 面板类型操作方式描述地形Edit->TerrainLMB:绘制所选地形 RMB:擦除地形 Shift+LMB:用所选地形填充区域地形特征Edit->Terrain Features(译者没找到这个路径,应同地形路径)除断崖外的所有地形特征: LMB:点击相邻六角格,在它们之间添加选定地形特征 RMB:擦除选定地形特征 Escarpments(断崖): LMB:点击靠近六角格边缘处,在该边缘添加断崖(点击的格子位于断崖下方) RMB:点击边缘以移除断崖 提示:通过地形面板绘制的防御工事为单格结构,无法形成防线。若要构建连贯的防线,请使用“Fortification(防御工事)”方向性特征工具绘制。这样所有连线格会自动设置为“防御工事”地形,无需单独设定。旗帜Edit->FlagsLMB:绘制所选旗帜 RMB:擦除旗帜 提示:在《装甲军团2》中,同一阵营可由多个玩家共用,因此每面旗帜会显示带有玩家颜色的边框。特殊六角格Edit->Special HexesLMB:绘制所选特殊六角格 RMB:擦除所选特殊六角格(该格的其他特殊属性不会改变)单位Edit->UnitsLMB:绘制所选单位或选择光标下单位 RMB:移除单位 Shift+LMB:打开单位属性窗口部署区Edit->Deployment ZonesLMB:绘制所选部署区 RMB:移除所选部署区(其他部署区不会受影响) 撤销/重做(Undo/Redo) 编辑器中的许多操作可以通过快捷键 Ctrl+Z 和 Ctrl+Y 分别执行撤销和重做。下表汇总了当前版本中支持或不支持撤销/重做的工具。 支持撤销不支持撤销地形 地形特征 旗帜 特殊六角格 单位 部署区域战斗场景参数 单位属性 裁剪/调整地图尺寸 战斗场景参数所有全局战斗场景参数可在 Edit->Scenario Params窗口中进行设置。重点注意以下几点: 战斗场景必须至少包含两位玩家。 每位玩家必须至少分配一个阵营。 每位玩家必须由人类或 AI 控制。目前应避免使用 “Player or AI” 选项。默认情况下,编辑器会以可直接在游戏中游玩的参数来创建新战斗场景。 使用底图图像在绘制地图时,可以在地图下方添加一张参考图(底图),以帮助更精准地定位地图元素。可通过以下命令进行管理: File->Add Pad Image:将所选底图显示在地图下方。 File->Remove Pad Image:移除已加载的底图。 File->Limit to in-game boundaries:启用后,底图仅显示在地图的可游玩区域内。 常见问题如何查看地图尺寸? 地图尺寸会显示在编辑器标题栏中,位于战斗场景名称之后。 小提示 在许多配置界面中,可以点击标题栏以展开或折叠内容区域。 故障排查 编辑器启动时会自动载入上次打开的地图文件。极少数情况下,若该地图文件存在问题,可能导致启动时崩溃。 解决方法:按住 Shift 键启动编辑器,即可跳过加载上次的地图。 编辑器自检(开发调试功能)自检功能仅用于开发阶段,在正式版本中将被移除。包括两个命令: Tools->Self-test (Editor):测试地图编辑工具和其撤销/重做功能。 Tools->Self-test (Random maps):测试随机地图的生成过程。若运行过程中需要终止测试,按住 空格键 即可中止执行。


A Guide to Commendation Rewards, Hidden Caches, and some other things found in the Axis Operations Campaigns. Intro For those of you who want to know when and what you can buy with Commendation Points, what goodies can be found in hidden caches, and some other special units and events that pop up, I decided to take it upon myself to find and note these things down and share them with you all, along with some commentary on them. I've also added in some brief notes regarding which missions have Bonus Objectives, as well as a running tally of the total Commendations you could have earned vs spent. I will not be going into detail about these Bonus Objectives or how to complete them, as that's a bit outside the scope of this guide. Please note that: A) Any commentary on the various units and other rewards are simply my personal opinion. Feel free to bring up your own experiences and opinions on these things, cause I very well could have missed something. B) I haven't played much with Retrograde, so most of my opinions assume you are playing without it. Similarly, I love me some Trophies of War, so I had to actively make sure I compared units more to the standard German units and not my arsenal of captured equipment. Anyway, let's get on with what you're all here for: Axis Operations: Spanish Civil War Seville Objectives There are 2 Bonus Objectives on this map. And they both give 1 Commendation each. Total: Earned 2/Spent 0 Cache The first mission of the Spanish Civil War is the location of our first hidden cache. If you can manage to run a ship loaded with one of your Spanish army of Africa units east, you can have them land at Gibraltar, where they find a set of 19 203mm M1931 artillery. The 203mm is the biggest, baddest artillery piece you'll find during the Spanish Civil War. Unfortunately, you can only acquire it here and in the only other cache you can find during this Campaign, so keep it safe or you'll quickly lose it. Anyequera Events I doubt I anyone doesn't know that capturing the Airfield at 13,15 spawns a trio of Ju52 bombers, so I'll just cut to the commentary. The Ju52s are pretty much mandatory to pull off one of the Bonus Objectives on this map, but after that their only real use is the fact that they are the only Strategic Bombers you'll have available for a while, especially if you're running Retrograde. Objectives There are 2 Bonus Objectives on this map. Total: Earned 4/Spent 0 Cache Remember that other cache of the Spanish Civil War I mentioned? If you send a unit up along the top of the map to a Village at coordinates 20,4 you'll find said cache. This one contains another 10 203mm M1931s, as well as 10 122mm M10/30 artillery pieces as well. The 122mm is another good artillery unit compared to your current German guns. However, the only way you'll be able to get replacements if it takes damage is to capture more from the Republicans. Merida Events And now we arrive at our first chance to spend those commendations you've been racking up (You have been completing those Bonus Objectives right?)! At the start of the mission, you have the opportunity to spend 3 Commendations for some captured equipment: 35 Trubia tanks and 35 UNL-35 recon units. The Trubia is a nifty little tank that is superior to your Panzer IAs. However, pretty much every other tank you'll encounter or buy during the Civil War are better, even the Panzer IBs. Still a useful unit during the early game, especially with Retrograde. The UNL is in a similar boat, in that it's better than your German recon units, but not as good as the enemy AACs and BAs. On the other hand, you don't get better German recon units besides the starting one, so the UNL can remain useful the entire campaign. Objectives There are 2 Bonus Objectives on this map. Total: Earned 6/Spent 3 Toledo Objectives There are 2 Bonus Objectives on this map. Total: Earned 8/Spent 3 Early Madrid Events At the start of this mission, if you spend a mere 2 Commendations, then on turn 2 you get one of, in my opinion, the best Commendation Rewards in both the Spanish Civil War and 1939 Campaigns: the Verdeja 2 tank Gift Unit. Frankly, the Verdeja 2 is the bastard love child of the mobility of a BT-5 and the firepower of a T-26. Hands down the best tank in this Campaign, and remains competitive against the various German, French, Polish, and Russian tanks you run into throughout 1939. I expect it to continue to serve well though the defeat of France, although I'm less certain of it's chances against the T-34s and KV-1s that are bound to show up once we get to Russia... Objectives There are no Bonus Objectives on this map. Total: Earned 8/Spent 5 Corunna Objectives There are 2 Bonus Objectives on this map. Escorting the prisoners to safety earns 2 Commendations, while capturing all Victory Points earns 1. Total: Earned 11/Spent 5 Malaga/Bilbao Objectives There is 1 Bonus Objectives on this map. Total: Earned 12/Spent 5 Brunete Events The start of this mission brings another opportunity to buy some captured enemy equipment. The 3 Commendations you spend this time earn you some better rewards that the last stash you bought, giving you 25 T-26 tanks and 25 I-16 fighters. The T-26 is one of the best tanks the Republicans have alongside the BT-5, and now you can have your own to replace your lackluster Panzers. It's even historically accurate, considering the Nationalists prized them enough that they put out a bounty to be rewarded to anyone who managed to capture a T-26 in working condition. The I-16s are more of mixed bag. The are better that you initial biplane Fighters, but unless you are playing Retrograde you should have HE 112s by now, which are roughly on par at minimum and don't have limited numbers. Objectives There is 1 Bonus Objectives on this map. Total: Earned 13/Spent 8 Zaragoza/Gijon Events Regardless of which path you took, at the start of either of these mission you are given a choice: Pay 50% of your current amount of Prestige and receive 12 Commendations, or don't. Honestly, I have a hard time coming up with a reason not to invest in these Prestige sinks, especially this one considering a certain high cost Commendation Reward coming up. Objectives There is 1 Bonus Objectives on this map. Total: Earned 26/Spent 8 Teruel Event An opportunity for another Gift Unit arrives at the start of the mission. 3 Commendations nets you a Panzer 2A on Turn 2. The Panzer IIA is kinda lackluster compared to the other Gift Unit you get during this campaign, but it's cheap and better than your Panzer Is. If you are playing the Trophies of War game and have a few T-26s and/or Bt-5s though, you can probably skip this one. Objectives There is 1 Bonus Objectives on this map, and it grants 2 Commendations Total: Earned 28/Spent 11 Ebro Events At the start of this infamous mission, we arrive at the primary argument for taking that Prestige Sink back in Zaragoza or Gijon. For a whopping 10 Commendations, you get your first Super Hero: Adolf Galland. Galland provides a significant boost to whichever Fighter or Tactical Bomber he is assigned to. +2 to Initiative and +2 Air Attack make give him an edge against enemy aircraft, while Aiming Assistance and Leadership provide support for nearby units. And of course, as a Legendary Hero he generates Prestige for you just by existing. As much as I love the Verdeja, if you are only going to aquire 1 Commendation Reward during the Spanish Civil War, it should probably be this guy. Objectives There is 1 Bonus Objectives on this map. Total: Earned 29/Spent 21 Catalonia Objectives While there are technically no Bonus Objectives, fulfilling the Main Objective of destroying 10 Convoys does earn you 1 Commendation. Total: Earned 30/Spent 21 Madrid 39 Events To wrap up the Spanish Civil War, the start of this mission gives you the opportunity to resupply your stock of captured equipment you may have acquired through previous Commendation rewards. For 3 Commendations you get 30 T-26s. 30 Trubias, 30 UNL-35s, and 30 I-16s. Objectives There are no Bonus Objectives on this map. Final Total: Earned 30/Spent 24 Axis Operations: 1939 Czechoslovakia Events Starting things off, we have several things happening this mission. Firstly, at the start you receive 5 Commendations for free. All you have to do is make sure you don't fully kill any enemies, or you lose all 5. Secondly, if you are NOT importing a Core Force from the Spanish Civil War, you start this Campaign with 6 Heroes, 5 of which are random. The 6th is a guy named Siegfried von Bonde. Von Bonde is an interesting Hero. He's better than the standard Heroes you get every mission, but not quite as good as the ones you can buy with Commendations like Galland. His Artillery Support and AT Support abilities allow you to turn any Unit into a makeshift Anti-Tank, although how good it performs depends on which unit you assign him to. Finally, on turn 2, regardless of whether you imported a Core Force or not, you receive a Gift Unit in the form of Spanish volunteers, the Azul-Infantrie. Your Spanish friends are a fine addition to your army. Their defensive stats are matched only by your Grenadiers, while their more average offensive stats are boosted by the Rapid Fire 1.5x trait they possess. They also have nifty hats. Sarreguemines Events You remember those 5 Commendations you get at the start of this Campaign? I hope you didn't lose them, because at the start of this mission you get the option to spend 5 Commendations for a new Super Hero: Albert Kerscher. Kerscher is a Tank/Anti Tank specialist, and his +3 Initiative, Tank Killer, and Aggressive Counterattack make him a terror to enemy tanks. He's also Famous, so more Prestige just for exisiting. If you happen to have von Bonde, pairing the them together is a potent combo. Objectives: There are 2 Bonus Objectives on this map, deploying 3 Minefields gives 1 Commendation, and all 6 Minefields gives an additional 2 Commendations. Total: Earned 9/Spent 5. Cache At a flag placed in some rough terrain at 27,20 you'll find the first cache of 1939: 5 Char B1 tanks. The Char B1 is one of the 2 tanks competing for the title of best French Tank (We'll get to it's competitor later.). Even your new Panzer 38(t)s only beat this titan in speed. The Char B boasts high defensive stats, although it's speed isn't the greatest. However, unless you are playing the capture game, with only 5 Char Bs you can't field any of these lumbering behemoths...yet. Warndt Objectives: There are 2 Bonus Objectives on this map, raiding St Avold gives 2 Commendations Total: Earned 12/Spent 5. Cache In the part of the city of St. Avold closest to the river, you'll find another cache: another set of 5 Char B1s! Now you can actually field a unit of them! Orenthal Objectives: There are 2 Bonus Objectives on this map, raiding Orenthal gives 2 Commendations. Total: Earned 15/Spent 5. Cache If you lay siege Orenthal and manage to claim the Airfield, you'll be rewarded with 7 more Char B1s (Noticing a pattern yet?). Forbach Objectives: There are 3 Bonus Objectives on this map. Total: Earned 18/Spent 5. Cache I hope you like the Char B1, because by taking Forbach itself you receive another 5 (For better or worse, this is the last one.). Saarbrucken Events We get 2 Events this mission. At the start, you get the option to spend 6 Commendations for a familiar face from Panzer Corps 1: Oleh Dir. Dir is an Infantry Hero, providing a very useful +2 Movement boost to the often slower Infantry. He also gives +2 Initiative and Precision Weapon, pakcing a stronger punch. And of course, like the other Super Heroes, he's a Famous guy. For another 6 Commendations on Turn 2, you can purchase a a stash of 35 Somua S35 parts, 10 of which show up on the map as an extra Unit on Turn 3. (The way the event reads and the similarity with the Verdeja and Panzer IIA Events in SCW made me think that this was a Gift Unit, but actually is just a Captured Unit stockpile.) The Somua S35 is the Char B1s competitor for best French tank I mentioned earlier. While it has less defense than the Char B1, it's still a flat upgrade in pretty much every way to your Panzer 38(t)s. Objectives: There are 2 Bonus Objectives on this map. Total: Earned 20/Spent 17. Bzura Objectives: There are 2 Bonus Objectives on this map. Total: Earned 22/Spent 17. Cache We have 2 caches to plunder on this map at the villages at 33,36 and 40,32, both of which contain 7 7TPdws and 7 SP wz. 29s each. Both the 7TPdw and the SP wz. 29s main selling point compared to your German counterparts is their Rapid Fire 1.5x trait. This somewhat makes up the difference for their weaker stats, but with these caches being the only place to get them (outside of captures), they probably aren't worth it. Which is a shame considering these are the the last caches of 1939. Modlin/Lvov Events Whichever route you pick, at the start of the mission you receive a new Gift Unit for free, and Armored Train. The Armored Train is an artillery unit with great mobility, but heavily limited by the fact that it can only move via rail. It's free though, so just make sure to check the map before deploying it. Brest/Wlodawa Events Time for the 1939 Prestige Sink. At the start of either mission you can pay 75% of your prestige for 14 Commendations. Much like with the Prestige Sink during the Spanish Civil War, you can expect a reason for this massive amount of resources soon. Objectives: There are no Bonus Objectives on this map. Total: Earned 36/Spent 17. Warsaw Events I told you it would be soon. At the start of the mission, you are given the opportunity to spend 8 commendations to investigate rumors of a Russian prototype plane. If you spend these Commendations, you will get a report that they found only garbage (18 PZL P.11c and 19 I-15 fighters as well as 17 PZL P.37B Los bombers) EVERY TIME. The important thing is that if you do spend those points, when turn 5 rolls around you are given the choice to spend 4 more Commendations to continue the search. If you spend that, then on Turn 9 you'll receive a report informing you of success, and you receive a Gift Unit of an Il-2 Sturmovik. The P.11cs, I-15s, and P.37Bs are all inferior to your German planes, even with Retrograde. The are, indeed, garbage. The Il-2, on the other hand, is a different story. People like me who enjoy the Bf110s versatility will love this plane, which is as good in a dogfight as the Bf110 while having bombing capabilities only slightly worse that your Ju87s. Even if you don't bother ever using it to fight another plane, it's still basically a Ju87 that isn;t as much of a sitting duck. You pretty much have to take the Prestige Sink if you want this though. 12 Commendations is a very hefty price tag if you just try to save your Commendations from missions, and runs the risk of missing out on other important rewards, namely Kerscher and Dir. Objectives: There are no Bonus Objectives on this map. Total: Earned 36/Spent 33. Raate Objectives: There is 1 Bonus Objectives on this map, and it gives 2 Commendations. Total: Earned 38/Spent 33. Taipale Objectives: There is 1 Bonus Objectives on this map, and it gives 2 Commendations. Total: Earned 40/Spent 33. Denmark Events We're ending 1939 with a bang. If you pay 5 Commendations at the start of this mission, you receive 35 KV-2s. The KV-2 is just a monster of a tank at this point, and unfortunately has the Slot requirements to prove it. It's a shame you only get it for one scenario of 1939, even moreso considering Denmark really doesn't have much of anything that can really compete with it. Objectives: There are no Bonus Objectives on this map. Total: Earned 40/Spent 38. Axis Operations: 1940, Part 1 Fornebu Events Let's start off with what you get when you start 1940 without importing a Core from 1939: 9 Heroes both new and old. Alongside some random Heroes, you get Adolf Galland from the SCW, Siegfried von Bonde from starting 1939 without a Core, and you also get 2 new special Heroes: Reinhardt Herzog and Ludwig Mittermeier. Herzog possessed First Strike and Phased Movement, making him a good choice to put on your front line Tanks and Infantry with Phased Movement opening up maneuverability options while First Strike give them an edge in combat. Mittermeier is an interesting Hero; possessing both Evasive and Liberator, he fits in with any Ground Unit you don't want getting too shot up while also giving bonuses for taking Flags with the unit. Objectives There are 2 Bonus Objectives on this map. Protecting the landed planes earns 3 Commendations. Total: 4 Earned/0 Spent. Cache If you manage to destroy the fortress that's harrassing the Blucher and take the Supply Hex it is positioned on, you recivie a stockpile of 30 Wurfrahmen 40. The Wurframen 40 is a powerful self-propelled rocket artillery. much better than the Sturmpanzer I which is currently your only other choice for self-propelled artillery. It is slot heavy like all good artillery with a cost of 5 Slots, and capturing that island is a major challenge, but the reward is definitely worth it. Totally not Czechoslovakia Events It is here on turn 5 that you can spend 3 Commendations to support women in auxiliary roles, granting the special Hero Elsa Kloss. Kloss is an Artillery Hero, and provides any Artillery assigned +3 Ammo and +1 Range. Despite not giving any special Traits, this is still a potent buff, as many of the more powerful Artillery have very limited stocks of ammunition, and extra range is always useful for an Artillery. Objectives There are 0 Bonus Objectives on this map. Total: 4 Earned/3 Spent. Valkenburg/Eben Emael Objectives There are 2 Bonus Objectives on this map. Total: 6 Earned/3 Spent. Cache On the Netherlands branch, in Valkenburg Raid, capturing the De Kooy Naval Airbase earns you 30 Fokker D.XXI. The Fokker D.XXI is a poor reward compared to the last Cache, as it is a vastly inferior Fighter compared to the German Fighters you should have available at this time. Grebbeberg/Hannut Events Our next Commendation Reward costs 4, and is a Neubaufahrzeug Gift Unit, deployed immediately. The Neubaufahrzeug is an interesting addition. Slower and slightly less armored than the Panzer III and IVs, it's Rapid Fire 1.5x combined with superior Attacks stats to aforementioned Tanks makes this a a powerful, if slightly more fragile, asset to your army. Objectives There is 1 Bonus Objectives on Grebbeberg, which rewards 3 Commendations. There are 2 Bonus Objectives on Hannut, of which destroy 20 French Units earns 2. Total: 9 Earned/7 Spent. Cache On the Belgium branch, in Hannut, on a Flagged hill at coordinates 2,18, you'll find a cache of 10 Char B1s. Sedan Objectives There is 1 Bonus Objectives on this map. Total: 10 Earned/7 Spent. Cache A Village near the southeast corner at coordinates 30,48 contains 5 Char B1s. A central Airfield at coordinates 17,25 yields 30 Breguet 693 Tactical Bombers. Unfortunately, the Breguet continues the trend of captured aircraft being inferior to your German ones. It does have a decent amount of extra range compared to your 87s, so there is at least a use for it if you wish. And finally, the town of Dinant just across the river at the north end of the map contains a treasure trove of 25 AMC 35s, 15 Hotchkiss H35s, and 15 Panhard 178s. AMC 35s are almost identical to your 38(t)s, with 1 extra point of Hard Attack, and are decently competitive against the early Panzer III and IVs. The H35s main strength is it's high defense, however your 38(t)s, IIIs, and IVs all have as good or better defense, along with significantly more attack power. easily the least valuable of the equipment here. The Panhard is a potent Recon unit, with stronger stats at the cost of not having Rapid Fire 1.5x like most of your German Recons. Arras Events Time for this chapter's Prestige Sink. Half your Prestige can be traded for 7 Commendation Points. Interestingly, declining this Prestige Sink causes a number of enemy Colonial Infantry to spawn. Objectives There are 2 Bonus Objectives on this map. Total: 19 Earned/7 Spent. Cache The town of Vimy north of Arras contains 15 Matilda Is and 10 Matilda IIs. The Matilda I is plagued with a dismal 3 Movement but otherwise its stats and Rapid Fire 1.5x are roughly on par with your 38(t)s. The Matilda II is a straight upgrade to it's counterpart in most categories even with the loss of Rapid Fire 1.5x, allowing it to be competitive against your IIIs and IVs, however it retains that unfortunate 3 Movement. Lillie Objectives There is 1 Bonus Objectives on this map. Total: 20 Earned/7 Spent. Cache The Airfield at Kortrijk near the northeast corner of the map has a stash of 35 D.520 Fighters. The D.520 is a much more welcome addition to your air force than previous aircraft caches, as it's essentially identical to your Bf 109Es but with extra range. Dunkirk Events We got 7 Commendations at Arras, and now for 7 Commendations we can recruit a new special Hero: Heinrich Bar. Bar is a Fighter Hero that grants a devastating combo of Double Attack and a +1 Bonus to Air Attack. He is also Famous, so enjoy the extra Prestige. Objectives There are 4 Bonus Objectives on this map. Total: 24 Earned/14 Spent. Abbeville Objectives There is 1 Bonus Objective on this map. which grants 2 Commendations. Total: 26 Earned/14 Spent. Neufchateau Events This reward works a bit differently than most. instead of using your regular Commendation, you instead have to use 'Special' Commendation earned through this map's Special (Not Bonus) Objectives of destroying the Char 2C and capturing Neufchateau. The special reward for this endeavor? The Char 2C itself, as captured stock totaling at 35. On one hand, the Char 2C has 3 Movement, which is bad. On the other hand, the Tank makes up for it by being a mobile fortress, with a massive 21 Ground Defense and Firepower on par with any of the other Tanks available at this time. Overall an extremely powerful, if slow, asset to your forces. Objectives Instead of Bonus Objectives, this map gives Special Objectives, which upon completing give you Special Commendation Points used exclusively for this map's Commendation Reward. Total: 26 Earned/14 Spent. Jersey Cache Taking the Lovasz Residence on the north end of the island causes the discvery of 9 Spitfire Mk.IIs (So close!) and 25 Hurricane Mk.IIC. While the Spitfire is overall superior to your Bf 109Es, the Bf 109Fs you get in Dover it's a trade of 1 Initiative for 1 Air Defense. Still useful, especially if Retrograde or the new Collector Challenge are active. Like the Spitfire, the Hurricane is better than the 109Es, but only on par with the 109Fs. The Hurricane does have an interesting quirk in that it has 4 Hard Attack, quadruple any of the other Fighters available and only 1 less than the Bf 110D, giving it some interesting ground attack possibilities. Dover Events Interestingly, Dover presents not a Prestige Sink, but the first Prestige Reset. You can have your Current Prestige be set to 8500, and gain 9 Commendation Points Objectives There are 2 Bonus Objective on this map. Total: 37 Earned/14 Spent. Brighton Events We finally get the chance to field some Spitfires, as in exchange for 6 Commendations you can buy 31 Spitfire Mk.IIs. If the Blucher survived Fornebu, it arrives on Turn 1 to assist your naval forces. Objectives There are 2 Bonus Objective on this map. Axis Operations: 1940, Part 2 Epsom Events We can spend 8 Commendations here for more British equipment, this time 35 Matilda IIs. Objectives There are 2 Bonus Objective on this map, raiding London gives 2 Commendations. Total: 43 Earned/28 Spent. Cache If you can get a unit to the northwest corner and take control of the Great West Aerodrome provides you with, of all things, a single unit of Meteor Mk.III jet Fighters. What can I say? It's a late war Jet Fighter in 1940, the only reason it isn't overpowered beyond belief is the fact that you only get a single one. Portsmouth Events We can spend 9 Commendations here for one final batch of mixed British equipment: 9 Matilda IIs, 11 Spitfire Mk.IIs, 7 Hurricane Mk.IICs, and a new acquisition of 29 Beaufighter Mk.IFs. The Beaufighter is Fighter-Bomber like your Bf 110s, and it is much better at it. An complete overall upgrade if you like using Fighter-Bombers. Objectives There are 2 Bonus Objective on this map. Sinking the Royal Navy earns 2. Total: 46 Earned/37 Spent. Pindus Objectives There are 2 Bonus Objective on this map. Total: 48 Earned/37 Spent. Valona Events Our final Commendation Reward is the option to spend 4 Commendations to 'borrow' some Italian Prototypes: giving you 35 L6/40 Lf Tanks and 35 20/70 Quadruplo self-propelled AA guns. It's difficult to compare the L6/40 Lf to your German machines, as we do not yet have access to any German flamethrower Tanks. It's stats are good, and it fills a niche we currently lack unless you captured some OT-133s in the past, so definitely a useful aquisition. The 20/70 is better armored and better at fighting against ground based enemies compared to your SdKfz mounted AA guns, making it an excellent option for mobile AA. Objectives There are no Bonus Objectives on this map. Final Total: 48 Earned/41 Spent. Axis Operations: 1941 East, Part 1 Zagreb Events Starting off with the non-import campagn starting linup we have the nerfed Adolf Galland, Siegfried von Bonde, Reinhardt Herzog, and Ludwig Mittermeier all returning from the 1940 start, alongside Esla Kloss from a 1940 Commendation Reward. Joining the roster of Hero aces are 5 newcomers: Volkhardt Kautz, Markus von Reuenthal, Wolfgang Schneider, Friedrich von Kraken, and Helmut Kielb. Also, fun fact, while comparing the lineup to the 1940 one, I noticed that most, if not all the new 2 Trait Heroes were single Trait heroes in 1940 (and presumably 1939). Nice to see some people getting promoted for their hard work. :mrgreen: Volkhardt Kautz was already an devastating Hero with the coveted Rapid Fire x2, but with Readiness any Unit he is assigned to becomes becomes even more dangerous for enemies to attack. Markus von Reuenthal gains Low Profile, granting a survivability boost alongside his previous Scavenger Trait, making him a pretty great Hero for a dedicated capture unit, or if you aren't bothering with captures he now actually holds some value. Wolfgang Schneider becomes a powerhouse for high Slot towed guns and Infantry as he gains Fast Deployment to combo with his previous Zero Slot trait. Friedrich von Kraken is released to become a champion of the Overstrength Mechanic by adding Consolidator to his Reduced Slots. The Unit he starts in also starts with 5 points of Overstrength already to make full use of his new skills. Helmut Kielb combines Prudent and Double Support, an interesting combo with useful applications for frontline AT guns and possibly Fighters. In other news, you receive a batch of 30 38M Toldi I tanks from your Hungarian friends on Turn 2. The Toldi has the unfortunate circumstance of having identical stats to your Panzer IICs that have unlimited replacements, leaving it uses limited to primarily flavor purposes or for runs using Collector. On the other hand, it's free so you can't complain too much. Objectives There are 2 Bonus Objectives on this map. Searching for the Prince gives 2 Commendations while Wagner Surviving gives 1 (We'll be seeing a lot of Wagner running around needing protection throughout the campaign so be prepared. Really wish he was in something a bit more armored like a Panzer or something though :? ...) Total: Earned 3/Spent 0 Yugoslavia Objectives Only 1 Bonus Objectives on this map an it gives 2 Commendations. Total: Earned 5/Spent 0 Thessaloniki Objectives 2 Bonus Objectives for 2 Commendations each. Total: Earned 9/Spent 0 Thermopylae Events Our first Commendation Reward is 19 Bf 109Z Prototypes which you can buy for 4 Commendations at the Scenario start. If you like the Bf 110s Fighter/Bomber capabilities, the 109Z is a straight upgrade, albeit at the cost of costing an extra Deployment Slot in comparison. Objectives There are 2 Bonus Objectives on this map, each giving 1 Commendation. Total: Earned 11/Spent 4 Cache We also have out first Cache in the out of the way town of Kouvela, guarded by a 30 Strength unit of Australian Infantry. The prize being 29 Cruiser Mk.II CS Assault Guns. These Assault Guns are cheaper and faster than the StuGs you currently have for Assault Guns, but have less Soft Attack and Ground Defense in exchange. Operation Mercury Events At the start we have another opportunity for a Prototype aircraft purchase, this time 19 He 111Zs for 5 Commendations. Much like the 109Z vs 110 comparison, the 111Z has better overall stats than any of your regular Strategic Bombers at this time, but costs an additional Deployment Slot. Personally, I'm not a fan of Strategic Bombers in general, and with certain other rewards approaching this is probably my first pick to skip. Also, be warned, despite saying that you will get landing craft to transport tanks and other ground units eventually, you are in fact stuck only with Air Transports for this mission even if you sink the Royal Navy. Keep that in mind when deploying and make sure you have plenty of parachutes. Meanwhile, on Turn 18 you are presented an important choice. You can choose to trade Adolf Galland for 100 Bf 109Gs. While the 109Gs are a flat upgrade that you are getting roughly a year early with plenty of stock, I'm personally not sold on it being worth losing an elite Hero like Galland. Definitely not if I bought him in SCW, although with the nerfed version you get at the start of 1940 and 41 I might be a bit more tempted. Of course, there is always the chance of this decision having further rewards and impacts in future Campaigns, so my opinion may change. Objectives There are 2 Bonus Objectives on this map, capturing VPs gives 2 and destroying aircraft gives 1 Commendation. Total: Earned 14/Spent 9 Cache In the middle of Crete on an airfield at 32,31 you'll find a cache full of 19 Spitfire Mk IIs, 19 Beaufighter Mk.IF, and 29 Stirling Mk.Is. The Stirling is the only new reward compared to previous Campaigns, and its a bit of a disappointment. Much like the He 111Z it costs an extra Deployment Slot compared to your German Bombers, but unlike the 111Z it's stats are much weaker, making that extra Slot much more crippling to the Stirling's usefulness. Totally Not Poland Events Oh boy, oh boy, for a Training Mission there is a lot to cover here. First, at the start you are given the opportunity to buy 19 Sturer Emil Prototypes for 3 Commendations. They also mention another Tank Destroyer offer which is presented on Turn 2, again paying 3 Commendations but this time for a 10.5cm K Gepanzerte (Sfl.), AKA the Dicker Max, Gift Unit that spawns on Turn 3. IMPORTANT NOTE! You can in fact purchase both of these Commendation Rewards if you have enough Commendations. However, the way that this Campaign is set up, if you bought both the 109Z and He 111Z then even if you met every Bonus Objective you will only have 5 Commendations and thus can only afford 1 of these. So plan accordingly on which Reward you are more comfortable with passing on. The Sturer Emil is a powerful Tank Destroyer that blows your current Panzerjagers out of the water. The 10.5cm Gepanzerte isn't quite as powerful as the Sturer Emil, but is still superior to the Panzerjager and has unlimited reinforcements compared to the Emil. However it is stuck at only 5 Strength, although if you aren't playing with No Overstrength this is easily rectified, as with only a base Slot cost of 2, Overstrengthing it to 10 only makes it worth 4 Slots (or 6 if you use a Consolidator Hero or a mere 3 if you use von Kraken who feels like he was designed for this role.). Next on the agenda, if you picked up that Meteor Cache near London Willy Messerschmitt turns up on Turn 5 asking for it, and you can choose to give it to him on Turn 6. No reward for doing this at this time save for an unusable set of 5 Me 262s, but considering the only other option is to destroy the Meteor you might as well accept. (Something tells me this indicates an Me 262 or Meteor Gift Unit/Prototypes given to us a fair bit earlier than expected.) And finally, we finally get the chance to recruit Hans Rudel on Turn 7, and he doesn't even cost a thing! He arrives on Turn 8 if you accept. Rudel is a Tactical Bomber Hero with Legendary as well as your choice of Traits from the following 3 pairs: Double Attack or Double Move, Aggressive Counterattack or Lightning Attack, and Ignores Entrenchment or Tank Killer. Pretty much all of these are amazing Traits for Tactical Bombers, and guarantee Rudel will be a tremendous force multiplier for any Bomber he's assigned to. Objectives Total: Earned 14/Spent 12 (or 11 or 10 depending on if you skipped the 109Z or 111Z Rewards to get both of the Tank Destroyers) Axis Operations: 1941 East, Part 2 Raseinai Events Upon arrival we have a Prestige Sink that for once doesn't give Commendations but equipment. Your Axis allies in Italy and Hungary offer to sell you some tanks for 50% of your Prestige, giving 35 M14/41, 35 L6/40 Lf, and 35 Toldi Is. Like the Cache on Crete the M14 is the only new piece of equipment here, and stat wise it's closer in parity to the Pz38(t) than your PzIII and IVs. Regardless of the Prestige Sink, Hungary, Romania, and Spain decide to give you some additional equipment for free on Turn 7. 35 R1 tanks, 35 Ca.135 Bombers, and probably the best of all the support sent this Scenarios; a Gift Unit of Azur Infantry, bringing your total to 2 of these units if you have been importing your Core since 1939. The R1s are essentially PzIBs that cost an extra 10 Prestige and run into the same issues as the Toldis in that why use them if you have Panzer Is with unlimited reinforcements? The Ca.135s are a fair bit more useful, being a relatively fair trade off of range and armor at the cost of firepower compared to your Ju 87s. Objectives There are 3 Bonus Objectives on this map, and you get to Commendations for destroying aircraft and holding Vilinus while holding Baisogaia only gives 1. Total: Earned 19/Spent 12 Stalin Line/Minsk 1941 Events At the start of each Scenario you get a free Armored Train. Free stuff is always nice. Objectives There are 2 Bonus Objectives on each map, and they all give +2 Commendations. Total: Earned 23/Spent 12 Tallinn/Smolensk 1941 Events An offer at the start is made to spend 4 Commendations for a batch of Russian aircraft: 24 LaGG-3, 31 Petlyakov Pe-2, and 19 Petlyakov Pe-8. The LaGG-3 if an overall weaker plane that your Bf 109s, but it costs 1 less Deployment Slot which gives it some potential use. The Petlyakove Pe-2 stats fall into a middle ground between your Ju 87s and the Ca.135s range vs firepower stats. The Petlyakove Pe-8 on the other hand is like the Stirlings, weaker than your German Strategic Bombers yet costing an extra Deployment Slot. Objectives There are 2 Bonus Objectives at Tallinn and 3 at Smolensk, Wagner's survival in either and sinking ships at Tallinn give +2 each, while at Smolensk capturing Bialystok and Grodno give +1 each. Total: Earned 27/Spent 16 Approaching Leningrad/Yelnya Offensive Events For 5 Commendations you have another chance to buy or restock the Bf 109Zs with a batch of 26. Objectives There are 2 Bonus Objectives on each map, each giving +2 Commendations. Total: Earned 31/Spent 21 Gomel Objectives 1 Objective for Wagner's survival gives 1 Commendation. (Well, that was a damn lie... :x ) Total: Earned 32/Spent 21 Lokhvista Events On Turn 3 you can spend 5 Commendations to buy or restock 23 HE 111Zs. This and the 109Z Reward at Leningrad/Yelnya are another good reason why you can skip one of the Rewards near the start of this Campaign for both Tank Destroyers. Objectives There are 2 Bonus Objectives on each map, each capturing VPs give +2 and destroying HQ unit give +3. Total: Earned 37/Spent 26 Kiev 1941 Events On Turn 20 you get the chance to salvage 19 KV-1/40, 18 BM-13 Katyuashas, 29 MiG-3s, and 26 Petlyakov Pe-2s from the battlefield. The KV-1 outclasses your Pz III and IVs in most aspects, and you also want a good stockpile for reasons that will become relevant later... The Katyuasha serves as a weaker but cheaper alternative to the Wurfrahmen 40. The MiG-3s unfortunately are like the LaGG-3 and inferior to your 109s. Objectives The one Objective of capturing Kiev gives +5 Commendations. Total: Earned 37/Spent 26 Bryansk Events For 8 Commendations you get to recruit another elite Hero: Helmet Wirnsberger. Wirnsberger is an Infantry Hero with +3 Initiative, +1 Speed, Low Profile to increase survivability, and Ignores ZOC. Sounds like a great choice for a Commando unit to me. Objectives For defeating the 13th and 50th Armies you get 2 Commendations each. Total: Earned 41/Spent 34 Mozhisk Line Events Another 50% Prestige Sink for allied equipment, another 35 38M Toldi Is, 35 M14/41s, and 35 L6/40 Lfs. Objectives The Bonus here earns 3 Commendations. Total: Earned 44/Spent 34 Battle of Moscow Events If you can fight your way to Raid the Kremlin you manage to acquire documents in the form of a single captured SU-100Y that I can only assume will become relevant in 1942 or future Campaigns like how the Meteor from 1940 did earlier this Campaign. Klin Events Out last Commendation Reward is a chance to grab another batch of Russian equipment for 5 Commendations: 19 ZIS-30, 18 BM-13 Katyushas, 29 MiG-3s, and 26 Petiyakov Pe-2s. The ZIS-30 outclasses your store bought Panzerjagers, although if you have the Sturer Emil and/or 10.5cm Gepanzerte it's not quite as impactful, but still useful especially with the other loot. Finally, on Turn 20 we have a special Event if you manage to fulfil the Challenge Objective. By giving the convoy 100 of your stockpiled Kv-1/40s (NOT KV-1/41s, those don't count!) to take back to Germany you receive a promise of a future reward in later Campaigns in the form of a single Jagdtiger Prototype. Final Objectives Total: Earned 44/Spent 39 Axis Operations: 1942 East, Part 1 Rzhev '42 Events Taking things from the top, we have the Special Heroes and Units granted to players that did not import a Core. Hero wise all the familiar faces from 1941 return save for Galland, who is replaced by a somewhat nerfed Hans-Ulrich Rudel who only possesses Double Attack and Tank Killer. As for Units you will get an Azul Infanterie, the 5 Strength Dicker Max Gift Unit you could purchase in 1941, and an He 111Z Gift Unit. On Turn 8, a Wagner returns, and he brings gifts! For resetting your Prestige to 9500 (Which funnily enough, will actually increase your Prestige if you started without an import.) Wagner grants you 15 Tiger (P) and 29 T-34-57. While not the more famous version, the Tiger P is still a Tiger, and the stats reflect that, including in Slot cost. Much like the Tiger (P), the T-34-57 is a solid step up from your current Panzers. In addition to the main Wagner event, you also are quickly given the opportunity to turn in the Jagdtiger token from Klin for another 15 Tiger (P). On one hand, 100 KV-1s and an escort mission in exchange for only 15 Tiger (P) might seem like a poor trade, however by this point you're able to capture 1941 and later KV-1 models making the '40 model obsolete, and the Tiger itself is both stronger and this gives you much more of a buffer for repairs. Up to you whether it's worth it or not. Objectives: Destroying the encircling enemies gives you 1 Commendation per group, giving you 3 total. Cache A village at 5,3 contains a Soviet stockpile of 25 KV-2, 30 T-50, 9 T-34-57, and 21 Yak-1. The T-50 is essentially a faster version of your Panzer IIIJs, and while I can’t speak for everyone, I for one will take an additional point of movement of a minor decrease in air defense on a tank every time. Much like many captured Soviet Aircraft, the Yak-1 fails to compete against your best German Fighters. A village at 6,32 contains a cache of Italian equipment originally captured by the Soviets, and now captured by you. Contains 45 L6/40 LF, 45 AB 41, and 45 L40 da 47/32. The AB 41 is essentially a better version of your SdKfz 222s while still being weaker than your SdKfz 232 8Rads. However, thanks to it costing 2 Slots like the 222 and not 3 Slots like the 232, it can still be useful for Slot budgeting purposes. The L40 Tank Destroyer provides some interesting tradeoffs compared to your Jagerpanzer 35Rs making it a decent alternative. Demyansk Pocket Events: At the start you can buy 35 Panzer IIIN Prototypes for 2 Commendations. Despite being a Panzer III, the IIIN is more of a direct upgrade to your Panzer IVs, and it is a significant one, especially with an actual Close Defense value. Objectives: Protecting all the Ju 52s will earn you 3 Commendations. Total: Earned 6/Spent 2 Cache: Ostashkov contains a cache of 25 MiG-3, 25 Yak-1, and 19 Ilyushin Il-4. The stats of the Il-4 are roughly on par with your best German Strategic Bombers, which makes the fact that it costs 1 more Slot than them an damning issue. Operation Cerberus Events At the start you are given 15 Fw 190As, and are given the option to buy an additional 15 and 19 Bf 109Z for 3 Commendations. The 190 is a significant upgrade over your Bf 109, but costs 5 Slots instead of 3. Up to you to decide is the stats are worth deploying a single Fighter where you could almost deploy 2. Objectives: 2 Commendations each for sinking the Home Fleet and Navy in general. Total: Earned 10/Spent 5 Kummersdorf '42 Events As is typical by now Training Scenarios double as Event dispensers, starting with the option to exchange 1 Commendation for 15 Tiger (P). On Turn 4 and 5 you get very similar events. Both cost 3 Commendations (Meaning you have to skip the Panzer IIIN or Fw 190 if you want to get both of these), both grant a Hero for Anti-Tanks/Anti-Aircraft, and their Traits are extremely similar. First up is Karla Wuhrer, who has Rapid Fire 2x and Fast Learner, and then you meet Karl Ullman, also with Rapid Fire 2x but with Learns from Mistakes instead of Fast Learner. Rapid Fire 2x is one of the strongest Hero Traits you can get, and that alone makes these two worth it in my opinion. If you can't pass up the Panzers and 190s or couldn't get enough Commendations to buy both, I would recommend Karla as Fast Learner is usually the better exp gain Trait. Note: The Events to buy the Heroes say that they cost 2 Commendations each, this is a typo as they still charge you 3 Commendations. Finally, on Turn 7 you can exchange the SU-100Y token you may have picked up in Moscow for 15 T-34-57 and 30 Su-122. The Su-122 is a very potent Tank Destroyer, and can perform double duty with it's ability to switch to an SPG mode. Objectives: Total: Earned 10/Spent 8 Kerch Peninsula Objectives: Defeating the Soviets can earn you 2 Commendations. Total: Earned 12/Spent 8 Cache 2 caches here to find, the first being at a fortification right by Kerch itself. This one contains a batch of British Lend Lease equipment: 25 Churchill Mk.II, 31 Spitfire Mk.II, 35 Beaufighter Mk.IF, and 40 Hurricane Mk.IID. While the Churchill is a bit slower and has less firepower than your Panzers, it does have a considerably higher set of defense stats, including 2 points in Close defense. This new model of Hurricane is a Fighter-Bomber, and is even better at that role than the Beaufighters (Particularly against Hard targets), which are still better than your Bf 110s. However, they have less range and cost an extra Slot in exchange for those otherwise mostly superior stats. The second cache is at a Village located at 33,14, and it contains 19 MiG-3, 25 Yak-1, and 23 Sukhoi Su-2. As is typical of captured Soviet Aircraft so far, the Su-2 is inferior to your German aircraft. Second Battle of Kharkov Events Another opportunity arrives to restock you Bf 109Z supply, 21 for 3 Commendation. Objectives: Both Objectives give 1 Commendation. Total: Earned 14/Spent 11 Voronezh Objectives: Taking out the HQ grants 1 Commendation. Total: Earned 15/Spent 11 Cache An Airfield at 33,4 contains 25 Yak-1, 10 La-5, and 21 Ilyushin Il-4. Not only is the La-5 a big step up from previous Soviet Fighters, it even beats your Bf 109Gs! On the other hand, it costs 5 Slots. Like the Fw 190s, up to you to decide if the stats are worth the price. Voroshilovgrad SDO Events Remember those Toldi Is the Hungarians kept giving us in 1941? Well, now you can buy 50 Toldi IIa for 3 Commendations. Now, while the Toldi I was only really good for flavor or Collector runs, the IIa is actually useful. Better defense and cheaper on Slots than your Panzer IIC, if you still want to deploy some Light Tanks these make good additions to your army. Objectives: Both Objectives grant 1 Commendation. Total: Earned 17/Spent 14 Axis Operations: 1942 East, Part 2+Side Note Novorossiysk/Operation Nordilicht Objectives: You get 2 Commendations for preventing Soviet sabotage in Novorossiysk, and 1 Commendation each for defeating both Armies in Nordilicht. Total: Earned 19/Spent 14 Cache In Novorossiysk, an Airfield at 24,50 has a cache of 34 MiG-3, 28 Pe-3, and 11 La-5. The Pe-3 is a bit of a weird Fighter considering its stats have more in common with your Bf110 than your 109s, better ground attack and range but weaker defense and air attack. Grozny/Lake Ladoga Events Both Scenarios have a Commendation Event, however their implementation is quite different. At the start of Grozny, you can spend 2 Commendations for 35 StuG IIIG Tank Destroyers. The StuG III is, as you might expect, an upgraded version of your existing Anti-Tank StuGs, with an increase in pretty much every relevant stat and even a couple points of Close Defense. It does cost 4 Slots however, compared to the 3 StuGs previously did. In Lake Ladoga, on the other hand, you have to make sure you fulfill the special objective, and then near the end of the Scenario you are given 2 Commendations, soon followed by the ability to spend 2 Commendation to recruit Goro von Manstein, an Infantry Specialist with Zero Slots and Vigilant. While this combination would be absurdly great for armored units, it's still quite useful for Infantry, particularity the high Slot cost close combat specialist Azur Infanterie. Objectives: The 2 objectives in Grozny and the Bonus Objective in Lake Ladoga give 1 Commendation each, and as mention the Ladoga Special objectives gives an additional 2 Commendations. Total: Earned 21 (22 on the Leningrad Route)/Spent 16 Cache All 3 caches are found in Grozny. The first is unskippable as it is located at the Primary Objective of Mirnyy, and it contains 26 Spitfire Mk.II, 19 Spitfire Mk.VB, and 28 Beaufighter Mk.IF. While the Mk.II has been surpassed by your Bf 109Gs, the new Spitfire Mk.VB surpasses the 109G in turn. It is still weaker than the Fw 190A, but the 190 takes 5 Slots. Another lend lease cache can be found at Nazran, holding 19 Churchill Mk.II, 41 Sherman Mk.I, and 45 Crusader CS. Shermans are pretty comparable to your Panzer IIIs with more of an emphasis on Soft Attack, and while weaker than your newest Panzer IVs, the top of the line IVs available at this point cost 5 Slots while the Shermans only cost 4 like your Panzer IIIs. The Crusader CS are essentially StuG IIIBs with an extra point of movement, and as I said earlier, I’ll almost always take the extra Movement for ground units. Finally, the cache at the 48,21 airfield contains 17 La-5 and 29 Tupolev Tu-2. The Tupolev has better defenses and range than your Ju 87s, but has weaker ground attack stats which is not usually a great tradeoff for a bomber. Note We interrupt your usually scheduled guide to talk about the elephant in the room. In the past, Route splits containing rewards have either given the same reward (the Neubaufahrzeug) or kept the rewards at least somewhat similar in nature and value (the Fokker D.XXI vs Char B1, the Char B1 is a far more useful unit, but you get a lot more D.XXI and captured aircraft are a rarity). This time however, you get a choice between 2 very different prizes. In the North, you get the chance to recruit a powerful Hero. In the south, you get to loot a bunch of caches of useful equipment and buy some prototypes. Generally, I'd say that a Hero that will be useful until the end of the war is the superior reward over equipment that will eventually become obsolete. However, some people don't like playing with Heroes (Or at least not high power ones), and some people might value playing with more captured equipment to be, well, the funner option. My advice here is don't let yourself feel trapped into going to Leningrad just because that's how you get a special Hero. Both routes have unique rewards, and the types of rewards and the nature of the Scenarios themselves lend themselves to different playstyles, so do feel free to pick the route that you want, not some so called "best" route. With that said, back to your usual guide. Axis Operations: 1942 East, Part 3 Bombing Stalingrad Events You can buy 35 He 219 for 3 Commendation here. The 219 is better than your 109s and arguably better than the 190s do to being cheaper on the Slot cost for fairly competitive stats. Objectives: All 4 Objectives grant 1 Commendation. Total: Earned 25/Spent 19 Streets of Stalingrad Objectives: Each Raid Objective gives 1 Commendation. Total: Earned 28/Spent 19 Assault on Stalingrad Events 2 Events for spending Commendations this Scenario. First you get the option of spending 5 Commendations for 45 Tiger I. It’s a Tiger tank and it has the stats to prove it, and whether they truly deserve it or not they are one of the legendary tanks of WW2. A few turns in you can choose to spend 3 more Commendations for 26 Bf 109Z, 22 He 219, 22 Spitfire Mk.II, and 9 Spitfire Mk.VB. On a side note, as far as I can tell, it doesn't matter which of the 2 objectives you accomplish (or if you managed to complete both), you actually choose to evacuate on schedule or stay and help between this Scenario and the next, regardless of the Objectives accomplished. Objectives: Total: Earned 28/Spent 27 Operation Winter Storm/Operation Blut Events If you choose and complete Operation Blut you recieve a single captured SMG Inf token, which is checked for at the start of the 1943 Campaign. Axis Operations: 1943 East, Universal Half Zaporizhia Events As usual, first off we have the Special Heroes and Units granted to players that start from this Campaign: All the usual suspects return, and our final 2 single Trait Heroes Upgrade to 2 Traits. Diederich Franzen is ready to break enemy defensive lines with a combo of Lightning Attack and Ignores Entrenchment. Igvar Dugross adds Survivor to his old Double Move Trait. A somewhat odd choice since technically Survivor can be sort of farmed through Awards, but that is risky so having a way to give this Trait to more fragile units could be useful. On the other hand, that reduction to 30% of our fighting strength they mention in the briefing took a actual in game toll it seems. Our only unique starting units this time are the ever-present Azul Infanterie and a aging Char B1 of all things. No more free Dicker Max or He 111Z it seems. Fortunately, on turn 4 that changes as we receive a Panther (P) Gift Unit. The Panther (P) is essentially a faster Tiger (P). Same armor, similar firepower, and an extra point of movement. Objectives Defeating the Soviet 1st Wave earns 3 Commendations. Total: Earned 3/Spent 0 Backhand Blow Objectives Destroying the Soviet Armored Corps earns 2 Commendations each. Total: Earned 7/Spent 0 Cache 13,1 contains 17 SU-57, 22 OT-34, and 29 PT-29 The OT-34 is a pretty much straight upgrade to your Flammpanzer IIs. The PT-29 is an interesting addition to your forces. It's primary purpose is in it's unique minesweeper utility, something the Germans will never get in a native tank, but unlike the other utility tank you have access to (the SdKfz 251/7 Brucken) the PT-34 actually has some respectable firepower and armor to protect itself with. It's still lacking compared to you best tanks, and with a limitd supply best to keep it off the frontlines regardless. The SU-57 is in many ways a budget StuG IIIG, with the same firepower but reduced stats pretty much everywhere else except movement, which gets a boost instead. It does only cost 3 Slots to the IIIGs 4 as well. 34,1 contains 21 Spitfire Mk.II, 19 P-40, and 26 P-38E. The P-40 is very much obsolete at this point in the war. And while it's range is an interesting perk, the P-38E is closer in strength to you oldest 109s than your G models and 219s. Shame, I always likes the look of the P-38. Kummersdorf 1943 Events As usual, Training Scenarios tend to throw a lot of Events at you. First off you can spend 2 Commendations for 18 Me 163Bs. The Me 163B's is an excellent Fighter both in terms of offense and defense, however it's meager 9 Movement can likely be crippling on the wrong maps, and it's 6 Slot Cost doesn't help. Not to mention it might be competing against a potential other award from this Scenario, which, speaking of... Next up, We finally get the payoff for that Aerodrome Raid during that ill-fated adventure in Britain. You can trade the Me 262 Token for an Me 262A Gift Unit. And as a bonus, it comes with a new Fighter Hero: Erich Hartmann, with Legendary, Lightning Attack, Reduced Slots, and Precision Weapon, and +4 Initiative. Ignores Fighter Support when attacking escorted bombers, increased Accuracy and Initiative for gaining the upper hand against any aircraft, and a pair of useful logistical skills in Legendary and Reduced Slots? Now that's a payoff! Or, you know, you can refuse the offer and trash the token if you want to... :roll: Me 262A is the first true jet fighter in the world, and what a beast it is. It outclasses everything else you have, including the new 163Bs (without the movement penalty to boot), with the only real downside being it's Slot Cost of 7, which fortunately is counteracted in part by Hartmann's Reduced Slots. Next on the Agenda, a visitor from Japan! You can spend 2 Commendations for a Japanese Tank Hero: Rikugun Tai-i Akiyama. This foreign ally turns a Tank's usual weakness into a strength with City Fighter and Vigilant, and also comes with the logistical benefit of Reduced Slots. Note: Based on the narrative of this event, there is a good chance in the future there will be an event like with Galland in Operation Mercury, where we send Akiyama back home for some unknown for now benefit. No guarantee, but just something I noticed. Total: Earned 7/Spent 4 Yakovlevo Objectives Capturing the Hilltop earns 3 Commendations. Total: Earned 10/Spent 4 Oboyan Events One final resupply of 36 Bf 109Zs for 3 Commendations. Objectives Capturing the Airfields earns 4 Commendations. Total: Earned 14/Spent 7 Prokhorovka Objectives Capturing all secondary Objectives doesn't give any Commendations, but does set up a flag for something later. Operation Roland Events If you have saved the 6th Army in Stalingrad, they show up as Auxiliaries to assist you this Scenario. Objectives Once again capturing all secondary Objectives doesn't give any Commendations and instead is set up for after this Scenario. Cache 8,21 grants 19 KV-85 and 24 SU-152 The KV-85 offers a potential sidegrade at best to the Tiger I, wich as you arguably strongest tank is not a bad at all. Su-152 is a nifty addition, at first glance a StuG IIIG with slightly less armor, the addition of an artillery mode gives this Tank Destroyer a bit of extra utility. 9,34 grants 34 Ilyushin Il-4 and Yermolayev Yer-2 The Yermolayev Yer-2, unlike so many other captured Soviet aircraft from 1942, is actually quite decent compared to your own Strategic Bombers available. Total: Earned 14/Spent 7 Note: You know those flags I mentioned being triggered by the Bonus Objectives in Prokhorovka and Operation Roland? Those are what trigger the option to go down the alternate history route. To do so, you have to trigger 2 of 3 Flags, the ones in Prokhorovka and Operation Roland are 2, and the third is having the SMG Infantry token from the end of 1942. and 2 of these 3 objectives will unlock the ahistorical route, and as far as I know completeing all 3 doesn't do anything special. Do to the nature of this route split, for once I will actually separate the Campaign paths into 2 sections. Axis Operations: 1943 East, Historical Half Orel Events 3 Commendations for a new Infantry Hero: Josef Allerberger. Allerberger has Famous, Low Profile, Initiative +1, and Speed +2. Survivability and mobility are both useful for Infantry units. Objectives Eliminating the Partisans and Vanguards earns 2 Commendations each. Total: Earned 18/Spent 10 Panther Line Events With the Italian surrender comes opportunity in the form of an offer to spend 6 Commendations for 51 L6/40Lf, 65 M15/42, 82 AB43, 45 Autocannone 90/53, and 37 20/70 Quadropolo. The M15/42 is closest in comparison to the aging Panzer IIIJ/1s, although it's 3 Close Defense can give it some niche application when compared to other 4 Slot tanks. While the AB43 is weaker than your 233 and 234/1 8Rads, it does only cost 2 Slots which can be useful. Autocannone 90/53 is the most interesting of the new additions, being in many ways a budget Nashorn/Elefant like how the SU-57 was with the StuG IIIG. Total: Earned 18/Spent 16 Taman Peninsula Objectives Escorting the Romanians out earns 4 Commendations. Total: Earned 22/Spent 16 Kremenchug Events By completing the Bonus Objective and having 5 Commendations to spend, you can spend those 5 Commendations for 21 Jagdpanther Prototypes. The Jagdpanther trades a small amount of armor for 2 points of movement compared to the Elefant, an easy trade in my opinion. Objectives Controlling the Bridgeheads earns 1 Commendation and enables this Scenarios Commendation Event. Total: Earned 23/ Spent 21 Axis Operations: 1943 East, Alternate History Half Stalino Events As with the historical path, you can spend 3 Commendations for Josef Allerburger. Objectives Destroying the Command Tanks earns 4 Commendations. Total: Earned 18/Spent 10 Rostov 1943 Events As with Allerburger, another similar Event occurs regarding the Italians, although the numbers are a bit different: 6 Commendations for 41 L6/40Lf, 35 M15/42, 29 P26/40, 52 AB43, 35 Autocannone 90/53, and 27 20/70 Quadropolo. The P26/40 trades lower firepower for higher defense compared to the Panzer IVG, which can be a decent teadeoff if you didn't have IVHs available. Cache 23,21 contains 19 KV-85 and 27 IS-1. The IS-1 has the highest Defense of any tank you have available normally and if it wasn't for the reduced Movement I'd almost consider it superior to the Tiger. Total: Earned 18/Spent 16 Elista Objectives Capturing all secondary objective earns 4 Commendations. Cache 47,3 contains a cache of 32 B-25B Mitchell and 27 B-17F. The B-25B Mitchell is generally outclassed by the Me 410A. The B-17F trades damage for range and defense compared to your own strategic bombers. Total: Earned 22/Spent 16 Astrakhan Events Another familiar event, unlocked by completing the Bonus Objective and having 5 Commendations to spend, you can spend those 5 Commendations for 29 Jagdpanther Prototypes. Objectives Controlling the Volga earns 1 Commendation and enables this Scenarios Commendation Event. Total: Earned 23/ Spent 21 Axis Operations: 1944 East, Historical Shanderovka Events The usual suspects arrive at the start of a non-imported Campaign start, with a few changes to the lineup: Reinhardt Herzog traded out his old skillset of Phased Movement and First Strike for +2 Speed, Alpine, and Prudent. On one hand, Phased Movement and First Strike for Prudent and Alpine is generally a poor trade in my book, but a +2 Speed that isn't locked to Infantry might just make up for it. Helmet Kleib takes a more direct approach to combat, trading his Double Support for Envelopment. Unless you are looking to take Advantage of surrenders, I'm not sold on this one. We also have a new face: Franz Baumann, with Vigilant and Rapid Fire 1.5x. A very welcome combo for any tank that has to fight in Close Terrain. And Kloss, Rudel, and a nerfed Hartmann (-1 Initiative bonus and loses Legendary and Reduced Slots) as representatives of prior Campaign reward Heroes. Sadly, our allies in the Azul Infantrie have finally left us (Unless you imported a core anyway). Additionally, this Scenario includes an opportunity to reset your Prestige to 6600, if you want to reduce your overflowing Prestige to add a sense of challenge or to resupply if you are having issues, but otherwise for no reward. Lysyanka Objectives Making Contact with the III Panzer Corps earns 2 Commendations. Avenging the XXXXIII Corps rewards you with 25 Tiger II and 25 Jagdtiger Prototypes. The Tiger II is a monster of a tank, and has a monsterous Slot Cost of 9 to go with it. Much like the Tiger II does with tanks, the Jagdtiger also outclasses your current lineup of tank destroyers, and the Slot increase isn't quite as drastic this time. Total: Earned: 2/Spent: 0 Operation Margarethe Events At Scenario start you can spend 2 Commendations for Gerhard Barkhorn. Barkhorn is a Fighter Pilot with Reduced Slots, Consolidator, Learns from Mistakes, and Famous. While Learns from Mistakes isn't the greatest, Reduced Slots+Consolidator is a great combo if you aren't playing with No Overstrength on. Objectives Capturing both sets of bridges earns 2 Commendations each. Total: Earned: 6/Spent: 2 Targu Frumos Objectives Protecting the Destroyers rewards 2 Commendations. Raiding Odessa serves as a cache of sorts, rewarding 40 Me 262A, 59 Spitfire Mk.IX, and 64 A-36. Unfortunately the Spitfire Mk.IX can’t quite match your Fw 190As, let alone the 262s you get alongside it. The A-36 on the other hand has some useful tradeoffs in range and tankbusting compared to your 190Fs. Total: Earned: 8/Spent: 2 Cernauti Events At Scenario start you can spend 2 Commendations for Matthaus Hetzenauer. Another Infantryman Hero, Hetzenauer grants +2 Initiative, +1 Speed, Famous, Precision Weapon, and Unyielding. Pretty solid all around. Kinda wonder if anyone's stacked 3 or 4 of these Infantry Heroes with movement buffs on a single Infantry Unit yet... Total: Earned: 8/Spent: 4 Note: This is oddly enough the last time Commendations are used on the historical path, future Bonus Objectives grant other rewards and there are no more Events to spend Commendations, so I'll stop keeping track. Lublin Objectives Saving the 4th Panzer adds Ulrich Hoffmann to your roster. Hoffmann is a Tank/Anti-Tank specialist with No Supply and Zero Slots. And un-encircleable, 0 Slots cost Tiger II? sign me up! :lol: Jokes aside, No Supply is an incredibly valuable Trait that I'm 99% sure will never show up on regular Heroes, so this is your only chance to grab it. Battle of Carei Objectives Taking Szatmarnemeti serves as another cache objective, as you find 59 76mm Land Mattresses, 33 203mm M1931, and 29 KV-85. The Land Mattresses are the only new captured equipment to talk about, and sadly they are identical to your older 15cm Nebelwerfer 41, so not much use outside Collector runs. Axis Operations: 1944 East, Alternate History Case Orange Events The Hero lineup remains the same as in the Historical route. Kind of a shame, would have been interesting to see our cast diverge in skills depending on how events played out. The starting Cores are different however, and you still get an Azul Infanterie in this timeline. Objectives Destroying the Soviet HQ Units reward 2 Commendations. Taking Astara adds Emma Habermann to your team. Habermann is a lot like Kloss, granting +2 Range and Shock Tactics to an Artillery of your choice. Range increase is always great for artillery, and Shock Tactics to pin targets in place in the cherry on top. Total: Earned: 2/Spent: 0 Operation Corridor Events You can recruit Gerhard Barkhorn for 2 Commendations. Objectives Protecting the caches rewards 1 Commendation per cache, of a max of 4. Total: Earned: 6/Spent: 2 Operation Tusk Objectives By destroying depots you gain 1 Commendation for the British depots and 2 for the American ones. Saving the PoWs rewards 1 Commendation, plus their aid in combat if needed. Total: Earned: 10/Spent: 2 Operation Stormbird Events Just from arriving, you receive an Me 262A Gift Unit and 170 He 162A Prototypes. The He 162A is similar in stats to the 262A, which means it outclasses pretty much everything else you have. Objectives Defeating the Paratroopers rewards 1 Commendation. Army Group B capturing Victory Points rewards 1 Commendation as well. Sinking the Allied Battleships grants another Gift Unit, this time a Go 229A. The Go 229A is better than both the 162A and 262A, so as long as you don’t mind wunderwaffe it’s an excellent addition to the Core. Total: Earned: 12/Spent: 2 Riga 1944 Events You get a 2 part Event on Turns 1 and 2, giving the option to spend 8 total Commendations; 4 on Turn 1 for 81 M3 Satan, 51 Sherman Firefly, 72 Cromwell Mk.VII, 66 M4A3E2, 70 Typhoon Mk.IB, and 70 B-17G and then 4 more on Turn 2 for 49 M10 Wolverine, 64 M14 MGMC, 55 Churchill AVRE, 75 Calliope, 70 P-47D, and 70 Spitfire Mk.XIV. The M3 Satan isn’t great, as the SdKfz 251/16 Flamm is on par if you do want a 3 Slot flame tank. The Sherman Firefly and Cromwell Mk.VII serve as capable alternatives to the Panther A and Panzer IVJ, respectively. The M4A3E2’s main niche is as a potential 6 Slot tank if you need one for some reason. Typhoon Mk.IB is pretty much junk compared to your FW 190 Fighter-Bombers. It’s closer in stats to the older Hs 129B2, but costs an extra Slot which is not great. Much like the captured F model from 1943, the B-17G serves as a decent alternative to your own strategic bombers. The M10 Wolverine is the best Tank Destroyer available to you now…in the 3 Slot category at least. The M14 MGMC is not great, only real advantage is movement. The Churchill AVRE actually becomes your best Assault Gun, at the cost of +1 Slot Cost and -1 Movement The Calliope trades less firepower for higher defense values compared to the Panzerwerfer 42. The Spitfire Mk.XIV is on par with your best Fw 190, and the P-47D beats them both. Objectives Building defenses rewards 1 Commendation. Total: Earned: 13/Spent: 10 Lvov 1944 Events For 2 Commendations you can recruit Matthaus Hetzenauer. Turn 7 is this version of the campaign's Prestige Reset, allowing you to reset your Prestige to 7900, once more for no reward. Objectives Building defenses rewards 2 Commendations this time. Defeating the Polish force grants you 44 Panzer VII Lowe. The Panzer VII Lowe is just a better Tiger II. If you can afford the 9 Slots cost, it’s a great addition to your army. Total: Earned: 15/Spent: 10 Operation Panzerschreck Objectives Clearing the rebels rewards 1 Commendation. Delivering supplies rewards 2 Commendations and gives the Hungarians 10000 Prestige to help fend off the Soviets. Total: Earned: 18/Spent: 10 Lvov 1944 Events You can spend 4 Commendations to acquire some equipment from your allies: 60 41M Turan II, 70 TACAM R-2, 40 Maresal, and 60 40M Nimrod The main thing about the Turan II is it’s mere 2 Slot cost while still comparing favorably to your handful of remaining 3 Slots vehicles, making it an interesting budget option. While the TACAM R-2 is generally inferior to your German options, the Maresal is superior to them. Finally, the 40M Nimrod compares very favorably with the Gepard in the 2 Slot Self-Propelled AA category. Total: Earned: 18/Spent: 14 Battle of Ploesti Events Capturing Jijila (You will need Paratroopers to reach it) rewards you with 85 KV-85 and 40 T-44. Despite what you might expect, the T-44 isn’t that great in my opinion. It only trades 1 point of Hard Attack for 1 point of Ground Defense compared to the Panther G, but costs an extra Slot. Axis Operations: 1945, East Historical Tata Events Nothing majorly new in the starting hero lineup, but starting unit lineup has a He 111Z which is neat. Cache The village at 9,45 contains 81 Toldi IIa, 76 Tulan II, and 49 Zrinyi III. And the airfield at 17,6 contains 78 Nimrod 40 and 69 Me 210C Operation Bodenplatte Objectives You can earn a total of 4 Commendations, 2 each from killing 8 and all 18 Allied Airfield Hangers. Total: Earned: 4/Spent: 0 Operation Konrad III Events You can spend 2 Commendations for a T-34/43, T-34-85, KV-1/42, KV-2, SU-152, Churchill Mk.VI, M4A3, Sherman Crocodile, M10 Wolverine, Sherman Calliope unit added to your Reserves. Total: Earned: 4/Spent: 2 Cache Taking 3,20 rewards you with 33 Lowe Prototypes Operation Southwind Events 1 Commendation can be spent to recruit Helga Grese. Helga is an Anti-Tank, Anti-Aircraft specialist with Skilled Support, Aiming Assistance, and Crippling Blow. Honestly, feels more like an Artillery Hero with that lineup of Skills, and not quite what I'd go for an AT/AA Hero, but still quite useful. Objectives Capturing Ipolyszalka rewards 2 Commendations Total: Earned: 6/Spent: 3 Operation Spring Awakening Events You can spend 2 Commendations for another batch of Reserve Units: an M3 Lee, M18 Hellcat, M15/42, Char B1, SU-100Y, T-26, T-28, Achilles, Crusader Mk.III, and a Matilda II. Total: Earned: 6/Spent: 5 (This is the last Commendation related event in the historical route) Cache Another 33 Lowe can be acquired by taking 37,24. Vienna Offensive Cache Taking 30,29 rewards one last batch of 50 Lowe as the last Cache of the historical campaign. Axis Operations: 1945, East Alternate History Operation Puma Events Unlike the historical route, the starting Hero lineup gets Upgrades across the board. Roll Call: -Siegfried von Bonde and Reinhardt Herzog add Reduced Slots, which is always useful for squeezing more units into battle. -Ludwig Mittermeier adds Survivor, which combined with Evasive makes for a very hard to kill unit. -Volkhardt Kautz adds Lightning Attack making him a powerhouse both offensively and defensively. -Markus von Reuenthal adds Overwhelming Attack and now only needs Shock Tactics or Envelopment to be a capturing machine. -Speaking of capturing, Wolfgang Schneider adds Shock Tactics, which working in tandem with Markus does the job. -Friedrich von Kraken replaced Reduced Slots with Zero Slots, a huge boost for his Overstrength capabilities. -Helmut Kielb adds Distraction. Not the greatest Trait, but with Prudent and a fast moving unit can cause chaos behind enemy lines. -Diederich Franzen adds Evasive which is just a solid trait in general -Ingvar Dugross adds Readiness for another defensive focused Hero alongside with existing Survivor with decent mobility thanks to Double Move. -Franz Baumann adds Low Profile to an already powerful Hero. -Elsa Kloss now has Double Attack to go with the extra Ammo and Range. Do with that knowledge what you will. -Hans-Ulrich Rudel adds Survivor, which is easily the least useful upgrade here as Survivor can be earned via medals. Although admittedly aircraft are probably the hardest to farm Survivor with so I can see some niche case usage. -Erich Hartmann adds Crippling Blow to really bring the pain to enemy aircraft. And hey, the Azul Infanterie are still here, very nice. Objectives Capturing the District Centers rewards 55 Lowe, 19 IS-3 and 19 T-44-100. Cache Caches at 26,15 and 23,31 grant 32 PT-34s each. Several airplanes Caches are available: 67 La-7 and 42 Pe-3 at 3,3; 51 Yak-9D and 51 Pe-3 at 10,30; and 45 Yak-9U and 22 Pe-3 at 23,6. Operation Wagtail Objectives Escorting the cargo ships rewards you with 55 Lowe and a Tank/Anti-Tank Hero named Otto Carius. Otto has Crippling Blow and a potent +2 to Speed. A perfect fit to spearhead your armored forces. Operation Barca Cache Another batch of aircraft Caches: 52 La-7 and 19 Pe-3 at 25,58; 41 Yak-9D and 27 Pe-3 at 39,2; 39 Yak-9U and 42 Pe-3 at 20,40. Operation Feuerkartoffel Objectives Another Hero, Beate Uhse, can be recruited by capturing Minsk Beate is a Fighter/Tactical Bomber Hero with Aiming Assistance, Zero Slots, and +1 Initiative. Zero Slots is always great, especially as Aircraft Slot costs have skyrocketed in these late years, and the rest is just a bonus. Cache 2 Caches, the first being 79 Il-2M3 and 95 Il-10 at 36,17 and the second being 63 OT-34-85, 44 T-44, 71 IS-3 and 85 SU-100 at 35,19. Zahidan Objectives You are rewarded with 999 Lowe for capturing Karachi. I guess they entered production in this timeline... Cache The final Caches for this campaign are 55 BL 7.2 inch and 61 Land Mattress at 10,18 and 68 M7 Priest and 54 Firefly Tulip at 25,3. Axis Operations: 1946 Amerika, Part 1 The Nagasaki Conference Events Nothing to do here but take stock of default starting force Heroes and special units if you didn't import a Core. On the Hero Front, the only change from Alt-History 1945 is the new addition of...Helga Grese? For some reason she is here from Historical 1945, as opposed to the 2 Heroes from the Alt-History path. Odd, but a Hero is a Hero. As for Unique Units, the ever reliable Azul Infantrie are here, plus a squadron of Bf 109Zs. In addition, you start with a number of E series tanks and tank destroyers and some Ju 187s that don't actually become properly available until the next Scenario. Operation Tenacity Objective Raiding Victoria is quite a profitable objective, assuming you can make it through the atomic fire to reach it in time. A Hero in Capitana Vigano, a Gift Unit of an Atomic V2, and some captured and not-so-captured equipment in 50 JP Banzai Infantry 46, 50 JP Naval Infantry 46, and 25 Vought XF5U. The Capitana is a Tank/Anti-Tank Hero with a coveted +1 Speed alongside the equally strong Double Attack, as well as Thorough Preparation and Legendary. The Japanese Infantry you'll be able to recruit this Campaign are generally cheaper in Slot cost compared to your infantry, in exchange for some tradeoffs. For these two, the Banzai Infantry have higher Attack and Close Defense values, but a lower Ground defense, while the Naval Infantry are dirt cheap in Slot Cost while only being slightly weaker statswise for a true budget option. And the Vought Flying Pancakes serve as the second best 7 Slot Fighter available to you, only marginally worse than the Go 229A. Operation O-Go Objective Capturing Anchorage is also incredibly valuable is you can pull it off. 100 Panzer VII Lowe (Have you even made a dent in that 999 you earned if you imported your Core?), 50 JP Naval Paratroopers 46, 50 JP Teishin Shudan 46, 40 20/70 quadruplo (An odd choice, but I don't know if Italy has anything more useful to send), and 29 of the fancy new Ranged Attack Bombers: the G10N3 Fugaku F. The Naval Paratroopers continue the trend of cheaper Slot Cost but tradeoffs (In this case weaker offense but stronger defense), but the Teishin Shudan break the trend by being a flat upgrade over their German counterparts, only losing Bunker Killer. As for the Fugaku, the only thing that stops this from being the scariest bomber flying is that is has limited Soft and Hard Attack values to make use of it's ranged attacks against non-naval targets. Still a great way to harass or finish off units from unique angles. Oh, and I guess Atomic Bombers exist, those are probably scarier still.(On a side note, anyone else realize the game now has a way to implement Torpedo Bombers? Just drop the range to 1 or 2.) Battle of San Francisco Objective Capturing the Presidio Forts gives you 2 things: 45 Sherman Crabs (Kinda wish we could get some of those shiny alt-history American tanks, but considering the amount of minefields in future Scenarios I get it.) and an Atomic V2. So, unlike Atomic aircraft, Atomic V2 only get 1 shot, the you lose them. but the kill the primary target no matter what, while aircraft only take 90% of their HP, so if you want something really, really dead. Oh, and don't worry about saving it too much. This is the first of many. Operation Bellerophon/Operation Teufel Events Both of these Scenarios grant the sole non-Elite Objective reward for this Campaign at the start: A Meerschweinchen. The Meerschweinchen is a Landkreuzer, the first you'll see this campaign. I don't really know what else to say but have fun. Objective In Bellerophon, destroying 2 Radar Installations rewards 30 Type 5 Chi-Ri, 45 Sherman Crab, and 40 J9N1 Kikka. The Type 5 is basically a Panther G by another name. The Kikka is slightly worse than your 262As, which makes sense considering it was basically a Japanese copy of the 262. Teufel instead gives you 50 Verdeja 3 and 45 Sherman Crab for capturing Mt. Diablo The legend of the SCW returns! With stats comparable to the E-50 while only costing _2_ Slots to deploy! ...Just keep it out of Close Terrain and protected by AA/Fighter cover. Portland Trail/Fall Grun Objectives Portland Trial offers 50 JP Naval Paratroopers 46, 50 Teishin Shudan 46, 30 Type 5 Chi-Ri, and 40 J7W Shinden. Falls in the same general situation as the Flying Pancake, but closer to the He 162A than the 229 and Pancake. Investigating the missing Japanese forces during Fall Grun grants 50 Panzer VII Lowe and 100 Type 5 Chi-Ri. Operation Flugelstutzen/Battle of Los Angeles Objectives Silencing the Forts in Flugelstutzen and destroying the Army Bases in Los Angeles grant basically the same thing: An Atomic Bomber Gift Unit. The G10N3 Fugaku A for Flugelstutzen and the Horten H.XVIII A for Los Angeles. They basically serve the same purpose, giving you a reusable variation of the Atomic V2 (Just keep in mind the primary target only loses 90% Strength, not 100%.) Operation Dora Objectives Capturing Carson City grants a Landkreuzer P.1000 Ratte Gift Unit, alongside a stockpile of 50 JP Banzai Infantry 46, 50 JP Naval Infantry 46, and 40 20/70 quadruplo. The Ratte may not be quite as strong as the Yamato-armed Meerschweinchen, but it's still a Landkreuzer. Operation Pfeffer Objectives Defeating the 5th Armored Division recruits our next Hero, Kurt Knispel, as well as 100 Panzer VII Lowe, 50 Verdeja 3, and 25 Vought XF5U. Knispel is another Tank/Anti-Tank Hero, with a powerful+2 Speed this time, along with Tank Killer, Artillery Support, and Legendary. Operation High Fortress Objectives Destroying Mount Rushmore Gifts another Atomic V2, alongside a stock of 50 JP Teishin Shudan 46, 50 JP Naval Paratroopers 46, and 35 Bf 109Z. Battle of Hoover Dam Objectives You can acquire 50 JP Banzai Infantry 46, 50 JP Naval Infantry 46, 50 Verdeja 3, 45 Sherman Crab, and 35 Vought XF5U by securing Hoover Dam. Ground Zero Objectives Fittingly, you gain another Gift Atomic V2 for defeating the Mounted Patrol, plus 35 Bf 109Z and 55 P-82 Twin Mustang. The Twin Mustang is the best 5 Slot Fighter available. Operation Kowboy Objectives Capturing Carlsbad Caverns rewards 50 JP Teishin Shudan 46, 50 JP Naval Paratroopers 46, 50 Verdeja 3, and 35 Vought XF5U. Alamo 1946 Objectives Taking the Alamo Gifts yet another Atomic V2, plus 70 Firefly Tulips and 35 Vought XF5U. The Tulips are tankier than your StuH 42s if looking for a new 3 Slot Tank Destroyer. Axis Operations: 1946 Amerika, Part 2 Battle of Witchita Objectives Back from the optional path, Raiding Newton gives 100 Panzer VII Lowe, 50 Verdeja 3, and 45 Vought XF5U Operation Liberty Objectives Getting Manstein to Topeka earns 40 Type 5 Chi-Ri and 55 Shinryu II, as well as ends the Scenario. The Shinryu II has the highest Air Attack of it's competition, but loses out on several other stats in exchange. Operation Lumpenjagd Objectives Taking out the Vanguard grants a Gift Atomic V2, 50 JP Teishin Shudan 46, 50 JP Naval Paratroopers 46, 55 P-82 Twin Mustang, 40 8 inch M1...and 90 203 M1931s? (Okay, I can kinda see the 20/70s being supplied by our Italian allies, but what the heck are these old Soviet guns doing here? Especially when they have the except same stats as the 8 inch!) The 8 inch M1, like the 203mm before it, falls into a middle ground between the German 15 and 21cm guns. Battle of Springfield Objectives Destroying your first encountered enemy Landkreuzer rewards your own Landkreuzer P.1000 Ratte as a Gift Unit, plus 100 Panzer VII Lowe. Operation Holzfaller Objectives Bridge Units get the chance to shine as using a few of them to make your own river crossing Gifts an Atomic V2. Battle of the Ebro 2: Electric Booga Operation Ken-Go Objectives Destroying another enemy Landkreuzer Gifts another Atomic V2. Operation Zweihandler Objectives Raiding Fort Knox gives another 100 Panzer VII Lowe (Seriously, could they not have just made those regular purchases at this point?), 50 Verdeja 3, and 45 Vought XF5U. Operation Prometheus Objectives Securing the Research Facility steals fire from the gods in the form of 5 Atomic V2s. Battle of the Pentagon Objectives One more enemy Landkreuzer, one more Gifted Landkreuzer P.1000 Ratte and 100 Panzer VII Lowe.
A list of traits found on Heroes in PC2 I don't think this is all of them just all the ones i have encountered so far and their in-game descriptions Traits List Traits List: AA Support - Provides support fire against air to ground attacks. Will shoot at any fighters and bombers attacking friendly ground units within its firing range Aggressive Counterattack - +3 attack when defending Aiming Assistance - +10% accuracy to all adjacent friendly units All-Terrain Entrenchment - Entrenches in any terrain with Maximum speed Alpine Troops - Gets +5 attack and +5 defense in hills and mountains and also ignores enemy High ground bonuses and entrenchment in such terrain (Unit Trait) Ambusher - Always Triggers an Ambush when attacked Artillery Support - Provides support fire to adjacent friendly units attacked by enemy unarmoured units (with "Soft" target type). Anti-tank support: the unit provides support fire against hard targets (basically the same ability as tank destroyers) Avenger - Gets attack bonus for each point of lost strength Bridging Unit - Acts as a bridge when positioned on a river (Unit Trait) Bunker Killer - +5 attack against structures (Unit Trait) Butcher - +5 attack against infantry units Camouflage - Can only be detected by recons or adjacent ground units Cheap Replacements - Replacements in battle cost as on deployment phase City Fighter - Combat Bonus in city terrain Close Combat - Has access to enemy unit's close defense rating when fighting in close terrain (Unit Trait only) Combat Luck - Combat Results can never be worse than predicted Counter Battery Fire - Will fire at any attacking artillery units within its firing range Crippling Blow - +5 Attack against full strength units Distraction - Enemy units next to this unit do not provide support fire Double Attack - Unit gets 2 attack actions per turn Double Mass Attack - When participating in Mass Attack, contributes double effect. Double Move - Unit gets 2 move actions per turn, without increasing the number of movement points Double Support - Provides support fire twice for each enemy attack Entrenchment Killer X - Destroys X points of entrenchment with every attack Entrenchment Support - All adjacent friendly units entrench at 2x speed (Unit Trait Only) Envelopment - Prevents enemy units from retreating, so they surrender instead Evasive - -10% accuracy to enemies shooting at this unit Expert Recon - Provides 3x accuracy bonus on adjacent enemy units Expert Support - +20% accuracy when providing support fire Exterminator - +5 attack against units below 50% strength Famous - Generates 20 prestige per turn Fast Deployment - can unmount from organic transport and fire after movement Fast Entrenchment - Gets 2x entrenchement speed Fast Learner - 2x Faster experience growth Fast Rebase - Aircraft does not spend Move Action on rebase Fast Retreat - +2 movement points when unit's strength is 33% from maximum Fearsome Reputation - All Adjacent enemy units get +3 suppression at the beginning of their turn Ferocious Defense - Entrenchment of this unit cannot be ignored Field Repairs - Restores one point of strength every turn the unit did not attack. Applies to Vehicles Fierce Fighter - +1 attack for each adjacent enemy unit Fighter Suppport - Provides support fire against enemy fighters attacking friendly bombers. Will also intercept enemy bombers attacking friendly ground units in adjacent hexes (Unit Trait only) First Aid - Restores one point of strength every turn the unit did not attack. Applies to Infantry. First Strike - Unit always attacks first Flag Killer - +5 Attack when attacking enemy flags Glider - Can Land and disembark the unit it carries on any land hex, not just airfields. Exceptions are hexes which are impassable for embarked unit. Hit and Run - When attacking, enemy units with the lower initiative do not shoot back Ignores Entrenchment - Ignores enemy entrenchment level Ignores ZOC - Ignores zone of control projected by enemy units when moving Learns from Mistakes - 3x experience for suffered casualties Lethal Attack - Half of suppression caused by this unit is converted to kills Liberator - 2x prestige for all flags captured by this unit Lightning Attack - Immune to all types of support fire Low Profile - Enemy units get -20% accuracy when shooting at this unit No Entrenchment - Unit does not entrench No Surrender - Unit never surrenders No Retaliation: enemy units will not return fire if attacked by that unit Overrun - Can destroy (Overrun) weakened enemy units without spending move or attack actions. The way it works is, after and overrun attack, move and attack actions of the unit will be replenished Overwhelming Attack - Any Damage to enemy units is enough to force them to retreating Phased Movement - Can move in steps within its movement point limit (like recon) Provocator - Adjacent enemies attacking other friendly units will attack this unit instead Prudent - Gets defense bonus for each point of lost strength Rapid Fire X - Makes X more shots than normal and consequently deals X damage to the target. This trait does not affect ammo spending, the unit still consumes 1 ammo per attack Readiness - Strikes first when defending Reduced Slots - Unit slot cost is reduced by 50%. River Fighters: Ignores Battle Penalties through River Fields Scavenger - Captures 2x equipment from surrendering enemies. Shock Tactics - When attacking, pins enemy unit in place by destroying all its movement points Sixth Sense - Immune to Ambushes Superior Manuever - Gets +1 initiative for each point of movement speed advantage over the enemy Tank Killer - +5 attack against tanks Tenacious Defender - +1 defense for each adjacent enemy unit Thorough Preparation - Initiative bonus +5… +1 on the first five turns of every mission Unyielding - Unit cannot be suppressed by enemy fire Vigiliant - Prevents enemies from using unit's Close Defense rating Vulnerable Target - Enemy units always shoot at this unit with 100% accuracy Zero Slots - Unit slot cost is reduced to zero Bundled strength: +5 strength points for the unit (tanks can have a maximum of 20, infantry 25 points/overstrength) Ignore Mass Attack: Immunity to mass attack Last Stand: Ignores all penalties from encirclements Alpine*: Gets +5 Attack and +5 Defence in hills and mountains, and also ignores enemy High Ground bonuses and Entrenchment in such terrain *Alpine is usually found on mountain troops but a hero was added in Frontlines Cyracenia DLC that has this trait Axis Operations Exclusive "Aces" In no particular order: Adolf Galland: Fighter Class Tactical Bomber Class +2 to Initiative +2 to Air Attack Legendary (Generates 50 Prestige per turn) Aiming Assistance (+10% accuracy to all adjacent units) *Includes ground units Leadership (+1 Initiative to all adjacent friendly units) Albert Kerscher: Tank Class Anti-Tank Class +3 to Initiative Famous (Generates 20 Prestige per turn) Tank Killer (+5 Attack against Tanks) Aggressive Counterattack (+3 Attack when defending) Oleh Dir: Infantry Class +2 to Initiative +2 to Speed Famous (Generates 20 Prestige per turn) Precision Weapon (+20% base Accuracy) Hans-Ulrich Rudel: Legendary Double Attack/(Something else I don't remember) Lightning Attack/(Something else I don't remember) Tank Killer/Ignores entrenchment Helmut Wirnsberger: Infantry Class +3 Initiative +1 Speed Low Profile Ignores ZOC Karla Wuhrer: Anti-Tank Class Anti-Aircraft Class Rapid Fire 2x Fast Learner Gero Von Manstein: Infantry Class Zero Slots Vigilant Karl Ullmann: Anti-Tank Class Anti-Aircraft Class Rapid Fire 2x Learns from Mistakes Helga Grese (1945 Historical): Anti-Tank Class Anti-Aircraft Class Skilled Support Aiming Assistance Crippling Blow Otto Carius (1945 Ahistorical): Tank Class Anti-Tank Class +2 Speed Crippling Blow Beate Uhse (1945 Ahistorical): Fighter Class Tactical Bomber Class +1 to Initiative Aiming Assistance Zero Slots Capitana Vigano (1946): Tank Class Anti-Tank Class +1 Speed Double Attack Thorough Preparation Legendary Frontlines DLCs Frontlines - Bulge: William Hunt: Aggressive Counterattack Fast Entrenchment First Aid Frank Murphy: Tank Killer No Retaliation Johnathan Taylor: Fast Learner Hit and Run Robert Knight: Rapid Fire 1.5x Cheap Replacements Frontlines - Cyreancia British Side: John "Jock" Campbell: Expert Support Double Support Famous William Gott: Avenger Provocator First Stike Denzil MacArthur: Flag Killer Ignores ZOC Arthur Allen: Lightning Attack Double Attack Butcher Hugh Russell: Double Move Vigilant Entrenchment Killer 2x J.A.L. Caunter: Overwhelming Attack Double Attack Provocator Horace Robertson: Flag Killer Unyielding Vigilant Iven MacKay: Sixth Sense Alpine Leadership John Combe Shock Tactics Superior Maneuver George Wootten Fast Deployment Ignore Mass Attack Bunker Killer Italian Side: Giovanni Cerio: Flag Killer Cheap Replacements Pietro Aresca: Unyielding Provocator Francesco Argentino: Lightning Attack Readiness War Stories DLCs War Stories - Fall of Poland: Aleksander Kowalski: Double Attack Vulnerable Attack Igor Dramowicz: Scavenger Overwhelming Attack Symon Borowik: Zero Slots No Entrenchment Civilian Paszkowski: Survivor Resilient Low Profile Evasive Nurse Lewinski: Survivor Sixth Sense Low Profile Evasive Commander Balinski: Survivor Double Attack Tank Killer Evasive Lieutenant Urbanowicz: Survivor Thorough Preparation Fierce Fighter Evasive Credits Thanks to kdrushal and Redeyes for some of the traits

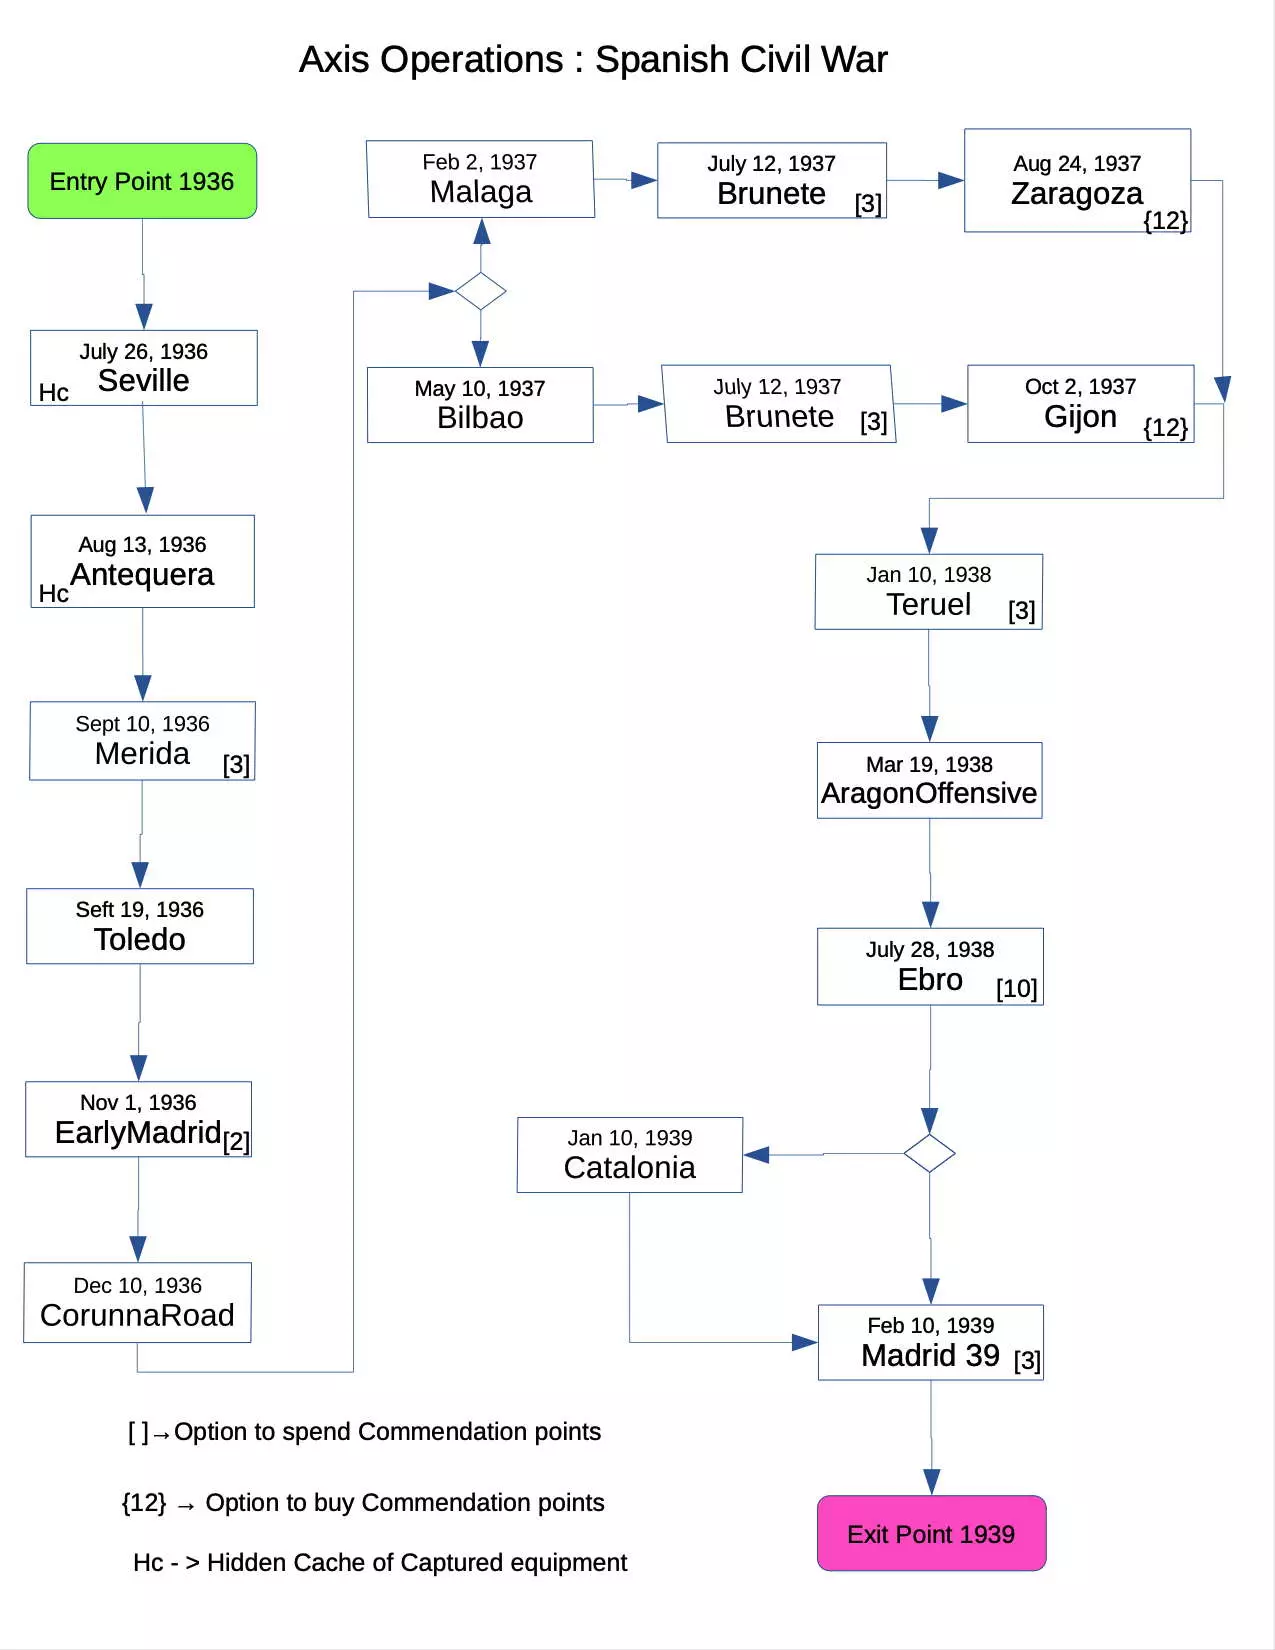
Tiered General Traits Multiplayer I figured a list about the general traits as it pertains to multiplayer only would be relevant since the v4 patch. S-Rank: These are must takes, Very good traits A-Rank: Good traits B-Rank: Ok, situational, or specialized C-Rank: Bad traits, never take Positive Traits: S-Rank: 1) Auxiliary force: Ever notice how you have extra prestige but no core slots in which to deploy units? Not anymore after taking this trait, however it needs to be combined with liberator for maximum effect. 2) Liberator: You are gonna be capturing a lot of cities, airfields, docks, etc so why not be making 50% prestige? This trait is required to use Auxiliary Force for max effect. 3) Perimeter Control: Zone of Control matters... A lot. With this trait you can eat away at the enemies ZOC. This will allow you to easily strike at vulnerable units like artillery and AA. It can also help you encircle or just get that mass attack bonus. Lastly and maybe most importantly it prevents the enemy from encircling you! This is because your units cancel the enemy ZOC. So as long as you have a string of units tracing back to a supply point your units can never be encircled. A-Rank: 1) Infantry General: You are gonna be using a lot of infantry, or at least you should if you are doing it right. This will give you more core slots to... you know... deploy more stuff. 2)Deadly grasp: Encirclement already is very annoying even after only 1 turn, so why not take it from an annoyance to "ouch that hurts!" 3)Anti-air Vetern: OMG OUCH MY PLANES!!!! Wow why didn't I make this S-rank. When you stare down air combat predictions of -6 to your planes you really reconsider attacking near AA. 4)Deep recon: Knowledge is power, right? Well this gives you a lot of good info at the most important points of the map, the victory hexes. You also get to know when your opponent is not protecting his victory hexes allowing for a paratrooper to easily steal it. Oh also 5% extra for your recon bonus, you are using recon... right? B-Rank: 1) Battle Academy: 25% extra exp is nice but this isn't the campaign, it is just a single battle. Even with the increased XP gain you still are only getting 1 star or 2 stars 2)Operational Initiative: Lets face it, combat will not even happen until turn 3 on all but the smallest map size, so effectively this trait only gives you +1 to initiative. 3)Flexible command: Situational, could be A rank, but you have to plan your army and moves around it AND your opponent has to allow you to encircle him. Obviously it combos well with deadly grasp but you could likely encircle your opponent without this trait just as easily. 4)Killer team: It is ok. RNG will likely give you at least 1 or two pretty worthless traits. C-Rank: 1)Trophies of War: Well humans generally aren't as dumb as AIs so you aren't likely to easily encircle and force surrenders on many units. And unlike the campaign you probably don't want to field captured units. 2)Industry Connection: RNG at its finest, the likelihood is this will be wasted on some new recon unit and not that super early tiger 2 or is2 like you hope. 3) Panzer General: Tanks are good but you aren't gonna deploy that many of them. There just isn't enough Open terrain to make buying a lot of tanks worth it. 4)Master of Blitz: Meh, The bonus just isn't strong enough and you don't have enough open terrain and tanks to make use of it. Negative Traits: S-Rank: 1) Slow Modernization: This trait is an auto pick because you are being smart and disbanding your entire army on the deployment phase, right? If so you will never upgrade a single unit in the course of the game so this is a free trait basically. A-Rank: 1) No overstrength: There are better, more efficient ways to deal with a problem then overstrength. 2)bad luck: You plan everything you do based on the combat prediction right? So then it probably doesn't matter if that -5 turns into a -7 does it? 3)trench slog: I mean it is just 1 less point of entrenchment removal, you probably are over-killing the unit with artillery and combat bombing anyway right? B-Rank: 1)Green army: With the quick exp gain now you are probably going to wait to preserve the rank of units more than 3 times. 2)Retrograde army: Depends on the year the fight is happening. Sometimes there isn't much change in equipment for 6 months, sometimes there is. 3)chaotic fire: Think of the the 2, 3, or 4 ammo units, this really really hurts them 4)Ineffective supply: Sometimes this really matters similarly to why chaotic fire is such a pain 5)Poor Maintenance: Same train of thought as ineffective supply and chaotic fire. Also RNG is bad. 6)Inept logistics: -10% core slots isn't the worst thing but also not the best C-Rank: 1)Poor ground control: ZOC matters a lot, you can't just give it away ever. 2)Delayed reinforcements: wow this is a quick way to lose, you will always want to reinforce units as opposed to letting them die and buying them again. 3)Denied artillery: As the saying goes "Infantry wins firefights" "Tanks win battles" and "Artillery wins wars". You need all 3 pieces of combined arms to be effective. Remove one and everything else falls down. 4)Denied air force: The air force is basically long range artillery and you really need air power to not only make a break threw but also protect your own assets. 5)Fear of unknown: You can never take this only because you have to use Paratroopers to capture front line objectives in the first turn, which means going through a lot of fog of war. The guide Tiered General Traits Multiplayer I figured a list about the general traits as it pertains to multiplayer only would be relevant since the v5 patch. S-Rank: These are must takes, Very good traits A-Rank: Good traits B-Rank: Ok, situational, or specialized C-Rank: Bad traits, never take Positive Traits: S-Rank: 1) Auxiliary force: Ever notice how you have extra prestige but no core slots in which to deploy units? Not anymore after taking this trait, however it needs to be combined with liberator for maximum effect. 2) Liberator: You are gonna be capturing a lot of cities, airfields, docks, etc so why not be making 50% prestige? This trait is required to use Auxiliary Force for max effect. 3) Perimeter Control: Zone of Control matters... A lot. With this trait you can eat away at the enemies ZOC. This will allow you to easily strike at vulnerable units like artillery and AA. It can also help you encircle or just get that mass attack bonus. Lastly and maybe most importantly it prevents the enemy from encircling you! This is because your units cancel the enemy ZOC. So as long as you have a string of units tracing back to a supply point your units can never be encircled. A-Rank: 1)Deadly grasp: Encirclement already is very annoying even after only 1 turn, so why not take it from an annoyance to "ouch that hurts!". Plus it only costs 1 point! 2)Anti-air Vetern: OMG OUCH MY PLANES!!!! Wow why didn't I make this S-rank. When you stare down air combat predictions of -6 to your planes you really reconsider attacking near AA. 3)Deep recon: Knowledge is power, right? Well this gives you a lot of good info at the most important points of the map, the victory hexes. You also get to know when your opponent is not protecting his victory hexes allowing for a paratrooper to easily steal it. Oh also 5% extra for your recon bonus, you are using recon... right? B-Rank: 1) Battle Academy: 25% extra exp is nice but this isn't the campaign, it is just a single battle. Even with the increased XP gain you still are only getting 1 star or 2 stars max in a battle. It just gets you there a turn or 2 faster. 2)Operational Initiative: Lets face it, combat will not even happen until turn 3 on all but the smallest map size, so effectively this trait only gives you +1 to initiative. 3)Flexible command: Situational, could be A rank, but you have to plan your army and moves around it AND your opponent has to allow you to encircle him. Obviously it combos well with deadly grasp but you could likely encircle your opponent without this trait just as easily. 4)Killer team: It is ok. RNG will likely give you at least 1 or two pretty worthless traits. 5) Infantry General: You are gonna be using a lot of infantry, or at least you should if you are doing it right. This will give you more core slots to... you know... deploy more stuff, but It will still only be about 15-25 extra slots max. C-Rank: 1)Trophies of War: Well humans generally aren't as dumb as AIs so you aren't likely to easily encircle and force surrenders on many units. And unlike the campaign you probably don't want to field captured units. 2)Industry Connection: RNG at its finest, the likelihood is this will be wasted on some new recon unit and not that super early tiger 2 or is2 like you hope. 3) Panzer General: Tanks are good but you aren't gonna deploy that many of them. There just isn't enough Open terrain to make buying a lot of tanks worth it. 4)Master of Blitz: Meh, The bonus just isn't strong enough and you don't have enough open terrain and tanks to make use of it. Negative Traits: S-Rank: 1) Slow Modernization: This trait is an auto pick because you are being smart and disbanding your entire army on the deployment phase, right? If so you will never upgrade a single unit in the course of the game so this is a free trait basically. A-Rank: 1) No overstrength: There are better, more efficient ways to deal with a problem then overstrength. 2)bad luck: You plan everything you do based on the combat prediction right? So then it probably doesn't matter if that -5 turns into a -7 does it? 3)trench slog: I mean it is just 1 less point of entrenchment removal, you probably are over-killing the unit with artillery and combat bombing anyway right? B-Rank: 1)Green army: With the quick exp gain now you are probably going to wait to preserve the rank of units more than 3 times. 2)Retrograde army: Depends on the year the fight is happening. Sometimes there isn't much change in equipment for 6 months, sometimes there is. 3)chaotic fire: Think of the the 2, 3, or 4 ammo units, this really really hurts them 4)Ineffective supply: Sometimes this really matters similarly to why chaotic fire is such a pain 5)Poor Maintenance: Same train of thought as ineffective supply and chaotic fire. Also RNG is bad. 6)Inept logistics: -10% core slots isn't the worst thing but also not the best C-Rank: 1)Poor ground control: ZOC matters a lot, you can't just give it away ever. 2)Delayed reinforcements: wow this is a quick way to lose, you will always want to reinforce units as opposed to letting them die and buying them again. 3)Denied artillery: As the saying goes "Infantry wins firefights" "Tanks win battles" and "Artillery wins wars". You need all 3 pieces of combined arms to be effective. Remove one and everything else falls down. 4)Denied air force: The air force is basically long range artillery and you really need air power to not only make a break threw but also protect your own assets. 5)Fear of unknown: You can never take this only because you have to use Paratroopers to capture front line objectives in the first turn, which means going through a lot of fog of war.

顺便说一下,对于那些在“元帅”难度下抱怨AI太弱的玩家,我推荐以下我自己常用的设置: - 难度等级:“元帅” - 高级选项-特殊挑战:“大卫对抗歌利亚”和“英勇的力量较量” - 属性点:“战壕挖掘”“缓慢现代化”“糟糕的地面控制” 使用这些设置后,每个场景都会变得非常有趣。整个联盟中正确的单位选择将决定胜负!这只适合“真正的战略家”!